


INSTALLATION INSTRUCTIONS FOR PART ASWC
ASWC
Axxess Steering Wheel Control
Interface Installation Manual
KIT FEATURES
•One Interface does it all - No additional interfaces needed
•Designed to be compatible with all major radio brands
•Auto detects vehicle type, radio connection, and presets controls
•Can be manually programmed for most vehicles
•Memory retains settings even after battery disconnection or interface removal
•Connection placements are all organized behind the radio
•USB updatable
INTERFACE COMPONENTS
•ASWC Interface • 12-pin harness with male 3.5 mm connector
•Female 3.5 mm connector with Brown and Brown/White wires
•12k-ohm resistor
TOOLS REQUIRED
•Cutting tool • Crimping tool • Tape
•Connectors (example: butt-connectors, bell caps, etc.)
REV. 7/13/2012 INSTASWC
METRA. THE WORLD’S BEST KITS.™
1-800-221-0932 |
metraonline.com |
© COPYRIGHT 2004-2011 METRA ELECTRONICS CORPORATION

|
Table of Contents |
|
Preface .............................................................................................. |
3 |
|
Overview |
|
|
– Introduction to the ASWC Interface and Wiring Harness ................. |
4-5 |
|
ASWC |
|
|
– |
Section 1: Installation .................................................................... |
6-7 |
– |
Section 2: Programming ................................................................ |
8-9 |
– |
Section 3: Troublshooting |
|
|
Auto Detect Mode...................................................................... |
10 |
|
Manual Programming........................................................... |
10-13 |
|
Changing Radio Type............................................................ |
13-14 |
|
Manual Radio Type Programming ......................................... |
14-15 |
– |
Section 4: Remapping |
|
|
Remapping SWC Buttons........................................................... |
16 |
|
Resetting Original SWC Settings ................................................ |
17 |
ASWC Ledgend |
|
|
– |
Vehicle LED Feedback..................................................................... |
18 |
– Radio LED Feedback.................................................................. |
18-19 |
|
– |
Button Assignment (remapping/manual programing)....................... |
19 |
Caution: Metra recommends disconnecting the negative battery terminal before beginning any installation. All accessories, switches, and especially air bag indicator lights must be plugged in before reconnecting the battery or cycling the ignition.
Note: Refer to the instructions included with the aftermarket radio.
1-800-221-0932 AxxESSINTERfACE.COM
© COPYRIGHT 2004-2011 METRA ELECTRONICS CORPORATION

Preface
What you need to know before you begin
1)Know the correct year, make, and model of your vehicle.
2)Be sure that the radio you are installing is compatible with the Axxess steering wheel control (ASWC) interface (refer to the aftermarket radio owner’s manual).
3)Go to the Axxess website (www.axxessinterface.com) and click on “Steering Wheel Control” (SWC), which is located on the right side of the screen. Once you put your vehicle information in and hit
“Submit”, a new page will come up with two sources of information. One, a document in PDF form located below in the “Documents” tab. And second, detailed information on which color(s) the steering wheel control wires will be in your vehicle under the “Vehicle Information” tab. Print the PDF document so you have it in the vehicle during the install as it is the best and easiest source of information.
Note: Even though we have done extensive research and
testing (to verify that the steering wheel control wire colors of the vehicle(s) we list are correct) it is still your responsibility to verify the steering wheel control wires with a multimeter. If you find a discrepancy please notify our Tech Department at 1-800-253-TECH. Please be in the vehicle when you call, with access to the interface and vehicle wiring.
3
Overview
Introduction to the ASWC Interface and Wiring Harness
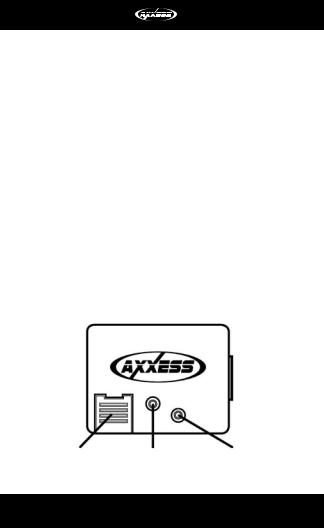
On the top of the ASWC interface there are three points of interest:
1)The programming LED – flashes rapidly when in auto detect mode, flashes slowly in manual programming mode.
2)The reset button – Hold down button for 3 seconds to start auto detect mode; hold down longer then 10 seconds to start manual programming mode.
3)The slide cover (USB Port Cover) – Open this up to reveal the USB update port. Using the USB-CAB update cable and the Axxess website you can make sure you always have the latest updated inventory.
USB Port Cover |
Reset Button |
Programming LED |
|
|
|
4

Overview
Below are the wire colors for the ASWC. Please visit the Axxess website at www.axxessinterface.com for detailed information on your specific vehicle and for what color wire(s) to use with the ASWC interface.
Pin-1 |
Pink |
Pin-2 |
White/Green |
Pin-3 |
Yellow/Green |
Pin-4 |
Green/Orange |
Pin-5 |
Gray/Red |
Pin-6 |
Black |
Pin-7 |
Blue/Pink |
Pin-8 Black/Green
Pin-9 Red (tip of 3.5 mm connector)
Pin-10 White (ring of 3.5 mm connector)
Pin-11 Gray/Blue
Pin-12 Red
5

Section 1: Installation
Once you have collected or printed out the information sheet on your particular vehicle from the Axxess website (www.axxessinterface.com) you’re ready to install the ASWC.
Installing the ASWC
1)Connect the Black wire of the ASWC to ground. You may use the same grounding point as the aftermarket radio.
2)Connect the Red wire of the ASWC to a 12-volt accessory wire, one that turns “on” and “off” with the ignition key.
3)Locate the correct SWC wire(s) in the vehicle’s radio primary or secondary harness as described in the vehicle information sheet found on the Axxess website. Connect the correct wire color(s) from the ASWC to the steering wheel control wire(s) in the vehicle.
Note: Metra recommends that the wire(s) are soldered for the best and most secure connection. T-Taps or scotch locks are not
recommended due to the higher chance of an intermitted connection or change in resistive values.
6
 Loading...