

Page 1
INSTALLATION INSTRUCTIONS FOR PART OESWC-LAN29-STK
OESWC-LAN29-STK
The OESWC-LAN29-STK is designed to allow you to add steering wheel control
options to 2006 and up GM LAN29 vehicles. The column mounted OESWC-
LAN29-STK will allow the customer to adjust their radio without taking their eyes
off the road. The OESWC-LAN29-STK will come pre-programmed with your most
popular features, volume up, volume down, seek up, seek down, and source. But
with the option of remapping the buttons to t every customer needs, this makes
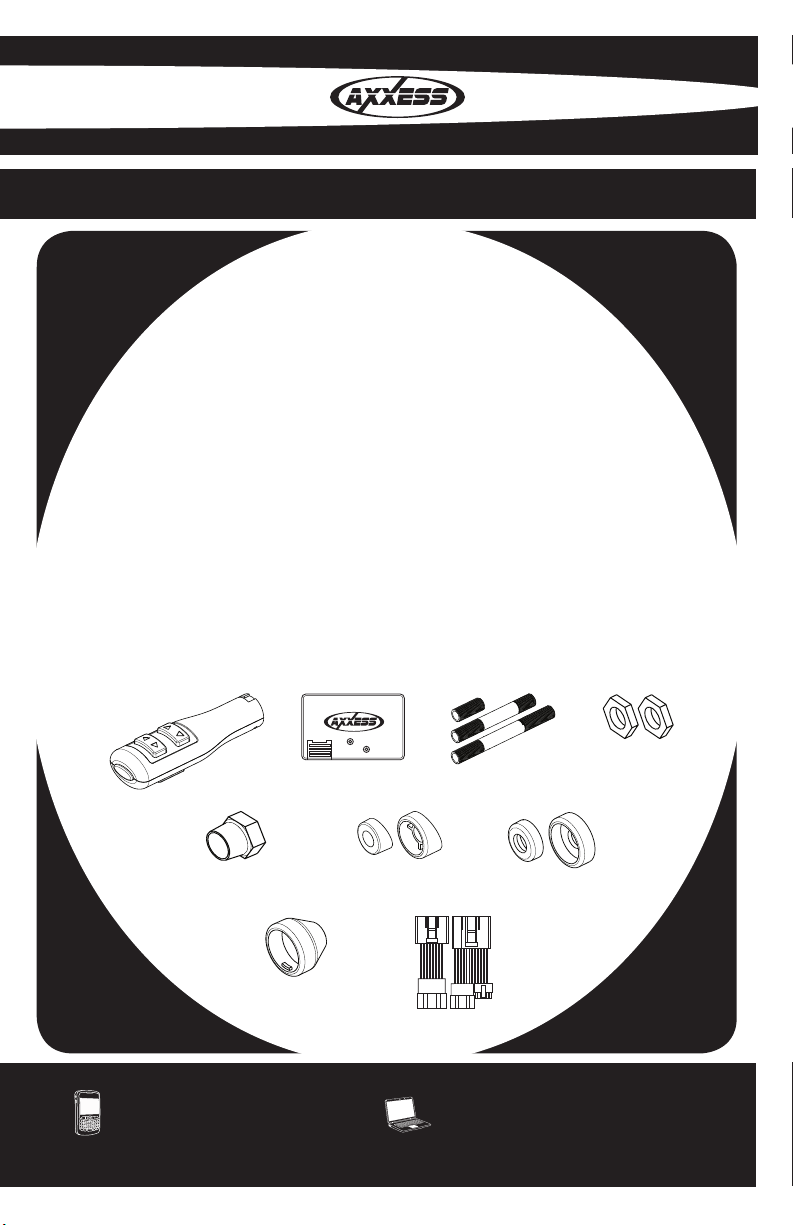
• A) ASWCSTALK • B) OESWC INTERFACE • C) (3) ROD ASSORTMENTS
• D) (2) 3/8 HEX NUTS • E) DECORATIVE NUT • F) (2)ANGLE MOUNT
this a must have interface that the Axxess line offers.
INTERFACE COMPONENTS
• G) (2)FLAT MOUNT
• H) TWIST ON COVER • I) VEHICLE T-HARNESS
A B
E
H
F
C
D
G
I
1-800-221-0932 axxessinterface.com
© COPYRIGHT 2004-2011 METRA ELECTRONICS CORPORATION
Page 2

TOOLS REQUIRED FOR INSTALLATION
IGNITION
TERMINALS
WIRE
CUTTER
M3.5
M2.6
M3
M5
M4
ISO
6
2.5
1.5
•Cutting Tool •Tape •Crimping Tool
•Connectors (I.E. butt-connectors, bell caps, ECT…) • Female Spade Connectors
*Important: Please check steering shroud before
drilling to make sure you have enough depth.
Page 3

ASWCSTALK ASSEMBLY
1. Remove and drill a 3/8 hole in the steering wheel shroud.
2. Select desired length rod and thread a 3/8 hex nut on to the shorter
threaded section.
3. Run the four wires from the ASWCSTALK through the rod of choice
and screw it into the ASWCSTALK
4. Take the twist on cover, run the wires through, and twist the cap on to
the ASWCSTALK making sure to align the notches on the cover.
5. Screw the DECORATIVE NUT to the end of the rod with the smaller
end facing the ASWCSTALK
6. Select the desired angle mount and put it on to the rod with the angle
facing away from the ASWCSTALK.
7. Run wires through the steering wheel shroud and insert rod through
the shroud.
8. Secure the ASWCSTALK with the supplied 3/8 nut. (Do not over
tighten)
9. Run wires to where the ASWCSTALK interface will be.
1
Page 4

Wiring Of ASWCSTALK And Interface
1. Connect the BLACK wires of the ASWCSTALK and the BLACK wire
of the interface to ground. You may use the same ground point that is
used for the radio.
2. Connect the GREEN/ORANGE and BLACK/GREEN wires of the
ASWCSTALK to the corresponding wires on the interface.
3. Connect the RED wire to 12 volt accessory
4. Tap off all other unused wires on the interface.
Programming the ASWCSTALK
* If this is the rst time the ASWCSTALK is being installed:
1. Turn the ignition on; the led will start ashing rapidly which means the
interface is looking for the ASWCSTALK and the radio. Go to step 3.
OR
* If the ASWCSTALK was installed before:
1. Turn the ignition on, the led will ash slowly
2. Hold down the reset button for more then 2 seconds but less then 10
seconds, the led will start ashing rapidly
3. The ASWCSTALK INTERFACE will automatically nd the
ASWCSTALK and radio.
4. After a couple of seconds the led should stop ashing and not light up
for 2 seconds. At this point do not push any buttons.
5. After the 2 seconds there will be a series of 7 ashes, some short and
some long.
6. The led will pause for another 2 seconds then ash up to 10 times.
7. This is the end of the auto detection stage. If the ASWCSTALK
interface detected the vehicle and the radio successfully the led will
light up solid red.
2
Page 5

8. Make sure the steering wheel control buttons function correctly in the
vehicle and enjoy your radio.
If the ASWCSTALK is mounted on the right side of the steering column
follow the instructions below. (Auto-detect must be done rst)
1. Turn the ignition on
2. Press the MODE on the ASWCSTALK for 10 seconds
3. Then press volume up for 2 seconds
4. The ASWCSTALK is now congured for the right side.
Troubleshooting the Auto Detect Mode
So you tried the auto detect feature and at the end the led did not stay on
solid red, it started ashing, or the steering wheel controls did not function
properly. That means the interface did not detect the ASWCSTALK or the
proper radio. Follow these steps to determine what happened:
First some basic tips:
1. Verify that you have 12 volt accessory and a good ground to the
ASWCSTALK and interface.
2. Verify that the 3.5mm connector is connected to your radio securely
and in the correct location.
3. If using the female 3.5mm connector on an Eclipse or Kenwood radio,
verify that the radio’s SWC wire is connected to the correct wire on
the interface.
Once all the information above has been veried and correct, you
will need to put the interface back into auto-detect mode. Follow the
instructions from “If the ASWCSTALK was installed before” section above,
however this time take notice of the led ashes in steps 5 and 6.
3
Page 6
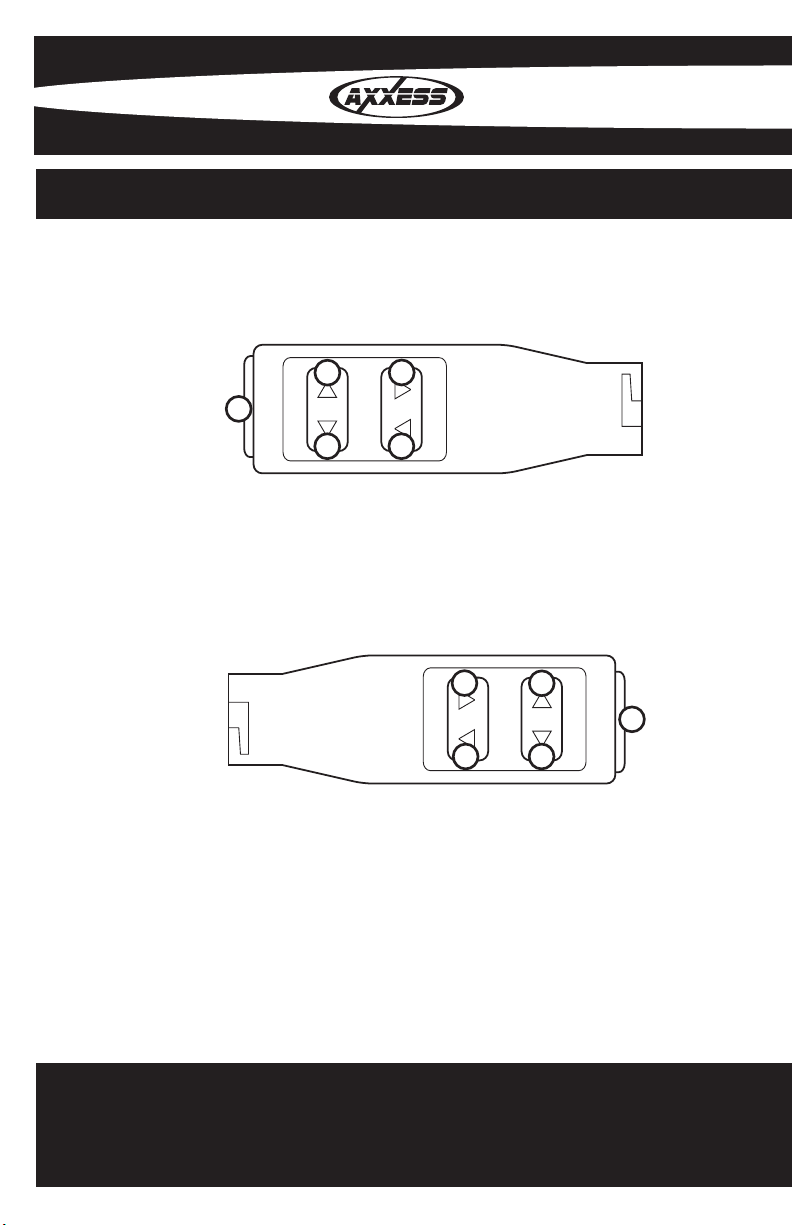
1
5
3
1. Volume up
2. Volume down
3. Seek up
4. Seek down
5. Mode (source)
1. Volume up
2. Volume down
3. Seek up
4. Seek down
5. Mode (source)
2
4
3
4
1
5
2
4
Page 7

NOTES
Page 8

INSTALLATION INSTRUCTIONS FOR PART OESWC-LAN29-STK
KNOWLEDGE IS POWER
Enhance your installation and fabrication skills by
enrolling in the most recognized and respected
mobile electronics school in our industry.
Log onto www.installerinstitute.com or call
800-354-6782 for more information and take steps
toward a better tomorrow.
Metra recommends MECP certified
technicians
REV. 2/4/11
1-800-221-0932 axxessinterface.com
© COPYRIGHT 2004-2011 METRA ELECTRONICS CORPORATION
 Loading...