

Page 1
Axis Print Servers
High Performance Multi-Protocol
Print Servers for Virtually All Networks
AXIS ONLINE CD
AXIS 560/660
User's Guide
v3.2
Page 2

AXIS 560/660 User’s Guide Read me First
Read me First
To get your prin t server quickly u p and running, follow the instructio ns below:
1
1. Connect the AXIS 560/660 to your network and to your printer as described in
Connecting the printer to the Network, on page 7.
2. Proceed to the setup sections that are relevant to your network environment, as
described in the ta ble below:
Environment Network Configuration Action
NDPS (Pure IP)
NDPS (IPX) See NetWare Using NDPS over IPX, on page 11
NetWare
Windows 95/98
& NT
Windows
3.1/WfW
OS/2
Macintosh AppleTalk See Setup for Macint osh, on page 19
Queue-based NetWare (Pure
IP)
Queue-based NetWare (IPX) See Queue-based NetWare Printing (IPX), on page 13
TCP/IP See Setup for Windows 95/98 & NT, on page 14
NetBIOS/NetBEUI See Setup for Windows 95/98 & NT, on page 14
TCP/IP
NetBIOS/NetBEUI See Setup for Windows 3.1 & WfW, on page 16
TCP/IP
NetBIOS/NetBEUI See Setup for OS/2, on page 18
See Assigning an IP Address, on page 8
Proceed with NetWare Using NDPS over IP, on page 10
See Assigning an IP Address, on page 8
Proceed with Queue-based NetWare Printing (Pure IP), on page
12
See Assigning an IP Address, on page 8
Proceed with Setup for Windows 3.1 & WfW, on page 16
See Assigning an IP Address, on page 8
Proceed with Setup for OS/2, on page 18
NetWare
Windows
OS/2
Macintosh
UNIX
UNIX TCP/IP
Internet Printing IPP See Using IPP, on page 22
See Assigning an IP Address, on page 8
Proceed with Setup for UNIX, on page 21
Management and Configuration
The tools that you should use to configure and manage the AXIS 560/660 are
presented in Management and Configuration, on page 23.
Page 3
2
Safety notices AXIS 560/660 User’s Guide
Safety notices
Take some time to read through the safety notices before installing the AXIS 560/660. Please observe all safety
markings and instructions when using this product.
NetWare
Caution! - must be observed to avoid loss of data or damage to your equipment.
Important: - must be observed to avoid operational impairment.
Do not proceed any of the ab ov e n ot i ces, until you have fully underst ood the implications.
Electromagnetic Compatibility (EMC) USA - This equipment generates and radiates radio frequency
energy and if not installed and used in accordance with the instruction manual, may cause interference to radio
communications. It has been tested and found to comply with the limits for a Class A computing device pursuant to
Windows
Subpart B of Part 15 of FCC rules, which are designed to p r ov id e rea s on a ble protection against suc h in terference
when operated in a commercial environment . Op era tion of this equipment in a res id en t ia l a rea is likely to cause
interference in which ca s e the user at his own expense will be required to take whatever measur e s ma y be r equired to
correct the interference. Shielded cables should be used with this unit to ensure compliance with the Class A limits.
Europe - This digital equipment fulfils the requirements for radiated emission according to limit B of
OS/2
EN55022/1994, and the re quirements for immunity according to EN50082-1/1992 residential , com mercial, and
light industry (Compliance is not valid for unshielded net work and printer c able s) .
Liability - Every care has been taken in the preparation of this manual; if you detect any inaccuracies or omissions,
please inform your local Axis office, which c an be found on the cover of this document. Axis Communicatio ns A B
cannot be held responsible for any technical or typographical errors and reserves the right to make changes to the
product and manuals without prior notice. Axis Communications AB makes no warranty of any kind with regard to
the material contained within this document, including, but not limited to, the implied warranties of merchantability
and fitness for a particular purpose. Axis Communications AB shall not be liable nor responsible for incidental or
Macintosh
consequential damages in connection with the furnishing, performance or use of this material.
Year 2000 Compliance - Axis Communications warr ant s t ha t all ve rsions of the AXIS 560/660 with software
versions 5.48 or later are Yea r 2000 compliant.
Axis’ Trademarks - NetPilot, ThinWizard, ThinServer.
UNIX
Other Trademark Acknowledgments - Adobe Acrobat R ea d er, Apple, DOS, Ethernet, Hew l ett-Packard,
HP, HP JetAdmin, HP Web JetAdmin, LAN Manager, LAN Server, LANtas ti c, Macintosh, Microsoft, Novell
NetWare, OS/2, UN I X, Windows, are registered trademarks of th e res pective holders.
Support Services - Should you require any technical assistance, please contact your Axis dealer. If your questions
cannot be answered immediately, your Axis dealer will forward your queries through the appropriate channels to
ensure you a rapid response.
If you are connected to Internet, you can find on-line manuals, technical support, software updates, application
software, corporate information, etc., on any of the lo cat ions lis ted be lo w.
WWW: http://www.axis.com
FTP server: ftp://ftp.axis.com/pub/axis
AXIS 560/660 User’s Guide Revision 3.2
Part No: 17149 Date: January 2000
Copyright © Axis Communications AB, 1995 - 2000
Page 4

AXIS 560/660 User’s Guide Table of Contents
Table of Contents
Read me First . . . . . . . . . . . . . . . . . . . . . . . . . . . . . . . . . . . . . . . . . . . . . . . . . . .1
Management and Configuration . . . . . . . . . . . . . . . . . . . . . . . . . . . . . . . . . . . 1
Safety notices . . . . . . . . . . . . . . . . . . . . . . . . . . . . . . . . . . . . . . . . . . . . . . . . . . . .2
Table of Contents . . . . . . . . . . . . . . . . . . . . . . . . . . . . . . . . . . . . . . . . . . . . . . . .3
Introduction . . . . . . . . . . . . . . . . . . . . . . . . . . . . . . . . . . . . . . . . . . . . . . . . . . . .4
Product Overview . . . . . . . . . . . . . . . . . . . . . . . . . . . . . . . . . . . . . . . . . . . . . . . .5
The AXIS 560 Print Server . . . . . . . . . . . . . . . . . . . . . . . . . . . . . . . . . . . . . . . 5
The AXIS 660 Print Server . . . . . . . . . . . . . . . . . . . . . . . . . . . . . . . . . . . . . . . 5
Basic Installation . . . . . . . . . . . . . . . . . . . . . . . . . . . . . . . . . . . . . . . . . . . . . . . . .6
Hardware Inventory . . . . . . . . . . . . . . . . . . . . . . . . . . . . . . . . . . . . . . . . . . . . . 6
Connecting the printer to the Network . . . . . . . . . . . . . . . . . . . . . . . . . . . . . . 7
Assigning an IP Address . . . . . . . . . . . . . . . . . . . . . . . . . . . . . . . . . . . . . . . . . . .8
Setup for NetWare . . . . . . . . . . . . . . . . . . . . . . . . . . . . . . . . . . . . . . . . . . . . . .10
NetWare Using NDPS over IP . . . . . . . . . . . . . . . . . . . . . . . . . . . . . . . . . . . 10
NetWare Using NDPS over IPX . . . . . . . . . . . . . . . . . . . . . . . . . . . . . . . . . . 11
Queue-based NetWare Printing (Pure IP) . . . . . . . . . . . . . . . . . . . . . . . . . . . 12
Queue-based NetWare Printing (IPX) . . . . . . . . . . . . . . . . . . . . . . . . . . . . . . 13
Setup for Windows 95/98 & NT . . . . . . . . . . . . . . . . . . . . . . . . . . . . . . . . . . .14
TCP/IP Printing using AXIS Print System . . . . . . . . . . . . . . . . . . . . . . . . . . . 14
NetBIOS/NetBEUI Printing using AXIS Print Monitor . . . . . . . . . . . . . . . . 15
Setup for Windows 3.1 & WfW . . . . . . . . . . . . . . . . . . . . . . . . . . . . . . . . . . . .16
TCP/IP Printing . . . . . . . . . . . . . . . . . . . . . . . . . . . . . . . . . . . . . . . . . . . . . . 16
NetBIOS/NetBEUI Printing . . . . . . . . . . . . . . . . . . . . . . . . . . . . . . . . . . . . . 16
Setup for OS/2 . . . . . . . . . . . . . . . . . . . . . . . . . . . . . . . . . . . . . . . . . . . . . . . . .18
TCP/IP Printing . . . . . . . . . . . . . . . . . . . . . . . . . . . . . . . . . . . . . . . . . . . . . . 18
NetBIOS/NetBEUI Printing . . . . . . . . . . . . . . . . . . . . . . . . . . . . . . . . . . . . . 18
Setup for Macintosh . . . . . . . . . . . . . . . . . . . . . . . . . . . . . . . . . . . . . . . . . . . . .19
Setup for UNIX . . . . . . . . . . . . . . . . . . . . . . . . . . . . . . . . . . . . . . . . . . . . . . . . .21
Using IPP . . . . . . . . . . . . . . . . . . . . . . . . . . . . . . . . . . . . . . . . . . . . . . . . . . . . .22
Management and Configuration . . . . . . . . . . . . . . . . . . . . . . . . . . . . . . . . . . . .23
Using any standard Web browser . . . . . . . . . . . . . . . . . . . . . . . . . . . . . . . . . . 23
Using AXIS ThinWizard . . . . . . . . . . . . . . . . . . . . . . . . . . . . . . . . . . . . . . . . 23
Using AXIS NetPilot . . . . . . . . . . . . . . . . . . . . . . . . . . . . . . . . . . . . . . . . . . . 24
Using FTP . . . . . . . . . . . . . . . . . . . . . . . . . . . . . . . . . . . . . . . . . . . . . . . . . . . 25
Using Telnet . . . . . . . . . . . . . . . . . . . . . . . . . . . . . . . . . . . . . . . . . . . . . . . . . 25
Using the Test Button . . . . . . . . . . . . . . . . . . . . . . . . . . . . . . . . . . . . . . . . . . 26
Using SNMP . . . . . . . . . . . . . . . . . . . . . . . . . . . . . . . . . . . . . . . . . . . . . . . . . 27
Using HP Administration Tools . . . . . . . . . . . . . . . . . . . . . . . . . . . . . . . . . . 27
Using Novell Utilities . . . . . . . . . . . . . . . . . . . . . . . . . . . . . . . . . . . . . . . . . . 28
3
NetWare
Windows
OS/2
Macintosh
UNIX
Page 5
4
Introduction AXIS 560/660 User’s Guide
Introduction
This document describes how to set up and manage the AXIS 560/660 in various
network environments. Should you require more information, please refer to the
NetWare
AXIS 560/660 User’s Manuals, which is available on the AXIS Online CD.
Unless stated otherwise, the AXIS 560 and AXIS 660 are co lle c tivel y de scrib ed as the
AXIS 560/660 throughout this manual.
AXIS Online CD
The AXIS Online CD provides an easy-to-use electronic catalog, that includes all of
Windows
the latest AXIS Utilitie s Softwar e, Product So ftware, Whit e Papers , User Documents ,
Technical References, etc. It is compatible for use within all of the supported Axis
computing environments.
You can view the contents of the AXIS Online CD via an Adobe Reader interface or
OS/2
an HTML interface. Howev er, all documents presented on the CD are in PDF
format.
Note:
If Adobe Acrobat Reader 3.0 is not installed o n to your sy stem, you can download it by clicking th e
Acrobat Reader button located on the starting page of the AXIS Online CD.
Macintosh
Axis official home page
The Axis home page is a good source for general information about Axis’ products.
This is located at http://www.axis.com. From this si te you can access late product
information, receive support information, learn more about other Axis products, etc.
UNIX
Page 6
AXIS 560/660 User’s Guide Product Overview
Product Overview
5
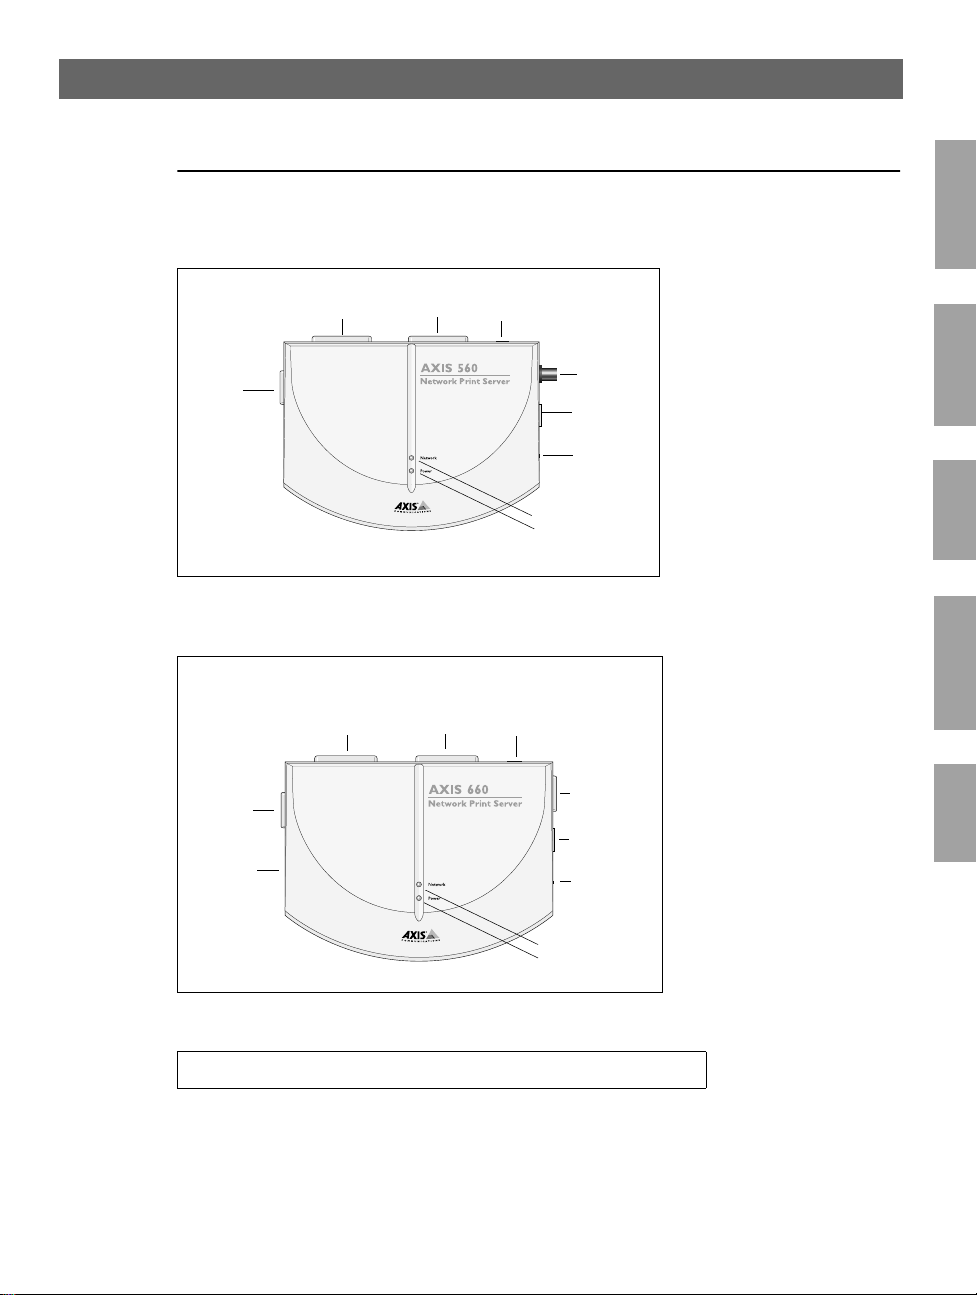
The AXIS 560 Print Server
COM1
Printer
Connector
LPT1 Printer
Connector
LPT2 Printer
Connector
External Power
Supply Connector
The AXIS 660 Print Server
External Power
Supply Connector
COM1
Printer
Connector
Ring Speed
Switch
(recessed)
LPT1 Printer
Connector
LPT2 Printer
Connector
Ethernet
10base2
Connector
Ethernet
10baseT
Connector
Test Button
Network Indicat or
Power Indicator
Token Ring
STP
Connector
Token Ring
UTP
Connector
Test Button
NetWare
Windows
OS/2
Macintosh
UNIX
Note:
The AXIS 660 does not support Apple TokenTalk.
Network Indicator
Power Indicator
Page 7

6
Basic Installation AXIS 560/660 User’s Guide
Basic Installation
Hardware Inventory
NetWare
Unpack and check all the items using the following check list. Contact your dealer if
anything is missing or damaged. All packing materials are recyclable.
Hardware Model Variants Part Numbers
Windows
Print Server
OS/2
Power Supply Type
Media Title Part Numbers
CD AXIS Online CD
AXIS 560 &
AXIS 660
(PS-B)
Macintosh
Printed Materials AXIS 560/660 User’s Guide 17149
AXIS 560 0053-1
AXIS 660 0054-1
Europe 13267
UK 13268
Australia 13269
USA 13270
Japan 13936
Revision 5.3 or
higher
Optional Accessories Description Part Numbers
Cables
UNIX
Serial Printer Cable 13281
Parallel Printer Cable 13360
Page 8
AXIS 560/660 User’s Guide Basic Installation
Connecting the printer to the Network
Follow the instructions below to connect a printer to the network via the AXIS
560/660 print server:
Caution!
The external power supply you are using must be marked with the correct mains voltage! Refer to
Hardware Inventory, on page 6.
1. Make sure that the printer is switched off and that the AXIS 560/660 external
power supply is disconnected.
2. Locate the serial number, found on the underside label of the AXIS 560/660, and
write it down. You will need this number during the network configuration.
Note:
7
NetWare
Windows
Each AXIS 560/660 Print Server is pre-configured with a unique node address that is identical
to the serial number.
3. Connect the printer to the LPT1, LPT2, or COM1 port on the AXIS 560/660
using an appropriate printer cable.
4. Connect your AXIS 560/660 to the network using either a twisted pair
(10baseT) or thin wire (10base2) cable.
5. For the AXIS 660 only: Slide the Ring Speed switch to 4 or 16, as appropriate for
your Token Ring network.
6. Switch on the printer and connect the ex ternal power supply to the AXIS
560/660. The power indicator light comes on. If the networ k indicator starts to
flash, the AXIS 560/660 is successfully connected to the network.
7. Press and release the test button on the AXIS 560/660 to print a test page. If the
AXIS 560/660 is correctly connected to the printer, the AXIS 560/660 internal
test page will be printed.
Note:
The AXIS 560/660 will print to the first printer it finds on its ports LPT1, LPT2 and COM1, in
that order.
OS/2
Macintosh
UNIX
Page 9

8
Assigning an IP Address AXIS 560/660 User’s Guide
Assigning an IP Address
To establish communication with the TCP/IP network, an IP ad dress must be
assigned to your AXIS 560/660 . Choose an approp riate me thod from the table be low:
NetWare
Server Platform Availability
UNIX Windows OS/2 NetWare
AXIS IP Installer X X
DHCP X X X X
ARP X X X X
Windows
Note:
OS/2
All methods are enabled by default. This means that if you have a DHCP server
running on your network, the AXIS 560/660 will receive an IP address immediately
after you have connected it into the network.
AXIS IP Installer is a Windows utility that allows you to set the IP address of your
AXIS 560/660. AXIS IP Installer is available on the AXIS Online CD. It can also be
downloaded from the Axis WWW home page at http://www.axis.com/.
Macintosh
Refer to the AXIS 560/660 User’s Manual for a more comprehensive description of
the available methods.
BOOTP X X X
RARP X
Refer to Setup for Macintosh, on page 19, for setting the IP address in the Macintosh environment.
Host Name Resolution
UNIX
If you are using host names, you can map a unique host name to the IP address. The
AXIS 560/660 supports WINS (Windows Internet Name Service) and DDNS
(Dynamic Domain Name System), which are recommended to use for host name
resolution when setting the IP address using DHCP.
WINS only supports 15 character long host names. If your host name is longer than
15 characters, your AXIS 560/660 truncates the host name to 15 characters when
registering with a WINS server.
Page 10

AXIS 560/660 User’s Guide Assigning an IP Address
DDNS supports 53 character long host names, but they can only consist of the
characters ‘A-Z’, ’a-z’ and ‘-’. If your host name consists of any other characters, they
are converted to ‘-’, when registering wi th a DDNS server.
9
Refer to your system manuals or to your network administrator for instructions on
how the host name resolution is performed on you r system.
Notes:
The host name limitations conclude that if you want to register the same host name at a WINS
server and a DDNS server, the host name should be no longer than 15 characters and it should
only contain the characters ‘A - Z’, ‘a-z’ and ‘-’.
The host name of the AXIS 560/660 is specified by the PS_NAME parameter.
NetWare
Windows
OS/2
Macintosh
UNIX
Page 11

10
NetWare
Setup for NetWare AXIS 560/660 User’s Guide
Setup for NetWare
NetWare Using NDPS over IP
Important:
If you want to print in NDPS, make sure that you have NDPS software istalled on your NetWare
file server.
Note:
You can select to install the connected printers as Public or Controlled Access printers.
Having assigned an IP address to the AXIS 560/660 as described in, Assigning an IP
Address, on page 8, you are now ready to install the AXIS 560/660 f or NDPS printing
over IP. Follow the instructions below:
1. Connect the AXIS 560/660 to the NetWare network, if it is not already
connected. Refer to Connecting the printer to the Network, on page 7 for more
information.
2. Start the NetWare Administrator . Cr eate an NDPS Manager object, if you do not
have one available.
3. Proceed to create the printer objects as Public or Controlled Acc ess printers.
Please refer to the appropriate Novell documentation for instructions on creating
NDPS Manager objects and the printer objects.
Notes:
The HP_JETADMIN parameter of the AXIS 560/660 must be set to YES in order for the
comunication between the AXIS 560/660 and th NDPS gateway to be enabled.
NDPS requires that you run NetWare 4.11 or higher.
During the creation of the printer object, you must choose the IP address of the AXIS 560/660.
Depending on which port you have connected printer, you should enter LPT1, LPT2 or COM1 as
your printer port when prompted during the creation of the printer object.
To print using TCP/IP, Axis print server firmware 6.1 or later is required. In order to print using
IPX/SPX, Axis print server firmware 5.51 or later is needed.
Page 12

AXIS 560/660 User’s Guide Setup for NetWare
NetWare Using NDPS over IPX
Installing the AXIS 560/660 as a Public Access printer:
1. Make sure that the NDPS Gateway is configured to automatically create a Public
Access printer.
2. Connect the AXIS 560/660 to the NetWare network, if it is not already
connected. Refer to Connecting the printer to the Network, on page 7 for more
information.
3. Use the AXIS NetPilot to set the HP_JETADMIN parameter of the AXIS
560/660 to YES. The HP_JETADMIN parameter must be set to enable
communication between the AXIS 560/660 and the HP NDPS Gateway. Please
refer to Using AX IS NetPilot, on page 24.
Please refer to the appropriate Novell documentation for instructions on creating
NDPS Manager objects and the NDPS printers.
Notes:
You can also set the HP_JETADMIN parameter of the AXIS 540/640 to YES via any standard web
browser. Please refer to Using any standard Web browser, on page 23.
The Public Access print servers are immediately available to everyone on the network.
The Axis Gateway will appear in NetWare 5.1 and later releases. To use the Axis Gateway with
earlier versions of NetWare, you can download the Axis Gateway Configuration utility from
www.axis.com.
To print using TCP/IP, Axis print server firmware 6.1 or later is required. In order to print using
IPX/SPX, Axis print server firmware 5.51 or later is needed.
11
NetWare
Page 13

12
NetWare
Setup for NetWare AXIS 560/660 User’s Guide
Queue-based NetWare Printing (Pure IP)
Follow the instructions below to install the AXIS 560/660 in the NetWare Pure IP
environment:
1. Start the Configuration Wizard from the User mode in the AXIS 560/660 Web
interface.
2. Click your way through the Wizard until reaching the NetWare page. Make sure
that the PSERVER_NDS parameter is set. If you want to change the parameter
value or if the parameter value is e m pty, enter the desired values. The parameter
value must include the tree or the preferred file ser ver you want to login to and
the print server name including the context.
3. Use NetWare Administrator to create the printer, print server and queue objects
in the NDS tree.
4. Use the Add Printer Wizard to install the printer on your clie nt. Note that only
NDS queue based PSERVER printing is supported. When installing, choose
Network Printer and browse to the queue you have just created. Alternatively,
choose Local Printer and select the queue you have just captured.
Any configuration and management of the AXIS 560/660 can be performed from any
standard Web browser. Please refer to Using any standard Web browser, on page 23.
Notes:
If the PSERVER_NDS parameter includes the name of a tree and not a specific file server,
RCONAG6.NLM must be running on at least one file server in the specified tree.
If you have both IPX and IP enabled in your network, you can use AXIS NetPilot to install the AXIS
560/660 and to conne c t print queues. See Queue -based NetWare Printing (IPX), on page 13.
Pure IP requires that you run NetWare 5 or higher.
Page 14

AXIS 560/660 User’s Guide Setup for NetWare
Queue-based NetWar e Printing (IPX)
AXIS NetPilot is the recommended tool you should use when you are installing the
AXIS 560/660 in the NetWare (IPX) environment. Install the AXIS NetPilot
software if you have not already done so. It is supplied on the AXIS Online CD and
can also be downloaded from the Axis WWW home page on http://www.axis.com/.
Note:
The AXIS NetPilot software must be installed on a Windows platform running a NetWare client.
Follow the instructions detailed below to install your AXIS 560/660 using the AXIS
NetPilot Installation Wizard:
1. Start AXIS NetPilot by double-clicking the AXIS NetPilot icon. The icon is
located in the folder where AXIS NetPilot was installed.
2. Locate the AXIS 560/660 in the ‘New Axis Units’ folder. Select it and click the
Install button on the AXIS NetPilot toolbar. If your network is large, it could
take a few seconds before the print server appears in the folder.
3. Choose the with Installation Wizard option and click OK. The Installation
Wizard will then guide you through the installation process.Should you requi re
assistance with any of the operations click the Help icon and follow the
instructions provided in the Help window.
13
NetWare
4. After you have completed the installation, you must use the Add printer Wizard
to install the printer on your client. When installing, choose Network Printer
and browse to the queue you have just created. Altern atively, choose Local
Printer and select the queue you have just captured.
5. When you have completed the instructions on the screen you are ready to print
in your NetWare environment.
Connecting additional print que ue s
Follow the instructions below to enhance your installation by adding extra print
queues:
1. Select the Network Print Server to be set up by clicking its icon.
2. Choose Network from the Setup menu or click the Network button on the
toolbar.
3. Select the NetWare tab, select the printer port and click the Connect... button.
4. A new window opens that allows you to create new print queues and connect
print queues to the AXIS 560/660.
Page 15

14
Windows
Setup for Windows 95/98 & NT AXIS 560/660 User’s Guide
Setup for Windows 95/98 & NT
TCP/IP Printing using AXIS Print System
AXIS Print System is the preferred utility for installing TCP/IP printer ports in
Windows 95, Windows 98 and Windows NT 4.0 environments. It allows you to
locate and install new network printers. If you choose Custom Installation while
installing the AXIS Print System, you will be able to set the IP address of the AXIS
560/660 using the comprised AXIS IP Installer.
For peer-to-pee r printing , AXIS Print Sys tem must be installed o n all pri nting client s,
while it is only necessary to install it on the server for client-server printing.
Install the AXIS Print Syst em s of t war e, if y ou ha ve no t alr ead y do ne so . It i s sup pl ied
on the AXIS Online CD. You can also downlo ad it from the Axis WWW ho me page
at http://www.axis.com/. Once installed, the AXIS Print System is automatically
initialized on system start-up.
To install a printer with the AXIS Print System, use the Installation Wizard that is
available from the AXIS Print System user interface. If you need help, please see the
AXIS Print System’s built-in Help system or refer to the User’s Manual.
Note:
For TCP/IP printing in Windows NT 3.5x environments, you should use AXIS Print Monitor.
Page 16

AXIS 560/660 User’s Guide Setup for Windows 95/98 & NT
NetBIOS/NetBEUI Printing using AXIS Print Monitor
For peer-to-peer printing, AXIS Print Monitor must be installed on all printing
clients, while it is only necessary to install it on the server for client-server printing.
Install the AXIS Print Monitor software, if you have not already done so. It is
supplied on the AXIS Online CD. You can also download it from the AXIS WWW
home page at http://www.axis.com/. Once installed, the AXIS Print Monitor is
automatically initialized on system start-up.
Important!
15
As AXIS Print Monitor is an integral part of AXIS Print System, you should NOT install an
independent version of AXIS Print Monitor if AXIS Print System is already installed on your client.
To install a printer with the AXIS P rint Monitor, use the Microsoft Add Printer
Wizard, which is available in your Windows operating system. The AXIS Print
Monitor’s built-in Help system de sc ri be s, i n ste p- by- st ep f a shi on, h ow t o i nst al l y our
printers as NetBIOS/NetBEUI, LPR or Raw TCP/IP printer ports. If you need help,
start the AXIS Print Monitor Help system from the AXIS Utilities folder or see the
User’s Manual.
Note:
As the AXIS 560/660 emulates the behavior of a local printer port, you must select the Local
Printer (Windows 95 and Windows 98) or My Computer (Windows NT) alternative when
performing the instructions in the Add Printer Wizard.
Windows
Page 17

16
Windows
Setup for Windows 3.1 & WfW AXIS 560/660 User’s Guide
Setup for Windows 3.1 & WfW
TCP/IP Printing
To enable TCP/IP printing in Windows 3.1 and Windows for Workgroups
environments, it is recommended that you use a shareware LPR spooler that can be
downloaded from ftp://ftp.axis.com/pub/axis/software/prt_srv/utility/wlprs/.
NetBIOS/NetBEUI Printing
AXIS Print Utility for Windows is the preferred tool for NetBIOS/NetBEUI printing
in Windows 3.1 and Windows for Workgroups environments.
Install the AXIS Print Util it y fo r Windows software, if you have no t alre ad y d one so .
It is supplied in the software\prt_srv\utility\axpuw\1.04 folder on the AXIS Online
CD. You can also download it from the Axis WWW home page at
http://www.axis.com/.
Peer-to-peer printing - This print method is recommended for smaller
networks and requires that all users install the AXIS Print Utility for Windows on
their workstations. Follow these steps to install your AXIS 560/660 for peer-to-peer
printing at a Windows for Workgroups or Windows 3.1 workstation:
1. Double-click the AXIS Print Utility icon.
2. In the Port menu, click Add. In the NPS Port list, select the AXIS 560/660 port
to be installed. The ports appear as <name>.LP1, <name>.LP2, and
<name>.CM1, where <name> is either AX followed by the last six digits of the
AXIS 560/660 serial number or a name you have previously given the AXIS
560/660. For example: AX100B35.LP1 or DevDept.LP1.
3. Accept or change the suggested Windows port name, and type any comments in
the Description field. Make a note of the Windows port name as you will need
this later. Click OK to install the Windows port.
4. In the Port menu, click Connect to bring up the Windows Printers dialog.
5. Select a printer driver from the list of Installed Printers, or click Add>> to install
a new driver. Click Connect...
6. Select the Windows port name, defined in step 3, from the Ports list.
7. Click OK to close the Connect dialog, and Close to close Printers.
Page 18

AXIS 560/660 User’s Guide Setup for Windows 3.1 & WfW
Notes:
Windows 3.1 will require network support such as LAN Server or LAN Manager Workstation
software to be installed in order to redirect a local printer port to a network device.
AXIS Print Utility for Windows must be running when you print through the AXIS 560/660. We
strongly recommend that you copy the AXIS Print Utility icon to your Windows StartUp folder.
Client-server printing - This print method is suitable for larger networks and
requires only one user to install the AXIS Print Utility for Windows software onto
their workstation. The setup procedure is described below:
1. Install AXIS Print Utility for Windows onto the file server.
2. Set up your AXIS 560/660 from the file server as described in Peer-to-peer
printing, on page 16, but you must additionally check the Share box for your
printer. Please refer to your Windows documentation for further instructions.
Your shared printers can now be used by all Windows clients and you do not need to
install the AXIS Print Utility for Windows on the clients.
Important:
17
Windows
The server setup described above should only be made on a Windows for Workgroups
workstation.
Page 19

18
OS/2
Setup for OS/2 AXIS 560/660 User’s Guide
Setup for OS/2
TCP/IP Printing
The AXIS 560/660 supports LPR Printing in the OS/2 environment.
Installing the AXIS 560/ 6 6 0
Follow the instructions below to install the AXIS 560/660 using the lprportd service
method:
1. Open t he OS/2 System window, select TCP/IP and TCP/IP Configuration.
2. Select Printing, type a number, e.g. 3, in the Maximum number of LPD ports
field. The Remote print server and Remote print server's printer fields should
remain empty.
3. Select Autostart, select lprportd, click the Autostart check box and select
Detached.
4. Exit and Save.
5. Restart your OS /2 client.
Creating a print queue
Continue with the instructions below to create a print queue:
1. Open t he Template group. Create an new printer from Templates by dragging
the Printer icon to the desktop with the right mouse button.
2. Select a printer driver and double-click the Output port named \PIPE\LPD0.
3. Enter the host name or the IP ad dress of the AXIS 560/660 in the LPD server
field.
4. Enter one of the AXIS 560/660 logical printer names, e.g. pr1, in the LPD
printer field.
NetBIOS/NetBEUI Printing
AXIS Print Utility for OS/2 is the preferred tool for NetBIOS/NetBEUI printing in
OS/2 environments. Install AXIS Print Utility for OS/2, if you have not already done
so. It is available on the AXIS Online CD in the software\prt_srv\utility\axpu\1_16
folder. You can also download it from the Axis WWW home page at
http://www.axis.com/. Please refer to the User’s Manual for more information.
Page 20

AXIS 560/660 User’s Guide Setup for Macintosh
Setup for Macintosh
Note:
Only AXIS 560 supports printing in the Macintosh environm ent.
Follow the instructions bel ow to choose a printer:
1. Open the Chooser from the Apple menu.
2. Click the LaserWriter, alternatively the LaserWriter 8.0 Icon.
3. If your network has more than one zone, click the name of the default zone. If
your network has no zones, this box does not appear.
4. Click the name of th e printer you wa nt to use. T he defaul t printer name is sh own
as: AXIS<nnnnnn>_<port>, where <nnnnnn> is the last six digits of the
serial number, and <port> is LPT1, LPT2, or COM1 respectively.
5. For LaserWriter 8.0 printer driver only:
Click Setup..., a nd then Select Auto Setup. If the printer, as well as the print
server, supports bi-directional printing the installation will be auto matically performed. If not, you will be prompted to select a PPD file matching your printer.
Click OK.
6. Click the Close box. This completes the configuration.
19
Macintosh
Repeat this procedure for each Macintosh using the AXIS 560/660.
Page 21

20
Setup for Macintosh AXIS 560/660 User’s Guide
Setting the IP address
Follow the step-by-step procedure below to set the IP address, enabling access to the
AXIS 560 via any standard Web browser:
1. Open the Choo ser and select a network printer driver, any LaserWriter will do.
2. Select the Axis printer port which name ends with "_CFG" and close the
Chooser.
3. Open a text editor, e.g. SimpleText and write a text file containing the following:
INT_ADDR: <IP address>
Example:
INT_ADDR: 171.16.2.143
4. Print the above tex t file. The settings will be stored in the AXIS 560.
5. Open the Chooser and select the printer port you wis h to use for printing
documents. Close the Chooser.
Note:
Macintosh
The _CFG port disappears 60 minutes after the AXIS 560 has been po wered on. If you want it to
reappear, you must restart the AXIS 560.
Page 22

AXIS 560/660 User’s Guide Setup for UNIX
Setup for UNIX
Before you start:
To establish communication with the TCP/IP network, you must assign an IP address to your AXIS
560/660 Print Server. Refer to Assigning an IP Address, on page 8.
Having performed the basic TCP/IP setup proce dur es, you are now able to print in
interactive mode using FTP or Reverse Telnet protocols. However, if you want to
integrate the AXIS 560/660 into your host spooler, you can use the Axis automatic
installation script axinstall. This utility sof twar e is r e si de nt on t he AXIS 56 0/660 and
can be downloaded to your host using FTP. It is also provided on the AXIS Online
CD in the software\prt_srv\utility\axinstall\latest folder and from the Axis WWW
home page at http://www.axis.com/.
Follow the procedure below to download axinstall to your host using FTP:
1. Log in to the AXIS 560/660 by typing:
ftp <host name> or ftp <IP address> in the UNIX shell window.
21
2. Enter
root as the user id and pass as the password.
3. Download the axinstall utility by typing:
get axinstall
Follow the procedure below to install the AXIS 560/660 using the axinstall script:
1. Type the command:
sh axinstall in th e UNIX shell window.
2. Follow the instructions that appear when the script is started.
When the AXIS 560/660 is installed, it will appear as it is directly connected to the
host printer spooler.
UNIX
Page 23

22
NetWare
Windows
OS/2
Macintosh
Using IPP AXIS 560/660 User’s Guide
Using IPP (only for AXIS 660)
You can use IPP (Internet Printing Protocol) for printing over any LAN or WAN
that supports TCP/IP. The Axis Print Se rver IPP functionality is
platform-independent and is automatically activated upon installation.
Note:
Currently available IPP clients include:
• the Internet Printer Connection software from Hewlett Packard for WindowsNT,
• the Microsoft IPP Client delivered with Windows 2000,
• IPP clients for Windows ‘95 and ‘98 that can be downloaded from the Micr osoft web site.
• the Common Unix Printing System for Unix/Linux environments.
The Axis print server with integrated IPP is compatible with any 1.0 and 1.1
compliant IPP client. The AXIS 660 Print Server presents IPP Printer objects to
the client, one for each printer port.
Notes:
Axis firmware including IPP can be down-loaded free of charge from the Axis website
http://www.axis.com.
If there are one or more firewalls between the IPP Client and the server, you may have to make
some changes to the firewall configuration. IPP uses TCP port 631 for printing, so any firewalls
between client and server must be configured to allow bi-directional traffic on that port.
In order to print to a remote printer via IPP, simply direct your print job to the
printer by means of the supported http: address scheme (which is used in the IPP
1.0 standard), or the ipp: address scheme (used in the IPP 1.1 standard).
UNIX
Example: http: address scheme
IPP address using host name IPP address using IP address Corresponding printer
http://axisps:631/LPT1 http://12.100.110.2:631/LPT1 Pr inte r a ttac he d to the LPT1
parallel port
See the Axis 660 User’s Manual for more examples on http: and ipp:
address schemes. Information on how to add an IPP printer to your printer list in
Windows environments can also be found in the User’s Manual.
Page 24

AXIS 560/660 User’s Guide Management and Configuration
Management and Configuration
23
Using any standard Web browser
Having assigned an IP address to your AXIS 560/660, you can confi gure and manage
your print server from any standard Web browser.
Access your AXIS 560/660, simply by entering the host name or the IP address of the
AXIS 560/660 as a URL in your browser, as follows:
Examples:
http://192.36.253.96
http://salesdept
From the internal home page, links to configuration, management, status and
statistics services are readily available.
Using AXIS ThinWizard
The AXIS ThinWizard management tool allows you to manage and upgrade mul tiple
ThinServer products. You can find, monitor and upgrade your Axis print servers
remotely in any TCP/IP network using any standard Web browser.
The internal home pages of Axis ThinServer products integrate directly into AXIS
ThinWizard, giving you direct access to the services described in Using any standard
Web browser above.
Install AXIS ThinWizard on a designated server in your network. The AXIS
ThinWizard software is available on the AXIS Online CD, but can also be
downloaded from the Axis WWW home page at http://www.axis.com/.
NetWare
Windows
OS/2
Macintosh
UNIX
Follow the instructions below to use AXIS ThinWizard:
1. Start a Web browser from a client in your network.
2. Enter the IP address or the host name of the server, where you installed AXIS
ThinWizard.
3. Enter the user id and the password and cl ick the Log in button.
4. The AXIS ThinWizard interface appears. Select a network group from the list. If
the list is empty, you must first c reate a g roup. In t hat case, just click t he Ne twork
Groups button and follow the instructions.
Please refer to the AXIS ThinWizard on -line hel p for more infor mation about h ow to
use AXIS ThinWizard.
Page 25

24
Management and Configuration AXIS 560/660 User’s Guide
Using AXIS NetPilot
The AXIS NetPilot configuration software provides an alternative tool for
conveniently configuring and monitoring of the AXIS 5 60/660. It can be installed on
NetWare
Windows platforms running NetBIOS/NetBEUI or NetWare clients running IPX.
The AXIS NetPilot software is available on the AXIS Online CD and can also be
downloaded from the Axis WWW home page at http://www.axis.com/.
AXIS NetPilot provides two tools for changing the parameters. The Prop er ty P ag es
provide a user-friendly in terface and are ideal if you have little experience in editing
Windows
the parameters. The Parameter List Editor, on the other hand, is a very fast and
effective tool, which can be used if you have considerable experience in editing the
parameter list. This tool also enable s batch configuration of your print servers.
Property pages:
OS/2
Follow the instructions below to open and edit an arbitrary Property Page:
1. Select the AXIS 560/660 from the Network Print Servers folder.
2. Select Properties from the Setup Menu or click the Properties button on the
AXIS NetPilot toolbar.
3. Select the tab that includes the parameter you want to change.
Macintosh
4. Change the value. Click Apply to save the change to the print server. If you select
OK instead, the Property pages close after th e change has been saved.
Please refer to the AXIS NetPilot on-line help or the User’s manual for more
information about how to use AXIS NetPilot.
UNIX
Page 26

AXIS 560/660 User’s Guide Management and Configuration
Using FTP
Having assigned an IP address to your AXIS 56 0/660, as d escr ibed in Assigni ng an IP
Address, on page 8, you can use FTP for configuring your print server.
Follow the instructions below to edit the config file using FTP:
1. Log in to the AXIS 560/660 by typing the command:
ftp <host name> or ftp <IP address> in a DOS window (Windows), in a
OS/2 window or in a UNIX shell window.
25
NetWare
2. Enter the user id and the password. (The default entries are
root and pass.)
3. Download the config file to your host by typing:
get config
4. Edit the file using your preferred text editor.
5. Save the config file to the print server by typing:
put config CONFIG
Note:
It is important that the destination file name is specified in capital letters. Otherwise the edits are
only temporary and will be lost when the AXIS 560/660 is powered down.
By using the same set of inst ructio ns you can also fetc h th e status file and the account
file from the AXIS 560/660. By typing
help in step 3 above, a list of all available files
and commands will be displayed.
Using Telnet
Having assigned an IP address to your AXIS 56 0/660, as d escr ibed in Assigni ng an IP
Address, on page 8, you can use Telnet for managing your print server.
Follow the instructions below to view the account file using Telnet:
1. Log in to the AXIS 560/660 by typing:
telnet <host name> or telnet <IP address> in a DOS window (Wi ndows
95/98/NT) or in a UNIX shell window. In a OS/2 window you should replace
telnet command with telnetpm.
the
Windows
OS/2
Macintosh
UNIX
2. Enter the user id and the password. (The default entries are
root and pass.)
3. View the account file by typing:
account
By using the same set of instructions you can also view the status file, perform soft
resets, hard resets and set the print server parameters to default settings. By typing
help in step 3 above, a list of all available commands will be displayed.
Page 27

26
Management and Configuration AXIS 560/660 User’s Guide
Using the Test Button
The following operations can be performed by pressing the test butto n in different
sequences. Please refer to Product Overview, on page 5, to identify the location of the
NetWare
test button.
Printing a test page:
• Press the test button once to print a test page.
Printing the parameter list:
Windows
• Press the test button twice to print the parameter list.
Resetting the AXIS 560/660 parameters to the factory de fault settings:
1. Remove the external power supply to switch off the AXIS 560/660.
2. Press and hold down the test button, while you reconnect the external power
OS/2
supply. Continue to hold down the test button until the network indicator starts
to flash at one second intervals. This should take about 5 seconds.
3. Release the test button and wait until the network indicator flashes at least five
times.
4. Press and hold down the test button again until the network indicator remains
Macintosh
constantly lit.
5. Restart the AXIS 560/660 by disconnecting and reconnecti ng the external power
supply.
Note:
UNIX
All parameters except the node address (NODE_ADDR.), the IP address (IP_ADDR.) and DHCP
enabled or disabled (DHCP_ENABLE.) are reset.
Please refer to the AXIS 560/660 User’s Manual for more information about the test
button.
Page 28

AXIS 560/660 User’s Guide Management and Configuration
Using SNMP
You can use SNMP (Simple Network Management Protocol) for remote monitoring
and configuration of the AXIS 560/660. All major functions applicable to print
servers are supported.
The AXIS 560/660 supports all relevant parts of MIB-II and the host resource MIB.
It also includes a private enterprise MIB called AXIS MIB. To make the full use of the
SNMP support you must have an SNMP tool that allows you to install private
enterprise MIBs.
27
NetWare
The AXIS MIB can be downloaded from:
• the /software/prt_srv/utility/mib/1_14 folder on the AXIS Online CD.
• the Axis WWW home page at http://www.axis.com/.
• the AXIS 560/660 using FTP.
Follow these steps to add the AX IS MIB to your SNMP software:
1. Log in to the AXIS 560/660 using FTP.
2. Download the MIB file /snmp/axis.mib to the SNMP host.
3. Install the AXIS MIB accord ing to instructions in your SNMP software
documentation.
Using HP Administration Tools
The AXIS 560/660 is compatible with the HP J etAdmin and the HP We b J etAdmin
printer management software. This means that you may use either tool to install and
configure your printer devices via your AXIS 560/660 print server. You can also use
them to monitor the current status of your AXIS 560/660 and other HP JetAdminor HP Web JetAdmin-compatible devices connected to your network.
However, to enable support for the HP administration tools, you must set the
HP_JETADMIN parameter of the AXIS 560/660 to YES.
Windows
OS/2
Macintosh
UNIX
Important:
Even though the AXIS 560/660 is compatible with the HP JetAdmin tool, it behaves slightly different
than an HP print server in certain situations. Please refer to the AXIS 560/660 User’s Manual,
available on the AXIS Online CD, for further information.
Page 29

28
Management and Configuration AXIS 560/660 User’s Guide
Using Novell Utilities
After installing the AXIS 560/660 into the NetWare environment, wi th AXIS
NetPilot, you can manage your AXIS 560/660 using Novell’s NetW a re
NetWare
Administrato r or PCONS OLE .
These tools allow you to:
• restart the AXIS 560/660
• view the status of the AXIS 560/660
• connect and disconnect print queues to the AXIS 560/660
Windows
• set notifications
Please refer to the appropriate Novell documentation for further information about
NetWare Administrator and PCON SOLE.
OS/2
Macintosh
UNIX
 Loading...