

Page 1

AXIS 540+/AXIS 560
Network Print Servers
User’s Manual
AXIS 540+/AXIS 560 1
Page 2

Regulatory Information
Safety Notices Take some time to read through the safety notices before installing the print server. Please observe all safety markings and
Important: Observe “Important:” in the text to avoid operational impairment. Do not proceed until you have fully understood the
Electromagnetic Compatibility
(EMC)
USA This equipment has been tested and found to comply with the limits for a Class B digital device, pursuant to Part 15 of the FCC
Europe This digital equipment fulfils the requirements for radiated emission according to limit B of EN55022, and the requirements
Japan This is a class B product based on the standard of the Voluntary Control Council for Interference from Information
Australia This electronic device meets the requirements of the Radio communications (Electromagnetic Compatibility) Standard 1998
instructions when using this product.
implications.
Rules. These limits are designed to provide reasonable protection against harmful interference in a residential installation. This
equipment generates, uses and can radiate radio frequency energy and, if not installed and used in accordance with the
instructions, may cause harmful interference to radio communications. However, there is no guarantee t hat interference will not
occur in a particular installation. If this equipment does cause harmful interference to radio or tele vision reception, which c an be
determined by turning the equipment off and on, the user is encouraged to try to correct the interference by one or more of the
following measures:
- reorient or relocate the receiving antenna
- increase the separation between the equipment and receiver
- connect the equipment into an outlet on a circuit different from that to which the receiver is connected
- consult the dealer or an experienced radio/TV technician for help. Shielded (STP) network cables must be used with this unit to
ensure compliance with the class B limits..
for immunity according to EN55024 residential, commercial, and light industry. Compliance is not valid for unshielded
network cables.
Technology Equipment (VCCI). If this is used near a radio or television receiver in a domestic environment, it may cause radio
interference. Install and use the equipment according to the instruction manual. Compliance is not valid for unshielded
network cables.
AS/NZS 3548. Compliance is not valid for unshielded network cables.
Liability Every care has been taken in the preparation of this manual; if you detect any inaccuracies or omissions, please inform your
Axis’ Trademarks AXIS IP JumpStarter, AXIS ThinWizard, axinstall, AXIS Print Monitor.
Other Trademark
Acknowledgments
Support Services Should you require technical assistance, please contact your Axis dealer. If your questions cannot be answered immediately,
Patent information Axis AB has intellectual property rights relating to technology embodied in the product that is described in this document. In
Software Acknowledgments This product includes software developed by the OpenSSL Project for use in the OpenSSL Toolkit.
local Axis office, which can be found on the cover of this document. Axis Communications AB cannot be held responsible for
any technical or typographical errors and reserves the right to make changes to the product and manuals without prior
notice. Axis Communications AB makes no warranty of any kind with regard to the material contained within this document,
including, but not limited to, the implied warranties of merchantability and fitness for a particular purpose. Axis
Communications AB shall not be liable nor responsible for incidental or consequential damages in connection with the
furnishing, performance or use of this material.
Adobe Acrobat Reader, Aix, Apple, Debian, Ethernet, EtherTalk, IBM, LAN Manager, LAN Server, Macintosh, Microsoft, Novell
NetWare, OS/2, OS/400, AS/400, Red Hat, Solaris, SuSe, UNIX/Linux, Microsoft Windows, are registered trademarks of the
respective holders.
your Axis dealer will forward your queries through the appropriate channels to ensure you a rapid response. On the Internet
you can find on-line manuals, technical support, software updates, application software, corporate information, etc..
particular, and without limitation, these intellectual property rights may include one or more of the patents listed at
http://www.axis.com/patent.htm and one or more additional patents or pending patent applications in the US and other
countries.
USERS MANUAL EN
Part No. 21399, Revision 2.1
Date: September 2004
Copyright © Axis Communications AB, 2004
2 AXIS 540+/AXIS 560
Page 3

Table of Contents
Section 1 Introduction 5
About this Manual 5
Supported Environments 5
About Axis 5
Support Services 5
Section 1 Product Overview 7
Package Contents 7
AXIS Network Product CD 8
Physical Description 9
Features and Benefits 11
Section 1 Basic Installation 12
Quick overview 12
Connect the Hardware 12
Assign an IP Address to the Print Server 13
Automatic IP address assignment 14
Manual IP address assignment 15
Making Network Printers available for printing on your PC
18
Installation Methods 18
Section 2 Adding Printers in Windows 19
Windows 2000/Windows XP/Windows Server 2003 20
Adding Printers in Windows 2000/Windows XP/2003 using
the Microsoft LPR Monitor 23
Adding Printers in Windows NT4 using the Microsoft LPR
Monitor 24
AXIS Print Monitor Software 26
Adding Printers over TCP/IP in Windows NT 4 using AXIS
Print Monitor 27
Adding NetBIOS/NetBEUI Printers in Windows 2000 using
AXIS Print Monitor 28
Adding Printers over NetBIOS/NetBEUI in Windows NT 4
using AXIS Print Monitor 29
Adding Printers in Windows 98 and Me over TCP/IP using
AXIS Print Monitor 30
Adding Printers in Windows 98 and Me over
NetBIOS/NetBEUI using AXIS Print Monitor 31
Section 1 Adding Printers in Macintosh 33
Installation in Mac OS X 33
Installation on MacOS 9.1 or older, using AppleTalk 34
Choosing a Printer 34
Section 2 Setting Up - NetWare 38
Setup using NDPS 39
Setup using iPrint 53
AXIS 540+/AXIS 560 3
Page 4

Basic Setup with AXIS NetPilot 58
Advanced Installation using AXIS NetPilot 60
Basic Queue-based printing over IP 62
Section 1 Adding Printers in UNIX/Linux 65
Print Tools 65
Typical Invocation via a Windows Manager 66
Typical Invocation from a Terminal Window 67
Debian 3.0 68
Red Hat 7.3 69
SuSE 8.0 71
AXIS axinstall Script 72
Print Methods on TCP/IP Networks 74
Section 1 Updating the Firmware 76
Upgrading the Firmware 76
Obtaining the Software 78
Section 2 Management and Configuration 79
Using a Web browser 79
Using AXIS ThinWizard for Print Server Management 83
Using FTP for Print Server Management 85
Using Telnet 87
Using SNMP 90
Using Novell Utilities 93
94
Section 3 Logical Printers 95
Section 4 The Test Button 103
Section 5 Technical Specification 104
4 AXIS 540+/AXIS 560
Page 5

Section 1 Introduction
Thank you for purchasing the AXIS 540+/AXIS 560. This product has been
developed to connect your printers anywhere in your network, allowing all
network users access to shared printer resources.
About this Manual
This manual is applicable for the AXIS 540+/AXIS 560, providing introductory
information as well as detailed instructions on how to set up and manage the
print server in various network environments. It is intended for everyone
involved in installing and managing the print server. To fully benefit from this
manual, you should be familiar with basic networking principles.
These instructions are based on the settings in a new and unconfigured print
server. To reload the default parameters, you can perform a Factory Default,
which will restore most of the settings. See “Performing a Factory Default” on
page 103.
Introduction
Supported Environments
About Axis
Support Services
• Windows
•NetWare
•Macintosh
•OS/2
•UNIX/Linux
Axis develops solutions for user-friendly and secure communication over wired
and wireless networks. The company is a worldwide market leader in network
connectivity, with products for the office, facility and industrial environments.
More information about Axis can be found at www.axis.com
Should you require any technical assistance, please contact your Axis reseller. If
your questions cannot be answered immediately, your Axis reseller will forward
your queries through the appropriate channels to ensure a rapid response.
AXIS 540+/AXIS 560 5
Page 6

Introduction
If you are connected to the Internet, you can:
• Download user documentation and firmware updates
• Find answers to previously resolved problems in the FAQ database. Search
by product, category or phrase
• Report problems to Axis support staff by logging in to your private support
area
• Visit the Axis support Web at www.axis.com/techsup
6 AXIS 540+/AXIS 560
Page 7
Section 1 Product Overview
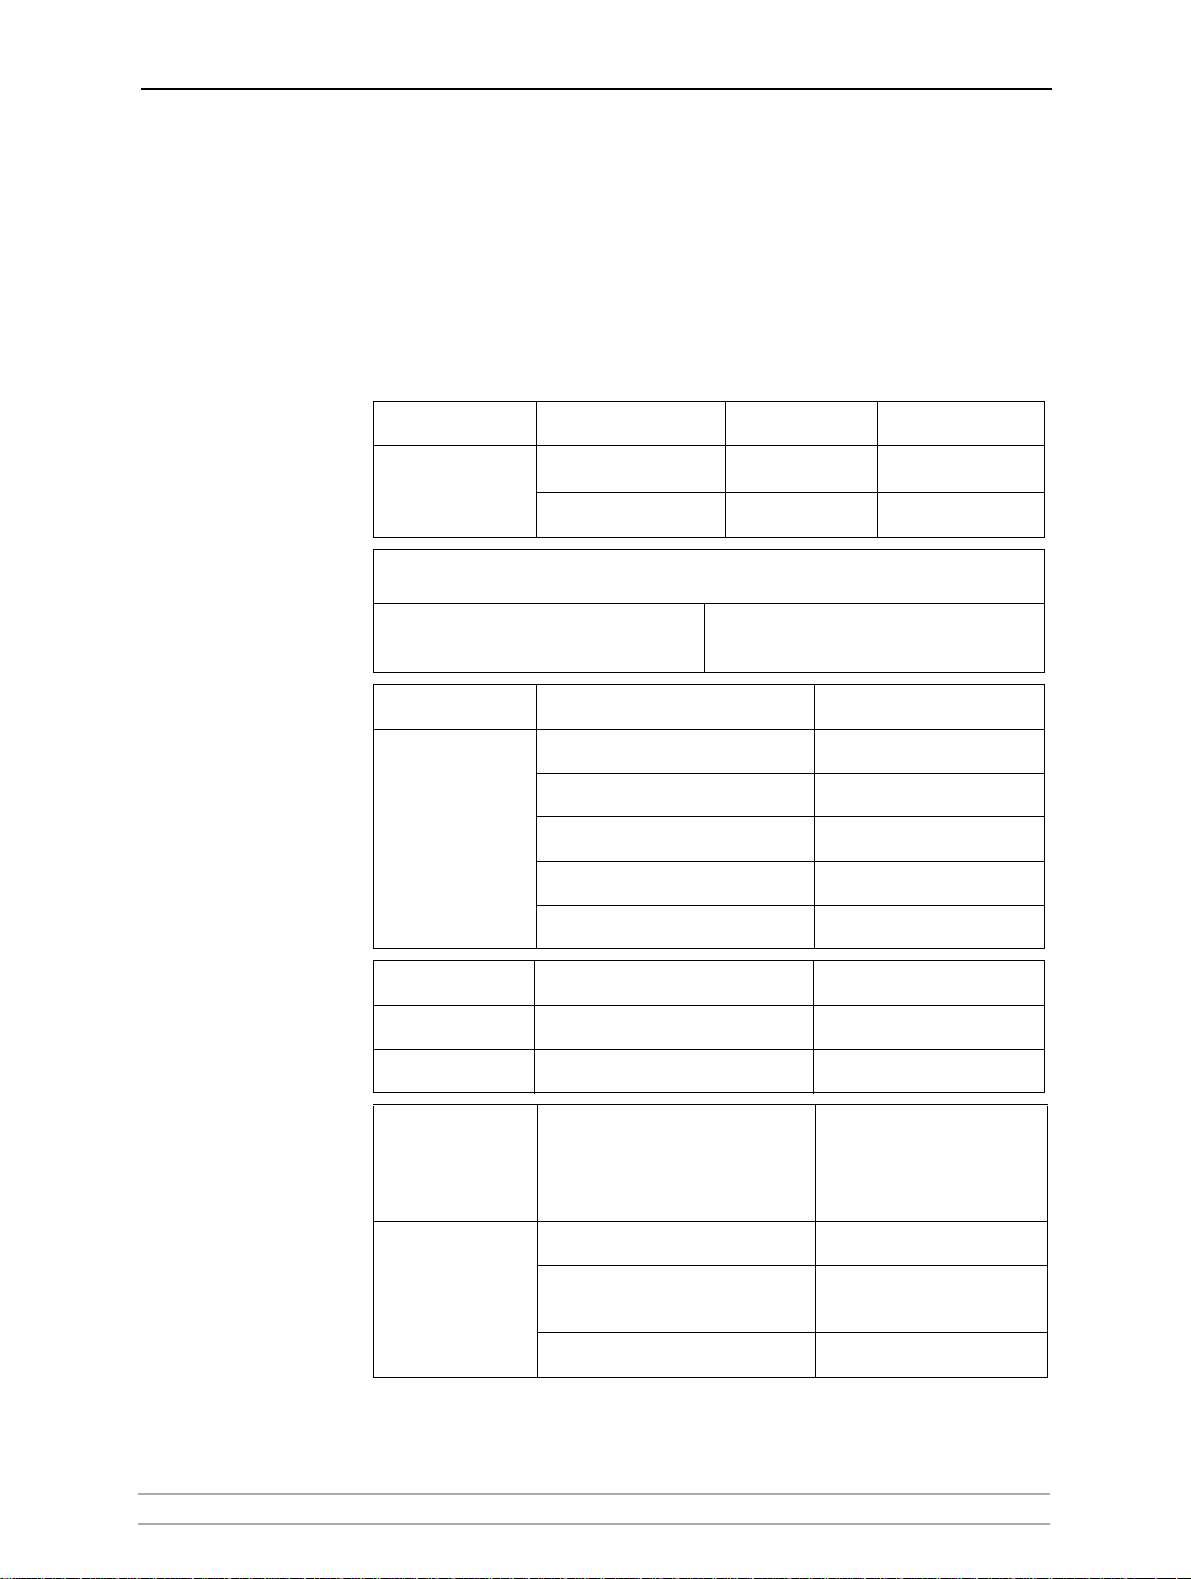
Package Contents
Verify that nothing is missing from the AXIS 540+/AXIS 560 package by using
the check list below. Please contact your dealer if anything is missing or
damaged. All packing materials are recyclable.
Hardware Model Part number Power Adapter
Product Overview
AXIS 560 0053-xxx-02
PS-H
Axis Print Server
AXIS 540+ 0058-xxx-02 PS-H
There are different versions of this product depending on the hardwar e platform. To determine which
version you have, please check the product label on the back of the print server:
AXIS 540+
version 2 - 0058-xxx-02
version 1 - 0058-xxx-01
AXIS 560
version 2 - 0053-xxx-02
version 1 - 0053-xxx-01
Power Adapter Model PS-H Part No.
Australia 19111
Europe 19108
PS-H
Korea 19112
UK 19109
USA / Japan 19110
Media Title Part Number
CD
AXIS Network Product CD rev 1.3 and up
Printed Material
AXIS 540+/AXIS 560 User’s Guide rev 1.0 and higher
Optional
accessories
(not included in
Description Part Number
package)
Parallel Printer Cable for AXIS 560 13360
Cables
Centronics to Mini Centronics
cable for AXIS 540+
16453
Parallel Printer cable for AXIS 540+ 13522
AXIS 540+/AXIS 560 7
Page 8

Product Overview
AXIS Network Product CD
The AXIS Network Product CD provides an easy-to-use electronic catalog, that
includes Axis software, firmware and user docum entation. It also contains free
Adobe Acrobat Reader software.
Start-up Procedures
for Windows
Start-up Procedures
for UNIX/Linux,
and Mac OS
If your computer is configured to autostart CDs, the AXIS Network Product CD
will start automatically when inserted into a local CD drive on Windows 98,
Me, NT, 2000 and XP platforms. You can also navigate to the CD root directory
and start the index.htm file from within the Windows file manager.
Using your preferred file manager application, navigate to the CD root directory
and click index.htm
8 AXIS 540+/AXIS 560
Page 9
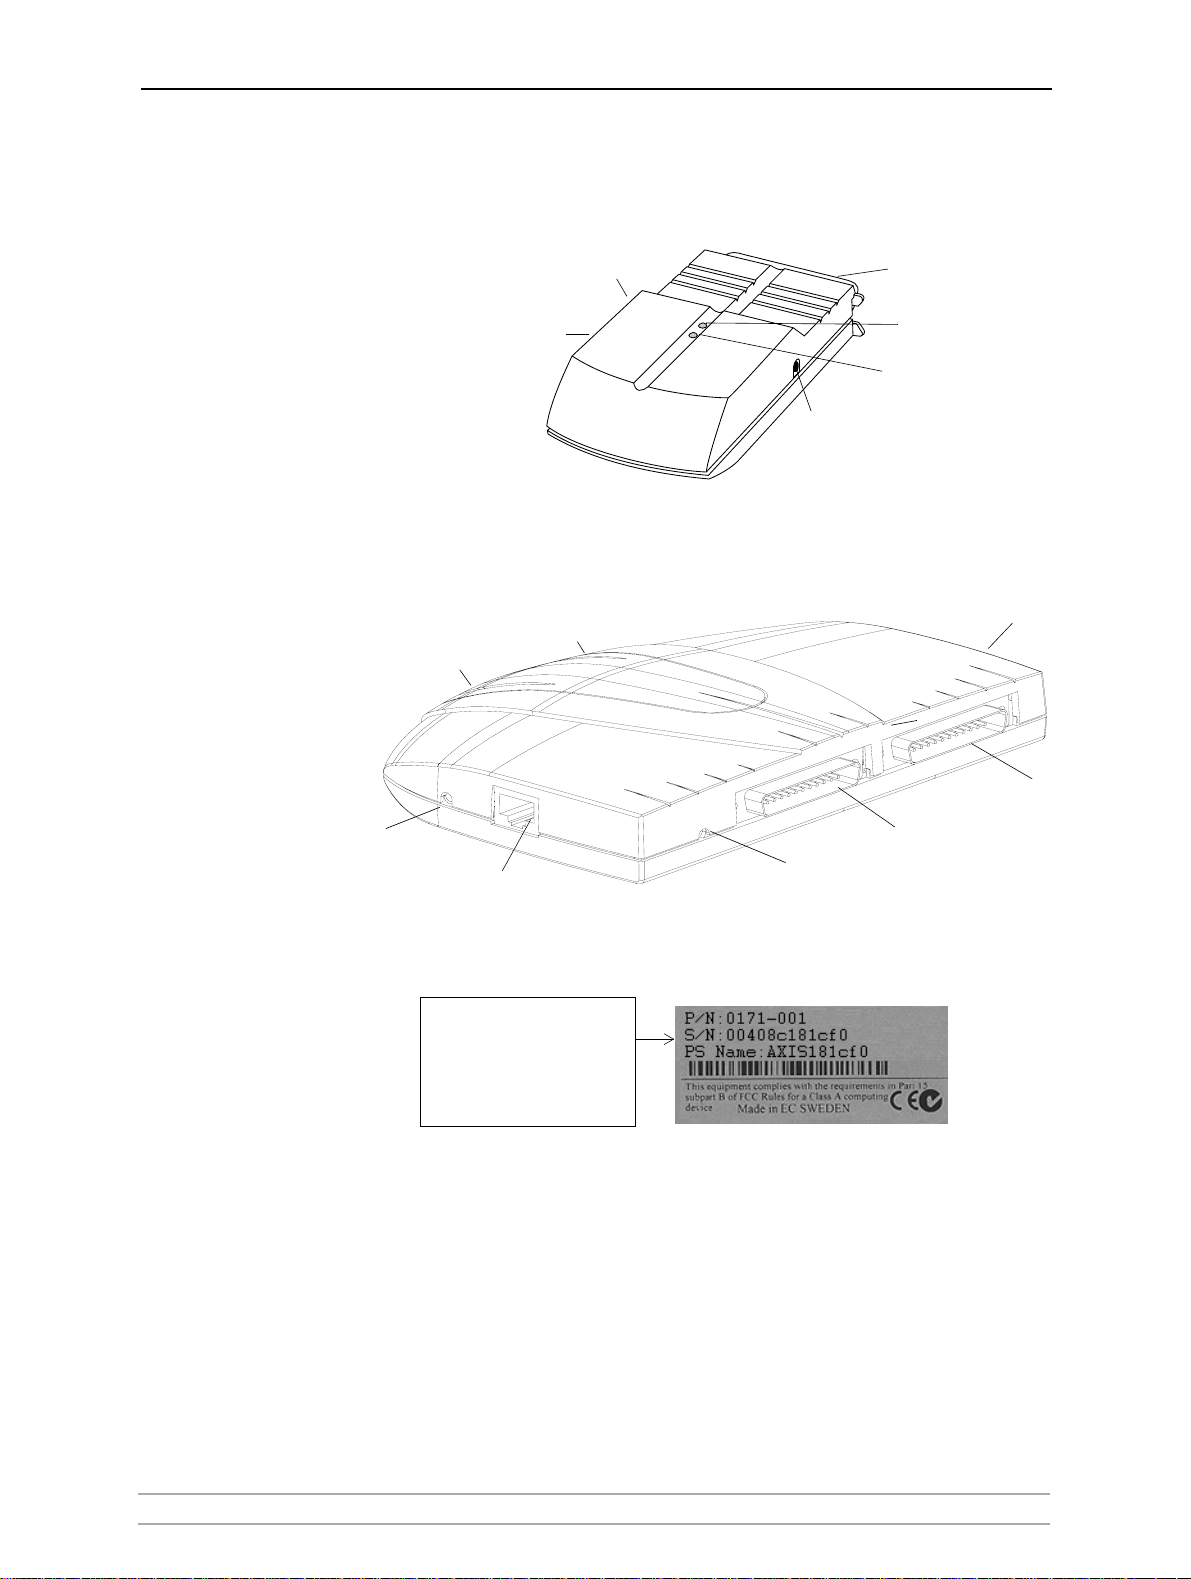
Physical Description
s
AXIS 540+
Ethernet
connector
Product Overview
Parallel printer port (LPT1)
AXIS 560
Network
Indicator
t button
Power Adapter
connector
Ethernet
connector
Power
indicator
Network
indicator
Power
indicator
Test button
Serial printer port (
Parallel printer
Parallel printer port (LPT2)
Power Adapter
connector
Backside label of print server
Serial number same as
MAC/Ethernet address; e.g.
00408c181cf0 =
00-40-8c-18-1c-f0 (Windows)
00:40:8c:18:1c:f0 (Unix/Mac)
Network Connector Axis Network Print Servers are designed for 10 Mbps or 100 Mbps Ethernet
networks and connect to the network via a twisted pair RJ45 category 5 cable
(10baseT and 100baseTX) or better.
AXIS 540+/AXIS 560 9
Page 10

Product Overview
Printer Ports • AXIS 540+: Parallel port: 36-pin Centronics connector. Highspeed IEEE 1284
compliant with ECP support and throughput of 1 MB/sec.
• AXIS 560: 25-pin DSUB connector. Highspeed IEEE 1284 compliant with ECP
support and throughput of 1 MB/sec.
• Serial port: 9-pin DSUB connector, RS-232, XON/ XOFF or RTS/CTS, data rates
up to 115.200 baud
Test Button The test button is used for:
• Printing a test page to check the connection to the printer.
• Printing the parameter list showing the print server settings.
• Performing a Factory Default of the print server, which will restore most of
the parameters and settings to factory default values.
See The Test Button, on page 103 for details.
Network Indicator The network indicator flashes to indicate network activity.
Power Indicator The power indicator is lit while power is applied. If it is not lit, or if it flashes,
there is a problem with the print server or its Power Adapter.
Printer compatibility All printers can be used except host-based printers (also known as GDI, PPA or
Windows-based printers).
Configuration and
Management
The print server can be configured and managed from its internal Web pages,
using HTTP as well as HTTPS in the secure mode. These Web pages offer you a
platform independent management tool that is suitable for all supported
network environments. See Using a Web Browser for Print Server Management,
on page 87 for details.
10 AXIS 540+/AXIS 560
Page 11

Features and Benefits
Reliability The print server provides high performance and reliability combined with low
Flexibility The print server supports printing in all major computer systems and
Speed The AXIS ETRAX 100 LX chip supports data transfer rates of up to 200 Mbit/s
Easy to Install The print server installs, operates and is managed in a reliable and easy fashion.
Product Overview
power consumption. The electronic circuits are based on the AXIS ETRAX 100 LX
chip, which comprises an integrated 32 bit RISC processor and associated
network controllers.
environments, including five different print methods in the TCP/IP environment.
The integrated IPP (Internet Printing Protocol) function allows for printing from
LAN to LAN via a WAN, such as the Internet.
(100 Mbit Ethernet full duplex).
Security You can assign a password to restrict login and printer access. It is also possible
to disable protocols and force a secure mode (https).
Monitoring The internal print server Web pages and AXIS ThinWizard (3.0 and up) allow you
to continuously monitor printer status. The Web pages are used to monitor
single Axis units while AXIS ThinWizard can be used to monitor multiple Axis
units.
Through e-mail notification, the administrator can be notified by e-mail
whenever an event that requires human intervention occurs in a printer. The email contains a short and concise description of the event.
Future Proof The firmware stored in the print server Flash memory can be upgraded over the
network. This allows you to quickly update and enhance its operational features
when new print server software becomes available.
NetWare Packet
Signature
The print server supports NetWare Packet Signature Level 1, 2, 3, which
protects servers and clients using the NetWare Core Protocol
™
services. NCP
packet signature prevents packet forgery by requiring the server and the client
to sign each NCP packet. See your Novell NetWare documentation for detailed
information.
AXIS 540+/AXIS 560 11
Page 12

Basic Installation
Section 1 Basic Installation
Quick overview
Follow these steps to make your printer network ready:
1. Connect the Hardware, on page 12
2. Assign an IP Address to the Print Server, on page 13
3. Making Network Printers available for printing on your PC, on page 18
Connect the Hardware
1. Make sure that the printer is switched off and that the Power Adapter is
disconnected
from the print server.
2. Locate the serial number, found on the underside label of the print server,
and write it down. Example: S/N: 00408c181cf0
3. Connect the printer directly to a port on the print server or using an
appropriate cable.
4. Connect the AXIS 5400+/AXIS 5600+ to your network (Ethernet Connector),
using a twisted pair RJ45 category 5 cable.
5. Switch on the printer and make sure it is ready for printing (display showing
“Online”, “Ready”, etc.)
6. Connect the Power Adapter to the print server. The Network Indicator will
start flashing when the print server is correctly connected to the network.
7. Wait 1 minute and press the test button once. A test page will be printed
on the connected printer — keep it handy during the installation. The test
page will show the assigned IP address of the print server.
Print server’s
IP address
Note:
AXIS 540+: the test page is printed on LPT1.
AXIS 560: when all printer ports are attached to a printer, the test page is printed in this
order: LPT1, COM1, LPT2.
12 AXIS 540+/AXIS 560
Page 13

Assign an IP Address to the Print Server
Basic Installation
Methods for Setting
the IP Address
Automatic IP Address
Assignment
Manual IP Address
Assignment
You can obtain an IP address for your print server by using one of the following
methods, depending on your network operating environment.
See IP Addressing, on page 1 for detailed instructions on IP address
management.
Method Server required Comment
Dynamic assignment of IP addresses. See
DHCP DHCP server
RARP RARP server
BOOTP BOOTP server
AutoIP No server required.
“Obtain an IP address with DHCP” on page
14
Static assignment of I P adresses. Cannot
be used over routers. See “Obtain an IP Ad-
dress using RARP in UNIX/Linux” on page
15
Static assignment of IP addresses. See
“Obtain an IP Address using BOOTP in
UNIX/Linux” on page 14
Automatic assignment of IP addresses.
See “Auto-IP Addressing” on page 3
When assigning an IP address manually you need to know the Ethernet address
of the print server. The Ethernet address is based on the print server’s serial
number, found on its underside label. A print server with the serial number
00408c181cf0 will have the Ethernet address 00 40 8c 18 1c f0.
Method Platform Comment See
“Set the IP Address using ARP in Windows
98/NT/
Me/2000/XP/2003” on
page 15
“Set the IP Address using ARP in UNIX/Linux
and Mac OS X” on page
16
“Set the IP Address using AXIS IP JumpStarter” on page 16
“Using AXIS ThinWizard
software for Print Server Management” on
page 94
ARP/Ping
AXIS IP JumpStarter
AXIS ThinWizard
Windows
UNIX/Mac OS X
Windows
Windows
2000/XP/2003
Requires the IP address for each
device to be downloaded
individually. Cannot be used
over routers.
You must define the Default
Router and Subnet Mask. Log
in to the print server’s web
pages and select Admin |
Network Settings | Detailed
View | TCP/IP | Default Router
and Subnet Mask. DHCP, AutoIP, BOOTP and RARP must first
be set to No.
Axis software that allows you to
find print servers in your network and assign an IP address to
them.
This software is recommended
for small offices and local networks.
Axis software that assists in setting the IP address of multiple
print servers simultaneously.
This software is recommended
for large organizations and enerprise networks.
AXIS 540+/AXIS 560 13
Page 14
Basic Installation
Notes:
• The ability to set the IP address with ARP and PING will only be enabled the first 10
minutes after restarting the print server.
• You need root privileges on your UNIX, Linux and Mac OS X system, or administrator priv-
ileges on a Windows NT server to set the IP address using RARP, BOOTP, DHCP and to add
an entry to the ARP table with the command 'arp -s'.
• When assigning an IP address manually, you must utilize a unique IP address that is not
already in use in your network.
Automatic IP address assignment
Obtain an IP address
with DHCP
Obtain an IP Address
using BOOTP
in UNIX/Linux
If you have a DHCP server on your network, your print server will automatically
obtain an IP address when you connect it physically to the network. The IP
address will appear on the test page that is printed when you press the test
button once. The test button is located on the long-end side of the print server.
Below is an example of how to set the IP address of the print server using
BOOTP. Append the following entry to your boot table. This is typically
performed by editing the file:
<host name>:ht=<hardware type>:vm=<vendor magic>:\
:ha=<hardware address>:ip=<IP address>:\
:sm=<subnet mask>:gw=<gateway field>
/etc/bootptab
Example:
npsname:ht=ether:vm=rfc1048:\
:ha=00408c100086:ip=192.168.3.191:\
:sm=255.255.255.0:gw=192.168.1.1
1. If necessary, update your host table and alias name databases as required
by your system.
2. If it is not already running, start the BOOTP daemon. This is typically
performed using the
bootpd command.
3. Restart the print server to download the IP address, default router address,
and subnet mask. The print server can automatically download a customized
config file from a TFTP server. Just add the name of the config file and the
TFTP server’s IP address to your boot table. The config file is downloaded
immediately after the print server receives its IP address.
4. You have now successfully set the IP address of the print server. Proceed to
“Making Network Printers available for printing on your PC” on page 18.
14 AXIS 540+/AXIS 560
Page 15

Basic Installation
Obtain an IP Address
using RARP in
UNIX/Linux
Note:
Follow the instructions below to set the IP address using RARP.
Append the following line to your Ethernet Address table. This is typically
located in the
<Ethernet address> <host name>
/etc/ethers file:
Example:
00:40:8c:10:00:86 npsname
1. Update, if necessary, your host table and alias name databases as required
by your system.
2. If it is not already running, start the RARP daemon. This is typically
performed using the
rarpd -a command.
3. Restart the print server to download the IP address.
4. You have now set the IP address of the print server. Continue to “Making
Network Printers available for printing on your PC” on page 18.
You have to restart the print server to download the IP address.
Obtain an IP address
using Auto-IP
Auto- IP is a scheme where devices allocate themselves an IP address at
random from the industry standard subnet of 169.254.x.x. AXIS print servers
are configured to support Auto-IP by default. See also “Auto-IP Addressing” on
page 3.
Manual IP address assignment
Set the IP Address
using ARP in
Windows 98/NT/
Me/2000/XP/2003
1. Open a Command Prompt and enter the following commands:
Syntax Example
arp -s <IP address> <Ethernet address>
ping <IP address>
2. The host will return
indicates that the address has been set and that communication is
established.
3. Log in to the print server’s Web pages (see Using a Web Browser for Print
Server Management, on page 87), select Admin | Network Settings |
Detailed View | TCP/IP and define Default Router and Subnet Mask. Make
sure you first set DHCP, Auto-IP, BOOTP and RARP (...Enabled) to No!
You have now set the IP address of the print server. Continue to “Making
Network Printers available for printing on your PC” on page 18.
arp -s 192.168.3.191 00-40-8c-10-00-86
ping 192.168.3.191
reply from 192.168.3.191, or a similar message. This
AXIS 540+/AXIS 560 15
Page 16

Basic Installation
Note:
• When you execute the ping command for the first time, you will experience a significantly
longer response time than is usual
• The ability to set the IP address with ARP and PING will only be enabled the first 4 minutes
after restarting the print server.
• By using the arp -d command, the static entry in the arp table is removed from the
host’s cache memory.
.
Set the IP Address
using ARP in
UNIX/Linux and Mac
OS X
Notes:
1. Open a Terminal and enter the following commands:
Syntax Example
arp -s <IP address> <Ethernet address>
ping <IP address>
2. The host will return
psname is alive, or a similar message. This indicates
arp -s 192.168.3.191 00:40:8c:10:00:86
ping 192.168.3.191
that the address has been set and that communication is established.
3. Log in to the print server’s Web pages (see Using a Web Browser for Print
Server Management, on page 87), select Admin | Network Settings |
Detailed View | TCP/IP and define Default Router and Subnet Mask. Make
sure you first set DHCP, Auto-IP, BOOTP and RARP (...Enabled) to No!
You have now successfully set the IP address of the print server. Continue to
“Making Network Printers available for printing on your PC” on page 18.
• If the host name has not been mapped to an IP address, simply replace the host name entry
with the IP address.
• The ARP command varies between different UNIX/Linux systems. Some BSD type systems
expect the host name and node address in reverse order. Furthermore IBM AIX systems will
require the additional argument ether.
• When you execute the ping command for the first time, you may experience a
significantly longer response time than is usual
• The ability to set the IP address with ARP and PING will only be enabled the first 4 minutes
after restarting the print server
.
Set the IP Address
using AXIS IP
JumpStarter
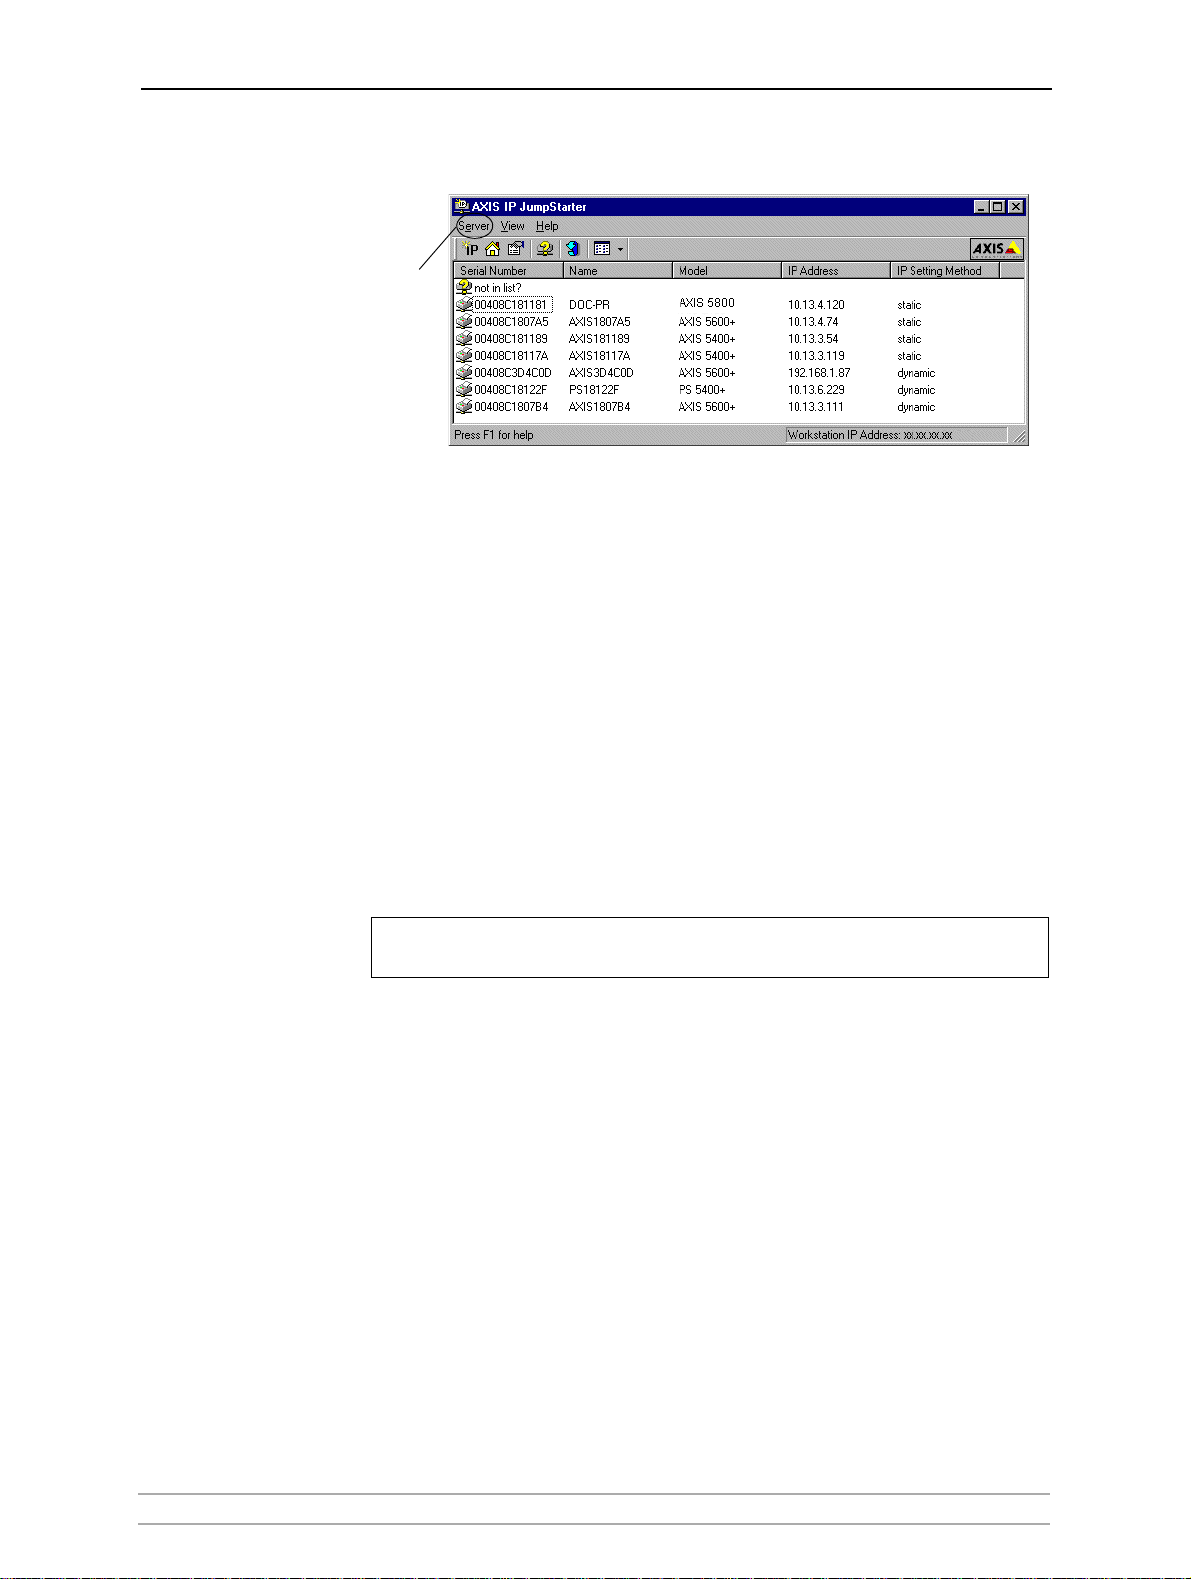
AXIS IP JumpStarter is an application that assists in assigning an IP address to
your print server and finding IP addresses already assigned to Axis servers.
1. Download and install AXIS IP JumpStarter. AXIS IP JumpStarter is
available on www.axis.com
2. For optimal use, open AXIS IPJumpstarter before you attach the print server
to the network.
16 AXIS 540+/AXIS 560
Page 17
Basic Installation
3. The software will scan your network for attached print servers. Select a print
server from the serial number list:
Server
menu
4. From the Server menu, select Set IP Address. The Set IP Address dialog
appears.
5. Click the radio button that corresponds to your choice of IP setting method
(static or dynamic using DHCP). When assigning a static IP address you also
have to define Subnet Mask and Default Gateway.
6. Click OK to save your settings.
Note:
7. Enter the server root password (by default set to pass), click OK and the print
server will appear in the list with the assigned IP address.
8. To verify that you have access to the print server’s Web pages, highlight the
print server in the list and select Server Home Page from the Server menu.
9. You have now finished the procedure of setting the IP address. Continue to
“Making Network Printers available for printing on your PC” on page 18.
If your print server does not appear in the serial number list, refer to the AXIS IP JumpStarter
online help files.
See Using AXIS ThinWizard for Print Server Management, on page 83 for
instructions on setting ip addresses with AXIS ThinWizard.
AXIS 540+/AXIS 560 17
Page 18

Basic Installation
Making Network Printers available for printing on your PC
Configuration
Methods
Installation Methods
Installation and
Integration
Once you have set the IP address of your print server, your network printer can
be added to any PC on your network. The method that you choose should be
dictated by your printing requirements and your supported network
environments. Select the appropriate method from the table below:
Refer to the table below to select the appropriate installation method. All Axis
client software is available on www.axis.com
Environment
Windows 2000, XP,
2003, NT
Windows 98, Me
UNIX/Linux
Method/
Client Software
No software necessary,
use Windows
Add Printer Wizard
Install AXIS Print Monitor
software, then use Windows Add Printer wizard
KDE Printtool
Printconf
YaST2 Printer Configuration Tool
Description
Used for adding network printers to your computer in
Windows 2000, XP, 2003, NT
Used for adding network printers to your computer in
Windows 98, Me
Used for installing network printers in Debian and
others
Used for installing network printers in Red Hat and
others
Used for installing network printers in SuSE
Sam Used for installing network printers in HP UX
Axis script developed for installing network printers
NetWare
Pure IP
NetWare
Macintosh
axinstall
NetWare Administrator Used for installing network printers in NetWare
AXIS Gateway Configuration Utility software
AXIS NetPilot software
Macintosh standard
methods in native/classic
mode
in UNIX/Linux for ptinting over PROS, LPR, FTP or Reverse Telnet protocols
Used for installing and configuring NDPS printers in
NetWare
Tool that runs on Windows platforms that for NetWare over IPX./SPX (Queue-mode)
Used for installing network printers in Macintosh
See also “IPP (Internet Printing Protocol)” on page 2. for information on
Internet printing over Large and Wide Area Networks.
18 AXIS 540+/AXIS 560
Page 19

Section 2 Adding Printers in Windows
Adding Printers in Windows
Overview of
Installation Methods
This section describes how to add network printers to a computer in Windows.
Refer to the table below to determine the most appropriate installation method
according to your computer environment:
Windows
Platform
Windows
2000, XP,
Server 2003
Windows 2000 NetBIOS/NetBEUI
Windows
NT 4
Windows
98/Me
Protocol Method See...
TCP/IP (LPR)
TCP/IP (LPR)
NetBIOS/NetBEUI
TCP/IP (LPR)
NetBIOS/NetBEUI
Windows Add Printer
Wizard
Microsoft
LPR Monitor
AXIS Print Monitor
software
Windows Add Printer
Wizard
Windows Add Printer
Wizard
AXIS Print Monitor
software
“Windows 2000/Windows XP/Windows
Server 2003” on page 20
“Adding Printers in Windows
2000/Windows XP/2003 using the Microsoft LPR Monitor” on page 23
Adding NetBIOS/NetBEUI Printers in
Windows 2000 using AXIS Print Monitor, on page 28
Adding Printers in Windows NT4 using
the Microsoft LPR Monitor, on page 24
“Adding Printers over NetBIOS/NetBEUI
in Windows NT 4 using AXIS Print Monitor” on page 29
“Adding Printers in Windows 98 and Me
over TCP/IP using AXIS Print Monitor”
on page 30
“Adding Printers in Windows 98 and Me
over NetBIOS/NetBEUI using AXIS Print
Monitor” on page 31
If you intend to use the print server in a multi-protocol environment, refer to
the chapters pertaining to the respective operating systems in this manual.
Client/Server Network For client/server printing, each computer sends print jobs through a network
server computer.
The printer must first be installed on the server computer (from the Add Printer
Wizard, AXIS Print Monitor) and then shared on the network, which makes it a
network printer. It will then appear as a Network Printer (in Windows’ Add
Printer Wizard and in AXIS Print Monitor) on the client computers. Each client
computer must install the appropriate printer drivers in order to print properly.
For Windows 98 and Me, it is only necessary to install AXIS Print Monitor on a server for
client/server printing.
Peer-to-Peer Network In Peer-to-Peer networks, each computer prints directly to the network printer.
The network printer appears as a Local Printer (in Windows’ Add Printer Wizard
and in AXIS Print Monitor), and needs to be added to each client computer that
wants to print. Each client computer must install the appropriate printer drivers
in order to print properly.
In Windows 98 and Me, AXIS Print Monitor must be installed on all (printing) client
computers for Peer-to-Peer printing.
AXIS 540+/AXIS 560 19
Page 20
Adding Printers in Windows
Windows 2000/Windows XP/Windows Server 2003
1. Windows XP/Windows Server 2003:
Go to Start | Printers and Faxes and click the Add a Printer icon to start
the Add Printer Wizard. Click Next.
Windows 2000:
Go to Start | Settings | Printers and click the Add Printer icon to start
the Add Printer Wizard. Click Next.
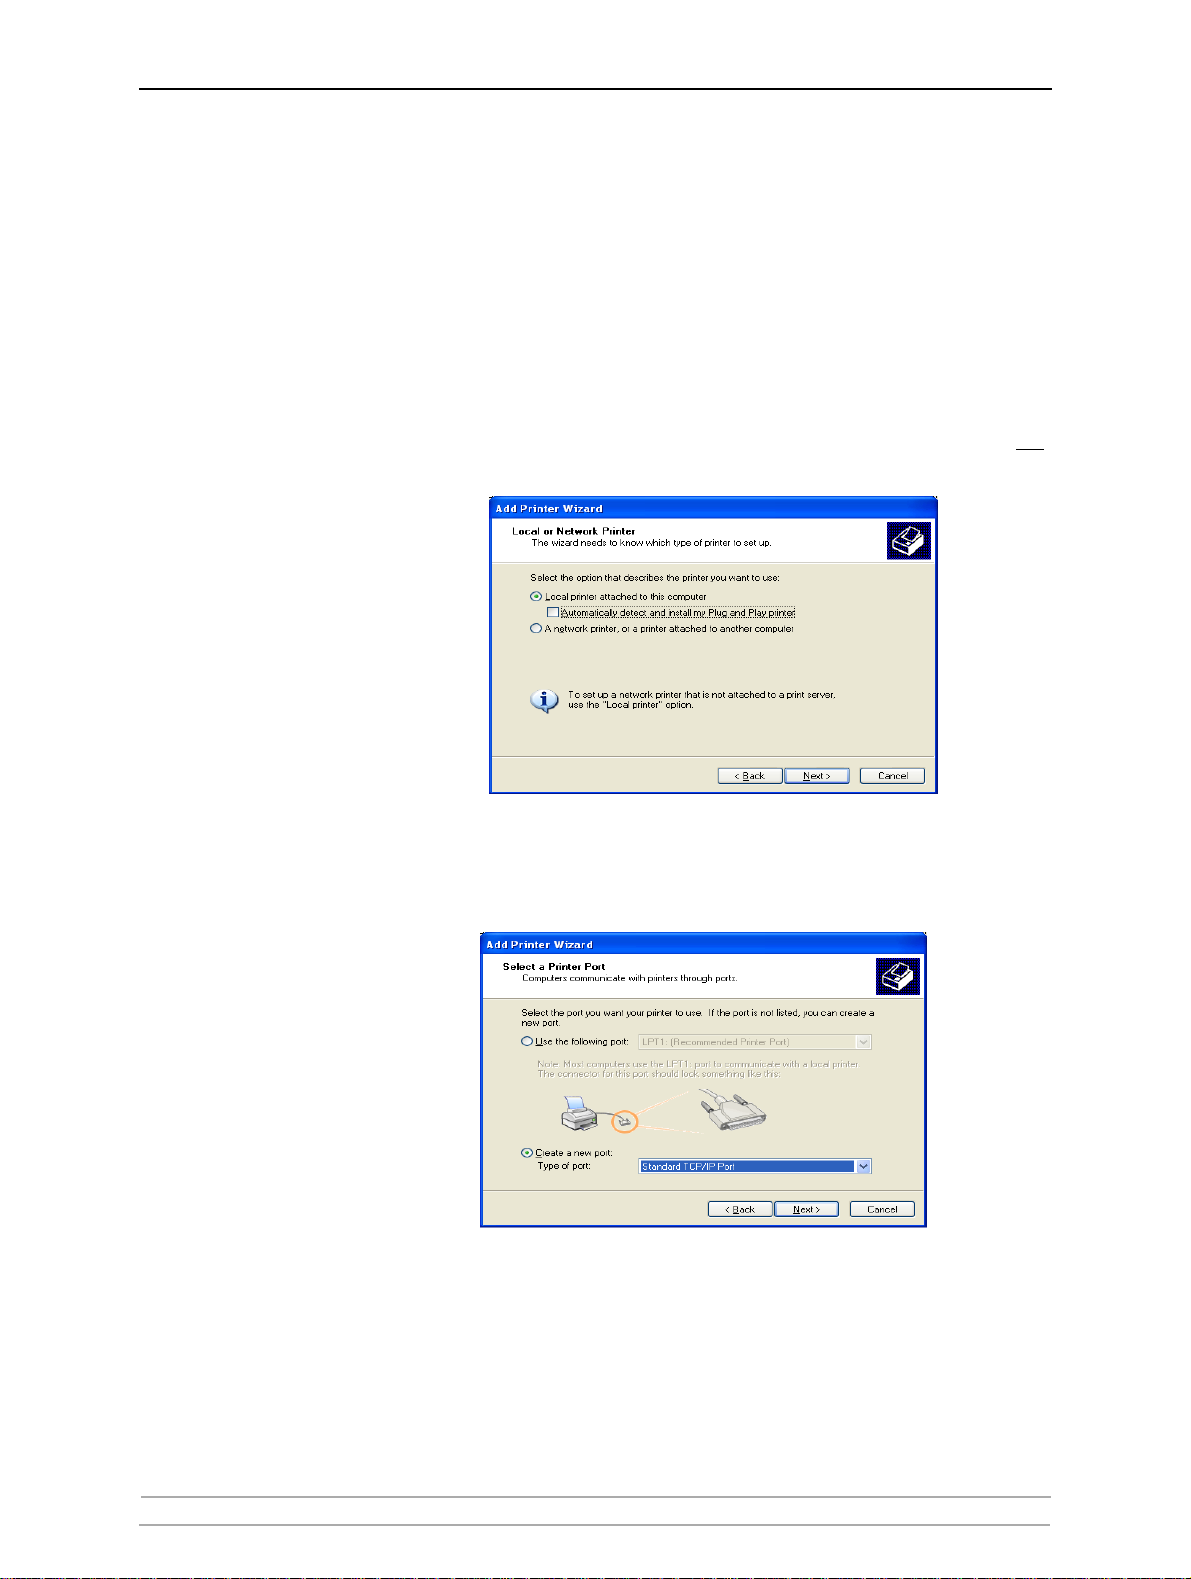
2. In the wizard, select Local Printer attached to this computer. Make sure the
Automatically detect and install my Plug and Play printer check box is not
checked. Click Next.
3. Click the Create a new port radio button and select Standard TCP/IP Port
from the list.
Click Next and the Add Standard TCP/IP Printer Port Wizard starts. Click
Next.
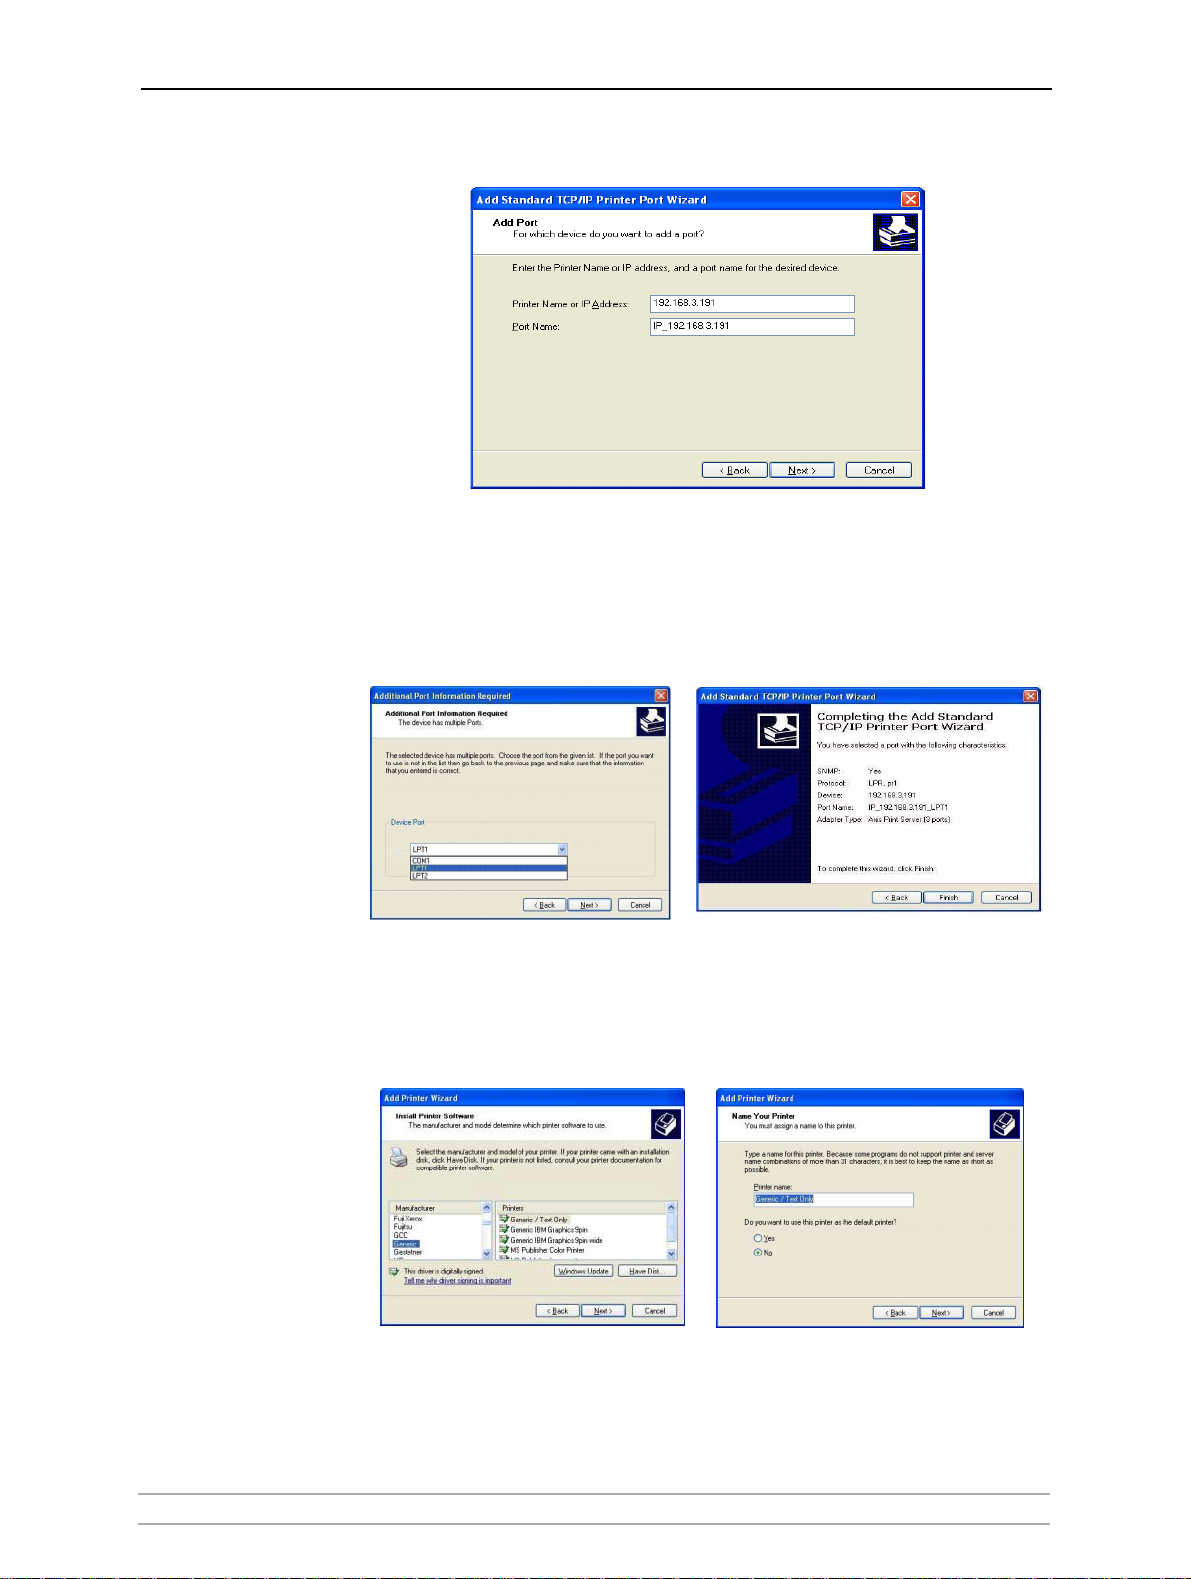
4. Enter the IP address of the print server in the Printer Name or IP Address field
(Example: 192.168.3.191)
The Port Name field will be filled in automatically when you enter the IP
address.
Optionally, add the port you want to use as a suffix
•_LPT1
•_LPT2
• _COM1
20 AXIS 540+/AXIS 560
Page 21
Adding Printers in Windows
(Example: 192.168.3.191_LPT1)
5. In the Additional Port Information Required window, select the Device Port
you want to use;
•LPT1
•LPT2
•COM1
Click Next then Finish
.
Click Next.
6. Select Manufacturer and Printer from the driver list or from a directory/file.
Click Next. If you already have the printer’s driver installed, you will be asked
whether to keep it or replace it.
7. Click Next. Supply a name for the printer and choose whether you want to
make it your default printer. Click Next.
AXIS 540+/AXIS 560 21
Page 22
Adding Printers in Windows
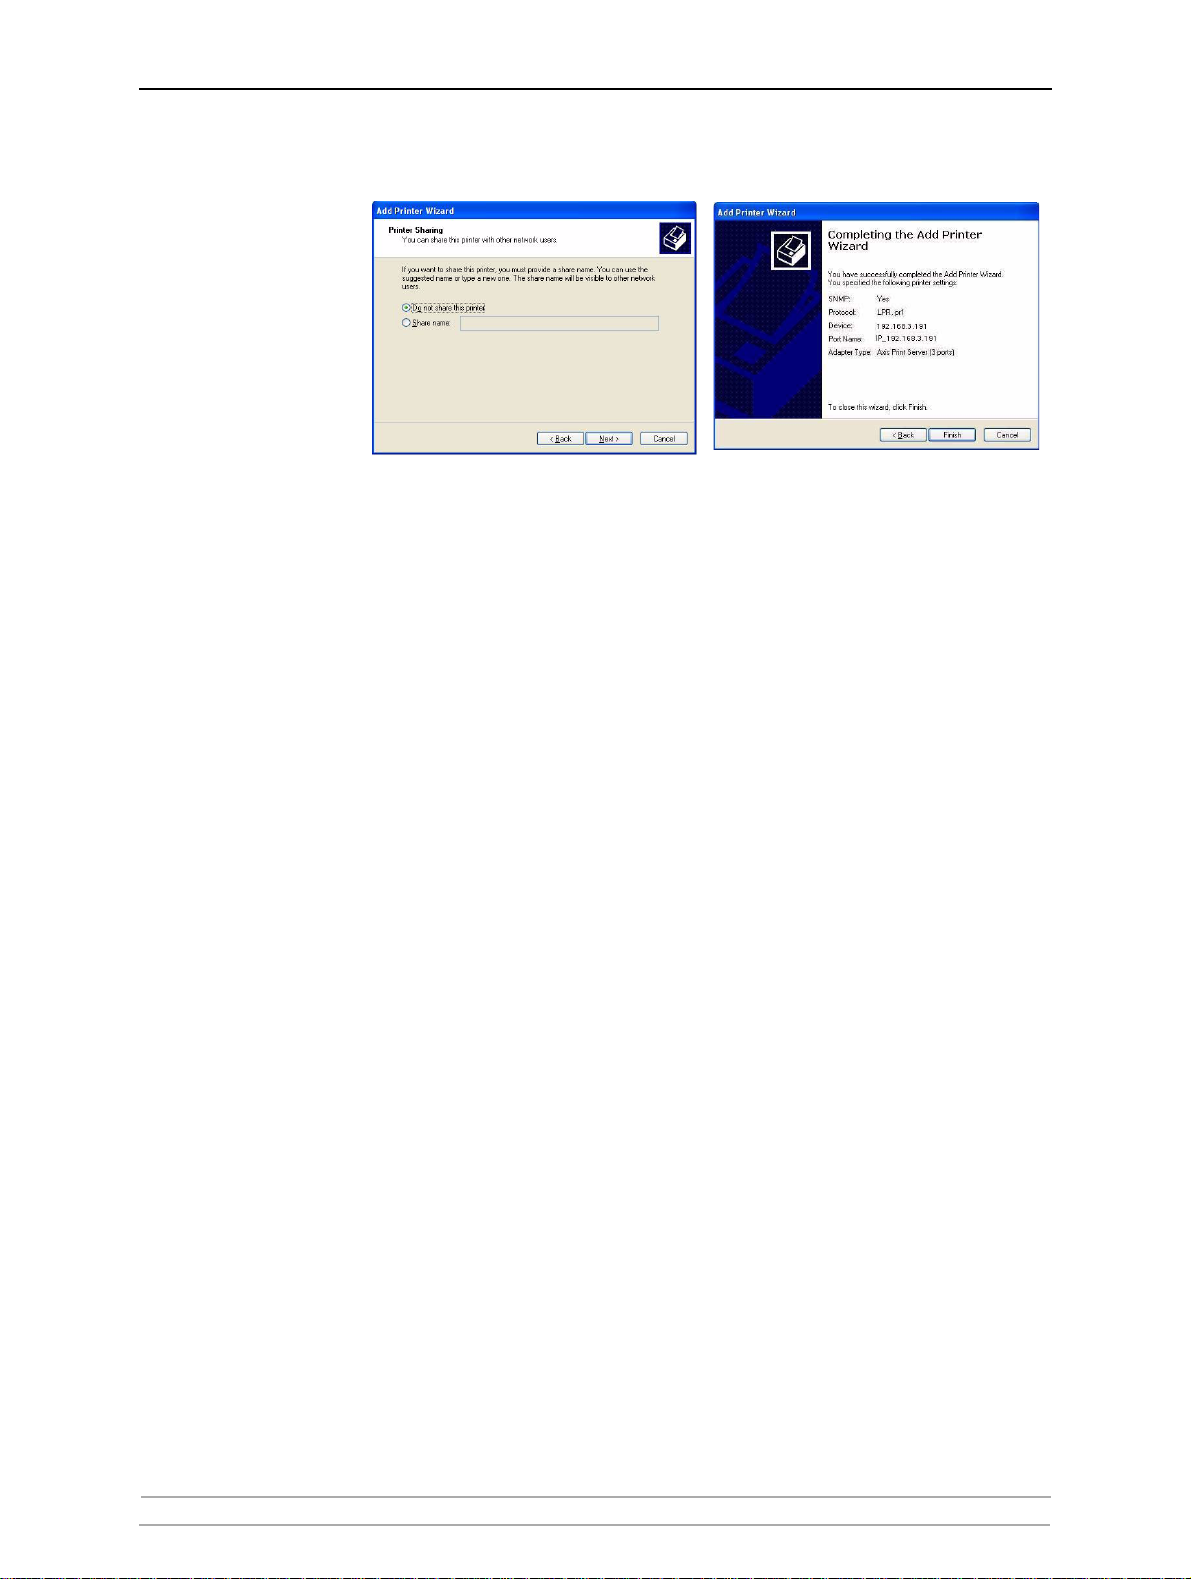
8. Choose whether you want to share the printer with other network users, print
a test page, etc. Select the appropriate radio button and click Next and Finish.
9. Print a test page to verify your installation.
You have now completed the installation.
22 AXIS 540+/AXIS 560
Page 23

Adding Printers in Windows
Adding Printers in Windows 2000/Windows XP/2003 using the Microsoft LPR Monitor
This section describes how to set up a Windows 2000/XP/2003 server for LPR
printing over the TCP/IP protocol, using the built-in Microsoft LPR Monitor i.e.
Print Services for UNIX.
Note:
See “Alternative Method for LPR Printing” on page 24 for instructions on
how to set up printing over LPR without installing Print Services for Unix.
Basic Setup If you have not already done so, you should perform the TCP/IP basic setup
procedures prior to installing a printer for LPR printing.
Preparing for
LPR Printing
Follow the following steps to prepare for LPR printing:
1. Open the Control Panel.
2. Click Add/Remove Programs.
3. Click Add/Remove Windows Components.
4. Check Other Network File and Print Services and click Details.
5. Check Print Services for Unix and click OK.
6. Click Next and Finish.
7. Close Add/Remove Programs and the Control Panel.
Installing an LPR
printer
Follow the instructions below to use the standard Windows method for
installing an LPR printer in Windows 2000/XP/2003:
Windows XP/2003: 1. Go to Start | Printers and Faxes and click the Add a Printer icon to start
the Add Printer Wizard. Click Next.
Windows 2000: 1. Go to Start | Settings | Printers and click the Add Printer icon to start
the Add Printer Wizard. Click Next.
2. Select the appropriate radio button: Local Printer. Click Next.
3. Click the Create a new port radio button and select LPR Port from the list.
Click Next.
4. Enter IP address (or host name) of the print server in the field Name and
address of server providing lpr (Example: 192.168.3.191) and enter the port
you want to use in the field Name of printer or print queue on that server
(Example: LPT1, LPT2, COM1). Click OK.
5. End the wizard in the usual manner: select Manufacturer and Printer,
keep/replace driver, name the printer, make it default or not, share it or not
and finally decide whether you want to print a test page.
AXIS 540+/AXIS 560 23
Page 24

Adding Printers in Windows
Client/Server Printing Select Network printer instead of Local Printer in Step 2 above if your print
server has already been installed by the administrator on another computer.
Follow the instructions in the Add Printer Wizard to complete the installation.
Important!
Alternative Method for
LPR Printing
• Make sure that the Automatically detect and install my Plug and Play printer checkbox
is not checked
• Press F1 to access the Windows online help system if you need additional help when
installing a printer/print server using this method.
If you wish to print over LPR but do not wish to install Print Services for Unix
you can do this by changing the printing protocol after having installed the
printer using the Standard TCP/IP method, see “Windows 2000/Windows
XP/Windows Server 2003” on page 20 for instructions.
Once the printer is installed, follow these instructions to change the printing
protocol:
1. Go to Start | Settings | Printers.
2. Double-click the installed printer.
3. Select Properties from the Printer menu.
4. Click the Ports tab.
5. Click the Configure Port button.
6. Click the LPR radio button and enter the queue name (PR1, PR2...).
7. Click OK to finish.
Adding Printers in Windows NT4 using the Microsoft LPR Monitor
If you have not already done so, you should perform the TCP/IP basic setup
procedures prior to installing a printer for LPR printing.
Preparing for
LPR Printing
In the Control Panel, double-click the Network icon. Select the Services tab. If
the TCP/IP Printing entry appears, then TCP/IP is already installed. Close the
Network folder and go on to Installing an LPR printer, below.
First, prepare for LPR printing:
1. Open the Control Panel and double-click the Network icon.
2. Select Protocols.
3. Add TCP\IP Protocol.
4. Select Services.
5. Add Microsoft TCP\IP Printing.
24 AXIS 540+/AXIS 560
Page 25

Adding Printers in Windows
Installing a Network
printer
1. Go to Start | Settings | Printers | Add Printer. Select My Computer and
click Next.
2. From the Available Ports list, choose the appropriate printer port, which will
appear as the IP address or host name of the print server. If it doesn’t appear
in the list, click Add Port.
3. Choose LPR Port from Available Printer Ports and click New Port.
4. Type the print server’s IP address (or host name) in the field Name or address
of server providing lpd (IP address example: 192.168.3.191). Enter which port
to use in the field Name of printer or print queue on that server (Example:
LPT1). Click OK and then Close.
5. The added print server will now appear in the Available Ports list. Click Next,
choose a driver and finish the installation as usual.
AXIS 540+/AXIS 560 25
Page 26

Adding Printers in Windows
AXIS Print Monitor Software
AXIS Print Monitor is the recommended tool to use for network printing in
Windows 98 and Me environments. AXIS Print Monitor is available free of
charge on www.axis.com
AXIS Print Monitor
Overview
AXIS Print Monitor allows the print server to be connected in the same simple
fashion as connecting a local printer. Once installed, it is automatically
initialized upon system startup. AXIS Print Monitor has been developed for
peer-to-peer printing, allowing your print jobs to be sent directly to the print
server.
Printing Environments AXIS Print Monitor supports printing over TCP/IP (LPR and Raw TCP) and
NetBIOS/NetBEUI. To enable printing in these environments, please ensure that
the desired printing protocols are running on your client.
Peer-to-Peer Printing The AXIS Print Monitor needs to be installed on each workstation to perform
peer-to-peer printing. Once installed, the AXIS Print Monitor allows you to
access all network printers, just as if they were connected directly to your
workstation.
Client/Server Printing AXIS Print Monitor needs only to be installed on one server to perform
client/server printing. The installed printers must be configured to be shared to
allow clients to use them. Pop-up messages should not be enabled on the
server as they will not be displayed on the client platforms.
Note:
AXIS Print Monitor can also be used for DOS printing. Please refer to the AXIS Print Monitor’s
Readme file for instructions. The Readme file is located in the same folder where AXIS Print
Monitor is installed on your PC.
26 AXIS 540+/AXIS 560
Page 27

Adding Printers in Windows
Adding Printers over TCP/IP in Windows NT 4 using AXIS Print Monitor
1. Install AXIS PrintMonitor on all workstations that will print via the print
server. AXIS PrintMonitor is available free of charge on www.axis.com
2. To start the Add Printer Wizard, select Settings | Printers from the Start menu
and double-click the Add Printer icon.
3. The Wizard asks you to select My Computer or Network printer server. Select
My Computer, click Next.
4. Click Add Port... In the Available Ports dialog, select AXIS Port and click New
Port...
5. Select LPR (TCP/IP) as your choice of protocol and click OK.
6. Enter the IP address or the host name of your print server (Example IP address:
192.168.3.191 or host name: AXIS181636).
In the Logical Printer Name field, enter the port you wish to use; LPT1, LPT2
or COM1. Click OK, click Close.
7. Select Manufacturer, Printers, choose a printer name and if you want to use
the printer as your default printer. Choose if you want to share the printer
and print a test page. Click Finish.
8. You may now configure the port, as described below.
Configure the Port: 1. Select Settings | Printers from the Start menu and highlight the printer
you wish to configure. Select File | Properties | Ports and click Configure
Port.
2. Choose whether error condition pop-up messages are to be displayed by
checking the box in the Configure AXIS Ports dialog. Define the frequency
at which the error messages should be displayed after retry. Click OK.
Even if the desired printer is available in the Manufacturers and Printers lists, you are advised
to use the print driver provided with the printer. This assures you of the latest driver software.
AXIS 540+/AXIS 560 27
Page 28

Adding Printers in Windows
Adding NetBIOS/NetBEUI Printers in Windows 2000 using AXIS Print Monitor
See to it that the NetBEUI protocol is installed on your client. Follow the
procedure below to install Axis Printer Ports from a Windows 2000
workstation:
1. To start the Add Printer Wizard, select Settings | Printers from the Start
menu and double-click the Add Printer icon. Start the installation by
clicking Next.
2. The Wizard asks you to select Local printer or Network printer. Select Local
printer. Click Next.
3. Click Create a new port. In the Available Ports dialog, select AXIS Port and
click Next.
4. Select NetBIOS/NetBEUI as your choice of network protocol and click OK.
5. Select the AXIS Port you want to add from the list of available ports. The port
appears as <name>.<port> (Example: AX100086.LP1). The <port> is taken
from the table below. Click OK.
Ports available Parallel port 1 Parallel port 2 Serial port
AXIS 540+ LP1 — —
AXIS 560 LP1 LP2 CM1
Note:
6. Choose the appropriate printer driver for your printer. Click Next and proceed
directly to step 9. It is only necessary to perform steps 7 - 8 if your printer
does not appear in the list.
Even if the desired printer is available in the Manufacturers and Printers
lists, you are advised to use the printer driver provided with the printer. This
assures you of the latest driver software.
7. Click the Have Disk... button. Insert the printer driver diskette/CD that was
provided with your printer, select the appropriate diskette/CD drive and click
OK.
8. Select the printer driver you want to install and click Next.
9. Enter an appropriate name for your printer and click Next.
10. Choose whether you want to share the printer with other network users and
click Next.
11. Choose whether you want to print a test page, click Next and then Finish.
28 AXIS 540+/AXIS 560
Page 29

Adding Printers in Windows
Adding Printers over NetBIOS/NetBEUI in Windows NT 4 using AXIS Print Monitor
See to it that the NetBEUI protocol is installed on your client. Follow the
procedure below to install Axis Printer Ports from a Windows NT 4.0
workstation:
1. Install AXIS PrintMonitor on all workstations that will print via the print
server.
2. To start the Add Printer Wizard, select Settings | Printers from the Start menu
and double-click the Add Printer icon.
3. The Wizard asks you to select My Computer or Network printer server. Select
My Computer. Click Next.
4. Click Add Port... In the Available Ports dialog, select AXIS Port and click New
Port...
5. Select NetBIOS/NetBEUI as your choice of network protocol and click OK.
6. Select the AXIS Port you want to add from the list of available ports. The port
appears as <name>.<port> (Example: AX100086.LP1). The <port> is taken
from the table below. Click OK.
Note:
Ports available Parallel port1 Parallel port 2 Serial port
AXIS 540+ LP1 — —
AXIS 560 LP1 LP2 CM1
7. Close the Printer Ports window.
8. Click the Configure Port... button. Choose whether error condition pop-up
messages are to be displayed by checking the box in the Configure Axis Ports
dialog. Define the frequency at which the error messages should be displayed
after retry. Click OK. Continue the installation by clicking Next.
9. Choose the appropriate printer driver for your printer. Click Next and proceed
directly to step 12. It is only necessary to perform steps 10-11 if your printer
does not appear in the list.
Even if the desired printer is available in the Manufacturers and Printers lists, you are
advised to use the printer driver provided with the printer. This assures you of the latest
driver software.
10. Click the Have Disk... button. Insert the printer driver diskette/CD that was
provided with your printer, select the appropriate diskette/CD drive and click
OK.
11. Select the printer driver you want to install and click Next.
12. Enter an appropriate name for your printer and click Next.
13. Choose whether you want to share the printer with other network users and
click Next.
14. Choose whether you want to print a test page and then click Finish.
AXIS 540+/AXIS 560 29
Page 30

Adding Printers in Windows
Adding Printers in Windows 98 and Me over TCP/IP using AXIS Print Monitor
1. Install AXIS PrintMonitor on all workstations that will print via the Axis
print server.
2. Next, start the Windows Add Printer Wizard: select Settings | Printers from
the Start menu and double-click the Add Printer icon.
3. After clicking Next in the first dialog, the Wizard asks you to select between
Local Printer and Network Printer. You must select Local Printer as the print
server emulates a local printer port. Click Next.
4. Choose the appropriate print driver for your printer. If the desired print driver
already appears within the displayed Manufacturers and printers lists,
highlight your selection, click Next and proceed directly to step 7. It is only
necessary to perform steps 5- 6 if your printer does not feature in the model
list.
5. Click the Have Disk... button. Insert the printer driver diskette/CD into the
appropriate disk drive of your computer.
6. Select the type of printer you want to install from the diskette/CD and click
Next. If you already have the printer’s driver installed, you will be asked
whether to keep it or to replace it.
7. Select the Printers@TCP/IP Port and click Next.
8. Enter an appropriate name for your printer and choose whether you want it
to be the default printer. Click Next.
9. In the next window, do not
10. The printer you have defined will now be displayed in the Printers Folder.
Right-click the printer object and select Properties.
11. Click the Details tab within the Properties page and then click Add Port to
display the available monitors.
12. Click the radio button “other”. Select AXIS Port and then click OK.
13. Select LPR (TCP/IP) as your choice of protocol and click OK.
14. Enter the IP address or the host name of your print server (Example IP address:
192.168.3.191 or host name: AXIS181636).
In the Logical Printer Name field, enter the port you wish to use; LPT1, LPT2
or COM1.
15. The TCP/IP port will then be added automatically to the list of available ports.
Click Apply and OK.
16. You may now configure the port, as described below. The Axis Printer Port is
now installed.
order a Test Page to be written, just click Finish.
30 AXIS 540+/AXIS 560
Page 31

Adding Printers in Windows
Configure the Port: 1. Select Settings | Printers from the Start menu and highlight the printer
you wish to configure. Select File | Properties | Details and click Port
Settings.
2. Choose whether error condition pop-up messages are to be displayed by
checking the box in the Configure AXIS Ports dialog. Define the frequency
at which the error messages should be displayed after retry. Click OK.
Note:
Even if the desired printer is available in the Manufacturers and Printers lists, you are
advised to use the print driver provided with the printer. This assures you of the latest
driver software.
Adding Printers in Windows 98 and Me over NetBIOS/NetBEUI using AXIS Print Monitor
Follow the procedures below to install Axis NetBIOS/NetBEUI printer ports on a
Windows 98 workstation, using AXIS Print Monitor:
1. To start the Add Printer Wizard, select Settings | Printers from the Start
menu and double-click the Add Printer icon.
Note:
2. After clicking Next in the first dialog, the Wizard asks you to select Local
printer or Network printer. Select Local printer. Click Next.
3. Choose the appropriate printer driver for your printer. If the desired printer
driver appears in the displayed Manufacturers and Printers lists, highlight
your selection, click Next and proceed directly to step 6. It is only necessary
to perform steps 4 - 5 if your printer does not appear in the model list.
Even if the desired printer is available in the Manufacturers and Printers
lists, you are advised to use the printer driver provided with the printer. This
assures you of the latest driver software.
4. Click the Have Disk... button. Insert the printer driver diskette/CD that was
provided with your printer, select the appropriate diskette/CD drive and click
OK.
5. Select the printer driver you want to install and click Next.
6. Select the AXIS Printer Port from the Available Ports list. The port names
appears as <name>.<port>. Here, <name> is AX followed by the last six digits
of the print server’s serial number (e.g. AX100086) and <port> is taken from
the table below. Click the Configure Port button.
Ports available Parallel port1 Parallel port 2 Serial port
AXIS 540+ LP1 — —
AXIS 560 LP1 LP2 CM1
Example: AX100086.LP1
AXIS 540+/AXIS 560 31
Page 32

Adding Printers in Windows
7. Choose whether error condition pop-up messages are to be displayed by
checking the box in the Configure AXIS Ports dialog. Define the frequency
at which the error messages should be displayed after retry. Click OK and
Next.
8. Enter an appropriate name for your printer and click Next.
9. Choose whether you wish to print a test page and click Finish.
32 AXIS 540+/AXIS 560
Page 33

Section 1 Adding Printers in Macintosh
Having connected the AXIS 540+/AXIS 560 to your network, this section now
describes how to set up your print server for printing in Mac OS X and earlier
Macintosh environments using AppleTalk.
If you intend to use the print server in a multi-protocol environment, refer to
the chapters pertaining to the respective operating systems in this manual.
Installation in Mac OS X
This section describes setting up your print server for printing in the Mac OS X.
1. Start Print Center (from Go | Applications | Utilities | Print Center)
2. Select Printers | Add Printer...
3. From the Printer List dialog, select AppleTalk.
4. Now, the port of your print server will appear in the list of available printers.
The port is shown as <host name>_<port>. Example: AXIS100086_LPT1.
Select the print server port you want to use.
Adding Printers in Macintosh
5. Select an appropriate printer driver for your printer from the Printer Model
drop-down list. If the printer is not available in the list, select Generic.
(You can also browse for a printer driver on your computer or network by
selecting Other... from the list.)
6. Click Add to complete the installation.
Note:
If you want to print using LPR, select:
1. Printers | Add Printer...
2. From the Printer List dialog, select LPR printers using IP.
3. Enter the IP address or host name of the print server in the LPR
printer’s Address field. You must uncheck
Server check box and enter a Queue Name:
Physical ports: LPT1, LPT2, COM1
Logical printer ports: PR1, PR2, PR, PR4, PR5, PR6, PR7, PR8
4. Choose a printer driver from the Printer Model list and click Add to
finish.
the Use Default Queue on
AXIS 540+/AXIS 560 33
Page 34

Adding Printers in Macintosh
Installation on MacOS 9.1 or older, using AppleTalk
Basic Configuration On MacOS 9.1 or older, basic configuration in AppleTalk is performed simply by
opening the Chooser window and selecting a printer.
You can change the default name of your print server or any of default
parameters by editing the print server’s config file. To access the config file
from a Macintosh, you can use:
• any Web browser with Javascript enabled
• FTP using MacTCP, Fetch or Anarchie
In order to use any of these methods, you must assign an IP address to the print
server as described in “Setting Parameters” on page 36.
Choosing a Printer
Selecting a Printer The method for choosing a printer varies depending on which version of
LaserWriter printer driver you are using.
Autodetect Printer
Type
• The LaserWriter 7.0 driver assumes that you use a standard PostScript
driver, and cannot take advantage of any printer specific features.
• The LaserWriter 8.0 driver uses PPD files that contain printer descriptions.
This gives you full control over any features your printer might have.
The print server can automatically detect the type of printer you are using if you enable Autodetect Printer Type. The print server can then recognize Epson and Hewlett Packard InkJet printers. Most Epson and Hewlett Packard InkJet printers that have Mac OS printer drivers for network printing are supported. Without the Autodetect Printer Type function, the AppleTalk printer type has to be specified manually in the print server. For Epson InkJets it would be "EPSONLQ2" and for HP InkJets it would be "DeskWriter". If the print server does not recognize the connected printer, the default setting "LaserWriter" will be used as printer type. "LaserWriter" is the recommended setting to be used with all PostScript printers.
To enable Autodetect Printer Type, log in to your print server’s Web interface
and select Admin | Network Settings | Detailed View | Macintosh | Auto
Detect Printer Type | Yes.
See the Help pages in the print server’s Web interface for details.
LaserWriter 7.0
Printer Driver
34 AXIS 540+/AXIS 560
Follow the instructions below to choose a printer:
1. Select Chooser from the Apple menu.
2. Click the LaserWriter icon.
3. If your network has more than one zone, click on the zone you want. (If your
network does not have any zones, this box will not appear.)
Page 35

Adding Printers in Macintosh
4. Click the name of the printer you want — the ports are shown as <host
name>_<port>. Example: AXIS100086_LPT1.
5. Click the Close box. This completes the configuration and closes the Chooser.
Repeat this procedure for each Macintosh computer on the network using the
print server.
LaserWriter 8.0
Printer Driver
Follow the instructions below to choose a printer:
1. Select Chooser from the Apple menu.
2. Click the LaserWriter 8.0 icon.
3. If your network has more than one zone click on the zone you want. (If your
network does not have any zones, this box will not appear.)
4. Click the name of the printer you want — the ports are shown as <host
name>_<port>. Example: AXIS100086_LPT1.
5. Click Setup... and then Auto Setup. If the selected printer supports bidirectional printing and the appropriate PPD file is available, the installation
is performed automatically and you can therefore proceed directly to step 7
(if this is not the case, the PPD file must be selected manually, as described
in step 6).
6. Choose the PPD file matching your printer, and click OK.
If your printer does not appear in the PPD file list, please contact your printer
vendor. Use the Generic PPD if you do not need any printer specific features.
7. Click OK, and then click the Close box. This completes the configuration and
closes the Chooser.
Repeat this procedure for each Macintosh computer on the network using the
print server.
Bi-directional
Support
The AXIS 540+/AXIS 560 allows the printer driver to communicate directly with
the printer and consequently facilitates complete functional control over print
jobs, e.g. automatic downloading of fonts not resident in the printer.
This functionality has backward compatibility with older printers and
Macintosh computers, which means that the AXIS 540+/AXIS 560 can generate
appropriate responses to Macintosh printer queries when the connected printer
does not support bi-directional communication.
Verifying the Setup You simply need to print a document from the Macintosh computer to verify
communication to the chosen printer. The basic installation can be considered
complete if the print test is satisfactory. The AXIS 540+/AXIS 560 is now ready
for use.
AXIS 540+/AXIS 560 35
Page 36

Adding Printers in Macintosh
BCP and TBCP You should specify if you want to enable or disable binary transfer of print data
Notes:
in the print server’s web interface (Admin | Network Settings | Detailed View
| Macintosh | Binary Protocol for Printer (1, 2). By enabling binary transfer
you reduce printing time, provided that the print job is sent as binary data to
the print server. This is particular true when you are printing large bitmaps.
• TBCP enables the print server to use the TBCP (Tagged Binary
Communication Protocol) to transfer print data to the printer. Select this
alternative when using Postscript printers.
• BCP enables the print server to use the BCP (Binary Communications
Protocol) to transfer print data to the printer. Select this alternative when
using Postscript printers.
• None disables all binary transfers, select this alternative for all nonPostScript printers and for ASCII PostScript printing.
• If you have have set the Auto-Detect Printer Type parameter to YES, the text output format
will be chosen automatically (Admin | Network Settings | Detailed View | Macintosh |
Auto Detect Printer Type | Yes).
• Some printers, e.g. Epson InkJet printers, can not be used when TBCP is enabled.
Setting Parameters In AppleTalk, you can change a limited number of the parameters of the AXIS
540+/AXIS 560, such as:
• enable and disable binary data transfers for your printing
• select the type of binary transfer protocol to use
• specify the AppleTalk printer type
• set the IP address
However, by assigning an IP address to your print server, you have access to all
of the print server parameters via any standard Web browser or via FTP. Refer
to Section 1 Print Server Management, on page 86 for more information.
Follow the instructions below to set the print server parameters in AppleTalk:
Important:
DO NOT use the parameter values from this example when configuring your print server. You
should select values that are appropriate for your printers and network settings.
1. Open the Chooser from the Apple menu.
2. Select a network printer driver — any LaserWriter will do.
3. Select the printer port ending with _CFG.
4. Close the Chooser.
5. Open a text editor, e.g. SimpleText.
36 AXIS 540+/AXIS 560
Page 37

Note:
Note:
Adding Printers in Macintosh
6. Write a text file containing the parameters you want to set:
BINARY_TYPE_1. :BCP
INT_ADDR. :192.168.3.191
ATYPE_1. :EPSONLQ2
Parameters that you do not want to set should be excluded from the text file. Refer to the
Parameter list in this manual for information about which values that are valid for each
parameter.
7. Print the text file. The settings will be stored in the print server.
8. Open the Chooser and select the printer port you wish to use for printing
documents.
9. Close the Chooser.
The _CFG port disappears 60 minutes after the AXIS 540+/AXIS 560 has been powered on. If
you want it to reappear, you must restart your print server.
AXIS 540+/AXIS 560 37
Page 38

Setting Up - NetWare
Section 2Setting Up - NetWare
This section describes how to continue the installation of the AXIS 540+/AXIS
560 in the NetWare environment. Identify which transport protocol you are
running on your network and which installation method you should use.
Continue the installation by selecting the appropriate installing instructions
from the table below:
Installation
method
NDPS TCP/IP
iPrint iPrint over LPR See “Setup using iPrint” on page 53.and
Queue-based
printing
Transport
protocol
IPX/SPX
iPrint over IPP See “Setup using iPrint” on page 53.and
IPX/SPX
Basic
Configuration
IPX/SPX
Advanced
configuration
Action
See “Setup using NDPS” on page 39.
- Public Access Printers, on page 40
- Controlled Access Printers, on page 44
See “Install a printer using AXIS LPR Gateway Configuration
Snapin” on page 55.
See “Install a printer with AXIS IPP Gateway Configuration
Snapin” on page 55.
To install using the AXIS NetPilot Installation Wizard,
See “Basic Setup with AXIS NetPilot” on page 58..
If you need a more advanced installation that is not covered by
the AXIS NetPilot Installation Wizard,
See “Advanced Installation using AXIS NetPilot” on page 60..
See “NetWare Administration” on page 64. for information on Novell’s
administration tools.
If you intend to operate your AXIS 540+/AXIS 560 in a multi-protocol, mixed
environment, you should also proceed to the other relevant sections in this
manual.
38 AXIS 540+/AXIS 560
Page 39

Setup using NDPS
Note:
Setting Up - NetWare
The AXIS 540+/AXIS 560 supports Novell Distributed Print Services (NDPS). You
can run NDPS over Pure IP (TCP/IP) or IPX/SPX.
Before the AXIS 540+/AXIS 560 can be installed, make sure that NDPS is
installed and a Broker is loaded on your NetWare file server.
Axis Network Print Server uses the AXIS NDPS Gateway for printing in networks
using either IP or IPX as transport protocols. The printer gateways are included
with the NDPS software (from version 5.1 and up) and are automatically
installed together with NDPS.
NDPS requires that you run NetWare 4.11 or higher. Pure IP is only supported by NetWare 5 or
higher.
Installing the Axis
Network Print Server
in the NDPS
environments
Important:
Having assigned an IP address to the AXIS 540+/AXIS 560 as described in
Assign an IP Address to the Print Server, on page 13, you are now ready to install
the Axis Network Print Server for NDPS printing. You can select to install the
connected printers as public or controlled access printers. Follow the
instructions below to install the Axis Network Print Server using NDPS:
• The NDPS Enabled parameter of the Axis Network Print Server must be set to Yes in order for
the communication between the print server and the NDPS gateway to be enabled. To change
this parameter, log in to the print server’s web pages and choose: Admin => Network Settings=> Detailed View=> NetWare=> NDPS Enabled => Yes.
• If you do not have an NDPS Manager object available, start out with creating one in the NetWare Administrator.
AXIS 540+/AXIS 560 39
Page 40

Setting Up - NetWare
Public Access Printers Follow these instructions to create a public access printer using the NDPS
Manager object in your NetWare administrator utility:
1. Double-click on the NDPS Manager object you will be using to control the
Printer Agents.
2. On the Identification page for the NDPS Manager, click the printer Agent List
button. The Printer Agent List dialog will appear.
3. Click New. The Create Printer Agent dialog will appear.
4. Type a name of your choice in the NDPS Printer Agent field
5. Select the Axis Gateway configuration in the Gateway Type window.
6. Click OK
7. In the Select the printer’s type window, choose your printer. If you cannot
find the printer, select an appropriate Generic one (PCL, PS, etc)
8. Select TCP/IP (default) or IPX as network protocol. Click Next.
40 AXIS 540+/AXIS 560
Page 41

Setting Up - NetWare
9. You will find the print server in the next window with the printer attached
on the connected port. Depending on the transport protocol you used when
you start the installation, the print server should appear as following:
• TCP/IP Network protocol:
IP Address and Port, e.g: 192.168.70.243 and LPT1
Only the ports with a connected printer show up in this window. If the
printer is not in the displayed print list, click Manually specify the print
server and do the following:Enter the Print Servers’ IP address in the IP
Address Field and choose a port in the Print Server Port field:
e.g., 192.168.70.243 and LPT1
The available ports are:
Ports available Parallel port 1 Parallel port 2 Serial port
AXIS 540+ LPT1 — —
AXIS 560 LPT1 LPT2 COM1
IPX Network protocol:
All the available ports will be presented, regardless if the printers are or not
connected to those ports, e.g.
LPT1
LPT2
COM1
AXIS5FF66A_P1
AXIS5FF66A_P2
AXIS5FF66A_P3
AXIS 540+/AXIS 560 41
Page 42

Setting Up - NetWare
The IPX Addresses for the above printers will appear as:
<IPX External Network Number>:<Print Server’s HW address>:<Socket
Number>
i.e.: 01d7e1c2:00408c5ff6a6:400c
where 400c, 401c, and 402c are the socket numbers corresponding the
LPT1, LPT2 and COM1 physical ports:
LPT1
LPT2
COM1
400c
401c
402c
If the printer is not in the displayed print list, click Manually specify the
print server and do the following:
1. Enter the <IPX External Network Number> in the Network field.
2. Enter the <Print Server’s HW address> in the LAN HW address field.
42 AXIS 540+/AXIS 560
Page 43

Setting Up - NetWare
3. Choose a port in the Print Server Port field, e.g. 01d7e1c2:00408c5ff6a6
and LPT1
The ports are LPT1, LPT2 or COM1.
Ports available Parallel port 1 Parallel port 2 Serial port
AXIS 540+ LPT1 — —
AXIS 560 LPT1 LPT2 COM1
4. When done, select your printer and click Finish.
5. Next, select the printer drivers for each client operating system. (Windows
2000, Windows NT4 and Windows 95/98). These drivers will be automatically
downloaded to users’ workstations when they install this printer in the future.
6. Click Continue and OK in the next NDPS window. The new Printer Agent
appears in the Printer Agent List window.
Check the Status: it should be Idle.
AXIS 540+/AXIS 560 43
Page 44

Setting Up - NetWare
7. Press Cancel to close the NDPS Manager
To install the printer on the workstation, See “Installing an NDPS Printer on a
Workstation” on page 49.
Controlled Access
Printers
Follow these steps to create a controlled access printer as an object in the
Directory Tree, using the NetWare administrator utility:
1. Log in as Admin.
2. Start the NW Admin utility on any Workstation
(SYS:PUBLIC\WIN32\nwadmin32.exe).
3. Browse the context your NDPS Manager resides in.
4. From the Object menu, select Create. The New Object dialog appears.
5. Select NDPS Printer. The Create NDPS Printer dialog appears.
6. Type a name of your choice in the NDPS Printer Name field, e.g.
AXIS5FF66A_IPX1
In the Printer Agent Source field, select the source of the Printer Agent. The
following options are available:
- Create a New Printer Agent. If you select this option, you are asked to select
either the Novell Gateway or a third party Gateway.
- Printer Agent on Existing NDS Object. Use a Printer already configured
as a controlled access printer (NDPS Printer Object).
If you select this option, a list of current NDPS Printer Objects in this container
will be displayed from which you can select the one you want to use.
- Public Access Printer Agent. Use an existing Printer Agent repr esenting a
Public Access Printer.
44 AXIS 540+/AXIS 560
Page 45

Setting Up - NetWare
7. Select Create a New Printer Agent and click Create to display the Create
Printer Agent dialog.
8. Confirm the Printer Agent name (default is the name of the new printer you
are creating) and browse to select the NDPS Manager to which you want to
assign it
9. Select AXIS Gateway Configuration in the Gateway Type field.
10. Click OK.
11. In the Select the printer’s type window choose your printer. If you cannot
find the printer, select an appropriate Generic one (PCL, PS, etc)
12. Select TCP/IP (default) or IPX as network protocol.
13. Click Next.
AXIS 540+/AXIS 560 45
Page 46

Setting Up - NetWare
14. You will find the print server in the next window with the printer attached
on the connected port.
Depending on the transport protocol you used when you start the installation,
the print server will appear as:
• TCP/IP Network protocol:
IP Address and Port, e.g: 192.168.70.243 and LPT1
Only the ports with a connected printer will show up in this window.
If the printer is not in the displayed print list:
1. Click Manually specify the print server enter the Print Servers’ IP address
in the IP Address field and choose a port in the Print Server Port field e.g.,
192.168.70.243 and LPT1:
The avaialable ports are LPT1, LPT2 or COM1:
Ports available Parallel port 1 Parallel port 2 Serial port
AXIS 540+ LPT1 — —
AXIS 560 LPT1 LPT2 COM1
46 AXIS 540+/AXIS 560
Page 47

Setting Up - NetWare
IPX Network protocol:
All the available ports will be presented, regardless if the printers are or not
connected to those ports.
LPT1
LPT2
COM1
AXIS5FF66A_P1
AXIS5FF66A_P2
AXIS5FF66A_P3
The IPX Addresses for the above printers will appear as:
<IPX External Network Number>:<Print Server’s HW address>:<Socket
Number>
i.e.: 01d7e1c2:00408c5ff6a6:400c
where 400c, 401c, and 402c are the socket numbers corresponding the
LPT1, LPT2 and COM1 physical ports:
LPT1
LPT2
COM1
400c
401c
402c
If the printer is not
in the displayed print list:
AXIS 540+/AXIS 560 47
Page 48

Setting Up - NetWare
1. Click Manually specify the print server and enter the <IPX External
Network Number> in the Network field.
2. Enter the <Print Server’s HW address> in the LAN HW address field and
choose a port in the Print Server Port field:
e.g.: 01d7e1c2:00408c5ff6a6 and LPT1.
The port numbers are LPT1, LPT2 or COM1.
Ports available Parallel port 1 Parallel port 2 Serial port
AXIS 540+ LPT1 — —
AXIS 560 LPT1 LPT2 COM1
3. When done, select your printer and click Finish.
4. Next, select the printer drivers for each client operating system. (Windows
2000, Windows NT4 and Windows 95/98). These drivers will be automatically
downloaded to users’ workstations when they install this printer in the future.
48 AXIS 540+/AXIS 560
Page 49

Setting Up - NetWare
5. Click Continue and OK in the next NDPS window. Your printer will appear as
an NDS object in the Directory Tree and will offer a full range of network
security options.
To install the printer on the workstation, See “Installing an NDPS Printer on a
Workstation” on page 49.
Installing an NDPS
Printer on a
Workstation
Using Novell Printer
Manager
To install the printer on a workstation, use either Novell Printer Manager
(NetWare 5.1 only) or the Add Printer Wizard on the local workstation.
1. Log in as Admin.
2. On the any workstation, browse to
<NW 5.1 File Server>\SYS:PUBLIC\Win32
and start Nwpmw32.exe (Novell Printer Manager).
The Novell Printers dialog appears, displaying a list of installed Public or
Controlled printers (if any printers have previously been installed on the
workstation).
3. From the Printer Manager’s Printer pull down menu, select New.
AXIS 540+/AXIS 560 49
Page 50

Setting Up - NetWare
4. Click Add. A list of available printers appears.
5. The list of available printers shows the NDPS Public Access Printers on the
network and the NDPS Controlled Access Printers in you current NDS context.
To see the Controlled Access Printers in other context that you have rights
to, click the Browse button and select your choice. Click OK.
6. Once selected, click Install. The Novell Printers – Install dialog appears.
50 AXIS 540+/AXIS 560
Page 51

Setting Up - NetWare
7. Click OK. The default driver for that printer is then automatically downloaded.
If the printer object does not have a printer driver associated with it, or a driver
was not found, you will be prompted to either to choose from a list of printer
drivers provided by NDPS or to provide a disk with the appropriate driver.
The Novell Printers dialog appears with the new printer, e.g.
AXIS5FF6A6_IPX1
in the installed list.
8. Click Close.
In the Novell Printer Manager window the new installed NDPS printer appears
with the name e.g. AXIS5FF6A6_IPX1
and is available for print jobs.
9. Verify by clicking Start - Settings - Printers on the workstation.
AXIS 540+/AXIS 560 51
Page 52

Setting Up - NetWare
Using the Add Printer
Wizard
1. Click Start on your workstation, select Settings =>Printers. There might be
some differences regarding this menu depending of MS Operating System
you are running.
2. Start the Add Printer Wizard on the workstation. The Add Printer Wizard
dialog will appear. Click Next.
3. Select Network printer and click Next.
4. Click Next again in the Locate Your Printer dialog (Win2000/XP) or press the
Browse button (Win9X)
5. Browse to the NDPS Printers. Expand either the NDPS Controlled Access
Printers or the NDPS Public Access Printers folder, select your newly installed
NDPS printer and follow the instructions.
When you have completed these steps, you are ready to start printing.
Notes:
• The Public Access print servers are immediately available for everyone on the network
• The Axis Gateway Configuration Utility is an installation and configuration tool for NDPS
printers in the NetWare environment.
The Axis Gateway will appear in NetWare 5.1 and later releases. You can download the Axis
Gateway Configuration Utility for use with earlier versions of NetWare from www.axis.com.
• To print using TCP/IP, Axis print server firmware 6.1 or later is required. In order to print using
IPX/SPX, Axis print server firmware 5.51 or later is needed.
52 AXIS 540+/AXIS 560
Page 53

Setup using iPrint
Setting Up - NetWare
iPrint is Novell's next generation of printing software that lets users print to
and from all destinations.
A standard Web page displays available printers to the user.
By clicking a printer, the iPrint client is installed (if not installed previously), the
printer's driver is downloaded, and a printer is created in the user's Printer
folder, enabling the user to send documents to the printer from any application
on the desktop.
Before setting up iPrint printers, make sure that you meet all the iPrint Setup
requirements. See the Novell iPrint Administration Guide for instructions on
installing, configuring, and customizing iPrint.
AXIS Print servers can be installed as iPrint printers, either by using the Novell
LPR gateway (LPR on IP) or the AXIS Gateway Configuration Snap-in for iPrint.
Axis provides two free Snap-ins for iPrint:
• AXIS LPR Gateway Configuration
• AXIS IPP Gateway Configuration
When you install Service Pack 6 (16 April 2003) for NetWare 5.1 or later and
Service Pack 3 (16 April 2003) for NetWare 6.0 or later, the AXIS LPR Gateway
Configuration will automatically be installed and configured on the NetWare
Servers and ready for use.
Installing AXIS IPP
Gateway
Configuration Snap-
in for NetWare 6.0
The AXIS IPP Gateway Configuration Snap-in for NetWare 6.0 can be
downloaded for free from www.axis.com. Follow the instructions below to
install the AXIS IPP Gateway Configuration Snap-in for NetWare 6.0, if you
want to add it in your iPrint environment.
1. Download the free axisIPP-snap-in.zip file from www.axis.com and unzip
it in a temporary directory.
2. Make sure the the NetWare Enterprise Web Server was previously installed
on the server. Otherwise, install it.
3. Novell iPrint uses the NDPS infrastructure, so make sure that all the NDPS
requirements have been met:
• Make sure that the BROKER.NLM is loaded. If it isn’t, type LOAD
BROKER in the server console prompt and select the name of the
Broker.
• Make sure that the NDPS Manager object is created in the Novell
Directory Services (NDS) tree. Refer to your Novell documentation for
creating this object.
• Make sure that the NDPSM.NLM is loaded. If it isn’t, type LOAD NDPSM
in the server console prompt and select the appropriate NDPS Manager.
AXIS 540+/AXIS 560 53
Page 54

Setting Up - NetWare
4. Shutdown Tomcat and the NetWare Enterprise Web Server on the NetWare
file server by executing the following commands:
Type "NSWEBDN" <Enter>
Type "TOMCAT33 -STOP" <Enter>
Type "NVXADMDN" <Enter>
5. Map the next available drive (e.g. G:) to the root of volume SYS on your
NetWare server.
From the temporary directory where axisIPP-snap-in.zip has been unzipped,
run the batch file AxisIPP.bat (default G:).
If the drive G: is not available, you have to edit the batch file and change the
drive to next available one.
Check that each line in the batch file is executed without failure.
6. Restart Tomcat and the NetWare Enterprise Web Server on the file server by
executing the following commands:
Type "TOMCAT33" <Enter>
Type "NVXADMUP" <Enter>
Type "NSWEB" <Enter.
7. Access the iManager web page on the NetWare server by opening the
following URL:
https://<IP address of NW server>:2200/eMFrame/iManager.html
You have to authenticate.
8. Click on iPrint Management on the left pane and select Create Printer.
9. On the right pane, verify that the newly installed AXIS IPP Gateway
Configuration is under the Gateway type drop-down menu.
If not, it may be necessary to restart the NetWare server.
Now you are ready to use the AXIS IPP Gateway Configuration for installing
iPrint printers. You have to have Administrator rights to install the printers
through iPrint.
54 AXIS 540+/AXIS 560
Page 55

Setting Up - NetWare
Install a printer with
AXIS IPP Gateway
Configuration Snapin
1. Use an AXIS 540+/AXIS 560 and connect a printer to any port.
2. Connect the print server to the network.
3. Connect the power supply.
4. Start both the printers and the print server.
5. Log in as Admin.
6. Use a web browser and the local host URL to login into iManager on your
NetWare server.
7. Open your browser to the following URL:
https://<IP address of NW server>:2200/eMFrame/iManager.html
You have to authenticate.
8. Click on iPrint Management on the left pane.
9. Click on Create Printer.
10. Choose a name of your choice for the printer
11. Choose the context wher e the printer will be installed.
12. Browse for the NDPS Manager and select it.
13. In the Gateway Type drop-down list, choose the Axis IPP Gateway
Configuration. Press Next.
Install a printer using
AXIS LPR Gateway
Configuration Snapin
14. In the Printer URL, you may choose either the IPP version 1.0 format:
http://<IP address of your print server>:631/lptx
or the IPP version 1.1:
ipp://<IP address of your print server>/lptx
where x is the port number. Click Next.
15. Select default drivers for your printer. Click Next and OK.
1. Use an AXIS 540+/AXIS 560 and connect a printer to whatever port you
want.
2. Connect the print server to the network.
3. Connect the power supply.
4. Start both the printers and the print server.
5. Log in as Admin.
6. Use a web browser and the local host URL to login into iManager on your
NetWare server.
7. Open your browser to the following URL:
https://<IP address of NW server>:2200/eMFrame/iManager.html You have
to authenticate.
8. Click on iPrint Management on the left pane.
AXIS 540+/AXIS 560 55
Page 56

Setting Up - NetWare
9. Click on Create Printer.
10. Choose a name for the printer.
11. Choose the context wher e the printer will be installed.
12. Browse for the NDPS Manager and select it.
13. In the Gateway Type drop-down list, choose the Axis LPR Gateway
Configuration. Click Next.
14. Choose either the IP address or the DNS Name for your print server.
15. Under Printer name, select the physical printer port, e.g. LPT1, or logical
printer port pr1-pr8 using the drop-down list. Click Next.
16. Select default drivers for your printer. Click Next and OK.
56 AXIS 540+/AXIS 560
Page 57

Setting Up - NetWare
Installing the iPrint
Printer on the
Workstation
Installing the iPrint
Printer using the
iPrint Client.
An iPrint printer can by locally installed on the workstation in two ways:
• Using the iPrint Client
• Using the MS Add Printer Wizard at the workstation.
See “Using the Add Printer Wizard” on page 52.)
In order for users to use iPrint, they need to install the Novell
®
iPrint Client
software and a printer. When a user selects a printer to be installed by iPrint,
iPrint checks to see if the Novell iPrint Client software is installed and then
installs it if necessary. Then the printer driver is downloaded and the printer is
installed in the user's Printer folder.
In order for iPrint to work properly, the workstation should have the following:
• Windows 95/98/Me or Windows NT*/2000/XP
• Web browser with JavaScript enabled:
• Microsoft Internet Explorer 5.0 or later
• Netscape 4.76 (iPrint is not supported on Netscape 6)
The user should use the following iPrint url:
http://<IP address of your NW server>:631/IPP
1. From a Netscape or Internet Explorer browser, enter the provided URL.
A Web page displays a listing of available printers to install and a link to
install the client software.
2. Select Install iPrint client software to locally install the iPrint printers. If you
try to install a printer before installing the iPrint client software, you will be
prompted to install the client software first.
If you associate a printer driver with a printer being installed, the driver is
automatically installed on the user's workstation. If the driver already exists,
that driver is overwritten even if it is a newer driver.
3. After installing a printer, it is added to the user's Printer folder. Users can print
to the printer by selecting it from any application.
AXIS 540+/AXIS 560 57
Page 58

Setting Up - NetWare
Basic Setup with AXIS NetPilot
Install the AXIS NetPilot software on your computer. AXIS NetPilot runs on
Windows 98 and Windows NT.
Starting the
Installation
Follow the instructions below to install the AXIS 540+/AXIS 560 with AXIS
NetPilot:
1. Start AXIS NetPilot by double-clicking the NetPilot icon, which is located
in the folder where you installed AXIS NetPilot.
2. Locate the Axis Network Print Server in the ‘New Axis Units’ folder. Select it
and click the Install button on the AXIS NetPilot toolbar. If your network is
large, it could take a few seconds before the print server appears in the folder.
3. Choose the with Installation Wizard option.
The AXIS NetPilot Installation Wizard guides you through the installation
process. The following options are available:
Note:
The number of options varies according to the number of environments you enable.
Print Server Name The default print server name consists of the characters ‘AXIS’ followed by the
last six digits of the serial number. If you want to change the print server name,
just type the new name in the available text field.
58 AXIS 540+/AXIS 560
Page 59

Setting Up - NetWare
Environments Choose which networking environments you want to configure the Axis
Network Print Server for, e.g. NetWare, TCP/IP, Windows & OS/2 or Macintosh.
If your network comprises various different platforms, you can enable any
combination of environments.
NetWare NDS Place NetWare Print Queues on a specific bindery server, or alternatively into
an NDS Tree.
The IP address Choose the method the Axis Network Print Server should employ for obtaining
an IP address. DHCP, ARP, RARP, BOOTP and Auto-IP are supported. You can
also select to set the IP address manually. Refer to Assign an IP Address to the
Print Server, on page 13 for further information about setting the IP address.
Print Queues The Axis Network Print Server uses the print server name followed by the
printer port as the default Print Queue names and print server port names. If
you want to change the default printer queue names, just type the new names
in the available text fields.
AXIS 540+
Environment
NetWare AXIS1A0003_LPT1_Q
Windows & OS/2 AX1A0003.LP1
AppleTalk AXIS1A0003_LPT1
Default Print Queue Names and Print Server Port Names
for each of the operating environments.
Default Names
AXIS 560
Environment
NetWare
Windows & OS/2
AppleTalk
Default Print Queue Names and Print Server Port Names
for each operating environment.
Default Names
AXIS1A0003_LPT1_Q
AXIS1A0003_LPT2_Q
AXIS1A0003_COM1_Q
AX1A0003.LP1
AX1A0003.LP2
AX1A0003.CM1
AXIS1A0003_LPT1
AXIS1A0003_LPT2
AXIS1A0003_COM1
Test Page The final user prompt in the Installation Wizard allows you to print a test page
through NetWare. The test page displays the name of all the NetWare servers
the Axis Network Print Server is connected to and shows the status of each
connection.
Unless you want to connect or create additional printing queues, the
installation for the NetWare environment is now completed.
AXIS 540+/AXIS 560 59
Page 60

Setting Up - NetWare
Notes:
• The parameters entered during installation are not permanent; they can be altered at any
time according to your network printing requirements.
• No serious or permanent damage will be caused if you make a mistake during installation.
If you find, at any time, that printing is not satisfactory, the parameters can easily be
changed to tune the system to your requirements.
• For information on advanced functions, please refer to the AXIS Network Print Server
Technical Reference. You can download this or other technical information over the Internet by accessing www.axis.com
Advanced Installation using AXIS NetPilot
Having installed your Axis Network Print Server print server in accordance with
the basic installation procedures described in Basic Setup with AXIS NetPilot, on
page 58, your Axis Network Print Server print server should now feature in the
‘Network Print Servers’ folder located in the AXIS NetPilot main window.
NetWare Network
Environment Window
Connecting
Print Queues
The NetWare Network Environment window allows you to connect additional
print queues to your Axis Network Print Server as well as create new ones.
Follow the steps below to gain access to the NetWare Network Environment
window:
1. Select the required Network Print Server from the ‘Network Print Server’
folder.
2. Choose Network from the Setup menu or click on the Network icon on the
AXIS NetPilot’s toolbar.
3. If you are not logged on to your NetWare file server, a dialog box will ask you
to log on.
The Axis Network Print Server periodically updates the configuration by
scanning the NDS tree or, in the case of NetWare versions 3.x, the designated
file servers.
Follow the steps below to connect a print queue to the print server port:
1. Open the NetWare ’Network Environments’ window.
2. Select the print server port you want to connect.
60 AXIS 540+/AXIS 560
Page 61

Setting Up - NetWare
3. Click the Connect... button. The Connect NetWare Print Queues window
appears.
The AXIS NetPilot Connect NetWare Print Queues window
4. Select the tree or server location of the print queue from the Resources box.
5. Select an existing print queue to connect to the server port, or create a new
print queue by clicking on Create Queue... If you have selected an existing
queue, advance to step 8. Continue with step 6 only if you want to create a
new queue.
6. Type the queue name in the Create Queue dialog window. If you want to
create a queue in the NDS tree you must also enter the name of the volume
where the queue will be located. Click OK.
7. Select the newly created queue from the queue list.
8. Select Print Server Mode or Remote Printer Mode. If you selected Print
Server Mode, advance directly to step 11, otherwise continue with step 9.
9. Select an appropriate NetWare Print Server name, that will be associated with
the Axis Network Print Server print server, by using the Browse... button.
AXIS 540+/AXIS 560 61
Page 62

Setting Up - NetWare
Notes:
• You cannot type or edit the name manually.
• Make sure that you have PSERVER.NLM running if you selected Remote Printer Mode in step
8.
10. If you want to define a remote printer number slot manually, check the
Manual box and type the desired number in the box.
11. Click the OK button to return to the Network Environments window.
Basic Queue-based printing over IP
Axis print servers with software version 6.0 or later allow users to print in a
Pure IP environment using traditional queue-based printing (which usually uses
the IPX transport protocol). Note that only NDS queue-based printing is
supported.
In the NetWare Pure IP environment, you must use the NetWare Administrator
to create the printer, print server and queue objects.
Installing the
Axis Network Print
Server
Follow the instructions below to install the Axis Network Print Server in the
NetWare Pure IP environment:
1. Start the Configuration Wizard from the User mode in the Axis Network
Print Server Web interface.
2. Click your way through the Wizard until reaching the NetWare page.
3. Set the parameters on the NetWare page:
• PSERVER NDS Tree (example: NW5TREE)
or
PSERVER NDS File Server: (example: FILESERVERNAME)
• PSERVER NDS Distinguished Name:
(example: AXISXXXXXX.<context>, where <context> is the container
where you want to create your print server)
62 AXIS 540+/AXIS 560
Page 63

Setting Up - NetWare
Setting the PSERVER parameters in the Axis Network Print Server Web interface.
4. Use the NetWare Administrator to create the printer, print server and queue
objects in the NDS tree and then link them together. The Print Services Quick
Setup (Non-NDPS) utility can be used for this. Go to Tools in the NetWare
Administrator.
Note:
Queue-based Printing
Methods
5. Use the Add Printer Wizard on your work station to install the printer on your
client. Note that only NDS queue based PSERVER printing is supported. When
installing, choose Network Printer and browse to the queue you have just
created. Alternatively, choose Local Printer and select the queue you have
just captured.
Any configuration and management of the Axis Network Print Server can be
performed from any standard Web browser. Please refer to Using a Web
browser, on page 79.
If both the IPX and IP protocols are enabled in your network and the print
server uses DUAL_STACK (enabled by default) as its network transport protocol,
then IPX will be chosen. To force the print server to use the IP transport
protocol, go to your print server’s web interface and choose Admin | Detailed
View | NetWare and change the NetWare Transport Protocol from
DUAL_STACK to IP_ONLY. Save and exit when finished.
Pure IP requires that you run NetWare 5 or higher.
The following overview explains the advantages and limitations of the two
supported queue-based printing methods.
Print Server Mode The Axis Network Print Server logs in to a file server(s) and repeatedly polls the
print queues for print jobs. In this fashion, the Axis Network Print Server
emulates a NetWare print server, which is a workstation running PSERVER. It
provides high printing speed with low network load and is the recommended
mode for medium to large sized networks. Each print server in PSERVER mode
takes one NetWare user license.
AXIS 540+/AXIS 560 63
Page 64

Setting Up - NetWare
Advantages • High performance: up to 1 Mbyte/s
Limitations • In bindery mode, this printing method requires a NetWare user licence for
each Axis Network Print Server to file server link.
Remote Printer Mode The Axis Network Print Server acts as Remote Printer for PSERVER.NLM running
on the NetWare file server, or to a dedicated workstation running PSERVER.EXE.
In this fashion, the Axis Network Print Server emulates a workstation running
the NetWare remote printer software RPRINTER, or NPRINTER. This mode is
only recommended for small networks where the number of NetWare user
licences is a major issue.
Advantages • NetWare user licences are not required.
Limitations • Lower performance, typically 20 - 70 kbytes/s for NLM and higher network
load.
Using Novell Utilities After installing the Axis Network Print Server into the NetWare environment,
you can manage your Axis Network Print Server, using either Novell’s NetWare
Administrator, or PCONSOLE.
NetWare Administration Some useful features provided by the NetWare Administrator are described in
more detail below:
Printer Status
The Printer Status menu, detailed below, shows the status of an active print job
serviced by an Axis Network Print Server network print server. It displays
detailed information concerning the active job including, Print Queue, print job
description, size of print file, percentage of job completed, etc. You can also
abort or pause the print job from this menu.
Notification
You can use the NetWare Administrator to enable or disable status notification
messages for printers connected to the AXIS 540+/AXIS 560, e.g. Busy, Off-line,
Out of paper, Paper jam, etc. You can also add or remove print job owners and
administrators from the list of persons to be notified.
Print Layout
You can view installed AXIS 540+/AXIS 560 and their relative print queues for
any NetWare Organizational Unit. You can also display summary information
by right-clicking on the printer object you want to examine.
64 AXIS 540+/AXIS 560
Page 65

Section 1 Adding Printers in UNIX/Linux
Print Tools
For printer configuration, printtool and printconfig are the most common. How
they are invoked depends on which distribution and window manager you use.
AIX SMIT is the recommended printing tool. It contains an integrated printer driver
list, but does not have printer detection functionality.
Instructions:
Type the command smit in a Terminal window, then click Print Spooling.
Debian printtool is the recommended printing tool. The program contains an integrated
printer driver list, but does not have printer detection functionality.
Instructions:
Adding Printers in UNIX/Linux
Type the command printtool in a Terminal window to start the graphical
version.
HP UX Sam is the recommended printing tool. It doesn’t provide an integrated printer
driver list, nor printer detection functionality.
Instructions:
Type the command sam in a Terminal window, click Printers and Plotters and
then click Actions and Add_Remote Printer/Plotter.
Mandrake printerdrake is the recommended printing tool. It contains an integrated printer
driver list, but does not have printer detection ability.
Red Hat printconf is the recommended printing tool. The program contains an
integrated printer driver list, but does not have printer detection functionality.
Instructions:
Type the command printconf-gui in a Terminal window to start the
graphical version.
You can also run printconf as a text-based application if you do not have the X
Window System installed, or if you prefer the text-based interface. Log in as
root (or use the command su to temporarily change to the root user), and type
the command /usr/sbin/printconf-tui from a shell prompt.
AXIS 540+/AXIS 560 65
Page 66

Adding Printers in UNIX/Linux
Solaris 9 The printing tool is called Printer Administrator. This operating environment has
an integrated printer driver list, but does not have printer detection
functionality.
Instructions:
Type the command /usr/sadm/admin/bin/printmgr in a Terminal
window.
SuSE YaST2 is the recommended printing tool. It contains a printer driver list as well
as printer detection capability.
Instructions:
To start the Printer Configuration tool, select this from the Desktop:
YaST2 menu button (on the panel) | In Yast Control Center | Hardware
| Edit Printers
Notes:
• A versatile IPP client for UNIX/Linux is CUPS. It can be downloaded from the Common Unix
Printing System’s Web site at www.cups.org
• If you don't find your specific printer in your distribution, have a look at
http://www.linuxprinting.org/database.html
Typical Invocation via a Windows Manager
Using the Mandrake 8.2 distribution (with CUPS installed) and the KDE
windows manger as an example, a typical set-up begins with starting
Mandrake Control Center.
1. Click Hardware | Printer and the Printerdrake application will be invoked.
2. Click Expert Mode to be able to add a network printer.
3. Click the Add a new printer button.
66 AXIS 540+/AXIS 560
Page 67

Adding Printers in UNIX/Linux
Print Queues Five types of print queues can be configured in the Mandrake distribution:
•Local Printer
• Printer on remote lpd server
• Network printer (TCP/Socket)
• Printer on SMB/Windows 95/98/NT server
• A printer device URl
4. Select the Network printer radio button and click Next.
5. Enter the IP address or host name of the print server as well as the port you
want to use. Port numbers available for TCP/IP are:
Port number LPT1 LPT2 COM1
AXIS 540+ 9900
AXIS 560 9900 9902 9901
6. Click Next.
7. Fill in data to help users identify the printer, i.e. name, description and
location. Click Next.
8. Select printer model and click Next.
9. Configure the printer and click Next. The printer is set up. Click Finish and
the printer is accessible.
Typical Invocation from a Terminal Window
Still using Mandrake as an example, open a Terminal Window and type the
command
start (as described above). If you do not have the X Window System installed,
the command will start a text based version. The same information as was
described above will be needed.
Note: In Mandrake, even if you type
automatically start.
printtool. If you are in a terminal window, the graphic version will
printtool at a shell prompt, printerdrake will
AXIS 540+/AXIS 560 67
Page 68

Adding Printers in UNIX/Linux
Debian 3.0
Debian offers a choice between plain LPD, LPRng and CUPS. There are several
printer configuration tools in this distribution, e.g. the apsfilter (version 5 or
later), which adds support for LPRng and Ghostscript's uniprint driver scheme.
Red Hat's printtool is also supported, for those who prefer GUI administration
tools.
For LPRng, LPD and CUPS use the Printtool.
Invocation 1. From the Gnome desktop, select Main Menu (on the panel) => Debian
2. On the KDE desktop, select the Main Menu (on the Panel) => System =>
menus => Apps => System => Printtool.
Debian => Printtool.
Print Queues Five types of print queues can be configured with printconf in the Debian
Adding a Remote Unix
Printer
3. Open a terminal window and type the command
printtool (in XTERM or
Gnome).
distribution:
• Local Printer
• Unix Printer (lpd Spool
• Windows Printer (SMB)
• Novell Printer (NCP Queue)
•JetDirect Printer
1. Start printtool and click Add.
2. Select Remote Unix (lpd) Queue from the Printer Type menu, and click OK.
Text fields for the following options appears:
• Printer name — Enter a unique name for the printer. (The name
cannot contain spaces and must begin with a letter. Valid characters
are a - z, A - Z, 0 - 9, -, and _.
• Remote Host — The hostname or IP address of the remote machine
to which the printer is attached.
• Remote Queue and input filter — The remote printer queue and
input filter.
3. Click Next to continue. Click Select to choose a printer driver and to set it up.
4. Click OK. Finally, click Test and print a test page.
68 AXIS 540+/AXIS 560
Page 69

Red Hat 7.3
Adding Printers in UNIX/Linux
Printtool has been replaced by Printconf. The utility maintains the /etc/printcap
configuration file, print spool directories, and print filters.
Note: If you type
printtool at a shell prompt, printconf will automatically start.
Invocation 1. On the Gnome desktop, select the Main Menu button (on the Panel) =>
Programs => System => Printer Configuration to start the graphical
version.
2. On the KDE desktop, select the Main Menu button (on the Panel) => Red
Hat => System => Printer Configuration to start the graphical version.
3. Type the command
printconf -gui at a shell prompt (for example, in an
XTerm or a Gnome terminal) to start the graphical version.
4. You can also run
printconf as a text based application if you do not have
the X Window System installed, or you just prefer the text based interface.
To run it, log in as root (or use the command
the root user), and type the command
/usr/sbin/printconf -tui from
su to temporarily change to
a shell prompt.
Print Queues Five types of print queues can be configured with
printconf in the Red Hat
distribution:
• Local Printer
• Unix Printer (lpd Spool)
• Windows Printer (SMB)
• Novell Printer (NCP Queue)
•JetDirect Printer
Important!
• Do not edit the /etc/printcap file. Each time the printer deamon (lpd) is started /restarted, a
new /etc/printcap file is dynamically created.
• If you want to add a printer without using printconf, edit the /etc/printcap.local file. The
entries in /etc/printcap.local are not displayed in printconf but are read by the printer
daemon.
• If you upgrade your system from a previous version of Red Hat Linux, your existing
configuration file is converted to the new format used by printconf. Each time a new
configuration file is generated by printconf, the old file is saved as /etc/printcap.old.
• If you add a new print queue or modify an existing one, you need to restart the printer
daemon (lpd) for the changes to take effect.
• Clicking the Apply button saves any changes that you have made and restarts the printer
daemon. The changes are not written to the /etc/printcap configuration file until the
printer daemon (lpd) is restarted. Alternatively, you can choose File => Save Changes and
then choose File => Restart lpd to save your changes and then restart the printer daemon.
• If a printer appears in the main printer list with the Queue Type set to INVALID, the printer
configuration is missing options that are required for the printer to function properly. To
remove this printer from the list, select it from the list and click the Delete button.
AXIS 540+/AXIS 560 69
Page 70

Adding Printers in UNIX/Linux
Adding a Remote
Unix Printer
Important!
1. To add a remote UNIX printer, such as one attached to a different
UNIX/Linux system on the same network, click the New button in the main
printconf window.
2. Select Unix Printer from the Queue Type menu, and click Next.
3. Enter a unique name for the printer in the Queue Name text field. The printer
name cannot contain spaces and must begin with a letter a through z or A
through Z. The valid characters are a through z, A through Z, 0 through 9,
-, and _. Click Next.
Text fields for the following options appear:
Server — The hostname or IP address of the remote machine to which
the printer is attached.
Queue — The remote printer queue. The default printer queue is
usually lp.
By default, the Strict RFC1179 Compliance option is not chosen. If
you are having problems printing to a non-Linux lpd queue, choose
this option to disable enhanced LPRng printing features.
4. Click Next to continue. The next step is to select the type of printer that is
connected to the remote system.
Selecting the Print
Driver
The remote machine must be configured to allow the local machine to print on the desired
queue. As root, create the file /etc/hosts.lpd on the remote machine to which the printer is
attached. On separate lines in the file, add the IP address or hostname of each machine which
should have printing privileges.
If you are configuring a local printer, select the print driver from the list. The
printers are divided by manufacturers. Click the arrow beside the manufacturer
for your printer. Find your printer from the expanded list, and click the arrow
beside the printer name. A list of drivers for your printer will appear. Select one.
Then finish the wizard in the usual manner.
70 AXIS 540+/AXIS 560
Page 71

SuSE 8.0
Adding Printers in UNIX/Linux
The printing system on SuSE Linux is based on an apsfilter, with some
enhancements; SuSE's apsfilter will recognize all common file formats
(including HTML, if html2ps is installed).
There are two ways to setup printers on SuSE systems:
• YaST2 will let you configure "PostScript", "DeskJet" and "Other
printers", supported by Ghostscript drivers; it's also possible to setup
HP's GDI printers (DeskJet 710/720, 820, 1000, via the "ppa" package).
YaST2 will provide /etc/printcap entries for every printer ("raw", "ascii",
"auto" and "color", if the printer to configure is a color printer). YaST2
will create spool directories and it will arrange apsfilterrc files, where
you're able to fine tune some settings (Ghostscript preloads, paper size,
paper orientation, resolution, printer escape sequences, etc.). With
YaST2 it's also possible to setup network printers (TCP/IP, Samba, or
Novell NetWare Printer).
• SuSE includes the regular SETUP program from the original apsfilter
package (with some enhancements); run
lprsetup to invoke this
configuration script. Once you get accustomed to its GUI, you'll be able
to configure local and network printers.
Invocation of YaST2 On the Gnome desktop select YaST2 Menu Button (on the panel) => Yast
Control Center => Hardware => Edit Printers to start the Printer
Configuration tool. On the KDE desktop select YaST Menu Button (on the
panel) => Yast2 modules => Hardware => Edit printers to start the graphic
version.
Print Queues SuSE and YaST2 differ between these printer connections:
• Local printers (Parallel, Serial and Disk File)
• LPD protocol network printing (Forward queue to a remote LPD and
Prefiltered queue for an LPD forwarding queue)
• Other network printing (Samba/Windows, Novell)
The SuSE installation manual explains the setup procedures in detail.
AXIS 540+/AXIS 560 71
Page 72

Adding Printers in UNIX/Linux
AXIS axinstall Script
Having performed the basic TCP/IP setup procedures as defined earlier in this
manual, you are now able to print in interactive mode using PROS, LPR, FTP or
Reverse Telnet protocols.
However, if you want to integrate the AXIS 540+/AXIS 560 with your host
spooler, you can use the Axis automatic installation script axinstall. This utility
software is resident in the print server and can be downloaded to your host
using FTP, so no disks are required. The axinstall script is also available from
www.axis.com
Having completed this operation, the printer connected to the print server will
appear as though it is directly connected to the host printer spooler.
If you intend to use the print server in a multi-protocol environment, refer to
the chapters pertaining to the respective operating systems in this manual.
Integration with the Host Printer Spooler
To integrate the AXIS 540+/AXIS 560 with the host printer spooler, you can use
the auto installation script axinstall, resident in the print server. Follow the
instructions below to install axinstall onto your host using FTP:
1. Login to the print server using the command:
ftp <host name>
-or-
ftp <IP address>
2. Enter root as user id and pass as password.
3. Download the script using the command:
get axinstall
Log out using the command
> ftp npserver
connected to npserver.
220 AXIS 560 FTP Print Server v6.43 March 23 2003
ready.
Name (npsserver:thomas): root
331 User name ok, need password
Password: pass
230 User logged in
ftp> get axinstall
200 PORT command successful.
150 Opening data connection for axinstall
(192,36,253,4,13,223), (mode ascii).
226 Transfer complete.
local: axinstall remote: axinstall
61187 bytes received in 14 seconds (4.2 kbytes/s)
ftp> bye
221 Goodbye.
quit, bye or exit depending on your FTP version.
(not visible)
Typical FTP session for downloading the axinstall script
72 AXIS 540+/AXIS 560
Page 73

Note:
Adding Printers in UNIX/Linux
The axinstall script has now been downloaded to your host. Execute the script
with this command:
sh axinstall or sh ./axinstall (depending on your system).
You will be guided through the installation by a step-by-step procedure. During
the installation you will be asked to select a print method; we suggest you
choose LPD or, for more functionality, use the PROS filter or named pipe
methods. Please refer to the following pages if you need guidance on the
choice of print methods.
NLPRng is not supported by axinstall.
The axinstall script will suggest one of the systems listed below when started. If
you do not find the suggestion appropriate, then manually select any of the
systems listed.
1....SunOS 4 (SUN BSD, Solaris 1.x)
2....SunOS 5 (SUN SYS V, Solaris 2.x)
3....AIX (IBM RS/6000, BULL DPX 20)
4....HP-UX (HP 9000)
5....BOS (BULL DPX 2)
6....DEC OSF/1 (Digital Equipment, Alpha)
7....ULTRIX (Digital Equipment, DEC)
8....IRIX (Silicon Graphics, SGI)
9....SCO UNIX (Santa Cruz Operation)
10...SCO UnixWare 2.x
11...SCO UnixWare 7
12...SCO OpenServer
13...FreeBSD (Berkeley UNIX)
14...Linux
15...Generic BSD (Berkeley UNIX)
16...Generic SYS V R3 (UNIX System V Release 3)
17...Generic SYS V R4 (UNIX System V Release 4)
Systems supported by axinstall
AXIS 540+/AXIS 560 73
Page 74

Adding Printers in UNIX/Linux
Print Methods on TCP/IP Networks
The AXIS 540+/AXIS 560 supports several different print methods in the TCP/IP
environment. axinstall will suggest a print method suitable for your particular
UNIX/Linux system, but you might want to use another method depending on
your printing requirements (banner pages, status logging, etc).
The diagram below shows the alternative data paths taken by some of the
UNIX/Linux print methods. This illustrates some of the advantages and
limitations of the different methods. Use the following information to
determine which method to adopt.
File to
Print
!
DIRECT
FTP
RTELNET
Print
Spooler
Printer
Axis Network Print Server
Illustration of different UNIX/Linux print methods
Filter/
Interface
Model
LPD FTP
RTELNET PROS B
PROS A
Devices
Parallel Port
Named Pipe
PROS print
daemon
Directly
connected
printer
LPD The Line Printer Daemon is a protocol for transferring print jobs between hosts.
This is the recommended method for UNIX/Linux systems, but some System V
versions do not support LPD.
Advantages:
Easy to set up — install the AXIS 540+/AXIS 560 as a remote queue in
System V, or add a remote printer to
/etc/printcap using the rm and rp
fields (BSD).
Limitations:
Spooler features, and
printcap or lpr options (BSD) such as multiple
copies, are not available.
FTP The File Transfer Protocol is used for transferring files between hosts.
Advantages:
Uses industry standard network software on the host.
Limitations:
No printer status logging. In the case of BSD it may conflict with other
input or output filters and does not allow both input and output filters. In
System V no filters or interface programs can be used.
74 AXIS 540+/AXIS 560
Page 75

Adding Printers in UNIX/Linux
PROS A protocol developed at Axis. Comes in two versions;
named pipe (PROS A) and filter (PROS B).
PROS A
Advantages
The AXIS 540+/AXIS 560 appears as a device to the system. This makes all filter
and model options available. It provides accounting and status logging.
Supports bi-directional printing. The printer information read back can be
viewed in a log file.
PROS A
Limitations
A ‘C’ compiler is required to build the PROS A drivers.
Note:
You can download a ‘C’ compiler from http://www.gnu.org/
PROS B
Advantages
PROS B
Limitations
It provides accounting and status logging. Supports bi-directional printing. The
printer information read back can be viewed in a log file.
A ‘C’ compiler is required to build the PROS B drivers and in the case of BSD, it
may conflict with other input or output filters. It does not allow both input and
output filters. Interface programs can not be used in System V.
Reverse Telnet Often used for printing via a terminal server printer port. Only recommended if
you already have a Reverse Telnet driver installed.
Advantages: Easy to set up with previously installed Reverse Telnet drivers.
Limitations: No status logging. Drivers are not supplied with the print server. Existing drivers
may be slow.
Other UNIX/Linux
Systems
Most UNIX/Linux systems resemble either BSD or System V and so with some
ingenuity, a solution can also be devised for other variants.
If the system has BSD socket type networking support, then
bsd directory of the AXIS 540+/AXIS 560) can be used as a starting point. It
receives print data from
written to
stdout.
Alternatively, FTP may be used. It is a good idea to use
sysv/ftp_sysv as a starting point.
IBM MVS Systems A sample JCL script,
It gives an example of how to print a file from an MVS mainframe to an AXIS
540+/AXIS 560 using FTP.
prosbsd (in the
stdin, and writes a log file to stderr. Nothing is
bsd/ftp_bsd or
jclex, is available in the mvs directory of the print server.
AXIS 540+/AXIS 560 75
Page 76

Updating the Firmware
Section 1 Updating the Firmware
Upgrading the Firmware
You can upgrade the AXIS 540+/AXIS 560 firmware using one of the following
methods:
• AXIS ThinWizard (TCP/IP)
• From the print server’s internal Web pages (TCP/IP)
•FTP (TCP/IP)
Note:
Updating instructions are supplied with the firmware release notes.
Upgrading from the
Print Server’s Internal
Web Pages
Upgrading using
AXIS ThinWizard
Follow these instructions to upgrade the firmware of your print server from its
internal Web pages (flash loading over the Web):
1. Open your Web browser, enter the IP address of your print server and
press Enter. (See “Print Server Management” on page 86 for detailed
instructions on accessing your Axis print server on the Web).
2. From the Admin mode, click the Firmware Upgrade button. From here you
can upgrade your print server with the latest available firmware.
AXIS ThinWizard 3.0 is a tool that enables batch upgrading of several print
servers and can be used for upgrading the print server’s firmware in TCP/IP
networks.
You must assign an IP address to the print server, as described earlier in this
manual, before you can use this upgrading method.
Follow the instructions below to upgrade your print servers using AXIS
ThinWizard:
1. Click the Firmware button. The Firmware Wizard starts.
2. Browse through the upgrading tips and click Next > when you are done.
Select Latest Available Version. Click Next >.
3. Select the servers you want to upgrade, by checking the correct upgrade
boxes. Click Next >.
4. Enter the default User ID and Password of the servers you selected in the
previous step. Select whether you want AXIS ThinWizard to verify the
password immediately or when the upgrading job has started, by checking
the appropriate box. Click Next >.
5. If you do not have a default password, just click Next >. If some of your
servers use a different User ID or Password than the default entries, they will
be displayed in the Remaining servers list. Enter the User ID and Password
for each individual server. Click Next >.
76 AXIS 540+/AXIS 560
Page 77

Updating the Firmware
6. Name the upgrade job. This is optional, so you can leave the field blank if
you want. Click the Start button to start the upgrading job.
Refer to “Using AXIS ThinWizard software for Print Server Management” on
page 94, for more information about AXIS ThinWizard.
Upgrading using FTP To upgrade over the network using FTP you will need a file with the new print
server firmware. The name of this file is in the form
product_version.bin.
You can use any of the previously mentioned methods to obtain the new file.
You must assign an IP address to the AXIS 540+/AXIS 560before you can use
this upgrading method.
Caution!
Be careful not to interrupt the file transfer. If the transfer is interrupted, the AXIS 540+/AXIS
560 may have to be re-initialized by your dealer.
The objective of this example is to upgrade a print server with firmware version
6.41 to firmware version 6.43.
This description from Windows XP uses the following examples:
• Print server model: AXIS 540+
• IP address of print server: 10.13.4.105
• New firmware version name: 540p_v2_6_43.bin
• Location of firmware and upgrade procedure: C:\Axis (Create a new
directory named e.g. ‘Axis’ on your hard drive and download the
firmware to that location).
AXIS 540+/AXIS 560 77
Page 78

Updating the Firmware
1. From www.axis.com, download the firmware and save it to the new
directory on your computer, e.g. C:\ Axis
2. Open a command prompt from Start => Run.
The Run window will appear.
Type cmd and click OK.
3. The DOS Command Prompt window will open.
Type c: and press the Enter button on your keyboard.
4. The firmware is saved in C:\Axis
Type cd Axis
5. Type dir and press Enter.
The Axis directory you have created will list all files:
6. Connect to the print server using ftp.
Type ftp 10.13.4.105
(Example using print server IP address 10.13.4.105)
7. Type root after "User:", press Enter.
Type pass after "Password:" (your entry will not be visible) press Enter.
Obtaining the Software
8. Change to binary mode transfer.
Type bin hash (or binary hash) and press Enter.
9. Use the 'put' command to upload the upgrade file to the flash location:
(Example using firmware named 540p_v2_6_43.bin):
Type put 540p_v2_6_43.bin FLASH (FLASH written in capital letters!)
Wait 30 seconds... You will receive a message stating "Transfer complete. Flash
programming finished OK. "The print server will restart in five seconds running
the new software.
When you see a new ftp prompt the procedure has been completed
successfully.
You can obtain all the print server firmware as well as the latest utility
software from the following locations:
• http://www.axis.com
• your local dealer
78 AXIS 540+/AXIS 560
Page 79

Management and Configuration
Section 2 Management and Configuration
The management and configuration tools that are supported by the Axis
Network Print Server allow you to:
• Change the print server parameters, i.e. editing the config file
• Receive extended information about the print jobs
•Receive printer port status
• Monitor your printers
• Reset the Axis Network Print Server
Configuration
Overview
Using a Web browser
The method you should use to manage and configure your Axis Network Print
Server depends on the operating system protocols of your network. The table
below displays which method to use for each supported environment.
Operating System Protocols
IBM Host
(AS/400, IBM Mainframe)
TCP/IP
(AS/400, IBM Mainframe, UNIX,
Windows
IPX/SPX
(NetWare)
NetBIOS/NetBEUI
Windows
AppleTalk
Configuration/Management methods
From an IBM Host - See page 94
Web Browser - See page 79
AXIS ThinWizard - See page 83
FTP - See page 85
Telnet - See page 87
SNMP - See page 90
Novell Utilities - See page 93
Web Browser - See page 79
Web browser - See page 79
Mac-FTP - See page 85
Once you have established the Axis Network Print Server in the TCP/IP
environment, as described in Assign an IP Address to the Print Server, on page
13, you are free to access the Axis Network Print Server Web pages from any
standard Web browser.
The Web interface of the Axis Network Print Server is divided into two modes of
operation, User mode and Admin mode:
User In User mode, you have no rights to change any parameter settings. However, if
you have access rights to the Admin mode, you can change some of the basic
parameters from User mode via the Configuration Wizard. This mode is
intended for regular users who are only interested in using the print server's
interface for checking print jobs or viewing printer properties. If you want to
change any other of the print server's settings, you must enter the Admin mode.
AXIS 540+/AXIS 560 79
Page 80

Management and Configuration
Admin When in Admin mode, you have access to all the print server's parameters and
you can change them to your liking. This mode is intended for network
administrators and can be password protected to prevent unauthorized
changing of the print server parameters.
Note:
To protect the Admin pages from unauthorized use, enter a password in the Root Password field
under Admin | General Settings
Accessing the Web
Pages
Note:
Available Services
from the User Mode
Follow the steps below to access the internal web pages of the Axis Network
Print Server:
1. Enter the print server’s IP address (or host name) in the Location/Address
field of your Web browser. Press Enter
2. The Printer Overview page will appear. Click the admin button to access the
Administration web pages.
3. You may be prompted for a password, enter the default user name root and
the default password pass. Click OK.
• It is highly recommended that you change the default password. This is done from the
Admin | General Settings | General tab in the Root Password field
• You can address the print server’s Web interface via https:// To do this you must enable
the SSL/TLS protocols in the web interface: Admin | Network Settings | Detailed View|
TCP/IP and set the HTTPS Enabled parameter to Yes (you must have a valid certificate
loaded).If you do not have a valid certificate loaded, select Admin | Security Settings
and click Create.
The following services are available from the User mode. A link to the Axis
home page is available from this mode.
Printer Overview The Printer Overview page contains a section that allows you to view the
general parameter setting of the Axis Network Print Server, including the print
server name and the location of the print server in your organization, if defined.
By clicking the printer icon a printer page opens, allowing you to view the
status and the supported capabilities ofconnected printer. The extent of this
information depends on the printer model. From the printer page, you can also
print a test page to the printer.
Print Jobs From the Print Jobs page you can view the status of the current print jobs,
including the number of printed bytes and the origin of the print job. You can
also view a log of the 20 latest print jobs that includes the user, the printing
protocol and the file size. A log that displays the accumulated usage of the
connected printers allows you to control the usage of the connected printers.
Help The Help page presents you with basic information about the Axis Network
80 AXIS 540+/AXIS 560
Page 81

Management and Configuration
Print Server and the Web user interface. A short description of the Axis
installation tools you should use when installing a printer on your PC, is also
included.
Available Services
from the Admin Mode
The following services are available from the Admin mode. An additional link to
www.axis.com is available from this mode.
This Print Server The This Print Server page contains a section that allows you to view and
modify the general parameter setting of the Axis Network Print Server,
including the print server name, the node address, the password and the base
URL. You can also configure any of the eight logical printers of the Axis
Network Print Server. Management operations, like restarting the Axis Network
Print Server and resetting its parameters to the factory default settings, are
also available.
Caution!
Any network configuration should involve the Network Administrator.
By clicking on the printer icon, a printer page opens, allowing you to view the
status and the supported capabilities of connected printer. The extent of this
information is depending on the printer model. From the printer page, you can
also print a test page to the printer.
Print Jobs From the Print Jobs page you can view the status of the current print jobs,
including the number of printed bytes and the origin of the print job. You can
also view a log of the 20 latest print jobs that includes the user, the printing
protocol and the file size. A log that displays the accumulated usage of the
connected printers allows you to control the usage of the connected printers. If
you want to delete an ongoing print job, a delete button is available on this
page.
Network Settings From the Network Settings page you can set all parameters that control the
network traffic to and from the Axis Network Print Server. You can enable or
disable any of the supported network protocols and fine-tune the parameter
settings.
Support From the Support page you can receive help to resolve any installation or print
problems that might occur. If your problems persist, the Support page allows
you to produce a Server Report. The Server Report includes the settings of the
Axis Network Print Server, information about your connected printers as well as
the current network settings. The Server Report is of great value for support
assistance, so please mail, email or fax it to your support channel together with
a detailed problem description.
Statistics The Statistics page displays information about the network traffic to and from
the Axis Network Print Server as well as information about servers and services
that are connected or associated with the Axis Network Print Server.
AXIS 540+/AXIS 560 81
Page 82

Management and Configuration
Help The Help page displays a comprehensive description of the
configuration and management activities that can be performed from
the internal Web pages of the Axis Network Print Server. Theses
activities include instructions on how to install the Axis Network
Print Server in various environments and how to upgrade it with new
firmware. A detailed index is also available.
Parameter List Shows all print server parameters and their current settings.
Restart Restarts the print server.
Software Default A Software Default will reset all print server parameters and settings
to their default values except:
• Node address (NODE_ADDR.)
• IP Address (INT_ADDR.)
• DHCP enabled (DHCP_ENB)
• Installed certificate
• Private key
A Software Default differs from a Factory Default in that the latter is
done by pressing the test button in a specific sequence to
default/clear all print server parameters to default.
See The Test Button, on page 103 for instructions on performing a
Factory Default.
Firmware Upgrade Upgrades the print server’s internal software.
82 AXIS 540+/AXIS 560
Page 83

Using AXIS ThinWizard for Print Server Management
AXIS ThinWizard software allows you to manage and upgrade multiple Axis
products. Using a standard Web browser, you can find, install, monitor,
configure and upgrade your Axis print servers remotely in any TCP/IP network.
AXIS Thin Wizard 3.0 is Windows 2000 and Windows XP compatible.
Management and Configuration
Installing AXIS
ThinWizard
Starting AXIS
ThinWizard
AXIS ThinWizard software is available on www.axis.com
You should only install AXIS ThinWizard on a designated computer on your
network.
To install, follow the instructions given by the Installation Wizard. During the
installation, you will be asked to enter a user id and a password — these will be
used when logging in to AXIS ThinWizard, so please take a note of them.
Follow the instructions below to start AXIS ThinWizard:
1. Make sure that the computer where you installed the AXIS ThinWizard is
up and running on your network.
2. Start a Web browser on a client in your network.
3. Enter the IP address or the host name of the computer where you installed
AXIS ThinWizard. (If the server is installed on another port than 80, you must
enter the port name after the host name or the IP address).
4. The AXIS ThinWizard start page now appears in the Web browser. Enter the
user id and password you specified during installation and click Log in.
5. The AXIS ThinWizard interface appears:
Important!
These parameters must be enabled in the print server’s web interface for AXIS ThinWizard to
function properly:
• FTP_ENB (FTP enabled): click Admin | Network Settings | Detailed view | TCP/IP | FTP
Enabed => Yes.
• SNMP_ENB (SNMP Enabled): click Admin | Network Settings | Detailed view | SNMPv1
Enabled => Yes
These parameters are enabled by default in the print server.
AXIS 540+/AXIS 560 83
Page 84

Management and Configuration
The first time you use AXIS ThinWizard, set the Preferences to reflect your
network environment:
Select a network group from the list on the Manage Network page. If the list is
empty, you must first create a group. Click the Network Groups tab and follow
the instructions.
Creating a
Network Group in
AXIS ThinWizard
Managing
Print Servers
The network group concept is the corner stone of AXIS ThinWizard. By dividing
your network into network groups, you can monitor your print servers more
efficiently. The scope of each network group is determined by the Axis server
types and IP address ranges that are included. You can create as many network
groups as you want.
Follow the instructions below to create a network group:
1. Click Network Groups in the AXIS ThinWizard main menu.
2. Click Create.
3. The Create Network Group page opens. Type the name of the network group,
enter the IP address ranges and Axis server types that should be included. If
you are only interested in managing print servers, deselect all options but the
print server option.
4. Click OK to create the network group.
You can edit the properties of each network group from the Network Groups
page. Simply select the network group from the list and use one of the Edit,
Copy or Remove commands.
Follow the instructions below to access the AXIS 540+/AXIS 560 using AXIS
ThinWizard:
1. Click Manage Network in the main menu.
2. Select the network group, including the, from the drop-down list. All AXIS
servers included in the network group appear in the window.
3. Click the link of the AXIS 540+/AXIS 560 to access its internal Web page.
4. The ‘Srv’ and ‘Dev’ columns show the status of your print servers and printers.
You are now free to manage and configure the print server as described in
Available Services from the User Mode, on page 80.
Upgrading
Axis Servers
Additional
Refer to Upgrading using AXIS ThinWizard, on page 76, for more information
about upgrading Axis servers using AXIS ThinWizard.
If you need more information, please refer to the AXIS ThinWizard on-line help.
Information
84 AXIS 540+/AXIS 560
Page 85

Management and Configuration
Using FTP for Print Server Management
Having assigned an IP address to your Axis Network Print Server, as
described in Assign an IP Address to the Print Server, on page 13, you
can change the Axis Network Print Server parameter settings using
the File Transport Protocol (FTP).
Editing the config file Follow the instructions below to edit the config file using FTP:
1. Log in to the Axis Network Print Server by typing:
ftp <host name> or ftp <IP address> in a DOS window
(Windows and OS/2) or in a UNIX shell.
2. Enter the user id and the password. (The default entries are
pass.)
and
root
3. Download the config file to your host by typing:
get config
4. Edit the file using your preferred text editor.
5. Save the config file to the Axis Network Print Server by typing:
put config CONFIG
Notes:
• It is important that the destination file is specified in capital letters. Otherwise the edits are temporary and will be lost once the Axis Network Print
Server has been powered off.
• To edit the config file from a Macintosh you will need FTP support such as
MacTCP, Fetch or Anarchie. The procedure for editing the file is the same as
described above.
The example on the next page describes how to edit the config file
using FTP from a DOS window.
AXIS 540+/AXIS 560 85
Page 86

Management and Configuration
Example:
> ftp npserver
connected to npserver.
220 Axis Network Print Server FTP Print Server v6.30
Dec 16 2000 ready.
Name (npserver:thomas): root
331 User name ok, need password
Password: pass
230 User logged in
ftp> get config
200 PORT command successful.
150 Opening data connection for config
(192,36,253,4,13,223), (mode ascii).
226 Transfer complete.
8588 bytes received in 0.24 seconds (35.63 kbytes/s)
ftp> put config CONFIG
200 PORT command successful.
150 Opening data connection for CONFIG
(192,36,253,4,13,223), (mode ascii).
226 Transfer complete.
8588 bytes received in 0.45 seconds (19.04 kbytes/s)
ftp> bye
221 Goodbye.
>
(not visible)
86 AXIS 540+/AXIS 560
Page 87

Management and Configuration
Viewing
the Account File
Viewing
the Status File
The account file contains data concerning the ten last print jobs. It specifies an
internal job number, the user that initiated the job, the protocol and logical
printer that was used, current status (Completed, Off-line, or Printing), number
of bytes printed, elapsed time and off- line time.
Follow the instructions below to view the account file using FTP:
1. Log in to the Axis Network Print Server by typing:
ftp <host name> or ftp <IP address> in a DOS windows (Windows
and OS/2) or in a UNIX shell.
2. Enter the user id and the password. (The default entries are
root and pass.)
3. Download the account file to your host by typing:
get account
4. View the account file using your preferred text editor.
The status command shows which printer port the logical printers are assigned
to, and their current status.
Follow the instructions below to view the status file using FTP:
1. Log in to the Axis Network Print Server by typing:
ftp <host name> or ftp <IP address> in a DOS windows (Windows
and OS/2) or in a UNIX shell.
Using Telnet
the Account File
2. Enter the user id and the password. (The default entries are
3. Download the status file to your host by typing:
get status
4. View the status file using your preferred text editor.
FTP Help By typing
files and commands will be displayed.
Having assigned an IP address to your Axis Network Print Server, as described in
Assign an IP Address to the Print Server, on page 13, you can manage your Axis
Network Print Server using the Telnet protocol.
Viewing
The account file contains data concerning the last ten print jobs. It specifies an
internal job number, the user that initiated the job, the protocol and logical
printer that was used, current status (Completed, Off-line, or Printing), number
of bytes printed, elapsed time and off- line time.
Follow the instructions below to view the account file using telnet:
root and pass.)
help in step 3 in the FTP instruction sets above, a list of all available
AXIS 540+/AXIS 560 87
Page 88

Management and Configuration
1. Log in to the Axis Network Print Server by typing:
telnet <host name> or telnet <IP address> in a DOS window
(Windows and OS/2) or in a UNIX shell.
Example:
2. Enter the user id and the password. (The default entries are
root and pass.)
3. View the account file by typing:
account
The example on the next page shows how to view the account file using Telnet
from a UNIX shell.
> telnet npserver
Trying 192.36.253.96...
Connected to npserver.
Escape character is ‘^]’.
Axis Network Print Server TELNET Print Server v6.30 Dec 16 2000
Axis Network Print Server network login: root
Password: pass
Axis Network Print Server TELNET Print Server v6.30 Dec 16 2000
Root> account
Current account file:
JOB USER PROT LPR S BYTES ETIME OTIME
(not visible)
1 Thomas FTP pr2C 1885 2 0
2 Joe LPT pr1C 23074 4 0
3 RICHARD PSERVER pr2 C 43044 5 0
4 MacUser APPLE pr1C 6717 2 0
5 LSLM_user NetBIOS pr2C 36995 3 0
6 patrick PROS pr5 P 83208 9 0
Root>
Typical Telnet session to view the Account File
88 AXIS 540+/AXIS 560
Page 89

Management and Configuration
Viewing
the Status file
The status command shows which printer port the logical printers are assigned
to, and their current status.
Follow the instructions below to view the status file using telnet:
1. Log in to the Axis Network Print Server by typing:
telnet <host name> or telnet <IP address> in a DOS window
(Windows and OS/2) or in a UNIX shell.
2. Enter the user id and the password. (The default entries are
root and pass.)
3. View the status file by typing:
status
Performing resets Three types of reset commands allow you to perform soft resets, to perform
hard resets, and to reset the print server’s parameters to its default settings.
Follow the instructions below to perform a soft reset using telnet:
1. Log in to the Axis Network Print Server by typing:
telnet <host name> or telnet <IP address> in a DOS window
(Windows and OS/2) or in a UNIX shell.
2. Enter the user id and the password. (The default entries are
root and pass.)
3. Restart the print server’s protocols by typing:
softreset
Replace the command in step 3 above with hardreset or default to perform
the other two reset operations.
AXIS 540+/AXIS 560 89
Page 90

Management and Configuration
Using SNMP
You can use SNMP (Simple Network Management Protocol) for remotely
monitoring and configuring of the Axis Network Print Server. All major
functions for print servers are supported.
General Information SNMP refers to a set of standards for network management, including a
protocol, a database structure specification, and a set of data objects. The Axis
Network Print Server SNMP implementation runs in the TCP/IP environment.
The management is handled by NMS (Network Management System) software
running on a host on your network. The NMS software communicates with
network devices by the means of messages, which are references to one or
more objects.
A message can be a question or an instruction to a device, or an alarm triggered
by a specific event in a device. Objects are contained in data bases called MIBs
(Management Information Base), where MIB-II is a standard database.
The Axis Network Print Server supports all relevant parts of MIB-II and also
includes a private enterprise MIB. Refer to The AXIS MIB, on page 90.
System Requirements
for SNMP
The AXIS MIB The AXIS MIB contains a large number of objects which may be categorized as
The following requirements must be fulfilled in order to make full use of the
Axis Network Print Server SNMP support:
• NMS software that allows you to install private enterprise MIBs
• A host, supporting FTP, on which to run the NMS software
Follow these steps to add the AXIS MIB to your NMS software:
1. Log in to the Axis Network Print Server using FTP.
2. Download the MIB file /snmp/axis.mib to the NMS host.
3. Install the AXIS MIB according to instructions in your NMS software
documentation.
follows:
• Menu objects - used for viewing and changing the Axis Network Print
Server configuration from the NMS program. Refer to The Parameter List,
on page 1.
• Printer status and unit administration objects - used for monitoring Axis
Network Print Server print jobs and storing parameter changes
permanently.
• Trap objects - used for alarms at various error conditions.
For technical details, you can view the MIB file (axis.mib) with any text editor.
90 AXIS 540+/AXIS 560
Page 91

Management and Configuration
Exceptions Even though the Axis Network Print Server is fully compatible with the HP
JetAdmin tool, the Axis Network Print Server behaves differently than an HP
print server in certain situations. The exceptions from the traditional HP
JetAdmin functionality are presented below.
The print server concept HP JetAdmin considers each printer port of the HP print server as an
independent print server. One physical HP print server will act as one or three
print servers depending on the number of supported printer ports. HP JetAdmin
always considers the Axis Network Print Server as one print server, independent
of the number of supported ports. The effects of this different behavior are:
• You can change a printer port’s properties from any of the Axis Network
Print Server printer ports’ property pages. This can not be done with an HP
print server.
• If you are performing a reset on one of the Axis Network Print Server
printer ports, all three ports will be reset.
• From each port you can view all print queues connected to the print server
and not only the queues connected to the specific printer port. To be able
to distinguish between the queues, they must be named
<queue_name>!<logical_printer_number>.
• The Axis Network Print Server printer ports have the same name. They are
only distinguished by suffixes. If you change the name on one of the Axis
Network Print Server printer ports, all three port names will be changed.
Note that the port names displayed in HP JetAdmin will not change until
one of the refresh commands in the Device Refresh menu has been
performed.
AXIS 540+/AXIS 560 91
Page 92

Management and Configuration
The Serial Printer Port HP JetAdmin does not support serial printer ports. If you must change the
default settings of the serial printer port of the print server, it is recommended
that you use the AXIS NetPilot. This will become necessary when you are
installing a printer on your serial port. Follow the steps below to change the
serial port parameters using AXIS NetPilot.
1. Start the AXIS NetPilot.
2. Select your Axis Network Print Server and click Install on the AXIS NetPilot
toolbar. Select with current configuration.
3. Your Axis Network Print Server has been transferred to the ‘Network Print
Servers’ folder. Select your Axis Network Print Server and click the Property
button on the AXIS NetPilot toolbar.
4. Select the Printer Ports tab.
5. Select COM1 from the Printer Port drop-down list.
6. Select XON/XOFF from the Handshake Protocol drop-down list, set the Baud
Rate to 38400 and select 1 stop bit. Click OK.
The settings in step 6 varies between different printer models. Please refer to
your printer documentation.
If your network supports TCP/IP you can also change the serial port parameters
by using the Axis Network Print Server Web interface.
92 AXIS 540+/AXIS 560
Page 93

Using Novell Utilities
Management and Configuration
After installing the Axis Network Print Server into the NetWare environment,
you can manage your Axis Network Print Server, using either Novell’s NetWare
Administrator, or PCONSOLE.
NetWare
Administration
Some useful features provided by the NetWare Administrator are described in
more detail below:
Printer Status The Printer Status menu, detailed below, shows the status of an active print job
serviced by an Axis Network Print Server network print server. It displays
detailed information concerning the active job including, Print Queue, print job
description, size of print file, percentage of job completed, etc. You can also
abort or pause the print job from this menu.
NetWare Administrator Printer Status Menu
Notification You can use the NetWare Administrator to enable or disable status notification
messages for printers connected to the Axis Network Print Server, e.g. Busy,
Off-line, Out of paper, Paper jam, etc. You can also add or remove print job
owners and administrators from the list of persons to be notified.
Print Layout You can view installed Axis Network Print Server Network Print Servers and
their relative print queues for any NetWare Organizational Unit. You can also
display summary information by right-clicking on the printer object you want
to examine.
AXIS 540+/AXIS 560 93
Page 94

Management and Configuration
NetWare Print Layout with corresponding information summary
94 AXIS 540+/AXIS 560
Page 95

Section 3 Logical Printers
The print server has a powerful facility for altering the print data. This means
that your desired print format can be realized on any type of printer. The
following actions can be invoked from the print server:
• The character set can be changed to suit the printer
• Strings can be added before and after the print data
• Strings within the print data can be substituted
• ASCII to PostScript conversion
• Redirection of print data to another printer if the printer is busy
• Hex Dump mode to assist with printing problems
If any of these actions are required, a Logical Printer is used to change the print
data before being sent to the printer port. There are eight logical printers (PR1PR8) that can be set up to filter the print data.
The default logical printers settings are such that PR1—PR4 cause no change to
the flow of print data, while PR5—PR8 add CR to LF control characters:
Logical Printers
Notes:
Logical Printer Changes to data
PR1 no change
PR2 no change
PR3 no change
PR4 no change
PR5 add CR to LF
PR6 add CR to LF
PR7 add CR to LF
PR8 add CR to LF
Each logical printer can be set via the print server’s internal Web pages: Open a
Web browser, enter the IP address of the print server in the Location/Address
field and select Admin | Logical Printers.
The logical printers can also be set up by editing the config file. See “Editing the
config File” on page 100.
• The examples in this section describe how you can configure the available logical printers
using a standard Web browser. If you want to set them directly by editing the config file,
just enter the values for the corresponding parameters.
• The examples should only be viewed as suggestions how to configure the logical printers.
You should, of course, configure them according to the needs of your network.
• In the Parameter List chapter of this manual, you can find a complete list of the print
server’s parameters.
AXIS 540+/AXIS 560 95
Page 96

Logical Printers
Character Set
Conversion
Example:
A common problem in a multiple host environment is that different hosts use
different ASCII character sets. As a result of this, language specific characters
(such as å ü ô ñ) are sometimes printed incorrectly.
The Axis Network Print Server solution to this problem is to assign a character
set conversion filter to a logical printer, and then link that logical printer to the
host causing the problem.
You select your desired conversion filter by setting the Character Set
Conversion (PRx_CSET.) parameter. The output from the conversion filter is
always IBM PC Set 2 (Code Page 437), and this is the character set the printer
must be set up for.
Your network contains a host using the character set ISO 8859-2 and a host using the
character set DEC.
In order to direct print jobs to the printer connected to the Axis Network Print
Server, you should assign the host to a separate logical printer, and install a
character set conversion filter.
Follow the instructions below to change the conversion filter:
1. From the print server’s internal Web page, select Admin | Logical
Printers.
2. Select the PR1 tab.
3. Set the parameter Physical Port to e.g. LPT1.
4. Set the parameter Character Set Conversion to ISO>IBM.
5. Click the OK button.
6. Select the PR2 tab.
7. Set the parameter Physical Port to e.g. LPT1.
8. Set the parameter Character Set Conversion to DEC>IBM.
9. Click the OK button.
The ISO 8859-2 printer data that is sent to logical printer PR1 converts to IBM
PC Set 2 and is printed on LPT1. Similarly, the DEC printer data that is sent to
logical printer PR2 converts to IBM PC Set 2 and is printed on LPT1.
96 AXIS 540+/AXIS 560
Page 97

Logical Printers
Adding Strings Before
and After Print Jobs
Example:
Example:
These string functions provide a way to send printer control commands before
and after each print job. They may be specified individually for each logical
printer. All strings are entered as hexadecimal byte values.
Assume that the logical printer PR5 is configured as a PostScript printer and that you want to
append the PostScript End of File character (hex 04) after each print job.
Follow the instructions below to add a string after the print job:
1. From the print server’s internal Web page, select Admin | Logical
Printers.
2. Select the PR5 tab.
3. Enter the string 04 in the String After Print Job text field.
4. Click the OK button.
You have an HP LaserJet printer with dual trays, and want to print on pre-printed forms when
using the logical printer PR4. The standard forms are taken from the lower tray, and the preprinted forms are taken from the upper tray. The string before print job should contain the
command to select the upper tray:
job should contain the command to select the lower tray:
(hex 1B 26 6C 34 48).
E
&l1H (hex 1B 26 6C 31 48). The string after print
C
E
C
&l4H
Follow the instructions below to add strings before and after the print job:
1. From the print server’s internal Web page, select Admin | Logical
Printers.
2. Select the PR4 tab.
3. Enter the string 1B 26 6C 31 48 in the String Before Print Job text field.
4. Enter the string 1B 26 6C 34 48 in the String After Print Job text field.
5. Click the OK button.
String Substitutions The string substitution function performs search and replace operations on the
print data. The primary application is to replace printer control commands. Up
to twenty string substitutions may be specified individually for each logical
printer.
All strings must be entered as hexadecimal byte values, and each match and
substitute string must be preceded by a count byte.
You substitute command strings by editing the String Substitutions (PRx_STR.)
parameter.
Example:
Assume that you want to replace the UNIX/Linux New Line (hex 0A) with an Carriage
Return/Line Feed (hex 0D 0A) for logical printer PR1.
AXIS 540+/AXIS 560 97
Page 98

Logical Printers
Example:
Follow the instructions below to substitute command strings:
1. From the print server’s internal Web page, select Admin | Logical
Printers.
2. Select the PR1 Web page.
3. Enter the string 01 0A 02 0D 0A in the String Substitutions text field.
Hex Code Explanation
01 length of the string you want to replace
0A the string you want to replace
02 length of the substitute string
0D 0A the substitute string
4. Click the OK button.
This conversion is the default setting for logical printers PR5 through PR8.
Assume that you want to replace the UNIX/Linux New Line (hex 0A) with an Carriage
Return/Line Feed (hex 0D 0A), and the printer command
E
Y (hex 1B 59) for logical printer PR2.
C
E
G1 (hex 1B 47 31) with
C
Note:
Follow the instructions below to substitute command strings:
1. From the print server’s internal Web page, select Admin | Logical
Printers.
2. Select the PR2 tab.
3. Enter the string 01 0A 02 0D 0A 03 1B 47 31 02 1B 59 in the String
Substitutions text field.
Hex code Explanation
01 length of the UNIX/Linux New Line command
0A the UNIX/Linux New Line command
02 length of the Carriage Return/Line Feed command
0D 0A the Carriage Return/Line Feed command
03 length of the printer command to replace
1B 47 31 the printer command to replace
02 length of the new printer command
1B 59 the new printer command
Click the OK button.
Extensive use of string substitutions will naturally decrease the throughput
rate of the Axis Network Print Server.
98 AXIS 540+/AXIS 560
Page 99

Logical Printers
ASCII to Postscript
Conversion
Example: Follow the instructions below to convert ASCII print data to PostScript for
The AXIS 540+/AXIS 560 logical printers can translate ASCII print data into
PostScript format. This makes it possible to print on a PostScript printer from a
host that does not support PostScript. The conversion is selected by activating a
filter that converts ASCII data into Postscript. This filter can be activated
individually for each logical printer.
Activate your desired filter by setting the Printer Language Translation
(PRx_FILT.) parameter.
logical printer PR2:
1. From the print server’s internal Web page, select Admin | Logical
Printers.
2. Select the PR2 tab.
3. Set the Printer Language Translation parameter to POSTSCR.
4. Click the OK button.
If you select the parameter value AUTO_PS, the print data for every print job is
searched and if any ASCII data is found, it is translated into PostScript. This
setting is recommended if you are not sure if the print data is ASCII or
PostScript.
PostScript Settings When a logical printer is set for PostScript conversion, you must specify the
following:
•page size
• page orientation
•page format
• which font to use
The default page size is A4 and the default page orientation is Portrait, while
the page format parameters are as follows:
Page Format Parameter Default Value Comment
Lines per page (MPL) 66
Characters per line (MPP) 0 0 = disable line wrap
Characters per inch (CPI) 100 100 = 10 char per inch
Lines per inch (LPI) 60 60 = 6 lines per inch
Left margin (LM) 30 30 = 3.0 mm
Top margin (TM) 50 50 = 5.0 mm
The PostScript font can be any font that is installed in the printer. If no font is
specified, Courier will be used.
Example: Follow the instructions below to set the PostScript parameters for logical
printer PR2:
1. From the print server’s internal Web page, select Admin | Logical
Printers.
2. Select the PR2 tab.
AXIS 540+/AXIS 560 99
Page 100

Logical Printers
3. Set the Printer Language Translation parameter to POSTSCR.
4. Set the PostScript Page Size parameter to LETTER.
5. Set the PostScript Page Orientation parameter to LANDS.
6. Enter the string 48 0 120 60 30 50 in the PostScript Page Format text field.
Hex code Explanation
48 48 lines per page
0 disable line wrap
120 120 = 12 characters per inch
60 60 = 6 lines per inch
30 30 = 3 mm left margin
50 50 = 5 mm top margin
7. Enter the string Helvetica in the PostScript Font text field.
8. Click the OK button.
100 AXIS 540+/AXIS 560
 Loading...