

Page 1

AXIS 221/223M
Network Camera
Installation Guide
ENGLISH
FRANCAIS
DEUTSCH ESPAÑOL
ITALIANO
Page 2

Page 3
AXIS 221/223M Installation Guide Page 3
AXIS 221/223M
Installation Guide
This installation guide provides instructions for installing the AXIS 221/223M on your
network. For all other aspects of using the product, please see the User’s Manual, available
on the CD included in this package, or from www.axis.com/techsup
Installation steps
1. Check the package contents against the list below.
2. Hardware overview. See page 4.
3. Connect the cables. See page 5.
4. Set an IP address. See page 6.
5. Set the password. See page 9.
Important!
This product must be used in
compliance with local laws
and regulations.
Package contents
Item Models/variants/notes
Network camera AXIS 221 Network Camera
AXIS 223M Network Camera
CS lens adaptor ring (AXIS 223M only)
PS-K indoor power supply country specific
Terminal block connector 10-pin connector block for connecting external devices to the I/O
terminal connector
3-pin connector block for connecting power to the 3-pin power
connector
CD AXIS Network Video Product CD, including product documentation,
installation tools and other software
Printed Materials AXIS 221/223M Installation Guide (this document)
Axis Warranty Document
ENGLISH
ENGLISH
ENGLISH
Important!
To use the AXIS 221/223M outdoors it must be installed in a protective housing. For
more information on protective housings and other accessories, please visit
www.axis.com
Page 4
Page 4 AXIS 221/223M Installation Guide
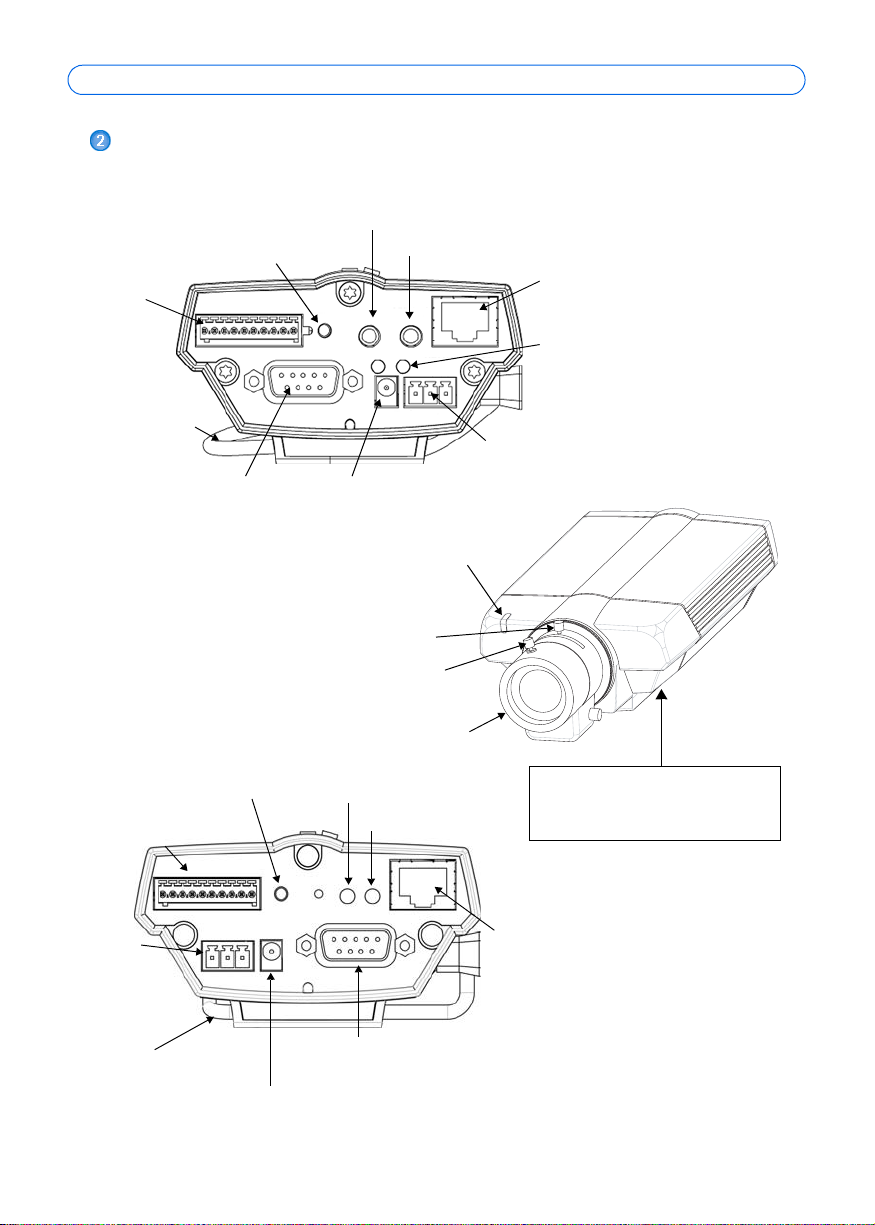
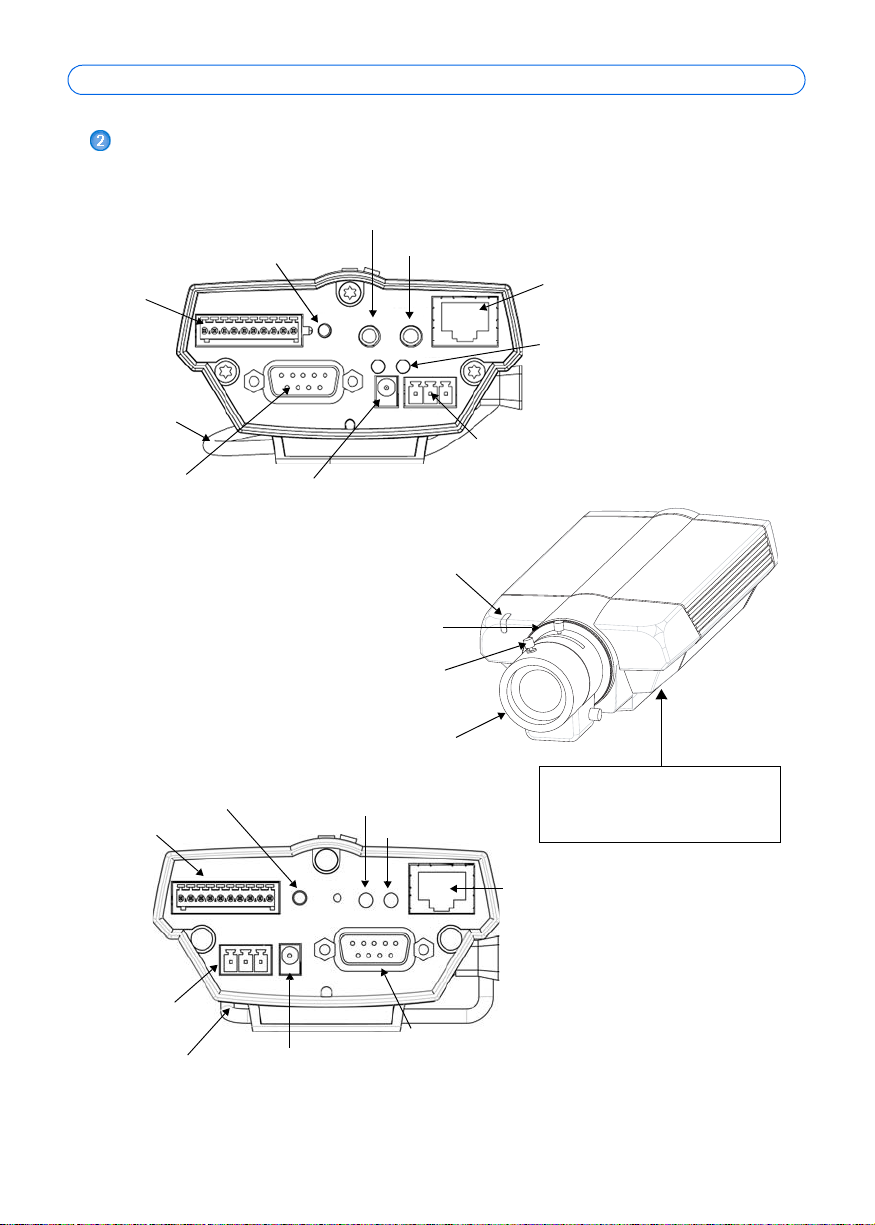
Hardware overview
AXIS 223M - Rear view
Audio out
Audio in
Network
Network
connector
connector
(also PoE)
(also PoE)
Power and network indicators
10-pin I/O
terminal
connector
DC-Iris
control cable
Reset/Control
button
RS-232
connector
AXIS 221 - Rear view
Reset/Control
button
10-pin I/O terminal
connector
Power
connector
block
PS-K
power adapter
connector
Zoom puller
(Tele/wide)
Focus puller
Power indicator
Network indicator
Power connector
block
Status
indicator
DC-Iris
Network
connector
(also PoE)
AXIS 221/223M
Front view
Product ID & Serial number (S/N).
The serial number may be
required during the installation.
DC-Iris
control cable
RS-232
connector
PS-K power adapter
connector
Dimensions
HxWxD = 49 x 88 x 200mm (1.9" x 3.5" x 7.9")
Weight = 620g (21.9oz) (power supply not included)
Page 5
AXIS 221/223M Installation Guide Page 5
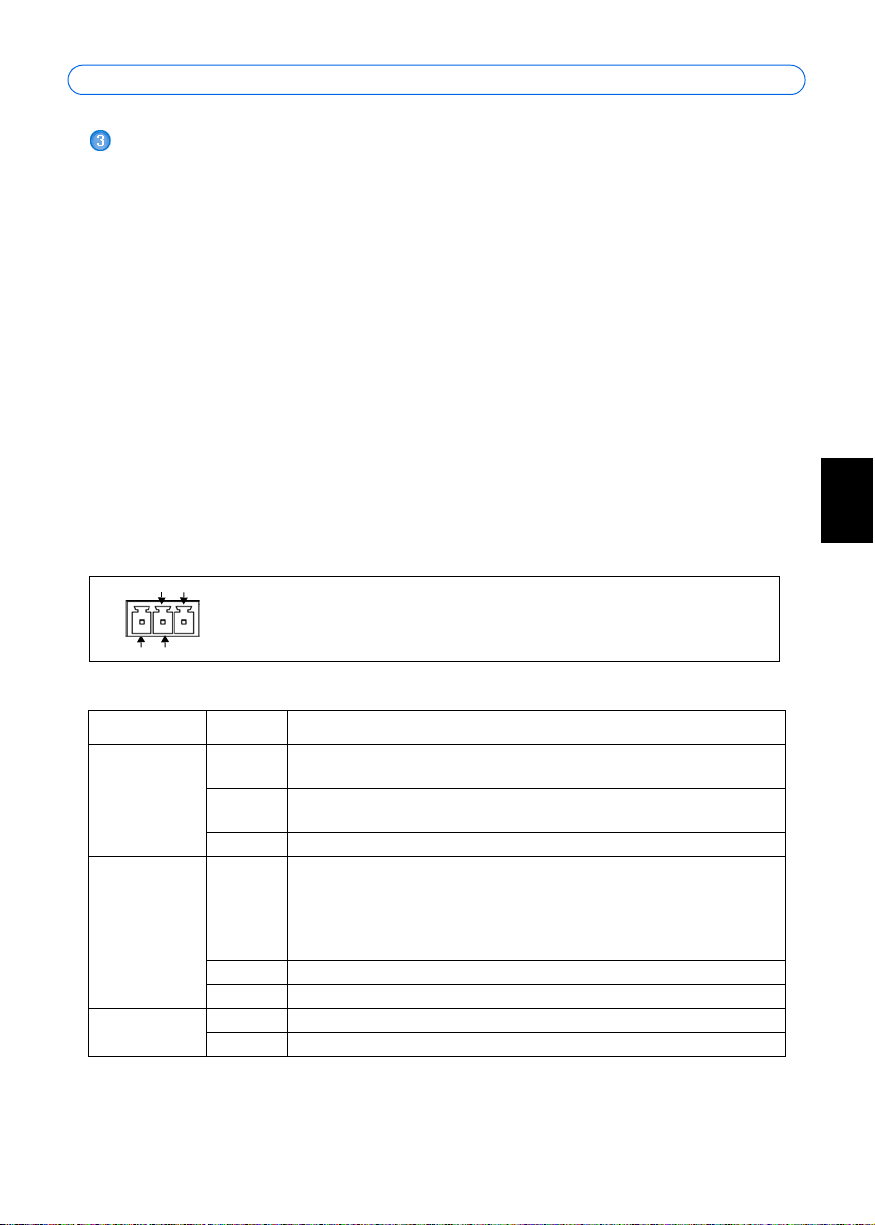
Connect the cables
1. Connect the camera to the network using a shielded network cable.
2. Optionally connect external input/output devices, e.g. alarm devices. See page 11 for
information on the terminal connector pins.
3. Optionally connect an active speaker and/or external microphone (AXIS 223M only).
4. Connect power, using one of the methods listed below:
• PoE (Power over Ethernet). If available, this is automatically detected when the
network cable is connected (see above).
• Connect the supplied indoor power adapter* to the power connector on the
camera.
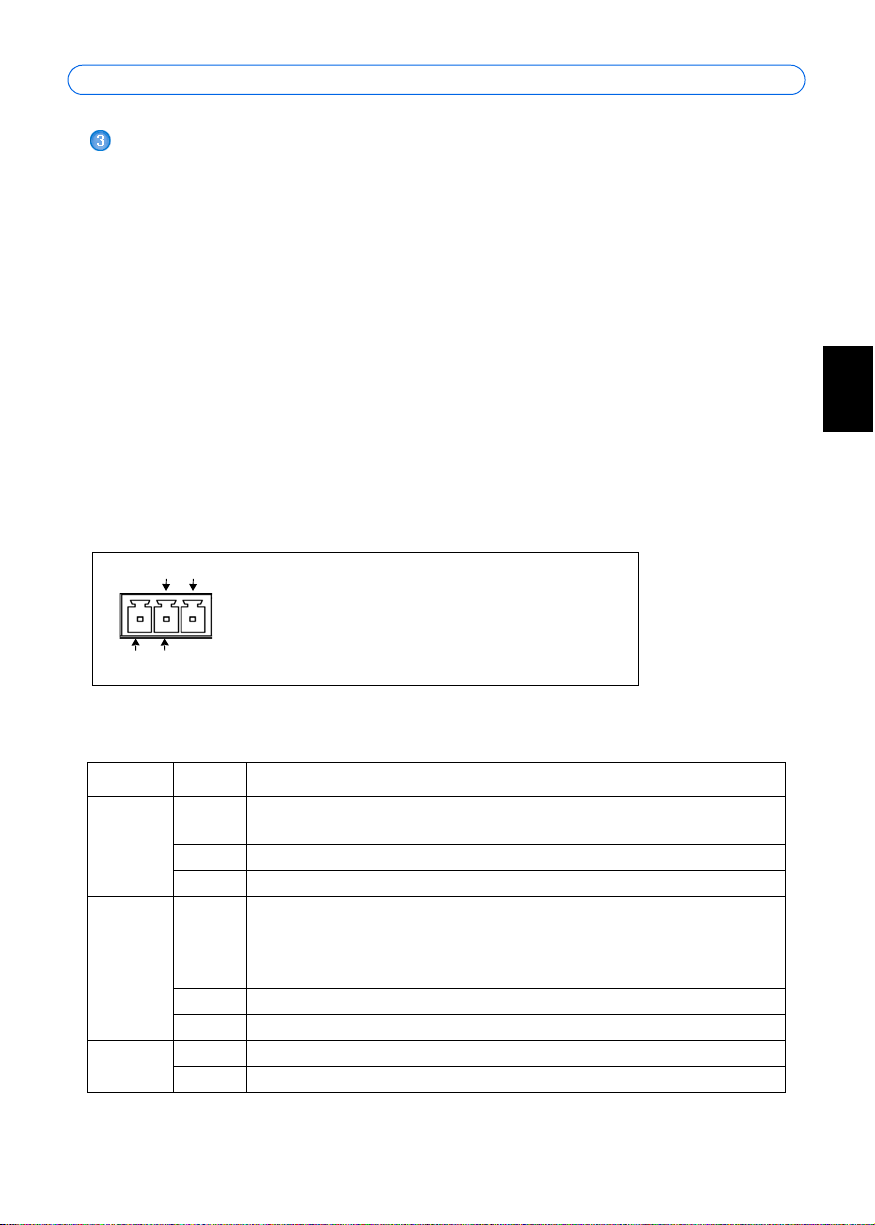
• The 3 pin power connector block on the rear panel. See the illustration below.
5. Check that the LED indicators show the correct conditions. See the table below for
further details. Note that some LEDs can be disabled and may be unlit.
3 pin power connector block
ENGLISH
ENGLISH
ENGLISH
AC AC
2
1
GND DC+
Connect AC power (10-24V) on pins 2 and 3.
3
Connect DC power (7-24V) on pins 1 and 2.
LED indicators
LED Color Description
Network Green Steady for connection to 100 Mbit/s network. Flashes for network
activity.
Amber Steady for connection to 10 Mbit/s network. Flashes for network activity.
Unlit No connection.
Status Green Shows steady green for normal operation. Note: The Status LED can be
configured to be unlit during normal operation, or to flash only when the
camera is accessed. See the online help files for more information. Go to
Setup > System Options > LED settings
Amber Steady during startup, reset to factory default or when restoring settings.
Red Slow flash for failed upgrade.
Power Green Normal operation.
Amber Flashes green/amber during firmware upgrade.
* only use the supplied PS-K power adapter
Page 6
Page 6 AXIS 221/223M Installation Guide
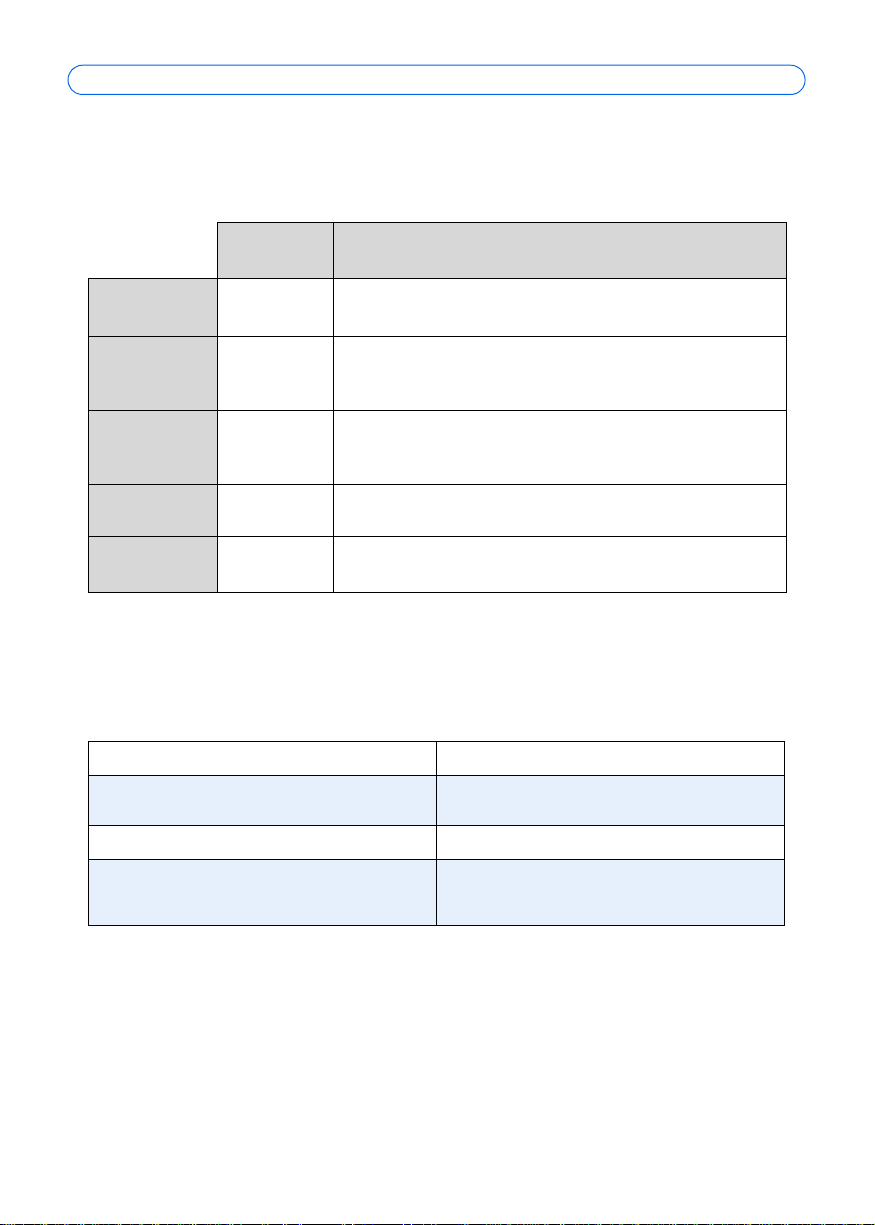
Assign an IP address
To make it accessible on the network, the AXIS 221/223M must be assigned an IP address.
Depending on the number of cameras you wish to install, the recommended method for
assigning IP addresses in Windows is either AXIS IP Utility or AXIS Camera Management.
Use the method that best suits your purpose.
Both of these free applications are available on the Axis Network Video Product CD supplied
with this product, or they can be downloaded from www.axis.com/techsup
Method Recommended for Operating system
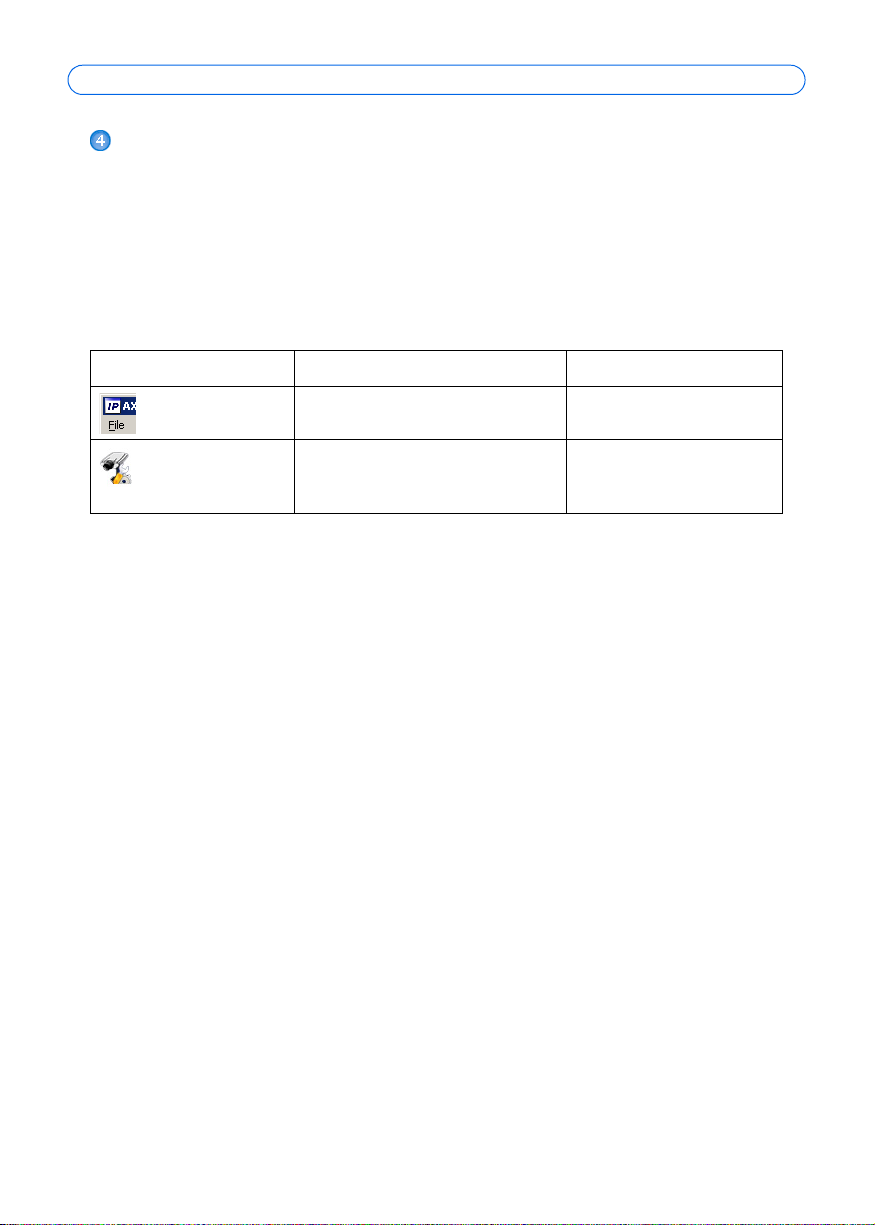
AXIS IP Utility
See page 7
AXIS Camera
Management
See page 8
Notes:
• A network DHCP server is optional.
• The AXIS 221/223M has the default IP address 192.168.0.90
• If assigning the IP address fails, check that there is no firewall blocking the operation.
• For other methods of assigning or discovering the IP address of the AXIS 221/223M, e.g. in other
operating systems, see page 10.
Single camera
Small installations
Multiple cameras
Large installations
Installation on a different subnet
Windows
Windows 2000
Windows XP Pro
Windows 2003 Server
Page 7
AXIS 221/223M Installation Guide Page 7
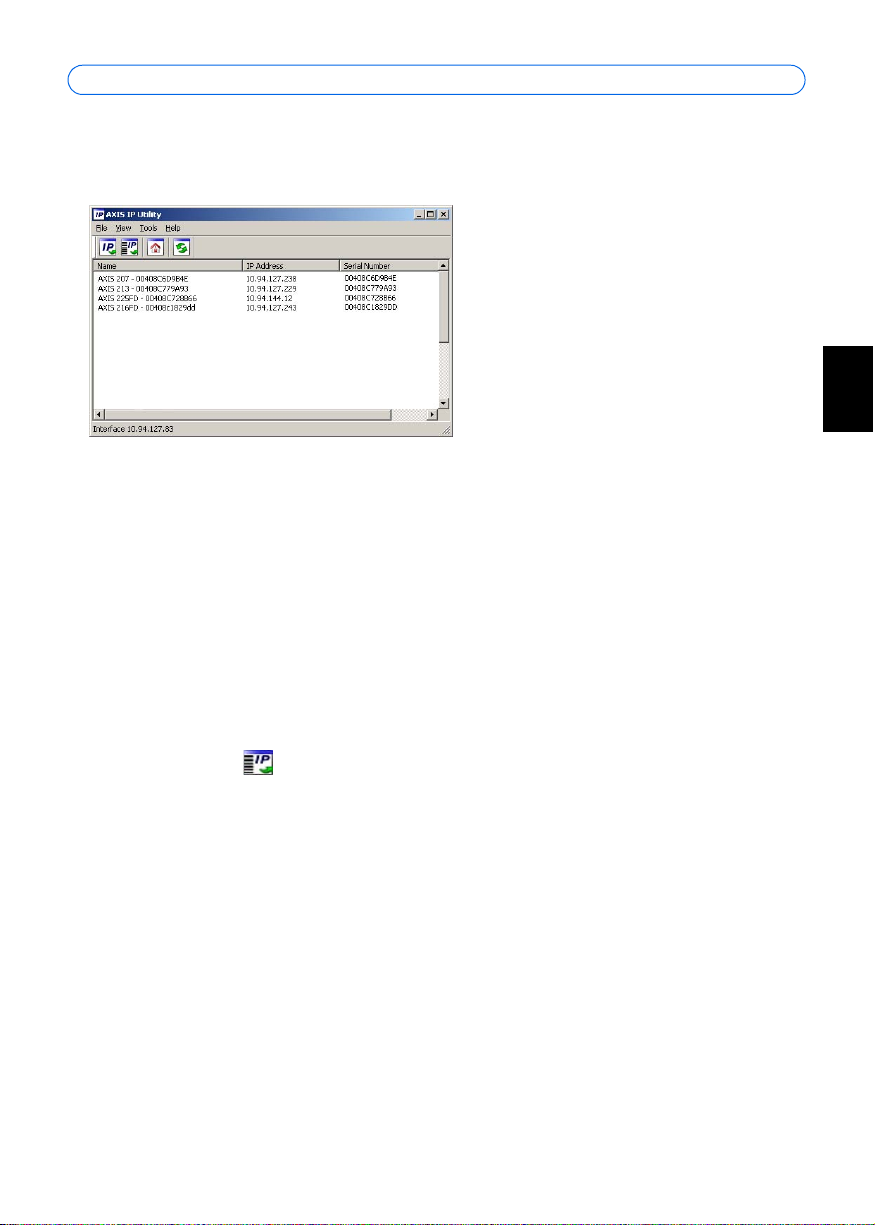
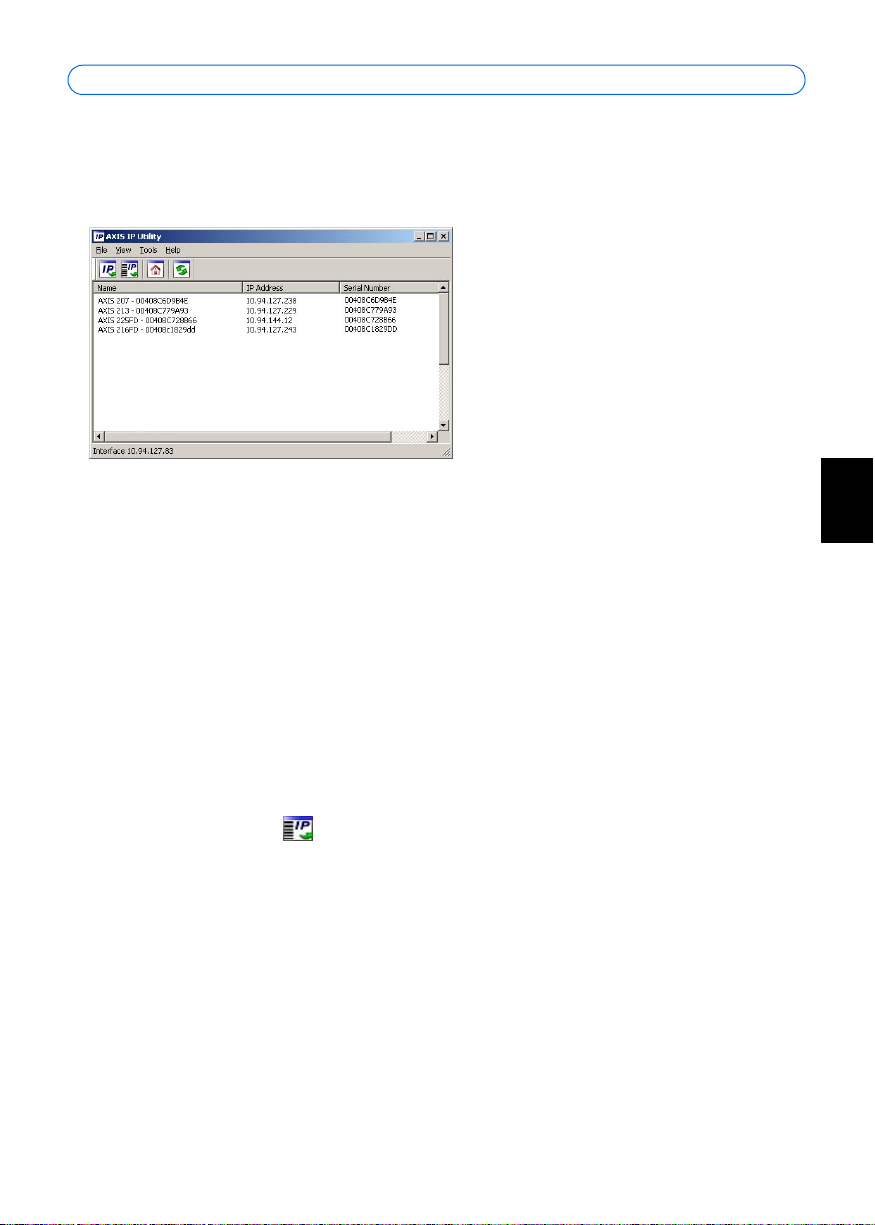
AXIS IP Utility - single camera/small installation
AXIS IP Utility automatically discovers and displays Axis devices on your network. The
application can also be used to manually assign a static IP address.
Note that the computer running AXIS IP Utility must be on the same network segment
(physical subnet) as the AXIS 221/223M.
Automatic discovery
1. Check that the AXIS 221/223M is connected to the network and that power has been
applied.
2. Start AXIS IP Utility.
3. When the camera appears in the window, double-click it to open its home page.
4. See page 9 for instructions on how to assign the password.
ENGLISH
ENGLISH
ENGLISH
Assign the IP address manually
1. Acquire an unused IP address on the same network segment as your computer.
2. Click the button Assign new IP address using serial number and enter the serial
number and IP address for the AXIS 221/223M. The serial number is located on the
product label.
3. Click the Assign button and follow the instructions.
4. Click the Home Page button to access the camera’s web pages.
5. See page 9 for instructions on how to set the password.
Page 8
Page 8 AXIS 221/223M Installation Guide
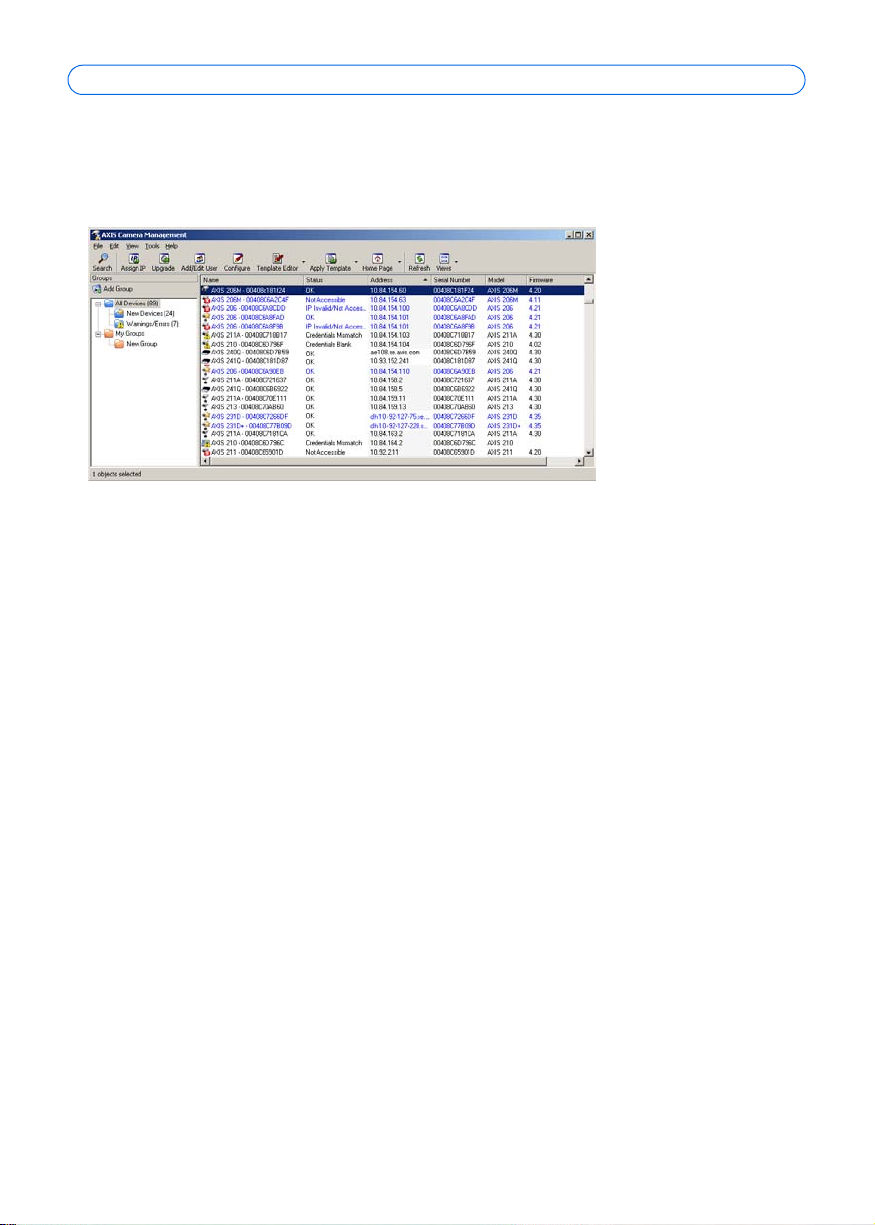
AXIS Camera Management - multiple cameras/large installations
AXIS Camera Management can automatically find and set IP addresses, show connection
status, and manage firmware upgrades for multiple Axis video products.
Automatic discovery
1. Check that the camera is connected to the network and that power has been applied.
2. Start AXIS Camera Management. When the AXIS 221/223M appears in the window,
double-click it to open the camera’s home page.
3. See page 9 for instructions on how to set the password.
Set the IP address in multiple devices
AXIS Camera Management speeds up the process of assigning IP addresses to multiple
devices, by suggesting IP addresses from a specified range.
1. Select the devices you wish to configure (different models can be selected) and click the
Assign IP button.
2. Select Obtain IP addresses automatically (DHCP), click the Update button and the
program will search in the specified range and suggest an IP address for each device.
-orEnter the range of IP addresses, the subnet mask and default router that devices can use
and click the Update button.
Page 9
AXIS 221/223M Installation Guide Page 9
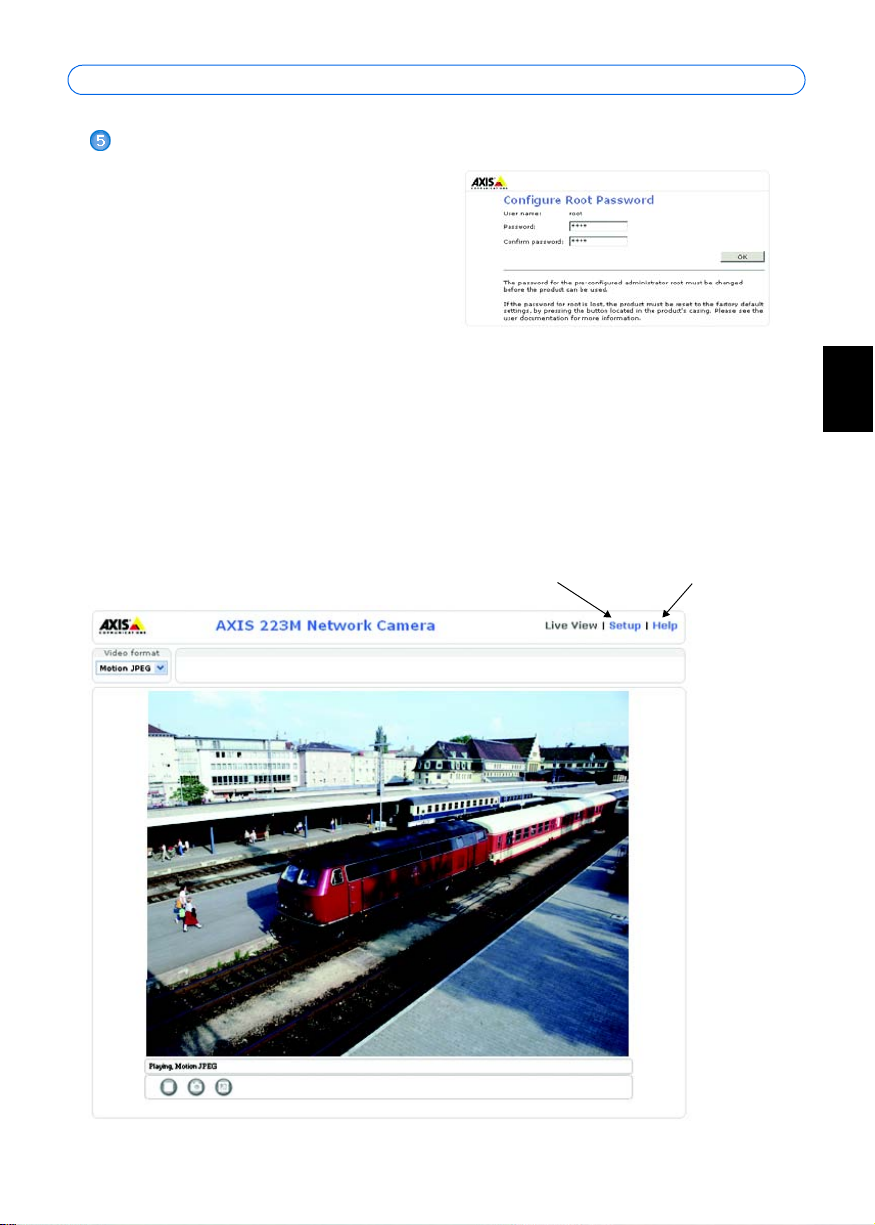
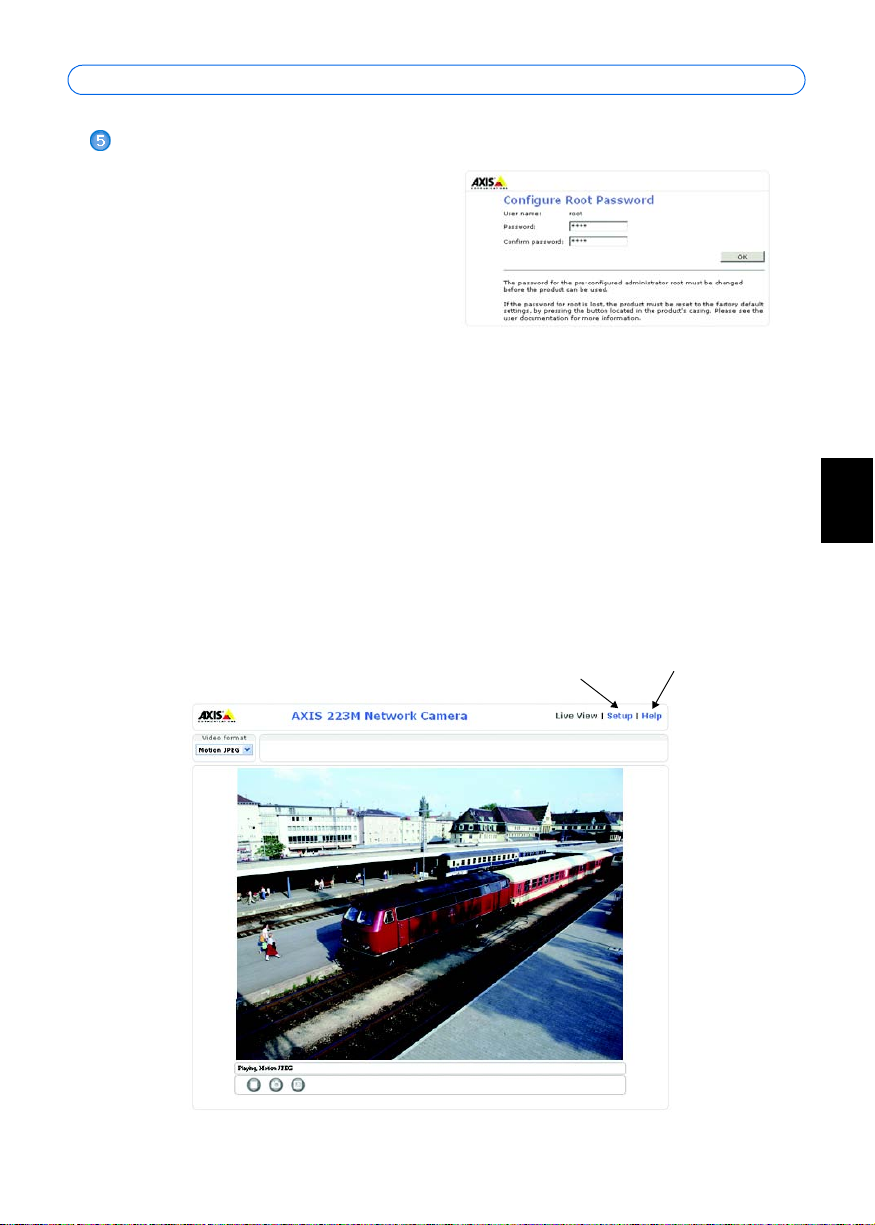
Set the password
When accessing the AXIS 221/223M for the
first time, the ‘Configure Root Password’
dialog will be displayed.
1. Enter a password and then re-enter it, to
confirm the spelling. Click OK.
2. Enter the user name root in the dialog.
Note: The default administrator user name
‘root’ cannot be deleted.
3. Enter the password as set above, and click OK. If the password is lost, the AXIS 221/
223M must be reset to the factory default settings. See page 12.
4. If required, click Yes to install AMC (AXIS Media Control), which allows viewing of the
video stream in Internet Explorer. You will need administrator rights on the computer to
do this.
The Live View page of the AXIS 221/223M is displayed, with links to the Setup tools, which
allow you to customize the camera.
Setup - Provides all the
necessary tools for setting up the
camera to requirements.
Help Displays
online help
ENGLISH
ENGLISH
ENGLISH
Page 10
Page 10 AXIS 221/223M Installation Guide
Other methods of setting the IP address
The table below shows the other methods available for setting or discovering the IP address.
All methods are enabled by default, and all can be disabled.
UPnP™
Bonjour
Operating
system
Windows
(ME or XP)
MAC OSX
(10.4 or later)
Notes
When enabled on your computer, the camera is automatically
detected and added to “My Network Places.”
Applicable to browsers with support for Bonjour. Navigate to
the Bonjour bookmark in your browser (e.g. Safari) and click on
the link to access the camera’s web pages.
AXIS Dynamic
DNS Service
All A free service from Axis that allows you to quickly and simply
install your camera. Requires an Internet connection with no
HTTP proxy. See www.axiscam.net for more information.
ARP/Ping
All See below. The command must be issued within 2 minutes of
connecting power to the camera.
View DHCP server
admin pages
All To view the admin pages for the network DHCP server, see the
server’s own documentation.
Set the IP address with ARP/Ping
1. Acquire an IP address on the same network segment your computer is connected to.
2. Locate the serial number (S/N) on the AXIS 221/223M label.
3. Open a command prompt on your computer and enter the following commands:
Windows syntax Windows example
arp -s <IP Address> <Serial Number>
ping -l 408 -t <IP Address>
arp -s 192.168.0.125 00-40-8c-18-10-00
ping -l 408 -t 192.168.0.125
UNIX/Linux/Mac syntax UNIX/Linux/Mac example
arp -s <IP Address> <Serial Number> temp
ping -s 408 <IP Address>
arp -s 192.168.0.125 00:40:8c:18:10:00
temp
ping -s 408 192.168.0.125
4. Check that the network cable is connected to the camera and then start/restart the
camera, by disconnecting and reconnecting power.
5. Close the command prompt when you see ‘Reply from 192.168.0.125: ...’ or similar.
6. In your browser, type in http://<IP address> in the Location/Address field and press Enter
on your keyboard.
Notes:
• To open a command prompt in Windows: from the Start menu, select Run... and type cmd. Click OK.
• To use the ARP command on a Mac OS X, use the Terminal utility in Application > Utilities.
Page 11

AXIS 221/223M Installation Guide Page 11
Unit connectors
Network connector - RJ-45 Ethernet connector. Supports Power over Ethernet. Using
shielded cables is recommended.
Power connector - Mini DC connector. 5.1V DC, max 3.6W. See product label for
connection.
Audio in - 3.5mm input for a mono microphone, or a line-in mono signal (left channel is
used from a stereo signal).
Audio out - Audio output (line level) that can be connected to a public address (PA) system
or an active speaker with a built-in amplifier. A pair of headphones can also be attached. A
stereo connector must be used for the audio out.
±
10 pin I/O terminal connector block
Pin Function Description
1 Output A On the external device output terminals (A and B), there is
2 Output B
3 Digital Input 1
Photocoupler Anode (+)
4 Digital Input 1
Photocoupler Cathode (-)
5 Digital Input 2
Photocoupler Anode (+)
6 Digital Input 2
Photocoupler Cathode (-)
7 RS-485-A (non-inverting) A half-duplex RS-485 interface for controlling auxiliary
8 RS-485-B (inverting)
9 DC+ Power Output This can drive the photocoupler inputs or other equipment.
10 GND Ground
no distinction between positive and negative (+ and -). The
terminals use a photocoupler and are electrically isolated
from the other internal circuitry.
The maximum load should not exceed 100mA and the maximum voltage should be not more than 50V DC. Note: Connecting AC to the output will damage the unit.
Photocoupled Input 1. Electrically isolated from the chassis
and connectors, this input can be supplied from an external
DC voltage or the DC Power Input/Output on pins 9 (DC+)
and 10 (GND).
Photocoupled Input 2. As above.
equipment.
The output voltage level is 3.0 V. A maximum current of
100mA can be sourced from the DC output.
ENGLISH
ENGLISH
ENGLISH
Page 12

Page 12 AXIS 221/223M Installation Guide
Accessing the AXIS 221/223M from the Internet
Once installed, your AXIS 221/223M is accessible on your local network (LAN). To access
the camera from the Internet, network routers must be configured to allow incoming traffic,
which is usually done on a specific port. Please refer to the documentation for your router
for further instructions. For more information on this and other topics, visit the Axis Support
Web at www.axis.com/techsup
Resetting to the Factory Default Settings
This will reset all parameters, including the IP address, to the Factory Default settings:
1. Disconnect power from the camera.
2. Press and hold the Control button and reconnect power.
3. Keep the Control button pressed until the Status indicator displays amber (this may take
up to 15 seconds), then release the button.
4. When the Status indicator displays green (which can take up to 1 minute) the process is
complete and the camera has been reset.
5. Re-assign the IP address, using one of the methods described in this document.
It is also possible to reset parameters to the original factory default settings via the web
interface. For more information, please see the online help or the user’s manual.
Further information
The user’s manual is available from the Axis Web site at www.axis.com or from the Axis
Network Video Product CD supplied with this product.
Tip!
Visit www.axis.com/techsup to check if there is updated firmware available for your
AXIS 221/223M. To see the currently installed firmware version, see the Basic
Configuration web page in the product’s Setup tools.
Page 13
AXIS 221/223M Guide d'installation Page 13
AXIS 221/223M
Guide d'installation
Ce guide d'installation vous explique comment installer l’AXIS 221/223M sur votre réseau.
Pour d'autres informations sur l'utilisation de ce produit, consultez le Manuel de l'utilisateur,
disponible sur le CD fourni ou sur www.axis.com/techsup.
Étapes de l'installation
1. Vérifiez le contenu de la livraison à l'aide de la liste ci-dessous.
2. Présentation du matériel. Reportez-vous à la page 14.
3. Branchez les câbles. Reportez-vous à la page 15.
4. Paramétrez une adresse IP. Reportez-vous à la page 16.
5. Définissez le mot de passe. Reportez-vous à la page 19.
Contenu de l'emballage
Article Modèles/variantes/remarques
Caméra réseau Caméra réseau AXIS 221
Caméra réseau AXIS 223M
Bague adaptatrice pour objectif CS (AXIS 223M uniquement)
Alimentation intérieure PS-K dépend du pays
Connecteur pour terminaux Connecteur 10 broches pour la connexion d'équipements externes au con-
necteur E/S
Connecteur 3 broches pour la connexion de l'alimentation au connecteur
d'alimentation 3 broches
CD CD AXIS Network Video Product avec la documentation du produit, les out-
ils d'installation et d'autres logiciels
Documentation imprimée AXIS 221/223M Guide d'installation (le présent document)
Document de garantie d'Axis
Important !
Ce produit doit être utilisé
conformément aux lois et
dispositions locales en
vigueur.
FRANÇAIS
FRANÇAIS
FRANCAIS
Important !
Pour pouvoir être utilisée à l'extérieur, la AXIS 221/223M doit être placée dans un
caisson de protection
d'autres accessoires, visitez le site www.axis.com.
. Pour plus d'informations sur les caissons de protection et sur
Page 14
Page 14 AXIS 221/223M Guide d'installation
-
Présentation du matériel
AXIS 223M - Vue arrière
Connecteur
E/S à 10
broches
Câble de
commande
de l'iris DC
Connecteur
RS-232
Bouton de
réinitialisation/
commande
Connecteur du
transformateur
(PS-K)
Sortie audio
Entrée audio
Voyant
d'état
Zoom
(Avant/Arrière)
Connecteur de réseau
(également PoE)
Voyants d'alimentation et
de réseau
Connecteur
d'alimentation
AXIS 221/223M
Vue avant
AXIS 221 - Vue arrière
réinitialisation/commande
Terminal
E/S à 10
broches
Connecteur
d'alimentation
Câble de
commande
de l'iris DC
Bouton de
Connecteur du
transformateur
(PS-K)
Mise au point
Iris DC
Voyant d'alimentation
Voyant de réseau
Connecteur
RS-232
Dimensions
H x L x P = 49 x 88 x 200 mm (1,9 " x 3,5 " x 7,9 ")
Poids = 620 g (21,9 oz) (alimentation non incluse)
ID du produit et numéro de série (S/N).
Le numéro de série peut être
requis pendant l'installation.
Connecteur de réseau
(également PoE)
Page 15
AXIS 221/223M Guide d'installation Page 15
Branchement des câbles
1. Connectez la caméra à votre réseau à l'aide d'un câble de réseau blindé.
2. Si vous le souhaitez, connectez des dispositifs d'entrée/sortie externes, par exemple des
dispositifs d'alarme. Reportez-vous à la page 22 pour plus d'informations sur les broches
du connecteur E/S.
3. Si vous le souhaitez, connectez un haut-parleur actif et/ou un microphone externe (AXIS
223M uniquement).
4. Branchez l'alimentation à l'aide de l'une des 3 méthodes reprises ci-dessous.
• PoE (Power over Ethernet). Si elle est disponible, cette option est automatiquement
détectée lorsque le câble réseau est branché (voir ci-dessus).
• Branchez le transformateur fourni au connecteur d'alimentation* de la caméra.
• Connecteur d'alimentation 3 broches sur le panneau arrière.
Consultez la figure ci-dessous.
5. Vérifiez que les DEL indiquent les conditions correctes. Pour plus d'informations,
consultez le tableau ci-dessous. Notez que certains témoins DEL peuvent être désactivés
et éteints.
Connecteur d'alimentation à 3 broches
CA CA
12
GND CC+
Branchez l'alimentation CA (10-24V) sur les broches 2 et 3.
3
Branchez l'alimentation CC (7-24V) sur les broches 1 et 2.
FRANÇAIS
FRANÇAIS
FRANCAIS
Témoins DEL
DEL Couleur Description
Réseau Vert Continu en cas de connexion à un réseau 100 Mbits/s. Clignote en cas
Orange Continu en cas de connexion à un réseau 10 Mbits/s. Clignote en cas
Éteint Pas de connexion.
État Vert Vert continu en cas de fonctionnement normal. Remarque : Le voyant d'état
Orange En continu pendant la réinitialisation des valeurs d'usine ou des paramètres.
Rouge Clignote lentement en cas d'échec de la mise à niveau.
Alimentation Vert Fonctionnement normal.
Orange Clignote en vert/orange pendant la mise à niveau du microprogramme.
* Utilisez uniquement le bloc d'alimentation PS-K fourni
d'activité réseau.
d'activité réseau.
peut être configuré pour être éteint au cours du fonctionnement normal, ou
pour clignoter uniquement lors des accès à la caméra. Reportez-vous à
l'aide en ligne pour plus d'informations.
Cliquez sur Setup > System Options > LED settings.
Page 16
Page 16 AXIS 221/223M Guide d'installation
Attribution d'une adresse IP
Pour que l'appareil AXIS 221/223M soit accessible sur le réseau, vous devez lui affecter une
adresse IP.
Selon le nombre de caméras à installer, pour attribuer des adresses IP sous Windows, il est
recommandé d'utiliser AXIS IP Utility ou AXIS Camera Management. Employez
l'application qui vous convient le mieux.
Ces deux applications gratuites sont disponibles sur le CD de la caméra vidéo réseau Axis
fourni avec ce produit. Vous pouvez également les télécharger à partir du site
www.axis.com/techsup.
Méthode Recommandée pour Système d'exploitation
AXIS IP Utility
Voir page 17
AXIS Camera Management
Voir page 18
Remarques :
• Un serveur DHCP réseau est fourni en option.
• L'adresse IP par défaut de l'appareil AXIS 221/223M est 192.168.0.90.
• En cas d'échec de l'attribution de l'adresse IP, vérifiez qu'aucun pare-feu ne bloque l'opération.
• Pour connaître les autres méthodes d'affectation ou de repérage de l'adresse IP de la caméra AXIS
221/223M, par exemple sur d'autres systèmes d'exploitation, reportez-vous à la page page 20.
Une seule caméra
Les petites installations
Plusieurs caméras
Les grandes installations
Installation sur un autre sous-réseau
Windows
Windows 2000
Windows XP Pro
Windows 2003 Server
Page 17
AXIS 221/223M Guide d'installation Page 17
AXIS IP Utility - Une seule caméra/petite installation
L'utilitaire AXIS IP Utility détecte et affiche automatiquement les périphériques Axis de
votre réseau. Cette application sert également à attribuer manuellement une adresse IP
statique.
Notez que l'ordinateur exécutant l'application AXIS IP Utility doit se trouver sur le même
segment de réseau (sous-réseau physique) que l'appareil AXIS 221/223M.
Détection automatique
1. Vérifiez que l'appareil AXIS 221/223M est connecté au réseau et que l'alimentation est
activée.
2. Démarrez AXIS IP Utility.
3. Lorsque l'icône de la caméra apparaît dans la fenêtre, double-cliquez dessus pour ouvrir
la page d'accueil correspondante.
4. Consultez la page 19 pour savoir comment définir le mot de passe.
FRANÇAIS
FRANÇAIS
FRANCAIS
Affectez manuellement l'adresse IP
1. Trouvez une adresse IP inutilisée sur le même segment de réseau que celui de votre
ordinateur.
2. Cliquez sur le bouton Assign IP address using serial number (Affecter l'adresse IP
en utilisant le numéro de série), puis saisissez le numéro de série et l'adresse IP de la
AXIS 221/223M. Le numéro de série se trouve sur l'étiquette du produit.
3. Cliquez sur le bouton Assign (Affecter) et suivez les instructions.
4. Cliquez sur le bouton Home Page (Page d'accueil) pour accéder aux pages Web de la
caméra.
5. Consultez la page 19 pour savoir comment définir le mot de passe.
Page 18
Page 18 AXIS 221/223M Guide d'installation
AXIS Camera Management - Plusieurs caméras/grandes installations
AXIS Camera Management détecte et définit automatiquement les adresses IP, affiche les
états de connexion et gère les mises à niveau de microprogrammes de nombreux produits
vidéo Axis.
Détection automatique
1. Vérifiez que la caméra est connectée au réseau et que l'alimentation est activée.
2. Démarrez AXIS Camera Management. Double-cliquez sur l'icône AXIS 221/223M,
lorsqu'elle apparaît dans la fenêtre de façon à ouvrir la page d'accueil.
3. Consultez la page 19 pour savoir comment définir le mot de passe.
Paramétrez l'adresse IP sur plusieurs appareils
AXIS Camera Management accélère le processus d'affectation d'adresses IP sur plusieurs
appareils en suggérant les adresses IP parmi une plage spécifiée.
1. Sélectionnez les appareils à configurer (il peut s'agir de plusieurs modèles), puis cliquez
sur le bouton Assign IP (Affecter une adresse IP).
2. Sélectionnez Obtain IP addresses automatically (DHCP) (Obtenir les adresses IP
automatiquement (DHCP)), puis cliquez sur le bouton Update (Mettre à jour).
L'application effectue une recherche dans la plage indiquée et suggère une adresse IP
pour chaque appareil.
-ouSaisissez la plage d'adresses IP, le masque de sous-réseau et le routeur par défaut que les
appareils peuvent utiliser, puis cliquez sur le bouton Update (Mettre à jour).
Page 19
AXIS 221/223M Guide d'installation Page 19
Définition du mot de passe
Si vous accédez à la caméra AXIS 221/223M
pour la première fois, la boîte de dialogue «
Configure Root Password » (Configurer le mot
de passe root) s'affiche à l'écran.
1. Entrez un mot de passe et entrez-le une
seconde fois pour en confirmer
l'orthographe. Cliquez sur OK.
2. Saisissez le nom d'utilisateur root dans la boîte de dialogue.
Remarque: Le nom d'utilisateur par défaut de l'administrateur, à savoir root, ne peut pas
être supprimé.
3. Entrez le mot de passe comme expliqué ci-dessus, puis cliquez sur OK. Si vous avez
oublié votre mot de passe, vous devrez rétablir les paramètres d'usine par défaut de la
caméra AXIS 221/223M. Reportez-vous à la page 23.
4. Si nécessaire, cliquez sur Yes (oui) pour installer AMC (Axis Media Control) afin de
pouvoir visualiser le flux vidéo dans Internet Explorer. Pour ce faire, vous devrez être
connecté à votre ordinateur avec les droits d'administrateur.
La page Live View (Vidéo en direct) de la caméra AXIS 221/223M s'affiche, avec des liens
vers les outils de configuration pour adapter la caméra à vos besoins.
Setup (Configuration) - Contient
tous les outils nécessaires pour
adapter la caméra à vos besoins.
Help (Aide)
Affiche l'aide
en ligne
FRANÇAIS
FRANÇAIS
FRANCAIS
Page 20

Page 20 AXIS 221/223M Guide d'installation
Autres méthodes de définition de l'adresse IP
Le tableau ci-dessous indique les autres méthodes permettant de définir ou de déterminer
l'adresse IP. Toutes les méthodes sont activées par défaut et désactivables.
UPnP™
Bonjour
AXIS Dynamic DNS
Service
ARP/Ping
Consultation des
pages administratives
du serveur DHCP
Système
d'exploitatio
n
Windows
(ME ou XP)
MAC OSX
(10.4 ou version
ultérieure)
Tous Service Axis gratuit vous permettant d'installer rapidement votre
Tous Reportez-vous aux instructions ci-dessous. La commande doit être
Tous Pour consulter les pages administratives du serveur DHCP réseau,
Remarques
Lorsque la caméra est activée sur votre ordinateur, elle est détectée
et ajoutée automatiquement au dossier Favoris réseau.
Applicable aux navigateurs prenant en charge Bonjour. Accédez au
raccourci de Bonjour dans votre navigateur (par exemple, Safari),
puis cliquez sur le lien pour accéder aux pages Web de la caméra.
caméra en toute simplicité. Nécessite une connexion Internet sans
proxy HTTP Pour plus d'informations, visitez le site www.axiscam.net.
saisie dans les 2 minutes suivant la connexion de l'alimentation à la
caméra.
reportez-vous à la documentation du serveur.
Page 21

AXIS 221/223M Guide d'installation Page 21
Définition de l'adresse IP à l'aide d'ARP/Ping
1. Trouvez une adresse IP inutilisée sur le même segment de réseau que celui de votre
ordinateur.
2. Repérez le numéro de série (S/N) sur l'étiquette de la caméra AXIS 221/223M.
3. Ouvrez une invite de commande sur votre ordinateur et entrez les commandes suivantes:
Syntaxe pour Windows Exemple pour Windows
arp -s <adresse IP> <numéro de série>
ping -l 408 -t <adresse IP>
Syntaxe pour UNIX/Linux/Mac Exemple pour UNIX/Linux/Mac
arp -s <adresse IP > <numéro de série>
temp
ping -s 408 <adresse IP>
arp -s 192.168.0.125 00-40-8c-18-10-00
ping -l 408 -t 192.168.0.125
arp -s 192.168.0.125 00:40:8c:18:10:00
temp
ping -s 408 192.168.0.125
4. Vérifiez que le câble réseau est connecté à la caméra, puis démarrez/redémarrez cette
dernière en débranchant, puis en rebranchant l'alimentation.
5. Fermez l'invite de commande quand vous voyez « Reply from 192.168.0.125: ... »
(Réponse de 192.168.0.125 : ...) ou un message similaire.
6. Dans votre navigateur, tapez http://<adresse IP> dans le champ Emplacement/Adresse,
puis appuyez sur Entrée sur le clavier.
Remarques :
• Pour ouvrir une invite de commande sous Windows : dans le menu Démarrer, sélectionnez Exécuter
et tapez cmd. Cliquez sur OK.
• Pour utiliser la commande ARP sur Mac OS X, utilisez l'utilitaire Terminal dans Application >
Utilitaires.
FRANÇAIS
FRANÇAIS
FRANCAIS
Page 22

Page 22 AXIS 221/223M Guide d'installation
Connecteurs de l'unité
Connecteur de réseau - Connecteur Ethernet RJ-45. Prend en charge la technologie PoE
(Power over Ethernet). Il est recommandé d'utiliser des câbles blindés.
Connecteur - Miniconnecteur CC. 5,1 V CC, jusqu'à 3,6 W. Reportez-vous à l'étiquette du
produit pour connaître la connexion
±.
Entrée audio - Entrée 3,5 mm pour microphone mono ou entrée de ligne pour signal mono
(le canal de gauche est utilisé pour un signal stéréo).
Sortie audio - Sortie audio (niveau de ligne) pouvant être connectée à un système de
sonorisation ou à un haut-parleur actif avec amplificateur intégré. Un casque peut
également être connecté. Pour une sortie audio, un connecteur stéréo doit être utilisé.
Connecteur pour terminaux E/S à 10 broches
Broche Fonction Description
1 Sortie A Sur les terminaux de sortie externes (A et B), il n'y a
2Sortie B
3 Entrée numérique 1
Anode de photocoupleur (+)
4 Entrée numérique 1
Cathode de photocoupleur (-)
5 Entrée numérique 2
Anode de photocoupleur (+)
6 Entrée numérique 2
Cathode de photocoupleur (-)
7 RS-485-A (non inverseuse) Une interface RS-485 bidirectionnelle non simultanée
8 RS-485-B (inverseuse)
9 Sortie CC+ Peut alimenter les entrées du photocoupleur ou d'autres
10 GND Terre
aucune distinction entre le positif et le négatif (+ et -). Les
terminaux utilisent un photocoupleur et sont isolés électriquement de l'autre circuit interne.
La charge maximale autorisée est de 100 mA et la tension
maximale ne doit pas dépasser 50V CC. Remarque : si vous
branchez l'alimentation CA à la sortie, l'appareil sera
endommagé.
Entrée photocouplée 1. Isolée électriquement du bâti et
des connecteurs, cette entrée peut être fournie par une
alimentation CC externe ou par l'entrée/la sortie CC sur
des broches 9 (CC+) et 10 (GND - mise à la terre).
Entrée photocouplée 2. Comme ci-avant.
pour commander le matériel auxiliaire.
équipements. Le niveau de la tension de sortie est de 3 V.
La sortie CC peut donner une intensité maximale de 100
mA.
Page 23

AXIS 221/223M Guide d'installation Page 23
Accès à la caméra AXIS 221/223M depuis Internet
Une fois installée, votre caméra AXIS 221/223M est accessible depuis votre réseau local
(LAN). Pour accéder à la caméra depuis Internet, vous devez configurer les routeurs réseau
afin d'autoriser l'entrée de données, ce qui se fait généralement sur un port spécifique.
Consultez la documentation de votre routeur pour obtenir davantage d'instructions. Pour de
plus amples informations, visitez le site de support d'Axis à l'adresse www.axis.com/techsup.
Rétablissement des paramètres d'usine par défaut
Procédez comme suit pour revenir aux paramètres par défaut définis en usine et réinitialiser
l'adresse IP :
1. Débranchez l'alimentation de la caméra.
2. Maintenez le bouton de commande enfoncé et rebranchez l'alimentation.
3. Maintenez le bouton enfoncé jusqu'à ce que le voyant d'état passe à l'orange (cela peut
prendre 15 secondes), puis relâchez le bouton.
4. Lorsque le voyant d'état émet une lumière verte (ce qui peut prendre 1 minute), les
paramètres par défaut de la caméra ont été rétablis.
5. Réaffectez l'adresse IP à l'aide de l'une des méthodes décrites dans ce document.
Il est également possible de rétablir les paramètres usine par défaut d'origine via l'interface
Web. Pour plus d'informations, reportez-vous à l'aide en ligne ou au Manuel de l'utilisateur.
Plus d'informations
Le Manuel de l'utilisateur est disponible sur le site Web d'Axis, www.axis.com, ou sur le CD
du produit vidéo réseau Axis fourni avec l'appareil.
FRANÇAIS
FRANÇAIS
FRANCAIS
Conseil :
Visitez le site www.axis.com/techsup pour vérifier si des microprogrammes mis à
jour sont disponibles pour votre appareil AXIS 221/223M. Pour connaître la version
du microprogramme actuellement installée, reportez-vous à la page Web Basic
Configuration (Configuration de base) dans les outils de configuration du produit.
Page 24

Page 25

AXIS 221/223M Installationsanleitung Seite 25
AXIS 221/223M
Installationsanleitung
In dieser Anleitung wird die Installation der AXIS 221/223M in einem Netzwerk beschrieben.
Alle weiteren Hinweise zur Verwendung des Produkts finden Sie im Benutzerhandbuch, das
auf der mitgelieferten CD oder auf unserer Webseite unter www.axis.com/techsup zur
Verfügung steht.
Installationsschritte
1. Prüfen Sie, ob alle in der nachfolgenden Liste aufgeführten Komponenten vorhanden
sind.
2. Hardwareübersicht: Siehe Seite 26.
3. Schließen Sie die Kabel an. Siehe Seite 27.
4. Legen Sie eine IP-Adresse fest. Siehe Seite 28.
5. Legen Sie ein Kennwort fest. Siehe Seite 31.
Lieferumfang
Komponente Modelle/Varianten/Anmerkungen
Netzwerkkamera AXIS 221 Netzwerkkamera
AXIS 223M Netzwerkkamera
Adapterring für CS-Objektiv (nur AXIS 223M)
PS-K Netzteil für
geschlossene Räume
Anschlussleiste 10-polige Klemmleiste zum Verbinden externer Geräte mit dem E/A-
CD CD für AXIS-Netzwerkvideoprodukte einschließlich
Gedruckte Dokumente AXIS 221/223M Installationshandbuch (dieses Dokument)
landesspezifisch
Anschluss
3-polige Anschlussleiste für die Stromversorgung über den 3-poligen
Stromanschluss
Produktdokumentation, Installationstools und anderer Software
Axis-Garantieerklärung
Wichtiger Hinweis!
Verwenden Sie dieses Produkt
nur gemäß der geltenden
rechtlichen Bestimmungen.
DEUTSCH
DEUTSCH
DEUTSCH
Wichtig!
Für die Benutzung im Freien muss die AXIS 221/223M in ein Schutzgehäuse eingebaut
werden. Weitere Informationen zum Schutzgehäuse und sonstigem Zubehör finden Sie
unter www.axis.com.
Page 26

Seite 26 AXIS 221/223M Installationsanleitung
Hardwareübersicht
AXIS 223M – Rückansicht
Taste Reset/Control
(Zurücksetzen/Steuerung)
10-poliger E/AAnschluss
DCIrisblende
Steuerkabel
RS-232-
Anschluss
Audio-Ausgang
Audio-Eingang
Netzteilanschluss
(PS-K)
Zoomregler
(Tele/Weitwinkel)
Schärferegler
Statusanzeige
NetzwerkAnschluss
(und PoE)
Betriebs- und Netzwerk-
Statusanzeige
Anschlussleiste
Stromversorgung
AXIS 221/223M-
Vorderseite
AXIS 221 – Rückansicht
Taste Reset/Control
(Zurücksetzen/Steuerung)
10-poliger E/A-
Anschluss
Stromanschlussleiste
DCIrisblende
Steuerkabel
Netzadapteranschluss
(PS-K)
DC-Irisblende
Betriebsanzeige
Netzwerkanzeige
RS-232Anschluss
Abmessungen
H × B × T = 49 × 88 × 200 mm
Gewicht = 620 g (ohne Netzteil)
Produkt- und Seriennummer (S/N)
Die Seriennummer wird
für die Installation benötigt.
Netzwerkanschluss
(und PoE)
Page 27

AXIS 221/223M Installationsanleitung Seite 27
Kabel anschließen
1. Verbinden Sie die Kamera über ein geschirmtes Netzwerkkabel mit dem Netzwerk.
2. Sie können zusätzlich externe Ein- und Ausgabegeräte, wie z. B. Alarmanlagen,
anschließen. Informationen zur Anschlussbelegung finden Sie auf Seite 33.
3. Sie können zusätzlich einen Aktivlautsprecher und/oder ein externes Mikrofon (nur bei
AXIS 223M) anschließen.
4. Schließen Sie die Kamera auf eine der folgenden Arten an die Stromversorgung an:
• PoE (Power over Ethernet). Wenn diese Option verfügbar ist, wird dies
automatisch erkannt, sobald das Netzwerkkabel angeschlossen wird (siehe oben).
• Schließen Sie das mitgelieferte Netzteil an den Netzanschluss der Kamera an*.
• Die 3-polige Anschlussleiste auf der Rückseite. Siehe Abbildung unten.
5. Überprüfen Sie, ob die LED-Anzeigen die korrekten Betriebszustände zeigen. Weitere
Informationen finden Sie in der Tabelle unten. Beachten Sie, dass LEDs deaktiviert sein
können und deshalb nicht leuchten.
3-polige Anschlussleiste für die Stromversorgung
DEUTSCH
DEUTSCH
AC AC
1
2
Masse DC+
Pins 2 und 3: 10–24 V Wechselspannung
3
Pins 1 und 2: 7–24 V Gleichspannung
LED-Anzeigen
LED Farbe Beschreibung
Netzwerk Grün
Gelb
Leuchtet
nicht
Status Grün
Gelb
Rot
Betrieb Grün
Gelb
* verwenden Sie nur das mitgelieferte PS-K Netzteil
Konstant bei Netzwerkverbindung mit 100 Mbit/s. Blinkt bei Netzwerkaktivität.
Konstant bei Netzwerkverbindung mit 10 Mbit/s. Blinkt bei Netzwerkaktivität.
Keine Verbindung.
Leuchtet bei normalem Betrieb konstant grün. Hinweis: Die Status-anzeige
kann so konfiguriert werden, dass sie bei normalem Betrieb nicht leuchtet oder
nur dann aufblinkt, wenn auf die Kamera zugegriffen wird. Nähere
Informationen dazu finden Sie in der Online-Hilfe. Wählen Sie Setup > System
Options > LED settings
Leuchtet konstant beim Start und beim Wiederherstellen der
Werkseinstellungen bzw. von vorherigen Einstellungen.
Blinkt langsam bei Aktualisierungsfehler.
Normalbetrieb.
Blinkt grün/gelb bei Firmware-Aktualisierung.
DEUTSCH
Page 28

Seite 28 AXIS 221/223M Installationsanleitung
IP-Adresse zuweisen
Der AXIS 221/223M muss eine IP-Adresse zugewiesen werden, damit sie im Netzwerk
verfügbar ist.
Von der Anzahl der zu installierenden Kameras hängt ab, ob die IP-Adressen unter Windows
mit Hilfe von AXIS IP Utility oder AXIS Camera Management zugewiesen werden sollten.
Verwenden Sie die für Ihre Zwecke geeignete Methode.
Beide Anwendungen stehen kostenlos auf der mitgelieferten CD für AxisNetzwerkvideoprodukte zur Verfügung oder können unter www.axis.com/techsup
heruntergeladen werden.
Methode Empfohlen für Betriebssystem
AXIS IP Utility
Siehe Seite 29
AXIS Camera
Management
Siehe Seite 30
Hinweise:
• Optional kann ein DHCP-Server im Netzwerk genutzt werden.
• Die Standard-IP-Adresse der AXIS 221/223M lautet 192.168.0.90.
• Falls Sie die IP-Adresse nicht zuweisen können, müssen ggf. die Einstellungen der Firewall überprüft
werden.
• Weitere Informationen zu alternativen Methoden zum Festlegen der IP-Adresse der AXIS 221/223M
(z. B. in anderen Betriebssystemen) finden Sie auf Seite 32.
Einzelne Kamera
Kleine Installationen
Mehrere Kameras
Große Installationen
Installation in einem anderen
Subnetz
Windows
Windows 2000
Windows XP Pro
Windows 2003 Server
Page 29

AXIS 221/223M Installationsanleitung Seite 29
AXIS IP Utility – Einzelne Kamera/Kleine Installation
AXIS IP Utility erkennt automatisch im Netzwerk vorhandene Axis-Geräte und zeigt diese
an. Die Anwendung kann außerdem zur manuellen Zuweisung einer statischen IP-Adresse
verwendet werden.
Beachten Sie, dass sich die AXIS 221/223M und der Computer, auf dem AXIS IP Utility
ausgeführt wird, im gleichen Netzwerksegment (physisches Subnetz) befinden müssen.
Automatische Erkennung
1. Stellen Sie sicher, dass die AXIS 221/223M an das Netzwerk und an die Stromversorgung
angeschlossen ist.
2. Starten Sie AXIS IP Utility.
3. Doppelklicken Sie auf das Symbol der Kamera, um die entsprechende Startseite zu
öffnen.
4. Anweisungen zum Festlegen des Kennworts finden Sie auf Seite 31.
DEUTSCH
DEUTSCH
DEUTSCH
Manuelle Zuweisung der IP-Adresse
1. Wählen Sie eine nicht zugewiesene IP-Adresse im gleichen Netzwerksegment, in dem
sich Ihr Computer befindet.
2. Klicken Sie auf die Schaltfläche Assign new IP address using serial number (Neue
IP-Adresse über Seriennummer festlegen), und geben Sie Seriennummer sowie IP-
Adresse der AXIS 221/223M ein. Die Seriennummer befindet sich auf dem
Produktaufkleber.
3. Klicken Sie auf die Schaltfläche Assign (IP-Adresse festlegen), und folgen Sie den
Anweisungen.
4. Klicken Sie auf die Schaltfläche Home Page (Startseite), um auf die Webseiten der
Kamera zuzugreifen.
5. Anweisungen zum Festlegen des Kennworts finden Sie auf Seite 31.
Page 30

Seite 30 AXIS 221/223M Installationsanleitung
AXIS Camera Management - Mehrere Kameras/Große Installation
Mit AXIS Camera Management können automatisch IP-Adressen gesucht und eingerichtet,
der Verbindungsstatus angezeigt und die Firmware-Aktualisierungen mehrerer AxisVideoprodukte verwaltet werden.
Automatische Erkennung
1. Stellen Sie sicher, dass die Kamera an das Netzwerk und an die Stromversorgung
angeschlossen ist.
2. Starten Sie AXIS Camera Management. Doppelklicken Sie auf das Symbol der AXIS 221/
223M, um die Startseite der Kamera zu öffnen.
3. Anweisungen zum Festlegen des Kennworts finden Sie auf Seite 31.
IP-Adresse für mehrere Geräte festlegen
AXIS Camera Management beschleunigt die Zuordnung von IP-Adressen für mehrere
Geräte, indem IP-Adressen aus einem angegebenen Bereich vorgeschlagen werden.
1. Wählen Sie die zu konfigurierenden Geräte aus (es können auch unterschiedliche
Modelle gewählt werden), und klicken Sie auf das Symbol Assign IP (IP-Adresse
zuweisen).
2. Wählen Sie Obtain IP addresses automatically (IP-Adressen automatisch zuweisen)
(DHCP), und klicken Sie auf die Schaltfläche Update (Aktualisieren). Das Programm
startet eine Suche im angegebenen Bereich und schlägt für jedes Gerät eine IP-Adresse
vor.
Oder:
Geben Sie den Bereich der IP-Adressen, die Subnetzmaske und den Standardrouter für
die Geräte ein, und klicken Sie auf die Schaltfläche Update (Aktualisieren).
Page 31

AXIS 221/223M Installationsanleitung Seite 31
Festlegen des Kennworts
Beim erstmaligen Zugriff auf die AXIS 221/
223M wird das Dialogfeld Configure Root
Password (Root-Kennwort konfigurieren)
angezeigt.
1. Geben Sie ein Kennwort ein, und
wiederholen Sie die Eingabe, um die
korrekte Schreibweise zu bestätigen.
Klicken Sie auf OK.
2. Geben Sie in das Dialogfeld als Benutzername „root“ ein.
Hinweis: Der vorgegebene Administrator-Benutzername „root“ kann nicht gelöscht
werden.
3. Geben Sie das zuvor festgelegte Kennwort ein, und klicken Sie auf OK. Wenn Sie das
Kennwort vergessen haben, muss die AXIS 221/223M auf die Werkseinstellungen
zurückgesetzt werden. Siehe Seite 35.
4. Klicken Sie auf Yes (Ja), um AMC (AXIS Media Control) zu installieren. Nach Abschluss
der Installation können Sie Video-Streams in Microsoft Internet Explorer anzeigen.
Hierzu müssen Sie über Administratorrechte für den Computer verfügen.
Die Seite „Direktübertragung“ der AXIS 221/223M wird angezeigt. Sie enthält Links zu
Setup-Tools, mit denen Sie die Kamera Ihren Bedürfnissen entsprechend anpassen können.
Setup: Hier finden Sie alle Tools, die Sie zum
Anpassen der Kamera an Ihre persönlichen
Anforderungen benötigen.
DEUTSCH
DEUTSCH
DEUTSCH
Hilfe: Zeigt
die OnlineHilfe an.
Page 32

Seite 32 AXIS 221/223M Installationsanleitung
Andere Methoden zum Festlegen der IP-Adresse
Diese Tabelle bietet einen Überblick über weitere Methoden, die IP-Adresse festzulegen bzw.
zu ermitteln. Alle Methoden sind standardmäßig aktiviert und können deaktiviert werden.
Betriebssystem Hinweise
UPnP™
Bonjour
AXIS Dynamic
DNS Service
ARP/Ping
Admin-Seiten des
DHCP-Servers
anzeigen
Windows
(ME oder XP)
MAC OSX
(ab Vers. 10.4)
Alle Ein kostenloser Service von Axis, mit dem Sie Ihre Kamera
Alle Siehe unten. Der Befehl muss innerhalb von 2 Minuten
Alle Hinweise zum Anzeigen der Administrationsseiten des DHCP-
Wenn die Funktion auf dem Computer aktiviert ist, wird die
Kamera automatisch erkannt und zur „Netzwerkumgebung“
hinzugefügt.
Kann nur bei Browsern verwendet werden, die Bonjour
unterstützen. Navigieren Sie zum Bonjour-Lesezeichen Ihres
Browsers (z. B. Safari), und klicken Sie auf den Link, um auf die
Webseiten der Kamera zu gelangen.
schnell und einfach installieren können. Voraussetzung ist eine
Internetverbindung ohne HTTP-Proxyserver. Weitere
Informationen hierzu finden Sie auf www.axiscam.net.
erfolgen, nachdem die Kamera an das Stromnetz
angeschlossen wurde.
Servers im Netzwerk finden Sie in der Serverdokumentation.
IP-Adresse per ARP/Ping zuweisen
1. Wählen Sie eine IP-Adresse aus dem Netzwerksegment, in dem sich auch Ihr Computer
befindet.
2. Suchen Sie die Seriennummer (S/N) auf dem Produktaufkleber der AXIS 221/223M.
3. Öffnen Sie auf Ihrem Computer die Eingabeaufforderung, und geben Sie die folgenden
Befehle ein:
Syntax unter Windows: Beispiel für Windows
arp -s <IP-Adresse> <Seriennummer>
ping -l 408 -t <IP-Adresse>
Syntax unter UNIX/Linux/Mac Beispiel für UNIX/Linux/Mac
arp -s <IP-Adresse> <Seriennummer> temp
ping -s 408 <IP-Adresse>
4. Stellen Sie sicher, dass das Netzwerkkabel mit der Kamera verbunden ist, und starten Sie
die Kamera bzw. starten Sie diese neu, indem Sie die Stromversorgung unterbrechen und
wiederherstellen.
arp -s 192.168.0.125 00-40-8c-18-10-00
ping -l 408 -t 192.168.0.125
arp -s 192.168.0.125 00:40:8c:18:10:00
temp
ping -s 408 192.168.0.125
Page 33

AXIS 221/223M Installationsanleitung Seite 33
5. Schließen Sie die Eingabeaufforderung, sobald ‚Reply from 192.168.0.125: ...’ oder eine
ähnliche Antwort angezeigt wird.
6. Starten Sie einen Browser, geben Sie im Adressfeld „http://<IP-Adresse>“ ein, und
drücken Sie die Eingabetaste auf der Tastatur.
Hinweise:
• So öffnen Sie unter Windows die Eingabeaufforderung: Wählen Sie „Ausführen...“ im Startmenü, und
geben Sie „cmd“ ein. Klicken Sie auf OK.
• Verwenden Sie zum Eingeben des Befehls „ARP“ unter Mac OS X das Dienstprogramm „Terminal“, das
Sie unter „Anwendung > Dienstprogramme“ finden.
Kameraanschlüsse
Netzwerkanschluss - RJ-45-Ethernetanschluss. Unterstützt PoE (Power over Ethernet). Die
Verwendung von geschirmten Kabeln wird empfohlen.
Stromanschluss - Mini-Gleichstromanschluss. 5,1 V Gleichstrom, max. 3,6 W. Siehe
Produktaufkleber bezüglich
Audio-Eingang - 3,5 mm-Eingang für Mono-Mikrofon oder Line-In-Monosignal (linker
Kanal für Stereo-Signal).
Audio-Ausgang - Audio-Ausgang (Line-Pegel), der mit einem PA-System oder einem
Aktivlautsprecher mit integriertem Verstärker verbunden werden kann. Auch der Anschluss
von Kopfhörern ist möglich. Für den Audio-Ausgang muss ein Stereoanschluss verwendet
werden.
±-Anschluss.
DEUTSCH
DEUTSCH
DEUTSCH
Page 34

Seite 34 AXIS 221/223M Installationsanleitung
10-polige E/A-Klemmleiste
Kontakt Funktion Beschreibung
1 Ausgang A An den Ausgängen für externe Geräte (A und B) wird
2 Ausgang B
3 Digitaler Eingang 1
Optokoppler-Anode (+)
4 Digitaler Eingang 1
Optokoppler-Kathode (-)
5 Digitaler Eingang 2
Optokoppler-Anode (+)
6 Digitaler Eingang 2
Optokoppler-Kathode (-)
7 RS-485-A (nicht
invertierend)
8 RS-485-B (invertierend)
9 Stromausgang DC+ Über diesen Ausgang werden der Optokoppler und
10 GND Masseanschluss
keine Unterscheidung zwischen Plus und Minus (+
und -) gemacht. Für die Anschlüsse wird ein
Optokoppler verwendet. Sie sind gegen andere interne
Schaltungen elektrisch isoliert.
Die maximale Stromstärke darf 100 mA nicht
überschreiten, und die Maximalspannung darf nicht
mehr als 50 V DC betragen. Hinweis: Wenn Sie an den
Ausgang Wechselspannung anlegen, wird das Gerät
beschädigt.
Optogekoppelter Eingang 1. Dieser Eingang ist vom
Gehäuse und den Anschlüssen elektrisch isoliert und
kann über eine externe Gleichspannungsquelle oder
den Gleichstrom-Eingang/-Ausgang an den Pins 9
(DC+) und 10 (Masse) mit Strom versorgt werden.
Optogekoppelter Eingang 2. Siehe oben.
Eine Halbduplex-Schnittstelle (RS-485) zum Steuern
von Zusatzausrüstung.
sonstige Ausrüstung betrieben. Die
Ausgangsspannung beträgt 3,0 V. Die maximale
Stromstärke des DC-Ausgangs liegt bei 100 mA.
Page 35

AXIS 221/223M Installationsanleitung Seite 35
Über das Internet auf die AXIS 221/223M zugreifen
Sobald die AXIS 221/223M installiert ist, können Sie über Ihr lokales Netzwerk (LAN) auf die
Kamera zugreifen. Um auch über das Internet auf die Kamera zugreifen zu können, müssen
Sie die Netzwerk-Router so konfigurieren, dass diese den entsprechenden eingehenden
Datenverkehr zulassen, was üblicherweise durch Zuweisung eines bestimmten Ports
geschieht. Ausführliche Informationen zu diesem Thema finden Sie in der Dokumentation
des Routers. Weitere Informationen hierzu und zu anderen Themen erhalten Sie auf der
Support-Webseite von Axis unter www.axis.com/techsup.
Zurücksetzen auf werkseitige Voreinstellungen
Gehen Sie folgendermaßen vor, um sämtliche Parameter einschließlich der IP-Adresse auf
die werkseitigen Standardeinstellungen zurückzusetzen:
1. Trennen Sie die Kamera von der Stromversorgung.
2. Halten Sie die Steuertaste gedrückt, und schließen Sie den Netzstecker wieder an.
3. Halten Sie die Steuertaste gedrückt, bis die Statusanzeige gelb leuchtet (dies kann bis zu
15 Sekunden dauern), und lassen Sie danach die Taste los.
4. Sobald die Statusanzeige grün leuchtet (dies kann bis zu einer Minute dauern), ist die
Kamera auf die werkseitigen Standardeinstellungen zurückgesetzt.
5. Weisen Sie die IP-Adresse erneut zu, indem Sie eines der in diesem Dokument
beschriebenen Verfahren verwenden.
Die Parameter können auch über die Weboberfläche auf die werkseitigen Einstellungen
zurückgesetzt werden. Weitere Informationen dazu finden Sie in der Online-Hilfe und im
Benutzerhandbuch.
Weitere Informationen
Das Benutzerhandbuch ist auf der Axis-Website unter www.axis.com erhältlich und befindet
sich auch auf der mitgelieferten CD für Axis-Netzwerkvideoprodukte.
Tipp!
Unter www.axis.com/techsup finden Sie Firmware-Aktualisierungen für Ihre AXIS
221/223M. Gehen Sie unter „Setup-Tools“ auf die Seite „Standardkonfiguration“,
um die aktuelle Firmware-Version anzuzeigen.
DEUTSCH
DEUTSCH
DEUTSCH
Page 36

Page 37

AXIS 221/223M Guía de instalación Página 37
AXIS 221/223M
Guía de instalación
Esta guía de instalación incluye las instrucciones necesarias para instalar la AXIS 221/223M
en su red. Para obtener información sobre cualquier cuestión relacionada con el uso del
producto, consulte el Manual del usuario, disponible en el CD que se incluye en este paquete
o en la página www.axis.com/techsup.
Pasos de instalación
1. Comprobación del contenido del paquete con la lista siguiente.
2. Presentación del hardware. Consulte la página 38.
3. Conexión de los cables. Consulte la página 39.
4. Configuración de una dirección IP.
Consulte la página 41.
5. Configuración de la contraseña.
Consulte la página 44.
Contenido del paquete
Artículo Modelos/variantes/notas
Cámara de red Cámara de Red AXIS 221
Cámara de Red AXIS 223M
Anillo adaptador de la lente CS (únicamente AXIS 223M)
Fuente de alimentación
para interior PS-K
Conector del bloque de
terminales
CD CD sobre el producto de vídeo de red de Axis, que incluye herramientas de
Material impreso Guía de instalación de AXIS 221/223M (este documento)
Específico del país
Bloque de conectores de 10 pines para conectar dispositivos externos al conector
de terminal de E/S
Bloque de conectores de 3 pines para proporcionar alimentación al conector de
alimentación de 3 pines
instalación, otro software y documentación acerca del producto
Documento de garantía de Axis
¡Importante!
Este producto debe utilizarse
de acuerdo con la legislación
y la normativa locales.
ESPAÑOL
ESPAÑOL
ESPAÑOL
Importante:
Para utilizar la AXIS 221/223M en espacios exteriores, es necesario instalar una caja
de protección. Si desea obtener más datos sobre las cajas de protección y otros
accesorios, visite www.axis.com.
Page 38

Página 38 AXIS 221/223M Guía de instalación
Presentación del hardware
AXIS 223M -Vista trasera
Salida de audio
Entrada de audio
Botón del zoom
(alejar/acercar)
Botón de
enfoque
Bloque de
conectores de
alimentación
Indicado
de estado
Conector
de red
(también PoE)
Indicadores de
alimentación y
de red
AXIS 221/223M
Vista frontal
Conector del
terminal de
E/S de 10
pines
Cable de
control
de DC-Iris
Botón de
reinicio/control
Conector
RS-232
Conector del
adaptador de
corriente (PS-K)
AXIS 221 - Vista trasera
Botón de
reinicio/control
Conector del
terminal de E/S de
10 pines
Bloque de
conectores de
alimentación
Cable de
control
de DC-Iris
Conector del
adaptador de
corriente
(PS-K)
DC-Iris
Indicador de alimentación
Indicador de red
Conector
RS-232
Etiqueta de ID y del número de
serie. Es posible que necesite
saber el número de serie
durante la instalación.
Conector de red
(también PoE)
Dimensiones
Alt. x Anch. x Prof. = 49 x 88 x 200mm (1,9" x 3,5" x 7,9")
Peso = 620g (21,9 onzas) (fuente de alimentación no incluida)
Page 39

AXIS 221/223M Guía de instalación Página 39
Conexión de los cables
1. Conecte la cámara a la red con un cable de red blindado.
2. También puede conectar dispositivos de entrada/salida externos, como dispositivos de
alarma. Para obtener más información sobre los pines de conectores de terminales,
consulte la página 47.
3. Como opción, puede conectar un altavoz activo o un micrófono externo (sólo AXIS
223M).
4. Conecte la alimentación utilizando uno de los métodos especificados en la lista que
aparece a continuación:
• PoE (corriente a través de Ethernet). Si está disponible, se detecta automáticamente
cuando el cable de red está conectado (consulte la ilustración anterior).
• Conecte la fuente de alimentación para interiores suministrada al conector de
alimentación* de la cámara.
• El bloque de conectores de alimentación de 3 pines del panel trasero. Consulte la
ilustración que aparece más abajo.
5. Compruebe que los indicadores LED anuncian las condiciones adecuadas. Para obtener
información más detallada, consulte la tabla que aparece abajo. Tenga en cuenta que
algunos LED pueden deshabilitarse y apagarse.
Bloque de conectores de alimentación de 3 pines
CA CA
Conecte la alimentación CA (10-24V) a los pines 2 y 3.
12
3
Conecte la alimentación CC (7-24V) a los pines 1 y 2.
GND CC+
ESPAÑOL
ESPAÑOL
ESPAÑOL
* utilice únicamente el alimentador PS-K suministrado
Page 40

Página 40 AXIS 221/223M Guía de instalación
Indicadores LED
LED Color Descripción
Red Verde Fijo para indicar conexión a una red de 100 Mbit/s. Parpadeo para indicar
actividad de red.
Ámbar Fijo para indicar conexión a una red de 10 Mbit/s. Parpadeo para indicar
actividad de red.
Apagado Sin conexión.
Estado Verde Verde fijo cuando el funcionamiento es normal. Nota: puede configurarse
Ámbar Fijo durante el inicio o cuando se restablecen los valores o la configuración
Rojo Parpadeo lento si no se puede realizar una actualización.
Alimentación Verde Funcionamiento normal.
Ámbar Parpadeo verde/ámbar durante la actualización del firmware.
el LED de estado para que esté apagado durante el funcionamiento normal
o que parpadee cuando se tiene acceso a la cámara. Para obtener más
información, consulte los archivos de la ayuda en línea. Vaya a Setup
(Configuración) > System Options (Opciones del sistema)> LED Settings
(Valores de los LED)
iniciales.
Page 41

AXIS 221/223M Guía de instalación Página 41
Asignación de una dirección IP
Debe asignarse una dirección IP a la AXIS 221/223M para que sea accesible desde la red.
Dependiendo del número de cámaras que desee instalar, el método recomendado de
asignación de direcciones IP en Windows será AXIS IP Utility o bien AXIS Camera
Management. Utilice el método que se adapte mejor a sus necesidades.
Ambas aplicaciones son gratuitas y están disponibles en el CD del producto de vídeo en red
de Axis suministrado con este producto o pueden descargarse de www.axis.com/techsup.
Método Recomendado para Sistema operativo
AXIS IP Utility
Consulte la página 42
AXIS Camera
Management
Consulte la página 43
Cámaras individuales
Instalaciones pequeñas
Varias cámaras
Instalaciones grandes
Instalación en una subred diferente
Windows
Windows 2000
Windows XP Pro
Windows 2003 Server
Notas:
• Se puede emplear de modo opcional un servidor DHCP de red.
• La AXIS 221/223M tiene la siguiente dirección IP predeterminada: 192.168.0.90.
• Si no puede asignar la dirección IP, compruebe que no haya ningún firewall que bloquee la operación.
• Consulte la página 45 para conocer otros métodos de asignación o detectar la dirección IP de la AXIS
221/223M, por ejemplo, en otros sistemas operativos.
ESPAÑOL
ESPAÑOL
ESPAÑOL
Page 42

Página 42 AXIS 221/223M Guía de instalación
AXIS IP Utility: Para cámaras individuales o instalaciones pequeñas
AXIS IP Utility descubre y muestra automáticamente los dispositivos Axis que existen en la
red. Además, puede utilizarse para fijar manualmente una dirección IP estática.
Recuerde que el equipo que ejecute AXIS IP Utility debe instalarse en el mismo segmento de
red (subred física) que la AXIS 221/223M.
Detección automática
1. Compruebe que la AXIS 221/223M está conectada a la red y que recibe alimentación.
2. Inicie AXIS IP Utiliy.
3. Cuando la cámara aparezca en la ventana, haga doble clic en ella para abrir la página de
inicio.
4. Consulte la página 44 para obtener instrucciones sobre cómo asignar la contraseña.
Asignación manual de la dirección IP
1. Obtenga una dirección IP que no esté en uso y que se encuentre en el mismo segmento
que su PC.
2. Haga clic en el botón Assign IP address using serial number <Asignar dirección IP
a partir del número de serie> e introduzca el número de serie y la dirección IP de la AXIS
221/223M. El número de serie aparece en la etiqueta del producto.
3. Haga clic en el botón Assign <Asignar> y siga las instrucciones.
4. Haga clic en Home Page <Página de inicio> para acceder a las páginas Web de la
cámara.
5. Consulte la página 44 para obtener instrucciones sobre cómo configurar la contraseña.
Page 43

AXIS 221/223M Guía de instalación Página 43
AXIS Camera Management: Para varias cámaras e instalaciones
grandes
AXIS Camera Management puede encontrar y configurar automáticamente direcciones IP,
mostrar el estado de la conexión y administrar las actualizaciones del firmware de varios
productos de vídeo de Axis.
Detección automática
1. Compruebe que la cámara está conectada a la red y que recibe alimentación.
2. Inicie AXIS Camera Management. Cuando aparezca la AXIS 221/223M en la ventana,
haga doble clic para abrir la página de inicio.
3. Consulte la página 44 para obtener instrucciones sobre cómo configurar la contraseña.
Configuración de la dirección IP en varios dispositivos
AXIS Camera Management acelera el proceso de asignación de direcciones IP en varios
dispositivos indicando direcciones IP disponibles dentro de un intervalo especificado.
ESPAÑOL
ESPAÑOL
ESPAÑOL
1. Seleccione los dispositivos que desee configurar (es posible seleccionar varios modelos) y
haga clic en el botón Assign IP <Asignar IP>.
2. Seleccione Obtain IP addresses automatically <Obtener direcciones IP
automáticamente> (DHCP), haga clic en el botón Actualización y el programa iniciará la
búsqueda en el intervalo especificado y sugerirá una dirección IP para cada dispositivo.
o bien
Introduzca el intervalo de direcciones IP, la máscara de subred y el router
predeterminado que pueden utilizar los dispositivos, y haga clic en el botón
Actualización.
Page 44

Página 44 AXIS 221/223M Guía de instalación
Configuración de la contraseña
Al acceder a la AXIS 221/223M por primera
vez, aparecerá el cuadro de diálogo
“Configurar contraseña de root”.
1. A continuación, escriba una contraseña y
vuelva a escribirla para confirmarla. Haga
clic en “OK” (Aceptar).
2. Escriba el nombre de usuario root en el
cuadro de diálogo
Nota: El nombre de usuario predeterminado para el administrador "root" no se puede
borrar.
3. Escriba la contraseña que introdujo anteriormente y haga clic en Aceptar. Si olvidó la
contraseña, debe restablecer la AXIS 221/223M a los valores iniciales. Consulte la página
48.
4. En caso necesario, haga clic en Sí para instalar el AMC (AXIS Media Control) y así
permitir la visualización del vídeo continuo en Internet Explorer. Para ello, debe tener
derechos de administrador en su ordenador.
La página En vivo de la AXIS 221/223M aparece con enlaces a las herramientas de
configuración que le permiten personalizar la cámara.
Setup: Proporciona todas las herramientas
necesarias para configurar la cámara según
sus requisitos.
Help:
Muestra la
ayuda en
línea
Page 45

AXIS 221/223M Guía de instalación Página 45
Otros métodos para configurar la dirección IP
Esta tabla presenta todos los métodos disponibles para configurar o detectar la dirección IP.
Todos los métodos están habilitados de forma predeterminada y es posible deshabilitarlos.
UPnP™
Bonjour
AXIS Dynamic
DNS Service
ARP/Ping
Visualización de
las páginas
admin. del
servidor DHCP
Sistema
operativo
Windows
(ME o XP)
MAC OSX
(10.4 o
posterior)
Todos Servicio gratuito de Axis que permite instalar la cámara de forma
Todos Véase más adelante. El comando debe emitirse en los dos minutos
Todos Para visualizar las páginas admin del servidor DHCP en red, consulte la
Notas
La cámara se detecta y se añade a “Mis sitios de red”
automáticamente, siempre que esta opción esté habilitada en el
equipo.
Aplicable a navegadores compatibles con Bonjour. Navegue hasta el
favorito Bonjour™ del explorador (p. ej., Safari) y haga clic en el vínculo
para acceder a las páginas Web de la cámara.
rápida y sencilla. Es necesario disponer de conexión a Internet sin
proxy HTTP. Para más información, consulte www.axiscam.net.
posteriores al encendido de la cámara.
documentación del servidor.
ESPAÑOL
ESPAÑOL
ESPAÑOL
Page 46

Página 46 AXIS 221/223M Guía de instalación
Configuración de la dirección IP con ARP/Ping
1. Adquiera una dirección IP en el mismo segmento de red en el que está conectado su
equipo.
2. Localice el número de serie (N/S) en la etiqueta de la AXIS 221/223M.
3. Abra una línea de comando en su equipo y escriba los comandos siguientes:
Sintaxis de Windows: Ejemplo de Windows
arp -s <Dirección IP> <Número de serie>
ping -l 408 -t <Dirección IP>
Sintaxis de UNIX/Linux/Mac Ejemplo de UNIX/Linux/Mac
arp -s <Dirección IP> <Número de serie>
temp
ping -s 408 <Dirección IP>
arp -s 192.168.0.125 00-40-8c-18-10-00
ping -l 408 -t 192.168.0.125
arp -s 192.168.0.125 00:40:8c:18:10:00
temp
ping -s 408 192.168.0.125
4. Compruebe que el cable de red está conectado a la cámara y desconecte y vuelva a
conectar la corriente para iniciarla o reiniciarla.
5. Cierre la línea de comando cuando vea ‘Reply from 192.168.0.125: ...’ o similar.
6. En el explorador, escriba http://<dirección IP> en el campo Ubicación/Dirección y pulse
Intro en el teclado.
Notas:
• Para abrir una línea de comando en Windows: desde el menú Inicio, seleccione Ejecutar… y escriba
cmd. Haga clic en Aceptar.
• Para utilizar el comando ARP en un sistema operativo Mac OS X, utilice la herramienta Terminal, que
se encuentra en Aplicaciones > Utilidades.
Page 47

AXIS 221/223M Guía de instalación Página 47
Conectores
Conector de red - Conector Ethernet RJ-45. Compatible con corriente a través de Ethernet.
Se recomienda emplear cables blindados.
Conector de alimentación - Conector mini de CC. 5,1V DC, máx. 3,6W. Consulte la etiqueta
del producto para información sobre la conexión de polaridad
positiva o negativa.
Entrada de audio - Entrada de 3,5mm para micrófono mono o a una señal mono de línea
(canal izquierdo utilizado desde una señal estéreo).
Salida de audio - Salida de audio (nivel de línea) que puede conectarse a un sistema de
dirección pública o un altavoz activo con amplificador incorporado. También puede añadirse
unos auriculares. Para la salida de audio, debe utilizarse un conector estéreo.
Bloque de conectores del terminal de E/S de 10 pines
Pin Función Descripción
1 Salida A En los terminales de salida del dispositivo externo (A y B) no se
2 Salida B
3 Entrada digital 1
Ánodo del fotoacoplador (+)
4 Entrada digital 1
Cátodo del fotoacoplador (-)
5 Entrada digital 2
Ánodo del fotoacoplador (+)
6 Entrada digital 2
Cátodo del fotoacoplador (-)
7 RS-485-A (sin inversión) Interfaz RS-458 semidúplex para controlar equipos auxiliares.
8 RS-485-B (inversión)
9 Salida de alimentación DC+ Compatible con las entradas del fotoacoplador u otro equipo.
10 GND Tierra
distingue el positivo del negativo (+ y-). Los terminales utilizan
un fotoacoplador y están aislados eléctricamente del resto de
los circuitos internos.
La carga máxima no debe superar los 100 mA y el voltaje
máximo no debe ser mayor de 50 V CC. Nota: si se conecta CA
en la salida, la unidad quedará dañada.
Entrada fotoacoplada 1. Esta entrada, que está aislada
eléctricamente de la carcasa y los conectores, puede recibir
corriente de una fuente CC externa o de la entrada/salida de
alimentación CC en los pines 9 (DC+) y 10 (GND).
Entrada fotoacoplada 2. Igual que lo descrito anteriormente.
La tensión de salida es de 3,0 V. La salida CC puede
proporcionar una corriente máxima de 100 mA.
ESPAÑOL
ESPAÑOL
ESPAÑOL
Page 48

Página 48 AXIS 221/223M Guía de instalación
Acceso a la AXIS 221/223M desde Internet
Una vez instalada, puede accederse a la AXIS 221/223M desde su red local (LAN). Para
acceder a la cámara desde Internet, los routers de red deben estar configurados para permitir
el tráfico de datos de entrada, que normalmente se efectúa en un puerto específico. Para
obtener más instrucciones, consulte la documentación de su router. Para obtener más
información sobre este u otros temas, visite la página de asistencia técnica de Axis en
www.axis.com/techsup.
Reconfiguración a los valores iniciales
Esta operación reconfigurará todos los parámetros, incluida la dirección IP, a los valores
iniciales:
1. Desconecte la alimentación de la cámara.
2. Mantenga presionado el botón de control y vuelva a conectar la alimentación.
3. Mantenga presionado el botón de control hasta que el indicador de estado brille con luz
ámbar (esto puede tardar hasta 15 segundos) y después suelte el botón.
4. Cuando el indicador de estado emita una luz verde (lo que puede tardar hasta 1 minuto),
ha finalizado el proceso y se han restablecido los valores iniciales de la cámara.
5. Vuelva a asignar la dirección IP utilizando uno de los métodos descritos en este
documento.
También es posible restablecer los valores predeterminados de la cámara mediante la interfaz
Web. Si desea más información, consulte la ayuda en línea o el manual del usuario.
Más información
Podrá acceder al Manual del usuario desde el sitio Web de Axis www.axis.com, o bien a
través del CD sobre el producto de vídeo de red de Axis suministrado con este producto.
Sugerencia:
Entre en www.axis.com/techsup para comprobar si existe firmware actualizado
disponible para la AXIS 221/223M. Para ver la versión de firmware que se encuentra
instalada en ese momento, consulte la página Web Configuración básica en las
herramientas de configuración del producto.
Page 49

Guida all'installazione di AXIS 221/223M Pagina 49
AXIS 221/223M
Guida all'installazione
Nel presente documento vengono fornite le istruzioni per installare la AXIS 221/223M nella
propria rete. Per tutti gli altri aspetti sull’utilizzo del prodotto, vedere il manuale dell’utente,
disponibile sul CD incluso nella confezione oppure all’indirizzo www.axis.com/techsup
Procedura di installazione
1. Controllare il contenuto della confezione utilizzando l'elenco fornito di seguito.
2. Panoramica dell’hardware. Vedere pagina 50.
3. Collegamento dei cavi. Vedere pagina 51.
4. Impostare un indirizzo IP. Vedere pagina 52.
5. Impostare la password. Vedere pagina 55.
Contenuto della confezione
Articolo Modello/varianti/note
Videocamera di rete Videocamera di rete AXIS 221
Videocamera di rete AXIS 223M
Anello adattatore obiettivo CS (solo AXIS 223M)
Alimentatore PS-K per uso
interno
Connettore della morsettiera Morsettiera a 10 pin per il collegamento di periferiche esterne al connettore
CD CD del prodotto, inclusi gli strumenti di installazione e altro software nonché
Documentazione cartacea Guida all'installazione di AXIS 221/223M (questo documento)
Specifico per il paese
I/O
Morsettiera a 3 pin per il collegamento dell’alimentazione al connettore di
alimentazione a 3 pin
la documentazione del prodotto
Certificato di garanzia Axis
Importante
Il prodotto deve essere
utilizzato in conformità alle
leggi e alle disposizioni locali.
ITALIANO
ITALIANO
Importante
Per utilizzarla in esterni, l'AXIS 221/223M deve essere installata in un alloggiamento
di protezione. Per ulteriori informazioni sugli alloggiamenti di protezione e altri
accessori, visitare il sito Web all'indirizzo www.axis.com.
Page 50

Pagina 50 Guida all’installazione di AXIS 221/223M
Panoramica dell’hardware
AXIS 223M - Vista posteriore
Morsettiera di
alimentazione
I/O a 10 pin
Pulsante
reset/controllo
Uscita audio
Ingresso audio
Connettore di
rete (anche PoE)
Indicatori di alimentazione
e di rete
Cavo di
controllo
obiettivo DC
Iris
Connettore
RS-232
AXIS 221 - Vista posteriore
Pulsante
Morsettiera
di alimentazione
I/O a 10 pin
Morsettiera
di
alimentazione
reset/controllo
Morsettiera di
Connettore di
alimentazione
(PS-K)
Levetta zoom
(Tele/wide)
Levetta
messa a
fuoco
DC-Iris controllo
diretto DC-Iris
Spia di alimentazione
Indicatore di rete
alimentazione
Indicatore
di stato
AXIS 221/223M
Vista anteriore
ID del prodotto e numero di serie (S/N).
Il numero di serie potrebbe essere
richiesto durante l'installazione.
Connettore di
rete (anche PoE)
Cavo di
controllo
obiettivo
DC Iris
Connettore di
alimentazione
(PS-K)
Connettore
RS-232
Dimensioni
AxLxP = 49 x 88 x 200 mm (1,9" x 3,5" x 7,9")
Peso = 620 g (21,9 oz) (alimentatore non incluso)
Page 51

Guida all'installazione di AXIS 221/223M Pagina 51
Collegamento dei cavi
1. Collegare la videocamera alla rete mediante un cavo di rete schermato.
2. Connettere altre periferiche esterne in ingresso/uscita (facoltativo) come, ad esempio,
sistemi di allarme. Per informazioni sui pin della morsettiera di alimentazione, vedere
pagina 58.
3. Collegare un altoparlante attivo o un microfono esterno (facoltativo) (solo AXIS 223M).
4. Collegare l'alimentazione mediante uno dei metodi elencati di seguito:
• PoE (Power over Ethernet). Se disponibile, è rilevato automaticamente al
collegamento dei cavi (vedere quanto riportato di sopra).
• Collegare l’alimentatore per uso interno al connettore di alimentazione* sulla
videocamera.
• Tramite la morsettiera di alimentazione a 3 pin sul pannello posteriore. Vedere
l'illustrazione riportata di seguito.
5. Verificare che i LED indichino le condizioni di funzionamento corrette. Per ulteriori
dettagli, consultare la tabella riportata di seguito. Notare che alcuni LED possono essere
disabilitati o spenti.
Morsettiera di alimentazione a 3 pin
CA CA
12
GND CC+
Collegare l'alimentazione CA (10-24 V) sui pin 2 e 3.
3
Collegare l'alimentazione CC (7-24V) sui pin 1 e 2.
ITALIANO
Indicatori LED
LED Colore Descrizione
Rete Verde Luce fissa: connessione di rete a 100 Mbit/s. Luce lampeggiante: attività di rete.
Giallo Luce fissa: connessione di rete a 10 Mbit/s. Luce lampeggiante: attività di rete.
Spia
spenta
Stato Verde Luce fissa: condizioni di normale utilizzo. Nota: è possibile configurare il LED di
Giallo Luce fissa: all'avvio ripristino delle impostazioni predefinite di fabbrica.
Rosso Luce lampeggiante lenta: aggiornamento non riuscito.
Alimentazione
Verde Normale utilizzo.
Giallo Luce lampeggiante verde/gialla: aggiornamento firmware.
* utilizza solo l'alimentatore PS-K fornito con l'unitá
Nessuna connessione attiva.
stato in modo che la spia rimanga spenta in condizioni di normale utilizzo
oppure in modo da ottenere una luce intermittente quando si effettua l'accesso
alla videocamera. Per ulteriori informazioni, consultare la Guida in linea. Andare
su Setup > System Options > LED settings
ITALIANO
Page 52

Pagina 52 Guida all’installazione di AXIS 221/223M
Assegnazione di un indirizzo IP
Per installare AXIS 221/223M in una rete è necessario assegnare alla videocamera un
indirizzo IP.
In base al numero di videocamere che si desidera installare, si consiglia di utilizzare AXIS IP
Utility o AXIS Camera Management per assegnare l’indirizzo IP in ambiente Windows.
Utilizzare il metodo che meglio si adatta alle proprie esigenze.
Entrambe le applicazioni sono disponibili gratuitamente sul CD del prodotto oppure possono
essere scaricate dal sito Web all’indirizzo www.axis.com/techsup.
Metodo Consigliato per… Sistema operativo
AXIS IP Utility
Vedere pagina 53
AXIS Camera
Management
Vedere pagina 54
Note
• L’utilizzo di un server DHCP di rete è facoltativo.
• L'indirizzo IP predefinito per la videocamera AXIS 221/223M è 192.168.0.90
• Se l'assegnazione dell'indirizzo IP non è riuscita correttamente, verificare che non siano presenti
firewall a bloccare l’operazione.
• Per altri metodi di assegnazione o di rilevazione dell’indirizzo IP per AXIS 221/223M, ad esempio in
altri sistemi operativi, vedere pagina 56.
Videocamera singola
Piccole installazioni
Più videocamere
Grandi installazioni
Installazione in una diversa subnet
Windows
Windows 2000
Windows XP Pro
Windows 2003 Server
Page 53

Guida all'installazione di AXIS 221/223M Pagina 53
AXIS IP Utility: poche videocamere/piccole installazioni
AXIS IP Utility consente di individuare e visualizzare automaticamente la presenza di
periferiche Axis sulla rete. L’applicazione inoltre può essere utilizzata per assegnare
manualmente un indirizzo IP statico.
Si tenga presente che AXIS 221/223M deve essere installata sullo stesso segmento di rete
(subnet fisica) del computer sul quale è in esecuzione AXIS IP Utility.
Rilevamento automatico
1. Verificare che AXIS 221/223M sia collegata alla rete e alimentata correttamente.
2. Avviare AXIS IP Utility.
3. Quando la videocamera verrà visualizzata, fare doppio clic su di essa per aprirne la home
page.
4. Vedere pagina 55 per istruzioni su come assegnare la password.
ITALIANO
Assegnazione automatica dell'indirizzo IP
1. Acquisire un indirizzo IP non utilizzato sullo stesso segmento di rete del computer.
2. Fare clic sul pulsante Assign new IP address using serial number (Assegna nuovo
indirizzo IP mediante numero di serie) e immettere il numero di serie e l'indirizzo IP
dell'AXIS 221/223M, che si trova sull'etichetta del prodotto stesso.
3. Fare clic sul pulsante Assign (Assegna) e seguire le istruzioni visualizzate.
4. Fare clic sul pulsante Home Page per accedere alle pagine Web della videocamera.
5. Vedere pagina 55 per istruzioni su come impostare la password.
ITALIANO
Page 54

Pagina 54 Guida all’installazione di AXIS 221/223M
AXIS Camera Management: più videocamere/grandi installazioni
AXIS Camera Management è in grado di individuare e impostare automaticamente gli
indirizzi IP, mostrare lo stato di connessione e gestire gli aggiornamenti del firmware di più
prodotti video Axis.
Rilevamento automatico
1. Verificare che la videocamera sia collegata alla rete e alimentata correttamente.
2. Avviare AXIS Camera Management. Quando verrà visualizzata la videocamera AXIS
221/223M, fare doppio clic su di essa per aprire la home page.
3. Vedere pagina 55 per istruzioni su come impostare la password.
Impostazione dell'indirizzo IP in più periferiche
AXIS Camera Management facilita il processo di assegnazione degli indirizzi IP di più
videocamere, suggerendo gli indirizzi IP in base a un intervallo specifico.
1. Selezionare le videocamere che si desidera configurare (possono essere selezionati
differenti modelli) e fare clic sul pulsante Assign IP (Assegna IP).
2. Selezionare Obtain IP addresses automatically (DHCP), (Ottieni indirizzo IP
automaticamente - DHCP), fare clic sul pulsante Update (Aggiorna) e il programma
ricercherà l’intervallo specifico, quindi suggerirà un indirizzo IP per ciascuna
videocamera.
-oppureImmettere l'intervallo di indirizzi IP, la subnet mask e il router predefinito per le
videocamere e fare clic sul pulsante Update (Aggiorna).
Page 55

Guida all'installazione di AXIS 221/223M Pagina 55
Impostazione della password
Quando si accede a AXIS 221/223M per la
prima volta, viene visualizzata la finestra di
dialogo "Configura password di primo
livello".
1. Immettere la password, quindi inserirla di
nuovo per confermarne l'esattezza. Fare
clic su OK.
2. Immettere il nome utente di primo livello nella finestra di dialogo.
Nota: non è possibile eliminare il nome utente "root" predefinito dell'amministratore.
3. Inserire la password impostata in precedenza e fare clic su OK. Se si dimentica la
password, sarà necessario ripristinare le impostazioni di fabbrica dell'AXIS 221/223M.
Vedere pagina 59.
4. Se necessario, fare clic su Sì per installare AMC (Axis Media Control) che consente di
visualizzare il flusso video in Microsoft Internet Explorer. A questo scopo è necessario
disporre dei privilegi di amministratore.
Viene visualizzata la pagina Immagini dal vivo di AXIS 221/223M con i collegamenti agli
strumenti di configurazione che consentono di personalizzare la videocamera.
Setup (Configurazione) - fornisce tutti gli
strumenti necessari per impostare la
videocamera in base alle necessità.
Help (Guida) Guida in linea
ITALIANO
ITALIANO
Page 56

Pagina 56 Guida all’installazione di AXIS 221/223M
Altri metodi di impostazione dell’indirizzo IP
Nella tabella sopra riportata sono illustrati altri metodi disponibili per impostare o
individuare l'indirizzo IP. Tutti i metodi sono disponibili per impostazione predefinita e
possono essere tutti disabilitati.
UPnP™
Bonjour
Servizio AXIS
Dynamic DNS
ARP/Ping
Visualizzazione
delle pagine di
amministrazione
del server DHCP
Sistema
operativo
Windows
(ME o XP)
MAC OSX
(versione 10.4 o
successive)
Tutti Un servizio gratuito fornito da Axis che consente di installare la
Tutti Vedere più avanti. È necessario eseguire il comando entro 2 minuti dal
Tutti Per visualizzare le pagine di amministrazione del server DHCP di rete,
Note
Se abilitato sul computer, la videocamera viene rilevata
automaticamente e aggiunta a “Risorse di rete”.
Si applica a browser con supporto Bonjour. Selezionare il segnalibro
Bonjour nel browser (ad esempio Safari) e fare clic sul collegamento
per accedere alle pagine Web della videocamera.
videocamera in modo facile e veloce. È necessaria una connessione a
Internet senza proxy HTTP. Per ulteriori informazioni, visitare il sito
Web all’indirizzo www.axiscam.net.
collegamento dell'alimentazione alla videocamera.
vedere la documentazione specifica del server.
Page 57

Guida all'installazione di AXIS 221/223M Pagina 57
Impostazione dell'indirizzo IP con ARP/Ping
1. Acquisire un indirizzo IP sullo stesso segmento di rete su cui è connesso il computer
utilizzato.
2. Individuare il numero di serie indicato sull'etichetta di AXIS 221/223M.
3. Aprire un prompt dei comandi sul computer e digitare i seguenti comandi:
Sintassi di Windows: Esempio di Windows
arp -s <Indirizzo IP> <Numero di serie>
ping -l 408 -t <Indirizzo IP>
Sintassi di UNIX/Linux/Mac: Esempio di UNIX/Linux/Mac
arp -s <Indirizzo IP> <Numero di serie>
temp
ping -s 408 <Indirizzo IP>
arp -s 192.168.0.125 00-40-8c-18-10-00
ping -l 408 -t 192.168.0.125
arp -s 192.168.0.125 00:40:8c:18:10:00
temp
ping -s 408 192.168.0.125
4. Verificare che il cavo di rete sia connesso alla videocamera e quindi avviare/riavviare la
videocamera, scollegando e ricollegando l’alimentazione.
5. Chiudere il prompt dei comandi una volta visualizzato il messaggio "Risposta da
192.168.0.125: ..." oppure un messaggio simile.
6. Nel browser immettere http://<indirizzo IP> nel campo del percorso/indirizzo e premere
Invio sulla tastiera.
Note
• Per aprire un prompt dei comandi in Windows: dal menu Start, selezionare Esegui... e immettere cmd.
Fare clic su OK.
• Per utilizzare il comando ARP su un sistema operativo Mac OS X, servirsi dell'utilità Terminal, in
Applicazioni > Utilità.
ITALIANO
ITALIANO
Page 58

Pagina 58 Guida all’installazione di AXIS 221/223M
Connettori
Connettore di rete: Ethernet RJ-45: PoE (Power over Ethernet). Si consiglia l’uso di cavi
schermati.
Connettore di alimentazione: a basso voltaggio. 5.1V DC, max 3.6W. Vedere l’etichetta sul
prodotto per la connessione dei poli
±.
Ingresso audio: 3,5 mm di ingresso per un solo microfono o per un solo segnale line-in
(canale di sinistra utilizzato per un segnale stereo).
Uscita audio: audio in uscita (livello segnale di linea) che può essere connesso ad un
indirizzo pubblico oppure un altoparlante attivo con amplificatore integrato. È possibile
collegare un paio di cuffie. È necessario utilizzare un connettore stereo per l'uscita audio.
Morsettiera di alimentazione I/O a 10 pin
Pin Funzione Descrizione
1 Uscita A Nei connettori di uscita della periferica esterna (A e B) non è
2Uscita B
3 Entrata digitale 1
Anodo optoisolatore (+)
4 Entrata digitale 1
Catodo optoisolatore (-)
5 Entrata digitale 2
Anodo optoisolatore (+)
6 Entrata digitale 2
Catodo optoisolatore (-)
7 RS-485-A (senza inversione) Interfaccia RS-485 con modalità half-duplex per l'apparecchiatura
8 RS-485-B (inversione)
9 Uscita CC+ Può alimentare le entrate dell'optoisolatore o altri strumenti. Il
10 GND Messa a terra
presente alcuna distinzione tra positivo e negativo (+ e -). Con i
connettori, isolati dagli altri circuiti elettrici interni, si utilizza un
componente optoisolato.
Non è possibile superare 100 mA di carico massimo e 50 V CC di
voltaggio massimo. Nota: se si collega l'alimentazione CA all'uscita
l'unità sarà danneggiata.
Entrata 1 optoisolata. Isolata dagli altri circuiti elettrici dello
chassis e dei connettori, questa entrata può essere alimentata da
una corrente CC esterna o dalla corrente CC di entrata/uscita sui
pin 9 (CC+) e 10 (messa a terra).
Entrata 2 optoisolata. Come descritto sopra.
di controllo ausiliaria.
voltaggio in uscita è pari a 3,0 V. Una corrente massima di 100mA
può essere alimentata dall'uscita CC.
Page 59

Guida all'installazione di AXIS 221/223M Pagina 59
Accesso all'AXIS 221/223M da Internet
Una volta installata, l'AXIS 221/223M è accessibile dalla LAN. Per accedere alla
videocamera da Internet, è necessario configurare i router di rete per consentire il traffico dei
dati in entrata, operazione che solitamente viene effettuata su una porta specifica. Per
ulteriori istruzioni sul router, fare riferimento alla documentazione. Per ulteriori
informazioni relative a questo e altri argomenti, visitare il sito Web del supporto tecnico di
Axis all'indirizzo www.axis.com/techsup
Ripristino delle impostazioni di fabbrica
Questa procedura consentirà di ripristinare le impostazioni di fabbrica per tutti i parametri,
incluso l'indirizzo IP.
1. Scollegare l'alimentazione dalla videocamera.
2. Tenere premuto il pulsante Control e ricollegare il cavo di alimentazione.
3. Tenere premuto il pulsante finché l'indicatore di stato diventa giallo (possono essere
necessari fino a 15 secondi), quindi rilasciare il pulsante.
4. Quando l'indicatore di stato diventa verde (l'operazione può richiedere fino a 1 minuto)
la procedura è completata e sono state ripristinate le impostazioni di fabbrica per la
videocamera.
5. Riassegnare l'indirizzo IP utilizzando uno dei metodi descritti nel presente documento.
È possibile inoltre ripristinare le impostazioni di fabbrica mediante l’interfaccia Web. Per
ulteriori informazioni, consultare la Guida in linea o il Manuale per l'utente.
ITALIANO
Ulteriori informazioni
Il Manuale per l’utente è disponibile sul sito Web di Axis all’indirizzo www.axis.com oppure
sul CD fornito con il prodotto.
Suggerimento
Visitare il sito di Axis all’indirizzo www.axis.com/techsup per verificare se sono stati
pubblicati aggiornamenti del firmware per la videocamera AXIS 221/223M. Per
conoscere la versione installata del firmware, vedere la pagina Configurazione base
negli strumenti di configurazione.
ITALIANO
Page 60

Page 61

AXIS 221/223M Installation Guide v1.2 February 2007
Copyright © Axis Communications AB, 2007 Part No. 28666
 Loading...