

Page 1

May 27, 2021
Rev. 1.0
© Axis Communications AB
HOW TO.
Generic Data Push Integration
Guide
Page 2

How To.
Generic Data Push Integration Guide
2
Contents
Introduction 3
System Architecture 4
Sample Data Output 5
Configuration 8
Example Implementation 9
Additional Resources 14
Page 3
How To.
Generic Data Push Integration Guide
3
Introduction
People-counting technolo g ies are widely used in man y t yp es of businesse s and
public locations. By auto matically counting the numbe r of persons that enter and
exit, people counte rs p rovide visitor statistics t h at enable businesses to anal yze
trends and optimize the ir operations.
Axis offers the analyti c s AXIS People Counter, which can be uploaded to any
compatible Axis camera, and AXI S P8815 -2 3D People Counter, wh ich consists of a
dedicated camera with e m b edded analytics . Both solutions pro vid e reliable results
when properly installed in s uitable locations.
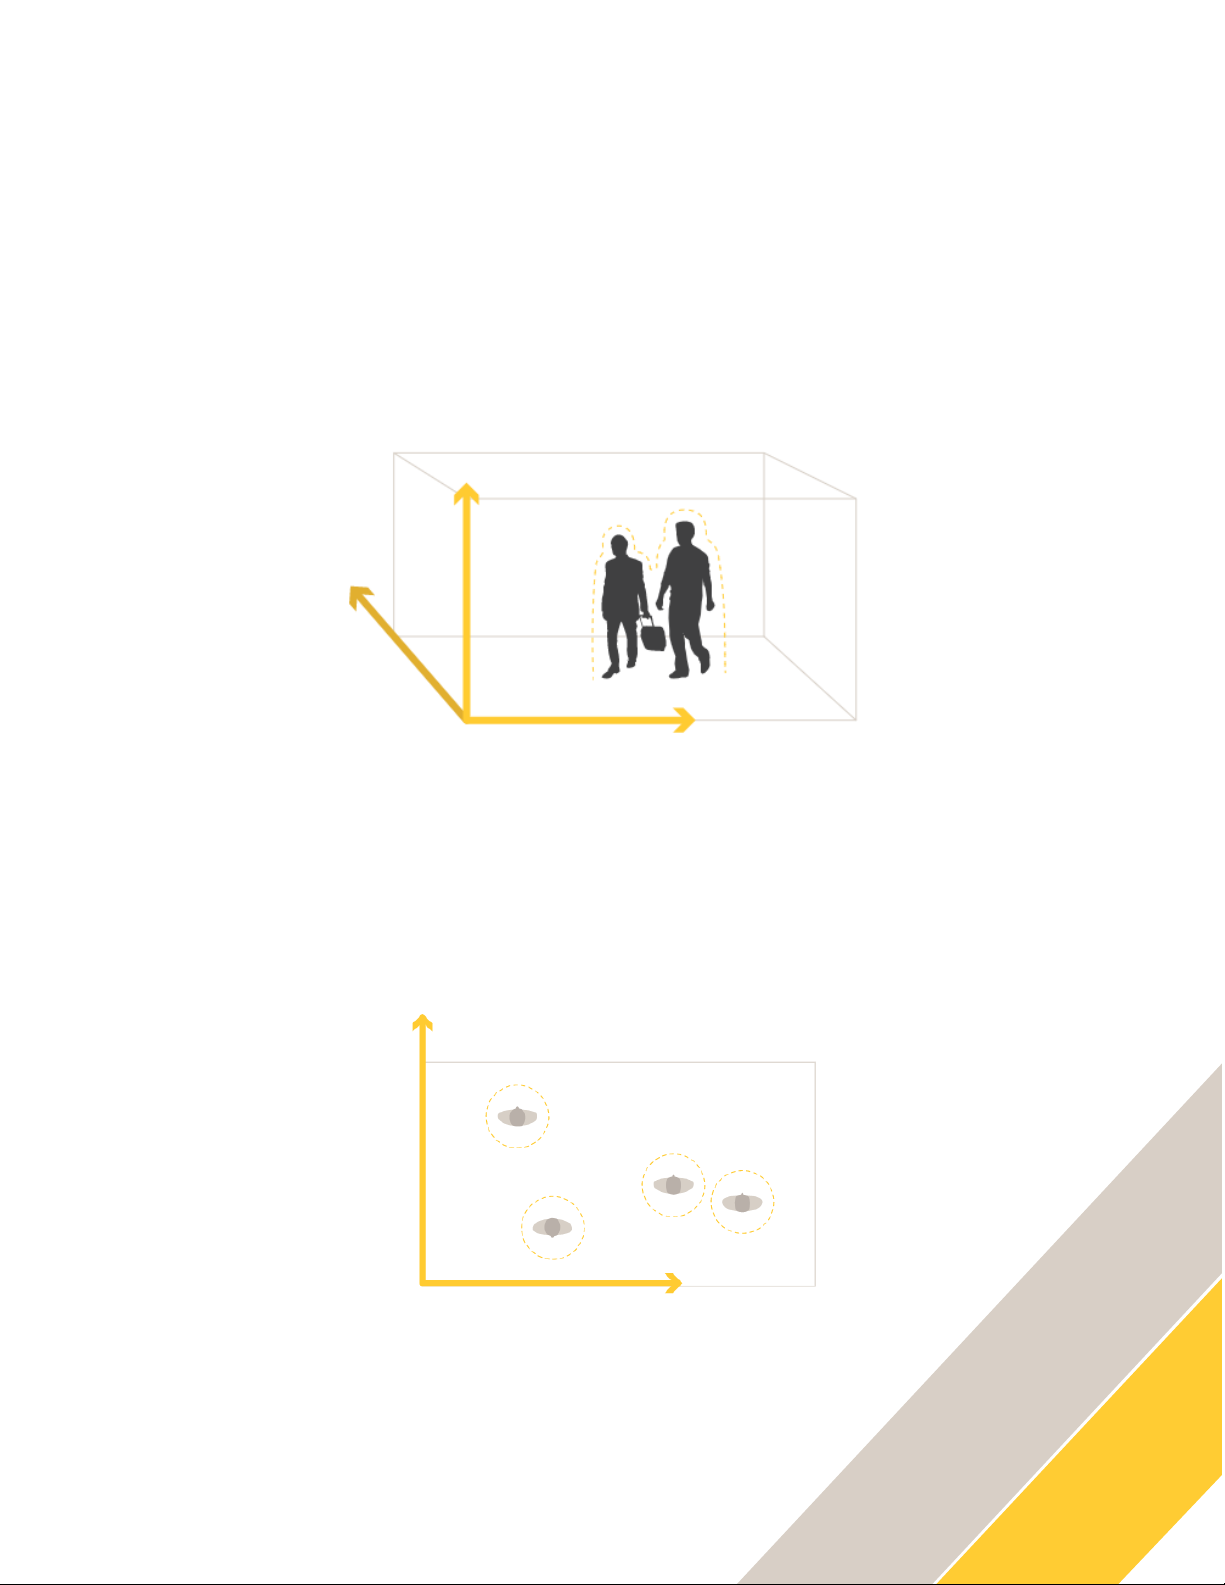
Figure 1. A 3D solution uses information from its two sensors to evaluate depth in the image.
AXIS P8815-2 3D People C o unter calculate s the depth within the maximum
counting area in order to m e asure the height and the siz e of the object. It is suitable
for crowded scenarios and scenes with challenging light c onditions like stro ng
sunlight, glares and shado ws.
Figure 2. A 2D solution registers moving objects on one plane, seen from above.
Page 4
How To.
Generic Data Push Integration Guide
4
AXIS People Counter is a 2D so lu tion that can be used o n a wide range of Axis
cameras. This makes it an eas y addition to a surve i lla nce site standardize d on a
specific Axis camera mo del or when there are spec ial r equirements on camera
capabilities and feat ures.
System Architecture
Axis people-counti ng s olutions offer a wide array o f reporting capabilitie s to enable
the integration of peop le counting data collecte d by the sensor into third -party
services and applicatio ns.
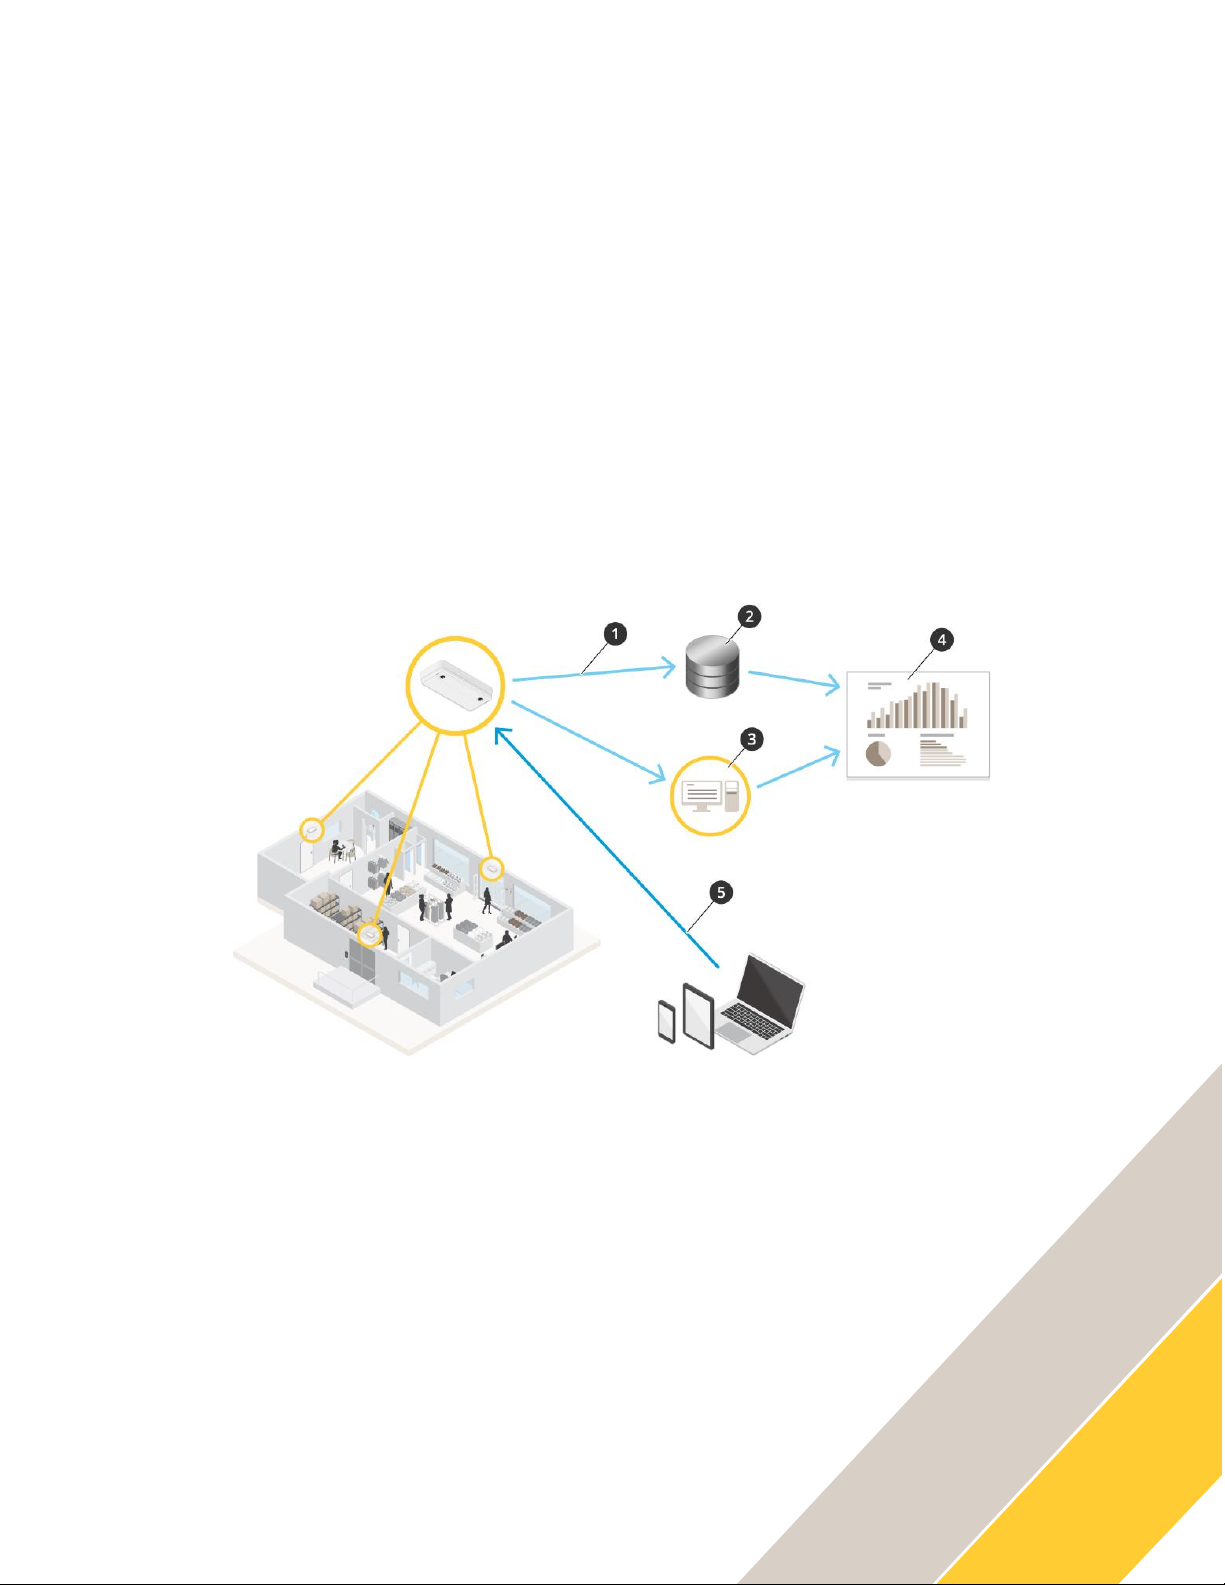
The following diagram dep icts a tradit i onal deployment of Axis p eople-c o unting
solutions in which the s e nsor data is integrated i nt o third -party applications and
services. It focuses on th e essential components o f the system and disregards other
as pects such as network se c urity component s which wou ld t ypically also be present
in the overall architect u re of a typical system.
1. AXIS P8815-2 3D People C o unter or AXIS People C o unter sends data
au tomatically to a remo te HTTPS destination thro ugh the data push
functionality.
2. A third-party database or service is used to store and p rocess the data
received from the AXIS P881 5-2 3D Peop le Counter or AXIS Peop le Counter.
3. Alt ernatively, the AXIS P8815 -2 3D People Co unter or AXIS People Counte r
sends data to a local inst anc e of AXIS S tore Data Manager wh ere the data is
stored.
4. A th ird-party reporting platfor m i s used to visualize t h e collected data from
the third-party databas e or AXIS Store Data Manager.
5. Alternatively, a built -in REST API allow s third -p arty applications to req uest
data d i rectly from the AXIS P881 5-2 3D Pe ople Counter or AXIS Peop le
Counter.
Page 5

How To.
Generic Data Push Integration Guide
5
This document focuses sp ecifically on the “Gene r ic Data Push” feature (1) used to
send raw data from the se nsor to a specified HTTPS endp oint in JSON format (2)
and p rovides a comp rehensive step -by-s tep integration guide includ ing a sample
implementation to help ge t you started.
For additional informatio n about the other integration cap abilities
depicted in the above illust r ation and complete API spe cifications of the
AXIS P8815-2 3D Peop le C o unter or AXIS People Counter, ple ase refer to
the application manual .
Sample Data Output
The JSON data ge ne rated by the Genetic Dat a Pu s h fe ature has the followi ng
structure:
{
"apiName":"Axis Retail Data",
"apiVersion":"0.4",
"utcSent":"2021-04-13T09:22:24Z",
"localSent":"2021-04-13T11:22:24",
"data":{
"utcFrom":"2021-04-13T09:19:00Z",
"utcTo":"2021-04-13T09:22:00Z",
"localFrom":"2021-04-13T11:19:00",
"localTo":"2021-04-13T11:22:00",
"measurements":[
{
"kind":"people-counts",
"utcFrom":"2021-04-13T09:19:00Z",
"utcTo":"2021-04-13T09:20:00Z",
"localFrom":"2021-04-13T11:19:00",
"localTo":"2021-04-13T11:20:00",
"items":[
{
"direction":"in",
"count":0,
"adults":0
},
{
"direction":"out",
"count":0,
"adults":0
}
]
}
]
},
"sensor":{
Page 6

How To.
Generic Data Push Integration Guide
6
"application":"AXIS 3D People Counter",
"applicationVersion":"10.5",
"timeZone":"Europe/Stockholm",
"name":"axis-accc8ef3d92e",
"serial":"accc8ef3d92e",
"ipAddress":"192.168.1.106"
}
}
Field Description
Field
Description
apiName
Name of the API being utilized
apiVersion
Version number of the API being
utilized
utcSent
UTC date and time when the data was
delivered
localSent
Local date and time when the data was
delivered
data
Array containing counting data
information
data[ ].utcFrom
UTC start date and time of the counting
data
data[ ].utcTo
UTC end date and time of the counting
data
data[ ].localFrom
Local start date and time of the
counting data
data[ ].localTo
Local end date and time of the counting
data
data[ ].measurements
Array containing counting data
measurements
data[ ].measurements[ ].kind
Type of data provided by the Axis
network camera
data[ ].measurements[ ].utcFrom
UTC start date and time of the counting
data for specific time interval
data[ ].measurements[ ].utcTo
UTC end date and time of the counting
data for specific time interval
data[ ].measurements[ ].localFrom
Local start date and time of the
counting data for specific time
interval
data[ ].measurements[ ].localTo
Local end date and time of the counting
data for specific time interval
data[ ].measurements[ ].items
Array containing the counting data for
specific time interval
data[ ].measurements[ ].items[ ].direction
Direction of the data recorded during
specific time interval – in or out
data[ ].measurements[ ].items[ ].count
Number of counts recorded during
specific time interval
data[ ].measurements[ ].items[ ].adults
Number of adult counts recorded during
specific time interval (only applicable
to AXIS P8815-2 3D People Counter)
sensor
Array containing sensor specific
information
Page 7

How To.
Generic Data Push Integration Guide
7
sensor[ ].application
Type of people counter application
sensor[ ].timeZone
Selected time zone for the Axis network
camera
sensor[ ].name
Device name provided from the
application
sensor[ ].serial
Serial number of the Axis network
camera
sensor[ ].ipAddress
IP address of the Axis network camera
NOT E
A response of 200 OK from the recipient is
necessary for the Axis device to send counting
data. Should there be an interruption in the
communication between the camera and the
recipient, the camera will automatically re-send
all counting data to the recipient since the last
200 OK response was received once the
communication resumes.
NOT E
At the time of writing, the latest protocol
version is 0.4. If the data being sent does
not correspond to the description stated in
this document, it is necessary to modify
the version of the protocol.
This is possible by issuing the following
request:
AXIS P8815-2 3D People Counter
Format: JSON
Method: PATCH
http://<servername>/a3dpc/api/settings
JSON input parameters
{"push_protocol_version":"V0_4"}
AXIS People Counter
http://CAMERAIP/axiscgi/param.cgi?action=update&
root.Tvpc.GenericHTTPPost0ProtocolVersion=V0_4
Page 8

How To.
Generic Data Push Integration Guide
8
Configuration
To enable the “Generic Data Push ” feature within th e AXIS P8815 -2 3D Peop le
Counter or AXIS Peo ple Counter application interface :
To make the device push d at a r egularly to a remote destination:
1. Go to Setup > Counte r and check that th e device has a name.
2. On the AXIS P8815 -2 3D People Counter, g o to Setup > Repo rting and turn
on R eport to server . On the AXIS People Counte r, go to Settings >
Reporting > Push Reporting.
3. In t h e URL field, enter the addr ess of the server, for
example https://example . com/path.
4. In the Send interval fi eld, set how ofte n yo u want th e device to send data to
the server. Th i s se tting is only av ail able on the AXIS P881 5-2 3D Peop le
Counter.
5. Optionally, enter a to ke n to let the device auth e nticate itself to the server in
the API token fie ld .
6. Click Te st connection .
If the connection is successful, it’s indi c ated by a white che c k mar k.
7. Click S av e.
NOT E
The remote destination must be configured with
HTTPS using a certificate validated by a public
or custom root CA, which must also be installed
on the Axis network camera in order to ensure
proper handshake and encryption of the data.
The certificate can be installed on the Axis
device by accessing Device settings > TCP/IP >
Security tab. Proceed to click on the + sign in
CA certificates and upload the certificate.
This step can be ignored if using a root CA
issued by a trusted certificate authority.
Page 9

How To.
Generic Data Push Integration Guide
9
Example Implementation
Axis has provided a sample HTTPS serv e r w ritten in Python that rec eives and parses
the data sent from the A XI S P8815 -2 3D P eople Counter or AXIS Pe ople Counter.
To make use of this example , it is nece ssary to install Python ve rsion 3 on the host
from which the script will be run. Pytho n is a standard compo nent in Linux
operating systems but need s to be manually installed on m achines running
Windows operating syste m s . The steps to install Pytho n ar e outside the scope of
this document, but the f o llowing page is a goo d resource to get Pyth on installed.
https://wiki.python.org/moin/BeginnersGuide/Download
To use the sample HTTPS ser v er:
1. Copy and paste the following code snippet in a notepad document and
sav e it as push_server.py. Please ensure that the file is saved with .py
as t he file extension, otherwise it might not be possible to run the
scr ipt.
#!/usr/bin/env python3
from http.server import BaseHTTPRequestHandler, HTTPServer
import logging
import json
import ssl
import socket
NOT E
Once the SSL certificate has been installed and
the data push feature enabled, the AXIS
P8815-2 3D People Counter or AXIS People
Counter will immediately begin sending stored
counting data in the desired time interval to the
recipient specified in the Reporting page.
NOT E
The following sample implementation requires
protocol version is 0.4 of the Generic Data Push
feature.
Page 10

How To.
Generic Data Push Integration Guide
10
class Handler(BaseHTTPRequestHandler):
def _set_response(self):
self.send_response(200)
self.send_header("Content-type", "text/html")
self.end_headers()
def do_GET(self):
raise NotImplementedError("GET request not supported")
def do_POST(self):
# Gets the size of data
content_length = int(self.headers["Content-Length"])
# Gets the data itself
post_data = self.rfile.read(content_length)
logging.debug(
"POST request,\nPath: %s\nHeaders:\n%s\n\nBody:\n%s\n",
str(self.path),
str(self.headers),
post_data.decode("utf-8"),
)
self.parse_and_print(post_data)
self._set_response()
self.wfile.write("POST request for {}".format(
self.path).encode("utf-8"))
def parse_and_print(self, post_data):
sensor_data = json.loads(post_data)
sensor_name = sensor_data["sensor"]["name"]
sensor_mac = sensor_data["sensor"]["serial"]
sensor_timezone = sensor_data["sensor"]["timeZone"]
sensor_IP = sensor_data["sensor"]["ipAddress"]
timestamp = sensor_data["localSent"]
if "data" not in sensor_data:
# Test connection message, no data appended
print("Connection from %s established successfully..." % sensor_IP)
else:
measurements = sensor_data["data"]["measurements"]
for measurement in measurements:
if measurement["items"] is None:
time_from = measurement["localFrom"]
time_to = measurement["localTo"]
print("Name: %s" % sensor_name)
print("Serial Number: %s" % sensor_mac)
print("Timezone: %s" % sensor_timezone)
print("Timestamp: %s" % timestamp)
print("From: %s" % time_from)
print("To: %s" % time_to)
print("In: 0")
print("Out: 0")
Page 11

How To.
Generic Data Push Integration Guide
11
print()
else:
counts = measurement["items"]
in_counts = counts[0]["count"]
out_counts = counts[1]["count"]
time_from = measurement["localFrom"]
time_to = measurement["localTo"]
print("Name: %s" % sensor_name)
print("Serial Number: %s" % sensor_mac)
print("Timezone: %s" % sensor_timezone)
print("Timestamp: %s" % timestamp)
print("From: %s" % time_from)
print("To: %s" % time_to)
print("In: %s" % in_counts)
print("Out: %s" % out_counts)
print()
def run(server_class=HTTPServer, handler_class=Handler, port=4443):
logging.basicConfig(level=logging.INFO)
hostname = socket.gethostname()
ip_address = socket.gethostbyname(hostname)
server_address = ("", port)
httpd = server_class(server_address, handler_class)
httpd.socket = ssl.wrap_socket(
httpd.socket,
certfile="server-cert.pem",
keyfile="server-key.pem",
server_side=True,
)
print("Starting sample push server on", ip_address, "on port 4443...")
try:
httpd.serve_forever()
except KeyboardInterrupt:
pass
httpd.server_close()
print("Stopping sample push server...")
if __name__ == "__main__":
from sys import argv
if len(argv) == 2:
run(port=int(argv[1]))
else:
run()
Page 12

How To.
Generic Data Push Integration Guide
12
2. As HTTPS is required to ensure encryption of the communication
between the device and receiving server, a root CA certificate and server
cert ificate must b e generated. The root CA certificate needs to b e
inst alled on the Axis device, whil e the server certi ficate is s tored on the
machine hosting the sample HTTPS server script.
For the purposes of thi s exercise, the following st eps provide guidance on
how to generate a self -signed certifi c ate using yourself as a root certificate
au thority.
a. Inst al l OpenSSL fro m http://openssl.org
b. Add th e path to the op e nssl.exe executable to yo ur PATH variable. Refer
to http://openssl.org for o ther configuration propert ies.
c. Navigate to the same directory where you saved th e push_server.py file.
d. To gener at e a CA private key, issue th e following command from a
command prompt:
openssl genrsa -des3 -out CA-key.pem 2048
e. To generate the root CA cert ificate, issue the following c o mmand:
openssl req -new -key CA-key.pem -x509 -days 1000 -out CA-cert.pem
You will need CA-ke y.pem and CA-cert.p e m to create and sign the server
certificate:
f. Generate a new key by issuing t he following comm and:
openssl genrsa -des3 -out server-key.pem 2048
Generate a self-sig ni ng request :
g. L ocate the openssl.c nf file is in your O penSSL installation directo ry.
NOT E
This configuration should only be used for
testing and development purposes. It is not
intended for use in a production environment.
NOT E
You will be prompted for information which will
be incorporated into the certificate, such as
Country, City, Company Name, etc. Remember
what information you entered as you may get
prompted for this information again at a later
stage.
Page 13

How To.
Generic Data Push Integration Guide
13
h. Copy the o pe nssl.cnf file to t h e directory where yo u saved the
push_server.py file.
i. Enter the following command:
openssl req –new –config openssl.cnf –key server-key.pem –out signreq.csr
j. Self-sign th e certificate us ing your CA-cert. p em certificate. Ent er the
following command (all in one li ne):
openssl x509 -req -days 365 -in signreq.csr
-CA CA-cert.pem -CAkey CA-key.pem -CAcreateserial -out server-cert.pem
k. If necessary, modify the location and name of the server certificate
on line 56 of the sample HTTPS server script.
3. Install the CA-cert.pem on the Axis device b y accessing System >
Security > CA certificates menu and clicking o n the + sign.
To run the HTTPS server, open a terminal or command line on the host
machine and navigate to the location where the push_server.py file is lo cated.
Execute the follow ing command:
python push_server.py
The terminal shoul d display the following informatio n upon successfully
running the script:
Starting sample push server on <host_ip> on port 4443.
Note the IP address and port that the server is running on.
At this point, the AXIS P8815 -2 3D People Counter or AXIS People Counter
can be configured as per the steps described in the “Configuration” chapter
NOT E
You will be prompted for information which
will be incorporated into the certificate, such
as Country, City, Company Name, etc. It is
necessary to input the server’s IP address or
FQDN when generating the signing request.
NOT E
If the connection is unsuccessful, please ensure
that an exception for incoming traffic on port
4443 has been added to the firewall for the
machine running the server.
Page 14

How To.
Generic Data Push Integration Guide
14
using the server’ s IP address and port in the URL field, followed by the time
interval in which the data should be sent. Click on “Test connection” button
to ensure that the connection to the receiving server is successful and save
the settings. The t erminal on the host machine will display a “ Co nnection
from <camera_IP> established successfully... ” upon successful
communication with the AXIS P8815 -2 3D P eople Counter or AXIS People
Counter.
After communicatio n between the device and the receiving server has been
established successfully, the following output containing the counting data
an d relevant information should be received accor ding to the time resolution
sel ected in the “Send interval” field of the AXIS P8815 -2 3D People Counter
or AXIS People Cou nter reporting settings page.
Name: axis-accc8ef3d92e
Serial Number: accc8ef3d92e
Timezone: Europe/Stockholm
Timestamp: 2021-03-18T15:55:12
From: 2021-03-18T15:54:00
To: 2021-03-18T15:55:00
In: 3
Out: 4
Additional Resources
AXIS P8815-2 3D People Counter Manual
https://help.axis.com/axis-p8815-2
AXIS People Counter Manual
https://help.axis.com/axis-people-counter
NOT E
When the communication between the device
and the receiving server is successfully
established, the device will automatically
push any historical data stored within the
device for up to 90 days.
 Loading...