

Page 1
AXISP5522–EPTZDomeNetworkCamera
ENGLISH
FRANÇAIS
DEUTSCH
ITALIANO
ESPANÕL
ò
ò
¨
¨
¾
¾
InstallationGuide
Page 2

LegalConsiderations
Videosurveillancecanberegulatedbylawsthatvaryfrom
countrytocountry.Checkthelawsinyourlocalregion
beforeusingthisproductforsurveillancepurposes.
Thisproductincludesone(1)H.264decoderlicense.To
purchasefurtherlicenses,contactyourreseller.
Liability
Everycarehasbeentakeninthepreparationofthis
document.PleaseinformyourlocalAxisofceofany
inaccuraciesoromissions.AxisCommunicationsABcannot
beheldresponsibleforanytechnicalortypographicalerrors
andreservestherighttomakechangestotheproductand
manualswithoutpriornotice.AxisCommunicationsAB
makesnowarrantyofanykindwithregardtothematerial
containedwithinthisdocument,including,butnotlimited
to,theimpliedwarrantiesofmerchantabilityandtnessfor
aparticularpurpose.AxisCommunicationsABshallnot
beliablenorresponsibleforincidentalorconsequential
damagesinconnectionwiththefurnishing,performance
oruseofthismaterial.Thisproductisonlytobeusedfor
itsintendedpurpose.
IntellectualPropertyRights
AxisABhasintellectualpropertyrightsrelatingto
technologyembodiedintheproductdescribedinthis
document.Inparticular,andwithoutlimitation,these
intellectualpropertyrightsmayincludeoneormoreof
thepatentslistedatwww.axis.com/patent.htmandoneor
moreadditionalpatentsorpendingpatentapplicationsin
theUSandothercountries.
Thisproductcontainslicensedthird-partysoftware.See
themenuitem“About”intheproduct’suserinterfacefor
moreinformation.
ThisproductcontainssourcecodecopyrightAppleComputer,
Inc.,underthetermsofApplePublicSourceLicense2.0
(seewww.opensource.apple.com/apsl).Thesourcecodeis
availablefromhttps://developer.apple.com/bonjour/
EquipmentModications
Thisequipmentmustbeinstalledandusedin
strictaccordancewiththeinstructionsgiveninthe
userdocumentation.Thisequipmentcontainsno
user-serviceablecomponents.Unauthorizedequipment
changesormodicationswillinvalidateallapplicable
regulatorycerticationsandapprovals.
TrademarkAcknowledgments
AXISCOMMUNICATIONS,AXIS,ETRAX,ARTPECandVAPIX
areregisteredtrademarksortrademarkapplicationsofAxis
ABinvariousjurisdictions.Allothercompanynamesand
productsaretrademarksorregisteredtrademarksoftheir
respectivecompanies.
Apple,Boa,Apache,Bonjour,Ethernet,InternetExplorer,
Linux,Microsoft,Mozilla,Real,SMPTE,QuickTime,UNIX,
Windows,WindowsVistaandWWWareregistered
trademarksoftherespectiveholders.Javaandall
Java-basedtrademarksandlogosaretrademarksor
registeredtrademarksofOracleand/oritsafliates.
TM
UPnP
isacerticationmarkoftheUPnP
Corporation.
SD,SDHCandSDXCaretrademarksorregisteredtrademarks
ofSD-3C,LLCintheUnitedStates,othercountriesorboth.
Also,miniSD,microSD,miniSDHC,microSDHC,microSDXC
arealltrademarksorregisteredtrademarksofSD-3C,LLC
intheUnitedStates,othercountriesorboth.
TM
Implementers
RegulatoryInformation
Europe
ThisproductcomplieswiththeapplicableCEmarking
directivesandharmonizedstandards:
•ElectromagneticCompatibility(EMC)Directive
2004/108/EC.SeeElectromagneticCompatibility(EMC)
onpage2.
•LowVoltage(LVD)Directive2006/95/EC.SeeSafety
onpage3.
•RestrictionsofHazardousSubstances(RoHS)Directive
201 1/65/EU.SeeDisposalandRecyclingonpage3.
Acopyoftheoriginaldeclarationofconformitymaybe
obtainedfromAxisCommunicationsAB.SeeContact
Informationonpage3.
ElectromagneticCompatibility(EMC)
Thisequipmenthasbeendesignedandtestedtofulll
applicablestandardsfor:
•Radiofrequencyemissionwheninstalledaccordingto
theinstructionsandusedinitsintendedenvironment.
•Immunitytoelectricalandelectromagneticphenomena
wheninstalledaccordingtotheinstructionsandused
initsintendedenvironment.
USA
Thisequipmenthasbeentestedusingashieldednetwork
cable(STP)andfoundtocomplywiththelimitsfora
ClassAdigitaldevice,pursuanttopart15oftheFCCRules.
Theselimitsaredesignedtoprovidereasonableprotection
againstharmfulinterferencewhentheequipmentis
operatedinacommercialenvironment.Thisequipment
generates,uses,andcanradiateradiofrequencyenergy
and,ifnotinstalledandusedinaccordancewiththe
instructionmanual,maycauseharmfulinterferenceto
radiocommunications.Operationofthisequipmentin
aresidentialareaislikelytocauseharmfulinterference
inwhichcasetheuserwillberequiredtocorrectthe
interferenceathisownexpense.
Theproductshallbeconnectedusingashieldednetwork
cable(STP)thatisproperlygrounded.
Canada
ThisdigitalapparatuscomplieswithCANICES-3(ClassA).
Theproductshallbeconnectedusingashieldednetwork
cable(STP)thatisproperlygrounded.
Cetappareilnumériqueestconformeàlanorme
NMBICES-3(classeA).Leproduitdoitêtreconnectéà
l'aided'uncâbleréseaublindé(STP)quiestcorrectement
misàlaterre.
Europe
ThisdigitalequipmentfulllstherequirementsforRF
emissionaccordingtotheClassAlimitofEN55022.The
productshallbeconnectedusingashieldednetworkcable
(STP)thatisproperlygrounded.Notice!ThisisaClassA
product.Inadomesticenvironmentthisproductmaycause
RFinterference,inwhichcasetheusermayberequired
totakeadequatemeasures.
Thisproductfulllstherequirementsforimmunity
accordingtoEN61000-6-1residential,commercialand
light-industrialenvironments.
Thisproductfulllstherequirementsforimmunity
accordingtoEN61000-6-2industrialenvironments.
Thisproductfulllstherequirementsforimmunity
accordingtoEN55024ofceandcommercialenvironments
Australia/NewZealand
ThisdigitalequipmentfulllstherequirementsforRF
emissionaccordingtotheClassAlimitofAS/NZSCISPR22.
Theproductshallbeconnectedusingashieldednetwork
Page 3
cable(STP)thatisproperlygrounded.Notice!Thisisa
ClassAproduct.Inadomesticenvironmentthisproduct
maycauseRFinterference,inwhichcasetheusermaybe
requiredtotakeadequatemeasures.
Japan
この装置は、クラスA情報技術装置です。この装
置を家庭環境で使用すると電波妨害を引き起こす
ことがあります。この場合には使用者が適切な対
策を講ずるよう要求されることがあります。本
製品は、シールドネットワークケーブル(STP)を
使用して接続してください。また適切に接地し
てください。
Korea
이기기는업무용(A급)전자파적합기기로서판매
자또는사용자는이점을주의하시기바라며,가
정외의지역에서사용하는것을목적으로합니다.
적절히접지된STP(shieldedtwistedpair)케이블
을사용하여제품을연결하십시오.
Safety
ThisproductcomplieswithIEC/EN60950-1and
IEC/EN60950-22,SafetyofInformationTechnology
Equipment.Theproductshallbegroundedeitherthrougha
shieldednetworkcable(STP)orotherappropriatemethod.
DisposalandRecycling
Whenthisproducthasreachedtheendofitsusefullife,
disposeofitaccordingtolocallawsandregulations.For
informationaboutyournearestdesignatedcollectionpoint,
contactyourlocalauthorityresponsibleforwastedisposal.
Inaccordancewithlocallegislation,penaltiesmaybe
applicableforincorrectdisposalofthiswaste.
Europe
Thissymbolmeansthattheproductshallnotbe
disposedoftogetherwithhouseholdorcommercialwaste.
Directive2012/19/EUonwasteelectricalandelectronic
equipment(WEEE)isapplicableintheEuropeanUnion
memberstates.Topreventpotentialharmtohumanhealth
andtheenvironment,theproductmustbedisposedofin
anapprovedandenvironmentallysaferecyclingprocess.
Forinformationaboutyournearestdesignatedcollection
point,contactyourlocalauthorityresponsibleforwaste
disposal.Businessesshouldcontacttheproductsupplierfor
informationabouthowtodisposeofthisproductcorrectly.
Thisproductcomplieswiththerequirementsof
Directive2011/65/EUontherestrictionoftheuseof
certainhazardoussubstancesinelectricalandelectronic
equipment(RoHS).
China
Thisproductcomplieswiththerequirementsofthe
legislativeactAdministrationontheControlofPollution
CausedbyElectronicInformationProducts(ACPEIP).
ContactInformation
AxisCommunicationsAB
Emdalavägen14
22369Lund
Sweden
Tel:+46462721800
Fax:+4646136130
www.axis.com
Support
Shouldyourequireanytechnicalassistance,pleasecontact
yourAxisreseller.Ifyourquestionscannotbeanswered
immediately,yourresellerwillforwardyourqueriesthrough
theappropriatechannelstoensurearapidresponse.Ifyou
areconnectedtotheInternet,youcan:
•downloaduserdocumentationandsoftwareupdates
•ndanswerstoresolvedproblemsintheFAQdatabase.
Searchbyproduct,category,orphrase
•reportproblemstoAxissupportstaffbylogginginto
yourprivatesupportarea
•chatwithAxissupportstaff(selectedcountriesonly)
•visitAxisSupportatwww.axis.com/techsup/
LearnMore!
VisitAxislearningcenterwww.axis.com/academy/for
usefultrainings,webinars,tutorialsandguides.
Page 4

Page 5
AXISP5522–EPTZDomeNetworkCamera
ENGLISH
SafetyInformation
ReadthroughthisInstallationGuidecarefullybeforeinstallingtheproduct.KeeptheInstallation
Guideforfuturereference.
HazardLevels
DANGER
WARNING
CAUTION
NO
TICE
NO NO
TICE TICE
Indicatesahazardoussituationwhich,ifnotavoided,willresultin
deathorseriousinjury.
Indicatesahazardoussituationwhich,ifnotavoided,couldresult
indeathorseriousinjury.
Indicatesahazardoussituationwhich,ifnotavoided,couldresult
inminorormoderateinjury.
Indicatesasituationwhich,ifnotavoided,couldresultindamage
toproperty.
OtherMessageLevels
ImportantIndicatessignicantinformationwhichisessentialfortheproduct
NoteIndicatesusefulinformationwhichhelpsingettingthemostout
tofunctioncorrectly.
oftheproduct.
5
Page 6

AXISP5522–EPTZDomeNetworkCamera
SafetyInstructions
NO
TICE
NO NO
TICE TICE
•TheAxisproductshallbeusedincompliancewithlocallawsandregulations.
•StoretheAxisproductinadryandventilatedenvironment.
•AvoidexposingtheAxisproducttoshocksorheavypressure.
•Donotinstalltheproductonunstablebrackets,surfacesorwalls.
•UseonlyapplicabletoolswheninstallingtheAxisproduct.Usingexcessiveforcewith
powertoolscouldcausedamagetotheproduct.
•Donotusechemicals,causticagents,oraerosolcleaners.
•Useacleanclothdampenedwithpurewaterforcleaning.
•Useonlyaccessoriesthatcomplywithtechnicalspecicationoftheproduct.Thesecanbe
providedbyAxisorathirdparty.
•UseonlysparepartsprovidedbyorrecommendedbyAxis.
•Donotattempttorepairtheproductbyyourself.ContactAxissupportoryourAxis
resellerforservicematters.
Transportation
NO
TICE
NO NO
TICE TICE
•WhentransportingtheAxisproduct,usetheoriginalpackagingorequivalenttoprevent
damagetotheproduct.
Battery
TheAxisproductusesa3.0VBR/CR2032lithiumbatteryasthepowersupplyforitsinternal
real-timeclock(RTC).Undernormalconditionsthisbatterywilllastforaminimumofveyears.
LowbatterypoweraffectstheoperationoftheRTC,causingittoresetateverypower-up.When
thebatteryneedsreplacing,alogmessagewillappearintheproduct’sserverreport.Formore
informationabouttheserverreport,seetheproduct´ssetuppagesorcontactAxissupport.
Thebatteryshouldnotbereplacedunlessrequired,butifthebatterydoesneedreplacing,contact
Axissupportatwww.axis.com/techsupforassistance.
WARNING
•Riskofexplosionifthebatteryisincorrectlyreplaced.
•ReplaceonlywithanidenticalbatteryorabatterywhichisrecommendedbyAxis.
•Disposeofusedbatteriesaccordingtolocalregulationsorthebatterymanufacturer's
instructions.
6
Page 7

AXISP5522–EPTZDomeNetworkCamera
ENGLISH
DomeCover
NO
TICE
NO NO
TICE TICE
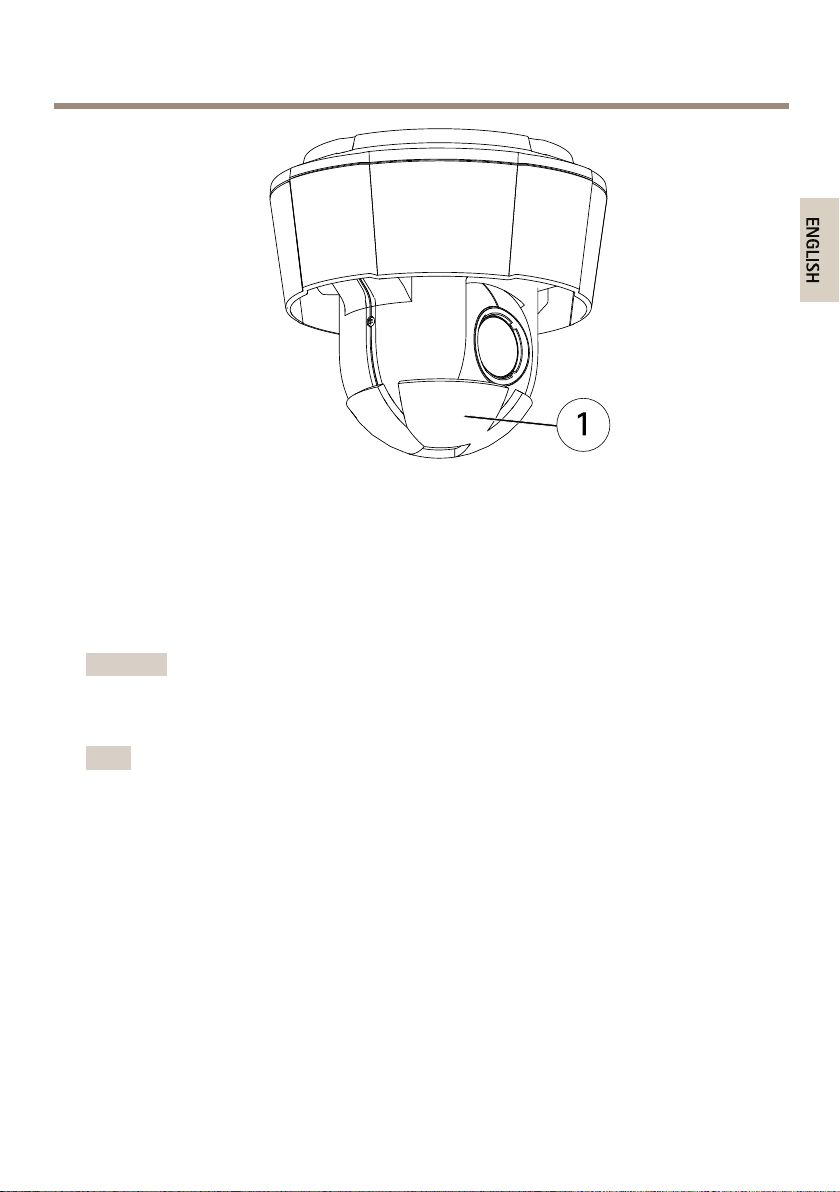
•Becarefulnottoscratch,damageorleavengerprintsonthedomecoverbecausethis
coulddecreaseimagequality.Ifpossible,keeptheprotectiveplasticonthedomecover
untiltheinstallationiscomplete.
•Donotcleanadomecoverthatlookscleantotheeyeandneverpolishthesurface.
Excessivecleaningcoulddamagethesurface.
•Forgeneralcleaningofthedomecoveritisrecommendedtouseanon-abrasive,
solvent-freeneutralsoapordetergentmixedwithpurewaterandasoft,cleancloth.Rinse
wellwithpurelukewarmwater.Drywithasoft,cleanclothtopreventwaterspotting.
•Neveruseharshdetergents,gasoline,benzeneoracetoneetc.andavoidcleaningthe
domecoverindirectsunlightoratelevatedtemperatures.
7
Page 8

8
Page 9

AXISP5522–EPTZDomeNetworkCamera
ENGLISH
InstallationGuide
ThisInstallationGuideprovidesinstructionsforinstallingAXISP5522–EPTZDomeNetwork
Cameraonyournetwork.Forotheraspectsofusingtheproduct,seetheUserManualavailable
atwww.axis.com
InstallationSteps
1.Makesurethepackagecontents,toolsandothermaterialsnecessaryfortheinstallation
areinorder.Seepage9.
2.Studythehardwareoverview.Seepage10.
3.Studythespecications.Seepage13.
4.Installthehardware.Seepage14.
5.Accesstheproduct.Seepage18.
PackageContents
•AXISP5522–EPTZDomeNetworkCamera50Hz/60Hz
•Cleartransparentdomecover(premounted)
•Smokedtransparentdomecover
•AXIST8123HighPoEMidspanincludingpowercable(countryspecic)
•IP66-ratedRJ45connectorkit
•Sunshield,includingscrews
•InstallationandManagementSoftwareCD
•Printedmaterials
-InstallationGuide(thisdocument)
-AxisWarrantyDocument
-Extraserialnumberlabel(2x)
OptionalAccessories
•AXIST91AMountingAccessories
•NetworkI/OAudioModule
•AXIST90BIlluminators
•AXIST8310VideoSurveillanceControlBoard
Forinformationaboutavailableaccessories,seewww.axis.com
9
Page 10
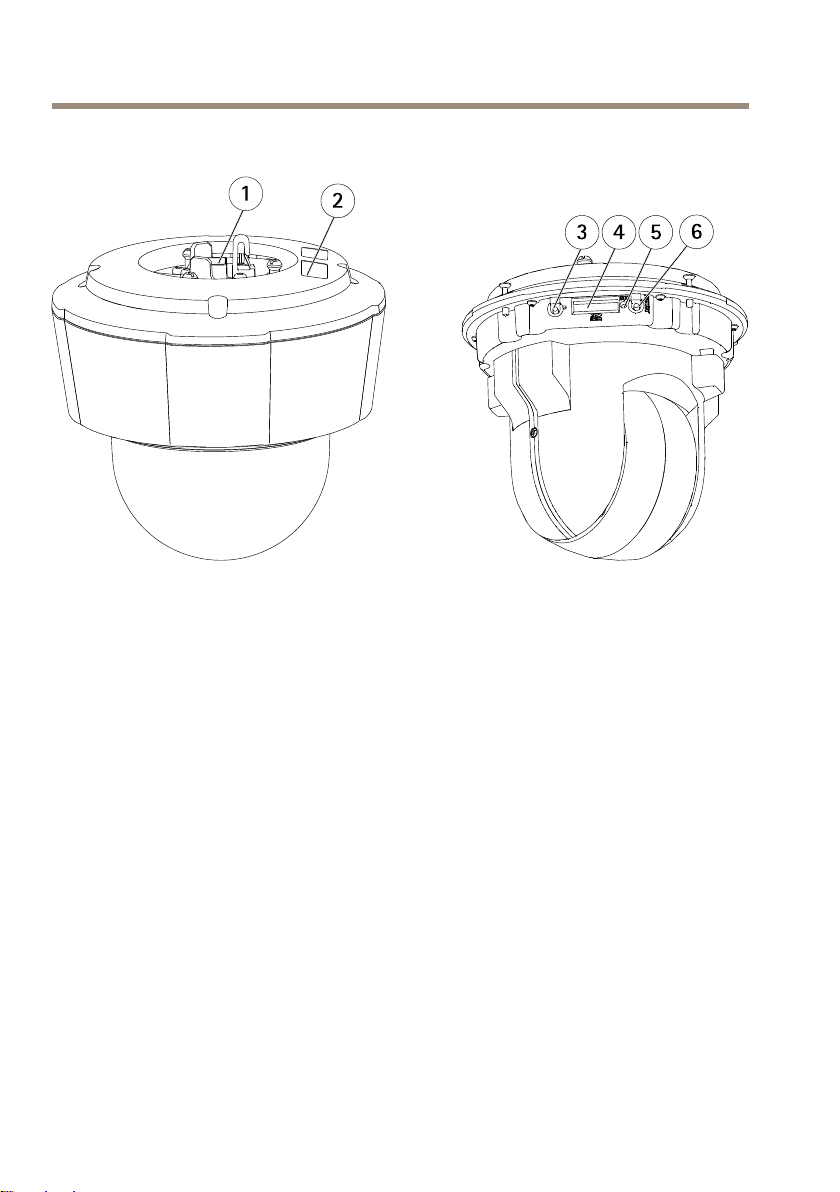
AXISP5522–EPTZDomeNetworkCamera
1
2
3 465
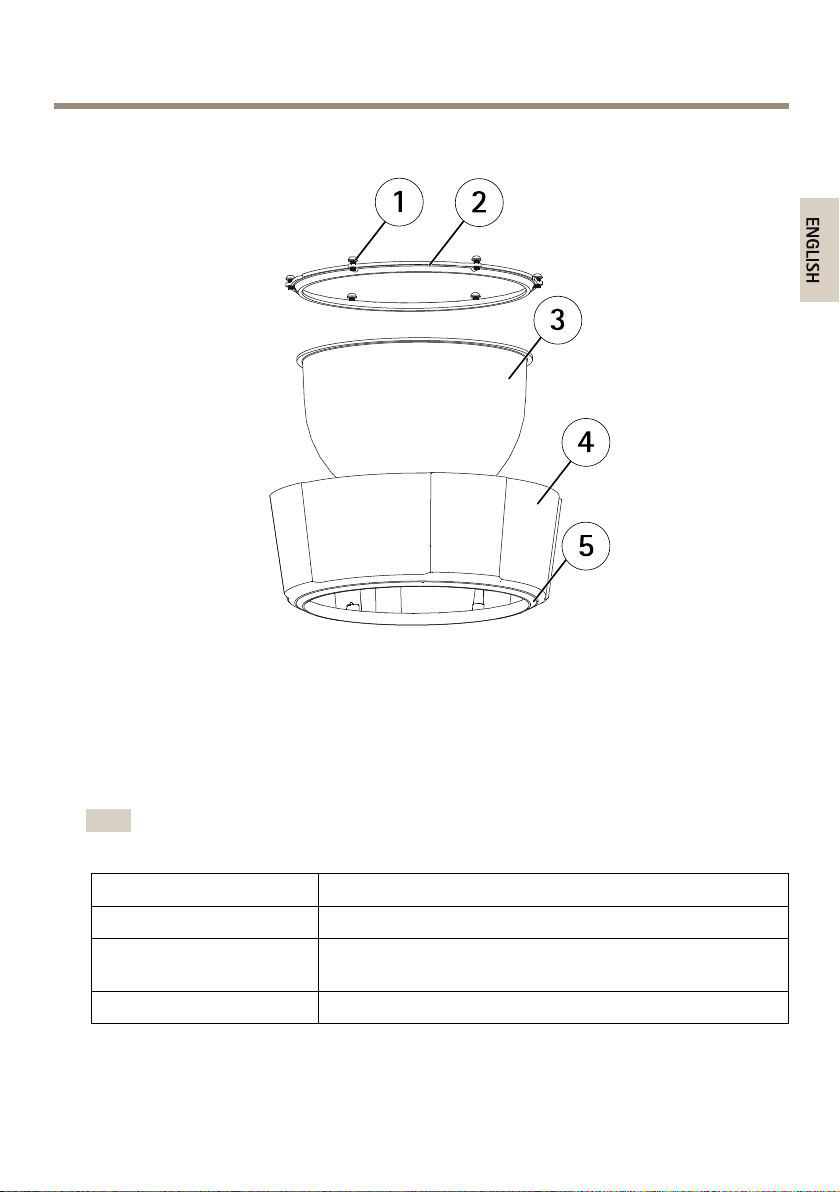
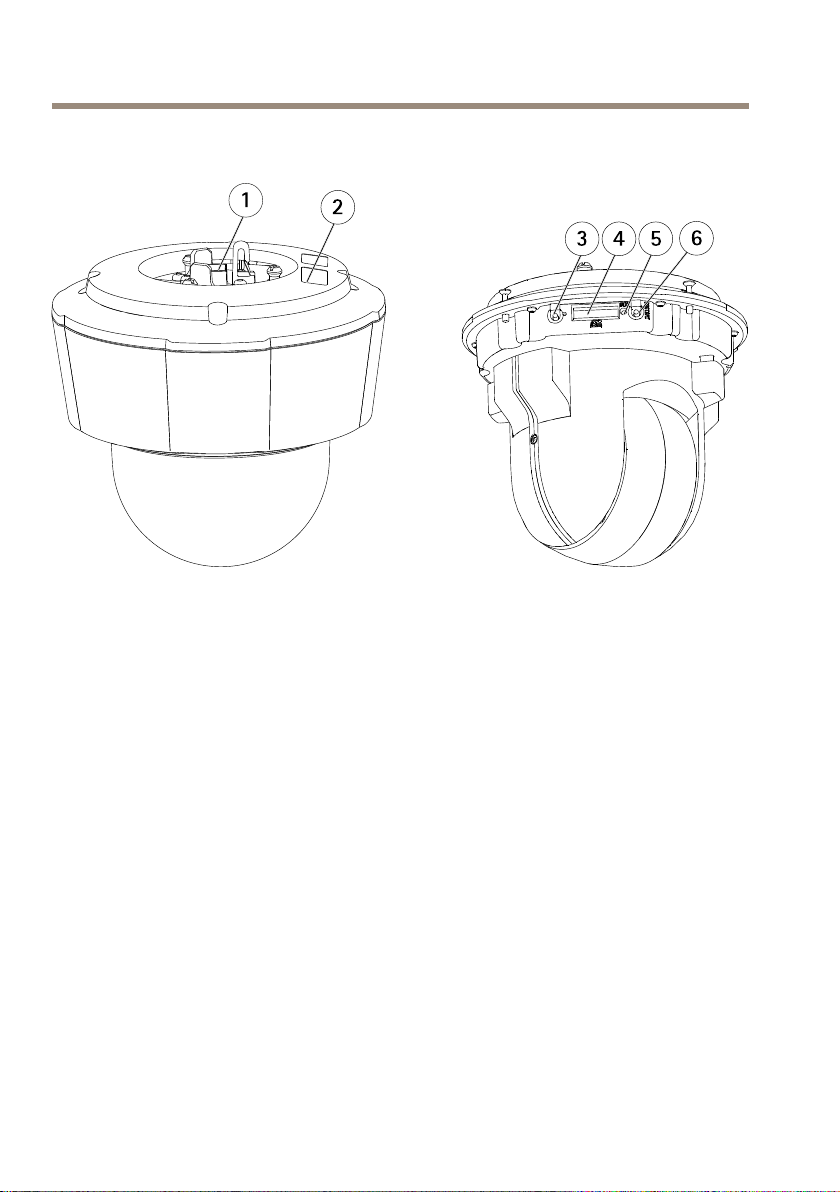
HardwareOverview
1.
Networkconnector
2.
Partnumber(P/N)&Serialnumber(S/N).Serialnumbermayberequiredduring
installation.
3.
Controlbutton
4.
SDHCcardslot
5.
StatusindicatorLED
6.
Restartbutton
10
Page 11
AXISP5522–EPTZDomeNetworkCamera
2
3
4
5
1
ENGLISH
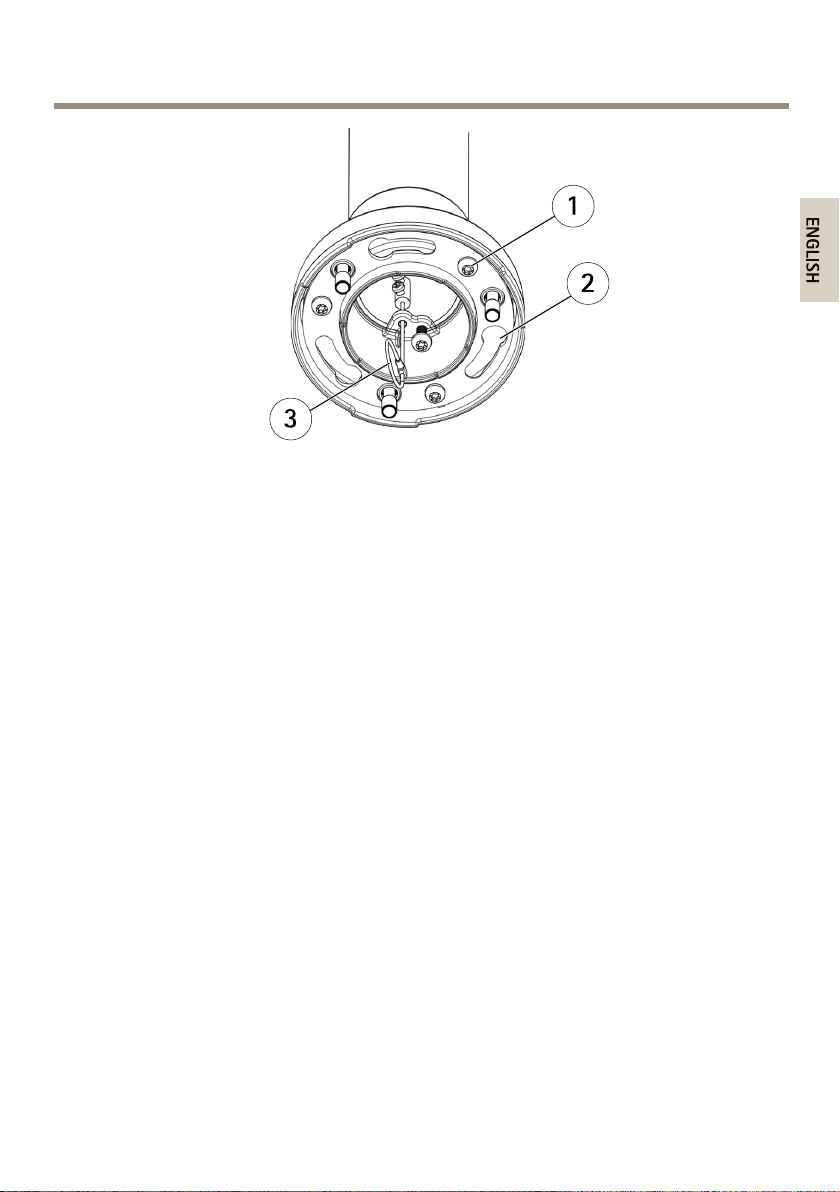
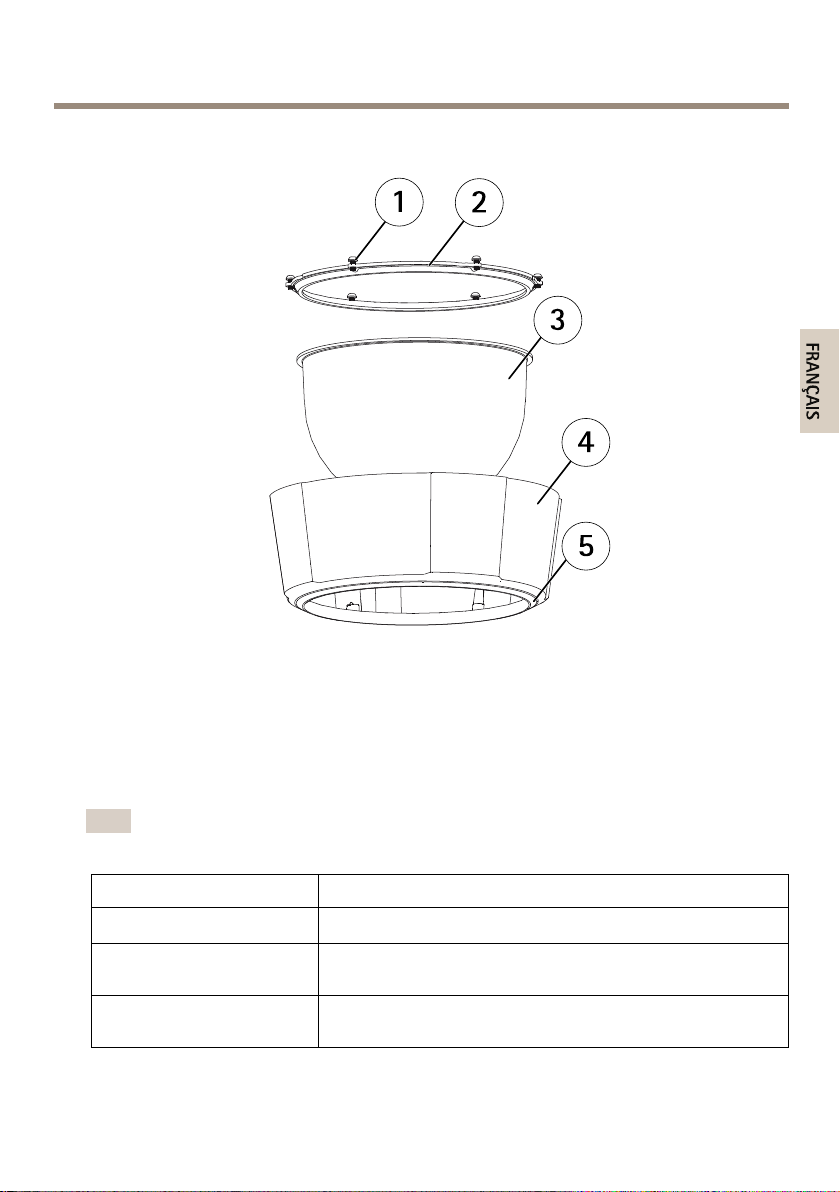
DomeCover
1
Screws
2
Domering
3
Domecover
4
Topcover
5
Sealingring
LEDIndicators
Note
•TheStatusLEDcanbeconguredtoashwhileaneventisactive.
StatusLED
Unlit
GreenShowssteadygreenfor10secondsfornormaloperationafter
Amber
Indication
Connectionandnormaloperation.
startupcompleted.
Steadyduringstartup.Flashesduringrmwareupgrade.
11
Page 12
AXISP5522–EPTZDomeNetworkCamera
Amber/RedFlashesamber/redifnetworkconnectionisunavailableorlost.
RedFlashesredforrmwareupgradefailure.
MidspanLEDIndicators
LED
Port
ACGreenSteadywhenACpowerinputconnected.
Color
UnlitNocameraconnected.
GreenSteadywhencameraconnected,normaloperation.
Green,ashingSlowashwhenovercurrentorshortcircuitcondition
Green,ashing
Indication
ontheport.
Fastashwheninputvoltageisoutofrangeorother
internalerror.
ConnectorsandButtons
Forspecicationsandoperatingconditions,seepage13.
NetworkConnector
RJ45Push-pullConnector(IP66)withHighPoweroverEthernet(HighPoE).
NO
TICE
NO NO
TICE TICE
Usethesuppliedmidspan.
NO
TICE
NO NO
TICE TICE
Theproductshallbeconnectedusingashieldednetworkcable(STP).Allcablesconnecting
theproducttothenetworkshallbeintendedfortheirspecicuse.Makesurethatthe
networkdevicesareinstalledinaccordancewiththemanufacturer’sinstructions.For
informationaboutregulatoryrequirements,seeElectromagneticCompatibility(EMC)on
page2.
NO
TICE
NO NO
TICE TICE
TocomplywiththeIP66-rateddesignofthecameraandmaintaintheIP66protection,
thesuppliedRJ45Push-pullConnector(IP66)shallbeused.Alternatively,usetheRJ45
IP66-ratedcablewithpremountedconnectorwhichisavailablefromyourAxisreseller.Do
notremovetheplasticnetworkconnectorshieldfromthecamera.
12
Page 13
AXISP5522–EPTZDomeNetworkCamera
ENGLISH
ControlButton
Forlocationofthecontrolbutton,seeHardwareOverviewonpage10.
Thecontrolbuttonisusedfor:
•Resettingtheproducttofactorydefaultsettings.Seepage18.
•ConnectingtoanAXISVideoHostingSystemserviceorAXISInternetDynamicDNS
Service.Formoreinformationabouttheseservices,seetheUserManual.
RestartButton
Presstherestartbuttontorestarttheproduct.
SDCardSlot
NO
TICE
NO NO
TICE TICE
•RiskofdamagetoSDcard.Donotusesharptoolsorexcessiveforcewheninserting
orremovingtheSDcard.
•Riskofdataloss.Topreventdatacorruption,theSDcardshouldbeunmountedbefore
removal.Tounmount,gotoSetup>SystemOptions>Storage>SDCardandclick
Unmount.
ThisproductsupportsSD/SDHC/SDXCcard(notincluded).
ForSDcardrecommendations,seewww.axis.com
Specications
OperatingConditions
Product
AXISP5522–EIEC60721-4-3
Classication
Class4K1,4C3,
4M3
IEC60529IP66
NEMA250Type
4X
TemperatureHumidity
-20°Cto50°C
(-4°Fto122°F)
13
Humidity15-100%RH
(condensing)
Page 14

AXISP5522–EPTZDomeNetworkCamera
PowerConsumption
NO
TICE
NO NO
TICE TICE
Usealimitedpowersource(LPS)witheitheraratedoutputpowerlimitedto≤100W
oraratedoutputcurrentlimitedto≤5A.
ProductHighPoE
AXISP5522–E
Max.30W
HighPoEMidspan(supplied)
100-240VAC,max.37W
InstalltheHardware
Readalltheinstructionsbeforepreparingtoinstallthenetworkcamerasinceseveralinstallation
preparationstepsrequireremovingthetopcoverandwouldbenetfrombeingcompletedtogether.
•Removetheprotectivepackagingbeforeinstallingthecamera.
•Theproductissuppliedwithacleartransparentdomecover(premounted)andasmoked
transparentdomecover.Toreplacethedomecover,seeReplacetheDomeCoveron
page15.
•AstandardorhighcapacitySDcard(notincluded)canbeusedtostorerecordingslocally
intheproduct.Thesunshieldmustberemovedtoinstall/removeanSDcard,seeInstall
anSDCardonpage16.
•ToinstalltheproductusingacompatiblebracketfromAXIST91AMountingAccessories
(soldseparately),seeInstalltheCameraonaBracketMount(soldseparately)onpage16.
RemovetheProtectivePackaging
SeeHardwareOverviewonpage10forlocationofcomponents.
1.Loosenthefourtopcoverscrewsandremovethetopcover.
2.Removetheprotectivepackaging.
14
Page 15
AXISP5522–EPTZDomeNetworkCamera
1
ENGLISH
1
Protectivepackaging
3.Ifreplacingtheclear/smokeddomecoverorinstallinganSDcard,seepage15and
page16.
4.Putthetopcoverbackinitsoriginalpositionandfastenthescrews.
ReplacetheDomeCover
Important
Thisproducthasadehumidifyingmembranetomaintainlowhumiditylevelsinsidethe
dome.Toavoidcondensation,donotdisassemblethecamerainrainorindampconditions.
Note
Becarefulnottoscratchordamagethedomecover.Ifpossible,keeptheprotectiveplastic
onthedomecoveruntiltheinstallationiscomplete.
Replacingthedomecoverisonlynecessaryifyouwanttouseasmokeddomecoverorifthe
domecoverisscratchedordamaged.Smokeddomecoversandsparecleardomecoverscanbe
purchasedfromyourAxisreseller.
SeeHardwareOverviewonpage10forlocationofcomponents.
1.Loosenthetopcoverscrewsandremovethetopcover.
2.Removethedomeringscrewsandremovethedomeringfromthetopcover.
3.Attachthedomeringandthereplacementdomecovertothetopcoverandsecureby
tighteningthescrews(torque1.0to1.2Nm).
4.ToinstallanSDcard(notincluded),seepage16.
15
Page 16

AXISP5522–EPTZDomeNetworkCamera
5.Putthetopcoverbackinitsoriginalpositionandfastenthescrews(torque2.5to3.0
Nm).
InstallanSDCard
NO
TICE
NO NO
TICE TICE
Topreventcorruptionofrecordings,theSDcardshouldbeunmountedbeforeitisejected.
Tounmount,gotoSetup>SystemOptions>Storage>SDCardandclickUnmount.
ItisoptionaltoinstallastandardorhighcapacitySDcard(notincluded),whichcanbeusedfor
localrecordingwithremovablestorage.
SeeHardwareOverviewonpage10forlocationofcomponents.
1.Removethesunshield.
2.Loosenallofthetopcoverscrewsandremovethetopcover.
3.InsertanSDcard(notincluded)intotheSDcardslot.
4.Putthetopcoverbackinitsoriginalpositionandfastenthescrews(torque2.5to3.0
Nm).
5.Putthesunshieldbackinitsoriginalpositionandfastenthescrews.
InstalltheCameraonaBracketMount(soldseparately)
NO
TICE
NO NO
TICE TICE
TocomplywiththeIP66-rateddesignofthecameraandmaintaintheIP66protection,
thesuppliedRJ45Push-pullConnector(IP66)shallbeused.Alternatively,usetheRJ45
IP66-ratedcablewithpremountedconnectorwhichisavailablefromyourAxisreseller.Do
notremovetheplasticnetworkconnectorshieldfromthecamera.
1.Installtheselectedbracketaccordingtotheinstructionssuppliedwiththebracket.If
drillingisrequired,makesuretousedrillbits,screwsandplugsthatareappropriatefor
thematerial.
2.ConnectsuppliedRJ45Push-pullConnector(IP66)tothenetworkcableaccordingtothe
instructionssuppliedwiththeconnector.
3.Securethecamerausingthesuppliedsafetywire.
16
Page 17
AXISP5522–EPTZDomeNetworkCamera
1
2
3
ENGLISH
1
Screw
2
Slotsforunitholders
3
Safetywire
4.Connectthenetworkcabletothecamera.
5.Slidetheunitholdersonthenetworkcameraintotheslotsinthemountingbracketand
rotatethecameraunit.
6.Securethenetworkcameratothemountingbracketbytighteningthescrews.
InstalltheMidspan
ThesuppliedmidspanenablesAxisnetworkvideoproductswithhighpowerconsumptiontoreceive
dataandpoweroverthesamenetworkcable.
1.Connectthemidspan(datain)tothenetworkswitchusinganetworkcable.
2.Connectthemidspan(dataandpowerout)tothecamerausingthenetworkcablethat
hasbeenconnectedtothecamera.
3.Connectthemidspantoagrounded(earthed)mainspoweroutlet(100–240VAC)using
thesuppliedpowercable.
17
Page 18

AXISP5522–EPTZDomeNetworkCamera
1
2
3
4
1
Dataandpowerout(connecttoAxisproduct)
2
Datain(connecttonetwork)
3
ACinputLEDindicator
4
PortLEDindicator
4.MakesurethattheLEDsonthemidspanindicatethecorrectconditions.SeeMidspan
LEDIndicatorsonpage12.
AccesstheProduct
UsethetoolsprovidedontheInstallationandManagementSoftwareCDtoassignanIPaddress,
setthepasswordandaccessthevideostream.Thisinformationisalsoavailablefromthesupport
pagesonwww.axis.com/techsup/
ResettoFactoryDefaultSettings
Important
Resettofactorydefaultshouldbeusedwithcaution.Aresettofactorydefaultwillreset
allsettings,includingtheIPaddress,tothefactorydefaultvalues.
Note
TheinstallationandmanagementsoftwaretoolsareavailableontheCDsuppliedwiththe
productandfromthesupportpagesonwww.axis.com/techsup
Toresettheproducttothefactorydefaultsettings:
1.Pressandholdthecontrolbuttonandtherestartbuttonatthesametime.
2.Releasetherestartbuttonbutcontinuetoholddownthecontrolbuttonforabout
15–30secondsuntilthestatusLEDindicatorashesamber.
18
Page 19

AXISP5522–EPTZDomeNetworkCamera
ENGLISH
3.Releasethecontrolbutton.TheprocessiscompletewhenthestatusLEDindicatorturns
green.Theproducthasbeenresettothefactorydefaultsettings.IfnoDHCPserveris
availableonthenetwork,thedefaultIPaddressis192.168.0.90
4.Usingtheinstallationandmanagementsoftwaretools,assignanIPaddress,setthe
passwordandaccessthevideostream
Itisalsopossibletoresetparameterstofactorydefaultviathewebinterface.GotoSetup
>SystemOptions>Maintenance.
FurtherInformation
TheUserManualisavailableatwww.axis.com
Visitwww.axis.com/techsuptocheckifthereisupdatedrmwareavailableforyournetwork
product.Toseethecurrentlyinstalledrmwareversion,gotoSetup>About.
VisitAxislearningcenterwww.axis.com/academyforusefultrainings,webinars,tutorialsand
guides.
WarrantyInformation
ForinformationaboutAxis’productwarrantyandtheretorelatedinformation,see
www.axis.com/warranty/
19
Page 20

20
Page 21
AXISP5522–EPTZDomeNetworkCamera
FRANÇAIS
Informationssurlasécurité
Lisezattentivementceguided'installationavantd'installerl'appareil.Conservezleguide
d'installationpourtouteréférenceultérieure.
Niveauxderisques
DANGER
AVERTISSEMENT
ATTENTION
VIS
A AAVIS VIS
Indiqueunesituationdangereusequi,siellen'estpasévitée,
entraîneraledécèsoudesblessuresgraves.
Indiqueunesituationdangereusequi,siellen'estpasévitée,
pourraitentraînerledécèsoudesblessuresgraves.
Indiqueunesituationdangereusequi,siellen'estpasévitée,
pourraitentraînerdesblessureslégèresoumodérées.
Indiqueunesituationqui,siellen'estpasévitée,pourrait
endommagerl'appareil.
Autresniveauxdemessage
ImportantIndiquelesinformationsimportantes,nécessairespourassurerle
NoteIndiquelesinformationsutilesquipermettrontd’obtenirle
bonfonctionnementdel’appareil.
fonctionnementoptimaldel’appareil.
21
Page 22

AXISP5522–EPTZDomeNetworkCamera
Consignesdesécurité
VIS
A AAVIS VIS
•LeproduitAxisdoitêtreutiliséconformémentauxloisetrèglementationslocalesen
vigueur.
•ConserverceproduitAxisdansunenvironnementsecetventilé.
•NepasexposerceproduitAxisauxchocsouauxfortespressions.
•Nepasinstallerceproduitsurdessupports,surfacesoumursinstables.
•Utiliseruniquementdesoutilsrecommandéspourl'installationdel'appareilAxis.
L'applicationd'uneforceexcessivesurl'appareilavecdesoutilspuissantspourrait
l'endommager.
•Nepasutiliserdeproduitschimiques,desubstancescaustiquesoudenettoyants
pressurisés.
•Utiliserunchiffonpropreimbibéd'eaupurepourlenettoyage.
•Utiliseruniquementdesaccessoiresconformesauxcaractéristiquestechniquesduproduit.
IlspeuventêtrefournisparAxisouuntiers.
•UtiliseruniquementlespiècesderechangefourniesourecommandéesparAxis.
•Nepasessayerderéparerceproduitparvous-même.Contacterl'assistancetechnique
d'AxisouvotrerevendeurAxispourdesproblèmesliésàl'entretien.
Transport
VIS
A AAVIS VIS
•LorsdutransportduproduitAxis,utilisezl'emballaged'origineouunéquivalentpour
éviterd'endommagerleproduit.
Batterie
LeproduitAxisutiliseunebatterieaulithiumBR/CR20323,0Vcommealimentationdeson
horlogeentempsréelinterne(RTC).Dansdesconditionsnormales,cettebatterieauneduréede
vieminimaledecinqans.
Silabatterieestfaible,lefonctionnementdel'horlogeentempsréelpeutêtreaffectéetentraîner
saréinitialisationàchaquemisesoustension.Unmessageenregistréapparaîtdanslerapportde
serveurduproduitlorsquelabatteriedoitêtreremplacée.Pourtoutcomplémentd'information
concernantlerapportdeserveur,reportez-vousauxpagesdeCongurationduproduitoucontactez
l'assistancetechniqued'Axis.
Labatteriedoitêtreremplacéeuniquementencasdebesoin,etpourcefaire,contactezl'assistance
techniqued'Axisàl'adressewww.axis.com/techsupetobtenirdel'aide.
22
Page 23
AXISP5522–EPTZDomeNetworkCamera
FRANÇAIS
AVERTISSEMENT
•Risqued'explosionsilabatterieestremplacéedefaçonincorrecte.
•Remplacez-launiquementparunebatterieidentiqueouunebatterierecommandéepar
Axis.
•Mettezaurebutlesbatteriesusagéesconformémentauxréglementationslocalesou
auxinstructionsdufabricantdelabatterie.
Couverclededôme
VIS
A AAVIS VIS
•Veillezànepasrayer,endommageroulaisserd'empreintessurlecouvercledudômecar
celapourraitaltérerlaqualitéd'image.Laissez,sipossible,laprotectionenplastiquesur
lecouvercledudômejusqu’àlandel’installation.
•Nenettoyezpaslecouvercledudômes'ilsemblepropreàl'œilnuetnefrottezjamaissa
surface.Unnettoyageexcessifpourraitendommagerlasurface.
•Pourlenettoyagegénéralducouvercledudôme,ilestrecommandéd'utiliserunproduit
nonabrasif,unsavonneutresanssolvantouundétergentmélangéavecdel'eaupureet
unchiffondouxpropre.Rincezbienàl'eautièdepure.Séchezavecunchiffondouxet
proprepouréviterlestâchesd'eau.
•N'utilisezjamaisdedétergentsagressifs,d'essence,debenzèneoud'acétone,etc.et
éviteztouteexpositiondirecteauxrayonsdusoleilouàdestempératuresélevéeslors
dunettoyage.
23
Page 24

24
Page 25
AXISP5522–EPTZDomeNetworkCamera
FRANÇAIS
Guided'installation
Ceguided'installationexpliquecommentinstallerlacaméradômeréseauAXISP5522–EPTZsur
votreréseau.Pourtouteautreinformationrelativeàl’utilisationduproduit,consultezlemanuelde
l’utilisateurdisponiblesurlesitewww.axis.com
Procéduresd’installation
1.Assurez-vousquelesoutilsetautresmatérielsnécessairesàl'installationsontinclus
dansl'emballage.Cf.page25.
2.Consultezladescriptiondumatériel.Cf.page26.
3.Étudiezlescaractéristiques.Cf.page30.
4.Installezlematériel.Cf.page30.
5.Utilisezleproduit.Cf.page34.
Contenudel’emballage
•CaméradômeréseauAXISP5522–EPTZ50Hz/60Hz
•Couverclededômetransparentnonfumé(prémonté)
•Couverclededômetransparentfumé
•InjecteurdepuissanceHighPoEAXIST8123aveccâbled’alimentationfourni(différent
selonlespays)
•KitdeconnexionRJ45conformeàlanormeIP66
•Pare-soleil,fourniavecvis
•CDd’installationetdegestion
•Documentsimprimés
-Guided’installation(cedocument)
-Documentdegarantied’Axis
-Étiquettesupplémentairedenumérodesérie(x2)
Accessoiresenoption
•AccessoiresdemontageAXIST91A
•ModuleaudioE/Sréseau
•IlluminateursAXIST90B
•TableaudecontrôledevidéosurveillanceAXIST8310
Pourplusd'informationssurlesaccessoiresdisponibles,consultezlesitewww.axis.com
25
Page 26
AXISP5522–EPTZDomeNetworkCamera
1
2
3 465
Aperçudumatériel
1.
Connecteurréseau
2.
Référence(P/N)etnumérodesérie(S/N).Lenumérodesériepeutêtrerequis
pendantl’installation.
3.
Boutondecommande
4.
LogementdecarteSDHC
5.
Voyantd’état
6.
Boutonderedémarrage
26
Page 27
Couverclededôme
2
3
4
5
1
FRANÇAIS
AXISP5522–EPTZDomeNetworkCamera
1
Vis
2
Garniturepourcaméradôme
3
Couverclededôme
4
Couverclesupérieur
5
Anneaud’étanchéité
Voyants
Note
•Levoyantd'étatpeutclignoterlorsqu'unévénementestactif.
Voyantd’état
Éteint
VertVertxependant10secondespourindiquerunfonctionnement
OrangeFixependantledémarrage.Clignotependantlamiseàniveau
Indication
Branchementetfonctionnementnormal.
normalaprèsledémarrage.
dumicroprogramme.
27
Page 28
AXISP5522–EPTZDomeNetworkCamera
Orange/RougeClignoteenorange/rougeencasd'indisponibilitéoudeperte
Rouge
delaconnexionréseau.
Clignoteenrougeencasd'échecdelamiseàniveaudu
microprogramme.
VoyantsDELdel'injecteur
DEL
Port
AC
Couleur
Éteint
VertEncontinupendantlaconnexiondelacaméra,
Vert,clignotement
Vert,clignotement
VertEncontinulorsqu'unetensiond'entréealternativeest
Indication
Aucunecaméraconnectée.
fonctionnementnormal.
Clignotelentementencasdesurintensitéoude
court-circuitsurleport.
Clignoterapidementlorsquelatensiond'entréeesthors
deportéeouencasd'uneautreerreurinterne.
connectée.
Connecteursetboutons
Pourlescaractéristiquesetlesconditionsd'utilisation,consultezpage30.
Connecteurréseau
Connecteurpousser-tirerRJ45(conformeàlanormeIP66)avecalimentationhautepuissance
parEthernet(PoEhautepuissance).
VIS
A AAVIS VIS
Utilisezl'injecteurfourni.
VIS
A AAVIS VIS
Leproduitdoitêtreconnectéàl'aided'uncâbleréseaublindé(STP).Touslescâblesreliantle
produitaucommutateurréseaudoiventêtredestinésàleurusagespécique.Assurez-vous
quelespériphériquesréseausontinstallésconformémentauxinstructionsdufabricant.
Pourplusd’informationssurlesexigencesréglementaires,consultezElectromagnetic
Compatibility(EMC)onpage2.
28
Page 29
AXISP5522–EPTZDomeNetworkCamera
FRANÇAIS
VIS
A AAVIS VIS
PourêtreconformeàlanormeIP66delacaméraetmaintenirlaprotectionIP66,ilest
nécessaired'utiliserleconnecteurpousser-tirerRJ45fourni(conformeàlanormeIP66).
Sinon,utilisezlecâbleRJ45compatiblenormeIP66avecconnecteurpréinstallé,disponible
auprèsd'unrevendeurAxis.Neretirezpasleblindageenplastiqueduconnecteurréseau
delacaméra.
Boutondecommande
Pourconnaîtrel'emplacementduboutondecommande,consultezAperçudumatérielpage26.
Leboutondecommandepermetderéaliserlesopérationssuivantes:
•Réinitialisationduproduitauxparamètresd’usinepardéfaut.Cf.page34.
•ConnexionauserviceduSystèmed'hébergementvidéoAXISouauserviceAXISInternet
DynamicDNS.Pourplusd'informationssurcesservices,reportez-vousauManuelde
l'utilisateur.
Boutonderedémarrage
Appuyezsurleboutonderedémarragepourredémarrerl'appareil.
EmplacementpourcarteSD
VIS
A AAVIS VIS
•LacarteSDrisqued'êtreendommagée.Nepasutiliserd'outilstranchantsetnepasforcer
lorsdel'insertionouduretraitdelacarteSD.
•Risquedepertededonnées.Pouréviterlacorruptiondesdonnées,lacarteSDdoitêtre
démontéeavantsonretrait.Pourcefaire,rendez-vousdansSetup>SystemOptions>
Storage>SDCard(Conguration>Optionsdusystème>Stockage>CarteSD)et
cliquezsurUnmount(Démonter).
CetappareilestcompatibleavecunecarteSD/SDHC/SDXC(nonincluse).
PourobtenirdesconseilssurlacarteSD,rendez-voussurwww.axis.com
29
Page 30
AXISP5522–EPTZDomeNetworkCamera
Caractéristiquestechniques
Conditionsd’utilisation
Produit
AXISP5522–EIEC60721-4-3
Classication
Classe4K1,4C3,
4M3
IEC60529IP66
NEMA250
Type4X
+TempératureHumidité
-20°Cà50°C
(-4°Fà122°F)
Humiditérelativede15%à
100%(aveccondensation)
Consommationélectrique
VIS
A AAVIS VIS
Utilisezunesourced'alimentationlimitée(LPS)dontlapuissancedesortienominaleest
limitéeà≤100Woudontlecourantdesortienominalestlimitéà≤5A.
ProduitHighPoEInjecteurdepuissanceHigh
AXISP5522–E
max.30W
PoE(fourni)
100-240VCA,max.37W
Installationdumatériel
Liseztouteslesinstructionsavantdepréparerl’installationdelacaméraréseau.Eneffet,de
nombreusesétapesdecettepréparationrequièrentleretraitducouverclesupérieuretilseraitplus
judicieuxdeleseffectuerensemble.
•Avantl’installation,retirezlacaméradesonemballagedeprotection.
•Ceproduitestfourniavecuncouverclededômetransparentclair(prémonté)et
uncouverclededômetransparentfumé.Pourremplacerlecouvercledudôme,
reportez-vousàRemplacementducouvercledudômepage31.
•UnecarteSDstandardouàhautecapacité(nonfournie)peutêtreutiliséepour
sauvegarderdesenregistrementsdansl'appareil.Lepare-soleildoitêtreretirépour
installer/enleverunecarteSD.Reportez-vousàInstallationd'unecarteSDpage32.
•Pourinstallerl'appareilàl'aided'unsupportcompatibleàpartirdesaccessoiresde
montageAXIST91A(vendusséparément),reportez-vousàInstallationdelacamérasur
unsupportmural(venduséparément)page32.
Retirezl’emballagedeprotection
Pourconnaîtrel'emplacementdescomposants,consultezAperçudumatérielpage26.
30
Page 31

AXISP5522–EPTZDomeNetworkCamera
1
FRANÇAIS
1.Desserrezlesquatrevisducouverclesupérieurpourleretirer.
2.Retirezl’emballagedeprotection.
1
Emballagedeprotection
3.Sivousreplacezlabullededômefumée/nonfumée,ouinstallezlacarteSD,
consultezpage31etpage32.
4.Remettezenplacelecouverclesupérieur,puisserrezlesvis.
Remplacementducouvercledudôme
Important
Ceproduitestéquipéd'unemembranededéshumidicationquipermetdemaintenirdes
niveauxd'humiditébasàl'intérieurdudôme.Pourévitertoutecondensation,nedémontez
paslacamérapartempspluvieuxouhumide.
Note
Veillezànepasrayerouendommagerlabulledudôme.Laissez,sipossible,laprotectionen
plastiquesurlecouvercledudômejusqu’àlandel’installation.
Leremplacementducouvercledudômeestnécessaireseulementsivoussouhaitezutiliserun
couverclededômefuméousilecouvercledudômeestrayéouendommagé.Lescouverclesde
dômefumésetlescouverclesdedômenonfumésderechangepeuventêtreachetésauprèsd'un
revendeurAxis.
Pourconnaîtrel'emplacementdescomposants,consultezAperçudumatérielpage26.
31
Page 32

AXISP5522–EPTZDomeNetworkCamera
1.Desserrezlesvisducouverclesupérieurpourleretirer.
2.Desserrezlesvisdel’anneaududôme,puisretirezcedernierducouverclesupérieur.
3.Fixezl’anneauetlabullederemplacementdudômesurlecouverclesupérieur,puis
serrezlesvis(couple1,0à1,2Nm).
4.PourinstallerunecarteSD(nonincluse),reportez-vousàpage32.
5.Remettezlecouverclesupérieurenplaceetserrezlesvisàuncouplede2,5à3,0Nm.
Installationd'unecarteSD
VIS
A AAVIS VIS
Pouréviterlacorruptiondesenregistrements,lacarteSDdoitêtredémontéeavantson
éjection.Pourcefaire,rendez-vousdansSetup>SystemOptions>Storage>SDCard
(Conguration>Optionsdusystème>Stockage>CarteSD)etcliquezsurUnmount
(Démonter).
Ilestpossible,enoption,d'installerunecarteSDstandardouàhautecapacité(nonfournie)qui
peutêtreutiliséepourl'enregistrementlocaletlestockageamovible.
Pourconnaîtrel'emplacementdescomposants,consultezAperçudumatérielpage26.
1.Retirezlepare-soleil.
2.Desserreztouteslesvisducouverclesupérieurpourleretirer.
3.InsérezunecarteSD(nonfournie)dansl'emplacementpourcarteSD.
4.Remettezlecouverclesupérieurenplaceetserrezlesvisàuncouplede2,5à3,0Nm.
5.Remettezenplacelepare-soleil,puisserrezlesvis.
Installationdelacamérasurunsupportmural(venduséparément)
VIS
A AAVIS VIS
PourêtreconformeàlanormeIP66delacaméraetmaintenirlaprotectionIP66,ilest
nécessaired'utiliserleconnecteurpousser-tirerRJ45fourni(conformeàlanormeIP66).
Sinon,utilisezlecâbleRJ45compatiblenormeIP66avecconnecteurpréinstallé,disponible
auprèsd'unrevendeurAxis.Neretirezpasleblindageenplastiqueduconnecteurréseau
delacaméra.
1.Installezlesupportchoisiconformémentauxinstructionsfourniesaveclesupport.
S’ils’avèrenécessairedepercer,vériezquelesforets,visetchevillesàutilisersont
appropriéspourlematériau.
2.Branchezleconnecteurpousser-tirerRJ45fourni(conformeàlanormeIP66)aucâble
réseauensuivantlesinstructionsfournies.
3.Sécurisezlacaméraàl'aideducâbledesécuritéfourni.
32
Page 33

AXISP5522–EPTZDomeNetworkCamera
1
2
3
FRANÇAIS
1
Vis
2
Supportsderack
3
Câbledesécurité
4.Connectezlecâbleréseauàlacaméra.
5.Glissezlessupportsdel'appareilsurlacaméraréseaudanslesfentesdusupportde
montageetfaitestournerlacaméra.
6.Sécurisezlacaméraréseausurlesupportdemontageenserrantlesvis.
Installationdel'injecteur
L'injecteurfournipermetauxproduitsdevidéosurIPd'Axisàforteconsommationd’énergiede
recevoirlesdonnéesetl'alimentationélectriquesurlemêmecâbleréseau.
1.Branchezl'injecteur(Donnéesd'entrée)aucommutateurréseauàl'aided'uncâbleréseau.
2.Connectezl'injecteur(sortiedesdonnéesetdel’alimentation)surlacaméravialecâble
réseauquiaétébranchéàlacaméra.
3.Connectezl'injecteuràunesortiedusecteurmiseàlaterre(100–240VCA)VAC)àl'aide
ducâbled’alimentationfourni.
33
Page 34

AXISP5522–EPTZDomeNetworkCamera
1
2
3
4
1
Sortiedesdonnéesetdel’alimentation(connexionàl'appareilAxis)
2
Entréededonnées(connexionauréseau)
3
EntréeCAduvoyantDEL
4
VoyantDELduport
4.Assurez-vousquelesvoyantsDELsurl'injecteurindiquentlesconditionsadéquates.Cf.
VoyantsDELdel'injecteurpage28.
Accèsauproduit
UtilisezlesoutilsfournissurleCDd’installationetdegestionpourattribueruneadresseIP,
congurezlemotdepasseetaccédezauuxdedonnéesvidéo.Cesinformationssontégalement
disponiblessurlespagesd’assistancetechniquedusitewww.axis.com/techsup
Réinitialisationauxparamètresd'usinepardéfaut
Important
Laréinitialisationauxparamètrespardéfautdoitêtreutiliséeavecprudence.Cette
opérationreconguretouslesparamètres,ycomprisl'adresseIP,auxvaleursd'usinepar
défaut.
Note
Leslogicielsd'installationetdegestionsontdisponiblessurleCDfourniavecleproduitet
surlespagesd'assistancedusitewww.axis.com/techsup
Pourréinitialiserl'appareilauxparamètresd'usinepardéfaut:
1.Appuyezsurleboutondecommandeetleboutonderedémarrageenmêmetempset
maintenez-lesenfoncés.
2.Relâchezleboutonderedémarragetoutenmaintenantleboutondecommandeenfoncé
pendant15–30secondes,jusqu’àcequelevoyantd’étatclignoteenorange.
34
Page 35

AXISP5522–EPTZDomeNetworkCamera
FRANÇAIS
3.Relâchezleboutondecommande.Leprocessusestterminélorsquelevoyantd'étatpasse
auvert.Lesparamètresd’usinepardéfautdel'appareilontétérétablis.Enl'absenced'un
serveurDHCPsurleréseau,l'adresseIPpardéfautest192.168.0.90.
4.Utilisezlesoutilsd'installationetdegestionpourattribueruneadresseIP,congurerle
motdepasseetaccéderauuxdedonnéesvidéo.
Ilestégalementpossiblederétablirlesparamètresd’usineàpartirdel’interfaceWeb.Accédezà
Setup>SystemOptions>Maintenance(Conguration>Optionsdusystème>Maintenance)
(Conguration>Congurationducontrôleursupplémentaire>Conguration>Optionsdu
système>Maintenance).
Pourobtenirplusderenseignements
LeManueldel’utilisateurestdisponibleàl’adressesuivante:www.axis.com
Consultezlesitewww.axis.com/techsuppourvériersidesmisesàjourdeslogicielssont
disponiblespourvotreappareilréseau.Pourconnaîtrelaversiondumicrologicielactuellement
installée,reportez-vousàlapageSetup>About(Conguration>Àproposde).
Visitezlecentred’apprentissageenligneAxissurlesitewww.axis.com/academypourensavoir
plussurlesformations,leswebinaires,lestutorielsetlesguides.
Informationssurlagarantie
PourobtenirdeplusamplesinformationssurlagarantieduproduitAXISetdesrenseignements
connexes,allezsurlesitewww.axis.com/warranty/
35
Page 36

36
Page 37

AXISP5522–EPTZDomeNetworkCamera
DEUTSCH
Sicherheitsinformation
LesenSiedasInstallationshandbuchsorgfältigdurchbevorsiedasProduktinstallieren.Bewahren
SiedasInstallationshandbuchfürzukünftigeZweckeauf.
Gefährdungsstufen
GEFAHRWeistaufeinegefährlicheSituationhin,welche,fallsnicht
WARNUNGWeistaufeinegefährlicheSituationhin,welche,fallsnicht
VORSICHTWeistaufeinegefährlicheSituationhin,welche,fallsnicht
HINWEIS
HINWEIS HINWEIS
verhindert,zuTododerschwerenVerletzungenführt.
verhindert,zuTododerschwerenVerletzungenführenkann.
verhindert,zugeringfügigerodermäßigerVerletzungführenkann.
WeistaufeinegefährlicheSituationhin,welche,fallsnicht
verhindert,zuSachschädenführenkann.
WeitereNachrichtenstufen
WichtigWeistaufwichtigeInformationenhin,diedenrichtigenBetrieb
BeachtenWeistaufnützlicheInformationenhin,diedieoptimale
desProduktsgewährleisten.
VerwendungdesProduktsunterstützen.
37
Page 38

AXISP5522–EPTZDomeNetworkCamera
Sicherheitsanweisungen
HINWEIS
HINWEIS HINWEIS
•DieAnwendungdesAxisProduktsmussunterBeachtungderörtlichgeltendenrechtlichen
Bestimmungenerfolgen.
•LagernSiedasAxisProduktineinertrockenenundbelüftetenUmgebung.
•AchtenSiedarauf,dassdasAxisProduktwederStößennochstarkemDruckausgesetztist.
•InstallierenSiedasProduktnichtaninstabilenHalterungen,OberächenoderWänden.
•VerwendenSiebeiderInstallationdesAxisProduktsausschließlichpassendeWerkzeuge.
EinzugroßerKraftaufwandmitelektrischenWerkzeugenkanndasProduktbeschädigen.
•VerwendenSiekeinechemischen,ätzendenoderaerosolhaltigenReinigungsmittel.
•VerwendenSiezumReinigeneinsauberes,mitlauwarmemWasserangefeuchtetesTuch.
•VerwendenSienurZubehör,dasdentechnischenDatendesProduktsentspricht.Dieses
istvonAxisoderDrittanbieternerhältlich.
•VerwendenSieausschließlichErsatzteiledievonAxisbereitgestelltoderempfohlen
werden.
•VersuchenSienicht,dasProduktselbstständigzureparieren.WendenSiesichbezüglich
ReparaturundWartungandenAxisSupportoderIhrenAxisHändler.
Transport
HINWEIS
HINWEIS HINWEIS
•BeiBedarftransportierenSiedasAxisProduktinderOriginalverpackungodereiner
entsprechendenVerpackung,sodassSchädenvermiedenwerden.
Batterie
DasAxis-Produktistmiteiner3,0V-BR/CR2032-Lithium-Batterieausgestattet,mitderdieinterne
Echtzeituhr(RTC)versorgtwird.UnternormalenBedingungenhatdieBatterieeineLebensdauer
vonmindestensfünfJahren.
BeientladenerBatterieistderBetriebderEchtzeituhrnichtmehrgewährleistet,sodassdieUhrbei
jedemSystemstartzurückgesetztwird.SieerhalteneineProtokollnachrichtimServerberichtdes
Produkts,wenneinBatteriewechselerforderlichist.WeitereInformationenüberdenServerbericht
ndenSieaufdenSetup-SeitendesProdukts,oderwendenSiesichandenAxis-Support.
DieBatteriesolltenurbeiBedarfersetztwerden.WendenSiesichindiesemFallandenAxis
Supportunterwww.axis.com/techsup.
38
Page 39

AXISP5522–EPTZDomeNetworkCamera
DEUTSCH
WARNUNG
•ExplosionsgefahrbeifehlerhaftemBatteriewechsel.
•DieBatteriedarfnurdurcheineidentischeBatterieodereinevonAxisempfohlene
Batterieersetztwerden.
•VerbrauchteBatteriensindgemäßdenörtlichenVorschriftenoderdenAnweisungendes
Herstellerszuentsorgen.
Kuppelabdeckung
HINWEIS
HINWEIS HINWEIS
•AchtenSiedaraufdieKuppelabdeckungwederzuzerkratzen,zubeschädigenoderdarauf
Fingerabdrückezuhinterlassen,dadiesdieBildqualitätbeeinträchtigenkann.Falls
möglichentfernenSiedieSchutzfolieerstnachdemdieInstallationabgeschlossenist.
•SäubernSieniemalseineKuppelabdeckung,wenndiesesaubererscheint,undpolierenSie
keinesfallsdieOberäche.ZuhäugesSäubernkanndieOberächebeschädigen.
•FürdienormaleReinigungderKuppelabdeckungwerdeneinenicht-scheuernde,
lösungsmittelfreieneutraleSeifeodereinentsprechendesReinigungsmittelmitsauberem
Wasserundeinsauberer,weicherLappenempfohlen.SpülenSiedieKuppelabdeckung
gründlichmitlauwarmem,sauberemWasserab.TrocknenSiedieKuppelabdeckungmit
einemweichen,sauberenLappen,umWassereckenzuvermeiden.
•VerwendenSieniemalsstarkeReinigungsmittel,Benzin,BenzoloderAcetonetc.
undvermeidenSie,dieKuppelabdeckungimdirektenSonnenlichtoderbeierhöhten
Temperaturenzusäubern.
39
Page 40

40
Page 41

AXISP5522–EPTZDomeNetworkCamera
DEUTSCH
Installationsanleitung
IndieserAnleitungwirddieInstallationderAXISP5522–EPTZ-Dome-Netzwerk-KamerainIhrem
Netzwerkbeschrieben.WeitereInformationenzurVerwendungdiesesProduktsndenSieim
Benutzerhandbuchunterwww.axis.com.
Installationsschritte
1.StellenSiesicher,dassdiePackungsinhalte,Werkzeugeundanderenotwendige
MaterialienfürdieInstallationinOrdnungsind.SieheSeite41.
2.MachenSiesichmitderHardware-Übersichtvertraut.SieheSeite42.
3.MachenSiesichmitdentechnischenDatenvertraut.SieheSeite46.
4.InstallierenSiedieHardware.SieheSeite46.
5.ZugriffaufdasProdukt.SieheSeite50.
Lieferumfang
•AXISP5522–EPTZ-Dome-Netzwerk-Kamera50Hz/60Hz
•Klare,transparenteKuppelabdeckung(vormontiert)
•TransparenteRauchglasabdeckung
•AXIST8123HighPoEMidspan,einschließlichNetzkabel(landesspezisch)
•RJ45-AnschlusssatzmitIP66-Zertizierung
•SonnenblendeinklusiveSchrauben
•CD-ROMmitInstallations-undVerwaltungssoftware
•GedruckteDokumente
-Installationsanleitung(diesesDokument)
-Axis-Gewährleistungserklärung
-ZusätzlicheEtikettenmitderSeriennummer(2x)
OptionalesZubehör
•AXIST91AMontagezubehörfürWand-bzw.Mastmontage
•Netzwerk-E/A-Audiomodul
•AXIST90BLeuchten
•AXIST8310SteuerungseinheitzurSicherheitsüberwachung
Unterwww.axis.comndenSieInformationenüberverfügbaresZubehör.
41
Page 42

AXISP5522–EPTZDomeNetworkCamera
1
2
3 465
ÜbersichtüberdieHardware
1.
Netzwerkanschluss
2.
Bestellnummer(P/N)undSeriennummer(S/N).DieSeriennummerwird
möglicherweisefürdieInstallationbenötigt.
3.
Steuertaste
4.
SDHC-Speicherkarteneinschub
5.
LED-Statusanzeige
6.
Neustart-Taste
42
Page 43

AXISP5522–EPTZDomeNetworkCamera
2
3
4
5
1
DEUTSCH
Kuppelabdeckung
1
Schrauben
2
Kuppelring
3
Kuppelabdeckung
4
ObereAbdeckung
5
Dichtungsring
LEDs
Beachten
•DieStatus-LEDkannsoeingestelltwerden,dasssieblinkt,wenneinEreignisaktivist.
Status-LED
LeuchtetnichtAnschlussundNormalbetrieb
GrünLeuchtetbeiNormalbetriebnachAbschlussdesStartvorgangs
GelbLeuchtetbeimStart.BlinktbeiderFirmware-Aktualisierung.
Bedeutung
10Sekundenlanggrün.
43
Page 44

AXISP5522–EPTZDomeNetworkCamera
Gelb/rotBlinktgelb/rot,wenndieNetzwerkverbindungnichtverfügbar
RotBlinktrotbeieinemFehlerwährendderFirmware-Aktualisierung.
istoderunterbrochenwurde.
Midspan-LED-Anzeigen
LEDFarbeBedeutung
Anschluss
Wechselstrom
LeuchtetnichtKeineKameraangeschlossen.
Grün
GrünesBlinken
GrünesBlinkenSchnellesBlinken,wenndieEingangsspannung
Grün
Leuchtetkonstant,wenneineKameraverbundenist,im
Normalbetrieb.
LangsamesBlinken,beiÜberstromoderKurzschlussdes
Ports.
außerhalbdesGrenzbereichsliegtoderandereinterne
Fehlervorliegen.
LeuchtetkonstantwennderWechselstromeingang
verbundenist.
AnschlüsseundTasten
FürdietechnischenDatenundBetriebsbedingungensieheSeite46.
Netzwerkanschluss
RJ45-AnschlusszumStecken/Ziehen(IP66)mitHighPoweroverEthernet(HighPoE).
HINWEIS
HINWEIS HINWEIS
BenutzenSiedenmitgeliefertenMidspan.
HINWEIS
HINWEIS HINWEIS
DasProduktmussmiteinemabgeschirmtenNetzwerkkabel(STP)angeschlossenwerden.
AlleKabel,diedasProduktmitdemNetzwerkswitchverbinden,müssenhierfürausgelegt
sein.StellenSiesicher,dassdieNetzwerkgerätegemäßdenAnweisungendesHerstellers
installiertwurden.InformationenzugesetzlichenBestimmungenndenSieunter
ElectromagneticCompatibility(EMC)onpage2.
44
Page 45

AXISP5522–EPTZDomeNetworkCamera
DEUTSCH
HINWEIS
HINWEIS HINWEIS
VerwendenSiedenimLieferumfangenthaltenenRJ45-AnschlusszumStecken/Ziehen
(IP66),umdieIP66-EinstufungderKamerabauweiseeinzuhaltenunddenIP66-Schutz
beizubehalten.SiekönnenauchdasRJ45-KabelmitIP66-Ratingundvorbelegtem
Steckerverwenden.DieseserhaltenSiebeiIhremAxisHändler.EntfernenSienichtdie
KunststoffabschirmungdesAnschlussesvonderKamera.
Steuertaste
DiePositionderSteuertastendenSieunter:ÜbersichtüberdieHardwareaufSeite42.
DieSteuertastehatfolgendeFunktionen:
•ZurücksetzendesProduktsaufWerkseinstellungen.SieheSeite50.
•VerbindenmiteinemAXISVideoHostingSystem-ServiceodereinemAXISInternet
DynamicDNS-Service.WeitereInformationenzudiesenDienstenndenSieinder
Bedienungsanleitung.
Neustart-Taste
DrückenSiedieNeustart-Taste,umdasProduktneuzustarten.
SD-Kartensteckplatz
HINWEIS
HINWEIS HINWEIS
•GefahrvonSchädenanderSD-Karte.VerwendenSiebeimEinlegenoderEntfernender
SD-Kartekeinescharfen/spitzenWerkzeugeundwendenSienichtzuvielKraftan.
•GefahrvorDatenverlust.UmeinerBeschädigungderAufnahmenvorzubeugen,solltedie
SD-KartevordemmechanischenAuswerfengetrenntwerden.RufenSiezumTrennen
Setup>SystemOptions>Storage>SDCard(Einrichtung>Systemoptionen>
Speicher>SD-Karte)aufundklickenSieaufUnmount(Trennen).
DiesesProduktunterstütztSD-/SDHC-/SDXC-Karten(separaterhältlich).
EmpfehlungenzuSD-KartenndenSieunterwww.axis.com.
45
Page 46

AXISP5522–EPTZDomeNetworkCamera
TechnischeDaten
Betriebsbedingungen
Produkt
AXISP5522–EIEC60721-4-3
Klassikation
Klasse4K1,4C3,
4M3
IEC60529IP66
NEMA250Typ
4X
Temperatur
-20°Cbis50°C
Luftfeuchtigkeit
RelativeLuftfeuchtigkeit15bis
100%RH(kondensierend)
Stromverbrauch
HINWEIS
HINWEIS HINWEIS
VerwendenSieeineStromquellemitbegrenzterLeistung(LPS),entwedermiteiner
Nennausgangsleistungvon≤100Wodereinemdauerhaftauf≤5Abegrenzten
Nennausgangsstrom.
ProduktHighPoEHighPoEMidspan
AXISP5522–E
Max.30W100bis240VWechselstrom,
(mitgeliefert)
max.37W
InstallierenderHardware
LesenSiezunächstalleAnweisungen,bevorSiemitderInstallationsvorbereitungder
Netzwerk-Kamerabeginnen.BeieinigenVorbereitungsschrittenmussdieobereAbdeckung
abgenommenwerden,sodassessinnvollist,dieseSchrittezusammendurchzuführen.
•EntfernenSievorderInstallationderKameradieSchutzfolien.
•DasProduktwirdmiteinertransparentenKlarglas-Kuppelabdeckung(vormontiert)und
einerRauchglas-Kuppelabdeckunggeliefert.WeitereInformationenzumAustauschder
KuppelabdeckungndenSieunterAustauschenderKuppelabdeckungaufSeite47.
•EineStandard-oderSD-KartemithoherKapazität(nichtenthalten)kannverwendet
werden,umAufnahmendirektaufdemProduktzuspeichern.DerSonnenschutzmuss
entferntwerden,umeineSD-Kartezuinstallieren/entfernen.SieheInstallationeiner
SD-KarteaufSeite48.
•WeitereInformationenzurInstallationdesProduktsmiteinerkompatiblenHalterungdes
AXIST91AMontagezubehörs(separaterhältlich)ndenSieunterAnbringenderKamera
aneinerHalterung(separaterhältlich)aufSeite49.
46
Page 47

AXISP5522–EPTZDomeNetworkCamera
1
DEUTSCH
EntfernenSiedieTransportsicherung
DiePositionderKomponentenndenSieunterÜbersichtüberdieHardwareaufSeite42.
1.LösenSiedievierSchraubenderoberenAbdeckungundnehmenSiedieAbdeckungab.
2.EntfernenSiedieTransportsicherung.
1
Transportsicherung
3.WennSiedieklarebzw.getönteKuppelabdeckungaustauschenodereine
SD-Speicherkarteinstallierenmöchten,führenSiedieAnweisungenaufSeite47bzw.
aufSeite48aus.
4.BringenSiedieobereAbdeckungwiederanderursprünglichenPositionanundziehen
SiedieSchraubenfest.
AustauschenderKuppelabdeckung
Wichtig
DiesesProduktistmiteinerEntfeuchtungsmembraneausgestattet,umdieFeuchtigkeitin
derKuppelgeringzuhalten.UmKondenswasserbildungzuvermeiden,demontierenSiedie
KameranichtimRegenoderunterfeuchtenBedingungen.
Beachten
AchtenSiedarauf,dieKuppelabdeckungnichtzuzerkratzenoderzubeschädigen.Falls
möglich,entfernenSiedieSchutzfolieerstnachAbschlussderInstallation.
47
Page 48

AXISP5522–EPTZDomeNetworkCamera
DerAustauschderKuppelabdeckungistnurerforderlich,wennSiedieRauchglas-Kuppelabdeckung
verwendenmöchten,dieKuppelabdeckungzerkratztistoderRissehat.GetönteKuppelabdeckungen
oderklareErsatzabdeckungenkönnenüberIhrenAxisHändlererworbenwerden.
DiePositionderKomponentenndenSieunterÜbersichtüberdieHardwareaufSeite42.
1.LösenSiedieSchraubenderoberenAbdeckungundnehmenSiedieAbdeckungab.
2.LösenSiedieSchraubendesKuppelringsundentfernenSiedenKuppelringvonder
oberenAbdeckung.
3.BringenSiedenKuppelringunddieErsatz-KuppelabdeckunganderoberenAbdeckungan
undbefestigenSiediese,indemSiedieSchraubenanziehen(Drehmoment1,0bis1,2Nm).
4.WeitereInformationenzurInstallationeinerSD-Karte(nichtimLieferumfangenthalten)
ndenSieunterSeite48.
5.BringenSiedieobereAbdeckungwiederanderursprünglichenPositionanundziehen
SiedieSchraubenfest(Drehmoment2,5bis3,0Nm).
InstallationeinerSD-Karte
HINWEIS
HINWEIS HINWEIS
UmeinerBeschädigungderAufnahmenvorzubeugen,solltedieSD-Kartegetrenntwerden,
bevordieseausgeworfenwird.RufenSiezumTrennenSetup>SystemOptions>Storage
>SDCard(Einrichtung>Systemoptionen>Speicher>SD-Karte)aufundklickenSie
aufUnmount(Trennen).
SiekönnenfürAufzeichnungenaufWechelspeichermedienoptionaleineStandard-odereine
SD-SpeicherkartemithoherKapazität(nichtenthalten)installieren.
DiePositionderKomponentenndenSieunterÜbersichtüberdieHardwareaufSeite42.
1.EntfernenSiedenSonnenschutz.
2.LösenSiealleSchraubenderoberenAbdeckungundnehmenSiedieAbdeckungab.
3.SchiebenSiedieSD-Karte(nichtenthalten)indenSD-Karteneinschub.
4.BringenSiedieobereAbdeckungwiederanderursprünglichenPositionanundziehen
SiedieSchraubenfest(Drehmoment2,5bis3,0Nm).
5.BringenSiedenSonnenschutzwiederanderursprünglichenPositionanundziehen
SiedieSchraubenfest.
48
Page 49

AXISP5522–EPTZDomeNetworkCamera
1
2
3
DEUTSCH
AnbringenderKameraaneinerHalterung(separaterhältlich)
HINWEIS
HINWEIS HINWEIS
VerwendenSiedenimLieferumfangenthaltenenRJ-45Push-Pull-Steckverbinder(IP66),um
dieIP66-SchutzartderKamerabauweiseeinzuhaltenunddenIP66-Schutzbeizubehalten.
SiekönnenauchdasRJ45-KabelmitIP66-RatingundvorbelegtemSteckerverwenden.
DieseserhaltenSiebeiIhremAxisHändler.EntfernenSienichtdieKunststoffabschirmung
desAnschlussesvonderKamera.
1.InstallierenSiedieausgewählteHalterungentsprechendderHalterungsanleitung.Falls
dasBohrenvonLöchernerforderlichist,stellenSiesicher,dassdieBohrer,Schrauben
undDübelfürdenBaustoffderWand/Deckegeeignetsind.
2.SchließenSiedenRJ-45-SteckerzumStecken/Ziehen(IP66)andasNetzwerkanschluss
entsprechenddermitdemSteckergeliefertenAnleitung.
3.SichernSiedieKamera,indemSiedenmitgeliefertenSicherheitsdrahtverwenden.
1
Schraube
2
AussparungenfürKamerabefestigungen
3
Sicherheitsdraht
4.SchließenSiedasNetzwerkkabelandieKameraan.
5.SchiebenSiedieGerätehalterungderNetzwerkkameraindieÖffnungender
MontagehalterungunddrehenSiedieKameraeinheit.
6.BefestigenSiedieNetzwerkkameraanderWandhalterung,indemSiedieSchrauben
festziehen.
49
Page 50

AXISP5522–EPTZDomeNetworkCamera
1
2
3
4
InstallierendesMidspan
DerbereitgestellteMidspanermöglichtAxisNetzwerkvideoproduktenmithohemStromverbrauch,
DatenundStromüberdasselbeNetzwerkkabelzuempfangen.
1.VerbindenSiedenMidspan(Dateneingang)mitdemNetzwerkswitch,mithilfeeines
Netzwerkkabels.
2.VerbindenSiedenMidspan(Daten-undStromausgang)mitderKameradurchdas
Netzwerkkabel,welchesmitderKameraverbundenwurde.
3.VerbindenSiedenMidspanmithilfedesmitgeliefertenNetzkabelsmiteinergeerdeten
Netzsteckdose(100–240VAC).
1
Daten-undStromausgang(mitdemAxisProduktverbinden)
2
Dateneingang(mitdenNetzwerkverbinden)
3
LED-AnzeigedesWechselstromeingangs
4
Port-LED-Anzeige
4.ÜberprüfenSie,obdieLEDsamMidspandierichtigenBedingungenanzeigen.Siehe
MidspanLEDIndicatorsonpage12.
ZugriffaufdasProdukt
VerwendenSiediebereitgestelltenToolsderInstallations-undManagement-Software-CD,umeine
IP-Adressezuzuordnen,einPassworteinzurichtenundaufdenVideostreamzuzugreifen.Diese
InformationndenSieebensoaufdenSupport-Seitenunterwww.axis.com/techsup/
ZurücksetzenaufWerkseinstellungen
Wichtig
DasZurücksetzenaufdieWerkseinstellungensolltemitVorsichtverwendetwerden.Beim
ZurücksetzenaufdieWerkseinstellungenwerdenalleEinstellungeneinschließlichder
IP-AdresseaufdieWerkseinstellungenzurückgesetzt.
50
Page 51

AXISP5522–EPTZDomeNetworkCamera
DEUTSCH
Beachten
DieSoftware-ToolsfürInstallationundVerwaltungsindaufdermitdemProdukt
ausgeliefertenCD-ROMundüberdieSupportseitenunterwww.axis.com/techsupverfügbar.
SowirddasProduktaufdieWerkseinstellungenzurückgesetzt:
1.HaltenSiedieSteuertasteunddieNeustarttastegleichzeitiggedrückt.
2.LassenSiedieNeustarttastelos,haltenSiedieSteuertasteaberweitere15bis30
Sekundenlanggedrückt,bisdieLED-Statusanzeigegelbblinkt.
3.LassenSiedieSteuertastelos.DerVorgangistabgeschlossen,wenndie
LED-Statusanzeigegrünleuchtet.DasProduktwurdeaufdieWerkseinstellungen
zurückgesetzt.WennkeinDHCP-ServerimNetzwerkverfügbarist,lautetdie
Standard-IP-Adresse192.168.0.90.
4.VerwendenSiedieSoftware-ToolsfürInstallationundVerwaltung,umeineIP-Adresse
zuzuweisen,einKennworteinzurichtenundaufdenVideostreamzuzugreifen.
DieParameterkönnenauchüberdieWeboberächeaufdieWerkseinstellungenzurückgesetzt
werden.RufenSieSetup>SystemOptions>Maintenance(Setup>Systemoptionen>
Wartung)auf.
WeitereInformationen
DasBenutzerhandbuchndenSieunterwww.axis.com.
Unterwww.axis.com/techsupndenSieFirmware-AktualisierungenfürIhrNetzwerkprodukt.Um
dieaktuellinstallierteFirmware-Versionzusehen,gehenSieaufSetup>About(Einrichten>
Über).
BesuchenSiedasAxis-Schulungszentrumwww.axis.com/academyfüranregendeSchulungen,
Webinare,LernprogrammeundAnleitungen.
Gewährleistung
InformationenzurGewährleistungderAxisProdukteundhierzuverbundeneInformationen,nden
Sieunterwww.axis.com/warranty/
51
Page 52

52
Page 53

AXISP5522–EPTZDomeNetworkCamera
ITALIANO
Proceduredisicurezza
LeggereconattenzionequestaGuidaall'Installazioneprimadiinstallareildispositivo.Conservare
laGuidaall'Installazioneperusifuturi.
Livellidipericolo
PERICOLO
AVVERTENZAIndicaunasituazionepericolosache,senonevitata,puòprovocare
ATTENZIONE
VVISO
A AAVVISO VVISO
Indicaunasituazionepericolosache,senonevitata,provocamorte
olesionigravi.
lamorteolesionigravi.
Indicaunasituazionepericolosache,senonevitata,puòprovocare
lesionimedieominori.
Indicaunasituazioneche,senonevitata,puòdanneggiarela
proprietà.
Altrilivellid'informazione
ImportanteIndicainformazioniimportanti,essenzialiperilcorretto
NotaIndicainformazioniutilicheaiutanoaottenereilmassimodal
funzionamentodelprodotto.
prodotto.
53
Page 54

AXISP5522–EPTZDomeNetworkCamera
Informazionidisicurezza
VVISO
A AAVVISO VVISO
•IldispositivoAxisdeveessereutilizzatoinconformitàalleleggiealledisposizionilocali.
•ConservareildispositivoAxisinunambienteasciuttoeventilato.
•EvitarediesporreildispositivoAxisaurtiopressionieccessive.
•Noninstallareildispositivosusupporti,supercioparetiinstabili.
•UtilizzaresolostrumentiapplicabiliquandosiinstallaildispositivoAxis.Sesiutilizzauna
forzaeccessivaconglistrumentidell'alimentazioneèpossibilecausaredannialdispositivo.
•Nonutilizzaresostanzechimiche,agenticausticiodetergentiaerosol.
•Utilizzareunpannopulitoinumiditoinacquapuraperlapulizia.
•Utilizzaresoloaccessoricompatibiliconlespecichetecnichedeldispositivo.Questi
possonoesserefornitidaAxisodaterzeparti.
•UtilizzaresolopartidiricambioforniteoconsigliatedaAxis.
•Nontentarediriparareildispositivodasoli.Contattarel'assistenzaoilrivenditoreAxis
perquestionirelativeallamanutenzione.
Trasporti
VVISO
A AAVVISO VVISO
•DuranteiltrasportodelprodottoAxis,utilizzarel'imballaggiooriginaleoequivalenteper
evitaredannialprodotto.
Batteria
IlprodottoAxisutilizzaunabatteriaallitioda3,0VBR/CR2032comealimentazioneperilsuo
real-timeclock(RTC)interno.Incondizioninormaliquestabatteriaavràunadurataminima
dicinqueanni.
UnabassacaricadellabatteriainuiscesulfunzionamentodelRTC,facendoloresettareaogni
accensione.Quandolabatteriadeveesseresostituita,unmessaggiodiregistrovienevisualizzato
nelreportserverdelprodotto.Perulterioriinformazionisulreportserver,vederelepaginedi
congurazionedelprodottoocontattarel'assistenzaAxis.
Labatterianondeveesseresostituitasenonrichiesto,manelcasoincuiquestofossenecessario,
contattareilsupportoAxisall'indirizzowww.axis.com/techsupperassistenza.
54
Page 55

AXISP5522–EPTZDomeNetworkCamera
ITALIANO
AVVERTENZA
•Rischiodiesplosioneselabatteriavienesostituitainmodoerrato.
•SostituiresoloconunabatteriaidenticaounabatteriaconsigliatadaAxis.
•Smaltirelebatterieusateinbaseallenormativelocalioalleistruzionidelproduttore
dellabatteria.
Cupoladiprotezione
VVISO
A AAVVISO VVISO
•Fareattenzioneanongrafare,danneggiareolasciareimprontesullacupoladiprotezione,
perchépotrebbediminuirelaqualitàdell'immagine.Sepossibile,tenerelaprotezionein
plasticasullacupolanoaquandol'installazionenonsaràcompletata.
•Nonpulirelacupoladiprotezionesenonnecessario.Unapuliziaeccessivapotrebbe
danneggiarelasupercie.
•Perlapuliziageneraledellacupoladiprotezione,siconsigliadiutilizzareunsapone
neutroodetergentenonabrasivoconacquapuraeunpannomorbidoepulito.Sciacquare
beneconacquapuratiepida.Asciugareconunpannomorbidoepulitoperevitare
macchied'acqua.
•Nonusaremaidetergentiaggressivi,benzina,benzeneoacetoneeccedevitaredipulirela
cupoladiprotezioneallalucedirettadelsoleoatemperatureelevate.
55
Page 56

56
Page 57

AXISP5522–EPTZDomeNetworkCamera
ITALIANO
Guidaall'installazione
LapresenteGuidaall'installazionefornisceleistruzioninecessarieperinstallarelatelecamera
direteacupolaAXISP5522–EPTZnellareteinuso.Perulterioriinformazionisull’utilizzodel
dispositivo,consultarelaGuidaperl'utentedisponibileall'indirizzowww.axis.com
Proceduradiinstallazione
1.Assicurarsicheilcontenutodellaconfezione,glistrumentiealtrimaterialinecessariper
l'installazionesianoinordine.Consultarepagina57.
2.Studiareladescrizionedell'hardware.Consultarepagina58.
3.Studiarelespeciche.Consultarepagina61.
4.Installazionedell’hardware.Consultarepagina62.
5.Accederealprodotto.Consultarepagina66.
Contenutodellaconfezione
•TelecameradireteacupolaAXISP5522–EPTZ50Hz/60Hz
•Coperchiodellacupolatrasparentechiaro(premontato)
•Coperturadellacupolatrasparentefumè
•MidspanAXIST8123HighPoEconcavodialimentazione(specicoperilpaese)
•KitdiconnessioneRJ45,classediprotezioneIP66
•Parasole,incluseviti
•CDdelsoftwaredigestioneeinstallazione
•Materialistampati
-Guidaall'installazione(questodocumento)
-DocumentodigaranziaAxis
-Etichettaaggiuntivaconnumerodiserie(2x)
Accessoriopzionali
•AccessoriperilmontaggioAXIST91A
•ModuloaudioI/Odirete
•IlluminatoriAXIST90B
•SchedadicontrollovideosorveglianzaAXIST8310
Perinformazionisugliaccessoridisponibili,visitareilsitoWebwww.axis.com
57
Page 58

AXISP5522–EPTZDomeNetworkCamera
1
2
3 465
Panoramicadell'hardware
1.
Connettoredirete
2.
Codicedispositivo(P/N)enumerodiserie(S/N).Ilnumerodiseriepuòessere
richiestodurantel'installazione.
3.
Pulsantedicomando
4.
AlloggiamentoschedaSDHC
5.
IndicatoreLEDdistato
6.
PulsantediRiavvio
58
Page 59

Coperchiodellacupola
2
3
4
5
1
ITALIANO
AXISP5522–EPTZDomeNetworkCamera
1
Viti
2
Anellocupola
3
Coperchiodellacupola
4
Coperchiosuperiore
5
Guarnizioneadanello
IndicatoriLED
Nota
•IlLEDdistatopuòessereconguratoperlampeggiarequandouneventoèattivo.
LEDdistatoIndicazione
SpentoConnessioneefunzionamentonormale.
VerdeUnaluceverdessaper10secondiindicailnormale
GialloCostantedurantel'avvio.Lampeggiadurantel'aggiornamento
funzionamentounavoltacompletatol'avvio.
delrmware.
59
Page 60

AXISP5522–EPTZDomeNetworkCamera
Giallo/rossoLampeggiaingiallo/rossoseilCollegamentodiretenonè
RossoLampeggiainrossosel'aggiornamentodelrmwarenonè
disponibileoèstatoperso.
andatoabuonne.
IndicatoriLEDdelMidspan
LED
Porta
AC
Colore
Spento
VerdeFissoquandolatelecameraècollegata,funzionamento
Verde,
lampeggiante
Verde,
lampeggiante
VerdeFissoquandol'ingressodell'alimentazioneècollegato.
Indicazione
Nessunatelecameraconnessa.
normale.
Lampeggiolentoquandovièsovracorrenteocondizione
dicortocircuitonellaporta.
Lampeggiovelocequandolatensioneiningressoèfuori
portataoaltroerroreinterno.
Connettoriepulsanti
Perlespecicheelecondizionidifunzionamento,consultarepagina61.
Connettoredirete
Connettorepush-pullRJ45(IP66)conHighPoweroverEthernet(HighPoE).
VVISO
A AAVVISO VVISO
Utilizzareilmidspanfornito.
VVISO
A AAVVISO VVISO
Collegareildispositivoconuncavodireteschermato(STP).Tuttiicavichecolleganoil
dispositivoallaretesonodestinatiallorousospecico.Accertarsicheidispositividirete
sianoinstallatisecondoleistruzionidelproduttore.Permaggioriinformazionisuirequisiti
normativi,consultareElectromagneticCompatibility(EMC)onpage2.
VVISO
A AAVVISO VVISO
ÈnecessarioutilizzareilConnettorepush-pullRJ45(IP66)indotazionepermantenere
inalteratelecaratteristicheditenutaeprotezionediclasseIP66dellatelecamera.In
alternativa,utilizzareilcavoRJ45diclasseIP66conconnettorepremontatodisponibile
pressoilpropriorivenditoreAxis.Nonrimuoverelaschermaturainplasticadelconnettore
diretedallatelecamera.
60
Page 61

AXISP5522–EPTZDomeNetworkCamera
ITALIANO
Pulsantedicomando
Perl'ubicazionedelpulsantedicomando,vederePanoramicadell'hardwareallapagina58.
Ilpulsantedicomandovieneutilizzatoper:
•Ripristinodelprodottoalleimpostazionipredenitedifabbrica.Consultarepagina66.
•CollegamentoaunservizioAXISVideoHostingSystemoAXISInternetDynamicDNS
Service.Perulterioriinformazionisuquestiservizi,consultareilManualeUtente.
Pulsantediriavvio
Premereilpulsantediriavvioperriavviareildispositivo.
SlotperschedaSD
VVISO
A AAVVISO VVISO
•RischiodidanniallaschedaSD.Nonutilizzarestrumentiappuntitienonesercitare
eccessivaforzadurantel'inserimentoolarimozionedellaschedaSD.
•Rischiodiperditadidati.Perprevenireildanneggiamentodeidati,laschedaSDdeve
esserescollegataprimadellarimozione.Perscollegare,andareaSetup>SystemOptions
>Storage>SDCard(Congurazione>Opzionidisistema>Archiviazione>Scheda
SD)efareclicsuUnmount(Smonta).
QuestodispositivosupportaschededimemoriaSD/SDHC/SDXC(schedadimemorianoninclusa).
PericonsiglisullaschedaSD,visitareilsitoWebwww.axis.com.
Datitecnici
Condizionidifunzionamento
Dispositivo
AXISP5522–EIEC60721-4-3
Classicazione
Classe4K1,4C3,
4M3
IEC60529IP66
NEMA250Tipo
4X
Temperatura
da-20°Ca50°C
(da-4°Fa122°F)
61
Umidità
Umiditàrelativa15-100%RH
(concondensa)
Page 62

AXISP5522–EPTZDomeNetworkCamera
Consumoenergetico
VVISO
A AAVVISO VVISO
Utilizzareunasorgentedialimentazionelimitata(LPS)siaconunapotenzadiuscita
nominalelimitataa≤100Wounacorrentenominalediuscitalimitataa≤5A.
DispositivoHighPoE
AXISP5522–E
Max.30W
MidspanHighPoE(fornito)
100-240VCA,max.37W
Installazionedell'Hardware
Leggeretutteleistruzioniprimadiprepararsiadinstallarelatelecameradirete,poichénumerose
fasidipreparazionedell'installazionerichiedonolarimozionedellacoperturasuperioreedè
opportunochevenganocompletateinsieme.
•Rimuoverel'imballoprotettivoprimadiinstallarelatelecamera.
•Ildispositivovienefornitoconuncoperchiotrasparentedellacupola(premontato)e
uncoperchiotrasparentefumé.Persostituireilcoperchiodellacupola,consultare
Sostituzionedelcoperchiodellacupolaallapagina63.
•UnaschedaSDstandardoadaltacapacità(noninclusa)puòessereutilizzataper
memorizzareleregistrazionilocalmenteneldispositivo.Perinstallare/rimuoverela
schedaSD,ènecessariorimuovereilparasole,consultareInstallazionediunascheda
SDallapagina64.
•PerinstallareildispositivoutilizzandounastaffacompatibilediAccessoriperil
montaggioAXIST91A(vendutoseparatamente),consultareInstallazionedellatelecamera
conmontaggioastaffa(vendutoseparatamente)allapagina64.
Rimozionedell'imballoprotettivo
ConsultarePanoramicadell'hardwareallapagina58perlaposizionedeicomponenti.
1.Allentarelequattrovitidellacoperturasuperioreerimuoverla.
2.Rimuoverel'imballoprotettivo.
62
Page 63

AXISP5522–EPTZDomeNetworkCamera
1
ITALIANO
1
Imballoprotettivo
3.Sesidevesostituirelacoperturaacupolachiara/oscurataoinstallareunaschedaSD,
consultarepagina63epagina64.
4.Rimontarelacoperturaposteriorenellaposizioneoriginaleeserrareleviti.
Sostituzionedelcoperchiodellacupola
Importante
Questatelecameraèdotatadiunamembranadeumidicantepermantenerebassoillivello
diumiditànellacupola.Perevitarefenomenidicondensa,nonsmontarelatelecamerein
casodipioggiaoelevataumiditàatmosferica.
Nota
Fareattenzioneanongrafareodanneggiarelacoperturaacupola.Sepossibile,tenere
laprotezioneinplasticasulcoperchiodellacupolanoaquandol'installazionenonsarà
completata.
Lasostituzionedelcoperchiodellacupolaènecessariasolosesidesiderautilizzareuncoperchio
scurooseilcoperchiodellacupolaègrafatoodanneggiato.Èpossibileacquistarecoperchia
cupolaoscuratiecoperchitrasparentidiricambiopressoilpropriorivenditoreAxis.
ConsultarePanoramicadell'hardwareallapagina58perlaposizionedeicomponenti.
1.Allentarelevitidellacoperturasuperioreerimuoverla.
2.Rimuoverelevitidell'anellodellacoperturaerimuoverel'anellodallacoperturasuperiore.
3.Fissarel'anellodellacupolaelacoperturaacupolasostitutivasullacoperturasuperiore
serrandoleviti(aunacoppiada1,0a1,2Nm).
63
Page 64

AXISP5522–EPTZDomeNetworkCamera
4.PerinstallareunaschedaSD(noninclusa),consultarepagina64.
5.Rimontarelacoperturasuperiorenellaposizioneoriginale,quindiserrareleviti(coppia
da2,5a3,0Nm).
InstallazionediunaschedaSD
VVISO
A AAVVISO VVISO
Perprevenireildanneggiamentodelleregistrazioni,laschedaSDdeveesserescollegata
primadell'espulsione.Perscollegare,andareaSetup>SystemOptions>Storage>SD
Card(Congurazione>Opzionidisistema>Archiviazione>SchedaSD)efareclic
suUnmount(Smonta).
ÈfacoltativoinstallareunaschedadimemoriaSDstandardoadaltacapacità(noninclusa),che
puòessereusataperlaregistrazioneinmodalitàlocaleconunitàdiarchiviazionerimovibile.
ConsultarePanoramicadell'hardwareallapagina58perlaposizionedeicomponenti.
1.Rimuovereilparasole.
2.Allentaretuttelevitidellacoperturasuperioreerimuoverla.
3.InserireunaschedaSD(noninclusa)nelloslotperschedeSD.
4.Rimontarelacoperturasuperiorenellaposizioneoriginale,quindiserrareleviti(coppia
da2,5a3,0Nm).
5.Rimontareilparasolenellaposizioneoriginaleeserrareleviti.
Installazionedellatelecameraconmontaggioastaffa(venduto
separatamente)
VVISO
A AAVVISO VVISO
ÈnecessarioutilizzareilConnettorepush-pullRJ45(IP66)indotazionepermantenere
inalteratelecaratteristicheditenutaeprotezionediclasseIP66dellatelecamera.In
alternativa,utilizzareilcavoRJ45diclasseIP66conconnettorepremontatodisponibile
pressoilpropriorivenditoreAxis.Nonrimuoverelaschermaturainplasticadelconnettore
diretedallatelecamera.
1.Installarelastaffaselezionatainbasealleistruzionifornite.Seènecessarioforare,
assicurarsidiutilizzarepunte,vitietasselliadattialmateriale.
2.Collegareilconnettorepush-pullRJ45(IP66)fornitoalcavodirete,comedaistruzioni
forniteconilconnettore.
3.Fissarelatelecamerautilizzandoilcavodisicurezzaindotazione.
64
Page 65

AXISP5522–EPTZDomeNetworkCamera
1
2
3
ITALIANO
1
Vite
2
Alloggiamentiperisupportidell'unità
3
Cavodisicurezza
4.Collegareilcavodireteallatelecamera.
5.Farscorrereisupportidell'unitàsullatelecameradiretenellefessuredellastaffadi
montaggioeruotarelatelecamera.
6.Fissarelatelecameradireteallastaffadimontaggioserrandoleviti.
Installazionedelmidspan
IlmidspanindotazioneconsenteaidispositiviAxiscontecnologiavideodireteconunelevato
consumoenergeticodiriceveredatiealimentazionetramitelostessocavodirete.
1.Collegareilmidspan(ingressodati)alloswitchdireteutilizzandouncavodirete.
2.Collegareilmidspan(uscitadatiealimentazione)allatelecameratramiteilcavodi
retecheèstatocollegatoallatelecamera.
3.Collegareilmidspanaunapresadialimentazionedirete(100–240VCA)conmessaa
terrautilizzandoilcavodialimentazioneindotazione.
65
Page 66

AXISP5522–EPTZDomeNetworkCamera
1
2
3
4
1
Uscitadatiealimentazione(collegarealdispositivoAxis)
2
Ingressodati(collegareallarete)
3
IndicatoreLEDingressoCA
4
IndicatoreLEDporta
4.AssicurarsicheiLEDdelmidspanindichinolecondizionicorrette.ConsultareIndicatori
LEDdelMidspanallapagina60.
AccederealProdotto
UtilizzareleutilitycontenutenelCDdelsoftwared'installazioneecongurazioneperassegnareun
indirizzoIP,impostarelapasswordedaccederealussovideo.Questeinformazionisonodisponibili
anchesullepaginededicateall'assistenzasulsitowww.axis.com/techsup/
Ripristinodeivaloripredenitidifabbrica
Importante
Ilripristinodelleimpostazionidifabbricadeveessereusatoconcautela.Unripristinodelle
impostazionidifabbricaconsentiràdiripristinareleimpostazionidifabbricapertuttii
parametri,inclusol'indirizzoIP.
Nota
Glistrumentiperl'installazioneelagestionedelsoftwaresonodisponibilisulCDfornito
conildispositivoesullepaginededicateall'assistenzasulsitoWebwww.axis.com/techsup.
Perripristinareildispositivoalleimpostazionipredenitedifabbrica:
1.Tenerepremuticontemporaneamentesiailpulsantedicomandocheilpulsantediriavvio.
2.Rilasciareilpulsantediriavvio,macontinuareatenerepremutoilpulsantedicomando
percirca15–30secondinoaquandoilLEDdistatolampeggiaingiallo.
66
Page 67

AXISP5522–EPTZDomeNetworkCamera
ITALIANO
3.Rilasciareilpulsantedicomando.IlprocessoècompletoquandoilLEDdistatodiventerà
verde.Ildispositivoèstatoreimpostatoalleimpostazionidifabbricapredenite.Se
nessunserverDHCPèdisponibileinrete,l'indirizzoIPpredenitoè192.168.0.90.
4.Medianteglistrumentiperl'installazioneelagestionedelsoftware,assegnareun
indirizzoIP,impostarelapasswordeaccederealussovideo.
Èanchepossibilereimpostareiparametrialleimpostazionipredenitedifabbricamediante
l’interfacciaweb.AndareaSetup>SystemOptions>Maintenance(Congurazione>Opzionidi
sistema>Manutenzione).
UlterioriInformazioni
IlManualeperl'Utenteèdisponibileall'indirizzowww.axis.com
Visitareilsitoall’indirizzowww.axis.com/techsuppervericaresesonostatipubblicati
aggiornamentidelrmwareperilpropriodispositivodirete.Perconoscerelaversionedelrmware
installata,andaresuSetup(Impostazioni)>About(Informazionisu).
VisitareilCentrodiapprendimentoAxisallapaginawww.axis.com/academyperservizidi
formazioneutili,webinar,tutorialeguide.
Informazionisullagaranzia
PerinformazionisullagaranziadeldispositivoAxiseinformazioniadessorelative,consultare
lapaginawww.axis.com/warranty/
67
Page 68

68
Page 69

AXISP5522–EPTZDomeNetworkCamera
ESPANÕL
Informacióndeseguridad
LeaestaGuíadeinstalaciónconatenciónantesdeinstalarelproducto.GuardelaGuíade
instalaciónparapoderconsultarlaenotromomento.
Nivelesdepeligrosidad
PELIGRO
ADVERTENCIA
ATENCIÓN
VISO
A AAVISO VISO
Indicaunasituaciónpeligrosaque,sinoseevita,provocará
lesionesgravesolamuerte.
Indicaunasituaciónpeligrosaque,sinoseevita,puedeprovocar
lesionesgravesolamuerte.
Indicaunasituaciónpeligrosaque,sinoseevita,puedeprovocar
lesionesmoderadasoleves.
Indicaunasituaciónpeligrosaque,sinoseevita,puedeprovocar
dañosmateriales.
Otrosnivelesdemensaje
ImportanteIndicainformaciónimportantequeesfundamentalparaqueel
NotaIndicainformaciónútilqueayudaaaprovecharelproductoal
productofuncionecorrectamente.
máximo.
69
Page 70

AXISP5522–EPTZDomeNetworkCamera
Instruccionesdeseguridad
VISO
A AAVISO VISO
•ElproductodeAxisdebeutilizarsedeacuerdoconlalegislaciónylanormativalocales.
•AlmaceneelproductodeAxisenunentornosecoyventilado.
•EvitelaexposicióndelproductodeAxisachoquesoaunafuertepresión.
•Noinstaleelproductoensoportes,superciesoparedesinestables.
•UtilicesololasherramientascorrespondientescuandoinstaleelproductodeAxis.La
aplicacióndeunafuerzaexcesivaconherramientaseléctricaspuedeprovocardaños
enelproducto.
•Noutilicelimpiadoresenaerosol,agentescáusticosniproductosquímicos.
•Limpieconunpañolimpiohumedecidoconaguapura.
•Utilicesoloaccesoriosquecumplanconlasespecicacionestécnicasdelproducto.Estos
accesorioslospuedeproporcionarAxisountercero.
•UtilicesolopiezasderepuestoproporcionadasorecomendadasporAxis.
•Nointenterepararelproductoustedmismo.Póngaseencontactoconelserviciode
asistenciatécnicadeAxisoconsudistribuidordeAxisparatratarasuntosdereparación.
Transporte
VISO
A AAVISO VISO
•CuandotransporteelproductodeAxis,utiliceelembalajeoriginalounequivalentepara
evitardañosenelproducto.
Batería
EsteproductodeAxisutilizaunabateríadelitioBR/CR2032de3,0Vcomofuentedealimentación
delrelojinternoentiemporeal.Encondicionesnormales,estabateríaduraráunmínimodecinco
años.
Unnivelbajodebateríaafectaráalfuncionamientodelrelojentiemporeal,loqueprovocaráel
restablecimientodeestecadavezqueseenciendaelproducto.Cuandoseanecesariosustituirla
batería,apareceráunmensajederegistroenelinformedelservidordelproducto.Paraobtener
másinformaciónsobreelinformedelservidor,vealaspáginasdeconguracióndelproductoo
póngaseencontactoconelserviciodeasistenciatécnicadeAxis.
Labateríanodebesustituirseamenosqueseanecesario;noobstante,siprecisahacerlo,póngaseen
contactoconelserviciodeasistenciatécnicadeAxisenwww.axis.com/techsupparasolicitarayuda.
70
Page 71

AXISP5522–EPTZDomeNetworkCamera
ESPANÕL
ADVERTENCIA
•Lasustituciónincorrectadelabateríaimplicariesgodeexplosión.
•SustituyalabateríaconunabateríaidénticauotrabateríarecomendadaporAxis.
•Desechelasbateríasusadasdeconformidadconlanormativalocalolasinstrucciones
delfabricante.
Cubiertadeldomo
VISO
A AAVISO VISO
•Presteatenciónanoarañar,dañarodejarlashuellasenlacubiertadeldomo,puestoque
estopuedeprovocarunadisminucióndelacalidaddeimagen.Siesposible,mantengael
plásticodeprotecciónenlacubiertadeldomohastaquesecompletelainstalación.
•Nolimpielacubiertadeldomosipareceasimplevistaqueestálimpiaynuncapulala
supercie.Unalimpiezaexcesivapodríadañarlasupercie.
•Pararealizarunprocedimientodelimpiezageneraldelacubiertadeldomoserecomienda
usardetergenteojabónneutros,sindisolventesynoabrasivosmezcladosconaguapura,
yuntraposuaveylimpio.Enjuaguebienconaguapuraytibia.Sequeconuntrapolimpio
ysuaveparaevitarlasmanchasdegotasdeagua.
•Nuncautilicedetergentesabrasivos,gasolina,benceno,acetona,etc.yevitelimpiarla
cubiertadeldomoatemperaturaselevadasoencontactodirectoconlaluzsolar.
71
Page 72

72
Page 73

AXISP5522–EPTZDomeNetworkCamera
ESPANÕL
Guíadeinstalación
EstaGuíadeinstalaciónincluyeinstruccionesparainstalarlacámaradomoderedPTZAXIS
P5522–Eensured.Paraconocerotrosaspectosdeusodelproducto,consulteelManualdel
usuariodisponibleenwww.axis.com.
Pasosdelainstalación
1.Asegúresedequedisponedelcontenidodelpaquete,lasherramientasylosdemás
materialesnecesariosparalainstalación.Veapágina73.
2.Estudielainformacióngeneraldelhardware.Veapágina74.
3.Estudielasespecicaciones.Veapágina77.
4.Instaleelhardware.Veapágina78.
5.Accedaalproducto.Veapágina82.
Contenidodelpaquete
•CámaradomoderedPTZAXISP5522–E50Hz/60Hz
•Cubiertadeldomotransparente(premontada)
•Cubiertadeldomotransparenteahumada
•MidspanHighPoEAXIST8123concabledealimentaciónincluido(especícodelpaís)
•KitdeconexiónRJ-45conclasicaciónIP66
•Parasol,tornillosincluidos
•CDdesoftwaredeinstalaciónygestión
•Materialesimpresos
-Guíadeinstalación(estedocumento)
-DocumentodegarantíadeAxis
-Etiquetasadicionalesconelnúmerodeserie(2)
Accesoriosopcionales
•AccesoriosdemontajeAXIST91A
•MódulodeaudioconE/Sdered
•IluminadoresAXIST90B
•ConsoladecontroldevideovigilanciaAXIST8310
Paraobtenerinformaciónsobrelosaccesoriosdisponibles,visitewww.axis.com.
73
Page 74

AXISP5522–EPTZDomeNetworkCamera
1
2
3 465
Informacióngeneraldelhardware
1.
Conectordered
2.
Númerodepieza(P/N)ynúmerodeserie(S/N).Puedenecesitarseelnúmerode
seriedurantelainstalación.
3.
Botóndecontrol
4.
RanuraparatarjetasSDHC
5.
IndicadorLEDdeestado
6.
Botóndereinicio
74
Page 75

Cubiertadeldomo
2
3
4
5
1
ESPANÕL
AXISP5522–EPTZDomeNetworkCamera
1
Tornillos
2
Anillodeldomo
3
Cubiertadeldomo
4
Cubiertasuperior
5
Anillodesellado
IndicadoresLED
Nota
•SepuedecongurarelLEDEstadoparaqueparpadeemientrashayauneventoactivo.
LEDdeestado
Apagado
Verde
Ámbar
Indicación
Conexiónyfuncionamientonormal.
Semuestrajodurantediezsegundosparaindicarun
funcionamientonormaldespuésdelcompletarelinicio.
Fijoduranteelinicio.Parpadeadurantelaactualizacióndel
rmware.
75
Page 76

AXISP5522–EPTZDomeNetworkCamera
Ámbar/rojo
RojoParpadeaenrojosiseproduceunerrordurantelaactualización
Parpadeaenámbar/rojosilaconexiónalarednoestádisponible
osehaperdido.
delrmware.
IndicadoresLEDdelmidspan
LED
Port
AC
Color
ApagadoNosehaconectadoningunacámara
VerdeFijoparaindicarfuncionamientonormal.
Verde,parpadeanteFlashlentoensituacióndesobrecargaocortocircuito
Verde,parpadeanteFlashrápidocuandolatensióndeentradanoesla
Verde
Indicación
enelpuerto
adecuadauotrofallointerno
FijocuandoseconectalaentradadealimentaciónAC.
Conectoresybotones
Paraconocerlasespecicacionesylascondicionesdefuncionamiento,veapágina77.
Conectordered
ConectorRJ45(IP66)conalimentacióndealtapotenciaatravésdeEthernet(HighPoE).
VISO
A AAVISO VISO
Utiliceelinyectorsuministrado.
VISO
A AAVISO VISO
Elproductoseconectarámedianteuncablederedblindado(STP).Todosloscablesque
conectenelproductoalareddeberánestarblindadosparasuusoespecíco.Asegúrese
dequelosdispositivosderedesténinstaladosdeconformidadconlasinstruccionesdel
fabricante.Paraobtenerinformaciónsobrelosrequisitosnormativos,veaElectromagnetic
Compatibility(EMC)onpage2.
VISO
A AAVISO VISO
ParacumplirconeldiseñodelaclasicaciónIP66delacámaraymantenerlaprotección
IP66,debeusarseelconectorRJ45conclasicaciónIP66suministrado.Comoalternativa,
useelcableRJ45conclasicaciónIP66conelconectormontadopreviamentedisponibleen
sudistribuidordeAxis.Noretirelaproteccióndeplásticodelconectordereddelacámara.
76
Page 77

AXISP5522–EPTZDomeNetworkCamera
ESPANÕL
Botóndecontrol
Paraconocerlaubicacióndelbotóndecontrol,veaInformacióngeneraldelhardwareenlapágina
74.
Elbotóndecontrolseutilizaparalosiguiente:
•Restablecerelproductoalaconguraciónpredeterminadadefábrica.Veapágina82.
•ConectarseaunservicioAXISVideoHostingSystemoalServiciodeDNSdinámico
deInternetdeAXIS.Paraobtenermásinformaciónsobreestosservicios,consulteel
Manualdelusuario.
Botóndereinicio
Pulseelbotóndereinicioparareiniciarelproducto.
RanuraparatarjetasSD
VISO
A AAVISO VISO
•RiesgodedañosenlatarjetaSD.Noutiliceherramientasaladasniejerzademasiada
fuerzaalinsertaroretirarlatarjetaSD.
•Riesgodepérdidadedatos.AntesderetirarlatarjetaSD,esprecisodesmontarlapara
evitarquelosdatosresultendañados.Paradesmontarla,vayaaSetup>SystemOptions
>Storage>SDCard(Conguración>Opcionesdelsistema>Almacenamiento>Tarjeta
SD)yhagaclicenUnmount(Desmontar).
EsteproductoadmitetarjetasSD/SDHC/SDXC(noincluidas).
ParaconocerlasrecomendacionesdetarjetaSD,consultewww.axis.com.
Especicaciones
Condicionesdefuncionamiento
Producto
AXISP5522–EIEC60721-4-3
Clasicación
Clase4K1,4C3,
4M3
IEC60529IP66
NEMA250Tipo
4X
TemperaturaHumedad
De-20˚Ca50˚C
77
Humedadrelativadel15al
100%(concondensación)
Page 78

AXISP5522–EPTZDomeNetworkCamera
Consumo
VISO
A AAVISO VISO
Utiliceunafuentedealimentaciónlimitada(LPS)conunapotencianominaldesalida
limitadaa≤100Wounacorrientenominaldesalidalimitadaa≤5A.
ProductoHighPoE
AXISP5522–E
30Wmáx.
MidspanHighPoE(incluido)
100–240VCA,37Wmáx.
Instalacióndelhardware
Consultetodaslasinstruccionesantesdeprepararlainstalacióndelacámaraderedyaque
algunospasosdelapreparacióndelainstalaciónprecisanqueseretirelacubiertasuperioryle
convendríarealizarlostodosjuntos.
•Retireelembalajedeprotecciónantesdeinstalarlacámara.
•Elproductosesuministraconunacubiertadeldomotransparente(premontada)y
unacubiertadeldomotransparenteahumada.Parasustituirlacubiertadeldomo,vea
Sustitucióndelacubiertadeldomoenlapágina79.
•PuedeemplearseunatarjetaSDestándarodegrancapacidad(noincluida)parael
almacenamientolocaldegrabacionesenelproducto.Elparasoldeberetirarsepara
instalaroextraerlatarjetaSD,veaInstalacióndeunatarjetaSDenlapágina80.
•Parainstalarelproductoutilizandounsoportecompatibledelosaccesoriosdemontaje
AXIST91A(sevendenporseparado),veaInstalacióndelacámaraenunmontajecon
soporte(sevendeporseparado)enlapágina80.
Retiradadelembalajedeprotección
VeaInformacióngeneraldelhardwareenlapágina74paraconocerlaubicacióndeloscomponentes.
1.Aojeloscuatrotornillosdelacubiertasuperioryretírela.
2.Retireelembalajedeprotección.
78
Page 79

AXISP5522–EPTZDomeNetworkCamera
1
ESPANÕL
1
Embalajedeprotección
3.Sivaasustituirlacubiertadeldomotransparente/ahumadaoainstalarunatarjeta
SD,veapágina79ypágina80.
4.Vuelvaacolocarlacubiertasuperiorensuposiciónoriginalyaprietelostornillos.
Sustitucióndelacubiertadeldomo
Importante
Esteproductocuentaconunamembranadeshumidicadoraparalaconservacióndeniveles
bajosdehumedaddentrodeldomo.Paraevitarlacondensación,nodesmontelacámaraen
situacionesdelluviaohumedad.
Nota
Tengacuidadodenoarañarodañarlacubiertadeldomo.Siesposible,mantengael
plásticodeprotecciónenlacubiertadeldomohastaqueterminelainstalación.
Lasustitucióndelacubiertadeldomosoloesnecesariasideseausarunacubiertadeldomo
ahumadaosilacubiertadeldomosehaarañadoodañado.SudistribuidordeAxispuede
proporcionarlelascubiertasdeldomoahumadasylasnormalesderepuesto.
VeaInformacióngeneraldelhardwareenlapágina74paraconocerlaubicacióndeloscomponentes.
1.Aojelostornillosdelacubiertasuperioryretírela.
2.Extraigalostornillosdelanillodeldomoyretiredichoanillodelacubiertadeldomo.
3.Fijeelanillodeldomoylacubiertadeldomodesustituciónalacubiertasuperiory
asegúrelaapretandolostornillos(pardetorsiónde1,0a1,2Nm).
79
Page 80

AXISP5522–EPTZDomeNetworkCamera
4.ParainstalarunatarjetaSD(noincluida),veapágina80.
5.Vuelvaacolocarlacubiertasuperiorensuposiciónoriginalyaprietelostornillos(parde
torsiónde2,5a3,0Nm).
InstalacióndeunatarjetaSD
VISO
A AAVISO VISO
Paraevitarquelasgrabacionesresultendañadas,esprecisodesmontarlatarjetaSD
antesdeexpulsarla.Paradesmontarla,vayaaSetup>SystemOptions>Storage>SD
Card(Conguración>Opcionesdelsistema>Almacenamiento>TarjetaSD)yhagaclic
enUnmount(Desmontar).
LainstalacióndeunatarjetaSDestándarodegrancapacidad(noincluida)paralagrabación
localconalmacenamientoextraíbleesopcional.
VeaInformacióngeneraldelhardwareenlapágina74paraconocerlaubicacióndeloscomponentes.
1.Retireelparasol.
2.Aojetodoslostornillosdelacubiertasuperioryretírela.
3.InserteunatarjetaSD(noincluida)enlaranuradetarjetasSD.
4.Vuelvaacolocarlacubiertasuperiorensuposiciónoriginalyaprietelostornillos(parde
torsiónde2,5a3,0Nm).
5.Vuelvaacolocarelparasolensuposiciónoriginalyaprietelostornillos.
Instalacióndelacámaraenunmontajeconsoporte(sevendeporseparado)
VISO
A AAVISO VISO
ParacumplirconeldiseñodelaclasicaciónIP66delacámaraymantenerlaprotección
IP66,debeusarseelconectorRJ45conclasicaciónIP66suministrado.Comoalternativa,
useelcableRJ45conclasicaciónIP66conelconectormontadopreviamentedisponibleen
sudistribuidordeAxis.Noretirelaproteccióndelconectordereddeplásticodelacámara.
1.Instaleelsoporteseleccionadosegúnlasinstruccionesqueleacompañan.Siesnecesario
perforar,asegúresedeusarbrocas,tornillosytacosadecuadosparaelmaterial.
2.ConecteelconectorRJ45conclasicaciónIP66alcablederedsegúnlasinstrucciones
facilitadasconelconector.
3.Fijelacámaraconelcabledeseguridadsuministrado.
80
Page 81

AXISP5522–EPTZDomeNetworkCamera
1
2
3
ESPANÕL
1
Tornillo
2
Ranurasparasoportesdeunidades
3
Cabledeseguridad
4.Conecteelcablederedalacámara.
5.Deslicelossoportesdelacámaraderedporlasranurasdelsoportedemontajeygirela
unidaddecámara.
6.Fijelacámaraderedalsoportedemontajeajustandolostornillos.
InstalacióndelMidspan
Elmidspan(inyectordecorriente)suministradopermitequelosproductosdevídeoenreddeAxis
conunconsumoeléctricoelevadorecibandatosyalimentaciónporelmismocableEthernet.
1.Conecteelmidspan(entradadedatos)alswitchderedmedianteuncabledered.
2.Conecteelmidspan(salidadedatosyalimentación)alacámaramedianteelcable
deredquesehaconectadoalacámara.
3.ConecteelmidspanaunatomadecorrienteCA(100-240VCA)conconexiónatierra
medianteelcabledealimentaciónproporcionado.
81
Page 82

AXISP5522–EPTZDomeNetworkCamera
1
2
3
4
1
Salidadedatosyalimentación(seconectaalproductoAxis)
2
Entradadedatos(seconectaalared)
3
IndicadorLEDdeentradadecorrientealterna
4
IndicadorLEDdeactividaddepuerto
4.CompruebequelosindicadoresLEDdelmidspanindiquenlascondicionesadecuadas.
ConsulteIndicadoresLEDdelmidspanenlapágina76.
Accesoalproducto
UtilicelasherramientassuministradasenelCDdelsoftwaredeinstalaciónygestiónparaasignar
unadirecciónIP,establecerlacontraseñayaccederalatransmisióndevídeo.Estainformación
tambiénestádisponibleenlaspáginasdeasistenciatécnicaenwww.axis.com/techsup/
Restablecimientoalaconguraciónpredeterminadadefábrica
Importante
Hayquetenercuidadoalrestablecerlaconguraciónpredeterminadadefábrica.Todos
losvalores,incluidaladirecciónIP,serestableceránalaconguraciónpredeterminada
defábrica.
Nota
LasherramientasdelsoftwaredeinstalaciónygestiónestándisponiblesenelCD
suministradoconelproducto,asícomoenlaspáginasdeasistenciatécnicaen
www.axis.com/techsup.
Pararestablecerelproductoalaconguraciónpredeterminadadefábrica:
1.Pulselosbotonesdecontrolydereinicioalmismotiempo.
2.Suelteelbotóndereinicioperomantengapulsadoelbotóndecontroldurante15–30
segundos,hastaqueelindicadorLEDdeestadoparpadeeenámbar.
82
Page 83

AXISP5522–EPTZDomeNetworkCamera
ESPANÕL
3.Suelteelbotóndecontrol.ElprocesonalizacuandoelindicadorLEDdeestadosepone
verde.Elproductoseharestablecidoalaconguraciónpredeterminadadefábrica.Si
nohayningúnservidorDHCPdisponibleenlared,ladirecciónIPpredeterminadaes
192.168.0.90.
4.Utilicelasherramientasdelsoftwaredeinstalaciónygestiónparaasignarunadirección
IP,establecerlacontraseñayaccederalatransmisióndevídeo.
Tambiénesposiblerestablecerlosparámetrosalosvalorespredeterminadosdefábricamediante
lainterfazweb.Paraello,vayaaSetup>SystemOptions>Maintenance(Conguración>
Opcionesdelsistema>Mantenimiento).
Másinformación
ElManualdeusuarioseencuentradisponibleenwww.axis.com.
Visitewww.axis.com/techsupparacomprobarsiexisteunrmwareactualizadodisponibleparasu
productodered.Paraverlaversióndelrmwareinstaladoactualmente,vayaaSetup>About
(Conguración>Acercade).
Visiteelcentrodeaprendizajedewww.axis.com/academyparaconsultarguías,tutoriales,
seminarioswebycursosquepuedenresultarleútiles.
Informacióndegarantía
ParaobtenermásdetallessobrelagarantíadelproductoAxisylainformaciónrelacionadaconella,
consultewww.axis.com/warranty/
83
Page 84

84
Page 85

AXISP5522–EPTZDomeNetworkCamera
ò
ò
¨
¨
¾
¾
安
全
情
安 安
本製品を設置する前に、このインストールガイドをよくお読みください。インス
トールガイドは、後で参照できるように保管しておいてください。
危
危 危
危 危危険 険
警 警警告 告
注 注注意 意
注 注注記 記
そ
そ そ
報
全 全
情 情
報 報
険
レ
ベ
険 険
険
告
意
記
の
の の
ル
レ レ
ベ ベ
ル ル
回避しない場合、死亡または重傷につながる危険な状
態を示します。
回避しない場合、死亡または重傷につながるおそれのあ
る危険な状態を示します。
回避しない場合、軽傷または中程度の怪我につながるお
それのある危険な状態を示します。
回避しない場合、器物の破損につながるおそれのある状
態を示します。
他
の
メ
ッ
セ
ー
ジ
レ
ベ
他 他
の の
メ メ
ッ ッ
セ セ
ー ー
ジ ジ
ル
レ レ
ベ ベ
ル ル
重要
注意製品を最大限に活用するために役立つ有用な情報を示
製品を正しく機能させるために不可欠な重要情報を示
します。
します。
85
Page 86

AXISP5522–EPTZDomeNetworkCamera
安
全
手
安 安
記
注 注注記 記
輸
輸 輸
記
注 注注記 記
順
全 全
手 手
順 順
•本製品は、お使いになる地域の法律や規制に準拠して使用してください。
•本製品は乾燥した換気のよい環境に保管してください。
•本製品に衝撃または強い圧力を加えないでください。
•本製品を不安定なブラケット、表面、または壁に設置しないでください。
•本製品を設置する際には、適切な工具のみを使用してください。電動工具を
使用して過剰な力をかけると、製品が損傷することがあります。
•化学薬品、腐食剤、噴霧式クリーナーは使用しないでください。
•清掃には、きれいな水に浸した清潔な布を使用してください。
•製品の技術仕様に準拠したアクセサリーのみを使用してください。これらの
アクセサリーは、Axisまたはサードパーティから入手できます。
•Axisが提供または推奨する交換部品のみを使用してください。
•製品を自分で修理しないでください。修理については、Axisサポートまたは
販売代理店にお問い合わせください。
送
送 送
•本製品を運搬する際は、製品が損傷しないよう、元の梱包か同等の梱包を
使用してください。
バ
ッ
テ
リ
バ バ
ッ ッ
本製品は、内部リアルタイムクロック(RTC)用電源として、3.0VBR/CR2032リチウ
ムバッテリーを使用します。このバッテリーは、通常条件下で最低5年間使用で
きます。
バッテリーが低電力状態になると、RTCの動作に影響し、電源を入れるたびにRTCが
リセットされます。バッテリーの交換が必要になると、製品のサーバーレポートに
ログメッセージが表示されます。サーバーレポートの詳細については、製品の設定
ページを参照するか、Axisサポートまでお問い合わせください。
必要な場合以外はバッテリーを交換しないでください。バッテリーの交換が必要な場
合は、Axisサポート(
ー
テ テ
リ リ
ー ー
www .axis.com/techsup
)までご連絡ください。
86
Page 87

AXISP5522–EPTZDomeNetworkCamera
ò
ò
¨
¨
¾
¾
告
警 警警告 告
•バッテリーは、正しく交換しないと爆発する危険があります。
•交換用バッテリーとしては、同一品またはAxisが推奨するバッテリーのみを
使用してください。
•使用済みバッテリーは、地域の規制またはバッテリーメーカーの指示に
従って廃棄してください。
ド
ー
ム
カ
バ
ド ド
ー ー
ム ム
記
注 注注記 記
•画質低下の原因となるので、ドームカバーに傷や指紋を付けたり、損傷しな
いように注意してください。可能であれば、設置が完了するまでドームカ
バーに保護プラスチックを付けたままにしてください。
•肉眼で見て汚れがない場合は、ドームカバーを掃除しないでください。ま
た、絶対に表面を磨かないでください。過度な清掃により、表面が破損す
ることがあります。
•ドームカバーの通常のクリーニングには、磨耗防止タイプの無溶媒の中性石
鹸またはきれいな水で薄めた洗剤と、柔らかい清潔な布を使用することをお
勧めします。洗浄後、きれいなぬるま湯でよくすすいでください。水滴の跡
が付かないよう、清潔な柔らかい布で拭いて乾かしてください。
•強力な洗剤、ガソリン、ベンジン、アセトンなどは絶対に使用しないでく
ださい。また直射日光が当たる場所や気温が上昇する場所での、ドーム
カバーの清掃は避けてください。
ー
カ カ
バ バ
ー ー
87
Page 88

88
Page 89

AXISP5522–EPTZDomeNetworkCamera
ò
ò
¨
¨
¾
¾
イ
ン
ス
ト
ー
ル
ガ
イ
イ イ
ン ン
ス ス
ト ト
ー ー
ル ル
このインストールガイドでは、AXISP5522–EPTZドームネットワークカメラをお
使いのネットワークにインストールする手順について説明します。製品の使用の
詳細については、Axisのホームページ(
参照してください
設
置
手
設 設
パ
パ パ
順
置 置
手 手
順 順
1.パッケージの内容、ツールなど、設置に必要な物がそろっているかを確認
します。
2.「ハードウェアの概要」をよく読みます。
3.「仕様」をよく読みます。
4.ハードウェアの設置。
5.製品にアクセスします。
ッ
ケ
ー
ッ ッ
ケ ケ
ー ー
•AXISP5522–EPTZドームネットワークカメラ(50Hz/60Hz)
•透明ドームカバー(装着済み)
•スモーク透明ドームカバー
•電源ケーブル付きAXIST8123HighPoEミッドスパン(国別)
•IP66保護等級に準拠したRJ45コネクターキット
•サンシールドとネジ
•インストール・管理ソフトウェアCD
•印刷物
89 ペ ー ジ
ジ
の
ジ ジ
の の
‑インストールガイド(本書)
‑AXIS保証書
‑予備のシリアル番号ラベル×2
ド
ガ ガ
イ イ
ド ド
を参照してください。
内
容
内 内
容 容
94 ペ ー ジ
98 ペ ー ジ
www .axis.com
94 ペ ー ジ
を参照してください。
を参照してください。
を参照してください。
)でユーザーズマニュアルを
90 ペ ー ジ
を参照してください。
オ
プ
シ
ョ
ン
ア
ク
セ
サ
リ
オ オ
プ プ
シ シ
ョ ョ
ン ン
ア ア
ク ク
セ セ
•AXIST91A取り付けアクセサリー
•ネットワークI/Oオーディオモジュール
•AXIST90Bイルミネーター
•AXIST8310ビデオ監視コントロールボード
利用可能なアクセサリーについては、
ー
サ サ
リ リ
ー ー
www .axis.com
89
を参照してください。
Page 90

AXISP5522–EPTZDomeNetworkCamera
1
2
3 465
ハ
ー
ド
ウ
ェ
ア
の
概
ハ ハ
ー ー
ド ド
ウ ウ
ェ ェ
ア ア
1.
ネ ッ ト ワ ー ク コ ネ ク タ
2.
型 番 (P/N) と シ リ ア ル 番 号 (S/N) 。 イ ン ス ト ー ル 時 に シ リ ア ル 番 号
が 必 要 に な る 場 合 が あ り ま す 。
3.
コ ン ト ロ ー ル ボ タ ン
4.
SDHC カ ー ド ス ロ ッ ト
5.
ス テ ー タ ス イ ン ジ ケ ー タ ー LED
6.
再 起 動 ボ タ ン
要
の の
概 概
要 要
90
Page 91

AXISP5522–EPTZDomeNetworkCamera
2
3
4
5
1
ò
ò
¨
¨
¾
¾
ド
ー
ム
カ
バ
ド ド
ー ー
ム ム
ー
カ カ
バ バ
ー ー
1
ネ ジ
2
ド ー ム リ ン グ
3
ド ー ム カ バ ー
4
上 蓋
5
密 閉 リ ン グ
LED
イ
LED LED
イ イ
注意
•ステータスLEDは、イベントの発生時に点滅させることができます。
ス スステ テテー ーータ タタス ススLED LED
無点灯接続時と正常動作時は、無点灯のままです。
緑起動後正常に動作する場合、10秒間、緑色に点灯し
黄
ン
ジ
ケ
ー
タ
ン ン
ジ ジ
ケ ケ
LED
ー
ー ー
タ タ
ー ー
明
説 説説明 明
ます。
起動時に点灯し、ファームウェアのアップグレード
時には点滅します。
91
Page 92

AXISP5522–EPTZDomeNetworkCamera
黄/赤
赤
ミ
ッ
ド
ス
パ
ン
の
ミ ミ
ッ ッ
ド ド
ス ス
パ パ
LED
LED LED
ポート
AC
コ
ネ
ク
タ
コ コ
ネ ネ
仕様と動作条件については、
ネ ネネッ ッット トトワ ワワー ーーク ククコ ココネ ネネク ククタ タ
RJ45プッシュプルコネクタ(IP66等級)、HighPoweroverEthernet(HighPoE)対応。
ー
ク ク
タ タ
ー ー
LED
ン ン
の の
LED LED
色
色 色
消灯
緑
緑、点滅
緑、点滅
緑AC電源の接続時に点灯します。
と
ボ
タ
と と
ボ ボ
タ タ
タ
ネットワーク接続が利用できないか、失われた場合
は、黄色/赤色で点滅します。
ファームウェアのアップグレードに失敗すると、赤色
で点滅します。
イ
ン
ジ
ケ
ー
タ
イ イ
ン ン
ジ ジ
ケ ケ
ン
ン ン
94 ペ ー ジ
ー
ー ー
タ タ
ー ー
示
表 表表示 示
カメラが接続されていません。
接続されたカメラが正常動作している場合、
点灯します。
ポートが過電流または短絡時、ゆっくりと点
滅します。
入力電圧が正常範囲外である場合やその他の内
部エラー発生時、速く点滅します。
を参照してください。
記
注 注注記 記
付属のミッドスパンを使用します。
記
注 注注記 記
本製品は、シールドネットワークケーブル(STP)を使用して接続してくださ
い。本製品は、用途に合ったケーブルを使用してネットワークに接続してく
ださい。ネットワーク装置がメーカーの指示どおりに設置されていることを
確認します。法的要件については、
page 2
を参照してください。
Electromagnetic Compatibility (EMC) on
92
Page 93

AXISP5522–EPTZDomeNetworkCamera
ò
ò
¨
¨
¾
¾
記
注 注注記 記
カメラのIP66対応設計への準拠およびIP66保護等級の維持のため、必ず付属
のRJ45プッシュプルコネクタ(IP66等級)を使用してください。あるいは、
RJ45コネクタ付きのIP66等級のケーブルをAxisの販売代理店から購入してくだ
さい。ネットワークコネクタのプラスチックシールドをカメラから取り外
さないでください。
ン
ン
ト
[Setup]
( ((ス ススト トトレ レレー ーージ ジジ) ))> >>[SD [SD
90 ペ ー ジ の 、 ハ ー ド ウ ェ ア の 概 要
98 ペ ー ジ
( ((設 設設定 定定) ))> >>[System [System
[System
[SD
Card]
Card] Card]
Options]
Options] Options]
(SD
(SD (SD
カ カカー ーード ドド) ))を選択し、[Unmount] [Unmount]
を参照してください。
( ((シ シシス スステ テテム ムムオ オオプ ププシ シショ ョョン ンン) ))> >
[Unmount]
コ ココン ンント トトロ ロロー ーール ルルボ ボボタ タタン ン
コントロールボタンの位置については、
照してください。
コントロールボタンは、以下の用途で使用します。
•製品を工場出荷時の設定にリセットする。
•AXISVideoHostingSystemサービスまたはAXISInternetDynamicDNSサービ
スに接続する。これらのサービスの詳細については、ユーザーズマニュ
アルを参照してください。
再 再再起 起起動 動動ボ ボボタ タタン ン
再起動ボタンを押すと、製品が再起動します。
SD
SD SD
カ カカー ーード ドドス ススロ ロロッ ッット ト
記
注 注注記 記
•SDカード損傷の危険があります。SDカードの挿入と取り外しの際には、鋭
利な工具を使用したり、過剰な力をかけないでください。
•データ損失の危険があります。データが破損しないように、SDカードは
マウント解除してから取り外す必要があります。SDカードをアンマウン
トするには、[Setup] [Setup]
[Storage]
[Storage] [Storage]
マ ママウ ウウン ンント トト) ))をクリックします。
本製品は、SD/SDHC/SDXCカードに対応しています(別売)。
を参
>
ン
( ((ア アアン ン
推奨するSDカードについては、
www .axis.com
を参照してください
93
Page 94

AXISP5522–EPTZDomeNetworkCamera
仕
様
仕 仕
様 様
動
作
条
動 動
件
作 作
条 条
件 件
品
製 製製品 品
AXISP5522–EIEC60721‑4‑3
消
費
電
消 消
注 注注記 記
製 製製品 品
AXISP5522–E
ハ
ハ ハ
ネットワークカメラのインストールの準備手順では、トップカバーを取り外すことが
必要なステップが複数あるため、これらのステップを同時に行えるようすべての
手順をよく読んでから取付準備を行ってください。
力
費 費
電 電
力 力
記
定格出力が100Wまたは5A以下の有限電源(LPS)を使用します。
品
ー
ド
ウ
ー ー
ド ド
ウ ウ
•カメラの取付前に緩衝材を取り除きます。
•本製品には透明ドームカバー(装着済み)とスモーク透明カバーとが同梱さ
れています。ドームカバーの交換方法については、
バ ー の 交 換
•標準または大容量のSDカード(非付属品)を使用すると、ローカルに録画を
行えます。SDカードの装着または取り出しの前に、サンシールドを取り外
す必要があります。
•AXIST91A取り付けアクセサリーの互換ブラケット(別売)を使用した製品の
設置方法については、
付 け
級
等 等等級 級
Class4K1、
4C3、4M3
IEC60529IP66
NEMA250
Type4X
High
High High
最大30W100~240VAC、最大37W
ェ
ア
の
設
ェ ェ
ア ア
を参照してください。
置
の の
設 設
置 置
を参照してください。
96 ペ ー ジ の 、 SD カ ー ド の 装 着
度
温 温温度 度
‑20°C~50°C
PoE
PoE PoE
96 ペ ー ジ の 、 ブ ラ ケ ッ ト ( 別 売 ) へ の カ メ ラ の 取 り
度
湿 湿湿度 度
湿度:15~100%RH(結露可)
High
PoE
High High
PoE PoE
ミ ミミッ ッッド ドドス ススパ パパン ン
( ((付 付付属 属属品 品品) )
)
95 ペ ー ジ の 、 ド ー ム カ
を参照してください。
ン
94
Page 95

AXISP5522–EPTZDomeNetworkCamera
1
ò
ò
¨
¨
¾
¾
緩
衝
材
を
取
り
除
緩 緩
衝 衝
材 材
を を
取 取
く
り り
除 除
く く
コンポーネントの位置については、
てください。
1.トップカバー用ネジ4本を緩めて、トップカバーを取り外します。
2.緩衝材を取り除きます。
1
緩 衝 材
3.クリアまたはスモークのドームカバーを交換したり、SDカードを取り付け
る場合は、
4.トップカバーを元の位置に取り付け、ネジを締めます。
95 ペ ー ジ
90 ペ ー ジ の 、 ハ ー ド ウ ェ ア の 概 要
および
96 ペ ー ジ
を参照してください。
を参照し
ド
ー
ム
カ
バ
ー
の
交
ド ド
ー ー
ム ム
カ カ
バ バ
ー ー
重要
本製品は、除湿膜を使用してドーム内の湿度を低く保っています。結露を予
防するために、カメラを雨の中または湿った状況で分解しないでください。
注意
ドームカバーに傷が付いたり、損傷したりしないよう注意してください。
可能であれば、設置が完了するまでドームカバーに保護プラスチックを付
けたままにしてください。
換
の の
交 交
換 換
95
Page 96

AXISP5522–EPTZDomeNetworkCamera
スモークドームカバーを使用したい場合や、ドームカバーに傷が付いたり、損傷した
りした場合にのみ、ドームカバーの交換が必要になります。スモークドームカバー
および交換用の透明ドームカバーは、Axisの販売代理店から購入できます。
コンポーネントの位置については、
てください。
1.トップカバー用ネジを緩めて、トップカバーを取り外します。
2.ドームリングのネジを取り外し、トップカバーからドームリングを取り
外します。
3.ドームリングと代替ドームカバーをトップカバーに取り付け、ネジを締め
て固定します(トルク1.0~1.2Nm)。
4.SDカード(別売)の装着方法については、
5.トップカバーを元の位置に取り付け、ネジを締めます(トルク2.5~3.0Nm)。
SD
カ
ー
ド
の
装
SD SD
カ カ
ー ー
ド ド
記
注 注注記 記
SDカードは、取り外す前に、録画データが破損しないようにアンマウント
する必要があります。SDカードをアンマウントするには、[Setup] [Setup]
[System
[System [System
(SD
(SD (SD
カ カカー ーード ドド) ))を選択し、[Unmount] [Unmount]
必要に応じて、標準または大容量のSDカード(非付属品)を装着すると、ローカルに
録画を行うことができます。
コンポーネントの位置については、
てください。
1.サンシールドを取り除きます。
2.トップカバー用ネジをすべて緩めて、トップカバーを取り外します。
3.SDカード(非付属品)をSDカードスロットに挿入します。
4.トップカバーを元の位置に取り付け、ネジを締めます(トルク2.5~3.0Nm)。
5.サンシールドを元の位置に取り付け、ネジを締めます。
着
の の
装 装
着 着
Options]
Options] Options]
( ((シ シシス スステ テテム ムムオ オオプ ププシ シショ ョョン ンン) ))> >>[Storage] [Storage]
90 ペ ー ジ の 、 ハ ー ド ウ ェ ア の 概 要
96 ペ ー ジ
[Unmount]
( ((ア アアン ンンマ ママウ ウウン ンント トト) ))をクリックします。
90 ペ ー ジ の 、 ハ ー ド ウ ェ ア の 概 要
[Storage]
を参照し
を参照してください。
[Setup]
( ((ス ススト トトレ レレー ーージ ジジ) ))> >>[SD [SD
( ((設 設設定 定定) ))> >
[SD
を参照し
>
Card]
Card] Card]
ブ
ラ
ケ
ッ
ト
別
売
へ
の
カ
メ
ラ
の
取
り
付
ブ ブ
ラ ラ
ケ ケ
ッ ッ
ト ト
( ((別 別
売 売
) ))へ へ
の の
カ カ
メ メ
ラ ラ
の の
取 取
記
注 注注記 記
カメラのIP66対応設計への準拠およびIP66保護等級の維持のため、必ず付属
のRJ45プッシュプルコネクタ(IP66等級)を使用してください。あるいは、
RJ45コネクタ付きのIP66等級のケーブルをAxisの販売代理店から購入してくだ
さい。ネットワークコネクタのプラスチックシールドをカメラから取り外
さないでください。
け
り り
付 付
け け
96
Page 97

AXISP5522–EPTZDomeNetworkCamera
1
2
3
ò
ò
¨
¨
¾
¾
1.ブラケット付属の説明書に従って、ブラケットを取り付けます。ドリ
ルによる穴開けが必要な場合は、素材に適したドリルビット、ネジ、プ
ラグを使用してください。
2.付属のRJ45プッシュプルコネクタ(IP66)を付属の説明書に従ってネットワー
クケーブルに接続します。
3.付属の安全ワイヤーを使用してカメラを固定します。
1
ネ ジ
2
ユ ニ ッ ト ホ ル ダ ー 用 ス ロ ッ ト
3
安 全 ワ イ ヤ ー
4.ネットワークケーブルをカメラに接続します。
5.ネットワークカメラのユニットホルダーを取り付け用ブラケットのスロッ
トにはめ込み、カメラユニットを回転させます。
6.ネジを締め、ネットワークカメラを取り付けブラケットに固定します。
ミ
ッ
ド
ス
パ
ン
の
取
り
付
ミ ミ
ッ ッ
ド ド
ス ス
パ パ
ン ン
の の
取 取
同梱のミッドスパンは、消費電力の大きなAXISネットワークビデオ製品に単一のネッ
トワークケーブルを使用してデータと電力を供給できるようにするものです。
1.ネットワークケーブルを使用して、ミッドスパン(データ入力)をネッ
トワークスイッチに接続します。
2.カメラに接続したネットワークケーブルを使用して、ミッドスパン(データ
および電源出力)とカメラを接続します。
3.付属の電源ケーブルを使用して、ミッドスパンを接地(アース)されたコン
セント(100~240VAC)に接続します。
け
り り
付 付
け け
97
Page 98

AXISP5522–EPTZDomeNetworkCamera
1
2
3
4
1
デ ー タ お よ び 電 源 出 力 (Axis 製 品 に 接 続 )
2
デ ー タ 入 力 ( ネ ッ ト ワ ー ク に 接 続 )
3
AC 入 力 イ ン ジ ケ ー タ ー LED
4
ポ ー ト イ ン ジ ケ ー タ ー LED
4.ミッドスパンのLEDが正しい状態を示しているかを確認します。
の 、 ミ ッ ド ス パ ン の LED イ ン ジ ケ ー タ ー
製
品
へ
の
ア
ク
セ
製 製
品 品
へ へ
の の
ア ア
IPアドレスの割り当て、パスワードの設定、ビデオストリームへのアクセスを行うに
は、インストール・管理ソフトウェアCDに収録されているツールを使用します。こ
の情報は、Axisのサポートページ(
工
場
出
荷
工 工
場 場
重要
注意
本製品を工場出荷時の設定にリセットするには、以下の手順を実行します。
1.コントロールボタンと再起動ボタンを同時に押し、そのまま押し続けます。
2.再起動ボタンだけを離し、コントロールボタンをステータスインジケー
時
出 出
荷 荷
時 時
工場出荷時の設定へのリセットは慎重に行ってください。工場出荷時の
設定へのリセットを行うと、IPアドレスを含むすべての設定が工場出荷時
の値にリセットされます。
インストール・管理ソフトウェアツールは、製品に付属のCD
と、
www .axis.com/techsup
ターLEDが黄色に点滅するまで約15–30秒間押し続けます。
ス
ク ク
セ セ
ス ス
www .axis.com/techsup/
の
設
定
に
リ
セ
ッ
の の
設 設
定 定
に に
リ リ
ト
セ セ
ッ ッ
ト ト
のサポートページから入手できます。
を参照してください。
す
る
す す
る る
)にも掲載されています。
92 ペ ー ジ
98
Page 99

AXISP5522–EPTZDomeNetworkCamera
ò
ò
¨
¨
¾
¾
3.コントロールボタンを離します。プロセスが完了すると、ステータスLEDが
緑色に変わります。これで本製品は工場出荷時の設定にリセットされまし
た。ネットワーク上に利用可能なDHCPサーバーがない場合、デフォルトの
IPアドレスは192.168.0.90になります。
4.インストール・管理ソフトウェアツールを使用して、IPアドレスの割り当
て、パスワードの設定、ビデオストリームへのアクセスを行います。
Webインターフェースを使用して、各種パラメーターを工場出荷時の設定に戻す
こともできます。[Setup [Setup
ン
シ シショ ョョン ン
関
関 関
‑ ‑‑保 保保守 守守) ))を選択します。
連
情
報
連 連
情 情
報 報
[Setup
System
‑ ‑‑System System
Options
Options Options
Maintenance]
‑ ‑‑Maintenance] Maintenance]
( ((設 設設定 定
定
‑ ‑‑シ シシス スステ テテム ムムオ オオプ プ
プ
ユーザーズマニュアルは、
www .axis.com/techsup
ムウェアがリリースされていないかを確認してください。現在インストールされて
いるファームウェアのバージョンを確認するには、[Setup [Setup
ン ンン情 情情報 報報) ))を参照してください。
Axisラーニングセンター(
つトレーニング、ウェブセミナー、チュートリアル、ガイドをご用意しています。
保
証
情
保 保
Axisの製品保証と関連情報については、
報
証 証
情 情
報 報
www .axis.com
にアクセスして、ご使用のネットワーク製品の新しいファー
www .axis.com/academy
で入手できます。
)にアクセスしてください。役に立
www .axis.com/warranty/
[Setup
About]
‑ ‑‑About] About]
( ((設 設設定 定定‑ ‑‑バ ババー ーージ ジジョ ョ
をご覧ください
ョ
99
Page 100

InstallationGuide
AXISP5522–EPTZDomeNetworkCamera
©AxisCommunicationsAB,2015
Ver.M1.3
Date:February2015
PartNo.61925
 Loading...