

Axis P5514-E, P5515-E, P5514, P5515 Installation Manual
AXISP55-ENetworkCameraSeries
ENGLISH
FRANÇAIS
DEUTSCH
ITALIANO
ESPANÕL
ò
ò
¨
¨
¾
¾
AXISP5514-EPTZNetworkCamera
AXISP5515-EPTZNetworkCamera
InstallationGuide

LegalConsiderations
Videosurveillancecanberegulatedbylawsthatvaryfrom
countrytocountry.Checkthelawsinyourlocalregion
beforeusingthisproductforsurveillancepurposes.
Thisproductincludesone(1)H.264decoderlicense.To
purchasefurtherlicenses,contactyourreseller.
Liability
Everycarehasbeentakeninthepreparationofthis
document.PleaseinformyourlocalAxisofceofany
inaccuraciesoromissions.AxisCommunicationsABcannot
beheldresponsibleforanytechnicalortypographicalerrors
andreservestherighttomakechangestotheproductand
manualswithoutpriornotice.AxisCommunicationsAB
makesnowarrantyofanykindwithregardtothematerial
containedwithinthisdocument,including,butnotlimited
to,theimpliedwarrantiesofmerchantabilityandtnessfor
aparticularpurpose.AxisCommunicationsABshallnot
beliablenorresponsibleforincidentalorconsequential
damagesinconnectionwiththefurnishing,performance
oruseofthismaterial.Thisproductisonlytobeusedfor
itsintendedpurpose.
IntellectualPropertyRights
AxisABhasintellectualpropertyrightsrelatingto
technologyembodiedintheproductdescribedinthis
document.Inparticular,andwithoutlimitation,these
intellectualpropertyrightsmayincludeoneormoreof
thepatentslistedatwww.axis.com/patent.htmandoneor
moreadditionalpatentsorpendingpatentapplicationsin
theUSandothercountries.
Thisproductcontainslicensedthird-partysoftware.See
themenuitem“About”intheproduct’suserinterfacefor
moreinformation.
ThisproductcontainssourcecodecopyrightAppleComputer,
Inc.,underthetermsofApplePublicSourceLicense2.0
(seewww.opensource.apple.com/apsl).Thesourcecodeis
availablefromhttps://developer.apple.com/bonjour/
EquipmentModications
Thisequipmentmustbeinstalledandusedin
strictaccordancewiththeinstructionsgiveninthe
userdocumentation.Thisequipmentcontainsno
user-serviceablecomponents.Unauthorizedequipment
changesormodicationswillinvalidateallapplicable
regulatorycerticationsandapprovals.
TrademarkAcknowledgments
AXISCOMMUNICATIONS,AXIS,ETRAX,ARTPECandVAPIX
areregisteredtrademarksortrademarkapplicationsofAxis
ABinvariousjurisdictions.Allothercompanynamesand
productsaretrademarksorregisteredtrademarksoftheir
respectivecompanies.
Apple,Boa,Apache,Bonjour,Ethernet,InternetExplorer,
Linux,Microsoft,Mozilla,Real,SMPTE,QuickTime,UNIX,
Windows,WindowsVistaandWWWareregistered
trademarksoftherespectiveholders.Javaandall
Java-basedtrademarksandlogosaretrademarksor
registeredtrademarksofOracleand/oritsafliates.
TM
UPnP
isacerticationmarkoftheUPnP
Corporation.
SD,SDHCandSDXCaretrademarksorregisteredtrademarks
ofSD-3C,LLCintheUnitedStates,othercountriesorboth.
Also,miniSD,microSD,miniSDHC,microSDHC,microSDXC
arealltrademarksorregisteredtrademarksofSD-3C,LLC
intheUnitedStates,othercountriesorboth.
TM
Implementers
RegulatoryInformation
Europe
ThisproductcomplieswiththeapplicableCEmarking
directivesandharmonizedstandards:
•ElectromagneticCompatibility(EMC)Directive
2004/108/EC.SeeElectromagneticCompatibility(EMC)
onpage2.
•LowVoltage(LVD)Directive2006/95/EC.SeeSafety
onpage3.
•RestrictionsofHazardousSubstances(RoHS)Directive
201 1/65/EU.SeeDisposalandRecyclingonpage3.
Acopyoftheoriginaldeclarationofconformitymaybe
obtainedfromAxisCommunicationsAB.SeeContact
Informationonpage3.
ElectromagneticCompatibility(EMC)
Thisequipmenthasbeendesignedandtestedtofulll
applicablestandardsfor:
•Radiofrequencyemissionwheninstalledaccordingto
theinstructionsandusedinitsintendedenvironment.
•Immunitytoelectricalandelectromagneticphenomena
wheninstalledaccordingtotheinstructionsandused
initsintendedenvironment.
USA
Thisequipmenthasbeentestedusingashieldednetwork
cable(STP)andfoundtocomplywiththelimitsfora
ClassAdigitaldevice,pursuanttopart15oftheFCCRules.
Theselimitsaredesignedtoprovidereasonableprotection
againstharmfulinterferencewhentheequipmentis
operatedinacommercialenvironment.Thisequipment
generates,uses,andcanradiateradiofrequencyenergy
and,ifnotinstalledandusedinaccordancewiththe
instructionmanual,maycauseharmfulinterferenceto
radiocommunications.Operationofthisequipmentin
aresidentialareaislikelytocauseharmfulinterference
inwhichcasetheuserwillberequiredtocorrectthe
interferenceathisownexpense.
Theproductshallbeconnectedusingashieldednetwork
cable(STP)thatisproperlygrounded.
Canada
ThisdigitalapparatuscomplieswithCANICES-3(ClassA).
Theproductshallbeconnectedusingashieldednetwork
cable(STP)thatisproperlygrounded.
Cetappareilnumériqueestconformeàlanorme
NMBICES-3(classeA).Leproduitdoitêtreconnectéà
l'aided'uncâbleréseaublindé(STP)quiestcorrectement
misàlaterre.
Europe
ThisdigitalequipmentfulllstherequirementsforRF
emissionaccordingtotheClassAlimitofEN55022.The
productshallbeconnectedusingashieldednetworkcable
(STP)thatisproperlygrounded.Notice!ThisisaClassA
product.Inadomesticenvironmentthisproductmaycause
RFinterference,inwhichcasetheusermayberequired
totakeadequatemeasures.
Thisproductfulllstherequirementsforimmunity
accordingtoEN61000-6-1residential,commercialand
light-industrialenvironments.
Thisproductfulllstherequirementsforimmunity
accordingtoEN55024ofceandcommercialenvironments
Australia/NewZealand
ThisdigitalequipmentfulllstherequirementsforRF
emissionaccordingtotheClassAlimitofAS/NZSCISPR22.
Theproductshallbeconnectedusingashieldednetwork
cable(STP)thatisproperlygrounded.Notice!Thisisa
ClassAproduct.Inadomesticenvironmentthisproduct

maycauseRFinterference,inwhichcasetheusermaybe
requiredtotakeadequatemeasures.
Japan
この装置は、クラスA情報技術装置です。この装
置を家庭環境で使用すると電波妨害を引き起こす
ことがあります。この場合には使用者が適切な対
策を講ずるよう要求されることがあります。本
製品は、シールドネットワークケーブル(STP)を
使用して接続してください。また適切に接地し
てください。
Korea
이기기는업무용(A급)전자파적합기기로서판매
자또는사용자는이점을주의하시기바라며,가
정외의지역에서사용하는것을목적으로합니다.
적절히접지된STP(shieldedtwistedpair)케이블
을사용하여제품을연결하십시오.
Safety
ThisproductcomplieswithIEC/EN/UL60950-1and
IEC/EN/UL60950-22,SafetyofInformationTechnology
Equipment.Theproductshallbegroundedeitherthrougha
shieldednetworkcable(STP)orotherappropriatemethod.
DisposalandRecycling
Whenthisproducthasreachedtheendofitsusefullife,
disposeofitaccordingtolocallawsandregulations.For
informationaboutyournearestdesignatedcollectionpoint,
contactyourlocalauthorityresponsibleforwastedisposal.
Inaccordancewithlocallegislation,penaltiesmaybe
applicableforincorrectdisposalofthiswaste.
Europe
Thissymbolmeansthattheproductshallnotbe
disposedoftogetherwithhouseholdorcommercialwaste.
Directive2012/19/EUonwasteelectricalandelectronic
equipment(WEEE)isapplicableintheEuropeanUnion
memberstates.Topreventpotentialharmtohumanhealth
andtheenvironment,theproductmustbedisposedofin
anapprovedandenvironmentallysaferecyclingprocess.
Forinformationaboutyournearestdesignatedcollection
point,contactyourlocalauthorityresponsibleforwaste
disposal.Businessesshouldcontacttheproductsupplierfor
informationabouthowtodisposeofthisproductcorrectly.
Thisproductcomplieswiththerequirementsof
Directive2011/65/EUontherestrictionoftheuseof
certainhazardoussubstancesinelectricalandelectronic
equipment(RoHS).
China
Thisproductcomplieswiththerequirementsofthe
legislativeactAdministrationontheControlofPollution
CausedbyElectronicInformationProducts(ACPEIP).
ContactInformation
AxisCommunicationsAB
Emdalavägen14
22369Lund
Sweden
Tel:+46462721800
Fax:+4646136130
www.axis.com
Support
Shouldyourequireanytechnicalassistance,pleasecontact
yourAxisreseller.Ifyourquestionscannotbeanswered
immediately,yourresellerwillforwardyourqueriesthrough
theappropriatechannelstoensurearapidresponse.Ifyou
areconnectedtotheInternet,youcan:
•downloaduserdocumentationandsoftwareupdates
•ndanswerstoresolvedproblemsintheFAQdatabase.
Searchbyproduct,category,orphrase
•reportproblemstoAxissupportstaffbylogginginto
yourprivatesupportarea
•chatwithAxissupportstaff
•visitAxisSupportatwww.axis.com/techsup/
LearnMore!
VisitAxislearningcenterwww.axis.com/academy/for
usefultrainings,webinars,tutorialsandguides.

AXISP55-ENetworkCameraSeries
ENGLISH
SafetyInformation
ReadthroughthisInstallationGuidecarefullybeforeinstallingtheproduct.KeeptheInstallation
Guideforfuturereference.
HazardLevels
DANGER
WARNING
CAUTION
NO
TICE
NO NO
TICE TICE
Indicatesahazardoussituationwhich,ifnotavoided,willresultin
deathorseriousinjury.
Indicatesahazardoussituationwhich,ifnotavoided,couldresult
indeathorseriousinjury.
Indicatesahazardoussituationwhich,ifnotavoided,couldresult
inminorormoderateinjury.
Indicatesasituationwhich,ifnotavoided,couldresultindamage
toproperty.
OtherMessageLevels
ImportantIndicatessignicantinformationwhichisessentialfortheproduct
NoteIndicatesusefulinformationwhichhelpsingettingthemostout
tofunctioncorrectly.
oftheproduct.
5

AXISP55-ENetworkCameraSeries
SafetyInstructions
NO
TICE
NO NO
TICE TICE
•TheAxisproductshallbeusedincompliancewithlocallawsandregulations.
•StoretheAxisproductinadryandventilatedenvironment.
•AvoidexposingtheAxisproducttoshocksorheavypressure.
•Donotinstalltheproductonunstablebrackets,surfacesorwalls.
•Donotpointthecameralenstowardthesunorotherhigh-intensityradiationsourcesas
thiscouldcausedamagetothecamera.
•UseonlyapplicabletoolswheninstallingtheAxisproduct.Usingexcessiveforcewith
powertoolscouldcausedamagetotheproduct.
•Donotusechemicals,causticagents,oraerosolcleaners.
•Useacleanclothdampenedwithpurewaterforcleaning.
•Useonlyaccessoriesthatcomplywithtechnicalspecicationoftheproduct.Thesecanbe
providedbyAxisorathirdparty.
•UseonlysparepartsprovidedbyorrecommendedbyAxis.
•Donotattempttorepairtheproductbyyourself.ContactAxissupportoryourAxis
resellerforservicematters.
•Donotpointthecameralenstowardthesunorotherhigh-intensityradiationsources
becausethiscouldcausedamagetothecamera.
Transportation
NO
TICE
NO NO
TICE TICE
•Keeptheprotectivepackaging.WhentransportingtheAxisproduct,theprotective
packagingshallbereplacedinitsoriginalposition.
•WhentransportingtheAxisproduct,usetheoriginalpackagingorequivalenttoprevent
damagetotheproduct.
Battery
TheAxisproductusesa3.0VBR/CR2032lithiumbatteryasthepowersupplyforitsinternal
real-timeclock(RTC).Undernormalconditionsthisbatterywilllastforaminimumofveyears.
LowbatterypoweraffectstheoperationoftheRTC,causingittoresetateverypower-up.When
thebatteryneedsreplacing,alogmessagewillappearintheproduct’sserverreport.Formore
informationabouttheserverreport,seetheproduct´ssetuppagesorcontactAxissupport.
Thebatteryshouldnotbereplacedunlessrequired,butifthebatterydoesneedreplacing,contact
Axissupportatwww.axis.com/techsupforassistance.
6

AXISP55-ENetworkCameraSeries
ENGLISH
WARNING
•Riskofexplosionifthebatteryisincorrectlyreplaced.
•ReplaceonlywithanidenticalbatteryorabatterywhichisrecommendedbyAxis.
•Disposeofusedbatteriesaccordingtolocalregulationsorthebatterymanufacturer's
instructions.
DomeCover
NO
TICE
NO NO
TICE TICE
•Becarefulnottoscratch,damageorleavengerprintsonthedomecoverbecausethis
coulddecreaseimagequality.Ifpossible,keeptheprotectiveplasticonthedomecover
untiltheinstallationiscomplete.
•Donotcleanadomecoverthatlookscleantotheeyeandneverpolishthesurface.
Excessivecleaningcoulddamagethesurface.
•Forgeneralcleaningofthedomecoveritisrecommendedtouseanon-abrasive,
solvent-freeneutralsoapordetergentmixedwithpurewaterandasoft,cleancloth.Rinse
wellwithpurelukewarmwater.Drywithasoft,cleanclothtopreventwaterspotting.
•Neveruseharshdetergents,gasoline,benzeneoracetoneetc.andavoidcleaningthe
domecoverindirectsunlightoratelevatedtemperatures.
7

8

AXISP55-ENetworkCameraSeries
ENGLISH
InstallationGuide
ThisInstallationGuideprovidesinstructionsforinstallingAXISP5514-E/P5515-EPTZDome
NetworkCameraonyournetwork.Forotheraspectsofusingtheproduct,seetheUserManual
availableatwww.axis.com
InstallationSteps
1.Makesurethepackagecontents,toolsandothermaterialsnecessaryfortheinstallation
areinorder.Seepage9.
2.Studythehardwareoverview.Seepage9.
3.Studythespecications.Seepage12.
4.Installthehardware.Seepage13.
5.Accesstheproduct.Seepage16.
PackageContents
•AXISP5514-E/P5515-EPTZDomeNetworkCamera
•Cleartransparentdomecover(premounted)
•RJ45Push-pullConnector(IP66)
•Sunshield,includingscrews
•Printedmaterials
-InstallationGuide(thisdocument)
-Extraserialnumberlabel(2x)
-AVHSAuthenticationkey
OptionalAccessories
•AXIST91AMountingAccessories
•AXIST94A03LRecessedmountkit
Forinformationaboutavailableaccessories,seewww.axis.com
HardwareOverview
NO
TICE
NO NO
TICE TICE
Makesurethedomeisattachedinoperationmode,otherwisefocusmaybeaffected.
9

AXISP55-ENetworkCameraSeries
12
13
14
15
16
3
1
2
4
5
9
8
11
10
6
7
17
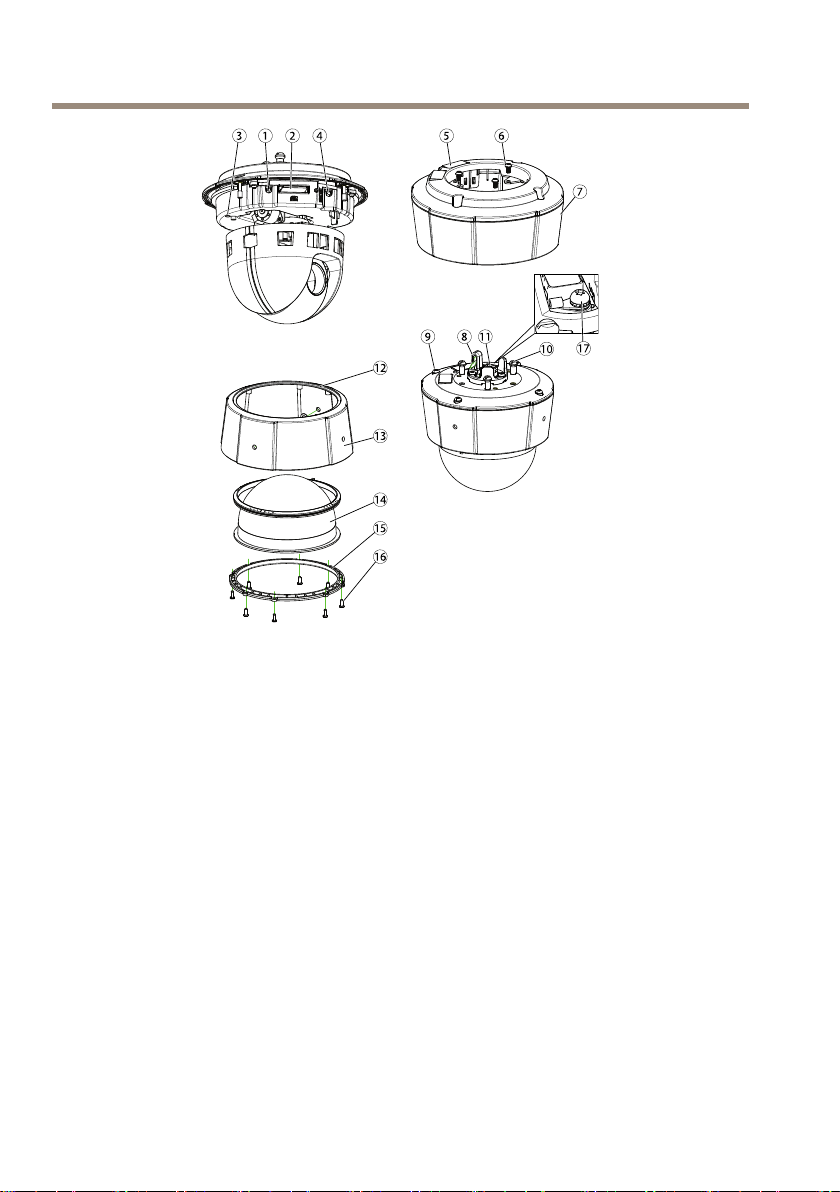
1.
Controlbutton
2.
SDcardslot
3.
StatusindicatorLED
4.
Restartbutton
5.
Partnumber(P/N)&serialnumber(S/N).Serialnumbermayberequiredduring
installation.
6.
Screws(3)
7.
Sunshield
8.
Hookforsafetywire
9.
Topcoverscrews(4)
10.
Unitholders(3)
11.
NetworkconnectorPoE
12.
Sealingring
13.
Topcover
14.
Domecover
15.
Domering
16.
Domeringscrews(8)
17.
Groundingscrew
10

AXISP55-ENetworkCameraSeries
ENGLISH
LEDIndicators
StatusLED
Unlit
GreenShowssteadygreenfor10secondsfornormaloperationafter
Amber
Amber/RedFlashesamber/redifnetworkconnectionisunavailableorlost.
Indication
Connectionandnormaloperation.
startupcompleted.
Steadyduringstartup.Flashesduringrmwareupgrade.
ConnectorsandButtons
Forspecicationsandoperatingconditions,seepage12.
NetworkConnector
RJ45EthernetconnectorwithPoweroverEthernet(PoE).
NO
TICE
NO NO
TICE TICE
Theproductshallbeconnectedusingashieldednetworkcable(STP).Allcablesconnecting
theproducttothenetworkshallbeintendedfortheirspecicuse.Makesurethatthe
networkdevicesareinstalledinaccordancewiththemanufacturer’sinstructions.For
informationaboutregulatoryrequirements,seeElectromagneticCompatibility(EMC)on
page2.
ControlButton
Forlocationofthecontrolbutton,seeHardwareOverviewonpage9.
Thecontrolbuttonisusedfor:
•Resettingtheproducttofactorydefaultsettings.Seepage17.
•ConnectingtoanAXISVideoHostingSystemserviceorAXISInternetDynamicDNS
Service.Formoreinformationabouttheseservices,seetheUserManual.
RestartButton
Presstherestartbuttontorestarttheproduct.
11

AXISP55-ENetworkCameraSeries
SDCardSlot
NO
TICE
NO NO
TICE TICE
•RiskofdamagetoSDcard.Donotusesharptoolsorexcessiveforcewheninserting
orremovingtheSDcard.
•Riskofdataloss.Topreventdatacorruption,theSDcardshouldbeunmountedbefore
removal.Tounmount,gotoSetup>SystemOptions>Storage>SDCardandclick
Unmount.
ThisproductsupportsSD/SDHC/SDXCcards(notincluded).
ForSDcardrecommendations,seewww.axis.com
Specications
OperatingConditions
Classication
IEC60721-4-3Class3K3,3M3+B38
IEC60068-2
TemperatureHumidity
-20°Cto50°C
(-4°Fto122°F)
Humidity15-100%RH
(condensing)
PowerConsumption
NO
TICE
NO NO
TICE TICE
Usealimitedpowersource(LPS)witheitheraratedoutputpowerlimitedto≤100W
oraratedoutputcurrentlimitedto≤5A.
PoE
PoweroverEthernet(PoE)
IEEE802.3af/802.3at
Type1Class3max.12.95W
12
AXISP55-ENetworkCameraSeries
1
ENGLISH
InstalltheHardware
NO
TICE
NO NO
TICE TICE
Theproductshallbeconnectedusingashieldednetworkcable(STP).Allcablesconnecting
theproducttothenetworkshallbeintendedfortheirspecicuse.Makesurethatthe
networkdevicesareinstalledinaccordancewiththemanufacturer’sinstructions.For
informationaboutregulatoryrequirements,seeElectromagneticCompatibility(EMC)on
page2.
Mounttheproductwiththedomefacingdownward.
Readalltheinstructionsbeforepreparingtoinstallthenetworkcamerasinceseveralinstallation
preparationstepsrequireremovingthetopcoverandwouldbenetfrombeingcompletedtogether.
Thesunshieldmustberemovedtoinstall/removeanSDcard.
•Removetheprotectivepackagingbeforeinstallingthecamera.
•Theproductissuppliedwithacleartransparentdomecover(premounted)andasmoked
transparentdomecover.Toreplacethedomecover,seepage14.
•AstandardorhighcapacitySDcard(notincluded)canbeusedtostorerecordings
locallyintheproduct.Seepage14.
•ToinstalltheproductusingacompatiblebracketfromAXIST91AMountingAccessories
(soldseparately),seepage15.
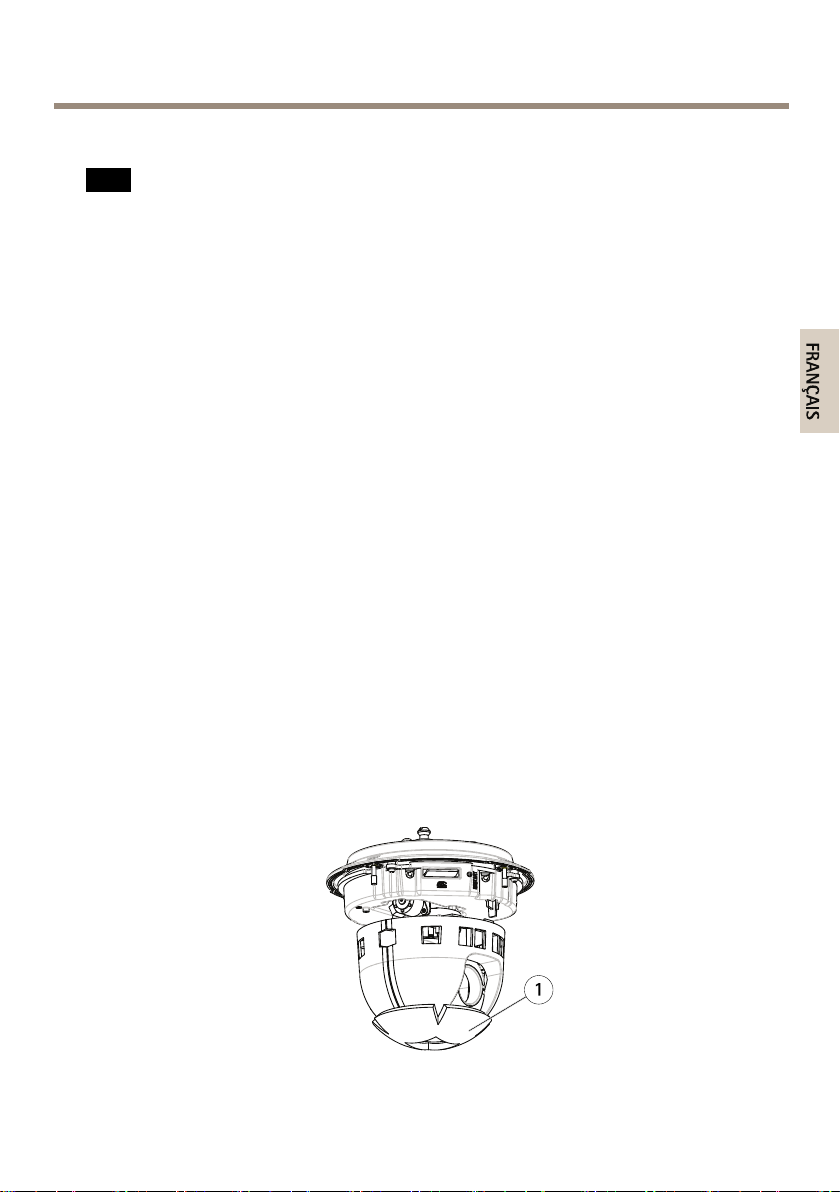
RemovetheProtectivePackaging
SeeHardwareOverviewonpage9forlocationofcomponents.
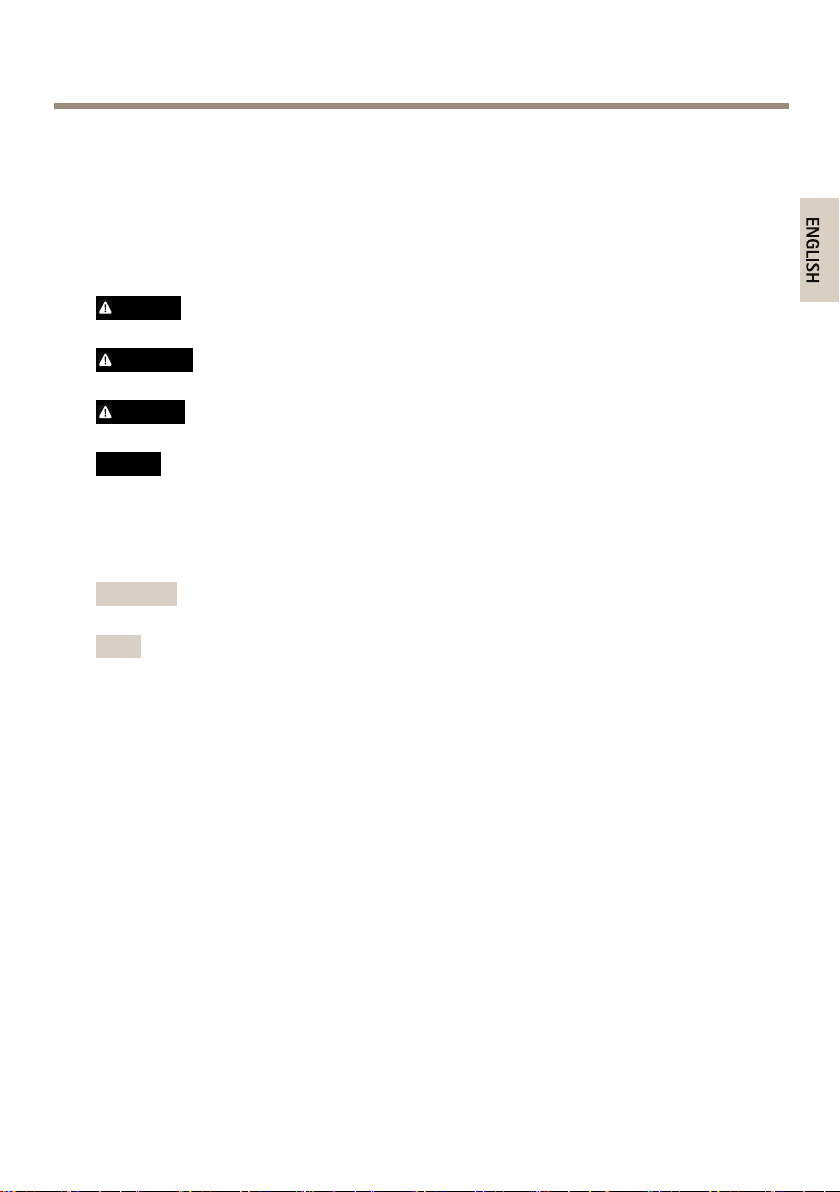
1.Loosenthefourtopcoverscrewsandremovethetopcover.
2.Removetheprotectivepackaging.
1
Protectivepackaging
13

AXISP55-ENetworkCameraSeries
3.Toreplacetheclear/smokeddomecover,seepage14.ToinstallanSDcardseepage14.
4.Putthetopcoverbackinitsoriginalpositionandfastentwodiagonallyoppositescrews
rst(torque<0.7Nm),andthenthetwootherscrews.
ReplacetheDomeCover
Important
Thisproducthasadehumidifyingmembranetomaintainlowhumiditylevelsinsidethe
dome.Toavoidcondensation,donotdisassemblethecamerainrainorindampconditions.
Note
Becarefulnottoscratchordamagethedomecover.Ifpossible,keeptheprotectiveplastic
onthedomecoveruntiltheinstallationiscomplete.
Replacingthedomecoverisonlynecessaryifyouwanttouseasmokeddomecoverorifthe
domecoverisscratchedordamaged.Smokeddomecoversandsparecleardomecoverscanbe
purchasedfromyourAxisreseller.
SeeHardwareOverviewonpage9forlocationofcomponents.
1.Loosenthetopcoverscrewsandremovethetopcover.
2.Removethe8domeringscrewsandremovethedomeringfromthetopcover.
3.Attachthedomeringandthereplacementdomecovertothetopcoverandsecureby
tighteningthescrews(torque0.4to0.6Nm).
4.ToinstallanSDcard(notincluded),seepage14.
5.Putthetopcoverbackinitsoriginalpositionandfastendiagonallytwooppositescrews
(torque<0.7Nm),andthentheotherscrews.
InstallanSDCard
NO
TICE
NO NO
TICE TICE
Topreventcorruptionofrecordings,theSDcardshouldbeunmountedbeforeitisejected.
Tounmount,gotoSetup>SystemOptions>Storage>SDCardandclickUnmount.
ItisoptionaltoinstallastandardorhighcapacitySDcard(notincluded),whichcanbeusedfor
localrecordingwithremovablestorage.
SeeHardwareOverviewonpage9forlocationofcomponents.
1.Removethesunshield.
2.Loosenthe4topcoverscrewsandremovethetopcover.
3.InsertanSDcard(notincluded)intotheSDcardslot.
14

AXISP55-ENetworkCameraSeries
1
3
4
5
2
ENGLISH
4.Putthetopcoverbackinitsoriginalpositionandfastentwodiagonallyoppositescrews
rst(torque<0.7Nm),andthentheotherscrews.
5.Putthesunshieldbackinitsoriginalpositionandfastenthescrews.
InstalltheCameraonaBracketMount(soldseparately)
WARNING
•Riskofelectricshock.Theproductshallbegroundedusingagroundingwire.Makesure
bothendsofthegroundingwireareincontactwiththeirrespectivegroundingsurfaces.
NO
TICE
NO NO
TICE TICE
•TocomplywiththeIP66-rateddesignofthecameraandmaintaintheIP66protection,
thesuppliedRJ45Push-pullConnector(IP66)shallbeused.Alternatively,usetheRJ45
IP66-ratedcablewithpremountedconnectorwhichisavailablefromyourAxisreseller.
Donotremovetheplasticnetworkconnectorshieldfromthecamera.
•Becarefulnottodamagethenetworkcablewhenconnectingit.
1.Installthebracket(notincluded)accordingtotheinstructionssuppliedwiththebracket.
Ifdrillingisrequired,makesuretousedrillbits,screwsandplugsthatareappropriate
forthematerial.Seewww.axis.comforinformationonavailablemountingaccessories.
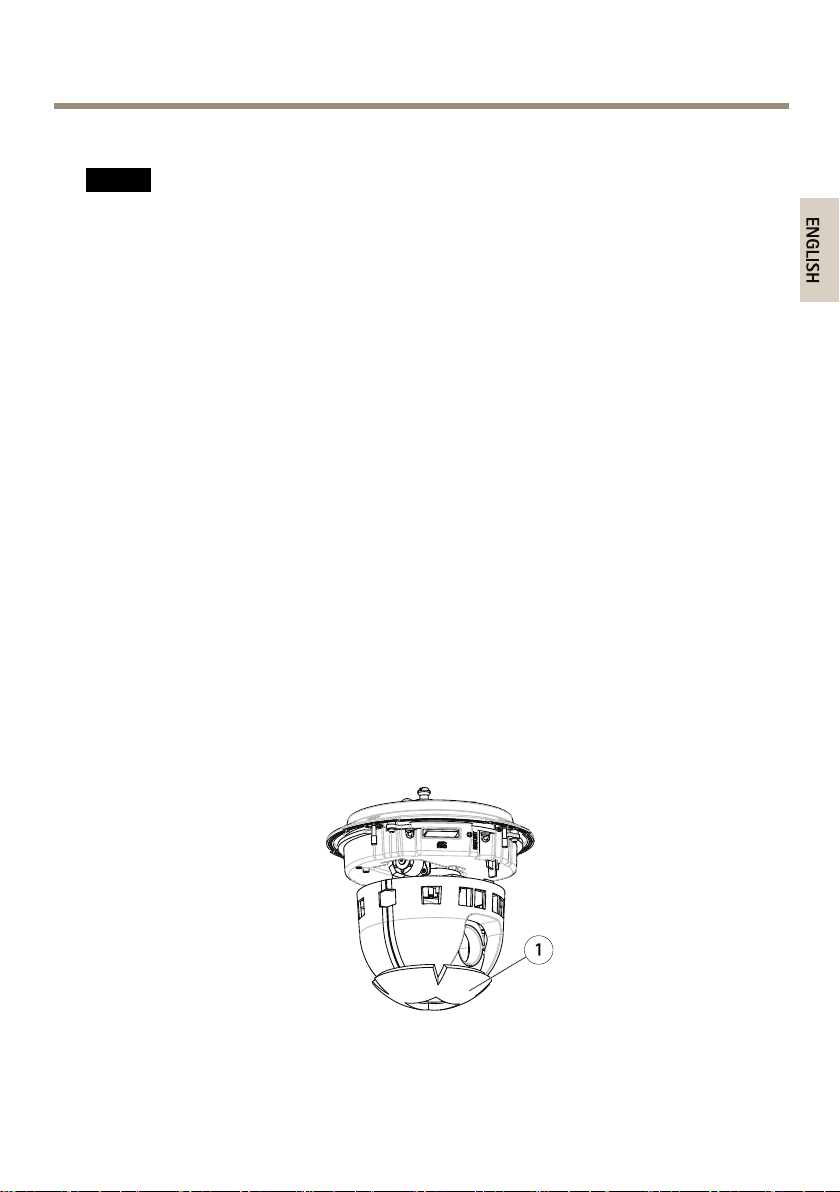
2.Securethecamerausingthesuppliedsafetywire.
3.Routethenetworkcableandagroundingwirethroughtheholesinthemounting
bracket.Makesurethegroundingwireisasshortaspossibletomakethecurrentpath
asshortaspossible.
4.Loosenthegroundingscrewandremovethewasherandcableshoe.
1.
Networkconnector–RJ45Push-pullConnector(IP66)
15
AXISP55-ENetworkCameraSeries
1
2
3
2.
Networkconnectorandnetworkconnectorshield
3.
GroundscrewT20
4.
Washer
5.
Cableshoe
5.Attachthegroundingwire(torque1.5to2Nm)tothecableshoeusingcableshoepliers.
6.Putthecableshoeandwasherbackintheiroriginalpositionsandtightenthescrew
(torque0.5Nm).Makesurethecableshoeisincontactwiththegroundingsurface.
7.ConnectthesuppliedRJ45Push-pullConnector(IP66)tothenetworkcableaccordingto
theinstructionssuppliedwiththeconnector.
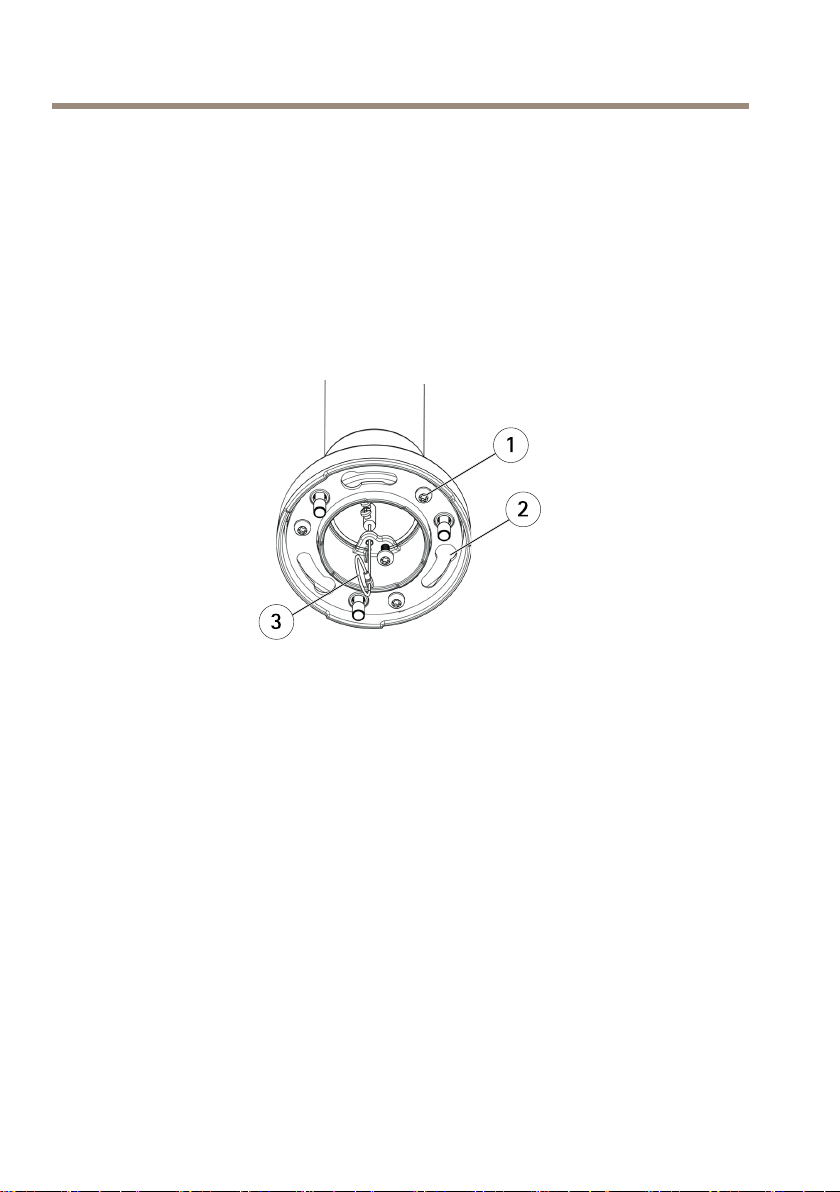
1
Screw
2
Slotsforunitholders
3
Safetywire
8.Connectthenetworkcabletothecamera.
9.Slidetheunitholdersonthenetworkcameraintotheslotsinthemountingbracketand
rotatethecameraunit.
10.Securethenetworkcameratothemountingbracketbytighteningthescrews.
AccesstheProduct
AXISIPUtilityandAXISCameraManagementarerecommendedmethodsforndingAxisproducts
onthenetworkandassigningthemIPaddressesinWindows®.Bothapplicationsarefreeandcan
bedownloadedfromwww.axis.com/techsup
Theproductcanbeusedwithmostoperatingsystemsandbrowsers.Therecommendedbrowsersare
•InternetExplorer
•Safari
®
withOSX
®
withWindows
®
®
16

AXISP55-ENetworkCameraSeries
ENGLISH
•Chrome
Formoreinformationaboutusingtheproduct,seetheUserManualavailableatwww.axis.com
TM
orFirefox
®
withotheroperatingsystems.
ResettoFactoryDefaultSettings
Important
Resettofactorydefaultshouldbeusedwithcaution.Aresettofactorydefaultwillreset
allsettings,includingtheIPaddress,tothefactorydefaultvalues.
Note
Theinstallationandmanagementsoftwaretoolsareavailablefromthesupportpages
onwww.axis.com/techsup
Toresettheproducttothefactorydefaultsettings:
1.Pressandholdthecontrolbuttonandtherestartbuttonatthesametime.
2.Releasetherestartbuttonbutcontinuetoholddownthecontrolbuttonfor15–30
secondsuntilthestatusLEDindicatorashesamber.
3.Releasethecontrolbutton.TheprocessiscompletewhenthestatusLEDindicatorturns
green.Theproducthasbeenresettothefactorydefaultsettings.IfnoDHCPserveris
availableonthenetwork,thedefaultIPaddressis192.168.0.90
4.Usingtheinstallationandmanagementsoftwaretools,assignanIPaddress,setthe
passwordandaccessthevideostream
Itisalsopossibletoresetparameterstofactorydefaultviathewebinterface.GotoSetup
>SystemOptions>Maintenance.
FurtherInformation
TheUserManualisavailableatwww.axis.com
Visitwww.axis.com/techsuptocheckifthereisupdatedrmwareavailableforyournetwork
product.Toseethecurrentlyinstalledrmwareversion,gotoSetup>About.
VisitAxislearningcenterwww.axis.com/academyforusefultrainings,webinars,tutorialsand
guides.
WarrantyInformation
ForinformationaboutAxis’productwarrantyandtheretorelatedinformation,see
www.axis.com/warranty/
17

18
AXISP55-ENetworkCameraSeries
FRANÇAIS
Informationssurlasécurité
Lisezattentivementceguided'installationavantd'installerl'appareil.Conservezleguide
d'installationpourtouteréférenceultérieure.
Niveauxderisques
DANGER
AVERTISSEMENT
ATTENTION
VIS
A AAVIS VIS
Indiqueunesituationdangereusequi,siellen'estpasévitée,
entraîneraledécèsoudesblessuresgraves.
Indiqueunesituationdangereusequi,siellen'estpasévitée,
pourraitentraînerledécèsoudesblessuresgraves.
Indiqueunesituationdangereusequi,siellen'estpasévitée,
pourraitentraînerdesblessureslégèresoumodérées.
Indiqueunesituationqui,siellen'estpasévitée,pourrait
endommagerl'appareil.
Autresniveauxdemessage
ImportantIndiquelesinformationsimportantes,nécessairespourassurerle
NoteIndiquelesinformationsutilesquipermettrontd'obtenirle
bonfonctionnementdel'appareil.
fonctionnementoptimaldel'appareil.
19

AXISP55-ENetworkCameraSeries
Consignesdesécurité
VIS
A AAVIS VIS
•LeproduitAxisdoitêtreutiliséconformémentauxloisetrèglementationslocalesen
vigueur.
•ConserverceproduitAxisdansunenvironnementsecetventilé.
•NepasexposerceproduitAxisauxchocsouauxfortespressions.
•Nepasinstallerceproduitsurdessupports,surfacesoumursinstables.
•Nepaspointerl'objectifverslesoleiloud'autressourcesderayonnementàhaute
intensité,carcelapourraitcauserdesdommagesàlacaméra.
•Utiliseruniquementdesoutilsrecommandéspourl'installationdel'appareilAxis.
L'applicationd'uneforceexcessivesurl'appareilavecdesoutilspuissantspourrait
l'endommager.
•Nepasutiliserdeproduitschimiques,desubstancescaustiquesoudenettoyants
pressurisés.
•Utiliserunchiffonpropreimbibéd'eaupurepourlenettoyage.
•Utiliseruniquementdesaccessoiresconformesauxcaractéristiquestechniquesduproduit.
IlspeuventêtrefournisparAxisouuntiers.
•UtiliseruniquementlespiècesderechangefourniesourecommandéesparAxis.
•Nepasessayerderéparerceproduitparvous-même.Contacterl'assistancetechnique
d'AxisouvotrerevendeurAxispourdesproblèmesliésàl'entretien.
•Nepaspointerl'objectifverslesoleiloud'autressourcesderayonnementàhaute
intensité,carcelapourraitcauserdesdommagesàlacaméra.
Transport
VIS
A AAVIS VIS
•Conservezl'emballagedeprotection.LorsdutransportduproduitAxis,l'emballagede
protectiondoitêtreremisdanssapositiond'origine.
•LorsdutransportduproduitAxis,utilisezl'emballaged'origineouunéquivalentpour
éviterd'endommagerleproduit.
Batterie
LeproduitAxisutiliseunebatterieaulithiumBR/CR20323,0Vcommealimentationdeson
horlogeentempsréelinterne(RTC).Dansdesconditionsnormales,cettebatterieauneduréede
vieminimaledecinqans.
Silabatterieestfaible,lefonctionnementdel'horlogeentempsréelpeutêtreaffectéetentraîner
saréinitialisationàchaquemisesoustension.Unmessageenregistréapparaîtdanslerapportde
20

AXISP55-ENetworkCameraSeries
FRANÇAIS
serveurduproduitlorsquelabatteriedoitêtreremplacée.Pourtoutcomplémentd'information
concernantlerapportdeserveur,reportez-vousauxpagesdeCongurationduproduitoucontactez
l'assistancetechniqued'Axis.
Labatteriedoitêtreremplacéeuniquementencasdebesoin,etpourcefaire,contactezl'assistance
techniqued'Axisàl'adressewww.axis.com/techsupetobtenirdel'aide.
AVERTISSEMENT
•Risqued'explosionsilabatterieestremplacéedefaçonincorrecte.
•Remplacez-launiquementparunebatterieidentiqueouunebatterierecommandéepar
Axis.
•Mettezaurebutlesbatteriesusagéesconformémentauxréglementationslocalesou
auxinstructionsdufabricantdelabatterie.
Couverclededôme
VIS
A AAVIS VIS
•Veillezànepasrayer,endommageroulaisserd'empreintessurlecouvercledudômecar
celapourraitaltérerlaqualitéd'image.Laissez,sipossible,laprotectionenplastiquesur
lecouvercledudômejusqu’àlandel’installation.
•Nenettoyezpaslecouvercledudômes'ilsemblepropreàl'œilnuetnefrottezjamaissa
surface.Unnettoyageexcessifpourraitendommagerlasurface.
•Pourlenettoyagegénéralducouvercledudôme,ilestrecommandéd'utiliserunproduit
nonabrasif,unsavonneutresanssolvantouundétergentmélangéavecdel'eaupureet
unchiffondouxpropre.Rincezbienàl'eautièdepure.Séchezavecunchiffondouxet
proprepouréviterlestâchesd'eau.
•N'utilisezjamaisdedétergentsagressifs,d'essence,debenzèneoud'acétone,etc.et
éviteztouteexpositiondirecteauxrayonsdusoleilouàdestempératuresélevéeslors
dunettoyage.
21

22

AXISP55-ENetworkCameraSeries
FRANÇAIS
Guided’installation
CeGuided'installationfournitdesinstructionspourl'installationdelacaméraréseauàdômeAXIS
P5514-E/P5515-EPTZsurvotreréseau.Pourtouteautreinformationrelativeàl’utilisationdu
produit,consultezlemanueldel’utilisateurdisponiblesurlesitewww.axis.com
Procéduresd’installation
1.Assurez-vousquelesoutilsetautresmatérielsnécessairesàl'installationsontinclus
dansl'emballage.Cf.page23.
2.Consultezladescriptiondumatériel.Cf.page23.
3.Étudiezlescaractéristiques.Cf.page26.
4.Installezlematériel.Cf.page27.
5.Utilisezleproduit.Cf.page31.
Contenudel’emballage
•CaméradômeréseauAXISP5514-E/P5515-EPTZ
•Couverclededômetransparentnonfumé(prémonté)
•Connecteurpousser-tirerRJ45(conformeàlanormeIP66)
•Pare-soleil,fourniavecvis
•Documentsimprimés
-Guided’installation(cedocument)
-Étiquettesupplémentairedenumérodesérie(x2)
-Cléd’authenticationAVHS
Accessoiresenoption
•AccessoiresdemontageAXIST91A
•KitdexationsuspenduAXIST94A03L
Pourplusd'informationssurlesaccessoiresdisponibles,consultezlesitewww.axis.com
Aperçudumatériel
VIS
A AAVIS VIS
Vériezqueledômeestxéenmodedefonctionnement,sinonlamiseaupointpeuten
êtreaffectée.
23
AXISP55-ENetworkCameraSeries
12
13
14
15
16
3
1
2
4
5
9
8
11
10
6
7
17
1.
Boutondecommande
2.
EmplacementpourcarteSD
3.
Voyantd’état
4.
Boutonderedémarrage
5.
Référence(P/N)etnumérodesérie(S/N).Lenumérodesériepeutêtrerequis
pendantl’installation.
6.
Vis(3)
7.
Pare-soleil
8.
Crochetpourcâbledesécurité
9.
Visducouverclesupérieur(4)
10.
Supportsderack(3)
11.
Connecteurréseau(PoE)
12.
Anneaud’étanchéité
13.
Couverclesupérieur
14.
Couverclededôme
15.
Garniturepourcaméradôme
16.
Visdelagarniturepourcaméradôme(8)
17.
Visdemiseàlaterre
24
AXISP55-ENetworkCameraSeries
FRANÇAIS
Voyants
Voyantd’état
Éteint
VertVertxependant10secondespourindiquerunfonctionnement
OrangeFixependantledémarrage.Clignotependantlamiseàniveau
Orange/RougeClignoteenorange/rougeencasd'indisponibilitéoudeperte
Indication
Branchementetfonctionnementnormal.
normalaprèsledémarrage.
dumicroprogramme.
delaconnexionréseau.
Connecteursetboutons
Pourlescaractéristiquesetlesconditionsd'utilisation,consultezpage26.
Connecteurréseau
ConnecteurEthernetRJ45avecl'alimentationparEthernet(PoE).
VIS
A AAVIS VIS
Leproduitdoitêtreconnectéàl'aided'uncâbleréseaublindé(STP).Touslescâblesreliantle
produitaucommutateurréseaudoiventêtredestinésàleurusagespécique.Assurez-vous
quelespériphériquesréseausontinstallésconformémentauxinstructionsdufabricant.
Pourplusd’informationssurlesexigencesréglementaires,consultezElectromagnetic
Compatibility(EMC)onpage2.
Boutondecommande
Pourconnaîtrel'emplacementduboutondecommande,consultezAperçudumatérielpage23.
Leboutondecommandepermetderéaliserlesopérationssuivantes:
•Réinitialisationduproduitauxparamètresd’usinepardéfaut.Cf.page31.
•ConnexionauserviceduSystèmed'hébergementvidéoAXISouauserviceAXISInternet
DynamicDNS.Pourplusd'informationssurcesservices,reportez-vousauManuelde
l'utilisateur.
Boutonderedémarrage
Appuyezsurleboutonderedémarragepourredémarrerl'appareil.
25

AXISP55-ENetworkCameraSeries
EmplacementpourcarteSD
VIS
A AAVIS VIS
•LacarteSDrisqued'êtreendommagée.Nepasutiliserd'outilstranchantsetnepasforcer
lorsdel'insertionouduretraitdelacarteSD.
•Risquedepertededonnées.Pouréviterlacorruptiondesdonnées,lacarteSDdoitêtre
démontéeavantsonretrait.Pourcefaire,rendez-vousdansSetup>SystemOptions>
Storage>SDCard(Conguration>Optionsdusystème>Stockage>CarteSD)et
cliquezsurUnmount(Démonter).
CetappareilestcompatibleavecunecarteSD/SDHC/SDXC(nonincluse).
PourobtenirdesconseilssurlacarteSD,rendez-voussurwww.axis.com
Caractéristiquestechniques
Conditionsd’utilisation
Classication
IEC60721-4-3Classe3K3,3M3+B38
IEC60068-2
TempératureHumidité
-20°Cà50°C
(-4°Fà122°F)
Humiditérelativede15à
100%(aveccondensation)
Consommationélectrique
VIS
A AAVIS VIS
Utilisezunesourced'alimentationlimitée(LPS)dontlapuissancedesortienominaleest
limitéeà≤100Woudontlecourantdesortienominalestlimitéà≤5A.
PoE
AlimentationparEthernet(PoE)
IEEE802.3af/802.3at
Type1Classe3max.12,95W
26
AXISP55-ENetworkCameraSeries
1
FRANÇAIS
Installationdumatériel
VIS
A AAVIS VIS
Leproduitdoitêtreconnectéàl'aided'uncâbleréseaublindé(STP).Touslescâblesreliantle
produitaucommutateurréseaudoiventêtredestinésàleurusagespécique.Assurez-vous
quelespériphériquesréseausontinstallésconformémentauxinstructionsdufabricant.
Pourplusd'informationssurlesexigencesréglementaires,consultezElectromagnetic
Compatibility(EMC)onpage2.
Fixezleproduitenorientantledômeverslebas.
Liseztouteslesinstructionsavantdepréparerl’installationdelacaméraréseau.Eneffet,de
nombreusesétapesdecettepréparationrequièrentleretraitducouverclesupérieuretilseraitplus
judicieuxdeleseffectuerensemble.
Lepare-soleildoitêtreretirépourinstaller/enleverunecarteSD.
•Avantl’installation,retirezlacaméradesonemballagedeprotection.
•Ceproduitestfourniavecuncouverclededômetransparentclair(prémonté)et
uncouverclededômetransparentfumé.Pourremplacerlecouvercledudôme,
reportez-vousàpage28.
•UnecarteSDstandardouàhautecapacité(nonfournie)peutêtreutiliséepour
sauvegarderdesenregistrementsdansl'appareil.Cf.page28.
•Pourinstallerl'appareilàl'aided'unsupportcompatibleàpartirdesaccessoiresde
montageAXIST91A(vendusséparément),reportez-vousàpage29.
Retirezl’emballagedeprotection
Pourconnaîtrel'emplacementdescomposants,consultezAperçudumatérielpage23.
1.Desserrezlesquatrevisducouverclesupérieurpourleretirer.
2.Retirezl’emballagedeprotection.
1
Emballagedeprotection
27
 Loading...