

Page 1
AXISP55NetworkCameraSeries
ENGLISH
FRANÇAIS
DEUTSCH
ITALIANO
ESPANÕL
ò
ò
¨
¨
¾
¾
AXISP5514PTZDomeNetworkCamera
AXISP5515PTZDomeNetworkCamera
InstallationGuide
Page 2

LegalConsiderations
Videoandaudiosurveillancecanberegulatedbylawsthat
varyfromcountrytocountry.Checkthelawsinyourlocal
regionbeforeusingthisproductforsurveillancepurposes.
Thisproductincludesone(1)H.264decoderlicenseand
one(1)AACdecoderlicense.Topurchasefurtherlicenses,
contactyourreseller.
Liability
Everycarehasbeentakeninthepreparationofthis
document.PleaseinformyourlocalAxisofceofany
inaccuraciesoromissions.AxisCommunicationsABcannot
beheldresponsibleforanytechnicalortypographicalerrors
andreservestherighttomakechangestotheproductand
manualswithoutpriornotice.AxisCommunicationsAB
makesnowarrantyofanykindwithregardtothematerial
containedwithinthisdocument,including,butnotlimited
to,theimpliedwarrantiesofmerchantabilityandtnessfor
aparticularpurpose.AxisCommunicationsABshallnot
beliablenorresponsibleforincidentalorconsequential
damagesinconnectionwiththefurnishing,performance
oruseofthismaterial.Thisproductisonlytobeusedfor
itsintendedpurpose.
IntellectualPropertyRights
AxisABhasintellectualpropertyrightsrelatingto
technologyembodiedintheproductdescribedinthis
document.Inparticular,andwithoutlimitation,these
intellectualpropertyrightsmayincludeoneormoreof
thepatentslistedatwww.axis.com/patent.htmandoneor
moreadditionalpatentsorpendingpatentapplicationsin
theUSandothercountries.
Thisproductcontainslicensedthird-partysoftware.See
themenuitem“About”intheproduct’suserinterfacefor
moreinformation.
ThisproductcontainssourcecodecopyrightAppleComputer,
Inc.,underthetermsofApplePublicSourceLicense2.0
(seewww.opensource.apple.com/apsl).Thesourcecodeis
availablefromhttps://developer.apple.com/bonjour/
EquipmentModications
Thisequipmentmustbeinstalledandusedin
strictaccordancewiththeinstructionsgiveninthe
userdocumentation.Thisequipmentcontainsno
user-serviceablecomponents.Unauthorizedequipment
changesormodicationswillinvalidateallapplicable
regulatorycerticationsandapprovals.
TrademarkAcknowledgments
AXISCOMMUNICATIONS,AXIS,ETRAX,ARTPECandVAPIX
areregisteredtrademarksortrademarkapplicationsofAxis
ABinvariousjurisdictions.Allothercompanynamesand
productsaretrademarksorregisteredtrademarksoftheir
respectivecompanies.
Apple,Boa,Apache,Bonjour,Ethernet,InternetExplorer,
Linux,Microsoft,Mozilla,Real,SMPTE,QuickTime,UNIX,
Windows,WindowsVistaandWWWareregistered
trademarksoftherespectiveholders.Javaandall
Java-basedtrademarksandlogosaretrademarksor
registeredtrademarksofOracleand/oritsafliates.
TM
UPnP
isacerticationmarkoftheUPnP
Corporation.
SD,SDHCandSDXCaretrademarksorregisteredtrademarks
ofSD-3C,LLCintheUnitedStates,othercountriesorboth.
Also,miniSD,microSD,miniSDHC,microSDHC,microSDXC
arealltrademarksorregisteredtrademarksofSD-3C,LLC
intheUnitedStates,othercountriesorboth.
TM
Implementers
RegulatoryInformation
Europe
ThisproductcomplieswiththeapplicableCEmarking
directivesandharmonizedstandards:
•ElectromagneticCompatibility(EMC)Directive
2004/108/EC.SeeElectromagneticCompatibility(EMC)
onpage2.
•LowVoltage(LVD)Directive2006/95/EC.SeeSafety
onpage3.
•RestrictionsofHazardousSubstances(RoHS)Directive
201 1/65/EU.SeeDisposalandRecyclingonpage3.
Acopyoftheoriginaldeclarationofconformitymaybe
obtainedfromAxisCommunicationsAB.SeeContact
Informationonpage3.
ElectromagneticCompatibility(EMC)
Thisequipmenthasbeendesignedandtestedtofulll
applicablestandardsfor:
•Radiofrequencyemissionwheninstalledaccordingto
theinstructionsandusedinitsintendedenvironment.
•Immunitytoelectricalandelectromagneticphenomena
wheninstalledaccordingtotheinstructionsandused
initsintendedenvironment.
USA
Thisequipmenthasbeentestedusingashieldednetwork
cable(STP)andfoundtocomplywiththelimitsfora
ClassAdigitaldevice,pursuanttopart15oftheFCCRules.
Theselimitsaredesignedtoprovidereasonableprotection
againstharmfulinterferencewhentheequipmentis
operatedinacommercialenvironment.Thisequipment
generates,uses,andcanradiateradiofrequencyenergy
and,ifnotinstalledandusedinaccordancewiththe
instructionmanual,maycauseharmfulinterferenceto
radiocommunications.Operationofthisequipmentin
aresidentialareaislikelytocauseharmfulinterference
inwhichcasetheuserwillberequiredtocorrectthe
interferenceathisownexpense.
Theproductshallbeconnectedusingashieldednetwork
cable(STP)thatisproperlygrounded.
Canada
ThisdigitalapparatuscomplieswithCANICES-3(ClassA).
Theproductshallbeconnectedusingashieldednetwork
cable(STP)thatisproperlygrounded.
Cetappareilnumériqueestconformeàlanorme
NMBICES-3(classeA).Leproduitdoitêtreconnectéà
l'aided'uncâbleréseaublindé(STP)quiestcorrectement
misàlaterre.
Europe
ThisdigitalequipmentfulllstherequirementsforRF
emissionaccordingtotheClassAlimitofEN55022.The
productshallbeconnectedusingashieldednetworkcable
(STP)thatisproperlygrounded.Notice!ThisisaClassA
product.Inadomesticenvironmentthisproductmaycause
RFinterference,inwhichcasetheusermayberequired
totakeadequatemeasures.
Thisproductfulllstherequirementsforimmunity
accordingtoEN61000-6-1residential,commercialand
light-industrialenvironments.
Thisproductfulllstherequirementsforimmunity
accordingtoEN61000-6-2industrialenvironments.
Thisproductfulllstherequirementsforimmunity
accordingtoEN55024ofceandcommercialenvironments
Australia/NewZealand
ThisdigitalequipmentfulllstherequirementsforRF
emissionaccordingtotheClassAlimitofAS/NZSCISPR22.
Theproductshallbeconnectedusingashieldednetwork
Page 3

cable(STP)thatisproperlygrounded.Notice!Thisisa
ClassAproduct.Inadomesticenvironmentthisproduct
maycauseRFinterference,inwhichcasetheusermaybe
requiredtotakeadequatemeasures.
Japan
この装置は、クラスA情報技術装置です。この装
置を家庭環境で使用すると電波妨害を引き起こす
ことがあります。この場合には使用者が適切な対
策を講ずるよう要求されることがあります。本
製品は、シールドネットワークケーブル(STP)を
使用して接続してください。また適切に接地し
てください。
Korea
이기기는업무용(A급)전자파적합기기로서판매
자또는사용자는이점을주의하시기바라며,가
정외의지역에서사용하는것을목적으로합니다.
적절히접지된STP(shieldedtwistedpair)케이블
을사용하여제품을연결하십시오.
Safety
ThisproductcomplieswithIEC/EN/UL60950-1,Safetyof
InformationTechnologyEquipment.Ifitsconnectingcables
areroutedoutdoors,theproductshallbegroundedeither
throughashieldednetworkcable(STP)orotherappropriate
method.
DisposalandRecycling
Whenthisproducthasreachedtheendofitsusefullife,
disposeofitaccordingtolocallawsandregulations.For
informationaboutyournearestdesignatedcollectionpoint,
contactyourlocalauthorityresponsibleforwastedisposal.
Inaccordancewithlocallegislation,penaltiesmaybe
applicableforincorrectdisposalofthiswaste.
Europe
immediately,yourresellerwillforwardyourqueriesthrough
theappropriatechannelstoensurearapidresponse.Ifyou
areconnectedtotheInternet,youcan:
•downloaduserdocumentationandsoftwareupdates
•ndanswerstoresolvedproblemsintheFAQdatabase.
Searchbyproduct,category,orphrase
•reportproblemstoAxissupportstaffbylogginginto
yourprivatesupportarea
•chatwithAxissupportstaff
•visitAxisSupportatwww.axis.com/techsup/
LearnMore!
VisitAxislearningcenterwww.axis.com/academy/for
usefultrainings,webinars,tutorialsandguides.
Thissymbolmeansthattheproductshallnotbe
disposedoftogetherwithhouseholdorcommercialwaste.
Directive2012/19/EUonwasteelectricalandelectronic
equipment(WEEE)isapplicableintheEuropeanUnion
memberstates.Topreventpotentialharmtohumanhealth
andtheenvironment,theproductmustbedisposedofin
anapprovedandenvironmentallysaferecyclingprocess.
Forinformationaboutyournearestdesignatedcollection
point,contactyourlocalauthorityresponsibleforwaste
disposal.Businessesshouldcontacttheproductsupplierfor
informationabouthowtodisposeofthisproductcorrectly.
Thisproductcomplieswiththerequirementsof
Directive2011/65/EUontherestrictionoftheuseof
certainhazardoussubstancesinelectricalandelectronic
equipment(RoHS).
China
Thisproductcomplieswiththerequirementsofthe
legislativeactAdministrationontheControlofPollution
CausedbyElectronicInformationProducts(ACPEIP).
ContactInformation
AxisCommunicationsAB
Emdalavägen14
22369Lund
Sweden
Tel:+46462721800
Fax:+4646136130
www.axis.com
Support
Shouldyourequireanytechnicalassistance,pleasecontact
yourAxisreseller.Ifyourquestionscannotbeanswered
Page 4

Page 5

AXISP55NetworkCameraSeries
ENGLISH
SafetyInformation
ReadthroughthisInstallationGuidecarefullybeforeinstallingtheproduct.KeeptheInstallation
Guideforfuturereference.
HazardLevels
DANGER
WARNING
CAUTION
NO
TICE
NO NO
TICE TICE
Indicatesahazardoussituationwhich,ifnotavoided,willresultin
deathorseriousinjury.
Indicatesahazardoussituationwhich,ifnotavoided,couldresult
indeathorseriousinjury.
Indicatesahazardoussituationwhich,ifnotavoided,couldresult
inminorormoderateinjury.
Indicatesasituationwhich,ifnotavoided,couldresultindamage
toproperty.
OtherMessageLevels
ImportantIndicatessignicantinformationwhichisessentialfortheproduct
NoteIndicatesusefulinformationwhichhelpsingettingthemostout
tofunctioncorrectly.
oftheproduct.
5
Page 6

AXISP55NetworkCameraSeries
SafetyInstructions
NO
TICE
NO NO
TICE TICE
•TheAxisproductshallbeusedincompliancewithlocallawsandregulations.
•TousetheAxisproductoutdoors,orinsimilarenvironments,itshallbeinstalledinan
approvedoutdoorhousing.
•StoretheAxisproductinadryandventilatedenvironment.
•AvoidexposingtheAxisproducttoshocksorheavypressure.
•Donotinstalltheproductonunstablebrackets,surfacesorwalls.
•Donotpointthecameralenstowardthesunorotherhigh-intensityradiationsourcesas
thiscouldcausedamagetothecamera.
•UseonlyapplicabletoolswheninstallingtheAxisproduct.Usingexcessiveforcewith
powertoolscouldcausedamagetotheproduct.
•Donotusechemicals,causticagents,oraerosolcleaners.
•Useacleanclothdampenedwithpurewaterforcleaning.
•Useonlyaccessoriesthatcomplywithtechnicalspecicationoftheproduct.Thesecanbe
providedbyAxisorathirdparty.
•UseonlysparepartsprovidedbyorrecommendedbyAxis.
•Donotattempttorepairtheproductbyyourself.ContactAxissupportoryourAxis
resellerforservicematters.
•Donotpointthecameralenstowardthesunorotherhigh-intensityradiationsources
becausethiscouldcausedamagetothecamera.
Transportation
NO
TICE
NO NO
TICE TICE
•Keeptheprotectivepackaging.WhentransportingtheAxisproduct,theprotective
packagingshallbereplacedinitsoriginalposition.
•WhentransportingtheAxisproduct,usetheoriginalpackagingorequivalenttoprevent
damagetotheproduct.
Battery
TheAxisproductusesa3.0VBR/CR2032lithiumbatteryasthepowersupplyforitsinternal
real-timeclock(RTC).Undernormalconditionsthisbatterywilllastforaminimumofveyears.
LowbatterypoweraffectstheoperationoftheRTC,causingittoresetateverypower-up.When
thebatteryneedsreplacing,alogmessagewillappearintheproduct’sserverreport.Formore
informationabouttheserverreport,seetheproduct´ssetuppagesorcontactAxissupport.
6
Page 7

AXISP55NetworkCameraSeries
ENGLISH
Thebatteryshouldnotbereplacedunlessrequired,butifthebatterydoesneedreplacing,contact
Axissupportatwww.axis.com/techsupforassistance.
WARNING
•Riskofexplosionifthebatteryisincorrectlyreplaced.
•ReplaceonlywithanidenticalbatteryorabatterywhichisrecommendedbyAxis.
•Disposeofusedbatteriesaccordingtolocalregulationsorthebatterymanufacturer's
instructions.
DomeCover
NO
TICE
NO NO
TICE TICE
•Becarefulnottoscratch,damageorleavengerprintsonthedomecoverbecausethis
coulddecreaseimagequality.Ifpossible,keeptheprotectiveplasticonthedomecover
untiltheinstallationiscomplete.
•Donotcleanadomecoverthatlookscleantotheeyeandneverpolishthesurface.
Excessivecleaningcoulddamagethesurface.
•Forgeneralcleaningofthedomecoveritisrecommendedtouseanon-abrasive,
solvent-freeneutralsoapordetergentmixedwithpurewaterandasoft,cleancloth.Rinse
wellwithpurelukewarmwater.Drywithasoft,cleanclothtopreventwaterspotting.
•Neveruseharshdetergents,gasoline,benzeneoracetoneetc.andavoidcleaningthe
domecoverindirectsunlightoratelevatedtemperatures.
7
Page 8

8
Page 9

AXISP55NetworkCameraSeries
ENGLISH
InstallationGuide
ThisInstallationGuideprovidesinstructionsforinstallingAXISP5514/P5515PTZDomeNetwork
Cameraonyournetwork.Forotheraspectsofusingtheproduct,seetheUserManualavailable
atwww.axis.com
InstallationSteps
1.Makesurethepackagecontents,toolsandothermaterialsnecessaryfortheinstallation
areinorder.Seepage9.
2.Studythehardwareoverview.Seepage9.
3.Studythespecications.Seepage15.
4.Installthehardware.Seepage16.
5.Accesstheproduct.Seepage21.
PackageContents
•AXISP5514/P5515PTZDomeNetworkCamera
•Mountingkitforhardanddropceilings
•Cleartransparentdomecover(premounted)
•Smokeddomecover
•Printedmaterials
-InstallationGuide(thisdocument)
-Extraserialnumberlabel(2x)
-AVHSAuthenticationkey
OptionalAccessories
•AXIST91AMountingAccessories
•AXIST94A03LRecessedmountkit
Forinformationaboutavailableaccessories,seewww.axis.com
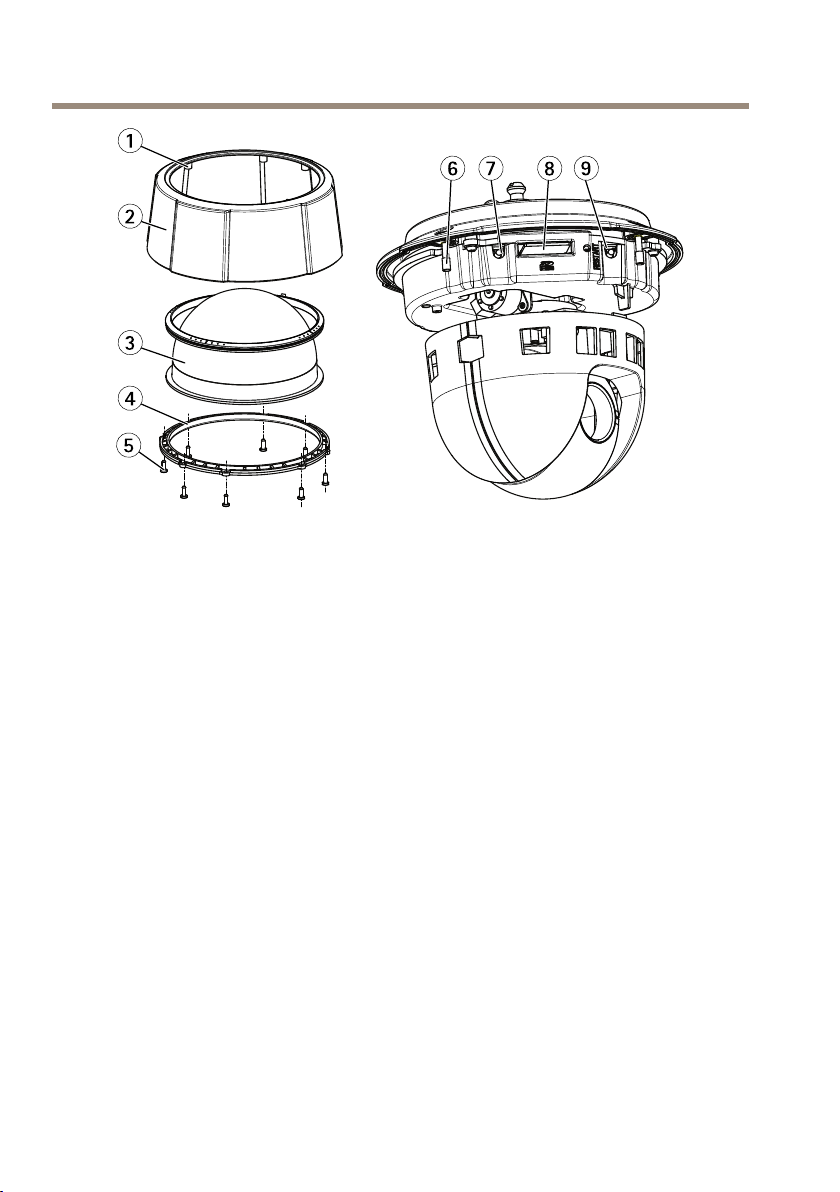
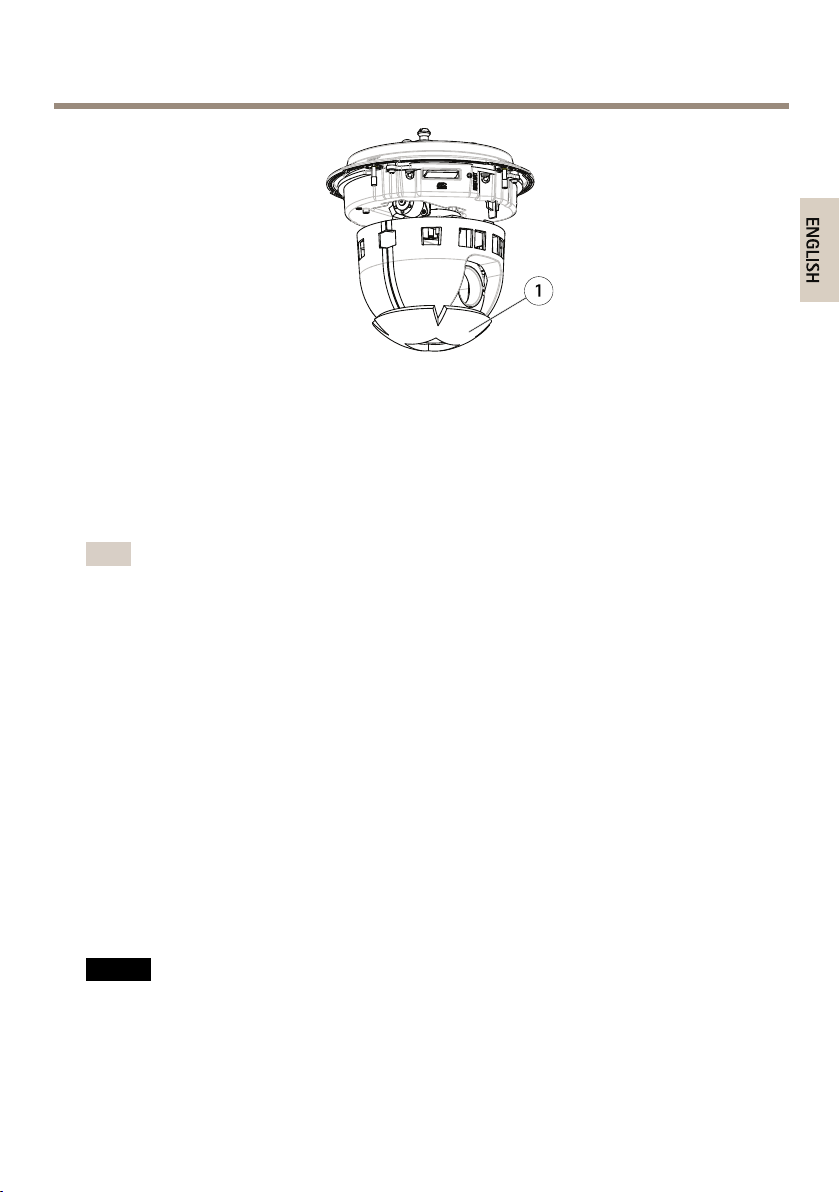
HardwareOverview
NO
TICE
NO NO
TICE TICE
Makesurethedomeisattachedinoperationmode,otherwisefocusmaybeaffected.
9
Page 10
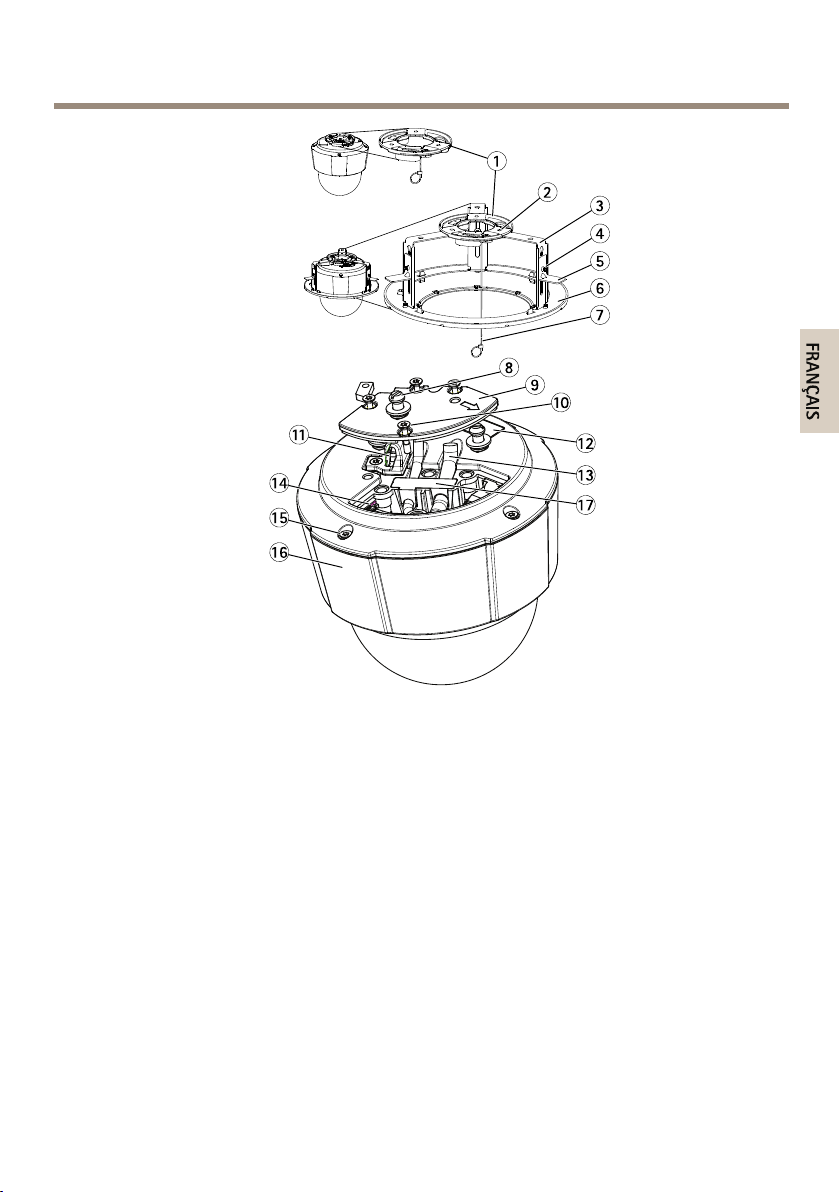
AXISP55NetworkCameraSeries
1
6
7
8
9
2
3
4
5
1
Sealingring
2
Topcover
3
Dome
4
Domering
5
Domeringscrews(8x)
6
StatusindicatorLED
7
Controlbutton
8
SDcardslot
9
Restartbutton
10
Page 11

AXISP55NetworkCameraSeries
1
2
3
4
5
6
7
8
9
10
13
12
17
11
14
15
16
ENGLISH
1
Mountingplate
2
Mountingplatescrews(3x)
3
Bracketarm(3x)
4
Bracketarmscrew(3x)andwasher(3x)
5
Mountingbracket
6
Trimring
7
Safetywire
8
Unitholders(3x)
9
Camerabaselid
10
11
12
Camerabaselidscrews(4x)
Hookforsafetywire
Partnumber(P/N)&Serialnumber(S/N).Serialnumbermayberequiredduring
installation.
13
Cabletracks
14
Multi-connector(forindoorversiononly)
15
Topcoverscrews(4x)
16
Topcover
17
Rubbergasket
11
Page 12

AXISP55NetworkCameraSeries
LEDIndicators
StatusLED
Unlit
GreenShowssteadygreenfor10secondsfornormaloperationafter
Amber
Amber/RedFlashesamber/redifnetworkconnectionisunavailableorlost.
Indication
Connectionandnormaloperation.
startupcompleted.
Steadyduringstartup.Flashesduringrmwareupgrade.
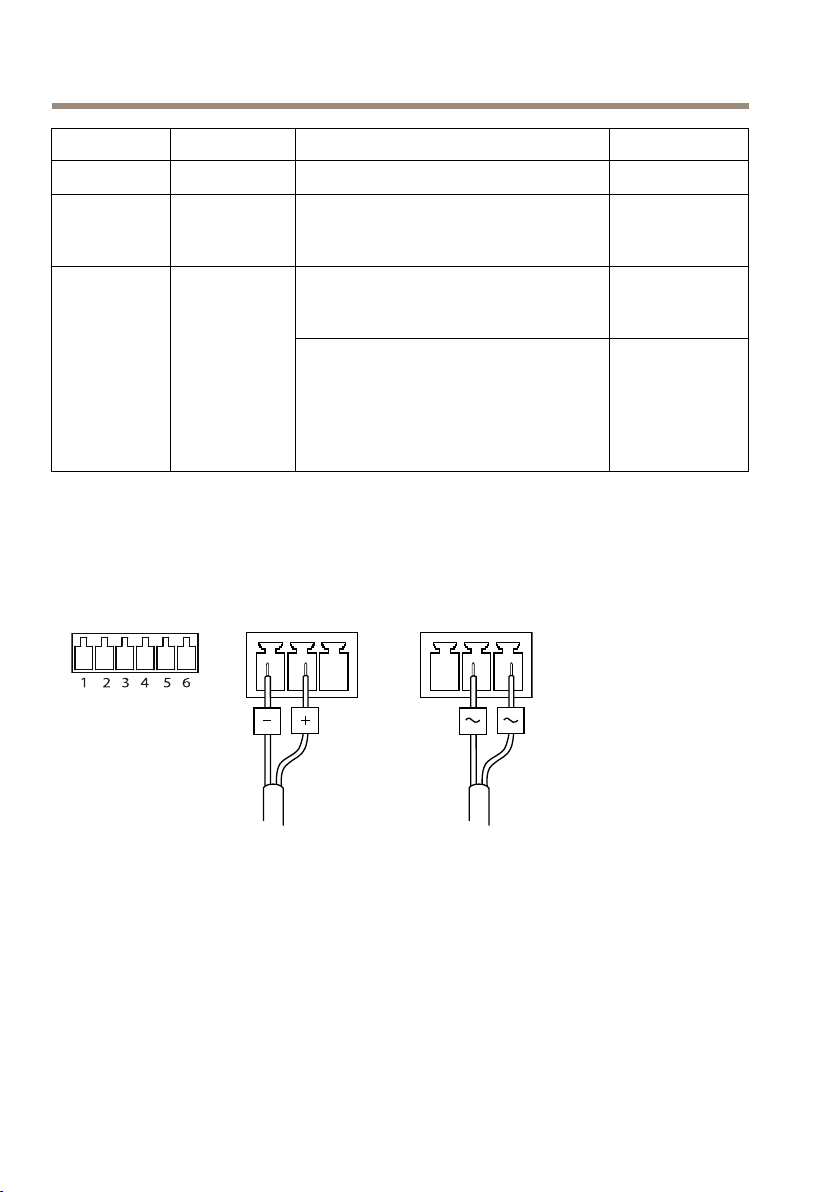
ConnectorsandButtons
Forspecicationsandoperatingconditions,seepage15.
NetworkConnector
RJ45EthernetconnectorwithPoweroverEthernet(PoE).
NO
TICE
NO NO
TICE TICE
Theproductshallbeconnectedusingashieldednetworkcable(STP).Allcablesconnecting
theproducttothenetworkshallbeintendedfortheirspecicuse.Makesurethatthe
networkdevicesareinstalledinaccordancewiththemanufacturer’sinstructions.For
informationaboutregulatoryrequirements,seeElectromagneticCompatibility(EMC)on
page2.
ControlButton
Forlocationofthecontrolbutton,seeHardwareOverviewonpage9.
Thecontrolbuttonisusedfor:
•Resettingtheproducttofactorydefaultsettings.Seepage22.
•ConnectingtoanAXISVideoHostingSystemserviceorAXISInternetDynamicDNS
Service.Formoreinformationabouttheseservices,seetheUserManual.
RestartButton
Presstherestartbuttontorestarttheproduct.
12
Page 13

AXISP55NetworkCameraSeries
ENGLISH
SDCardSlot
NO
TICE
NO NO
TICE TICE
•RiskofdamagetoSDcard.Donotusesharptoolsorexcessiveforcewheninserting
orremovingtheSDcard.
•Riskofdataloss.Topreventdatacorruption,theSDcardshouldbeunmountedbefore
removal.Tounmount,gotoSetup>SystemOptions>Storage>SDCardandclick
Unmount.
ThisproductsupportsSD/SDHC/SDXCcards(notincluded).
ForSDcardrecommendations,seewww.axis.com
Multi-ConnectorCable(soldseparately)
WhenconnectingexternalequipmenttotheAxisproduct,amulti-connectorcable(availablefrom
Axis)isrequiredinordertomaintaintheproduct’sIPrating.Themulti-connectorcablecanbe
purchasedfromyourAxisreseller.
Connectthemulti-connectorcabletotheproduct’smulti-connector.Tolocatethemulti-connector,
seeHardwareOverviewonpage9.Thecableprovidesthefollowingconnectors:
Powerconnector-3-pinterminalblockusedforpowerinput.Seeimagebelow.UseaSafetyExtra
LowVoltage(SELV)compliantlimitedpowersource(LPS)witheitheraratedoutputpowerlimited
to≤100Woraratedoutputcurrentlimitedto≤5A.
Audioin(pink)-3.5mminputforamonomicrophone,oraline-inmonosignal(leftchannelis
usedfromastereosignal).
Audioout(green)-3.5mmoutputforaudio(linelevel)thatcanbeconnectedtoapublicaddress
(PA)systemoranactivespeakerwithabuilt-inamplier.Astereoconnectormustbeusedforthe
audioout.
I/Oterminalconnector-Usewithexternaldevicesincombinationwith,forexample,tampering
alarms,motiondetection,eventtriggering,timelapserecordingandalarmnotications.Inaddition
tothe0VDCreferencepointandpower(DCoutput),theI/Oconnectorprovidestheinterfaceto:
•Digitaloutput—ForconnectingexternaldevicessuchasrelaysandLEDs.
ConnecteddevicescanbeactivatedbytheVAPIX®ApplicationProgramming
Interface,outputbuttonsontheLiveViewpageorbyanActionRule.Theoutput
willshowasactive(shownunderSystemOptions>Port&Devices>Port
Status)ifthealarmdeviceisactivated.
•Digitalinput—Analarminputforconnectingdevicesthatcantogglebetween
anopenandclosedcircuit,forexample:PIRs,door/windowcontacts,glass
breakdetectors,etc.Whenasignalisreceivedthestatechangesandtheinput
becomesactive(shownunderSystemOptions>Port&Devices>PortStatus).
13
Page 14
AXISP55NetworkCameraSeries
1 2 3 4 5 6
FunctionPinNotes
0VDC(-)
DCoutput
Congurable
(Inputor
Output)
Foranexamplediagram,seeConnectionDiagramsonpage15.
I/Oconnector
1
2
3–6
DCpowerinputACpowerinput
Canbeusedtopowerauxiliaryequipment.
Note:Thispincanonlybeusedaspower
out.
Digitalinput–Connecttopin1to
activate,orleaveoating(unconnected)
todeactivate.
Digitaloutput–Connectedtopin1when
activated,oating(unconnected)when
deactivated.Ifusedwithaninductive
load,e.g.arelay,adiodemustbe
connectedinparallelwiththeload,for
protectionagainstvoltagetransients.
Specications
3.3VDC
Maxload=
250mA
0tomax40VDC
0tomax40VDC,
opendrain,
100mA
14
Page 15
ConnectionDiagrams
1
2
A
B
ENGLISH
I/OConnector
AXISP55NetworkCameraSeries
1
0VDC(-)
2
DCoutput3.3V,max250mA
A
I/Oconguredasinput
B
I/Oconguredasoutput
Specications
OperatingConditions
Classication
IEC60721-4-3
Class3K3,3M3
+B38
IEC60068-2
TemperatureHumidity
0°Cto50°C
(32°Fto122°F)
Humidity15-85%RH
(non-condensing)
15
Page 16

AXISP55NetworkCameraSeries
PowerConsumption
NO
TICE
NO NO
TICE TICE
Usealimitedpowersource(LPS)witheitheraratedoutputpowerlimitedto≤100W
oraratedoutputcurrentlimitedto≤5A.
PoE
PoweroverEthernet(PoE)
IEEE802.3af/802.3at
Type1Class3max.12.95W
ACDC
20-28VDC,max.22VA20-24VAC,max13.5W
InstalltheHardware
NO
TICE
NO NO
TICE TICE
Mounttheproductwiththedomefacingdownward.
Readalltheinstructionsbeforepreparingtoinstallthenetworkcamerasinceseveralinstallation
preparationstepsrequireremovingthetopcoverandwouldbenetfrombeingcompletedtogether.
•Removetheprotectivepackagingbeforeinstallingthecamera.
•Theproductissuppliedwithacleartransparentdomecover(premounted)andasmoked
transparentdomecover.Toreplacethedomecover,seepage17.
•AstandardorhighcapacitySDcard(notincluded)canbeusedtostorerecordings
locallyintheproduct.Seepage17.
•ToinstalltheproductusingacompatiblebracketfromAXIST91AMountingAccessories
(soldseparately),seepage20.
RemovetheProtectivePackaging
SeeHardwareOverviewonpage9forlocationofcomponents.
1.Loosenthefourtopcoverscrewsandremovethetopcover.
2.Removetheprotectivepackaging.
16
Page 17
AXISP55NetworkCameraSeries
1
ENGLISH
1
Protectivepackaging
3.Toreplacetheclear/smokeddomecover,seepage17.ToinstallanSDcardseepage17.
4.Putthetopcoverbackinitsoriginalpositionandfastentwodiagonallyoppositescrews
rst(torque<0.7Nm),andthenthetwootherscrews.
ReplacetheDomeCover
Note
Becarefulnottoscratchordamagethedomecover.Ifpossible,keeptheprotectiveplastic
onthedomecoveruntiltheinstallationiscomplete.
Replacingthedomecoverisonlynecessaryifyouwanttousethesmokeddomecoverorifthe
domecoverisscratchedordamaged.SparedomecoverscanbepurchasedfromyourAxisreseller.
SeeHardwareOverviewonpage9forlocationofcomponents.
1.Loosenthetopcoverscrewsandremovethetopcover.
2.Removethe8domeringscrewsandremovethedomeringfromthetopcover.
3.Attachthedomeringandthereplacementdomecovertothetopcoverandsecureby
tighteningthescrews(torque0.4to0.6Nm).
4.ToinstallanSDcard(notincluded),seepage17.
5.Putthetopcoverbackinitsoriginalpositionandfastendiagonallytwooppositescrews
(torque<0.7Nm),andthentheotherscrews.
InstallanSDCard
NO
TICE
NO NO
TICE TICE
Topreventcorruptionofrecordings,theSDcardshouldbeunmountedbeforeitisejected.
Tounmount,gotoSetup>SystemOptions>Storage>SDCardandclickUnmount.
17
Page 18
AXISP55NetworkCameraSeries
1
2
ItisoptionaltoinstallastandardorhighcapacitySDcard(notincluded),whichcanbeusedfor
localrecordingwithremovablestorage.
SeeHardwareOverviewonpage9forlocationofcomponents.
1.Loosenthe4topcoverscrewsandremovethetopcover.
2.InsertanSDcard(notincluded)intotheSDcardslot.
3.Putthetopcoverbackinitsoriginalpositionandfastentwodiagonallyoppositescrews
rst(torque<0.7Nm),andthentheotherscrews.
HardCeilingMount
1.
Mountingplate
2.
Securitywire
Toinstallthemountingplate:
1.Usethesupplieddrilltemplatetopositiontheholes.Usedrillbits,screws,andplugs
appropriatefortheceilingmaterial.
2.Installthemountingplate.
3.Loosenthe4camerabaselidscrewsandremovethecamerabaselid.SeeHardware
Overviewonpage11.Becarefulnottodamagethecableswhileconnectingthem.
4.Routeandconnectthenetworkcableandmulti-connectorcable(optional)alongthe
cabletracksandthroughtheholesintherubbergasket.
5.Putthecamerabaselidbackinitsoriginalpositionandfastenthescrews.
6.Securethecamerausingthesuppliedsafetywire.
7.Slidetheunitholdersonthenetworkcameraintotheslotsonthemountingplateand
rotatethecameraunit.
18
Page 19

AXISP55NetworkCameraSeries
1
2
2
1
ENGLISH
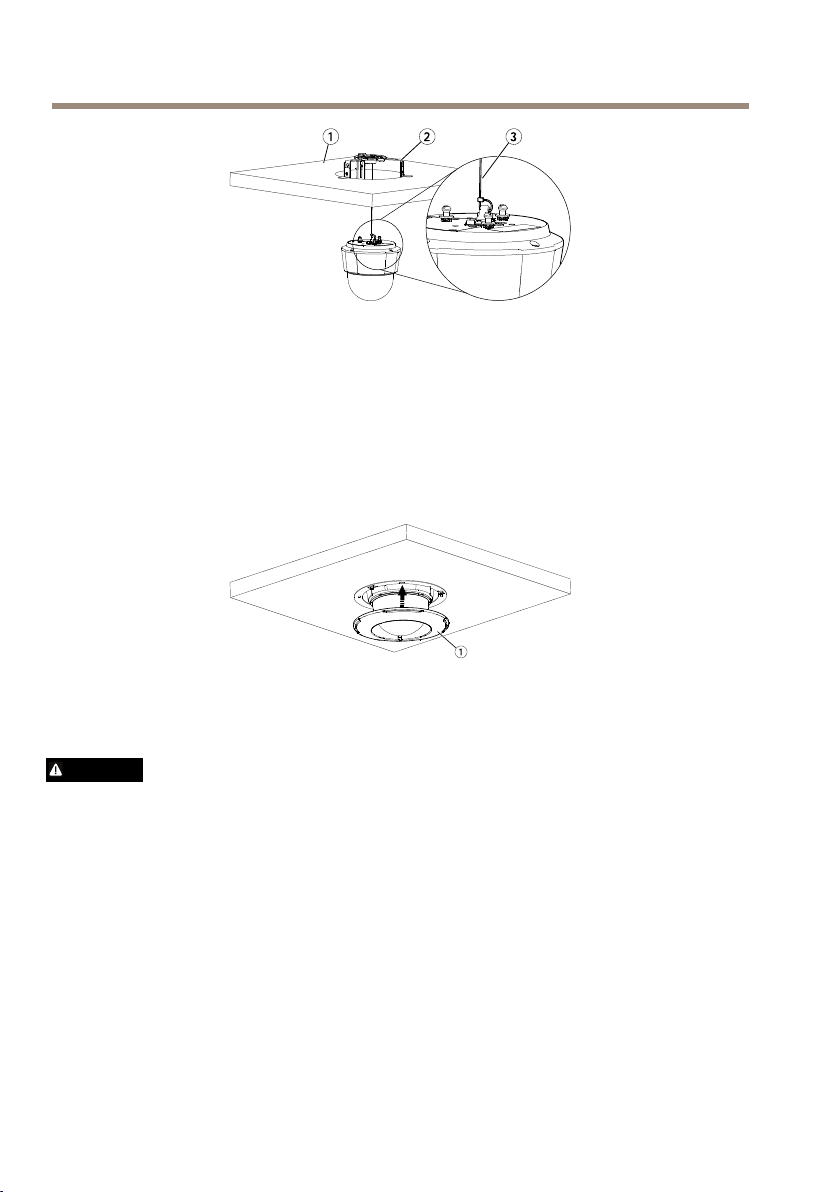
DropCeilingMount
1.
Ceilingtile
2.
Diameterofhole190mm(7.5in)
Note
•Thecombinedweightofthecameraandceilingmountisapproximately2.3kg(5.1lb.).
Checkthattheceilingmaterialisstrongenoughtosupportthisweight.
•Theceilingtileshouldbe5-60mm(0.2-2.4in)thick.
1.Removetheceilingtileinwhichthedropceilingmountistobetted.
2.Usethesuppliedtemplatetomarkthepositionforthe189.5mm(7.5in)holeinthe
ceilingtile.Cutaroundthetemplate.
3.Assembletheceilingbracket.
4.Placetheceilingbracketontheceilingtile.Seeillustrationfurtherdown.
5.Tightenthebracketarmscrewsusingatorx20screwdriverhead.
6.Loosenthe4camerabaselidscrewsandremovethecamerabaselid.(seeHardware
Overviewonpage11).
7.Removetherubbergasketandroutethenetworkcableandthemulti-connectorcableif
required.Becarefulnottodamagethecableswhenconnectingtothenetworkcamera.
1.
Multi-connectorcable
2.
Networkcable
8.Putthecamerabaselidbackinitsoriginalpositionandfastenthescrews.
9.Securethecamerausingthesuppliedsafetywire.
19
Page 20
AXISP55NetworkCameraSeries
2
1
3
1
1.
Ceilingtile
2.
Ceilingbracket
3.
Safetywire
10.Slidetheunitholdersonthenetworkcameraintotheslotsonthemountingplateand
rotatethecameraunit
11.Installtheceilingtile,withthecameramounted,intotheceiling.
12.Placethetrimringovertheceilingbracketandsnapitintoplace.
1.
Trimring
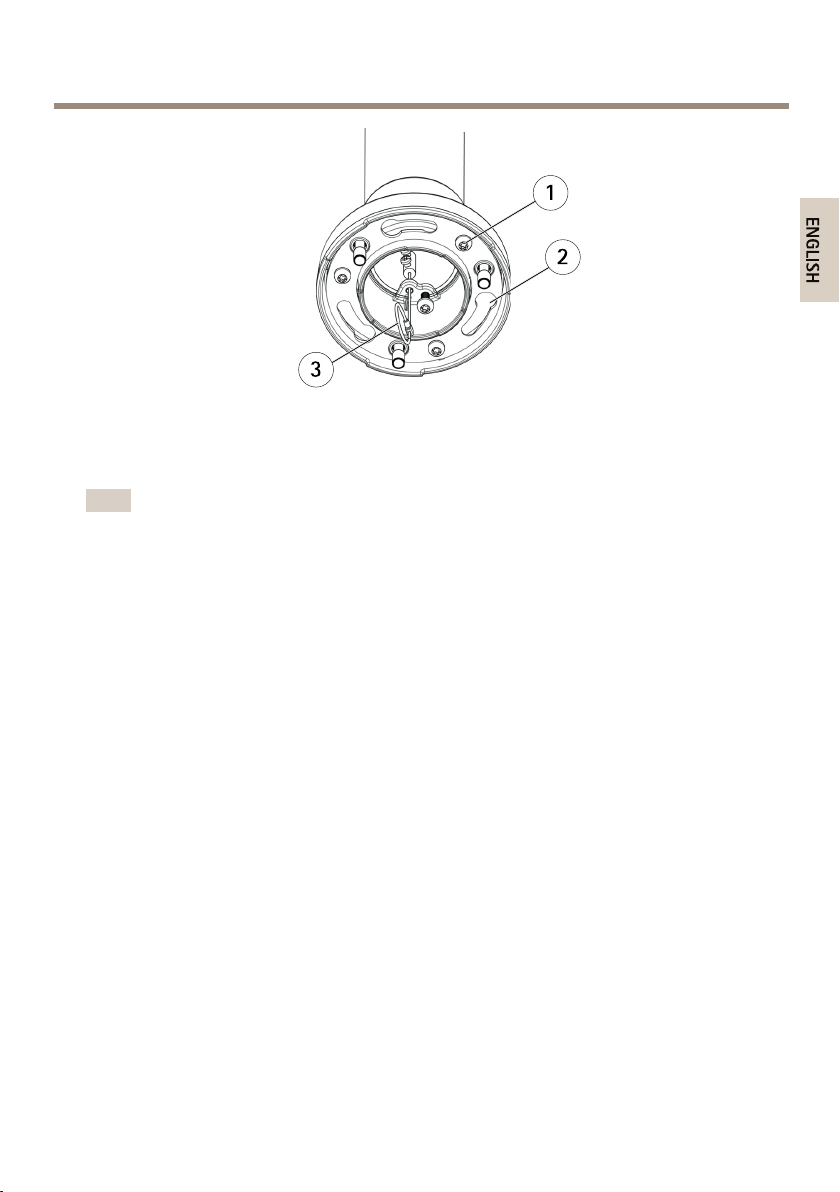
InstalltheCameraonaBracketMount(soldseparately)
WARNING
•Riskofelectricshock.Theproductshallbegroundedusingagroundingwire.Makesure
bothendsofthegroundingwireareincontactwiththeirrespectivegroundingsurfaces.
1.Installthebracket(notincluded)accordingtotheinstructionssuppliedwiththebracket.
Ifdrillingisrequired,makesuretousedrillbits,screwsandplugsthatareappropriate
forthematerial.Seewww.axis.comforinformationonavailablemountingaccessories.
2.Securethecamerausingthesuppliedsafetywire.
3.Loosenthecamerabaselidscrewsandremovethecamerabaselid.
20
Page 21
AXISP55NetworkCameraSeries
1
2
3
ENGLISH
1
Screw
2
Slotsforunitholders
3
Safetywire
Note
•Becarefulnottodamagethecableswhenconnectingthem.
•Makesurethatthefoamgasketholesarealignedwiththecabletracksand,ifapplicable,
removethecut-outpieceforthemulti-connectorcablefromthefoamgasket.
4.Connectthenetworkcableandthemulti-connectorcable(soldseparately),ifapplicable,
tothecamera.
5.Turnthecableholderstokeepthecablesinplace.
6.Putthecamerabaselidbackinitsoriginalpositionandtightenthescrews(torque
1.5Nm).
7.Slidetheunitholdersonthenetworkcameraintotheslotsinthemountingbracketand
rotatethecameraunit.
8.Securethenetworkcameratothemountingbracketbytighteningthescrews.
AccesstheProduct
AXISIPUtilityandAXISCameraManagementarerecommendedmethodsforndingAxisproducts
onthenetworkandassigningthemIPaddressesinWindows®.Bothapplicationsarefreeandcan
bedownloadedfromwww.axis.com/techsup
Theproductcanbeusedwithmostoperatingsystemsandbrowsers.Therecommendedbrowsersare
®
®
withOSX
TM
withWindows
®
orFirefox
®
withotheroperatingsystems.
•InternetExplorer
•Safari
•Chrome
Formoreinformationaboutusingtheproduct,seetheUserManualavailableatwww.axis.com
®
21
Page 22

AXISP55NetworkCameraSeries
ResettoFactoryDefaultSettings
Important
Resettofactorydefaultshouldbeusedwithcaution.Aresettofactorydefaultwillreset
allsettings,includingtheIPaddress,tothefactorydefaultvalues.
Note
Theinstallationandmanagementsoftwaretoolsareavailablefromthesupportpages
onwww.axis.com/techsup
Toresettheproducttothefactorydefaultsettings:
1.Pressandholdthecontrolbuttonandtherestartbuttonatthesametime.
2.Releasetherestartbuttonbutcontinuetoholddownthecontrolbuttonfor15–30
secondsuntilthestatusLEDindicatorashesamber.
3.Releasethecontrolbutton.TheprocessiscompletewhenthestatusLEDindicatorturns
green.Theproducthasbeenresettothefactorydefaultsettings.IfnoDHCPserveris
availableonthenetwork,thedefaultIPaddressis192.168.0.90
4.Usingtheinstallationandmanagementsoftwaretools,assignanIPaddress,setthe
passwordandaccessthevideostream
Itisalsopossibletoresetparameterstofactorydefaultviathewebinterface.GotoSetup
>SystemOptions>Maintenance.
FurtherInformation
TheUserManualisavailableatwww.axis.com
Visitwww.axis.com/techsuptocheckifthereisupdatedrmwareavailableforyournetwork
product.Toseethecurrentlyinstalledrmwareversion,gotoSetup>About.
VisitAxislearningcenterwww.axis.com/academyforusefultrainings,webinars,tutorialsand
guides.
WarrantyInformation
ForinformationaboutAxis’productwarrantyandtheretorelatedinformation,see
www.axis.com/warranty/
22
Page 23
AXISP55NetworkCameraSeries
FRANÇAIS
Informationssurlasécurité
Lisezattentivementceguided'installationavantd'installerl'appareil.Conservezleguide
d'installationpourtouteréférenceultérieure.
Niveauxderisques
DANGER
AVERTISSEMENT
ATTENTION
VIS
A AAVIS VIS
Indiqueunesituationdangereusequi,siellen'estpasévitée,
entraîneraledécèsoudesblessuresgraves.
Indiqueunesituationdangereusequi,siellen'estpasévitée,
pourraitentraînerledécèsoudesblessuresgraves.
Indiqueunesituationdangereusequi,siellen'estpasévitée,
pourraitentraînerdesblessureslégèresoumodérées.
Indiqueunesituationqui,siellen'estpasévitée,pourrait
endommagerl'appareil.
Autresniveauxdemessage
ImportantIndiquelesinformationsimportantes,nécessairespourassurerle
NoteIndiquelesinformationsutilesquipermettrontd'obtenirle
bonfonctionnementdel'appareil.
fonctionnementoptimaldel'appareil.
23
Page 24

AXISP55NetworkCameraSeries
Consignesdesécurité
VIS
A AAVIS VIS
•LeproduitAxisdoitêtreutiliséconformémentauxloisetrèglementationslocalesen
vigueur.
•PourpouvoirutiliserleproduitAxisàl'extérieur,oudansdesenvironnementssimilaires,il
doitêtreinstallédansunboîtierd'extérieurhomologué.
•ConserverceproduitAxisdansunenvironnementsecetventilé.
•NepasexposerceproduitAxisauxchocsouauxfortespressions.
•Nepasinstallerceproduitsurdessupports,surfacesoumursinstables.
•Nepaspointerl'objectifverslesoleiloud'autressourcesderayonnementàhaute
intensité,carcelapourraitcauserdesdommagesàlacaméra.
•Utiliseruniquementdesoutilsrecommandéspourl'installationdel'appareilAxis.
L'applicationd'uneforceexcessivesurl'appareilavecdesoutilspuissantspourrait
l'endommager.
•Nepasutiliserdeproduitschimiques,desubstancescaustiquesoudenettoyants
pressurisés.
•Utiliserunchiffonpropreimbibéd'eaupurepourlenettoyage.
•Utiliseruniquementdesaccessoiresconformesauxcaractéristiquestechniquesduproduit.
IlspeuventêtrefournisparAxisouuntiers.
•UtiliseruniquementlespiècesderechangefourniesourecommandéesparAxis.
•Nepasessayerderéparerceproduitparvous-même.Contacterl'assistancetechnique
d'AxisouvotrerevendeurAxispourdesproblèmesliésàl'entretien.
•Nepaspointerl'objectifverslesoleiloud'autressourcesderayonnementàhaute
intensité,carcelapourraitcauserdesdommagesàlacaméra.
Transport
VIS
A AAVIS VIS
•Conservezl'emballagedeprotection.LorsdutransportduproduitAxis,l'emballagede
protectiondoitêtreremisdanssapositiond'origine.
•LorsdutransportduproduitAxis,utilisezl'emballaged'origineouunéquivalentpour
éviterd'endommagerleproduit.
Batterie
LeproduitAxisutiliseunebatterieaulithiumBR/CR20323,0Vcommealimentationdeson
horlogeentempsréelinterne(RTC).Dansdesconditionsnormales,cettebatterieauneduréede
vieminimaledecinqans.
24
Page 25

AXISP55NetworkCameraSeries
FRANÇAIS
Silabatterieestfaible,lefonctionnementdel'horlogeentempsréelpeutêtreaffectéetentraîner
saréinitialisationàchaquemisesoustension.Unmessageenregistréapparaîtdanslerapportde
serveurduproduitlorsquelabatteriedoitêtreremplacée.Pourtoutcomplémentd'information
concernantlerapportdeserveur,reportez-vousauxpagesdeCongurationduproduitoucontactez
l'assistancetechniqued'Axis.
Labatteriedoitêtreremplacéeuniquementencasdebesoin,etpourcefaire,contactezl'assistance
techniqued'Axisàl'adressewww.axis.com/techsupetobtenirdel'aide.
AVERTISSEMENT
•Risqued'explosionsilabatterieestremplacéedefaçonincorrecte.
•Remplacez-launiquementparunebatterieidentiqueouunebatterierecommandéepar
Axis.
•Mettezaurebutlesbatteriesusagéesconformémentauxréglementationslocalesou
auxinstructionsdufabricantdelabatterie.
Couverclededôme
VIS
A AAVIS VIS
•Veillezànepasrayer,endommageroulaisserd'empreintessurlecouvercledudômecar
celapourraitaltérerlaqualitéd'image.Laissez,sipossible,laprotectionenplastiquesur
lecouvercledudômejusqu’àlandel’installation.
•Nenettoyezpaslecouvercledudômes'ilsemblepropreàl'œilnuetnefrottezjamaissa
surface.Unnettoyageexcessifpourraitendommagerlasurface.
•Pourlenettoyagegénéralducouvercledudôme,ilestrecommandéd'utiliserunproduit
nonabrasif,unsavonneutresanssolvantouundétergentmélangéavecdel'eaupureet
unchiffondouxpropre.Rincezbienàl'eautièdepure.Séchezavecunchiffondouxet
proprepouréviterlestâchesd'eau.
•N'utilisezjamaisdedétergentsagressifs,d'essence,debenzèneoud'acétone,etc.et
éviteztouteexpositiondirecteauxrayonsdusoleilouàdestempératuresélevéeslors
dunettoyage.
25
Page 26

26
Page 27

AXISP55NetworkCameraSeries
FRANÇAIS
Guided’installation
Ceguided'installationexpliquecommentinstallerlacaméradômeréseauAXISP5514/P5515PTZ
survotreréseau.Pourtouteautreinformationrelativeàl’utilisationduproduit,consultezle
manueldel’utilisateurdisponiblesurlesitewww.axis.com
Procéduresd’installation
1.Assurez-vousquelesoutilsetautresmatérielsnécessairesàl'installationsontinclus
dansl'emballage.Cf.page27.
2.Consultezladescriptiondumatériel.Cf.page27.
3.Étudiezlescaractéristiques.Cf.page33.
4.Installezlematériel.Cf.page34.
5.Utilisezleproduit.Cf.page39.
Contenudel’emballage
•CaméradômeréseauAXISP5514/P5515PTZ
•Kitdexationpourplafondsetfauxplafonds
•Couverclededômetransparentnonfumé(prémonté)
•Couverclededômefumé
•Documentsimprimés
-Guided’installation(cedocument)
-Étiquettesupplémentairedenumérodesérie(x2)
-Cléd’authenticationAVHS
Accessoiresenoption
•AccessoiresdemontageAXIST91A
•KitdexationsuspenduAXIST94A03L
Pourplusd'informationssurlesaccessoiresdisponibles,consultezlesitewww.axis.com
Aperçudumatériel
VIS
A AAVIS VIS
Vériezqueledômeestxéenmodedefonctionnement,sinonlamiseaupointpeuten
êtreaffectée.
27
Page 28

AXISP55NetworkCameraSeries
1
6
7
8
9
2
3
4
5
1
Anneaud’étanchéité
2
Couverclesupérieur
3
Dôme
4
Garniturepourcaméradôme
5
Visdelagarniturepourcaméradôme(x8)
6
Voyantd’état
7
Boutondecommande
8
EmplacementpourcarteSD
9
Boutonderedémarrage
28
Page 29
AXISP55NetworkCameraSeries
1
2
3
4
5
6
7
8
9
10
13
12
17
11
14
15
16
FRANÇAIS
1
Plaquedemontage
2
Visdelaplaquedemontage(x3)
3
Brasdusupport(x3)
4
Vis(x3)etrondelle(x3)dubrasdusupport
5
Supportdexation
6
Garniture
7
Câbledesécurité
8
Supportsdel'appareil(x3)
9
Couverclesurlabasedelacaméra
10
11
12
Visducouvercledebasedelacaméra(x4)
Crochetpourcâbledesécurité
Référence(P/N)etnumérodesérie(S/N).Lenumérodesériepeutêtrerequis
pendantl’installation.
13
Passagespourcâble
14
Multiconnecteur(pourversionintérieureuniquement)
15
Visducouverclesupérieur(x4)
16
Couverclesupérieur
17
Jointencaoutchouc
29
Page 30

AXISP55NetworkCameraSeries
Voyants
Voyantd’état
Éteint
VertVertxependant10secondespourindiquerunfonctionnement
OrangeFixependantledémarrage.Clignotependantlamiseàniveau
Orange/RougeClignoteenorange/rougeencasd'indisponibilitéoudeperte
Indication
Branchementetfonctionnementnormal.
normalaprèsledémarrage.
dumicroprogramme.
delaconnexionréseau.
Connecteursetboutons
Pourlescaractéristiquesetlesconditionsd'utilisation,consultezpage33.
Connecteurréseau
ConnecteurEthernetRJ45avecl'alimentationparEthernet(PoE).
VIS
A AAVIS VIS
Leproduitdoitêtreconnectéàl'aided'uncâbleréseaublindé(STP).Touslescâbles
reliantleproduitaucommutateurréseaudoiventêtredestinésàleurusagespécique.
Assurez-vousquelespériphériquesréseausontinstallésconformémentauxinstructions
dufabricant.Pourplusd’informationssurlesexigencesréglementaires,consultez
ElectromagneticCompatibility(EMC)onpage2.
Boutondecommande
Pourconnaîtrel'emplacementduboutondecommande,consultezAperçudumatérielpage27.
Leboutondecommandepermetderéaliserlesopérationssuivantes:
•Réinitialisationduproduitauxparamètresd’usinepardéfaut.Cf.page40.
•ConnexionauserviceduSystèmed'hébergementvidéoAXISouauserviceAXISInternet
DynamicDNS.Pourplusd'informationssurcesservices,reportez-vousauManuelde
l'utilisateur.
Boutonderedémarrage
Appuyezsurleboutonderedémarragepourredémarrerl'appareil.
30
Page 31

AXISP55NetworkCameraSeries
FRANÇAIS
EmplacementpourcarteSD
VIS
A AAVIS VIS
•LacarteSDrisqued'êtreendommagée.Nepasutiliserd'outilstranchantsetnepasforcer
lorsdel'insertionouduretraitdelacarteSD.
•Risquedepertededonnées.Pouréviterlacorruptiondesdonnées,lacarteSDdoitêtre
démontéeavantsonretrait.Pourcefaire,rendez-vousdansSetup>SystemOptions>
Storage>SDCard(Conguration>Optionsdusystème>Stockage>CarteSD)et
cliquezsurUnmount(Démonter).
CetappareilestcompatibleavecunecarteSD/SDHC/SDXC(nonincluse).
PourobtenirdesconseilssurlacarteSD,rendez-voussurwww.axis.com
Câblemulticonnecteurs(venduséparément)
Lorsquevousconnectezunéquipementexterneàl'appareilAxis,uncâblemulticonnecteurs
(disponiblechezAxis)estnécessairepourmaintenirlaprotectionIPdel'appareil.Lecâble
multiconnecteurspeutêtreachetéauprèsd'unrevendeurAxis.
Connectezlecâblemulticonnecteurssurlemulticonnecteurdel'appareil.Pourlocaliserle
multiconnecteur,reportez-vousàAperçudumatérielpage27.Lecâblefournitlesconnecteurs
suivants:
Connecteurd’alimentation-Blocterminalà3brochesutilisépourl'alimentationàl'arrivée.Voir
l'imageci-dessous.Utilisezunesourced'alimentationlimitée(LPS)conformeauxexigencesdeTrès
bassetensiondesécurité(TBTS)dontlapuissancedesortienominaleestlimitéeà≤100Woudont
lecourantdesortienominalestlimitéà≤5A.
Entréeaudio(rose)-Entréede3,5mmpourmicrophonemonoousignalmonoavecentréede
ligne(lecanalgauched'unsignalstéréoestutilisé).
Sortieaudio(verte)-Sortieaudiode3,5mm(niveaudeligne)quipeutêtreconnectéeàun
systèmedesonorisation(PA)ouàunhaut-parleuractifavecamplicateurintégré.Unconnecteur
stéréodoitêtreutilisépourlasortieaudio.
ConnecteurpourterminalE/S-Utilisezavecdespériphériquesexternesassociésauxapplications
tellesquelesalarmesdedétérioration,ladétectiondemouvement,ledéclenchementd'événements,
l'enregistrementàintervallesetlesnoticationsd'alarme.Enplusdupointderéférence0VCCet
del'alimentation(sortieCC),leconnecteurd'E/Sfournituneinterfaceauxélémentssuivants:
•Sortienumérique–Permetdeconnecterdesdispositifsexternes,commedes
relaisoudesvoyants.Lesappareilsconnectéspeuventêtreactivésparl'interface
deprogrammationVAPIX®,lesboutonsdesortiesurlapageLiveView(Vidéoen
direct)ouparunerègled'action.Lasortieestconsidéréecommeétantactive
(afchéedansSystemOptions>Port&Devices>PortStatus(Optionssystème
>Portetpériphériques>Étatduport))siledispositifdel'alarmeestactivé.
31
Page 32

AXISP55NetworkCameraSeries
1 2 3 4 5 6
•Entréenumérique–Entréed'alarmeutiliséepourconnecterdesdispositifs
pouvantpasserd'uncircuitouvertàuncircuitfermé,parexemple:détecteurs
infrarougepassifs,contactsdeporte/fenêtre,détecteursdebrisdeverre,etc.À
laréceptiond'unsignal,l'étatchangeetl'entrées'active(sousSystemOptions
>Port&Devices>PortStatus(Optionsdusystème>Portetdispositifs
>Étatduport)).
FonctionBrocheNotes
0VCC(-)
SortieCC
Congurable
(entréeou
sortie)
Pourunexempledeschéma,consultezSchémasdeconnexionpage33.
Connecteurd'E/S
1
2
3–6
Entrée
d'alimentationCC
Peutserviràalimenterlematériel
auxiliaire.
Remarque:cettebrochenepeutêtre
utiliséequecommesortied’alimentation.
Entréenumérique–Connectez-laàla
broche1pourl’activeroulaissez-laotter
(déconnectée)pourladésactiver.
Sortienumérique-Connectéeàla
broche1lorsqu'elleestactivée,otte
(déconnectée)lorsqu'elleestdésactivée.
Sivousl’utilisezavecunecharge
inductive,parexempleunrelais,une
diodedoitêtreconnectéeenparallèle
aveclacharge,enguisedeprotection
contrelestensionstransitoires.
Entrée
d'alimentationCA
Caractéristiques
3.3VCC
Charge
maximale=
250mA
0à40VCC
0à40VCCmax.,
drainouvert,
100mA
32
Page 33

Schémasdeconnexion
1
2
A
B
FRANÇAIS
Connecteurd’E/S
AXISP55NetworkCameraSeries
1
0VCC(-)
2
SortieCC3,3V,maxi.250mA
A
Entrée/sortieconguréecommeentrée
B
Entrée/sortieconguréecommesortie
Caractéristiquestechniques
Conditionsd’utilisation
Classication
IEC60721-4-3
Classe3K3,3M3
+B38
IEC60068-2
TempératureHumidité
0°Cà50°C
(32°Fà122°F)
Humiditérelativede15à85%
(sanscondensation)
33
Page 34

AXISP55NetworkCameraSeries
Consommationélectrique
VIS
A AAVIS VIS
Utilisezunesourced'alimentationlimitée(LPS)dontlapuissancedesortienominaleest
limitéeà≤100Woudontlecourantdesortienominalestlimitéà≤5A.
PoE
AlimentationparEthernet(PoE)
IEEE802.3af/802.3at
Type1Classe3max.12,95W
CACC
20à28VCC,max.22VA20à24VCA,max.13,5W
Installationdumatériel
VIS
A AAVIS VIS
Fixezleproduitenorientantledômeverslebas.
Liseztouteslesinstructionsavantdepréparerl’installationdelacaméraréseau.Eneffet,de
nombreusesétapesdecettepréparationrequièrentleretraitducouverclesupérieuretilseraitplus
judicieuxdeleseffectuerensemble.
•Avantl’installation,retirezlacaméradesonemballagedeprotection.
•Ceproduitestfourniavecuncouverclededômetransparentclair(prémonté)et
uncouverclededômetransparentfumé.Pourremplacerlecouvercledudôme,
reportez-vousàpage35.
•UnecarteSDstandardouàhautecapacité(nonfournie)peutêtreutiliséepour
sauvegarderdesenregistrementsdansl'appareil.Cf.page36.
•Pourinstallerl'appareilàl'aided'unsupportcompatibleàpartirdesaccessoiresde
montageAXIST91A(vendusséparément),reportez-vousàpage38.
Retirezl’emballagedeprotection
Pourconnaîtrel'emplacementdescomposants,consultezAperçudumatérielpage27.
1.Desserrezlesquatrevisducouverclesupérieurpourleretirer.
2.Retirezl’emballagedeprotection.
34
Page 35

AXISP55NetworkCameraSeries
1
FRANÇAIS
1
Emballagedeprotection
3.Pourremplacerlecouverclededômefumé/nonfumé,voirpage35.Pourinstallerune
carteSD,consultezpage36.
4.Remettezlecouverclesupérieurenplaceetserrezdeuxvisdiamétralementopposéesà
uncouplede<0,7Nmavantdeserrerlesdeuxautresvis.
Remplacementducouvercledudôme
Note
Veillezànepasrayerouendommagerlabulledudôme.Laissez,sipossible,laprotectionen
plastiquesurlecouvercledudômejusqu’àlandel’installation.
Leremplacementducouvercledudômeestnécessaireseulementsivoussouhaitezutiliserle
couverclededômefuméousilecouvercledudômeestrayéouendommagé.Vouspouvezacheter
descouverclesdedômefumésderechangeauprèsdevotrerevendeurAxis.
Pourconnaîtrel'emplacementdescomposants,consultezAperçudumatérielpage27.
1.Desserrezlesvisducouverclesupérieurpourleretirer.
2.Desserrezles8visdel’anneaududôme,puisretirezcedernierducouverclesupérieur.
3.Fixezl’anneauetlabullederemplacementdudômesurlecouverclesupérieur,puis
serrezlesvis(couple0,4à0,6Nm).
4.PourinstallerunecarteSD(nonincluse),reportez-vousàpage36.
5.Remettezlecouverclesupérieurenplaceetserrezdeuxvisopposéesàuncouplede
<0,7Nmavantdeserrerlesautresvis.
35
Page 36

AXISP55NetworkCameraSeries
1
2
Installationd'unecarteSD
VIS
A AAVIS VIS
Pouréviterlacorruptiondesenregistrements,lacarteSDdoitêtredémontéeavantson
éjection.Pourcefaire,rendez-vousdansSetup>SystemOptions>Storage>SDCard
(Conguration>Optionsdusystème>Stockage>CarteSD)etcliquezsurUnmount
(Démonter).
Ilestpossible,enoption,d'installerunecarteSDstandardouàhautecapacité(nonfournie)qui
peutêtreutiliséepourl'enregistrementlocaletlestockageamovible.
Pourconnaîtrel'emplacementdescomposants,consultezAperçudumatérielpage27.
1.Desserrezles4visducouverclesupérieurpourleretirer.
2.InsérezunecarteSD(nonfournie)dansl'emplacementpourcarteSD.
3.Remettezlecouverclesupérieurenplaceetserrezdeuxvisdiamétralementopposéesà
uncouplede<0,7Nmavantdeserrerlesdeuxautres.
Fixationauplafonddelacaméra
1.
Plaquedemontage
2.
Fildesécurité
Installationdelaplaquedemontage:
1.Marquezlesemplacementsdestrousàl’aidedugabaritdeperçagefourni.Utilisezdes
forets,desvisetdeschevillesappropriésaumatériauduplafond.
2.Installationdelaplaquedemontage.
3.Dévissezles4visxantlecouverclesurlabasedelacaméraetretirezlecouverclede
labase.Reportez-vousàVued'ensembledumatérielàlapage29.Veillezànepas
endommagerlescâbleslorsquevouslesconnectez.
4.Acheminezetconnectezlecâbleréseauetlecâblemulticonnecteurs(enoption)lelong
despassagespourcâbleetàtraverslesoricesdanslejointencaoutchouc.
5.Remettezenplacelecouvercledebasedelacaméra,puisserrezlesvis.
6.Sécurisezlacaméraàl'aideducâbledesécuritéfourni.
7.Glissezlessupportsdel'appareilsurlacaméraréseaudanslesfentesdelaplaquede
montageetfaitestournerlacaméra.
36
Page 37

AXISP55NetworkCameraSeries
1
2
2
1
FRANÇAIS
Fixationaufaux-plafond
1.
Dalledeplafond
2.
Diamètredutrou190mm(7,5po)
Note
•Lepoidscumulédelacaméraetdukitdemontageestd'environ2,3kg(5,1lb).
Assurez-vousquelematériauduplafondestsufsammentsolidepoursupportercepoids.
•Ladalledeplafonddoitavoiruneépaisseurcompriseentre5et60mm(0,2et2,4po).
1.Retirezladalledeplafondsurlaquellelaxationpourfaux-plafonddoitêtremontée.
2.Utilisezlegabaritfournipourmarquerl’emplacementdutroude189,5mm(7,5po)dans
laplaquedeplafond.Faitesuntrousuivantlecontourdugabarit.
3.Assemblezlesupportpourinstallationauplafond.
4.Placezlesupportsurlaplaquedeplafond.Reportez-vousàl’illustrationci-dessous.
5.Serrezlesvisdubrasdesupportàl’aided’untournevistorx20.
6.Dévissezles4visxantlecouverclesurlabasedelacaméraetretirezlecouvercledela
base.(reportez-vousàVued'ensembledumatérielàlapage29).
7.Retirezlejointencaoutchoucetacheminezlecâbleréseauetlecâblemulticonnecteurs,
lecaséchéant.Veillezànepasendommagerlescâbleslorsdubranchementàlacaméra
réseau.
1.
Câblemulticonnecteurs
2.
Câbleréseau
8.Remettezenplacelecouvercledebasedelacaméra,puisserrezlesvis.
37
Page 38

AXISP55NetworkCameraSeries
2
1
3
1
9.Sécurisezlacaméraàl'aideducâbledesécuritéfourni.
1.
Dalledeplafond
2.
Supportplafonnier
3.
Câbledesécurité
10.Glissezlessupportsdel'appareilsurlacaméraréseaudanslesfentesdelaplaquede
montageetfaitestournerlacaméra
11.Installezlaplaquedeplafond(aveclacaméradéjàmontée)dansleplafond.
12.Placezlarondelledécorativesurlesupport,puisenclenchez-la.
1.
Garniture
Installationdelacamérasurunsupportmural(venduséparément)
AVERTISSEMENT
•Risquedechocélectrique.Leproduitdoitêtremisàlaterreàl'aided'uncâbledemiseà
laterre.Assurez-vousquelesdeuxextrémitésducâbledemiseàlaterresontencontact
aveclessurfacesdemiseàlaterrecorrespondantes.
1.Installezlesupport(nonfourni)conformémentauxinstructionsfourniesaveclesupport.
S’ils’avèrenécessairedepercer,vériezquelesforets,visetchevillesàutilisersont
appropriéspourlematériau.Consultezlesitewww.axis.compourplusd’informationssur
lesaccessoiresdemontagedisponibles.
2.Sécurisezlacaméraàl'aideducâbledesécuritéfourni.
3.Dévissezlesvisxantlecouverclesurlabasedelacaméraetretirezlecouvercledela
base.
38
Page 39

AXISP55NetworkCameraSeries
1
2
3
FRANÇAIS
1
Vis
2
Supportsderack
3
Câbledesécurité
Note
•Veillezànepasendommagerlescâbleslorsquevouslesconnectez.
•Assurez-vousquelestrousdujointenmoussesontalignésaveclesporte-câbleset,lecas
échéant,retirezlapiècedécoupéeducâblemulticonnecteurssurlejointenmousse.
4.Connectezlecâbleréseauetlecâblemulticonnecteurs(vendusséparément),lecas
échéant,àlacaméra.
5.Retournezlessupportsdescâblespourmaintenirlescâblesenplace.
6.Remettezlecouverclesurlabasedelacaméradanssapositiond'origineetserrezles
vis(couple1,5Nm).
7.Glissezlessupportsdel'appareilsurlacaméraréseaudanslesfentesdusupportde
montageetfaitestournerlacaméra.
8.Sécurisezlacaméraréseausurlesupportdemontageenserrantlesvis.
Utilisezleproduit
SivoussouhaitezrechercherdesproduitsAxissurleréseauouleuraffecterdesadresses
IPsousWindows®,nousrecommandonsl’utilisationdesapplicationsAXISIPUtilityet
AXISCameraManagement.Cesdeuxapplicationssontgratuitesetpeuventêtretéléchargées
depuiswww.axis.com/techsup
Leproduitpeutêtreutiliséaveclaplupartdessystèmesd’exploitationetdesnavigateurs.Les
navigateursrecommandéssont
•InternetExplorer
•Safari
®
avecOSX
®
avecWindows
®
®
,
39
Page 40

AXISP55NetworkCameraSeries
•Chrome
Pourplusd’informationsconcernantl’utilisationduproduit,consultezlemanueldel’utilisateur
disponiblesurlesitewww.axis.com
TM
ouFirefox
®
aveclesautressystèmesd'exploitation.
Réinitialisationauxparamètresd’usinepardéfaut
Important
Laréinitialisationauxparamètrespardéfautdoitêtreutiliséeavecprudence.Cette
opérationreconguretouslesparamètres,ycomprisl’adresseIP,auxvaleursd’usinepar
défaut.
Note
Leslogicielsd’installationetdegestionsontdisponiblessurlespagesd’assistancedu
sitewww.axis.com/techsup
Pourréinitialiserl’appareilauxparamètresd’usinepardéfaut:
1.Appuyezsurleboutondecommandeetleboutonderedémarrageenmêmetempset
maintenez-lesenfoncés.
2.Relâchezleboutonderedémarragetoutenmaintenantleboutondecommandeenfoncé
pendant15à30secondes,jusqu'àcequelevoyantclignoteenorange.
3.Relâchezleboutondecommande.Leprocessusestterminélorsquelevoyantd’étatpasse
auvert.Lesparamètresd’usinepardéfautdel’appareilontétérétablis.Enl’absenced’un
serveurDHCPsurleréseau,l’adresseIPpardéfautest192.168.0.90.
4.Utilisezlesoutilsd’installationetdegestionpourattribueruneadresseIP,congurerle
motdepasseetaccéderauuxdedonnéesvidéo.
Ilestégalementpossiblederétablirlesparamètresd’usineàpartirdel’interfaceWeb.Accédezà
Setup>SystemOptions>Maintenance(Conguration>Optionsdusystème>Maintenance).
Pourobtenirplusderenseignements
LeManueldel’utilisateurestdisponibleàl’adressesuivante:www.axis.com
Consultezlesitewww.axis.com/techsuppourvériersiunemiseàjourdumicroprogrammeest
disponiblepourvotreappareilréseau.Pourconnaîtrelaversiondumicroprogrammeactuellement
installée,reportez-vousàlapageSetup>About(Conguration>Àproposde).
VisitezlecentredeformationenligneAxissurlesitewww.axis.com/academypourensavoirplus
surlesformations,leswebinaires,lestutorielsetlesguides.
40
Page 41

AXISP55NetworkCameraSeries
FRANÇAIS
Informationssurlagarantie
PourobtenirdeplusamplesinformationssurlagarantieduproduitAXISetdesrenseignements
connexes,allezsurlesitewww.axis.com/warranty/
41
Page 42

42
Page 43

AXISP55NetworkCameraSeries
DEUTSCH
Sicherheitsinformation
LesenSiedasInstallationshandbuchsorgfältigdurchbevorsiedasProduktinstallieren.Bewahren
SiedasInstallationshandbuchfürzukünftigeZweckeauf.
Gefährdungsstufen
GEFAHRWeistaufeinegefährlicheSituationhin,die,fallsnichtverhindert,
WARNUNGWeistaufeinegefährlicheSituationhin,welche,fallsnicht
VORSICHTWeistaufeinegefährlicheSituationhin,welche,fallsnicht
HINWEIS
HINWEIS HINWEIS
zuTododerschwerenVerletzungenführt.
verhindert,zuTododerschwerenVerletzungenführenkann.
verhindert,zugeringfügigerodermäßigerVerletzungführenkann.
WeistaufeinegefährlicheSituationhin,welche,fallsnicht
verhindert,zuSachschädenführenkann.
WeitereNachrichtenstufen
WichtigWeistaufwichtigeInformationenhin,diedenrichtigenBetrieb
BeachtenWeistaufnützlicheInformationenhin,diedieoptimale
desProduktsgewährleisten.
VerwendungdesProduktsunterstützen.
43
Page 44

AXISP55NetworkCameraSeries
Sicherheitsanweisungen
HINWEIS
HINWEIS HINWEIS
•DieAnwendungdesAxisProduktsmussunterBeachtungderörtlichgeltendenrechtlichen
Bestimmungenerfolgen.
•BeiderAnwendungvonAxisProduktenimAußenbereichoderähnlichenUmgebungen,
müssendieseinzugelassenenAußengehäuseninstalliertwerden.
•LagernSiedasAxisProduktineinertrockenenundbelüftetenUmgebung.
•AchtenSiedarauf,dassdasAxisProduktwederStößennochstarkemDruckausgesetztist.
•InstallierenSiedasProduktnichtaninstabilenHalterungen,OberächenoderWänden.
•VermeidenSie,dassSiedieKameradirektindieSonneoderanderehochintensive
Strahlungsquellenausrichten,dadiesSchädenanderKameraverursachenkann.
•VerwendenSiebeiderInstallationdesAxisProduktsausschließlichpassendeWerkzeuge.
EinzugroßerKraftaufwandmitelektrischenWerkzeugenkanndasProduktbeschädigen.
•VerwendenSiekeinechemischen,ätzendenoderaerosolhaltigenReinigungsmittel.
•VerwendenSiezumReinigeneinsauberes,mitlauwarmemWasserangefeuchtetesTuch.
•VerwendenSienurZubehör,dasdentechnischenDatendesProduktsentspricht.Dieses
istvonAxisoderDrittanbieternerhältlich.
•VerwendenSieausschließlichErsatzteiledievonAxisbereitgestelltoderempfohlen
werden.
•VersuchenSienicht,dasProduktselbstständigzureparieren.WendenSiesichbezüglich
ReparaturundWartungandenAxisSupportoderIhrenAxisHändler.
•VermeidenSie,dassSiedieKameradirektindieSonneoderanderehochintensive
Strahlungsquellenausrichten,dadiesSchädenanderKameraverursachenkann.
Transport
HINWEIS
HINWEIS HINWEIS
•BewahrenSiedieSchutzverpackungauf.BeiBedarfAxisProduktinderOriginalverpackung
transportieren.
•BeiBedarftransportierenSiedasAxisProduktinderOriginalverpackungodereiner
entsprechendenVerpackung,sodassSchädenvermiedenwerden.
Batterie
DasAxis-Produktistmiteiner3,0V-BR/CR2032-Lithium-Batterieausgestattet,mitderdieinterne
Echtzeituhr(RTC)versorgtwird.UnternormalenBedingungenhatdieBatterieeineLebensdauer
vonmindestensfünfJahren.
44
Page 45

AXISP55NetworkCameraSeries
DEUTSCH
BeientladenerBatterieistderBetriebderEchtzeituhrnichtmehrgewährleistet,sodassdieUhrbei
jedemSystemstartzurückgesetztwird.SieerhalteneineProtokollnachrichtimServerberichtdes
Produkts,wenneinBatteriewechselerforderlichist.WeitereInformationenüberdenServerbericht
ndenSieaufdenSetup-SeitendesProdukts,oderwendenSiesichandenAxisSupport.
DieBatteriesolltenurbeiBedarfersetztwerden.WendenSiesichindiesemFallandenAxis
Supportunterwww.axis.com/techsup.
WARNUNG
•ExplosionsgefahrbeifehlerhaftemBatteriewechsel.
•DieBatteriedarfnurdurcheineidentischeBatterieodereinevonAxisempfohlene
Batterieersetztwerden.
•VerbrauchteBatteriensindgemäßdenörtlichenVorschriftenoderdenAnweisungendes
Herstellerszuentsorgen.
Kuppelabdeckung
HINWEIS
HINWEIS HINWEIS
•AchtenSiedaraufdieKuppelabdeckungwederzuzerkratzen,zubeschädigenoderdarauf
Fingerabdrückezuhinterlassen,dadiesdieBildqualitätbeeinträchtigenkann.Falls
möglichentfernenSiedieSchutzfolieerstnachdemdieInstallationabgeschlossenist.
•SäubernSieniemalseineKuppelabdeckung,wenndiesesaubererscheint,undpolierenSie
keinesfallsdieOberäche.ZuhäugesSäubernkanndieOberächebeschädigen.
•FürdienormaleReinigungderKuppelabdeckungwerdeneinenicht-scheuernde,
lösungsmittelfreieneutraleSeifeodereinentsprechendesReinigungsmittelmit
destilliertemWasserundeinsauberer,weicherLappenempfohlen.SpülenSiedie
KuppelabdeckunggründlichmitlauwarmemdestilliertemWasserab.TrocknenSiedie
Kuppelabdeckungmiteinemweichen,sauberenLappen,umWassereckenzuvermeiden.
•VerwendenSieniemalsstarkeReinigungsmittel,Benzin,BenzoloderAcetonetc.
undvermeidenSie,dieKuppelabdeckungimdirektenSonnenlichtoderbeierhöhten
Temperaturenzusäubern.
45
Page 46

46
Page 47

AXISP55NetworkCameraSeries
DEUTSCH
Installationsanleitung
IndieserAnleitungwirddieInstallationderAXISP5514/P5515PTZ-Dome-Netzwerk-Kamerain
IhremNetzwerkbeschrieben.WeitereInformationenzurNutzungdiesesProduktsndenSieim
Benutzerhandbuchunterwww.axis.com.
Installationsschritte
1.StellenSiesicher,dassdiePackungsinhalte,Werkzeugeundanderenotwendige
MaterialienfürdieInstallationinOrdnungsind.SieheSeite47.
2.MachenSiesichmitderHardware-Übersichtvertraut.SieheSeite47.
3.MachenSiesichmitdentechnischenDatenvertraut.SieheSeite53.
4.InstallierenSiedieHardware.SieheSeite54.
5.GreifenSieaufdasProduktzu.SieheSeite60.
Lieferumfang
•AXISP5514/P5515PTZ-Dome-Netzwerk-Kamera
•MontagesatzfürdieBefestigunganMassivdeckenundabgehängtenDecken
•Klare,transparenteKuppelabdeckung(vormontiert)
•GetönteKuppelabdeckung
•GedruckteDokumente
-Installationsanleitung(diesesDokument)
-ZusätzlicheEtikettenmitderSeriennummer(2x)
-AVHS-Authentizierungsschlüssel
OptionalesZubehör
•AXIST91AMontagezubehör
•AXIST94A03LSatzfürdieversenkteMontage
Unterwww.axis.comndenSieInformationenüberverfügbaresZubehör.
ÜbersichtüberdieHardware
HINWEIS
HINWEIS HINWEIS
StellenSiesicher,dassdieKuppelbeiBetriebangebrachtist,andernfallskannderFokus
beeinträchtigtsein.
47
Page 48

AXISP55NetworkCameraSeries
1
6
7
8
9
2
3
4
5
1
Dichtungsring
2
ObereAbdeckung
3
Kuppel
4
Kuppelring
5
Kuppelringschrauben(8x)
6
LED-Statusanzeige
7
Steuertaste
8
SD-Kartensteckplatz
9
Neustart-Taste
48
Page 49

AXISP55NetworkCameraSeries
1
2
3
4
5
6
7
8
9
10
13
12
17
11
14
15
16
DEUTSCH
1
Montageplatte
2
SchraubenfürdieMontageplatte(3x)
3
Halterungsarm(3x)
4
Halterungsarmschrauben(3x)undUnterlegscheiben(3x)
5
Montagehalterung
6
Klemmansch
7
Sicherheitsdraht
8
Gerätehalter(3x)
9
Kamera-Grundplatte
10
11
12
SchraubenfürdieKamera-Grundplatte(4x)
HakenfürSicherheitsdraht
Bestellnummer(P/N)undSeriennummer(S/N).DieSeriennummerwird
möglicherweisefürdieInstallationbenötigt.
13
Kabelführungen
14
Mehrfachanschluss(nurModellfürdenInnenbereich)
15
SchraubenfürobereAbdeckung(4x)
16
ObereAbdeckung
17
Gummidichtung
49
Page 50

AXISP55NetworkCameraSeries
LEDs
Status-LED
LeuchtetnichtAnschlussundNormalbetrieb
GrünLeuchtetbeiNormalbetriebnachAbschlussdesStartvorgangs
GelbLeuchtetbeimStart.BlinktbeiderFirmware-Aktualisierung.
Gelb/rotBlinktgelb/rot,wenndieNetzwerkverbindungnichtverfügbar
Bedeutung
10Sekundenlanggrün.
istoderunterbrochenwurde.
AnschlüsseundTasten
FürdietechnischenDatenundBetriebsbedingungensieheSeite53.
Netzwerkanschluss
RJ-45-EthernetanschlussmitPoweroverEthernet(PoE).
HINWEIS
HINWEIS HINWEIS
DasProduktmussmiteinemabgeschirmtenNetzwerkkabel(STP)angeschlossenwerden.
AlleKabel,diedasProduktmitdemNetzwerkswitchverbinden,müssenhierfürausgelegt
sein.StellenSiesicher,dassdieNetzwerkgerätegemäßdenAnweisungendesHerstellers
installiertwurden.InformationenzugesetzlichenBestimmungenndenSieunter
ElectromagneticCompatibility(EMC)onpage2.
Steuertaste
DieSteuertastebendetsichanfolgenderStelle:ÜbersichtüberdieHardwareaufSeite47.
DieSteuertastehatfolgendeFunktionen:
•ZurücksetzendesProduktsaufdieWerkseinstellungen.SieheSeite60.
•VerbindenmiteinemAXISVideoHostingSystem-ServiceodereinemAXISInternet
DynamicDNS-Service.WeitereInformationenzudiesenDienstenndenSieinder
Bedienungsanleitung.
Neustart-Taste
DrückenSiedieNeustart-Taste,umdasProduktneuzustarten.
50
Page 51

AXISP55NetworkCameraSeries
DEUTSCH
SD-Kartensteckplatz
HINWEIS
HINWEIS HINWEIS
•GefahrvonSchädenanderSD-Karte.VerwendenSiebeimEinlegenoderEntfernender
SD-Kartekeinescharfen/spitzenWerkzeugeundwendenSienichtzuvielKraftan.
•GefahrvorDatenverlust.UmeinerBeschädigungderAufnahmenvorzubeugen,solltedie
SD-KartevordemmechanischenAuswerfengetrenntwerden.RufenSiezumTrennen
Setup>SystemOptions>Storage>SDCard(Einrichtung>Systemoptionen>
Speicher>SD-Karte)aufundklickenSieaufUnmount(Trennen).
DiesesProduktunterstütztSD-/SDHC-/SDXC-Karten(separaterhältlich).
EmpfehlungenzuSD-KartenndenSieunterwww.axis.com.
Mehrfachanschlusskabel(separaterhältlich)
WennSieeinexternesGerätmiteinemAxisProduktverbindenmöchten,istein
Mehrfachanschlusskabel(beiAxiserhältlich)erforderlich,umdieIP-SchutzklassedesProdukteszu
erhalten.DasMehrfachanschlusskabelkönnenSiebeiIhremAxisHändlererwerben.
SchließenSiedasMehrfachanschlusskabelandenMehrfachanschlussdesProduktesan.
InformationenzurPositiondesMehrfachanschlussesndenSieunterÜbersichtüberdieHardware
aufSeite47.DasKabelweistfolgendeAnschlüsseauf:
Netzanschluss-3-poligerAnschlussblockfürdieStromversorgung.SieheDiagrammweiterunten.
VerwendenSieeinemitdenAnforderungenfürSchutzkleinspannung(SELV)kompatibleStromquelle
mitbegrenzterLeistung(LPS),entwedermiteinerNennausgangsleistungvon≤100Wodereinem
dauerhaftauf≤5AbegrenztenNennausgangsstrom.
Audio-Eingang(rosa)-3,5-mm-AnschlussfüreinMonomikrofonodereinMonosignal(linker
KanalwirdvoneinemStereosignalbenutzt).
Audio-Ausgang(grün)-3,5-mm-Audio-Ausgang(Leistungsstufe)zumAnschließeneiner
Rundrufanlage(PA)odereinesAktivlautsprechersmitintegriertemVerstärker.Fürden
Audio-AusgangmusseinStereo-Steckerbenutztwerden.
E/A-Anschluss-ZurVerwendungmitexternenGeräteninVerbindungmitManipulationsalarmen,
Bewegungserkennung,Ereignisauslösung,Zeitrafferaufnahmen,Alarmbenachrichtigungen
usw.Abgesehenvom0VDC-BezugspunktundStrom(Gleichstromausgang)verfügtdie
E/A-KlemmenleisteübereineSchnittstellezu:
•Digitalausgang–zumAnschlussexternerGerätewieRelaisundLEDs.
AngeschlosseneGerätekönnenüberdieVAPIX®ApplicationProgramming
Interface(Programmierschnittstelle)überdieSchaltächenfürdenAusgang
aufderSeite„LiveView”oderdurcheineAktionsregelaktiviertwerden.Der
Ausgangwirdalsaktiviert(sieheSystemOptions>Ports&Devices>Port
Status(Systemoptionen>Ports&Geräte>PortStatus))angezeigt,wenn
dasAlarmmeldegeräteingeschaltetist.
51
Page 52

AXISP55NetworkCameraSeries
1 2 3 4 5 6
•Digitaleingang–AlarmeingangfürdenAnschlussvonGeräten,diezwischen
geöffnetemundgeschlossenemSchaltkreiswechselnkönnen,z.B.:PIR-Kameras,
Tür-/Fensterkontakte,Glasbruchmelderusw.BeiEmpfangeinesSignalsändert
sichderStatusundderEingangwirdaktiviert(sieheSystemOptions>Ports&
Devices>PortStatus(Systemoptionen>Ports&Geräte>PortStatus)).
FunktionKontaktHinweiseTechnische
0VDC(-)
Gleichstro-
mausgang
Kongurierbar(Ein-oder
Ausgang)
EinBeispielschaltbildndenSieunterAnschlussschaltbilderaufSeite53.
E/A-Anschluss
1
2
3–6
Gleichstromeingang
KannfürdieStromversorgungvon
Zusatzgerätenverwendetwerden.
Hinweis:DieserKontaktkannnurfürden
Stromausgangverwendetwerden.
Digitaleingang–zumAktivierenmit
Pin1verbinden;zumDeaktivierennicht
anschließen.
Digitalausgang–beiAktivierungmit
Pin1verbunden;wenndeaktiviert:frei
(nichtverbunden).BeiVerwendung
miteinerinduktivenLast,z.B.einem
Relais,mussparallelzurLastzum
SchutzvorSpannungsspitzeneineDiode
zwischengeschaltetwerden.
Wechselstromeingang
Daten
3,3VDC
Max.
Stromstärke=
250mA
0bismax.40VDC
0bismax.40VDC,
OpenDrain,
100mA
52
Page 53

AXISP55NetworkCameraSeries
1
2
A
B
DEUTSCH
Anschlussschaltbilder
E/A-Anschluss
1
0V(-)DC
2
DC-Ausgang3,3V,max.250mA
A
E/AalsEingangkonguriert
B
E/AalsAusgangkonguriert
TechnischeDaten
Betriebsbedingungen
Klassikation
IEC60721-4-3
Klasse3K3,3M3
+B38
IEC60068-2
Temperatur
0°Cbis50°C
Luftfeuchtigkeit
RelativeLuftfeuchtigkeit15bis
85%(nichtkondensierend)
53
Page 54

AXISP55NetworkCameraSeries
Stromverbrauch
HINWEIS
HINWEIS HINWEIS
VerwendenSieeineStromquellemitbegrenzterLeistung(LPS),entwedermiteiner
Nennausgangsleistungvon≤100Wodereinemdauerhaftauf≤5Abegrenzten
Nennausgangsstrom.
PoEWechselstrom
PoweroverEthernet(PoE)
IEEE802.3af/802.3at
Typ1Klasse3max.12,95W
20bis28VDC,max.22VA20bis24VAC,max.13,5W
Gleichstrom
InstallierenderHardware
HINWEIS
HINWEIS HINWEIS
BefestigenSiedasProduktmitderKuppelnachunten.
LesenSiezunächstalleAnweisungen,bevorSiemitderInstallationsvorbereitungder
Netzwerk-Kamerabeginnen.BeieinigenVorbereitungsschrittenmussdieobereAbdeckung
abgenommenwerden,sodassessinnvollist,dieseSchrittezusammendurchzuführen.
•EntfernenSievorderInstallationderKameradieTransportsicherung.
•DasProduktwirdmiteinertransparentenKlarglas-Kuppelabdeckung(vormontiert)und
einerRauchglas-Kuppelabdeckunggeliefert.WeitereInformationenzumAustauschder
KuppelabdeckungndenSieunterSeite55.
•EineStandard-oderSD-KartemithoherKapazität(nichtenthalten)kannverwendet
werden,umAufnahmendirektaufdemProduktzuspeichern.SieheSeite56.
•WeitereInformationenzurInstallationdesProduktsmiteinerkompatiblenHalterungdes
AXIST91AMontagezubehörs(separaterhältlich)ndenSieunterSeite59.
EntfernenSiedieTransportsicherung.
DiePositionderKomponentenndenSieunterÜbersichtüberdieHardwareaufSeite47.
1.LösenSiedievierSchraubenderoberenAbdeckungundnehmenSiedieAbdeckungab.
2.EntfernenSiedieTransportsicherung.
54
Page 55

AXISP55NetworkCameraSeries
1
DEUTSCH
1
Transportsicherung
3.WeitereInformationenzumAustauschenderklaren/getöntenKuppelabdeckungnden
SieunterSeite55.WeitereInformationenzurInstallationeinerSD-Speicherkartenden
SieunterSeite56.
4.BringenSiedieobereAbdeckungwiederanderursprünglichenPositionanundziehen
SiezuerstdiediagonalgegenüberliegendenSchrauben(Anzugsmoment<0,7Nm)und
danndieanderenbeidenSchraubenfest.
AustauschenderKuppelabdeckung
Beachten
AchtenSiedarauf,dieKuppelabdeckungnichtzuzerkratzenoderzubeschädigen.Falls
möglich,entfernenSiedieSchutzfolieerstnachAbschlussderInstallation.
DerAustauschderKuppelabdeckungistnurerforderlich,wennSiediegetönteKuppelabdeckung
verwendenmöchten,dieKuppelabdeckungzerkratztistoderRissehat.Ersatz-Kuppelabdeckungen
erhaltenSievonIhremAxisHändler.
DiePositionderKomponentenndenSieunterÜbersichtüberdieHardwareaufSeite47.
1.LösenSiedieSchraubenderoberenAbdeckungundnehmenSiedieAbdeckungab.
2.LösenSiedie8SchraubendesKuppelringsundentfernenSiedenKuppelringvonder
oberenAbdeckung.
3.BringenSiedenKuppelringunddieErsatz-KuppelabdeckunganderoberenAbdeckungan
undbefestigenSiediese,indemSiedieSchraubenanziehen(Drehmoment0,4bis0,6Nm).
4.WeitereInformationenzurInstallationeinerSD-Karte(nichtimLieferumfangenthalten)
ndenSieunterSeite56.
5.BringenSiedieobereAbdeckungwiederanderursprünglichenPositionanundziehen
SiezuerstdiebeidendiagonalgegenüberliegendenSchrauben(Drehmoment<0,7Nm)
unddanndieanderenSchraubenfest.
55
Page 56

AXISP55NetworkCameraSeries
1
2
InstallationeinerSD-Karte
HINWEIS
HINWEIS HINWEIS
UmeinerBeschädigungderAufnahmenvorzubeugen,solltedieSD-Kartegetrenntwerden,
bevordieseausgeworfenwird.RufenSiezumTrennenSetup>SystemOptions>Storage
>SDCard(Einrichtung>Systemoptionen>Speicher>SD-Karte)aufundklickenSie
aufUnmount(Trennen).
SiekönnenfürAufzeichnungenaufWechelspeichermedienoptionaleineStandard-odereine
SD-SpeicherkartemithoherKapazität(nichtenthalten)installieren.
DiePositionderKomponentenndenSieunterÜbersichtüberdieHardwareaufSeite47.
1.LösenSiedie4SchraubenderoberenAbdeckungundnehmenSiedieAbdeckungab.
2.SchiebenSiedieSD-Karte(nichtenthalten)indenSD-Karteneinschub.
3.BringenSiedieobereAbdeckungwiederanderursprünglichenPositionanundziehen
SiezuerstdiediagonalgegenüberliegendenSchrauben(Anzugsmoment<0,7Nm)und
danndieanderenSchraubenfest.
HalterungfürMassivdecken
1.
Montageplatte
2.
Sicherungsdraht
InstallierenderMontageplatte:
1.MarkierenSiediePositionderBohrlöchermithilfedermitgeliefertenBohrschablone.
DieverwendeteBohrerspitzen,SchraubenundDübelmüssenfürdasDeckelmaterial
geeignetsein.
2.InstallierenSiedieMontageplatte.
3.LösenSiedie4BasisdeckelschraubenderKameraundentfernenSiedenBasisdeckel.
SieheHardwareübersichtaufSeite49.AchtenSiebeimVerbindenderKabeldarauf,
diesenichtzubeschädigen.
4.VerlegenSiedasNetzwerkkabelunddasMehrfachanschlusskabel(optional)anden
KabelbahnenunddurchdieÖffnungeninderGummidichtungundschließenSiediesean.
5.BefestigenSiedenBasisdeckelderKamerawiederanseinemPlatzundziehenSiedie
Schraubenan.
6.SichernSiedieKameramitdemmitgeliefertenSicherheitsdraht.
56
Page 57

AXISP55NetworkCameraSeries
1
2
DEUTSCH
7.SchiebenSiedieSteuerungshalterderNetzwerkkameraindieÖffnungender
MontageplatteundrotierenSiedieKameraeinheit.
HalterungfürabgehängteDecken
1.
Deckenplatte
2.
Lochdurchmesser190mm
Beachten
•DasGesamtgewichtvonKameraundDeckenhalterungbeträgtetwa2,3kg.Vergewissern
Siesich,dassdasDeckenmaterialstabilgenugist,umdiesesGewichtzutragen.
•DieDeckenplattesollte5bis60mmdicksein.
1.EntfernenSiedieDeckenplatte,indiedieHalterungfürabgehängteDeckeneingelassen
werdensoll.
2.MarkierenSiemithilfedermitgeliefertenSchablonediePositionder189,5-mm-Öffnung
inderDeckenplatte.SchneidenSiedieÖffnungentlangderSchabloneaus.
3.MontierenSieDeckenhalterung.
4.BringenSiedieDeckenhalterunganderDeckenplattean.SieheAbbildungweiterunten.
5.ZiehenSiedieSchraubendesHalterungsarmsmiteinemTorx-SchraubendreherT20fest.
6.LösenSiedie4BasisdeckelschraubenderKameraundentfernenSiedenBasisdeckel.
(sieheHardwareübersichtaufSeite49).
7.EntfernenSiedieGummidichtungundverlegenSiedasNetzwerkkabelunddas
Mehrfachanschlusskabel(beiBedarf).AchtenSiedarauf,dieKabelbeimAnschließenan
dieNetzwerk-Kameranichtzubeschädigen.
57
Page 58

AXISP55NetworkCameraSeries
2
1
2
1
3
1
1.
Mehrfachanschlusskabel
2.
Netzwerkkabel
8.BefestigenSiedenBasisdeckelderKamerawiederanseinemPlatzundziehenSiedie
Schraubenan.
9.SichernSiedieKameramitdemmitgeliefertenSicherheitsdraht.
1.
Deckenplatte
2.
Deckenhalterung
3.
Sicherheitsdraht
10.SchiebenSiedieSteuerungshalterderNetzwerkkameraindieÖffnungender
MontageplatteundrotierenSiedieKameraeinheit.
11.BefestigenSiedieDeckenplattemitdermontiertenKamerainderDecke.
12.PlatzierenSiedenKlemmanschüberderDeckenhalterungundrastenSieihnein.
1.
Klemmansch
58
Page 59

AXISP55NetworkCameraSeries
1
2
3
DEUTSCH
AnbringenderKameraaneinerHalterung(separaterhältlich)
WARNUNG
•Stromschlaggefahr.DasProduktsolltemiteinemErdungskabelgeerdetwerden.
SorgenSiedafür,dassbeideEndendesErdungskabelsKontaktmitdenentsprechenden
Erdungsächenhaben.
1.InstallierenSiedieHalterung(nichtenthalten)entsprechendderHalterungsanleitung.
FallsdasBohrenvonLöchernerforderlichist,stellenSiesicher,dassdieBohrer,Schrauben
undDübelfürdenBaustoffderWand/Deckegeeignetsind.Unterwww.axis.comnden
SieInformationenüberverfügbaresMontagezubehör.
2.SichernSiedieKameramitdemmitgeliefertenSicherheitsdraht.
3.LösenSiedieSchraubenderKamera-GrundplatteundentfernenSiedieGrundplatte.
1
Schraube
2
AussparungenfürKamerabefestigungen
3
Sicherheitsdraht
Beachten
•AchtenSiebeimVerbindenderKabeldarauf,diesenichtzubeschädigen.
•VergewissernSiesich,dassdieSchaumstoffdichtungslöcherandenKabelbahnen
ausgerichtetsind.EntfernenSiebeiBedarfdieAusschnittefürdasMulti-Verbindungskabel
ausderSchaumstoffdichtung.
4.SchließenSiedasNetzwerkkabelunddasMehrfachanschlusskabel(separaterhältlich)
andieKameraan.
5.DrehenSiedieKabelhalter,umdieKabelamPlatzzuhalten.
6.BefestigenSiedenBasisdeckelderKamerawiederanseinenPlatzundziehendie
Schraubenan(Drehmoment1,5Nm).
59
Page 60

AXISP55NetworkCameraSeries
7.SchiebenSiedieGerätehalterungderNetzwerkkameraindieÖffnungender
MontagehalterungunddrehenSiedieKameraeinheit.
8.BefestigenSiedieNetzwerkkameraanderWandhalterung,indemSiedieSchrauben
festziehen.
ZugriffaufdasProdukt
FürdieSuchenachAxisProduktenimNetzwerkundzurZuweisungeinerIP-Adresseunter
Windows®werdenAXISIPUtilityundAXISCameraManagementempfohlen.BeideAnwendungen
sindkostenlosundkönnenvonunsererWebsiteunterwww.axis.com/techsupheruntergeladen
werden.
DasProduktistmitdenmeistenStandard-BetriebssystemenundBrowsernkompatibel.Empfohlen
werdendieBrowser
•InternetExplorer
•Safari
•Chrome
WeitereInformationenzurNutzungdiesesProduktsndenSieimBenutzerhandbuchunter
www.axis.com.
®
unterOSX
TM
®
unterWindows
®
oderFirefox
®
unteranderenBetriebssystemen
®
ZurücksetzenaufWerkseinstellungen
Wichtig
DasZurücksetzenaufdieWerkseinstellungensolltemitVorsichtverwendetwerden.Beim
ZurücksetzenaufdieWerkseinstellungenwerdenalleEinstellungeneinschließlichder
IP-AdresseaufdieWerkseinstellungenzurückgesetzt.
Beachten
DieSoftware-ToolsfürInstallationundVerwaltungsindüberdieSupportseitenunter
www.axis.com/techsupverfügbar.
SowirddasProduktaufdieWerkseinstellungenzurückgesetzt:
1.HaltenSiedieSteuertasteunddieNeustarttastegleichzeitiggedrückt.
2.LassenSiedieNeustarttastelos,haltenSiedieSteuertastejedochfürweitere15bis30
Sekundengedrückt,bisdieLED-Statusanzeigegelbblinkt.
3.LassenSiedieSteuertastelos.DerVorgangistabgeschlossen,wenndie
LED-Statusanzeigegrünleuchtet.DasProduktwurdeaufdieWerkseinstellungen
zurückgesetzt.WennkeinDHCP-ServerimNetzwerkverfügbarist,lautetdie
Standard-IP-Adresse192.168.0.90.
4.VerwendenSiedieSoftware-ToolsfürInstallationundVerwaltung,umeineIP-Adresse
zuzuweisen,einKennworteinzurichtenundaufdenVideostreamzuzugreifen.
60
Page 61

AXISP55NetworkCameraSeries
DEUTSCH
DieParameterkönnenauchüberdieWeboberächeaufdieWerkseinstellungenzurückgesetzt
werden.RufenSieSetup>SystemOptions>Maintenance(Setup>Systemoptionen>
Wartung)auf.
WeitereInformationen
DasBenutzerhandbuchndenSieunterwww.axis.com.
Unterwww.axis.com/techsupndenSieFirmware-AktualisierungenfürIhreNetzwerkprodukte.Um
dieaktuellinstallierteFirmware-Versionzusehen,gehenSieaufEinrichten>Über.
BesuchenSiedasAxis-Schulungszentrumwww.axis.com/academyfüranregendeSchulungen,
Webinare,LernprogrammeundAnleitungen.
Gewährleistungsinformationen
InformationenzurGewährleistungderAxisProdukteundandere,hierzurelevanteInformationen,
ndenSieunterwww.axis.com/warranty/
61
Page 62

62
Page 63

AXISP55NetworkCameraSeries
ITALIANO
Informazionidisicurezza
Leggereconattenzionequestaguidaall'installazioneprimadiinstallareildispositivo.Conservare
questodocumentoperusifuturi.
Livellidipericolo
PERICOLO
AVVERTENZAIndicaunasituazionepericolosache,senonevitata,puòprovocare
ATTENZIONE
VVISO
A AAVVISO VVISO
Indicaunasituazionepericolosache,senonevitata,provocamorte
olesionigravi.
lamorteolesionigravi.
Indicaunasituazionepericolosache,senonevitata,puòprovocare
lesionimedieominori.
Indicaunasituazioneche,senonevitata,puòdanneggiarela
proprietà.
Altrilivellidimessaggio
ImportanteIndicainformazioniimportanti,essenzialiperilcorretto
NotaIndicainformazioniutilicheaiutanoaottenereilmassimodal
funzionamentodeldispositivo.
dispositivo.
63
Page 64

AXISP55NetworkCameraSeries
Istruzionidisicurezza
VVISO
A AAVVISO VVISO
•IldispositivoAxisdeveessereutilizzatoinconformitàalleleggiealledisposizionilocali.
•PerutilizzareildispositivoAxisinambientiesterni,oinambientisimili,deveessere
installatoinunacustodiaperesterniapprovata.
•ConservareildispositivoAxisinunambienteasciuttoeventilato.
•EvitarediesporreildispositivoAxisaurtiopressionieccessive.
•Noninstallareildispositivosusupporti,supercioparetiinstabili.
•Nonpuntarel'obiettivodellatelecameraversoilsoleoaltresorgentidiradiazioniadalta
intensità,perchéquestopotrebbecausaredanniallatelecamera.
•UtilizzaresolostrumentiapplicabiliquandosiinstallaildispositivoAxis.Sesiutilizzauna
forzaeccessivaconglistrumentidell'alimentazioneèpossibilecausaredannialdispositivo.
•Nonutilizzaresostanzechimiche,agenticausticiodetergentiaerosol.
•Utilizzareunpannopulitoinumiditoinacquapuraperlapulizia.
•Utilizzaresoloaccessoricompatibiliconlespecichetecnichedeldispositivo.Questi
possonoesserefornitidaAxisodaterzeparti.
•UtilizzaresolopartidiricambioforniteoconsigliatedaAxis.
•Nontentarediriparareildispositivodasoli.Contattarel'assistenzaoilrivenditoreAxis
perquestionirelativeallamanutenzione.
•Nonpuntarel'obiettivodellatelecameraversoilsoleoaltresorgentidiradiazioniadalta
intensità,perchéquestopotrebbecausaredanniallatelecamera.
Trasporto
VVISO
A AAVVISO VVISO
•Conservarel'imballaggiodiprotezione.DuranteiltrasportodeldispositivoAxis,
l'imballaggiodiprotezionedeveesserericollocatonellasuaposizioneoriginale.
•DuranteiltrasportodeldispositivoAxis,utilizzarel'imballaggiooriginaleoequivalente
perevitaredannialdispositivo.
Batteria
IldispositivoAxisutilizzaunabatteriaallitioda3,0VBR/CR2032comealimentazioneperil
suoreal-timeclock(RTC)interno.Incondizioninormaliquestabatteriaavràunadurataminima
dicinqueanni.
UnabassacaricadellabatteriainuiscesulfunzionamentodelRTC,facendoloresettareaogni
accensione.Quandolabatteriadeveesseresostituita,unmessaggiodiregistrovienevisualizzato
64
Page 65

AXISP55NetworkCameraSeries
ITALIANO
nelreportserverdeldispositivo.Perulterioriinformazionisulreportserver,vederelepaginedi
congurazionedeldispositivoocontattarel'assistenzaAxis.
Labatterianondeveesseresostituitasenonrichiesto,manelcasoincuiquestofossenecessario,
contattareilsupportoAxisall'indirizzowww.axis.com/techsupperassistenza.
AVVERTENZA
•Rischiodiesplosioneselabatteriavienesostituitainmodoerrato.
•SostituiresoloconunabatteriaidenticaounabatteriaconsigliatadaAxis.
•Smaltirelebatterieusateinbaseallenormativelocalioalleistruzionidelproduttore
dellabatteria.
Cupoladiprotezione
VVISO
A AAVVISO VVISO
•Fareattenzioneanongrafare,danneggiareolasciareimprontesullacupoladiprotezione,
perchépotrebbediminuirelaqualitàdell'immagine.Sepossibile,tenerelaprotezionein
plasticasullacupolanoaquandol'installazionenonsaràcompletata.
•Nonpulirelacupoladiprotezionesenonnecessario.Unapuliziaeccessivapotrebbe
danneggiarelasupercie.
•Perlapuliziageneraledellacupoladiprotezione,siconsigliadiutilizzareunsapone
neutroodetergentenonabrasivoconacquapuraeunpannomorbidoepulito.Sciacquare
beneconacquapuratiepida.Asciugareconunpannomorbidoepulitoperevitare
macchied'acqua.
•Nonusaremaidetergentiaggressivi,benzina,benzeneoacetoneeccedevitaredipulirela
cupoladiprotezioneallalucedirettadelsoleoatemperatureelevate.
65
Page 66

66
Page 67

AXISP55NetworkCameraSeries
ITALIANO
Guidaall'installazione
Lapresenteguidaall'installazionefornisceleistruzioninecessarieperinstallarelatelecameradi
reteacupolaAXISP5514/P5515PTZnellareteinuso.Perulterioriinformazionisull'utilizzodel
dispositivo,consultarelaguidaperl'utentedisponibileall'indirizzowww.axis.com
Proceduradiinstallazione
1.Assicurarsicheilcontenutodellaconfezione,glistrumentiealtrimaterialinecessariper
l'installazionesianoinordine.Consultarepagina67.
2.Studiareladescrizionedell'hardware.Consultarepagina67.
3.Studiarelespeciche.Consultarepagina73.
4.Installarel’hardware.Consultarepagina74.
5.Accederealdispositivo.Consultarepagina79.
Contenutodellaconfezione
•TelecameradireteacupolaAXISP5514/P5515PTZ
•Kitdimontaggiopersofttiecontrosoftti
•Custodiaconcupolatrasparentechiara(premontata)
•Coperturaacupolaoscurata
•Materialistampati
-Guidaall'installazione(questodocumento)
-Etichettaaggiuntivaconnumerodiserie(2x)
-ChiavediautenticazioneAVHS
Accessoriopzionali
•AccessoriperilmontaggioAXIST91A
•KitpermontaggioincassatoAXIST94A03L
Perinformazionisugliaccessoridisponibili,visitareilsitoWebwww.axis.com
Panoramicadell'hardware
VVISO
A AAVVISO VVISO
Assicurarsichelacupolavengacollegatainmodalitàoperativainmododanonalterarela
messaafuoco.
67
Page 68

AXISP55NetworkCameraSeries
1
6
7
8
9
2
3
4
5
1
Guarnizioneadanello
2
Coperchiosuperiore
3
Cupola
4
Anellocupola
5
Vitianellocupola(8x)
6
IndicatoreLEDdistato
7
Pulsantedicomando
8
SlotperschedaSD
9
Pulsantediriavvio
68
Page 69

AXISP55NetworkCameraSeries
1
2
3
4
5
6
7
8
9
10
13
12
17
11
14
15
16
ITALIANO
1
Piastradimontaggio
2
Vitipiastradimontaggio(3x)
3
Bracciostaffa(3x)
4
Vitebracciostaffa(3x)erondella(3x)
5
Staffadimontaggio
6
Anellodinitura
7
Cavodisicurezza
8
Supportiunità(3x)
9
Coperchiodellabasedellatelecamera
10
11
12
Vitidelcoperchiodellabasedellatelecamera(4x)
Ganciopercavodisicurezza
Codicedispositivo(P/N)enumerodiserie(S/N).Ilnumerodiseriepuòessere
richiestodurantel'installazione.
13
Passaggideicavi
14
Multiconnettore(soloperversioneperambientiinterni)
15
Vitidellacoperturasuperiore(4x)
16
Coperchiosuperiore
17
Guarnizioneingomma
69
Page 70

AXISP55NetworkCameraSeries
IndicatoriLED
LEDdistatoIndicazione
SpentoConnessioneefunzionamentonormale.
VerdeUnaluceverdessaper10secondiindicailnormale
Giallo
Giallo/rossoLampeggiaingiallo/rossoseilCollegamentodiretenonè
Connettoriepulsanti
Perlespecicheelecondizionidifunzionamento,consultarepagina73.
Connettoredirete
ConnettoreEthernetRJ45conPoweroverEthernet(PoE+).
VVISO
A AAVVISO VVISO
Collegareildispositivoconuncavodireteschermato(STP).Tuttiicavichecolleganoil
dispositivoallaretesonodestinatiallorousospecico.Accertarsicheidispositividirete
sianoinstallatisecondoleistruzionidelproduttore.Permaggioriinformazionisuirequisiti
normativi,consultareElectromagneticCompatibility(EMC)onpage2.
funzionamentounavoltacompletatol'avvio.
Lucessadurantel'avvio.Lampeggiadurantel'aggiornamento
delrmware.
disponibileoèstatoperso.
Pulsantedicomando
Perl'ubicazionedelpulsantedicomando,vederePanoramicadell'hardwareallapagina67.
Ilpulsantedicomandovieneutilizzatoper:
•Ripristinodeldispositivoalleimpostazionipredenitedifabbrica.Consultarepagina80.
•CollegamentoaunservizioAXISVideoHostingSystemoAXISInternetDynamicDNS
Service.Perulterioriinformazionisuquestiservizi,consultareilManualeUtente.
Pulsantediriavvio
Premereilpulsantediriavvioperriavviareildispositivo.
70
Page 71

AXISP55NetworkCameraSeries
ITALIANO
SlotperschedaSD
VVISO
A AAVVISO VVISO
•RischiodidanniallaschedaSD.Nonutilizzarestrumentiappuntitienonesercitare
eccessivaforzadurantel'inserimentoolarimozionedellaschedaSD.
•Rischiodiperditadidati.Perprevenireildanneggiamentodeidati,laschedaSDdeve
esserescollegataprimadellarimozione.Perscollegare,andareaSetup>SystemOptions
>Storage>SDCard(Congurazione>Opzionidisistema>Archiviazione>Scheda
SD)efareclicsuUnmount(Smonta).
QuestodispositivosupportaschededimemoriaSD/SDHC/SDXC(schedadimemorianoninclusa).
PericonsiglisullaschedaSD,visitareilsitoWebwww.axis.com.
Cavomulticonnettore(vendutoseparatamente)
QuandosicollegaunapparecchioesternoalprodottoAxis,ènecessariouncavomulticonnettore
(disponibiledaAxis)permantenerelaclassicazioneIPdelprodotto.Èpossibileacquistareilcavo
multiconnettorepressoilpropriorivenditoreAxis.
Collegareilcavomulticonnettorealmulticonnettoredelprodotto.Perindividuareil
multiconnettore,consultarePanoramicadell'hardwareallapagina67.Ilcavofornisceiconnettori
seguenti:
Morsettieradialimentazione-Morsettieraa3pinusataperl'ingressodell'alimentazione.Vedere
illustrazioneseguente.Utilizzareunasorgentedialimentazionelimitata(LPS)compatibileconuna
bassissimatensionedisicurezza(SELV)conunapotenzadiuscitanominalelimitataa≤100Wo
unacorrentenominalediuscitalimitataa≤5A.
Ingressoaudio(rosa)-3,5mmpermicrofonoinmonoosegnalemonoline-in(ilcanalesinistroè
usatodaunsegnaleinstereo).
Uscitaaudio(verde)-Uscitaaudioda3,5mm(livellodilinea)chepuòessereconnessaaun
sistemadiindirizzopubblico(PA),oppureaunaltoparlanteconamplicatoreintegrato.Perl'uscita
audioènecessariousareunconnettorestereo.
ConnettoredelmorsettoI/O-Utilizzarecondispositiviesterniincombinazionecon,ad
esempio,allarmiantimanomissione,rilevazionedelmovimento,attivazionedieventi,registrazione
temporizzataenotichediallarme.Oltrealpuntodiriferimento0VCCeall'alimentazione(uscita
CC),ilconnettoreI/Oforniscel'interfacciaper:
•Uscitadigitale–PercollegaredispositiviesternicomerelèoLED.Leperiferiche
collegatepossonoessereattivatetramiteVAPIX®API(interfacciaperla
programmazionediapplicazioni),tramiteipulsantidicomandodellapaginaLive
View(Immaginidalvivo)oppuretramitel'opzioneActionRule(regoladiazione).
L’uscitaverràvisualizzatacomeattiva(visualizzatainSystemOptions>Port
&Devices>PortStatus(OpzionidiSistema>Porta&Dispositivi>Stato
porta))seildispositivodiallarmeèattivato.
71
Page 72

AXISP55NetworkCameraSeries
1 2 3 4 5 6
•Ingressodigitale–Ingressoallarmeutilizzabilepercollegareleperiferiche,
chepuòpassaredalcircuitochiusoalcircuitoaperto,adesempio:Sensori
dimovimento(PIR),contattiporta/nestra,rilevatoridirotturavetriecosì
via.Dopolaricezionedelsegnalelostatocambiael’ingressodiventaattivo
(visualizzatoinSystemOptions>Port&Devices>PortStatus(Opzionidi
Sistema>PorteeDispositivi>Statoporta)).
FunzionePinNote
0VCC(-)
UscitaCC
Congurabile
(ingressoo
uscita)
Perunesempiodischema,consultareSchemadelleconnessioniallapagina73.
ConnettoreI/O
1
2
3–6
Ingresso
alimentazioneCC
Ilpinpuòessereutilizzatoancheper
alimentareunaperifericaausiliaria.
Nota:questopinpuòessereusatosolo
comeuscitaalimentazione.
Ingressodigitale-collegarealpin1
perattivarlooppurelasciarloisolato
(scollegato)perdisattivarlo.
Uscitadigitale–Collegarealpin1
quandoattiva,isolata(scollegata)quando
inattiva.Seutilizzataconuncarico
induttivo,adesempiounrelèesterno,è
necessariocollegareundiodoinparallelo
alcaricoperproteggereildispositivoda
sovratensioni.
Ingresso
alimentazioneCA
Speciche
3,3VCC
Caricomassimo
=250mA
da0amax40VCC
Da0amax40VCC,
open-drain,
100mA
72
Page 73

Schemadelleconnessioni
1
2
A
B
ITALIANO
ConnettoreI/O
AXISP55NetworkCameraSeries
1
0VCC(-)
2
UscitaCC3,3V,max250mA
A
I/Oconguratocomeingresso
B
I/Oconguratocomeuscita
Datitecnici
Condizionidifunzionamento
Classicazione
IEC60721-4-3
Classe3K3,3M3
+B38
IEC60068-2
Temperatura
Da0°Ca50°C
Umidità
Umiditàrelativacompresatrail
15el'85%(senzacondensa)
73
Page 74

AXISP55NetworkCameraSeries
Consumoenergetico
VVISO
A AAVVISO VVISO
Utilizzareunasorgentedialimentazionelimitata(LPS)conunapotenzadiuscitanominale
limitataa≤100Wounacorrentenominalediuscitalimitataa≤5A.
PoE
PoweroverEthernet(PoE)
IEEE802.3af/802.3at
Tipo1Classe3max.12,95W
CACC
20-28VCC,max.22VA20-24VCC,max13,5W
Installazionedell'hardware
VVISO
A AAVVISO VVISO
Montareildispositivoconlacupolarivoltaversoilbasso.
Leggeretutteleistruzioniprimadiprepararsiadinstallarelatelecameradirete,poichénumerose
fasidipreparazionedell'installazionerichiedonolarimozionedellacoperturasuperioreedè
opportunochevenganocompletateinsieme.
•Rimuoverel'imballoprotettivoprimadiinstallarelatelecamera.
•Ildispositivovienefornitoconunacupolatrasparente(premontata)eunatrasparente
fumé.Persostituirelacupola,consultarepagina75.
•UnaschedaSDstandardoadaltacapacità(noninclusa)puòessereutilizzataper
memorizzareleregistrazionilocalmenteneldispositivo.Consultarepagina76.
•Perinstallareilprodottoutilizzandounastaffacompatibiledaaccessoridimontaggiodi
AXIST91A(vendutoseparatamente),consultarepagina78.
Rimozionedell'imballoprotettivo
ConsultarePanoramicadell'hardwareallapagina67perlaposizionedeicomponenti.
1.Allentarelequattrovitidellacoperturasuperioreerimuoverla.
2.Rimuoverel'imballoprotettivo.
74
Page 75

AXISP55NetworkCameraSeries
1
ITALIANO
1
Imballoprotettivo
3.Persostituirelacoperturaacupolatrasparente/oscurata,consultarepagina75.Per
installareunaschedaSD,consultarepagina76.
4.Rimontarelacoperturaposteriorenellaposizioneoriginaleeserrareprimadueviti
diagonalmenteopposte(aunacoppia<0,7Nm),quindilealtredueviti.
Sostituzionedellaprotezioneacupola
Nota
Fareattenzioneanongrafareodanneggiarelacoperturaacupola.Sepossibile,tenerela
protezioneinplasticasullacupolanoaquandol'installazionenonsaràcompletata.
Lasostituzionedellacupolaènecessariasolosesidesiderautilizzarequellascuraoselacupolaè
grafataodanneggiata.ÈpossibileacquistarecupolediricambiopressoilpropriorivenditoreAxis.
ConsultarePanoramicadell'hardwareallapagina67perlaposizionedeicomponenti.
1.Allentarelevitidellacoperturasuperioreerimuoverla.
2.Rimuoverele8vitidell'anellodellacoperturaerimuoverel'anellodallacopertura
superiore.
3.Fissarel'anellodellacupolaelacoperturaacupolasostitutivasullacoperturasuperiore
serrandoleviti(aunacoppiada0,4a0,6Nm).
4.PerinstallareunaschedaSD(noninclusa),consultarepagina76.
5.Rimontarelacoperturaposteriorenellaposizioneoriginaleeserraredueviti
diagonalmenteopposte(aunacoppia<0,7Nm),quindilealtreviti.
75
Page 76

AXISP55NetworkCameraSeries
1
2
InstallazionediunaschedaSD
VVISO
A AAVVISO VVISO
Perprevenireildanneggiamentodelleregistrazioni,laschedaSDdeveesserescollegata
primadell'espulsione.Perscollegare,andareaSetup>SystemOptions>Storage>SD
Card(Congurazione>Opzionidisistema>Archiviazione>SchedaSD)efareclic
suUnmount(Smonta).
ÈfacoltativoinstallareunaschedadimemoriaSDstandardoadaltacapacità(noninclusa),che
puòessereusataperlaregistrazioneinmodalitàlocaleconunitàdiarchiviazionerimovibile.
ConsultarePanoramicadell'hardwareallapagina67perlaposizionedeicomponenti.
1.Allentarele4vitidellacoperturasuperioreerimuoverla.
2.InserireunaschedaSD(noninclusa)nelloslotperschedeSD.
3.Rimontarelacoperturaposteriorenellaposizioneoriginaleeserrareprimadueviti
diagonalmenteopposte(aunacoppia<0,7Nm),quindilealtreviti.
Montaggioasoftto
1.
Piastradimontaggio
2.
Cavodisicurezza
Perinstallarelapiastradimontaggio:
1.Usarelamascheradiforaturafornitaperposizionareifori.Utilizzarepunte,vitietasselli
adattialmaterialedelsoftto.
2.Installarelapiastradimontaggio.
3.Allentarele4vitidellabasedelcoperchiodellatelecameraerimuoverlo.Vedere
Panoramicadell'hardwareinpagina69.Fareattenzioneanondanneggiareicaviquando
lisicollega.
4.Posizionareecollegareilcavodireteeilcavomulticonnettore(facoltativo)lungole
traccedeicavieattraversoiforidellaguarnizioneingomma.
5.Rimontareilcoperchiodellabasedellatelecameranellaposizioneoriginaleeserrare
leviti.
6.Fissarelatelecamerautilizzandoilcavodisicurezzaindotazione.
7.Farscorrereisupportidell'unitàsullatelecameradiretenellefessuredellapiastradi
montaggioeruotarelatelecamera.
76
Page 77

AXISP55NetworkCameraSeries
1
2
2
1
ITALIANO
Montaggioacontrosoftto
1.
Pannellodelsoftto
2.
Diametrodelforo190mm
Nota
•Ilpesototaledellatelecameraedegliaccessoriperilmontaggioasofttoèdicirca2,3
kg.Controllarecheilmaterialedelsofttosiasufcientementerobustopersostenere
talepeso.
•Ilpannellodelsofttodovrebbeesserespessoda5a60mm.
1.Rimuovereilpannellodelsofttoincuideveesseremontatoilcontrosoftto.
2.Utilizzarelamascherafornitapercontrassegnarelaposizionedelforoda189,5mmnel
pannellodelsoftto.Tagliarelungolamaschera.
3.Montarelastaffaperilmontaggioasoftto.
4.Posizionarelastaffaperilsofttonelpannello.Vederel'illustrazionepiùavanti.
5.Serrarelevitidelbracciodellastaffausandouncacciavitetorx20.
6.Allentarele4vitidellabasedelcoperchiodellatelecameraerimuoverlo.Vedere
Panoramicadell'hardwareinpagina69.
7.Rimuoverelaguarnizioneingommaecollegareilcavodireteeilcavomultiplo,se
necessario.Fareattenzioneanondanneggiareicavimentrevengonoconnessialla
telecameradirete.
1.
Cavomulticonnettore
2.
Cavodirete
77
Page 78

AXISP55NetworkCameraSeries
2
1
3
1
8.Rimontareilcoperchiodellabasedellatelecameranellaposizioneoriginaleeserrare
leviti.
9.Fissarelatelecamerautilizzandoilcavodisicurezzaindotazione.
1.
Pannellodelsoftto
2.
Staffaperilmontaggioasoftto
3.
Cavodisicurezza
10.Farscorrereisupportidell'unitàsullatelecameradiretenellefessuredellapiastradi
montaggioeruotarelatelecamera
11.Rimontareilpannellonelsoftto,conlatelecameramontata.
12.Collocarel'anelloperimetralesullastaffapersofttoefarloscattareinposizione.
1.
Anellodinitura
Installazionedellatelecameraconmontaggioastaffa(venduto
separatamente)
AVVERTENZA
•Rischiodiscosseelettriche.Ilprodottodeveesserecollegatoaterrautilizzandouncavodi
messaaterra.Assicurarsicheentrambeleestremitàdelcavodimessaaterrasianoin
contattoconlerispettivesupercidimessaaterra.
1.Installarelastaffa(noninclusa)inbasealleistruzionifornite.Seènecessarioforare,
assicurarsidiutilizzarepunte,vitietasselliadattialmateriale.VisitareilsitoWeb
www.axis.comperinformazionisugliaccessoridimontaggiodisponibili.
2.Fissarelatelecamerautilizzandoilcavodisicurezzaindotazione.
78
Page 79

AXISP55NetworkCameraSeries
1
2
3
ITALIANO
3.Allentarelevitidellabasedelcoperchiodellatelecameraerimuoverlo.
1
Vite
2
Alloggiamentiperisupportidell'unità
3
Cavodisicurezza
Nota
•Fareattenzioneanondanneggiareicaviquandolisicollega.
•Assicurarsicheiforidellaguarnizioneinschiumasianoallineaticonletraccedeicavie,se
èilcaso,rimuoverelaprefratturaperilcavomulticonnettoredallaguarnizioneinschiuma.
4.Collegareilcavodireteeilcavomultiplo(vendutoseparatamente),seèilcaso,alla
telecamera.
5.Ruotareiportacavipermantenereicaviinposizione.
6.Posizionareilcoperchioposterioredellatelecameranellasuaposizioneoriginariae
serrareleviti(serraggio1,5Nm).
7.Farscorrereisupportidell'unitàsullatelecameradiretenellefessuredellastaffadi
montaggioeruotarelatelecamera.
8.Fissarelatelecameradireteallastaffadimontaggioserrandoleviti.
Accederealdispositivo
AXISIPUtilityeAXISCameraManagementsonoimetodiconsigliatipertrovareidispositiviAxisin
reteeassegnarelorounindirizzoIPinWindows®.Questeapplicazionisonoentrambegratuitee
possonoesserescaricatedawww.axis.com/techsup
Ildispositivopuòessereutilizzatoconlamaggiorpartedeisistemioperativiedeibrowser.
Ibrowserconsigliatisono
•InternetExplorer
®
conWindows
®
79
Page 80

AXISP55NetworkCameraSeries
•Safari
•Chrome
Perulterioriinformazionisull'utilizzodeldispositivo,consultarelaGuidaperl'utentedisponibile
sulsitoWebwww.axis.com
®
conOSX
TM
®
oFirefox
®
conaltrisistemioperativi.
Ripristinodeivaloripredenitidifabbrica
Importante
Ilripristinodelleimpostazionidifabbricadeveessereusatoconcautela.Unripristinodelle
impostazionidifabbricaconsentiràdiripristinareleimpostazionidifabbricapertuttii
parametri,inclusol'indirizzoIP.
Nota
Glistrumentiperl'installazioneelagestionedelsoftwaresonodisponibilinellepagine
dedicateall'assistenzasulsitoWebwww.axis.com/techsup.
Perripristinareildispositivoalleimpostazionipredenitedifabbrica:
1.Tenerepremuticontemporaneamentesiailpulsantedicomandocheilpulsantediriavvio.
2.Rilasciareilpulsantediriavvio,macontinuareatenerepremutoilpulsantedicomando
per15-30secondinoaquandoilLEDdistatolampeggiaingiallo.
3.Rilasciareilpulsantedicomando.IlprocessoècompletoquandoilLEDdistatodiventerà
verde.Ildispositivoèstatoreimpostatoalleimpostazionidifabbricapredenite.Se
nessunserverDHCPèdisponibileinrete,l'indirizzoIPpredenitoè192.168.0.90.
4.Medianteglistrumentiperl'installazioneelagestionedelsoftware,assegnareun
indirizzoIP,impostarelapasswordeaccederealussovideo.
Èanchepossibilereimpostareiparametrialleimpostazionipredenitedifabbricamediante
l'interfacciaWeb.AndareaSetup>SystemOptions>Maintenance(Congurazione>Opzionidi
sistema>Manutenzione).
UlterioriInformazioni
Ilmanualeperl'utenteèdisponibileall'indirizzowww.axis.com
Visitareilsitoall’indirizzowww.axis.com/techsuppervericaresesonostatipubblicati
aggiornamentidelrmwareperilpropriodispositivodirete.Perconoscerelaversionedelrmware
installata,andaresuSetup(Impostazioni)>About(Informazionisu).
VisitareilcentrodiapprendimentoAxisallapaginawww.axis.com/academyperservizidi
formazioneutili,webinar,tutorialeguide.
80
Page 81

AXISP55NetworkCameraSeries
ITALIANO
Informazionisullagaranzia
PerinformazionisullagaranziadeldispositivoAxiseinformazioniadessorelative,consultare
lapaginawww.axis.com/warranty/
81
Page 82

82
Page 83

AXISP55NetworkCameraSeries
ESPANÕL
Informacióndeseguridad
LeaestaGuíadeinstalaciónconatenciónantesdeinstalarelproducto.GuardelaGuíade
instalaciónparapoderconsultarlaenotromomento.
Nivelesdepeligrosidad
PELIGRO
ADVERTENCIA
ATENCIÓN
VISO
A AAVISO VISO
Indicaunasituaciónpeligrosaque,sinoseevita,provocará
lesionesgravesolamuerte.
Indicaunasituaciónpeligrosaque,sinoseevita,puedeprovocar
lesionesgravesolamuerte.
Indicaunasituaciónpeligrosaque,sinoseevita,puedeprovocar
lesionesmoderadasoleves.
Indicaunasituaciónpeligrosaque,sinoseevita,puedeprovocar
dañosmateriales.
Otrosnivelesdemensaje
ImportanteIndicainformaciónimportantequeesfundamentalparaqueel
NotaIndicainformaciónútilqueayudaaaprovecharelproductoal
productofuncionecorrectamente.
máximo.
83
Page 84

AXISP55NetworkCameraSeries
Instruccionesdeseguridad
VISO
A AAVISO VISO
•ElproductodeAxisdebeutilizarsedeacuerdoconlalegislaciónylanormativalocales.
•ParausarelproductodeAxisenexteriores,oenentornossimilares,debeinstalarseen
unacarcasaexterioraprobada.
•AlmaceneelproductodeAxisenunentornosecoyventilado.
•EvitelaexposicióndelproductodeAxisachoquesoaunafuertepresión.
•Noinstaleelproductoensoportes,superciesoparedesinestables.
•Noapuntelalentedelacámarahaciaelsoluotrasfuentesderadiacióndealta
intensidad,yaqueestopodríacausardañosalacámara.
•UtilicesololasherramientascorrespondientescuandoinstaleelproductodeAxis.La
aplicacióndeunafuerzaexcesivaconherramientaseléctricaspuedeprovocardaños
enelproducto.
•Noutilicelimpiadoresenaerosol,agentescáusticosniproductosquímicos.
•Limpieconunpañolimpiohumedecidoconaguapura.
•Utilicesoloaccesoriosquecumplanconlasespecicacionestécnicasdelproducto.Estos
accesorioslospuedeproporcionarAxisountercero.
•UtilicesolopiezasderepuestoproporcionadasorecomendadasporAxis.
•Nointenterepararelproductoustedmismo.Póngaseencontactoconelserviciode
asistenciatécnicadeAxisoconsudistribuidordeAxisparatratarasuntosdereparación.
•Noapuntelalentedelacámarahaciaelsoluotrasfuentesderadiacióndealta
intensidad,yaqueestopodríacausardañosalacámara.
Transporte
VISO
A AAVISO VISO
•Mantengaelembalajedeprotección.CuandotransporteelproductodeAxis,elembalaje
deproteccióndebevolveraponerseensuposiciónoriginal.
•CuandotransporteelproductodeAxis,utiliceelembalajeoriginalounequivalentepara
evitardañosenelproducto.
Batería
EsteproductodeAxisutilizaunabateríadelitioBR/CR2032de3,0Vcomofuentedealimentación
delrelojinternoentiemporeal.Encondicionesnormales,estabateríaduraráunmínimodecinco
años.
84
Page 85

AXISP55NetworkCameraSeries
ESPANÕL
Unnivelbajodebateríaafectaráalfuncionamientodelrelojentiemporeal,loqueprovocaráel
restablecimientodeestecadavezqueseenciendaelproducto.Cuandoseanecesariosustituirla
batería,apareceráunmensajederegistroenelinformedelservidordelproducto.Paraobtenermás
informaciónsobreelinformedelservidor,consultelaspáginasdeconguracióndelproductoo
póngaseencontactoconelserviciodeasistenciatécnicadeAxis.
Labateríanodebesustituirseamenosqueseanecesario;noobstante,siprecisahacerlo,póngaseen
contactoconelserviciodeasistenciatécnicadeAxisenwww.axis.com/techsupparasolicitarayuda.
ADVERTENCIA
•Lasustituciónincorrectadelabateríaimplicariesgodeexplosión.
•SustituyalabateríaporunabateríaidénticauotrabateríarecomendadaporAxis.
•Desechelasbateríasusadasdeconformidadconlanormativalocalolasinstrucciones
delfabricante.
Cubiertadeldomo
VISO
A AAVISO VISO
•Presteatenciónanoarañar,dañarodejarlashuellasenlacubiertadeldomo,puestoque
estopuedeprovocarunadisminucióndelacalidaddeimagen.Siesposible,mantengael
plásticodeprotecciónenlacubiertadeldomohastaquesecompletelainstalación.
•Nolimpielacubiertadeldomosipareceasimplevistaqueestálimpiaynuncapulala
supercie.Unalimpiezaexcesivapodríadañarlasupercie.
•Pararealizarunprocedimientodelimpiezageneraldelacubiertadeldomoserecomienda
usardetergenteojabónneutros,sindisolventesynoabrasivosmezcladosconaguapura,
yunpañosuaveylimpio.Enjuaguebienconaguapuraytibia.Sequeconunpañolimpio
ysuaveparaevitarlasmanchasdegotasdeagua.
•Nuncautilicedetergentesabrasivos,gasolina,benceno,acetona,etc.yevitelimpiarla
cubiertadeldomoatemperaturaselevadasoencontactodirectoconlaluzsolar.
85
Page 86

86
Page 87

AXISP55NetworkCameraSeries
ESPANÕL
Guíadeinstalación
EstaGuíadeinstalaciónincluyeinstruccionesparainstalarlascámarasdomoderedPTZAXIS
P5514/P5515ensured.Paraconocerotrosaspectosdeusodelproducto,consulteelManualdel
usuariodisponibleenwww.axis.com.
Pasosdelainstalación
1.Asegúresedequedisponedelcontenidodelpaquete,lasherramientasylosdemás
materialesnecesariosparalainstalación.Veapágina87.
2.Estudielainformacióngeneraldelhardware.Veapágina87.
3.Estudielasespecicaciones.Veapágina93.
4.Instaleelhardware.Veapágina94.
5.Accedaalproducto.Veapágina99.
Contenidodelpaquete
•CámaradomoderedPTZAXISP5514/P5515
•Kitdemontajeparatechosdurosyfalsostechos
•Cubiertadeldomotransparente(montajeprevio)
•Cubiertadeldomoahumada
•Materialesimpresos
-Guíadeinstalación(estedocumento)
-Etiquetasadicionalesconelnúmerodeserie(2)
-ClavedeautenticaciónAVHS
Accesoriosopcionales
•AccesoriosdemontajeAXIST91A
•KitdemontajeempotradoAXIST94A03L
Paraobtenerinformaciónsobrelosaccesoriosdisponibles,visitewww.axis.com.
Informacióngeneraldelhardware
VISO
A AAVISO VISO
Asegúresedeconectareldomoenmododefuncionamiento,sino,elenfoquepuedeverse
afectado.
87
Page 88

AXISP55NetworkCameraSeries
1
6
7
8
9
2
3
4
5
1
Anillodesellado
2
Cubiertasuperior
3
Domo
4
Anillodeldomo
5
Tornillosdelanillodeldomo(8)
6
IndicadorLEDdeestado
7
Botóndecontrol
8
RanuraparatarjetasSD
9
Botóndereinicio
88
Page 89

AXISP55NetworkCameraSeries
1
2
3
4
5
6
7
8
9
10
13
12
17
11
14
15
16
ESPANÕL
1
Placademontaje
2
Tornillosparaplacademontaje(3)
3
Brazosdelsoporte(3)
4
Tornillosparabrazodelsoporte(3)yarandelas(3)
5
Soportedemontaje
6
Anillodeajuste
7
Cabledeseguridad
8
Soportesdelaunidad(3)
9
Tapadelabasedelacámara
10
11
12
Tornillosdelatapadelabasedelacámara(4)
Ganchoparacabledeseguridad
Númerodepieza(P/N)ynúmerodeserie(S/N).Puedenecesitarseelnúmerode
seriedurantelainstalación.
13
Guíasdecables
14
Multiconector(soloparalaversiónparainterior)
15
Tornillosdecubiertasuperior(4)
16
Cubiertasuperior
17
Juntadegoma
89
Page 90

AXISP55NetworkCameraSeries
IndicadoresLED
LEDdeestado
Apagado
Verde
Ámbar
Ámbar/rojo
Indicación
Conexiónyfuncionamientonormal.
Semuestrajodurantediezsegundosparaindicarun
funcionamientonormaldespuésdecompletadoelinicio.
Fijoduranteelinicio.Parpadeadurantelaactualizacióndel
rmware.
Parpadeaenámbar/rojosilaconexiónalarednoestádisponible
osehaperdido.
Conectoresybotones
Paraconocerlasespecicacionesylascondicionesdefuncionamiento,veapágina93.
Conectordered
ConectorEthernetRJ45conalimentaciónatravésdeEthernet(PoE).
VISO
A AAVISO VISO
Elproductoseconectarámedianteuncablederedblindado(STP).Todosloscablesque
conectenelproductoalareddeberánestarblindadosparasuusoespecíco.Asegúrese
dequelosdispositivosderedesténinstaladosdeconformidadconlasinstruccionesdel
fabricante.Paraobtenerinformaciónsobrelosrequisitosnormativos,veaElectromagnetic
Compatibility(EMC)onpage2.
Botóndecontrol
Paraconocerlaubicacióndelbotóndecontrol,veaInformacióngeneraldelhardwareenlapágina
87.
Elbotóndecontrolseutilizaparalosiguiente:
•Restablecerelproductoalaconguraciónpredeterminadadefábrica.Veapágina100.
•ConectarseaunservicioAXISVideoHostingSystemoalServiciodeDNSdinámico
deInternetdeAXIS.Paraobtenermásinformaciónsobreestosservicios,consulteel
Manualdelusuario.
Botóndereinicio
Pulseelbotóndereinicioparareiniciarelproducto.
90
Page 91

AXISP55NetworkCameraSeries
ESPANÕL
RanuraparatarjetasSD
VISO
A AAVISO VISO
•RiesgodedañosenlatarjetaSD.Noutiliceherramientasaladasniejerzademasiada
fuerzaalinsertaroretirarlatarjetaSD.
•Riesgodepérdidadedatos.AntesderetirarlatarjetaSD,esprecisodesmontarlapara
evitarquelosdatosresultendañados.Paradesmontarla,vayaaSetup>SystemOptions
>Storage>SDCard(Conguración>Opcionesdelsistema>Almacenamiento>
TarjetaSD)yhagaclicenUnmount(Desmontar).
EsteproductoadmitetarjetasSD/SDHC/SDXC(noincluidas).
ParaconocerlasrecomendacionesdetarjetaSD,consultewww.axis.com.
Cablemulticonector(sevendeporseparado)
CuandoseconectanequiposexternosalproductodeAxis,sedebeusaruncablemulticonector
(disponibleenAxis)paramantenerlaclasicaciónIPdelproducto.SudistribuidordeAxispuede
proporcionarleuncablemulticonector.
Enchufeelcablemulticonectoralmulticonectordelproducto.Paraubicarelmulticonector,vea
Informacióngeneraldelhardwareenlapágina87.Elcableproporcionalossiguientesconectores:
Conectordealimentación-Bloquedeterminalesde3pinesutilizadoparalaentradade
alimentación.Vealaimagensiguiente.Useunafuentedealimentaciónlimitada(LPS)quecumpla
losrequisitosdetensiónmuybajadeseguridad(SELV)conunapotencianominaldesalidalimitada
a≤100Wounacorrientenominaldesalidalimitadaa≤5A.
Entradadeaudio(rosa)-Entradade3,5mmparamicrófonomono,oentradadelíneadeseñal
mono(seusaelcanalizquierdodeunaseñalestéreo).
Salidadeaudio(verde)-Salidadeaudio(niveldelínea)de3,5mmquesepuedeconectara
unsistemademegafoníapúblicaoaunaltavozconamplicadorincorporado.Debeutilizarse
unconectorestéreoparalasalidadeaudio.
ConectordelterminaldeE/S-Seutilizacondispositivosexternoscombinados,porejemplo,con
alarmasantimanipulación,deteccióndemovimiento,activacióndeeventos,grabacióndeintervalos
detiempoynoticacionesdealarma.Ademásdelpuntodereferenciade0VCCylapotencia
(salidadeCC),elconectordeE/Sofrecelainterfazpara:
•Salidadigital:paraconectardispositivosexternoscomorelésyLED.Los
dispositivosconectadossepuedenactivarmediantelaInterfazdeprogramación
deaplicaciones(API)VAPIX®,losbotonesdesalidadelapáginaLiveViewo
medianteunaregladeacción.Lasalidasemostraráactiva(seindicaenSystem
Options>Port&Devices>PortStatus(Opcionesdelsistema>Puertoy
dispositivos>Estadodelpuerto))sieldispositivodealarmaestáactivado.
91
Page 92

AXISP55NetworkCameraSeries
1 2 3 4 5 6
•Entradadigital:unaentradadealarmaparaconectardispositivosquepuedan
alternarcircuitoscerradosyabiertos,como:detectoresPIR,contactosdepuertas
yventanas,detectoresderoturadecristales,etc.Cuandoserecibeunaseñal,
elestadocambiaylaentradasevuelveactiva(seindicaenSystemOptions>
Port&Devices>PortStatus(Opcionesdelsistema>Puertoydispositivos
>Estadodelpuerto)).
Función
0VCC(-)
SalidadeCC
Congurable
(entradao
salida)
ConectordeE/S
PinNotas
1
2
3–6
Entradade
alimentaciónde
CC
Sepuedeutilizarparaconectarelequipo
auxiliar.
Nota:Estepinsepuedeusarsolocomo
salida.
Entradadigital:Conectaralpin1para
activarlaodejarlasuelta(odesconectada)
paradesactivarla.
Salidadigital:Conectadaalpin1cuando
seactivaysuelta(sinconectar)cuando
estádesactivada.Siseutilizaconuna
cargainductiva(porejemplo,unrelé),
debeconectarseundiodoenparaleloala
cargacomoprotecciónantetransitorios
detensión.
Entradade
alimentaciónde
CA
Especicaciones
3,3VCC
Cargamáx.=
250mA
0a40VCCmáx.
De
0a40VCCmáx.,
drenajeabierto,
100mA
92
Page 93

1
2
A
B
ESPANÕL
ConectordeE/S
AXISP55NetworkCameraSeries
1
0VCC(-)
2
SalidadeCC3,3V,250mAmáx.
A
E/Sconguradacomoentrada
B
E/Sconguradacomosalida
Especicaciones
Condicionesdefuncionamiento
Clasicación
IEC60721-4-3
Clase3K3,3M3
+B38
IEC60068-2
TemperaturaHumedad
De0°Ca50°C
Humedadrelativadel15al85
%(sincondensación)
93
Page 94

AXISP55NetworkCameraSeries
Consumo
VISO
A AAVISO VISO
Utiliceunafuentedealimentaciónlimitada(LPS)conunapotencianominaldesalida
limitadaa≤100Wounacorrientenominaldesalidalimitadaa≤5A.
PoE
Alimentaciónatravés
deEthernet(PoE)
IEEE802.3af/802.3at
Tipo1Clase312,95Wmáx.
CACC
20-28VCC,22VAmáx.20-24VCA,13,5Wmáx.
Instalacióndelhardware
VISO
A AAVISO VISO
Monteelproductoconeldomomirandohaciaabajo.
Consultetodaslasinstruccionesantesdeprepararlainstalacióndelacámaradered,yaque
algunospasosdelapreparacióndelainstalaciónprecisanqueseretirelacubiertasuperioryle
convendríarealizarlostodosjuntos.
•Retireelembalajedeprotecciónantesdeinstalarlacámara.
•Elproductosesuministraconunacubiertadeldomotransparente(premontada)yuna
cubiertadeldomotransparenteahumada.Parasustituirlacubiertadeldomo,vea
página95.
•PuedeemplearseunatarjetaSDestándarodegrancapacidad(noincluida)parael
almacenamientolocaldegrabacionesenelproducto.Veapágina96.
•Parainstalarelproductoutilizandounsoportecompatibledelosaccesoriosdemontaje
AXIST91A(sevendenporseparado),veapágina98.
Retiradadelembalajedeprotección
VeaInformacióngeneraldelhardwareenlapágina87paraconocerlaubicacióndeloscomponentes.
1.Aojeloscuatrotornillosdelacubiertasuperioryretírela.
2.Retireelembalajedeprotección.
94
Page 95

AXISP55NetworkCameraSeries
1
ESPANÕL
1
Embalajedeprotección
3.Parasustituirlacubiertadeldomotransparente/ahumada,veapágina95.Parainstalar
unatarjetaSD,veapágina96.
4.Vuelvaacolocarlacubiertasuperiorensuposiciónoriginalyaojelosdostornillos
opuestosendiagonalprimero(pardetorsión<0,7Nm)y,acontinuación,aojelos
otrosdostornillos.
Sustitucióndelacubiertadeldomo
Nota
Tengacuidadodenoarañarodañarlacubiertadeldomo.Siesposible,mantengael
plásticodeprotecciónenlacubiertadeldomohastaqueterminelainstalación.
Lasustitucióndelacubiertadeldomosoloesnecesariasideseausarlacubiertaahumadaosila
cubiertadeldomosehaarañadoodañado.SudistribuidordeAxispuedeproporcionarlecubiertas
dedomoderepuesto.
VeaInformacióngeneraldelhardwareenlapágina87paraconocerlaubicacióndeloscomponentes.
1.Aojelostornillosdelacubiertasuperioryretírela.
2.Extraigalos8tornillosdelanillodeldomoyretiredichoanillodelacubiertasuperior.
3.Fijeelanillodeldomoylacubiertadeldomodesustituciónalacubiertasuperiory
asegúrelaapretandolostornillos(pardetorsiónde0,4a0,6Nm).
4.ParainstalarunatarjetaSD(noincluida),veapágina96.
5.Vuelvaacolocarlacubiertasuperiorensuposiciónoriginalyaprietelosdostornillos
opuestosendiagonalprimero(pardetorsión<0,7Nm)y,acontinuación,losotrosdos.
95
Page 96

AXISP55NetworkCameraSeries
1
2
InstalacióndeunatarjetaSD
VISO
A AAVISO VISO
Paraevitarquelasgrabacionesresultendañadas,esprecisodesmontarlatarjetaSDantes
deexpulsarla.Paradesmontarla,vayaaSetup>SystemOptions>Storage>SDCard
(Conguración>Opcionesdelsistema>Almacenamiento>TarjetaSD)yhagaclicen
Unmount(Desmontar).
LainstalacióndeunatarjetaSDestándarodegrancapacidad(noincluida)paralagrabación
localconalmacenamientoextraíbleesopcional.
VeaInformacióngeneraldelhardwareenlapágina87paraconocerlaubicacióndeloscomponentes.
1.Aojelos4tornillosdelacubiertasuperioryretírela.
2.InserteunatarjetaSD(noincluida)enlaranuraparatarjetasSD.
3.Vuelvaacolocarlacubiertasuperiorensuposiciónoriginalyaojelosdostornillos
opuestosendiagonalprimero(pardetorsión<0,7Nm)y,acontinuación,aojelos
demás.
Montajeentechoduro
1.
Placademontaje
2.
Cabledeseguridad
Parainstalarlaplacademontaje:
1.Utilicelaplantilladeperforadoproporcionadapararealizarlosoriciosensusitio.
Utilicebrocas,tornillosytacosadecuadosparaelmaterialdeltecho.
2.Instalelaplacademontaje.
3.Aojelos4tornillosdelatapadelabasedelacámarayextráigala.VeaInformación
generaldelhardwareenpágina89.Asegúresedenodañarloscablescuandolosconecte.
4.Paseyconecteelcablederedyelcablemulticonector(opcional)porlasguíasdecables
ylosoriciosdelajuntadegoma.
5.Vuelvaacolocarlatapadelabasedelacámaraensuposiciónoriginalyaprietelos
tornillos.
6.Fijelacámaraconelcabledeseguridadsuministrado.
7.Deslicelossoportesdelacámaraderedporlasranurasdelaplacademontajeygirela
unidaddecámara.
96
Page 97

AXISP55NetworkCameraSeries
1
2
2
1
ESPANÕL
Montajeenfalsotecho
1.
Placadeltecho
2.
Diámetrodeloriciode190mm.
Nota
•Elpesocombinadodelmontajeentechoylacámaraesaproximadamentede2,3kg.
Compruebequeelmaterialdeltechosealosucientementeresistentecomoparasoportar
esepeso.
•Laplacadeltechodebetenerungrosordeentre5y60mm.
1.Retirelaplacadeltechoenlaquesevayaaajustarelmontajedelfalsotecho.
2.Utilicelaplantillasuministradaparamarcarlaposicióndelagujerode189,5mmenla
placadeltecho.Cortesegúnlaplantilla.
3.Monteelsoportedeltecho.
4.Coloqueelsoportedeltechoenlaplacadeltecho.Consultelailustraciónmásabajo.
5.AprietelostornillosdelbrazodelsoporteconundestornilladorTorx20.
6.Aojelos4tornillosdelatapadelabasedelacámarayextráigala.(VeaInformación
generaldelhardwareenpágina89).
7.Quitelajuntadegomaypaseelcablederedyelcablemulticonector,siprocede.
Asegúresedenodañarloscablescuandolosconectealacámaradered.
1.
Cablemulticonector
2.
Cabledered
8.Vuelvaacolocarlatapadelabasedelacámaraensuposiciónoriginalyaprietelos
tornillos.
97
Page 98

AXISP55NetworkCameraSeries
2
1
3
1
9.Fijelacámaraconelcabledeseguridadsuministrado.
1.
Placadeltecho
2.
Soportedeltecho
3.
Cabledeseguridad
10.Deslicelossoportesdelacámaraderedporlasranurasdelaplacademontajeygirela
unidaddecámara.
11.Instalelaplacadeltecho,conlacámaramontadaenella,eneltecho.
12.Coloqueelanillodeajustesobreelsoportedeltechoyencájeloensusitio.
1.
Anillodeajuste
Instalelacámaraenunmontajeconescuadra(sevendeporseparado)
ADVERTENCIA
•Riesgodedescargaeléctrica.Elproductodeberáconectarseatierramedianteuncablede
tierra.Asegúresedequelosdosextremosdelcabledetierraesténencontactoconsus
respectivassuperciesdetomadetierra.
1.Instaleelsoporte(noincluido)segúnlasinstruccionesqueloacompañan.Siesnecesario
perforar,asegúresedeusarbrocas,tornillosytacosadecuadosparaelmaterial.Para
obtenerinformaciónsobrelosaccesoriosdemontajedisponibles,veawww.axis.com.
2.Fijelacámaraconelcabledeseguridadsuministrado.
3.Aojelostornillosdelatapadelabasedelacámarayextráigala.
98
Page 99

AXISP55NetworkCameraSeries
1
2
3
ESPANÕL
1
Tornillo
2
Ranurasparasoportesdeunidades
3
Cabledeseguridad
Nota
•Asegúresedenodañarloscablescuandolosconecte.
•Asegúresedequelosoriciosdelajuntadegomaesténalineadosconlasguíasdecables
y,sicorresponde,retirelapiezadecortedelcablemulticonectordelajuntadegoma.
4.Conecteelcablederedyelcablemulticonector(sevendeporseparado),sicorresponde,
alacámara.
5.Girelossoportesdecablesparacolocarloscablesensulugar.
6.Vuelvaacolocarlatapadelabasedelacámaraensuposiciónoriginalyaprietelos
tornillos(pardetorsiónde1,5Nm).
7.Deslicelossoportesdelacámaraderedporlasranurasdelsoportedemontajeygirela
unidaddecámara.
8.Fijelacámaraderedalsoportedemontajeajustandolostornillos.
Accesoalproducto
SerecomiendanAXISIPUtilityyAXISCameraManagementcomométodosparabuscarlos
productosdeAxisenlaredyasignarlesdireccionesIPenWindows®.Ambasaplicacionesson
gratuitasypuedendescargasedewww.axis.com/techsup
Elproductosepuedeutilizarconlamayoríadelossistemasoperativosynavegadores.Los
navegadoresrecomendadosson
•InternetExplorer
•Safari
•Chrome
®
conOSX
TM
®
conWindows
®
oFirefox
®
conotrossistemasoperativos.
®
99
Page 100

AXISP55NetworkCameraSeries
Paraobtenermásinformaciónsobreelusodelproducto,consulteelManualdelusuario,disponible
enwww.axis.com.
Restablecimientoalaconguraciónpredeterminadadefábrica
Importante
Hayquetenercuidadoalrestablecerlaconguraciónpredeterminadadefábrica.Todos
losvalores,incluidaladirecciónIP,serestableceránalaconguraciónpredeterminada
defábrica.
Nota
Lasherramientasdelsoftwaredeinstalaciónygestiónestándisponiblesenlaspáginasde
asistenciatécnicaenwww.axis.com/techsup.
Pararestablecerelproductoalaconguraciónpredeterminadadefábrica:
1.Pulselosbotonesdecontrolydereinicioalmismotiempo.
2.Suelteelbotóndereinicioperomantengapulsadoelbotóndecontroldurante15-30
segundos,hastaqueelindicadorLEDdeestadoparpadeeenámbar.
3.Suelteelbotóndecontrol.ElprocesonalizacuandoelindicadorLEDdeestadosepone
verde.Elproductoseharestablecidoalaconguraciónpredeterminadadefábrica.Si
nohayningúnservidorDHCPdisponibleenlared,ladirecciónIPpredeterminadaes
192.168.0.90.
4.Utilicelasherramientasdelsoftwaredeinstalaciónygestiónparaasignarunadirección
IP,establecerlacontraseñayaccederalatransmisióndevídeo.
Tambiénesposiblerestablecerlosparámetrosalosvalorespredeterminadosdefábricamediante
lainterfazweb.Paraello,vayaaSetup>SystemOptions>Maintenance(Conguración>
Opcionesdelsistema>Mantenimiento).
Másinformación
ElManualdeusuarioseencuentradisponibleenwww.axis.com.
Visitewww.axis.com/techsupparacomprobarsiexisteunrmwareactualizadodisponibleparasu
productodered.Paraverlaversióndelrmwareinstaladoactualmente,vayaaSetup>About
(Conguración>Acercade).
Visiteelcentrodeaprendizajedewww.axis.com/academyparaconsultarguías,tutoriales,
seminarioswebycursosquepuedenresultarleútiles.
100
 Loading...