

Page 1
INSTALLATIONGUIDE
ENGLISH
FRANÇAIS
DEUTSCH
ITALIANO
ESPANÕL
ò
ò
¨
¨
¾
¾
AXISP3365–VEFixedDomeNetworkCamera
Page 2

LegalConsiderations
Videoandaudiosurveillancecanberegulatedbylawsthat
varyfromcountrytocountry.Checkthelawsinyourlocal
regionbeforeusingthisproductforsurveillancepurposes.
Thisproductincludesone(1)H.264decoderlicenseand
one(1)AACdecoderlicense.Topurchasefurtherlicenses,
contactyourreseller.
Liability
Everycarehasbeentakeninthepreparationofthis
document.PleaseinformyourlocalAxisofceofany
inaccuraciesoromissions.AxisCommunicationsABcannot
beheldresponsibleforanytechnicalortypographicalerrors
andreservestherighttomakechangestotheproductand
manualswithoutpriornotice.AxisCommunicationsAB
makesnowarrantyofanykindwithregardtothematerial
containedwithinthisdocument,including,butnotlimited
to,theimpliedwarrantiesofmerchantabilityandtnessfor
aparticularpurpose.AxisCommunicationsABshallnot
beliablenorresponsibleforincidentalorconsequential
damagesinconnectionwiththefurnishing,performance
oruseofthismaterial.Thisproductisonlytobeusedfor
itsintendedpurpose.
IntellectualPropertyRights
AxisABhasintellectualpropertyrightsrelatingto
technologyembodiedintheproductdescribedinthis
document.Inparticular,andwithoutlimitation,these
intellectualpropertyrightsmayincludeoneormoreof
thepatentslistedatwww.axis.com/patent.htmandoneor
moreadditionalpatentsorpendingpatentapplicationsin
theUSandothercountries.
Thisproductcontainslicensedthird-partysoftware.See
themenuitem“About”intheproduct’suserinterfacefor
moreinformation.
ThisproductcontainssourcecodecopyrightAppleComputer,Inc.,underthetermsofApplePublicSourceLicense
2.0(seewww.opensource.apple.com/apsl).Thesourcecode
isavailablefromhttps://developer.apple.com/bonjour/
EquipmentModications
Thisequipmentmustbeinstalledandusedin
strictaccordancewiththeinstructionsgiveninthe
userdocumentation.Thisequipmentcontainsno
user-serviceablecomponents.Unauthorizedequipment
changesormodicationswillinvalidateallapplicable
regulatorycerticationsandapprovals.
TrademarkAcknowledgments
AXISCOMMUNICATIONS,AXIS,ETRAX,ARTPECandVAPIX
areregisteredtrademarksortrademarkapplicationsofAxis
ABinvariousjurisdictions.Allothercompanynamesand
productsaretrademarksorregisteredtrademarksoftheir
respectivecompanies.
Apple,Boa,Apache,Bonjour,Ethernet,InternetExplorer,
Linux,Microsoft,Mozilla,Real,SMPTE,QuickTime,UNIX,
Windows,WindowsVistaandWWWareregistered
trademarksoftherespectiveholders.Javaandall
Java-basedtrademarksandlogosaretrademarksor
registeredtrademarksofOracleand/oritsafliates.
TM
UPnP
isacerticationmarkoftheUPnP
Corporation.
SD,SDHCandSDXCaretrademarksorregisteredtrademarks
ofSD-3C,LLCintheUnitedStates,othercountriesorboth.
Also,miniSD,microSD,miniSDHC,microSDHC,microSDXC
arealltrademarksorregisteredtrademarksofSD-3C,LLC
intheUnitedStates,othercountriesorboth.
TM
Implementers
RegulatoryInformation
Europe
ThisproductcomplieswiththeapplicableCEmarking
directivesandharmonizedstandards:
•ElectromagneticCompatibility(EMC)Directive
2004/108/EC.SeeElectromagneticCompatibility
(EMC),onpage2.
•LowVoltage(LVD)Directive2006/95/EC.SeeSafety,
onpage3.
•RestrictionsofHazardousSubstances(RoHS)Directive
2011/65/EU.SeeDisposalandRecycling,onpage3.
Acopyoftheoriginaldeclarationofconformitymaybe
obtainedfromAxisCommunicationsAB.SeeContact
Information,onpage3.
ElectromagneticCompatibility(EMC)
Thisequipmenthasbeendesignedandtestedtofulll
applicablestandardsfor:
•Radiofrequencyemissionwheninstalledaccordingto
theinstructionsandusedinitsintendedenvironment.
•Immunitytoelectricalandelectromagneticphenomena
wheninstalledaccordingtotheinstructionsandused
initsintendedenvironment.
USA
Usinganunshieldednetworkcable(UTP)–This
equipmenthasbeentestedusinganunshieldednetwork
cable(UTP)andfoundtocomplywiththelimitsfora
ClassAdigitaldevice,pursuanttopart15oftheFCCRules.
Theselimitsaredesignedtoprovidereasonableprotection
againstharmfulinterferencewhentheequipmentis
operatedinacommercialenvironment.Thisequipment
generates,uses,andcanradiateradiofrequencyenergy
and,ifnotinstalledandusedinaccordancewiththe
instructionmanual,maycauseharmfulinterferenceto
radiocommunications.Operationofthisequipmentin
aresidentialareaislikelytocauseharmfulinterference
inwhichcasetheuserwillberequiredtocorrectthe
interferenceathisownexpense.
Usingashieldednetworkcable(STP)–Thisequipment
hasalsobeentestedusingashieldednetworkcable(STP)
andfoundtocomplywiththelimitsforaClassBdigital
device,pursuanttopart15oftheFCCRules.Theselimits
aredesignedtoprovidereasonableprotectionagainst
harmfulinterferenceinaresidentialinstallation.This
equipmentgenerates,usesandcanradiateradiofrequency
energyand,ifnotinstalledandusedinaccordancewith
theinstructions,maycauseharmfulinterferencetoradio
communications.However,thereisnoguaranteethat
interferencewillnotoccurinaparticularinstallation.If
thisequipmentdoescauseharmfulinterferencetoradioor
televisionreception,whichcanbedeterminedbyturning
theequipmentoffandon,theuserisencouragedtotryto
correcttheinterferencebyoneormoreofthefollowing
measures:
•Reorientorrelocatethereceivingantenna.
•Increasetheseparationbetweentheequipmentand
receiver.
•Connecttheequipmentintoanoutletonacircuit
differentfromthattowhichthereceiverisconnected.
•Consultthedealeroranexperiencedradio/TV
technicianforhelp.
Tobeusedinaresidentialareaorademandingelectrical
environment,theproductshallbeconnectedusinga
shieldednetworkcable(STP)thatisproperlygrounded.
Canada
ThisClassBdigitalapparatuscomplieswithCanadian
ICES-003.Theproductshallbeconnectedusingashielded
Page 3

networkcable(STP)thatisproperlygrounded.
CetappareilnumériquedelaclasseBestconfomeàla
normeNMB-003duCanada.Leproduitdoitêtreconnecté
àl'aided'uncâbleréseaublindé(STP)quiestcorrectement
misàlaterre.
Europe
ThisdigitalequipmentfulllstherequirementsforRF
emissionaccordingtotheClassBlimitofEN55022.The
productshallbeconnectedusingashieldednetworkcable
(STP)thatisproperlygrounded.
Thisproductfulllstherequirementsforemissionand
immunityaccordingtoEN50121-4andIEC62236-4railway
applications.
Thisproductfulllstherequirementsforimmunity
accordingtoEN61000-6-1residential,commercialand
light-industrialenvironments.
Thisproductfulllstherequirementsforimmunity
accordingtoEN61000-6-2industrialenvironments.
Thisproductfulllstherequirementsforimmunity
accordingtoEN55024ofceandcommercialenvironments
Australia/NewZealand
ThisdigitalequipmentfulllstherequirementsforRF
emissionaccordingtotheClassBlimitofAS/NZSCISPR22.
Theproductshallbeconnectedusingashieldednetwork
cable(STP)thatisproperlygrounded.
Japan
この装置は、クラスB情報技術装置です。この装置
は、家庭環境で使用することを目的としています
が、この装置がラジオやテレビジョン受信機に近
接して使用されると、受信障害を引き起こすこと
があります。取扱説明書に従って正しい取り扱い
をして下さい。本製品は、シールドネットワーク
ケーブル(STP)を使用して接続してください。また
適切に接地してください。
Korea
이기기는가정용(B급)전자파적합기기로서주로
가정에서사용하는것을목적으로하며,모든지
역에서사용할수있습니다.적절히접지된STP
(shieldedtwistedpair)케이블을사용하여제품
을연결하십시오.
Safety
ThisproductcomplieswithIEC/EN/UL60950-1and
IEC/EN/UL60950-22,SafetyofInformationTechnology
Equipment.Theproductshallbegroundedeitherthrougha
shieldednetworkcable(STP)orotherappropriatemethod.
DisposalandRecycling
Whenthisproducthasreachedtheendofitsusefullife,
disposeofitaccordingtolocallawsandregulations.For
informationaboutyournearestdesignatedcollectionpoint,
contactyourlocalauthorityresponsibleforwastedisposal.
Inaccordancewithlocallegislation,penaltiesmaybe
applicableforincorrectdisposalofthiswaste.
Europe
disposal.Businessesshouldcontacttheproductsupplierfor
informationabouthowtodisposeofthisproductcorrectly.
Thisproductcomplieswiththerequirementsof
Directive2011/65/EUontherestrictionoftheuseof
certainhazardoussubstancesinelectricalandelectronic
equipment(RoHS).
China
Thisproductcomplieswiththerequirementsofthe
legislativeactAdministrationontheControlofPollution
CausedbyElectronicInformationProducts(ACPEIP).
ContactInformation
AxisCommunicationsAB
Emdalavägen14
22369Lund
Sweden
Tel:+46462721800
Fax:+4646136130
www.axis.com
Support
Shouldyourequireanytechnicalassistance,pleasecontact
yourAxisreseller.Ifyourquestionscannotbeanswered
immediately,yourresellerwillforwardyourqueriesthrough
theappropriatechannelstoensurearapidresponse.Ifyou
areconnectedtotheInternet,youcan:
•downloaduserdocumentationandsoftwareupdates
•ndanswerstoresolvedproblemsintheFAQdatabase.
Searchbyproduct,category,orphrase
•reportproblemstoAxissupportstaffbylogginginto
yourprivatesupportarea
•chatwithAxissupportstaff(selectedcountriesonly)
•visitAxisSupportatwww.axis.com/techsup/
LearnMore!
VisitAxislearningcenterwww.axis.com/academy/for
usefultrainings,webinars,tutorialsandguides.
Thissymbolmeansthattheproductshallnotbe
disposedoftogetherwithhouseholdorcommercialwaste.
Directive2012/19/EUonwasteelectricalandelectronic
equipment(WEEE)isapplicableintheEuropeanUnion
memberstates.Topreventpotentialharmtohumanhealth
andtheenvironment,theproductmustbedisposedofin
anapprovedandenvironmentallysaferecyclingprocess.
Forinformationaboutyournearestdesignatedcollection
point,contactyourlocalauthorityresponsibleforwaste
Page 4

Page 5
AXISP3365–VEFixedDomeNetworkCamera
ENGLISH
SafetyInformation
ReadthroughthisInstallationGuidecarefullybeforeinstallingtheproduct.KeeptheInstallation
Guideforfuturereference.
HazardLevels
DANGER
WARNING
CAUTION
NOTICE
NOTICE NOTICE
Indicatesahazardoussituationwhich,ifnotavoided,willresultin
deathorseriousinjury.
Indicatesahazardoussituationwhich,ifnotavoided,couldresult
indeathorseriousinjury.
Indicatesahazardoussituationwhich,ifnotavoided,couldresult
inminorormoderateinjury.
Indicatesasituationwhich,ifnotavoided,couldresultindamage
toproperty.
OtherMessageLevels
ImportantIndicatessignicantinformationwhichisessentialfortheproduct
NoteIndicatesusefulinformationwhichhelpsingettingthemostout
tofunctioncorrectly.
oftheproduct.
5
Page 6

AXISP3365–VEFixedDomeNetworkCamera
SafetyInstructions
NOTICE
NOTICE NOTICE
•TheAxisproductshallbeusedincompliancewithlocallawsandregulations.
•StoretheAxisproductinadryandventilatedenvironment.
•AvoidexposingtheAxisproducttoshocksorheavypressure.
•Donotinstalltheproductonunstablebrackets,surfacesorwalls.
•UseonlyapplicabletoolswheninstallingtheAxisproduct.Excessiveforcecouldcause
damagetotheproduct.
•Donotusechemicals,causticagents,oraerosolcleaners.Useacleanclothdampened
withpurewaterforcleaning.
•Useonlyaccessoriesthatcomplywithtechnicalspecicationoftheproduct.Thesecanbe
providedbyAxisorathirdparty.
•UseonlysparepartsprovidedbyorrecommendedbyAxis.
•Donotattempttorepairtheproductbyyourself.ContactAxissupportoryourAxis
resellerforservicematters.
Transportation
NOTICE
NOTICE NOTICE
•WhentransportingtheAxisproduct,usetheoriginalpackagingorequivalenttoprevent
damagetotheproduct.
Battery
TheAxisproductusesa3.0VBR/CR2032lithiumbatteryasthepowersupplyforitsinternal
real-timeclock(RTC).Undernormalconditionsthisbatterywilllastforaminimumofveyears.
LowbatterypoweraffectstheoperationoftheRTC,causingittoresetateverypower-up.When
thebatteryneedsreplacing,alogmessagewillappearintheproduct’sserverreport.Formore
informationabouttheserverreport,seetheproduct´ssetuppagesorcontactAxissupport.
Thebatteryshouldnotbereplacedunlessrequired,butifthebatterydoesneedreplacing,contact
Axissupportatwww.axis.com/techsupforassistance.
WARNING
•Riskofexplosionifthebatteryisincorrectlyreplaced.
•ReplaceonlywithanidenticalbatteryorabatterywhichisrecommendedbyAxis.
•Disposeofusedbatteriesaccordingtolocalregulationsorthebatterymanufacturer's
instructions.
6
Page 7

AXISP3365–VEFixedDomeNetworkCamera
ENGLISH
DomeCover
NOTICE
NOTICE NOTICE
•Becarefulnottoscratch,damageorleavengerprintsonthedomecoverbecausethis
coulddecreaseimagequality.Ifpossible,keeptheprotectiveplasticonthedomecover
untiltheinstallationiscomplete.
•Donotcleanadomecoverthatlookscleantotheeyeandneverpolishthesurface.
Excessivecleaningcoulddamagethesurface.
•Forgeneralcleaningofthedomecoveritisrecommendedtouseanon-abrasive,
solvent-freeneutralsoapordetergentmixedwithpurewaterandasoft,cleancloth.Rinse
wellwithpurelukewarmwater.Drywithasoft,cleanclothtopreventwaterspotting.
•Neveruseharshdetergents,gasoline,benzeneoracetoneetc.andavoidcleaningthe
domecoverindirectsunlightoratelevatedtemperatures.
7
Page 8

8
Page 9

AXISP3365–VEFixedDomeNetworkCamera
ENGLISH
InstallationGuide
ThisInstallationGuideprovidesinstructionsforinstallingAXISP3365–VENetworkCameraonyour
network.Forotheraspectsofusingtheproduct,seetheUserManualavailableatwww.axis.com
InstallationSteps
1.Makesurethepackagecontents,toolsandothermaterialsnecessaryfortheinstallation
areinorder.Seepage9.
2.Studythehardwareoverview.Seepage10.
3.Studythespecications.Seepage13.
4.Installthehardware.Seepage16.
5.Accesstheproduct.Seepage21.
PackageContents
•AXISP3365–VEFixedDomeNetworkCamera
•1Resitorxscrewdriver
•1Smokeddomecoverwithgasket
•5mnetworkcablewithgasket
•1cablegasket
•1terminalconnector
•1weathershield
•InstallationandManagementSoftwareCD
•Printedmaterials
-InstallationGuide(thisdocument)
-Drilltemplate(1x)
-Extraserialnumberlabel(2x)
-AVHSAuthenticationkey
OptionalAccessories
•Multi-userdecoderlicensepack
•AXIST8414InstallationDisplay
•AXISPoEMidspans
•AXIST90AIlluminators
•IP51-rateddrop-ceilingmountkit
•Pendantkit
9
Page 10
AXISP3365–VEFixedDomeNetworkCamera
1 2 3 4 5 6
7 8
9 10
13
14
12
11
15
16
•Mountingbracket
•Cableshield
•Pendantkitincludingweathershield
•AudioI/Ocablewithpre-mountedgasket
Forinformationaboutavailableaccessories,seewww.axis.com
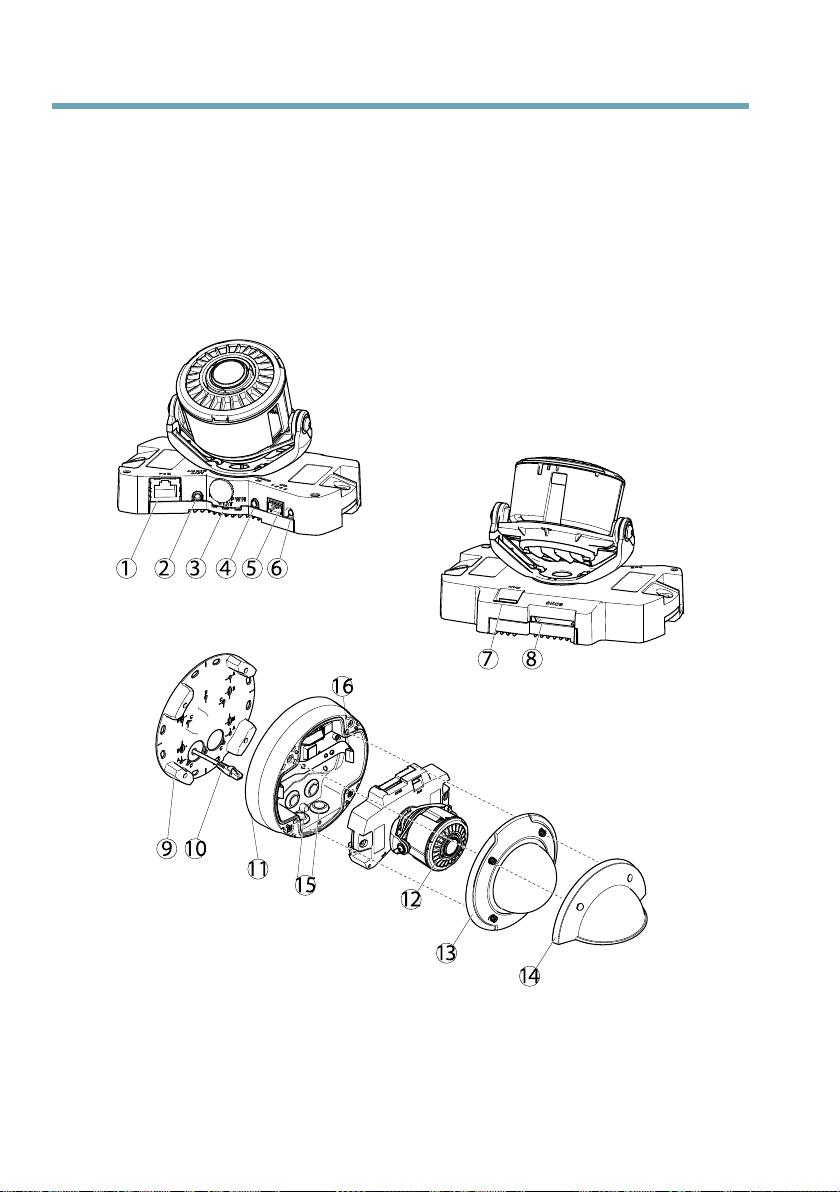
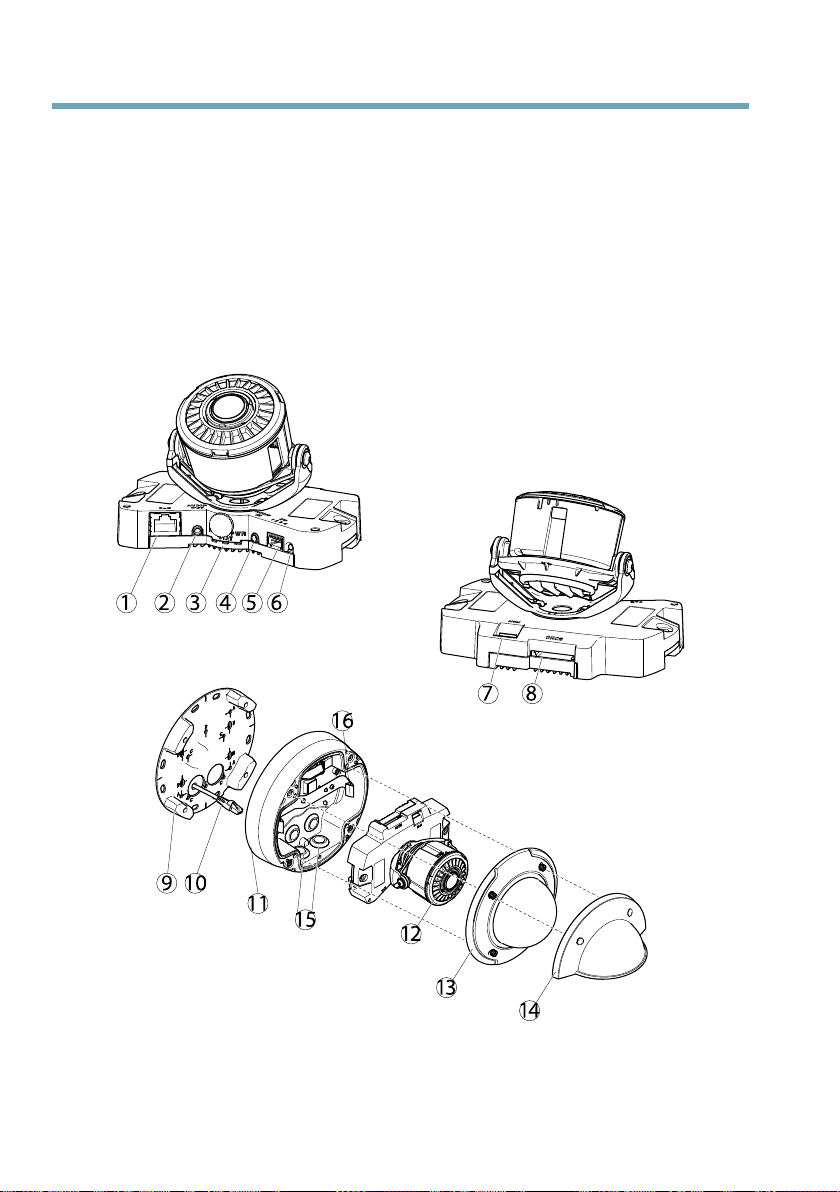
HardwareOverview
1.
Networkconnector
2.
Audioout
3.
LEDindicators(network,status,power)
10
Page 11
AXISP3365–VEFixedDomeNetworkCamera
ENGLISH
4.
Audioin
5.
I/Oconnector
6.
Controlbutton
7.
Fanconnector
8.
SDcardslot
9.
Mountingbracket
10.
Networkcable
11.
Unitcasing
12.
Cameraheater
13.
Domecover
14.
Weathershield
15.
Sideholesforcablesroutedalongwall
16.
Spring
Dimension(HxW)
117x179mm(4.59”x7.05”)
Weight
1.6kg(3.5lb)
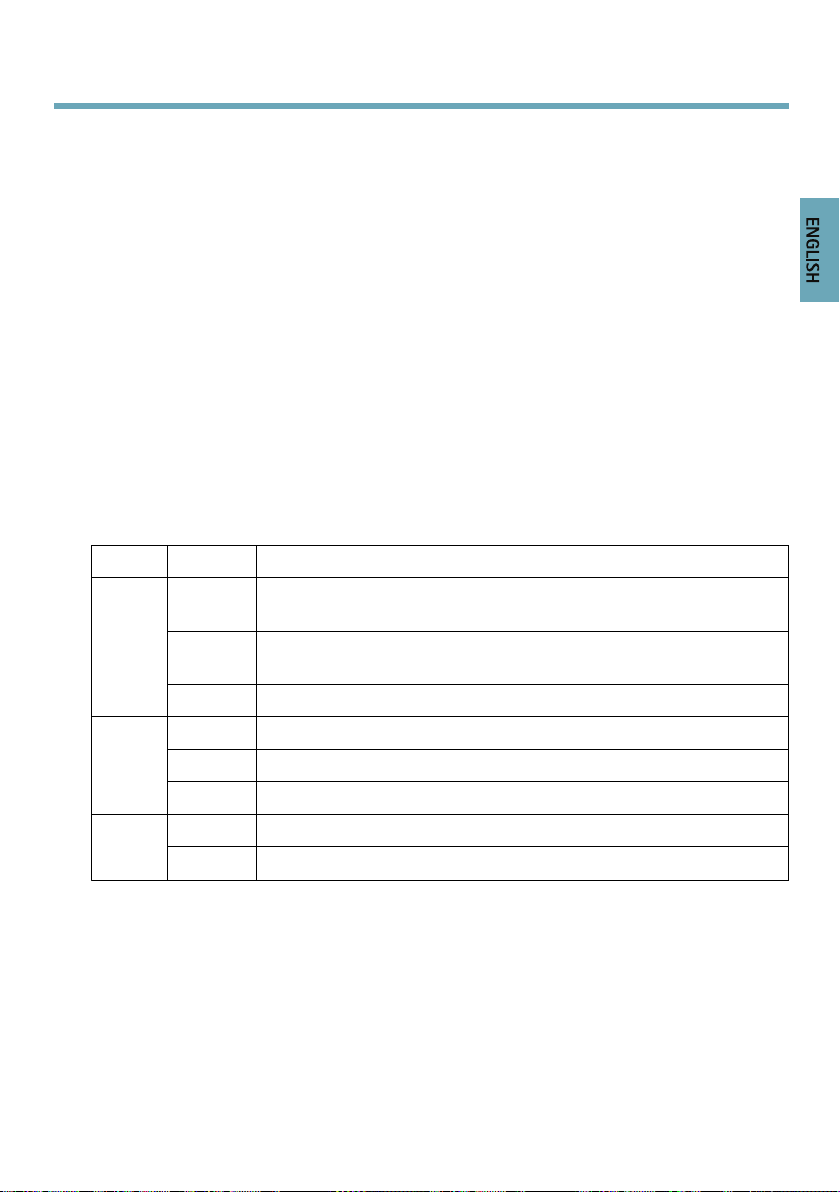
LEDIndicators
LED
Network
Status
Color
Green
Amber
UnlitNonetworkconnection.
GreenSteadygreenfornormaloperation.
Amber
Red
Green
Amber
Indication
Steadyforconnectiontoa100Mbit/snetwork.Flashesfornetwork
activity.
Steadyforconnectiontoa10Mbit/snetwork.Flashesfornetwork
activity.
Steadyduringstartupandwhenrestoringsettings.
Slowashforfailedupgrade.
Normaloperation. Power
Flashesgreen/amberduringrmwareupgrade.
11
Page 12

AXISP3365–VEFixedDomeNetworkCamera
Note
•TheStatusLEDcanbeconguredtobeunlitduringnormaloperation.Tocongure,go
toSetup>SystemOptions>Ports&Devices>LED.Seetheonlinehelpformore
information.
•TheStatusLEDcanbeconguredtoashwhileaneventisactive.
•TheStatusLEDcanbeconguredtoashforidentifyingtheunit.GotoSetup>System
Options>Maintenance.
ConnectorsandButtons
Forspecicationsandoperatingconditions,seepage13.
NetworkConnector
RJ45Ethernetconnector.SupportsPoweroverEthernet(PoE).
NOTICE
NOTICE NOTICE
Duetolocalregulationsortheenvironmentalandelectricalconditionsinwhichtheproduct
istobeused,ashieldednetworkcable(STP)maybeappropriateorrequired.Allcables
connectingtheproducttothenetworkandthatareroutedoutdoorsorindemanding
electricalenvironmentsshallbeintendedfortheirspecicuse.Makesurethatthenetwork
devicesareinstalledinaccordancewiththemanufacturer’sinstructions.Forinformation
aboutregulatoryrequirements,seeElectromagneticCompatibility(EMC),onpage2.
I/OConnector
Usewithexternaldevicesincombinationwith,forexample,tamperingalarms,motiondetection,
eventtriggering,timelapserecordingandalarmnotications.Inadditiontothe0VDCreference
pointandpower(DCoutput),theI/Oconnectorprovidestheinterfaceto:
•Digitaloutput–ForconnectingexternaldevicessuchasrelaysandLEDs.Connected
devicescanbeactivatedbytheVAPIX®ApplicationProgrammingInterface,output
buttonsontheLiveViewpageorbyanActionRule.Theoutputwillshowasactive
(shownunderSystemOptions>Ports&Devices)ifthealarmdeviceisactivated.
•Digitalinput–Analarminputforconnectingdevicesthatcantogglebetweenanopen
andclosedcircuit,forexample:PIRs,door/windowcontacts,glassbreakdetectors,
etc.Whenasignalisreceivedthestatechangesandtheinputbecomesactive(shown
underSystemOptions>Ports&Devices).
AudioConnector
TheAxisproducthasthefollowingaudioconnectors:
•Audioin(pink)–3.5mminputforamonomicrophone,oraline-inmonosignal(left
channelisusedfromastereosignal).
12
Page 13
AXISP3365–VEFixedDomeNetworkCamera
ENGLISH
•Audioout(green)–3.5mmoutputforaudio(linelevel)thatcanbeconnectedto
apublicaddress(PA)systemoranactivespeakerwithabuilt-inamplier.Astereo
connectormustbeusedforaudioout.
SDCardSlot
AnSDcard(notincluded)canbeusedforlocalrecordingwithremovablestorage.Formore
information,seeSpecications,onpage13.
NOTICE
NOTICE NOTICE
Topreventcorruptionofrecordings,theSDcardshouldbeunmountedbeforeremoval.To
unmount,gotoSetup>SystemOptions>Storage>SDCardandclickUnmount.
ControlButton
Thecontrolbuttonisusedfor:
•Resettingtheproducttofactorydefaultsettings.Seepage21.
•ConnectingtoanAXISVideoHostingSystemserviceorAXISInternetDynamicDNS
Service.Formoreinformationabouttheseservices,seetheUserManual.
Specications
OperatingConditions
TheAxisproductisintendedforoutdooruse.
Product
AXISP3365–VEIEC62262IK10,
Classication
NEMA250Type4X
Temperature
-40°Cto55°C(-40°Fto131°F)
PowerConsumption
ProductPoE
AXISP3365–VE
PoweroverEthernet(PoE)IEEE802.3af/802.3atType1Class3
13
Page 14
Connectors
1 2 3 4
I/OConnector
4-pinterminalblockfor:
•Auxiliarypower(DCoutput)
•DigitalInput
•DigitalOutput
•0VDC(-)
AXISP3365–VEFixedDomeNetworkCamera
FunctionPinNotes
0VDC(-)
DCoutput
DigitalInput
Digital
Output
1
2
Canbeusedtopowerauxiliaryequipment.
Note:Thispincanonlybeusedaspowerout.
3
Connecttopin1toactivate,orleaveoating
(unconnected)todeactivate
4
Connectedtopin1whenactivated,oating
(unconnected)whendeactivated.Ifused
withaninductiveload,e.g.arelay,adiode
mustbeconnectedinparallelwiththeload,
forprotectionagainstvoltagetransients.
Specications
0VDC
3.3VDC
Maxload=50mA
0tomax40VDC
0tomax40VDC,open
drain,100mA
14
Page 15
AXISP3365–VEFixedDomeNetworkCamera
3.3 V max 50 mA
1
2
3
4
123
ENGLISH
AudioConnector
3.5mmaudio
connectors(stereo)
AudioInput
1Tip
Microphone/Linein
AudioOutput
Lineout(mono)
2Ring
3SleeveGroundGround
SDCardSlot
SupportsSDcardswithupto64GBofstorage.Forbestrecordingperformance,useanSDHC
orSDXCcardwithspeedclass10.
15
Page 16
AXISP3365–VEFixedDomeNetworkCamera
1
2
3
InstalltheHardware
PreparetheNetworkCable
Ifacableotherthantheprovidedcableisused,youneedtoprepareanetworkcablewithagasket.
Gentlyforcethecablethroughthegasketprovidedandattachanetworkconnector.Itmaybe
necessarytopierceaholeinthegasketwiththeresitorxscrewdriver.
Note
•Donotforcethenetworkconnectorintothegasket.
•Donotpiercethegasketwithaknifeorothersharpobject.
PreparetheUnitCasing(forroutingcablesalongthewall)
Ifthecablesaretoberoutedalongthewall,preparetheunitcasingasfollows:
1.Detachthesidelidthatisattachedtotheunitcasingbyremovingthescrew.
2.Loosenthetwoscrewsonthecableshieldanddetachthebottompart.
3.Attachthebottompartofthecableshieldtotheunitcasingwiththescrew.
1.
Cableshield(optionalaccessory)–toppart
2.
Cableshield(optionalaccessory)–bottompart
3.
Unitcasing
16
Page 17

AXISP3365–VEFixedDomeNetworkCamera
ENGLISH
ReplaceClear/SmokedDomeCover(Optional)
TheAxisproductissuppliedwithanoptionaldome.Toreplacethedomecover:
1.Loosenthe4screwsunderthedomecoverthatholdthedomeinplace.
2.Replacetheolddomewiththenew.Makesuretherubbergasketsitssecurelyinplace
andtightenthescrews.
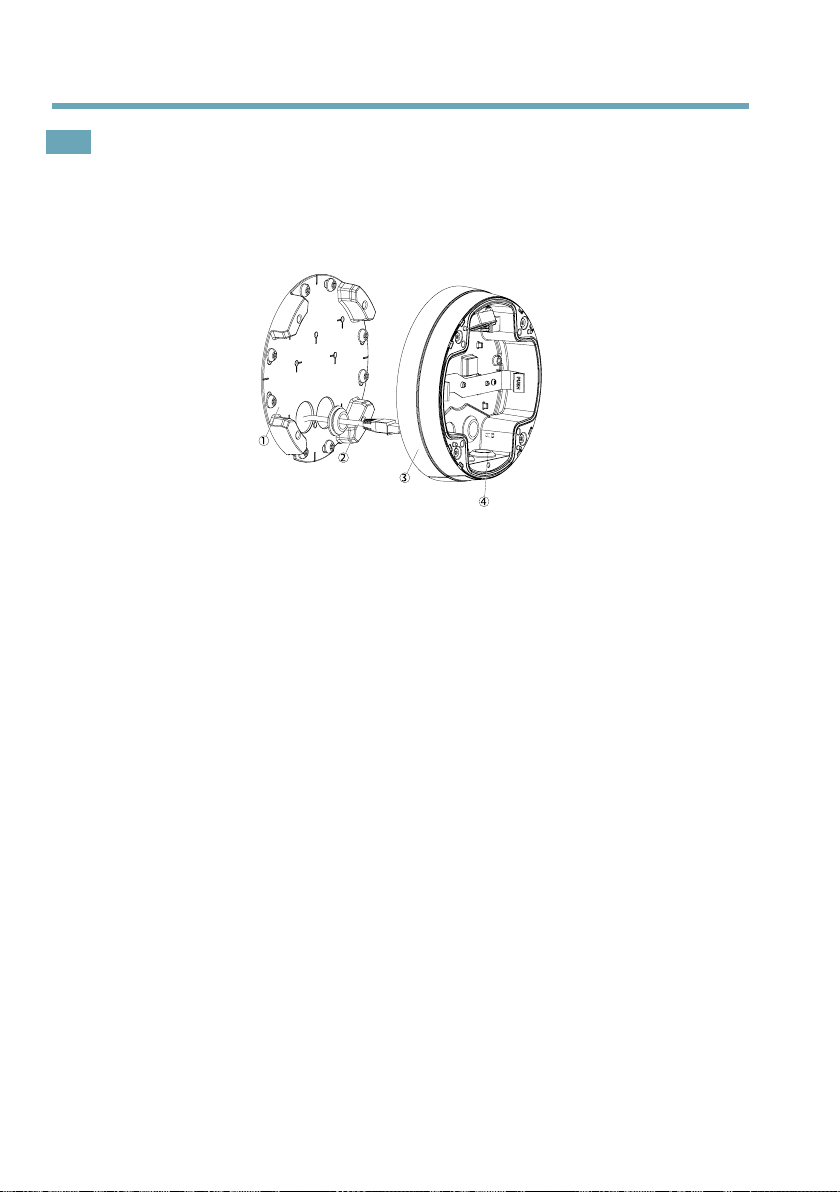
MountingBracket
Themountingplatehas4mountingpatterns(A,B,C,D).Themountingpatternsfollowthestandard
forthefollowingmountingoptions:
•A:4"squarebox
•B:standard-sizedUSdoublegangjunctionbox
•C:4"octagonbox
•D:standard-sizedUSsinglegangjunctionbox
RoutetheCables
Dependingonwhetheryouwanttoroutethecablesthroughoralongthewall,followtherelevant
instructionsbelow.Toroutecablesalongthewall:
1.Usingthedrilltemplatedrill4holesinthewall.
2.Attachthemountingbrackettothewallusing4screwsappropriateforthewallmaterial.
3.Removethecameraunitfromtheunitcasingbypushingthespringsaside.
4.Removethegasketsfromthesideholesintheunitcasing.Ifthereisonlyonecable,
removeonlyonegasket.
5.Placetheunitcasingonthemountingbracketandattachitbytighteningthefourscrews.
6.Pullthecablesupthroughthesideholesintheunitcasing.
7.Dragthegasketsalongthecableandplugthemintotheholes.Thegasketsshouldt
snuglyintheholeswithnofoldsorbends.
8.Re-attachthetoppartofthecableshieldbytighteningthetwoscrews.
17
Page 18
AXISP3365–VEFixedDomeNetworkCamera
1
2
3
4
Note
Toavoidmoisture-relatedproblemsitisrecommendedthatthecablesareroutedtothe
camerafrombelowwiththecableholesfacingdownwards.
Toroutecablesthroughthewall:
1.
Mountingbracket
2.
Networkcablewithgasket
3.
Unitcasing
4.
Removegasketsfromholes
1.Usingthedrilltemplatedrill4holesinthewall.
2.Routethenetworkcable(andtheI/O,audiocableifnecessary)throughthewalland
throughtheholesinthemountingbracket.
3.Attachthemountingbrackettothewallusing4screwsappropriateforthewallmaterial.
4.Removethecameraunitfromtheunitcasingbypushingthespringsaside.
5.Removethegasketsfromthebackholesintheunitcasing.Ifthereisonlyonecable,
removeonlyonegasket.
6.Routethecablesthroughtheseholes.
7.Dragthegasketsalongthecablesandplugthemintotheholes.Thegasketsshouldt
snuglyintheholeswithnofoldsorbends.
8.Attachtheunitcasingtothemountingbracketbytighteningthefourscrews.
18
Page 19

AXISP3365–VEFixedDomeNetworkCamera
1
2
3
ENGLISH
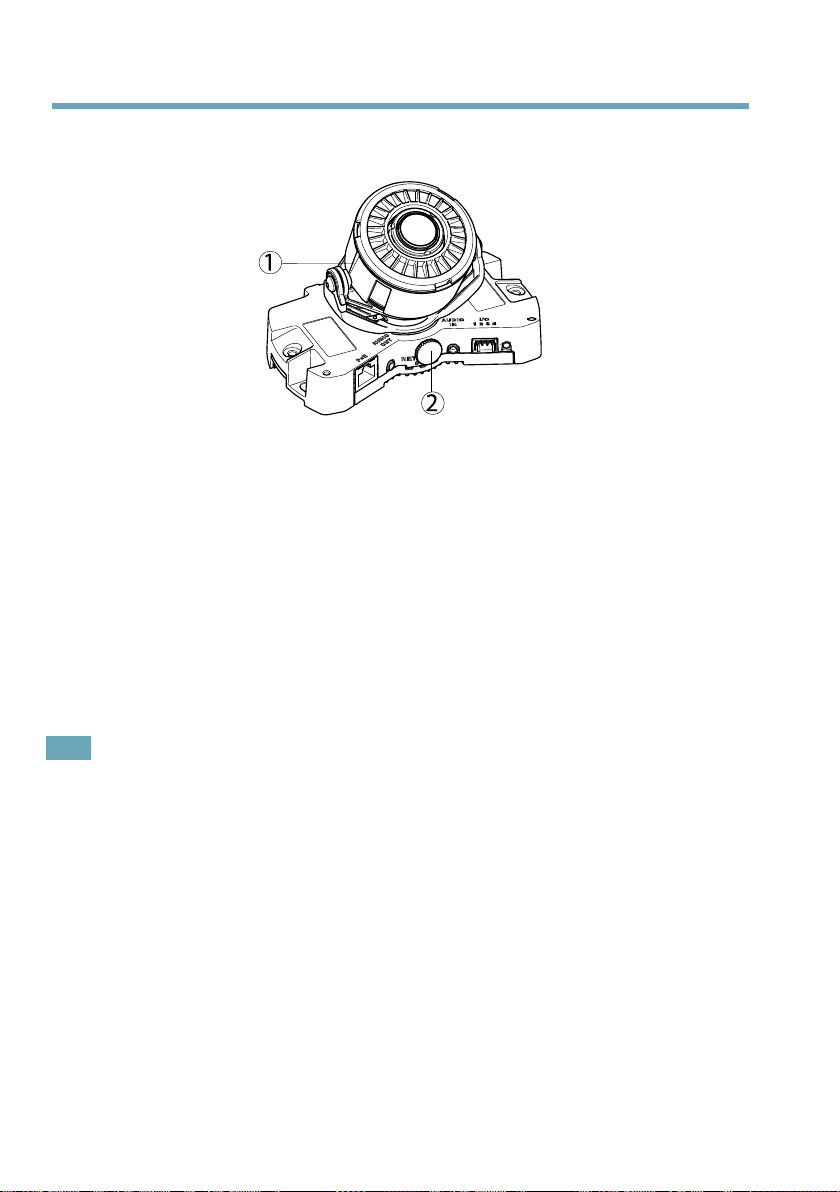
InstalltheCameraUnit
1.
Fanconnector
2.
Cameraunit
3.
Networkcable
Note
•Becarefulnottostretchorbendthenetworkcabletoomuch.Thiscouldcausedamageto
thenetworkcable.
•TheAxisproductcanalsobettedwithametalconduitforprotectingthecablingwhen
cablesareroutedalongthewall.
1.Attachthenetworkcabletothecameraunit;andthecableforaudioandI/Oif
required.Itisrecommendedthatthenetworkcableistwistedtoaloopasshowninthe
illustrationabove.
2.InserttheSDmemorycard(optional).
3.Pullasidethespringsintheunitcasingandclickthecameraunitinplace.
4.Attachthefanconnectortotheconnectorinthecameraunit.
19
Page 20
AXISP3365–VEFixedDomeNetworkCamera
1
2
AdjusttheLens
1.
Linestohelpwithhorizontalalignment
2.
Lockingscrew
OpentheLiveViewpage(seeAccesstheProduct,onpage21)inthewebinterfaceandmakethe
followingadjustmentstothecamera:
1.Loosenthelockingscrew.
2.Turnthelenstothedesiredposition.Makesurethelinesoneithersideofthelensare
alignedhorizontally.Ensurethatthemarkonthelenscover,betweenthehorizontal
lines,isfacingup.
3.Oncesatised,gentlytightenthelockingscrewtosecurethecamera’sposition.
4.OpentheFocusAdjustmentpageinthewebinterfaceunderSetup>BasicSetup>
Focus&Zoom,andfollowtheon-screeninstructions.Usetheimagewindowtoadjust
thefocusandzoom.Seetheonlinehelplesformoreinformation.
Note
•Duetothedome’srefraction,theimagemayappearslightlyoutoffocusoncethedome
hasbeenplaced.TocorrectthisgototheFocusAdjustmentpageintheWebinterface
underSetup>BasicSetup>Focus&Zoom,andadjustthefocusagain.
•Adjustingthefocusandzoommanuallycandamagethelens.
CompletetheInstallation
1.Rotatetheblackshieldinsidethedometomatchthecamera’sposition.
2.Ifrequired,attachtheweathershieldtothecamerabeforeyouattachthedomecover.
Todothisremovethetwoscrewsinthedomecover.Transferthewashersfromthese
screwstothescrewsusedontheweathershield,andattachtheweathershield.
3.Makesuretherubbergasketsitssecurelyonthedomecover,attachthedomecoverto
theunitcasingbytighteningthe4screws.
Theinstallationisnowcomplete.
20
Page 21

AXISP3365–VEFixedDomeNetworkCamera
ENGLISH
AccesstheProduct
UsethetoolsprovidedontheInstallationandManagementSoftwareCDtoassignanIPaddress,
setthepasswordandaccessthevideostream.Thisinformationisalsoavailablefromthesupport
pagesonwww.axis.com/techsup/
ResettoFactoryDefaultSettings
Important
Resettofactorydefaultshouldbeusedwithcaution.Aresettofactorydefaultwillreset
allsettings,includingtheIPaddress,tothefactorydefaultvalues.
Note
TheinstallationandmanagementsoftwaretoolsareavailableontheCDsuppliedwiththe
productandfromthesupportpagesonwww.axis.com/techsup
Toresettheproducttothefactorydefaultsettings:
1.Disconnectpowerfromtheproduct.
2.Pressandholdthecontrolbuttonandreconnectpower.SeeHardwareOverview,on
page10.
3.Keepthecontrolbuttonpressedforabout15–30secondsuntilthestatusLEDindicator
ashesamber.
4.Releasethecontrolbutton.TheprocessiscompletewhenthestatusLEDindicatorturns
green.Theproducthasbeenresettothefactorydefaultsettings.IfnoDHCPserveris
availableonthenetwork,thedefaultIPaddressis192.168.0.90
5.Usingtheinstallationandmanagementsoftwaretools,assignanIPaddress,setthe
password,andaccessthevideostream.
Itisalsopossibletoresetparameterstofactorydefaultviathewebinterface.GotoSetup
>SystemOptions>Maintenance.
FurtherInformation
TheUserManualisavailableatwww.axis.com
Visitwww.axis.com/techsuptocheckifthereisupdatedrmwareavailableforyournetwork
product.Toseethecurrentlyinstalledrmwareversion,gotoSetup>About.
VisitAxislearningcenterwww.axis.com/academyforusefultrainings,webinars,tutorialsand
guides.
21
Page 22

AXISP3365–VEFixedDomeNetworkCamera
WarrantyInformation
ForinformationaboutAxis’productwarrantyandtheretorelatedinformation,see
www.axis.com/warranty/
22
Page 23
AXISP3365–VEFixedDomeNetworkCamera
FRANÇAIS
Informationssurlasécurité
Lisezattentivementceguided'installationavantd'installerl'appareil.Conservezleguide
d'installationpourtouteréférenceultérieure.
Niveauxderisques
DANGER
AVERTISSEMENT
ATTENTION
AVIS
AVIS AVIS
Indiqueunesituationdangereusequi,siellen'estpasévitée,
entraîneraledécèsoudesblessuresgraves.
Indiqueunesituationdangereusequi,siellen'estpasévitée,
pourraitentraînerledécèsoudesblessuresgraves.
Indiqueunesituationdangereusequi,siellen'estpasévitée,
pourraitentraînerdesblessureslégèresoumodérées.
Indiqueunesituationqui,siellen'estpasévitée,pourrait
endommagerl'appareil.
Autresniveauxdemessage
ImportantIndiquelesinformationsimportantes,nécessairespourassurerle
NoteIndiquelesinformationsutilesquipermettrontd'obtenirle
bonfonctionnementdel'appareil.
fonctionnementoptimaldel'appareil.
23
Page 24

AXISP3365–VEFixedDomeNetworkCamera
Consignesdesécurité
AVIS
AVIS AVIS
•LeproduitAxisdoitêtreutiliséconformémentauxloisetrèglementationslocalesen
vigueur.
•ConserverceproduitAxisdansunenvironnementsecetventilé.
•NepasexposerceproduitAxisauxchocsouauxfortespressions.
•Nepasinstallerceproduitsurdessupports,surfacesoumursinstables.
•Utiliseruniquementdesoutilsrecommandéspourl'installationdel'appareilAxis.Une
forceexcessiveappliquéesurl'appareilpourraitl'endommager.
•Nepasutiliserdeproduitschimiques,desubstancescaustiquesoudenettoyants
pressurisés.Utiliserunchiffonpropreimbibéd'eaupurepourlenettoyage.
•Utiliseruniquementdesaccessoiresconformesauxcaractéristiquestechniquesduproduit.
IlspeuventêtrefournisparAxisouuntiers.
•UtiliseruniquementlespiècesderechangefourniesourecommandéesparAxis.
•Nepasessayerderéparerceproduitparvous-même.Contacterl'assistancetechnique
d'AxisouvotrerevendeurAxispourdesproblèmesliésàl'entretien.
Transport
AVIS
AVIS AVIS
•LorsdutransportduproduitAxis,utilisezl'emballaged'origineouunéquivalentpour
éviterd'endommagerleproduit.
Batterie
LeproduitAxisutiliseunebatterieaulithiumCR20323,0Vcommealimentationdesonhorloge
entempsréelinterne(RTC).Dansdesconditionsnormales,cettebatterieauneduréedevie
minimaledecinqans.
UnebatteriefaibleaffectelefonctionnementduRTC,entraînantsaréinitialisationàchaquemise
soustension.Unmessagedejournalapparaîtlorsquelabatteriedoitêtreremplacée.
Labatteriedoitêtreremplacéeuniquementencasdebesoin,etpourlefaire,contactezl'assistance
techniqued'Axisàl'adressewww.axis.com/techsup/pourobtenirdel'aide.
24
Page 25

AXISP3365–VEFixedDomeNetworkCamera
FRANÇAIS
AVERTISSEMENT
•Risqued'explosionsilabatterieestremplacéedefaçonincorrecte.
•Remplacez-launiquementparunebatterieidentiqueouunebatterierecommandéepar
Axis.
•Mettezaurebutlespilesusagéesconformémentauxréglementationslocalesouaux
instructionsdufabricantdelabatterie.
Couverclededôme
AVIS
AVIS AVIS
•Veillezànepasrayer,endommageroulaisserd'empreintessurlecouvercledudômecar
celapourraitaltérerlaqualitéd'image.Laissez,sipossible,laprotectionenplastiquesur
lecouvercledudômejusqu’àlandel’installation.
•Nenettoyezpaslecouvercledudômes'ilsemblepropreàl'œilnuetnefrottezjamaissa
surface.Unnettoyageexcessifpourraitendommagerlasurface.
•Pourlenettoyagegénéralducouvercledudôme,ilestrecommandéd'utiliserunproduit
nonabrasif,unsavonneutresanssolvantouundétergentmélangéavecdel'eaupureet
unchiffondouxpropre.Rincezbienàl'eautièdepure.Séchezavecunchiffondouxet
proprepouréviterlestâchesd'eau.
•N'utilisezjamaisdedétergentsagressifs,d'essence,debenzèneoud'acétone,etc.et
éviteztouteexpositiondirecteauxrayonsdusoleilouàdestempératuresélevéeslors
dunettoyage.
25
Page 26

26
Page 27

AXISP3365–VEFixedDomeNetworkCamera
FRANÇAIS
Guided'installation
Ceguided'installationexpliquecommentinstallerlacaméraréseauAXISP3365–VEsurvotre
réseau.Pourtouteautreinformationrelativeàl'utilisationduproduit,reportez-vousaumanuelde
l'utilisateurdisponiblesurlesitewww.axis.com
Procéduresd’installation
1.Assurez-vousquelesoutilsetautresmatérielsnécessairesàl'installationsontinclus
dansl'emballage.Cf.page27.
2.Consultezladescriptiondumatériel.Cf.page28.
3.Étudiezlescaractéristiques.Cf.page31.
4.Installezlematériel.Cf.page34.
5.Utilisezleproduit.Cf.page39.
Contenudel'emballage
•CaméraréseauàdômexeAXISP3365–VE
•1tournevisResitorx
•1couverclededômefuméavecjoint
•Câbleréseaude5mavecjoint
•1jointdecâble
•1connecteurpourterminaux
•1protectionétanche
•CDd'installationetdegestion
•Documentsimprimés
-Guided'installation(cedocument)
-Gabaritdeperçage(1x)
-Étiquettesupplémentairereprenantlenumérodesérie(x2)
-Cléd’authenticationAVHS
Accessoiresenoption
•Packdelicencesmulti-utilisateursdudécodeur
•Moniteurd’installationAXIST8414
•InjecteurPoEAXIS
•IlluminateursAXIST90A
•Kitdexationaufaux-plafondconformeàlanormeIP51
27
Page 28
AXISP3365–VEFixedDomeNetworkCamera
1 2 3 4 5 6
7 8
9 10
13
14
12
11
15
16
•Kitdesuspension
•Supportdemontage
•Protectiondecâble
•Kitd'adaptateurdesuspensioncomprenantuneprotectionétanche
•Câbled'E/Saudioavecjointprémonté
Pourplusd’informationssurlesaccessoiresdisponibles,consultezlesitewww.axis.com
Aperçudumatériel
1.
Connecteurréseau
2.
Sortieaudio
28
Page 29
AXISP3365–VEFixedDomeNetworkCamera
FRANÇAIS
3.
VoyantsDEL(réseau,état,alimentation)
4.
Entréeaudio
5.
Connecteurd'E/S
6.
Boutondecommande
7.
Connecteurdeventilateur
8.
EmplacementpourcarteSD
9.
Supportdemontage
10.
Câbleréseau
11.
Boîtierdel’unité
12.
Régulateurdechaleurdelacaméra
13.
Couverclededôme
14.
Protectionétanche
15.
Trouslatérauxpourl'acheminementdescâbleslelongdumur
16.
Ressort
Dimensions(HxL)
117x179mm(4,59x7,05po)
Poids
1,6kg(3,5lb)
Voyants
Voyant
Réseau
État
tation
Couleur
Vert
Orange
Éteint
VertVertxeencasdefonctionnementnormal.
Orange
Rouge
VertFonctionnementnormal. AlimenOrange
Indication
Fixeencasdeconnexionàunréseaude100Mbits/s.Clignoteencas
d’activitéréseau.
Fixeencasdeconnexionàunréseaude10Mbits/s.Clignoteencas
d’activitéréseau.
Pasdeconnexionréseau.
Fixependantledémarrageetlorsdelarestaurationdesparamètres.
Clignotelentementencasd’échecdelamiseàniveau.
Levoyantvert/orangeclignotependantlamiseàniveaudu
microprogramme.
29
Page 30

AXISP3365–VEFixedDomeNetworkCamera
Note
•Levoyantd'étatpeutêtreéteintpendantlefonctionnementnormal.Pourcefaire,
rendez-vousdansSetup>SystemOptions>Ports&Devices>LED(Conguration
>Optionssystème>Portsetdispositifs>DEL).Consultezl'aideenlignepourplus
d'informations.
•Levoyantd'étatpeutclignoterlorsqu'unévénementestactif.
•Levoyantd'étatpeutclignoterpendantl'identicationdel'appareil.Rendez-vous
dansSetup>SystemOptions>Maintenance(Conguration>Optionssystème>
Maintenance).
Connecteursetboutons
Pourlescaractéristiquesetlesconditionsd'utilisation,consultezpage31.
Connecteurréseau
ConnecteurEthernetRJ45.Prendenchargel'alimentationparEthernet(PoE).
AVIS
AVIS AVIS
Lesréglementationslocalesoulesconditionsenvironnementalesetélectriquesdans
lesquellesleproduitestutilisépeuventnécessiterl'utilisationd'uncâbleréseaublindé
(STP).Touslescâblesréseauquisontacheminésàl'extérieuroudansdesenvironnements
électriquesexigeantsdoiventêtreblindés(STP)etdestinésàleurusagespécique.
Assurez-vousquelecommutateurréseauestconvenablementmisàlaterre.Pourplus
d’informationssurlesexigencesréglementaires,consultezElectromagneticCompatibility
(EMC),onpage2.
Connecteurd'E/S
Utilisez-leavecdespériphériquesexternesassociésauxapplicationstellesquelesalarmesde
détérioration,ladétectiondemouvement,ledéclenchementd'événements,l'enregistrementà
intervallesetlesnoticationsd'alarme.Enplusdupointderéférence0VCCetdel'alimentation
(sortieCC),leconnecteurd'E/Sfournituneinterfaceauxélémentssuivants:
•Sortienumérique–Permetdeconnecterdesdispositifsexternes,commedesrelais
oudesvoyants.Lesappareilsconnectéspeuventêtreactivésparl'interfacede
programmationd'applicationsVAPIX®,desboutonsdesortiesurlapageLiveView
(Vidéoendirect)ouparunerègled'action.Lasortieestconsidéréecommeétantactive
(commeindiquédansSystemOptions>Ports&Devices(Optionsdusystème>Portset
dispositifs))siledispositifd’alarmeestactivé.
•Entréenumérique–Entréed'alarmeutiliséepourconnecterdesdispositifspouvant
passerd'uncircuitouvertàuncircuitfermé,parexemple:détecteursinfrarougepassifs,
contactsdeporte/fenêtre,détecteursdebrisdeverre,etc.Àlaréceptiond'unsignal,
l'étatchangeetl'entrées'active(sousSystemOptions>Ports&Devices(Optionsdu
système>Portsetdispositifs)).
30
Page 31

AXISP3365–VEFixedDomeNetworkCamera
FRANÇAIS
Connecteuraudio
LeproduitAxisdisposedesconnecteursaudiosuivants:
•Entréeaudio(rose):entréede3,5mmpourmicrophonemonoousignald’entréemono
(lecanaldegaucheestutilisépourlesignalstéréo).
•Sortieaudio(verte):sortiede3,5mm(sortiedeligne)quipeutêtreconnectéeàun
systèmedesonorisation(PA)ouàunhaut-parleuractifavecamplicateurintégré.Un
connecteurstéréodoitêtreutilisépourlasortieaudio.
EmplacementpourcarteSD
UnecarteSD(nonfournie)peutêtreutiliséepourl’enregistrementlocalsurstockageamovible.
Pourensavoirplus,consultezCaractéristiquestechniques,àlapage31.
AVIS
AVIS AVIS
Pouréviterlacorruptiondesenregistrements,lacarteSDdoitêtredémontéeavantson
retrait.Pourcefaire,rendez-vousdansSetup>SystemOptions>Storage>SDCard
(Conguration>Optionsdusystème>Stockage>CarteSD)etcliquezsurUnmount
(Démonter).
Boutondecommande
Leboutondecommandepermetderéaliserlesopérationssuivantes:
•Réinitialisationduproduitauxparamètresd’usinepardéfaut.Cf.page39.
•ConnexionauserviceduSystèmed'hébergementvidéoAXISouauserviceAXISInternet
DynamicDNS.Pourplusd'informationssurcesservices,reportez-vousauManuelde
l'utilisateur.
Caractéristiquestechniques
Conditionsd'utilisation
L'appareilAxisestuniquementdestinéàuneutilisationenextérieur.
Produit
AXISP3365–VEIEC62262IK10,
Classication
NEMA250Type4X
Température
-40°Cà55°C
31
Page 32

Consommationélectrique
1 2 3 4
ProduitPoE
AXISP3365–VE
Connecteurs
Connecteurd'E/S
Blocterminalà4brochespour:
•Alimentationauxiliaire
(sortieCC)
•Entréenumérique
•Sortienumérique
•0VCC(-)
AXISP3365–VEFixedDomeNetworkCamera
AlimentationparEthernet(PoE)IEEE802.3af/802.3atType1
Classe3
FonctionBro-
0VCC(-)
SortieCC
Entrée
numérique
Sortie
numérique
che
1
2
3
4
Notes
Peutserviràalimenterlematériel
auxiliaire.
Remarque:cettebrochenepeut
êtreutiliséequecommesortie
d’alimentation.
Connectez-laàlabroche1pourl’activer
oulaissez-laotter(déconnectée)pour
ladésactiver.
Connectéeàlabroche1lorsqu'elleest
activée,otte(déconnectée)lorsque
désactivée.Sivousl’utilisezavec
unechargeinductive,parexempleun
relais,unediodedoitêtreconnectée
enparallèleaveclacharge,enguise
deprotectioncontrelestensions
transitoires.
Caractéristiques
3,3VCC
Chargemax.=50mA
0à40VCC
Chargemax=100mA
Tensionmax=+40VCC
32
Page 33

AXISP3365–VEFixedDomeNetworkCamera
3.3 V max 50 mA
1
2
3
4
123
FRANÇAIS
Connecteuraudio
Connecteurs
audio3,5mm(stéréo)
Entréeaudio
1Embout
Entréemicro/ligne
Sortieaudio
Sortieligne(mono)
2Anneau
3MancheMiseàlaterreMiseàlaterre
EmplacementpourcarteSD
PriseenchargedescartesSDjusqu'à64Go.Pourdesperformancesd'enregistrementoptimales,
utilisezunecarteSDHCouSDXCdeclasse10.
33
Page 34

AXISP3365–VEFixedDomeNetworkCamera
1
2
3
Installationdumatériel
Préparationducâbleréseau
Sivousutilisezuncâbleautrequeceluifourni,ilestnécessairedeprépareruncâbleréseauavecun
joint.Faitespasserdélicatementlecâbleàtraverslejointfournietcomplétez-leparunconnecteur
réseau.Ilpeutêtrenécessairedeperceruntroudanslejointàl’aidedutournevisResitorx.
Note
•Neforcezpasl’entréeduconnecteurréseaudanslejoint.
•Nepercezpaslejointavecuncouteauoutoutautreobjettranchant.
Préparationduboîtierdel’unité(acheminementdescâbleslelongdumur)
Silescâblesdoiventêtreacheminéslelongdumur,préparezleboîtierdel’unitédelamanière
suivante:
1.Détachezlecouverclelatéralduboîtierdel’unitéenretirantlavis.
2.Dévissezlesdeuxvissurlaprotectiondecâbleetdétachezlapartieinférieure.
3.Fixezlapartieinférieuredelaprotectiondecâbleauboîtierdel’unitéaveclavis.
1.
Protectiondecâble(accessoireenoption)–partiesupérieure
2.
Protectiondecâble(accessoireenoption)–partieinférieure
3.
Boîtierdel’unité
34
Page 35

AXISP3365–VEFixedDomeNetworkCamera
FRANÇAIS
Remplacementducouverclededômefuméounonfumé(enoption)
LacaméraAxisestfournieavecundômeenoption.Pourremplacerlecouvercledudôme:
1.Souslecouvercledudôme,dévissezles4visquimaintiennentledômeenplace.
2.Remplacezl’anciendômeparlenouveau.Assurez-vousquelejointencaoutchouc
estbienenplaceetserrezlesvis.
Supportdemontage
Laplaquedemontagea4congurationsdemontage(A,B,CetD).Lescongurationsdemontage
suiventlanormedesoptionsdemontagesuivantes:
•A:boîtiercarréde4po
•B:boîtierdejonctionaméricaindoubledetaillenormale
•C:boîtieroctogonalde4po
•D:boîtierdejonctionaméricainsimpledetaillenormale
Acheminementdescâbles
Selonquevoussouhaitezfairepasserlescâbleslelongdumurouàtraverslemur,suivezles
instructionscorrespondantesci-dessous.Acheminementdescâbleslelongdumur:
1.Envousservantdugabaritdeperçage,percez4trousdanslemur.
2.Fixezlesupportdexationaumurenutilisant4visappropriéesaumatériaudumur.
3.Retirezlacaméraduboîtierdel’unitéenécartantlesressorts.
4.Retirezlesjointsdestrouslatérauxduboîtierdel’unité.S’iln’yaqu’unseulcâble,
retirezunseuljoint.
5.Posezleboîtierdel’unitésurlesupportdexationetxez-leenserrantlesquatrevis.
6.Faitespasserlescâblesàtraverslestrouslatérauxduboîtierdel’unité.
7.Faitesglisserlesjointslelongducâbleetxez-lesdanslestrous.Lesjointsdoiventêtre
parfaitementajustésauxtrous,sansplisnicourbures.
8.Fixezànouveaulapartiesupérieuredelaprotectiondecâbleenserrantlesdeuxvis.
35
Page 36

AXISP3365–VEFixedDomeNetworkCamera
1
2
3
4
Note
Pouréviterdesproblèmesliésàl’humidité,ilestrecommandéd’acheminerlescâblesvers
lacaméraparledessous,lestrousdescâblesdirigésverslebas.
Acheminementdescâblesàtraverslemur:
1.
Supportdemontage
2.
Câbleréseauavecjoint
3.
Boîtierdel’unité
4.
Retraitdesjointsdestrous
1.Envousservantdugabaritdeperçage,percez4trousdanslemur.
2.Faitespasserlecâbleréseau(ainsiquelecâbled’E/Saudio,sinécessaire)àtraverslemur
etdanslestrousdusupportdexation.
3.Fixezlesupportdexationaumurenutilisant4visappropriéesaumatériaudumur.
4.Retirezlacaméraduboîtierdel’unitéenécartantlesressorts.
5.Retirezlesjointsdestrousarrièreduboîtierdel’unité.S’iln’yaqu’unseulcâble,retirez
unseuljoint.
6.Acheminezlescâblesparcestrous.
7.Faitesglisserlesjointslelongdescâblesetxez-lesdanslestrous.Lesjointsdoivent
êtreparfaitementajustésauxtrous,sansplisnicourbures.
8.Fixezleboîtierdel’unitéausupportdexationenserrantlesquatrevis.
36
Page 37

AXISP3365–VEFixedDomeNetworkCamera
1
2
3
FRANÇAIS
Installationdelacaméra
1.
Connecteurdeventilateur
2.
Caméra
3.
Câbleréseau
Note
•Veillezànepastroptendrenitropplierlecâbleréseau.Celarisqueraitd'endommagerle
câbleréseau.
•CettecaméraAxispeutégalementêtredotéed’unconduitmétalliquepourprotégerle
câblageencasd'acheminementdescâbleslelongdumur.
1.Fixezlecâbleréseauàlacaméraainsiquelecâbleaudioetd’E/Ssinécessaire.Ilest
recommandéd’enroulerlecâbleréseaupourformeruneboucle,commeindiquésur
lagureci-dessus.
2.InsérezlacartemémoireSD(enoption).
3.Écartezlesressortsduboîtierdel’unitéetinsérezlacamérajusqu'àcequ'elle
s'encliquette.
4.Fixezleconnecteurduventilateurauconnecteurdelacaméra.
37
Page 38

AXISP3365–VEFixedDomeNetworkCamera
1
2
Réglagedel’objectif
1.
Lignesfacilitantl'alignementhorizontal
2.
Visdeverrouillage
OuvrezlapageLiveView(Vidéoendirect)(voirAccèsauproduit,àlapage39)dansl’interfaceWeb
eteffectuezlesréglagessuivantssurlacaméra:
1.Dévissezlavisdeverrouillage.
2.Tournezl’objectifdanslapositionsouhaitée.Assurez-vousqueleslignesdechaquecôté
del’objectifsontalignéeshorizontalement.Assurez-vousquelamarquesurlecouvercle
del’objectif,entrelesligneshorizontales,estdirigéeverslehaut.
3.Unefoisquevousavezterminé,serrezdélicatementlavisdeverrouillagepourbien
xerlacaméra.
4.OuvrezlapageFocusAdjustment(Réglagedelamiseaupoint)dansl'interfaceWebsous
Setup>BasicSetup>Focus&Zoom(Conguration>Congurationdebase>Miseau
point&zoom)etsuivezlesinstructionsàl'écran.Utilisezlafenêtred’imagepourrégler
lezoometlamiseaupoint.Reportez-vousàl’aideenlignepourplusd’informations.
Note
•Dufaitdelaréfractiondudôme,l'imagepeutapparaîtrelégèrementoueunefoisledôme
installé.Pourcorrigerceci,accédezàlapageFocusAdjustment(Réglagedelamiseau
point)dansl'interfaceWebsousSetup>BasicSetup>Focus&Zoom(Conguration>
Congurationdebase>Miseaupoint&zoom)etréglezànouveaulamiseaupoint.
•Leréglagemanueldelamiseaupointetduzoompeutendommagerl’objectif.
Findel’installation
1.Tournezlebouclierdeprotectionnoiràl'intérieurduboîtierdudômedelacaméra
pourl'alignersurlapositiondelacaméra.
2.Sinécessaire,xezlaprotectionétancheàlacaméraavantdexerlecouvercledudôme.
Pourcela,retirezlesdeuxvisducouvercledudôme.Transférezlesrondellesdecesvis
auxvisutiliséessurlaprotectionétancheetxezcettedernière.
38
Page 39

AXISP3365–VEFixedDomeNetworkCamera
FRANÇAIS
3.Assurez-vousquelejointencaoutchoucestcorrectementplacésurlecouvercledudôme
etxezlecouvercledudômeauboîtierdel'appareilenserrantles4vis.
L'installationestmaintenantterminée.
Accèsauproduit
UtilisezlesoutilsfournissurleCDd'installationetdegestionpourattribueruneadresseIP,
congurerlemotdepasseetaccéderauuxdedonnéesvidéo.Cesinformationssontégalement
disponiblessurlespagesd'assistancetechniquedusitewww.axis.com/techsup
Réinitialisationauxparamètresd'usinepardéfaut
Important
Laréinitialisationauxparamètrespardéfautdoitêtreutiliséeavecprudence.Cette
opérationreconguretouslesparamètres,ycomprisl'adresseIP,auxvaleursd'usinepar
défaut.
Note
Leslogicielsd'installationetdegestionsontdisponiblessurleCDfourniavecleproduitet
surlespagesd'assistancedusitewww.axis.com/techsup
Pourréinitialiserl'appareilauxparamètresd'usinepardéfaut:
1.Déconnectezl'alimentationdel'appareil.
2.Maintenezleboutondecommandeenfoncéetremettezl'appareilsoustension.
ConsultezAperçudumatériel,àlapage28.
3.Maintenezleboutondecommandeenfoncépendant15–30secondes,jusqu’àcequele
voyantd'étatpasseàl’orangeetclignote.
4.Relâchezleboutondecommande.Leprocessusestterminélorsquelevoyantd'étatpasse
auvert.Lesparamètresd’usinepardéfautdel'appareilontétérétablis.Enl'absenced'un
serveurDHCPsurleréseau,l'adresseIPpardéfautest192.168.0.90.
5.Utilisezlesoutilsd'installationetdegestionpourattribueruneadresseIP,congurerle
motdepasseetaccéderauuxdedonnéesvidéo.
Ilestégalementpossiblederétablirlesparamètresd’usineàpartirdel’interfaceWeb.Accédezà
Setup>SystemOptions>Maintenance(Conguration>Optionsdusystème>Maintenance)
(Conguration>Congurationducontrôleursupplémentaire>Conguration>Optionsdu
système>Maintenance).
Pourobtenirplusderenseignements
LeManueldel'utilisateurestdisponibleàl'adressesuivante:www.axis.com
39
Page 40

AXISP3365–VEFixedDomeNetworkCamera
Consultezlesitewww.axis.com/techsuppourvériersidesmisesàjourdeslogicielssont
disponiblespourvotreappareilréseau.Pourconnaîtrelaversiondumicrologicielactuellement
installée,reportez-vousàlapageSetup>About(Conguration>Àproposde).
Visitezlecentred'apprentissageenligneAxissurlesitewww.axis.com/academypourensavoir
plussurlesformations,leswebinaires,lestutorielsetlesguides.
Informationssurlagarantie
Pourobtenirplusd'amplesinformationssurlagarantieduproduitAXISetdesrenseignements
connexes,allezsurlesitewww.axis.com/warranty/
40
Page 41

AXISP3365–VEFixedDomeNetworkCamera
DEUTSCH
Sicherheitsinformation
LesenSiedasInstallationshandbuchsorgfältigdurchbevorsiedasProduktinstallieren.Bewahren
SiedasInstallationshandbuchfürzukünftigeZweckeauf.
Gefährdungsstufen
GEFAHRWeistaufeinegefährlicheSituationhin,die,fallsnichtverhindert,
WARNUNGWeistaufeinegefährlicheSituationhin,welche,fallsnicht
VORSICHTWeistaufeinegefährlicheSituationhin,welche,fallsnicht
HINWEIS
HINWEIS HINWEIS
zuTododerschwerenVerletzungenführt.
verhindert,zuTododerschwerenVerletzungenführenkann.
verhindert,zugeringfügigerodermäßigerVerletzungführenkann.
WeistaufeinegefährlicheSituationhin,welche,fallsnicht
verhindert,zuSachschädenführenkann.
WeitereNachrichtenstufen
WichtigWeistaufwichtigeInformationenhin,diedenrichtigenBetrieb
BeachtenWeistaufnützlicheInformationenhin,diedieoptimale
desProduktsgewährleisten.
VerwendungdesProduktsunterstützen.
41
Page 42

AXISP3365–VEFixedDomeNetworkCamera
Sicherheitsanweisungen
HINWEIS
HINWEIS HINWEIS
•DieAnwendungdesAxisProduktsmussunterBeachtungderörtlichgeltendenrechtlichen
Bestimmungenerfolgen.
•LagernSiedasAxisProduktineinertrockenenundbelüftetenUmgebung.
•AchtenSiedarauf,dassdasAxisProduktwederStößennochstarkemDruckausgesetztist.
•InstallierenSiedasProduktnichtaninstabilenHalterungen,OberächenoderWänden.
•VerwendenSiebeiderInstallationdesAxisProduktsausschließlichpassendeWerkzeuge.
EinzugroßerKraftaufwandkanndasProduktbeschädigen.
•VerwendenSiekeinechemischen,ätzendenoderaerosolhaltigenReinigungsmittel.
VerwendenSiezumReinigeneinsauberes,mitlauwarmemWasserangefeuchtetesTuch.
•VerwendenSienurZubehör,dasdentechnischenDatendesProduktsentspricht.Dieses
istvonAxisoderDrittanbieternerhältlich.
•VerwendenSieausschließlichErsatzteiledievonAxisbereitgestelltoderempfohlen
werden.
•VersuchenSienicht,dasProduktselbstständigzureparieren.WendenSiesichbezüglich
ReparaturundWartungandenAxisSupportoderIhrenAxisHändler.
Transport
HINWEIS
HINWEIS HINWEIS
•BeiBedarftransportierenSiedasAxisProduktinderOriginalverpackungodereiner
entsprechendenVerpackung,sodassSchädenvermiedenwerden.
Batterie
DasAxis-Produktistmiteiner3,0V-BR/CR2032-Lithium-Batterieausgestattet,mitderdieinterne
Echtzeituhr(RTC)versorgtwird.UnternormalenBedingungenhatdieBatterieeineLebensdauer
vonmindestensfünfJahren.
BeientladenerBatterieistderBetriebderEchtzeituhrnichtmehrgewährleistet,sodassdie
UhrbeijedemSystemstartzurückgesetztwird.SieerhalteneineProtokollnachricht,wennein
Batteriewechselerforderlichist.
DieBatteriesolltenurbeiBedarfersetztwerden.WendenSiesichindiesemFallandenAxis
Supportunterwww.axis.com/techsup.
42
Page 43

AXISP3365–VEFixedDomeNetworkCamera
DEUTSCH
WARNUNG
•ExplosionsgefahrbeifehlerhaftemBatteriewechsel.
•DieBatteriedarfnurdurcheineidentischeBatterieodereinevonAxisempfohlene
Batterieersetztwerden.
•VerbrauchteBatteriensindgemäßdenörtlichenVorschriftenoderdenAnweisungendes
Herstellerszuentsorgen.
Kuppelabdeckung
HINWEIS
HINWEIS HINWEIS
•AchtenSiedaraufdieKuppelabdeckungwederzuzerkratzen,zubeschädigenoderdarauf
Fingerabdrückezuhinterlassen,dadiesdieBildqualitätbeeinträchtigenkann.Falls
möglichentfernenSiedieSchutzfolieerstnachdemdieInstallationabgeschlossenist.
•SäubernSieniemalseineKuppelabdeckung,wenndiesesaubererscheint,undpolierenSie
keinesfallsdieOberäche.ZuhäugesSäubernkanndieOberächebeschädigen.
•FürdienormaleReinigungderKuppelabdeckungwerdeneinenicht-scheuernde,
lösungsmittelfreieneutraleSeifeodereinentsprechendesReinigungsmittelmitsauberem
Wasserundeinsauberer,weicherLappenempfohlen.SpülenSiedieKuppelabdeckung
gründlichmitlauwarmem,sauberemWasserab.TrocknenSiedieKuppelabdeckungmit
einemweichen,sauberenLappen,umWassereckenzuvermeiden.
•VerwendenSieniemalsstarkeReinigungsmittel,Benzin,BenzoloderAcetonetc.
undvermeidenSie,dieKuppelabdeckungimdirektenSonnenlichtoderbeierhöhten
Temperaturenzusäubern.
43
Page 44

44
Page 45

AXISP3365–VEFixedDomeNetworkCamera
DEUTSCH
Installationsanleitung
IndieserAnleitungwirddieInstallationderAXISP3365–VE-Netzwerk-KamerainIhremNetzwerk
beschrieben.WeitereInformationenzurNutzungdiesesProduktesndenSieimBenutzerhandbuch
unterwww.axis.com.
Installationsschritte
1.StellenSiesicher,dassdiePackungsinhalte,Werkzeugeundanderenotwendige
MaterialienfürdieInstallationinOrdnungsind.SieheSeite45.
2.MachenSiesichmitderHardware-Übersichtvertraut.SieheSeite46.
3.MachenSiesichmitdentechnischenDatenvertraut.SieheSeite49.
4.InstallierenSiedieHardware.SieheSeite52.
5.ZugriffaufdasProdukt.SieheSeite57.
Lieferumfang
•AXISP3365–VEUnbeweglicheFixedDome-Netzwerk-Kamera
•1Resitorx-Schraubendreher
•1GetönteKuppelabdeckungmitDichtung
•5mNetzwerkkabelmitDichtung
•1Kabeldichtung
•1Anschlussleiste
•1Wetterschutz
•CD-ROMmitInstallations-undVerwaltungssoftware
•Dokumente
-Installationsanleitung(diesesDokument)
-Bohrschablone(1x)
-ZusätzlicheEtikettenmitderSeriennummer(2x)
-AVHS-Authentizierungsschlüssel
OptionalesZubehör
•Decoder-LizenzpaketfürmehrereBenutzer
•AXIST8414Installationsmonitor
•AXISPoEMidspans
•AXIST90ALeuchten
•MontagesatzfürabgehängteDeckenderKlasseIP51
45
Page 46

AXISP3365–VEFixedDomeNetworkCamera
1 2 3 4 5 6
7 8
9 10
13
14
12
11
15
16
•Hängemontage-Satz
•Montagehalterung
•Kabelabdeckung
•Hängemontage-SatzmitWetterschutz
•Audio-E/A-KabelmitvormontierterDichtung
Unterwww.axis.comndenSieInformationenüberverfügbaresZubehör.
ÜbersichtüberdieHardware
1.
Netzwerkanschluss
2.
Audioausgang
46
Page 47

AXISP3365–VEFixedDomeNetworkCamera
DEUTSCH
3.
LED-Anzeigen(Netzwerk,Status,Stromversorgung)
4.
Audioeingang
5.
E/A-Anschluss
6.
Steuertaste
7.
Lüfteranschluss
8.
SD-Karteneinschub
9.
Montagehalterung
10.
Netzwerkkabel
11.
Kameragehäuse
12.
Kameraheizung
13.
Kuppelabdeckung
14.
Wetterschutz
15.
SeitenlöcherfürdieentlangderWandverlegtenKabel
16.
Feder
Abmessungen(HxB)
117x179mm(4,59”x7,05”)
Gewicht
1,6kg(3,5lb)
LED-Anzeigen
LEDFarbeBedeutung
Netzwerk
Status
Stromversorgung
Grün
Gelb
Leuchtet
nicht
Grün
GelbLeuchtetbeimStartundbeimWiederherstellenderEinstellungen.
RotBlinktlangsambeieinemAktualisierungsfehler.
Grün
Gelb
LeuchtetbeiVerbindungmiteinem100MBit/s-Netzwerk.Blinktbei
Netzwerkaktivität.
LeuchtetbeiVerbindungmiteinem10MBit/s-Netzwerk.Blinktbei
Netzwerkaktivität.
KeineNetzwerkverbindungvorhanden.
LeuchtetbeiNormalbetriebgrün.
NormalerBetrieb.
Blinktgrün/gelbbeiderFirmware-Aktualisierung.
47
Page 48

AXISP3365–VEFixedDomeNetworkCamera
Beachten
•DieStatus-LEDkannsoeingestelltwerden,dasssiewährenddesNormalbetriebsnicht
leuchtet.DieseKongurationkönnenSieunterSetup>SystemOptions>Ports&
Devices>LED(Einrichtung>Systemoptionen>Anschlüsse&Geräte>LED)einstellen.
WeitereInformationenndenSieinderOnline-Hilfe.
•DieStatus-LEDkannsoeingestelltwerden,dasssieblinkt,wenneinEreignisaktivist.
•DieStatus-LEDkannsoeingestelltwerden,dasssieblinkt,wenndieEinheiterkanntwird.
RufenSieSetup>SystemOptions>Maintenance(Einrichtung>Systemoptionen>
Wartung)auf.
AnschlüsseundTasten
FürdietechnischenDatenundBetriebsbedingungensieheSeite49.
Netzwerkanschluss
RJ45-Ethernet-Anschluss.UnterstütztPoweroverEthernet(PoE).
HINWEIS
HINWEIS HINWEIS
AufgrundörtlicherVorschriftenoderumweltbedingterundelektrischerBedingungen,
unterdenendasProduktverwendetwird,kanneinabgeschirmtesNetzwerkkabel(STP)
empfehlenswertodernotwendigsein.AlleNetzwerkkabel,dieimAußenbereichoderin
schwierigenelektrischenUmgebungenverlegtwerden,solltenabgeschirmt(STP)und
nurfürdiezweckgebundeneAnwendungeingesetztwerden.StellenSiesicher,dassder
Netzwerkswitchvorschriftsmäßiggeerdetist.InformationenzugesetzlichenBestimmungen
ndenSieunterElectromagneticCompatibility(EMC),onpage2.
E/A-Anschluss
ZurVerwendungmitexternenGeräteninVerbindungmitManipulationsalarmen,
Bewegungserkennung,Ereignisauslösung,Zeitrafferaufnahmen,Alarmbenachrichtigungen
usw.Abgesehenvom0VDC-BezugspunktundStrom(Gleichstromausgang)verfügtdie
E/A-KlemmenleisteübereineSchnittstellezu:
•Digitalausgang–zumAnschlussexternerGerätewieRelaisundLEDs.
AngeschlosseneGerätekönnenüberdieVAPIX®ApplicationProgrammingInterface
(Programmierschnittstelle)überdieSchaltächenfürdenAusgangaufderSeite„Live
View”oderdurcheineAktionsregelaktiviertwerden.DerAusgangwirdalsaktiv(siehe
SystemOptions>Ports&Devices(Systemoptionen>Anschlüsse&Geräte))angezeigt,
wenndasAlarmmeldegerätaktiviertist.
•Digitaleingang–AlarmeingangfürdenAnschlussvonGeräten,diezwischen
geöffnetemundgeschlossenemSchaltkreiswechselnkönnen,z.B.:PIR-Sensoren,
Tür-/Fensterkontakte,Glasbruchmelderusw.BeiEmpfangeinesSignalsändertsich
derStatusundderEingangwirdaktiviert(sieheSystemOptions>Ports&Devices
(Systemoptionen>Anschlüsse&Geräte)).
48
Page 49

AXISP3365–VEFixedDomeNetworkCamera
DEUTSCH
Audioanschlüsse
DasAxis-ProduktistmitdenfolgendenAudioanschlüssenausgestattet:
•Audioeingang(rosa)–3,5-mm-AnschlussfüreinMonomikrofonodereinMonosignal
(derlinkeKanalwirdvoneinemStereosignalbenutzt).
•Audioausgang(grün)–3,5-mm-Audioausgang(Leitungspegel)zumAnschließeneiner
Rundrufanlage(PA)odereinesAktivlautsprechersmitintegriertemVerstärker.Fürden
AudioausgangmusseinStereosteckerverwendetwerden.
SD-Kartensteckplatz
ZurlokalenAufzeichnungmitWechselmedienkanneineSD-Speicherkarte(nichtimLieferumfang
enthalten)verwendetwerden.FürweitereInformationensieheTechnischeDaten,aufSeite49.
HINWEIS
HINWEIS HINWEIS
UmeinerBeschädigungderAufnahmenvorzubeugen,solltedieSD-Kartevordem
mechanischenAuswerfengetrennt(deaktiviert)werden.RufenSiezumTrennenSetup>
SystemOptions>Storage>SDCard(Einrichtung>Systemoptionen>Speicher>
SD-Karte)aufundklickenSieaufUnmount(Trennen).
Steuertaste
DieSteuertastehatfolgendeFunktionen:
•ZurücksetzendesProduktsaufWerkseinstellungen.SieheSeite57.
•VerbindenmiteinemAXISVideoHostingSystem-ServiceodereinemAXISInternet
DynamicDNS-Service.WeitereInformationenzudiesenDienstenndenSieinder
Bedienungsanleitung.
TechnischeDaten
Betriebsbedingungen
DasAxisProduktistfürdieVerwendungimFreienkonzipiert.
Produkt
AXISP3365–VEIEC62262IK10,
Klassikation
NEMA250Typ4X
49
Temperatur
-40°Cbis55°C
Page 50

AXISP3365–VEFixedDomeNetworkCamera
1 2 3 4
Stromverbrauch
ProduktPoE
AXISP3365–VE
Anschlüsse
E/A-Anschluss
4-poligerAnschlussblockfür:
•Zusatzstromversorgung
(Gleichstromausgang)
•Digitaleingang
•Digitalausgang
•0VDC(-)
FunktionPinHinweiseTechnischeDaten
0VDC(-)
Gleich-
stromausgang
Digitaleingang
Digitalausgang
1
2
KannfürdieStromversorgungvon
Zusatzgerätenverwendetwerden.
Hinweis:DieserKontaktkannnurfürden
Stromausgangverwendetwerden.
3
ZumAktivierenmitPin1verbinden;zum
Deaktivierennichtanschließen.
4
BeiAktivierungmitPin1verbunden;wenn
deaktiviert:frei(nichtverbunden).Bei
VerwendungmiteinerinduktivenLast,z.B.
einemRelais,mussparallelzurLastzum
SchutzvorSpannungsspitzeneineDiode
zwischengeschaltetwerden.
PoweroverEthernet(PoE)IEEE802.3af/802.3atTyp1Klasse3
3,3VDC
Max.Stromstärke=
50mA
0bismax.40VDC
Max.Stromstärke=
100mA
Max.Spannung=
+40VDC
50
Page 51

AXISP3365–VEFixedDomeNetworkCamera
3.3 V max 50 mA
1
2
3
4
123
DEUTSCH
Audioanschlüsse
3,5-mmAudioanschlüsse
(stereo)
AudioeingangAudioausgang
1Spitze
Mikrofon-/Leitungseingang
Leitungsausgang(mono)
2Ring
3Schaft
MasseMasse
SD-Kartensteckplatz
UnterstütztSD-Kartenmitbiszu64GBSpeicherplatz.VerwendenSieeineSDHC-oderSDXC-Karte
derGeschwindigkeitsklasse10,umoptimaleAufzeichnungsergebnissezuerzielen.
51
Page 52

AXISP3365–VEFixedDomeNetworkCamera
InstallierenderHardware
VorbereitendesNetzwerkkabels
FallseinanderesalsdasmitgelieferteKabelverwendetwird,müssenSieeinNetzwerkkabelmit
einerDichtungvorbereiten.FührenSiedasKabelvorsichtigdurchdiemitgelieferteDichtung
undbringenSieeinenNetzwerksteckeramKabelan.MöglicherweisemüssenSiemitdem
Resitorx-SchraubendrehereinLochindieDichtungstechen.
Beachten
•VersuchenSienicht,denNetzwerksteckerdurchdieDichtungzuführen.
•StechenSienichtmiteinemMesserodereinemanderenscharfenGegenstandindie
Dichtung.
VorbereitendesKameragehäuses(wenndieKabelanderWandentlang
geführtwerden)
WenndieKabelanderWandentlanggeführtwerdensollen,bereitenSiedasKameragehäusewie
folgtvor:
1.NehmenSiedieamKameragehäusebefestigteSeitenabdeckungab,indemSiedie
Schraubeentfernen.
2.LösenSiediebeidenSchraubenanderKabelabdeckungundnehmenSiedenunteren
Teilab.
3.BefestigenSiedenunterenTeilderKabelabdeckungmitderSchraubeamKameragehäuse.
52
Page 53

AXISP3365–VEFixedDomeNetworkCamera
1
2
3
DEUTSCH
1.
Kabelabdeckung(optionalesZubehör)–obererTeil
2.
Kabelabdeckung(optionalesZubehör)–untererTeil
3.
Kameragehäuse
Austauschenderklaren/getöntenKuppelabdeckung(optional)
DasAxis-ProduktwirdmiteineroptionalenKuppelgeliefert.SotauschenSiedieKuppelabdeckung
aus:
1.LösenSiedievierSchraubenunterderKuppelabdeckung,diedieKuppelanihrerPosition
halten.
2.TauschenSiediealteKuppelgegendieneueaus.StellenSiesicher,dassdie
GummidichtungrichtigsitztundziehenSiedieSchraubenan.
Montagehalterung
DieMontageplattebesitzt4Montagemuster(A,B,C,D).DieMontagmusterfolgendemStandard
fürdiefolgendenMontageoptionen:
•A:4"quadratischeAnschlussdose
•B:Standard-US-Doppelverteilerdose
•C:4"achteckigeAnschlussdose
•D:Standard-US-Anschlussdose
53
Page 54

AXISP3365–VEFixedDomeNetworkCamera
1
2
3
4
ZiehenderKabel
BefolgenSieabhängigdavon,obSiedieKabeldurchdieWandoderanderWandentlangführen
möchten,dieentsprechendennachstehendenAnweisungen.FürdieVerlegungderKabelander
Wand:
1.BohrenSiemithilfederBohrschablone4LöcherindieWand.
2.BefestigenSiedieMontagehalterungmitviergeeignetenSchraubenanderWand.
3.EntfernenSiedieKameraeinheitausdemKameragehäuse,indemSiedieFedernzur
Seitedrücken.
4.EntfernenSiedieDichtungenvondenSeitenlöchernimKameragehäuse.Fallsnurein
Kabelvorhandenist,entfernenSienureineDichtung.
5.SetzenSiedasKameragehäuseaufdieHalterung,undbefestigenSiees,indemSiedie
vierSchraubenanziehen.
6.ZiehenSiedieKabeldurchdieSeitenlöcherimKameragehäusenachoben.
7.ZiehenSiedieDichtungenamKabelentlang,unddrückenSiesieindieLöcher.Die
DichtungenmüssenohneFaltenoderKrümmungenfestindenLöchernsitzen.
8.BringenSiedenoberenTeilderKabelabdeckungwiederan,indemSiediebeiden
Schraubenanziehen.
Beachten
ZurVermeidungfeuchtigkeitsbedingterProblemewirdempfohlen,dieKabelvonuntenzur
Kamerazuführen,wobeidieKabellöchernachuntenzeigen.
FürdieVerlegungderKabeldurchdieWand:
1.
Montagehalterung
2.
NetzwerkkabelmitDichtung
3.
Kameragehäuse
4.
EntfernenSiedieDichtungenausdenLöchern
1.BohrenSiemithilfederBohrschablone4LöcherindieWand.
54
Page 55

AXISP3365–VEFixedDomeNetworkCamera
1
2
3
DEUTSCH
2.FührenSiedasNetzwerkkabel(sowiebeiBedarfdasE/A-bzw.Audiokabel)durchdie
WandunddurchdieLöcherinderHalterung.
3.BefestigenSiedieMontagehalterungmitviergeeignetenSchraubenanderWand.
4.EntfernenSiedieKameraeinheitausdemKameragehäuse,indemSiedieFedernzur
Seitedrücken.
5.EntfernenSiedieDichtungenvondenLöcherninderRückseitedesKameragehäuses.
FallsnureinKabelvorhandenist,entfernenSienureineDichtung.
6.FührenSiedieKabeldurchdieseLöcher.
7.ZiehenSiedieDichtungenandenKabelnentlang,unddrückenSiesieindieLöcher.Die
DichtungenmüssenohneFaltenoderKrümmungenfestindenLöchernsitzen.
8.BefestigenSiedasKameragehäuseanderHalterung,indemSiedievierSchrauben
anziehen.
InstallierenderKameraeinheit
1.
Lüfteranschluss
2.
Kameraeinheit
3.
Netzwerkkabel
Beachten
•AchtenSiedarauf,dasNetzwerkkabelnichtübermäßigzudehnenoderzubiegen.
DadurchkönntedasNetzwerkkabelbeschädigtwerden.
•SiekönnendasAxis-ProduktauchmiteinerKabelführungausMetallzumSchutzder
Kabelausstatten,wenndieKabelanderWandentlanggeführtwerden.
1.SchließenSiedasNetzwerkkabelsowiebeiBedarfdasKabelfürAudioundE/Aandie
Kameraeinheitan.Eswirdempfohlen,dasNetzwerkkabelwieinderobigenAbbildung
gezeigtzueinerSchlaufezulegen.
2.SetzenSiedieSD-Speicherkarteein(optional).
55
Page 56

AXISP3365–VEFixedDomeNetworkCamera
1
2
3.ZiehenSiedieFedernimKameragehäusezurSeite,undsetzenSiedieKameraeinheit
soein,dasssieinihrerPositioneinrastet.
4.SchließenSiedenSteckerdesLüftersamLüfteranschlussinderKameraeinheitan.
AnpassendesObjektivs
1.
LinienzurUnterstützungeinerhorizontalenAusrichtung
2.
Feststellschraube
ÖffnenSiedieSeiteLiveView(Live-Ansicht)(sieheZugriffaufdasProdukt,aufSeite57)und
nehmenSiefolgendeEinstellunganderKameravor:
1.LösenSiedieFeststellschraube.
2.DrehenSiedasObjektivindiegewünschtePosition.StellenSiesicher,dassdieLinien
aufbeidenSeitendesObjektivshorizontalausgerichtetsind.StellenSiesicher,dassdie
MarkierungaufderObjektivabdeckungzwischendenhorizontalenLiniennachobenzeigt.
3.WenndierichtigeAusrichtungerreichtist,schraubenSiedieFeststellschraubevorsichtig
wiederfest,umdieKamerapositionzusichern.
4.ÖffnenSieüberdieWeboberächeunterSetup>BasicSetup>Focus&Zoom
(EinrichtungBasiskonguration>FokusundZoom)dieSeiteFocusAdjustment
(Bildschärfeeinstellen)undbefolgenSiedieBildschirmanweisungen.StellenSiemitdem
BildfensterdieBildschärfeunddenZoomein.WeitereInformationenhierzunden
SieinderOnline-Hilfe.
Beachten
•AufgrundderLichtbrechungenaufderGlasoberächekanndasBildleichtunscharf
erscheinen,nachdemdieKuppelinstalliertwurde.Siekönnendieskorrigieren,indem
SieinderWeboberächeunterSetup>BasicSetup>Focus&Zoom(Einrichtung
BasiskongurationFokusundZoom)dieSeiteFocusAdjustment(Bildschärfeeinstellen)
öffnenunddieBildschärfeerneutanpassen.
•DurchdasmanuelleEinstellenderBildschärfekanndasObjektivbeschädigtwerden.
56
Page 57

AXISP3365–VEFixedDomeNetworkCamera
DEUTSCH
AbschlussderInstallation
1.BringenSiedasschwarzeSchildinderKuppeldurchDreheninÜbereinstimmungmit
derKameraposition.
2.BefestigenSiebeiBedarfdenWetterschutzanderKamera,bevorSiedie
Kuppelabdeckunganbringen.EntfernenSiedazudiebeidenSchraubeninder
Kuppelabdeckung.NehmenSiedieUnterlegscheibenvondiesenSchraubenab,dieam
Wetterschutzangebrachtsind,undbringenSiedenWetterschutzan.
3.StellenSiesicher,dassdieGummidichtungsicheraufderKuppelabdeckungsitzt,
bringenSiedieKuppelabdeckungamGehäusederEinheitan,indemSiedie4Schrauben
festziehen.
DieInstallationistdamitabgeschlossen.
ZugriffaufdasProdukt
VerwendenSiediebereitgestelltenToolsderInstallations-undManagement-Software-CD,um
eineIP-Adressezuzuordnen,einPassworteinzurichtenundaufdenVideostromzuzugreifen.Diese
InformationndenSieebensoaufdenSupport-Seitenunterwww.axis.com/techsup/
ZurücksetzenaufWerkseinstellungen
Wichtig
DasZurücksetzenaufdieWerkseinstellungensolltemitVorsichtverwendetwerden.Beim
ZurücksetzenaufdieWerkseinstellungenwerdenalleEinstellungeneinschließlichder
IP-AdresseaufdieWerkseinstellungenzurückgesetzt.
Beachten
DieSoftware-ToolsfürInstallationundVerwaltungsindaufdermitdemProdukt
ausgeliefertenCD-ROMundüberdieSupportseitenunterwww.axis.com/techsupverfügbar.
SowirddasProduktaufdieWerkseinstellungenzurückgesetzt:
1.TrennenSiedasProduktvonderStromversorgung.
2.HaltenSiedieSteuertastegedrücktundsteckenSiedenNetzsteckerwiederein.Siehe
ÜbersichtüberdieHardware,aufSeite46.
3.HaltenSiedieSteuertasteetwa15–30Sekundengedrückt,bisdieLED-Statusanzeige
gelbblinkt.
4.LassenSiedieSteuertastelos.DerVorgangistabgeschlossen,wenndie
LED-Statusanzeigegrünleuchtet.DasProduktwurdeaufdieWerkseinstellungen
zurückgesetzt.WennkeinDHCP-ServerimNetzwerkverfügbarist,lautetdie
Standard-IP-Adresse192.168.0.90.
57
Page 58

AXISP3365–VEFixedDomeNetworkCamera
5.VerwendenSiedieSoftware-ToolsfürInstallationundVerwaltung,umeineIP-Adresse
zuzuweisen,einKennworteinzurichtenundaufdenVideostreamzuzugreifen.
DieParameterkönnenauchüberdieWeboberächeaufdieWerkseinstellungenzurückgesetzt
werden.RufenSieSetup>SystemOptions>Maintenance(Setup>Systemoptionen>
Wartung)auf.
WeitereInformationen
DasBenutzerhandbuchndenSieunterwww.axis.com.
Unterwww.axis.com/techsupndenSieFirmware-AktualisierungenfürIhreNetzwerkprodukte.Um
dieaktuellinstallierteFirmware-Versionzusehen,gehenSieaufEinrichten>Über.
BesuchenSiedasAxis-Schulungszentrumwww.axis.com/academyfüranregendeSchulungen,
Webinare,LernprogrammeundAnleitungen.
Garantieinformationen
InformationenzurGarantiederAxisProdukteundhierzuverbundeneInformationen,ndenSie
unterwww.axis.com/warranty/
58
Page 59

AXISP3365–VEFixedDomeNetworkCamera
ITALIANO
InformazionidiSicurezza
LeggerequestaGuidaall'Installazioneprimadiinstallareilprodotto.ConservarelaGuida
all'Installazioneperusifuturi.
Livellidipericolo
PERICOLO
AVVERTENZAIndicaunasituazionepericolosache,senonevitata,puòprovocare
ATTENZIONE
AVVISO
AVVISO AVVISO
Indicaunasituazionepericolosache,senonevitata,provocamorte
olesionigravi.
lamorteolesionigravi.
Indicaunasituazionepericolosache,senonevitata,puòprovocare
lesionimedieominori.
Indicaunasituazioneche,senonevitata,puòdanneggiarela
proprietà.
Livellialtromessaggio
ImportanteIndicainformazioniimportanti,essenzialiperilcorretto
NotaIndicainformazioniutilicheaiutanoaottenereilmassimodal
funzionamentodelprodotto.
prodotto.
59
Page 60

AXISP3365–VEFixedDomeNetworkCamera
Istruzionidisicurezza
AVVISO
AVVISO AVVISO
•IlprodottoAxisdeveessereutilizzatoinconformitàalleleggiealledisposizionilocali.
•ConservareilprodottoAxisinunambienteasciuttoeventilato.
•EvitarediesporreilprodottoAxisaurtiopressionieccessive.
•Noninstallareilprodottosusupporti,supercioparetiinstabili.
•UtilizzaresolostrumentiapplicabiliquandosiinstallailprodottoAxis.Unaforzaeccessiva
puòcausaredannialprodotto.
•Nonutilizzaresostanzechimiche,agenticausticiodetergentiaerosol.Utilizzareunpanno
pulitoinumiditoinacquapuraperlapulizia.
•Utilizzaresoloaccessoricompatibiliconlespecichetecnichedelprodotto.Questi
possonoesserefornitidaAxisodaterzeparti.
•UtilizzaresolopartidiricambioforniteoconsigliatedaAxis.
•Nontentarediriparareilprodottodasoli.Contattarel'assistenzaoilrivenditoreAxis
perquestionirelativeallamanutenzione
Trasporti
AVVISO
AVVISO AVVISO
•DuranteiltrasportodelprodottoAxis,utilizzarel'imballaggiooriginaleoequivalenteper
evitaredannialprodotto.
Batteria
IlprodottoAxisutilizzaunabatteriaallitioda3,0VBR/CR2032comealimentazioneperilsuo
real-timeclock(RTC)interno.Incondizioninormaliquestabatteriaavràunadurataminima
dicinqueanni.
UnabassacaricadellabatteriainuiscesulfunzionamentodelRTC,facendoloresettareaogni
accensione.Unmessaggiodiregistrovienevisualizzatoquandolabatteriadeveesseresostituita.
Labatterianondeveesseresostituitasenonrichiesto,manelcasoincuiquestofossenecessario,
contattareilsupportoAxisall'indirizzowww.axis.com/techsupperassistenza.
AVVERTENZA
•Rischiodiesplosioneselabatteriavienesostituitainmodoerrato.
•SostituiresoloconunabatteriaidenticaounabatteriaconsigliatadaAxis.
•Smaltirelebatterieusateinbaseallenormativelocalioalleistruzionidelproduttore
dellabatteria.
60
Page 61

AXISP3365–VEFixedDomeNetworkCamera
ITALIANO
Coperchiodellacupola
AVVISO
AVVISO AVVISO
•Fareattenzioneanongrafare,danneggiareolasciareimprontesulcoperchiodellacupola,
perchépotrebbediminuirelaqualitàdell'immagine.Sepossibile,tenerelaprotezionein
plasticasulcoperchiodellacupolanoaquandol'installazionenonsaràcompletata.
•Nonpulireilcoperchiodellacupolacheallosguardosembrapulitoenonlucidarela
supercie.Unapuliziaeccessivapotrebbedanneggiarelasupercie.
•Perlapuliziageneraledelcoperchiodellacupola,siconsigliadiutilizzareunsapone
neutroodetergentenonabrasivoconacquapuraeunpannomorbidoepulito.Sciacquare
beneconacquapuratiepida.Asciugareconunpannomorbidoepulitoperevitare
macchied'acqua.
•Nonusaremaidetergentiaggressivi,benzina,benzeneoacetoneeccedevitaredipulireil
coperchiodellacupolaallalucedirettadelsoleoatemperatureelevate.
61
Page 62

62
Page 63

AXISP3365–VEFixedDomeNetworkCamera
ITALIANO
Guidaall’installazione
LapresenteGuidaall'installazionefornisceleistruzioninecessarieperinstallarelatelecameradi
reteAXISP3365–VEnellareteinuso.Perulterioriinformazionisull’utilizzodelprodotto,consultare
laGuidaperl'utentedisponibileall'indirizzowww.axis.com
Procedurediinstallazione
1.Assicurarsicheilcontenutodellaconfezione,glistrumentiealtrimaterialinecessariper
l'installazionesianoinordine.Consultarepagina63.
2.Studiareladescrizionedell'hardware.Consultarepagina64.
3.Studiarelespeciche.Consultarepagina67.
4.Installazionedell’hardware.Consultarepagina70.
5.Accederealprodotto.Consultarepagina75.
ContenutodellaConfezione
•TelecameradireteacupolassaAXISP3365–VE
•1cacciaviteResitorx
•1coperturadellacupolafumèconguarnizione
•Cavodireteda5mconguarnizione
•1guarnizionepercavi
•1connettorepermorsetti
•1schermodiprotezionedagliagentiatmosferici
•CDd'installazioneegestione
•Materialistampati
-Guidaall’installazione(questodocumento)
-Mascheradiforatura(1x)
-Etichettaaggiuntivaconnumerodiserie(2x)
-ChiavediautenticazioneAVHS
Accessoriopzionali
•Pacchettolicenzaperdecodicatoremultiutente
•Displayd'installazioneAXIST8414
•MidspanAXISPoE
•IlluminatoriAXIST90A
•KitdimontaggiopercontrosofttidiclasseIP51
63
Page 64

AXISP3365–VEFixedDomeNetworkCamera
1 2 3 4 5 6
7 8
9 10
13
14
12
11
15
16
•Kitpermontaggioasospensione
•Staffadimontaggio
•Schermaturadelcavo
•Kitpermontaggioasospensioneconschermodiprotezionedagliagentiatmosferici
•CavodiI/Oaudioconguarnizionepremontata
Visitareilsitowebwww.axis.comperinformazionisugliaccessoridisponibili.
Panoramicadell'hardware
1.
2.
Connettoredirete
Uscitaaudio
64
Page 65

AXISP3365–VEFixedDomeNetworkCamera
ITALIANO
3.
IndicatoriLED(stato,rete,alimentazione)
4.
Ingressoaudio
5.
ConnettoreI/O
6.
Pulsantedicomando
7.
Connettoredellaventola
8.
SlotperschedaSD
9.
Staffadimontaggio
10.
Cavodirete
11.
Casingdell’unità
12.
Riscaldatoredellatelecamera
13.
Coperchiodellacupola
14.
Schermodiprotezionedagliagentiatmosferici
15.
Forilateralipercaviinstallatilungolaparete
16.
Molla
Dimensione(AxL)
117x179mm(4,59"x7,05")
Peso
1,6kg(3.5lb)
IndicatoriLED
LED
Rete
LEDdi
stato
tazione
Colore
Verde
Giallo
Spento
VerdeLuceverdessa:condizionidinormaleutilizzo.
Giallo
RossoLucelampeggiantelenta:aggiornamentononriuscito.
VerdeNormaleutilizzo. AlimenGiallo
Indicazione
Lucessaperconnessionediretea100MBit/s.Lucelampeggiante:
attivitàdirete.
Lucessaperconnessionediretea10MBit/s.Lucelampeggiante:
attivitàdirete.
Assenzadiconnessione.
Fissadurantel'avvioequandosiripristinanoleimpostazioni.
Lucelampeggianteverde/gialla:aggiornamentormware.
65
Page 66

AXISP3365–VEFixedDomeNetworkCamera
Nota
•LostatusdelLEDpuòessereconguratoperesserespentoduranteilnormale
funzionamento.Percongurarlo,selezionareSetup(Congurazione)>SystemOptions
(Opzionidisistema)>Ports&Devices(Porte&Dispositivi)>LED.Perulteriori
informazioni,consultarel'aiutoinlinea.
•IlLEDdistatopuòessereconguratoperlampeggiarequandouneventoèattivo.
•IlLEDdistatopuòessereconguratoperlampeggiareperidenticarel'unità.Andare
suSetup>SystemOptions>Maintenance(Congurazione>Opzionidisistema
>Manutenzione).
Connettoriepulsanti
Perlespecicheelecondizionidifunzionamento,consultarepagina67.
Connettoredirete
ConnettoreEthernetRJ45.SupportaPoweroverEthernet(PoE).
AVVISO
AVVISO AVVISO
Acausadinormativelocaliocondizioniambientaliedelettricheincuiilprodottodeve
essereutilizzato,puòessereopportunoonecessariol'utilizzodiuncavodireteschermato
(STP).Eventualicavidiretechevengonoposizionatiall'apertooinambientielettrici
devonoessereschermati(STP)edestinatiallorousospecico.Assicurarsicheloswitch
diretesiacorrettamentemessoaterra.Permaggioriinformazionisuirequisitinormativi,
consultareElectromagneticCompatibility(EMC),onpage2.
ConnettoreI/O
Utilizzarecondispositiviesterniincombinazionecon,adesempio,allarmiantimanomissione,
rilevazionedelmovimento,attivazionedieventi,registrazionetemporizzataenotichediallarme.
Oltrealpuntodiriferimento0VCCeall'alimentazione(uscitaCC),ilconnettoreI/Ofornisce
l'interfacciaper:
•Uscitadigitale–PercollegaredispositiviesternicomerelèoLED.Leperiferichecollegate
possonoessereattivatetramiteVAPIX®API(interfacciaperlaprogrammazionedi
applicazioni),tramiteipulsantidicomandodellapaginaLiveView(Immaginidalvivo)
oppuretramitel'opzioneActionRule(regoladiazione).L’uscitaverràvisualizzatacome
attiva(visualizzatainSystemOptions(OpzionidiSistema)>Ports&Devices(Portee
Dispositivi))seildispositivodiallarmeèattivato.
•Ingressodigitale–Ingressoallarmeutilizzabilepercollegareleperiferiche,chepuò
passaredalcircuitochiusoalcircuitoaperto,adesempio:Sensoridimovimento(PIR),
contattiporta/nestra,rilevatoridirotturavetriecosìvia.Dopolaricezionedelsegnale
lostatocambiael’ingressodiventaattivo(visualizzatoinSystemOptions>Ports&
Devices(OpzionidiSistema>PorteeDispositivi)).
66
Page 67

AXISP3365–VEFixedDomeNetworkCamera
ITALIANO
Connettoreaudio
IlprodottoAxisdisponedeiseguenticonnettoriaudio:
•Ingressoaudio(rosa)-Ingressoaudioda3,5mmpermicrofonoinmonoosegnalemono
line-in(ilcanalesinistroèusatodaunsegnalestereo).
•Uscitaaudio(verde)-Uscitaaudioda3,5mm(livellodilinea)chepuòessereconnessa
aunsistemadiindirizzopubblico(PA)oaunaltoparlanteconamplicatoreintegrato.
Perl'uscitaaudioènecessariousareunconnettorestereo.
SlotperschedaSD
ÈpossibileutilizzareunaschedaSD(noninclusa)perlaregistrazioneinmodalitàlocaleconunità
diarchiviazionerimovibile.Perulterioriinformazioni,consultareDatitecnici,allapagina67.
AVVISO
AVVISO AVVISO
Perprevenireildanneggiamentodelleregistrazioni,laschedaSDdeveesseresmontata
primadellarimozione.Persmontare,andaresuSetup>SystemOptions>Storage>SD
Card(Congurazione>Opzionidisistema>Archiviazione>SchedaSD)efareclic
suUnmount(Smonta).
Pulsantedicomando
Ilpulsantedicomandovieneutilizzatoper:
•Ripristinodelprodottoalleimpostazionipredenitedifabbrica.Consultarepagina75.
•CollegamentoaunservizioAXISVideoHostingSystemoAXISInternetDynamicDNS
Service.Perulterioriinformazionisuquestiservizi,consultareilManualeUtente.
Datitecnici
Condizionidifunzionamento
IlprodottoAxisèdestinatoall'usoesterno.
Prodotto
AXISP3365–VEIEC62262IK10,
Classicazione
NEMA250Type4X
67
Temperatura
Da-40°a55°C
Page 68

Consumoenergetico
1 2 3 4
ProdottoPoE
AXISP3365–VE
Connettori
ConnettoreI/O
Morsettieraa4pinper:
•Alimentazioneausiliaria
(uscitaCC)
•Ingressodigitale
•Uscitadigitale
•0VCC(-)
AXISP3365–VEFixedDomeNetworkCamera
PoweroverEthernet(PoE)IEEE802.3af/802.3attipo1classe3
FunzionePinNote
0VCC(-)
UscitaCC
Ingresso
digitale
Uscita
digitale
1
2
Ilpinpuòessereutilizzatoancheper
alimentareunaperifericaausiliaria.
Nota:questopinpuòessereusatosolocome
uscitaalimentazione.
3
Collegarealpin1perattivarlooppure
lasciarloisolato(scollegato)perdisattivarlo
4
Collegarealpin1quandoattiva,isolata
(scollegata)quandoinattiva.Seutilizzata
conuncaricoinduttivo,adesempiounrelè
esterno,ènecessariocollegareundiodo
inparalleloalcaricoperproteggereil
dispositivodasovratensioni.
Speciche
3,3VCC
Caricomassimo=50mA
da0amax40VCC
Caricomassimo=100mA
Tensionemassima=
+40VCC
68
Page 69

AXISP3365–VEFixedDomeNetworkCamera
3.3 V max 50 mA
1
2
3
4
123
ITALIANO
Connettoreaudio
Connettoriaudioda
3,5mm(stereo)
IngressoaudioUscitaaudio
1Punta
Ingressomicrofono/linea
Uscitalinea(mono)
2Anello
3Guaina
TerraTerra
SlotperschedaSD
SupportaschedeSDconunmassimodi64GBdiarchiviazione.Perprestazionidiregistrazione
ottimali,utilizzareunaschedaSDHCoSDXCconclassedivelocità10.
69
Page 70

AXISP3365–VEFixedDomeNetworkCamera
1
2
3
Installazionedell'Hardware
Preparazionedelcavodirete
Sesiutilizzauncavodiversodaquellofornito,sulcavodireteènecessariomontareuna
guarnizione.Spingeredelicatamenteilcavonellaguarnizionefornitaessarloadunconnettoredi
rete.PuòtalvoltaesserenecessarioforarelaguarnizioneconilcacciaviteResitorx.
Nota
•Nonspingereaforzailconnettorediretenellaguarnizione.
•Nonforarelaguarnizioneconuncoltelloounaltrooggettoappuntito.
Preparazionedelcasingdell'unità(installazionedeicavilungolaparete)
Seicavidevonopassarelungolaparete,attenersiallaseguenteproceduraperpreparareilcasing
dell'unità:
1.Staccarelacoperturalateralessataalcasingdell'unitàrimuovendolavite.
2.Allentareleduevitisullaschermaturadelcavoestaccarelaparteinferiore.
3.Utilizzandolavite,ssarelaparteinferioredellaschermaturadelcavoalcasingdell'unità.
1.
Schermaturadelcavo(accessorioopzionale)–sezionesuperiore
2.
Schermaturadelcavo(accessorioopzionale)–sezioneinferiore
3.
Casingdell’unità
70
Page 71

AXISP3365–VEFixedDomeNetworkCamera
ITALIANO
Sostituzionedellacoperturadellacupolatrasparente/fumé(opzionale)
IlprodottoAxisvienefornitoconunacupolaopzionale.Persostituirelacoperturadellacupola:
1.Allentarele4vitichessanolacupolainposizionesottolacopertura.
2.Sostituirelacupolaesistenteconquellanuova.Assicurarsichelaguarnizioneingomma
siabensaldaeserrareleviti.
Staffadimontaggio
Lapiastradimontaggioha4diversischemidimontaggio(A,B,C,D).Ladisposizioneèstandardper
ciascunadelleseguentiopzionidimontaggio:
•A:scatolaquadratada4"
•B:scatoladigiunzioneperunitàdoppia,adimensionistandardUSA
•C:scatolaottagonaleda4"
•D:scatoladigiunzioneperunitàsingola,adimensionistandardUSA
Installazionedeicavi
Attenersialleproceduredescrittediseguitoperinstallareicavi,infunzionedelpercorsoattraverso
olungolaparete.Perinstallareicavilungolaparete:
1.Usarelamascheradiforaturaperpraticare4forinellaparete.
2.Fissarelastaffadimontaggioallapareteutilizzando4vitiidoneealmaterialedella
parete.
3.Rimuoverel'unitàtelecameradalcasingdell'unitàspingendovialemolle.
4.Rimuovereleguarnizionidaiforilateralidelcasingdell'unità.Seèpresenteunsolocavo,
rimuovereunasolaguarnizione.
5.Posizionareilcasingdell'unitàsullastaffadimontaggioessarloinposizioneserrando
lequattroviti.
6.Tirareicaviattraversoiforilateralidelcasingdell'unità.
7.Farscorrereleguarnizionilungoilcavoeinserirleneifori.Controllarecheleguarnizioni
siinseriscanoafondoneifori,senzapiegheocurvature.
71
Page 72

AXISP3365–VEFixedDomeNetworkCamera
1
2
3
4
8.Rimontarelapartesuperioredellaschermaturadelcavoserrandoledueviti.
Nota
Perevitareproblemidovutiall’umidità,èconsigliabileinstallareicavinellaparteinferiore
dellatelecamera,coniforipericavirivoltiversoilbasso.
Perinstallareicaviattraversolaparete:
1.
Staffadimontaggio
2.
Cavodireteconguarnizione
3.
Casingdell’unità
4.
Guarnizionirimossedaifori
1.Usarelamascheradiforaturaperpraticare4forinellaparete.
2.Inserirenellapareteilcavodirete(e,senecessario,ilcavoI/Oeaudio),facendolo
passareattraversoiforisullastaffadimontaggio.
3.Fissarelastaffadimontaggioallapareteutilizzando4vitiidoneealmaterialedella
parete.
4.Rimuoverel'unitàtelecameradalcasingdell'unitàspingendovialemolle.
5.Rimuovereleguarnizionidaiforiposterioridelcasingdell'unità.Seèpresenteunsolo
cavo,rimuovereunasolaguarnizione.
6.Farpassareicaviattraversoifori.
7.Farscorrereleguarnizionilungoicavieinserirleneifori.Controllarecheleguarnizioni
siinseriscanoafondoneifori,senzapiegheocurvature.
8.Fissareilcasingdell'unitàallastaffadimontaggioserrandolequattroviti.
72
Page 73

AXISP3365–VEFixedDomeNetworkCamera
1
2
3
ITALIANO
Installazionedell'unitàtelecamera
1.
Connettoredellaventola
2.
Unitàtelecamera
3.
Cavodirete
Nota
•Fareattenzioneanontirareopiegareeccessivamenteilcavodirete,poichésipotrebbe
danneggiareilprodotto.
•IlprodottoAxispuòancheesseremunitodiunacanalinametallicaperproteggereicavi
nelcasoincuivenganoinstallatilungolaparete.
1.Fissareilcavodireteall'unitàtelecamera,quindissareicaviaudioeI/O,senecessario.
Èconsigliabileavvolgereilcavodireteadanello,comemostratonellaguraprecedente.
2.InserirelaschedadimemoriaSD(opzionale).
3.Allontanarelemolledelcasingdell'unitàeinstallarel'unitàtelecamerafacendola
scattareinposizione.
4.Fissareilconnettoredellaventolaaquellosull'unitàtelecamera.
73
Page 74

AXISP3365–VEFixedDomeNetworkCamera
1
2
Regolazionedell'obiettivo
1.
Lineediriferimentoperl'orientamentoorizzontale
2.
Vitediarresto
AprirelapaginaLiveView(Immaginidalvivo)(consultareAccederealProdotto,allapagina75)
dell’interfacciawebedeffettuareleseguentioperazioninellatelecamera:
1.Allentarelavitediarresto.
2.Ruotarel’obiettivonellaposizionedesiderata.Controllarechelelineesuciascunlato
dell'obiettivosianoallineateinorizzontale.Assicurarsicheilcontrassegnosulcoperchio
dell'obiettivo,tralelineeorizzontali,siarivoltoversol'alto.
3.Stringeredelicatamentelavitediarrestoperbloccarelatelecameranellaposizione
desiderata.
4.AprirelapaginaFocusAdjustment(Regolazionemessaafuoco)nell'interfacciawebin
Setup>BasicSetup>Focus&Zoom(Congurazione>Congurazionedibase>Messa
afuocoezoom)eseguireleistruzionivisualizzate.Utilizzarelanestradiregolazione
delleimmaginiperimpostarelamessaafuocoelozoom.Perulterioriinformazioni,
consultarelaGuidainlinea.
Nota
•Acausadellarifrazionedovutaallacupola,l'immaginepotrebbeapparireleggermente
sfocataquandovienemontatalacupola.Percorreggerequestoproblema,aprirelapagina
FocusAdjustment(Regolazionemessaafuoco)nell'interfacciawebinSetup>Basic
Setup>Focus&Zoom(Congurazione>Congurazionedibase>Messaafuocoe
zoom),eregolarenuovamentelamessaafuoco.
•Laregolazionemanualedellamessaafuocoedellozoompuòdanneggiarel’obiettivo.
Completamentodell’installazione
1.Ruotareloschermoneroall'internodellacupolaperfarlocorrispondereallaposizione
dellatelecamera.
74
Page 75

AXISP3365–VEFixedDomeNetworkCamera
ITALIANO
2.Senecessario,ssareallatelecameraloschermodiprotezionedagliagentiatmosferici,
primadimontarelacoperturadellacupola.Pereffettuarequestaoperazione,è
necessariorimuovereleduevitisullacoperturadellacupola.Spostarelerondelleda
questevitiallevitiutilizzatesulloschermodiprotezionedagliagentiatmosferici,quindi
ssarequest'ultimo.
3.Assicurarsichelaguarnizioneingommasiabensaldasullacoperturadellacupola,
ssarelacoperturadellacupolaalcasingdell'unità,serrandole4viti.
Aquestopuntol'installazioneècompletata.
AccederealProdotto
UtilizzareleutilitycontenutenelCDdelsoftwared'installazioneegestioneperassegnareun
indirizzoIP,impostarelapasswordedaccederealussovideo.Questeinformazionisonodisponibili
anchesullepaginededicateall'assistenzasulsitowww.axis.com/techsup/
Ripristinodeivaloripredenitidifabbrica
Importante
Ilripristinodelleimpostazionidifabbricadeveessereusatoconcautela.Unripristinodelle
impostazionidifabbricaconsentiràdiripristinareleimpostazionidifabbricapertuttii
parametri,inclusol'indirizzoIP.
Nota
Glistrumentiperl'installazioneelagestionedelsoftwaresonodisponibilisulCDfornito
conilprodottoesullepaginededicateall'assistenzasulsitoWebwww.axis.com/techsup.
Perripristinareilprodottoalleimpostazionipredenitedifabbrica:
1.Scollegarel'alimentazionedalprodotto.
2.Tenerepremutoilpulsantedicontrolloericollegarel'alimentazione.VederePanoramica
dell'hardware,allapagina64.
3.Tenerepremutoilpulsantedicontrolloper15–30secondicircanoaquandol'indicatore
LEDdistatolampeggeràingiallo.
4.Rilasciareilpulsantedicomando.IlprocessoècompletoquandoilLEDdistatodiventerà
verde.Ilprodottoèstatoreimpostatoalleimpostazionidifabbricapredenite.Senessun
serverDHCPèdisponibileinrete,l'indirizzoIPpredenitoè192.168.0.90.
5.Medianteglistrumentiperl'installazioneelagestionedelsoftware,assegnareun
indirizzoIP,impostarelapasswordeaccederealussovideo.
Èanchepossibilereimpostareiparametrialleimpostazionipredenitedifabbricamediante
l’interfacciaweb.AndaresuSetup>SystemOptions>Maintenance(Congurazione>Opzioni
disistema>Manutenzione).
75
Page 76

AXISP3365–VEFixedDomeNetworkCamera
Ulterioriinformazioni
IlManualeperl'utenteèdisponibileall'indirizzowww.axis.com
Visitareilsitowww.axis.com/techsuppervericaresesonodisponibiliaggiornamentidelrmware
perilprodottodirete.Perconoscerelaversionedelrmwareattualmenteinstallata,andaresu
Setup>About(Congurazione>Informazioni).
VisitareilCentrodiformazioneAxisallapaginawww.axis.com/academyperutiliwebinar,
esercitazioni,formazioneeguide.
Informazionisullagaranzia
PerinformazionisullagaranziadelprodottoAxiseinformazioniadessorelative,consultare
lapaginawww.axis.com/warranty/
76
Page 77

AXISP3365–VEFixedDomeNetworkCamera
ESPANÕL
Informacióndeseguridad
LeaestaGuíadeinstalaciónconatenciónantesdeinstalarelproducto.GuardelaGuíade
instalaciónparapoderconsultarlaenotromomento.
Nivelesdepeligro
PELIGRO
ADVERTENCIA
ATENCIÓN
AVISO
AVISO AVISO
Indicaunasituaciónpeligrosaque,sinoseevita,provocará
lesionesgravesolamuerte.
Indicaunasituaciónpeligrosaque,sinoseevita,puedeprovocar
lesionesgravesolamuerte.
Indicaunasituaciónpeligrosaque,sinoseevita,puedeprovocar
lesionesmoderadasoleves.
Indicaunasituaciónpeligrosaque,sinoseevita,puedeprovocar
dañosmateriales.
Otrosnivelesdemensaje
ImportanteIndicainformaciónimportantequeesfundamentalparaqueel
NotaIndicainformaciónútilqueayudaaaprovecharelproductoal
productofuncionecorrectamente.
máximo.
77
Page 78

AXISP3365–VEFixedDomeNetworkCamera
Instruccionesdeseguridad
AVISO
AVISO AVISO
•ElproductodeAxisdebeutilizarsedeacuerdoconlasleyesynormaslocales.
•AlmaceneelproductodeAxisenunentornosecoyventilado.
•EvitelaexposicióndelproductodeAxisachoquesoaunafuertepresión.
•Noinstaleelproductoensoportes,superciesoparedesinestables.
•UtilicesololasherramientascorrespondientescuandoinstaleelproductodeAxis.La
aplicacióndeunafuerzaexcesivapuedeprovocardañosenelproducto.
•Noutilicelimpiadoresenaerosol,agentescáusticosniproductosquímicos.Limpieconun
trapolimpiohumedecidoconaguapura.
•Utilicesoloaccesoriosquecumplanconlasespecicacionestécnicasdelproducto.Estos
accesorioslospuedeproporcionarAxisountercero.
•UtilicesolopiezasderepuestoproporcionadasorecomendadasporAxis.
•Nointenterepararelproductoustedmismo.Póngaseencontactoconelsoportetécnico
deAxisoconsudistribuidordeAxisparatratarasuntosdereparación.
Transporte
AVISO
AVISO AVISO
•CuandotransporteelproductodeAxis,utiliceelembalajeoriginalounequivalentepara
evitardañosenelproducto.
Batería
EsteproductodeAxisutilizaunabateríadelitioBR/CR2032de3,0Vcomofuentedealimentación
delrelojinternoentiemporeal.Encondicionesnormales,estabateríaduraráunmínimodecinco
años.
Unniveldelabateríabajoafectaráalfuncionamientodelrelojentiemporeal,causandoel
restablecimientodeestecadavezqueseenciendaelproducto.Elsistemamostraráunmensajede
registrocuandoseaprecisosustituirlabatería.
Labateríanodebesustituirseamenosqueseanecesario;noobstante,siprecisahacerlo,póngaseen
contactoconelserviciodeasistenciatécnicadeAxisenwww.axis.com/techsupparasolicitarayuda.
78
Page 79

AXISP3365–VEFixedDomeNetworkCamera
ESPANÕL
ADVERTENCIA
•Lasustituciónincorrectadelabateríaimplicariesgodeexplosión.
•SustituyalabateríaconunabateríaidénticauotrabateríarecomendadaporAxis.
•Desechelasbateríasusadasdeconformidadconlanormativalocalolasinstrucciones
delfabricante.
Cubiertadeldomo
AVISO
AVISO AVISO
•Presteatenciónanoarañar,dañarodejarlashuellasenlacubiertadeldomo,puestoque
estopuedeprovocarunadisminucióndelacalidaddeimagen.Siesposible,mantengael
plásticodeprotecciónenlacubiertadeldomohastaquesecompletelainstalación.
•Nolimpielacubiertadeldomosipareceasimplevistaqueestálimpiaynuncapulala
supercie.Unalimpiezaexcesivapodríadañarlasupercie.
•Pararealizarunprocedimientodelimpiezageneraldelacubiertadeldomoserecomienda
usardetergenteojabónneutros,sindisolventesynoabrasivosmezcladosconaguapura,
yuntraposuaveylimpio.Enjuaguebienconaguapuraytibia.Sequeconuntrapolimpio
ysuaveparaevitarlasmanchasdegotasdeagua.
•Nuncautilicedetergentesabrasivos,gasolina,benceno,acetona,etc.yevitelimpiarla
cubiertadeldomoatemperaturaselevadasoencontactodirectoconlaluzsolar.
79
Page 80

80
Page 81

AXISP3365–VEFixedDomeNetworkCamera
ESPANÕL
Guíadeinstalación
EstaGuíadeinstalaciónincluyelasinstruccionesnecesariasparainstalarlacámaraderedAXIS
P3365–VEensured.Paraconocerotrosaspectosdeusodelproducto,consulteelManualdel
usuariodisponibleenwww.axis.com.
Pasosdelainstalación
1.Asegúresedequedisponedelcontenidodelpaquete,lasherramientasylosdemás
materialesnecesariosparalainstalación.Veapágina81.
2.Estudielainformacióngeneraldelhardware.Veapágina82.
3.Estudielasespecicaciones.Veapágina85.
4.Instaleelhardware.Veapágina88.
5.Accedaalproducto.Veapágina93.
Contenidodelpaquete
•CámaradomoderedjaAXISP3365–VE
•1destornilladorResitorx
•1cubiertadeldomoahumadaconjunta
•Cablederedde5mconjunta
•1juntadelcable
•1conectordelterminal
•1parasol
•CDdelsoftwaredeinstalaciónygestión
•Materialesimpresos
-Guíadeinstalación(estedocumento)
-Plantilladeperforado(1)
-Etiquetasadicionalesconelnúmerodeserie(2)
-ClavedeautenticaciónAVHS
Accesoriosopcionales
•Packdelicenciadeldescodicadormultiusuario
•PantalladeinstalaciónAXIST8414
•MidspansPoEdeAXIS
•IluminadoresAXIST90A
•KitdemontajeenfalsostechosconclasicaciónIP51
81
Page 82

AXISP3365–VEFixedDomeNetworkCamera
1 2 3 4 5 6
7 8
9 10
13
14
12
11
15
16
•Kitcolgante
•Soportedemontaje
•Blindajedecable
•Kitcolgantequeincluyeparasol
•CabledeE/Sdeaudioconjuntamontadapreviamente
Paraobtenerinformaciónsobrelosaccesoriosdisponibles,veawww.axis.com.
Informacióngeneraldelhardware
1.
2.
Conectordered
Salidadeaudio
82
Page 83

AXISP3365–VEFixedDomeNetworkCamera
ESPANÕL
3.
IndicadoresLED(red,estadoyencendido)
4.
Entradadeaudio
5.
ConectordeE/S
6.
Botóndecontrol
7.
Conectordelventilador
8.
RanuraparatarjetasSD
9.
Soportedemontaje
10.
Cabledered
11.
Carcasadelaunidad
12.
Calentadordelacámara
13.
Cubiertadeldomo
14.
Parasol
15.
Oricioslateralesparaloscablesqueseutilizanenlapared
16.
Muelle
Dimensiones(altoxancho)
117x179mm
Peso
1,6kg
IndicadoresLED
LED
Red
Estado
tación
Color
Verde
Ámbar
ApagadoNohayconexiónalared.
VerdeVerdejoparaindicarunfuncionamientonormal.
Ámbar
RojoParpadeadespaciosisehaproducidounerrorenunaactualización.
VerdeFuncionamientonormal. Alimen-
Ámbar
Indicación
Fijoparaindicarunaconexiónaunaredde100MBits/s.Parpadea
cuandohayactividaddered.
Fijoparaindicarunaconexiónaunaredde10MBits/s.Parpadeacuando
hayactividaddered.
Fijoduranteelinicioyalrestaurarvaloresdeconguración.
Parpadeaenverde/ámbardurantelaactualizacióndelrmware.
83
Page 84

AXISP3365–VEFixedDomeNetworkCamera
Nota
•SepuedecongurarelLEDEstadoparaqueseapagueduranteelfuncionamientonormal.
Paraello,vayaaSetup>SystemOptions>Ports&Devices>LED(Conguración>
Opcionesdelsistema>Puertosydispositivos>LED).Vealaayudaenlíneaparaobtener
másinformación.
•SepuedecongurarelLEDEstadoparaqueparpadeemientrashayauneventoactivo.
•SepuedecongurarelLEDdeestadoparaqueparpadeeeidentiquelaunidad.Vaya
aSetup>SystemOptions>Maintenance(Conguración>Opcionesdelsistema>
Mantenimiento).
Conectoresybotones
Paraconocerlasespecicacionesylascondicionesdefuncionamiento,veapágina85.
Conectordered
ConectorEthernetRJ45.AdmitealimentaciónatravésdeEthernet(PoE).
AVISO
AVISO AVISO
Debidoalanormativalocaloalascondicionesambientalesyeléctricasenlasquesevayaa
utilizarelproducto,puedequeseaadecuadouobligatorioelusodeuncablederedblindado
(STP).Todosloscablesderedqueseutilicenenexterioresoenentornoseléctricosexigentes
deberánestarblindados(STP)ydiseñadosparasuusoespecíco.Asegúresedequeel
conmutadordereddispongadeunaconexiónatierraadecuada.Paraobtenerinformación
sobrelosrequisitosnormativos,veaElectromagneticCompatibility(EMC),onpage2.
ConectordeE/S
Seutilizacondispositivosexternoscombinados,porejemplo,conalarmasantimanipulación,
deteccióndemovimiento,activacióndeeventos,grabacióndeintervalosdetiempoynoticaciones
dealarma.Ademásdelpuntodereferenciade0VCCylapotencia(salidadeCC),elconectorde
E/Sofrecelainterfazpara:
•Salidadigital–paraconectardispositivosexternoscomorelésyLED.Losdispositivos
conectadossepuedenactivarmediantelaInterfazdeprogramacióndeaplicaciones(API)
VAPIX®,losbotonesdesalidadelapáginaLiveViewomedianteunaregladeacción.La
salidasemostraráactiva(seindicaenSystemOptions>Ports&Devices(Opcionesdel
sistema>Puertosydispositivos))sieldispositivodealarmaestáactivado.
•Entradadigital–unaentradadealarmaparaconectardispositivosquepuedanalternar
circuitoscerradosyabiertos,como:detectoresPIR,contactosdepuertasyventanas,
detectoresderoturadecristales,etc.Cuandoserecibeunaseñal,elestadocambiayla
entradasevuelveactiva(seindicaenSystemOptions>Ports&Devices(Opcionesdel
sistema>Puertosydispositivos)).
84
Page 85

AXISP3365–VEFixedDomeNetworkCamera
ESPANÕL
Conectordeaudio
ElproductodeAxisintegralossiguientesconectoresdeaudio:
•Entradadeaudio(rosa):entradade3,5mmparamicrófonomono,oentradadelíneade
señalmono(seusaelcanalizquierdodeunaseñalestéreo).
•Salidadeaudio(verde):salidaparaaudio(niveldelínea)de3,5mmquesepuede
conectaraunsistemademegafoníapúblicaoaunaltavozconamplicadorincorporado.
Debeutilizarseunconectorestéreoparalasalidadeaudio.
RanuraparatarjetasSD
PuedeemplearseunatarjetaSD(noincluida)paralagrabaciónlocalconalmacenamientoextraíble.
Paraobtenermásinformación,veaEspecicaciones,enlapágina85.
AVISO
AVISO AVISO
AntesderetirarlatarjetaSD,hayquedesinstalarlaparaevitarquelasgrabaciones
resultendañadas.Paradesinstalarla,vayaaSetup>SystemOptions>Storage>SD
Card(Conguración>Opcionesdelsistema>Almacenamiento>TarjetaSD)yhaga
clicenUnmount(Desinstalar).
Botóndecontrol
Elbotóndecontrolseutilizaparalosiguiente:
•Restablecerelproductoalaconguraciónpredeterminadadefábrica.Veapágina93.
•ConectarseaunservicioAXISVideoHostingSystemoalServiciodeDNSdinámicode
InternetdeAXIS.Paraobtenermásinformaciónsobreestosservicios,veaelManual
delusuario.
Especicaciones
Condicionesdefuncionamiento
ElproductodeAxissehacreadoparasuusoenexteriores.
Producto
AXISP3365–VEIEC62262IK10,
Clasicación
NEMA250Tipo4X
85
Temperatura
De-40°Ca55°C
Page 86

Consumo
1 2 3 4
ProductoPoE
AXISP3365–VE
Conectores
ConectordeE/S
Bloquedeterminalesde4pinespara:
•Alimentaciónauxiliar(salida
deCC)
•Entradadigital
•Salidadigital
•0VCC(-)
AXISP3365–VEFixedDomeNetworkCamera
AlimentaciónatravésdeEthernet(PoE)IEEE802.3af/802.3at
Tipo1Clase3
Función
0VCC(-)
SalidadeCC
Entrada
digital
Salidadigital
PinNotas
1
2
Sepuedeusarparaconectarelequipo
auxiliar.
Nota:Estepinsepuedeusarsolocomo
salida.
3
Conéctelaalpin1paraactivarlaodéjela
suelta(desconectada)paradesactivarla
4
Conectadaalpin1cuandoseactivaysuelta
(sinconectar)cuandoestádesactivada.
Siseutilizaconunacargainductiva(por
ejemplo,unrelé),debeconectarseundiodo
enparaleloalacargacomoprotecciónante
transitoriosdetensión.
Especicaciones
3,3VCC
Cargamáx.=50mA
0a40VCCmáx.
Cargamáx.=100mA
Tensiónmáx.=+40VCC
86
Page 87

AXISP3365–VEFixedDomeNetworkCamera
3.3 V max 50 mA
1
2
3
4
123
ESPANÕL
Conectordeaudio
Conectoresdeaudio
de3,5mm(estéreo)
Entradadeaudio
1Punta
Entradadelínea/micrófono
Salidadeaudio
Salidadelínea(mono)
2Anillo
3ManguitoTierraTierra
RanuraparatarjetasSD
AdmitetarjetasSDdehasta64GBdecapacidaddealmacenamiento.Paraobtenerunrendimiento
degrabaciónóptimo,utiliceunatarjetaSDHCoSDXCdevelocidaddeclase10.
87
Page 88

AXISP3365–VEFixedDomeNetworkCamera
1
2
3
Instalacióndelhardware
Preparacióndelcabledered
Siseutilizauncabledistintoalqueseproporciona,esnecesarioprepararuncablederedconuna
junta.Apliqueunafuerzasuaveenlajuntaqueseproporcionayenchufeunconectordered.Puede
queseanecesariorealizarunoricioenlajuntaconeldestornilladorResitorx.
Nota
•Nofuerceelconectorderedenlajunta.
•Noperforelajuntaconuncuchilloniningúnobjetoalado.
Preparacióndelacarcasadelaunidad(paracablesenlapared)
Siloscablessevanaponerenlapared,preparelacarcasadelaunidaddelasiguienteforma:
1.Quiteeltornilloparasepararlatapalateraldelacarcasadelaunidad.
2.Aojelosdostornillosdelblindajedecableyseparelaparteinferior.
3.Utiliceeltornilloparaajustarlapartetraseradelblindajedecablealacarcasadela
unidad.
1.
Blindajedecable(accesorioopcional)–partesuperior
2.
Blindajedecable(accesorioopcional)–parteinferior
3.
Carcasadelaunidad
88
Page 89

AXISP3365–VEFixedDomeNetworkCamera
ESPANÕL
Sustitucióndelacubiertadeldomotransparente/ahumada(opcional)
ElproductodeAxissesuministraconunacubiertaopcional.Parasustituirlacubiertadeldomo:
1.Aojeloscuatrotornillosdedebajodelacubiertadeldomoquemantieneneldomo
ajustado.
2.Sustituyaeldomoantiguoporelnuevo.Asegúresedequelajuntadegomaseajusta
correctamenteensuposiciónyaprietelostornillos.
Soportedemontaje
Laplacademontajecuentaconcuatrodiseñosdemontaje(A,B,CyD).Losdiseñosdemontaje
siguenlanormadelassiguientesopcionesdemontaje:
•A:cajacuadradade10,16cm
•B:cajadeconexionesdesalidadobledetamañoestándarparaEE.UU.
•C:cajaoctogonalde10,16cm
•D:cajadeconexionesdesalidaúnicadetamañoestándarparaEE.UU.
Guíadeloscables
Dependiendodesideseaponerloscablesatravésdelaparedoalolargodeella,sigalas
instruccionesrelevantesqueaparecenacontinuación.Paraponerloscablesalolargodelapared:
1.Utilicelaplantilladeperforadoparahacercuatrooriciosenlapared.
2.Coloqueelsoportedemontajeenlaparedutilizandocuatrotornillosapropiadospara
elmaterialdelapared.
3.Separelosmuellespararetirarlacámaradelacarcasadelaunidad.
4.Retirelasjuntasdelosoricioslateralesdelacarcasadelaunidad.Siexistesoloun
cable,retiresolounajunta.
5.Coloquelacarcasadelaunidadenelsoportedemontajeyfíjelamedianteloscuatro
tornillos.
6.Tirehaciaarribadeloscablesatravésdelosoricioslateralesdelacarcasadelaunidad.
89
Page 90

AXISP3365–VEFixedDomeNetworkCamera
1
2
3
4
7.Arrastrelasjuntasalolargodelcableyconéctelasenlosoricios.Lasjuntasdeben
ajustarseperfectamentealosoriciossinqueexistanplieguesnidobleces.
8.Aprietelosdostornillosparavolveraunirlapartesuperiordelblindajedecable.
Nota
Paraevitarproblemasrelacionadosconlahumedad,esrecomendablepasarloscablesdela
cámaradesdeabajoconlosoriciosdelcablemirandohaciaabajo.
Paracolocarloscablesatravésdelapared:
1.
Soportedemontaje
2.
Cablederedconjunta
3.
Carcasadelaunidad
4.
Retiradadelasjuntasdelosoricios
1.Utilicelaplantilladeperforadoparahacercuatrooriciosenlapared.
2.Paseelcabledered(yelcabledeaudioydeE/S,sifuesenecesario)atravésdelapared
ylosoriciosenelsoportedemontaje.
3.Coloqueelsoportedemontajeenlaparedutilizandocuatrotornillosapropiadospara
elmaterialdelapared.
4.Separelosmuellespararetirarlacámaradelacarcasadelaunidad.
5.Retirelasjuntasdelosoriciostraserosdelacarcasadelaunidad.Siexistesoloun
cable,retiresolounajunta.
6.Paseloscablesatravésdeestosoricios.
7.Arrastrelasjuntasalolargodeloscablesyconéctelasalosoricios.Lasjuntasdeben
ajustarseperfectamentealosoriciossinqueexistanplieguesnidobleces.
8.Aprieteloscuatrotornillosparaconectarlacarcasadelaunidadalsoportedemontaje.
90
Page 91

AXISP3365–VEFixedDomeNetworkCamera
1
2
3
ESPANÕL
Instalacióndelacámara
1.
Conectordelventilador
2.
Cámara
3.
Cabledered
Nota
•Asegúresedenoestirarodoblarelcabledereddemasiado.Estopodríaprovocarque
sedañara.
•ElproductodeAxistambiénpuedeestarequipadoconunaconexiónmetálicapara
protegerelcableadocuandoloscablesseutilizanalolargodelapared.
1.Conecteelcablederedalacámara;yelcabledeaudioydeE/Ssifuesenecesario.
Esrecomendableenrollarelcablederedenespiralcomosemuestraenlailustración
superior.
2.InsertelatarjetadememoriaSD(opcional).
3.Retirelosmuellesdelacarcasadelaunidadyajustelacámaraensuposición.
4.Enchufeelconectordelventiladoralconectordelacámara.
91
Page 92

AXISP3365–VEFixedDomeNetworkCamera
1
2
Ajustedelobjetivo
1.
Líneasdeayudaparalaalineaciónhorizontal
2.
Tornillodebloqueo
AbralapáginaLiveView(consulteAccesoalproducto,enlapágina93)enlainterfazwebyrealice
lossiguientesajustesenlacámara:
1.Aojeeltornillodebloqueo.
2.Gireelobjetivoparacolocarloenlaposicióndeseada.Asegúresedequelaslíneasdecada
ladodelobjetivoseencuentranalineadashorizontalmente.Asegúresedequelamarca
delacubiertadelobjetivo,entrelaslíneashorizontales,estáorientadahaciaarriba.
3.Unavezcomprobadoesto,aprieteconcuidadoeltornillodebloqueoparajarlaposición
delacámara.
4.AbralapáginaFocusAdjustment(Ajustedelenfoque)enlainterfazwebenSetup>
BasicSetup>Focus&Zoom(Conguración>Conguraciónbásica>Enfoqueyzoom)
ysigalasinstruccionesenpantalla.Utilicelaventanadeimagenparaajustarelenfoque
yelzoom.Vealosarchivosdelaayudaenlíneaparaobtenermásinformación.
Nota
•Debidoalarefraccióndeldomo,laimagenpuedeaparecerligeramentedesenfocada
unavezcolocado.Paracorregiresto,vayaalapáginaFocusAdjustement(Ajustedel
enfoque)enlainterfazwebenSetup>BasicSetup>Focus&Zoom(Conguración>
Conguraciónbásica>Enfoqueyzoom)yajustedenuevoelenfoque.
•Siseajustanelenfoqueyelzoommanualmente,puedenproducirsedañosenelobjetivo.
Finalizacióndelainstalación
1.Girelacubiertanegradentrodeldomoparaquecoincidaconlaposicióndelacámara.
2.Siesnecesario,coloqueelparasolenlacámaraantesdeponerlacubiertadeldomo.
Parahacerlo,retirelosdostornillosdelacubiertadeldomo.Cambielasarandelasde
esostornillosalostornillosutilizadosenelparasolycoloqueelparasol.
92
Page 93

AXISP3365–VEFixedDomeNetworkCamera
ESPANÕL
3.Asegúresedequelajuntadegomaseajustecorrectamentealacubiertadeldomoy
aprieteloscuatrotornillosparaajustarlacubiertadeldomoalacarcasadelaunidad.
Lainstalaciónsehacompletado.
Accesoalproducto
UtilicelasherramientassuministradasenelCDdelsoftwaredeinstalaciónygestiónparaasignar
unadirecciónIP,establecerlacontraseñayaccederalatransmisióndevídeo.Estainformación
tambiénestádisponibleenlaspáginasdeasistenciatécnicaenwww.axis.com/techsup/
Restablecimientoalaconguraciónpredeterminadadefábrica
Importante
Hayquetenercuidadoalrestablecerlaconguraciónpredeterminadadefábrica.Todos
losvalores,incluidaladirecciónIP,serestableceránalaconguraciónpredeterminada
defábrica.
Nota
LasherramientasdelsoftwaredeinstalaciónygestiónestándisponiblesenelCD
suministradoconelproducto,asícomoenlaspáginasdeasistenciatécnicaen
www.axis.com/techsup.
Pararestablecerelproductoalaconguraciónpredeterminadadefábrica:
1.Desconectelaalimentacióndelproducto.
2.Mantengapulsadoelbotóndecontrolyvuelvaaconectarlaalimentación.Vea
Informacióngeneraldelhardware,enlapágina82.
3.Mantengapulsadoelbotóndecontroldurante15–30segundoshastaqueelindicador
LEDdeestadoparpadeeenámbar.
4.Suelteelbotóndecontrol.ElprocesonalizacuandoelindicadorLEDdeestadosepone
verde.Elproductoseharestablecidoalaconguraciónpredeterminadadefábrica.Si
nohayningúnservidorDHCPdisponibleenlared,ladirecciónIPpredeterminadaes
192.168.0.90.
5.Utilicelasherramientasdelsoftwaredeinstalaciónygestiónparaasignarunadirección
IP,establecerlacontraseñayaccederalatransmisióndevídeo.
Tambiénesposiblerestablecerlosparámetrosalosvalorespredeterminadosdefábricamediante
lainterfazweb.Paraello,vayaaSetup>SystemOptions>Maintenance(Conguración>
Opcionesdelsistema>Mantenimiento).
93
Page 94

AXISP3365–VEFixedDomeNetworkCamera
Másinformación
ElManualdeusuarioseencuentradisponibleenwww.axis.com.
Visitewww.axis.com/techsupparacomprobarsiexisteunrmwareactualizadodisponibleparasu
productodered.Paraverlaversióndelrmwareinstaladoactualmente,vayaaSetup>About
(Conguración>Acercade).
Visiteelcentrodeaprendizajedewww.axis.com/academyparaconsultarguías,tutoriales,
seminarioswebycursosquepuedenresultarleútiles.
Informacióndelagarantía
ParaobtenermásinformaciónacercadelagarantíadelproductoAxiseinformaciónrelacionada,
visitewww.axis.com/warranty/
94
Page 95

AXISP3365–VEFixedDomeNetworkCamera
ò
ò
¨
¨
¾
¾
安
全
情
安 安
本製品を設置する前に、このインストールガイドをよくお読みください。インストー
ルガイドは、後で参照できるように保管しておいてください。
危
危 危
危 危危険 険
警 警警告 告
注 注注意 意
注 注注記 記
そ
そ そ
報
全 全
情 情
報 報
険
レ
ベ
険 険
険
告
意
記
の
の の
ル
レ レ
ベ ベ
ル ル
回避しない場合、死亡または重傷につながる危険な状
態を示します。
回避しない場合、死亡または重傷につながる可能性のあ
る危険な状態を示します。
回避しない場合、軽傷または中程度の怪我につながる可
能性のある危険な状態を示します。
回避しない場合、器物の破損につながる可能性のある状
態を示します。
他
の
メ
ッ
セ
ー
ジ
レ
ベ
他 他
の の
メ メ
ッ ッ
セ セ
ー ー
ジ ジ
ル
レ レ
ベ ベ
ル ル
重要
注意製品を最大限に活用するために役立つ有用な情報を示
製品を正しく機能させるために不可欠な重要情報を示
します。
します。
95
Page 96

AXISP3365–VEFixedDomeNetworkCamera
安
全
手
安 安
記
注 注注記 記
輸
輸 輸
記
注 注注記 記
順
全 全
手 手
順 順
•本製品は、お使いになる地域の法律や規制に準拠して使用してください。
•本製品は乾燥した換気のよい環境に保管してください。
•本製品に衝撃または強い圧力を加えないでください。
•本製品を不安定なブラケット、表面、または壁に設置しないでください。
•本製品を設置する際には、適切な工具のみを使用してください。過剰な力
がかかると、製品が損傷することがあります。
•化学薬品、腐食剤、噴霧式クリーナーは使用しないでください。清掃には、
きれいな水に浸した清潔な布を使用してください。
•製品の技術仕様に準拠したアクセサリーのみを使用してください。これらの
アクセサリーは、Axisまたはサードパーティから入手できます。
•Axisが提供または推奨する交換部品のみを使用してください。
•製品を自分で修理しないでください。修理については、Axisのサポートまた
は販売代理店にお問い合わせください。
送
送 送
•本製品を運搬する際は、製品が損傷しないよう、元の梱包か同等の梱包を
使用してください。
バ
ッ
テ
リ
バ バ
ッ ッ
本製品は、内部リアルタイムクロック(RTC)用電源として、3.0VBR/CR2032リチウム
バッテリーを使用します。このバッテリーは、通常条件下で最低5年間使用できます。
バッテリーが低電力状態になると、RTCの動作に影響し、電源を入れるたびにRTC
がリセットされます。バッテリーの交換が必要になると、ログメッセージが表
示されます。
必要な場合以外はバッテリーを交換しないでください。バッテリーの交換が必要な場
合は、Axisサポート(
ー
テ テ
リ リ
ー ー
www .axis.com/techsup
)までご連絡ください。
96
Page 97

AXISP3365–VEFixedDomeNetworkCamera
ò
ò
¨
¨
¾
¾
告
警 警警告 告
•バッテリーは、正しく交換しないと爆発する危険があります。
•交換用バッテリーとしては、同一品またはAxisが推奨するバッテリーのみを
使用してください。
•使用済みバッテリーは、地域の規制またはバッテリーメーカーの指示に
従って廃棄してください。
ド
ー
ム
カ
バ
ド ド
ー ー
ム ム
記
注 注注記 記
•画質低下の原因となるので、ドームカバーに傷や指紋を付けたり、損傷しな
いように注意してください。可能であれば、設置が完了するまでドームカ
バーに保護プラスチックを付けたままにしてください。
•肉眼で見て汚れがない場合は、ドームカバーを掃除しないでください。ま
た、絶対に表面を磨かないでください。過度な清掃により、表面が破損す
ることがあります。
•ドームカバーの通常のクリーニングには、磨耗防止タイプの無溶媒の中性石
鹸またはきれいな水で薄めた洗剤と、柔らかい清潔な布を使用することをお
勧めします。洗浄後、きれいなぬるま湯でよくすすいでください。水滴の跡
が付かないよう、清潔な柔らかい布で拭いて乾かしてください。
•強力な洗剤、ガソリン、ベンジン、アセトンなどは絶対に使用しないでく
ださい。また直射日光が当たる場所や気温が上昇する場所での、ドーム
カバーの清掃は避けてください。
ー
カ カ
バ バ
ー ー
97
Page 98

98
Page 99

AXISP3365–VEFixedDomeNetworkCamera
ò
ò
¨
¨
¾
¾
イ
ン
ス
ト
ー
ル
ガ
イ
イ イ
ン ン
ス ス
ト ト
ー ー
ル ル
このインストールガイドでは、AXISP3365–VEネットワークカメラをネットワークに
インストールする手順について説明します。本製品の使用の詳細については、Axisの
ホームページ(
設
置
手
設 設
置 置
手 手
1.パッケージの内容、ツールなど、設置に必要な物がそろっているかを確認
2.「ハードウェアの概要」をよく読みます。
3.「仕様」をよく読みます。
4.ハードウェアを設置します。
5.製品にアクセスします。
パ
ッ
ケ
パ パ
ッ ッ
ケ ケ
•AXISP3365–VE固定ドームネットワークカメラ
•いじり止めヘックスローブドライバー×1
•ガスケット付きスモークドームカバー×1
•ガスケット付きネットワークケーブル(5m)
•ケーブルガスケット×1
•ターミナルコネクタ×1
•ウェザーシールド×1
•インストール・管理ソフトウェアCD
•印刷物
www .axis.com
順
順 順
します。
ー
ー ー
ペ ー ジ 99
ジ
の
ジ ジ
の の
‑インストールガイド(本書)
‑ドリルテンプレート×1
‑予備のシリアル番号ラベル×2
‑AVHS認証キー
ド
ガ ガ
イ イ
ド ド
)でユーザーズマニュアルを参照してください。
を参照してください。
ペ ー ジ 100
ペ ー ジ 103
ペ ー ジ 106
ペ ー ジ 111
内
容
内 内
容 容
を参照してください。
を参照してください。
を参照してください。
を参照してください。
オ
プ
シ
ョ
ン
の
ア
ク
セ
サ
リ
オ オ
プ プ
シ シ
ョ ョ
ン ン
の の
ア ア
ク ク
セ セ
•マルチユーザーデコーダライセンスパック
•AXIST8414インストレーションディスプレイ
•AXISPoEミッドスパン
•AXIST90Aイルミネーター
•IP51準拠天井埋め込みキット
ー
サ サ
リ リ
ー ー
99
Page 100

AXISP3365–VEFixedDomeNetworkCamera
1 2 3 4 5 6
7 8
9 10
13
14
12
11
15
16
•ペンダントキット
•取り付けブラケット
•ケーブルシールド
•ウェザーシールド付きペンダントキット
•音声I/Oケーブル(ガスケット取り付け済み)
利用可能なアクセサリーについては、
ハ
ー
ド
ウ
ェ
ア
の
概
ハ ハ
ー ー
ド ド
ウ ウ
ェ ェ
ア ア
要
の の
概 概
要 要
www .axis.com
を参照してください。
1.
ネ ッ ト ワ ー ク コ ネ ク タ
2.
音 声 出 力
100
 Loading...