

Page 1
1
MONITOR
- 2.4 GHz Digital 7” Wireless Colour LCD Monitor
- High Resolution
- Wide Angle Views
- Single ~ Quad Operation
- Recording Function up to 128GB
- Multivolt 12/24V Input
- Remote Control
CAMERA
- Heavy Duty Wireless CCD Camera
- 120° Wide Viewing Angle
- Night Vision
- IP69 Waterproof Rating
- 12/24V Operation
- 3dB Patch Antenna for Enhanced Range
2
WARRANTY
YEAR
The JS007WQK is loaded with userfriendly features and is ideal for use in
heavy duty vehicles. It comes with a
7”monitor that can display 1,2,3 or 4
cameras and includes one heavy-duty
camera that has an ingress protection
rating of IP69. It operates wirelessly
and can record up to 128G of action.
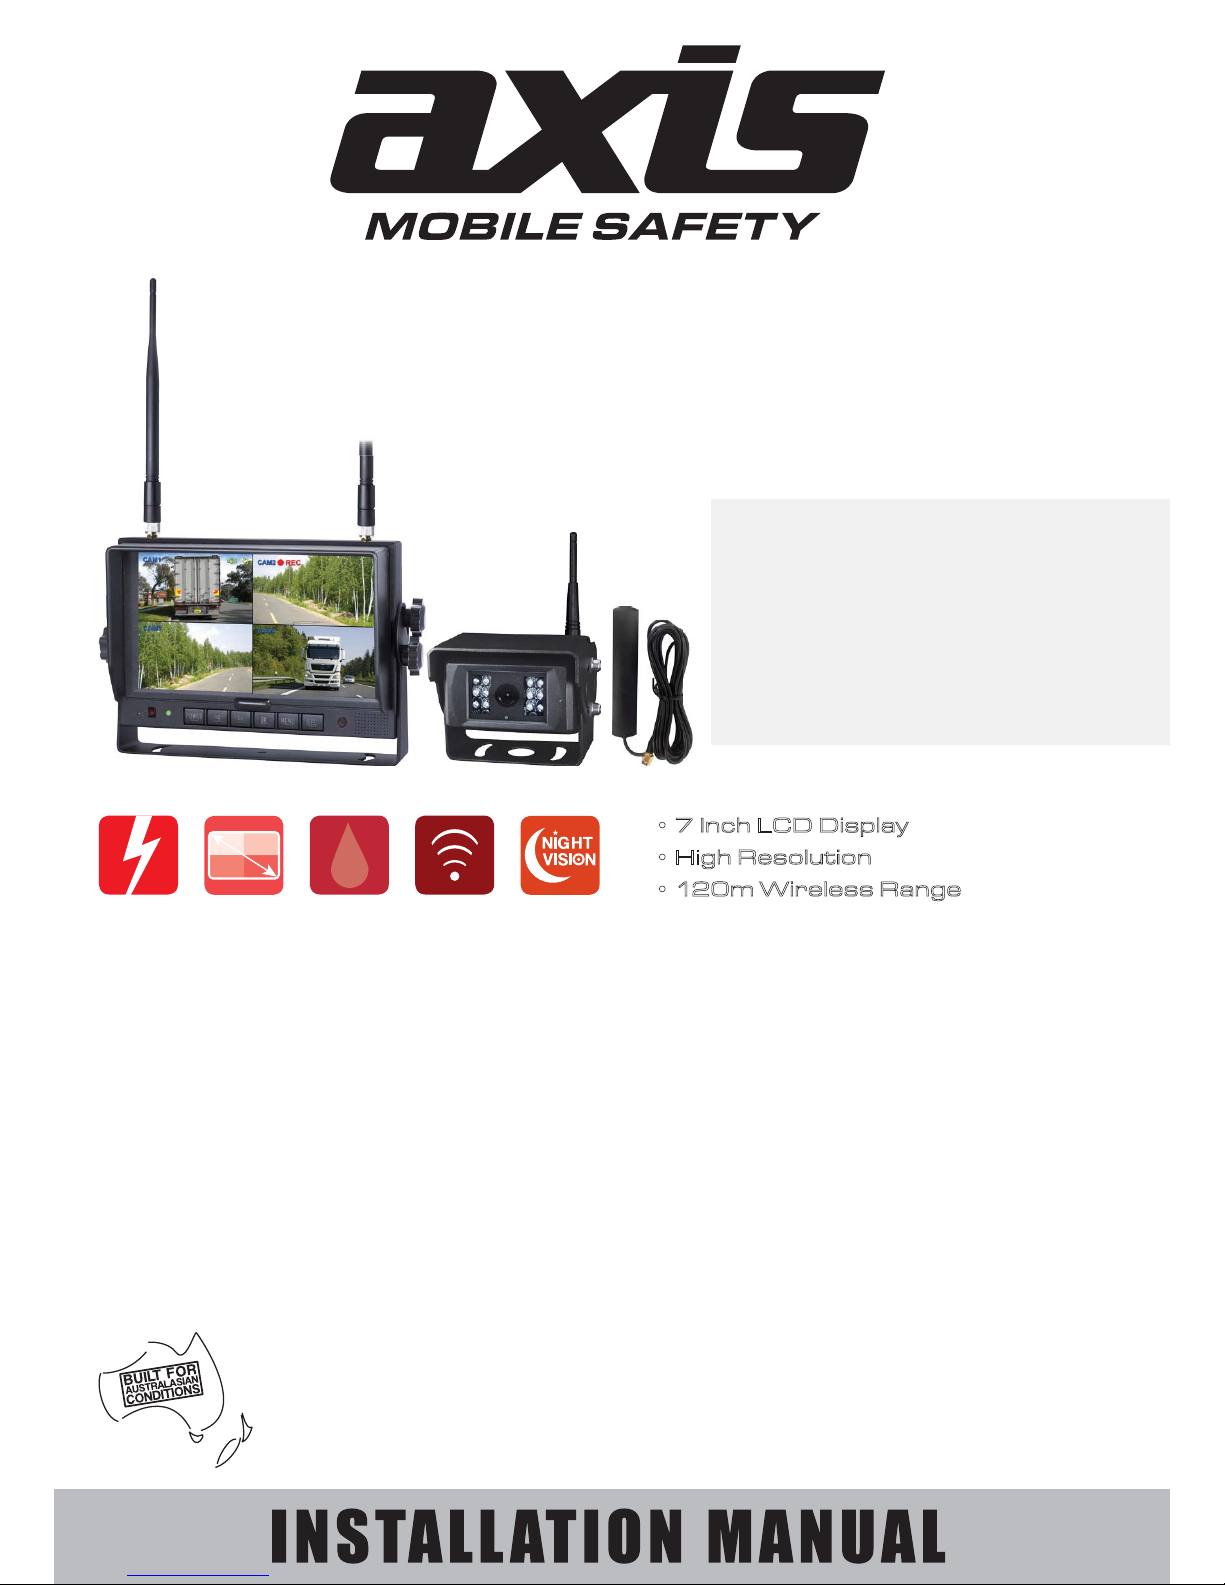
JS007WQK
HEAVY DUTY WIRELESS REVERSING KIT
7” LCD DIGITAL QUAD RECORDING MONITOR
with WATERPROOF CCD CAMERA
MULTIVOLT
12
24
CAMERA
IP69
WEATHER
PROOF
IR CAMERA2.4GHz WIRELESS1, 2, 3, 4 VIEW
• 7 Inch LCD Display
• High Resolution
• 120m Wireless Range
INCLUDED
Mounting Brackets:
- Dash Mount
- U-Shape Mount
Accessories:
- Sunshade
- Remote Control
- 3dB Patch Antenna for
Enhanced Range
Page 2
2
CONTENTS
General...................................................................................................... 2
Technical Specifications.......................................................................... 3
Accessories................................................................................................ 4
Parts Identification.................................................................................... 5
Remote Control Operation...................................................................... 6
Basic Operation........................................................................................ 7
Menu.......................................................................................................... 9
Recording Time......................................................................................... 15
Trouble Shooting....................................................................................... 15
GENERAL
1. The device may be powered by a 12 or 24 Volt automotive battery or vehicle
electrical system.
2. Make sure all cables are connected properly. Observe polarity. Improper cable
connections may damage the monitor.
3. Do not expose the monitor to excessive heat, cold or moisture.
4. Do not watch the video while driving unless you are monitoring the rear view
camera display.
5. Remove the cable connections from the monitor before cleaning the device.
6. Use a mild household detergent and clean the unit with a slightly damp,
soft cloth. Never use strong solvents such as thinner or benzine.
7. Changes or modifications not expressly approved in this manual may void your
warranty and necessitate expensive repairs.
Note: Occasionally, a few highlights or dark pixels may occur on the LCD screen.
This is a common phenomenon in active matrix display technology and does not
necessarily indicate any defect or fault.
Page 3

3
TECHNICAL SPECIFICATIONS
MONITOR
LCD Size: 178mm (7”)
Resolution: 800 x 3 (RGB) x 480
Contrast: 500:1
Brightness: 400 cd/m²
Viewing Angle: U: 50 / D: 70, R/L: 70
Dot Pitch: 0.0642(W) x 0.1790(H)
Aspect Ratio: 16:9
Image Orientation: Normal / Mirror / Flip / Mirror Flip
Inputs: 4 channels
Operating Frequency: 2.4 ~ 2.4835 GHz
Receiving Sensitivity: -89 dBm
Pairing to Camera/s Auto when camera activated
Compression Format: MPEG4
Transmit Output Power: 17 dBm
Modulation: 2.4G FSK/GFSK
Time Delay: 120ms
Transmitting Range: 120 Metres (approx)
Recording Media: Micro-SD / TF Card (not supplied)
Max SD Card Capacity: 128G
Cycled Recording: 1 ~ 4 channels
Signal System: PAL / NTSC
Power Supply: DC 10-32V
Power Consumption: 6W Max
2QERDUG/RXGVSHDNHU :
Operating Temperature: -20~+70°C
CAMERA
Image Device: 1/3” PC1089 Sensor
Viewing Angle: 120°
Signal System: PAL
Effective Pixels: 728 x 488
Sensing Area: 4.6228mm x 3.6112mm
Scanning System: 2:1 Interlace
Sync System: Internal
Horizontal Sync Frequency: 15.625 KHz
Vertical Sync Frequency: 50 Hz
S/N Radio: Better than 48dB
White Balance: Auto
Electronic Shutter: 1/50 (PAL) ~1/100,000 seconds
Operating Frequency: 2.4 ~ 2.4835 GHz
Receiving Sensitivity: -89 dBm
Line of Sight Range: 120 metres
Compression Format: MPEG4
Frame Rate: 25f/s
Transmit Output Power: 17 dBm
RF Bit Rate: 4Mbps
Minimum Illumination: 0 Lux (12 IR LEDs)
Night Vision Distance: 10m
Audio: Yes
Waterproof Rating: IP69
Power Supply: DC 8-36V
Page 4
4
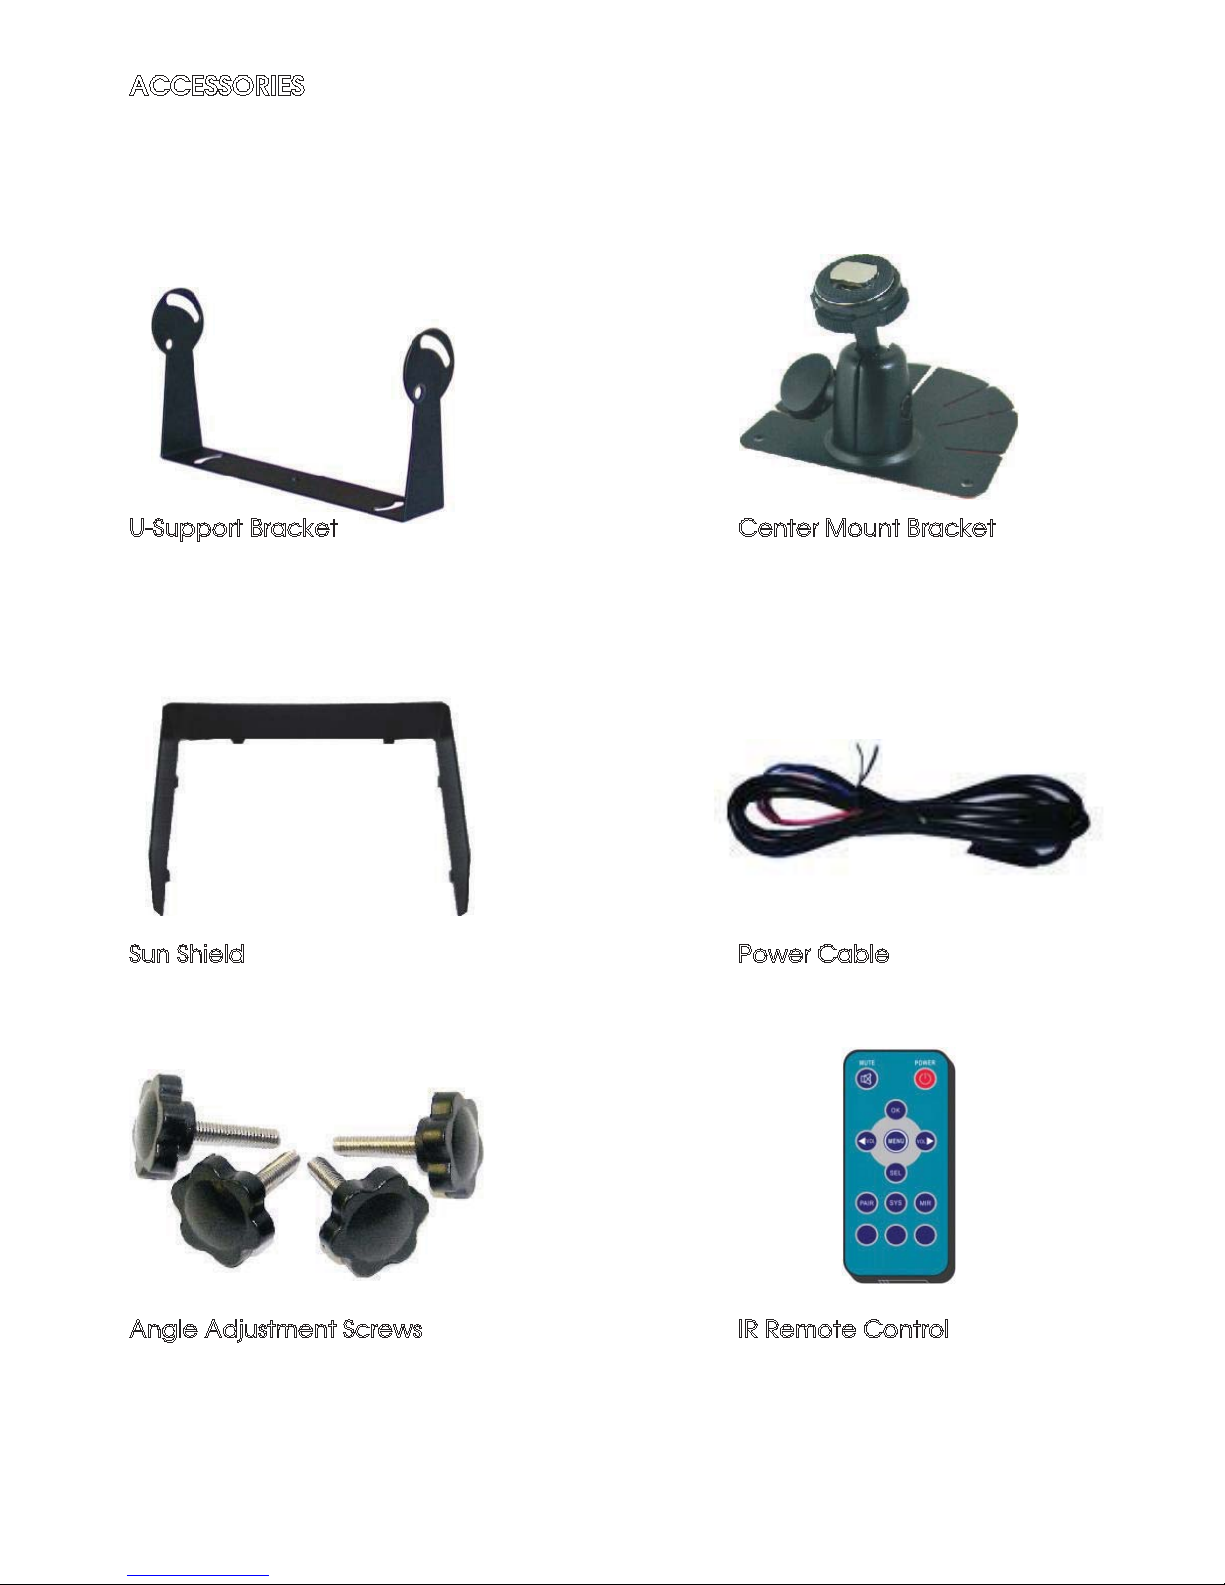
ACCESSORIES
U-Support Bracket Center Mount Bracket
Power Cable
IR Remote Control
Sun Shield
Angle Adjustment Screws
Page 5
5
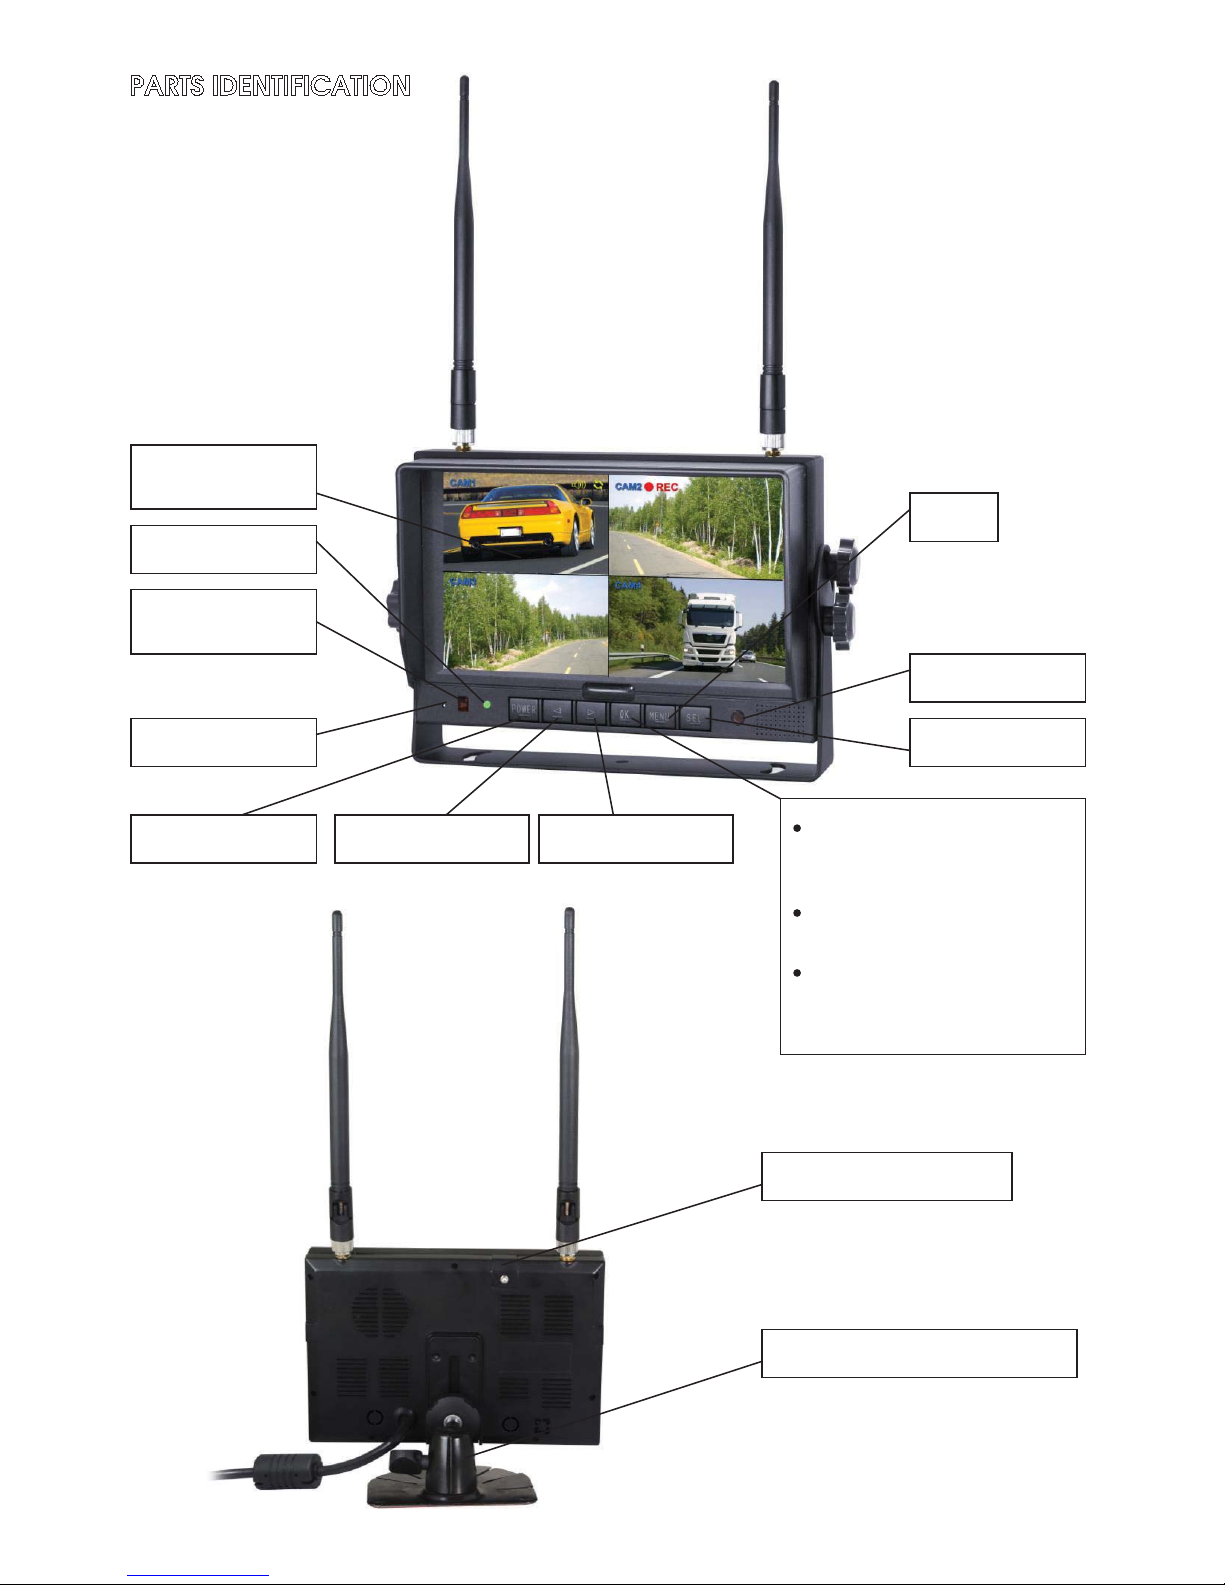
Power switch
Volume increase
Press OK button to enter
menu item or save user
settings.
Press OK button - shortcut
for start/stop recording.
Press OK button for 3
seconds - shortcut for
PAIRING.
Loudspeaker
Menu
Digital Color
LCD screen
Power indicator
Remote control
sensor
Light level sensor
Mounting bracket installation
Volume decrease
Select channels
Micro-SD /TF Card Slot
PARTS IDENTIFICATION
Page 6
6
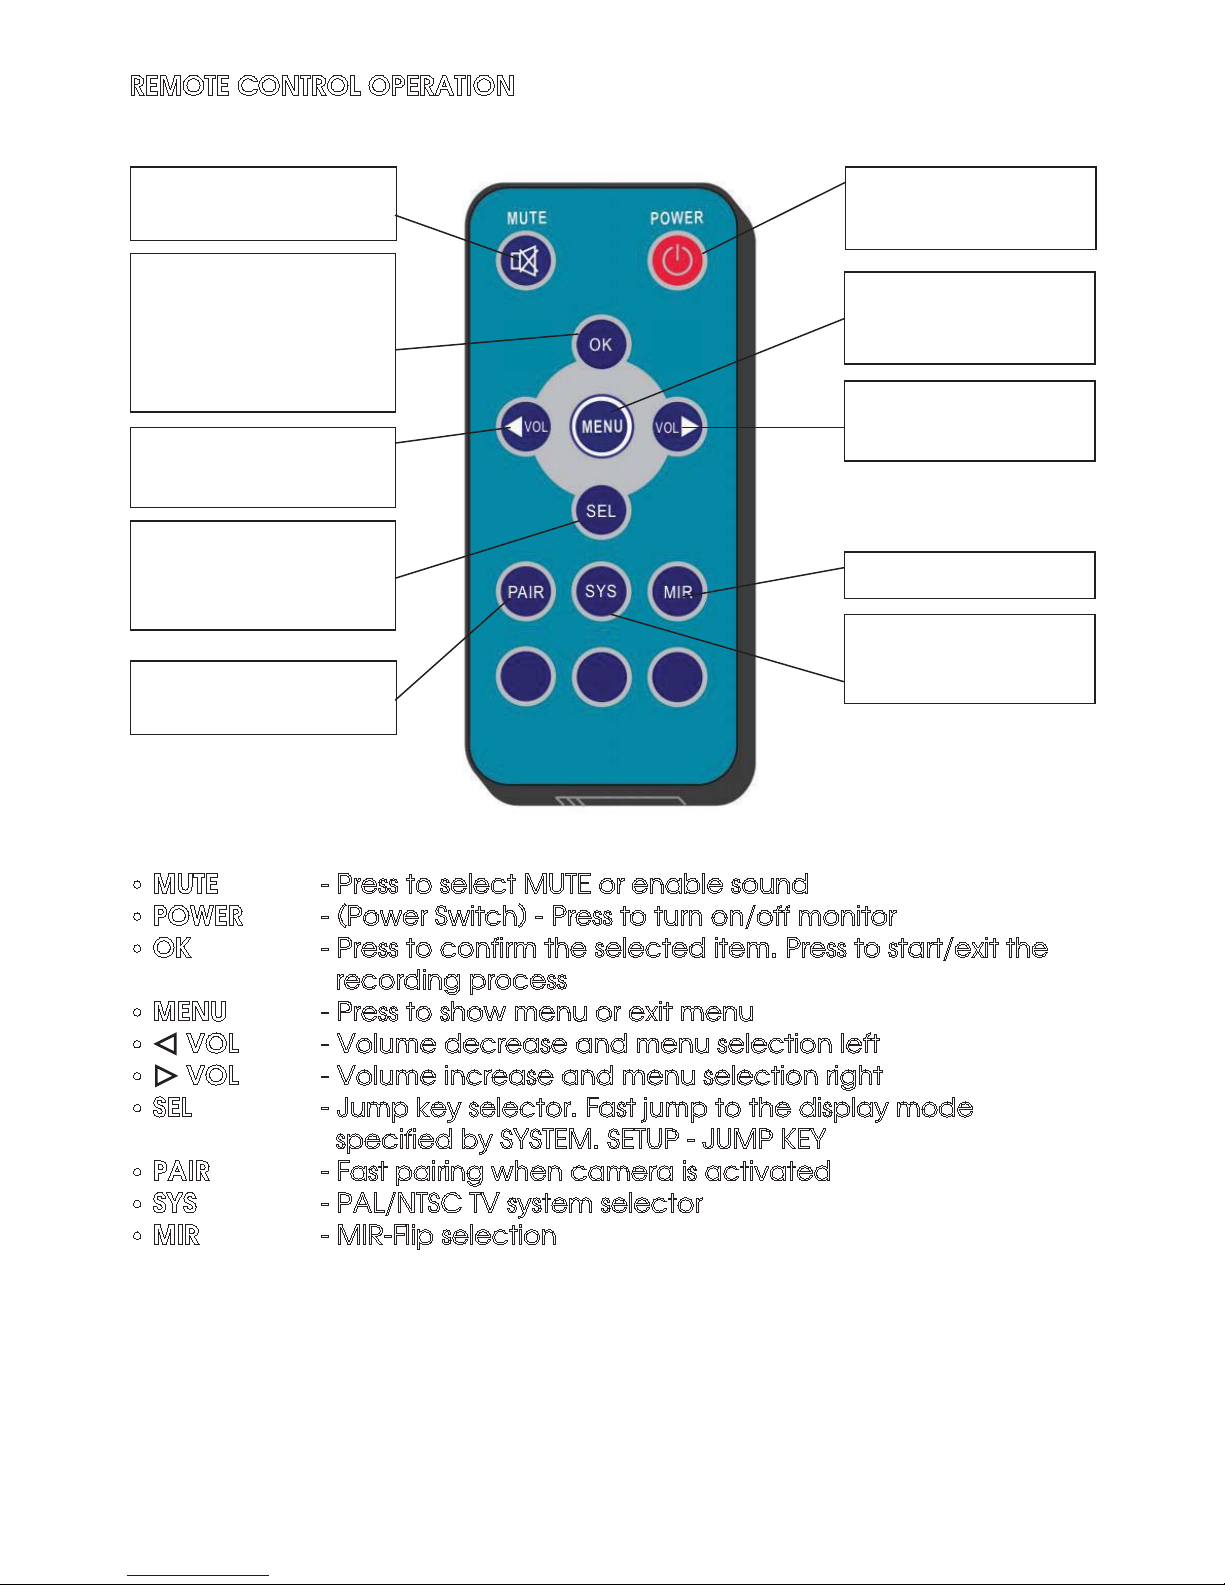
REMOTE CONTROL OPERATION
• MUTE - Press to select MUTE or enable sound
• POWER - (Power Switch) - Press to turn on/off monitor
• OK - Press to confirm the selected item. Press to start/exit the
recording process
• MENU - Press to show menu or exit menu
• VOL - Volume decrease and menu selection left
• VOL - Volume increase and menu selection right
• SEL - Jump key selector. Fast jump to the display mode
specified by SYSTEM. SETUP - JUMP KEY
• PAIR - Fast pairing when camera is activated
• SYS - PAL/NTSC TV system selector
• MIR - MIR-Flip selection
Press to select MUTE
or enable sound
Press OK button to enter
menu item or save user
settings.
Press OK button - shortcut
for start/stop recording.
Volume decrease and
menu selection left
Jump key selector. Fast
jump to the display mode
specified by SYSTEM
Press to turn on/off the
monitor
Press to show menu
or exit menu
Volume increase and
menu selection right
MIR- Flip selection
Fast pairing when
camera is activated
PAL / NTSC TV system
selector
Page 7
7
Support attaching piece
Knob
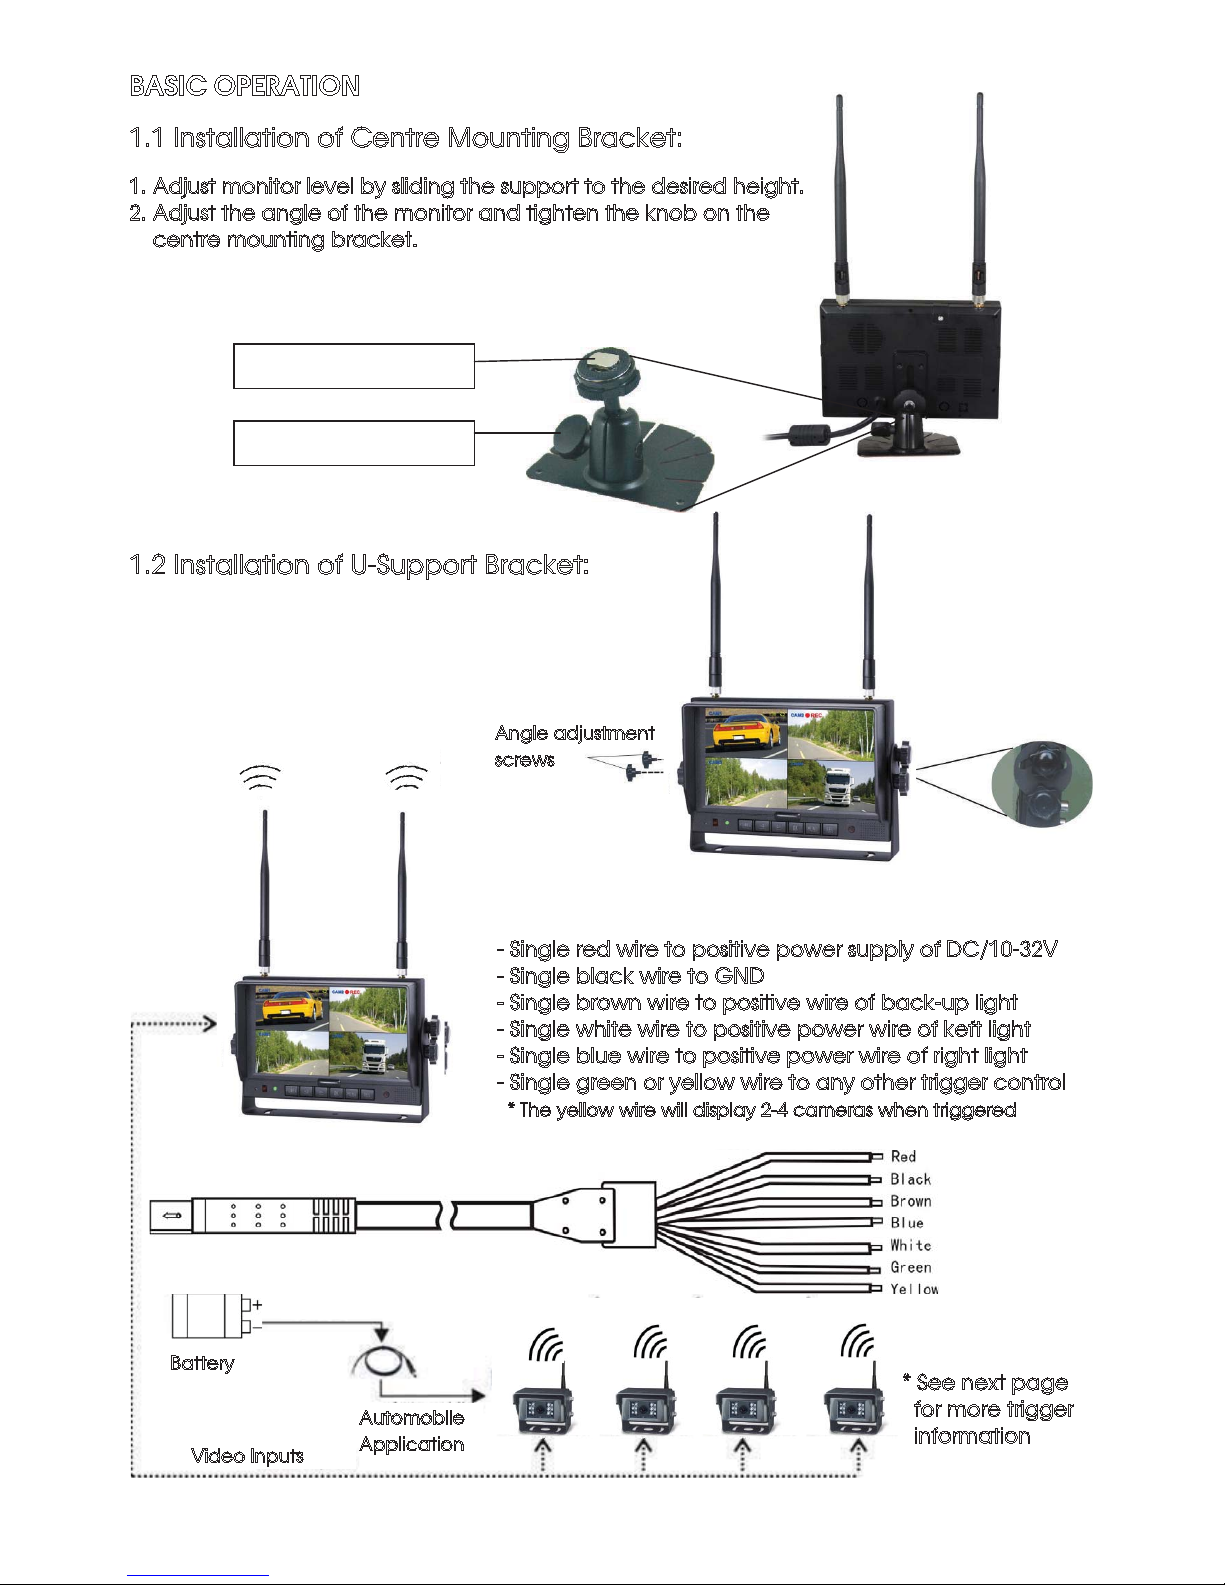
BASIC OPERATION
1.1 Installation of Centre Mounting Bracket:
1. Adjust monitor level by sliding the support to the desired height.
2. Adjust the angle of the monitor and tighten the knob on the
centre mounting bracket.
1.2 Installation of U-Support Bracket:
- Single red wire to positive power supply of DC/10-32V
- Single black wire to GND
- Single brown wire to positive wire of back-up light
- Single white wire to positive power wire of keft light
- Single blue wire to positive power wire of right light
- Single green or yellow wire to any other trigger control
* The yellow wire will display 2-4 cameras when triggered
Battery
Angle adjustment
screws
Automobile
Application
Video Inputs
* See next page
for more trigger
information
Page 8

8
1.3 Trigger Display:
1.3.1. When the green wire is activated, the monitor
automatically switches to CAM1
1.3.2. When the white wire is connected to the positive wire of
the left turn light, the monitor automatically switches to CAM2
(left side camera) when the left turn is activated.
1.3.3. When the blue wire is connected to the positive wire of
the right turn light, the monitor automatically switches to CAM3
(right side camera) when the right turn indicator is activated.
1.3.4. When the brown wire is connected to the positive wire of
the back-up light, the monitor automatically switches to CAM4
(back-up camera) when the back-up light is turned on. The
distance grid will also be displayed.
1.3.5. When the yellow wire is connected to the positive wire,
the monitor automatically switches to quad or split display.
Connection depends on the application request.
Cameras displayed are selected via settings menu.
1.4 Volume Selection Under Quad View:
1.4.1. Check the volume icon on the top right area on single channel. It stands for audio out
for the selected channel.
1.4.2. Press Ż or Ź to select the channel for
audio out.
CAM1
CAM2
CAM3
CAM4
CAM1
CAM2
CAM3
CAM4
Page 9
9
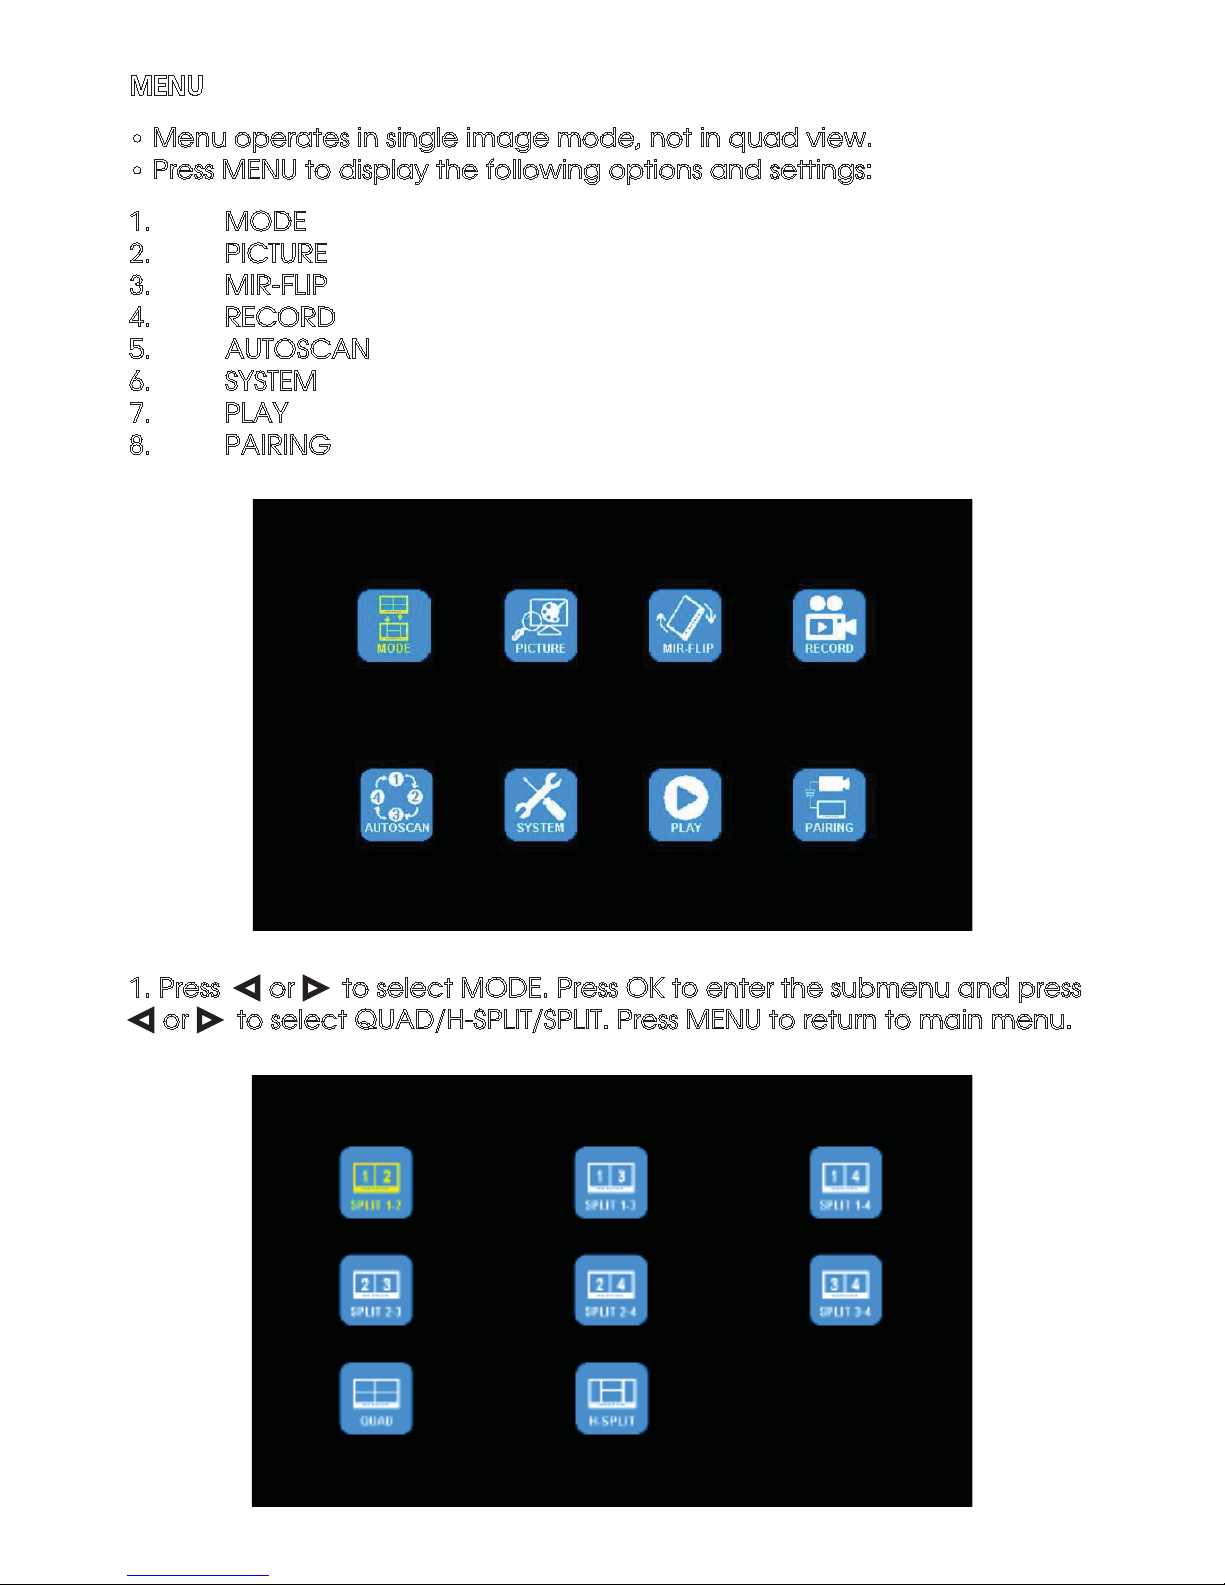
MENU
• Menu operates in single image mode, not in quad view.
• Press MENU to display the following options and settings:
1. MODE
2. PICTURE
3. MIR-FLIP
4. RECORD
5. AUTOSCAN
6. SYSTEM
7. PLAY
8. PAIRING
1. Press Ż or Źto select MODE. Press OK to enter the submenu and press
Ż or Źto select QUAD/H-SPLIT/SPLIT. Press MENU to return to main menu.
Page 10
10
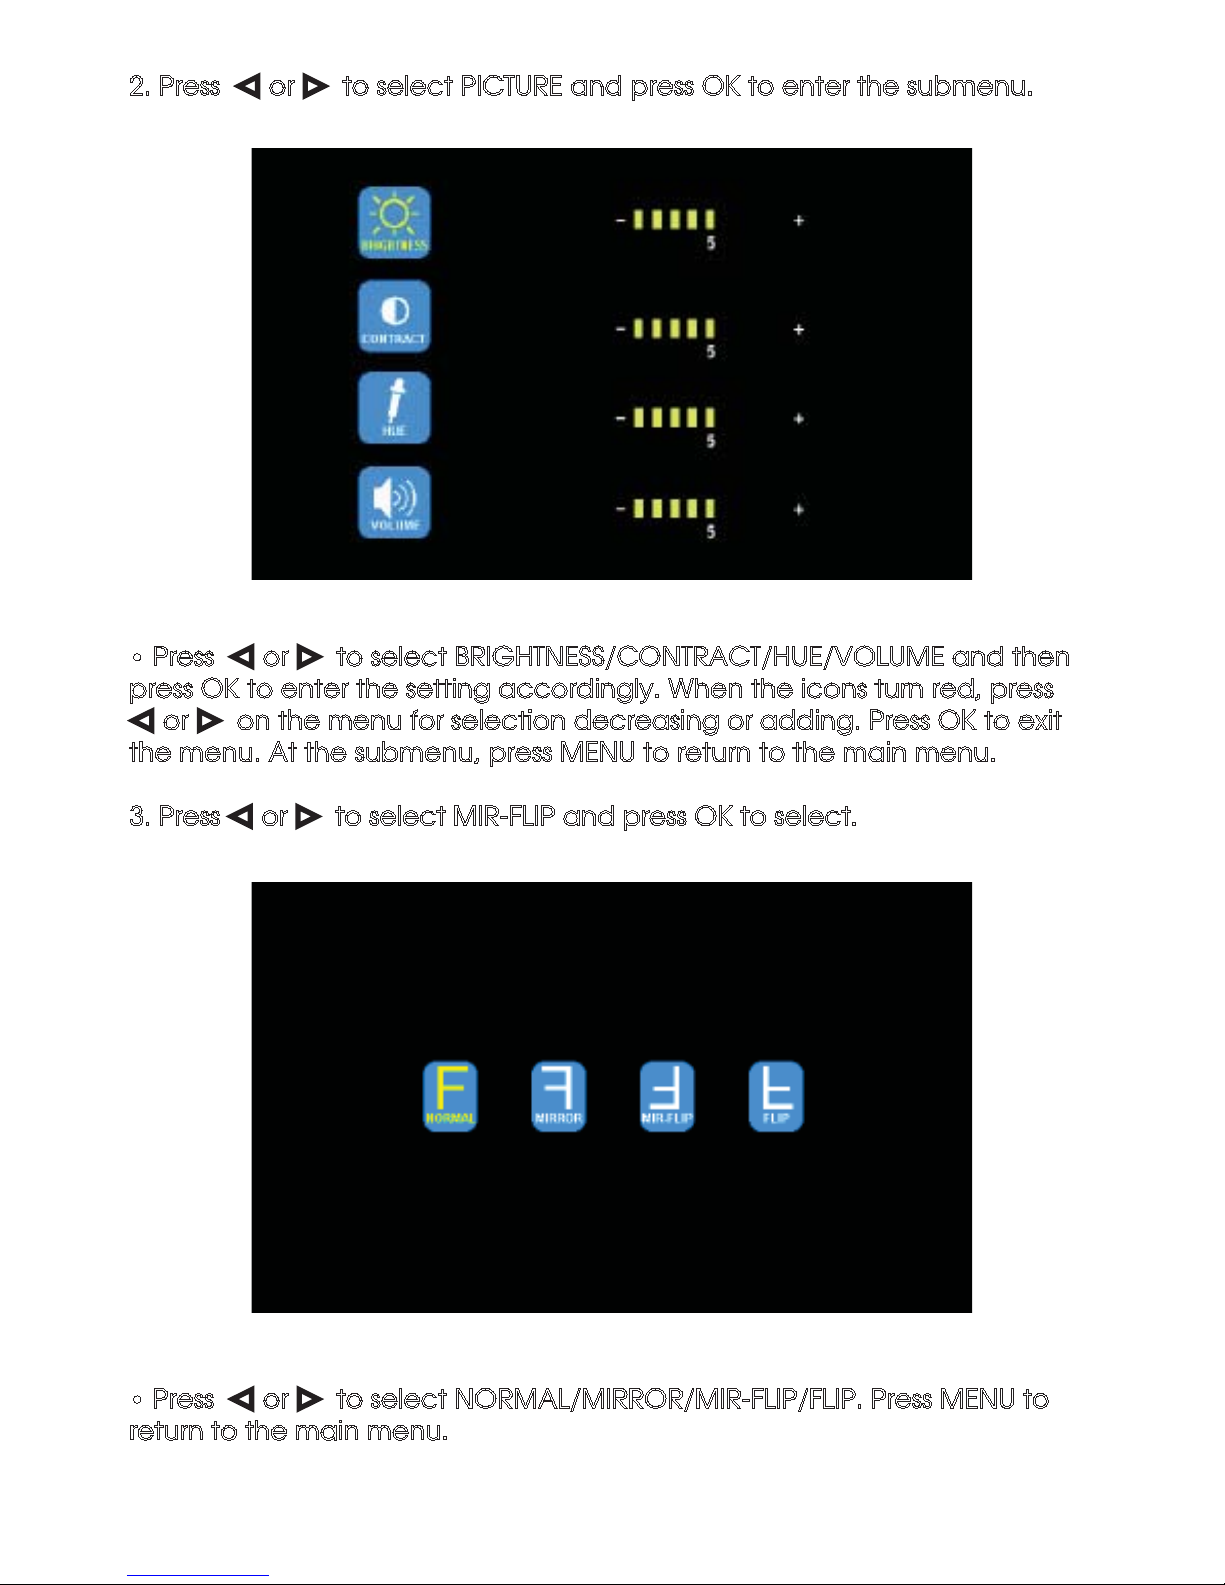
2. Press Ż or Źto select PICTURE and press OK to enter the submenu.
• Press Ż or Źto select BRIGHTNESS/CONTRACT/HUE/VOLUME and then
press OK to enter the setting accordingly. When the icons turn red, press
Ż or Źon the menu for selection decreasing or adding. Press OK to exit
the menu. At the submenu, press MENU to return to the main menu.
3. Press Ż or Źto select MIR-FLIP and press OK to select.
• Press Ż or Źto select NORMAL/MIRROR/MIR-FLIP/FLIP. Press MENU to
return to the main menu.
Page 11

11
4. Press Ż or Źto select RECORD and press OK to enter.
• Press Ż or Źto select REWRITE/FORMAT and then press OK to enter the
setting accordingly. When the icons turn red, press Ż or Źon menu to
select. Press OK to exit the menu. At the submenu, press MENU to return to
main menu.
• REWRITE: When the disk is full, the monitor will delete the earliest manual/
timing record file one by one and continue recording.
• FORMAT: Micro SD card must be formatted before being used. All
documents in the TF card will be lost when the card is formatted.
5. Press Ż or Źto select AUTOSCAN and press OK to enter.
Page 12
12
• Press Ż or Źto select CAM1/CAM2/CAM3/CAM4/SCANTIME and then
press OK to enter the setting accordingly. When the icons turn red, press
Ż or Źon menu for selection decreasing or adding. Press OK to exit the
menu. At the submenu, press MENU to return to main menu.
• If the channel is turned OFF, image of the corresponding camera will not
be shown in AUTOSCAN display mode.
• Setting scale of SCANTIME is 5-45S, the the step time of 5s.
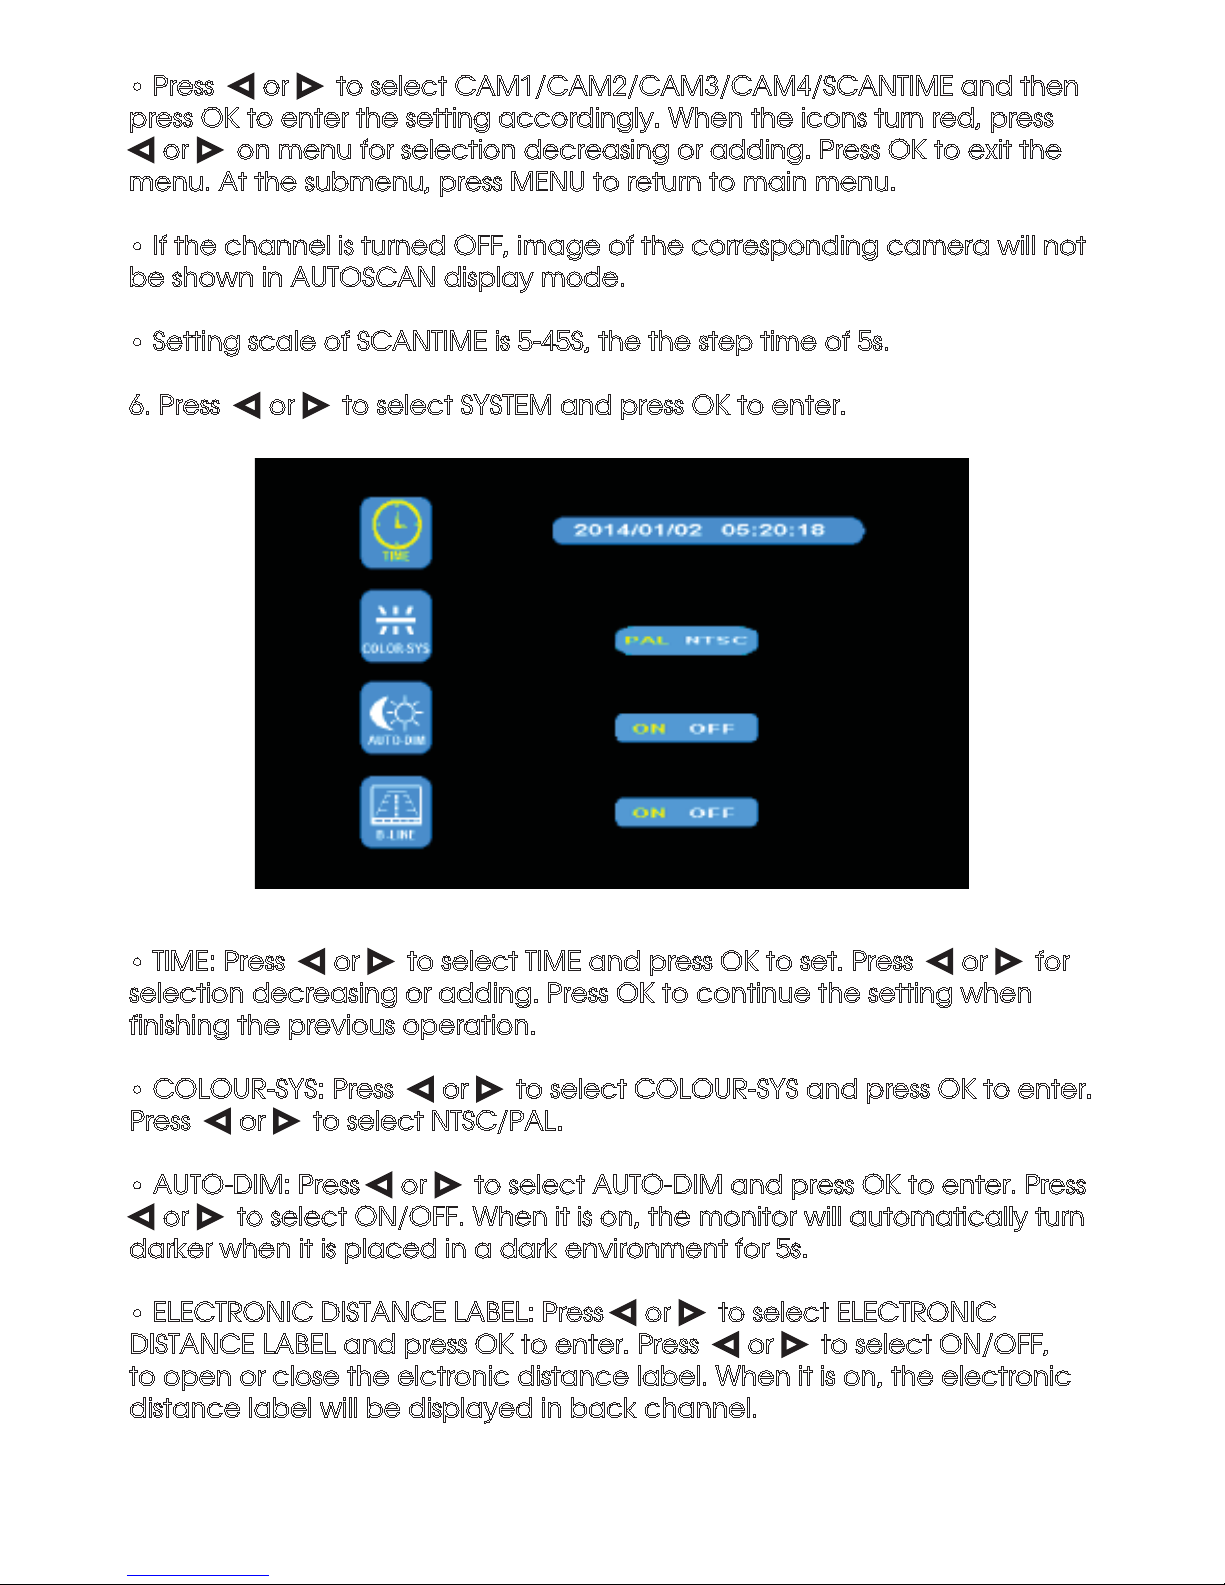
6. Press Ż or Źto select SYSTEM and press OK to enter.
• TIME: Press Ż or Źto select TIME and press OK to set. Press Ż or Źfor
selection decreasing or adding. Press OK to continue the setting when
finishing the previous operation.
• COLOUR-SYS: Press Ż or Źto select COLOUR-SYS and press OK to enter.
Press Ż or Źto select NTSC/PAL.
• AUTO-DIM: Press Ż or Źto select AUTO-DIM and press OK to enter. Press
Ż or Źto select ON/OFF. When it is on, the monitor will automatically turn
darker when it is placed in a dark environment for 5s.
• ELECTRONIC DISTANCE LABEL: Press Ż or Źto select ELECTRONIC
DISTANCE LABEL and press OK to enter. Press Ż or Źto select ON/OFF,
to open or close the elctronic distance label. When it is on, the electronic
distance label will be displayed in back channel.
Page 13
13
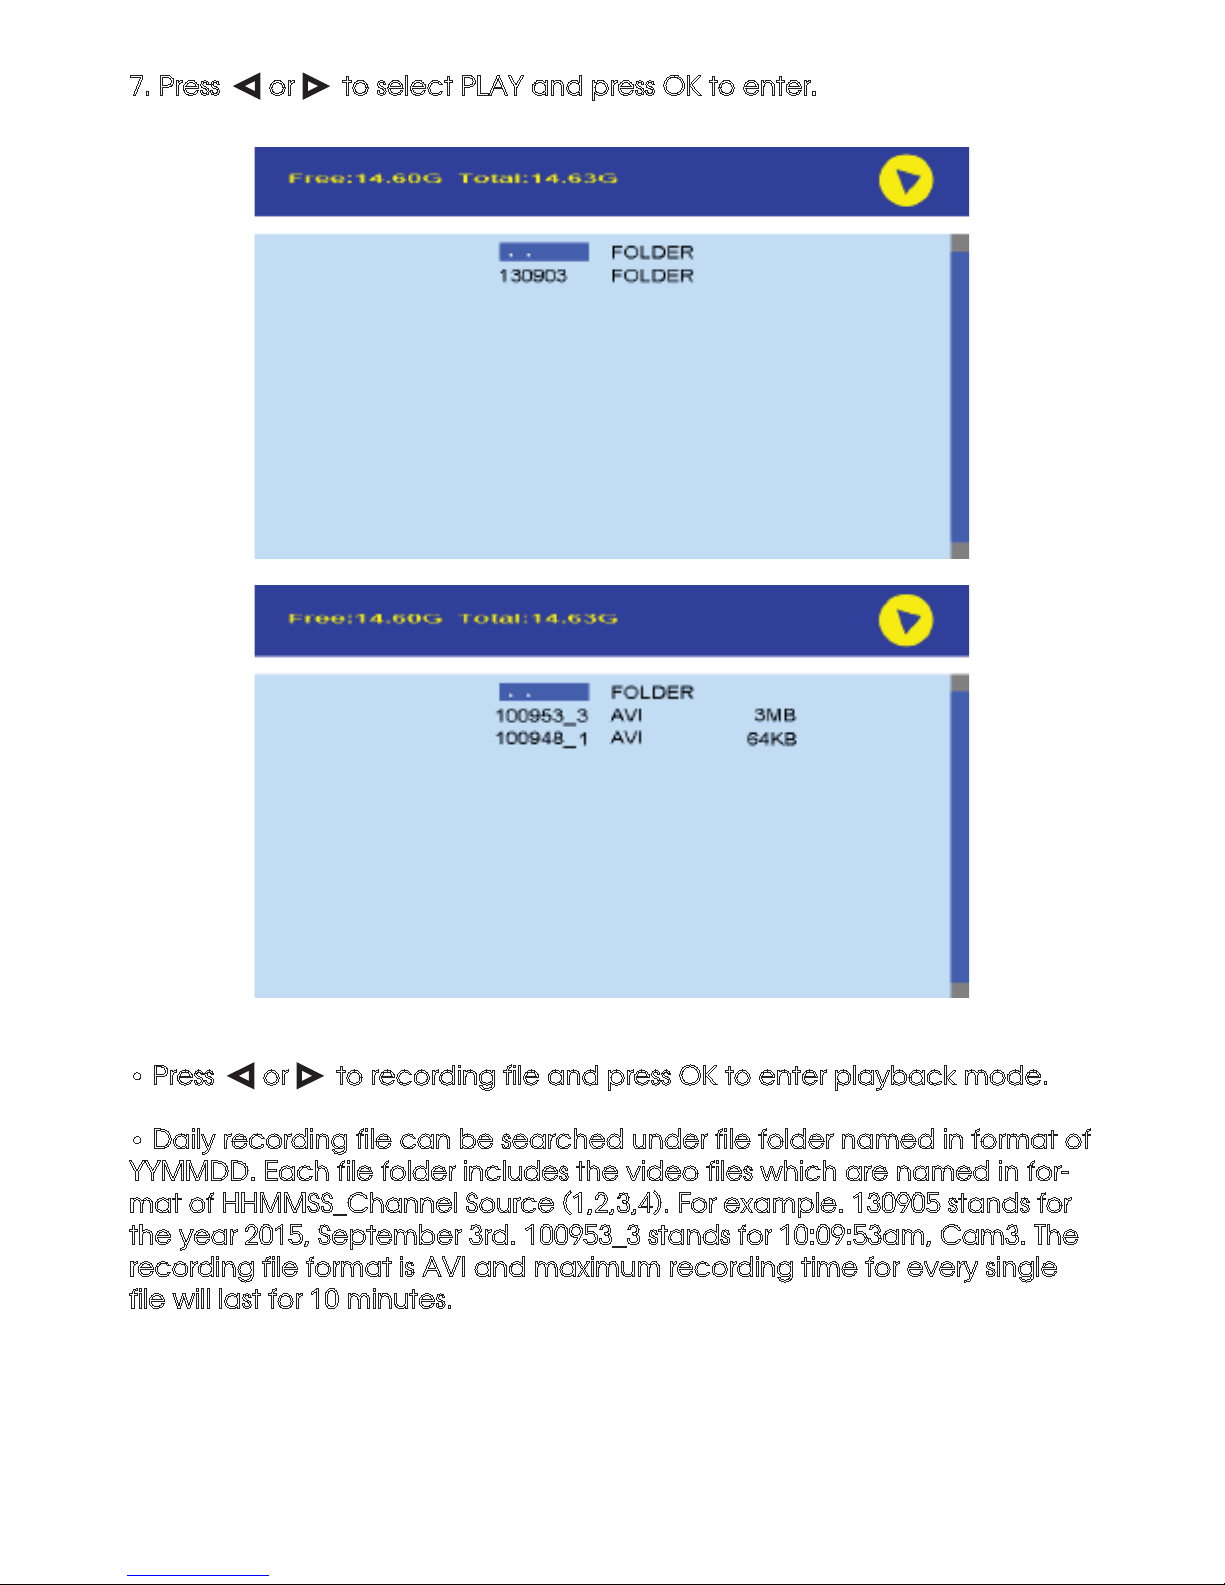
7. Press Ż or Źto select PLAY and press OK to enter.
• Press Ż or Źto recording file and press OK to enter playback mode.
• Daily recording file can be searched under file folder named in format of
YYMMDD. Each file folder includes the video files which are named in format of HHMMSS_Channel Source (1,2,3,4). For example. 130905 stands for
the year 2015, September 3rd. 100953_3 stands for 10:09:53am, Cam3. The
recording file format is AVI and maximum recording time for every single
file will last for 10 minutes.
Page 14
14
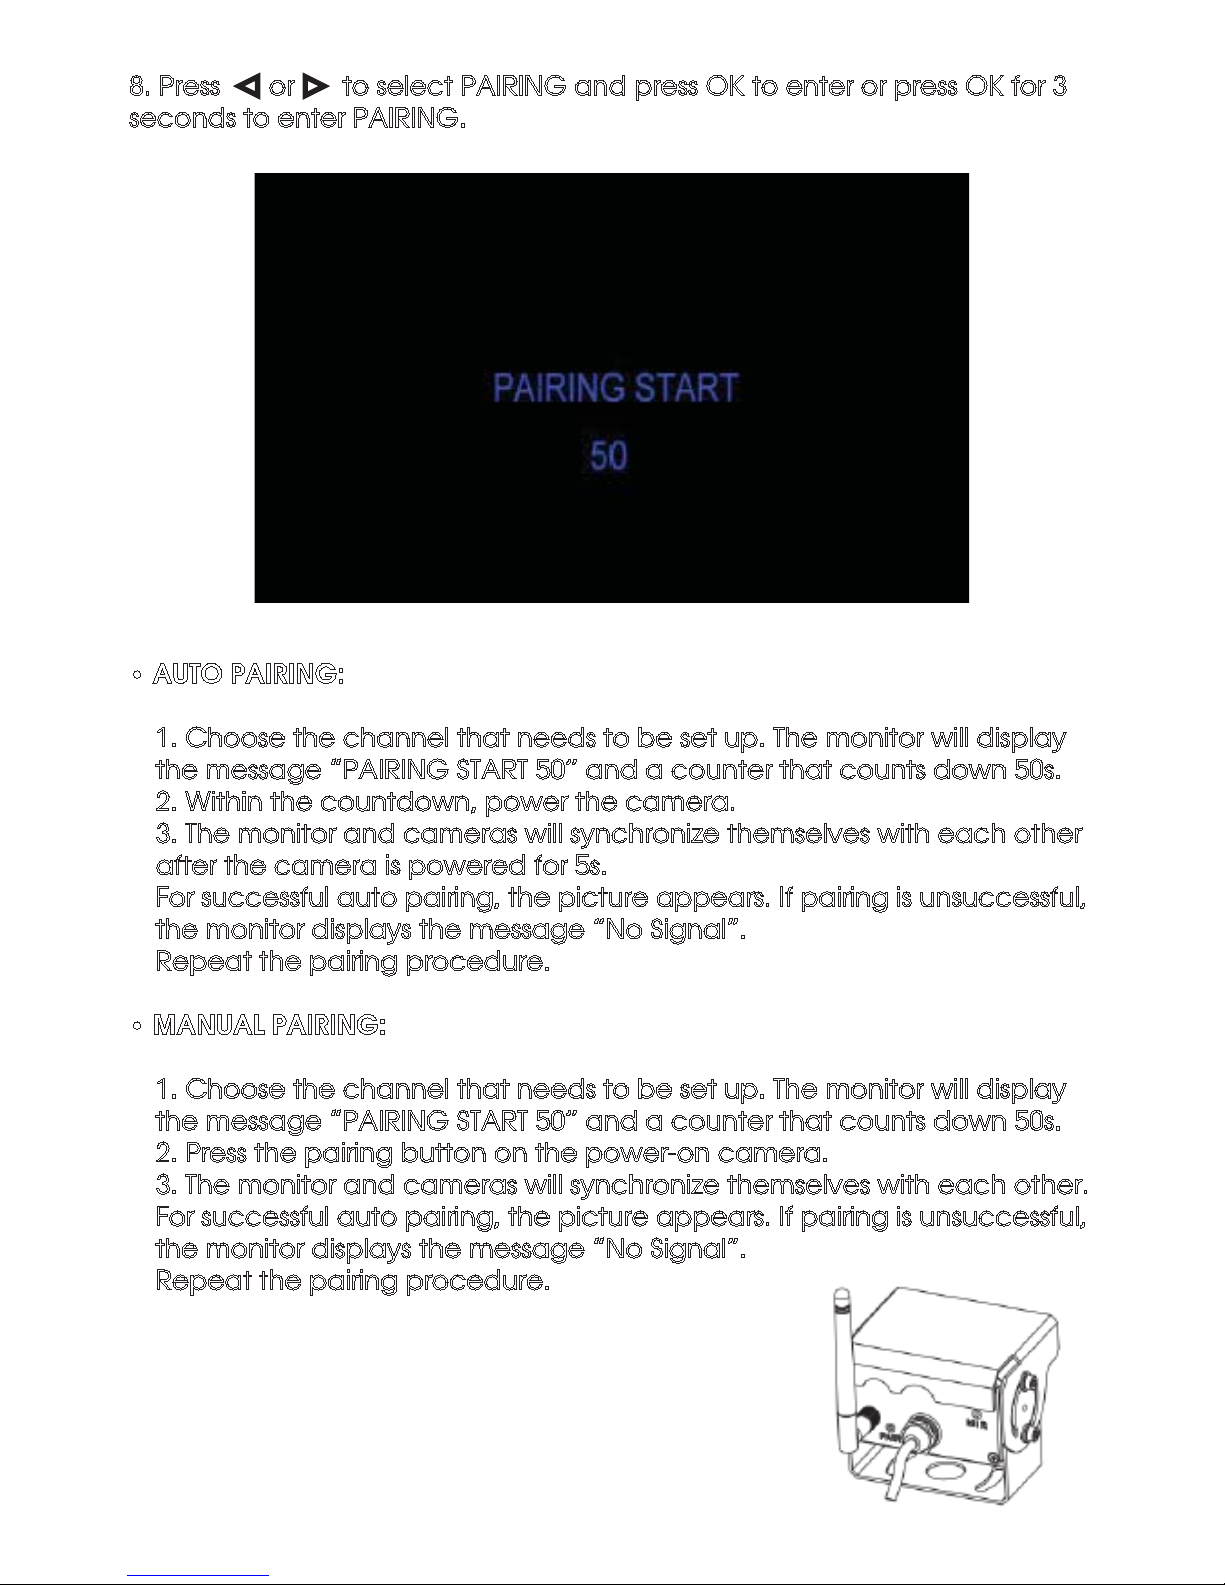
8. Press Ż or Źto select PAIRING and press OK to enter or press OK for 3
seconds to enter PAIRING.
• AUTO PAIRING:
1. Choose the channel that needs to be set up. The monitor will display
the message “PAIRING START 50” and a counter that counts down 50s.
2. Within the countdown, power the camera.
3. The monitor and cameras will synchronize themselves with each other
after the camera is powered for 5s.
For successful auto pairing, the picture appears. If pairing is unsuccessful,
the monitor displays the message “No Signal”.
Repeat the pairing procedure.
• MANUAL PAIRING:
1. Choose the channel that needs to be set up. The monitor will display
the message “PAIRING START 50” and a counter that counts down 50s.
2. Press the pairing button on the power-on camera.
3. The monitor and cameras will synchronize themselves with each other.
For successful auto pairing, the picture appears. If pairing is unsuccessful,
the monitor displays the message “No Signal”.
Repeat the pairing procedure.
Page 15

15
RECORDING TIME
For the recording time of TF cards with different capacities, please refer to
the table below. The actual recording time is subject to the
operating environment.
TROUBLESHOOTING
The symptoms described below do not necessarily mean a failur within the
display. Please check the following items before you initiate request
for repair.
TF
MODE
8G 16G 32G 64G 128G
SINGLE
(640x480x1)
14h 28h 55h 110h 220h
QUAD
(320x240x4)
11h 22h 43h 86h 172h
SPLIT
(400x480x2)
13h 25h 50h 101h 201h
Symptoms Possible Causes/Solutions
No picture,
no sound
No signal
- Improper connection of automobile adapter.
- Use of un-authorized power supply.
- Power switch is in OFF position.
No sound
- Check whether the camera has power.
- Pair the monitor and the camera again.
- Check whether the sound volume is turned off or set too low.
Dark picture
- Check whether brightness and contrast are adjusted correctly.
No color
- Adjust the HUE settings.
- Try using the 3m patch antenna. Mount in an area with few obstructions
(metal) between antenna and transmitter/receiver.
Page 16
16
JS007WQK
 Loading...