

Page 1

Preface
About Axis
Preface
HP MIO
Thank you for purchasing the AXIS HP MIO printer interface. Our
goal in developing this product is to provide you with a high-quality,
high-performance interface between the IBM system environment and
your Hewlett-Packard printer, combining the best of both worlds.
Axis Communications is dedicated to provide inventive solutions for
network connection of computer peripherals. Since the start in 1984,
it has been one of the fastest growing companies in the market. The
headquarters are located in Lund, Sweden, with subsidiaries in
Boston, Tokyo, and Hong Kong.
Axis Communications has a distributor network operating in more
than 50 countries world-wide, marketing three product lines:
IBM Mainframe and S/3x – AS/400 Printer Interfaces:
These
products include a wide range of plug-in interfaces and stand-alone
products such as the AXIS Cobra+, AXIS 330/370 Cobra, AXIS HP
MIO, the AXIS AFP IPDS-to-PostScript converter, and the AXIS
AFP MIO/IOP IPDS-to-PCL converters
Network Print Servers:
These intelligent Ethernet and Token Ring
print servers support a wide range of LAN protocols. The AXIS 540,
AXIS 560 and AXIS 570 are Ethernet print servers, and the AXIS
640, AXIS 660 and AXIS 670 are Token Ring print servers. The AXIS
150 is an Ethernet print server dedicated to PC networks.
CD-ROM Servers:
Axis CD-ROM servers allow CD-ROM data to
be shared over the network. The product range includes the AXIS
850 and AXIS 851 Ethernet CD-ROM servers as well as the AXIS
950 and AXIS 951 Token Ring CD-ROM servers.
AXIS HP MIO User’s Manual 1
Page 2

HP MIO
Preface
ABOUT THIS MANUAL
This manual will guide you through a simple step-by-step installation
and configuration procedure. It is divided into four sections:
1. INTRODUCTION
– The AXIS HP MIO board, how it works,
where to use it, and its main features.
2. GETTING STARTED
– How to install the AXIS HP MIO
board into your printer, and how to connect it to the IBM system.
3. CONFIGURATION
– How to configure the AXIS HP MIO
using the printer’s front panel.
4. ADVANCED FUNCTIONS
– An overview of AXIS HP MIO
functions beyond the standard IBM printer emulation.
The manual applies to the AXIS HP MIO with firmware release 1.21
and subsequent releases until otherwise notified. Please refer to the
AXIS HP MIO Technical Reference for further information of
functions and parameters.
Every care has been taken in the preparation of this manual; if you
detect any inaccuracies or omissions, please inform us at the address
on the back cover. Axis Communications AB cannot be held
responsible for any technical or typographical errors and reserves the
right to make changes to the product and manuals without prior
notice.
2 AXIS HP MIO User’s Manual
Page 3
Emission Notices
Preface
HP MIO
USA
Europe
This equipment generates, uses, and can radiate radio frequency
energy and if not installed and used in accordance with the instruction
manual, may cause interference to radio communications. It has been
tested and found to comply with the limits for a Class A computing
device pursuant to Subpart B of Part 15 of FCC rules, which are
designed to provide reasonable protection against such interference
when operated in a commercial environment. Operation of this
equipment in a residential area is likely to cause interference in which
case the user, at his own expense, will be required to take whatever
measures may be required to correct the interference. Shielded cables
should be used with this unit to ensure compliance with the Class A
limits.
This digital equipment fulfils the requirements for radiated emission
according to limit B of EN55022/1987, and the requirements for
immunity according to EN50082-1/1992 residential, commercial,
and light industry. (Compliance is not valid for unshielded network
and printer cables.)
Trademark Acknowledgements
IBM and Hewlett Packard are registered trademarks of the respective
holders.
AXIS HP MIO User’s Manual Revision: 1.2
Part No: 13142 Dated: June, 1996
Copyright © Axis Communications AB, 1996
AXIS HP MIO User’s Manual 3
Page 4

HP MIO
Preface
This page is intentionally blank
4 AXIS HP MIO User’s Manual
Page 5

Table of Contents
Table of Contents
Section 1 Introduction
How It Works . . . . . . . . . . . . . . . . . . . . . . . . . . . . . . . . . . . . . . . . . . . . . . . . . 8
Where To Use It . . . . . . . . . . . . . . . . . . . . . . . . . . . . . . . . . . . . . . . . . . . . . . 9
Main Features . . . . . . . . . . . . . . . . . . . . . . . . . . . . . . . . . . . . . . . . . . . . . . . . 10
Section 2 Getting Started
Hardware Installation . . . . . . . . . . . . . . . . . . . . . . . . . . . . . . . . . . . . . . . . . . 12
Verifying the Installation . . . . . . . . . . . . . . . . . . . . . . . . . . . . . . . . . . . . . . . . 14
Connecting to the System . . . . . . . . . . . . . . . . . . . . . . . . . . . . . . . . . . . . . . 16
Section 3 Configuration
The Front Panel Menus . . . . . . . . . . . . . . . . . . . . . . . . . . . . . . . . . . . . . . . . 18
System Language (SYSL) . . . . . . . . . . . . . . . . . . . . . . . . . . . . . . . . . . . . . . . 19
IBM Printer Emulation (PREMUL) . . . . . . . . . . . . . . . . . . . . . . . . . . . . . . . . 20
Maximum Page Length (MPL) . . . . . . . . . . . . . . . . . . . . . . . . . . . . . . . . . . . 21
Automatic Orientation (AUTORI) . . . . . . . . . . . . . . . . . . . . . . . . . . . . . . . 22
Page Orientation (PAGEORI) . . . . . . . . . . . . . . . . . . . . . . . . . . . . . . . . . . . 23
Page Size (PAGESIZE) . . . . . . . . . . . . . . . . . . . . . . . . . . . . . . . . . . . . . . . . . 24
. . . . . . . . . . . . . . . . . . . . . . . . . . . . . . . . . . . . . . . . . . . . . . . . . . . . . . . 7
. . . . . . . . . . . . . . . . . . . . . . . . . . . . . . . . . . . . . . . . . . . . . . . . . . . . . 17
. . . . . . . . . . . . . . . . . . . . . . . . . . . . . . . . . . . . . . . . . . . . . . . . . . . 11
Custom Page Width (PAGEWIDTH) . . . . . . . . . . . . . . . . . . . . . . . . . . . . 25
Custom Page Length (PAGELENGTH) . . . . . . . . . . . . . . . . . . . . . . . . . . . 26
Print Parameter List . . . . . . . . . . . . . . . . . . . . . . . . . . . . . . . . . . . . . . . . . . . 27
Section 4 Advanced Functions
Configuration from the System . . . . . . . . . . . . . . . . . . . . . . . . . . . . . . . . . . 30
Hex Transparency . . . . . . . . . . . . . . . . . . . . . . . . . . . . . . . . . . . . . . . . . . . . . 31
Font Selection . . . . . . . . . . . . . . . . . . . . . . . . . . . . . . . . . . . . . . . . . . . . . . . . 32
Appendix A The AXIS HP MIO Rear Panel
The System Indicator . . . . . . . . . . . . . . . . . . . . . . . . . . . . . . . . . . . . . . . . . . 34
The PC SHARE Indicator . . . . . . . . . . . . . . . . . . . . . . . . . . . . . . . . . . . . . . . 35
The Rotary Switch . . . . . . . . . . . . . . . . . . . . . . . . . . . . . . . . . . . . . . . . . . . . 35
The Coax/Twinax Switch . . . . . . . . . . . . . . . . . . . . . . . . . . . . . . . . . . . . . . . 35
Test Mode . . . . . . . . . . . . . . . . . . . . . . . . . . . . . . . . . . . . . . . . . . . . . . . . . . . 35
. . . . . . . . . . . . . . . . . . . . . . . . . . . . . . . . . . . . . . . . . . . . . . . 29
. . . . . . . . . . . . . . . . . . . . . . . . . . . . . . . . . . . . . . 34
AXIS HP MIO User’s Manual 5
Page 6

Table of Contents
Appendix B System Configuration Guidelines
5250/Twinax Host Configuration . . . . . . . . . . . . . . . . . . . . . . . . . . . . . . . . 37
3270 Host Configuration . . . . . . . . . . . . . . . . . . . . . . . . . . . . . . . . . . . . . . . 39
Appendix C Fonts
Appendix D Technical Specifications
Appendix E How To Contact Axis
. . . . . . . . . . . . . . . . . . . . . . . . . . . . . . . . . . . . . . . . . . . . . . . . . . . . . . . . . . . . 40
. . . . . . . . . . . . . . . . . . . . . . . . . . . . . . . . . . . . . . . . . . . . 44
. . . . . . . . . . . . . . . . . . . . . . . . . . . . . . . . . . . . . . . . . . . . . 46
Axis on-line service . . . . . . . . . . . . . . . . . . . . . . . . . . . . . . . . . . . . . . . . . . . . 46
Appendix F Related Documentation
. . . . . . . . . . . . . . . . . . . . . . . . . . . . . . . . . . . . . . . . . . . . 48
. . . . . . . . . . . . . . . . . . . . . . . . . . . . . . . . . . . . 37
6 AXIS HP MIO User’s Manual
Page 7
Section 1 Introduction
The AXIS HP MIO is a plug-in interface board that makes it possible
to connect a Hewlett-Packard printer to an IBM AS/400, S/3x, or
Mainframe environment. It supports all HP printers with an MIO
expansion slot, such as LaserJet 5Si, LaserJet 4Si, LaserJet 4+, Color
LaserJet, DesignJet, and PaintJet XL300.
Your HP printer with the AXIS HP MIO appears to the IBM system
as an original IBM printer, while still maintaining its PC or LAN
printer capabilities.
In addition, the AXIS HP MIO allows you to make full use of all HP
printer features in the IBM system environment.
Section 1: Introduction
HP MIO
AXIS HP MIO User’s Manual 7
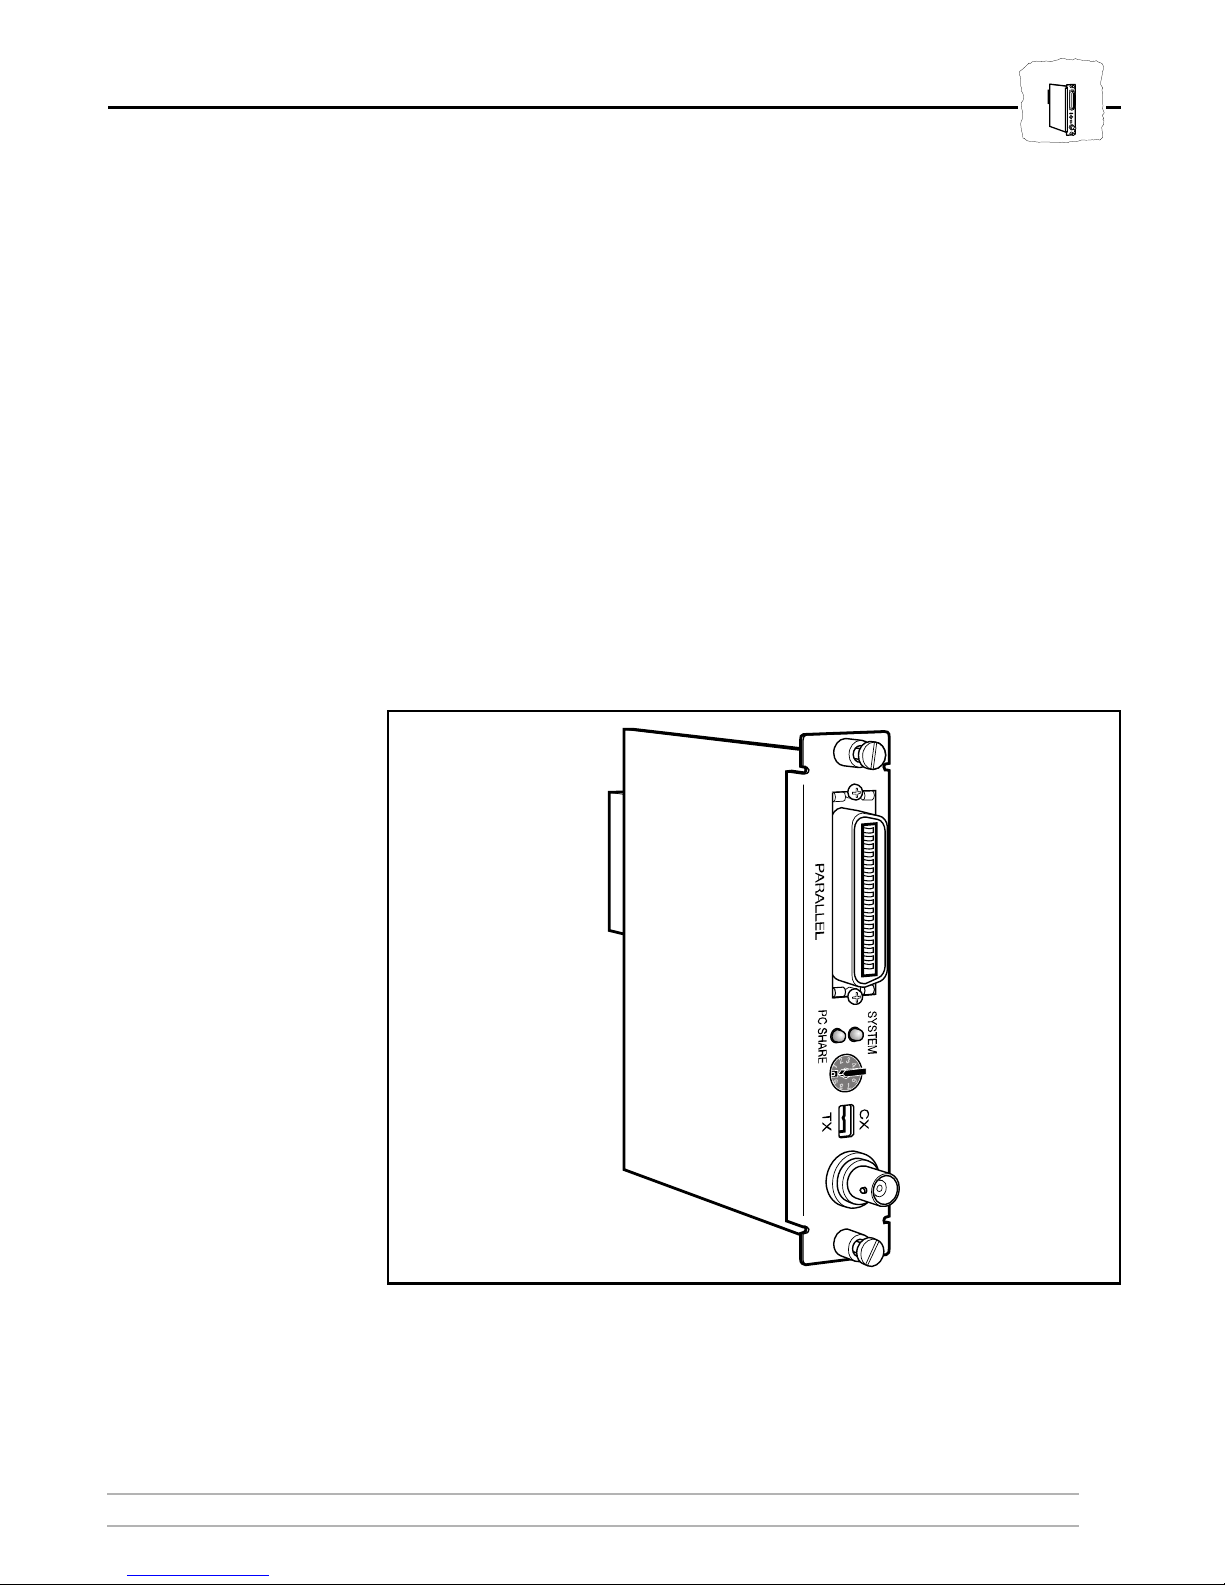
The AXIS HP MIO board
Page 8
HP MIO
Section 1: Introduction
How It Works
An IBM system communicates with printers using a high-speed, bidirectional protocol very different from the PC standard parallel and
serial connections.
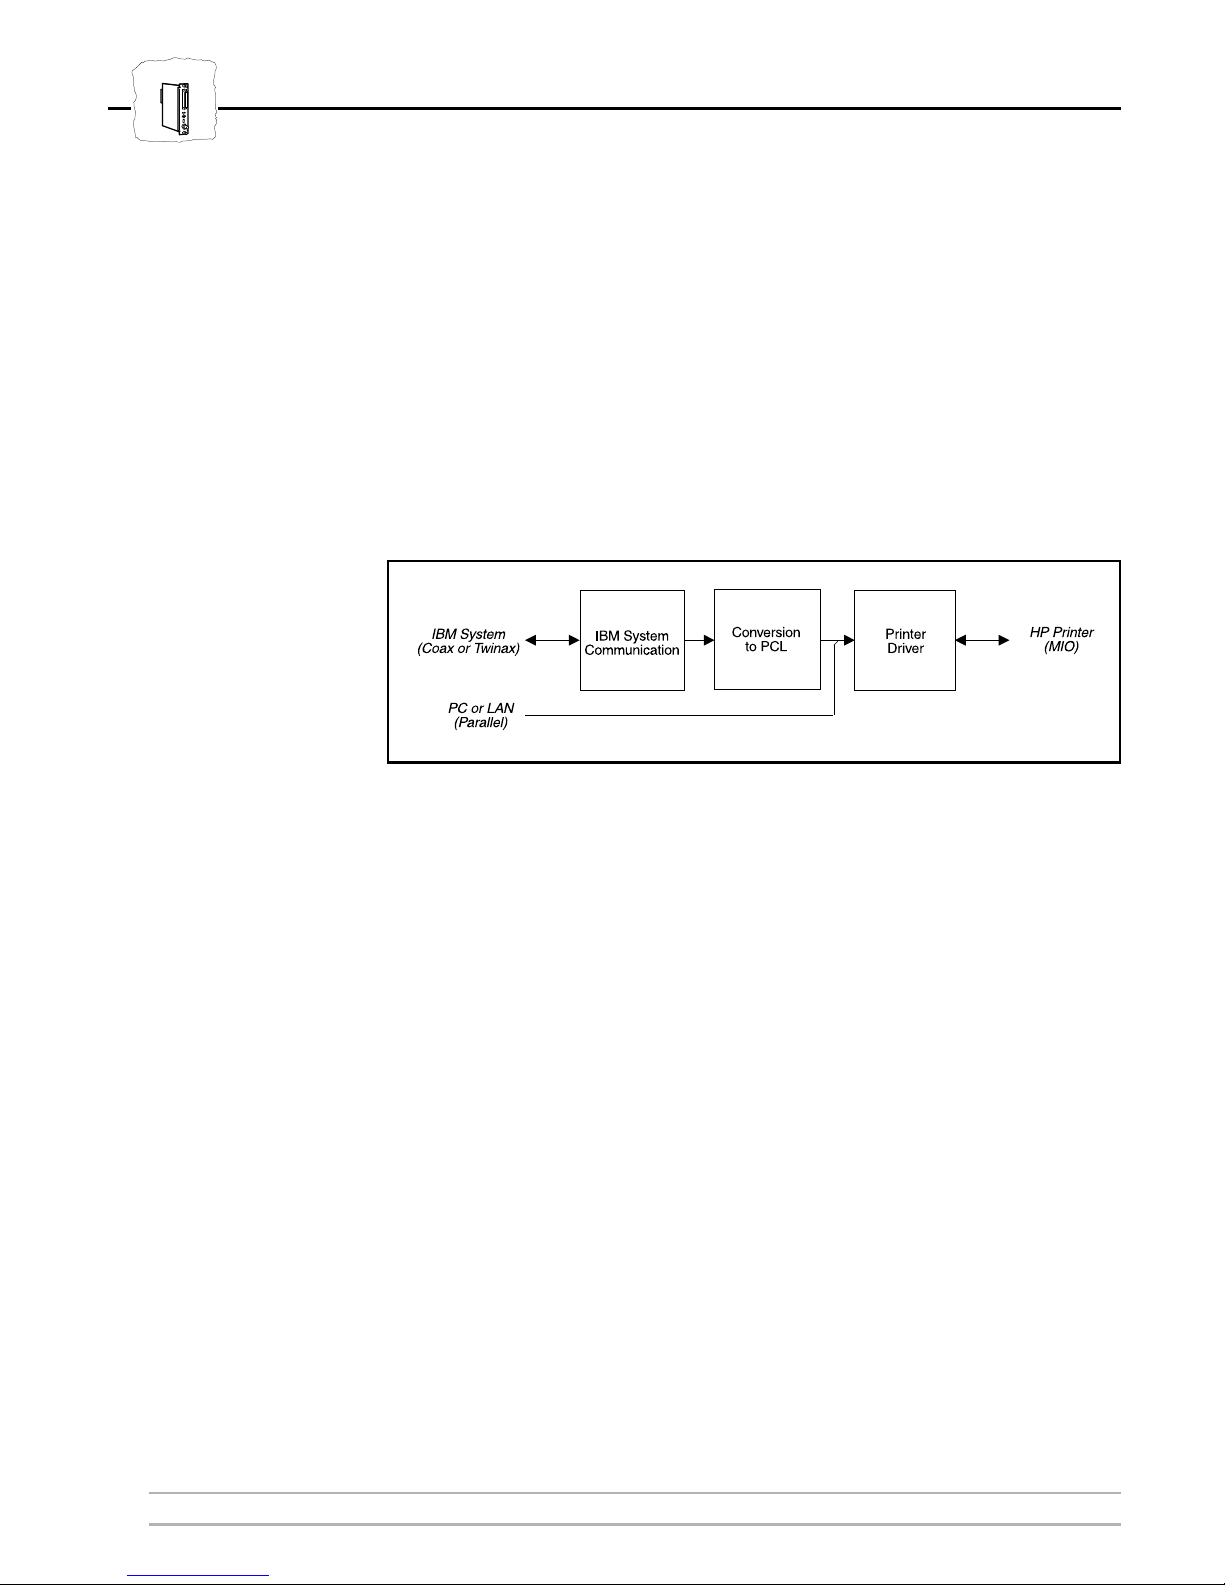
In the AXIS HP MIO, the conversion of IBM system data to HP
printer data is carried out in three steps as illustrated in the picture
below:
The AXIS HP MIO IBM System to HP Printer Data Conversion
The
IBM System Communication
block extracts the print data, page
formatting commands, and font selection commands from the IBM
data stream.
Conversion to PCL
The
block converts the data into PCL, which is the
format used by HP printers.
The
Printer Driver
block passes the data on to the printer using the
internal MIO (Modular Input/Output) interface.
The Printer Driver also accepts PCL data from a local PC or a LAN
print server (such as the AXIS NPS 560) using the AXIS HP MIO
parallel port. In this way, you can share the printer between two
different environments. The PC/LAN print data is not converted or
otherwise modified by the AXIS HP MIO board.
8 AXIS HP MIO User’s Manual
Page 9

Where To Use It
Section 1: Introduction
HP MIO
The pictures below show the HP printer with AXIS HP MIO
interface in an IBM environment, also illustrating the printer sharing
function. The top picture is a 3270/Coax installation, and the bottom
picture is a 5250/Twinax installation.
AXIS 560/660
Ethernet Print Server
PC
The HP printer with AXIS HP MIO in an IBM 3270/Coax environment
AXIS 560/660
Ethernet Print Server
PC
AXIS HP MIO User’s Manual 9
The HP printer with AXIS HP MIO in an IBM 5250/Twinax environment
Page 10

HP MIO
Section 1: Introduction
Main Features
Reliability
Compatibility
Ease of Use
Flexibility
IBM Printer Emulations
The AXIS HP MIO hardware is a state-of-the-art RISC architecture
design. Based on highly integrated circuits, it combines low power
consumption with high performance and reliability.
The AXIS HP MIO interface is designed to be fully compatible with
the emulated IBM printers. You can print all your existing documents
without having to adapt them specially for the AXIS HP MIO.
The AXIS HP MIO is delivered in ready-to-run state. The few
parameters you might need to change are directly accessed from the
printer’s front panel.
For the advanced user, the AXIS HP MIO has a large number of
configuration parameters that allows you to tailor the interface to meet
a wide range of specific needs.
The AXIS HP MIO is pre-configured to emulate an IBM 3816 page
printer. This selection makes the best use of the HP printer
capabilities, but you can also select from a wide range of other IBM
printers.
Fonts
Printer Sharing
The pre-defined font definition table contains 130 IBM fonts, each
mapped to a printer resident PCL font. The font mapping is designed
to emulate, as close as possible, the output from an original IBM
printer and at the same time offer full access to the HP printer’s
scalable fonts.
You can share the printer between the Coax/Twinax host and up to
three different local PCs or LAN print servers connected to the AXIS
HP MIO parallel port and the printer’s own parallel and serial ports.
You do not have to purchase any special cabling, since standard
printer cables may be used. The printer sharing requires no operator
intervention, and no AXIS HP MIO or printer configuration.
10 AXIS HP MIO User’s Manual
Page 11
Section 2 Getting Started
Unpack and inspect all parts for damage. Contact your dealer if
anything is missing or damaged. All packing materials are recyclable,
including the anti-static bag.
Section 2: Getting Started
HP MIO
Caution
The AXIS HP MIO board contains static-sensitive components.
Always hold the board by the edges or the rear panel when removed
from the anti-static bag. Make sure to take all recommended
precautions related to static-sensitive devices.
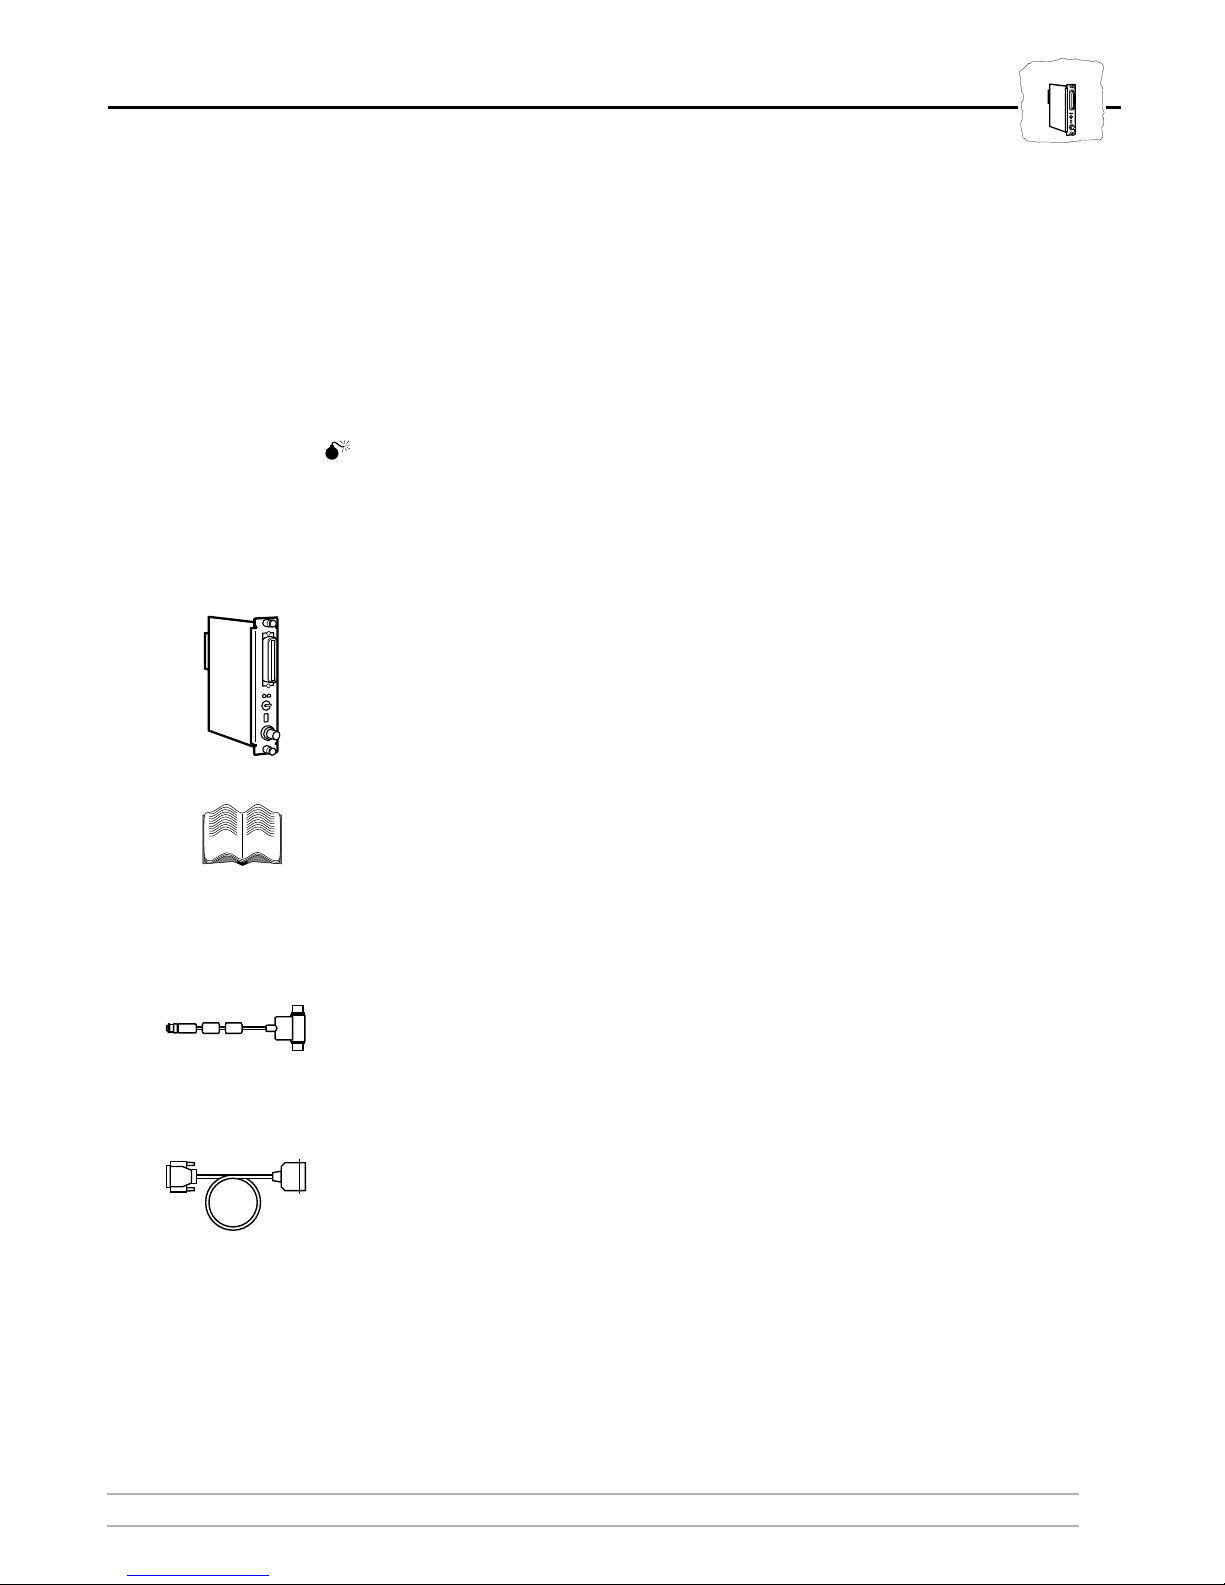
The standard delivery contains the following:
❏
AXIS HP MIO board, part no. 0045-1 (European version) or
AXIS HP MIO board, part no. 0045-3 (US version)
❏
AXIS HP MIO User’s Manual (part no. 13142)
Optional accessories:
❏
❏
AXIS HP MIO User’s Manual 11
AXIS Twinax T-cable (part no. 12554)
Centronics parallel printer cable (part no. 13133)
Page 12
HP MIO
Section 2: Getting Started
Hardware Installation
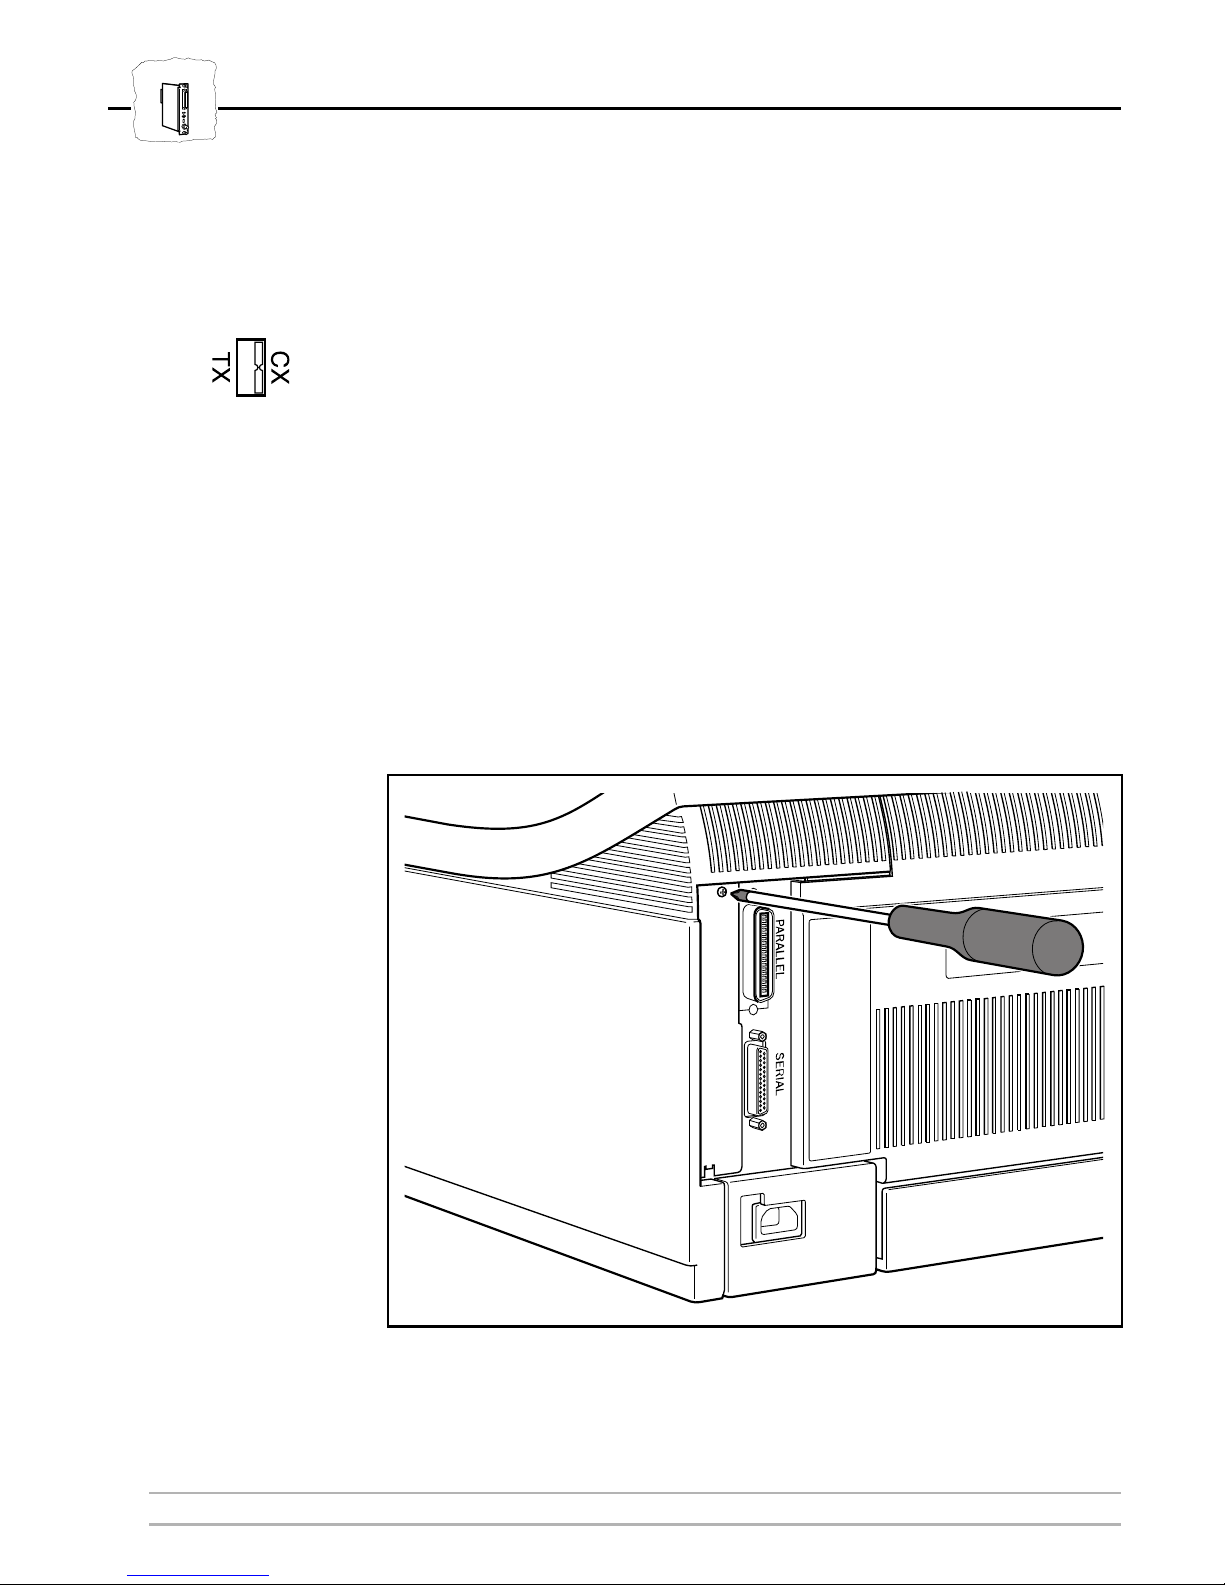
Before you begin the installation, you must set the rear panel Coax/Twinax
switch in the correct position. Use a flat screwdriver to set the switch in
CX
position (shown to the left) for 3270/Coax mode, or TX position for
5250/Twinax mode.
The AXIS HP MIO board should be installed into the MIO
expansion slot at the rear of your HP printer. The guidelines below are
for the HP LaserJet 4p, but the installation procedure is similar for all
HP printers. If you have a printer other than the LaserJet 4+, consult
the printer manual on how to access the MIO slot.
You will need one Philips and one flat screwdriver for the installation.
12 AXIS HP MIO User’s Manual
Removing the cover plate (HP LaserJet 4+)
Page 13
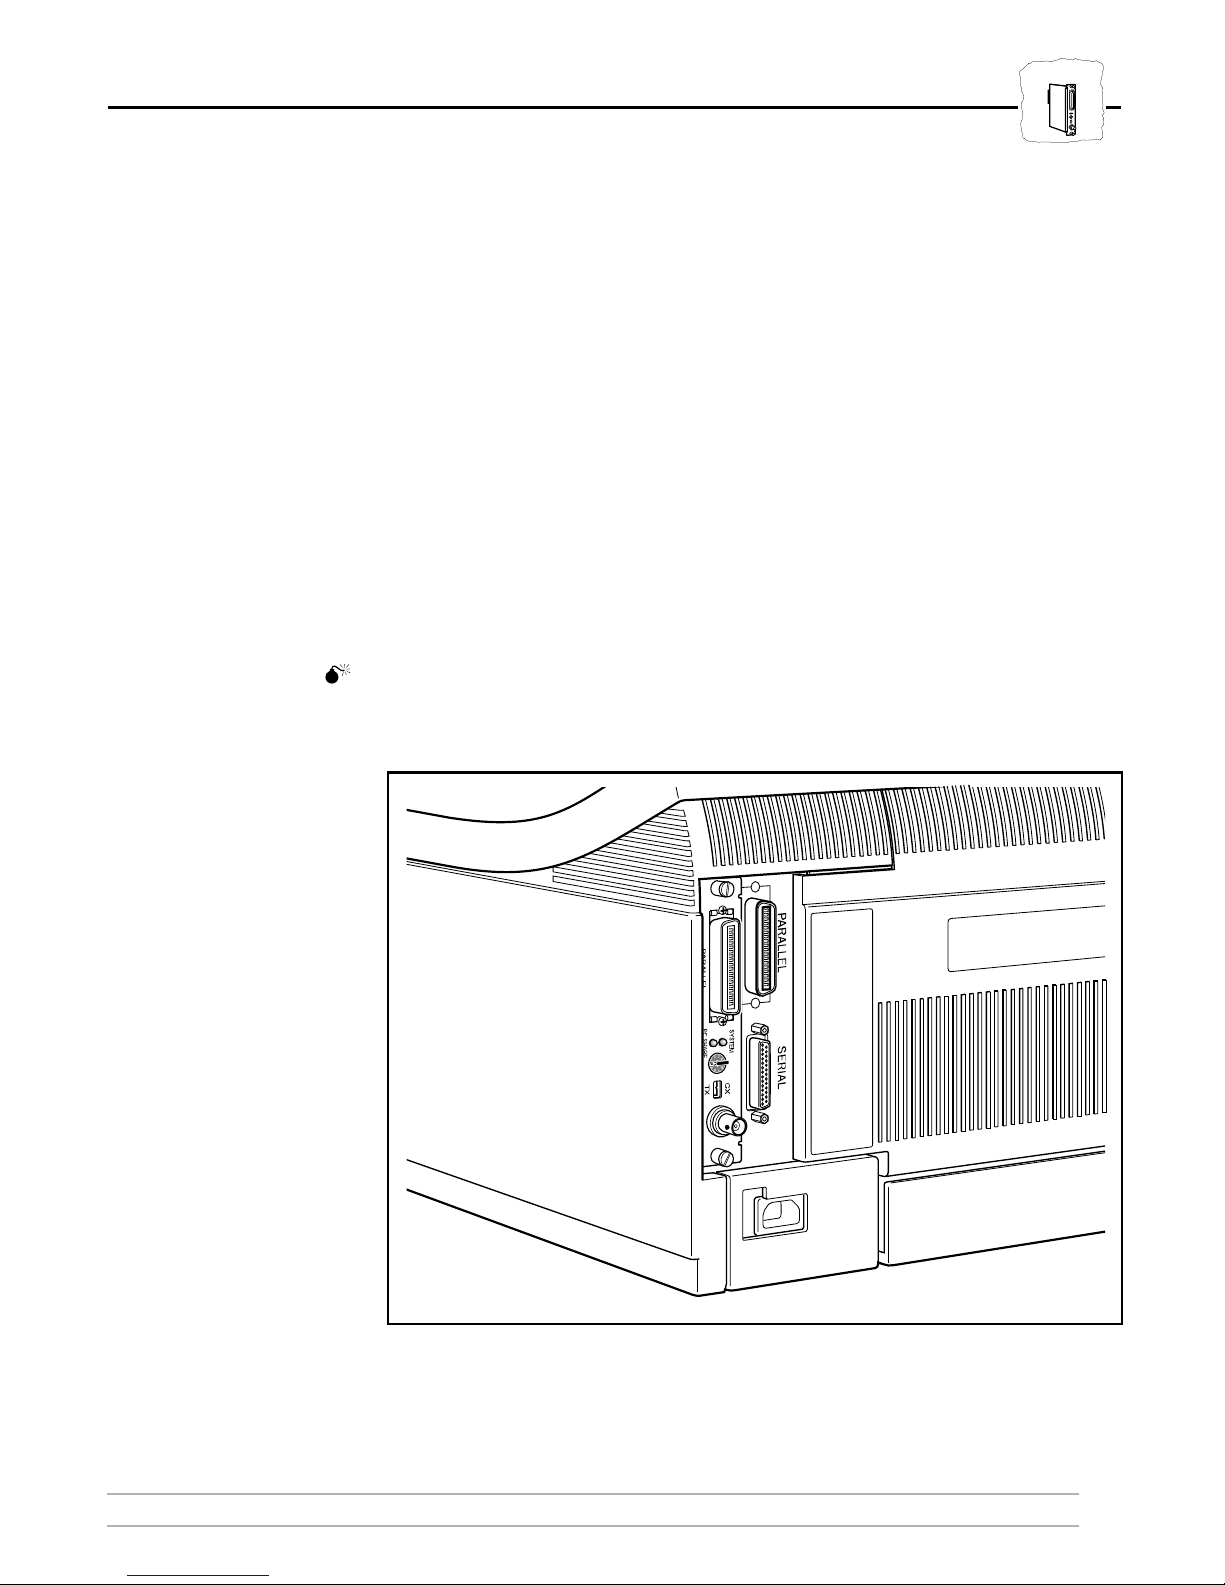
Section 2: Getting Started
HP MIO
Follow these steps and refer to the illustrations to install the AXIS HP
MIO board:
1. Switch off the printer.
2. Remove the cover plate over the MIO slot.
3. Slide the AXIS HP MIO board into place.
4. Tighten the two screws securing the rear panel.
5. Set the rotary switch in position ‘0’.
6. Switch on the printer.
The hardware installation is now completed.
Caution
Twinax users: Do not connect the printer to the IBM system before
the rotary switch is set to the correct device address (see Section 2.3).
AXIS HP MIO User’s Manual 13
The AXIS HP MIO board installed (HP LaserJet 4+)
Page 14

HP MIO
Section 2: Getting Started
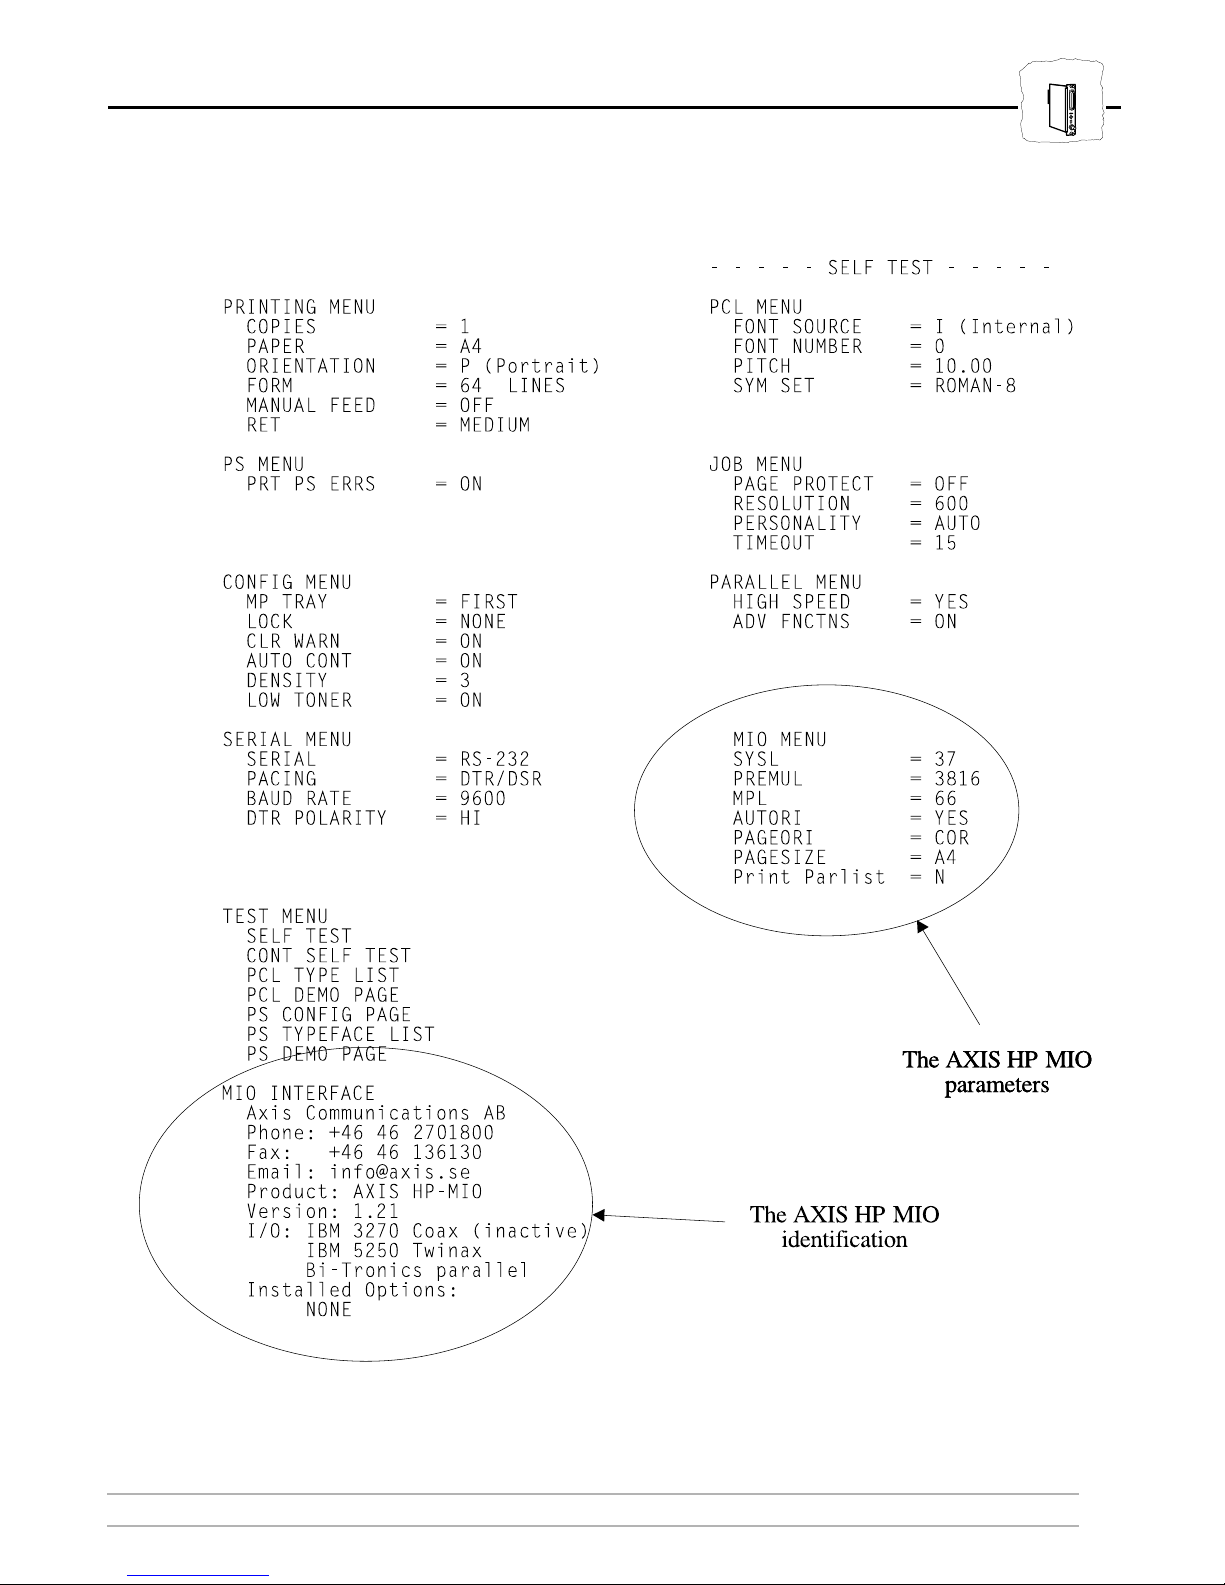
Verifying the Installation
After completing the hardware installation, you can verify that the
AXIS HP MIO board is running by printing the
sample on the next page). On the HP LaserJet 4, this entry is found
under the
The AXIS HP MIO identification is printed under the MIO MENU
title. The example below is for an AXIS HP MIO board in
5250/Twinax mode, the 3270/Coax mode is marked ‘inactive’.
The AXIS HP MIO parameters are printed under the MIO MENU
title. This shows the current settings for the configuration parameters
available from the front panel.
TEST MENU
Self Test
page (see
.
14 AXIS HP MIO User’s Manual
Page 15
Section 2: Getting Started
HP MIO
Extract from the HP LaserJet 4+ Self Test page
AXIS HP MIO User’s Manual 15
Page 16

HP MIO
Section 2: Getting Started
Connecting to the System
The last step in the installation procedure is to connect your printer to
the IBM Coax or Twinax host.
Caution
Once again, make sure that the rear panel Coax/Twinax switch is in
the correct position. The current mode is shown under the AUX IO
INTERFACE title on the Self Test page.
For 5250/Twinax mode:
1. Switch off the printer.
2. Find a free device address
on the Twinax port.
The
selected address must be
configured for an IBM 3816
For 3270/Coax mode:
1. Switch off the printer.
2. Find a free printer port on
the control unit.
The selected
port must be configured for an
LU-1 or LU-3 printer.
printer.
3. Connect a coax cable
3. Set the rotary switch to the
selected device address.
4. Connect the Axis T-cable
bar to the twinax cables.
between the control unit and
the AXIS HP MIO board.
4. Switch on the printer.
Don't forget to notify your
system operator before
breaking the twinax line!
5. Connect the T-cable to the
6. Switch on the printer.
The SYSTEM indicator will flash for a few seconds, and should then
remain lit showing that contact with the IBM system is established.
You can verify the connection by making a local copy printout from
your system.
The installation procedure is now completed. Your printer is ready for
permanent use, and will not require any user intervention during
normal operation.
16 AXIS HP MIO User’s Manual
AXIS HP MIO board.
Page 17

Section 3 Configuration
Your AXIS HP MIO board is configured at delivery to emulate an
IBM 3816 page printer using Letter size or A4 paper. Should you
want to change any of this, the following configuration parameters can
be accessed from the printer’s front panel:
• System Language = 37 (US English)
• IBM Printer Emulation = 3816
• Maximum Page Length = 66 lines
• Automatic Orientation = YES
Section 3: Configuration
System language
Page lenght
Emulation
• Page Orientation = COR
• Page Size = LETTER (US version) or
A4 (European version)
If you have a printer without a front panel, or if you want to change
any of the parameters not available in the front panel menu, please
refer to Section 4,
Configuration from the System
, and to AXIS HP
MIO Technical Reference.
AXIS HP MIO User’s Manual 17
Page 18

System language
Page lenght
Emulation
Section 3: Configuration
The Front Panel Menus
The remainder of this section describes how to change the AXIS HP
MIO configuration parameters using the HP LaserJet 4+ front panel.
The procedure for other HP printers is similar, but the menus are
differently organized, and you may need to use different keys to
navigate. However, guided by the printed Self Test page and the
printer manual, you shouldn’t have any difficulties finding the menu
entries.
The AXIS HP MIO configuration parameters are found under the
MIO MENU. To get there, first set the printer off-line, then press the
Menu
key repeatedly until the MIO MENU appears.
Next, press the Item key to get into the menu. The first entry that
appears is the System Language. An asterisk is displayed in the right-
most position when the currently active value is shown.
Change the value as desired by pressing the ‘+’ or ‘-’ keys. Press Enter
to save the new value, and the asterisk will be displayed.
Press Item again to scroll through the parameters.
When done, press the On-Line key, and the configuration is
completed and saved.
18 AXIS HP MIO User’s Manual
Page 19

System language
Section 3: Configuration
Page lenght
Emulation
System Language (SYSL) SYSL=37 *
The System Language parameter must match your IBM system
configuration in order to get correct language specific characters.
The default System Language is 37 (US English). You only have to
change this selection if your IBM system is configured for a different
System Language. If in doubt, consult your System Manager.
Select System Language according to your IBM system
configuration.
System Language
Selections:
Note: ❏ Selections marked Cx will appear only in Coax mode, and Tx
VALUE DESCRIPTION VALUE DESCRIPTION
*37 US English, Portuguese Alternate,
and Canadian Bilingual
256 New Spanish Word Processing Tx 287 Danish/Norwegian Alternate Cx
260 Canadian French Cx 288 Swedish/Finnish Alternate Cx
273 Austrian/German 289 Spanish Cx
274 Belgian 293 APL Cx
275 Brazilian 297 French/French Azerty
277 Danish/Norwegian 340 OCR Tx
278 Swedish/Finnish 361 International T ypographicCx
280 Italian 500 International Set 5 and Swiss
281 Japanese English 871 Icelandic
282 Portuguese 892 OCR-A Cx
284 Spanish and Spanish Speaking 893 OCR-B Cx
285 UK English
286 Austrian/German Alternate Cx
Bilingual
selections will appear only in Twinax mode.
AXIS HP MIO User’s Manual 19
Page 20

System language
Page lenght
Emulation
Section 3: Configuration
IBM Printer Emulation (PREMUL)
The IBM Printer Emulation parameter must match your IBM system
configuration in order to get correctly formatted printouts.
The default IBM Printer Emulation is 3816 (IBM 3816 model
01S/01D). You will only have to change this selection if your IBM
system is configured for a different IBM printer. If in doubt, consult
your System Manager.
Select IBM Printer Emulation according to your IBM system
configuration.
IBM Printer Emulation
Selections:
VALUE DESCRIPTION
3812 IBM 3812 models 2 (Coax non-IPDS), and 1 and 2 (Twinax), page printer
SPREMUL=3816
*
* 3816 IBM 3816 models 01S and 01D, page printer
3287 IBM 3287 model 2C, matrix printer Cx only
3268 IBM 3268 model 2C, matrix printer Cx only
3262 IBM 3262 models 3 and 13, matrix printer Cx only
4214 IBM 4214 models 1 (Coax) and 2 (Twinax), matrix printer
4224 IBM 4224 model 2 non-IPDS, matrix printer Cx only
5224 IBM 5224 models 1 and 2, matrix printer Tx only
5225 IBM 5225 models 1 through 4, matrix printer Tx only
5226 IBM 5224 models 1 through 3, matrix printer Tx only
4230 IBM 4230 models 201 (Coax) and 101 (Twinax), matrix printer
Note: ❏ Selections marked Cx only will appear only in Coax mode, and
Tx only selections will appear only in Twinax mode.
20 AXIS HP MIO User’s Manual
Page 21

Section 3: Configuration
System language
Page lenght
Emulation
Maximum Page Length (MPL)
The MPL parameter sets the number of lines per page. The AXIS HP
MIO automatically ejects the page when the specified number of lines
have been printed.
The default value is 66 lines. You should only change this selection if
your documents are set up for a different page length.
Select Maximum Page Length.
Maximum Page
Length Selections:
You can select any page length from 0 to 255 lines.
SMPL=66
*
Note: Selecting 0 will give a page length of one line.
AXIS HP MIO User’s Manual 21
Page 22
System language
Page lenght
Emulation
Section 3: Configuration
Automatic Orientation (AUTORI)
This parameter selects automatic or fixed page orientation.
The default selection is YES (Automatic Orientation). You can change
this to NO if you want to print all pages in the same orientation
regardless of the calculated (logical) page size, see below.
Automatic
Orientation
Selections:
Select
YES: Automatic Orientation. The page orientation depends on the
/deselect Automatic Orientation.
page format set by the IBM host. For each new page, a logical
page size is calculated and compared to the physical size set by
the Page Size parameter, see page 24. The page orientation is
then determined as follows:
SAUTORI=YES
*
• If the logical length is greater than the logical width, the
page will be printed in Portrait orientation.
• If the logical length is less than or equal to the logical
width, the page will be printed in Landscape orientation.
• If the logical page size doesn’t fit the page in either
orientation, the page will be printed according to the Page
Orientation parameter, see page 23.
NO: Fixed Orientation. The page will always be printed according
to the Page Orientation parameter, see page 23.
22 AXIS HP MIO User’s Manual
Page 23

Section 3: Configuration
System language
Page lenght
Emulation
Page Orientation (PAGEORI)
This parameter sets the default page orientation. The default
orientation is used when the current page doesn’t fit the physical page
size set by the Page Size parameter, or when the Automatic Orientation
parameter is set to NO.
The default selection is COR (Computer Output Reduction, see
note). You should only change this if you want to disable the COR
function.
Select
Page Orientation
Selections
default Page Orientation.
VALUE DESCRIPTION
* COR Computer Output Reduction (COR) is enabled
SPAGEORI=COR
*
PORT Use portrait as default orientation
LAND Use Landscape as default orientation
Notes: ❏ COR printouts have the following characteristics:
•Landscape orientation.
•Vertically compressed to 70%.
•Horizontally compressed by using a font of higher character
density.
•Top and left margins of 0.5 inches each.
❏ This parameter applies to all available input bins. If you should
need to configure input bins individually, refer to Configuration
from the System on page 30.
AXIS HP MIO User’s Manual 23
Page 24

System language
Page lenght
Emulation
Section 3: Configuration
Page Size (PAGESIZE)
This parameter is used to set the physical page size. It must match the
actual paper size you are using in order to get correct printouts.
The default size is LETTER for the US version, and A4 for the
European version. You will only have to change this selection if you
are using paper of a different format.
Select
physical Page Size.
SPAGESIZE=LETTER
(US version)
SPAGESIZE=A4
*
(European version)
*
Page Size Selections:
Notes: ❏ If CUSTOM is selected, you will be prompted for the width and
VALUE DESCRIPTION
EXEC 7.25 x 10.5 inches
* LETTER 8.5 x 11 inches US version default
LEGAL 8.5 x 14 inches
*A4 210 x 297 mm (8.27 x 11.69 inches) European version default
A3 297 x 420 mm (11.69 x 16.54 inches)
B4 250 x 353 mm (10.12 x 14.33 inches)
MON 3.8 x 7.5 inches (Monarch envelopes)
C10 4.1 x 9.4 inches (COM-10 envelopes)
DL 4.3 x 8.6 inches (DL envelopes)
CUSTOM User defined size
length parameters.
This parameter applies to all available input bins. If you should need
to configure input bins individually, refer to Configuration from the
System on page 30.
24 AXIS HP MIO User’s Manual
Page 25

Section 3: Configuration
System language
Page lenght
Emulation
Custom Page Width (PAGEWIDTH)
Note: This selection will only appear if you have selected CUSTOM as Page
Size.
The selected page width must match the width of the actual paper you
are using in order to get correct printouts. The page width is displayed
in units of 0.01 inches.
The default value is the page width for the last selected page size (if you
changed from LETTER to CUSTOM, the default width is 850,
corresponding to 8.50 inches).
Select Custom Page Width
SPAGEWIDTH=850
*
.
Page Width Selections You can select any page width from 0 to 1999, corresponding to
0.00 – 19.99 inches.
Note: Pressing the + or - key changes the value in steps of 0.01 inches. By
holding down the key for a few seconds, the value changes more
rapidly, first in steps of 0.10 inches, then in steps of 1.00 inches.
AXIS HP MIO User’s Manual 25
Page 26

System language
Page lenght
Emulation
Section 3: Configuration
Custom Page Length (PAGELENGTH)
Note: This selection will only appear if you have selected CUSTOM as Page
Size.
The selected page length must match the length of the actual paper
you are using in order to get correct printouts. The page length is
displayed in units of 0.01 inches.
The default value is the page length for the last selected page size (if you
changed from LETTER to CUSTOM, the default length is 1100,
corresponding to 11.00 inches).
Select
Custom Page Length
SPAGELENGTH=1100
*
Page Length
Selections
You can select any page length from 0 to 1999, corresponding to
0.00 – 19.99 inches.
Note: Pressing the + or - key changes the value in steps of 0.01 inches. By
holding down the key for a few seconds, the value changes more
rapidly, first in steps of 0.10 inches, then in steps of 1.00 inches.
26 AXIS HP MIO User’s Manual
Page 27

Section 3: Configuration
System language
Page lenght
Emulation
Print Parameter List
This selection activates the Print Parameter List function. The
Parameter List contains all AXIS HP MIO configuration parameters,
and the complete font definition table.
The default selection is N (No). Change this to Y (Yes) and press Enter
if you want to print the Parameter List. The printout starts when you
press the On-Line key.
Select
Print Parameter List
Options
N: No. The Parameter List will not be printed.
SPrint Parlist=N
/deselect Parameter List printout.
*
Y: Yes. The Parameter List will be printed when you set the printer
on line.
Notes: ❏ As soon as the Parameter List has been printed, the Print
Parameter List selection will be automatically reset to N.
❏ If you only want to print the configuration parameters covered in
this section, you can print the Self Test sheet instead. The Self
Test is described in Section 2.
AXIS HP MIO User’s Manual 27
Page 28

System language
Page lenght
Emulation
Section 3: Configuration
This page is intentionally blank
28 AXIS HP MIO User’s Manual
Page 29

Section 4: Advanced Functions
Section 4 Advanced Functions
This section deals with some of the AXIS HP MIO functions that
brings your HP printer beyond the normal IBM printer emulation. It
is only intended as an overview – for a complete description of these
functions, please refer to the AXIS HP MIO Technical Reference.
The functions covered in this manual are:
• Configuration from the System
1001010100111
11010001001
010011101
This is an alternative method for changing the front panel
configuration parameters, and for changing parameters not
available from the front panel. You may send a file containing the
configuration commands either from your IBM system, or from a
local PC.
• Hex Transparency
This function allows you to use all the HP printer features in the
IBM system environment.
• Font Selection
The font commands provides easy access to the printer resident
PCL fonts from your IBM system documents.
Note: ❏ If you intend to use any of these functions, we strongly
recommend that you order the AXIS HP MIO Technical
Reference from your distributor. The Technical Reference also
describes a wide range of additional functions to further enhance
your printouts.
AXIS HP MIO User’s Manual 29
Page 30
1001010100111
11010001001
010011101
Section 4: Advanced Functions
Configuration from the System
For printers without a front panel, you can configure the AXIS HP
MIO by inserting configuration commands in your document. The
example below shows a configuration sequence that sets all front panel
parameters to their default values (US version; for the European
version, substitute LETTER with A4):
Example:
%AXIS+
%CONFIG+
SYSL = 37;
PREMUL = 3816;
MPL = 66;
AUTORI = YES;
BIN1 = COR,LETTER;
BIN2 = COR,LETTER;
BIN3 = COR,LETTER;
BIN4 = COR,LETTER;
BIN5 = COR,LETTER;
SAVE;
%CONFIG-
Note that page orientation and size may be set individually for each
input bin, while the front panel parameters affect all available bins
simultaneously.
A common application is to print on pre-printed forms from the lower
bin, while printing standard jobs from the upper bin. To do this, you
may need to turn off the COR (Computer Output Reduction)
function for the lower bin:
Example:
%AXIS+
%CONFIG+
BIN2 = PORT,LETTER;
SAVE;
%CONFIG-
30 AXIS HP MIO User’s Manual
Page 31

Hex Transparency
1001010100111
Section 4: Advanced Functions
11010001001
010011101
The transparency function allows you to send ASCII data to the
printer directly from the host application. The data may be of any
language supported by the printer, e.g. PCL, HP-GL, or PostScript.
This gives you access to all the HP printer features from within the
IBM environment.
When the percent and less-than characters (%<) are received, the
AXIS HP MIO will switch over to hex transparency mode. Following
data (hexadecimal byte values or quoted text) are passed directly to the
printer without any conversion. The hex transparency mode continues
until the greater-than and percent characters (>%) are received.
Example:
The example below shows how to embed ‘start underline’ (
&d0D) and ‘stop underline’ (
E
&d@) commands in your
C
E
documents:
The word %<1B26643044>%underline%<1B266440>% is
underlined.
You may use %<1B,"&d0D">%quoted text%<1B,"&d@">%
as well.
Resulting printout:
The word underline
You may use quoted text
is underlined.
as well.
C
AXIS HP MIO User’s Manual 31
Page 32

1001010100111
11010001001
010011101
Section 4: Advanced Functions
This is a more advanced example, showing how to draw a
rectangle using HP-GL commands:
1:
%<1B,"E",1B,"%0B",
2:
"IN;SP1;PA0,0;EA2500,1500;"
3:
1B,"%0A",1B,"E">%
This is what it does line-by-line: (1) – Start transparency (%<),
reset printer (
the rectangle, and (3) – Resume PCL mode (
printer (
Please refer to your printer manual (Technical Reference) for a
description of the HP-GL commands.
E
E), and enter HP-GL mode (
C
E
E), and stop transparency (>%).
C
E
%0B), (2) – Draw
C
E
%0A), reset
C
Font Selection
When experimenting with HP-GL or PostScript functions, don’t forget
to resume PCL mode and reset the printer afterwards!
Fonts can be selected by the system in two ways: directly by font
reference (FGID number), or indirectly by pitch selection (CPI). The
FGID selection is only available in Twinax mode.
In order to gain full access to the PCL fonts in both Coax and Twinax
mode, the AXIS HP MIO offers an alternative font selection
command.
Font selection commands may be included anywhere in your
documents. They begin with ‘percent-slash’ (%/) followed by the
word FONT and the font (FGID) number. An optional point size
value preceeded by a comma may be included. The command is ended
with a semi-colon (;).
32 AXIS HP MIO User’s Manual
Page 33

Section 4: Advanced Functions
Example:
The following example shows how to select a 10 CPI (fixed pitch)
italic font, and a scalable (proportional) font in 18 points.
%/FONT 18;This is 10 CPI Courier italic
%/FONT 6199,180;This is 18 pt Palatino
• A font command starts with %/ and ends with ;.
1001010100111
11010001001
010011101
• 18 and 6199 are the FGID (F
ont Global Identifier) numbers
specifying the fonts. See Appendix C for a complete list of the
supported FGIDs.
• 180 is a Point Size parameter used for scaling the font. The value
is entered as ten times the desired point size.
Resulting printout:
Notes: ❏ If Point Size is omitted, 10 points will be used as default for all
scalable fonts.
❏ Fixed pitch fonts are not scalable. If a Point Size is specified, it
will be used to compress/expand the font. (
%/FONT 18,105; will
compress the 10 CPI font to 10.5 CPI without changing the size
of the characters).
❏ If a Point Size is specified for a PSM font (see Appendix C), only
AXIS HP MIO User’s Manual 33
the inter-word spacing will be affected. The default space width
equals a 12 CPI space.
Page 34

HP MIO
Appendix A: The AXIS HP MIO Rear Panel
Appendix A The AXIS HP MIO Rear Panel
The rear panel has two indicators (SYSTEM and PC SHARE), a
rotary switch, a Coax/Twinax switch, and two connectors. The larger
connector (PARALLEL) is used for local PC or LAN print server
input, and smaller circular is used for Coax/Twinax input.
The picture below shows the rear panel with its indicators, switches,
and connectors.
The System Indicator
This indicator (green) is lit when the AXIS HP MIO is connected to
the IBM system. It can also flash in the following cases:
• At power-up (for a few seconds).
• When Test Mode is entered, see below.
• During test function execution (rapid flash).
34 AXIS HP MIO User’s Manual
The AXIS HP MIO Rear Panel
Page 35

The PC SHARE Indicator
This indicator (yellow) is lit during a local PC or LAN printout. Host
printouts will be held waiting until the PC/LAN printout is
completed.
The Rotary Switch
The ten-position rotary switch is used for setting the AXIS HP MIO
device address (this applies to 5250/Twinax mode only – the switch
should always be in zero position in 3270/Coax mode).
Appendix A: The AXIS HP MIO Rear Panel
HP MIO
The switch is also used for accessing Test Mode functions.
The Coax/Twinax Switch
This switch (CX/TX) configures the AXIS HP MIO hardware for
Coax or Twinax mode operation. It should be set prior to the
installation. Do not alter this switch when the printer is powered on or
connected to the IBM system.
Test Mode
The Test Mode is used for accessing internal AXIS HP MIO
functions. Entering Test Mode makes the AXIS HP MIO go off-line
towards all connected input sources, so you do not have to disconnect
any cables.
AXIS HP MIO User’s Manual 35
Page 36

HP MIO
Appendix A: The AXIS HP MIO Rear Panel
Set the rotary switch to position 9 to enter Test Mode. When the
SYSTEM indicator starts to flash, select one of the following
functions:
Position Test Mode Function
0 Reserved
1 Set Factory Defaults – abandon the current configuration
2 Confirm Factory Defaults – see note below
3 ASCII Hex Dump Mode – print the outgoing data stream as hexadecimal
values
4 System Hex Dump Mode – print the incoming data stream as hexadecimal
values
5 Reserved
6 Reserved
7 Terminal Configuration – run the Configuration Utility on an IBM display
station
8 Print Parameter List – print the complete configuration
9 Exit T est Mode – resume normal print operation
Caution 5250/Twinax Users: Don’t forget to set the rotary switch to the device
address after exiting Test Mode.
Notes: ❏ To set factory default configuration, a two-step operation is
required in order to avoid accidental activation and loss of
configuration settings. When position 1 is selected, the yellow PC
SHARE indicator begins to flash. To confirm this selection,
switch to position 2 within two seconds.
❏ The Hex Dump modes are useful when analyzing incorrect
printouts, but be careful – they can consume huge amounts of
paper! Refer to the AXIS HP MIO Technical Reference for
details.
❏ The Terminal Configuration Utility provides an easy-to-use
method of customizing the AXIS HP MIO board using a directly
attached IBM 5250/3270 display station. Refer to the AXIS HP
MIO Technical Reference for details.
36 AXIS HP MIO User’s Manual
Page 37

Appendix B: System Configuration Guidelines
Appendix B System Configuration
Guidelines
This appendix contains technical details for the system operator on
how to configure the IBM system for the AXIS HP MIO board.
5250/Twinax Host Configuration
The AXIS HP MIO is, by default, set to emulate the IBM 3816
01S/01D printer with 5219 software. This setting is recommended for
any 5250 system, as it makes the best use of the functionality of the
HP printer.
HP MIO
5256 may be used when you need to guarantee that the AS/400 will
not send format settings (CPI, LPI, etc.). This is useful when you use
Hex Transparency to control printer behaviour.
AS/400 Configuration If you will configure for a number of AXIS HP MIO interfaces, or if
you will use IBM 3812 emulation, manual configuration is
recommended. Manual configuration is performed using
CRTDEVPRT or WRKDEVD F6 (Create).
You may, prior to configuration, use PRTDEVADR to get a chart
showing free port and switch setting combinations. Device type
(TYPE) and Device model (MODEL) must match the setting of AXIS
HP MIO. The printers are listed in functionality order, with 5256
being the least functional (advanced) of the IBM printer emulations.
AXIS HP MIO printer emulation Device type Device model
IBM 5256 5256 1
IBM 5224 5224 1
IBM 5225 5225 1
IBM 4214 4214 2
IBM 4230 4214 2
IBM 3812 3812 1
IBM 3816 3812 1
AXIS HP MIO User’s Manual 37
Page 38
HP MIO
Appendix B: System Configuration Guidelines
S/36 Configuration If you will configure for a number of AXIS HP MIO interfaces,
manual configuration is recommended.
Manual configuration is performed using CNFIGSSP.
The device code must match the setting of AXIS HP MIO:
AXIS HP MIO printer emulation Device code
IBM 5256 PB
IBM 5224 PC
IBM 5225 PC
IBM 4214 PG
IBM 4230 PG
IBM 3812 PD
IBM 3816 PD
S/38 Configuration If you will configure for a number of AXIS HP MIO interfaces,
manual configuration is recommended. Manual configuration is
performed using CRTDEVD.
Device type (DEVTYPE) must match the setting of AXIS HP MIO:
AXIS HP MIO printer emulation Device type
IBM 5256 5256
IBM 5224 5224
IBM 5225 5225
IBM 4214 4214
IBM 4230 4214
IBM 3812 3812
IBM 3816 3812
38 AXIS HP MIO User’s Manual
Page 39

3270 Host Configuration
The AXIS HP MIO board supports non-SNA (LU-0) 3270 DSC,
SNA LU-3 3270 DSE, and SNA LU-1 SCS data streams.
When printing in an SNA network, VTAM needs to be set up,
depending on desired LU type. The following VTAM logon-mode
entries apply to MVS, VM, and VSE.
The logon-mode entries are the same for all emulated IBM printers
(selected by the AXIS HP MIO IBM Printer Emulation parameter)
SNA LU-1 SCS:
Appendix B: System Configuration Guidelines
HP MIO
SCS MODEENT LOGMODE=SCS,FMPROF=X'03',TSPROF=X'03',PRIPROT=X'B1',
SECPROT=X'90',COMPROT=X'3080',RUSIZES=X'87C6',
PSERVIC=X'01000000E100000000000000',
PSNDPAC=X'01',SRCVPAC=X'01'
SNA LU-3 3270 DSE:
DSC4K MODEENT LOGMODE=DSC4K,FMPROF=X'03',TSPROF=X'03',PRIPROT=X'B1',
SECPROT=X'90',COMPROT=X'3080',RUSIZES=X'8787',
PSERVIC=X'03000000000018502B507F00'
(Continuation characters in column 72 are not shown)
You also need to match the Printer Emulation setting in AXIS HP
MIO with the setting of your 3270 printer driver software (JES/328x,
VPS, CMA-Spool, RSCS, etc.).
If there is no selection for 4224, 4230, 3812, or 3816, you can instead
select 3268.
AXIS HP MIO User’s Manual 39
Page 40

Appendix C: Fonts
Appendix C Fonts
This appendix lists all the 130 IBM fonts supported by the AXIS HP
MIO. Fonts are selected by FGID (F
in Section 4. Each IBM font is mapped to a printer resident PCL font,
selected to make a close match to the original IBM font. The IBM to
PCL font mapping is controlled by the Font Definition Table. All
entries in this table are fully editable, and you can also add new
entries. Refer to the AXIS HP MIO Technical Reference for further
information.
ont Global Identifier) as outlined
10 CPI Fonts
FGID IBM FONT NAME
3 OCR-B
5 Orator
11 Courier 10
12 Prestige Pica
13 Artisan 10
18 Courier Italic 10
19 OCR-A
20 Pica
30 Math Symbol 10
38 Orator Bold
39 Gothic Bold 10
40 Gothic T ext 10
41 Roman T ext 10
42 Serif T ext 10
43 Serif Italic 10
46 Courier Bold 10
60 Prestige Bold 10
12 CPI Fonts
FGID IBM FONT NAME
66 Gothic T ext 12
68 Gothic Italic 12
69 Gothic Bold 12
70 Serif T ext 12
71 Serif Italic 12
72 Serif Bold 12
80 Math Symbol 12
84 Script
85 Courier 12
86 Prestige Elite
87 Letter Gothic 12
91 Light Italic 12
108 Courier Bold 12
110 Letter Gothic Bold
111 Prestige Elite Bold
112 Prestige Elite Italic
40 AXIS HP MIO User’s Manual
Page 41

Appendix C: Fonts
Proportional PSM Fonts
FGID IBM FONT NAME
155 Boldface Italic
158 Modern
159 Boldface
160 Essay
162 Essay Italic
163 Essay Bold
173 Essay Light
175 Document
13.3 CPI Fonts
FGID IBM FONT NAME
204 Gothic Text 13
15 CPI Fonts
FGID IBM FONT NAME
221 Prestige 15
223 Courier 15
225 Math Symbol 15
229 Serif T ext 15
230 Gothic T ext 15
18 CPI Fonts
FGID IBM FONT NAME
258 Courier 18
8 CPI Fonts
FGID IBM FONT NAME
266 Courier Bold 8
20 CPI Fonts
FGID IBM FONT NAME
281 Gothic T ext 20
25 CPI Fonts
FGID IBM FONT NAME
289 Gothic T ext 25
26.7 CPI Fonts
FGID IBM FONT NAME
290 Gothic T ext 27
5 CPI Fonts
FGID IBM FONT NAME
244 Courier 5
245 Courier Bold 5
17 CPI Fonts
FGID IBM FONT NAME
252 Courier 17
253 Courier Bold 17
254 Courier 17 (sub/super)
AXIS HP MIO User’s Manual 41
Proportional T ypographic Fonts
(Fixed Point Size)
FGID IBM FONT NAME
751 Sonoran-Serif 8-pt Roman
Medium
1051 Sonoran-Serif 10-pt Roman
Medium
1053 Sonoran-Serif 10-pt Roman Bold
1056 Sonoran-Serif 10-pt Roman
Italic Medium
1351 Sonoran-Serif 12-pt Roman
Medium
1653 Sonoran-Serif 16-pt Roman Bold
2103 Sonoran-Serif 24-pt Roman Bold
Page 42

Appendix C: Fonts
Proportional T ypographic Fonts
(Scalable – User Defined FGIDs)
FGID PCL FONT NAME
3840 CG Times
3841 CG Times Bold
3842 CG Times Italic
3843 CG Times Bold Italic
3844 CG Omega
3845 CG Omega Bold
3846 CG Omega Italic
3847 CG Omega Bold Italic
3848 Coronet
3849 Clarendon Condensed
3850 Univers Medium
3851 Univers Bold
3852 Univers Medium Italic
3853 Univers Bold Italic
3854 Univers Medium Condensed
3855 Univers Bold Condensed
3856 Univers Medium Condensed
Italic
3857 Univers Bold Condensed Italic
3858 Antique Olive
3859 Antique Olive Bold
3860 Antique Olive Italic
FGID PCL FONT NAME
3861 Garamond Antiqua
3862 Garamond Halbfett
3863 Garamond Kursiv
3864 Garamond Kursiv Halbfett
3865 Marigold
3866 Albertus Medium
3867 Albertus Extra Bold
3868 Arial
3869 Arial Bold
3870 Arial Italic
3871 Arial Bold Italic
3872 Times New
3873 Times New Bold
3874 Times New Italic
3875 Times New Bold Italic
3876 Symbol
3877 Wingdings
42 AXIS HP MIO User’s Manual
Page 43

Proportional T ypographic Fonts
(Scalable Point Size)
FGID IBM FONT NAME
5687 Times Roman
5707 Times Roman Bold
5815 Times Roman Italic
5835 Times Roman Bold Italic
6199 Palatino
6219 Palatino Bold
6327 Palatino Italic
6347 Palatino Bold Italic
16951 Century Schoolbook
16971 Century Schoolbook Bold
17079 Century Schoolbook Italic
17099 Century Schoolbook Bold Italic
33335 Optima
33355 Optima Bold
33463 Optima Italic
33483 Optima Bold Italic
33591 Futura Book
33601 Futura Heavy
33719 Futura Book Italic
33729 Futura Heavy Italic
34103 Helvetica
34123 Helvetica Bold
34231 Helvetica Italic
34251 Helvetica Bold Italic
41783 Cursive
41803 Cursive Bold
41911 Cursive Italic
41931 Cursive Bold Italic
Appendix C: Fonts
AXIS HP MIO User’s Manual 43
Page 44

HP MIO
Appendix D: Technical Specifications
Appendix D Technical Specifications
IBM 5250 Features
Host Environments IBM System/34, IBM System/36, IBM System/38, IBM AS/400
Attachments IBM 5259 Migration Data Link, IBM 5294 Control Unit, IBM 5394
Control Unit, IBM 5494 Control Unit, IBM 5251 model 12 Control
Unit, IBM 5299 Terminal Multiconnector
Printer Emulations IBM 3812 models 1 and 2 with 5219 software, IBM 3816 models 01S
and 01D with 5219 software, IBM 4214 model 2, IBM 5224 models
1 and 2, IBM 5225 models 1 - 4, IBM 5256 models 1 - 3, IBM 4230
model 101
System Features SCS and FFT data streams, Virtual Printer PC/Support, Multiple Bin
Support, 19 National Languages, Page Presentation Media, Computer
Output Reduction, Duplex, Page Rotation in four orientations, FGID
Font Selection, Fixed-pitch, Proportional, and Typographic Fonts,
Scalable font support
IBM 3270 Features
Host Environments IBM S/370, S/390, IBM 303x, 308x, 309x, IBM 81xx, IBM 47xx,
IBM 43xx, IBM 937x
Attachments IBM 3174 Control Unit, IBM 3274 type A Control Unit, IBM 3276
Control Unit Display System, IBM 4701/4702 Device Cluster
Adapter, IBM 4300 Printer Adapter, IBM 9370 Subsystem Control
Unit, IBM 3299 Multiplexor
Printer Emulations IBM 3812 model 1, IBM 3816 model 01S and 01D, IBM 3287
model 2C, IBM 3268 models 3 and 13, IBM 4214 model 1, IBM
4224 model 2 (non-IPDS), IBM 4230 model 201
System Features SNA SCS (LU-1), SNA DSE (LU-3), and BSC, 3270/DSC data
streams, APL2/Text Feature, LU-1 FM Headers Subset 1, SCS
Local/Remote Save/Restore Formats, Extended Attribute Buffer
(EAB), 3270/DSC/DSE Query Reply and LU-1 Query List, IBM
RPQs, Load Translate Table, Country Extended Code Pages (CECP),
Page Presentation Media, Computer Output Reduction, Scalable font
support
44 AXIS HP MIO User’s Manual
Page 45

Appendix D: Technical Specifications
HP MIO
Additional Features • Configuration from the front panel, IBM system, local PC, or
IBM Display Station
• Fully editable character translation tables
• Programmable Hex Transparency function
• 255 User Definable Strings
• 127 programmable string substitutions
• 130 predefined fonts
• Scalable font selection through FGID and Point Size
• Automatic printer sharing functions
• System and ASCII hex dump modes
• Bar Codes
Supported Printers • HP LaserJet 5Si
• HP LaserJet 4(+), HP LaserJet 4V, HP LaserJet 4Si
• HP LaserJet IIISi
• HP DesignJet 600/650C, HP DeskJet 1200C/1600C
• HP PaintJet XL300, HP Color LaserJet
• Any HP or compatible with MIO expansion slot
Dimensions
50 x 30 x 130 mm / 6.0 x 1.2 x 5.1 inches
Weight 0.22 kg / 0.48 lb
Power Max. 150 mA @ 5V DC (supplied from the printer)
Approvals
EMI EN 55022/1987, EN50082-1/1992. FCC Class A.
Safety All safety regulations according to HP printer specifications
Environmental
Temperature 5 - 40 °C / 40 - 105 °F
Humidity 20 - 80% non-condensing
All specifications are subject to change without prior notice
AXIS HP MIO User’s Manual 45
Page 46

HP MIO
Appendix E: How To Contact Axis
Appendix E How To Contact Axis
Technical Support If you need technical support, please contact your dealer. If they can’t
help you, they will forward your request to us.
Axis on-line service
Use the Axis on-line service at any time to retrieve electronically
distributed items. The material available includes the HP MIO
Technical Reference, the Adobe Acrobat Reader (required for all Axis
on-line documentation), company and product presentations, etc. All
items are available on Internet by a WWW browser or FTP file
transfer, and on the Axis Bulletin Board.
Internet and
World Wide Web
The Axis Bulletin
Board System
If you are connected to Internet, have a look at the Axis WWW Home
Page at http://www.axis.se/or http://www.axisinc.com/. Where you
will find information about the company and our products. You can
also down-load on-line manuals and tools such as the Acrobat Reader
for different platforms. You can also get files and information through
anonymous ftp: log in to ftp.axis.se or ftp.axisinc.com and go to the
/pub/axis directory, or enter ftp://ftp.axis.se/pub/axis or
ftp://ftp.axisinc.com/pub/axis in your WWW browser.
Another way to access the Axis archive is the Axis BBS. You will need
a high-speed modem, a VT100 or VT220 terminal emulator, and a
Kermit or ZModem compatible software. Dial +46 46 12 06 32 or
+46 46 211 94 53 and log in as guest (no password required).
46 AXIS HP MIO User’s Manual
Page 47

Appendix E: How To Contact Axis
HP MIO
The Axis Offices To contact an Axis office, choose the one nearest to your region:
Europe, Middle East,
South America,
Africa, Australia
North & Central
America
Japan Axis Communications K.K.
Axis Communications AB
Scheelevägen 16
S-223 70 Lund, Sweden
Phone: +46 46 270 18 00
Fax: +46 46 13 61 30
Email: info@axis.se
Axis Communications Inc.
4 Constitution Way, Suite G, Woburn, MA 01801-1030, USA
Phone: 1-800-444-AXIS, (617) 938-1188
Fax: (617) 938-6161
Email: info@axisinc.com
8th Center Plaza 5F, 1-10-16 Nihombashi Horidome-cho,
Chuo-ku, Tokyo 103, Japan
Phone: +81 3 3663 8801
Fax: +81 3 3663 8802
Email: info@axiscom.co.jp
Hong Kong, Asia
(except Japan &
Middle East)
Axis Communications Ltd.
Room 602, Asian House, Hennessy Road,
Wanchai, Hong Kong
Phone: +852 2836 0813
Fax: +852 2573 5935
Email: info@axis.com.hk
AXIS HP MIO User’s Manual 47
Page 48

HP MIO
Appendix F: Related Documentation
Appendix F Related Documentation
TITLE PART NO.
AXIS HP MIO Technical Reference 13364
AXIS Support Reference Manual 13083
IBM System/36 Functions Reference Guide SA21-9436
IBM System/38 Service Guide SY31-0523
IBM AS/400 Programming: Guide to Programming for Printing SC21-8194
IBM AS/400 Printing GG24-3452
IBM AS/400 Device Configuration Guide SC41-8106
IBM 3274 Control Unit Customizing Guide GA23-0065
IBM 3174 Subsystem Control Unit Customizing Guide GA23-0214
IBM 3174 Character Set Reference GA27-3831
IBM 3816 Page Printer Reference for AS/400, S/36, or S/38 GA34-2084
IBM 3812 and 3816 Page Printers Programming Reference
for 3270 Information Display System Attachment
IBM 3812 and 3816 Page Printers Font Reference GA34-2111
VTAM Customisation SC23-0112
GA34-2081
48 AXIS HP MIO User’s Manual
 Loading...