

Page 1
GB
INSTALLATION
SLICER
MAINTENANCE
AX-S 13G
AX-S C13/N
C33F/N
INSTALLATION
UNPACKING
Immediately after unpacking the slicer, check it for possible shipping damage. If you find the machine
damaged after unpacking, save the packing material and contact the carrier within 15 days from
delivery.
Before installation, test the electrical service to assure that it fits with the specifications on the machine
data plate 1 .
ELECTRICAL
Warning: THIS MACHINE IS PROVIDED WITH THIS PLUG . IT MUST BE CONNECTED
TO PROPER GROUND PLUG, GROUNDED OUTLET. IF THERE IS NO GROUND PLUG, CONTACT
AN ELECTRICIAN.
CLEANING
This machine must be thoroughly cleaned and sanitized after installation and before being put into
service.
SAFETY
SAFETY DEVICES INCORPORATED IN THIS SLICER MUST BE IN THEIR
CORRECT OPERATING POSITIONS ANYTIME THE SLICER IS IN USE.
The blade cover 6 must be in position over the knife and secured by tightening the hand knob. 7
The Iast slice device 4 must be used when slicing, it keeps your hands away from the knife.
1/4
Filename: Man_AX-S_C13N_GB.PMD 14/01/11
Page 2
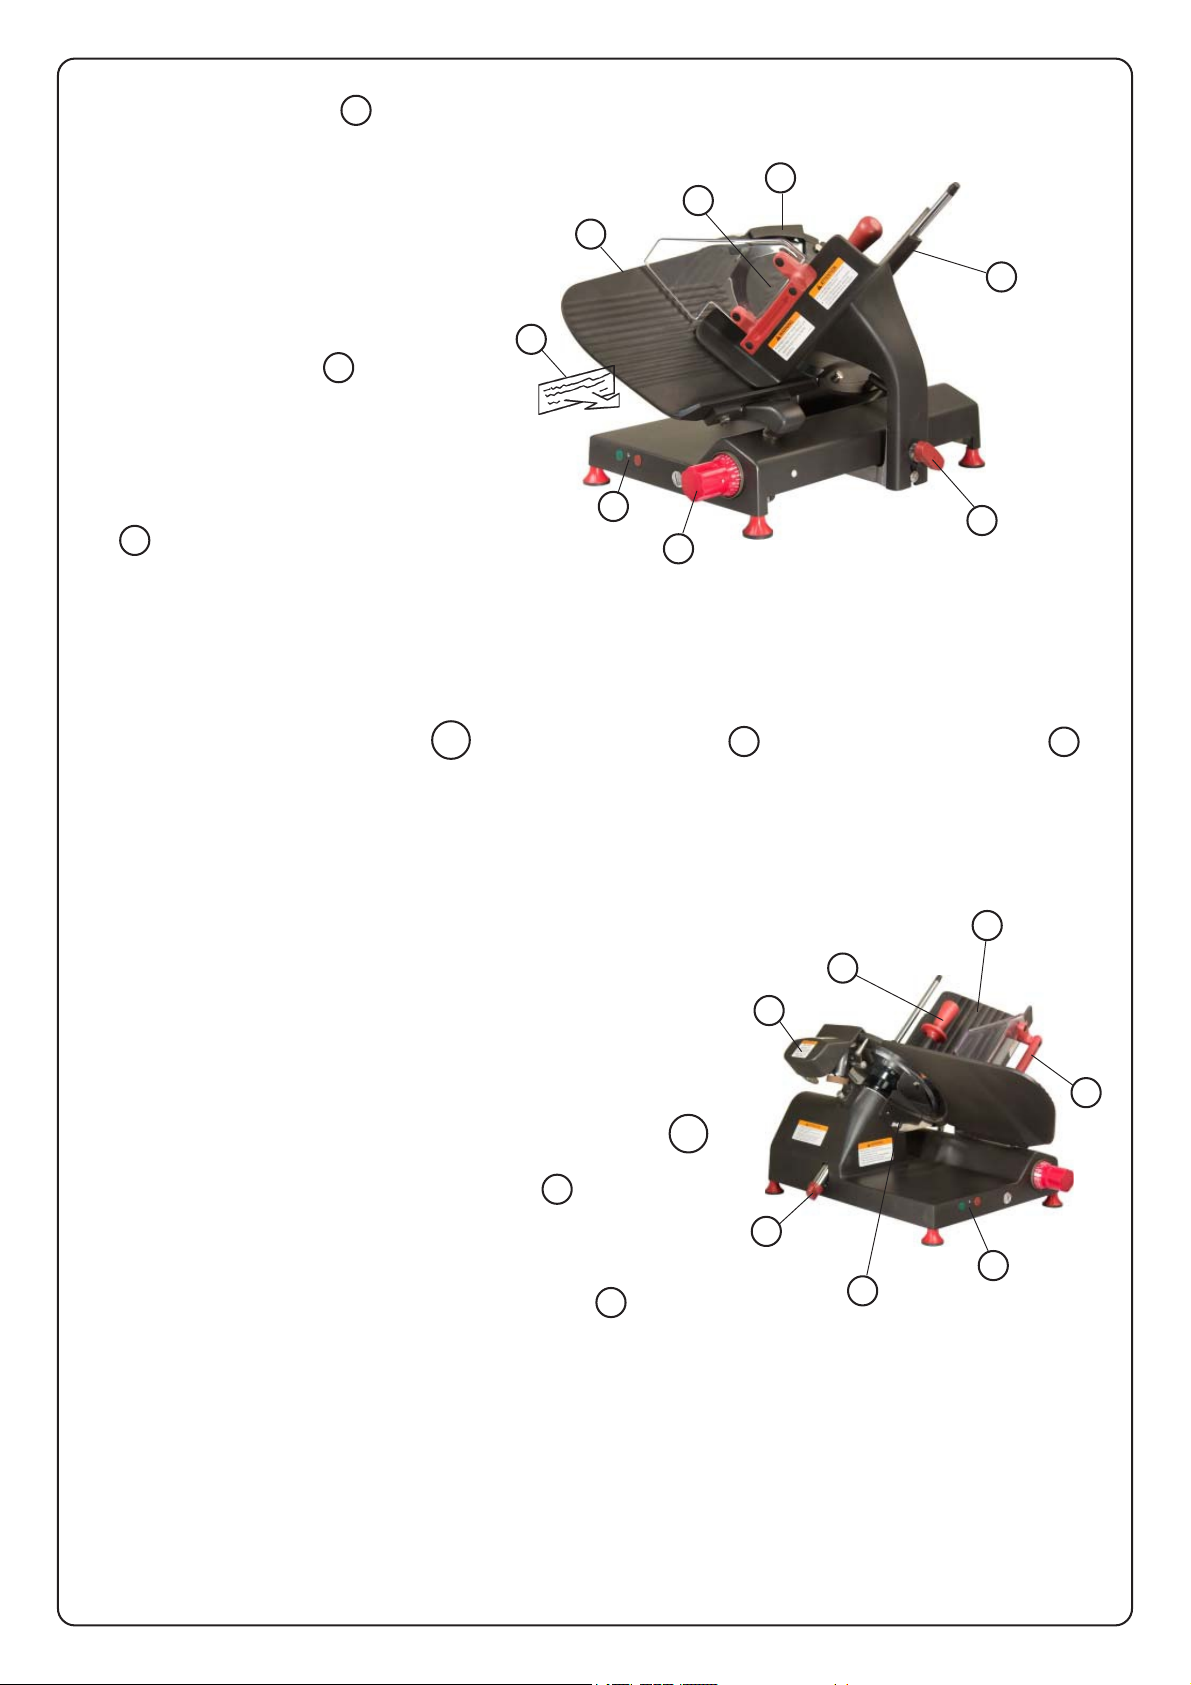
When the slicer is not running, the
slicer thickness control 2 must be
set on zero (fuIly clockwise) to cover the
blade edge.
Always UNPLUG the power
cord before cleaning or moving
6
14
10
the slicer.
3
SLICING
1
PuII the product holder 3
towards you until it stops and place the
product to be sliced on the product
holder tray. Lay the last slice device
against the product and on the slicer
switch, press the pushbutton green or
red 9 .
9
8
2
Adjust the slice thickness rotating the
slice thickness control. The numbers
on the slice thickness control do not
indicate actual measurements but may
be used for reference to duplicate slice
thickness.
Using either the carriage handle 13 or the Iast slice device 4 push the product holder 3
back and forth to slice.
Always switch off the slicer and turn the slice thickness control clockwise to zero when not slicing.
CLEANING
This machine must be thoroughly cleaned after each day’s
4
3
operation or anytime it will not be used for an extended period
of time.
10
WARNING: UNPLUG MACHINE POWER CORD
AND TURN THE INDEX KNOB FULLY CLOCKWISE
BEFORE CLEANING THE SLICER.
13
Loosen the fixing screws and remove the slice deflector 12.
The product holder can be removed for an easy
cleaning rotating its handle counterclockwise 8
Using a mild soap and hot water solution and a clean cloth,
wipe all surfaces of the slicer.
Thoroughly rinse it with another clean cloth and fresh water.
Remove the blade cover removing the hand knob 7 .
7
9
12
WARNING: THE SLICER BLADE IS VERY SHARP, USE EXTREME CAUTION WHEN WORKING
NEAR THE BLADE.
CAREFULLY wash both sides of the blade with the slice thickness control turned fully clockwise.
Wash the blade by wiping outward from the center.
ALWAYS rinse the blade thoroughly using fresh water and a clean cloth. Never use steel pads to clean
the blade. Wash and rinse the removed camponents before reassembling them.
DO NOT wash any slicer components in a dishwasher.
2/4
Page 3

MAINTENANCE
Attention
Use protection gloves
BLADE SHARPENING
Your slicer blade will provide long service in normal deli, food store, or commercial kitchen
use.
Clean the blade removing any greasy residue
Make sure that the machine is off.
4
1
3
Rotate the slice thickness control
4 to zero to make sure that the
blade is covered by the slice
thickness plate 5 .
Lift the sharpener cover 1
Slip off completely the sharpener
and spin it 180 degrees.
Put the sharpener device.
Push the green button to start the
machine.
1
5
2
4
Sharpening: Press the
sharpening wheel for about 10-15
seconds, then pres s
simultaneously also the grinding
stone for two seconds.
Contemporaneously loosen the
two grindstones.
5
After sharpening press the red
stop pushbutton.
3/4
6
Page 4

Lift and rotate 180 degrees the
sharpener and reallocate it into
its initial position.
Lower the sharpener cover.
Cleaning of the grinding
wheels
To obtain an excellent sharpening
7
the grinding wheel must always be
clean.
Remove dirt and grease with
alcohol and the supplied special
brush.
8
LUBRICATION
The rod on which the product holder slides, which is underneath the slicer, should be weekly
properly lubricated.
The machine does not have an oiler hole. Lift up the machine and oil the rod directly. After the
lubrication have the carriage slide 4 or 5 times.
DO NOT use vegetable oil.
Occasionally, the slice thickness plate slide rod should be coated lightly with lubricant.
Turn the slice thickness control fully counterclockwise when lubricating this slide rod and then turn it
fully clockwise when finished.
DO NOT lubricate the rod on which the last slice device slides. It must be kept clean but not
lubricated.
The motor has sealed bearings and requires no lubrication maintenance.
WEAR ADJUSTMENT
After several, years of operation and many sharpenings of the blade it may become necessary to have
the slice thickness plate
Dimensions mm
14 adjusted closer to the blade.
AX-S 13G
AX-S C13/N
C33F/N
E 520
F 450
H 580
I 730
Motor Data
Hp Volts Hz Ph
0,5 115 60 1
Slicing capacity mm
AX-S 13/G
AX-S C13/N
C33F/N
A
B 280
C 280
D 240
170
4/4
B
D
A
C
 Loading...