

Page 1

INSTALLATION
RETURN
MAINTENANCE
SLICER
AX-S GLM12/N
INSTALLATION
UNPACKING
Immediately on delivery unloading, please check whether machine packaging is eventually deteriorated
and in this case make necessary reservations on signing the delivery note. You will than check the
machine inside packaging and eventually contact immediately the carrier when it is damaged.
Prior to installation, test the electrical service to assure that it is in compliance with the specifications on
the machine data plate 1 .
ELECTRICAL
Warning: THIS MACHINE IS PROVIDED WITH THIS PLUG MUST BE CONNECTED
TO PROPERLY GROUNDING PLUG, GROUNDED OUTLET. IF THE RECEPTACLE IS NOT THE
PROPER GROUNDING TYPE, CONT ACT AN ELECTRICIAN.
CLEANING
This machine must be thoroughly cleaned and sanitized after installation and before being put into
service.
SAFETY
SAFETY DEVICES INCORPORA TED IN THIS SLICER MUST BE IN THEIR
CORRECT OPERA TING POSITION EVERY TIME THE SLICER IS IN USE.
The blade cover 6 must be in position over the knife and secured by tightening
the hand knob 7 .
The Iast slice device 4 must be used when slicing, it keeps your hands away from the knife.
1/4
Filename: Man_AX-S_GLM12_N_230609.PDM
Page 2
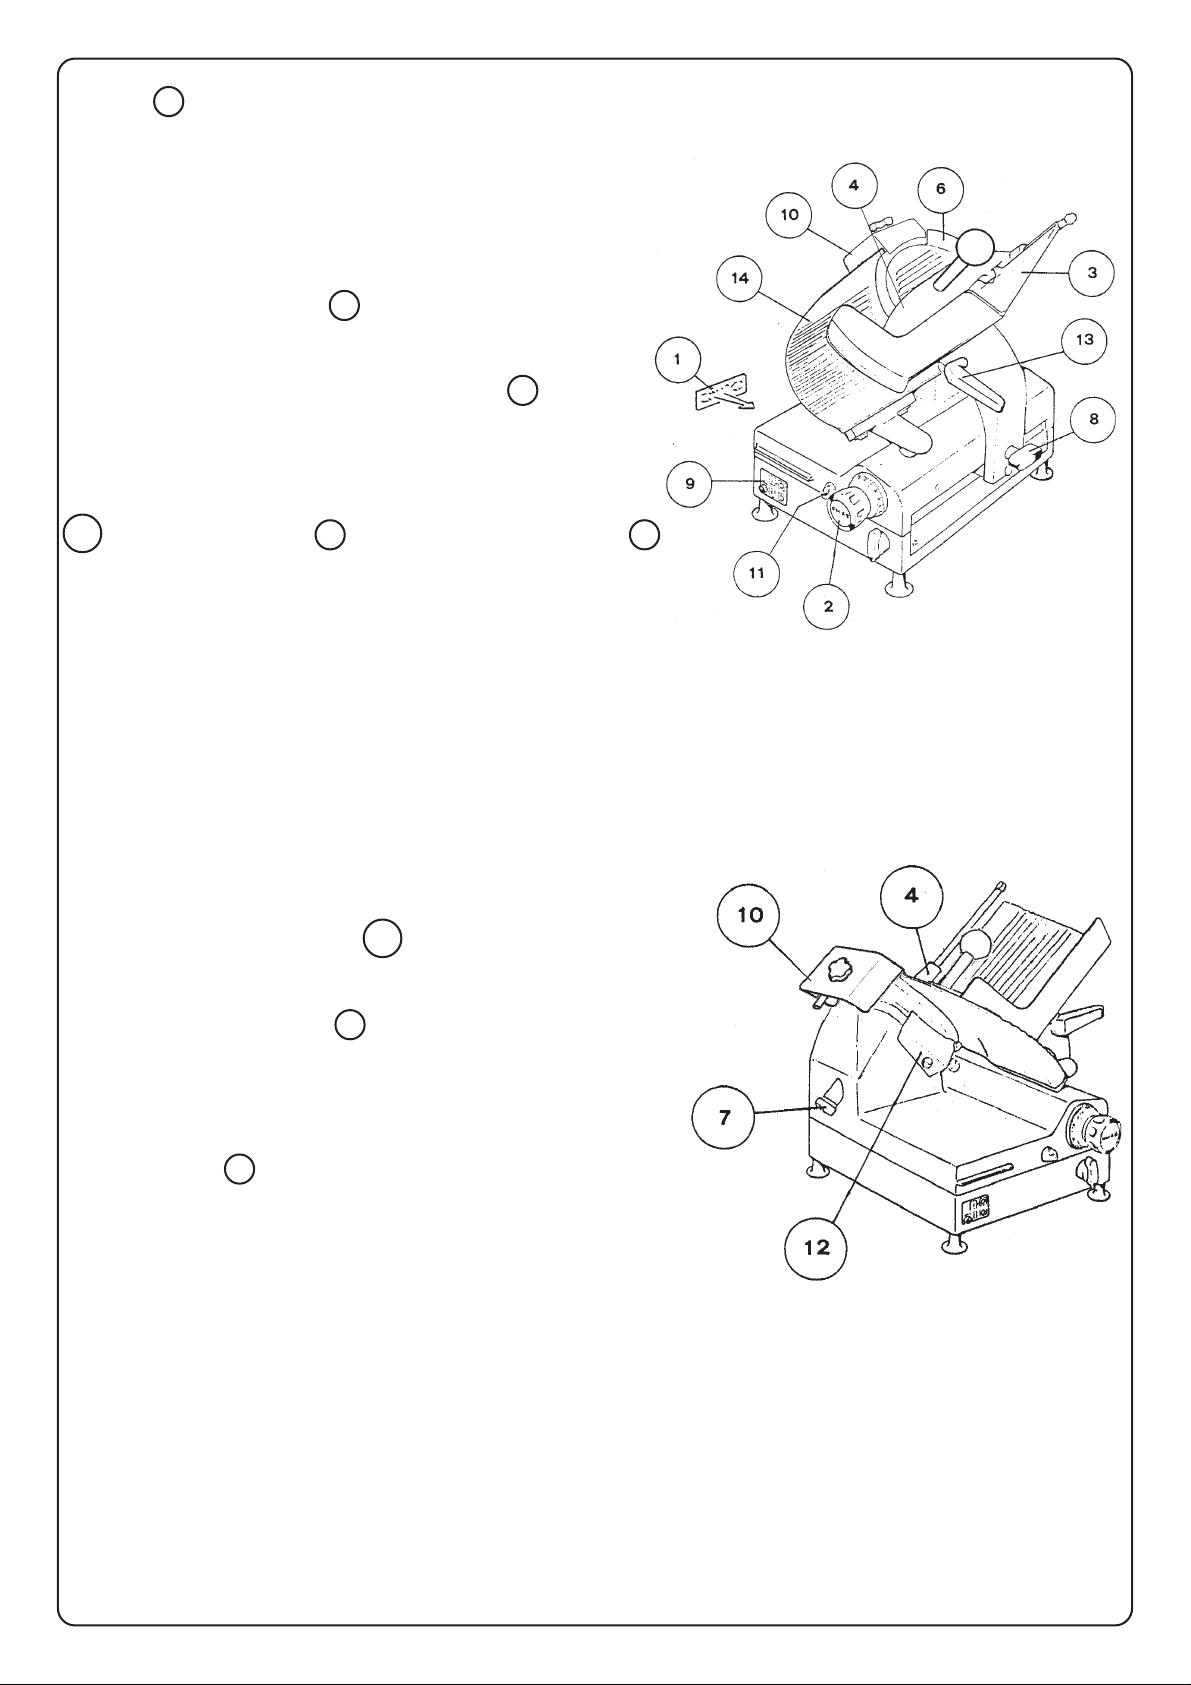
When the siicer is not working, the slicer thickness
control 2 must be set on zero (fuIly clockwise) to prevent
the blade edge from being exposed.
Always UNPLUG the power cord before cleaning or moving
the slicer.
SLICING
PuII the product holder 3 towards you until it stops
and place the product to be sliced on the product holder
tray . Place the last slice device against the product and
start the slicer by pressing the on-off swtich 9 . Adjust the
slice thickness by turning the slice thickness control. The
numbers on the slice thickness control do not indicate
precise measurement, but may be used for reference to
duplicate slice thickness. Using either the carriage handle
13 or Iast slice device 4 push the product holder 3
back and forth to slice. Always swtich-off the slicer and
turn the slice thickness control clockwise to zero when
not slicing.
W ARNING: Slicer should not be operated by untrained
personnel or persons under 18 years of age.
CLEANING
This machine must be thoroughly cleaned after each day’s
operation or every time it will not be used for an extended
period.
WARNING: UNPLUG MACHINE POWER CORD
AND TURN THE INDEX KNOB FULLY CLOCKWISE
BEFORE CLEANING THE SLICER.
Remove the slice deflector 12 by removing its thumb
screw.
The product holder can be removed for an easy cleaning
by unfastening its handle 8 .
Using a mild soap and hot water solution and a clean cloth,
wipe all surfaces of the slicer .
Thoroughly rinse it with another clean cloth and fresh water .
Remove the blade cover by removing
the hand knob 7 . With the hand knob removed, grasp
the edge of the blade cover and carefully lift it straight off
the knife.
WARNING: THE SLICER BLADE IS VERY SHARP USE
EXTREME CAUTION WHEN WORKING NEAR THE
BLADE.
CAREFULL Y wash both sides of the blade with the slice
thickness control turned fully clockwise. Wash the blade
by wiping outward from the centre. ALWAYS rinse the
blade thoroughly using fresh water and a clean cloth. Never
use steel pads it clean the blade. Wash and thoroughly
rinse the removed components prior to reassembling them.
DO NOT wash any slicer components in a dishwasher .
2/4
Page 3

MAINTENANCE
ATTENTION
Use protection gloves
ELECTRICAL SAFETY
When the slicer is running the eventual removal of the blade cover 6 , or the default of electric power ,
causes the stop of the machine.
T o restart the slicer press the on-of f switch 9 .
SHARPENING OPERATION
Y our slicer blade will provide long service in normal deli, food store, or commercial kitchen use.
However, in high volume applications where it is a practice to sharpen the blade frequently or even daily ,
the blade will be expended in a shorter time.
For a correct sharpening of the blade follow these
instructions:
1 Make sure that the machine is off.
2 Clean the blade removing any greasy residue.
3 Rotate the slice thickness control to zero to make
sure that the blade is covered by the slice thickness
plate.
ATTENTION
During the sharpening operations, pay attention
to an accidental contact with the blade.
4 Slip off completely the sharpener and spin it 180
degrees.
5 Put the sharpener device.
6 Push the green button to start the machine.
7 Sharpening: Press the sharpening wheel for about
10-15 seconds, then press simultaneously also the
grinding stone for two seconds.
Contemporaneously loosen the two grindstones.
8 Press the red stop pushbutton.
9 Lift and rotate of 180° the sharpener and reset
it into its initial position
Cleaning of the grinding wheels
T o obtain an excellent sharpening the grinding wheel must
always be clean.
Remove dirt and grease with alcohol and the supplied
special brush.
3/4
Page 4

DEFINITIONS
MANUAL OPERATION
Rotate the AUTO/MANUAL selector carriage release handle by 180
0
,clockwise
Push the on switch/blade start pushbutton
Adjust the thickness you want by turning the slice thickness control knob
Actuate the carriage by your hand
Push the off switch/blade stop pushbutton
AUTOMA TIC OPERA TION
Rotate the AUTO/MANUAL selector carriage release handle by 180
0
, counterclockwise
Push the on switch/blade start pushbutton
Adjust the thickness you want by turning the slice thickness control knob
Push the product holder start pushbutton
Adjust the length of the stroke by turning the product holder stroke adjustment
Push the product holder stop pushbutton to end carriage movement
Push the off switch bIade stop pushbutton
LUBRICATION
The rod on which the product holder slides, which is underneath the slicer , should be lubricated
weekly with several drops of oil. S top the carriage at the end of the stroke nearest the operator position
and pour the Iubricant into the special oiler. DO NOT use vegetable oil. Occasionally , the slice thickness
plate slide rod should be coated Iightly with lubricant. Turn the slice thickness control fully counterclockwise
when Iubricating this slide rod and then turn it fully clockwise when finished. DO NOT lubricate the rod on
which the last slice device slides. It must be kept clean but not lubricated. The motor has sealed
bearings and requires no Iubrication maintenance.
WEAR ADJUSTMENT
After several, years of operation and many sharpenings of the blade it may become necessary to have
the slice thickness plate 14 adjusted closer to the blade.
Motor Data
Volts 115
Hz 60
Ph 1
Amp 3,5
N/min 1750
Slicing capacity mm
220
200
170
Weight
Net 44
Gross 50
230
Dimensions mm
4/4
 Loading...