

Page 1
PLEASE READ DIRECTIONS COMPLETELY BEFORE USE.
nitris
Model: AX-3335
fuel
Model: AX-3331
AXIS SHAVERS INSTRUCTION MANUAL
Page 2

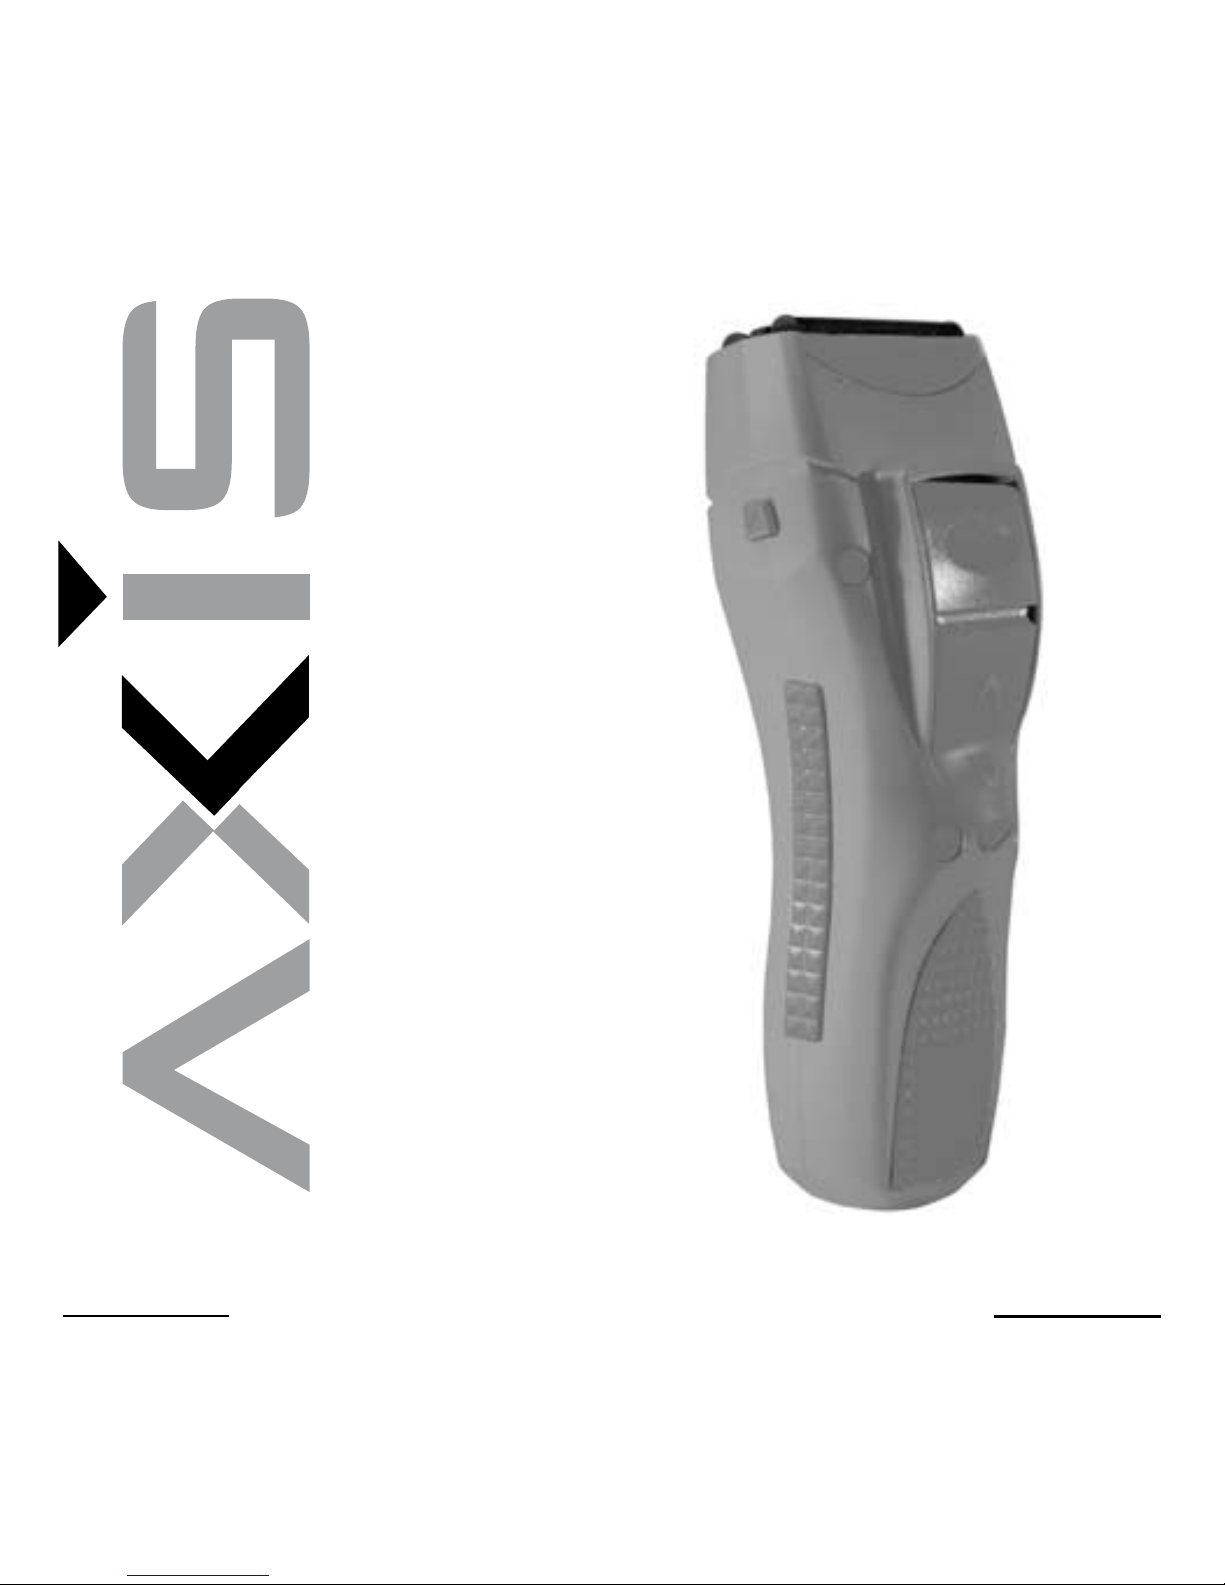
Congratulations!
You are now the proud owner of an
Axis Rechargeable/AC-powered
Shaver AX-3335 or AX-3331.
Before using your shaver,
please read the instructions in this
manual carefully for its proper
use and care. Please keep the
manual handy for ready reference.
AXIS/Bodyline Products International, Inc.
198 N. Brandon Drive
Glendale Heights, Illinois 60139 USA
Made in China
Page 3

Axis Nitris and Axis Fuel |4| english
Axis Nitris and Axis Fuel |5| english
IMPORTANT SAFETY
INSTRUCTIONS
Before you start using your shaver, please review these basic
precautions that will aid in your use of this electrical device.
Please read all instructions before using your shaver.
DANGER
To minimize the risk of electric shock…
NEVER REACH for a shaver that has been dropped into water. Unplug
the unit immediately.
DO NOT USE your shaver while bathing or showering.
ALWAYS UNPLUG your shaver after use or prior to cleaning the unit,
except when charging the unit.
DO NOT PLACE OR STORE the shaver in water or any other liquid or
where it may accidentally fall or be pulled into water.
WARNING
To avoid burns, fire, electric shock or other injury…
1. Except when recharging your shaver, never leave the unit unattended when plugged in.
2. Always provide close adult supervision when using your shaver near
children or the disabled.
3. Follow all instructions in this manual carefully. Do not use attachments with your shaver that have not been specifically recommended
by Bodyline Products International Inc.
4. Do not use a unit that is not operating normally, has been immersed
in water or other liquid, or has a damaged cord or plug.
Page 4

Axis Nitris and Axis Fuel |6| english
Axis Nitris and Axis Fuel |7| english
Call 1-877-263-9500 to arrange for service.
5. Never operate your shaver outdoors. Avoid use in the vicinity of
aerosol products or where oxygen is being administered. Also, keep
the cord away from heated surfaces.
6. When plugging in your shaver, first attach the cord to the unit and
then plug the cord into an electric outlet. When disconnecting, be sure
to switch the unit off, unplug the cord from the electric outlet and then
detach the cord from the shaver.
7. Do not insert foreign objects into any of the openings in the unit.
8. Never store the unit with the cord attached.
9. Store your shaver and power cord in a dry place.
10. Avoid exposing the unit to direct sunlight or ambient temperatures
above 140°F (60°C).
11. To avoid injury to the face, do not use the unit if the cutters or
head assembly have been damaged.
12. Never wrap the power cord around the unit. Damage to the power
cord may result.
13. This shaver is intended and designed for use on human facial hair
only.
14. Never unplug or plug-in the shaver when your hands are moist or
wet.
15. For home use only.
WASHABLE SHAVER
A shaving appliance the hand-held part of which
may be cleaned under water
16. Use only in dry condition
17. Do not submerge shaver into water.
Page 5

Axis Nitris and Axis Fuel |8| english
Axis Nitris and Axis Fuel |9| english
18. The hand-held unit shall be detached from the power supply cord
before cleaning.
19. The shaver shall not be used until it has dried.
SAVE THESE INSTRUCTIONS
PRECAUTIONS ON USING THE SHAVER
> Do not keep the shaver in a humid place, a place where the shaver
is exposed to splashes of water, or in high temperatures.
> To clean the body case of the shaver, wipe it with a cloth soaked
with a diluted water solution of a neutral detergent. Do not use thinner or benzene as it will damage the plastic portions of the body.
> Do not recharge the shaver or use it with an AC power supply when
the room temperature is below 0° C or over 40° C. Also, never
recharge it under direct sunlight or near a heating element such as
heater or incandescent light.
> Do not recharge the shaver or use it with an AC power supply in a
humid place or a place where the shaver is exposed to splashes of
water.
> Do not leave the shaver unattended while it is recharged.
> If pre-shave lotion or shaver oil sticks to the body case of the
shaver, wipe it off completely. Otherwise, the plastic portions of the
shaver may be damaged.
> Before shaving, wipe off oiliness of your face. Otherwise, the shav-
ings will stick to the outer foil as the inner blade rubs against it. If
you find the outer foil soiled, wipe it clean with tissue paper or the
like before using the shaver.
> Excessive application of shaver oil will also soil the outer foil. In that
case, wipe the foil clean with tissue paper or the like before using
the shaver. When cleaning the shaver, take care not to apply an
excess amount of shaver oil on the inner blade and outer foil.
Page 6
Axis Nitris and Axis Fuel |10| english
Axis Nitris and Axis Fuel |11| english
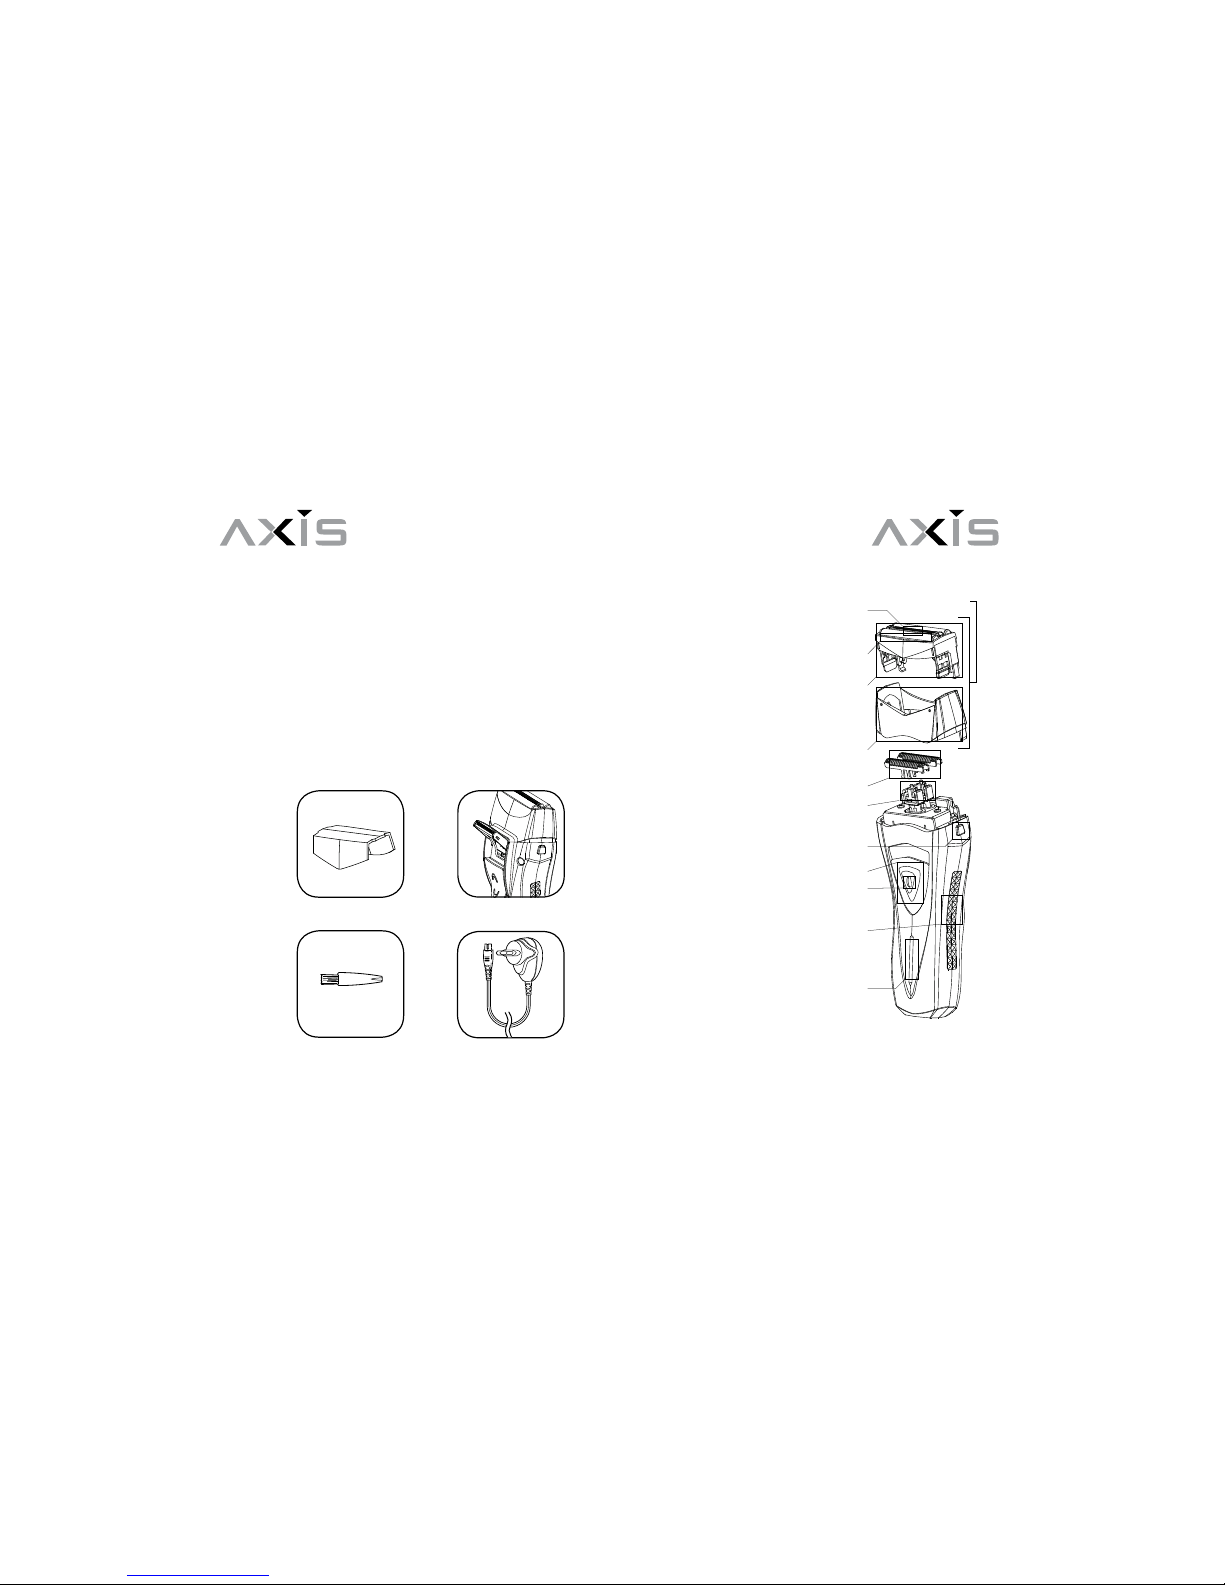
PARTS OF YOUR SHAVER
headguard
AC adaptor
cleaning brush
headguard
headguard
cleaning brush
trimmer
center slot trimmer
outer foils
outerfoilframe
outer foil frame base
inner cutters
oscillator
foil screen assembly
release buttons
on/off switch
switch lock button
side panels
foil screen assembly
LED charging indicator
and low batteryindicator
Page 7
Axis Nitris and Axis Fuel |12| english
Axis Nitris and Axis Fuel |13| english
SHAVING TIPS
Keep the unit clean and dry at all times.
Wash and dry your skin thoroughly prior to shaving.
In order to achieve the closest shave and avoid unnecessary wear on
the foils, be sure that both foils contact the skin simultaneously. Do not
hold the shaver at an angle where only one foil contacts the skin – this
will cause distortion of the foil and may result in skin irritation.
Stretch your skin with your free hand while using short, circular strokes.
This will make the hairs stand out from your face and allow the cutting
heads to reach them more easily. Shave against the grain for optimum
results.
To facilitate cutting and avoid foil wear, do not apply the shaver to your
skin with high pressure.
The normal replacement period for the foil screens is about 6 months.
In order to maintain shaving performance and comfort, replace the
cutters at least once a year. To order replacement parts, please refer to
the “Ordering Replacement Parts” section of this manual.
Using this Shaver
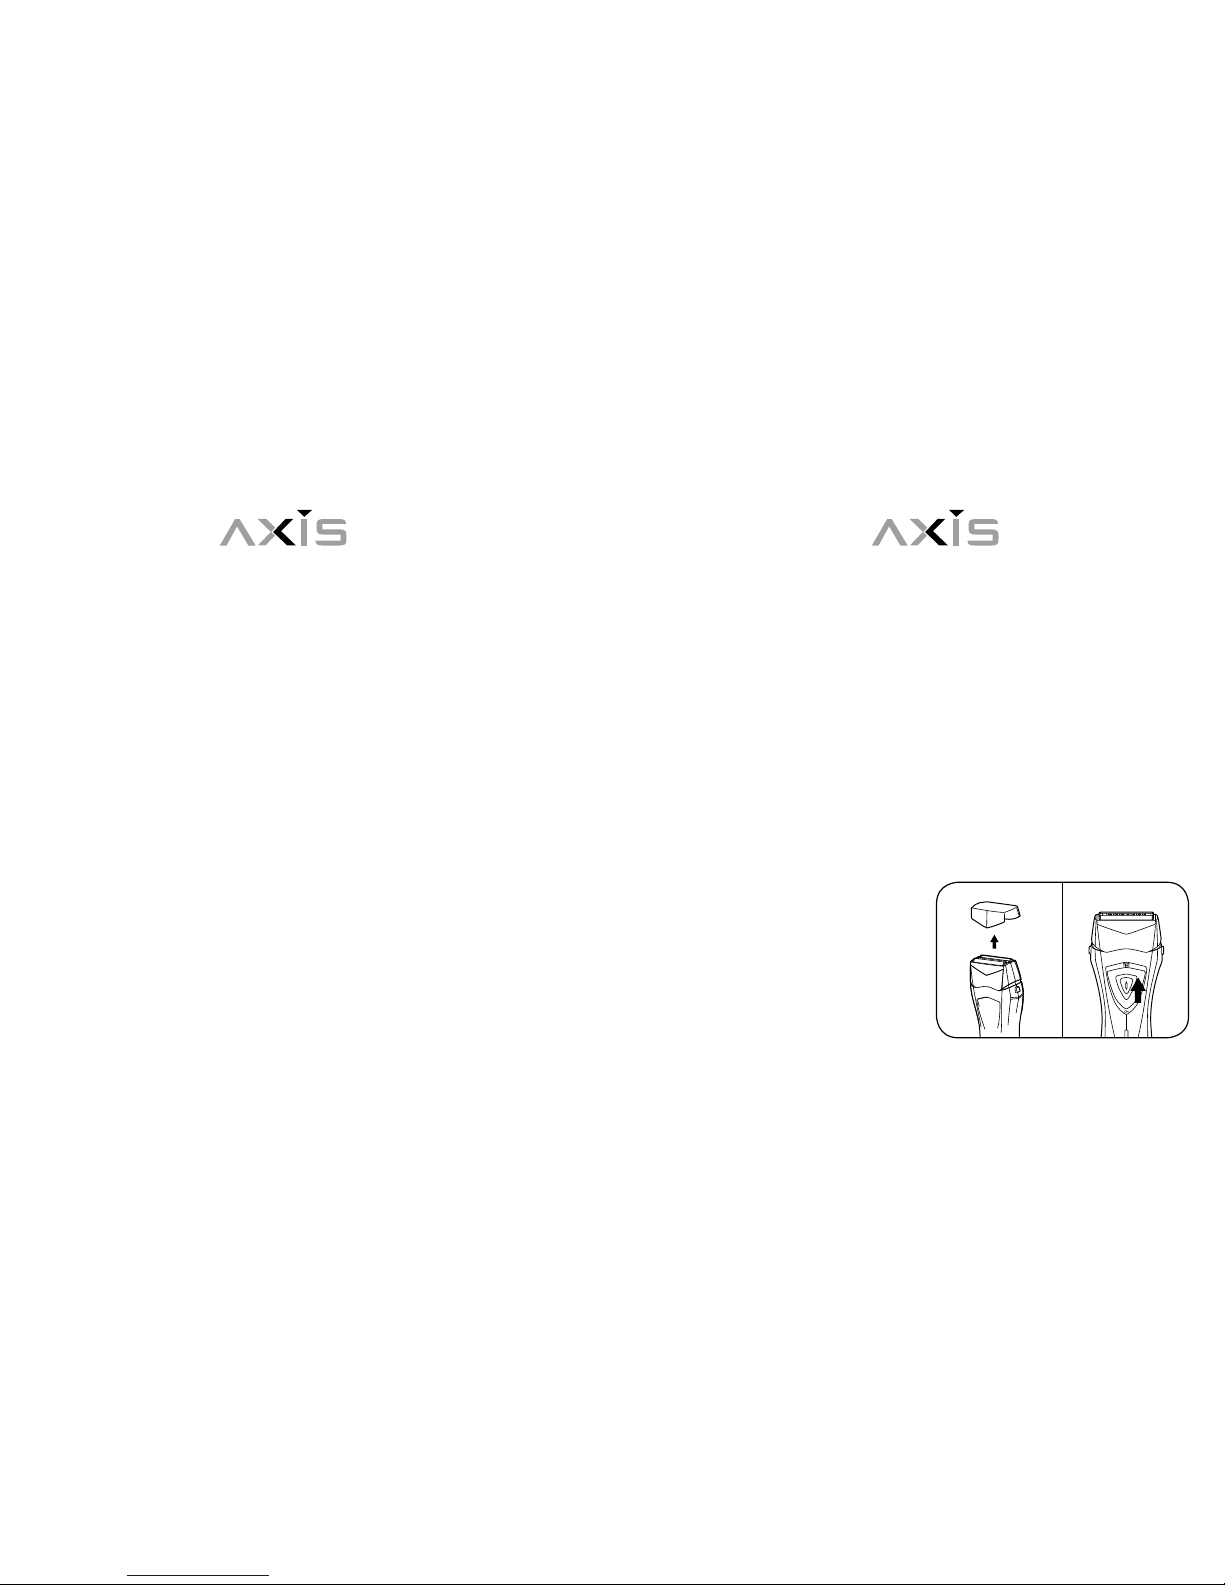
1. Remove the protective plastic headguard. (Fig. 1)
2. Ensure that the foil screens and inner cutters are not damaged.
Replace damaged parts before using. To obtain replacement parts,
refer to the “Ordering Replacement Parts” section of this manual.
3. To turn the shaver on, depress
the lock button and slide the on/off
switch up to the “on” position. (fig. 2)
1 2
Page 8
Axis Nitris and Axis Fuel |14| english
Axis Nitris and Axis Fuel |15| english
.4. Gently stretch the skin of your face with your free hand while moving the shaver slowly and smoothly against the grain of your beard.
Hold the shaver at a 90° angle to your face while maintaining contact
with the foils.
5. To shave the chin area, gently pull the skin upward and stroke
the shaver in an easy up and down motion. To avoid damaging the
delicate foils, do not apply high pressure.
6. Turn shaver off and replace protective headguard.
To Shave Longer Hairs, Sideburns or Beards
The trimmer easily cuts the longer, hard to reach hairs of the face and
neck.
1. Turn the shaver on.
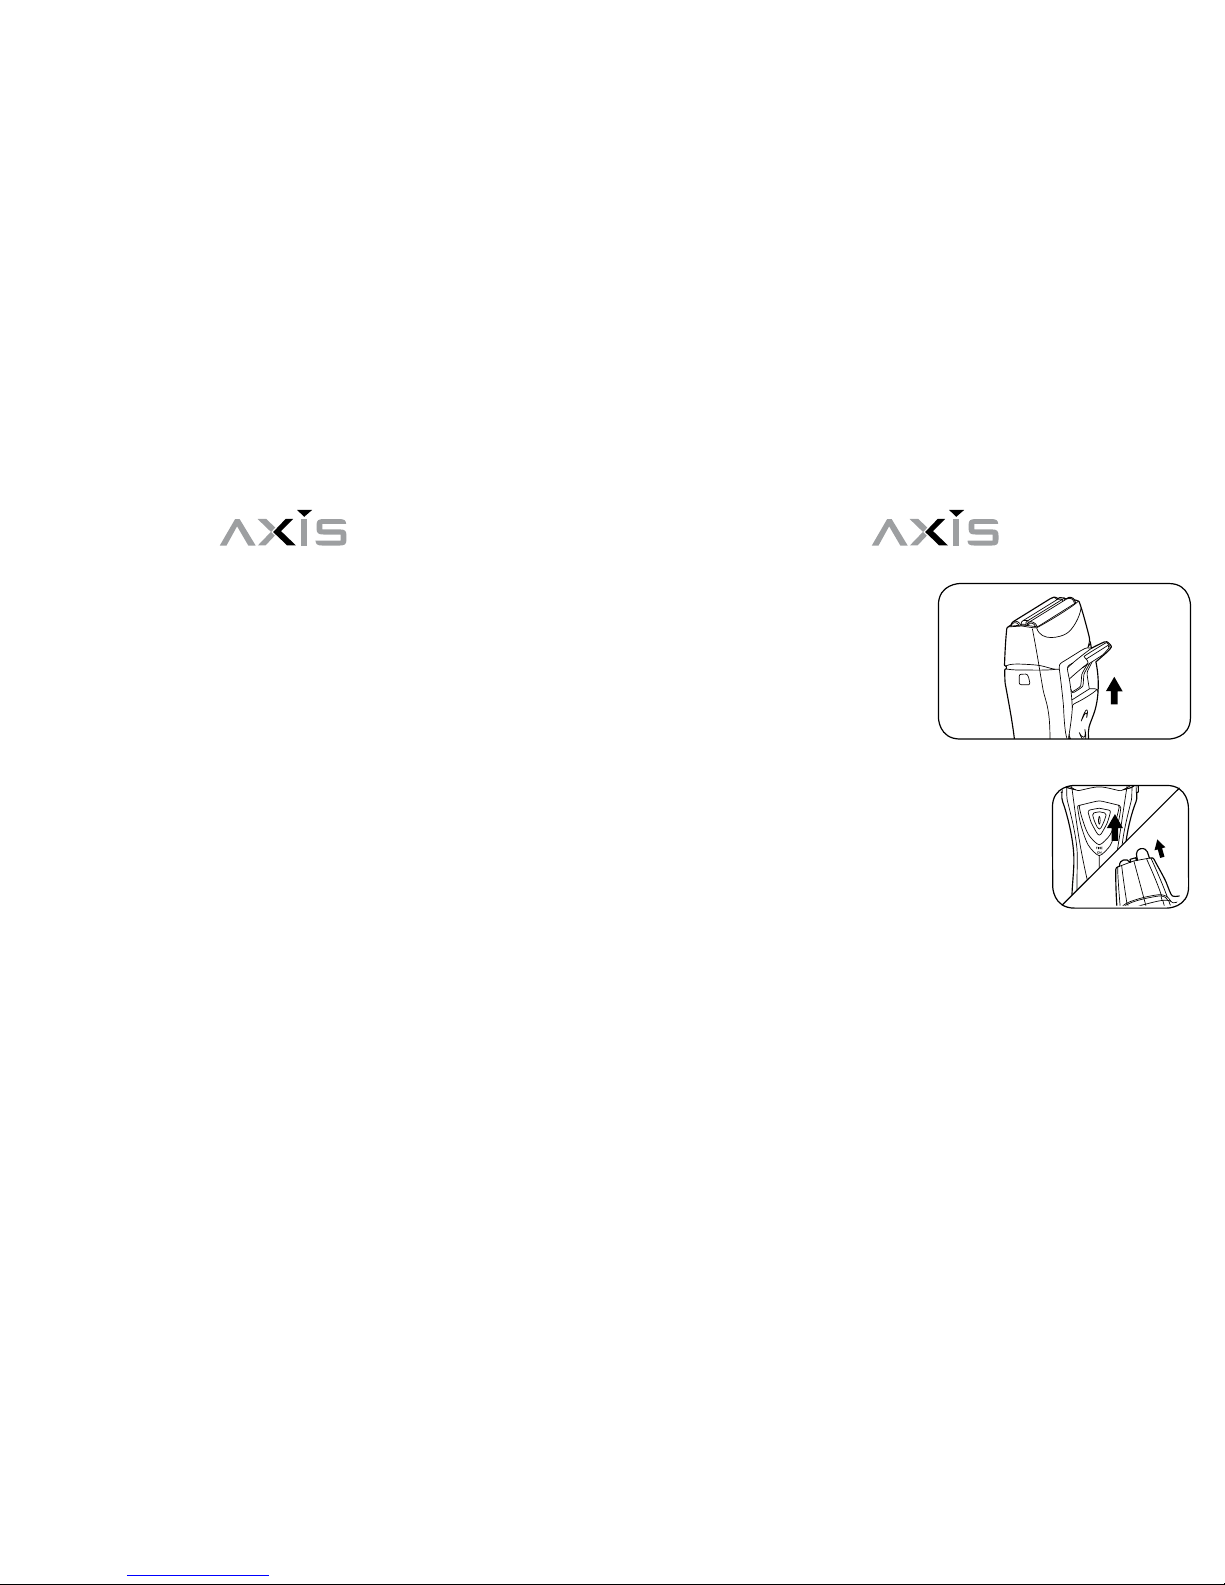
2. Push up the trimmer switch button into its locked position.
3. To trim sideburns, hold so that the
trimmer lightly touches the skin at a
90° angle and move downwards. To
avoid draining the battery, keep the
trimmer in its off position when not
in use.
To shave mustaches
1. Turn the shaver on.
2. Slide the on/off switch up to the “FINE” position.
3. Place the adjustable foil in gentle contact with
your skin. Move the shaver slowly while gently
stretching your skin.
Page 9

Axis Nitris and Axis Fuel |16| english
Axis Nitris and Axis Fuel |17| english
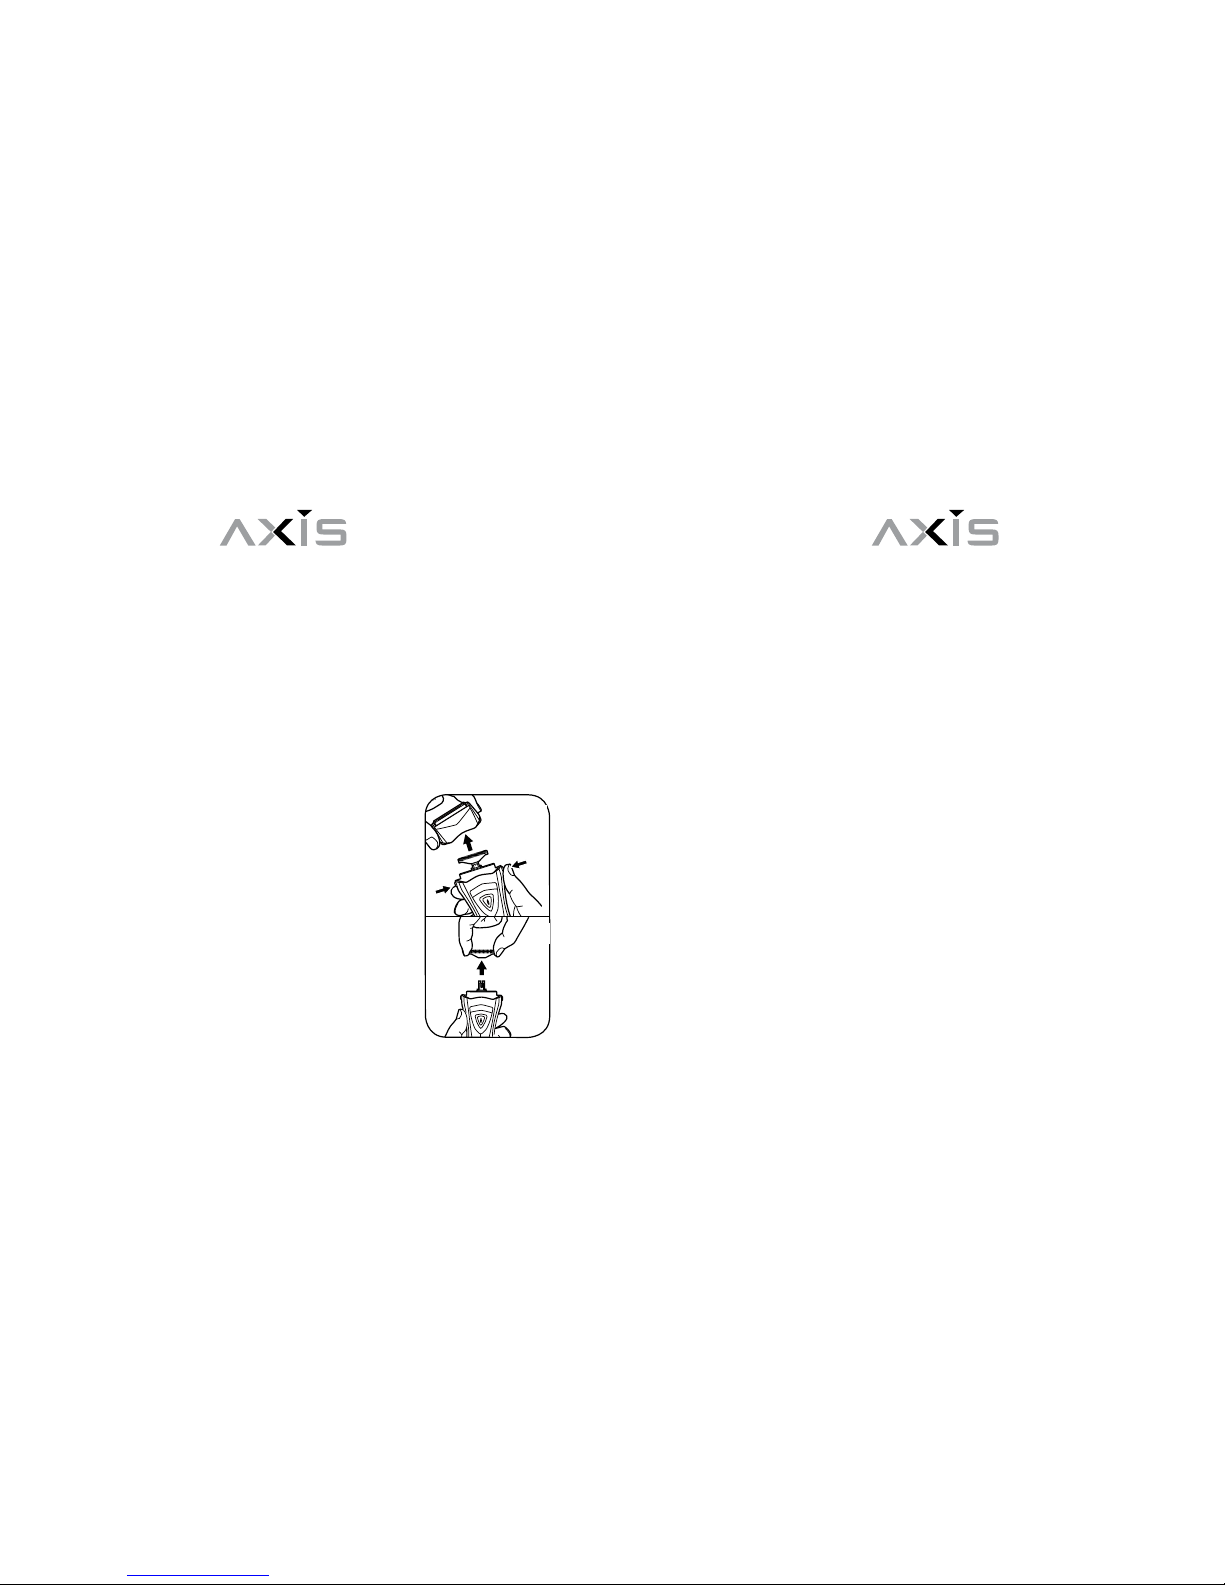
Cleaning the Head and Cutter Assembly
Regular cleaning is necessary to maintain the optimal performance and
maximum comfort from the shaver. Wipe the shaver’s body using a
damp cloth and mild soap or detergent. To avoid damaging the shaver,
do not use harsh cleansers or solvents.
Wet Cleaning
1. Switch the shaver off and ensure that the power cord is not attached. Depress the foil screen assembly release buttons on both
sides of the unit and gently lift the foil screen assembly off. (fig. 1)
2. Switch the shaver on and allow
fresh, cold or lukewarm water to
run over the cutters. (fig. 2)
3. When finished cleaning, switch
the shaver off and replace the foil
screen assembly, making sure it locks into place.
Using the Cleaning Brush
This shaver should be cleaned with the brush provided after every
three wet cleanings.
1. Switch the shaver off and ensure that the power cord is not attached. Depress the foil screen assembly release buttons on both
sides of the unit and gently lift off the foil screen assembly off. (fig. 1)
2. Gently brush the hairs from the inner cutters, the inside surface of
the foil screen assembly and the shaver’s case. (fig. 3) To remove the
inner cutters for cleaning, gently lift
straight up from its mount. (fig. 4)
3. To clean the delicate outer foil
screens, gently wipe the surface of
the foils with tissue paper, being sure
not to apply a great deal of pressure.
1 2
3 4
Page 10

Axis Nitris and Axis Fuel |18| english
Axis Nitris and Axis Fuel |19| english
4. When finished cleaning, reseat the inner cutters
on the mounts and replace the hairpocket, making sure it locks into place.
Note: to ensure proper operation, the outer foil
frame assembly must be properly seated. To
avoid damaging the delicate foil screens, do not
remove them from their frame.
Worldwide Voltage
This shaver features worldwide automatic dual
voltage conversion for 100-240 volt, 50-60 Hz AC
current. You can plug the power/recharging cord into
an electric outlet virtually anywhere in the world (an
adapter plug may be necessary), and the shaver will
adjust automatically to the required voltage.
Recharging the Shaver
AX-3335 features a 5-stage LED power indicator. (fig. 1)
AX-3331 features a green indicator light that flashes when recharging
is needed, remains on while the shaver is charging, and turns off when
the shaver is fully charged. Use only the power/recharger cord that
came with the shaver. The shaver is also designed to be used while
plugged into an electric outlet. The unit will not charge while it is in use,
so be sure to turn the unit off to allow charging when you are finished
shaving. The shaver will provide a 3 minutes shave after 5 minutes of
charging.
5 Stage Power Indicator
Bottom LED Flashing: recharging required
LEDs Flash Sequentially and Then Lit: shaver is recharging
5
5 Stage Power Indicator
Bottom LED Flashing - Recharging Required
LEDs Flash Sequentially and Then Lit - Shaver is Recharging
All LEDs Lit - Shaver is Fully Recharged
LEDs Light Sequentially - Shaver is Operating Normally
1
Page 11

Axis Nitris and Axis Fuel |20| english
Axis Nitris and Axis Fuel |21| english
All LEDs Lit: shaver is fully recharged
LEDs Light Sequentially: shaver is operating
normally
When using the shaver for the first time or if the
shaver has not been used for a long time, charge
the shaver for 16 hours.
1. Insure that the On/Off switch is in the “Off” position. First, connect
the power cord to the shaver and then plug it into an electric outlet.
2. During recharging, the LEDs will flash and
then remain lit as the unit recharges. Recharging generally takes one
hour. When fully charged, the shaver will provide approximately one
week of shaving run time.
Storing the Shaver and Power cord
If the shaver is to remain unused for a long period of time, store the
unit and power cord in a cool, dry place. Do not wrap the cord around
the unit during storage. Avoid twisting the power cord. Be sure to
unplug and untwist the cord if it becomes twisted during use or while
charging.
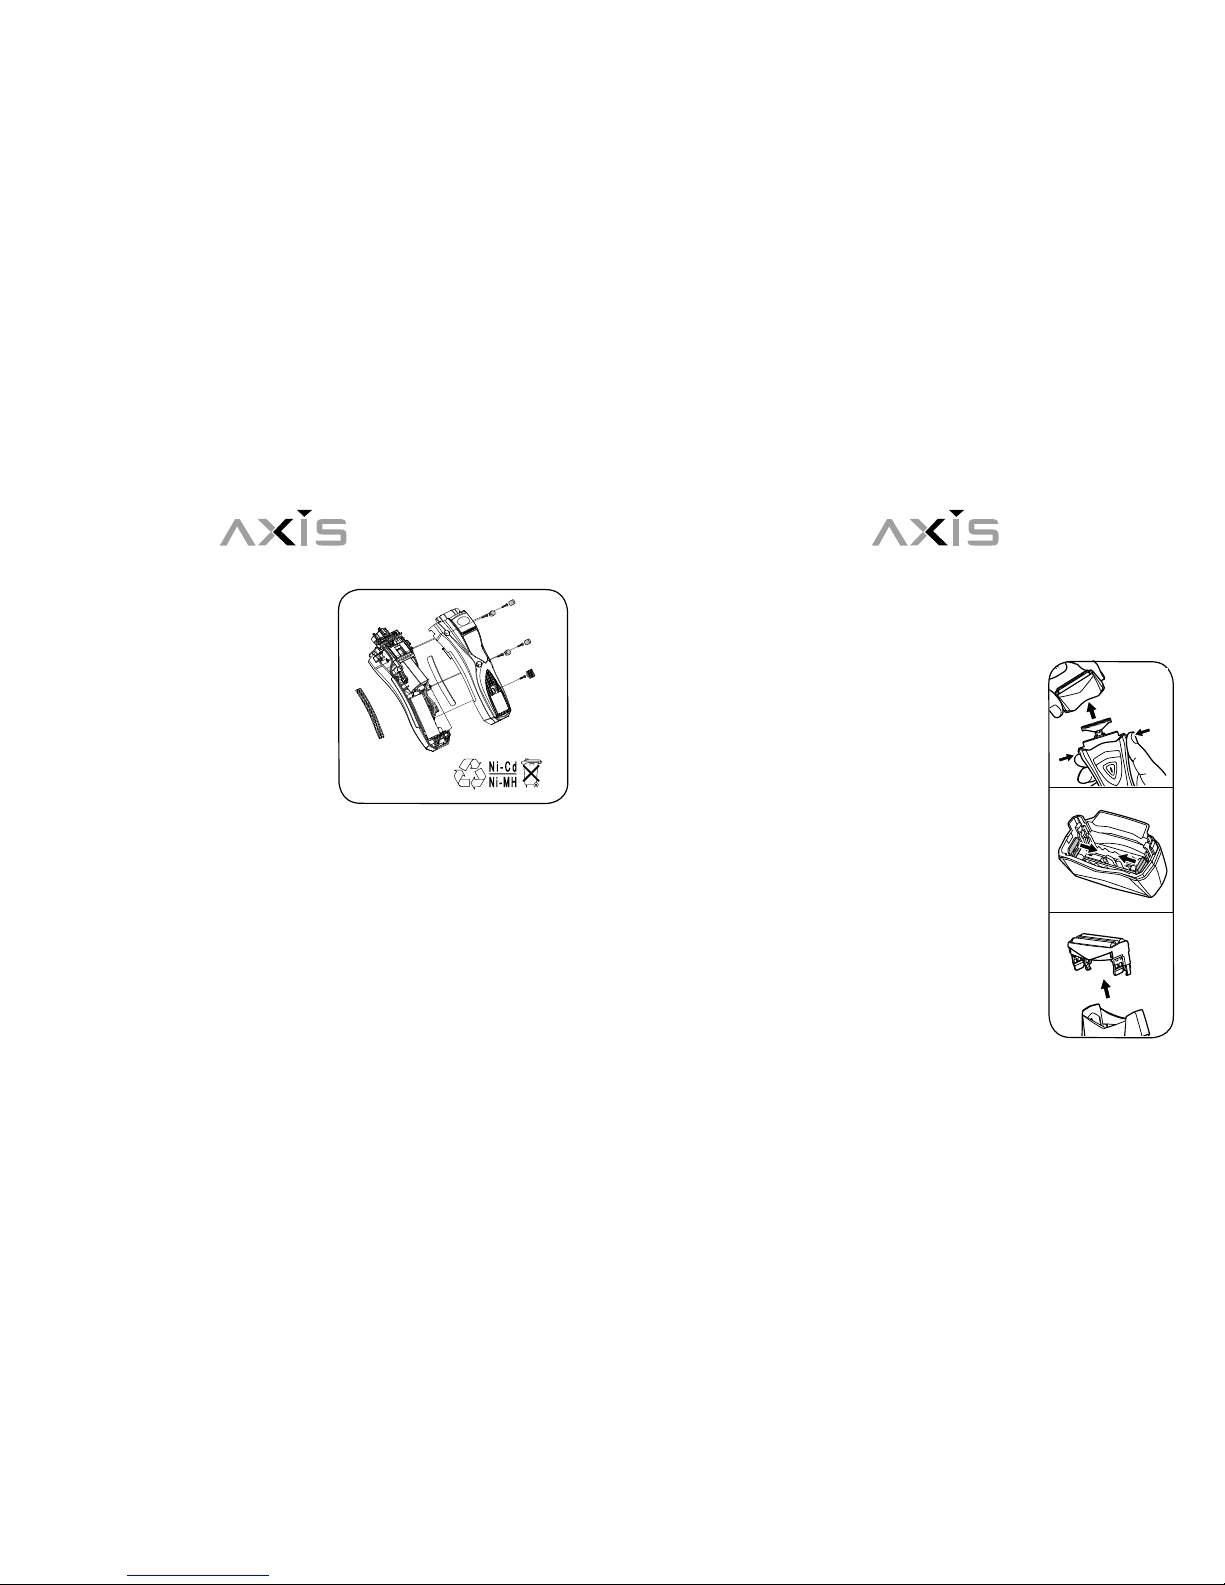
Removing the Batteries for Disposal/ Recycling
It is important that the rechargeable batteries in the shaver be recycled
or properly disposed of after it has reached the end of its useful life.
Turn the On/Off Switch “on” and run the shaver until the inner cutters
stop.
1. Remove the headguard, foil screen assembly, and inner cutters.
2. Remove the 2 screws on the top of shaver. (Fig.
1)
3. Remove the 5 screw covers on the back of
shaver. Remove 2 side panels.
1
Page 12
Axis Nitris and Axis Fuel |22| english
Axis Nitris and Axis Fuel |23| english
4. Remove 5 screws on the back
of shaver.
5. Gently pull the two halves of the
shaver body apart.
6. Pull the batteries out from the
shaver.
7. Cut the wires that connect the
batteries (4 wires for batteries) with
nippers.
WARNING! To avoid the risk of bursting and the subsequent release of
toxic materials, never mutilate or place the batteries in fire. To prevent
accidental burns, avoid short-circuiting the batteries. Dispose of batteries in accordance with local disposal/recycling requirements.
To Replace Foil Screens
IMPORTANT: For the best shaving performance and results, we recommend that you replace the shaver’s foil screens every six months and
inner cutters at least once a year.
Skin irritation or a deterioration of shave quality typically indicates that your foils need to be
replaced. Replacement intervals will vary with
individual use and hair types.
(Please refer to the “Ordering Replacement Parts”
section)
1. Remove the foil screen assembly by pressing
the release buttons on both sides of the shaver
and lifting off the assembly off. (fig. 1)
2. The Outer Foils are mounted to the Outer
Foil Frame. Release the Foil Frame from the Foil
Frame Base by gently sliding a fingernail between
Fig. 3
Fig. 2
Fig. 1
Fig. 2
Fig. 1
Fig. 1
3
2
1
Page 13
Axis Nitris and Axis Fuel |24| english
Axis Nitris and Axis Fuel |25| english
the side of the Foil Frame and the Foil Frame base. (fig. 2) Inverting the
Foil Base will allow the Foil Frame to drop out. (fig. 3)
3. Position the replacement Outer Foils over the cutters. Be careful not
to damage the foils. Gently slide the head assembly down until it seats
firmly into place.
To Replace the Inner Cutters
(Please refer to the “Ordering Replacement Parts”
section)
NOTE: Always replace foil screens when replacing
the inner cutters.
1. Remove the foil screen assembly by pressing
the release buttons on both sides of the shaver
and lifting it off. (fig. 1)
2. Remove the inner cutters by grasping and
lifting upwards. (fig. 2)
3. Be sure to hold the replacement cutters firmly as you carefully insert
them into the inner cutter mounts.
4. Push the replacement cutters down firmly until they lock into place.
5. Replace the foil screen assembly and gently slide it down until you
hear it lock into place.
Ordering replacement parts
Please contact Axis/BPI at 1-877-263-9500 to order replacement
parts for your Axis shaver. Please refer to the following part number.
Part number: AN-2
Description: Replacement Outer Foil Frame and Inner Cutters for
Model AX-3335/AX-3331
Fig. 3
Fig. 2
Fig. 2
Fig. 1
Fig. 1
Fig. 3
Fig. 2
Fig. 1
Fig. 1
1
2
Page 14

Axis Nitris and Axis Fuel |26| english
Axis Nitris and Axis Fuel |27| english
> The above part is available at the retailer from whom your shaver
was purchased.
If your shaver requires service:
Call Axis at 1-877-263-9500. To assist us in serving you, please have
the model number and date of purchase for your shaver available.
1-YEAR LIMITED WARRANTY
AXIS/Bodyline Products International, Inc. (BPI) warrants that your
product, except as noted below, is on the date of purchase free from
defect in material and workmanship for a period of one year. In the
event of a defect in material or workmanship, AXIS / BPI will repair or
replace this product with new parts, free of charge as follows:
1. The warranty is extended only to the original purchaser. A purchase
receipt or other proof of date of the original purchase is required for
service and parts replacement under this warranty.
2. Do not return the product to the retailer from whom this product
was purchased.
3. Contact AXIS/BPI toll-free at 1-877-263-9500 to obtain authorization during the warranty period to return the defective product by mail,
postage prepaid.
LIMITATIONS AND EXCLUSIONS
There are no express warranties except as listed above.
This warranty only covers failures due to defects in materials or work-
manship that occur during normal use. It does not cover foils, blades,
cutters, or attachments or damage that occurs in shipment, or failures
that are caused by products not supplied by AXIS / Bodyline Products
International, Inc., or failures that result from accident, misuse, abuse,
and neglect from mishandling, misapplication, improper maintenance,
improper cleaning, alteration, modification, line power surge, or com-
Page 15

Axis Nitris and Axis Fuel |28| english
mercial use of the product, such as hotel, office or rental use of the
product, or service by anyone other than AXIS / Bodyline Products
International, Inc., or damage that is attributable to acts of God.
AXIS / BODYLINE PRODUCTS INTERNATIONAL, INC. SHALL NOT BE
LIABLE FOR INCIDENTAL OR CONSEQUENTAL DAMAGES RESULTING FROM THE USE OF THIS PRODUCT OR ARISING OUT OF ANY
BREACH OF THIS WARRANTY.
ALL EXPRESS AND IMPLIED WARRANTIES, INCLUDING THE WARRANTIES OF MERCHANDISE AND FITNESSS FOR A PARTICULAR
PURPOSE, ARE LIMITED TO THE APPLICABLE WARRANTY PERIOD
SET FORTH ABOVE.
Some states do not allow the exclusion or limitation of incidental or
consequential damages, or limitations on how long an implied warranty
lasts, so the above exclusions and limitations may not apply to you.
This warranty gives you specific legal rights and you may also have
Félicitations!
Vous êtes maintenant l’heureux
propriétaire d’un rasoir Axis
AX-3335 ou AX-3331 recharge-
able ou fonctionnant sur secteur
courant alternatif (CA).
Avant d’utiliser votre rasoir, veuillez
lire attentivement les instructions de
ce manuel d’emploi pour une bonne
utilisation et un bon entretien du ra-
soir. Veuillez garder le manuel à por-
tée de main pour toute référence.
Page 16

Axis Nitris and Axis Fuel |30| Francais
Axis Nitris and Axis Fuel |31| Francais
INSTRUCTIONS
IMPORTANTES
CONCERNANT VOTRE
SÉCURITÉ.
Il est nécessaire de toujours observer certaines précautions élémentaries en utilisant un appareil électrique.
Veuillez lire attentivement toutes ces instructions
avant d’utiliser votre nouveau rasior.
DANGER
Pour limiter les risques d’électrocution...
1. NE JAMAIS RÉCUPÉRER un rasoir une fois tombé à l’eau. Debrancher l’appareil immédiatement.
2. NE PAS UTILISER le rasoir dans le bain ou sous la douche.
3. DÉBRANCHER TOUJOURS le rasoir après l’emploi ou avant de le
nettoyer, sauf s’il est en cours de chargement.
4. NE PAS METTRE OU RANGER le rasoir dans de l’eau ou tout autre
liquide, ou encore dans un lieu d’où il peut accidentellement tomber ou
être amené dans l’eau. Appelez 1-877-263-9500 pour tout service
apres-vente.
AVERTISSEMENT
Pour eviter toute brulure, danger d’incedie, electrocution ou autre...
1. Ne jamais laisser le rasoir branche sans surveillance sauf lors de
son chargement.
Page 17

Axis Nitris and Axis Fuel |32| Francais
Axis Nitris and Axis Fuel |33| Francais
2. Assurer toujours un etroite surveillance si le rasoir est utilise en
presence d’enfants ou de personnes handicapees.
3. Suivez attentivement toutes les instructions de ce manuel. Ne pas
utliser d’accessoires qui ne sont pas spécifiquement recommandés
par avec le rasoir.
4. Ne pas utiliser l’appareil s’il ne fonctionne pas normalement, a
été immergé dans de l’eau ou toute autre liquide, ou si le cordon
d’alimentation ou la prise sont endommagés. Appelez 1-877-2639500 pour tout service apres-vente.
5. Ne jamais utlitiser le rasoir en plein air. Éviter d’utiliser à proximité
d’aérosols ou en cas d’adminitration d’oxygène. Toujours garder le
cordon d’alimentation éloigné des surfaces chaffées.
6. Por brancher le rasoir raccorder déjà le cordon d’alimentation à
l’appareil avante de la brancher dans une prise électrique. Avante de
débrancher l’appareil, vérifier qu’il est sur arrêt, débrancher le cordon
d’alimentation de la prise électrique, puis retirer le cordon du rasoir.
7. Ne pas insérer de corps étrangers dans les orifices de l’appareil.
8. Ne jamais ranger le rasoir sans avoir désolidarisé le cordon.
9. Ranger le rasoir et le cordon d’alimentation dans un lieu sec.
10. Éviter d’exposer l’appareil à la lumière directe du soileil ou à une
températrure ambiante supérieure à 60 degrés C.
11. Pour éviter toute blessure au visage, ne pas utiliser l’appareil si les
lames ou les têtes ont été endommagées.
12. Ne jamais enrouler le cordon d’alimentation autour de l’appareil
sous peine de l’endommager.
13. Ce rasoir est conçu et destiné à être utilisé sur les poils du visage
uniquement.
14. Ne jamais débrancher ou brancher le rasoir ayant les mains
Page 18

Axis Nitris and Axis Fuel |34| Francais
Axis Nitris and Axis Fuel |35| Francais
humides ou mouillées.
15. Produit à usage ménager uniquement.
RASOIR LAVABLE
un dispositif de rasage qui fonctionne avec l’électricité dont rasant des
lames peut être nettoyé sous l’eau.
16. Employez seulement dans la condition sèche
17. Ne submergez pas le rasoir dans l’eau
18. Le rasoir doit être détaché de la corde électrique avant le nettoyage
19. N’utilisez pas le rasoir jusqu’à ce qu’il ait séché
CONSERVEZ CES
INSTRUCTIONS
PRÉCAUTIONS D’EMPLOI DU RASOIR
> Ne rangez pas le rasoir dans un lieu humide ou un lieu où il est
exposé à des éclaboussures ou à des températures élevées.
> Pour nettoyer le boîtier principal du rasoir, utilisez un chiffon humide
avec un détergent neutre dilué à l’eau. N’utilisez pas de diluant ou
de benzène car cela endommagerait les parties en plastique du
boîtier.
> Ne rechargez ou n’utilisez pas le rasoir avec un adaptateur CA
lorsque la température est inférieure à 0° C ou supérieure à 40° C.
De plus, ne le rechargez jamais en plein soleil ou près d’une source
de chaleur tel qu’un radiateur ou une lampe à incandescence.
> Ne chargez ou n’utilisez pas le rasoir avec une alimentation CA dans
un lieu humide ou un lieu où le rasoir est exposé à des éclabous-
sures.
Page 19

Axis Nitris and Axis Fuel |36| Francais
Axis Nitris and Axis Fuel |37| Francais
> Ne laissez pas le rasoir sans surveillance lorsque il est rechargé.
> Si de la lotion avant rasage ou de l’huile de nettoyage du rasoir
reste collée sur le boîtier du rasoir, éliminez-la totalement. Sinon, les
parties en plastique du rasoir pourraient être endommagées.
> Avant le rasage, nettoyez bien les parties grasses de la peau. Sinon,
les poils resteront collés à la grille externe lorsque la lame intérieure
la frotte. Si la grille externe est sale, nettoyez la avec un mouchoir en
papier ou quelque chose du même type avant d’utiliser le rasoir.
> Une utilisation excessive d’huile de nettoyage salira également la
grille externe. Dans ce cas, essuyez la grille externe avec un mouchoir en papier ou quelque chose du même type avant d’utiliser le
rasoir. Lors du nettoyage du rasoir, n’appliquez pas une quantité trop
importante d’huile sur la lame interne et sur la grille externe.
PARTS OF YOUR SHAVER
Capuchon de protection
Adaptateur CA
Brosse de nettoyage
headguard
headguard
cleaning brush
Tondeuse
Page 20

Axis Nitris and Axis Fuel |38| Francais
Axis Nitris and Axis Fuel |39| Francais
tondeuse à emplacement central
grilles externes
cadre desgrilles externes
socle du cadre
des grilles externes
couteaux internes
oscillateur
ensemble écran-grilles
boutons d’éjection release buttons
interrupteur marche / arrêt (on/off)
bouton de verrouillage de l’interrupteur
panneaux latéraux
ensemble écran-grilles
témoins lumineux del de charge
etde batterie/pile épuisée
CONSEILS POUR LE RASAGE
Maintenez l’appareil propre et sec à tout moment.
Lavez-vous et séchez-vous la peau soigneusement avant de vous
raser.
Afin de réaliser un rasage des plus précis et d’éviter une usure inutile
des grilles, veillez à ce que les deux grilles entrent en contact avec
la peau en même temps. Ne tenez pas le rasoir selon un angle où
seule l’une des grilles est en contact avec la peau (cela causerait une
déformation de la grille et pourrait aboutir à une irritation de la peau).
Étirez la peau avec la main libre tout en faisant de courts mouvements
circulaires. Cela permettra de redresser les poils et ainsi les têtes de
coupe pourront les atteindre plus facilement. Passez le rasoir dans le
sens contraire de celui de la pousse du poil pour obtenir les meilleurs
résultats.
Page 21

Axis Nitris and Axis Fuel |40| Francais
Axis Nitris and Axis Fuel |41| Francais
Afin de faciliter la coupe et d’éviter l’usure de la grille, n’appliquez pas
le rasoir sur la peau en exerçant une pression importante.
La période de remplacement habituel des écrans-grilles est d’environ
6 mois. Afin de conserver des performances et un confort de rasage,
remplacez les couteaux au moins une fois par an. Pour commander
des pièces de rechange, référez-vous à la section « Commande de
pièces de rechange » de ce manuel.
Utilisation de votre rasoir
1. Retirez le capuchon de protection en plastique. (Fig. 1)
2. Vérifiez que les écrans-grilles
et les couteaux internes ne soient
pas endommagés. Remplacez les
parties endommagées avant toute
utilisation. Pour obtenir des pièces
de rechange, référez-vous à la sec-
1 2
tion «Commande de pièces de rechange» de ce manuel.
3. Pour activer le rasoir, appuyez sur le bouton de verrouillage et faites
glisser l’interrupteur marche/arrêt (ON/OFF ) sur la position marche
(ON). (Fig. 2)
4. À l’aide de la main libre, étirez doucement la peau de votre visage
tout en déplaçant le rasoir lentement et en douceur en sens contraire
de celui de la pousse du poil. Tenez le rasoir perpendiculairement
(angle de 90°) à votre visage qui doit rester en contact avec les grilles.
5. Pour raser la zone du menton, tirez doucement la peau vers le haut
et passez le rasoir simplement du haut vers le bas et vice versa. Pour
éviter d’endommager les grilles qui sont fragiles, ne pressez pas trop
fort.
6. Désactivez le rasoir et replacez le capuchon de protection.
Page 22

Axis Nitris and Axis Fuel |42| Francais
Axis Nitris and Axis Fuel |43| Francais
Pour raser les poils plus longs, les pattes ou la
barbe
La tondeuse coupe plus facilement les poils longs et difficiles d’accès
du visage et de la nuque.
1. Activez le rasoir.
2. Relevez le bouton de la tondeuse afin de le verrouiller.
3. Pour tailler les pattes, tenez l’appareil de manière à ce que la
tondeuse soit perpendiculaire (90°) à la peau afin qu’elle touche
légèrement la peau, puis déplacez-la de haut en bas. Afin de ne pas
décharger entièrement la batterie/pile, laissez la tondeuse à l’arrêt
lorsqu’elle n’est pas utilisée.
Pour raser les moustaches
1. Activez le rasoir.
2. Faites glisser l’interrupteur marche/arrêt vers
le haut et placez-le en position FINE (mode haute
précision)
3. Placez délicatement la grille ajustable en contact avec la peau.
Déplacez le rasoir lentement tout en tirant sur la peau.
Nettoyage de l’ensemble tête et couteau
Un nettoyage régulier est nécessaire afin de préserver des performances optimales et un confort maximum du rasoir. Essuyez le boîtier
du rasoir en utilisant un chiffon humide et du savon doux ou du détergent. Pour éviter d’endommager le rasoir, n’utilisez pas de produits
d’entretien corrosifs ou des solvants. .
Page 23

Axis Nitris and Axis Fuel |44| Francais
Axis Nitris and Axis Fuel |45| Francais
Nettoyage à l’eau
1. Désactivez le rasoir et vérifiez
que le cordon d’alimentation ne
soit pas attaché au rasoir. Appuyez
sur les boutons d’éjection de
l’ensemble écran-grille des deux
côtés de l’appareil et retirez délicatement l’ensemble écran-grille. (Fig.
1)
2. Activez le rasoir et passez les couteaux sous de l’eau propre, froide
ou tiède. (Fig. 2)
3. Lorsque vous avez fini de nettoyer le rasoir, désactivez-le et
remettez l’ensemble écran-grille en place en vous assurant qu’il soit
verrouillé en place.
1 2
Utilisation de la brosse de nettoyage
Ce rasoir doit également être nettoyé régulièrement, après tous les
trois nettoyages sous l’eau, avec la brosse fournie.
1. Désactivez le rasoir et assurez-vous que le cordon d’alimentation
ne soit pas attaché au rasoir. Appuyez sur les boutons d’éjection
de l’ensemble écran-grille des deux côtés de l’appareil et enlevez
délicatement l’ensemble écran-grille. (Fig.1)
2. À l’aide de la brosse, enlevez délicatement les poils rasés des
couteaux internes, de la surface intérieure de l’ensemble écran-grille et
du boîtier du rasoir. (Fig.3) Afin de retirer les couteaux internes pour les
nettoyer, soulevez-les délicatement
de leur support, vers le haut. (Fig. 4)
3. Pour nettoyer les écrans-grilles
externes, essuyez délicatement
la surface des grilles à l’aide de
3 4
Page 24

Axis Nitris and Axis Fuel |46| Francais
Axis Nitris and Axis Fuel |47| Francais
mouchoirs en papier, en veillant à ne pas appuyer
trop fort.
4. Lorsque vous avez fini le nettoyage, replacez les
couteaux internes sur leur support et remettez la
poche à poils en place, en vous assurant qu’elle soit
bien verrouillée en place.
Remarque: pour assurer un fonctionement correct, le cadre des grilles
externes doit être placé correctement. Pour ne pas endommager les
écrans-grilles délicats, ne les retirez pas de leur cadre.
Pour nettoyer la tondeuse, désactivez le rasoir et faites glisser la
tondeuse vers le haut pour la déployer. Brossez délicatement les poils
des lames de la tondeuse. (Fig. 5)
Remarque: Pour éviter les dégâts, assurez-vous d’essuyer minutieusement la lotion avant rasage ou l’huile de nettoyage du rasoir du boîtier
du rasoir.
5
Tension de fonctionnement dans le monde entier
Ce rasoir est équipé d’un convertisseur automatique qui permet une
utilisation dans le monde entier pour 100 / 240 V ca, 50 / 60 Hz.
Il est possible de brancher le cordon d’alimentation ou de recharge
dans pratiquement n’importe quelle prise de courant au monde (un
adaptateur peut être nécessaire), et le rasoir s’ajustera automatiquement à la tension requise.
Recharger le rasoir
AX-3335 est équipé d’un témoin lumineux DEL indicateur de puissance à 5 étapes.
AX-3331 est équipé d’un témoin lumineux vert qui clignote lorsqu’il
faut recharger le rasoir ; il reste allumé lorsque le rasoir est en charge
et s’éteint lorsque le rasoir est entièrement chargé.
Page 25

Axis Nitris and Axis Fuel |48| Francais
Axis Nitris and Axis Fuel |49| Francais
Utilisez uniquement le cordon d’alimentation ou de recharge qui a
été fourni avec le rasoir. Le rasoir est également conçu pour pouvoir
être utilisé en étant branché directement sur une prise de courant.
L’appareil ne se chargera pas lorsqu’il est en cours d’utilisation ; il est
donc nécessaire de l’éteindre afin de permettre la charge lorsque vous
avez fini de vous raser. Le rasoir permet un rasage de 3 minutes après
avoir été rechargé pendant 5 minutes.
Indicateur de puissance à 5 étapes
Le témoin lumineux du bas clignote:recharge nécessaire
Les témoins lumineux clignotent de façon
séquentielle puis s’allument: rasoir en charge
Tous les témoins lumineux sont allumés:
rasoir entièrement chargé
5 Stage Power Indicator
Bottom LED Flashing - Recharging Required
LEDs Flash Sequentially and Then Lit - Shaver is Recharging
All LEDs Lit - Shaver is Fully Recharged
LEDs Light Sequentially - Shaver is Operating Normally
1
Les témoins lumineux s’allument de façon séquentielle:
rasoir fonctionnant normalement
Lors de la première utilisation du rasoir ou si le rasoir n’a pas été utilisé
depuis longtemps, chargez-le pendant 16 heures.
1. Assurez-vous que l’interrupteur marche/arrêt soit en position arrêt
(OFF). Tout d’abord, connectez le cordon d’alimentation
au rasoir, puis, branchez-le dans une prise de courant.
2. Pendant la recharge, les témoins lumineux clignotent, puis
s’allument au fur et à mesure que l’appareil
recharge. La recharge prend en général une heure.
Lorsque le rasoir est entièrement chargé, il fournit
environ une semaine de temps de rasage.
Page 26

Axis Nitris and Axis Fuel |50| Francais
Axis Nitris and Axis Fuel |51| Francais
Rangement du rasoir et du cordon d’alimentation
Si le rasoir doit rester inutilisé pendant une longue période, rangez
l’appareil et le cordon d’alimentation dans un endroit frais et sec.
N’enroulez pas le cordon autour de l’appareil lors du rangement. Évitez
de tordre le cordon d’alimentation. Assurez-vous de débrancher et de
bien dérouler le cordon s’il se tord pendant l’utilisation ou pendant la
charge.
Comment enlever les batteries/piles pour les
jeter/recycler
IIl est important que les batteries/piles rechargeables du rasoir soient
recyclées ou qu’on les détruise correctement lorsque leur durée de vie
est arrivée à son terme.
Mettez l’interrupteur marche/arrêt sur marche (ON) et
faites fonctionner le rasoir jusqu’à ce que les couteaux
internes s’arrêtent.
1
1. Retirez le capuchon de protection, l’ensemble écran-grille et les
couteaux internes.
2. Retirez les deux vis au sommet du rasoir (fig. 1)
3. Retirez les 5 cache-vis à l’arrière du rasoir. Retirez les deux panneaux latéraux.
4. Retirez les 5 vis à l’arrière du rasoir.
5. Séparez délicatement les deux moitiés
du corps du rasoir.
6. Retirez les batteries/piles du rasoir.
7. Coupez les fils qui relient les batteries/piles (4 fils pour batteries/piles) avec
une pince.
Page 27

Axis Nitris and Axis Fuel |52| Francais
Axis Nitris and Axis Fuel |53| Francais
AVERTISSEMENT! Afin d’éviter les risques d’explosion et la libération
subséquente de substances toxiques, ne mutilez jamais ou ne jetez
jamais les batteries/piles au feu. Pour éviter les brûlures accidentelles,
évitez de court-circuiter les batteries/piles. Jetez les batteries/piles
conformément aux règlementations locales en matière de déchets et
de recyclage.
Pour remplacer les écrans-grilles
IMPORTANT: Pour obtenir les meilleures performances et les meilleurs
résultats de rasage, nous vous recommandons de remplacer les
écrans-grilles tous les six mois et les couteaux internes au moins une
fois par an.
Des irritations cutanées ou une détérioration de la qualité du rasage
indique normalement que les grilles doivent être remplacées. Les
intervalles de remplacement varient en fonction de l’usage personnel
et du type de poils.
(Veuillez vous référer à la section «Commande de pièces de rechange»)
1. Retirez l’ensemble écran-grille en poussant les
boutons d’éjection des deux côtés du rasoir et soulevez
le bloc. (fig. 1)
2. Les grilles externes sont montées sur le cadre des
grilles externes. Dégagez le cadre des grilles de son
socle en glissant délicatement un ongle entre le côté
du cadre et le socle. (fig. 2) Retournez le socle pour
permettre au cadre des grilles de se détacher. (fig. 3)
3. Placez les nouvelles grilles externes sur les
couteaux. Veillez à ne pas endommager les grilles.
Poussez délicatement l’ensemble tête vers le bas jusqu’à
qu’il soit bien en place.
Fig. 3
Fig. 2
Fig. 1
Fig. 2
Fig. 1
Fig. 1
3
2
1
Page 28

Axis Nitris and Axis Fuel |54| Francais
Axis Nitris and Axis Fuel |55| Francais
Pour remplacer les
couteaux/lames internes
(Veuillez vous référer à la section
“Commande de pièces de rechange”)
REMARQUE: Remplacez toujours les écrans-grilles
lorsque vous remplacez les couteaux internes.
1. Retirez l’ensemble écran-grille en appuyant sur les
boutons d’éjection situés de chaque côté du rasoir et
soulevez-le. (fig. 1)
2. Retirez les couteaux/lames internes ; prenez-les fermement entre
les doigts et soulevez-les. (fig. 2)
3. Veillez à tenir les couteaux de rechange fermement lorsque vous les
insérez prudemment dans les supports des couteaux internes.
Fig. 3
Fig. 2
Fig. 2
Fig. 1
Fig. 1
Fig. 3
Fig. 2
Fig. 1
Fig. 1
1
2
4. Poussez les couteaux de rechange vers le bas fermement jusqu’à
ce qu’ils soient bien verrouillés en place.
5. Replacez l’ensemble écran-grille et faites-le glisser délicatement
vers le bas jusqu’à ce qu’il soit bien verrouillé en place.
Command de pièces de rechange
Veuillez contacter Axis/BPI au 1-877-263-9500 pour commander les
pièces de rechange de votre rasoir Axis. Veuillez se référer au numéro
de la pièce suivant.
Numéros de référence des pièces: AN-2
Description: Cadre des grilles externes et lames internes de rechange
pour le modèle AX-3335/AX-3331.
Exigences de réparation
Si votre rasoir doit être réparé, veuillez vous référer au dépliant inclus
dans ce manuel qui répertorie les différents lieux de réparation.
Page 29

Axis Nitris and Axis Fuel |56| Francais
Axis Nitris and Axis Fuel |57| Francais
Service de réparation
Appelez le 1-877-263-9500. Pour garantir un service rapide et
efficace, soyez prêt à fournir le numéro du modele ainsi que la date
d’achat de votre rasoir.
GARANTIE LIMITÉE DE 1 AN
Axis/Bodyline Products Inc. (BPI) garanit que ce produit, sauf comme
indiqué ci-dessous, est exempt, à compter de la date d’achat, de
défauts de matériaux et de fabrication pour une periode d’un an. En
cas de défaut de materiaux ou de fabrication, Axis/BPI s’engage à
réparer ce produit avec des pièces neuves ou à le remplacer sans frais
de votre part dans les condition suivantes:
1. Cette garantie limitée ne s’applique qu’à l’acheteur initial. Vous
devez joindre le reçu ou autre preuve d’achat indiquant la date de
l’achat original à toute demande de réparation et échange de pièces
sous garantie.
2. Ne retournez pas le produit chez le détaillant où vous l’avez acheté.
3. Contactez Axis/BPI au numéro gratuit 1-877-263-9500 pour
obtenir l’autorisation, pendant la période de garanite, de renvoyer le
produit défectueux par courrier, port payé.
LIMITES ET EXCLUSIONS
Il n’existe aucune autre garantie expresse outre celle qui est mentionnée dans la présente.
La présente garantie ne couvre que les défaillances provenant de
défauts de matériaux ou de fabrication qui pourraient se produire
pendant une utilisation normale. Elle ne couvre pas les grilles, les
lames, les couteaux, out les accessoires ou les dommages que
pourrait subir le produit pendant son expédition, ni les défaillances
résultant de l’utilisation de produits non fournis par Axis/BPI, ni celles
résultant d’accident, mauvais emploi, manipulation abusive, négligence,
Page 30

Axis Nitris and Axis Fuel |58| Francais
Axis Nitris and Axis Fuel |59| Francais
mauvaise application, entretien inapproprié, nettoyage inapproprié,
altération, modification, surtension du secteur ou usage commercial du
produit, tel que dans les hôtels, les bureaux ou les locations du produit
et les réparations effectuées par un personnel autre qu’Axis/BPI ou les
dommages résultant de cas fortuits.
AXIS/BPI NE SERA RESPONSABLE D’AUCUN DOMMAGE INDIRECT
OU ACCÉSSOIRE RÉSULTANT DE L’UTILI INFRACTION AUX TERMS
DE CETTE GARANTIE.
TOUTES LES GARANTIES EXPRESS ET TACTIES, Y COMPRIS LES
GARANTIES DE COMMERCIALISATION ET D’ADAPTABILITÉ À UN
USAGE PARTICULIER, SONT LIMITÉES À LA PÉRIODE DE GARANTIE
APPLICABLE MENTIONNÉE DANS LA PRÉSENTE.
Certains états interdisent l’exlusion ou la limitation des dommages
indirects ou accessoires, ou encore les limitations de derée des garanties tacties; il se peut donc que certaines des restrictions et exlusions
ci-dessus ne s’appliquent pas à vous. Cette garantie vous confère des
droits légaux spécifiques mais vous pouvez en outre bénéficier de
droits supplémentaries qui varient d’un état à l’autre.
Fabrique pour Axis/BPI
198 N. Brandon Drive,
Glendale Heights, IL 60139 USA
Fabrique en Chine
Page 31

Axis Nitris and Axis Fuel |61| Espanol
¡Felicitaciones!
Usted tiene ahora la satisfacción
de ser dueño de una afeitadora
recargable y a corriente alterna,
la Axis Shaver AX-3335
ó AX-3331.
Antes de usarla, lea detenidamente
este manual para ver las instruc-
ciones sobre su uso y cuidado apro-
piado. Mantenga este manual a la
mano para usarlo con comodidad
INSTRUCCIONES
IMPORTANTES
PARA SU SEGURIDAD.
Simpre se deben tomar precauciones básicas
al usar cualquier artefacto eléctrico.
Lea todas las instrucciones cuidadosamente
antes de usar su nueva afeitadora.
PELIGRO
Para minimizar el riesgo de descargas eléctricas...
1. NUNCA TOQUE una afeitadora que haya caído al agua. Desenchufe
la unidad immediatamente.
Page 32

Axis Nitris and Axis Fuel |62| Espanol
Axis Nitris and Axis Fuel |63| Espanol
2. NO USE la afeitadora mientras se baña o ducha.
3. SIEMPRE DESENCHUFE la afeitadora después de usarla o antes de
limpiarla, salvo para cargar la unidad.
4. NO COLOQUE NI ALMACENE la afeitadora en agua ni otro líquido, o
donde pueda caer o ser arrojada accidentalmente al agua.
ADVERTENCIA
Para evitar quemaduras, incendios, descargas eléctricas u otras
lesiones...
1. Salvo al recargar la afeitadora, nunca deje de prestarle atención
cuando esté echufada.
2. Siempre mantenga una estrecha supervisión de un adulto al usar la
afeitadora cerca de niños o personas discapacitadas.
3. Siga cuidadosamente las instrucciones de este manual. No use
aditamentos con su afeitadora que no hayan sido recomendados
especificamente por Axis.
4. No use una unidad que no funcione normalmente, que haya sido
sumergida en agua u otro líquido, o que tenga un cable o enchufe
dañado. Llama 1-877-263-9500 para informarse sobre detalles del
servicio.
5. Nunca opere la afeitadora Axis al aire libre. Evite el uso en las inmediaciones de productos en aerosol o donde se administre oxígeno.
Además, mantenga el cable lejos de superficies calientes.
6. Al enchufar la afeitadora Axis, primero conecte el cable a la
máquina y luego enchúfelo en el tomacorriente eléctrico. Al desconectaria, ceriórese de que el interruptor de la unidad esté apagado,
desenchufe el cable del tomacorriente eléctrico y luego deconécto de
la afeitadora.
Page 33

Axis Nitris and Axis Fuel |64| Espanol
Axis Nitris and Axis Fuel |65| Espanol
7. No inserte objetos extraños en ninguna de las aberturas de la
unidad.
8. Nunca almacene la afeitadora con el cable puesto.
9. Almacene la mánquina y el cable en un lugar seco.
10. Evite la exposición de la unidad a la luz solar directa o a temperaturas ambientales superiores a los 140 grados F (60° C.)
11. Para evitar lesiones en su rostro, no use la unidad si el conjunto
de cortadoras o cabezales está dañado.
12. Nunca envuelva el cable de alimentación alrededor de la unidad,
ya que se podría dañar.
13. Esta afeitadora Axis está hecha y diseñada para usarse sólo en el
vello facial humano.
14. Nunca desenchufe o enchufe la afeitadora cuando sus manos
estén húmedas o mojadoas.
15. Sólo para uso doméstico.
MÁQUINA DE AFEITAR LAVABLE
un dispositivo que afeita que funciona con la electricidad que
afeitando las láminas se puede limpiar debajo del agua.
16. Utilice solamente en condiciones secas
17. No sumerja la máquina de afeitar en agua
18. Separe la máquina de afeitar de la fuente de alimentación antes
de la limpieza él
19. No utilice la máquina de afeitar hasta que se ha secado
CONSERVE ESTAS
INSTRUCCIONES
Page 34

Axis Nitris and Axis Fuel |66| Espanol
Axis Nitris and Axis Fuel |67| Espanol
PRECAUCIONES AL USAR LA AFEITADORA
> No guardar la afeitadora en un lugar húmedo, donde le pueda caer
agua, o donde esté expuesta a altas temperaturas.
> Para limpiar la cubierta de la afeitadora, use un paño humedecido
con un detergente neutral diluido en agua. No use disolvente
de pintura o bencina, ya que dañará las piezas de plástico de la
cubierta.
> No recargue la afeitadora o la use con corriente alterna cuando la
temperatura de la habitación es bajo 0º C o más de 40º C. Tampoco la recargue nunca bajo el sol o cerca del calor como el de un
calefactor o luz incandescente.
> No recargar la afeitadora o usarla conectada a la electricidad en un
lugar húmedo o un lugar donde está expuesta a que le salpique
agua.
> No deje la afeitadora desatendida mientras se está recargando.
> Si le cae loción o crema de afeitar a la cubierta de la afeitadora,
limpiarla totalmente. Si no se la limpia, las partes de plástico de la
afeitadora se pueden dañar.
> Antes de afeitarse, secarse bien la cara. Porque si no, los residuos
del desbarbe se pegarán a la malla exterior al rozar la cuchilla
contra la malla. Si encuentra sucia la malla exterior, límpiela con una
toallita de papel o algo similar antes de usar la afeitadora.
> Uso excesivo de cremas de afeitar también ensuciará la malla
exterior. En ese caso, limpie la malla con una toalla de papel o algo
similar antes de usar la afeitadora. Cuando limpie la afeitadora,
cuide de no introducir demasiada crema o aceite de afeitar en la
cuchilla interior o la malla exterior.
Page 35

Axis Nitris and Axis Fuel |68| Espanol
Axis Nitris and Axis Fuel |69| Espanol
PARTS OF YOUR SHAVER
cubierta del cabezal
Adaptateur CA
cepillo para limpieza
headguard
headguard
cleaning brush
recortador
ranura central del recortador
mallas exteriores
marco de la malla exterior
base del marco de la malla exterior
cuchillas interiores
oscilador
conjunto de la malla
botones de liberación
interruptor de prender y apagar
botón de seguro de cierre
paneles laterales
conjunto de la malla
luces led indicadorasde carga,
yindicador de batería descargada
Page 36

Axis Nitris and Axis Fuel |70| Espanol
Axis Nitris and Axis Fuel |71| Espanol
CONSEJOS ÚTILES
Mantenga la unidad limpia en todo momento.
Lávese y séquese la piel completamente antes de afeitarse.
Para lograr la afeitada más limpia y evitar desgaste innecesario a las
mallas, asegúrese que ambas mallas se contactan con la piel simultáneamente. No use la afeitadora en un ángulo tal que sólo una de las
mallas se contacta con la piel. Eso causará deformación de la malla y
puede producirle irritación de la piel.
Al afeitarse, estire la piel con la mano y use recorridos cortos y en
círculos. Esto hará que los pelos se levanten de la cara y permitirá que
los cabezales los corten con mayor facilidad. El mejor resultado se
obtiene afeitando contra la dirección del pelo.
Para facilitar el corte y evitar desgaste de la malla, no presione mucho
la afeitadora contra la cara.
El período normal de reemplazo de las mallas es de aproximadamente
6 meses. Para continuar recibiendo afeitadas buenas y cómodas,
reemplace las cuchillas al menos aproximadamente una vez por año.
Para pedir piezas de repuesto, refiérase a la sección “Cómo pedir
piezas de repuesto” de este manual.
Cómo usar esta afeitadora
1. Quite la cubierta plástica del cabezal. (fig.1)
2. Asegúrese que las mallas y las cuchillas interiores no tengan daños.
Reemplace las piezas dañadas antes de usar la afeitadora. Para obtener piezas de repuesto, refiérase
a la sección “Cómo pedir piezas de
repuesto” de este manual.
1 2
Page 37

Axis Nitris and Axis Fuel |72| Espanol
Axis Nitris and Axis Fuel |73| Espanol
3. Para prender la afeitadora, pulsar el botón de seguro y deslizar el
interruptor a la posición “ON”. (fig. 2)
4. Con la mano desocupada, estire suavemente la piel de su cara
mientras corre la afeitadora lenta y suavemente contra la dirección de
crecimiento de la barba. Use la afeitadora a un ángulo de 90º de la
cara manteniendo contacto con las mallas.
5. Para afeitar la zona del mentón, tire de la piel hacia arriba y deslice
la afeitadora suavemente con movimientos hacia arriba y abajo. Para
evitar dañar las delicadas mallas, no aplique fuerte presión.
6. Apague la afeitadora y vuelva a colocar la tapa del cabezal.
Para afeitar pelos más largos, patillas o barba
La recortadora corta con facilidad los pelos menos fáciles de la cara
y el cuello.
1. Prenda la afeitadora.
2. Ponga el botón de la recortadora
en posición de seguro.
3. Para cortar patillas, coloque la
recortadora en forma que toque
suavemente la piel a un ángulo de
90º y muévala hacia abajo. Para evitar desgastar la batería, mantenga
la recortadora apagada cuando no la esté usando.
Para afeitar bigotes
1. Prenda la afeitadora.
2. Coloque al interruptor en la posición “FINE”.
3. Ponga la malla ajustable en contacto suave con
la piel. Deslice la afeitadora lentamente mientras
estira suavemente la piel.
Page 38

Axis Nitris and Axis Fuel |74| Espanol
Axis Nitris and Axis Fuel |75| Espanol
Limpieza del conjunto del cabeza y la cuchilla
Es necesario hacerles limpieza con regularidad para mantenerlos en
óptimo funcionamiento y comodidad para quien se afeite. Limpie el
cuerpo de la afeitadora con una tela húmeda y jabón o detergente
suave. Para evitar dañar la afeitadora, no utilice detergentes ásperos o
disolventes.
Limpieza con agua
1. Apague la afeitadora y asegúrese que no tiene enchufado al
cordón. Presione los botones de liberación del conjunto de la malla
en ambos lados de la unidad y levante y saque con cuidado el conjunto de la malla. (fig.1)
2. Prenda la afeitadora y deje que
corra agua limpia fría o tibia sobre las
cuchillas. (fig. 2)
1 2
3. Cuando termine la limpieza, apague la afeitadora y devuelva el
conjunto de la malla asegurándose que quede asegurada en su sitio.
Cómo usar el cepillo
de limpieza
Se debe limpiar esta afeitadora con el cepillo provisto, después de
cada tres limpiezas con agua.
1. Apague la afeitadora y asegúrese que el cordón eléctrico no está
enchufado. Presione los botones de liberación del conjunto de la
malla en ambos lados de la unidad y levante y saque con cuidado el
conjunto de la malla. (fig.1)
2. Con el cepillo quitar con cuidado
los pelos de las cuchillas interiores,
la superficie interior del conjunto de
la malla y la cubierta de la afeita-
3 4
Page 39

Axis Nitris and Axis Fuel |76| Espanol
Axis Nitris and Axis Fuel |77| Espanol
dora. (fig. 3) Para sacar las cuchillas interiores para
limpiarlas, sáquelas de su montura tirando hacia
arriba. (fig. 4)
3. Para limpiar las delicadas mallas exteriores, limpie
con cuidado sus superficies con toallitas de papel
asegurándose de no ejercer demasiada presión.
4. Al terminar la limpieza, devolver las cuchillas interiores a sus monturas y asegurar el compartimiento para pelos en su sitio.
Observación: Para asegurar buen funcionamiento, el marco de la malla
exterior debe estar asentado correctamente. Para evitar daños a las
delicadas mallas, no se les debe sacar de su marco.
Para limpiar el recortador, apague la afeitadora y deslice el recortador
hacia arriba. Limpie cuidadosamente los pelos de las cuchillas del
recortador. (fig. 5)
5
NOTA: Para evitar daños, asegúrese de limpiar completamente del
cuerpo de la afeitadora las lociones o productos para afeitarse.
Voltaje universal
Esta afeitadora brinda conversión automática de corriente de 100
a 240 voltios y de 50 a 60 Hz para usarse en todo el mundo. Se
puede enchufar el recargador en un tomacorriente en prácticamente
cualquier parte del mundo (quizás se necesite un adaptador de
enchufes), y se ajustará automáticamente al voltaje necesario.
Para recargar la afeitadora
La AX-3335 tiene un indicador LED de nivel de carga (fig.1).
La AX-3331 tiene una luz indicadora verde que pestañea cuando se
requiere cargar; permanece prendida mientras se carga, y se apaga
cuando está totalmente cargada. Utilice el cordón con recargador
eléctrico que vino con la afeitadora. La afeitadora también se ha
Page 40

Axis Nitris and Axis Fuel |78| Espanol
Axis Nitris and Axis Fuel |79| Espanol
diseñado para usarse mientras está enchufada a un tomacorriente. No
se cargará mientras la usa así, de modo que asegúrese de apagarla
para permitir que se recargue cuando termine de afeitarse.
La afeitadora proporcionará 3 minutos de afeitada después de recargarla por 5 minutos.
Indicador de carga de 5 etapas
Pestañea el LED inferior: necesita recargarse
El LED pestañea momentáneamente y luego queda prendido:
se está recargando
Todos los LED están prendidos:
la afeitadora está totalmente cargada
Los LED se prenden en secuencia:
la afeitadora está funcionando normalmente
5 Stage Power Indicator
Bottom LED Flashing - Recharging Required
LEDs Flash Sequentially and Then Lit - Shaver is Recharging
All LEDs Lit - Shaver is Fully Recharged
LEDs Light Sequentially - Shaver is Operating Normally
1
Para usar la afeitadora por primera vez, o después de no haberla
usado por mucho tiempo, se debe recargar por 16 horas.
1. Asegúrese que el interruptor está en posición “OFF”. Primero,
conecte el cordón de recarga a la afeitadora y después a un tomacorriente. (fig. 2)
2. Durante la recarga, los LED pestañearán y luego quedarán
prendidos hasta que se recargue totalmente. Una recarga completa
usualmente toma una hora. Desde que está totalmente cargada, la
afeitadora proporcionará aproximadamente una semana de afeitadas.
Almacenamiento de la afeitadora y el cordón
Si no se va a usar la afeitadora por mucho tiempo
guárdela, y al cordón eléctrico, en un lugar fresco
y seco. No guarde la afeitadora envuelta con el
cordón. Evite retorcer el cordón eléctrico. Asegúrese
de desenchufar y enderezar el cordón si se hubiera
Page 41

Axis Nitris and Axis Fuel |80| Espanol
Axis Nitris and Axis Fuel |81| Espanol
torcido al usarlo o durante el procedimiento de recarga.
Cómo sacar las baterías para
desecharlas o reciclarlas
Es importante que las baterías recargables de la afeitadora se reciclen
o que sean desechadas apropiadamente cuando ya ha terminado su
ciclo de vida útil.
Ponga el interruptor en “ON” y haga funcionar la afeitadora hasta que
las cortadoras dejen de funcionar.
1. Quite la cubierta del cabezal, el conjunto de la malla y las cuchillas
interiores.
2. Quite los 2 tornillos de la parte superior de la
afeitadora. (fig. 1)
3. Quite los 5 tornillos de la parte inferior de la afeitadora. Saque los 2 paneles laterales.
1
4. Quite los 5 tornillos de la parte inferior
de la afeitadora.
5. Tire con cuidado de las dos mitades
del cuerpo y sepárelas.
6. Saque las baterías de la afeitadora.
7. Con unas tenazas corte los cables
que conectan las baterías (4 cables por
batería)
ADVERTENCIA! Para evitar el riesgo de explosión y la consiguiente
liberación de materiales tóxicos, nunca desarme o incinere las baterías.
Para evitar quemarse accidentalmente, evite cruzar los polos de las
baterías. Deseche baterías de acuerdo con las normas sobre desecho
o reciclado de su localidad.
Page 42

Axis Nitris and Axis Fuel |82| Espanol
Axis Nitris and Axis Fuel |83| Espanol
Para reemplazar las mallas
IMPORTANTE: : Para obtener las mejores afeitadas y funcionamiento,
recomendamos que se reemplace la malla de la
afeitadora cada seis meses, y las cuchillas interiores
al menos una vez al año.
Normalmente, si hay irritación de la piel o deterioro
de la calidad de la afeitada, significa que hay que
reemplazar la malla. El intervalo entre reemplazo de
mallas varía según el uso de la persona y su tipo
de pelo. (Véase la sección “Cómo pedir piezas de
repuesto”.)
1. Quitar el conjunto de la malla presionando los
botones de liberación que se encuentran a cada
lado de la afeitadora, y levantando y sacando el
conjunto. (fig. 1)
Fig. 3
Fig. 2
Fig. 1
Fig. 2
Fig. 1
Fig. 1
3
2
1
2. Las mallas exteriores están montadas en el marco de la malla
exterior. Libere el marco de la malla a partir de la base del marco de
la malla deslizando su uña entre el costado del marco de la malla y la
base del marco de la malla. (fig. 2). Al voltear la base se permitirá que
el marco de la malla caiga. (fig. 3)
3. Coloque las mallas exteriores de repuesto sobre las cuchillas. Cuide
de no causarle daño a las mallas. Deslice hacia abajo con cuidado el
conjunto del cabezal hasta que quede ajustado en su sitio.
Reemplazo de las cuchillas interiores
Véase la sección “Cómo pedir piezas de repuesto.”
NOTA: Siempre reemplace las mallas al mismo tiempo que las cuchil-
las interiores.
1. Quitar el conjunto de la malla presionando los botones de liberación
que se encuentran a cada lado de la afeitadora, y levantando y
sacando el conjunto. (fig. 1)
Page 43

Axis Nitris and Axis Fuel |84| Espanol
Axis Nitris and Axis Fuel |85| Espanol
2. Sacar las cuchillas interiores tirando de ellas hacia
arriba. (fig. 2)
3. Asegúrese de asir firmemente las cuchillas de
repuesto cuando las inserta con cuidado en sus
asientos interiores.
4. Empuje hacia abajo firmemente las nuevas
cuchillas hasta que enganchen en su sitio.
5. Reemplace el conjunto de mallas y con cuidado
deslícelo hacia abajo hasta que escuche que se
aseguraron en su sitio.
Pedido de partes de repuesto
Para pedir partes de repuesto para su afeitadora Axis, llame por favor
a Axis/BPI at 1-877-263-9500. Refiera por favor al número de pieza
siguiente.
Fig. 3
Fig. 2
Fig. 2
Fig. 1
Fig. 1
Fig. 3
Fig. 2
Fig. 1
Fig. 1
1
2
número de parte: AN-2
Descripción: Marco de malla exterior y cuchillas interiores (Outer Foil
Frame and Inner Cutters) para los modelos
AX-3335/AX-3331
> La parte antedicha está disponible en el minorista de quien su
máquina de afeitar fue comprada..
Servicio de reparación
Si su afeitadora necesita reparación, vea el folleto incluido en este
manual donde se encuentra la lista de los locales que proporcionan
servicio.
Si su afeitadora necesita servicio
Si su afeitadora necesita servicio, llame al 1-877-263-9500. Para
ayudarnos a servirlo, tenga a mano el número de modelo y la fecha de
compra de su afeitadora.
Page 44

Axis Nitris and Axis Fuel |86| Espanol
Axis Nitris and Axis Fuel |87| Espanol
GARANTÍA LIMITADA POR UN AÑO
AAxis/Bodyline Products Inc. (en adelante BPI) garantiza que su
producto, excepto las limitaciones expuestas a continuación, está libre
de defectos de materiales y manufactura por un período de un año a
partir de la facha de compra. En el caso de un defecto en los materiales o en la manufactura, Axis/BPI reparará o reemplazará sin cargo
este producto con partes nuevas, de la siguiente manera:
1. Esta garantía se extiende solamente al comprador original. Para
efectuar el servico o reemplazo de partes bajo esta garantía, se exige
un recibo de compra u otra prueba respecto de la fecha original de
compra.
2. No devuelva el producto al comercio en que has adquirido el
mismo.
3. Comuníquese con la línea gratuita de Axis/BPI 1-877-263-9500
para obtener la autorización durante el período de garantía con el fin
de devolver el producto defectuoso por correo, con franqueo prepago.
LIMITACIONES Y EXCLUSIONES
No existen garantias expresas salvo las mencionadas anteriormente.
Esta garantía cubre únicamente fallas debidas a defectos en los mate-
rials o en la manufactura que ocurren durante el uso normal. No cubre
las láminas metálicas perforadas, hojas, cuchillas o accesorios o daños
que ocurren en el envío o fallas causadas por productos no provistos
por Axis/BPI o fallas debidas a accidentes, uso incorrecto, abuso,
manipuleo negligente, aplicacion indebida, mantenimiento inadecuado,
limpieza inadecuada, alterciones, modificaciones, sobretensiones en la
línea de alimentacion o usos comerciales del producto, tales como en
hoteles, oficinas o su alquiler o su servicio por parte de cualquiera que
no sea Axis/BPI o daños atribuibles a causas de fuerza mayor.
AXIS/BPI NO SERA RESPONSABLE POR LAS DANOS INCIDENTALES
Page 45

Axis Nitris and Axis Fuel |88| Espanol
O CONSECUENCIALES DEBIDO AL USO DE ESTE PRODUCTO O
EMERGENTE DE CUALQIER INCUMPLIMIENTO DE ESTA GARANTIA.
LA DURACION DE TODAY LAS GARANTIAS EXPLICITAS E IMPLICITAS, INCLUYENDO LAS DE COMERCIABILIDAD O APTITUD PARA UN
PROPOSITO EN PARTICULAR, ESTARA LIMITADA A LA DURACION
ESTABLECIDA ANTERIORMENTE.
Algunos estados no admiten la exclusion o limitacion de los danos
incidentales o consecuenciales ni la limitacion a la duracion de una garantia implicta, por lo cual es posible que las exclusiones y limitaciones
anteriores no se apliquen a su caso. Esta garantia le otorga derechos
legales especificos y es posible que tenga otros derechos que varian
entre un estado y otro.
Fabricado para Axis/Bodyline Products Inc. 198 N. Brandon Drive,
Glendale Heights, IL 60139 USA
Fabricado en China
Page 46

Page 47

AXIS/Bodyline Products International, Inc.
198 N. Brandon Drive
Glendale Heights, Illinois 60139 USA
Toll-free: 1-877-263-9500
www.bodylineproducts.com
Made in China
 Loading...