

Page 1

INSTRUCTION MANUAL
2
WARRANTY
YEAR
AX1509
9 INCH LCD TWIN HEADREST
ENTERTAINMENT PACKAGE
with BUILT-IN DVD-CD PLAYER
SPECIFICATIONS
- 9 Inch (23cm) LCD-TFT Touch Monitor
- 800 x 480 Pixels Resolution
- LED Backlight
- 16:9 Screen Format
- DVD/CD/VCD.RMVB/MP3/WMA/DIVX/MPEG4 Playback System
- USB 2.0 Port (Front Panel)
- SD/MMC/MS Card Reader (Front Panel)
- AV Input (Front Panel)
- Optional DC Input (Front Panel)
- IR Transmitter (2 Ch for Wireless Headphones)
- Wireless FM Modulator (8 Ch for Audio Output)
- On-Board Stereo Speakers
- Video Games (included)
- PAL/NTSC/AUTO Colour System
- Universal Headrest Replacement
- Adjustable Tilt
- Removable Monitor Covers with Zippers (for Safety & Protection)
- 6-Pole Adapters (12/12.5/12.7/13.8/14/16 mm)
- 12V DC Input / Negative Ground
--10° ~ +55°C Operating Temperature
- 250(L) x 200(W) x 145(H)mm Dimensions
INCLUDED:
- 2 x 9 Inch LCD Twin Headrest Entertainment Packages
- 1 Pair of Universal Headrests Included
- 2 Pairs of Folding IR Headphones
- 2 x Remote Control (Dual Function)
- 2 x Removable Flap Covers with Zipper
- 6 Sets of Pole Adapters (12/12.5/12.7/13.8/14/16 mm)
- Installation Wiring & Hardware
- 6 x AAA Batteries
- 2 x Video Game Discs
- 2 x Cig Power Leads
Removable
Flap Covers
with Zipper
FlapCover
s
wi
th Zipper
Page 2

2.
Page 3

CONTENTS
Precautions 4
Notice before operation 4
Accessories 5
Battery installation of remote control 6
Application of remote control 7
Remote Control Function 8
Touchscreen Menu 9
Disc Play Controls 10
Basic Setup 12
Disc Setup 13
Audio Setup 14
Digital Setup 15
Operation for games 16
Trouble Shooting 17
Technical Specication 18
Pole Installation 19
3.
Page 4

PRECAUTIONS
Thank you for purchasing this Axis product. Please carefully read these instructions
and retain for future reference.
Caution
• For the sake of safety, do not install monitor within view of the driver.
• The product contains high voltage. Do not attempt to dismantle or repair
without professional assistance.
• The players are equipped with TFT colour LCD screens which are fragile. Please
exercise care when installing.
• Do not clean with corrosive chemicals. A soft cloth is recommended.
• The operating voltage is DC 12V (+-2V). The player may be damaged from higher
or lower voltage ranges.
Special Tip:
• When in use, the LCD panel may display a small number of bright spots on the
screen. This is a normal phenomenon in active matrix display technology and does
not mean the product is defective.
NOTICE BEFORE OPERATION
Safety
• Before operating the product, please check that the voltage of your car is
consistent with the working voltage of the player.
• Grasp the powerplug rmly when connecting or disconnecting. Do not pull the
power line by force. Laser beams used in the product are harmful to the eyes.
Do not dismantle. Only a professional technician should repair or maintain.
Placement
• The storage temperature should be -30°C to 75°C and the working temperature
should be -10° to 55°C.
• Prevent dust settling on the laser head. This would aect the quality of play.
Please use a laser head cleaner if necessary.
Precautions for disc
• In order to keep discs clean, please carefully hold from the edge of a disc and not
touch its surface.
• Do not ax any label or tape on the disc.
• Keep the disc away from direct sunlight or heat sources.
• Carefully store discs after use.
• If the disc is dirty, please clean with soft cloth from the centre outwards.
• Do not use abrasive chemicals to clean the disc.
4.
Page 5

5.
ACCESSORIES
Please check the following accessories after opening the package:
Remote Control Native Game Disc Instruction Manual Pole Adaptors
Headphones Power Connection Line
with AV Cable
HEADREST [PILLOW TYPE] DVD INSTALL METHOD
Remove the original headrests. Match the steel pole spacing to the original
diameter. Select and install the matching plastic pole size adaptor. Pass the power
source and audio frequency lines through the steel frame and connect. Adjust the
height of the headrest.
Page 6
6.
REMOVE DISC
(1) Press key to eject the disc.
(2) Do not scratch the surface when handling the disc.
(3) Carefully store the disc.
BATTERY INSTALLATION OF THE REMOTE CONTROL
1. At positions A and B on the remote control, press A in the arrowhead direction
and then retract the battery holder.
2. Take out the used battery and load the new battery with anode upwards.
3. Place the battery holder back to its original position.
(AAA Battery)
CAUTIONS:
In order to prevent battery leakage, remove the battery if the remote
control will not be used for a long time (longer than one month)
Page 7

PRECAUTIONS FOR REMOTE CONTROL
• Please remove the PVC sheet (if present) to activate the remote control.
• Point remote control in a straight line to receiver. Any barrier may aect the signal.
• A strong light source may aect the eciency of the device
• Please operate the remote control at a distance of less than 5m.
Application of the remote control
1. Horizontal: ± 30°
2. Vertical: ± 30°
3. Straight Line: 5 metres
NOTE:
Most functions operate by touchscreen
or remote control.
7.
Page 8

8.
1
START Load GAMES Disc,then press this START key to begin playing games.
2
MODE Return to the Submenu
3
PBC/MENU Press thi s key to return to the root menu in playing .
4
POWER Power ON/OFF
5
TFT MENU Menu for different functions:Brightness,contrast,IR etc.
6
DISPLAY Display the disc information and play time.
7
REPEAT Press to return last chapter or Menu
8
SETUP
Open/close DVD setup menu
9
ANGLE Angle switching key, used for S V CD,DVD and MP4 discs with multiple angles.
10
A Games key for shoot and attack(avaliable in some kinds of games only)
11
B Games key for shoot and attack(avaliable in some kinds of games only)
12
C Games key for shoot and attack(avaliable in some kinds of games only)
13
D Games key for shoot and attack(avaliable in some kinds of games only)
14
TITLE Return t o the beginning of the play
15
MUTE Press MUTE to tu r n the speakers off
16
PROGRAM Track programm i ng play (play sequence)
17
DIRECTION KEY Direction key for RIGHT/LEFT/UP/DOWN.
18
USB/SD Press to choose audio or video from USB or SD card
19
PREVIOUS/NEXT Select to play the previous or next chapter
20
PLAY/PAUSE Press to start or pause play
21
STOP Stop play
22
VOLUME-/+ Press to adjust the Volume hi gher or l ower
23
FAST/BACK FORWARD FAST OR BACK BY 4,8,16 +/-
24
NUMBER KEY To choose different chapters and songs by the serial No.
25
DVD/AV Select DVD mode to AV mode
26
SUBTITLE Display su btitles.
27
ZOOM Zoom in/out,multiple modes
28
SLOW
Playing slow by 1/2, 1/3,1/ 4,1/5,1/6,1/7,1/8
29
30
RETURN Back to
previous chapter
31
RIGHT Games direction key for Right
32
DOWN Games direction key for Down
33
LEFT Games direction key for Left
34
UP Games direction key for Up
AUDIO
select for Left/RLJKW/SWHUHRAUDIO
35
GOTO
Press for numbered song and page when reading e-books.
REMOTE CONTROL FUNCTIONS
IR
FM
HOME
SEARCH
Page 9

9.
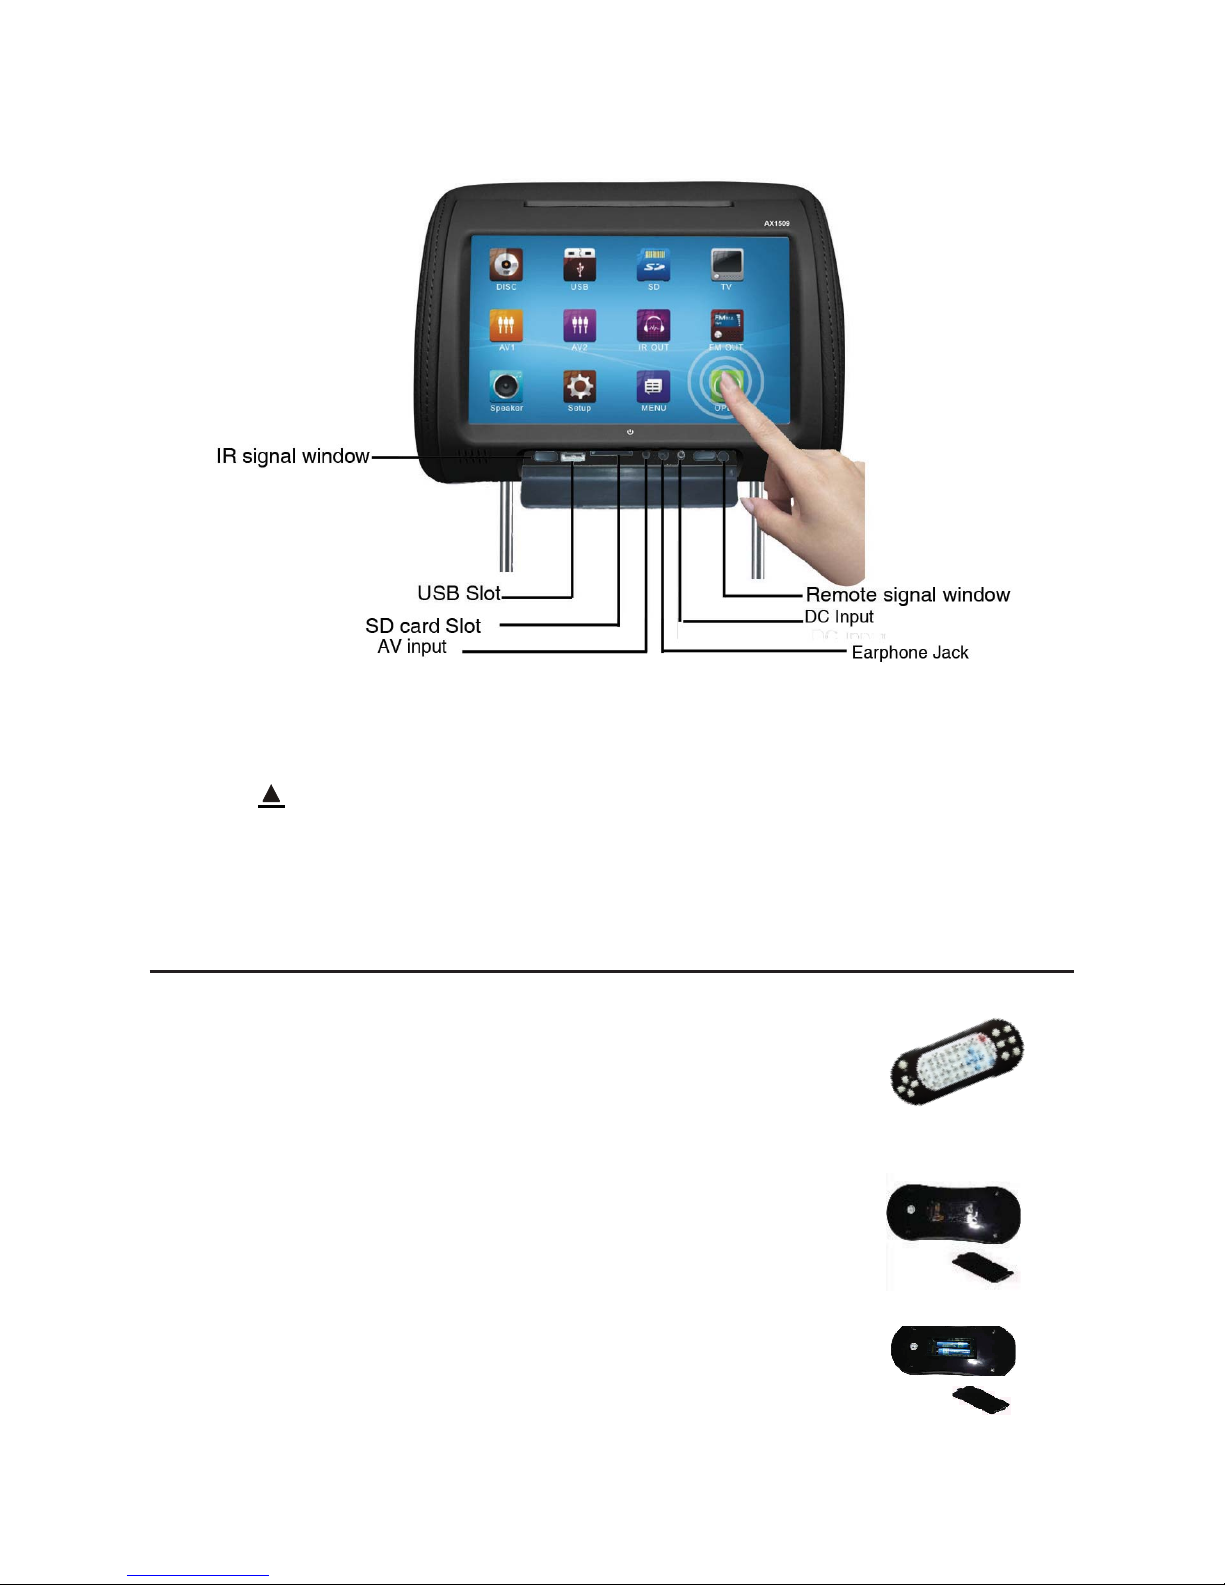
TOUCHSCREEN MENU
Choose the menu for Disc/USB/SD or AV and also control IR/FM/Speaker/Brightness
and Contrast directly by touching the icons on the LCD. Touch OPEN to Display the
panel. Touch OPEN again to close.
USB/SD Card Readers
When inserting USB or SD cards, the unit will automatically display les into VIDEO,
TXT, PHOTO, MUSIC and GAMES. Enter dierent les for your desired movie, photo
or music.
AV IN
Touch AV IN to share movies or music on this unit.
FM/IR
To use IR or FM function, please nd the IR or FM icons. Touch to open or close IR or FM.
MENU SETUP
Touch MENU icon and the monitor will display picture setup icon. Then select
brightness, contrast and colour to increase or reduce these functions.
Figure 1
Main Panel
USB/SD Card readers
AV IN
IR OUT
FM OUT MENU
Page 10

10.
DISC PLAYING
Touch Disc icon on the panel. The unit will enter into Disc reading mode.
Control IR/FM/Speaker volume, brightness and contrast [Figure 2]
Figure 2
MENU
IR in disc play mode
FM
VOLUME
NUMBER CHOICE
MENU PLAYING
in disc play mode
Page 11

REPEAT SETUP
FORWARD KEYS
PAUSE
PREVIOUS/NEXT KEYS
DISC OUT KEY
BACK TO DESK
11.
IR TRANSMITTER (For IR headphones)
To use IR function for IR headphones, please nd the IR Mode icon in the menu.
Select to open or close IR Mode.
There are two IR channels: A & B. When using IR headphones, please set the channel
of your IR headphone exactly the same as the IR channel of the player.
For example: When your IR headphones channel is A, then your player IR channel
also should be at A position.
FM TRANSMITTER
To use FM function, please nd the FM Mode icon in the menu.
Select to open or close FM Mode.
To transfer the sound to your car audio system, make sure your car radio frequency
is exactly the same as the AX1509.
Page 12

BASIC SETUP
Touch Setup key and the LCD will display as Figure 1. Touch desired function, then
the submenu will display. Set up one by one. Touch Back to exit the setup Menu.
Figure 1
1. System (see Figure 3)
Touch System to set up the Panel calibration
and version.
Touch Back to exit setup Menu.
Figure 3
12.
Page 13

(2) Touch desired language option. Multiple languages are available for selection
including: English, Japanese, German, Spanish, French, Portuguese and Russian.
(3) Touch setup key to enter the setup system. Select PASSWORD and press Enter
key to conrm. Then the screen will display the picture as Figure 4.
(4) RATING
When playing discs with locking function, you can restrict content appropriate to
the age of viewer.
Figure 4
2. Disc (see Figure 4)
(1) Touch key to enter setup. Touch disc then screen will display setup OSD,
Languages, Audio Language, Subtitle Language, Password and Rating.
13.
Page 14

14.
3. Audio Setup
4. Speaker Setup
Page 15

NOTE:
LT/RT: If the disc has PROLOGIC dolby stereo eect, the disc signal can produce a
cinema eect decoded by the player.
Stereo: for 5.1 channel output, the audio will output two roads of signal
(left channel and right channel)
Virtual Sound: in playing 5.1 channel recorded discs, the main channel will output
the virtual surround eect.
NOTE: All setup options can exit the menu by pressing SETUP key. The system set up
menu may dier from the actual operation due to software updates.
4. Digital Setup
15.
Page 16

16.
OPERATION FOR GAME FUNCTION
The player features game functions.
2 in 1 Remote Control
1. Description for Game Disc Operation
(1) Press Eject and load the game disc. The game main menu will display
in seconds.
(2) Press direction key of the function control or game controller to select the
games and then press ENTER on the function control or press START on the game
controller to enter the game.
2. Description for the Wireless Game Control
(1) Press Select to enter the menu of the built-in games.
(2) Press direction key to select the desired games, then press START to enter
the game.
(3) Enter the game, press the direction key to select up/down/left/right, A & B key
to operate.
(4) Press Stop/Return key on the function control or press RESET key on the game
controller to exit the game. If enter EMBEDDED Game, press Stop/Return key or
press RESET key to return to the main menu. Then use direction key to select EXIT
and press ENTER on the function control or START on game controller to exit
the game.
Page 17

SYMPTOM SOLUTIONS
No Response 1. Check all power connections.
2. Check power is on.
No Sound 1. Check whether the volume is on the main position or in Mute.
2. No sound from Unit: Check if FM or IR transmit status has been
selected. Select FM OFF and turn o IR Audio output function.
3. No sound from IR Headphones: Check if IR transmit status has
been selected. Turn ON IR Audio output function.
4. No sound outputs in the following: Pause/Fast Forward/
Fast Reverse/Stop.
5. Resume default via setup system.
Image 1. Check whether the player is in line input state.
Press DVD/AV to switch to DVD state.
2. Check whether the brightness setup is appropriate.
Disc cannot 1. Check whether a disc has been correctly loaded with label side
be read facing the user.
2. The disc is damaged or dirty. Please load another disc or clean.
3. Adjust the region code of disc to match the player.
4. If the disc format is wrong, change to compatible format.
Improper 1. Set up the TV system once again.
image size 2. Select the corresponding screen format from the setup menu.
Track cannot 1. Some sections of some discs do not permit a selection.
be selected
The remote 1. Check whether there exists any barrier between the remote
is not working control and the player.
2. Point in a line straight to the player.
3. Check the battery is installed correctly.
4. Replace battery if needed.
TROUBLESHOOTING
17.
Page 18

18.
TECHNICAL SPECIFICATIONS AND PARAMETERS
PRODUCT NAME AUTOMOBILE HEADREST DVD PLAYER
Disc Type MP3/DVD/SVCD/VCD/DVCD/CD/CDG/WMA/JPEG/CD-R/
(signal source) CD-RW
Display 9” TFT LED digital touch panel (16:9)
Output Port Audio: Stereo
Video: Complex video signal output (AV)
USB Port
MS/MMC/SD Card Port
Video System PAL/NTSC/AUTO
Video 1.0Vp-p (75ohm)
Characteristics
Audio Frequency characteristics: 20-20KHZ (1dB)
Characteristics SNR: >90dB
Total harmonic distortion: <0.01%
Power Voltage DC: 12V/1.5A
Power Approx 12W
Consumption
Working -10° ~ +55°C
Temperature
Working 15 ~ 75%
Humidity
Net Weight Approx 2.2Kg
Dimensions 250(L) x 200(W) x 145(H) mm
Page 19

METAL POLES DETAILS PICTURE
1. Take out the product
from the gift box.
1. White plastic
cover before
loosening the
screws.
2. White plastic
cover after
loosening the
screws.
Insert the metal pole into the round
hole of the white plastic cover.
2. Use screwdriver to
loosen four screws on
the white plastic cover
on the bottom of the
unit.
3. Insert the metal pole
into the round hole of
the white plastic cover.
4. Assemble as shown.
19.
Page 20

AX1509
 Loading...