

Page 1

INSTRUCTION MANUAL
AX1499
2
WARRANTY
YEAR
9” ACTIVE CLIP-ON HEADREST
DVD PLAYER
FEATURES
• DVD/CD/VCD/MP3/WMA/DivX/MPEG4 Playback System
• USB 2.0 Port
• SD/MMC/MS Card Reader
• AV Input
• Earphone Socket
• IR Transmitter (2 Ch for Wireless Headphones)
• Wireless FM Modulator (8 Ch for Audio Output)
• On-Board Stereo Speakers
• Remote Control
• 9-Inch LCD-TFT Monitor
• 800 x 480 Pixels Resolution
• LED Backlight
• 16:9 Screen Format
• Pole Adapters
• 12V DC Input (1V - 14V)
• 255(W) x 210(H) x 47(D)
Page 2

CONTENTS
Functions...............................................................................................................3
Remote Control...................................................................................................4
Battery Installation Diagram for Remote Control...................................4
Installation............................................................................................................5
Operation of DVD System...............................................................................6
System Setup.......................................................................................................6
Introduction of USB/SD Function.................................................................8
Menu Function Setup.......................................................................................8
Wiring Diagram...................................................................................................9
Troubleshooting................................................................................................10
General..................................................................................................................11
2.
Page 3
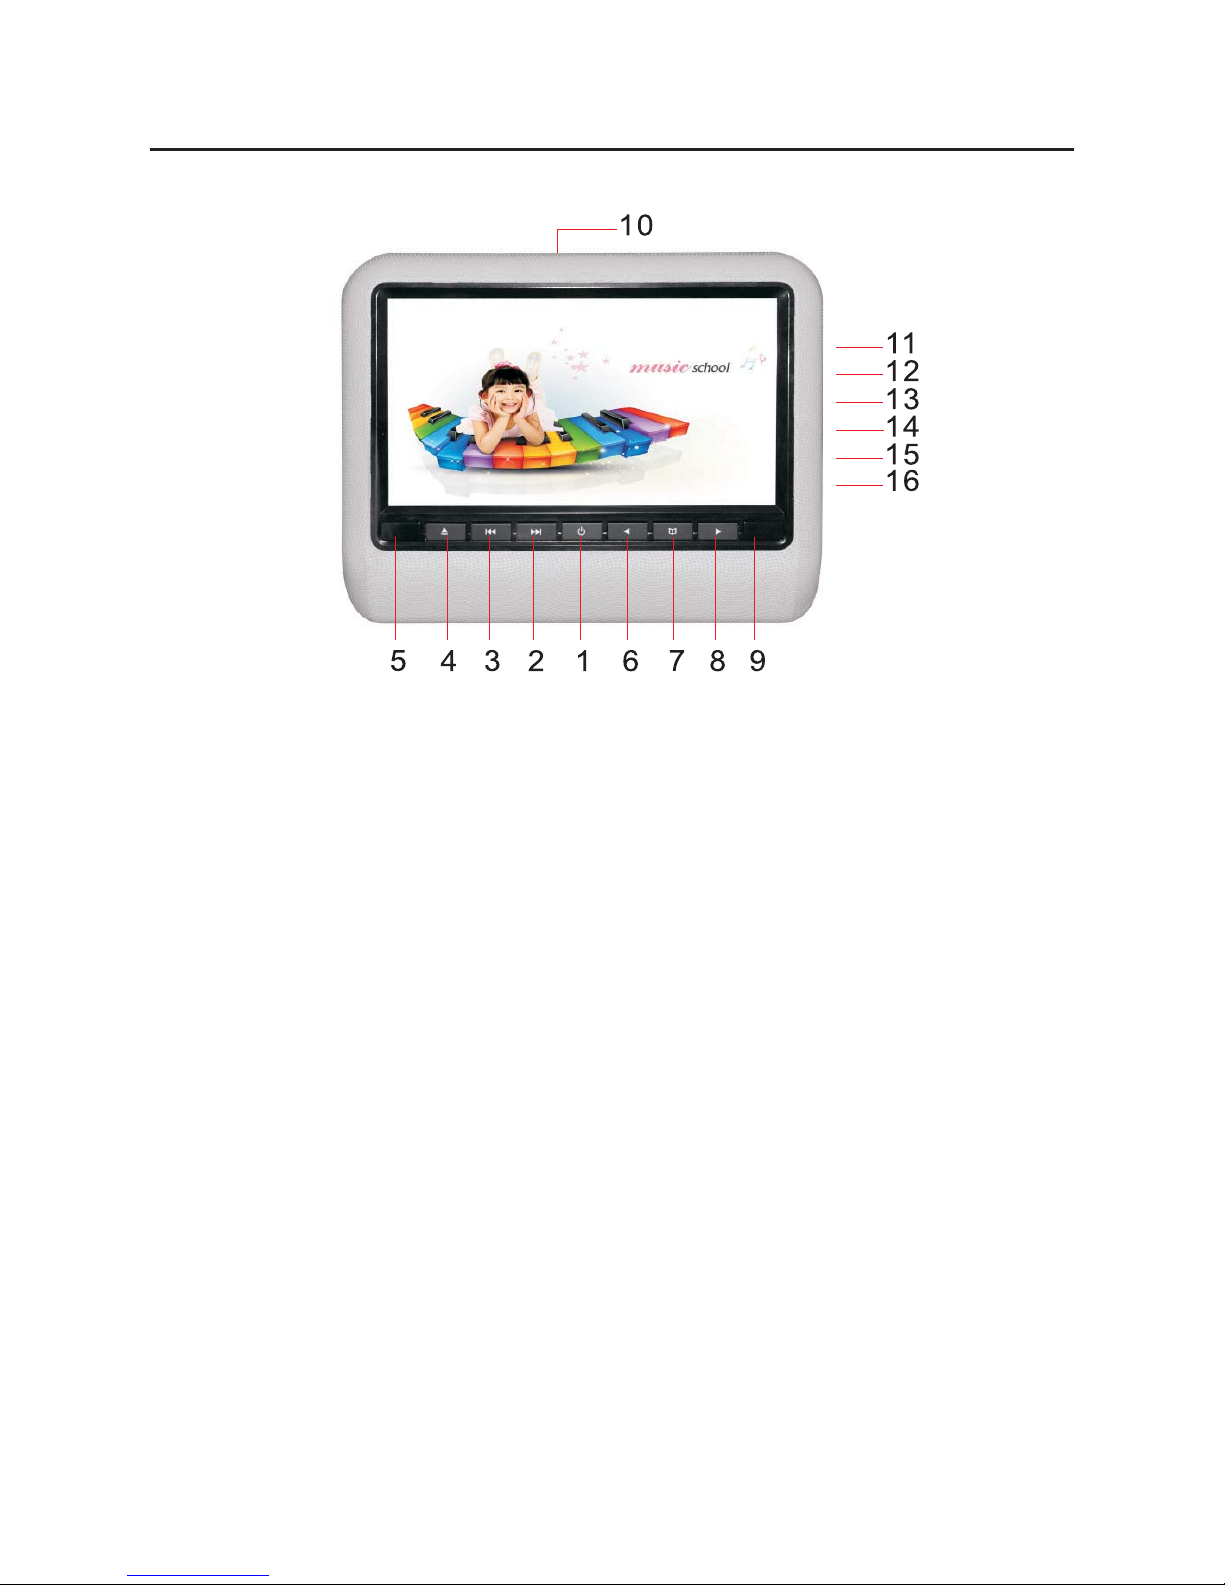
3.
9. Remote Window
10. Disc In/Out Slot
11. USB Port
12. SD Port
13. Earphone Jack
14. Video 2 Input
15. Power/AV Input/Output
16. DC 12V Jack
FUNCTIONS
1. Power and Video Switch
2. Next
3. Previous
4. Disc In/Out
5. IR Window
6. Volume-
7. Menu/Play/Pause
8. Volume+
Page 4
4.
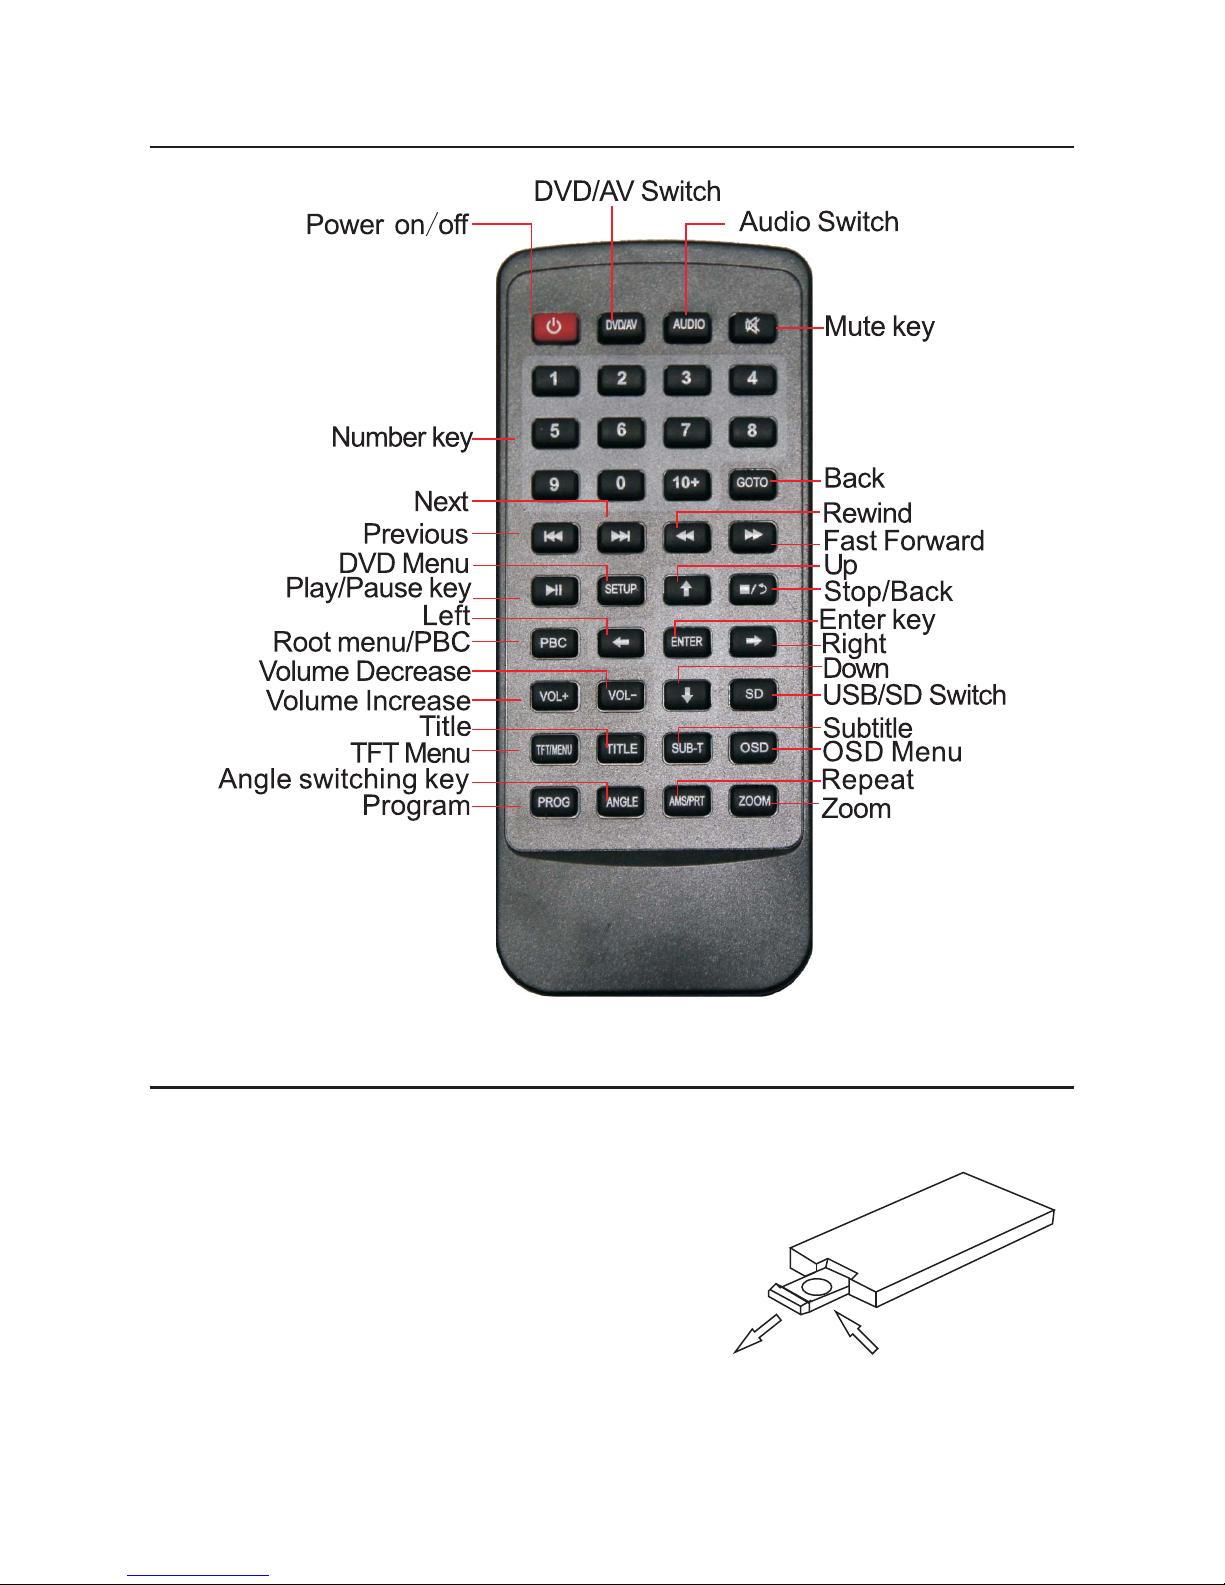
REMOTE CONTROL
BATTERY INSTALLATION DIAGRAM FOR REMOTE CONTROL
Attention
1. Do not touch the infrared lens.
2. Do not press remote control when
disassembling the battery cover.
3. Remove the battery when not in use
for an extended period of time.
4. Normal battery life is about one year.
Replace battery when range of remote
control reduces.
1. Pull out the
battery holder
2. Tighten the
fastener
Page 5

INSTALLATION
1. Pull out the 2 U-shaped metal holders from the mounting assembly.
Remove the black plastic spacers.
2. Lift the original headrest. Choose the matching size black plastic spacer and
split apart. Attach to the original car headrest post. Then insert the U-shaped
metal holders to secure the 2 plastic rings.
3. Insert the metal holders and adjust to ensure equal spacing between the
headrest poles.
4. Insert the metal plate attached to the back of the monitor into the plastic bracket.
Then adjust to the desired angle and x it tightly. Lower the original headrest to
the appropriate position.
5.
Page 6
6.
OPERATION OF DVD SYSTEM
Play DVD/DCD/CD
When loading a disc into the DVD slot, please face the label to the back.
(Recorded surface facing you). Play will start.
Press on panel or on remote control to stop.
Press on panel or on remote control to pause.
Play MP3
Insert the le storage media into the machine to auto play.
Press on remote control to stop.
Press on panel or on remote control to pause.
Replay
Press to repeat one or more songs.
Press numeric key to directly play the specied song.
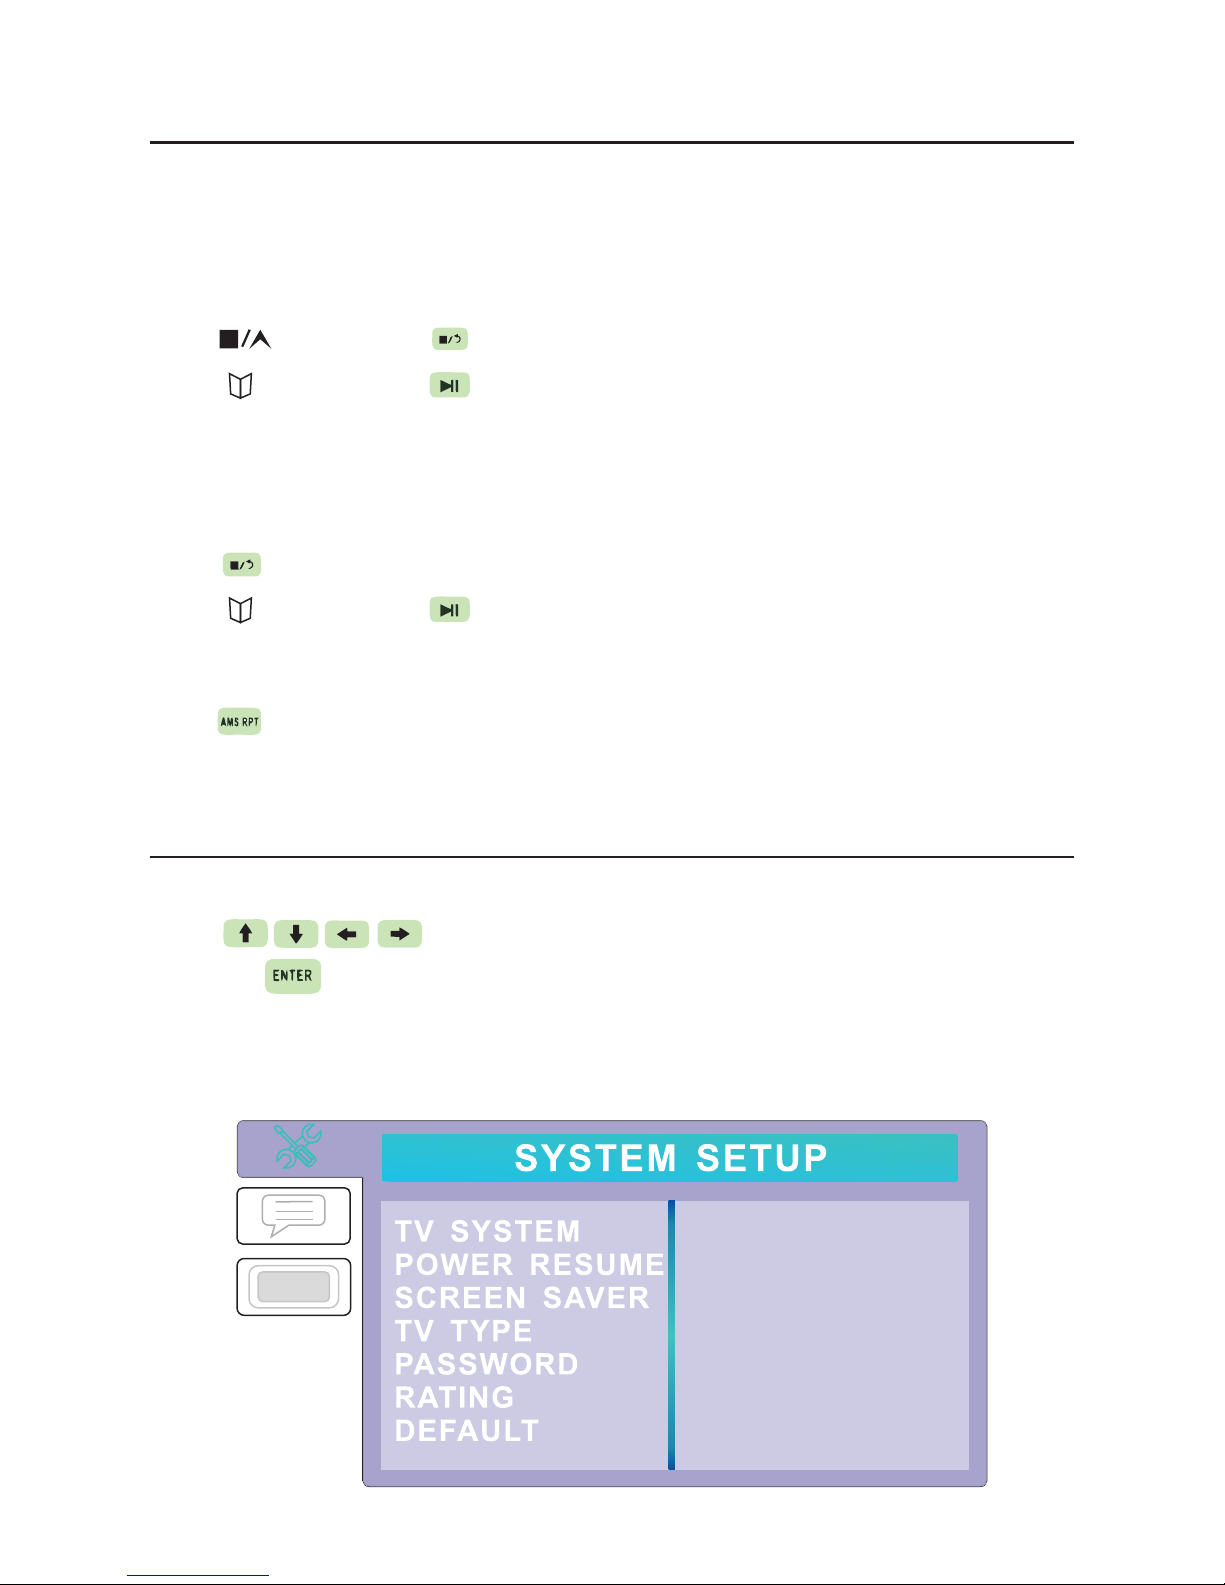
SYSTEM SETUP
Press setup button to enter system and menu.
Press on remote control to select option
and press to enter (as below)
Page 7

7.
SYSTEM SETUP (continued)
1. TV System: Set DVD image format to NTSC/PAL or AUTO.
2. Resume Play: Switch to resume play after power o.
3. Screen Saver: Switch o screen protection icon.
4. Screen Picture Ratio: Choose image output ratio as desired
5. Password: Set new password. The initial password is (0000)
6. Level Set: Set parental lock. Note - default password is (0000)
7. Default Setting: Restore factory settings.
8. Language: Choose the desired language available from the menu.
9. Audio Language: Set the disc output language.
10. Subtitle Language: Set the disc subtitle language
11. Menu Language: Set the menu language of disc. (Note - the disc must support
that language).
12. Video Setup: Set DVD, video display eect.
Page 8

8.
INTRODUCTION OF USB/SD FUNCTION
1. Enter: Press under DVD mode and switch to DVD, USB or SD mode.
2. Exit: Press or under USB/SD mode and then switch to DVD mode.
MENU FUNCTION SETUP
In AV1 or AV2 mode, press on panel or on remote control to enter the
main menu.
Then press on panel or on remote control to setup
and adjust.
Main menu includes below parts:
Image Volume Function
Detailed Setup as Below Diagram
1. IMAGE SETUP
2. VOLUME SETUP
1. Brightness
2. Contrast
3. Color
4. Language
5. Tint
1. Volume Adjust
2. IR Setup
3. FM Setup
Page 9
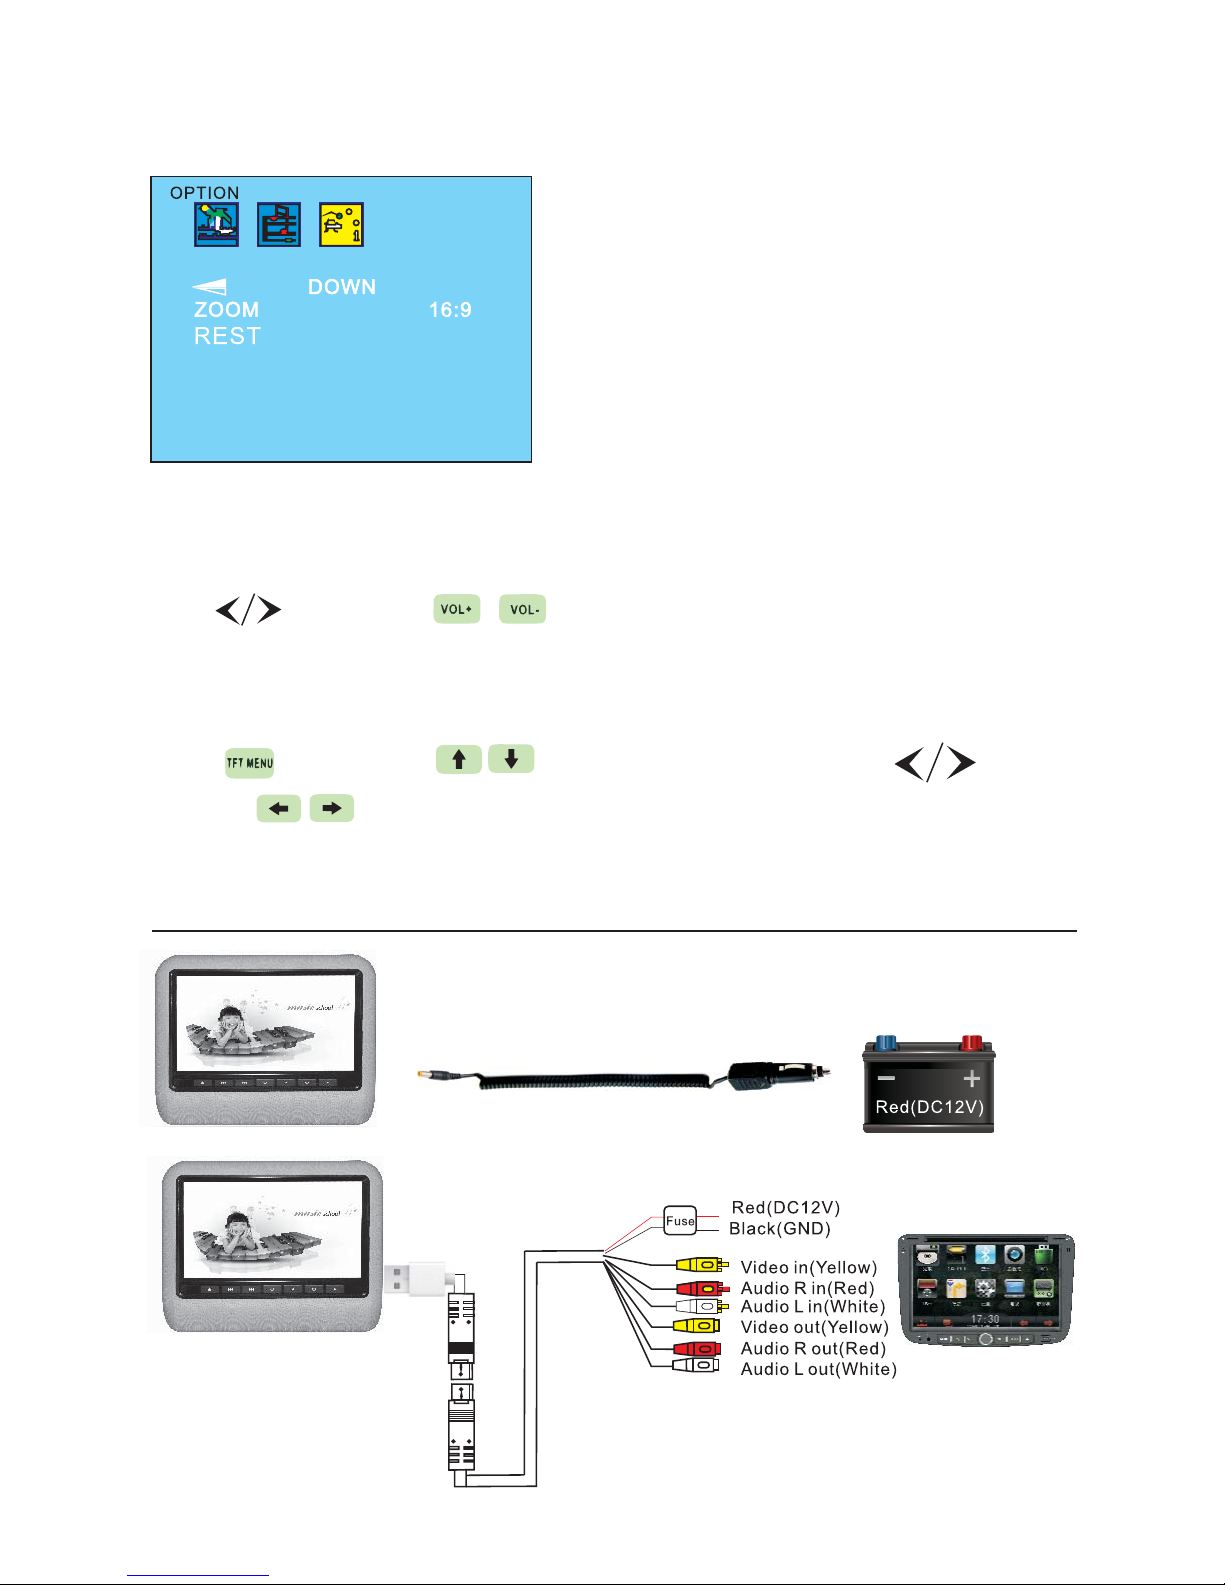
3. FUNCTION SETUP
AUDIO
Press on panel or on remote control to set audio.
FUNCTIONS
Press on panel or on remote control then press on
panel or on remote control to set selection.
WIRING DIAGRAM
9.
1. Rotation
2. Image Display Mode
3. Reset
Page 10

10.
TROUBLESHOOTING
Problem Comment
No sound and image Power is disconnected. Turn the machine on.
No image Disc is scratched. Signal wire is disconnected.
No sound Volume too low or the volume setup needs checking.
Black screen Incorrect setup of image brightness and contrast. Low voltage.
Blurring and unstable image Disc is scratched.
Colour Cast Function menu setup is incorrect. Weak signal.
No power Check interconnect circuit. Replace fuse if necessary.
No image after loading the disc Only audio on the disc. Disc is scratched. Disc format is
not supported
Unstable sound DVD is dirty, scratched or seriously damaged. Clean or replace
the disc
Page 11

11.
GENERAL
1. Do not expose the device to wet, damp or hot environments.
2. Do not disassemble or attempt to repair. Should a problem arise, consult a
qualied technician.
3. Do not use abrasive chemical cleaners on the LCD or cabinet. Please use a soft
dry cloth.
4. The storage temperature for this device is from -20°C to 70°C and the operating
temperature is from -10° to 60°C.
5. This device supports DIVX/MPEG4/DVD/DVD+R/SVCD/VCD/DVCD/CD/MP3/
WMA/CD-R/RW/HDCD+-R/JPEG or CD-ROM7.
6. In the interests of safety, please do not operate this device within view of the
driver.
7. Power supply: DC12V (voltage range: 10V - 14V), negative ground.
NOTE:
When in use, the LCD panel may contain a small number of bright spots
on the screen. This is a normal phenomenon in active matrix display
technology and does not mean the product is defective.
Page 12

AX1499
 Loading...