

Page 1

AXISQ8685-EPTZNetworkCamera
InstallationGuide
Page 2

Page 3

English
EN
France:Français
Deutschland:Deutsch
Italia:Italiano
España:Español
日本:日本語
中文:简体中文
FR
DE
IT
ES
JA
ZH
Page 4

InstallationGuide
Safetyinformation..........................................11
Hazardlevels...................................................1 1
Othermessagelevels.............................................11
Safetyinstructions..........................................12
Transportation..................................................12
Battery.......................................................13
Packagecontents............................................15
Hardwareoverview..........................................16
Howtoinstalltheproduct.....................................18
Mountthebaseunit..............................................18
Routethecables................................................20
Installthenetworklink............................................26
Connectthecables...............................................27
InstallanSDcard(optional)........................................28
Howtoaccesstheproduct.........................................28
Resettofactorydefaultsettings................................29
Furtherinformation..........................................30
Optionalaccessories..............................................30
Warrantyinformation.............................................30
Specications..............................................31
SDcardslot....................................................31
Connectors....................................................31
Cables........................................................34
Operatingconditions.............................................35
Powerconsumption..............................................35
Informationssurlasécurité....................................37
Niveauxderisques...............................................37
Autresniveauxdemessage.........................................37
Consignesdesécurité........................................38
Transport......................................................39
Batterie.......................................................39
Contenudel’emballage.......................................41
Aperçudumatériel..........................................42
Commentinstallerleproduit...................................44
Montagedel'unitédebase.........................................45
Acheminementdescâbles..........................................47
Installationdelaliaisonréseau......................................53
Branchezlescâbles..............................................54
Installationd’unecarteSD(facultatif).................................55
Commentaccéderauproduit.......................................55
Réinitialiserlesparamètrespardéfaut............................56
Informationscomplémentaires..................................57
Accessoiresenoption.............................................57
4
Page 5

AXISQ8685-EPTZNetworkCamera
Informationssurlagarantie........................................57
Caractéristiques.............................................58
FentepourcarteSD..............................................58
Connecteurs...................................................58
Câbles........................................................62
Conditionsdefonctionnement......................................62
Consommationd'énergie..........................................63
Sicherheitsinformationen......................................65
Gefährdungsstufen...............................................65
AndereMeldeebenen.............................................65
Sicherheitsanweisungen.......................................66
Transport......................................................67
Batterie.......................................................67
Lieferumfang..............................................69
ÜbersichtüberdieHardware...................................70
InstallierendesProdukts......................................72
MontierenderGerätebasis.........................................73
DieKabelverlegen...............................................75
EinrichtenderNetzwerkverbindung...................................81
AnschließenderKabel............................................82
InstalliereneinerSD-Speicherkarte(optional)............................83
ZugriffaufdasProdukt............................................83
ZurücksetzenaufWerkseinstellungen.............................84
WeitereInformationen.......................................85
OptionalesZubehör..............................................85
Gewährleistungsinformationen......................................85
TechnischeDaten...........................................86
EinschubfürSD-Speicherkarte......................................86
Anschlüsse....................................................86
Kabel........................................................89
Betriebsbedingungen.............................................90
Leistungsaufnahme..............................................90
Informazionidisicurezza......................................91
Livellidipericolo................................................91
Altrilivellidimessaggio...........................................91
Informazionidisicurezza......................................92
Trasporto......................................................92
Batteria.......................................................93
Contenutodellaconfezione....................................95
Panoramicadell'hardware.....................................96
Comeinstallareildispositivo...................................98
Montaggiodell'unitàbase.........................................99
Installazionedeicavi.............................................101
5
Page 6

InstallationGuide
Installazionedelcollegamentodirete.................................107
Collegamentodeicavi............................................108
Installazionediunaschedadimemoria(opzionale)........................109
Comeaccederealdispositivo.......................................109
Ripristinodelleimpostazionipredenitedifabbrica..................110
UlterioriInformazioni........................................111
Accessoriopzionali...............................................111
Informazionisullagaranzia.........................................1 1 1
Speciche.................................................1 12
Slotperschedadimemoria.........................................112
Connettori.....................................................1 12
Cavi.........................................................1 15
Condizionidifunzionamento.......................................116
Consumoenergetico..............................................1 16
Informacióndeseguridad.....................................117
Nivelesdepeligro...............................................117
Otrosnivelesdemensaje..........................................117
Instruccionesdeseguridad.....................................1 18
Transporte.....................................................1 19
Batería.......................................................119
Contenidodelpaquete........................................121
Informacióngeneraldelhardware...............................122
Cómoinstalarelproducto.....................................124
Montajedelaunidadbase.........................................125
Guíadeloscables...............................................127
Instalacióndelenlacedered........................................132
Conexióndeloscables............................................133
InstalacióndeunatarjetaSD(opcional)................................134
Cómoaccederalproducto.........................................134
Restablecimientoalaconguraciónpredeterminadadefábrica.........135
Másinformación............................................136
Accesoriosopcionales.............................................136
Informacióndegarantía...........................................136
Especicaciones............................................137
RanuraparatarjetasSD...........................................137
Conectores....................................................137
Cables........................................................140
Condicionesdefuncionamiento.....................................141
Consumodeenergía..............................................141
安
安 安
安
安 安
報
全 全全情 情情報 報
危険レベル................................................143
その他のメッセージレベル...................................143
全 全全手 手手順 順
..............................................143
順
..............................................144
6
Page 7

AXISQ8685-EPTZNetworkCamera
輸送.....................................................145
バッテリー................................................145
パ
パ パ
ッ ッッケ ケケー ーージ ジジの のの内 内内容 容
ハ
ハ ハ
ー ーード ドドウ ウウェ ェェア アアの のの概 概概要 要
製
製 製
品 品品の のの取 取取り りり付 付付け けけ方 方方法 法
ベースユニットの取り付け...................................150
ケーブルの配線............................................152
ネットワークリンクのインストール............................158
ケーブルの接続............................................159
SDカードの装着(オプション)....................................160
製品のアクセス方法........................................160
工
工 工
場 場場出 出出荷 荷荷時 時時の のの設 設設定 定定に ににリ リリセ セセッ ッット トトす すする る
関
関 関
仕
仕 仕
安
安 安
安
安 安
包
包 包
硬
硬 硬
如
如 如
重
重 重
更
更 更
规
规 规
報
連 連連情 情情報 報
オプションアクセサリー.....................................162
保証情報.................................................162
様
様 様
..................................................163
SDカードスロット..........................................163
コネクター................................................163
ケーブル.................................................166
動作条件.................................................167
消費電力.................................................167
息
全 全全信 信信息 息
危险等级.................................................169
其他消息等级..............................................169
明
全 全全说 说说明 明
运输.....................................................170
电池.....................................................170
容
装 装装内 内内容 容
览
件 件件概 概概览 览
何 何何安 安安装 装装产 产产品 品
安装底座单元..............................................176
布线.....................................................178
安装网络链路..............................................184
连接电缆.................................................185
安装SD卡(可选).........................................186
如何访问产品..............................................186
置 置置为 为为出 出出厂 厂厂默 默默认 认认设 设设置 置
息
多 多多信 信信息 息
可选附件.................................................188
质保信息.................................................188
格
格 格
..................................................189
SD卡插槽.................................................189
接口.....................................................189
容
.......................................147
要
法
..............................................162
..............................................169
..............................................170
..............................................173
..............................................174
品
...........................................176
置
..............................................188
.....................................148
.....................................150
る
...........................161
.....................................187
7
Page 8

InstallationGuide
电缆.....................................................192
工作条件.................................................193
功耗.....................................................193
8
Page 9

Readthisrst
ReadthroughthisInstallationGuidecarefullybefore
installingtheproduct.KeeptheInstallationGuidefor
futurereference.
Legalconsiderations
Thisproductincludesthefollowinglicences:
•one(1)H.264decoderlicense
Topurchasefurtherlicenses,contactyourreseller.
Liability
Everycarehasbeentakeninthepreparationofthis
document.PleaseinformyourlocalAxisofceofany
inaccuraciesoromissions.AxisCommunicationsABcannot
beheldresponsibleforanytechnicalortypographicalerrors
andreservestherighttomakechangestotheproductand
manualswithoutpriornotice.AxisCommunicationsAB
makesnowarrantyofanykindwithregardtothematerial
containedwithinthisdocument,including,butnotlimited
to,theimpliedwarrantiesofmerchantabilityandtnessfor
aparticularpurpose.AxisCommunicationsABshallnot
beliablenorresponsibleforincidentalorconsequential
damagesinconnectionwiththefurnishing,performance
oruseofthismaterial.Thisproductisonlytobeusedfor
itsintendedpurpose.
Intellectualpropertyrights
AxisABhasintellectualpropertyrightsrelatingto
technologyembodiedintheproductdescribedinthis
document.Inparticular,andwithoutlimitation,these
intellectualpropertyrightsmayincludeoneormoreof
thepatentslistedataxis.com/patent.htmandoneormore
additionalpatentsorpendingpatentapplicationsinthe
USandothercountries.
Thisproductcontainslicensedthird-partysoftware.See
themenuitem“About”intheproduct’suserinterfacefor
moreinformation.
ThisproductcontainssourcecodecopyrightApple
Computer,Inc.,underthetermsofApplePublicSource
License2.0(seeopensource.apple.com/apsl).Thesource
codeisavailablefromdeveloper.apple.com/bonjour/
Equipmentmodications
Thisequipmentmustbeinstalledandusedin
strictaccordancewiththeinstructionsgiveninthe
userdocumentation.Thisequipmentcontainsno
user-serviceablecomponents.Unauthorizedequipment
changesormodicationswillinvalidateallapplicable
regulatorycerticationsandapprovals.
Trademarkacknowledgements
AXISCOMMUNICATIONS,AXISandVAPIXareregistered
trademarksortrademarkapplicationsofAxisABinvarious
jurisdictions.Allothercompanynamesandproductsare
trademarksorregisteredtrademarksoftheirrespective
companies.
Apple,Boa,Apache,Bonjour,Ethernet,InternetExplorer,
Linux,Microsoft,Mozilla,Real,SMPTE,QuickTime,UNIX,
Windows,WindowsVistaandWWWareregistered
trademarksoftherespectiveholders.Javaandall
Java-basedtrademarksandlogosaretrademarksor
registeredtrademarksofOracleand/oritsafliates.The
UPnPWordMarkandUPnPLogoaretrademarksofOpen
ConnectivityFoundation,Inc.intheUnitedStatesorother
countries.
SD,SDHCandSDXCaretrademarksorregisteredtrademarks
ofSD-3C,LLCintheUnitedStates,othercountriesorboth.
Also,miniSD,microSD,miniSDHC,microSDHC,microSDXC
arealltrademarksorregisteredtrademarksofSD-3C,LLC
intheUnitedStates,othercountriesorboth.
Regulatoryinformation
Europe
ThisproductcomplieswiththeapplicableCEmarking
directivesandharmonizedstandards:
•ElectromagneticCompatibility(EMC)Directive
2014/30/EU.SeeElectromagneticcompatibility(EMC)
9.
•LowVoltage(LVD)Directive2014/35/EU.SeeSafety10.
•RestrictionsofHazardousSubstances(RoHS)Directive
201 1/65/EU.SeeDisposalandrecycling10.
Acopyoftheoriginaldeclarationofconformitymaybe
obtainedfromAxisCommunicationsAB.SeeContact
information10.
Electromagneticcompatibility(EMC)
Thisequipmenthasbeendesignedandtestedtofulll
applicablestandardsfor:
•Radiofrequencyemissionwheninstalledaccordingto
theinstructionsandusedinitsintendedenvironment.
•Immunitytoelectricalandelectromagneticphenomena
wheninstalledaccordingtotheinstructionsandused
initsintendedenvironment.
USA
Thisequipmenthasbeentestedusinganunshielded
networkcable(UTP)andfoundtocomplywiththelimits
foraClassAdigitaldevice,pursuanttopart15oftheFCC
rules.Thisequipmenthasalsobeentestedusingashielded
networkcable(STP)andfoundtocomplywiththelimitsfor
aClassAdigitaldevice,pursuanttopart15oftheFCCrules.
Theselimitsaredesignedtoprovidereasonableprotection
againstharmfulinterferencewhentheequipmentis
operatedinacommercialenvironment.Thisequipment
generates,uses,andcanradiateradiofrequencyenergy
and,ifnotinstalledandusedinaccordancewiththe
instructionmanual,maycauseharmfulinterferenceto
radiocommunications.Operationofthisequipmentin
aresidentialareaislikelytocauseharmfulinterference
inwhichcasetheuserwillberequiredtocorrectthe
interferenceathisownexpense.
Canada
ThisdigitalapparatuscomplieswithCANICES-3(ClassA).
Theproductshallbeconnectedusingashieldednetwork
cable(STP)thatisproperlygrounded.Cetappareil
numériqueestconformeàlanormeCANNMB-3(classeA).
Leproduitdoitêtreconnectéàl'aided'uncâbleréseau
blindé(STP)quiestcorrectementmisàlaterre.
Europe
ThisdigitalequipmentfulllstherequirementsforRF
emissionaccordingtotheClassAlimitofEN55032.The
productshallbeconnectedusingashieldednetworkcable
(STP)thatisproperlygrounded.Notice!ThisisaClassA
product.Inadomesticenvironmentthisproductmaycause
RFinterference,inwhichcasetheusermayberequired
totakeadequatemeasures.
Australia/NewZealand
ThisdigitalequipmentfulllstherequirementsforRF
emissionaccordingtotheClassAlimitofAS/NZSCISPR32.
Theproductshallbeconnectedusingashieldednetwork
cable(STP)thatisproperlygrounded.Notice!Thisisa
ClassAproduct.Inadomesticenvironmentthisproduct
maycauseRFinterference,inwhichcasetheusermaybe
requiredtotakeadequatemeasures.
Japan
Page 10
この装置は、クラスA情報技術装置です。この装
置を家庭環境で使⽤すると電波妨害を引き起こす
ことがあります。この場合には使⽤者が適切な対
策を講ずるよう要求されることがあります。本
製品は、シールドネットワークケーブル(STP)を
使⽤して接続してください。また適切に接地し
てください。
Korea
이기기는업무용환경에서사용할목적으로적합
성평가를받은기기로서가정용환경에서사용하
는경우전파간섭의우려가있습니다.적절히접
지된STP(shieldedtwistedpair)케이블을사용하
여제품을연결하십시오.
Safety
ThisproductcomplieswithIEC/EN/UL62368-1,safetyof
audio/videoandITequipmentandIEC/EN/UL60950-22,
SafetyofInformationTechnologyEquipment.Theproduct
shallbegroundedusingboththeprotectiveearthwirein
thepowercableandthegroundingbraid.Makesureboth
endsoftheprotectiveearthwireandthegroundingbraid
areincontactwiththeirrespectivegroundingsurfaces.
Thepowersupplyusedwiththisproductshallfulllthe
requirementsforSafetyExtraLowVoltage(SELV)according
toclause2.2ofIEC/UL60950-1orCEC/NECClass2source
ofsupplyasdenedintheCanadianElectricalCode,CSA
C22.1andNationalElectricalCode,ANSI/NFPA70.
Disposalandrecycling
Whenthisproducthasreachedtheendofitsusefullife,
disposeofitaccordingtolocallawsandregulations.For
informationaboutyournearestdesignatedcollectionpoint,
contactyourlocalauthorityresponsibleforwastedisposal.
Inaccordancewithlocallegislation,penaltiesmaybe
applicableforincorrectdisposalofthiswaste.
Europe
Thissymbolmeansthattheproductshallnotbe
disposedoftogetherwithhouseholdorcommercialwaste.
Directive2012/19/EUonwasteelectricalandelectronic
equipment(WEEE)isapplicableintheEuropeanUnion
memberstates.Topreventpotentialharmtohumanhealth
andtheenvironment,theproductmustbedisposedofin
anapprovedandenvironmentallysaferecyclingprocess.
Forinformationaboutyournearestdesignatedcollection
point,contactyourlocalauthorityresponsibleforwaste
disposal.Businessesshouldcontacttheproductsupplierfor
informationabouthowtodisposeofthisproductcorrectly.
Thisproductcomplieswiththerequirementsof
Directive2011/65/EUontherestrictionoftheuseof
certainhazardoussubstancesinelectricalandelectronic
equipment(RoHS).
China
电
气
实
装
部
分
0:表示该有毒有害物质在该部件所有均质材料中
的含量均在GB/T26572标准规定的限量要求以下。
X:表示该有毒有害物质至少在该部件的某一均质
材料中的含量超出GB/T26572标准规定的限量要
求。
Contactinformation
AxisCommunicationsAB
Emdalavägen14
22369Lund
Sweden
Tel:+46462721800
Fax:+4646136130
axis.com
00000
X
Warrantyinformation
ForinformationaboutAxis’productwarrantyandthereto
relatedinformation,gotoaxis.com/warranty
Support
Shouldyourequireanytechnicalassistance,pleasecontact
yourAxisreseller.Ifyourquestionscannotbeanswered
immediately,yourresellerwillforwardyourqueriesthrough
theappropriatechannelstoensurearapidresponse.Ifyou
areconnectedtotheInternet,youcan:
•downloaduserdocumentationandsoftwareupdates
•ndanswerstoresolvedproblemsintheFAQdatabase.
Searchbyproduct,category,orphrase
•reportproblemstoAxissupportstaffbylogginginto
yourprivatesupportarea
•chatwithAxissupportstaff
•visitAxisSupportataxis.com/support
Learnmore!
VisitAxislearningcenteraxis.com/academyforuseful
trainings,webinars,tutorialsandguides.
Thisproductcomplieswiththerequirementsof
SJ/T11364-2014,Markingfortherestrictionofhazardous
substancesinelectricalandelectronicproducts.
有毒有害物质或元素
部
件
名
称
汞
铅
(Pb)
镉
(Hg)
六价
(Cd)
铬
(Cr(VI))
多溴
多溴
联苯
二苯
(PB-
醚
B)
(PBDE)
Page 11

AXISQ8685-EPTZNetworkCamera
Safetyinformation
Hazardlevels
DANGER
Indicatesahazardoussituationwhich,ifnotavoided,willresultindeathorseriousinjury.
WARNING
Indicatesahazardoussituationwhich,ifnotavoided,couldresultindeathorseriousinjury.
CAUTION
Indicatesahazardoussituationwhich,ifnotavoided,couldresultinminorormoderate
injury.
NO
TICE
NO NO
TICE TICE
Indicatesasituationwhich,ifnotavoided,couldresultindamagetoproperty.
Othermessagelevels
Important
Indicatessignicantinformationwhichisessentialfortheproducttofunctioncorrectly.
Note
Indicatesusefulinformationwhichhelpsingettingthemostoutoftheproduct.
EN
11
Page 12

AXISQ8685-EPTZNetworkCamera
Safetyinstructions
DANGER
Riskofelectricshock.Allcablesshallbede-energizedbeforeinstallingorperforming
maintenanceontheproduct.
WARNING
TheAxisproductshallbeinstalledbyatrainedprofessional,andincompliancewithlocal
lawsandregulations.
CAUTION
Riskofinjury.Movingparts.Keepyourbodypartsawayfromtheproductwhenin
operation.Disconnectfrompowersupplybeforeinstallingorperformingmaintenance
ontheproduct.
CAUTION
Riskofinjury.Hotsurface.Donottouchtheproductwheninoperation.Disconnect
frompowersupplyandallowthesurfacestocoolbeforeperformingmaintenanceon
theproduct.
NO
TICE
NO NO
TICE TICE
•TheAxisproductshallbeusedincompliancewithlocallawsandregulations.
•StoretheAxisproductinadryandventilatedenvironment.
•AvoidexposingtheAxisproducttoshocksorheavypressure.
•Donotinstalltheproductonunstablepoles,brackets,surfacesorwalls.
•UseonlyapplicabletoolswheninstallingtheAxisproduct.Usingexcessiveforcewith
powertoolscouldcausedamagetotheproduct.
•Donotusechemicals,causticagents,oraerosolcleaners.
•Useacleanclothdampenedwithpurewaterforcleaning.
•Useonlyaccessoriesthatcomplywiththetechnicalspecicationofyourproduct.These
canbeprovidedbyAxisorathirdparty.AxisrecommendsusingAxispowersource
equipmentcompatiblewithyourproduct.
•UseonlysparepartsprovidedbyorrecommendedbyAxis.
•Donotattempttorepairtheproductyourself.ContactAxissupportoryourAxisreseller
forservicematters.
•Donotpointthecameralenstowardthesunorotherhigh-intensityradiationsources
becausethiscouldcausedamagetothecamera.
Transportation
NO
TICE
NO NO
TICE TICE
•WhentransportingtheAxisproduct,usetheoriginalpackagingorequivalenttoprevent
damagetotheproduct.
12
Page 13

AXISQ8685-EPTZNetworkCamera
Battery
TheAxisproductusesa3.0VBR2032lithiumbatteryasthepowersupplyforitsinternalreal-time
clock(RTC).Undernormalconditionsthisbatterywilllastforaminimumofveyears.
LowbatterypoweraffectstheoperationoftheRTC,causingittoresetateverypower-up.When
thebatteryneedsreplacing,alogmessagewillappearintheproduct’sserverreport.Formore
informationabouttheserverreport,seetheproduct´ssetuppagesorcontactAxissupport.
Thebatteryshouldnotbereplacedunlessrequired,butifthebatterydoesneedreplacing,contact
Axissupportataxis.com/supportforassistance.
Lithiumcoincell3.0Vbatteriescontain1,2-dimethoxyethane;ethyleneglycoldimethylether
(EGDME),CASno.110-71-4.
WARNING
•Riskofexplosionifthebatteryisincorrectlyreplaced.
•ReplaceonlywithanidenticalbatteryorabatterywhichisrecommendedbyAxis.
•Disposeofusedbatteriesaccordingtolocalregulationsorthebatterymanufacturer's
instructions.
13EN14
Page 14

Page 15

Packagecontents
•AXISQ8685–EPTZNetworkCamera
•Powerconnector
•I/Oconnector
•Torx®bitT20andT30
•Printedmaterials
-InstallationGuide(thisdocument)
-Extraserialnumberlabel(2x)
-AVHSAuthenticationkey
AXISQ8685-EPTZNetworkCamera
EN
15
Page 16
AXISQ8685-EPTZNetworkCamera
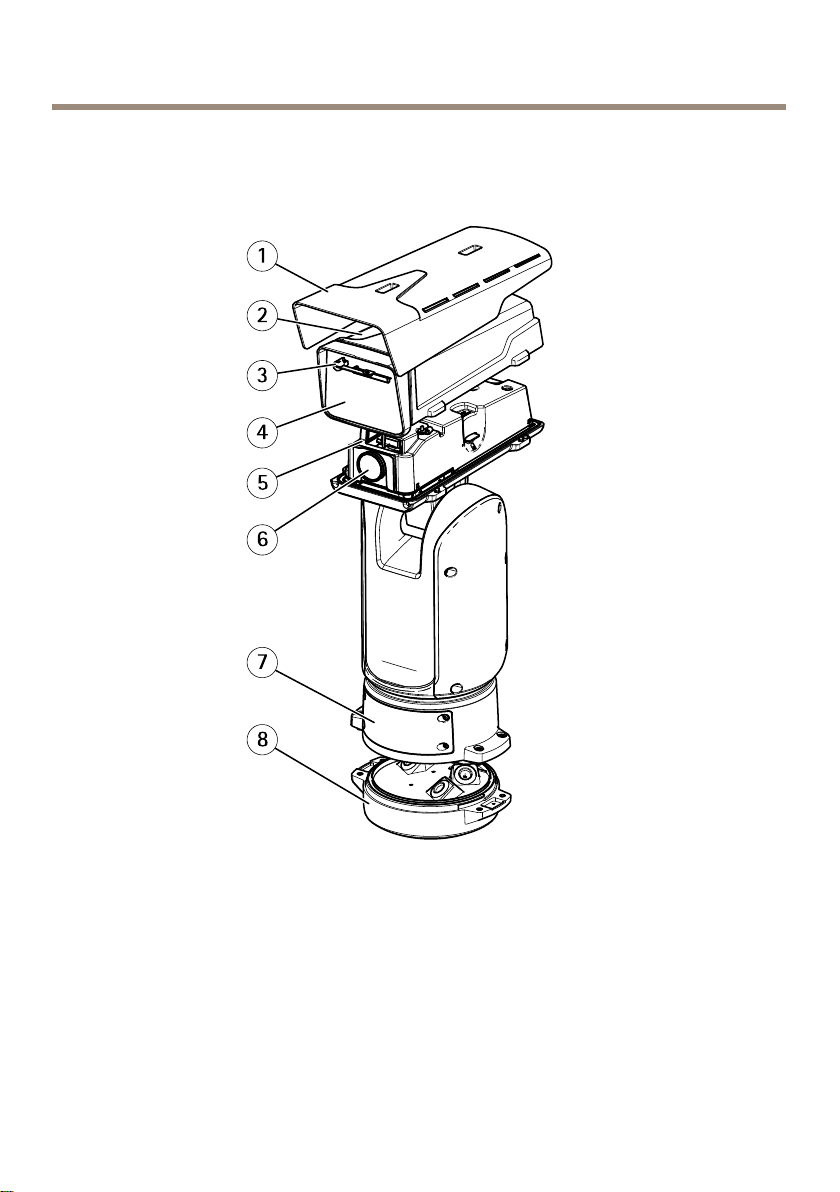
Hardwareoverview
Forspecicationsofthehardwarecomponents,seeSpecicationsonpage31.
1
Sunshield
2
Topcover
3
Wiper
4
Frontwindow
5
Innercover
6
Lens
7
Lid
8
Baseunit
16
Page 17
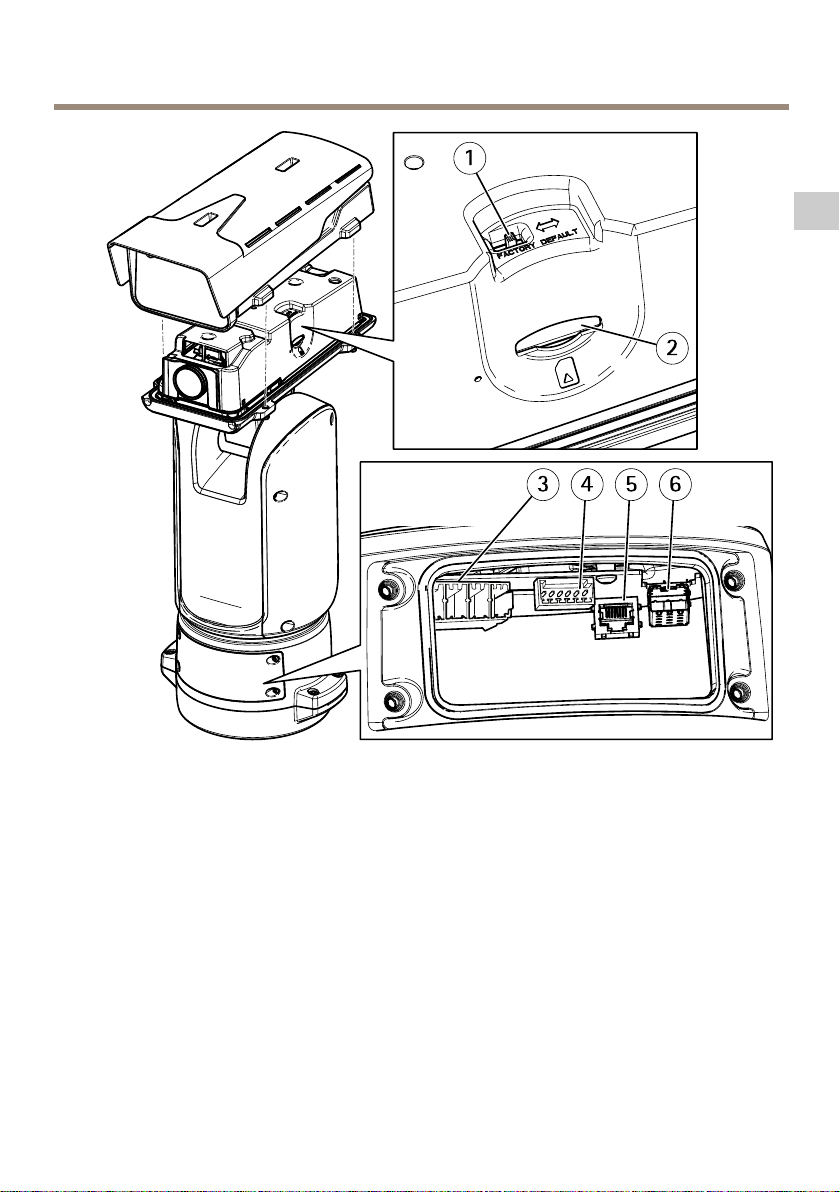
AXISQ8685-EPTZNetworkCamera
EN
1
Factorydefaultswitch
2
SDmemorycardslot
3
Inputpowerconnector
4
I/Oconnector
5
RJ45connector
6
SFPslotforSFPmodule(SFPmodulenotincluded)
17
Page 18
AXISQ8685-EPTZNetworkCamera
Howtoinstalltheproduct
DANGER
Riskofelectricshock.Allcablesshallbede-energizedbeforeinstallingtheproduct.
CAUTION
Theelectricalconnectionsandconduitinstallationsshallbemadebyacertiedelectrician
andincompliancewithlocalregulations.
CAUTION
Riskofinjury.Movingparts.Keepyourbodypartsawayfromtheproductwhenin
operation.Disconnectfrompowersupplybeforeinstallingorperformingmaintenance
ontheproduct.
CAUTION
Riskofinjury.Hotsurface.Donottouchtheproductwheninoperation.Disconnect
frompowersupplyandallowthesurfacestocoolbeforeperformingmaintenanceon
theproduct.
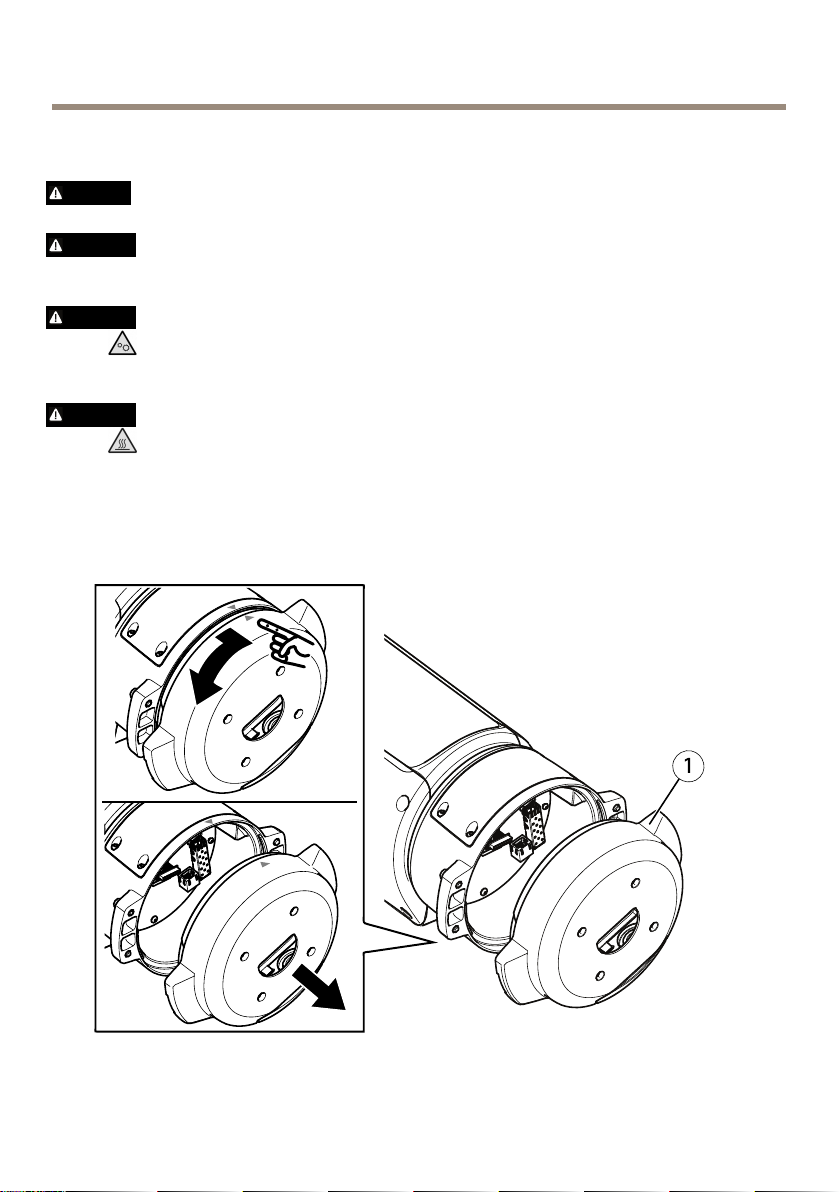
Mountthebaseunit
1
Baseunit
18
Page 19
AXISQ8685-EPTZNetworkCamera
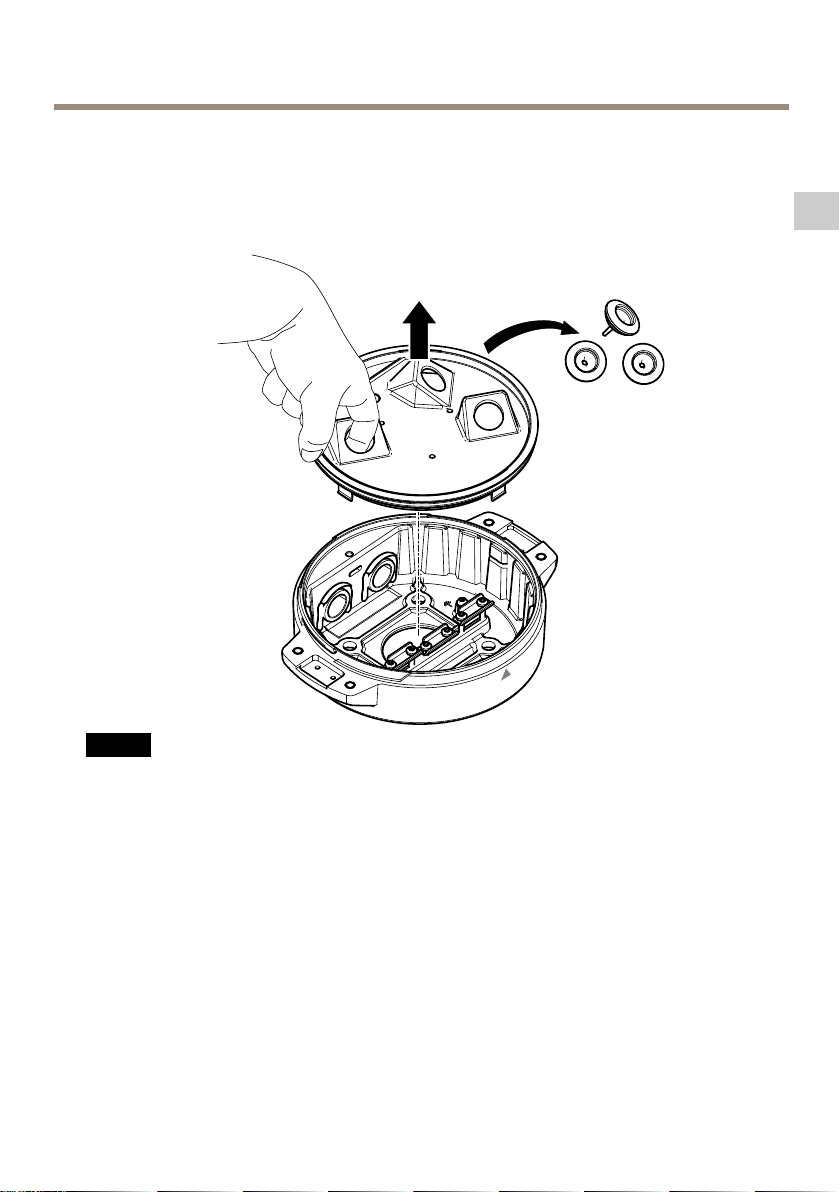
1.Removethefourbaseunitscrews(T30).
2.Simultaneouslypullandturnthebaseunitcounterclockwiseuntilthearrowsonthebase
unitandtherestoftheunitarealigned.
3.Removethebaseunit.
EN
NO
TICE
NO NO
TICE TICE
Donotusesharptoolswhenremovingthetransparentbaseunitcover.
4.Removethetransparentbaseunitcover.
19
Page 20
AXISQ8685-EPTZNetworkCamera
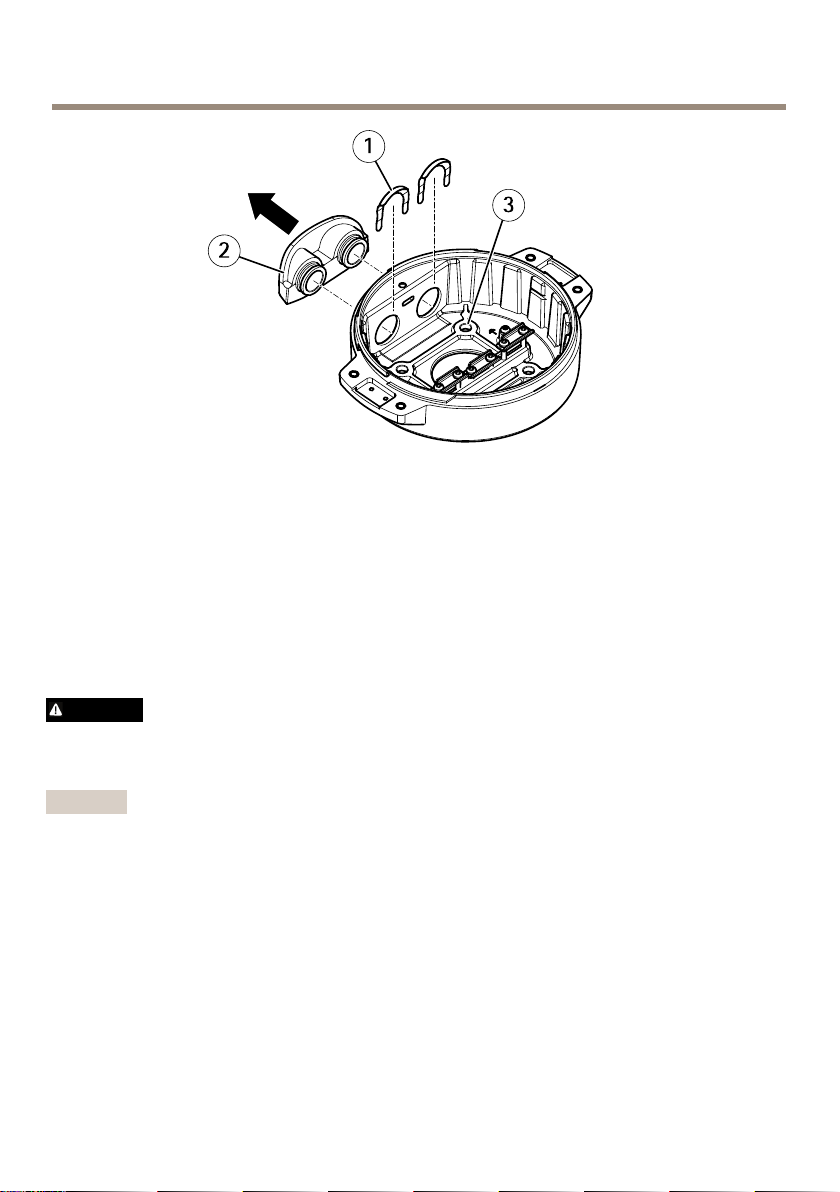
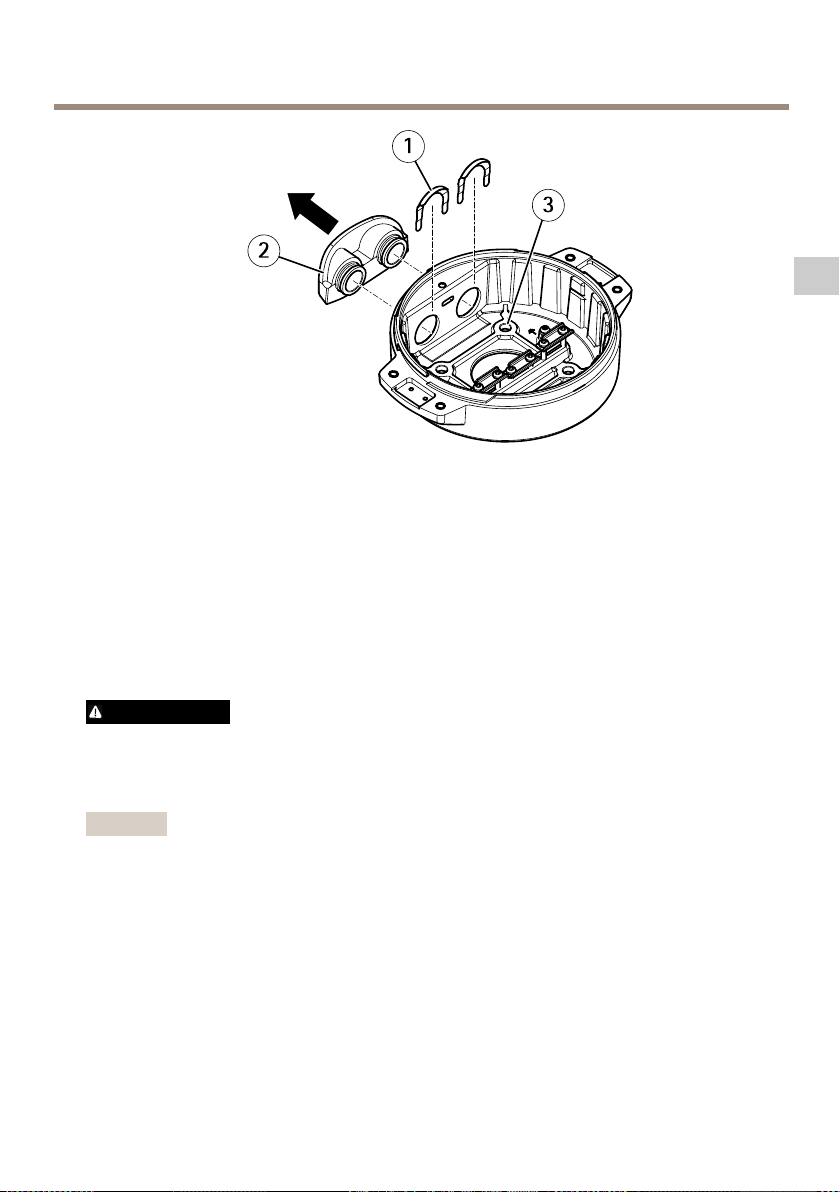
1
Conduitcoverclip
2
Conduitcover
3
Screwhole(x4)
5.Forconduitinstallationsonly:removethetwoconduitcoverclipsfollowedbythe
conduitcover.
6.Attachthebaseunittothemountingsurfaceusingtheappropriatefastenersinthe
fourscrewholes.
Routethecables
WARNING
Riskofelectricshock.Theproductshallbegroundedusingboththeprotectiveearthwire
inthepowercableandthegroundingbraid.Makesurebothendsoftheprotectiveearth
wireandthegroundingbraidareincontactwiththeirrespectivegroundingsurfaces.
Important
Useonlycablesthatcomplywiththespeciedcablearea.Formoreinformation,see
Cablethicknessonpage34.
20
Page 21
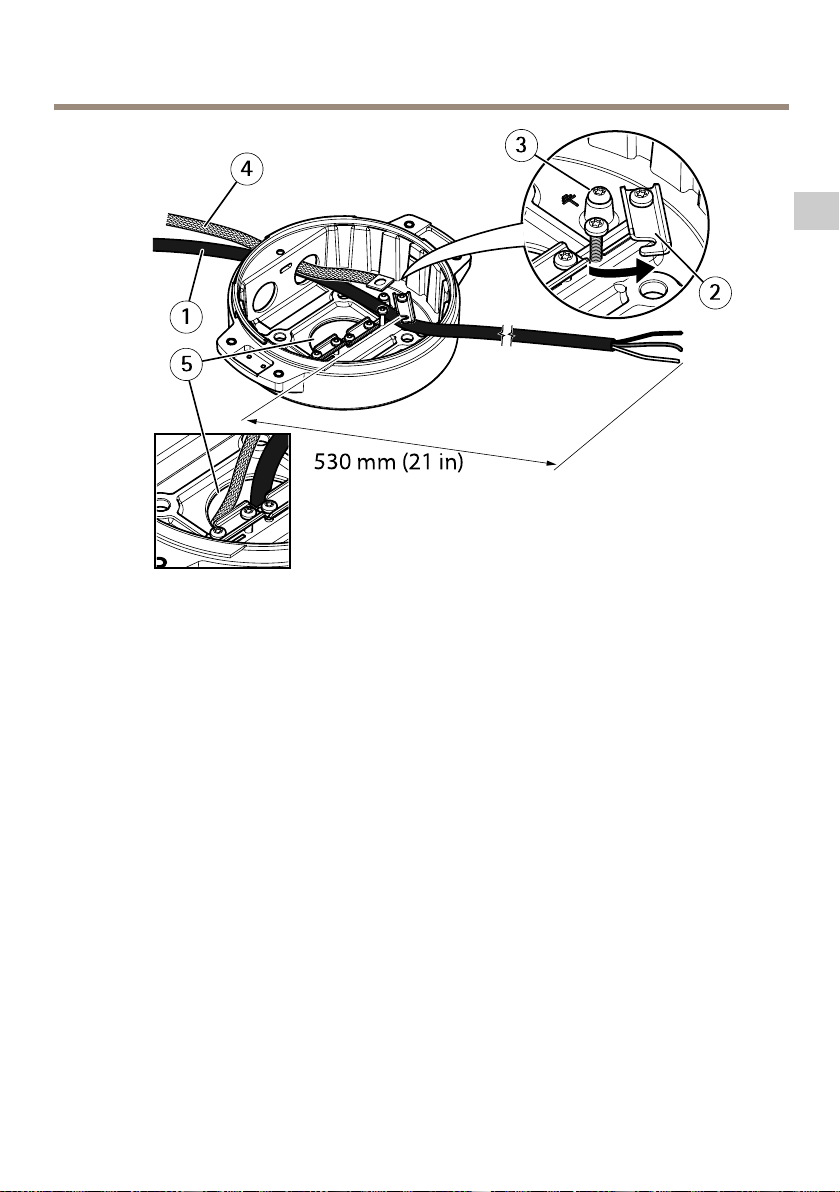
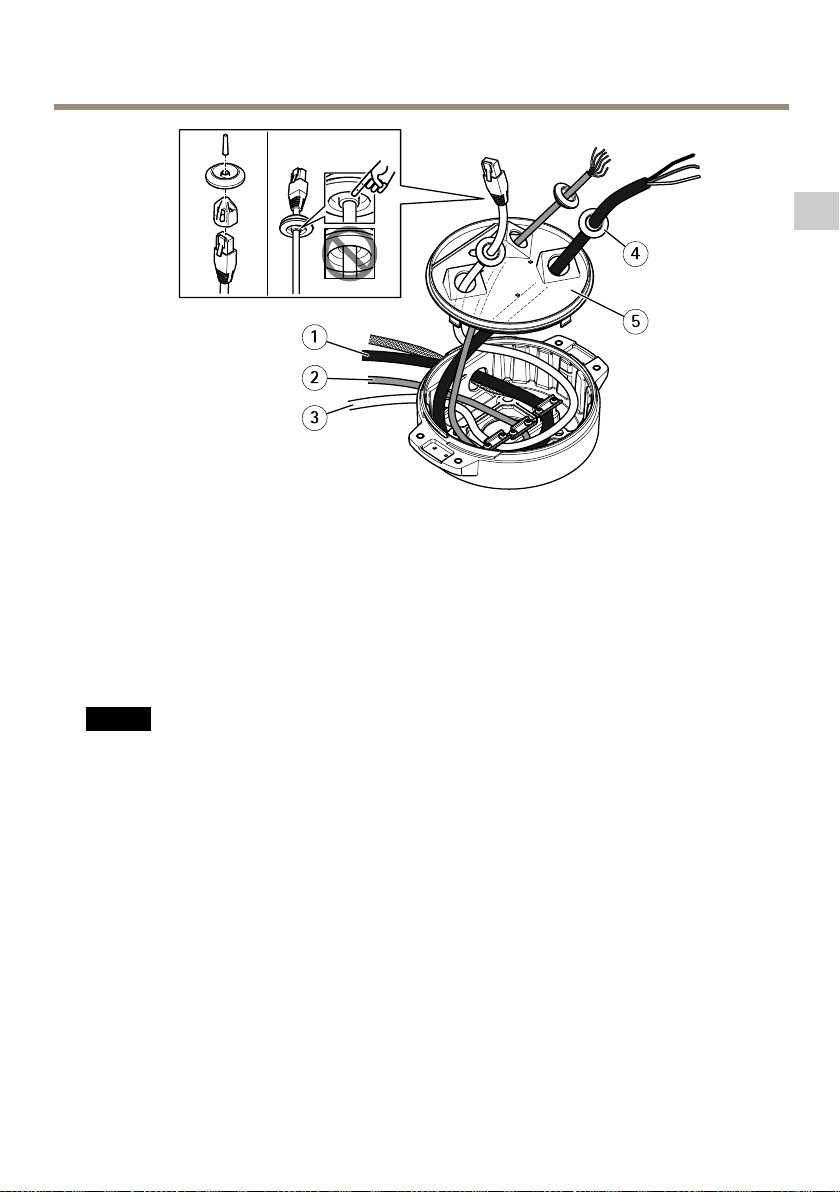
1
Powercable(notincluded)
2
Strainrelief
3
Groundingscrew
4
Groundingbraid(notincluded)
5
Bottomcablehole
AXISQ8685-EPTZNetworkCamera
EN
1.Installtheoptionalconduitadapters(notincluded).
2.Connectthegroundingbraidtothegroundingscrew.
3.Insertthepowercable,I/Ocableandnetworkcablethroughtheholeinthebaseunitas
shownintheillustrationabove.Alternativelyinsertthemthroughthebottomcablehole.
4.Insertthepowercablethroughthestrainreliefwithadistanceof530mm(21in)from
thestrainrelieftotheendofthecable.
21
Page 22
AXISQ8685-EPTZNetworkCamera
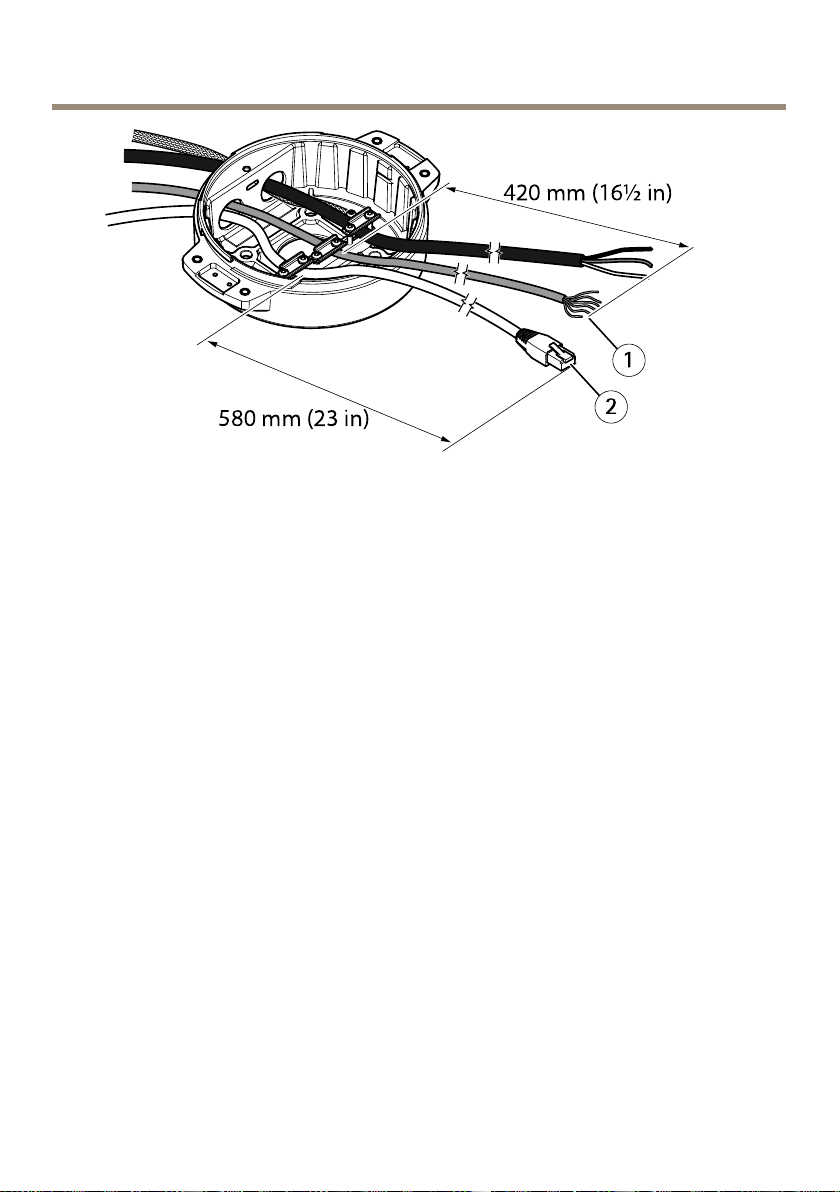
1
I/Ocable(optional,notincluded)
2
Networkcable(notincluded)
5.InserttheI/Ocable(optional)throughthestrainreliefwithadistanceof420mm(16½
in)fromthestrainrelieftotheendofthecable.
6.Insertthenetworkcable(opticalbercableand/orRJ45cable)throughthestrainrelief
withadistanceof580mm(23in)fromthestrainrelieftotheendoftheconnector.
Formoreinformationondifferentnetworkconnectivityoptions,seeInstallthenetwork
linkonpage26.
7.Closeandtightenthethreestrainreliefs.
22
Page 23
AXISQ8685-EPTZNetworkCamera
1
Powercable(notincluded)
2
I/Ocable(optional,notincluded)
3
Networkcable(notincluded)
4
Cablegasket
5
Transparentbaseunitcover
8.Fitcablegasketsonthecables.SeeCablethicknessonpage34.
9.Insertthepower,I/Oandnetworkcablesincludingthecablegasketsthroughtheholesin
thetransparentbaseunitcoverandarrangethecablesasshownintheillustrationabove.
NO
TICE
NO NO
TICE TICE
IfyouusebothanopticalbrecableandanRJ45cablefornetworkconnectivity,routethe
opticalbrecablethroughthesamecablegasketastheI/Ocable.Applyasealantbetween
thecablesandthecablegaskettopreventleakage.Formoreinformationondifferent
networkconnectivityoptions,seeInstallthenetworklinkonpage26.
EN
10.Replacethetransparentbaseunitcoveronthebaseunitandtthecablegasketsinside
theholes.
23
Page 24
AXISQ8685-EPTZNetworkCamera
1
I/Oconnector
2
Powerconnector
3
O-ring
NO
TICE
NO NO
TICE TICE
Makesuretheprotectiveearthwireisabout10mm(3/8in)longerthantheothertwo
wires(inthepowercable),sothatitwillnotbedisconnectedaccidentallyifpulled.
Note
Werecommendthatyoustripapproximately90mm(3½in)ofthepowercablejacketand
70mm(2¾in)oftheI/Ocablejacketforeaseofinstallation.
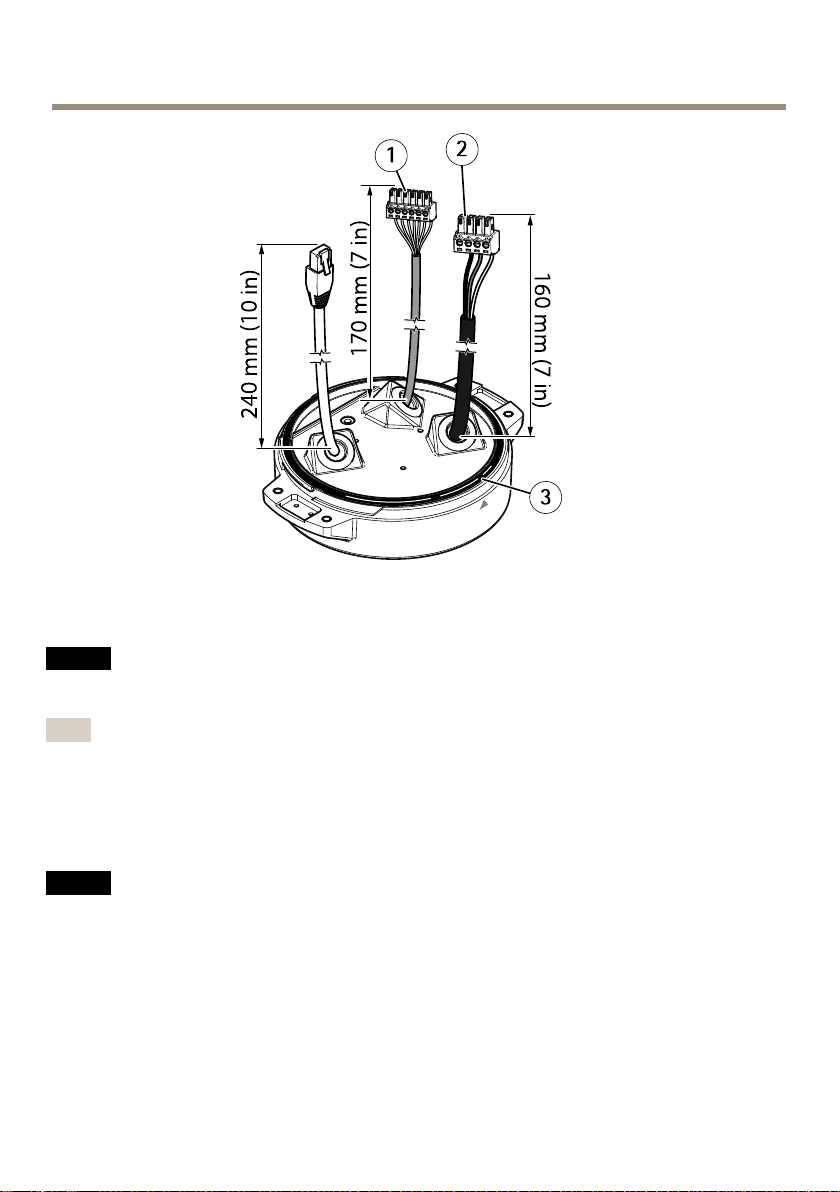
11.InstallthepowerandI/Oconnectors,seeConnectorsonpage31.
12.Adjustthenetwork,I/Oandpowercablessothatthedistancefromthecablegasketto
theendoftheconnectoris240mm(10in),170mm(7in),and160mm(7in)respectively.
NO
TICE
NO NO
TICE TICE
MakesurethattheO-ringisttedcorrectlyaroundthetransparentbaseunitcover.
24
Page 25
AXISQ8685-EPTZNetworkCamera
EN
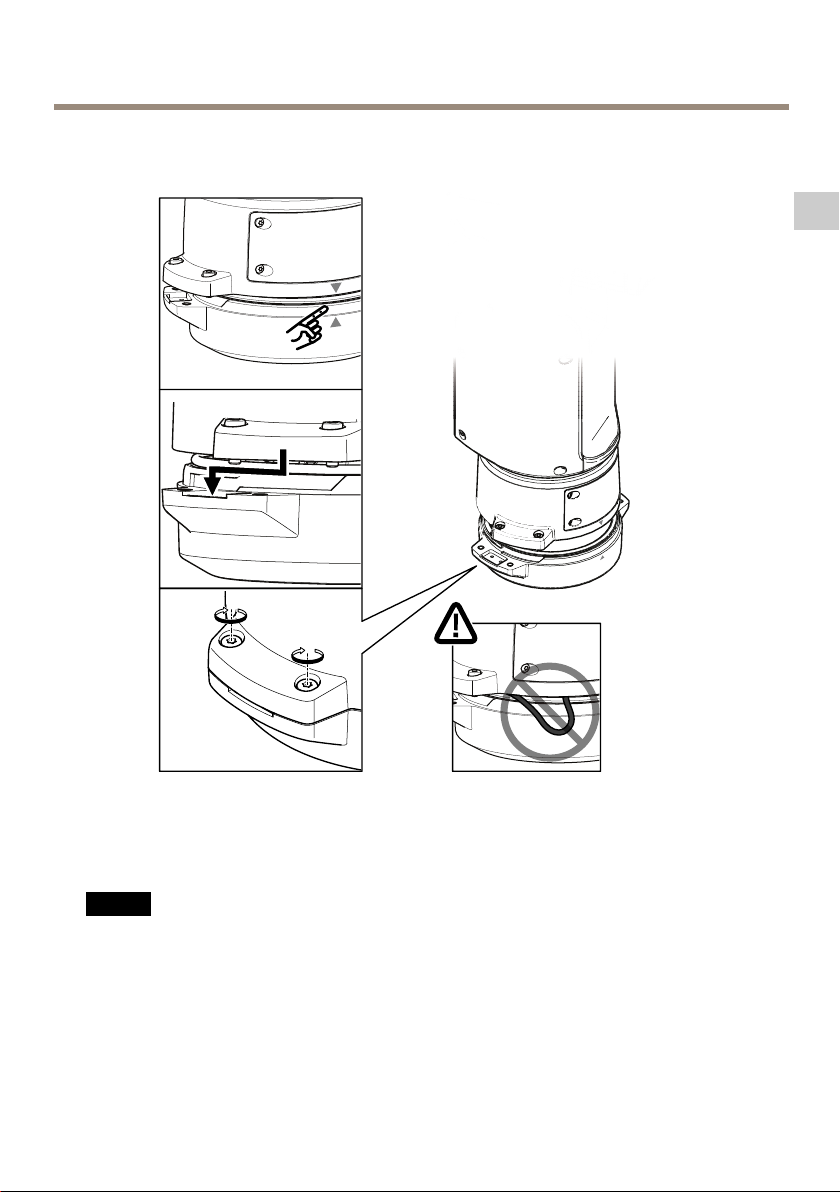
13.Replacethepositioningunitonthebaseunitmakingsurethatthearrowsonthetwo
unitsarealigned.
14.Turnthepositioningunitclockwisebacktoitsoriginalpositionandtightenthefour
baseunitscrews(torque3.0Nm).
NO
TICE
NO NO
TICE TICE
Makesurethatthecablesdonotgetnotpinchedwhenmountingthetwounits.
25
Page 26
AXISQ8685-EPTZNetworkCamera
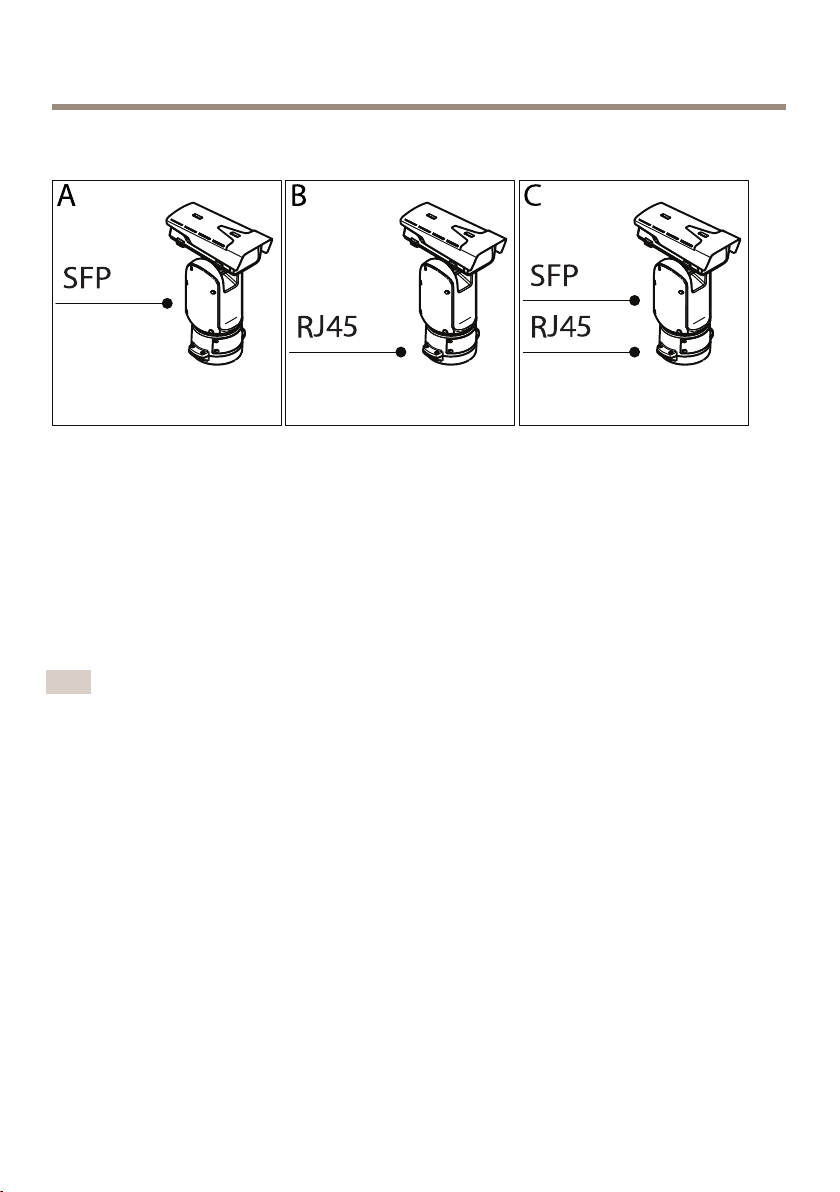
Installthenetworklink
Youhavedifferentoptionsforinstallingthenetworklink:
•A:viaanopticalberorRJ45cableconnectedtotheSFPmodule(witharespective
connector)intheSFPslot.
•B:viaanRJ45cableconnectedtothexedRJ45connector.
•C:viabothoftheabove,inwhichcaseconnectionviatheSFPmodulefunctionsasthe
primarynetworklinkandconnectionviathexedRJ45connectorasthefail-overlink.
Formoreinformationonnetworkconnectorlocations,seeConnectorsonpage31.
Note
•SFPmoduleisnotincluded.FormoreinformationonavailableSFPmodules,see
www.axis.com
•EstablishinganetworklinkonlyviatheopticalbercableusingtherespectiveSFPmodule
worksasastand-alonesolutionforlongrangecablinginstallations.
26
Page 27
AXISQ8685-EPTZNetworkCamera
Connectthecables
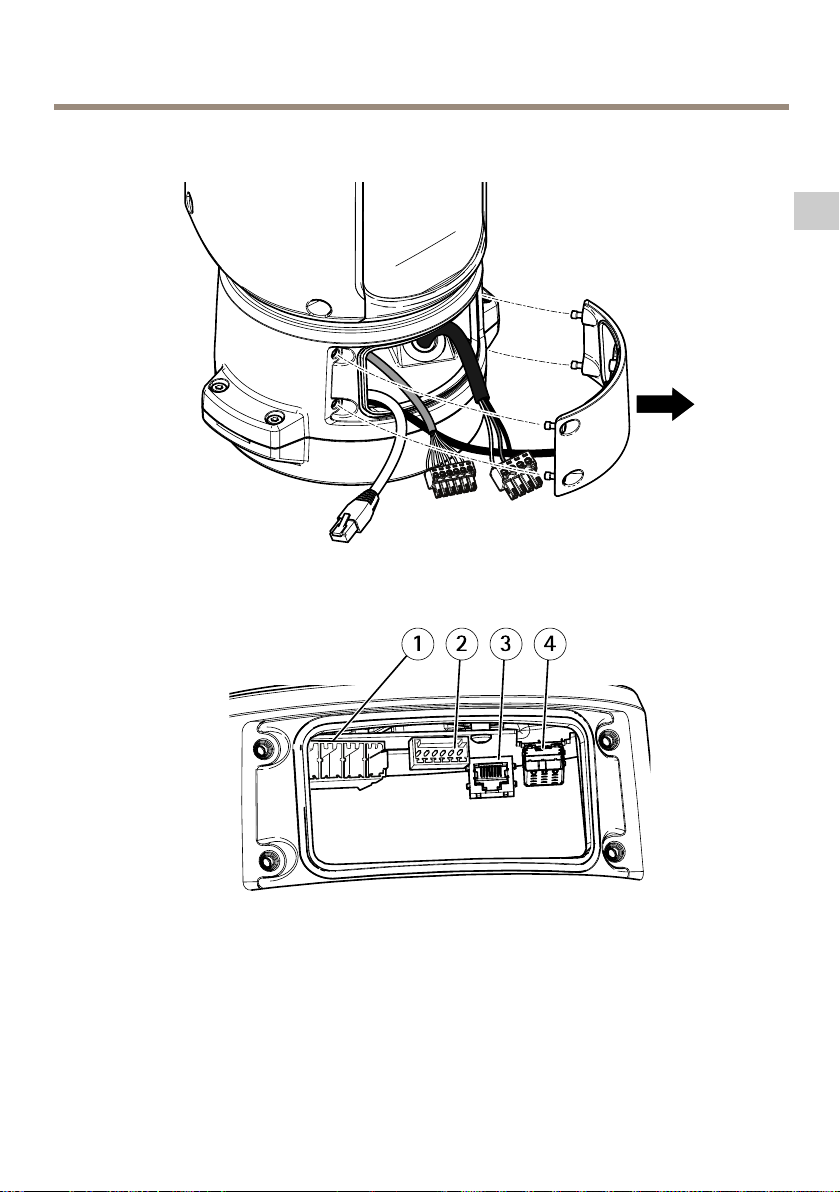
1.Loosenthefourlidscrews(T20)andremovethelid.
EN
1
Inputpowerconnector
2
I/Oconnector
3
RJ45connector
4
SFPslotforSFPmodule(SFPmodulenotincluded)
2.Connectthenetwork(opticalbreand/orRJ45),I/Oandpowercables.Formore
informationondifferentnetworkconnectivityoptions,seeInstallthenetworklinkon
page26.
27
Page 28

AXISQ8685-EPTZNetworkCamera
3.Replacethelidandtightenthefourlidscrews(torque3.0Nm).
4.Applypowertotheproduct.
InstallanSDcard(optional)
AstandardorhighcapacitySDcard(notincluded)canbeusedtostorerecordingslocallyinthe
product.SeeSpecicationsonpage31beforeinstallingtheSDcard.
1.Disconnectpowerfromtheproduct.
2.Removethefourtopcoverscrewsandremovethetopcover.
3.InsertanSDcardintotheSDcardslot,seeHardwareoverviewonpage16.
4.Replacethetopcoverandtightenthescrews(torque3.0Nm).
5.Re-connectpowertotheproduct.
Howtoaccesstheproduct
AXISIPUtilityandAXISCameraManagementarerecommendedmethodsforndingAxisproducts
onthenetworkandassigningthemIPaddressesinWindows®.Bothapplicationsarefreeandcan
bedownloadedfromaxis.com/support
Theproductcanbeusedwithmostoperatingsystemsandbrowsers.Werecommendthefollowing
browsers:
•InternetExplorer
•Safari
•Chrome
Formoreinformationaboutusingtheproduct,seetheUserManualavailableataxis.com
®
withOSX
TM
®
withWindows
®
orFirefox
®
withotheroperatingsystems.
®
28
Page 29

Resettofactorydefaultsettings
AXISQ8685-EPTZNetworkCamera
CAUTION
Riskofinjury.Movingparts.Keepyourbodypartsawayfromtheproductwhenin
operation.Disconnectfrompowersupplybeforeinstallingorperformingmaintenance
ontheproduct.
CAUTION
Riskofinjury.Hotsurface.Donottouchtheproductwheninoperation.Disconnect
frompowersupplyandallowthesurfacestocoolbeforeperformingmaintenanceon
theproduct.
Important
Resettofactorydefaultshouldbeusedwithcaution.Aresettofactorydefaultwillreset
allsettings,includingtheIPaddress,tothefactorydefaultvalues.
Note
Theinstallationandmanagementsoftwaretoolsareavailablefromthesupportpageson
www.axis.com/support/downloads
Toresettheproducttothefactorydefaultsettings:
1.Disconnectpowerfromtheproduct.
2.Removethefourtopcoverscrewsandremovethetopcover.
3.ChangethepositionoftheFactorydefaultswitch,seeHardwareoverviewonpage16.
4.Replacethetopcoverandtightenthescrews(torque3.0Nm).
5.Re-connectpowertotheproduct.
Itisalsopossibletoresetparameterstofactorydefaultviathewebinterface.GotoSetup>
SystemOptions>MaintenanceandclickDefault.
EN
29
Page 30

AXISQ8685-EPTZNetworkCamera
Furtherinformation
•Forthelatestversionofthisdocument,seeaxis.com
•Theusermanualisavailableataxis.com
•Tocheckifthereisupdatedrmwareavailableforyourproduct,seeaxis.com/support
•Forusefulonlinetrainingsandwebinars,seeaxis.com/academy
Optionalaccessories
Foracompletelistofavailableaccessoriesforthisproduct,gotoaxis.com>product>Software
&Accessories.
Warrantyinformation
ForinformationaboutAxis’productwarrantyandtheretorelatedinformation,goto
axis.com/warranty
30
Page 31

AXISQ8685-EPTZNetworkCamera
Specifications
Tondthelatestversionoftheproduct’sdatasheet,gotoaxis.com>[product]>Support&
Documentation.
SDcardslot
CAUTION
Riskofinjury.Movingparts.Keepyourbodypartsawayfromtheproductwhenin
operation.Disconnectfrompowersupplybeforeinstallingorperformingmaintenance
ontheproduct.
CAUTION
Riskofinjury.Hotsurface.Donottouchtheproductwheninoperation.Disconnect
frompowersupplyandallowthesurfacestocoolbeforeperformingmaintenanceon
theproduct.
NO
TICE
NO NO
TICE TICE
•RiskofdamagetoSDcard.Donotusesharptools,metalobjects,orexcessiveforcewhen
insertingorremovingtheSDcard.Useyourngerstoinsertandremovethecard.
•Riskofdatalossandcorruptedrecordings.DonotremovetheSDcardwhiletheproduct
isrunning.UnmounttheSDcardfromtheproduct’swebpagebeforeremoval.
ThisproductsupportsSD/SDHC/SDXCcards(notincluded).
ForSDcardrecommendations,seeaxis.com
EN
Connectors
Networkconnector
RJ45Ethernetconnector.
SFPconnector.
NO
TICE
NO NO
TICE TICE
Theproductshallbeconnectedusingashieldednetworkcable(STP)oranopticalber
cable.Allcablesconnectingtheproducttothenetworkshallbeintendedfortheir
specicuse.Makesurethatthenetworkdevicesareinstalledinaccordancewith
themanufacturer’sinstructions.Forinformationaboutregulatoryrequirements,see
Electromagneticcompatibility(EMC)9.
31
Page 32

AXISQ8685-EPTZNetworkCamera
I/Oconnectors
UsetheI/Oconnectorwithexternaldevicesincombinationwith,forexample,tamperingalarms,
motiondetection,eventtriggering,andalarmnotications.Inadditiontothe0VDCreference
pointandpower(DCoutput),theI/Oconnectorprovidestheinterfaceto:
Digitaloutput-ForconnectingexternaldevicessuchasrelaysandLEDs.Connecteddevicescan
beactivatedbytheVAPIX®ApplicationProgrammingInterfaceorintheproduct’swebpage.
Digitalinput-Forconnectingdevicesthatcantogglebetweenanopenandclosedcircuit,for
examplePIRsensors,door/windowcontacts,andglassbreakdetectors.
Adigitallightsensor-Forreceivingavalueoftheambientlightintensityfromanexternallight
sensor.Thisisusedtocontroltheproduct’sdayandnightfunctionality.
6-pincongurableterminalblock
FunctionPinNotes
0VDC(-)
DCoutput
(Inputor
Output)
1
DCground0VDC
2
Canbeusedtopowerauxiliaryequipment.
Note:Thispincanonlybeusedaspowerout.
3–
Digitalinput–Connecttopin1toactivate,or
6
leaveoating(unconnected)todeactivate.
Digitaloutput–Connecttopin1toactivate,or
leaveoating(unconnected)todeactivate.Ifused
withaninductiveload,e.g.,arelay,connecta
diodeinparallelwiththeload,toprotectagainst
voltagetransients.
Specications
12VDC
Maxload=50mA
0tomax30VDC Congurable
0tomax30VDC,
opendrain,100mA
32
Page 33

1
0VDC(-)
2
DCoutput12V,max50mA
A
I/Oconguredasinput
B
I/Oconguredasoutput
AXISQ8685-EPTZNetworkCamera
EN
Powerconnector
4-pinterminalblockforpowerinput.
24VAC/DCpowerconnector
NO
TICE
NO NO
TICE TICE
Thissectionisvalidforproductspoweredby24VACand24VDConly.
33
Page 34

AXISQ8685-EPTZNetworkCamera
Position
1
2
3
4
240VACpowerconnector
NO
TICE
NO NO
TICE TICE
Thissectionisvalidforproductspoweredby100–240VAConly.
Position
1
2
3
4
24VAC24VDC
ProtectiveearthProtectiveearth
24VACPhase
24VACNeutral
NotconnectedNotconnected
100–240VAC
Protectiveearth
240VACNeutral
Notconnected
240VACPhase
+24V
0V
Cables
Cablethickness
Thecablediameter,whenusingcablegasketsprovidedwiththeproduct,shouldbeintherangeof
5to1 1mm(0.2to0.4in).
NO
TICE
NO NO
TICE TICE
•Usecablesthatkeepwithinthespeciedcablearea
•Selectcablesincompliancewithyourlocalregulations
•Makesureallcableholesareproperlysealed
34
Page 35

AXISQ8685-EPTZNetworkCamera
•Usecablegasketsorcableglandsthatmatchboththecableholeandthecablearea
Forinformationaboutaccessories,suchascablegasketsandcableglandsthatallowforother
cableareas,seewww.axis.com
Operatingconditions
ThisAxisproductisintendedforindoorandoutdooruse.
TemperatureHumidity
Normal:-50°Cto55°C(-58°Fto131°F)
Maximum(intermittent):65°C(149°F)
Coldstart:-40°Cto55°C(-40°Fto131°F)
10–100%RH(non-condensing)
Powerconsumption
TypicalconsumptionMaxconsumption
16W204W
Important
Whenusingthe22m(72ft)AXISCable24VDC/24–240VACwith
AXISQ8685-E24VAC/DC,apowersupplycapableofdelivering400Wisrequiredto
compensateforthepowerlossinthecable.
NO
TICE
NO NO
TICE TICE
Thetypicalpowerconsumptionvaluesarebasedonthefollowing:
EN
•Anylossesinthepowercabledisregarded
•Nopositioningactive
•Nowipermotoractive
•Temperatureat25°C/77°F(allheatersoff)
•OneH.264streamatmaximumresolution
•MJPEGstreamrecordedtoSDcard
35
Page 36

36
Page 37

AXISQ8685-EPTZNetworkCamera
Informationssurlasécurité
Niveauxderisques
DANGER
Indiqueunesituationdangereusequi,siellen'estpasévitée,entraîneraledécèsoudes
blessuresgraves.
AVERTISSEMENT
Indiqueunesituationdangereusequi,siellen'estpasévitée,pourraitentraînerledécès
oudesblessuresgraves.
ATTENTION
Indiqueunesituationdangereusequi,siellen'estpasévitée,pourraitentraînerdes
blessureslégèresoumodérées.
VIS
A AAVIS VIS
Indiqueunesituationqui,siellen'estpasévitée,pourraitendommagerl'appareil.
Autresniveauxdemessage
Important
Indiquelesinformationsimportantes,nécessairespourassurerlebonfonctionnementde
l’appareil.
Note
Indiquelesinformationsutilesquipermettrontd’obtenirlefonctionnementoptimalde
l’appareil.
FR
37
Page 38

AXISQ8685-EPTZNetworkCamera
Consignesdesécurité
DANGER
Risquedechocélectrique.Touslescâblesdoiventêtremishorstensionavantl'installation
ouuneinterventiondemaintenancesurleproduit.
AVERTISSEMENT
LeproduitAxisdoitêtreinstalléparunprofessionnelqualiéetconformémentauxloiset
règlementationslocalesenvigueur.
ATTENTION
Risquesdeblessures.Piècesmobiles.Restezàl'écartduproduitlorsqu'ilestencours
defonctionnement.Débranchezl'alimentationélectriqueavantd'installerleproduitou
d'effectuersonentretien.
ATTENTION
Risquesdeblessures.Surfaceschaudes.Netouchezpasleproduitlorsqu'ilesten
coursdefonctionnement.Débranchezl'alimentationélectriqueetlaissezlessurfaces
refroidiravantd'effectuerl'entretienduproduit.
VIS
A AAVIS VIS
•LeproduitAxisdoitêtreutiliséconformémentauxloisetrèglementslocaux.
•ConserverceproduitAxisdansunenvironnementsecetventilé.
•NepasexposerceproduitAxisauxchocsouauxfortespressions.
•Nepasinstallerceproduitsurdespoteaux,supports,surfacesoumursinstables.
•Utiliseruniquementdesoutilsrecommandéspourl'installationdel'appareilAxis.
L'applicationd'uneforceexcessivesurl'appareilavecdesoutilspuissantspourrait
l'endommager.
•Nepasutiliserdeproduitschimiques,desubstancescaustiquesoudenettoyants
pressurisés.
•Utiliserunchiffonpropreimbibéd'eaupurepourlenettoyage.
•Utiliseruniquementdesaccessoiresconformesauxcaractéristiquestechniquesdevotre
produit.IlspeuventêtrefournisparAxisouuntiers.Axisrecommanded'utiliserun
équipementd'alimentationAxiscompatibleavecvotreproduit.
•UtiliseruniquementlespiècesderechangefourniesourecommandéesparAxis.
•Nepasessayerderéparervous-mêmeceproduit.Contacterl'assistancetechniqued'Axis
ouvotrerevendeurAxispourdesproblèmesliésàl'entretien.
•Évitezdepointerl’objectifdelacaméraverslesoleiloutouteautresourcederadiation
dehauteintensité.Celarisqued’endommagerlacaméra.
38
Page 39

AXISQ8685-EPTZNetworkCamera
Transport
VIS
A AAVIS VIS
•LorsdutransportduproduitAxis,utilisezl'emballaged'origineouunéquivalentpour
éviterd'endommagerleproduit.
Batterie
LeproduitAxisutiliseunebatterieaulithiumBR20323,0Vcommealimentationdesonhorloge
entempsréelinterne(RTC).Dansdesconditionsnormales,cettebatterieauneduréedevie
minimaledecinqans.
Silabatterieestfaible,lefonctionnementdel'horlogeentempsréelpeutêtreaffectéetentraîner
saréinitialisationàchaquemisesoustension.Unmessageenregistréapparaîtdanslerapportde
serveurduproduitlorsquelabatteriedoitêtreremplacée.Pourtoutcomplémentd'information
concernantlerapportdeserveur,reportez-vousauxpagesdeCongurationduproduitoucontactez
l'assistancetechniqued'Axis.
Labatteriedoitêtreremplacéeuniquementencasdebesoin,etpourcefaire,contactezl'assistance
techniqued'Axisàl'adressewww.axis.com/supportetobtenirdel'aide.
Lespilesboutons3,0Vaulithiumcontiennentdu1,2-diméthoxyéthane,éthylèneglycoldiméthyl
éther(EGDME),CASN°1 10-71-4.
AVERTISSEMENT
•Risqued'explosionsilabatterieestremplacéedefaçonincorrecte.
•Remplacez-launiquementparunebatterieidentiqueouunebatterierecommandéepar
Axis.
•Mettezaurebutlesbatteriesusagéesconformémentauxréglementationslocalesou
auxinstructionsdufabricantdelabatterie.
FR
39
Page 40

40
Page 41

Contenudel’emballage
•CaméraréseauPTZAXISQ8685–E
•Connecteurd'alimentation
•ConnecteurE/S
•Torx®emboutT20etT30
•Documentsimprimés
AXISQ8685-EPTZNetworkCamera
FR
-Guided’installation(cedocument)
-Étiquettesupplémentairedenumérodesérie(x2)
-Cléd’authenticationAVHS
41
Page 42

AXISQ8685-EPTZNetworkCamera
Aperçudumatériel
Pourconnaîtrelescaractéristiquesdescomposantsmatériels,consultezCaractéristiquespage58.
1
Pare-soleil
2
Couverclesupérieur
3
Essuyage
4
Fenêtreavant
5
Couvercleinterne
6
Objectif
7
Opercule
8
Unitédebase
42
Page 43

AXISQ8685-EPTZNetworkCamera
FR
1
Commutateurvaleurspardéfaut
2
LogementpourcartemémoireSD
3
Connecteurd'alimentationd'entrée
4
ConnecteurE/S
5
ConnecteurRJ45
6
EmplacementSFPpourmoduleSFP(moduleSFPnoninclus)
43
Page 44

AXISQ8685-EPTZNetworkCamera
Commentinstallerleproduit
DANGER
Risquedechocélectrique.Touslescâblesdoiventêtrehorstensionavantd'installer
leproduit.
ATTENTION
Lesconnexionsélectriquesetlesinstallationsdeconduitesdoiventêtreeffectuéesparun
électriciencertiéetconformémentauxréglementationslocales.
ATTENTION
Risquesdeblessures.Piècesmobiles.Restezàl'écartduproduitlorsqu'ilestencours
defonctionnement.Débranchezl'alimentationélectriqueavantd'installerleproduitou
d'effectuersonentretien.
ATTENTION
Risquesdeblessures.Surfaceschaudes.Netouchezpasleproduitlorsqu'ilesten
coursdefonctionnement.Débranchezl'alimentationélectriqueetlaissezlessurfaces
refroidiravantd'effectuerl'entretienduproduit.
44
Page 45

Montagedel'unitédebase
AXISQ8685-EPTZNetworkCamera
FR
1
Unitédebase
1.Déposerlesquatrevisdel'unité(T30).
2.Tirezettournezsimultanémentl'unitédebasedanslesensanti-horairejusqu'àceque
lesèchessurl'unitédebaseetlerestedel'unitésoientalignées.
3.Déposezl'unitédebase.
45
Page 46

AXISQ8685-EPTZNetworkCamera
VIS
A AAVIS VIS
Nepasutiliserd'outilstranchantslorsdeladéposeducouvercletransparentdel'unitéde
base.
4.Déposezlecouvercletransparentdel'unitédebase.
46
Page 47
AXISQ8685-EPTZNetworkCamera
1
Clipducachedeconduit
2
Cachedeconduit
3
Troudevis(x4)
5.Pourdesinstallationsdeconduituniquement:déposerlesdeuxclipsducachede
conduitsuivisparlecacheduconduit.
6.Fixezl'unitédebaseàlasurfacedemontageenutilisantlesélémentsdexation
appropriésdanslesquatretrousdevis.
FR
Acheminementdescâbles
AVERTISSEMENT
Risquedechocélectrique.Leproduitdoitêtremisàlaterreàl'aideducâbledeprotection
demiseàlaterreducâbled'alimentationetdelatressedeterre.Assurez-vousqueles
deuxextrémitésducâbledeprotectiondemiseàlaterreetlatressedeterresonten
contactaveclessurfacesdemiseàlaterrecorrespondantes.
Important
Utilisezuniquementdescâblesconformesàlazonespéciée.Pourensavoirplus,consultez
Épaisseurducâblepage62.
47
Page 48

AXISQ8685-EPTZNetworkCamera
1
Câbled’alimentation(nonfourni)
2
Réducteurdetension
3
visdemiseàlaterre
4
Tressedeterre(nonfournie)
5
passageducâbleinférieur
1.Installezlesadaptateursdeconduitenoption(nonfournis).
2.Reliezlatressedeterreàlavisdemiseàlaterre.
3.Insérezlecâbled'alimentation,lecâbled'E/Setlecâbleréseauàtraversl'oricede
l'unitédebasecommeillustréci-dessus.Vouspouvezaussilesinsérerdansl'orice
ducâbleinférieur.
4.Insérezlecâbled'alimentationàtraversleréducteurdetensionavecunedistancede
530mm(21po)depuisleréducteurdetensionjusqu'àl'extrémitéducâble.
48
Page 49

AXISQ8685-EPTZNetworkCamera
1
CâbleE/S(enoption,nonfourni)
2
Câbleréseau(noninclus)
5.InsérezlecâbleE/S(enoption)àtraversleréducteurdetensionavecunedistancede
420mm(16½po)duréducteurdetensionjusqu'àl'extrémitéducâble.
6.Insérezlecâbleréseau(câblebreoptiqueet/oucâbleRJ45)àtraversleréducteurde
tensionavecunedistancede580mm(23po)depuisleréducteurdetensionjusqu'à
l'extrémitéduconnecteur.Pourplusd'informationssurlesdifférentesoptionsde
connectivitéréseau,consultezInstallationdelaliaisonréseaupage53.
7.Fermezetserrezlestroisreliefsdetraction.
FR
49
Page 50

AXISQ8685-EPTZNetworkCamera
1
Câbled'alimentation(noninclus)
2
CâbleE/S(enoption,nonfourni)
3
Câbleréseau(noninclus)
4
Jointdecâble
5
Couvercletransparentdel'unitédebase
8.Placezlesjointssurlescâbles.Cf.Épaisseurducâblepage62.
9.Insérezlescâblesd'alimentation,d'E/Setréseauycomprislesjointsàtraverslesorices
ducouvercletransparentdel'unitédebaseetdisposezlescâblescommeillustré
ci-dessus.
VIS
A AAVIS VIS
SivousutilisezuncâbleàbreoptiqueetuncâbleRJ45pourlaconnectivitéréseau,
acheminezlecâbleàbreoptiqueàtraverslemêmejointquelecâbled'E/S.Appliquezun
jointentrelescâblesetlejointdecâblepourempêchertoutefuite.Pourplusd'informations
surlesoptionsdeconnectivitéréseau,voirInstallationdelaliaisonréseaupage53.
10.Replacezlecouvercletransparentdel'unitédebasesurcelle-cietplacezlesjoints
danslesorices.
50
Page 51

AXISQ8685-EPTZNetworkCamera
1
ConnecteurE/S
2
Connecteurd'alimentation
3
Jointtorique
VIS
A AAVIS VIS
Pourévitertoutedéconnexionintempestive,lecâbledeprotectiondemiseàlaterre
doitêtrepluslongd'environ10mm(3/8po)quelesdeuxautresls(danslecâble
d'alimentation).
Note
Nousvousrecommandonsdedénuderenviron90mm(3½po)delagaineducâble
d'alimentationet70mm(2¾po)delagaineducâbled'E/Spouruneinstallationaisée.
FR
11.Pourinstallerlesconnecteursd'alimentationetd'E/S,voirConnecteurspage58.
12.Réglezlescâblesréseau,d'E/Setd'alimentationdesortequeladistancedepuislejoint
ducâblejusqu'àl'extrémitéduconnecteursoitrespectivementde240mm(10po),
170mm(7po)et160mm(7po).
VIS
A AAVIS VIS
Assurez-vousquelesjointstoriquessontcorrectementxésautourducouvercle
transparentdel'unitédebase.
51
Page 52

AXISQ8685-EPTZNetworkCamera
13.Replacezl'unitédepositionnementsurl'unitédebaseenvousassurantquelesèches
surlesdeuxunitéssontalignées.
14.Tournezl'unitédepositionnementdanslesensdesaiguillesd'unemontrejusqu'àsa
positiond'origineetserrezlesquatrevisdel'unitédebase(couplede3Nm).
VIS
A AAVIS VIS
Assurez-vousquelescâblesnesoientpaspincéslorsdumontagedesdeuxunités.
52
Page 53

AXISQ8685-EPTZNetworkCamera
Installationdelaliaisonréseau
Vousdisposezdeplusieursoptionspourinstallerlaliaisonréseau:
•A:viauncâbleàbreoptiqueouuncâbleRJ45raccordéaumoduleSFP(avec
connecteurcorrespondant)surl'emplacementSFP.
•B:viauncâbleRJ45raccordéauconnecteurRJ45xe.
•C:vialesdeuxsolutionsci-dessus,auquelcasleraccordementvialemoduleSFP
fonctionnecommelaliaisonréseauprimaireetleraccordementvialeconnecteurRJ45
xecommelaliaisondesecours.
FR
Pourplusd'informationssurlesemplacementsdesconnecteursréseau,voirConnecteurspage58.
Note
•LemoduleSFPn'estpasfourni.Pourplusd’informationssurlesmodulesSFP,consultezle
sitewww.axis.com
•L'établissementd'uneliaisonréseauuniquementvialecâbleàbreoptiqueàl'aidedu
moduleSFPrespectiffonctionnecommeunesolutionautonomepourlesinstallationsde
câblagelonguedistance.
53
Page 54

AXISQ8685-EPTZNetworkCamera
Branchezlescâbles
1.Desserrezlesquatrevisducouvercle(T20)etretirezlecouvercle.
1
Connecteurd'alimentationd'entrée
2
ConnecteurE/S
3
ConnecteurRJ45
4
EmplacementSFPpourmoduleSFP(moduleSFPnoninclus)
2.Branchezlecâbleréseau(breoptiqueet/ouRJ45),E/Setd'alimentation.Pourplus
d'informationssurlesoptionsdeconnectivitéréseau,voirInstallationdelaliaisonréseau
page53.
54
Page 55

AXISQ8685-EPTZNetworkCamera
3.Replacezlecouvercle,puisserrezlesquatrevisducouvercle(coupledeserrage3,0Nm).
4.Mettezleproduitsoustension.
Installationd’unecarteSD(facultatif)
UnecarteSDstandardouàhautecapacité(nonfournie)peutêtreutiliséepoursauvegarderdes
enregistrementsdansl'appareil.ConsultezCaractéristiquespage58avantd'installerlacarteSD.
1.Débranchezleproduitdusecteur.
2.Retirezlesquatrevisducouverclesupérieuretlecouverclesupérieur.
3.InsérezunecarteSDdanslafentepourcarteSD;pourensavoirplusconsultezAperçu
dumatérielpage42.
4.Replacezlecachesupérieur,puisserrezlesvis(coupledeserrage3,0Nm).
5.Remettezleproduitsoustension.
Commentaccéderauproduit
AXISIPUtilityetAXISCameraManagementsontrecommandéspourtrouverdesproduitsAxissur
leréseauetleurattribuerdesadressesIPWindows®.Cesapplicationssontgratuitesetpeuvent
êtretéléchargéesviaaxis.com/support
Leproduitpeutêtreutiliséaveclaplupartdessystèmesd'exploitationetnavigateurs.Nous
recommandonslesnavigateurssuivants:
•InternetExplorer
•Safari
•Chrome
Pourplusd'informationssurl'utilisationduproduit,consultezleManueldel'utilisateurdisponible
suraxis.com
®
avecOSX
TM
®
avecWindows
®
ouFirefox
®
aveclesautressystèmesd’exploitation.
®
,
FR
55
Page 56

AXISQ8685-EPTZNetworkCamera
Réinitialiserlesparamètrespardéfaut
ATTENTION
Risquesdeblessures.Piècesmobiles.Restezàl'écartduproduitlorsqu'ilestencours
defonctionnement.Débranchezl'alimentationélectriqueavantd'installerleproduitou
d'effectuersonentretien.
ATTENTION
Risquesdeblessures.Surfaceschaudes.Netouchezpasleproduitlorsqu'ilesten
coursdefonctionnement.Débranchezl'alimentationélectriqueetlaissezlessurfaces
refroidiravantd'effectuerl'entretienduproduit.
Important
Laréinitialisationdesparamètrespardéfautdoitêtreeffectuéeavecprécaution.Cette
opérationreconguretouslesparamètres,ycomprisl’adresseIP,auxvaleursd’usinepar
défaut.
Note
Leslogicielsd’installationetdegestionsontdisponiblessurlespagesd’assistancedusite
www.axis.com/support/downloads
Pourréinitialiserlesparamètrespardéfautduproduit:
1.Débranchezleproduitdusecteur.
2.Retirezlesquatrevisducouverclesupérieuretlecouverclesupérieur.
3.Changezlapositionducommutateurpardéfaut,consultezpourcefaireAperçu
dumatérielpage42.
4.Replacezlecouverclesupérieuretserrezlesvis(couplede3Nm).
5.Remettezleproduitsoustension.
Ilestégalementpossiblederétablirlesparamètresd’usineàpartirdel’interfaceWeb.Cliquezsur
Setup>SystemOptions>Maintenance(Conguration>Optionssystème>Maintenance),
puissurDefault(Défaut).
56
Page 57

AXISQ8685-EPTZNetworkCamera
Informationscomplémentaires
•Pourobtenirlaversionlaplusàjourdecedocument,voiraxis.com
•Lemanueld'utilisateurestdisponibleviaaxis.com
•Pourvériers'ilexisteunmicrologicielmisàjourpourvotreproduit,voiraxis.com/support
•Pouraccéderàdesformationsetwebinairesenligneutiles,voiraxis.com/academy
Accessoiresenoption
Pourunelistecomplètedesaccessoiresdisponiblespourceproduit,accédezàaxis.com>produit>
Logicieletaccessoires.
Informationssurlagarantie
Pourplusd'informationssurlagarantieduproduitAxisetlesinformationsconnexes,rendez-vous
suraxis.com/warranty
FR
57
Page 58

AXISQ8685-EPTZNetworkCamera
Caractéristiques
Pourobtenirladernièreversiondelachetechniqueduproduit,rendez-voussuraxis.com>produit
>Assistanceetdocumentation.
FentepourcarteSD
ATTENTION
Risquesdeblessures.Piècesmobiles.Restezàl'écartduproduitlorsqu'ilestencours
defonctionnement.Débranchezl'alimentationélectriqueavantd'installerleproduitou
d'effectuersonentretien.
ATTENTION
Risquesdeblessures.Surfaceschaudes.Netouchezpasleproduitlorsqu'ilesten
coursdefonctionnement.Débranchezl'alimentationélectriqueetlaissezlessurfaces
refroidiravantd'effectuerl'entretienduproduit.
VIS
A AAVIS VIS
•RisquededommagesàlacarteSD.N'utilisezpasd'outilstranchantsoud'objets
métalliquespourinsérerouretirerlacarteSD,etneforcezpaslorssoninsertionoude
sonretrait.Utilisezvosdoigtspourinséreretretirerlacarte.
•Risquedepertededonnéesetd'enregistrementscorrompus.NeretirezpaslacarteSD
pendantqueleproduitfonctionne.DémontezlacarteSDdelapageWebduproduit
avantdelaretirer.
CetappareilestcompatibleavecunecarteSD/SDHC/SDXC(nonincluse).
PourdesrecommandationssurlescartesSD,consultezwww.axis.com
Connecteurs
Connecteurréseau
ConnecteurEthernetRJ45.
ConnecteurSFP.
VIS
A AAVIS VIS
Leproduitdoitêtreconnectéàl'aided'uncâbleréseaublindé(STP)oud'uncâbleà
bresoptiques.Touslescâblesreliantleproduitaucommutateurréseaudoiventêtre
destinésàleurusagespécique.Assurez-vousquelespériphériquesréseausontinstallés
conformémentauxinstructionsdufabricant.Pourplusd’informationssurlesexigences
réglementaires,consultezElectromagneticcompatibility(EMC)9.
58
Page 59

AXISQ8685-EPTZNetworkCamera
Connecteurd’E/S
Utilisezleconnecteurd’E/Savecdespériphériquesexternes,associésauxapplicationstellesque
lesalarmesdedétérioration,ladétectiondemouvement,ledéclenchementd'événementsetles
noticationsd'alarme.Enplusdupointderéférence0VCCetdel'alimentation(sortieCC),le
connecteurd'E/Sfournituneinterfaceauxélémentssuivants:
Sortienumérique-Permetdeconnecterdesdispositifsexternes,commedesrelaisoudesvoyants.
Lesappareilsconnectéspeuventêtreactivésparl'interfacedeprogrammationVAPIX®oudans
lespagesWebdesproduits.
Entréenumérique-Pourconnecterdesdispositifspouvantpasserd'uncircuitouvertàuncircuit
fermé,parexemplecapteursinfrarougepassifs,contactsdeporte/fenêtreetdétecteursdebrisde
verre.
Uncapteurdelumièrenumérique-Pourrecevoirunevaleurdel'intensitélumineused'uncapteur
delumièreexterne.Cettevaleurestutiliséepourcontrôlerlafonctionjour/nuit.
Blocterminalcongurableà6broches
FonctionB-
0VCC(-)
SortieCC
Congurable
(entréeou
sortie)
Remarques
roche
1
MasseCC0VCC
2
Peutserviràalimenterlematérielauxiliaire.
Remarque:cettebrochenepeutêtreutiliséeque
commesortied’alimentation.
3–
Entréenumérique-Connectez-vousàlabroche
6
1pouractiveroulaissernonconnectépour
désactiver.
Sortienumérique-Connectez-vousàlabroche
1pouractiveroulaissernonconnectépour
désactiver.Siutiliséavecunechargeinductive,
parexempleunrelais,connectezunediodeen
parallèleàlachargeandeprotégercontreles
transitoiresdetension.
Caractéristiques
12VCC
Chargemax.=
50mA
0à30VCCmax
0à30VCCmax.,
drainouvert,100mA
FR
59
Page 60

AXISQ8685-EPTZNetworkCamera
FonctionB-
0VCC(-)
SortieCC
Congurable
(entréeou
sortie)
Remarques
roche
1
MasseCC0VCC
2
Peutserviràalimenterlematérielauxiliaire.
Remarque:cettebrochenepeutêtreutiliséeque
commesortied’alimentation.
3–
Entréenumérique–Connectez-laàlabroche1
6
pourl’activeroulaissez-laotter(déconnectée)
pourladésactiver.
Sortienumérique-Connectéeàlabroche1
lorsqu'elleestactivée,otte(déconnectée)
lorsqu'elleestdésactivée.Sivousl’utilisezavec
unechargeinductive,parexempleunrelais,une
diodedoitêtreconnectéeenparallèleavecla
charge,enguisedeprotectioncontrelestensions
transitoires.
Caractéristiques
12VCC
Chargemax.=
50mA
0à30VCCmax.
0à30VCCmax.,
drainouvert,100mA
1
0VCC(-)
60
Page 61

AXISQ8685-EPTZNetworkCamera
2
SortieCC12V,maxi.50mA
A
Entrée/sortieconguréecommeentrée
B
Entrée/sortieconguréecommesortie
Connecteurd'alimentation
Blocterminalà4brochespourl'alimentation.
Connecteurd'alimentation24VCA/CC
VIS
A AAVIS VIS
Cettesectionconcernelesproduitsalimentésen24VCAet24VCCuniquement.
Position
1
2
3
4
Connecteurd'alimentation240VCA)
VIS
A AAVIS VIS
24VCA24VCC
TerredeprotectionTerredeprotection
Phase24VCA
24VCANeutre
NonconnectéNonconnecté
Cettesectionconcernelesproduitsalimentésen100–240VCAuniquement.
FR
+24V
0V
61
Page 62

AXISQ8685-EPTZNetworkCamera
Position
1
2
3
4
100-240VCA
Terredeprotection
240VCANeutre
Nonconnecté
Phase240VCA
Câbles
Épaisseurducâble
Lediamètreducâble,lorsdel'utilisationdejointsdecâblefournisavecleproduit,doitêtre
compriseentre5et1 1mm(0,2à0,4po).
VIS
A AAVIS VIS
•Utilisezdescâblesadaptésàlazonespéciée
•Sélectionnezdescâblesconformesàlalégislationlocale
•Assurez-vousquelespassgesdecâblessontcorrectementscellés
•Utilisezdesjointsdecâbleetdespresse-étoupesadaptésauxpassagesdecâbleset
àlazonedecâble
Pourplusd'informationssurlesaccessoires,telsquelesjointsdecâbleetlespresse-étoupes
adaptésàd'autreszonesdecâble,consultezwww.axis.com
Conditionsdefonctionnement
CeproduitAxisestdestinéàêtreutiliséàl'intérieuretàl'extérieur.
62
Page 63

AXISQ8685-EPTZNetworkCamera
TempératureHumidité
Normale:-50°Cà55°C(-58°Fà131°F)
Maximale(intermittente):65°C(149°F)
Démarrageàfroid:
-40°Cà55°C(-40°Fà131°F)
10–100%HR(sanscondensation)
Consommationd'énergie
ConsommationtypeConsommationmaximale
16W204W
Important
LorsquevousutilisezlecâbleAXISde22m(72ft)24VCC/24à240VCAavec
AXISQ8685-E24VCC/CC,ilfautunealimentationcapabledelivrer400Wpourcompenser
lapertedepuissancedanslecâble.
VIS
A AAVIS VIS
Lesvaleurstypiquesdeconsommationd'énergiesontbaséessurcequisuit:
•Toutepertedanslecâbled'alimentationnonpriseencompte
•Aucunpositionnementactif
•Aucunmoteurd'essuyageactif
•Températureà25°C/77°F(touschauffageséteints)
•UnuxH.264àrésolutionmaximale
•FluxMJPEGenregistrésurlacarteSD
FR
63
Page 64

64
Page 65

AXISQ8685-EPTZNetworkCamera
Sicherheitsinformationen
Gefährdungsstufen
GEFAHR
WeistaufeinegefährlicheSituationhin,welche,fallsnichtverhindert,zuTododer
schwerenVerletzungenführenkann.
WARNUNG
WeistaufeinegefährlicheSituationhin,welche,fallsnichtverhindert,zuTododer
schwerenVerletzungenführenkann.
VORSICHT
WeistaufeinegefährlicheSituationhin,welche,fallsnichtverhindert,zugeringfügiger
odermäßigerVerletzungführenkann.
HINWEIS
HINWEIS HINWEIS
WeistaufeinegefährlicheSituationhin,welche,fallsnichtverhindert,zuSachschäden
führenkann.
AndereMeldeebenen
Wichtig
WeistaufwichtigeInformationenhin,diedenrichtigenBetriebdesProduktsgewährleisten.
Beachten
WeistaufnützlicheInformationenhin,diedieoptimaleVerwendungdesProdukts
unterstützen.
DE
65
Page 66

AXISQ8685-EPTZNetworkCamera
Sicherheitsanweisungen
GEFAHR
Stromschlaggefahr.VorderInstallationoderWartungdesProduktsmusssichergestellt
werden,dassankeinemderKabelSpannunganliegt.
WARNUNG
DasAxisProduktmussvonfachmännischemPersonalundunterEinhaltungderörtlich
geltendenBestimmungeninstalliertwerden.
VORSICHT
VerletzungsgefahrGefahrdurchbeweglicheTeileKörperteilewährenddesBetriebs
vomProduktfernhalten.VorderInstallationoderWartungdesProduktsalleKabelvon
derStromversorgungabklemmen.
VORSICHT
VerletzungsgefahrHeißeOberächeDasProduktwährenddesBetriebsnichtberühren.
VorderWartungdesProduktsdieOberächenabkühlenlassen.
HINWEIS
HINWEIS HINWEIS
•DasAxis-ProduktmussunterBeachtungdergeltendenGesetzeundBestimmungen
betriebenwerden.
•LagernSiedasAxisProduktineinertrockenenundbelüftetenUmgebung.
•AchtenSiedarauf,dassdasAxisProduktwederStößennochstarkemDruckausgesetztist.
•InstallierenSiedasProduktnichtaninstabilenMasten,Halterungen,Oberächenoder
Wänden.
•VerwendenSiebeiderInstallationdesAxisProduktsausschließlichpassendeWerkzeuge.
EinzugroßerKraftaufwandmitelektrischenWerkzeugenkanndasProduktbeschädigen.
•VerwendenSiekeinechemischen,ätzendenoderaerosolhaltigenReinigungsmittel.
•VerwendenSiezumReinigeneinsauberes,mitdestilliertemWasserangefeuchtetesTuch.
•VerwendenSienurZubehör,dasdentechnischenVorgabenIhresProduktsentspricht.
DiesesistvonAxisoderDrittanbieternerhältlich.AxisempehltdiemitIhremProdukt
kompatibleStromversorgungvonAxis.
•VerwendenSieausschließlichErsatzteiledievonAxisangebotenoderempfohlenwerden.
•VersuchenSienicht,diesesProduktselbsttätigzureparieren.WendenSiesichbezüglich
ReparaturundWartungandenAxisSupportoderIhrenAxisHändler.
•RichtenSiedasKameraobjektivnichtdirektaufdieSonneoderanderestarkeLichtquellen,
umeineBeschädigungderKamerazuvermeiden.
66
Page 67

AXISQ8685-EPTZNetworkCamera
Transport
HINWEIS
HINWEIS HINWEIS
•BeiBedarftransportierenSiedasAxisProduktinderOriginalverpackungodereiner
entsprechendenVerpackung,sodassSchädenvermiedenwerden.
Batterie
DasAxisProduktistmiteiner3,0-V-BR2032-Lithium-Batterieausgestattet,mitderdieinterne
Echtzeituhr(RTC)versorgtwird.UnternormalenBedingungenhatdieBatterieeineLebensdauer
vonmindestensfünfJahren.
BeientladenerBatterieistderBetriebderEchtzeituhrnichtmehrgewährleistet,sodassdieUhrbei
jedemSystemstartzurückgesetztwird.SieerhalteneineProtokollnachrichtimServerberichtdes
Produkts,wenneinBatteriewechselerforderlichist.WeitereInformationenüberdenServerbericht
ndenSieaufdenSetup-SeitendesProdukts,oderwendenSiesichandenAxisSupport.
DieBatteriesolltenurbeiBedarfersetztwerden.WendenSiesichindiesemFallunter
www.axis.com/supportandenAxis-Support.
Lithium-Knopfzellen(3,0V)enthalten1,2-Dimethoxyethan;Ethylenglycoldimethylether(EGDME),
CAS-Nr.1 10-71-4.
WARNUNG
•ExplosionsgefahrbeifehlerhaftemBatteriewechsel.
•DieBatteriedarfnurdurcheineidentischeBatterieodereinevonAxisempfohlene
Batterieersetztwerden.
•VerbrauchteBatteriensindgemäßdenörtlichenVorschriftenoderdenAnweisungendes
Herstellerszuentsorgen.
DE
67
Page 68

68
Page 69

Lieferumfang
•Netzwerk-KameraAXISQ8685–EPTZ
•Netzanschluss
•E/A-Anschluss
•Torx®BitsT20undT30
•GedruckteDokumente
-Installationsanleitung(diesesDokument)
-ZusätzlicheEtikettenmitderSeriennummer(2x)
-AVHS-Authentizierungsschlüssel
AXISQ8685-EPTZNetworkCamera
DE
69
Page 70

AXISQ8685-EPTZNetworkCamera
ÜbersichtüberdieHardware
DietechnischenDatenfürHardwarekomponentenndenSieunterTechnischeDatenaufSeite86.
1
Sonnenblende
2
ObereAbdeckung
3
Wischer
4
Frontfenster
5
InnereAbdeckung
6
Objektiv
7
Deckel
8
Basisgerät
70
Page 71

AXISQ8685-EPTZNetworkCamera
DE
1
WerksseitigerStandardschalter
2
SD-Speicherkarteneinschub
3
StromversorgungsanschlussEingang
4
E/A-Anschluss
5
AnschlussRJ-45
6
SFP-EinschubfürSFP-Glasfasermodule(SFP-Modulnichtenthalten)
71
Page 72

AXISQ8685-EPTZNetworkCamera
InstallierendesProdukts
GEFAHR
StromschlaggefahrVorderInstallationoderWartungdesProduktsmüssenalleKabelvon
derStromversorgungabgeklemmtwerden.
VORSICHT
DieInstallationderelektrischenAnschlüsseundKabelkanäledarfnurvoneinem
zugelassenenElektrikerinÜbereinstimmungmitdengeltendenBestimmungen
vorgenommenwerden.
VORSICHT
VerletzungsgefahrGefahrdurchbeweglicheTeileKörperteilewährenddesBetriebs
vomProduktfernhalten.VorderInstallationoderWartungdesProduktsalleKabelvon
derStromversorgungabklemmen.
VORSICHT
VerletzungsgefahrHeißeOberächeDasProduktwährenddesBetriebsnichtberühren.
VorderWartungdesProduktsdieOberächenabkühlenlassen.
72
Page 73

MontierenderGerätebasis
AXISQ8685-EPTZNetworkCamera
DE
1
Gerätebasis
1.DievierSchrauben(T30)derGerätebasisentfernen.
2.DieGerätebasisgleichzeitigziehenundgegendenUhrzeigersinndrehen,bisdiePfeile
aufderGerätebasisunddemRestdesGerätsineinerLiniestehen.
3.DieGerätebasisentfernen.
73
Page 74

AXISQ8685-EPTZNetworkCamera
HINWEIS
HINWEIS HINWEIS
BeimEntfernendertransparentenAbdeckungderGerätebasiskeinespitzenWerkzeuge
verwenden.
4.DietransparenteAbdeckungderGerätebasisentfernen.
74
Page 75

AXISQ8685-EPTZNetworkCamera
1
KlammerderKabelführung
2
AbdeckungderKabelführung
3
Schraubenbohrung(4x)
5.NurbeiInstallationenüberdieKabelführung:ZuerstdiebeidenKlammernder
KabelführungundanschließenddieAbdeckungderKabelführungentfernen.
6.DieGerätebasismitgeeignetenBefestigungselementenfürdievierSchraubenbohrungen
anderBefestigungsächeanbringen.
DE
DieKabelverlegen
WARNUNG
StromschlaggefahrDasProduktmussgeerdetwerden.DazumüssensowohlderSchutzleiter
imStromversorgungskabelalsauchdasErdungsbandverwendetwerden.Sicherstellen,dass
beideEndendesSchutzleitersunddesErdungsbandesKontaktmitdenentsprechenden
Erdungsächenhaben.
Wichtig
NurKabelmitdemvorgegebenenKabelquerschnittverwenden.WeitereInformationen
ndenSieunterKabelstärkeaufSeite89.
75
Page 76

AXISQ8685-EPTZNetworkCamera
1
Stromversorgungskabel(nichtimLieferumfangenthalten)
2
Zugentlastung
3
Masseschraube
4
Erdungsband(nichtimLieferumfangenthalten)
5
Kabelöffnungunten
1.DieoptionalenKabelführungsadapterinstallieren(nichtimLieferumfangenthalten).
2.DasErdungskabelmitderErdungsschraubebefestigen.
3.DieKabelfürStromversorgung,NetzwerkundE/Aeinschließlichder
KabelverschraubungenwieinderAbbildungobendurchdieÖffnungdesBasisgeräts
führen.AlternativdieKabeldurchdieuntereKabelöffnungeinführen.
4.DasStromversorgungskabeldurchdieZugentlastungführen.DabeieineLängevon530
mmzwischenZugentlastungundKabelendeeinhalten.
76
Page 77

AXISQ8685-EPTZNetworkCamera
1
E/A-Kabel(optional,nichtimLieferumfangenthalten)
2
Netzwerkkabel(nichtimLieferumfangenthalten)
5.Das(optionale)E/A-KabelmiteinemAbstandvon420mmzwischenZugentlastungund
KabelendedurchdieZugentlastungführen.
6.DasNetzwerkkabel(GlasfaseroderKabeltypRJ-45)durchdieZugentlastungführen.
DabeieineLängevon580mmzwischenZugentlastungundAnschlussendeeinhalten.
WeitereInformationenzudenverschiedenenAnschlussoptionenandasNetzwerk,siehe
EinrichtenderNetzwerkverbindungaufSeite81.
7.DiedreiZugentlastungenschließenundanziehen.
DE
77
Page 78

AXISQ8685-EPTZNetworkCamera
1
Stromversorgungskabel(nichtimLieferumfangenthalten)
2
E/A-Kabel(optional,nichtimLieferumfangenthalten)
3
Netzwerkkabel(nichtimLieferumfangenthalten)
4
Kabeldichtung
5
TransparenteAbdeckungderGerätebasis
8.DieKabeldichtungenaufdieKabelschieben.SieheKabelstärkeaufSeite89.
9.DieKabelfürStromversorgung,NetzwerkundE/AeinschließlichderKabeldichtungen
durchdieÖffnungendertransparentenAbdeckungderGerätebasisführenunddieKabel
wieinderAbbildungobendargestelltausrichten.
HINWEIS
HINWEIS HINWEIS
WirdsowohleinGlasfaserkabelalsaucheinKabeldesTypsRJ-45verwendet,das
GlasfaserkabeldurchdieselbeKabeldichtungführenwiedasE/A-Kabel.Gegendas
EindringenvonFeuchtigkeitzwischenKabelnundKabeldichtungeinDichtmittelverwenden.
WeitereInformationenzuverschiedenenAnschlussoptionenandasNetzwerk,siehe
EinrichtenderNetzwerkverbindungaufSeite81.
10.DietransparenteAbdeckungderGerätebasiswiederaufsetzenunddieKabeldichtungen
indieÖffnungenschieben.
78
Page 79

AXISQ8685-EPTZNetworkCamera
1
E/A-Anschluss
2
Netzanschluss
3
O-Ring
HINWEIS
HINWEIS HINWEIS
Sicherstellen,dassdieErdungsleitungetwa10mmlängeristalsdiebeidenanderen
Leitungen(imStromversorgungskabel),sodassdiesebeiZugbelastungnichtunbeabsichtigt
getrenntwird.
Beachten
FüreinenleichterenEinbauempfehlenwir,etwa90mmdesMantelsdes
Stromversorgungskabelundetwa70mmdesMantelsdesE/A-Kabelszuentfernen.
DE
11.ZumEinbauderStromversorgungs-undE/A-AnschlüssesieheAnschlüsseaufSeite86.
12.DieKabelfürNetzwerk,E/AundStromversorgungsoausrichten,dassdieLängezwischen
KabeldichtungundEndedesAnschlussesjeweils240mm,170mmund160mmbeträgt.
HINWEIS
HINWEIS HINWEIS
Sicherstellen,dassderO-RingrichtigumdietransparenteAbdeckungderGerätebasis
herumeingepasstist.
79
Page 80

AXISQ8685-EPTZNetworkCamera
13.DasPositionierungsgerätwiederanderGerätebasisanbringenunddabeisicherstellen,
dassdiePfeilederbeidenGeräteineinerLiniestehen.
14.DiePositionierungseinheitimUhrzeigersinninihreAusgangsstellungdrehenunddievier
SchraubenderGrundeinheitanziehen(Drehmoment3,0Nm).
HINWEIS
HINWEIS HINWEIS
Sicherstellen,dassdieKabelbeimZusammenbauenderbeidenGerätenichteingeklemmt
werden.
80
Page 81

AXISQ8685-EPTZNetworkCamera
EinrichtenderNetzwerkverbindung
EsgibtverschiedenenOptionen,dieNetzwerkverbindungeinzubauen:
•A:MithilfeeinesGlasfaserkabelsodereinesKabelsdesTypsRJ-45,das(miteinem
entsprechendenAnschluss)andasSFP-ModulimSFP-Einschubangeschlossenwird.
•B:MithilfeeinesAnschlussesdesTypsRJ-45andenfestenAnschlussdesTypsRJ-45.
•C:MithilfebeiderobenangeführtenMöglichkeiten.IndiesemFallagiertderAnschluss
überdasSFP-ModulalsdieprimäreNetzwerkverbindungunddieVerbindungüberden
festenAnschlussdesTypsRJ-45alsFail-Over-Anschluss.
DE
WeitereInformationenzurLagederNetzwerksteckverbindungen,sieheAnschlüsseaufSeite86.
Beachten
•SFP-ModulnichtimLieferumfangenthalten.WeitereInformationenzulieferbaren
SFP-Modulen,siehewww.axis.com.
•DieNetzwerkverbindungausschließlichüberdasGlasfaserkabelmittelsdes
entsprechendenSFP-ModulsdientalseigenständigeLösungfürKabelinstallationenmit
großerReichweite.
81
Page 82

AXISQ8685-EPTZNetworkCamera
AnschließenderKabel
1.DievierDeckelschrauben(T20)lösenunddenDeckelabnehmen.
1
StromversorgungsanschlussEingang
2
E/A-Anschluss
3
RJ-45-Anschluss
4
SFP-EinschubfürSFP-Module(SFP-Modulnichtenthalten)
2.DasNetzwerk(Glasfaserund/oderRJ-45),E/AunddieStromversorgunganschließen
WeitereInformationenzuverschiedenenAnschlussoptionenandasNetzwerk,siehe
EinrichtenderNetzwerkverbindungaufSeite81.
82
Page 83

AXISQ8685-EPTZNetworkCamera
3.DenDeckelaustauschenunddievierDeckelschraubenanziehen(Drehmoment3,0Nm).
4.DasProduktandieStromversorgunganschließen.
InstalliereneinerSD-Speicherkarte(optional)
MiteinerStandard-SD-KarteodereinerSD-KartemitgroßemSpeichervolumen(nichtim
Lieferumfangenthalten)könnenAufzeichnungendirektaufdemProduktgespeichertwerden.Vor
demInstallierenderSD-SpeicherkarteTechnischeDatenaufSeite86beachten.
1.DasProduktvonderStromversorgungtrennen.
2.DievierSchraubenderoberenAbdeckunglösenunddieAbdeckungabnehmen.
3.ZumEinsetzenderSD-KarteindenSD-KarteneinschubsieheÜbersichtüberdieHardware
aufSeite70.
4.DieobereAbdeckungwiederanbringenunddieSchraubenanziehen(Drehmoment
3,0Nm).
5.DasProduktwiederandieStromversorgunganschließen.
ZugriffaufdasProdukt
ZumFindenvonAxis-ProduktenimNetzwerkundZuweisenvonIP-AdressenunterWindows®
werdenAXISIPUtilityundAXISCameraManagementempfohlen.BeideAnwendungensind
kostenlosundkönnenvonaxis.com/supportheruntergeladenwerden.
DE
DasProduktistmitdenmeistenBetriebssystemenundBrowsernkompatibel.Empfohlenwerden
folgendeBrowser:
•InternetExplorer
•Safari
•Chrome
WeitereInformationenzurNutzungdiesesProduktsndenSieimBenutzerhandbuchaufaxis.com.
®
unterOSX
TM
®
unterWindows
®
oderFirefox
®
unteranderenBetriebssystemen
®
83
Page 84

AXISQ8685-EPTZNetworkCamera
ZurücksetzenaufWerkseinstellungen
VORSICHT
VerletzungsgefahrGefahrdurchbeweglicheTeileKörperteilewährenddesBetriebs
vomProduktfernhalten.VorderInstallationoderWartungdesProduktsalleKabelvon
derStromversorgungabklemmen.
VORSICHT
VerletzungsgefahrHeißeOberächeDasProduktwährenddesBetriebsnichtberühren.
VorderWartungdesProduktsdieOberächenabkühlenlassen.
Wichtig
DasZurücksetzenaufdieWerkseinstellungenmussmitUmsichtgeschehen.Beim
ZurücksetzenaufdieWerkseinstellungenwerdenalleEinstellungeneinschließlichder
IP-AdresseaufdieWerkseinstellungenzurückgesetzt.
Beachten
DieSoftware-ToolsfürdieInstallationundVerwaltungsindüberdieSupportseitenunter
www.axis.com/support/downloadsverfügbar.
DasProduktaufWerkseinstellungenzurücksetzen:
1.DasProduktvonderStromversorgungtrennen.
2.DievierSchraubenderoberenAbdeckunglösenunddieAbdeckungabnehmen.
3.DieStellungdesWerkseinstellungsschaltersändern.SiehedazuÜbersichtüberdie
HardwareaufSeite70.
4.DieobereAbdeckungwiederanbringenunddieSchraubenanziehen(Drehmoment3,0
Nm).
5.DasProduktwiederandieStromversorgunganschließen.
DieParameterkönnenauchüberdieWeboberächeaufdieWerkseinstellungenzurückgesetzt
werden.ZuSetup>SystemOptions>Maintenance(Setup>Systemoptionen>Wartung)
navigierenundaufDefault(Standard)klicken.
84
Page 85

AXISQ8685-EPTZNetworkCamera
WeitereInformationen
•DieaktuelleVersiondiesesDokumentsndenSieaufaxis.com
•DasBenutzerhandbuchstehtaufaxis.comzurVerfügung.
•Unteraxis.com/supportndenSiedieaktuellenFirmwareversionenfürIhreProdukte.
•NützlichesOnlinetrainingundWebinarendenSieunteraxis.com/academy.
OptionalesZubehör
EinevollständigeZubehörlistefürdiesesProduktndenSieaufaxis.com>Produkt>Software
undZubehör.
Gewährleistungsinformationen
InformationenzurGewährleistungfürAxis-ProdukteundandereindiesemZusammenhang
relevanteInformationenndenSieunteraxis.com/warranty
DE
85
Page 86

AXISQ8685-EPTZNetworkCamera
TechnischeDaten
DieaktuelleVersiondertechnischenDatendesProduktsndenSieaufaxis.comunterProdukt>
SupportundDokumentation.
EinschubfürSD-Speicherkarte
VORSICHT
VerletzungsgefahrGefahrdurchbeweglicheTeileKörperteilewährenddesBetriebs
vomProduktfernhalten.VorderInstallationoderWartungdesProduktsalleKabelvon
derStromversorgungabklemmen.
VORSICHT
VerletzungsgefahrHeißeOberächeDasProduktwährenddesBetriebsnichtberühren.
VorderWartungdesProduktsdieOberächenabkühlenlassen.
HINWEIS
HINWEIS HINWEIS
•GefahrvonSchädenanderSD-Karte.BeimEinsetzenoderEntfernenderSD-Kartekeine
scharfenWerkzeugeoderGegenständeausMetallbenutzenundkeineübermäßigeKraft
anwenden.SetzenSiedieKarteperHandein.DasGleichegiltfürdasEntfernen.
•GefahrvonDatenverlustundBeschädigungvonAufzeichnungen.DieSD-Kartedarfnicht
entferntwerden,währenddasProduktinBetriebist.VordemAusbauderSD-Kartediese
vonWebseitedesProduktstrennen.
DiesesProduktunterstütztKartendesTypsSD/SDHC/SDXC(nichtimLieferumfangenthalten).
EmpfehlungenzuSD-KartenndenSieaufaxis.com.
Anschlüsse
Netzwerkanschluss
RJ45-Ethernetanschluss.
SFP-Anschluss.
HINWEIS
HINWEIS HINWEIS
DasProduktmussmiteinemabgeschirmtenNetzwerkkabel(STP)odereinemGlasfaserkabel
angeschlossenwerden.AlleKabel,diedasProduktmitdemNetzwerkswitchverbinden,
müssenhierfürausgelegtsein.StellenSiesicher,dassdieNetzwerkgerätegemäß
denAnweisungendesHerstellersinstalliertwurden.Informationenzugesetzlichen
BestimmungenndenSieunterElectromagneticcompatibility(EMC)9.
86
Page 87

AXISQ8685-EPTZNetworkCamera
E/A-Anschlüsse
ÜberdenE/A-AnschlusswerdenexterneGeräteinVerbindungmitManipulationsalarmen,
Bewegungserkennung,Ereignisauslösung,AlarmbenachrichtigungenundanderenFunktionen
angeschlossen.Abgesehenvon0VDC-BezugspunktundStrom(Gleichstromausgang)verfügt
derE/A-AnschlussübereineSchnittstellezu:
Digitalausgang-ZumAnschlussexternerGerätewieRelaisundLEDs.AngeschlosseneGeräte
könnenüberdieVAPIX®-API(ApplicationProgrammingInterface)oderüberdieProduktwebsite
aktiviertwerden.
Digitaleingang-ZumAnschlussvonGeräten,diezwischengeöffnetemundgeschlossenem
Schaltkreiswechselnkönnen,z.B.PIR-Sensoren,Tür-/FensterkontakteundGlasbruchmelder.
DigitalerLichtsensor-FürdenEmpfangeinesWertsfürdieUmgebungslichtstärkevoneinem
externenLichtsensor.DientzurSteuerungderTag-undNachtfunktionalitätdesProdukts.
6-poligerkongurierbarerAnschlussblock
DE
FunktionK-
0VDC(-)
DC-Ausgang
Kongurierbar(EinoderAusgang)
HinweiseTechnischeDaten
ontakt
1
Masse
2
KannfürdieStromversorgungvonZusatzgeräten
verwendetwerden.
Hinweis:DieserKontaktkannnurfürden
Stromausgangverwendetwerden.
3–
Digitaleingang–zumAktivierenanKontakt1
6
anschließen;zumDeaktivierennichtanschließen.
Digitalausgang–zumAktivierenanKontakt1
anschließen;zumDeaktivierennichtanschließen.
BeiVerwendungmiteinerinduktivenLast,
wieetwaeinemRelais,musszumSchutzvor
SpannungssprüngeneineDiodeparallelzurLast
geschaltetwerden.
0VDC
12VDC
Max.Stromstärke=
50mA
0bismax.30VGleichstrom
0bismax.30VGleichstrom,
OpenDrain,100mA
87
Page 88

AXISQ8685-EPTZNetworkCamera
1
0VGleichstrom(-)
2
Gleichstromausgang12V,max.50mA
A
E/AalsEingangkonguriert
B
E/AalsAusgangkonguriert
Netzanschluss
4-poligerAnschlussblockfürdenStromeingang.
Netzanschluss24V,Wechselstrom/Gleichstrom
HINWEIS
HINWEIS HINWEIS
DieserAbschnittbeziehtsichnuraufProduktemitStromversorgung24VWechselstrom
und24VGleichstrom.
88
Page 89

AXISQ8685-EPTZNetworkCamera
Position24VWechselstrom
1
2
3
4
Netzanschluss240VWechselstrom
HINWEIS
HINWEIS HINWEIS
Position100bis240VWechselstrom
1
2
3
4
SchutzerdeSchutzerde
Phase24VWechselstrom+24V
Nullleiter24VWechselstrom0V
NichtverbundenNichtverbunden
DieserAbschnittbeziehtsichnuraufProduktemitStromversorgung100Vbis240V
Wechselstrom.
Schutzerde
Nullleiter240VWechselstrom
Nichtverbunden
Phase240VWechselstrom
24VGleichstrom
DE
Kabel
Kabelstärke
WenndiedemProduktbeiliegendenKabeldichtungenverwendetwerden,mussder
Kabeldurchmesserzwischen5und11mmliegen.
HINWEIS
HINWEIS HINWEIS
•Kabelverwenden,diederQuerschnittsvorgabeentsprechen.
•Kabelverwenden,diedenörtlichenVorschriftenentsprechen.
•Sicherstellen,dassalleKabeldurchführungenordnungsgemäßabgedichtetsind.
89
Page 90

AXISQ8685-EPTZNetworkCamera
•KabeldichtungenoderKabelverschraubungenverwenden,diesowohlder
KabeldurchführungalsauchdemKabelquerschnittentsprechen.
FürInformationenzuZubehörwieKabeldichtungenundKabelverschraubungenfürandere
Kabelquerschnitte,siehe<1>www.axis.com.
Betriebsbedingungen
DiesesAxis-ProduktistfürdieVerwendungimInnen-undAußenbereichausgelegt.
Temperatur
Normal:-50°Cbis+55°C
Maximal(kurzzeitig)65°C
Kaltstart:-40°Cbis+55°C
Leistungsaufnahme
TypischerStromverbrauchMax.Stromverbrauch
16W204W
Wichtig
WennmitderAXISQ8685-E24VAC/DCdasAXIS-Kabel24VGleichstrom/24–240
VWechselstrommit22mLängeverwendetwird,mussdasStromversorgungskabel
400Wliefernkönnen,umLeitungsverlusteauszugleichen.
HINWEIS
HINWEIS HINWEIS
DietypischenWertederLeistungsaufnahmebasierenauffolgendenAnnahmen:
•LeitungsverlusteimStromversorgungskabelnichtberücksichtigt
•KeinePositionierungaktiv
•KeinWischermotoraktiv
•Temperaturbeträgt25°C(alleHeizungenausgeschaltet)
•EinH.264-StreammitmaximalerAuösung
•AufzeichneneinesMJPEG-StreamsaufSD-Karte
Luftfeuchtigkeit
RelativeLuftfeuchtigkeit10bis100%(nicht
kondensierend)
90
Page 91

AXISQ8685-EPTZNetworkCamera
Informazionidisicurezza
Livellidipericolo
PERICOLO
Indicaunasituazionepericolosache,senonevitata,provocamorteolesionigravi.
AVVERTENZA
Indicaunasituazionepericolosache,senonevitata,potrebbeprovocarelamorteolesioni
gravi.
ATTENZIONE
Indicaunasituazionepericolosache,senonevitata,potrebbeprovocarelesionimedie
ominori.
VVISO
A AAVVISO VVISO
Indicaunasituazioneche,senonevitata,potrebbedanneggiarelaproprietà.
Altrilivellidimessaggio
Importante
Indicainformazioniimportanti,essenzialiperilcorrettofunzionamentodeldispositivo.
Nota
Indicainformazioniutilicheaiutanoaottenereilmassimodaldispositivo.
IT
91
Page 92

AXISQ8685-EPTZNetworkCamera
Informazionidisicurezza
PERICOLO
Rischiodiscosseelettriche.Tuttiicavinonsarannosottotensioneprimadiinstallare
oeseguirelamanutenzionesulprodotto.
AVVERTENZA
IldispositivoAxisdeveessereinstallatodaunprofessionistaqualicato,inconformità
alleleggiealledisposizionilocali.
ATTENZIONE
Rischiodilesioni.Partiinmovimento.Tenereilcorpoadistanzadaldispositivo
duranteilfunzionamento.Scollegaredall'alimentazioneprimadiinstallareoeseguire
lamanutenzionesuldispositivo.
ATTENZIONE
Rischiodilesioni.Superciecalda.Nontoccareildispositivoduranteilfunzionamento.
Scollegaredall'alimentazioneeraffreddarelesuperciprimadieseguirelamanutenzione
suldispositivo.
VVISO
A AAVVISO VVISO
•IldispositivoAxisdeveessereutilizzatoinconformitàalleleggiealledisposizionilocali.
•ConservareildispositivoAxisinunambienteasciuttoeventilato.
•EvitarediesporreildispositivoAxisaurtiopressionieccessive.
•Noninstallareildispositivosusupporti,superci,paretiopaliinstabili.
•UtilizzaresolostrumentiapplicabiliquandosiinstallaildispositivoAxis.Sesiutilizzauna
forzaeccessivaconstrumentinonadattièpossibilecausaredannialdispositivo.
•Nonutilizzaresostanzechimiche,agenticausticiodetergentiaerosol.
•Utilizzareunpannopulitoinumiditoinacquapuraperlapulizia.
•Utilizzaresoloaccessoricompatibiliconlespecichetecnichedeldispositivo.Questi
possonoesserefornitidaAxisodaterzeparti.Axisconsiglial'usodell'apparecchiaturadi
alimentazioneAxiscompatibileconildispositivo.
•UtilizzaresolopartidiricambioforniteoconsigliatedaAxis.
•Nontentarediriparareildispositivodasoli.Contattarel'assistenzaoilrivenditoreAxis
perquestionirelativeallamanutenzione.
•Nonrivolgerel'obiettivodellatelecameraversoilsoleoaltresorgentidiradiazionimolto
intensepoichésipotrebbedanneggiarelatelecamera.
Trasporto
VVISO
A AAVVISO VVISO
•DuranteiltrasportodeldispositivoAxis,utilizzarel'imballaggiooriginaleoequivalente
perevitaredannialdispositivo.
92
Page 93

AXISQ8685-EPTZNetworkCamera
Batteria
IldispositivoAxisutilizzaunabatteriaallitioda3,0VBR2032comealimentazioneperilsuo
real-timeclock(RTC)interno.Incondizioninormaliquestabatteriaavràunadurataminima
dicinqueanni.
UnabassacaricadellabatteriainuiscesulfunzionamentodelRTC,facendoloresettareaogni
accensione.Quandolabatteriadeveesseresostituita,unmessaggiodiregistrovienevisualizzato
nelreportserverdeldispositivo.Perulterioriinformazionisulreportserver,vederelepaginedi
congurazionedeldispositivoocontattarel'assistenzaAxis.
Labatterianondeveesseresostituitasenonrichiesto,manelcasoincuiquestofossenecessario,
contattareilsupportoAxisall'indirizzowww.axis.com/supportperassistenza.
Batteriaabottoneallitio3,0Vcontengono1,2-dimetossietano;eteredimetilicodiglicoleetilenico
(EGDME),CASn.110-71-4.
AVVERTENZA
•Rischiodiesplosioneselabatteriavienesostituitainmodoerrato.
•SostituiresoloconunabatteriaidenticaounabatteriaconsigliatadaAxis.
•Smaltirelebatterieusateinbaseallenormativelocalioalleistruzionidelproduttore
dellabatteria.
93IT94
Page 94

Page 95

Contenutodellaconfezione
•TelecameradireteAXISQ8685–EPTZ
•Connettoredialimentazione
•ConnettoreI/O
•PuntaTorx®T20eT30
•Documentazione
-Guidaall'installazione(questodocumento)
-Etichettaaggiuntivaconnumerodiserie(2x)
-ChiavediautenticazioneAVHS
AXISQ8685-EPTZNetworkCamera
IT
95
Page 96

AXISQ8685-EPTZNetworkCamera
Panoramicadell'hardware
Perlespecichedeicomponentihardware,vedereSpecicheallapagina112.
1
Parasole
2
Protezionesuperiore
3
Tergicristallo
4
Finestraanteriore
5
Coperchiointerno
6
Obiettivo
7
Coperchio
8
Unitàbase
96
Page 97

AXISQ8685-EPTZNetworkCamera
IT
1
Ripristinodeivaloripredenitidifabbrica
2
SlotperschedadimemoriaSD
3
Connettoreingressoalimentazione
4
ConnettoreI/O
5
ConnettoreRJ45
6
SlotSFPpermoduloSFP(moduloSFPnonincluso)
97
Page 98

AXISQ8685-EPTZNetworkCamera
Comeinstallareildispositivo
PERICOLO
Rischiodiscosseelettriche.Tuttiicavinonsarannosottotensioneprimadiinstallareil
dispositivo.
ATTENZIONE
Leconnessionielettricheel'installazionedeitubiprotettividevonoessereeffettuatedaun
elettricistacerticatoeinconformitàallenormativelocali.
ATTENZIONE
Rischiodilesioni.Partiinmovimento.Tenereilcorpoadistanzadaldispositivo
duranteilfunzionamento.Scollegaredall'alimentazioneprimadiinstallareoeseguire
lamanutenzionesuldispositivo.
ATTENZIONE
Rischiodilesioni.Superciecalda.Nontoccareildispositivoduranteilfunzionamento.
Scollegaredall'alimentazioneeraffreddarelesuperciprimadieseguirelamanutenzione
suldispositivo.
98
Page 99

Montaggiodell'unitàbase
AXISQ8685-EPTZNetworkCamera
IT
1
Unitàbase
1.Rimuoverelequattroviti(T30)dell'unitàbase.
2.Estrarreeruotaresimultaneamentel'unitàbaseinsensoantiorarionchélefrecce
sull'unitàbaseesulrestodell'unitànonsonoallineate.
3.Rimuoverel'unitàbase.
99
Page 100

AXISQ8685-EPTZNetworkCamera
VVISO
A AAVVISO VVISO
Nonutilizzarestrumentiappuntitidurantelarimozionedelcoperchiotrasparentedell'unità
base.
4.Rimuovereilcoperchiotrasparentedell'unitàbase.
100
 Loading...