

Axas E4HD User manual [ml]
User Manual
Contents
I. Before installation
(A) PRECAUTION!!!
(B) Packaging Contents
(C) Product Descriptions
(D) Conditional Access
(E) Remote Control
(F) Main Features
(G) Technical Data
User Manual
3
5
6
8
9
11
12
II. Installation of the Receiver
1. Connecting satellite cables
2. Connecting the TV (and VCR)
III. First Time Installation (using Wizard)
Step1. Video Input Selection
Step2. Video Mode Selection
Step3. Language Selection
Step4. Configuring Satellite Connection
Step5. Check The Internet Connection
Step6. Configuring Tuner A
IV. Basic Operations
1. Program Information (Infobar)
2. Channel List (Channel Selection Menu)
3. Electronic program Guide (Event View)
4. Plug-ins
V. Network Setup
1. Service Searching
A. Tuner Configuration
B. Automatic Scan of Services
C. Manual Scan of Services
2. Factory Reset
13
14
15
15
16
16
17
17
19
20
22
24
27
27
27
28
30
1
DVB-S2 DIGITAL RECEIVER
User Manual
German manual
VI. Copyright – GNU GPL
VII. Troubleshooting
VIII. Glossary
31
50
66
68
DVB-S2 DIGITAL RECEIVER
2

User Manual
(A) PRECAUTION!!!
The receiver has been designed and manufactured in compliance with EU consumer
safety requirement (CE). Please read the following safety precautions carefully.
1. Connecting Power
• This product operate only in the range of AC 100V ~240V and 50Hz/60Hz. Please check first your
power supply to see if it fits this range.
• Please be noted that you need to disconnect from the mains before you start any maintenance or installation
procedures.
• Make sure that the power cord is placed in a position where it is easy to unplug it from the mains
in an emergency.
2. Overloading
• Do not overload a wall outlet, extension cord or adapter as this may cause electrical fire or shock.
3. Liquid
• This product is not water-proof and should not be exposed to dripping, splashing, or any type of liquid.
• No objects filled with liquid such as base shall be placed on the product.
• Please do not clean the product with wet cloth, which may cause a short circuit.
• No wet objects should be placed near the product.
4. Ventilation
• Allow a sufficient space between the product and other objects to make sure air ventilation of the product.
• Do not block the top or rear of the product with an object, which will close the ventilation holes and
lead to a high temperature of the system. This may cause a failure of the product.
• Do not stack other electronic devices on top of the product.
• Do not insert any kind of pointed objects like screw, gimlet, etc. into the ventilation holes of the product.
5. Connecting the Satellite Cable
• Disconnect the power of the product before you connect the satellite cable to the product.
Otherwise, it may cause
6. Grounding
• The LNB must be earthed to the system earth for the satellite dish.
7. Location
• Place the product indoor.
• Do not expose the product to rain, sun or lightening.
• Do not place the product near any heat appliances as a radiator.
• Ensure that there is more than 10cm distance from any electrical devices and wall.
3
DVB-S2 DIGITAL RECEIVER
User Manual
8. Lightening, Storm or Not In Use
• Unplug the product and disconnect the antenna cable during a thunderstorm or lightning, especially
when left unattended and unused for a long period of time. This will prevent possible damages from
power surges or lightening.
9. Replacement of Parts
• Unauthorized part replacements, especially by one who is not a qualified technician may result in damage
to the product.
• Ensure that when part replacements are necessary qualified technicians perform the task using the
components specified by the manufacturer.
10. Hard Disk Drive ( In case of using external USB HDD)
• Do not move the product or turn the power off suddenly while the Hard Disk Drive (HDD) is still running.
• The company shall not be liable for any corruption of data on the HDD caused by careless use or misuse
of users.
11. Battery
• There is danger of explosion if batteries are incorrectly replaced.
• Replace batteries only with the same or equivalent type.
◎ “WEEE” Symbol instructions.
This product should not be disposed with other house hold wastes at the end of its working life.
Please separate this from other types of wastes and recycle it responsibly to promote the sustainable
reuse of material resources. This will help prevent harm to the environment or human health form
uncontrolled waste disposal.
DVB-S2 DIGITAL RECEIVER
4
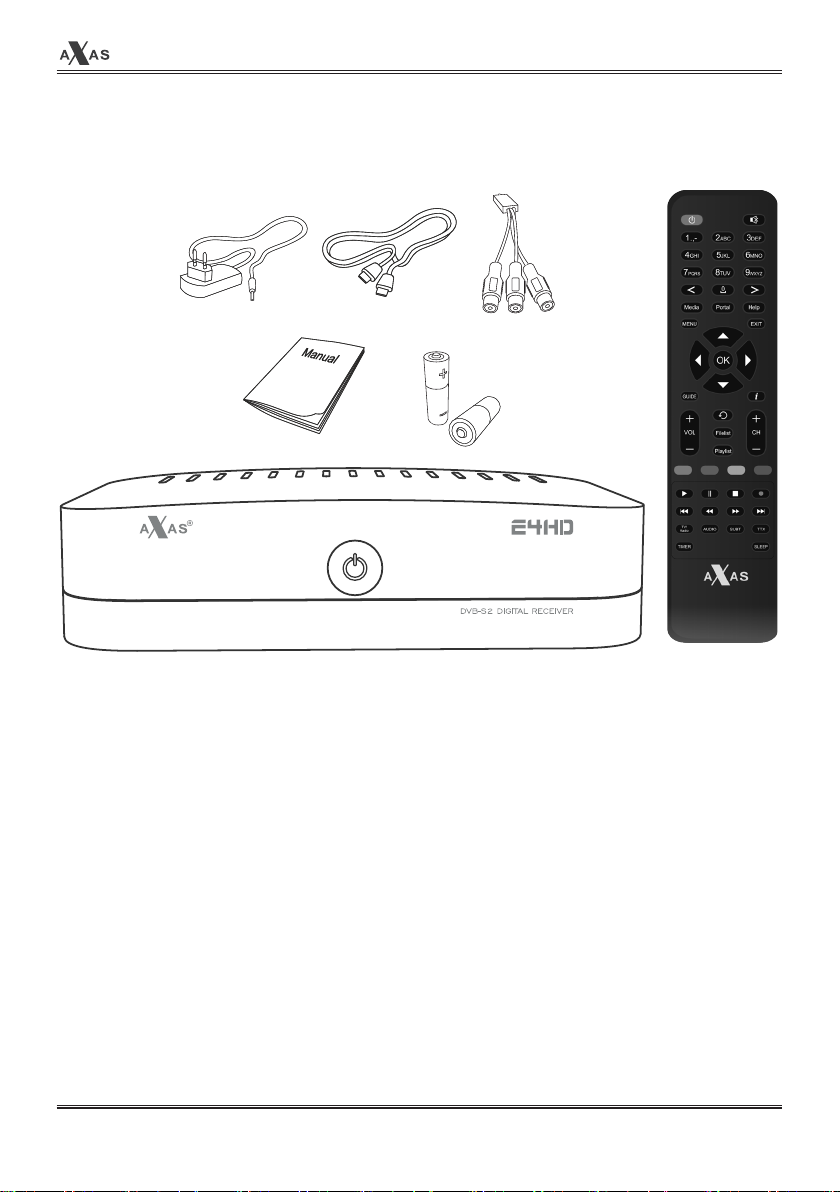
(B) Packaging Contents
User Manual
Please check all package contents before using your product.
• Receiver
• Remote Control
• HDMI Cable
• User Manual
• DC Power Adator
• Battery
• RCA Cable
5
DVB-S2 DIGITAL RECEIVER
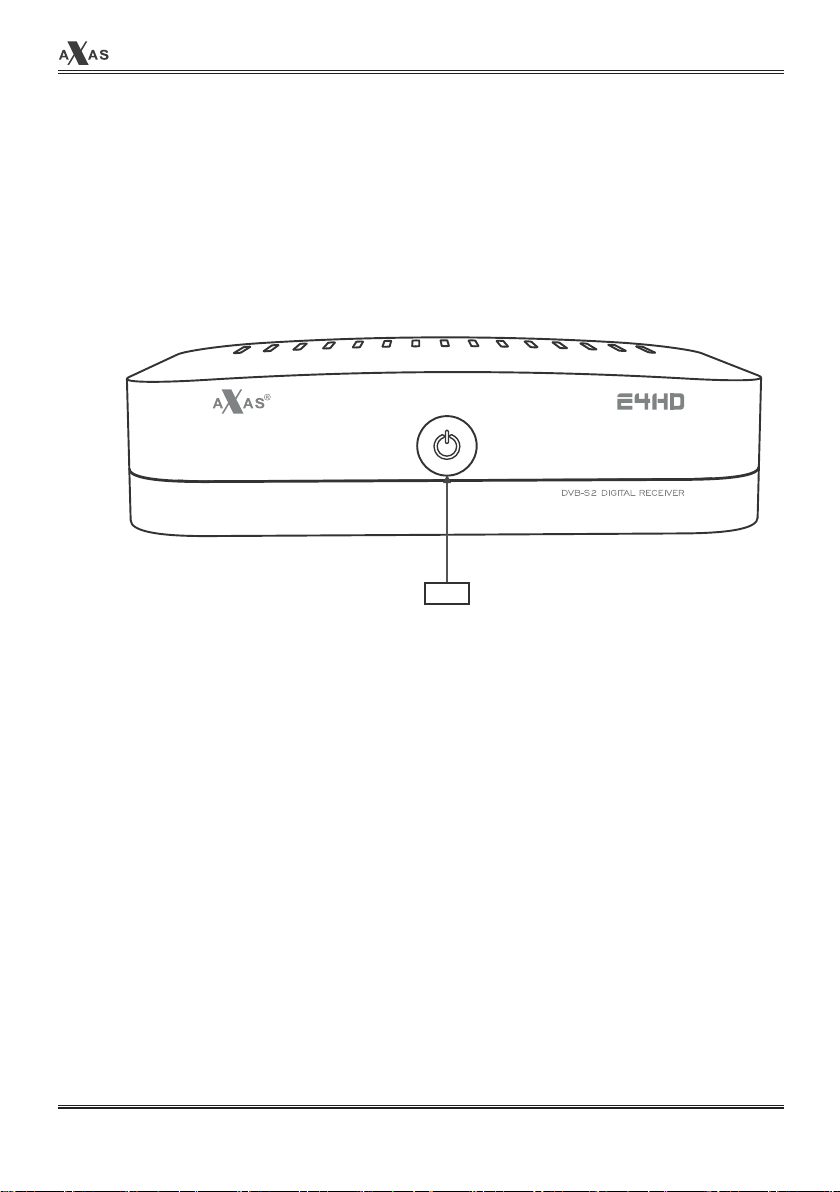
(C) Product Descriptions
▣ Front Panel
User Manual
F1
F1: Button (Power On/Off)
DVB-S2 DIGITAL RECEIVER
6
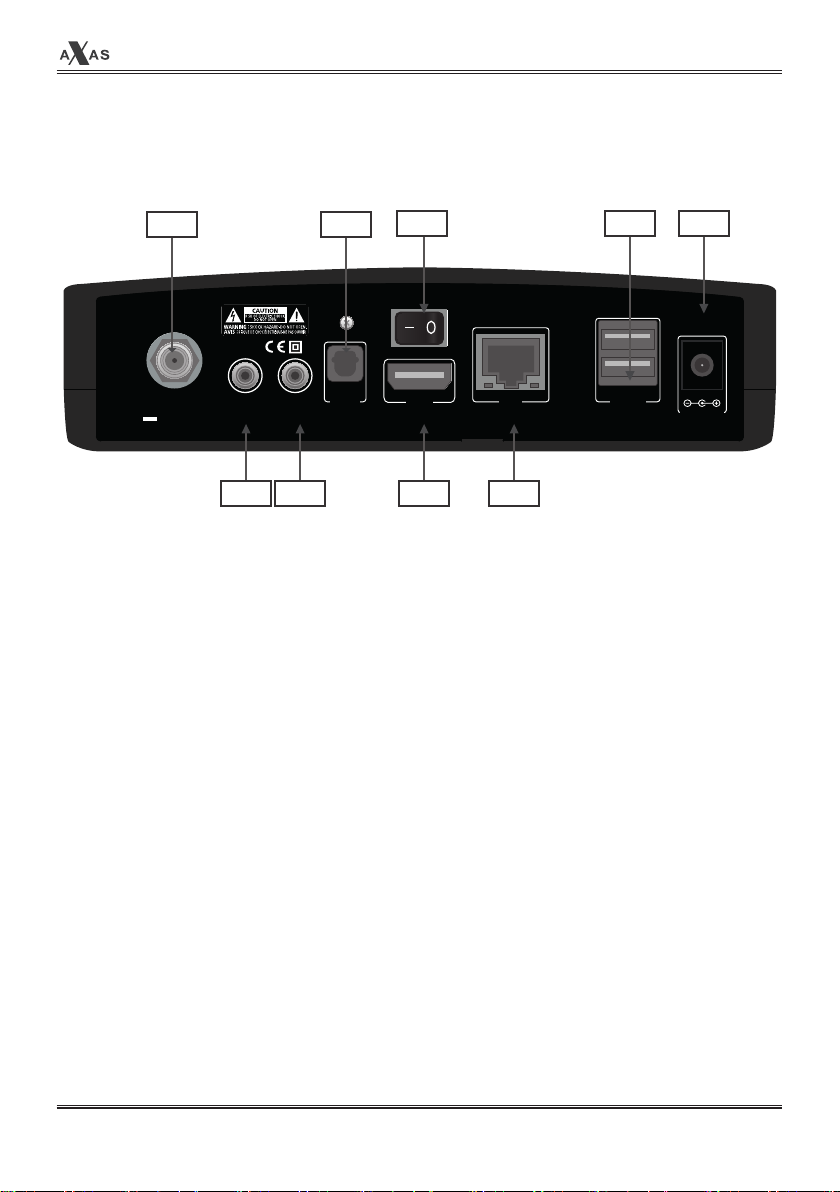
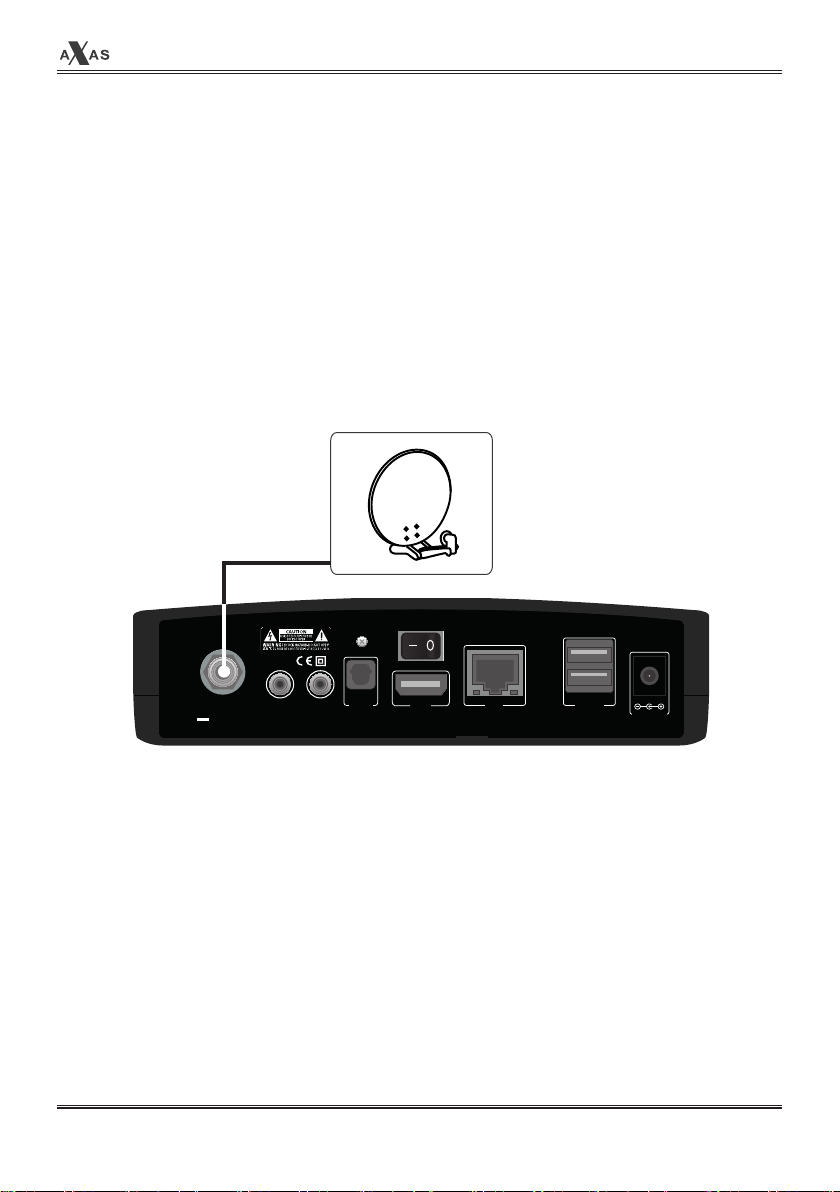
▣ Rear Panel
User Manual
R1 R4
LNB IN
Max 400mA
COMPONENT VIDEO/
AUDIO
13/18V, 22KHZ
ON/OFF
HDMI LAN USB x 2S/PDIF
R3R2 R6 R7
R1: LNB IN
Connect the IF cable from your LNB on your dish to this connector.
R2: COMPONENT
Connects to RCA cable.
R3: Video/Audio output
Connects to TV using RCA cable.(composite YPbPr).
R4: S/PDIF
Connects to a digital audio system using S/PDIF cable.
R9R5 R8
DC 12V,3A
R5: On/Off Switch
Powers on/off.
R6: HDMI
Connects to TV using a HDMI cable for both audio and video signals.
R7: LAN
Connects the PC or another set top box of the receiver.
R8: USB
Connects the USB Memory Stick or external HDD.
7
DVB-S2 DIGITAL RECEIVER
User Manual
R9: Power
Adaptor to this connector.
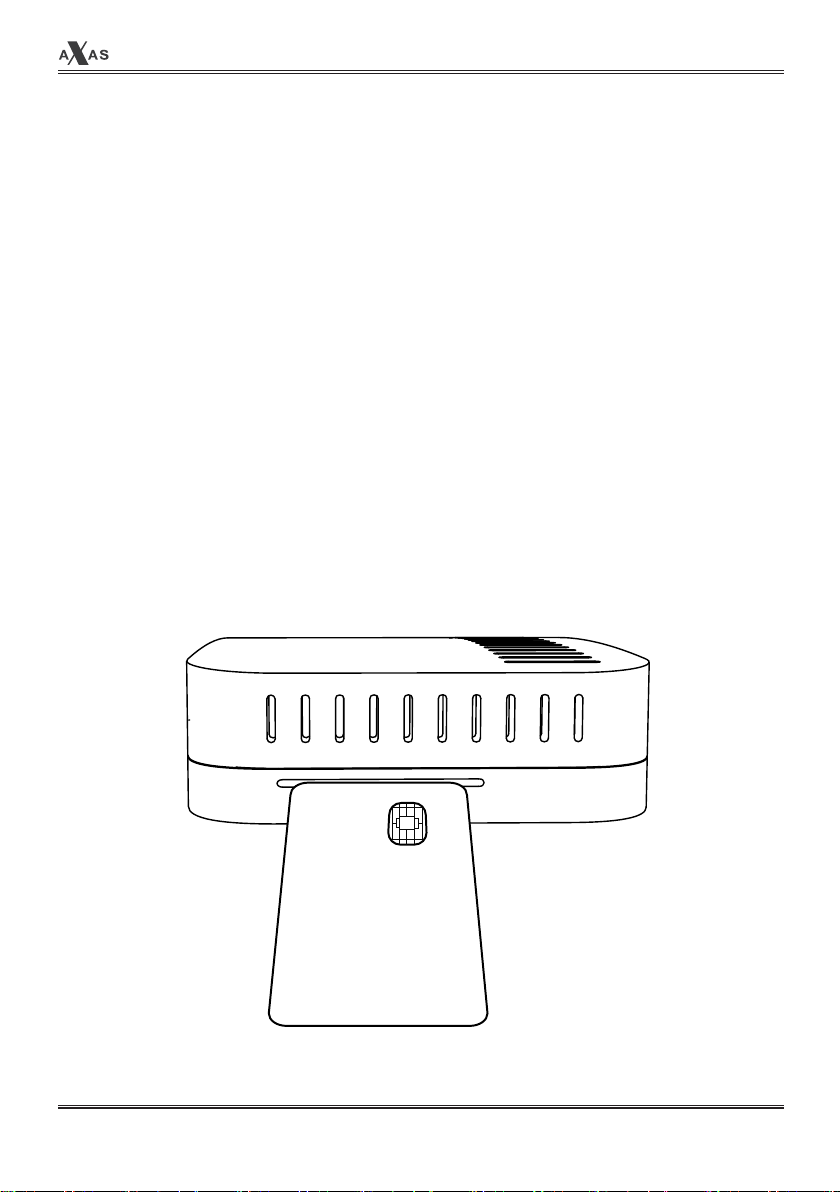
(D) Conditional Access
Amongst the channels that are scanned via the receiver, some channel can be properly tuned on
only with the corresponding Smartcard. The receiver provides one Smartcard Reader slot and users
need to purchase those Smartcards that are required for viewing such subscription based services.
Insertion of Smartcard
① Insert Smartcard as in the following instruction.
② Make sure that the Smartcard remains inserted while viewing.
DVB-S2 DIGITAL RECEIVER
8
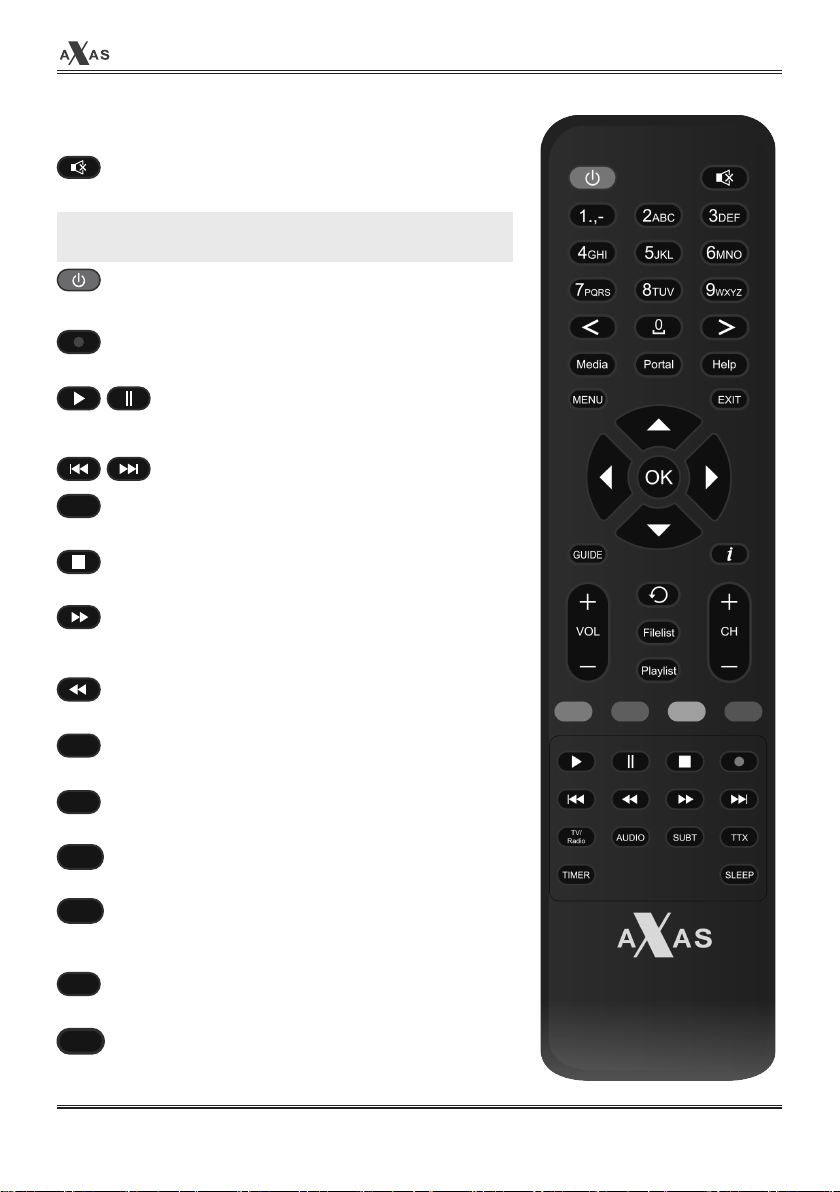
(E) Remote Control
. MUTE
Silences the audio temporarily.
NOTE: when Teletext is activated, mute key is also used
when toggling between the Teletext page and the lice mode.
. Power
To switch receiver to ON or to STANDBY
. Recording
Displays instantly the recording menu.
. Play/ Pause
Plays the selected file (e.g. recording) at the normal speed.
Pause the live program or recording play.
. Previous, Next
TIMER
. Timer
Sets sleep timer.
. Stop
Stops playing of a recording and goes to the live mode.
. Fast Forward
Fast Forward at up to 128 times faster than the normal speed
(x2 / 4 / 8 / 16 / 32 / 64 / 128).
User Manual
. Fast Forward
Pause the live program or recording play.
SUBT
. Subtitle
Displays the subtitle of the current channel if the channel provides subtitle.
TV/
Radio
. TV/ Radio
Displays the TV/Radio Channel list
AUDIO
. Audio
Displays the audio track option to choose (e.g. ACS, Stereo).
TTX
. TTX
Displays the teletext information of current channel, if the channel
provides teletext data.
SLEEP
. SLEEP
Go to Power Timers.
GUIDE
. GUIDE
Go to Power Timers.
9
DVB-S2 DIGITAL RECEIVER
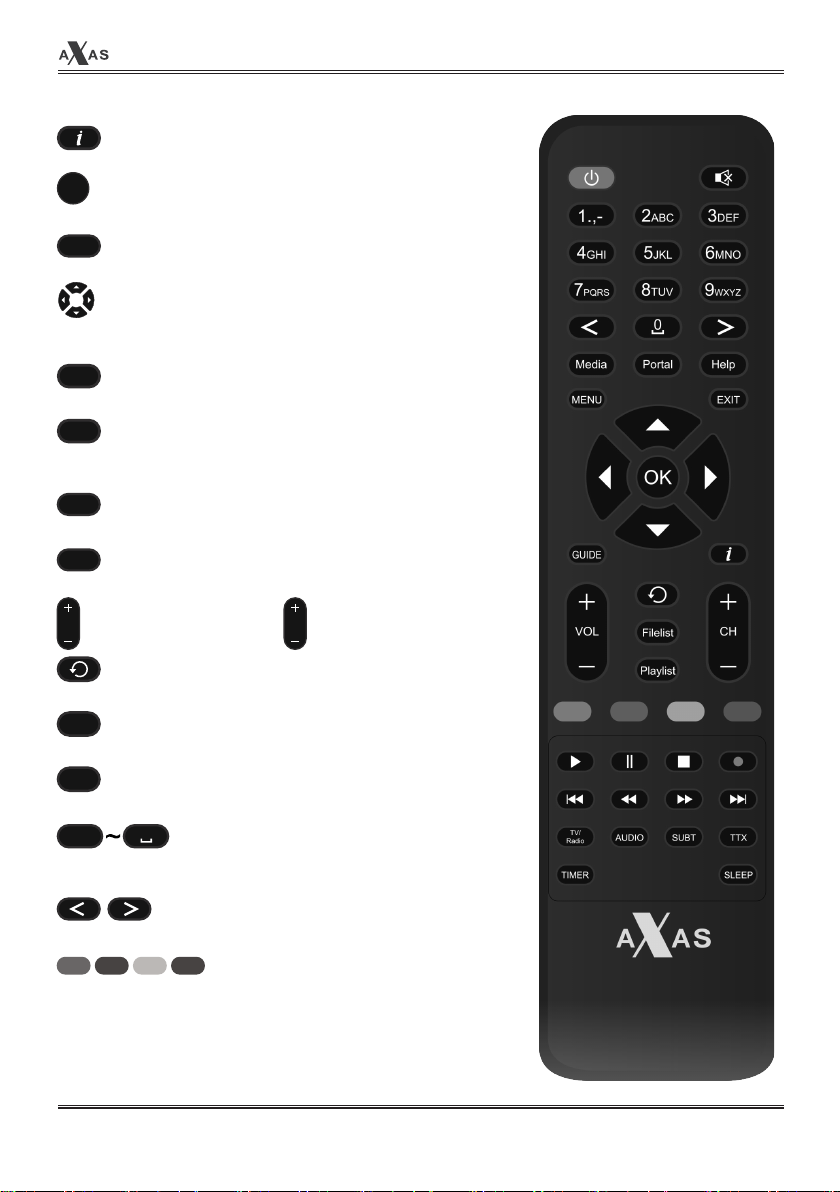
. Info
To display current channel information.
OK
. OK
Confirms the selected menu option.
Help
. Help
Displays the programme guide.
. Navigation Keys
Navigates up/down and left/right on the menu options.
Up/down keys are used to call up the channel list.
MENU
. Menu
Displays the main menu.
EXIT
. EXIT
Exits the current menu option into the live mode, or switches one
step back of the menu.
Media
. Media
Displays the video track option to choose.
Portal
. Portal
Portal
. Volume +/-
VOL
Adjusts the audio volume.
CH
. Channel +/-
Navigates through the
scanned channel list
. Back
Returns to the previous screen.
Filelist
. Filelist
Displays the list of recordings stored on the internal HDD if any.
Playlist
. Playlist
Displays channel list during viewing mode.
1.,-
. Number Keys
0
Enter a channel number or numbers required to be input according to
menu options.
User Manual
. Navigation Keys
Navigates left/right on the menu options.
. Color Keys
Each key is assigned a specific function that may be different in
each menu.
• Red
• Green
• Yellow
• Blue
DVB-S2 DIGITAL RECEIVER
10

(F) Main Features
• DVB-S2 satellite receiver
• DualThread 750 MHz (2000 DMIPS) Broadcom BCM7362 Processor
• 512MB NAND Flash /512MB DDR3 RAM
• Fully Automatic /Manual tuning
• DisEqC 1.0 / 1.1 / 1.2 / USALS, rotor, unicable
• Smartcard Reader
• Innovative openATV Linux operating system
• Multilanguage menu
• Preprogrammed favorites lists
• Extensive network functions
• Web interface for PC or Smartphone Control
• Teletext
• MultiEPG (Electronic Program Guide)
• Timer programming
• 10/100 MB network interface
• Supports downloadable plugins
• Fully automatic update function
• WiFi support (optional)
• Energy saving
User Manual
11
DVB-S2 DIGITAL RECEIVER
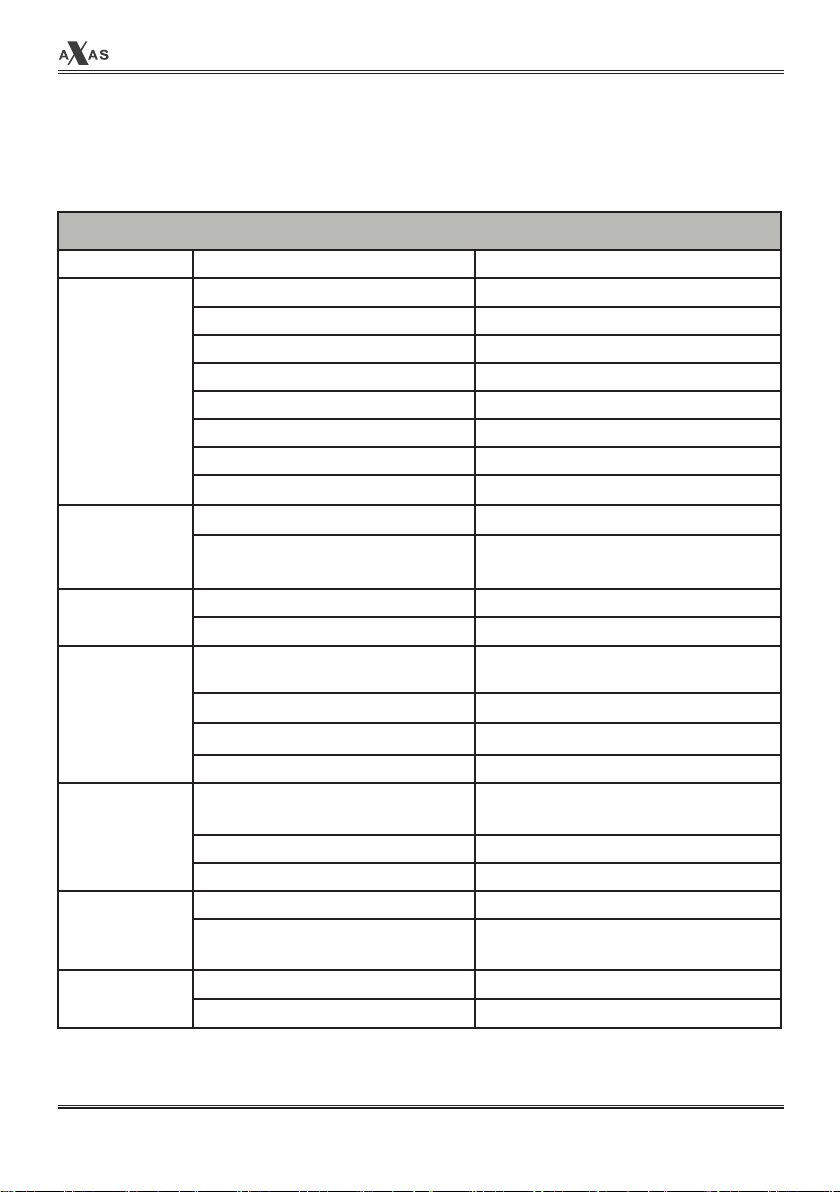
(G) Technical Data
The receiver Technical Specifications
Front Standby Button Standby
Power switch 1
Sat-IF input 1 x F-type Socket
Video output (analogue) 1 x Cinch-socket(Video)
Rear
Panel
Power
Video/audio output(digital) 1 x HDMI
Audio output (analogue) 2 x Cinch Sockel
Audio output (digital) Standard optical (SPDIF)
USB 2.0 2
Ethernet 1
AC Adaptor DC 12V 3A
Power consumption
(Max./typ. Operation/stand-by)
User Manual
36 / 20 / 1W
RF
Video
Decoding
LNB
General
RF range 950-2150 MHz
Modulation, FEC, de-multiplexer DVB-S / DVB-S2 Standard
Video resolution
Video decoding MPEG-2, MPEG-4 kompatibel
Input data rate 2 – 45 MSymb/s
S/N > 53 dB
Decoding
Sampling Rate 32 / 4.1 / 48 kHz
S/N > 65 dB
LNB supply (vert./horiz.) 13 / 18V; Max. 400mA
Control signal
Dimensions(W x H x D) 175 x 125 x 42 mm
Weight 0.4 kg
DVB-S2 DIGITAL RECEIVER
CCIR 601 (720 x 576 reihen), 576p,
720p, 1080i
Digital Audio,MPEG-1, Layer
1, 2, 3
22kHz; ToneBurst ; DiSEqCTM
1.0 /1.1 / 1.2
12
User Manual
II. Installation of the receiver
This chapter will guide you through the whole installation process of the receiver. Please
read each section carefully to make sure that the system runs properly.
1. Connecting Satellite Cables
The receiver is integrated with one satellite tuner, and one of the first steps is to connect satellite
cable(s) to STB in order to gain optimal signal quality. You can either choose one of the following
connection methods depending on the equipment you have.
ON/OFF
LNB IN
COMPONENT VIDEO/
13/18V, 22KHZ
Max 400mA
AUDIO
A. Connecting Satellite Cables
Connect satellite cable to LNB INPUT.
13
HDMI LAN USB x 2S/PDIF
DC 12V,3A
DVB-S2 DIGITAL RECEIVER
User Manual
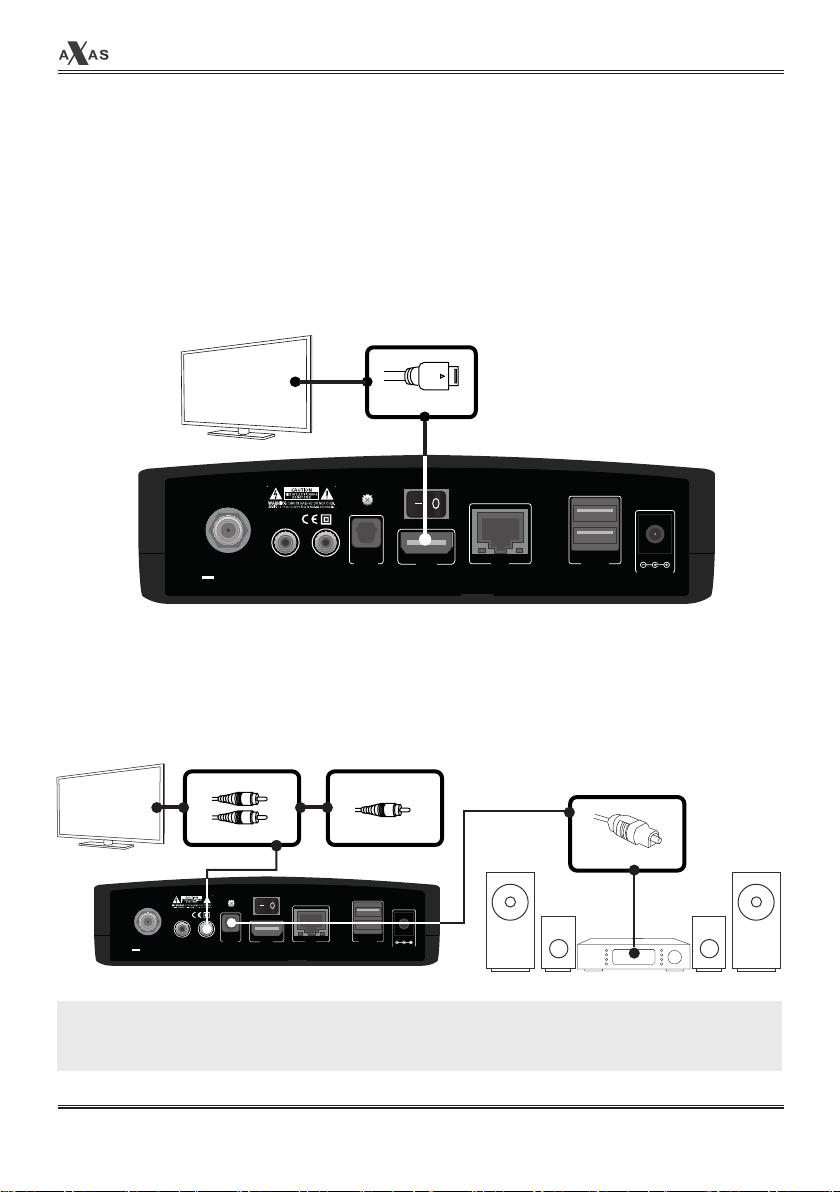
2. Connecting the TV (and VCR)
The receiver provides a variety of audio/video connection methods.
A. Connecting TV via HDMI cable
For the sake of the best picture quality, especially for digital TV, HDMI connection is recommended.
Most HDTVs Have HDMI connectors to ensure the highest picture quality. In the rear panel of the
receiver. one HDMI connector is available for this purpose. Connect your TV to the receiver. using
a HDMI cable as follows.
HDMI
ON/OFF
LNB IN
13/18V, 22KHZ
Max 400mA
COMPONENT VIDEO/
AUDIO
HDMI LAN USB x 2S/PDIF
DC 12V,3A
B. Connecting TV via Component Cable
The secondly recommend TV connection for digital TV is via component cable (YPbPr). However,
unlike the HDMI connection which delivers audio and video signal at the same time, YPbPr connection requires additional audio connection either via RCA cable (Stereo L/R) or S/PDIF as follows.
AUDIO VIDEO
S/PDIF
ON/OFF
LNB IN
COMPONENT VIDEO/
13/18V, 22KHZ
Max 400mA
AUDIO
NOTE: When you have an A/V receiver with S/PDIF digital audio input, this connection is recommended
to enjoy the best audio quality, especially for the Digital sound.
DVB-S2 DIGITAL RECEIVER
HDMI LAN USB x 2S/PDIF
DC 12V,3A
14
User Manual
III. First Time Installation (using Wizard)
When you turn on the receiver for the first time after purchase, an installation wizard will begin
step by step.
NOTE: OK key is used for confirmation and turns to the next step. Press EXIT key to return to the precious
page. This manual has been edited in reference to the standard SD skin. You can change it to the default
HD skin.
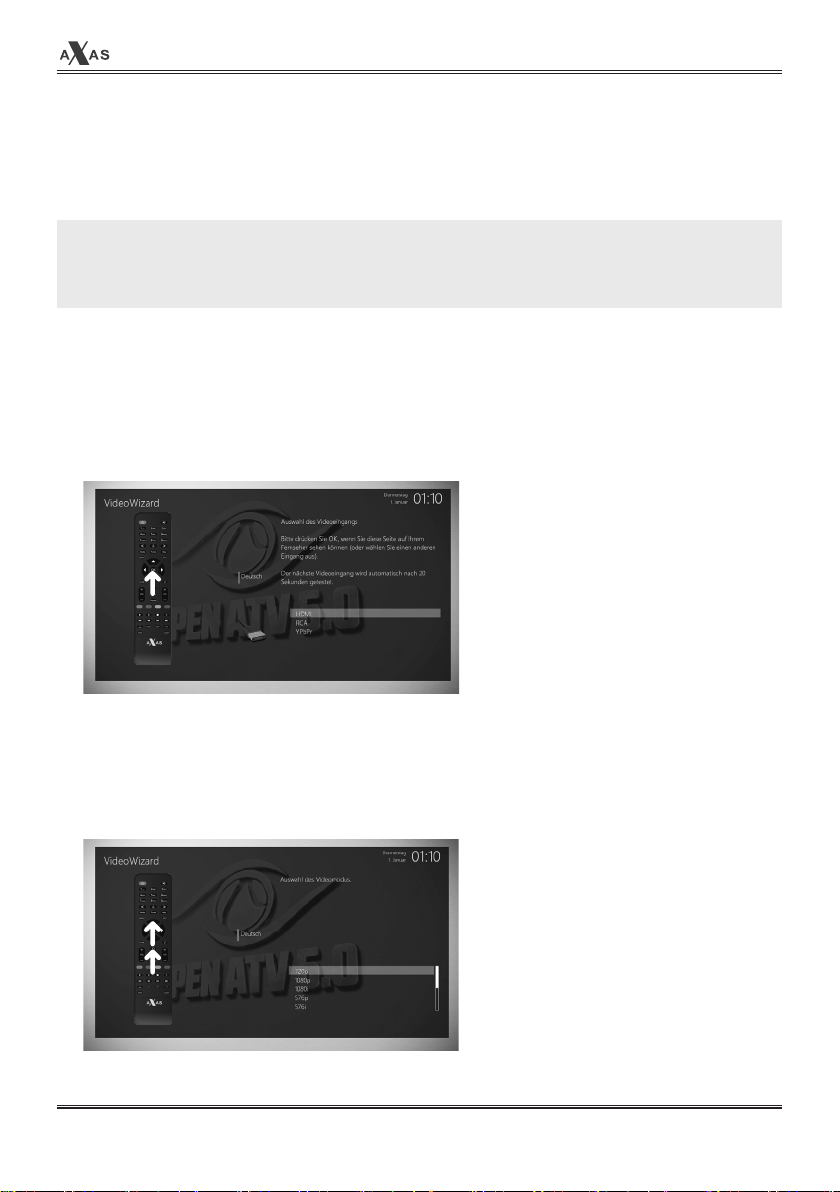
Step 1. Video Input Selection
The receiver various I/O for video connection and here you can choose the main video connection
port for your receiver. Use UP/DOWN key to scroll up and down to find the video connection port
you want.
Step 2. Video Mode Selection
The receiver provides various modes for video and here you can choose the video mode for your
receiver. Use UP/DOWN key to scroll up and down to find the video mode you want.
15
DVB-S2 DIGITAL RECEIVER
User Manual
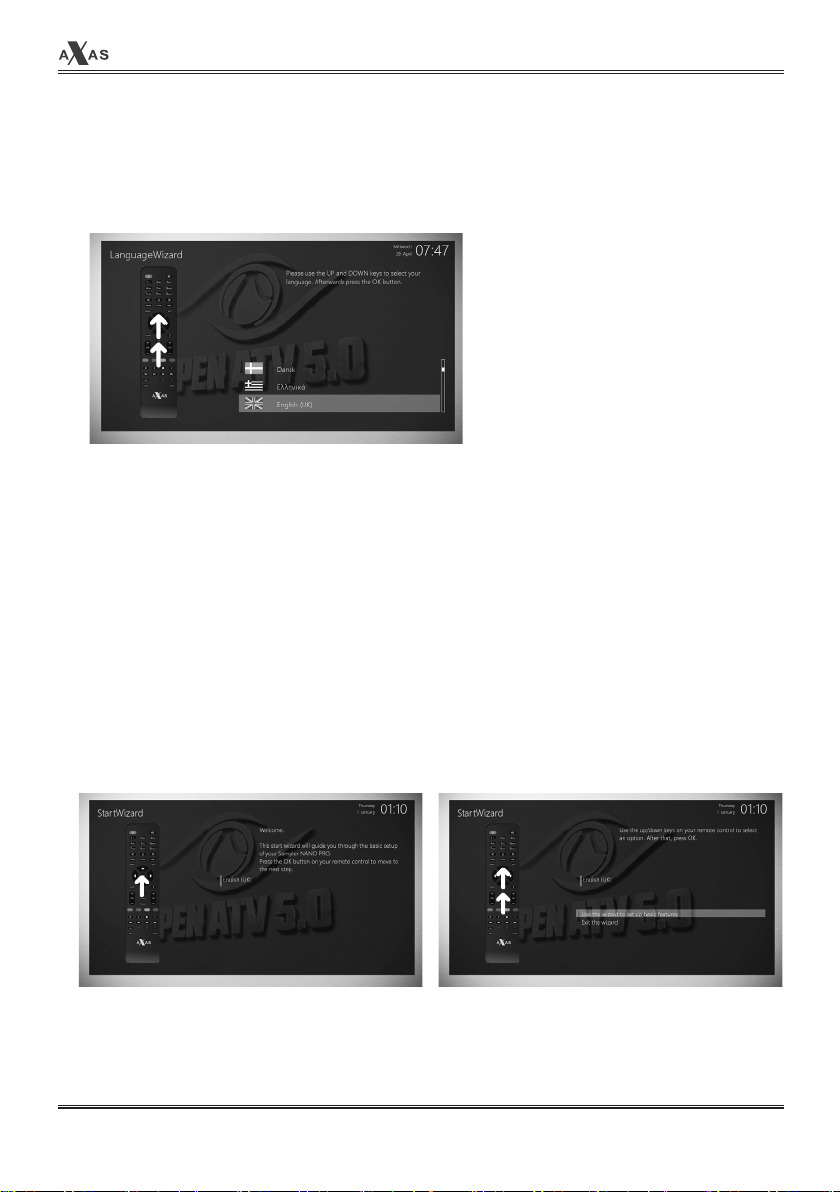
Step 3. Language Selection
The receiver provides various languages and here you can choose the main language for your receiver. Use UP/DOWN key to scroll up and down to find the language you want.
Step 4. Configuring Satellite Connection
From now on you need to configure the satellite connection. You have two options:
• Use wizard to set up basic features
• Exit wizard
You are strongly recommended to use wizard as it is designed to guide you through the configuration
process.
DVB-S2 DIGITAL RECEIVER
16

User Manual
Step 5. Check The Internet Connection
Please connect your receiver to the internet and you can check internet connection.
Use up/down key to scrol up and down to check the internet connection or skip it.
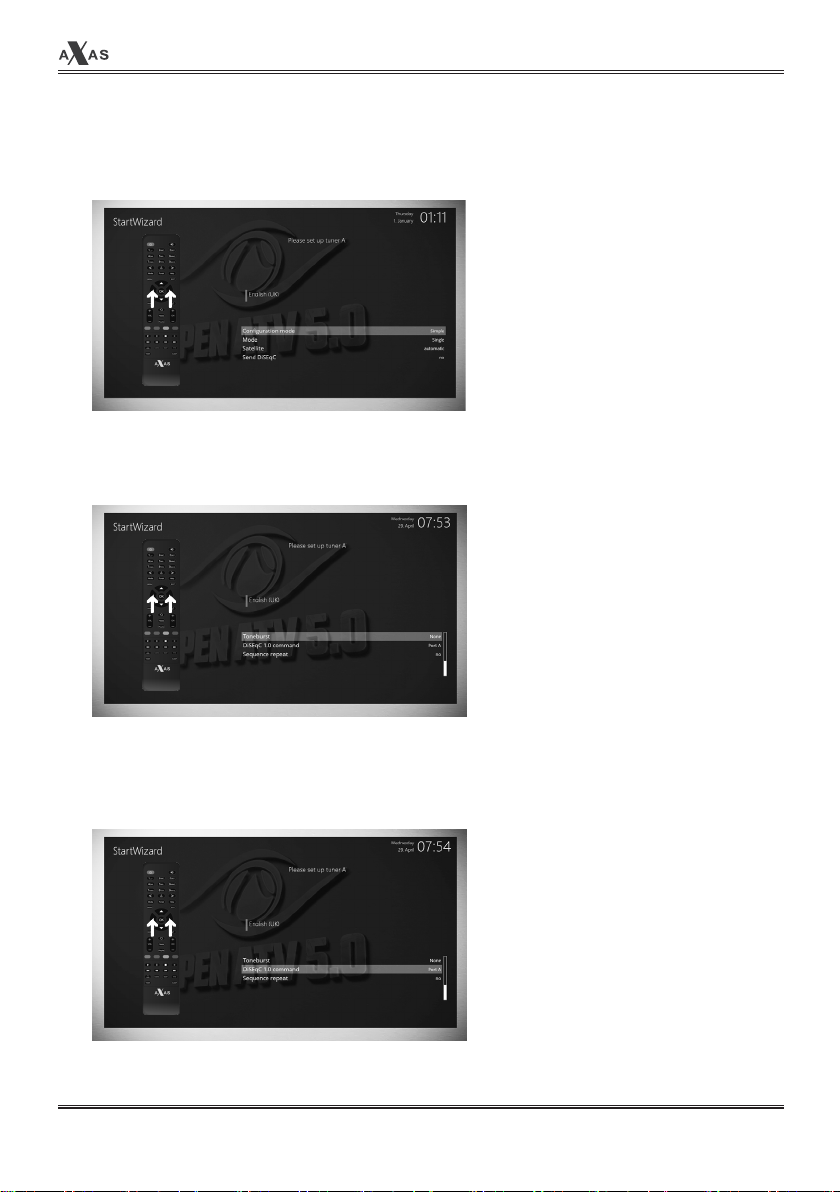
Step 6. Configuring Tuner A
Using LEFT/RIGHT key, you can choose one of the following Configuration Modes:
• Nothing connected
• Simple
• Loop through to: mode to make the LNB1 be internally connected to the LNB2 in.
17
DVB-S2 DIGITAL RECEIVER
User Manual
The three modes are available for the satellite cable connection between LNB and your receiver as below:
• Single
This option is used to receive a single satellite with a single LNB. The cable from
LNB is directly connected to the receiver.
• Toneburst A/B
This option is used if you want to receive
two satellites using a Toneburst switch.
DVB-S2 DIGITAL RECEIVER
• DisEqC A/B/C/D
This option allows you to configure four
satellites in Port A, Port B, Port C and
Port D.
18
User Manual
IV. Basic Operations
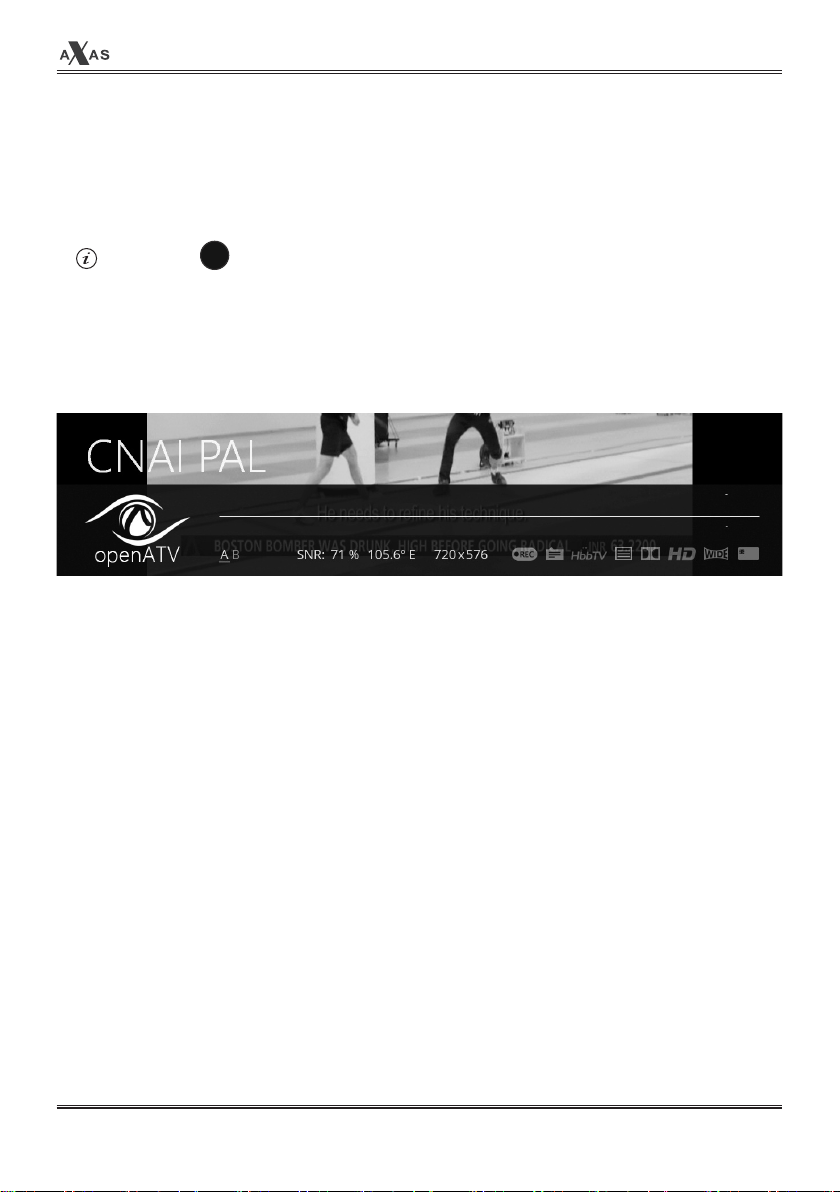
1. Program Information (Infobar)
[ : Press OK key]
Whenever you change the channel, infobar is always displayed for 5 seconds (default setting).
Infobar is designed to provide you comprehensive information of the channel that you are currently
watching.
• Press OK to call up infobar.
① A: the tuner being used for the current channel.
② SNR ( Signal to Noise Ratio) : Signal Level
③ AGC ( Automatic Gain Control) : Signal Strength
④ The name of the current channel
⑤ Remaining time of the current program
⑥ The current program
⑦ The next program
⑧ REC: Highlighted in red when recording is in progress.
⑨ CAS: Encrypted program
⑩ Teletext: Highlight when the program provides Teletext
⑪ 16:9 : Screen ratio
⑫ RED: to activate recording
⑬ GREEN: to call up Subservices, if available
⑭ YELLOW: to activate Timeshift
⑮ Extensions: to call up a menu for Sleep Timer and Graphical Multi EPG
OK
19
DVB-S2 DIGITAL RECEIVER
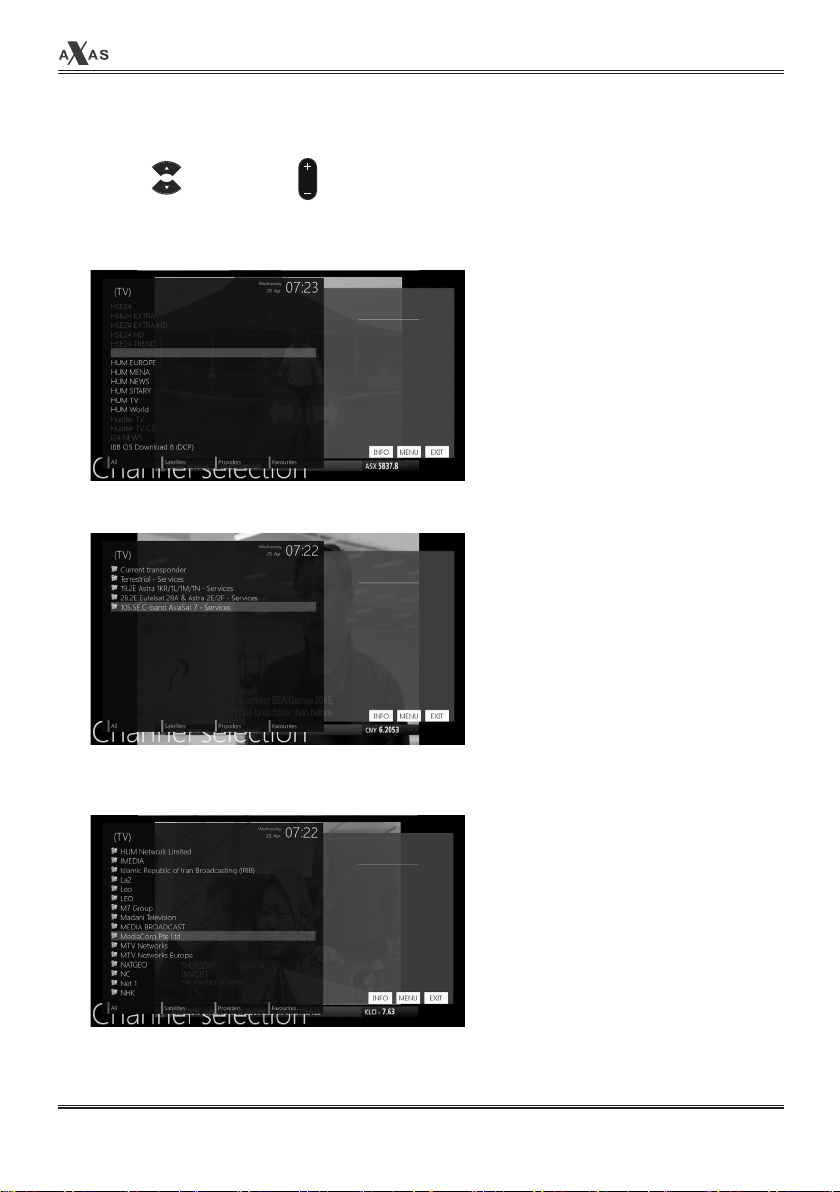
2. Channel List (Channel Selection Menu)
[ⓘ: Press , CHANNEL key]
If press UP/DOWN key, this will activate
CH
Channel Selection
User Manual
Menu as below.
Four types of the channel lists are available to help you manage your channel
selection.
• RED displays the list of all scanned
channels.
• GREEN displays the list of all satellites
scanned.
Per each satellite, channels are arranged according to
Services, Provider
, and
New.
DVB-S2 DIGITAL RECEIVER
• Yellow displays the list of providers.
20

User Manual
• BLUE displays the list of your favorite
channels.
In order for you to add certain channels to this
① Call up the
② Go to ALL list by pressing RED Key.
③ Select the channel that you want to add to the
④ Press MENU key on the selected channel and the following menu appears.
⑤ Choose
⑥ Go to the Favorites list by pressing BLUE to confirm that the selected channel is correctly
included in the list.
Channel Selection
“add service to favorites”
list by pressing UP or DOWN key.
and press OK.
Favorites
Favorites
list
list.
21
DVB-S2 DIGITAL RECEIVER
 Loading...