


Axas E-3HD User guide [ml]

Before Operation, Please read entire Manual thoroughly and retain for future reference.

02
(A) Safety Instructions
This product should not be disposed with other house hold wastes at the end of
its working life.Please separate this from other types of wastes and recycle it
responsibly to promote the sustainable reuse of material resources. This will help
prevent harm to the environment or human health from uncontrolled waste disposal.
● This product operates only in the range of AC 100V~250V and 50Hz/60Hz.
Please check first your power supply to see if it fits this range.
● Please be noted that you need to disconnect from the mains before you start any
maintenance or installation procedures.
● Make sure that the power cord is placed in a position where it is easy to unplug it from
the mains in an emergency.
● Do not overload a wall outlet, extension cord or adapter as this may cause electrical
fire or shock.
● This product is not water-proof and should not be exposed to dripping, splashing,
or any type of liquid.
● No objects filled with liquid such as base shall be placed on the product.
● Please do not clean the product with wet cloth, which may cause a short circuit.
● No wet objects should be placed near the product.
● Disconnect the power of the product before you connect the satellite cable
to the product. Otherwise, it may cause damage to the LNB.
● The LNB must be earthed to the system earth for the satellite dish.
● Unplug the product and disconnect the antenna cable during a thunderstorm
or lightening, especially when left unattended and unused for a long period of time.
This will prevent possible damages from power surges or lightening
● Place the product indoor.
● Do not expose the product to rain, sun or lightening.
● Do not place the product near any heat appliances as a radiator.
● Ensure that there is more than 10 cm distance from any electrical devices & wall.
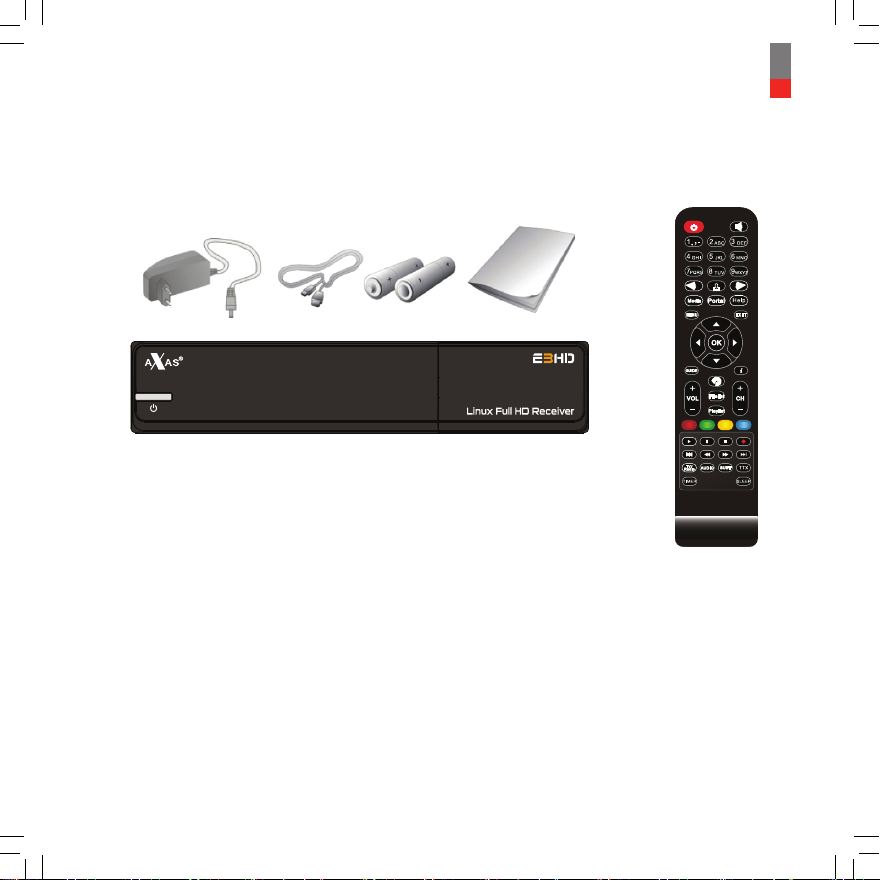
(B) Packaging Contents
Please check all package contents before using your product.
● Set Top Box
● Remote Control
● Batteries
● HDMI cable (Optional)
● D/C Power Adaptor
● User Manual
03
04
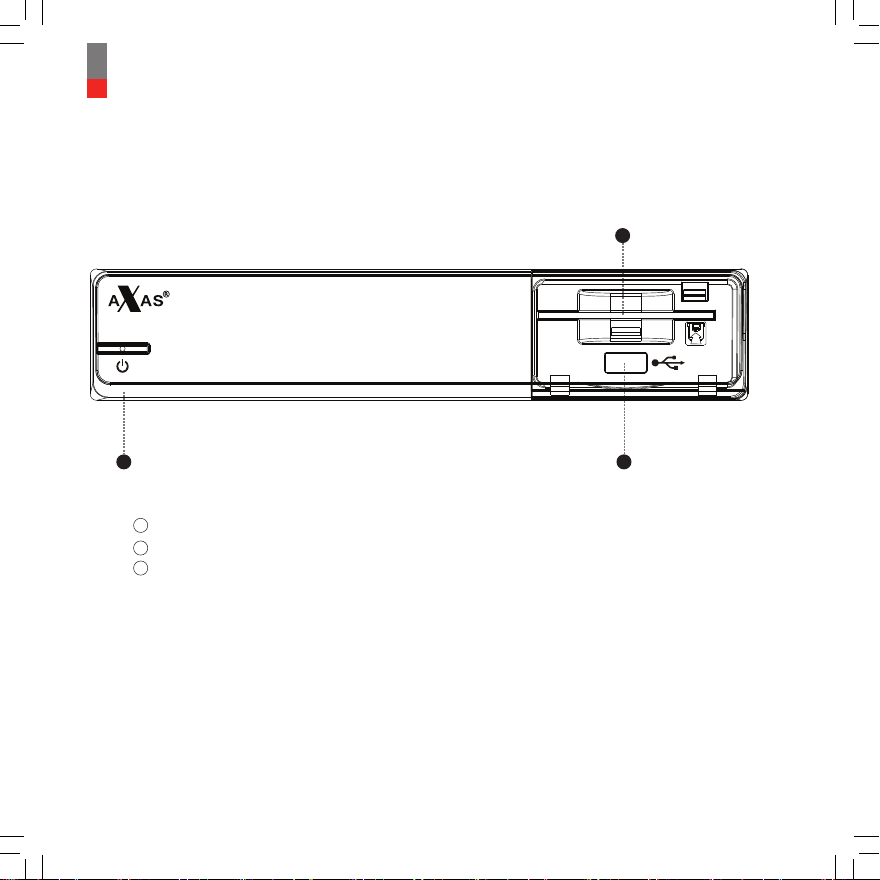
(C) Product Descriptions
Front Panel
3
1
1
Buttons : Standby
2
USB : Connects to the USB memory stick or external HDD
3
Smartcard reader slot : One Smartcard slots are provided
2

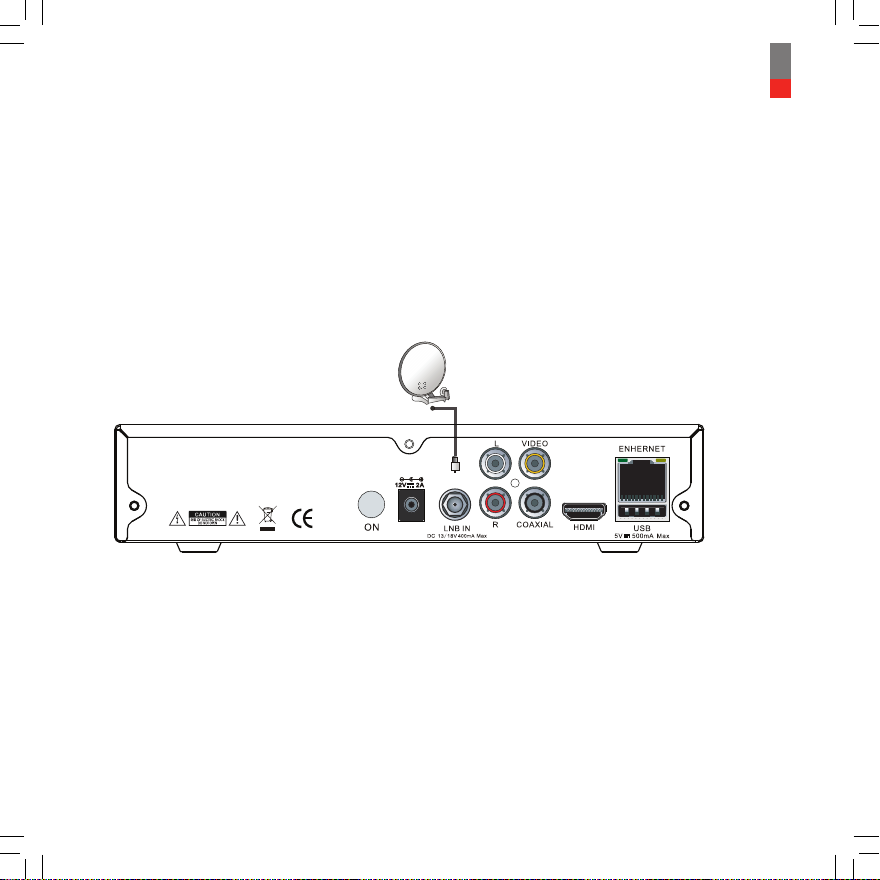
Rear Panel
05
5
9
1
1
ON : Powers On/Off.
2
DC-IN: Connects the detachable D/C power adapter.
3
LNB-IN : One satellite cable can be connected.
4
Audio output : Connects to TV using RCA cable.
5
Video output : Connects to TV using RCA cable.
6
COAXIAL : Connects to a digital audio system using S/PDIF cable.
7
HDMI : Connects to TV using a HDMI cable for both audio and video signals.
8
USB : Connects the USB memory stick or external HDD.
9
Ethernet : Connects the set top box to network.
3
2
4
6 7
8
06
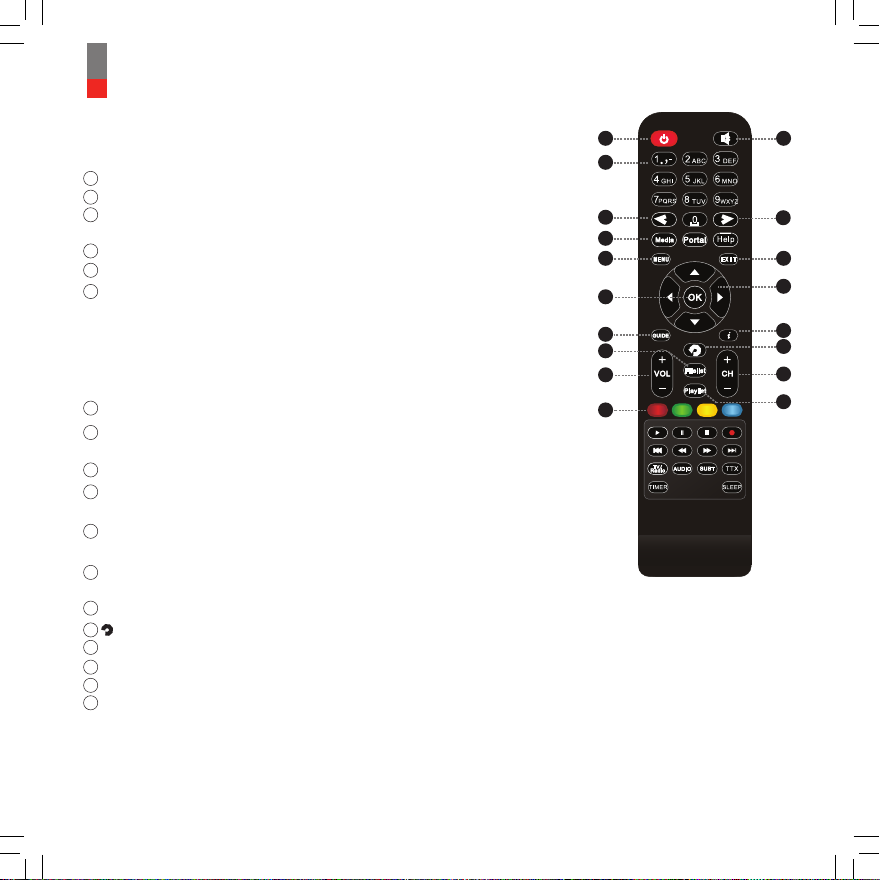
(D) Remote Control
1
Power : To switch the receiver in and out of stand-by mode.
2
Mute : Mutes the audio.
3
Numeric Keys : Enters a service number for service change or
to specify values for menu options.
4
< : Navigates left on the menu options.
5
> : Navigates right on the menu options.
6
Media, Portal, Help :
• Media - Displays the TV channel list.
• Portal - Displays the Radio channel list.
• Help - Displays major important operation methods of
Set Top Box.This provides users with a quick guide of using
Set Top Box.
7
MENU : Displays the main menu.
8
EXIT : Exits the current menu option into the live mode, or switches one
step back of the menu.
9
OK : Confirms the selected menu option.
10
Navigation Keys : Navigates Up/Down and Left/Right on the menu options.
Up/down keys are used to call up the channel list.
11
GUIDE : Displays the Electronic Program Guide (EPG) information
if provided.
Information : Displays the service information box.
12
13
Filelist :
: One step backword.
14
15
VOL +/- : Adjusts the audio volume.
16
CH +/- : Navigates through the scanned channel list
17
Playlist :
18
Color Keys : Each key is assigned a specific function that may be
It is also used to display more information about a program.
Displays the list of recordings stored on the internal HDD if any.
Displays channel list during viewing mode.
different in each menu.
1
3
4
6
7
9
11
13
15
18
2
5
8
10
12
14
16
17

19
ll : Pause.
20
Stop : Stop
21
▶: Play.
22
Reserved
23
: Backward skip.
24
: Fast forward.
25
: Rewind.
26
: Forward skip.
27
TV/Radio : Switch TV and Radio.
28
TTX : Displays the Teletext information of the current channel,
if the channel provides Teletext data.
29
Audio : Displays the audio track option to choose (e.g. AC3, Stereo).
30
SUBT : Displays the subtitle of the current channel
if the channel provides subtitle.
31
Timer : Displays recordings by timer list.
32
SLEEP : Set sleep timer.
07
19
21
23
25
27
29
31
20
22
24
26
28
30
32

08
(E) Main Features
● 750 DMIPS Processor
● Linux Operating System
● Media Player
● Downloadable Plug-ins supported
● 1 x Smartcard Reader
● MPEG2/H.264 Hardware Decoding
● 1 x DVB-S2 Tuner
● Status Indicator
● 256MB NAND Flash/512MB DDR Memory
● 10/100MB Ethernet Interface
● 2 x USB 2.0
● HDMI
● Composite Video
● EPG supported
● Automatic & Manual Service Scan supported
● Multiple LNB control (DiSEqC) supported
● Skin change supported
● Power Supply by External SMPS
(F) Installation of Set Top Box
This chapter will guide you through the whole installation process of Set Top Box.
. Please read each section carefully to make sure that the system runs properly.
1. Connecting Satellite Cables
Set Top Box is integrated with one satellite tuner, and one of the first steps is to connect
satellite cable to Set Top Box in order to gain optimal signal quality.
A. Connecting Satellite Cable
Connect satellite cable to LNB-IN.
09
10
2. Connecting the TV
Set Top Box provides a variety of audio/video connection methods.
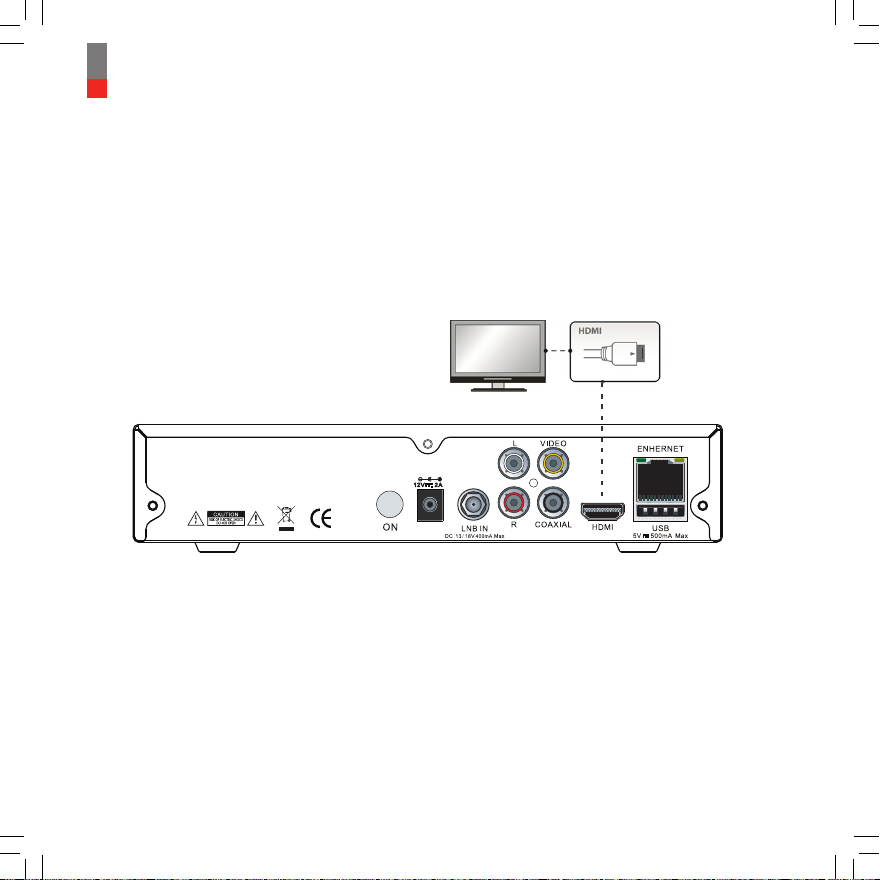
A. Connecting TV via HDMI Cable
For the sake of the best picture quality, especially for digital TV,
HDMI connection is recommended. Most HDTVs have HDMI connectors to ensure
the highest picture quality. In the rear panel of Set Top Box one HDMI connector
is available for this purpose. Connect your TV to Set Top Box using a HDMI cable
as follows.