

AXA Remote 2.0 Instructions Manual

AXA Remote 2.0
Information
You have just acquired a high quality AXA product.
The instructions below must be followed closely in order to
effectively assemble and operate this product.
Implementation:
Top and side-hung windows, opening outwards
Assembly tools (recommended):
Tape measure, (cordless) drill, screwdriver, Ø 2 mm drill bit,
pencil or stiletto, screw ring and socket wrench
Assembly location Minimum required
assembly space:
Minimum window height: 30 cm.
Maximum range remote control: distance 10 m.
37-223 (05-12)
User manual
Remote control (figure ):
The remote control has 3 buttons: Open, Stop and Close.
When the Open or Close buttons are pressed briefly, the
window will fully open or close.
When the Open or Close buttons are pressed continuously,
the window will open or close as long as the button is pressed.
When the Stop button is pressed, the movement will be
stopped.
Always point the remote control at the front of the
closing unit (figure ).
Configuring remote control:
1 Place 2x AAA batteries in the remote control
and 4x AA batteries in the closing unit (figure ).
2 The LED light in the closing unit will come on for 20 seconds
(green). Press the Open button (top button) on the remote
control. The light will briefly turn off when configuration has
taken place.
Open
Stop
Close
A B
40 mm
38 mm
380 m m
Window
Window casing
Stay
Hinge s ide
50
88
26
26
310
38
min. 38 cm, max. 100 cm
min. 30 cm,
max. 100 cm
EMC 2004/108/EC
Top-hung
window
Package contents
1. (2x) AAA Batteries
2. (4x) AA Batteries
3. (1x) Closing unit
4. (1x) Window casing plate
5. (1x) Drilling template
6. (1x) Cover
7. (1x) Window plate
8. (1x) Screw ring
9. (2x) Screws 3.5 x 30 mm
10. (9x) Screws 4.0 x 40 mm
11. (1x) Socket wrench
12. ((1x) Remote control
1
3
4
6
2
5
7
8
9
10
11
12
1
C
12
3
C
B
2
1
POLICE
HALLMARK
SAFE LIVING
A
Remote-controlled window opener
Assembly manual
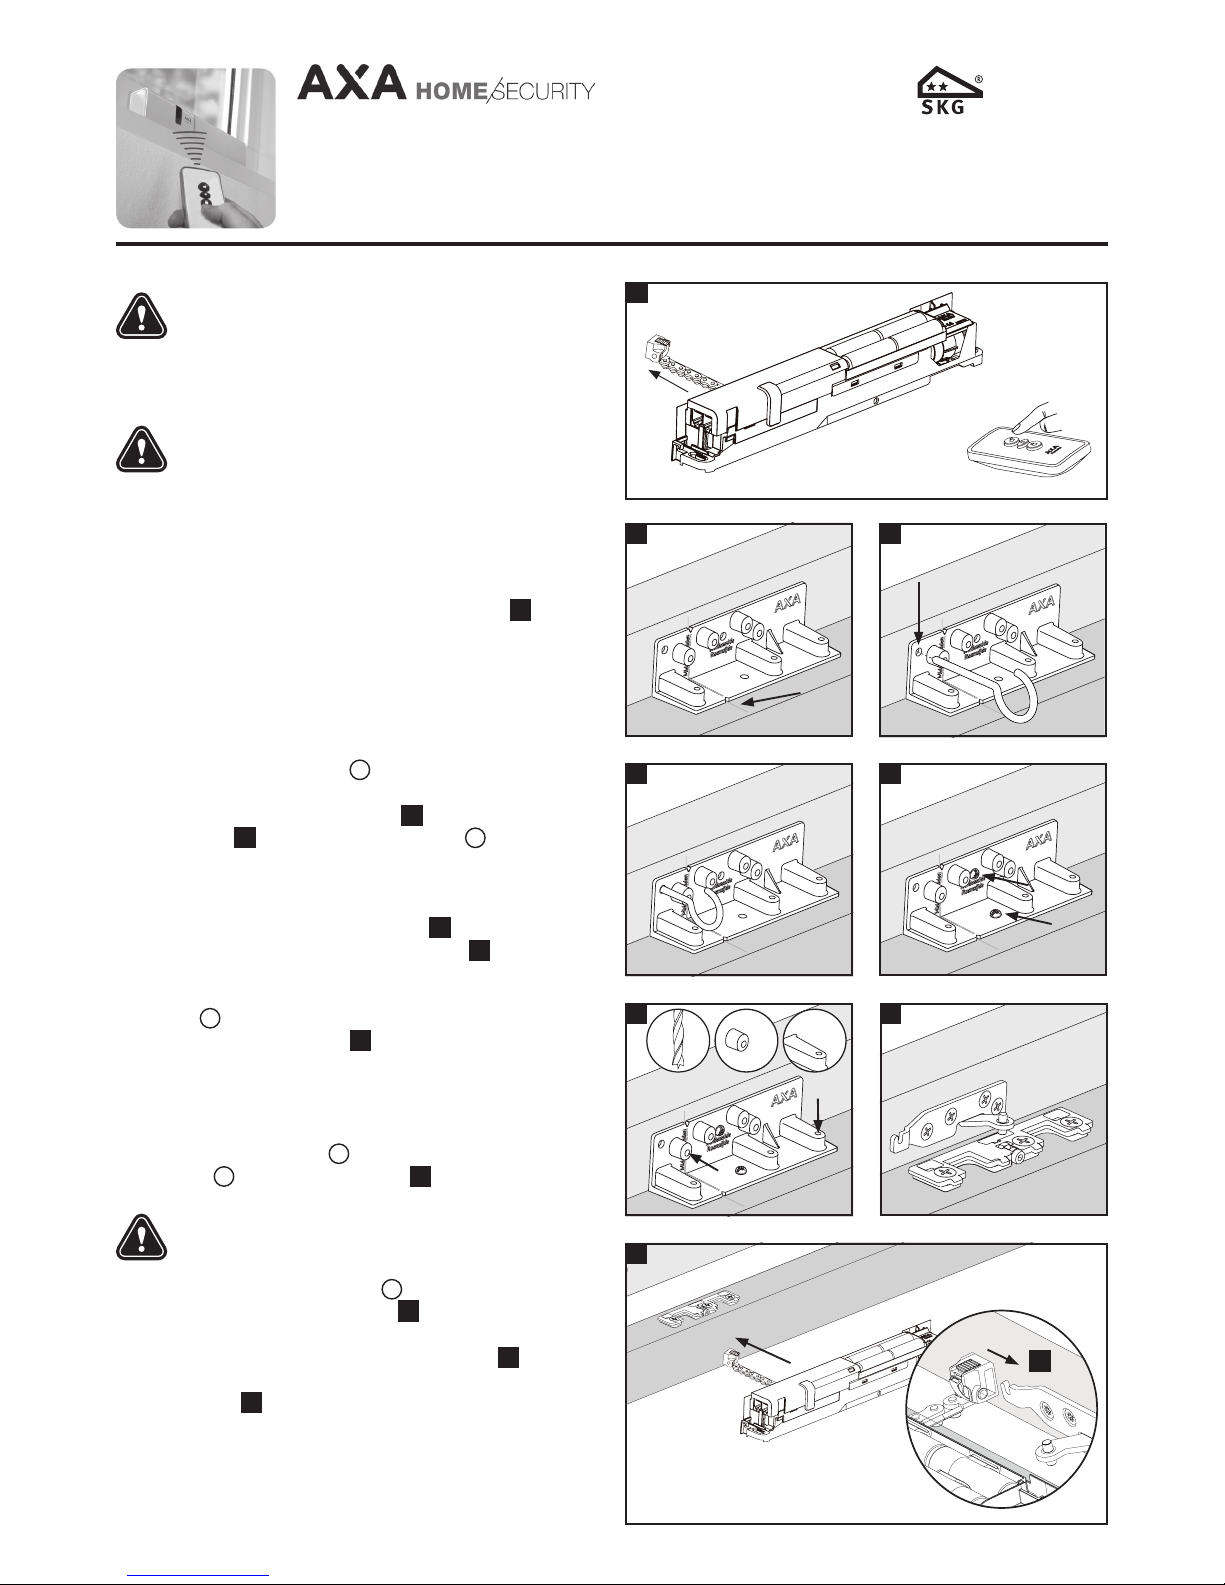
4 Check whether the window closes effortlessly.
5 Mark the middle of the window on the window casing.
6 Place the drilling template, with the centre of the V sign
on the marked central point, firmly against the
window and window casing (figure ). Mark the
hole (figure ) and screw the screw hook into the
window through the opening of the drill template
(pre-drill Ø 2 mm). Use this screw hook to properly close
the window; ensure the drilling template is firmly against
the window and window casing (figure ). Mark 2 assembly
points through the drilling template (figure ).
Pre-drill the assembly points (Ø 2 mm).
7 Fix the drilling template in place using the
screws (3.5 x 30 mm).
8 Pre-drill the 7 holes (figure ) using a Ø 2 mm drill bit.
9 Remove the drilling template
Assembly
10 Mount the window plate (using pre-drilled holes) with
4 screws (4.0 x 40 mm) * (figure ).
When using a wireless drill, you must make the last
few tightening revolutions by hand
11 Mount the window casing plate (using pre-drilled holes)
with 3 4.0 x 40 mm screws (figure ).
12 Slide the closing unit on to the window casing plate; keep
the window slightly open when doing so (figure ).
13 Slide the chain block fully over the window
plate (figure ). The block will fix itself in place.
E
G
I
K
F
H
J
The configuration time is 20 seconds. The LED light
will switch off once this time passes. If you want to
configure the remote control or another remote
control, you must briefly remove the batteries and
then re-insert them. Then repeat step 2.
- A remote control can be configured to an unlimited
number of window units.
- A window unit can be configured to maximum 8
remote controls.
3 Press the Open button again and allow the chain to fully exit
the closing unit.
The closing unit is now ready for assembly (figure ).
D
* For pinewood: Use 4 x 4.5 x 45 mm screws
5
8
9
4
7
10
D
F
E
G
H
I
J
J
K
L
L
AXA Remote 2.0
Remote-controlled window opener
37-223 (05-12)
EMC 2004/108/EC
2
POLICE
HALLMARK
SAFE LIVING
4x 3x
 Loading...