

Avycon AVR-HN504P4-1T, AVR-HN504P4-2T, AVR-HN504P4-3T, AVR-HN504P4-4T, AVR-HN504P4-6T Installation Guide
...Page 1

Digital Video Recorder
Quick Start Guide
Page 2
1. Notes
● Please re ad this inst ruction ca refully fo r correct use of the product and preserve it for reference
purpo ses.
● All the e xamples an d pictures used here areThis ma nual is suit able for 4/8 /16 CH HD-TV I DVR.
for ref erence onl y.
● There may b e several te chnicall y incorrect places or printing errors in this manual. The updates
will be a dded into th e new versio n of this manual. The contents of this manual are subject to c hange
witho ut notice.
● This de vice shoul d be operate d only from the type of power source indicated on the marking label.
The vol tage of the po wer must be verified before using the same. Kindly remove the cables from the
power s ource if the d evice is not t o be used for a long period of time.
2. Packing Check
Pleas e check the de vice and the accessories after getting the device. If there are any damages ,
short ages or defe cts, pleas e contact your dealer immediately.
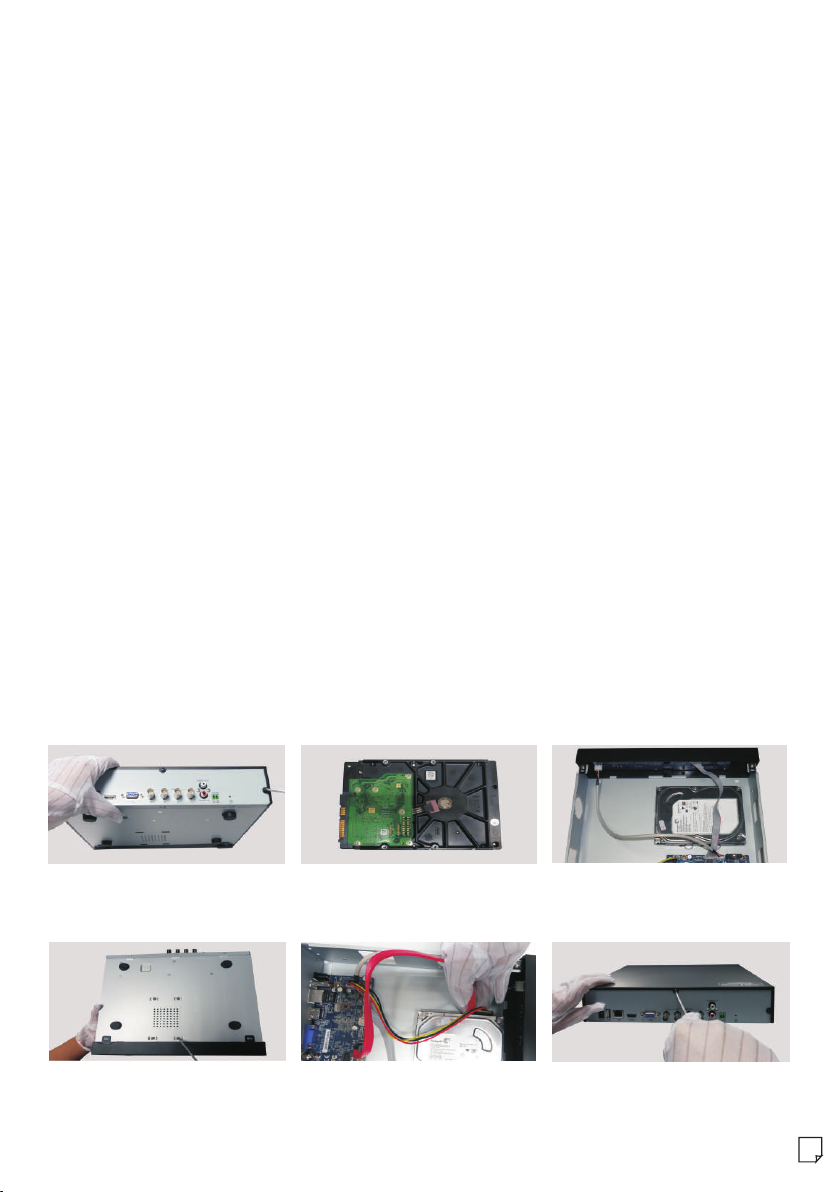
3. HDD Installation
This se ries of the pr oduct supp orts to inst all 1 SATA hard drives.
Pleas e use the HDD th e manufact urers recommend specially for security and safe field. Please make
sure th at the devic e is powered o ff before the installation.
① Loosen the screws to open
the cov er.
④ Turn over the machine and
secur e the HDD with t he screws.
② Take the HDD out.
⑤ Connect the power and
data ca bles.
③ Put the HDD onto the bottom
of the ma chine.
⑥ Install back the cover and
secur e it with the sc rews.
1
Page 3

4. Rear Panel Instructions
The int erfaces of t he rear panels are for reference only.
Rear Pa nel for 4 CH
Rear Pa nel for 8 CH
Rear Pa nel for 16 CH
Name
DC12V
USB
LAN
HD TVI
VIDEO IN
VGA
Descri ption
DC12V power in put
Connec t USB mouse o r USB stora ge de vices.
Networ k port
HD-TVI v ideo inpu t
VGA out put ; connect t o monitor.
Name
HDMI
AUDIO OU T
AUDIO IN
RS 485
Descri ption
Connec t to high-d efiniti on di splay dev ice.
Audio ou tput; con nect to sou nd bo x.
1 CH audio i nput; con nect to mic rop hone.
Connec t to keyboa rd or speed d ome .
A is TX+ ; B is TX- .
5. Startup & Shutdown
Start up:
① Conne ct the monit or.
② Conne ct with the po wer.
③ The device w ill boot and the power indicator will turn blue.
④ A Wizard window will pop up.
Shutd own:
By mous e – Enter “Mai n Menu” and th en select “Shutdown” icon. This will bring up a shutdown
windo w. The devi ce will shut d own by click ing “OK” button. Then disconnect the power.
2
Page 4

6. Login
After the wizard setup, you can see the live image.Right
click to pop up a menu toolbar. Click main menu
button. This will take you to see a login box. The default
username is admin; the default password is 123456.
Enter username and password and click “Login” button
to go into the main menu setup.
7. NAT
NAT Settings
►
① The DVR shall be powered on and connected to the network.
② Go to Menu→Setup→Network. Refer to Fig 1. You can obtain the IP address, Subnet Mask and
Gateway automatically. Also you can manually input them according to the configuration of PC.
Please make sure the network segment is the same as that of the network which is used.
③
Set the preferred or alternative DNS Server. Click “Apply” to save the parameters.
④
Go to Menu→Setup→Network→NAT tab. Refer to Fig 2.
⑤ Enable NAT and input the NAT Server and Port number (The default NAT Server is
www.autonat.com .
⑥ Click “Apply” to save the parameters.
; the default Port number is 8989)
(Fig 1)
NAT Access
►
After finishing the NAT settings, you can enter the NAT Server on the PC(Input http://www.autonat.com
to goto the IE client). If you are the first time to access the NAT, the network will download the ActiveX
automatically. After installing ActiveX successfully, it will pop up the login box:
Serial No: The MAC address o f the DVR (Go to Me nu
→Informatio n→Netwo rk to che ck the MAC address of
the DVR).
User Name: the username of D VR, the d efaul t username
is admin.
Password: th e passw ord of DV R, the default
password is 12 3456.
(Fig 2)
3
Page 5

8. DDNS & UPnP Setup
►Quic k DDNS Setup
You may set up DDNS to be used in connection when
your DVR is set to use PPPoE as its network connection.
① Go to Main Mneu→Setup→Network→Other Settings.
② Enabl e DDNS and sel ect “www.autod dns.com”
in the dropdown list of the DDNS Type. Then self-define
the host name. After you regi ster it successfully, save
the set tings by cli cking “Apply” button. Now, you can
remotely access the DVR using the domain name via WAN.
►UPnP S etup
You can use t he UPnP function to enable the fast connection of the device to WAN via a router
witho ut port mapp ing.
① Go to Oth er Setting s tab and enab le UPnP and then click “Apply” button to save.
② Enabl e the UPnP function in the router.
* Before s etting UP nP, please co nfigure t he correc t loc al IP addres s, su bnet m ask , gateway a nd DNS acco rding
to the rou ter. Make su re the HTTP port an d data port a re correc tly s et. Ma ke su re the rout er suppor ts UPnP
functi on.
9. Manual Recording
Befor e recordin g, please install and format a HDD. Right click the mouse in the live interface
to pop up t he followi ng menu tool bar. Click butto n to start rec ording.
10. Playback
Right c lick the mou se in the live interface to pop up the
menu to olbar. Click the little tria ngle butto n beside
butto n to set playb ack time (eg. 5 minutes). Then click
button to play back the record from the past 5 minutes.
4
45004 1000513 A1
 Loading...