

Page 1

OPERATORS MANUAL
This manual provides
Installation & Operating instructions for
NOTIFY CARRIER OF DAMAGE AT ONCE.
It is the responsibility of the consignee to inspect the
container upon receipt of same and to determine
the possibility of any damage, including concealed
damage. Avtec suggests that if you are suspicious
of damage to make a notation on the delivery receipt. It will be the responsibility of the consignee to
file a claim with the carrier. We recommend that you
do so at once.
Information contained in this document is known to be
current and accurate at the time of printing/creation.
Unified Brands recommends referencing our product line
websites, unifiedbrands.net, for the most updated product
information and specifications.
P/N OMANUAL_CVVS-08/06
1055 Mendell Davis Drive
Jackson, MS 39272
888-994-7636, fax 888-864-7636
avtecind.com
Page 2

Table of Contents
Installation Requirements for Avtec Ventilation Hoods ........................................ page 4
Canopy Hoods ........................................................................................................ page 4
Low Side Wall Ventilators ...................................................................................... page 5
Pizza Oven Hoods ................................................................................................. page 5
Exhaust Fans & Ducts ........................................................................................... page 6
Fresh Air Supply Fans ............................................................................................. page 6
Hoods with Air Volume Controllers - Adjustment Instructions .............................. page 7
Side Skirts .............................................................................................................. page 7
Top Enclosure Panels ............................................................................................. page 7
Stainless Steel Wall Panels - Insulated Wall Panels - Single Thickness Wall Panels ...... page 8
Operation Instructions Start-Check-Balance ......................................................... page 9
Direct Draw Hoods ............................................................................................... page 9
Make-Up Air Hoods ............................................................................................. page 9
Final Air Balance Make-Up Air Hoods ........................................................... page 10
SAFETY PROCEDURES
• Do not attempt to service this unit yourself as removing covers may cause
unnecessary exposure to dangerous voltage.
• Never connect the unit to a power source while standing in water. Wet hands
and wet oors should be avoided when connecting any electrical appliance to
a power outlet.
• Fans may have multiple power connections. Make sure all fans are isolated
from power prior to performing maintenance.
2
888-994-7636
Page 3
In addition, all Avtec food service
equipment is backed by some of the
best warranties in the foodservice
industry and by our professional staff of
service technicians.
Retain this manual for future reference.
NOTICE: Due to a continuous program of product improvement, Avtec
reserves the right to make changes in design and specications without
prior notice.
NOTICE: Please read the entire manual carefully before installation. If
certain recommended procedures are not followed, warranty claims will
be denied.
MODEL NUMBER
SERIAL NUMBER
INSTALLATION DATE
avtecind.com
3
Page 4
Installation Instructions
HOOD FACE
T-MOLDING
C-CHANNEL
INSTALLATION REQUIREMENTS
FOR ALL AVTEC CHINOOK
VENTILATION HOODS
CANOPIES
Avtec CHINOOK ventilation hoods are provided with punched hanging brackets designed to receive 1/2" threaded rod with a 1/2" nut and washer. Supporting rods must be
connected to all factory installed brackets. Recommended hanging height is 6’-6” above
nished oor for canopies. Low side wall ventilators should be installed directly upon
a Avtec base or on a re rated wall. If wall mounted, the bottom of the vent side panel
should be 3’ above nished oor.
ALL AVTEC VENTILATION SYSTEMS MUST BE INSTALLED IN ACCOR-
DANCE WITH NFPA-96, REMOVAL OF SMOKE AND GREASE LADEN
VAPORS FROM COMMERCIAL COOKING EQUIPMENT.
1. Check all local codes prior to installation. Special requirements may be necessary
depending upon building material construction.
2. Move crated hood to location of installation and very carefully uncrate hood.
3. Raise hood to proper hanging height.
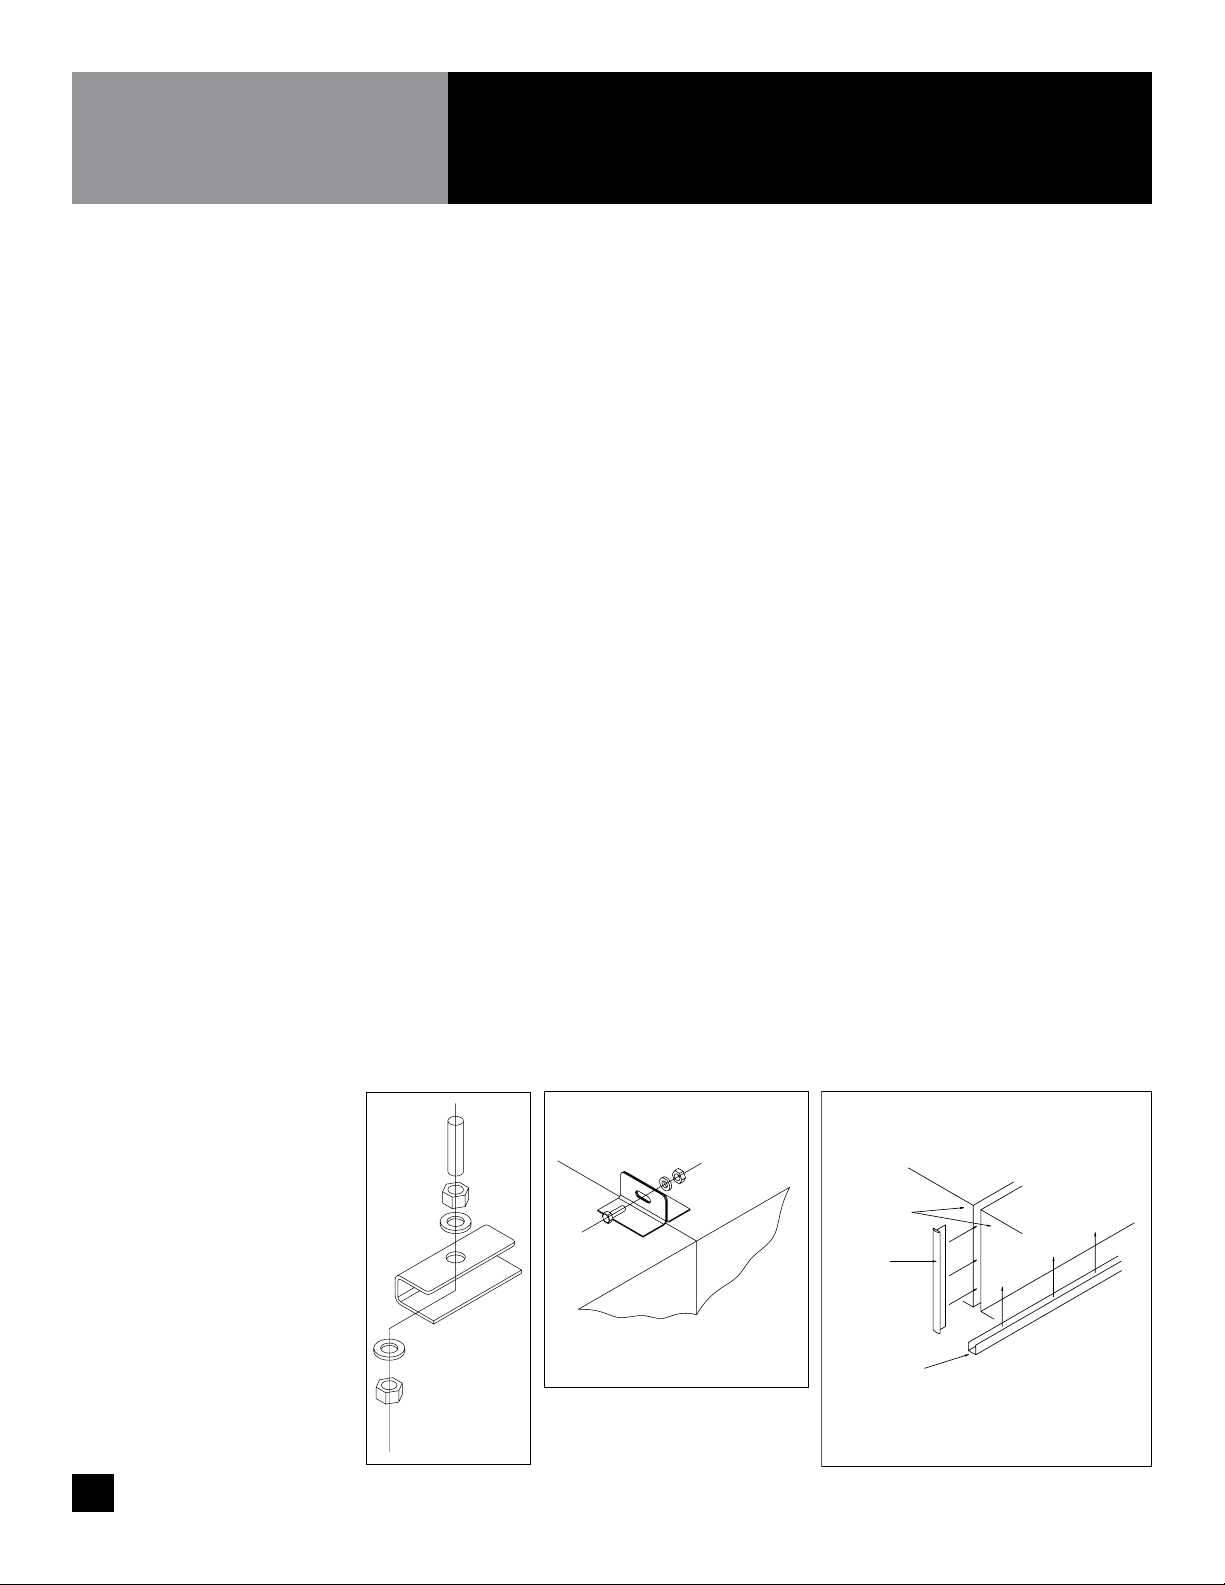
4. Suspend hood from adequate roof supports using 1/2" threaded rods with nuts
and washers (See Fig. 1).
5. Level hood left to right and front to back.
6. Brackets are provided for hoods which are to be installed end to end or back to back.
Bolt brackets together using 3/8" bolt through holes provided (See Fig. 2).
Figure 1
7. Install C channel where the ends of the hood meet and install T moldings on front
face of hoods where they join. High temperature silicone can be used to install
channel and T moldings (See Fig. 3).
8. For make-up air hoods, the supply collar with built-in UL listed re damper and
air volume damper must be installed per instructions on collar.
9. Provide a removable service door in supply duct near re damper (See Fig. 5).
Figure 3Figure 2
4
888-994-7636
Page 5

Installation Instructions
INSULATED
SUPPLY DUCT
FIRE DAMPER &
VOLUME CONTROL
DAMPER
FLUID WELD
EXHAUST DUCT
ACCESS
PANEL
* 36" ABOVE FINISHED
FLOOR
SCREW FOR BASE
MOUNT
(BOTH SIDES)
SCREW
FOR
WALL
MOUNT
LOW SIDE WALL
VENTILATORS
PIZZA OVEN HOODS
DECK OVEN INSTALLATION
(MODEL VPO)
1. Check all local codes prior to installation. Special requirements may be necessary
depending upon building material construction.
2. Move crated hood to location of installation and very carefully uncrate vent.
3. If vent is base mounted, base must be installed and leveled front to back and left
to right.
4. Place vent on base. Secure vent to base by screwing side walls of vent to base
(See Fig. 4).
5. If vent is wall mounted, place vent on wall, level front to back and left to right, then
bolt metal hanging bracket located on top of hood to wall (See Fig. 5).
6. Bottom of ventilator should be 36" above nished oor (See Fig. 4).
7. Fluid weld exhaust duct to hood exhaust duct collar (See Fig. 5).
8. For make-up air ventilators, the supply collar with built-in UL listed re damper
and air volume damper must be installed per instructions on collar.
9. Attach air supply duct work to supply collar. DO NOT SCREW INTO
FIRE DAMPER.
1. Check all local codes prior to installation. Special requirements may be necessary
depending upon building material construction.
2. Move crated hood to location of installation and very carefully uncrate vent.
3. Place hood directly on top of pizza oven.
PIZZA OVEN INSTALLATION
(MODEL VCP)
CONVEYOR
1. Check all local codes prior to installation. Special requirements may be necessary
depending upon building material construction.
2. Move crated hood to location of installation and very carefully uncrate vent.
3. Suspend hood from adequate roof supports using 1/2" threaded rods and nuts, and
washers (See Fig.1).
4. Hood should be hung no more than 1/2" above top of oven.
5. Install exhaust duct from hood exhaust collar to exhaust fan and curb.
Figure 4
Figure 5
avtecind.com
5
Page 6

Installation Instructions
HINGE KIT
GREASE TERMINATOR
OR
GREASE TROUGH
EXHAUST DUCT
ALL WELD
CONSTRUCTION
EXHAUST DUCT IS FLUID
WELDED TO COLLAR
CEILING
40" MINIMUM
EXHAUST
DUCT IS
FLUID
WELDED
TO
COLLAR
GREASE
TERMINATOR
OR
GREASE TROUGH
CEILING
EXHAUST DUCTALL WELD
CONSTRUCTION
HING
40" MINIMUM
10' - 0" MINIMUM
Figure 6
EXHAUST FAN & DUCT
(See Fig. 6)
1. Check all local codes prior to installation.
2. All exhaust fans are supplied with a hinge kit, grease box and disconnect switch.
3. The exhaust fan curb should be installed directly above the hood if possible.
Always maintain the shortest duct run possible.
4. Cut hole and seal exhaust fan curb to roof.
5. Place exhaust fan on curb.
6. Install hinges and airline cable on exhaust fan cap and metal curb. Remember to
leave ample room for fan to tilt back. Fan will remain in tilted back position.
7. Install grease collection box on side of fan that has grease tube discharge.
8. The exhaust duct must be constructed of 16 gauge carbon steel or 18 gauge
stainless steel. All seems must be uid welded.
9. A duct transition should be provided below the exhaust fan inlet.
10. The exhaust duct must be uid welded to hood collar.
11. Make all necessary electrical connections and check fan for proper rotation.
NOTE: Fan will exhaust air running in wrong direction.
Figure 7
6
FRESH AIR SUPPLY FAN
(See Fig. 7)
888-994-7636
1. Check all local codes prior to installation.
2. Supply fan inlet must be located a minimum 10’ from the exhaust fan. If 10" is
not possible a 3’ vertical separation may* be acceptable.
3. Cut and seal supply fan curb to roof.
4. Duct shall be constructed of 22 or 24 gauge steel. Insulated duct material should be
used to eliminate frost and/or condensation.
5. Duct shall be sized to provide air velocities not exceeding 1200 FPM.
6. A volume control damper, provided in the duct just above the supply collar that
contains the UL listed re damper, should be properly set to supply CFM required.
7. If the hood is provided without the supply collar installed, it must be installed per
the instructions provided on the collar.
8. Carefully place the supply fan on roof curb. Face supply fan inlet away from
prevailing winter wind. Electrical back draft damper is recommended in cold climates.
9. Bolt or screw fan to fan curb.
10. Make all necessary electrical connections and check fan for proper rotation
NOTE: Fan will supply air running in wrong direction.
*Dependent on local code requirements.
Page 7

Installation Instructions
RETAINING SCREW
HOOD WITH AIR
VOLUME CONTROLLERS
(See Fig. 8)
Figure 8
INSTALLATION OF SIDE SKIRTS
pieces provided
(See Fig. 9-11 on page 8)
One or two optional side skirts may be provided
Some Avtec canopy hoods will be designed without patented Air Volume Controllers
(AVC) located directly behind the standard lter bank. The AVC is specially designed to
exhaust high volumes of air over high heat - high grease producing equipment thereby
reducing the total exhaust volume.
The AVCs were factory set, based on the cooking equipment specied on the approved
drawings, therefore the AVC will not have to be adjusted. AVCs can be removed for hood
cleaning also. If, however, the cooking equipment has changed or should change in the
future, the following procedure should be followed.
AVC ADJUSTMENT INSTRUCTIONS
1. Remove all grease lters from the hood.
2. Loosen retaining screws on channels holding the AVC at each end.
3. Slide AVC up or down as needed. The higher the AVC is moved the greater will be
the exhaust volume.
4. Reset the retaining screw at the desired position.
5. Replace grease lters.
INSTALLATION
1. Side skits are offset at the top and have a 90° bend inward at the rear.
2. Skirts are to overlap the outside of the hood. Bolts and acorn nuts should be attached
per the drawing (stainless bolts and acorn nuts supplied).
TOP ENCLOSURES
INSTALLATION OF
ENCLOSURE PANELS
pieces provided
(See Fig. 9-11 on page 8)
Enclosure panels are provided
for exposed side(s) of hood(s)
3. Skirt ange should be screwed to the wall (screws not provided).
INSTALLATION INSTRUCTIONS
1. Hoods ordered with enclosure panels will be shipped with threaded metal studs
installed on perimeter of hood top where panels are to be installed. Retaining nuts
and washers are installed on the studs prior to shipping.
2. Loosen nuts on studs. Slide enclosure panel under loosened nuts. Holes in panels
are open on end so nuts do not have to be removed.
3. If enclosure panels are installed on one or more hoods butted end to end, the
butting ends of the front enclosure panels should be bolted together.
avtecind.com
7
Page 8

Installation Instructions
A
A
B
B
T-MOLDING
ENCLOSURE TOP
HOOD TOP
HOOD FRONT
ENCLOSURE TOP
ENCLOSURE
SIDE
78" A.F.F.
END SEAM CAP
CENTER SEAM CAP
END SEAM CAP
INSTALLATION OF INSULATED
STAINLESS STEEL WALL PANEL
pieces provided
INSTALLATION INSTRUCTIONS
FOR INSULATED WALL PANEL
(See Fig. 12)
INSTALLATION INSTRUCTIONS FOR
SINGLE THICKNESS WALL PANEL
(See Fig. 13)
A. Top panel will have a 1” ange full length top and bottom, and interlocking slots
located on the bottom.
B. Bottom panel will have interlocking tabs on top and full length 1” ange on bottom.
1. Install wall panels prior to hanging hood(s).
2. Install top panel rst at 6’-6" A.F.F. and level. Screw panel to wall making sure
slotted holes are facing oor.
3. Install lower panel by sliding tabs into slotted holes in upper panel, screw bottom
ange to wall.
4. Caulk horizontal seam with NSF approved silicone sealant.
5. When hood is hung it will rest on top panel.
NOTE: Be careful not to damage wall panel face when installing hood.
1. Install wall panels prior to hanging hood(s).
2. Install seam strips at proper locations and screw to wall.
3. Apply glue to wall between seam strips.
Figure 9
8
888-994-7636
4. Slip end of wall panel into seam strip, pull out middle of panel and slip other end
of panel into other seam strip. Gently apply pressure over entire wall panel to secure
to wall. Wall bands for side walls are provide with 1” return bend, which is to be
located behind rear wall panels.
Figure 10
Figure 11
Figure 12
Figure 13
Page 9

Start / Check / Balance
DIRECT DRAW HOODS
MAKE-UP AIR HOODS
Exhaust Fan(s)
1. Close all doors and windows.
2. Operate all exhaust fans, even fans serving other hoods, make-up air units and
building HVAC.
3. Turn on all cooking equipment under the hood to preheat to operating temperature.
4. Produce large quantities of smoke.
5. Observe capture of vapors.
6. If all vapors are not captured, increase exhaust fan RPM.
7. Check air pressure in kitchen. Pressure must be negative relative to dining
room pressure.
8. Air velocities entering the kitchen from the dining room should not exceed 100 FPM.
No air should be moving toward the dining area.
9. Repeat steps 6 and 7 until all vapors are captured.
10. Same as step 7 with bottom of next page.
NOTE: The exhaust and supply (if any) air ow rates were established under controlled laboratory conditions, and greater exhaust and/or lesser supply air may be
required for complete vapor and smoke removal in specic installations.
1. Open all doors and/or windows leading to outside.
2. Start the exhaust fan only. Do not run the supply fan or make-up unit.
3. Refer to drawings and/or UL information label on hood for proper CFM
requirements.
SUPPLY FAN OR
MAKE-UP AIR UNIT
4. Adjust speed of exhaust fan to obtain proper air velocities and CFM through
grease lters.
1. Start the supply fan and/or make-up air unit only. Do not run the exhaust fan.
2. Refer to drawings or UL information label on hood for proper
CFM requirements.
avtecind.com
9
Page 10

Final Air Balance
MAKE-UP AIR HOODS
1. Close all doors and windows.
2. Operate all exhaust fans even those serving other hoods, supply fans, make-up air
unit and building HVAC system.
3. Turn on all cooking equipment under the hood and preheat to operating temperature.
4. Produce large quantities of smoke or steam.
5. Observe capture of vapors.
6. If all vapors are not totally captured, ne tune the system by adjusting the air volume
control damper installed in the supply collar. Slightly reduce the amount of supply
air directed under the hood until full capture is obtained.
10
888-994-7636
Page 11

NOTES AND WORKSHEET
avtecind.com
11
Page 12

1055 Mendell Davis Drive • Jackson MS 39272
888-994-7636 • 601-372-3903 • Fax 888-864-7636
avtecind.com
P/N OMANUAL_CVVS-08/06
 Loading...