

Page 1
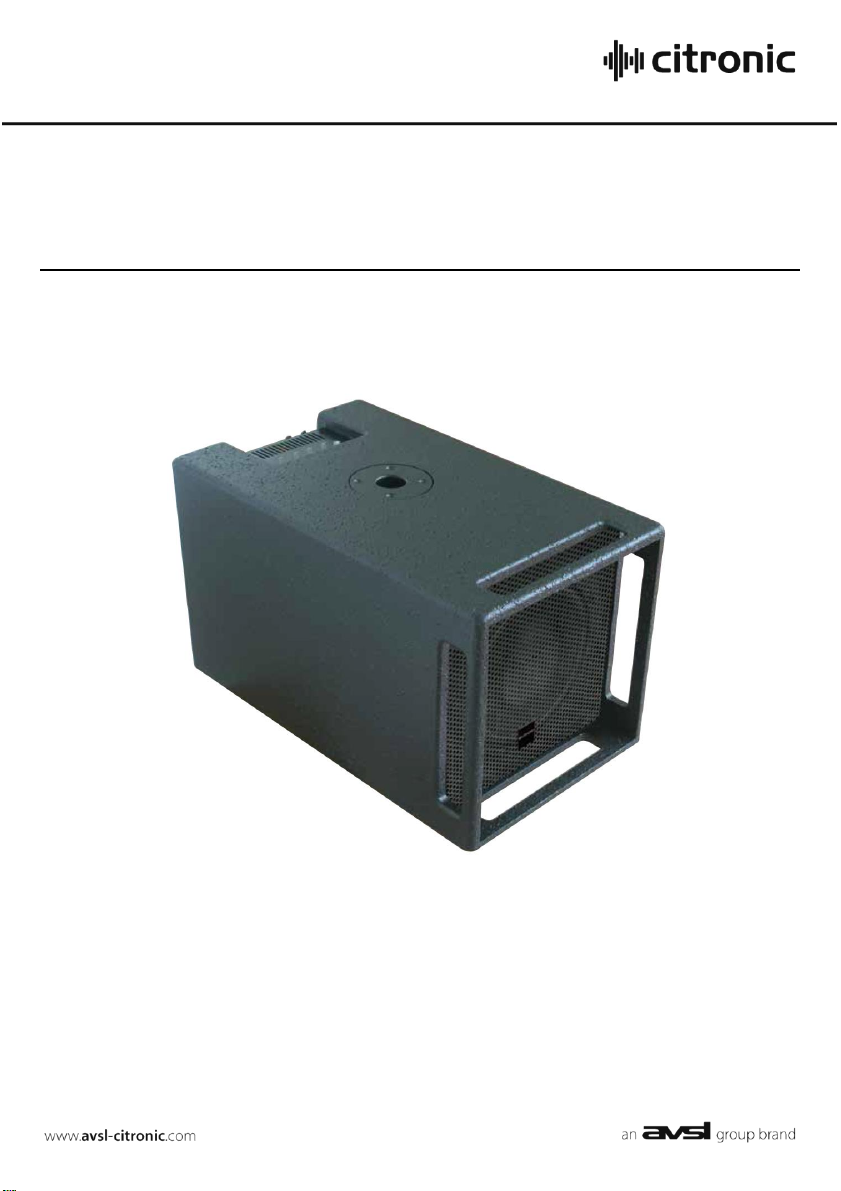
CXB10A
Item ref: 178.274UK
Active Subwoofer
User Manual
Page 2
Caution: Please read this manual carefully before operating
Damage caused by misuse is not covered by the warranty
Introduction
Thank you for choosing this CXB10A active subwoofer, which can be added to existing
systems or used as the main unit to power up to 4 satellite speakers in a compact PA system.
Please read this manual prior to use to avoid damage through misuse.
Warning
To prevent the risk of fire or electric shock, do not expose this appliance to rain or moisture
and avoid ingress of water into the enclosure. To prevent electric shock do not remove the
cover. No user serviceable parts inside. Refer servicing to qualified service personnel.
Safety
Prior to connecting mains, ensure that the supply voltage is correct and the mains lead is in
good condition. If the mains fuse blows, refer the unit to qualified service personnel.
This unit must be earthed.
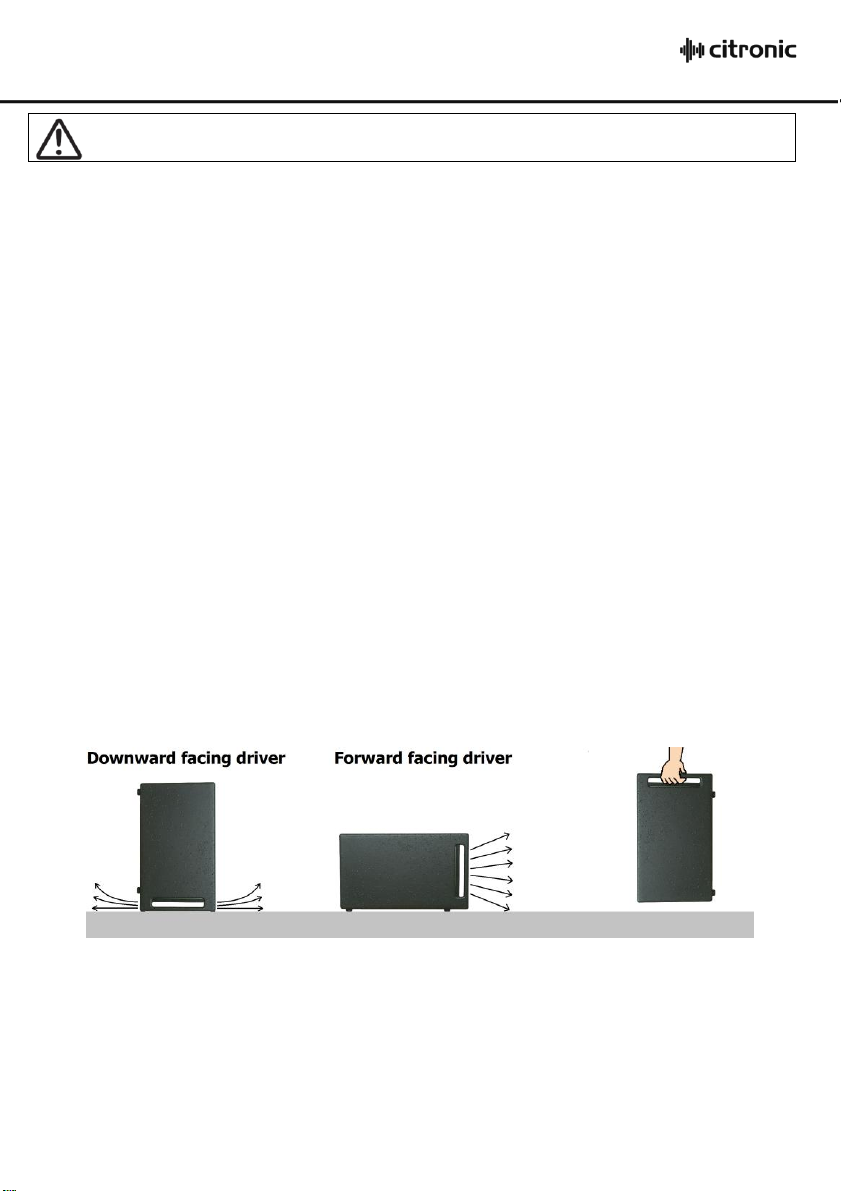
Placement
The CXB10A has been designed so that it can operate with the driver facing forwards (ideal
for live performances) or positioned with the driver facing downwards (smaller footprint, ideal
for installation). Self-adhesive feet are provided to protect floor surfaces when installed in the
downward facing orientation. Ensure that connections and controls are protected from
potential damage. The slotted front ports double as carrying handles for convenience.
Keep the unit out of direct sunlight and away from heat sources.
Keep away from moist or dusty environments.
Cleaning
Use a soft cloth with a neutral detergent to clean the cabinet, panel and controls.
To avoid damage, do not use solvents to clean this equipment.
178.274UK User Manual
Page 3

Top Panel
1. Mic / Line level switch
2. Bass EQ control
3. Treble EQ control
4. Sub volume control
5. Master volume control
6. R+L combo XLR/jack inputs
7. R+L RCA inputs
8. Right satellite speaker output
9. Left satellite speaker output
10. IEC mains inlet and fuse holder
11. Mains power on/off switch
12. Ground lift switch
Rear Panel
Setting up
The CXB10A subwoofer has an internal class D amplifier which can also power 2 or 4 satellite
speakers. The ideal placement for any subwoofer is on the floor, against a wall and if possible,
in a corner. Any surfaces that the cabinet is adjacent to will help to optimize the delivery of
low frequencies.
If satellite cabinets are to be powered from the CXB10A, connect these to the L+R speaker
outputs (pin1, pin1-) on the rear panel, ensuring a minimum impedance of 4Ω is connected to
each output. Satellite power output is 125Wrms @ 8Ω and 170Wrms @ 4Ω per channel.
Connect L+R inputs via jack or XLR to the combo inputs (6) or on RCA inputs (7) on the rear
panel. These input connectors are wired in parallel so that the unconnected pair can be used
to continue the signal onto other equipment (amps, active speakers etc.)
178.274UK User Manual
Page 4

Operation
Power supply
220-240Vac, 50/60Hz (IEC)
Fuse rating
T3.15AL 250V
Inputs
L+R Combo (Jack/XLR), L+R RCA
Outputs
L+R SPK connectors
Controls
Bass, Treble, Sub Vol, Master Vol
Crossover frequency
150Hz
Sub driver
250mmØ (10“)
Power: Subwoofer
250Wrms
Power: Satellites @ 8 Ohms
2 x 125Wrms
Power: Satellites @ 4 Ohms
2 x 170Wrms
Pole mount
Top-mounted 35mm socket
Dimensions
340 x 340 x 570mm
Weight
16.8kg
No output and no LEDs lit
Check POWER switch is on
Check mains lead is connected
Check mains fuse hasn’t blown
No output from sub unit
Ensure that Sub volume control is not turned fully down
Distorted or overdriven
output
Check that Mic/Line button is not pressed in
Reduce the Master volume, Bass and Treble controls
Disposal: The “Crossed Wheelie Bin” symbol on the product means that the product is classed as Electrical or
Electronic equipment and should not be disposed with other household or commercial waste at the end of its useful life.
The goods must be disposed of according to your local council guidelines.
Turn Master and Sub volume controls (5, 4) fully down and Treble and Bass (3, 2) controls to
the vertical (12 o’clock) position. The CXB10A has a Mic/Line switch (1) to allow operation
directly from low impedance (e.g. microphones) inputs.
Warning: For normal line level signals, ensure this switch is
not
pressed in.
Connect to mains power using the IEC lead provided (10).
Play a signal to the inputs and switch the mains power on (11). Gradually turn up the Master
volume control and check the satellite speaker output (if satellites are connected).
Turn up the Sub volume control and check the low frequency output from the sub cabinet.
Adjust overall tone via the Treble and Bass EQ controls. If there is audible mains hum,
switching the Ground Lift switch (12) to “LIFT” may help. Otherwise, switch to “GND”.
Turn down volume controls before switching off. Unplug mains if not used for long periods.
Specifications
Troubleshooting
Errors and omissions excepted.
Copyright© 2014. AVSL Group Ltd.
178.274UK User Manual
 Loading...