

Page 1

WX XM Weather Manual
EKPIV / EKPIV PRO / Geopilot 2 Plus
AvMap/Navigation
133 Falmouth Rd Suite E Mashpee MA 02649
800.363.2627 Fax 508.539.4383
www.avmap.us / info@avmap.us
updated 7/23/09
Page 2

2.Insert your CF or SD Carde into a card reader on your computer and open it.
WX XM addendum for
EKP IV / EKP IV PRO / Geopilot 2 Plus
1 WX XM WEATHER OVERVIEW.......................................................................................................3
LOCATE THE WX WEATHER FEATURE............................................................................................3
TURN ON WX WEATHER FEATURE...................................................................................................3
DISPLAY THE WX FEATURE ON THE MAP.......................................................................................4
2 PRODUCTS LIST................................................................................................................................5
NEXRAD & Precipitation Type................................................................................................................5
METAR....................................................................................................................................................6
TAF..........................................................................................................................................................7
LIGHTNING............................................................................................................................................8
TFR..........................................................................................................................................................9
NOTE:
XM Weather requires a monthly subscription and a special WX XM Receiver to be
connected to the GPS device. For WX-XM subscription information and radio activation,
please call 1-800-985-9200. For receiver information and purchase, please contact AvMap
Navigation at 1-800-363-2627.
Your unit may require a Software update. You will need to have V2.12.153R or higher.
If you do need an update, please got to www.avmap.us – You must be a registered User to
download.
1.Download the Software from the Website. You will then have to load the new SW file(s) ending ins .SWX
EKPIV / EKPIV Pro will have 2 SW Files / GP II Plus will only have 1 SW Files
3.You will see a "Charts" folder, 2 files that end in .SWX and a CMap2.cer file (and maybe a CMap.cer file
too).
4.You will want to replace the older .swx file(s) with the new ones you have downloaded from the Website.
Delete the older .SWX file(s) from the Card
5. Copy the NEW downloaded .SWX files onto Card.
2
Page 3
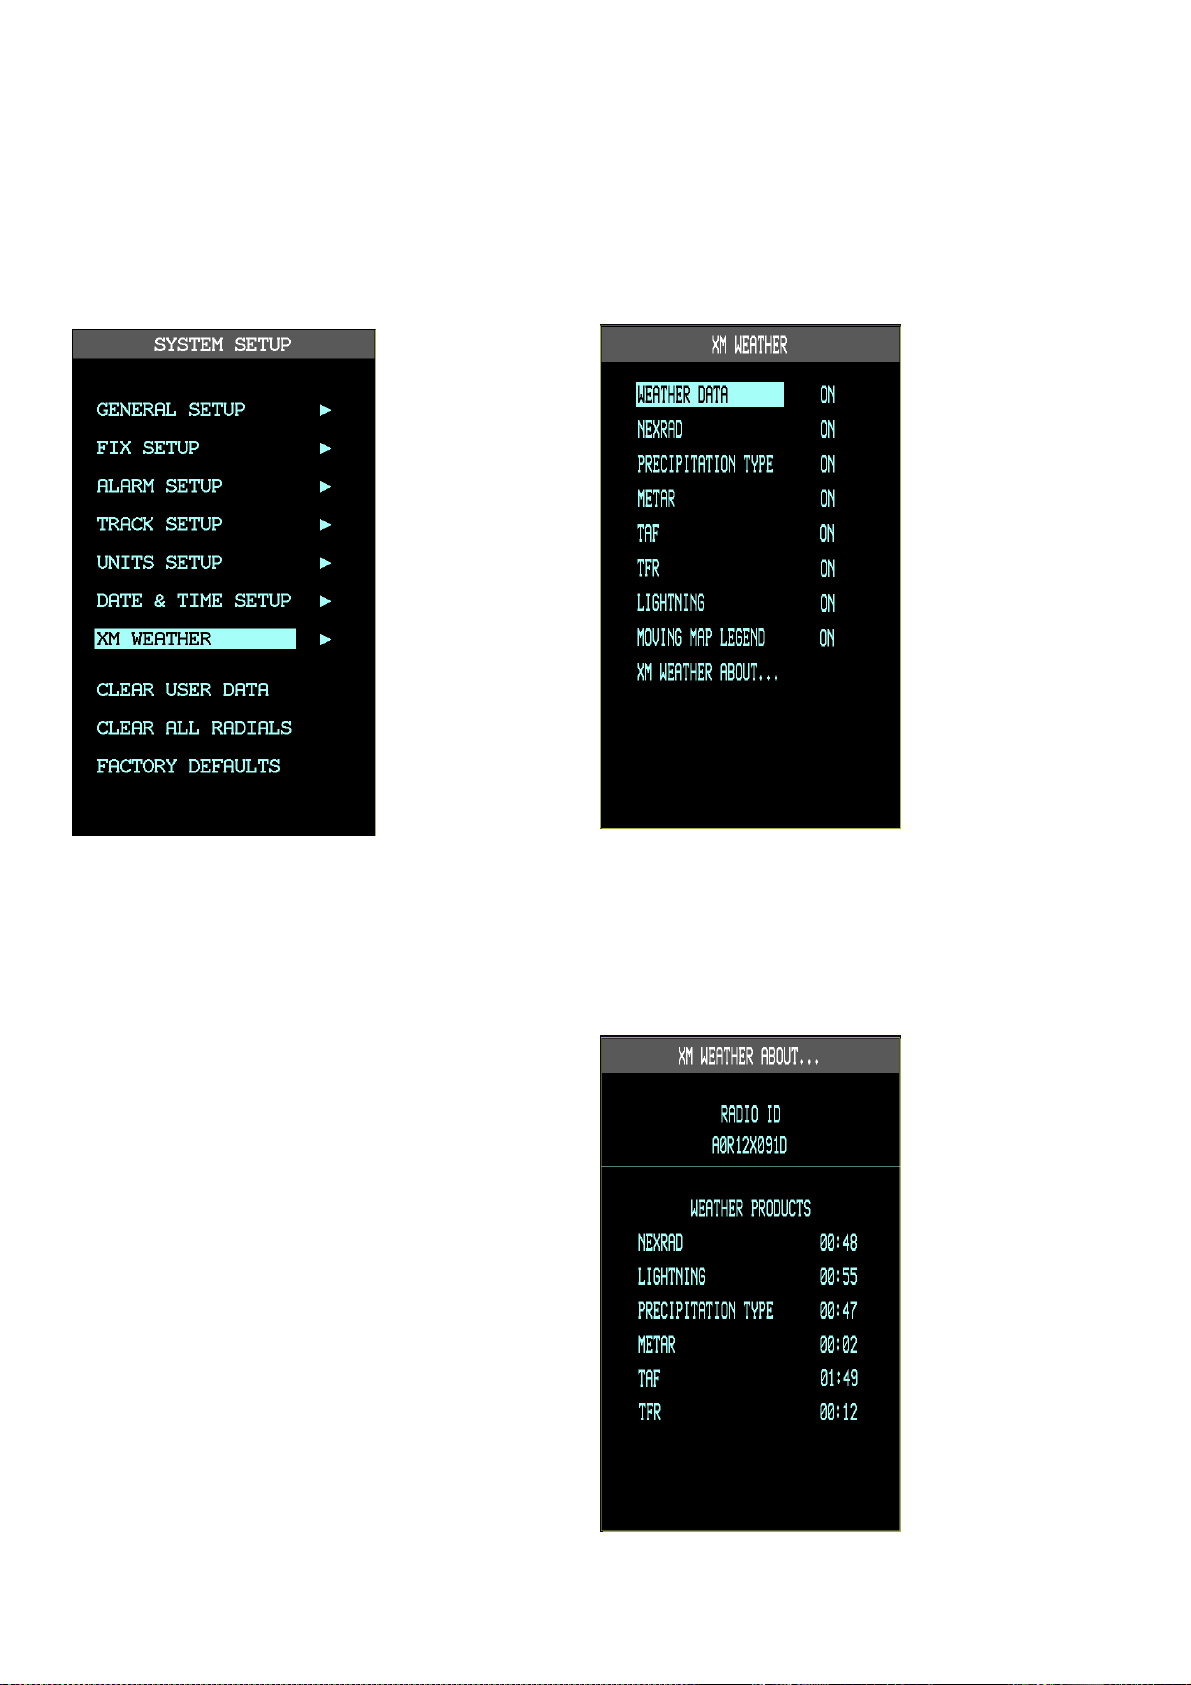
1 WX XM WEATHER OVERVIEW
LOCATE THE WX WEATHER FEATURE
The WX WEATHER feature is located in the SYSTEM SETUP MENU and enables the user to activate the
Weather function and select what products should be seen on the Moving Map.
TURN ON WX WEATHER FEATURE
Connect the Receiver to the serial socket in the upper left part of the EKP IV or to the TMC port of the
GPII+ and set WEATHER DATA to ON. The XM WEATHER ABOUT page will show the receiver ID.
The start up procedure can take several minutes
expecially when the receiver is used for the first
time. In this case the EKP IV / GPII+ should be
left powered on and connected to the receiver
until the first WX XM products are received.
Once the procedure is finished, timers will start
showing the age of each received products in
the XM WEATHER ABOUT page.
NOTE: A subscription to WX XM
service is needed for products to receive
data.
3
Page 4

DISPLAY THE WX FEATURE ON THE MAP
While on the Moving Map hold CYCLE (EKP IV) or hold MENU (GPII+) to enter the Map
Presentation Menu and Select WEATHER STATIC.
This will enable the display of weather data on the navigator. At any time the MAP
PRESENTATION MENU can be reselected in order to return to the normal GENERIC Moving
Map Mode or to the TAWS mode.
Once in WEATHER STATIC mode a timer in the bottom left corner of the screen will show the
elapsed time since the last NEXRAD product was received by the navigator.
In order to see NEXRAD color pattern legend on the bottom right side of the Moving Map, on the
XM WEATHER page set Moving Map Legend to ON.
4
Page 5

2 PRODUCTS LIST
NEXRAD & Precipitation Type
NEXRAD (NEXt Generation RADar) product is integrated with the Precipitation Type product to
display precipitation phenomena. Each phenomena is represented in shades of green in case of rain,
purple in case of mixed rain/snow and blue in case of snow.
A legend for the product can be enabled in the WX XM Menu and shown on the bottom right of the
screen.
5
Page 6

METAR
METAR (METereological Aeronautical Reports) is a format for reporting weather information.
When METAR data relative to an airport is available, a color coded hexagon is shown on the upper
left side of its icon. In order to see METAR data move the cursor over the airport, they will be
shown on the quick info popup window. More detailed information can be accessed by holding the
MENU key and selecting the first METAR line with the ENTER key.
METAR LEGEND :
6
Page 7

TAF
TAF (Terminal Area Forecast) is a 24-hour forecast issued by the National Weather service for
several airports in the US. These forecasts include: wind, visibility, precipitation phenomena and
wind shear. Go over an airport with the cursor to check if TAF data is present, if so an excerp of the
first forecast will be seen in the quick info. To see the complete forecast, hold the MENU key and
select the first TAF line with the ENTER key, you will be able to check all the bulletins and switch
among them by moving the cursor.
7
Page 8

LIGHTNING
LIGHTNING product shows lightning strikes that have occurred within the past 7 minutes. Strike
areas are shown with a lightning bolt icon over it.
NOTE: Only cloud to ground lightning is shown by this product.
8
Page 9

TFR
TFRs (Temporary Flight Restrictions) are volumes of airspace where all aircraft are temporarily
restricted from entering into unless a waiver has been issued. TFRs are routinely issued for
occurrences such as sporting events, dignitary visits, military depots and forest fires. TFRs are
represented as a dotted RED (active) or ORANGE (inactive) area. Go over an area covered by a
TFR, press ENTER and select “Airspace Info” in the Cursor Menu to see detailed information
regarding it.
9
 Loading...