

Page 1
User Manual
Geosat 6 series
Corresponding to Software Version
1.10.xx
Page 2

Dear Customer,
Congratulation for choosing an AvMap Satellite Navigator.
AvMap GPS systems are made in Italy since 1994.
Your journey, Our Technology
Page 3

Index
I. How to use the Manual 7
I.I Updating the software and downloading new
manuals 7
II. Warning 8
II.I Advices for a good use of the navigator 9
II.II Battery Disposal 10
II. III Maintenance 11
III. Device Description and rst use 12
III.I Content of the box 12
III.II Hardware features 12
III.III Installation with suction cup holder 14
III.IV Installation with the in-car 15
integrated holder 15
1. Main Menu 16
2. Satellite navigation 17
2.1.1 Help Mode 18
2.1.2 FAQ’s 18
2.2 The Map 20
2.2.1 Explore the map 22
2.3 Setting a destination 23
2.3.1 Search Options 23
2.3.2 Inserting an address as destination 23
2.3.3 Choosing the destination among the POIs 24
2.3.4 Choosing the destination among your
Favourite POIs 26
2.3.5 Choosing the destination among the Contacts 26
2.3.6 More Options for navigation 28
2.3.7 Record your track on the map 29
2.3.8 Lane Assistant 29
2.3.9 My Position 29
2.4 Planning and modifying a route 32
2.4.1 Planning a route from A to B 32
2.4.2 Route Functions Menu 32
Page 4

2.4.3 Choosing the route options 33
2.4.4 Adding Via Points 36
2.4.5 Changing the Via Points sequence 36
2.4.6 Simulating mode 37
2.5 Advanced planning 39
2.5.1 Viewing the Turn List 39
2.5.2 Detouring to avoid a street 39
2.5.3 Blocking a road 40
2.5.4 Route overview 41
2.5.5 Planning next stop 42
2.6 Trip Computer 45
2.7 Managing Personal data 47
2.7.1.1 Saving the route 47
2.7.1.2 Modifying or using a saved route 48
2.7.2 Points of Interest 49
2.7.2.1 POI types 49
2.7.2.2 Displaying or Hiding a POI category 49
2.7.2.3 Setting the favourite POI categories 49
2.7.2.4 I User POI 50
2.7.2.5 Setting the speed traps alarm 52
2.7.3 Address book 53
2.7.3.1 Address book 53
2.7.3.2 Creating a new contact 53
2.7.3.3 Creating or modifying a folder 54
2.7.3.4 Alarm Contacts 54
2.7.3.5 Setting Home address 55
2.7.3.6 Transferring your contacts 55
2.7.4 Tracks 56
2.8 GSM Phone 59
2.8.1 Activating the Phone 59
2.8.2 Making a Call 60
2.8.3 Sending SMS 61
2.8.4 Incoming SMS and Calls 62
Page 5

2.8.6 Settings 64
2.9 Hands free calls with Bluetooth® 66
2.9.1 Setting the Bluetooth® communication 66
2.9.2 Receiving calls 67
2.9.3 Private calls 69
2.9.4 Adjusting the volume of the speaker 69
2.9.5 Dialling a telephone number 70
2.9.6 Using the keyboard during a call 70
2.9.7 Last call 70
2.9.8 Calling Home 71
2.9.9 Calling a Point of interest 72
2.9.10 Calling contacts 72
2.9.11 Calls register 72
2.9.12 Automatic answer 73
2.10 iPod® Control 75
2.10.1 Connect the iPod® to Geosat 6 75
2.10.2 iPod® Control menu 75
2.10.3 Listening to a Playlist 75
2.10.4 Browsing songs by author 76
2.10.5 Song player page 76
2.10.6 Reproduction settings 77
2.11 Alcohol Test 79
2.11.1 Calibration 79
2.11.2 Making the Alcohol Test 79
2.12 Unit status 82
2.12.1 Unit status Menu 82
2.12.2 GPS page 82
2.13 System info 83
2.14.1 User Preferences 84
2.14.1.1 Text-To-Speech 84
2.14.1.2 Setting the time zone 85
2.14.2 Device Preferences 85
Page 6

2.14.2.1 Display options 86
2.14.3 Map Preferences 87
2.14.3.1 Setting the navigation data 88
2.14.4 Setting contacts alarms 89
2.14.4.1 Setting the speed alarm 89
3. Multimedia Player 91
4. Digital TV 93
4.1 Channel Scan 93
4.2 Choosing a Channel and watching it 94
4.3 Favourites List 94
4.4 Channel’s info 94
4.5 Channel’s programming 95
4.6 Channel’s Lock 95
4.7 General Setup 96
4.8 Multi language 97
5. Updates 98
5.1 Checking your software version 98
5.2 Registering your product 98
5.3 Downloading the software updates 99
5.4 Installing the software updates 99
5.5 Updating the Map 100
5.6 Available Maps 101
5.7 Why to update the Maps 101
6. Trouble Shooting 102
Appendix
A – Setting the rst destination: ux diagram 112
B - Preloaded POI categories 113
C: Map Legend 115
Analytic Index 116
Technical Specications 118
Page 7

I. How to use the Manual
This User Manual is updated to the
Software version 1.10.xx released in
February 2009 for the AvMap Geosat 6
satellite navigators.
This manual includes the instructions for all the
navigators of the Geosat 6 family, so some described
functions may not be present in your navigator. Check
the features of your navigator in the Technical
Specications section of this manual.
I.I Updating the software and
downloading new manuals
It is important to check which is the Software Version
preloaded on your navigator, and to download
for free the updates available on www.avmap.it
following the instructions of Chapter 5. For each
new Software version an Addendum to the manual
is published. You can download the addendum from
www.avmap.it: entering the Support section, click on
Downloads then select yo ur product; in the list of the
available documents choose the one corresponding
to the Software of your interest.
AvMap - 7
Page 8

II. Warning
Using this navigator implies that the user accepts and
follows all these warnings and all the instructions
contained on this manual.
•The manufacturer and the distribution chain
disclaim any liability deriving from an improper use
of the device in a way that may cause accidents or
damages to things or persons.
•The driver is held responsible for using Geosat in the
correct way (passenger or non passenger mode).
•The User should ignore the indications suggested
by Geosat in situations that appear to be in contrast
with the Highway Code.
•The Manufacturer and the distribution chain
disclaim any liability deriving from an improper use
8 - AvMap
of the device in a way that may violate the Highway
Code.
•Do not switch on the GSM phone when and where it
is forbidden the use of mobile phones, or when it can
cause interferences or dangerous situations.
•Please respect the restrictions: switch off the
device in airplanes, close to medical appliances,
fuel, chemical substances or explosives.
•Do not program the navigator while driving
•The Navteq cartographic data loaded in the
navigator may present some discrepancies from the
reality. This is due to the continuous changes in the
street network. Some areas have a better coverage
than others.
Page 9

•Network Services: in order to use the phone you
need to request the service to a Carrier. The carrier
will provide you with all the necessary information
on fees. Some networks may have restrictions on
the use of some services.
II.I Advices for a good use of the
navigator
1.Do not place the navigator in positions that may
obstruct the driver’s view
4.This device IS NOT water proof, avoid wetting it.
5.Do not rely exclusively on vocal instructions.
Depending on a variety of factors, (speed, weather,
GPS reception etc) these instructions may not be
correct or timely. Always take the information
provided as indicative, and always respect the
Highway Code. Satellite navigators should be
considered merely as aids. The driver is held
responsible for safe driving and the choice of the
best route to take.
2.Do not place the navigator in positions that may
interfere with the correct functioning of the security/
safety equipment of the vehicle (e.g. airbags).
3.Make sure that the navigator is correctly attached
to the bracket before driving.
6.During the trip it is possible to get instructions
like: ‘Bear the right’ or “Right turn in 300 m”; these
instructions are based on the preloaded cartographic
data and could differ from the actual conditions
of the street. In proximity of round about or big
crossings drive carefully as the vocal instructions
AvMap - 9
Page 10

may not be simple.
7.Do not consult the navigator whilst driving if this
represents a danger for you and other people.
8.Only AvMap branded SD cards are compatible
with AvMap satellite navigators. No other SD can be
used.
II.II Battery Disposal
This product is equipped with a built-in Li-Ion
battery. Do not use the product in damp or
corrosive environments. In order to lengthen
the life of the battery, do not recharge it at
temperatures higher than 60°C.
THE LI-ION BATTERY PROVIDED WITH THE PRODUCT
MUST BE RECYCLED OR DISPOSED IN THE CORRECT
WAY. The symbol shown here and on the box
10 - AvMap
indicates the conformity
to the WEEE directive.
Do not dispose of
this WEEE product as
domestic waste; some
substances contained in
electronic equipment can
damage the environment and harm human health
if misused or if they are not disposed of in the
correct way. Return the device to the distributor
when purchasing a new one. The unlawful disposal
of these wastes is punished with sanctions.
Information about emissions for Canada: this Class
B digital device is in conformity with the Canadian
law ICES-003/NMB- 003. R&TTE DL2 Directive:
this device is in conformity with the UE directive
99/5/CE
Page 11

II. III Maintenance
•Do not leave the navigator in direct sunlight for
extended periods. This could compromise the correct
running of your Geosat. If you suspect that the
navigator has been over heated because of sunlight
exposure, let the temperature of the car cool down,
and wait for the device temperature to go down to
normal values before switching it on.
•Do not use oil based products to clean the LCD
surface.
AvMap - 11
Page 12
III. Device Description and rst use
III.I Content of the box
• Geosat 6 Satellite Navigator
• SD memory card
• Magnetic holder
• CA power supply cable
• Car Power Supply cable
• USB cable
• OTG Cable*
• iPod cable*
• External TV antenna*
• User manual
• In-car installation guide*
* Only for some models
12 - AvMap
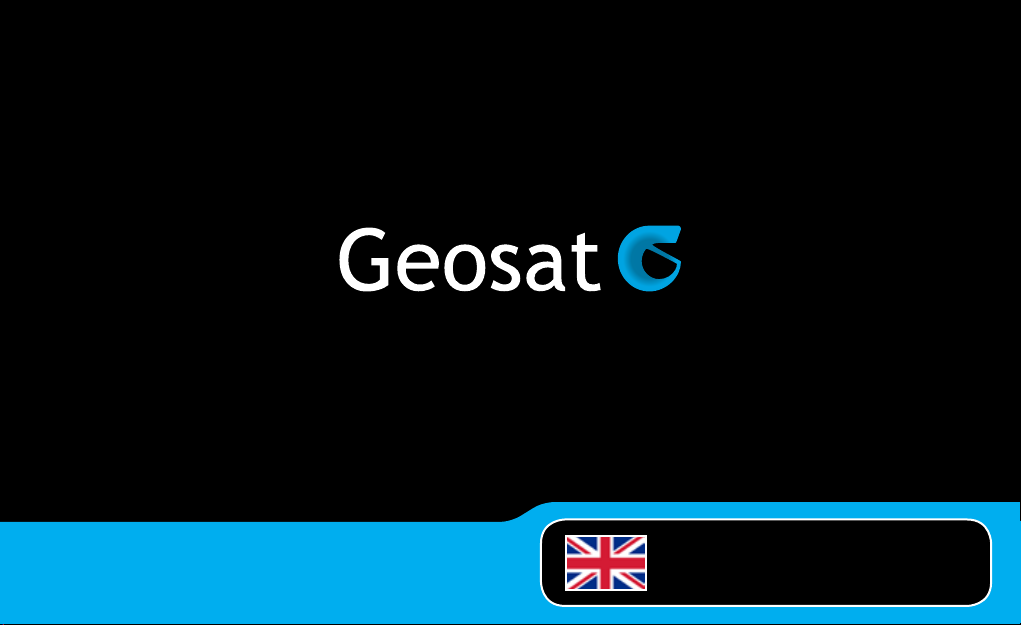
III.II Hardware features
Alcohol sensor*
Microphone
Serial Port
USB (master/slave)
Audio output
Power supply
(with CA power supply cable)
Power key
Speakers
Page 13

DVB-T antenna *
Hook for magnetic holder
Back
Reset
SD Slot
SIM Card slot*
Sensor for automatic brightness control
How to insert the SIM card*:
Insert the SIM card in the slot just below
the SD, with the chip facing up, and the
cut corner on the right.
DVB-T antenna*
In areas with weak DVBT signal, the use
of the external TV antenna may improve
the quality of reception. Please insert
the antenna carefully as shown in the
illustration, not to damage the connector.
* Only for some models
Main Switch ON –OFF
AvMap - 13
Page 14

III.III Installation with suction cup holder
1. Fix the car mount on the windscreen with the
suction cup in a position that does not represent a
danger in case of accident or sharp braking, and that
does not distract the driver.
NO
2. Plug the car power supply cable in the cigarette
lighter, and the other end in the holder (see
picture).
ATTENTION: it is not possible to feed the navigator
plugging the car power supply cable directly in the
device. Do NOT plug the cable in the audio output!
3. Move the navigator’s main switch from OFF to the
ON position using a pen (see picture).
14 - AvMap
ATTENTION: it is not possible to feed the
navigator plugging the car power supply
cable directly in the device. Do NOT plug the
cable in the audio output!
Socket for car power cable (with
cigarette lighter plug)
Page 15

4. Place the Geosat 6 on the magnetic car mount
coupling with a simple gesture.
5. Press the power key to power on the navigator.
6. The smart magnetic rotating mount makes it
possible to rotate the navigator from landscape to
portrait mode to choose your point of view.
III.IV Installation with the in-car
integrated holder
For the in-car integrated models please read the incar installation quick guide included in the box.
The suction cup holder and the car charger are also
provided with the in-car integrated models. When
used with the suction cup holder, some functions
will be missing:
•It won’t be possible to use the iPOD control
•It won’t be possible to interface the navigator with
the car sound system.
AvMap - 15
Page 16
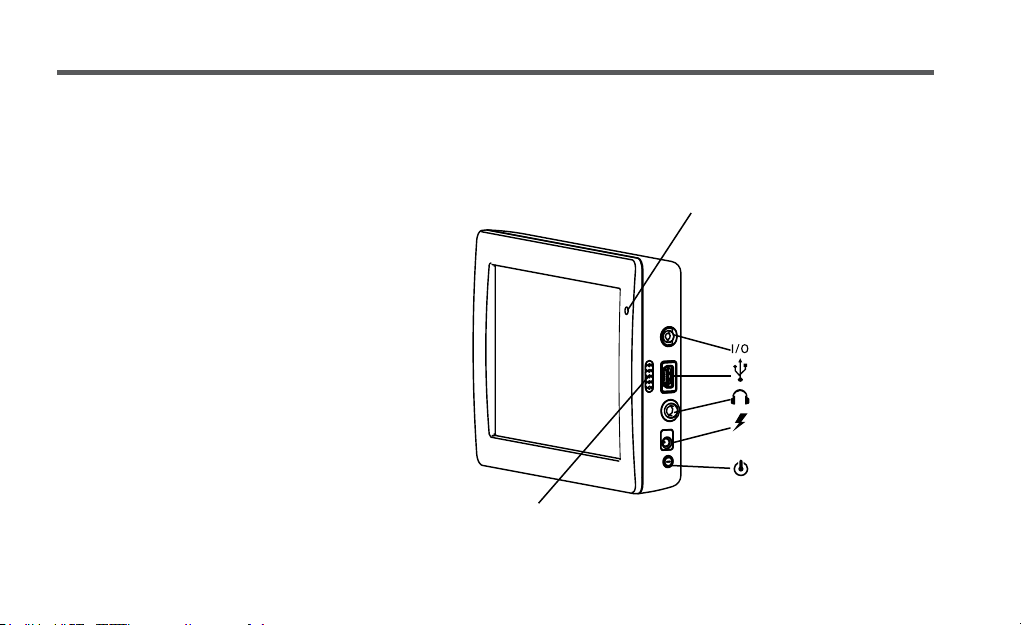
1. Main Menu
Press and hold for two seconds the power key to power
on the navigator.
When powered on, Geosat 6 will display the main menu.
From the main menu you can choose among several
functions:
• Satellite Navigator
• Music and Video Player
• Picture viewer*
• Digital TV*
To access to the navigation software, touch the Satellite
Navigation button.
*Only for some models.
16 - AvMap
Page 17
2. Satellite navigation
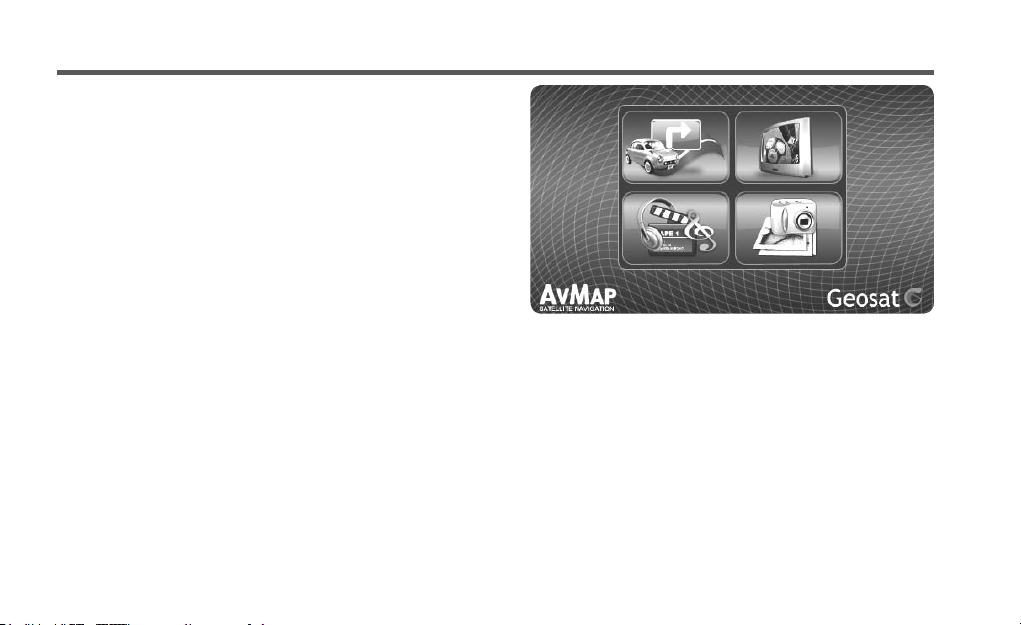
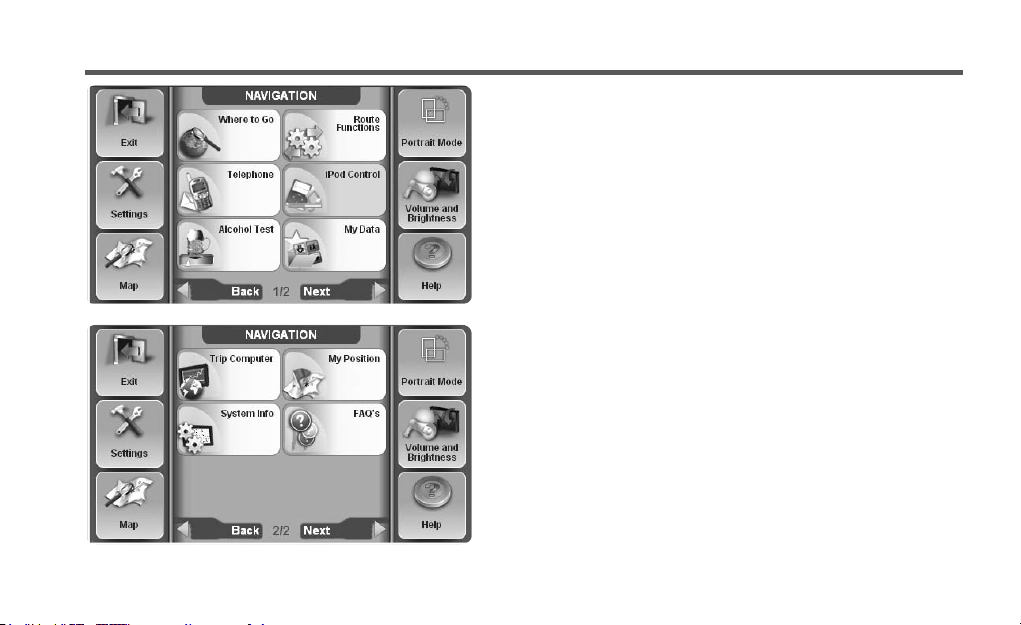
2.1 The Navigation menu
If you are accessing the navigation Software for the
rst time, the navigator will ask to choose the desired
language. Then the Software will ask to set the time
(read par. 2.14.1.2)
When the satellite navigation software is started, some
important warnings are displayed.
Touch the Accept button, the Navigation Menu will
open.
The navigation software consists in the map and the
Navigation Menu. The navigation menu is displayed. It
can be opened in any moment touching the Menu button
in the map. Viceversa, the map can be opened in any
moment touching the Map button in the lower left corner
of the Navigation Menu.
The Navigation Menu consists of a xed menu which can
be scrolled with the arrow buttons, and a xed part with
AvMap - 17
Page 18

Satellite Navigator
buttons that are always accessible.
Fixed menu
• Exit: it opens the Main Menu to choose the function
(par 1.1).
• Settings: it opens the Settings Menu (par. 2.12).
• Map: it opens the Map.
• Portrait / Landscape: it allows changing the view
mode.
Attention: this button is active only when the Geosat
6 is not attached to the car mount. When on the
mount, it is enough to rotate the navigator and the
software will switch automatically from Landscape
to Portrait mode.
• Volume and Brightness: it opens the volume and
brightness control.
• Help: it allows getting hints on how to use the
buttons (par 2.1.1).
18 - AvMap
Mobile Menu
In the mobile menu you will see all the buttons
relative to the different functions so it can vary from
one model to another.
2.1.1 Help Mode
The Help mode helps you getting instructions on
how to use the buttons in the navigation software.
Touch the Help button (the button with the question
mark icon) to enter in the help mode then press any
button to get the relative explanation. A window will
open with the instructions on how and why to use
the selected button. Close the window by pressing
Close.
2.1.2 FAQ’s
The F.A.Q. section gives you detailed instructions on
how to use the most common navigation functions.
Page 19
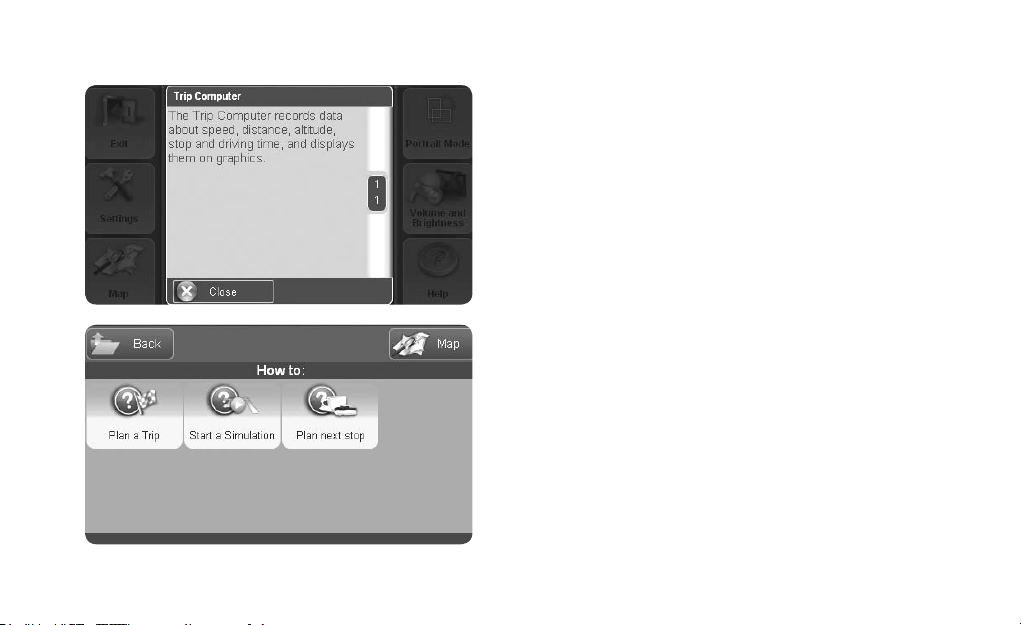
Satellite Navigator
To open the FAQ section press the FAQ button in the
navigation menu. You will nd three wizards on how to:
• Plan a Trip
• Start a Simulation
• Plan next stop
The FAQ can be updated with free software updates.
AvMap - 19
Page 20
Satellite Navigator
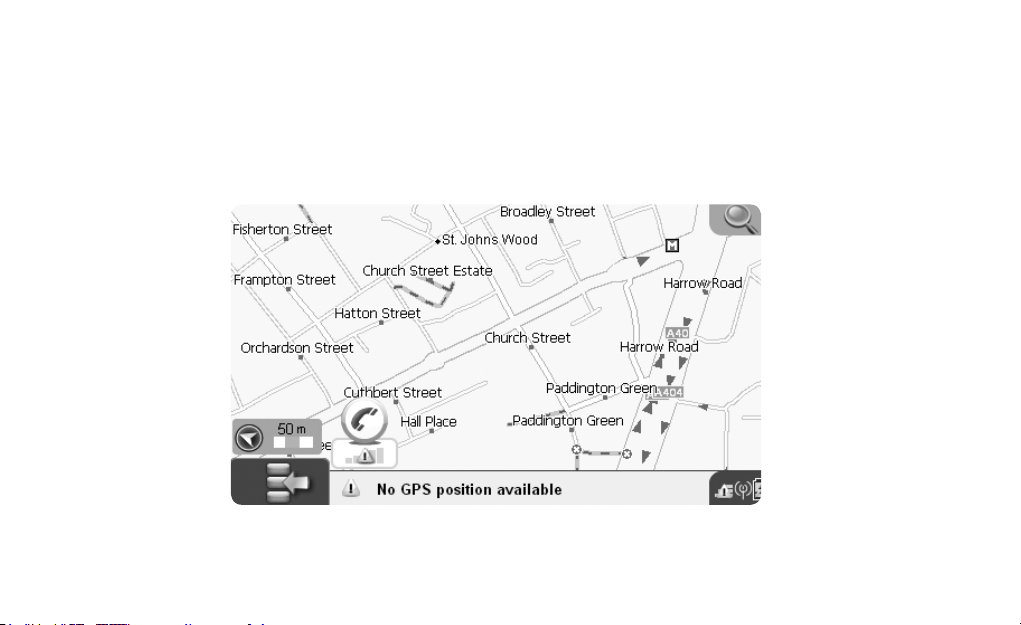
2.2 The Map
When there is no active navigation, the map appears as follows:
Scale and Compass
Zoom
Touch to open the
Navigation Menu
20 - AvMap
Info on current position
Status icons: GPS signal
and Battery
Page 21
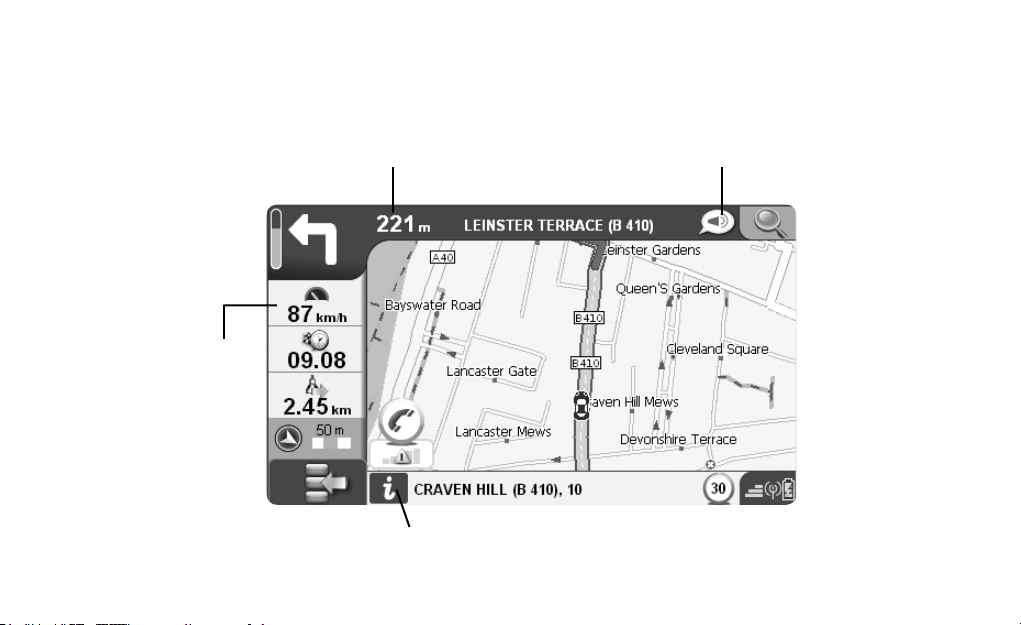
When in navigation, the map appears as follows:
Distance to next manoeuvre
Name of the street you have to take
Next manoeuvre
icon and progress bar
Navigation data: touch
to choose the data
you wish to display.
The data displayed by
default are: time to
go, distance to go and
speed.
Name of the street you are travelling along
Satellite Navigator
Vocal instruction Icon: touch the icon
to listen to the corresponding vocal
instruction.
AvMap - 21
Page 22
Satellite Navigator
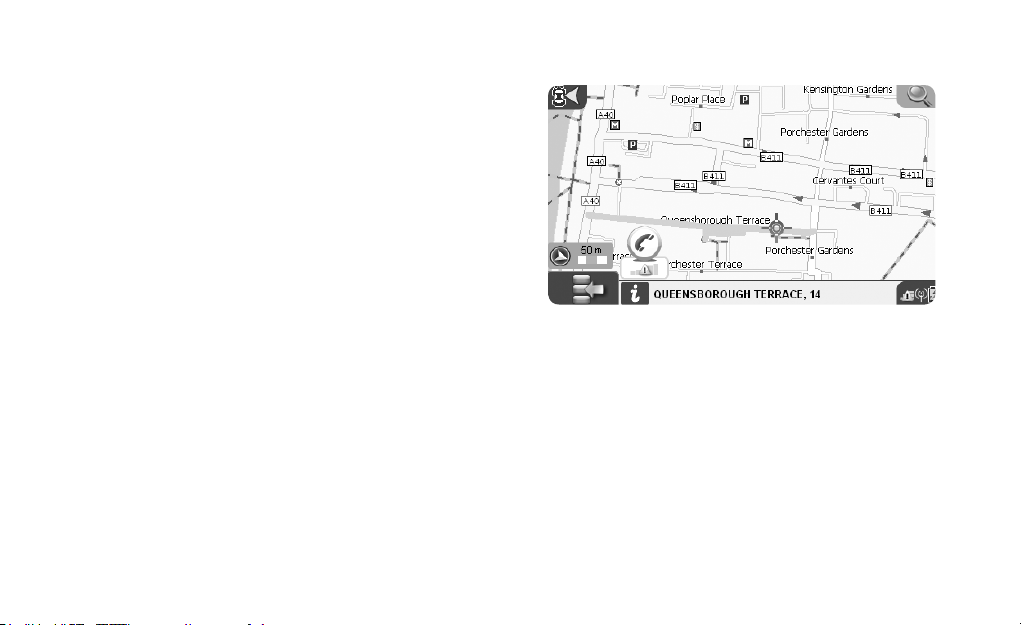
2.2.1 Explore the map
You can explore the map with or without a valid GPS
signal. To explore the map, touch it in any point, and the
cursor will appear, then drag it in the desired direction.
Touch the Zoom buttons to zoom in or out. The info bar
(the blue bar at the bottom of the screen) shows the
exact address corresponding to the cursor position.
If you select a street, the info bar will show the name,
and the entire street (corresponding to that name) will
be highlighted in green. To get more info on the selected
point, ouch the info bar and the full info page will open.
22 - AvMap
Page 23

Satellite Navigator
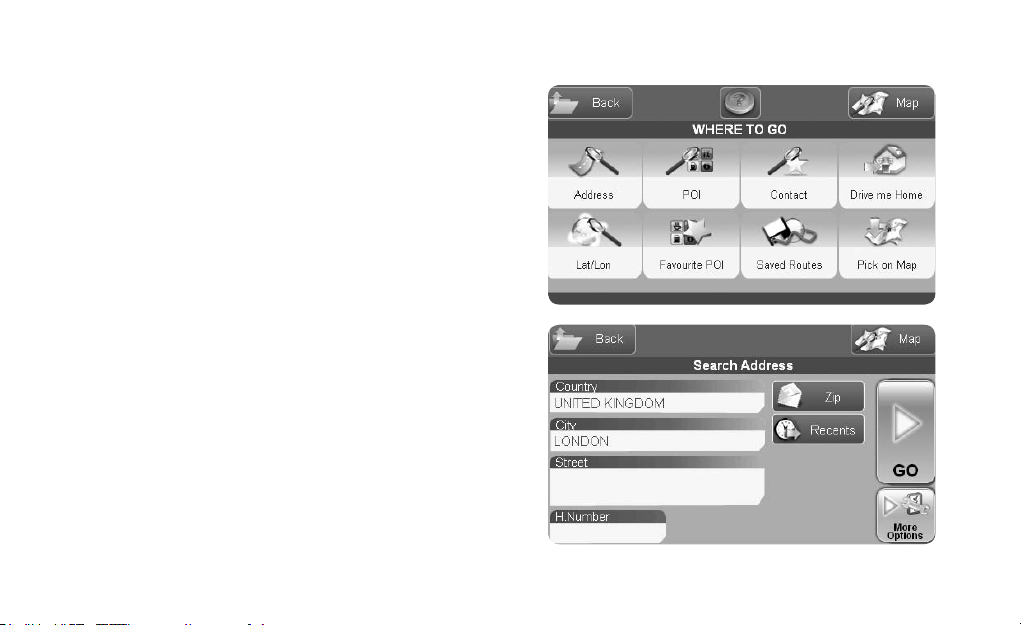
2.3 Setting a destination
• Open the Navigation Menu
• Touch the Where to Go button.
• From the Where to Go menu you can choose your
destination in many different ways. (Flux diagram in
Appendix B).
2.3.1 Search Options
The Where to Go menu offers several options to
search for your destination:
• Address: to insert a complete address
• POI: to search your destination among the points
of interest
• Address Book: to search your destination among
the contacts saved in the address book.
• Drive me home: to set the home address as
destination
• Lat-Lon: to inset the destination with the
geographical coordinates Lat-Lon
• Favourite POI: to search your destination among
the favourite POI
• Saved Routes: to choose reload a saved route
• Pick on Map: to choose you destination picking it
manually on the map.
2.3.2 Inserting an address as destination
To insert an address as destination, touch the Address
button, then ll the elds Country, City, Street and
House number. Touch the Country eld to open the virtual
keyboard.
• Digit the name of the country on the virtual keyboard
touching a letter at a time
• Once you have inserted the name, touch the OK
button
• Repeat the operation for each eld
AvMap - 23
Page 24
Satellite Navigator
• Touch the GO button to set as destination and calculate
(the software will calculate the route and the map will be
displayed as in Chap 5.), or touch More Options to open the
More Options page (par. 2.3.6).
2.3.3 Choosing the destination among the POIs
The Points of Interest Data Base consists of preloaded
locations on your cartography, which enable to quickly
research a certain destination under a category. There are
websites that specialize in the collection, management
and distribution of POIs for you to load into your device
(par. 2.7.2.4).
To search for a POI:
• Open the Navigation Menu
• Press Where to Go
• Select POI
On the new menu select the research option between:
• Near my position
24 - AvMap
Page 25

POI Categories
• Car Service
• Transportation
• Emergency
• Attractions
• Entertaining
• Restaurants
• Public admin.
• Hotels
• Medical services
• Natural attractions
• Services
• Shops
• Sport
• Others
• Dynamic POIs
Satellite Navigator
• Near a City
• Near my destination
• Near a Via point
Select Close to my position option to search for POIs
close to your current position. The category list will be
displayed.
Every category is divided into subcategories (for a complete
list consult the appendix). Select the POI category you are
interested to and then select among the subcategory list
displayed. For example: Transportation category, Airports
subcategory. The navigator will automatically search the
closest POI to your current position, and will display the
full list among which you can choose the most convenient
one. Once you choose a POI, select it to open the page
containing
the complete information about it. Touch the Go button to
start the navigation or the More Option button, or go back
to the POI list. If you choose the Near a city option, you
AvMap - 25
Page 26

Satellite Navigator
will rst have to enter the City name and then select
a category and the subcategory and follow the steps
as above. If you choose the Near a via point option,
you will be displayed the via points list along your
route, choose a Via Point and then proceed with the
selection of a category. If you select Near destination,
proceed with the selection of a category and then
subcategory to nd POI near your nal destination.
At the end of the procedure, in the POI full info page
POI you can choose to start the navigation or to call
its telephone number through the GSM if the GSM
SIM card is inserted and activated as explained in
Chap 2.8, or call it through a Bluetooth connection
with your phone (depending o the model).
2.3.4 Choosing the destination among
your Favourite POIs
The search among the Favourite POI is very simple,
26 - AvMap
for it allows to search directly under a Favourite
subcategory. (See par 2.7.2.3)
At the end of the procedure, in the POI full info page
POI you can choose to start the navigation or to call
its telephone number through the GSM, if the GSM
SIM card is inserted and activated as explained in
Chap 2.8, or call it through a Bluetooth connection
with your phone (depending o the model).
2.3.5 Choosing the destination among
the Contacts
It is possible to save up to 1000 personal contacts
with name, address and icon, organized into folders
(to add
a new contact see par 2.7.3.2). A contact can be set
as destination. To access the list:
• Open the Navigation Menu
• Select Where to Go
Page 27

Satellite Navigator
Suggestions
The orange icon on the side of a folder indicates
that the approaching alarm has been set on all the
contacts contained in that folder. To set the alarms,
see the Contact Management section (par 2.7.3.4).
The orange icon associated to a contact, indicates
that it has been assigned a GPS position, a telephone
number or both. In case you forget where you saved
a contact, you can always carry out a name search.
AvMap - 27
Page 28
Satellite Navigator
• Select Search Contacts
The list of the existing folders will be displayed (e.g.
Business, Friends, Relatives etc.) Select the desired
folder to display the list of contacts. Select the contact
to access the complete information window.
At the end of the procedure, you can choose to start the
navigation toward the contact or to call its telephone
number through the GSM, if the GSM SIM card is inserted
and activated as explained in Chap 2.8, or call it through
a Bluetooth connection with your phone (depending o
the model).
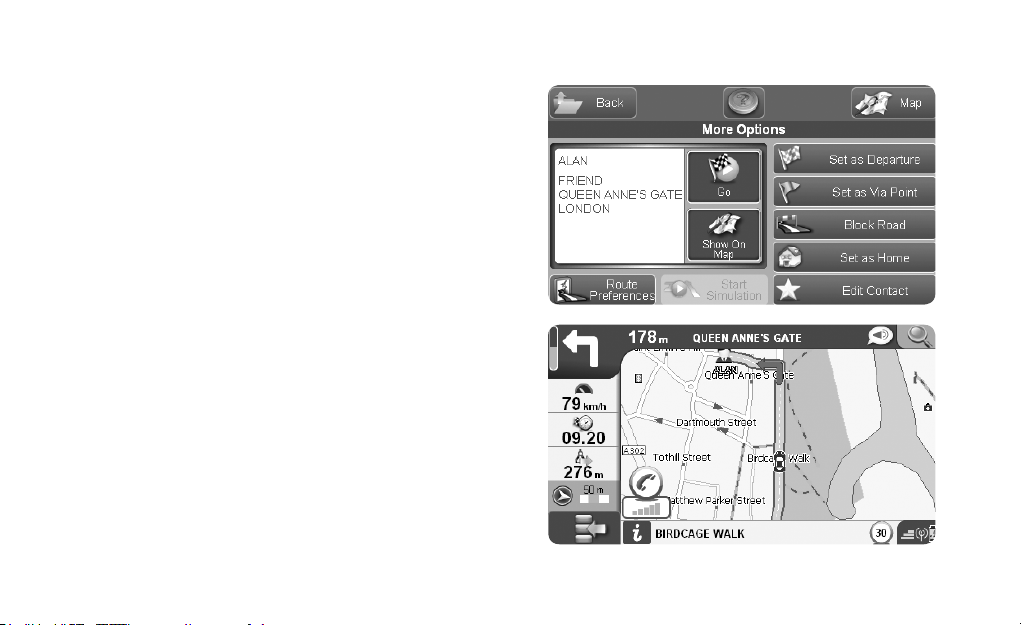
2.3.6 More Options for navigation
Once you have selected the destination, (a contact, an
address or a POI), you can navigate straight to it or access
the page More Options, that allows you to choose how to
use the selected location.
28 - AvMap
Page 29

Satellite Navigator
2.3.7 Record your track on the map
With Geosat 6 you can record on the map the track
of your trip. This function is very useful when you
are navigating off-road. The track is shown on the
map with a red line. The track can be saved and it be
reloaded in any moment. To open the Tracks menu:
• Open the Navigation Menu
• Touch the Personal Data button
• Touch the Tracks button
• From the Tracks menu you can start or stop the
registration of a track and choose its colour. The
registration will go on till you will manually stop it.
2.3.8 Lane Assistant
The Lane Assistant helps you in multiple lanes streets
where the sole manoeuvre instruction could not be
enough. In these cases it is important to know in
advance which lane to follow. The Lane Assistant is
an automatic function that shows, where available,
the several lanes with pictograms in the lower
information bar. The pictograms show:
• The direction of the trafc ow for each lane
• The type of horizontal divider between one lane
and another (e.g. single continuous dividing line,
two parallel continuous lines, broken separation
line, etc.)
• The lane or the lanes to be followed highlighted
in green.
The information appears and disappears
automatically.
2.3.9 My Position
To have a detailed information on your GPS position
(while navigating or not), you can consult the page
AvMap - 29
Page 30

Satellite Navigator
‘My Position’
• Press the Navigation MENU button
• Select ‘My Position’
The page will display the precise address of the GPS
position and the geographical coordinates LatitudeLongitude. From this page you can also search useful POI
close to your current position.
30 - AvMap
Page 31

Satellite Navigator
Suggestions
• You do not have to ll all the elds in the Insert address page. For instance if you insert just the city name,
leaving the street eld blank, the navigator will calculate the route toward the centre of the city.
• You can search for an address also through the post code, without knowing the name of the town. Touch the
Post Code button, and then insert Country, Post Code and street name.
• To search among the recently found destinations, touch the Recent button and then choose among the list
of results.
• When inserting an address with the virtual keyboard, you can choose to activate or not the auto completing
function. When the auto completing function is active, it helps you inserting the correct name, and if you
touch OK (the green button) you can see the suggested result (i.e. If you have inserted LON the navigator will
suggest LONDON). When the auto completing function is off, you can insert just a part of the name then touch
OK to see all the possible results (i.e. all the city names starting with LON).
AvMap - 31
Page 32

Satellite Navigator
2.4 Planning and modifying a route
2.4.1 Planning a route from A to B
If you are in the car and you are receiving a valid
GPS signal, the point of departure corresponds to
your GPS position. Nevertheless it is always possible
to plan a route even without GPS signal, before
departing, by entering both the departure point and
the destination point.
• Enter the address by following the procedure
described in paragraph 2.3
•Touch More Options
In the More Options page you can set the entered
address as a departing point by pressing Set as
Departure. A page will open up asking “Do you want
to set a destination now?”
• Press Yes, the Where to Go Page will open.
• Repeat the procedure to enter the destination.
32 - AvMap
Touch Go to Set as Destination and calculate the
route. The map will be displayed.
In absence of GPS signal the navigation will not start
but the route will be displayed with a green line. You
can either consult or modify the itinerary (par.2.5).
2.4.2 Route Functions Menu
To modify a route, enter the Route Functions menu,
by selecting it from the Navigation Menu. The menu
contains a series of useful options to modify and
optimize the route according to your needs. The
options are:
• Clear route: to delete the set route
•Recalculate: to manually recalculate the route.
• Invert route
• Edit Via Points: to modify the via points sequence
and set detours.
Page 33

Satellite Navigator
• Plan next stop: to set the next via point along your
route.
•Detour: avoid a street along the route and recalculate.
• Route overview: to visualize all the information on the
route, such as the expected time of arrival, the time to
destination and distance to destination
•Save route: save the set route.
• Turn List: to visualize the itinerary as a list of
manoeuvres.
•Simulation: to simulate the navigation through the set
route.
• Route preferences: to set the criteria for route
calculation.
2.4.3 Choosing the route options
The Route Options menu allows setting the best
calculation according to your own needs.
From the Route Functions menu touch the Route Options
AvMap - 33
Page 34

Satellite Navigator
button, then touch Route Preferences. You can
choose your Route among the shortest route, the
fastest, with fewer turns or off road.
• The shortest route: it is calculated preferring the
shortest distance, but it does not consider the type
of road. For this reason there could be stretches
with very low speed limits, or narrow stretches. The
resulting route is the shortest way form A to B, but it
may be not the best for your vehicle.
• The Fastest route: it is calculated on the base
of the type of streets covered, preferring streets
with high speed limits (such as highways). This way,
the total distance could be longer but the time to
destination will be shorter.
• With fewer turns: with this option, the software
calculates the route with fewer manoeuvres, as
34 - AvMap
straight as possible, for a comfortable driving. The
resulting route will probably be longer both in terms
of time and distance than the previous ones.
Attention: these parameters are applied on the
cartographic data, so their efcacy depends on the quality
of the maps. For this reason it is highly recommended to
keep the maps updated (read Chap 5).
You can also customize the route calculation
choosing to avoid some types of streets or areas.
From the Route Functions menu touch the Route
Options button, then touch the Avoid button. You
can to avoid:
• Toll roads
• Highways
• U turns
• Pedestrian roads
Page 35

Satellite Navigator
• Ferry routes
• Built-up areas
• Unpaved roads
Bear in mind that you are choosing what to avoid in
the route. So if you select: Toll roads, then the route
calculation will avoid toll roads.
AvMap - 35
Page 36

Satellite Navigator
2.4.4 Adding Via Points
You can modify the route by adding via points. Select
the address (par. 2.3); Touch More Options then set it
as Via Point. The map will display a departing ag, a
destination ag and a via point ag. To add a second
via point, simply repeat the operation. Once you
have added all the via points, you can always change
its sequence.
2.4.5 Changing the Via Points sequence
• Open the Navigation Menu
• Select Route Functions
• Select Edit Via Points
36 - AvMap
Page 37

Satellite Navigator
You can change here the order of the via points, delete
them or add new ones. To move one via point, select it
and then press the arrow up / arrow down button. Once
you have optimized the trip according to your needs,
you can save the route for future uses by pressing Save
Route. Once you have moved the via points, touch Accept
to start the recalculation.
2.4.6 Simulating mode
Once you plan your route, you can always start a simulation
of navigation that will display the moving vehicle along the
itinerary with the average speed assigned to each road by
Navteq, or you can see it speeded up x2,x4,x8 times. During
the simulation you can consult the itinerary with the list
of roads and the list of manoeuvres. (Par.2.5.1). To start a
simulation:
• Plan a route from point A to B as explained in the previous
AvMap - 37
Page 38

Satellite Navigator
paragraphs.
• From the More Options page (2.3.6), press Simulation.
• The simulation menu will open. Press On, then choose the
speed and then press Accept. The map will display
the simulation of the navigation.
To stop the simulation, open the same page and press the Off
button. In the Simulation Settings page, you can choose the
simulation speed among:
• Real Time
• Speeded up x 2
• Speeded up x 4
• Speeded up x 8
38 - AvMap
Page 39

Satellite Navigator
2.5 Advanced planning
2.5.1 Viewing the Turn List
The Turn List option allows viewing the list of all the
manoeuvres to be made along the trip. Select a
manoeuvre to view it on the Map. To open the Turn List:
select Route Functions and then Select Turn List. You can
open the Turn List during the navigation simply pressing
the arrow that indicates the next manoeuvre in the upper
left corner of the map.
2.5.2 Detouring to avoid a street
You can choose to detour a route by avoiding a street.
To open the list of streets along the route, open the
Navigation Menu, select Route Functions and then select
Detour. You can select one street and choose to avoid it
by pressing Detour. The Navigator will recalculate the
AvMap - 39
Page 40

Satellite Navigator
route avoiding the selected street. Press Reset Default
itinerary to delete all the detours.
2.5.3 Blocking a road
It is also possible to Block a street (if for instance the
road is under construction), the Block will remain until
the user unblocks it. Select a street manually on the
map, or by typing an address then in the More Options
page (par. 2.3.6) press the Block street button. The
street will be displayed in red and two red icons will
delimit it.
To unblock it:
•In the navigation menu, touch Settings
•Touch Route Preferences
•Open the list of blocked roads
•Select the desired road to unblock it.
40 - AvMap
Page 41

Satellite Navigator
2.5.4 Route overview
On the Route Overview window, you can nd the most
relevant information concerning the route, for you to
consult during your trip or while planning it:
• Point of departure
• Point of arrival
• Departure Time
• Total Distance
• Remaining distance
• Total time
• Remaining time
• Estimated arrival time
Three orange icons indicate the kind of street that you
will encounter along the route:
• Total Km to cover on major roads
• Total Km to be cover on toll roads
• Total Km to be cover on unpaved roads
AvMap - 41
Page 42

Satellite Navigator
Pressing on these icons you access to the Route Options
menu where you can decide to avoid for example unpaved
roads. From the Route Overview page, select Show route
on map, to view the complete route in one screenshot.
Press Set Departure Time to set the departure time (this
allows you to get a preview of the estimated time of
arrival).
Select Set Speed in order to set the speed according to
your average speed.
2.5.5 Planning next stop
This function allows planning the stops along your route.
To access the route planner:
• Open Navigation Menu
• Select Route Functions
• Select Plan next stop
You will be able to search the position where you will
be within a certain distance or a certain time frame
42 - AvMap
Page 43

Satellite Navigator
from the point of departure and to search POIs near that
position. Let’s take this as an example: shall you want to
stop for refuelling within 100 Km from your departure:
• Select the window Where
• Set the distance (ex 100 Km) by pressing the arrow
• Select the Gas Station option to search for the closest
ones to your estimated position
• A list of gas stations near that position will be displayed.
Select one of the options. You will be displayed the
page containing the complete information
• Press the green button to access the Start navigation
page
• On the Start Navigation page press Set as Via Point.
Shall you, for instance want to nd a restaurant within
two hours:
• Select the option When
• Set the time and select the Restaurants option.
• The software will calculate you position using the
AvMap - 43
Page 44

Satellite Navigator
average speed allowed in every street according to
Navteq ofcial data, or the average speed that you
44 - AvMap
Suggestions
To better plan your next trip you can do it
even without the GPS signal, while in the
ofce or at home. If necessary, plug
the navigator to the charger. To plan the next
stop in a time interval, it is always necessary
to set the departure date.
It is also advisable to personalize the average
speed, to get a personalized result. have
entered. Average speed settings can always
be personalised from Settings Menu (see par
2.14.1).
Page 45

Satellite Navigator
2.6 Trip Computer
While on a journey, you can consult the Trip computer,
even if you are driving without having set a destination.
To access the Trip computer:
• Select Trip Computer from the navigation menu
• Touch Data and Graphics. The trip data include:
• The distance covered
• The top speed reached and average speed
• The highest altitude and average altitude
• The total time of stops
To view the speed and altitude graphs, touch the relative
icons for each column. The graphs draw in real time the
situation for each trip segment. The trip segment is
indented as the itinerary between one stop and another.
The white line represents the real time situation; the
green line represents the average value in that segment.
AvMap - 45
Page 46

Satellite Navigator
The orange vertical lines represent the stops (pauses).
The data are registered continuously and they can be set
to zero only by resetting the counters, by touching the
reset button below each column of the trip data.
To reset all the counters in one operation, touch the
Reset button in the trip Computer Menu.
The Total counter registers the data of the total life of
the navigator, and it cannot be set to zero. It includes:
• Maximum speed and average speed
• Maximum altitude and average altitude
• Total time
• Total distance
• Total stop time (the sum of stops)
46 - AvMap
Page 47

Satellite Navigator
2.7 Managing Personal data
From the personal data menu you can manage: your
saved routes, your Points of interests (downloaded form
the internet), contacts and tracks
2.7.1 Saved Routes
2.7.1.1 Saving the route
Once a route has been set, you can save it for future
uses.
• Open the Navigation menu
• Select Route Functions
• Select Save Route
A virtual keyboard will appear: edit the name of the
route and press OK. The route is added to the list of
saved routes
AvMap - 47
Page 48

Satellite Navigator
2.7.1.2 Modifying or using a saved route
Select the desired route to open the Saved route options
menu. In this page you can:
• Rename the route
• Check the Route (Turn List)
•Delete the route
• Change the Icon of the route
If you want to use a saved route again:
Touch the View route button in order to open the Turn
List page, then press the green arrow button to accept
and access to the start navigation page. In the Start
Navigation page press the chequered ag button to
calculate and start the navigation along the saved route.
If the saved starting point is different from your current
GPS position, the software will calculate the route from
your current position to the saved starting point then
heading to the nal destination. Once you are navigating
on the saved route, you can always modify it. The
48 - AvMap
Page 49

Satellite Navigator
changes won’t be saved unless you press Save route
in the Edit trip menu, this way you can save it as a
new route with a new name.
2.7.2 Points of Interest
2.7.2.1 POI types
The cartography of the car navigator already includes
a vast database of Points of interest also called
System POI (to consult the category and subcategory
list, see the appendix). On top of these System POIs,
you can add new ones.
All you need to do is to download the special software
available from the AvMap site www.avmap.it and then
consult specialized sites such as (e.g. www.poigps.com).
These POIs are called Users POIs.
2.7.2.2 Displaying or Hiding a POI category
1.Select POI management
2.Press System POI and access the categories list
3.Select a category and enter the subcategory list
4.Press the Icon on Map button to choose to display
or hide the selected category.
By default all the POIs are visualized on the map
with their corresponding icon. Nevertheless you can
always decide to hide some POIs categories.
2.7.2.3 Setting the favourite POI categoriesn
The Favourite POI list has the purpose of simplifying
the research by frequently searched POI categories
for instance Gas stations, restaurants, ATMs, etc.
Select Favourite POIs to view the favourite
subcategories list. Select an item from the list and
you will access the menu that allows to delete it from
favourites or to reactivate it. To add a subcategory
AvMap - 49
Page 50

Satellite Navigator
to favourites:
1.Press System POIs and access the categories list
2.Select a category and consult the subcategories list
3.Select a subcategory
4.Press Add to Favourites. The subcategory will be added
to the favourites list, to facilitate your research.
2.7.2.4 I User POI
You can download new POIs such as speed cameras,
shops, restaurants, etc. You must rst register your
device on the www.avmap.it web site under the Support
/ Register section, in order to be able to download the
Geosat update application (Chap. 5)
• Download the POIs from your favourite internet site
(ex. www.poigps.com), paying attention to choose the
AvMap compatible format. Save them on your PC.
• From the Support section at www.avmap.it, select
50 - AvMap
Page 51

Satellite Navigator
Downloads and FAQs
• Then select the device model “Geosat 6” from the
scroll down menu.
• Click on Software update to download the
application to update software and to load new
Points of Interest (for software update read Chap.
5)
• Registered Login and Password will be requested
• Save the File on your Pc.
• Once the software has been downloaded on your
PC, connect the Geosat 6 to the USB port with its
wire.
• Run the Geosat 6 Updater application and select
the POI transfer icon. This application allows you to
select the les to transfer into your navigator.
• A window will show the user POI already loaded in
the navigator.
• Select the “+” icon to add a new le.
• Select the rst le to transfer from your PC and
click “open”.
• The window will now show the downloaded le
• Repeat the process to add new les.
To access the users personal POIs:
Select User POI option from the POI Management
Menu. The complete list of the user’s POIs will be
displayed. Select a group to access the complete
info. From here you can:
• Set an approaching alarm to all the POIs belonging
to the group.
• View or hide the POI icon from the map
• Add the group to favourites
AvMap - 51
Page 52

Satellite Navigator
2.7.2.5 Setting the speed traps alarm
1.Touch User POI
2.Select the user POI group you want to alarm
3.In full info page touch the Alarm button, on the right
column
4.Choose the type of alarm (touch one, then touch test
to hear it )
5.Touch the green arrow in the lower bar to open the
second page, where you can set the ray (form 100 m to 5
Km) within which the proximity alarm has to detect POI.
Touch Accept to go back to the POI full info page.
6.Touch on Icon on Map to choose whether to show or to
hide the Poi icon on the Map, then press Accept.
At this point beside the name of the POI group you will
see an orange icon of a bell indicating the POI group
has been alarmed and an icon of a magnifying glass
indicating that the POI belonging to this group are visible
52 - AvMap
Page 53

Satellite Navigator
on the map.
2.7.3 Address book
2.7.3.1 Address book
Geosat 6 can store up to 1.000 personal contacts in
the address book. The contacts will be saved in a
predened folder, or in a folder chosen by you.
2.7.3.2 Creating a new contact
To create a new contact: enter the desired folder, by
selecting it from the list of folders. Then select Add
a contact, the Add contact menu will open, choose
here in which way you want to select the address.
To add an address, select address and follow the
same procedure as when adding a new destination.
You can also enter a point by entering latitude and
longitude, either by selecting it from the POIs or by
directly choosing it from the map. Once you enter
the point, you can access the Contact Options Menu,
where you will be able to:
• Edit the name of the contact
• Change the icon
• Move the contact to another le where it has been
saved.
• Add a new telephone number (only for models with
Bluetooth or GSM)
• Delete the newly created contact.
• Set the contact as Home.
Press the Edit name button to change the name, the
keyboard where to type the name will be displayed.
Select OK to go back to Contact Options. After you
have done all the modications select Accept. A new
page with be displayed with the option navigate to
AvMap - 53
Page 54

Satellite Navigator
the contact or go back to Options if you want to do
more modications. To exit the process press Map.
2.7.3.3 Creating or modifying a folder
When you access the address book, on the left side
of the screen, you will nd the list of the folders and
on the right side the buttons for their management.
To add a new folder press “Add folder” option. The
Folder Options menu will appear. You can:
Edit the name of the folder. A virtual keyboard will
be displayed. Type the name you want to give the
folder and then press OK.
• Change the icon that will represent the le.
• Set an approaching alarm on the contacts of the le.
• Delete the le you created.
After nishing the modications, select Accept and
54 - AvMap
go back to the folders list, where the new folder will
be displayed.
After that, you can still modify the folder’s attributes.
Enter the le by selecting it from the list. Then press
Modify le to access the Folder Option menu.
2.7.3.4 Alarm Contacts
It is possible to set an approaching alarm to one or
more contacts folders:
1.Choose the folder you want to alarm.
2.Touch Folder Options
3.Touch Set the Alarm
4.Choose the alarm
5.Use the arrow to scroll to the second page and set the
alarm range
6.Touch Accept
Page 55

Satellite Navigator
7.Repeat the operation for each folder you would like to
alarm. To deactivate all the alarms read Par. 2.14.4.1
2.7.3.5 Setting Home address
The HOME address can be quickly recalled with the quick
Drive me Home command from the Where to Go menu.
To set your home address: Enter the address by following
the procedure on par. 2.3 On the More Options page
select Set as Home. The Drive me Home function will
activate the navigation from the current GPS position to
the address set as Home.
2.7.3.6 Transferring your contacts
When you buy a map update, you just have to substitute
the old SD card with the new one preloaded with the new
software and new maps. In order not to lose you personal
contacts, you will need to copy these contacts on the
new SD card.
AvMap - 55
Page 56

Satellite Navigator
1.Connect Geosat 6 (with the old SD card) to the PC
through the USB cable
2.Open PC resources and explore Geosat 6 ad a removable
disc.
3.Copy the folder named ‘Geosat 6’ and paste it on your PC.
4.Disconnect Geosat 6
5.Substitute the old SD with the new one, and then
connect Geosat 6 to the PC again.
6.Open PC resources and explore Geosat 6 ad a removable disc.
7.Paste the folder named ‘Geosat 6’ previously saved on
your PC, on the new memory card.
8.After this operation you need to download a software
update (Chap. 5)
56 - AvMap
Page 57

2.7.4 Tracks
In this menu you can view the saved tracks each one
with its color and with the indication of the length
in KM. You can decide to hide or to show the track on
the map. Read par 2.3.7 on how to record a track.
Satellite Navigator
AvMap - 57
Page 58

Satellite Navigator
Suggestions
• There are several ways to save a new contact:
From the map: press on the Map in the exact location you want to save, and then press the address bar to
open the full info page. Touch the More Options page (see More Options page par 2.3.6). From here you
can press the Add as contact button, to add the address in the contact address book.
From the Where to Go Menu: insert an address in the same way you would do to search for a destination,
than in the More Options page press the Add as contact button.
• Save your Home address! This way it will be very easy to nd the way back home thanks to the Drive
me Home shortcut button.
• Quick saving: the navigator saves all the new contacts in a predened folder with a predened name so
you can save them quickly and then you can go back later to rename them and organize them.
58 - AvMap
Page 59

2.8 GSM Phone
Does your navigator have the built-in GSM Phone?
Check in the technical specications at the end of
this manual if your version does include the GSM
Phone then check in then navigation menu if you
see the Phone button.
Some models of the Geosat 6 PND family are GSM
phones, working with GSM SIM cards, and are
equipped with speakers and a microphone thanks to
which you can make hands-free calls, without any
earphone.
Network services: in order to use the phone, you
need to request the service to a Carrier. The carrier
will provide you with all the necessary information
on fees. Some networks may have restrictions on
the use of some services.
Satellite Navigator
ATTENTION: Geosat 6 GSM models are compatible
with GSM SIM cards. The SIM card can be of any
carrier as log as it is a GSM type (not UMTS).
How to insert the sim card (only for models with GSM):
Insert the SIM card in the slot just below the SD, with
the chip facing up, and the cut corner on the right.
2.8.1 Activating the Phone
To access to the Phone functions, touch the Phone
button in the navigation menu, or the phone icon
appearing on the Map.
•Once in the Phone menu, touch the Activate
button.
•At this point you can make only emergency calls
(touching the Call button). To use the other phone
AvMap - 59
Page 60

Satellite Navigator
functions you need to insert the PIN.
•Touch Enter PIN and digit the PIN number of the SIM.
•When the phone is activated, the icon on the map gets
green, and the GSM signal status is also shown.
•Touch the phone icon on the map to open again the
Phone menu.
2.8.2 Making a Call
To Make a Call, touch Call in the Phone menu, then
choose among the following options:
• Number, if you ant to digit a number with the virtual
keyboard
• Contact, if you want to look for a number in the address
book
• POI, if you want to look for a phone number among
Points of interest
• Home, if you want to call the number set as home.
• Recent Calls, to look for a number among the list of the
60 - AvMap
Page 61

Satellite Navigator
last called numbers.
After having chosen the number, touch the green receiver
icon to start the call.
2.8.3 Sending SMS
•Enter the Phone menu
•Enter the Messages menu
•Touch new Message and digit the text with the virtual
keyboard.
To digit special symbols, touch the symbols button. The
special symbol virtual keyboard will be displayed.
To go back to the normal keyboard touch ABC. To change
the characters from small to CAPITAL, use the buttons on
the right: “A” for the Capital keyboard or “a” to go back
to the small keyboard.
•Once the text has been completed, touch enter.
•Insert the recipient’s number by touching the Send to
AvMap - 61
Page 62

Satellite Navigator
eld
•A virtual keyboard will be displayed, digit the
number and touch Enter.
If you want to use a number in your phone book
touch Edit Recipient.
Once the message has been sent, the Software will
go back to the map and SMS will be saved in the Sent
SMS folder.
2.8.4 Incoming SMS and Calls
If the phone is active the navigator will receive calls
and messages even during the navigation and will
notify the event with a pop up window.
Receiving a Call:
When you receive a Call, a window is displayed on
the map showing the caller number (and name if it
is saved in the phone book) you can decide whether
62 - AvMap
to take it or not or to mute the phone ring, touching
Accept / Refuse or the mute icon. If you accept the
Call, then it will be hands free. During the call, the
display shows the map and the phone icon changes
to the Call in progress status.
To end the call, touch the icon? To open the Call
menu, then touch End call.
During the call, it is also possible to mute the
microphone, by touching the Mute microphone
button in the Call menu, the button will then change
in Microphone Active. Touch it to activate the
microphone.
Receiving SMS:
When you receive an SMS, a warning is displayed on
the map and you can choose to open the SMS or to
read it later. In both cases, the SMS is saved in the
incoming SMS folder, so you can read it anytime.
Page 63

Satellite Navigator
If you choose Read now, it will be displayed, to avoid
distractions you can touch Read it to me, the navigator
will read the SMS for you.
2.8.5 Call register
To access the Call register, touch the Call Register button
in the Phone menu. Here you can nd:
•All Calls:
•Missed calls
•Outgoing calls
•Incoming calls
Each list can be cleared, by entering the list, and touch
Delete All. To delete the entire register, touch Cleat
Register in the Call Register menu.
AvMap - 63
Page 64

Satellite Navigator
2.8.6 Settings
To change the settings touch the Settings button in the
Phone menu. For this menu you can:
•Choose whether to show or not your caller ID. Touch
Phone Options and then touch Enable or Disable.
•Set the phone to answer automatically after a preset
interval of time. Touch Phone Options and then touch
the arrows to set the interval of time (for example if you
set 10 seconds, you will automatically answer to the call
after 10 seconds, without touching the display).
•Set the SMS options like saving or not outgoing
messages.
•Set the volume for the ring tone, by touching Audio
options.
•Copy the phone book from the SIM card to the navigator’s
memory, by touching copy from SIM.
•Change the PIN number. Touch Change PIN then digit the
64 - AvMap
Page 65

current PIN and then the new PIN. You will have to
insert again the new PIN to conrm it.
•Set your Home phone number.
Satellite Navigator
AvMap - 65
Page 66

Satellite Navigator
2.9 Hands free calls with Bluetooth®
Does your navigator have the Bluetooth? Check in
the technical specications at the end of this manual
if your version does include Bluetooth® then check
in then navigation menu if you see the Bluetooth
button.
With the Geosat 6 models equipped with Bluetooth®,
you can make and receive hands-free calls in your
car. Your mobile phone can communicate with
Geosat 6 thanks to the Bluetooth® technology, so
that you can manage calls directly from the display
of Geosat 6 without touching your mobile phone.
Geosat 6 is equipped with a powerful speaker and
microphone so that you can listen and talk without
the need of headphones.
66 - AvMap
2.9.1 Setting the Bluetooth®
communication
To set the Bluetooth® communication between your
mobile phone and Geosat 6 you need to go through
the pairing procedure (this is necessary only the
rst time).
1.In the second page of the navigation Menu, press
the Bluetooth® button.
2.Touch enable Bluetooth® to activate the
Bluetooth® (when this is active the icon changes to
Disable Bluetooth)
3.Now activate the Bluetooth® communication on
your mobile phone too.
4.Touch the Search phones button on Geosat 6 display
to search for Bluetooth devices on the surroundings.
The names of the found devices will appear in the
list on the side.
Page 67

Satellite Navigator
5.Once the search is over, touch the name of the desired
device (the name of your mobile phone), and touch the
Connect button.
6.Now the message of pairing request from AvMap Geosat
6 will appear on your mobile phone insert the PIN code:
0000. The communication is now active and the devices
are paired. The Pairing procedure is necessary only this
rst time, then Geosat 6 will automatically nd and
recognize the paired devices.
2.9.2 Receiving calls
When you receive a phone call and your mobile phone
is communicating via Bluetooth ® with Geosat 6, the
incoming call window appears on the display of the
navigator. The incoming call window shows the telephone
number and asks you whether you want to accept the
call or not. To reject the call answer by touching NO (the
red phone button); the incoming phone call window will
AvMap - 67
Page 68

Satellite Navigator
close.
To accept the call touch YES (the green phone button).
If you accept the call, the incoming windows will close
and the map will appear with the green phone icon in
the lower right corner of the display to show that the
phone call is in progress. Thanks to the Bluetooth®
communication, the call will be hands free, and you will
hear it through the powerful speakers of Geosat 6. While
the phone call is in progress, it is possible to access to the
Call Options by touching the green phone Icon. From the
Call options page you can open the keyboard, disconnect
the call from the navigator, or Hang up the call. In the
status bar (lower right corner) one icon indicates the
status of the Bluetooth communication and of the call.
68 - AvMap
Page 69

Satellite Navigator
2.9.3 Private calls
If you do not want to use hands free calling, you can
always disconnect the phone call from the navigator and
take it in the normal way.
1. Touch the green telephone icon on the Map to open
the Phone call Options page.
2. Touch the Disconnect button: the hands free calling
will be disabled and the call could be taken in the
traditional way.
3. Close the window by touching the cross button on the
upper right corner.
2.9.4 Adjusting the volume of the speaker
While the calls in progress, you can ad just the volume
of the speaker.
1. Press the Main MENU key on the side Keyboard
2. Touch the Mobile Phone button to open the Mobile
Phone page
AvMap - 69
Page 70

Satellite Navigator
3. Touch the Speaker Preferences button
4. Touch the arrows to adjust the volume
2.9.5 Dialling a telephone number
It is possible to dial a telephone number directly
from the display of Geosat 6 (When the Bluetooth®
communication is active).
1. Press the Main MENU key on the side Keyboard
2. Touch the Mobile Phone button to open the Mobile
Phone page
3. Touch the Call button
4. Press the Call Number button to open the virtual
keyboard.
5. Dial the number and touch the green telephone
icon to start the call. If the dialled number is busy,
a warning page will appear “Busy number”, touch
OK to hang up. During the phone call it is possible to
open the call options page.
70 - AvMap
2.9.6 Using the keyboard during a call
During a call, you may need to enter some numbers
(for example to dial an extension or to follow the
instructions of an automatic answer machine). You
can dial these numbers directly from the screen of
Geosat 6:
1. Touch the green telephone icon on the Map to
open the Phone call Options page.
2. Touch the Tone Keyboards but ton: the virtual
keyboard will open.
3. Enter the numbers and then close the window by
touching the cross button on the too right corner.
2.9.7 Last call
As in a mobile phone, the last 15 calls dialled on
Geosat 6 are saved in the memory.
To redial the last number:
1. Press the Main MENU key on the side Keyboard
Page 71

Satellite Navigator
2. Touch the Mobile Phone button to open the Mobile
Phone page
3. Touch the Redial button
The last called number will be redialled.
2.9.8 Calling Home
With the Home shortcut key you can quickly call your
house number (or the number you have set as Home).
To set your Home number
1. Press the Main MENU key on the side Keyboard
2. Touch the Mobile Phone button to open the Mobile
Phone page
3. Touch the Call Home button. The call will start and
the window will close to go back to the map view.
If the Home number has not been set, then a window will
open asking to digit the number.
AvMap - 71
Page 72

Satellite Navigator
2.9.9 Calling a Point of interest
The points of interest preloaded on Geosat 6 maps
are complete with telephone number (for example
restaurants, hotels, hospitals, shops etc). You can
call these number directly from Geosat 6. To call a
point of interest:
1. Press the Main MENU key on the side Keyboard
2. Touch the Mobile Phone button to open the Mobile
Phone page
3. Touch the Call button
4. Touch the Call POI button. The POI Search menu
will open. Once you get to the results, touch one
point of interest to open the corresponding full info
page.
5. In the full info page touch the green telephone
icon to call the selected Point of interest.
72 - AvMap
2.9.10 Calling contacts
You can save up to 1000 personal contacts with
name, address and telephone number. You can call
these contacts directly from Geosat 6.
1. Press the Main MENU key on the side Keyboard
2. Touch the Mobile Phone button to open the
Mobile Phone page
3. Touch the Call button
4. Touch the Call Contact button. The Contact
search menu will open. Once you get to the results,
touch one contact to open the corresponding info
page.
5. In the contact info page touch the green
telephone icon to call the selected contact.
2.9.11 Calls register
As in a mobile phone, the last 15 calls dialled and
received on Geosat 6 are saved in the memory. To
Page 73

Satellite Navigator
see the Calls register
To open the recent dialled calls:
1. Press the Main MENU key on the side Keyboard
2. Touch the Mobile Phone button to open the Mobile
Phone page
3. Touch the Calls Register button
The calls are grouped as: unanswered, recent dialled,
and recent received. To delete the register touch the
delete register button. .
To call back a number in the calls register, select the
number then touch Call.
2.9.12 Automatic answer
You can set the automatic answer to a hands free
Bluetooth call after few seconds, so that you can answer
without even touching Geosat 6 display.
1. Press the Main MENU key on the side Keyboard
2. Touch the Mobile Phone button to open the Mobile
AvMap - 73
Page 74

Satellite Navigator
Phone page
3. Touch the Phone settings button
4. Touch the Auto Respond button
The Auto respond page will open. You can here set
the time frame (seconds) after which the automatic
answer is activated.
74 - AvMap
Page 75

Satellite Navigator
2.10 iPod® Control
Does your navigator have the iPod Control? Check
in the technical specications at the end of this
manual if your version does include iPod Control.
This function is available only with In-car integration
kit that have the iPod input. The iPod button, unlike
the Bluetooth one, stays inactive until the iPod
is connected to the car holder. This behaviour is
correct and it does not mean that the function is not
available.
With Geosat 6 (only for the in-car integrated models),
you can control your iPod® directly from the display
of the navigator, even during the navigation.
2.10.1 Connect the iPod® to Geosat 6
Connect the iPod as described in the Quick installation
guide provided in the box.
2.10.2 iPod® Control menu
Once the iPod® has been connected, the iPod button
in the navigation menu, will light up. Touch it to open
the iPod® Control menu where you can choose the
play lists, the albums or the song as in your iPod®.
2.10.3 Listening to a Playlist
To choose a Play list saved on your iPod®, touch the
Play list button in the iPod® Control menu. Select
one Play list to see the list of songs. Touch on one
song to play the play list.
.
AvMap - 75
Page 76

Satellite Navigator
2.10.4 Browsing songs by author
To browse a song by author:
1. Touch the iPod® button
2. Scroll the list of authors and select the desired one.
3. The list of albums will appear, select the desired one.
4. The list of songs will appear. Select the desired one.
2.10.5 Song player page
When a song is playing, you can go back to navigation. To open
again the song player page, touch the note icon on the map.
The song player page displays the following information:
• Number of the song playing in the play list (e.g. 4 of 34).
• Time length of the song.
• Time remaining to the end of the song.
• Title, author and album.
• Reproduction mode (shufe, repeat, etc.).
In the lower bar you can:
76 - AvMap
Page 77

Satellite Navigator
• Adjust the volume, with the buttons + and –.
• Pause the song.
• Forward or rewind the next or previous song.
2.10.6 Reproduction settings
To open the Settings page touch the button at the centre
of the upper bar in all the iPod control pages. You can set
here the type of reproduction:
• No repetition: when the play list is over, the reproduction
is interrupted.
• Repeat all: the entire play list is repeated.
• Repeat one: repeats the song selected.
• Shufe: plays the songs randomly.
The selected reproduction type will be shown with an
icon on the song Player Page.
AvMap - 77
Page 78

Satellite Navigator
78 - AvMap
Page 79

Satellite Navigator
2.11 Alcohol Test
Does your navigator have the Alcohol Test? Check
in the technical specications at the end of this
manual if your version does include the Alcohol test
then check in then navigation menu if you see the
Alcohol test button.
This Function is available only for the models some
of Geosat 6.
This alcohol test has no legal validity. The resulting
values are indicative and should not be considered
as certifying the ability to drive according to the
Law. AvMap declines liability for the improper use
or erroneous use of this accessory function.
2.11.1 Calibration
In order to make an alcohol test, you rst need to
calibrate the breathe sensor. Make sure you perform
the calibration when you have not assumed any
alcoholic substance; this operation is needed only
once. In the main navigation menu, touch the
Alcohol test button, read the disclaimer and accept.
Touch the User Calibration button, wait for the
initialization and blow in the point indicated by the
red arrow on the display. Wait until the “Calibration
done” message appears.
2.11.2 Making the Alcohol Test
Once the calibration is performed, touch Make the
Alcohol test. Follow the instructions and blow in the
point indicated by the red arrow on the display. The
result will be displayed according to the g/l of alcohol
revealed in the breath. When the level is considered
AvMap - 79
Page 80

Satellite Navigator
too high, the message suggests not to drive. Press Repeat
Test to make again the alcohol test. The alcohol level
at which a person is considered to be legally impaired
varies by country. In Germany and Italy it is 0.50 g/l.
Sanctions vary from country to country.
WARNINGS:
1.The breathalyzer is designed to test persons having a
specic blood-breath ratio. Not 100% of the population
has this blood-breath ratio, such ratios in fact vary and
the variance can produce erroneous test results.
2.The temperature of the machine itself varies, affecting
test results.
3.Body temperatures vary, affecting test results.
4.Smoking may affect the results
5.Taking two consecutive tests without waiting may
affect the result, as the sensor needs the time to clean
itself, wait at least 2 minutes.
80 - AvMap
Page 81

Satellite Navigator
6.Taking the test just after drinking affects the result as
the alcohol in the breath is not coming form the lungs,
but straight from the mouth.
These warnings apply for this alcohol test as well as the
pre-testers used by the police.
AvMap - 81
Page 82

Satellite Navigator
2.12 Unit status
2.12.1 Unit status Menu
To access all the information on the Unit status, press
the status icons on the map. You will be able to check:
• Battery status
• GPS signal status
• TMC signal status (on models that have it integrated)
• Bluetooth status (on models with Bluetooth)
2.12.2 GPS page
On the GPS page the satellites and a series of data such
as altitude, current position, ground speed, movement
direction, hour and date are displayed. Press Reset to
restart the GPS antenna and Data Display to view the
data page.
82 - AvMap
Page 83

Satellite Navigator
2.13 System info
This menu provides info on the software version, the
map preloaded and the components installed in your
Geosat 6.
2.14 Settings
Select settings from the navigation menu to set your
preferences:
• User Preferences
• Device Preferences
• Route Preferences
• Map Preferences
• Alarms
• Delete recent
• Default Settings
AvMap - 83
Page 84

Satellite Navigator
2.14.1 User Preferences
The User Preferences Menu allows to set personalized
parameters.
•Voice: choose the voice for the navigator’s vocal
instructions
•Text Language: choose the language of the text
•Voice Options: adjust the volume of vocal instructions
•Customized speeds: set your average speed, these value
will be used to calculate the time to destination
•Time zone: set your time zone
2.14.1.1 Text-To-Speech
Geosat 6 provides turn-by-turn vocal instructions. You
can choose between pre-recorded human voices or
instructions read by a vocal synthesis technology (Textto-Speech).
The advantage of the Text-to-Speech system is that
it allows the navigator to ‘read out loud’ beside the
84 - AvMap
Page 85

Satellite Navigator
manoeuvre instruction (e.g. ‘Turn right’), even the
name of the street to take (e.g. ‘Turn right in Regent
street’). This way the instructions will be complete
and more useful. To activate the Text-To-Speech:
1.Open the User Preference menu and touch Voice
Language.
2.Touch Text-To-Speech.
3.Choose the desired language from the list
4.Touch Accept
2.14.1.2 Setting the time zone
The time is shown when the navigator gets a valid
GPS x. The estimated time of arrival is calculated
starting from this time. The Time is received from
the satellites as Universal Coordinated Time (UTC,
or GMT). This clock is extremely precise but you
need to set the time zone and the Day Light Saving
(summer) or solar time (winter).
Geosat 6 is set on the Italian time zone (UTC+1 o
CET - Central European Time), Day light saving OFF
(winter).
To modify the time zone:
Open the Navigation Menu
Touch Settings
Touch User Preferences
Touch Time Zone
Choose the desired time zone
Select Day Light Saving ON / OFF (summer / winter
Touch Accept.
ATTENTION: remember you have to change the time
zone manually when you move for one time zone to
another.
2.14.2 Device Preferences
Through the Device Settings menu you can set the
AvMap - 85
Page 86

Satellite Navigator
following parameters:
•Starting Page
•Beep
•Unit of measure
•Lat Lon format
•Time format
•Data format
•Power save
•Display options
2.14.2.1 Display options
In the rst page of the Display Options menu you can
adjust the brightness of the display.
In the second page you can set the Night vision. The
night vision changes the colour palette to allow an easier
consultation in absence of light. If you select Auto, then
the switch between day vision and night vision will be
86 - AvMap
Page 87

Satellite Navigator
automatic, following the time.
In the same window you can also set the brightness as
automatic: the brightness will vary according to the
environment brightness level that is perceived by the
sensor on the back of the Geosat 6.
2.14.3 Map Preferences
Through this menu you can:
• Choose the Map Direction (towards North or towards
route)
• Set the Map Detail
• Enable Satellite background image
• Choose the map vision: 2D or 3D
• Set the Automatic Zoom
• Set the display of the icons on the map
• Set the Data boxes ( the type of data displayed during
the navigation)
AvMap - 87
Page 88

Satellite Navigator
2.14.3.1 Setting the navigation data
If the navigation is active three elds are displayed by default
on the left side of the screen (horizontal mode) or in the lower
side (vertical mode): speed, time to destination and distance
to destination. These elds can be customized.
1.Touch a box to change the information displayed in it.
2.Select from the side list the information that you want to
display.
3.Repeat the operation for information Box 2 and 3
4.Press Accept to close the window and get back to the map.
You can choose between:
• Altitude
• Driving time
• Average speed
• Maximum speed
• Trip Distance
• Total distance
• Via stop duration
88 - AvMap
Page 89

Satellite Navigator
• Speed
• Total Time
• Time
• Time Sunset/Dawn
• Time to next manoeuvre
• Expected time to destination
• Countdown
• Distance to destination
2.14.4 Setting contacts alarms
It is possible to alarm the contacts, so that an
acoustic alarm warns you every time you are near a
saved contact. You can alarm one or more contacts
folders, as described in par. 2.7.3.4. To deactivate
the acoustic alarm:
Open the Navigation Menu
Select Settings
Touch Alarms
Touch OFF.
If you touch ON, all the alarms set in the Contacts
management page will be reactivated.
2.14.4.1 Setting the speed alarm
In order to set the speed alarm:
1.Open the navigation Menu
2.Touch setting
3.Touch Alarms
In this window it is possible to activate:
• The automatic speed alarm, which is an alarm
warning you when you are trespassing the speed limit
for one road stretch (as indicated from the Navteq
data). During the navigation, the speed limit will be
shown (when present in the Navteq data) with the
corresponding sign in the information bar, next to
the street name.
AvMap - 89
Page 90

Satellite Navigator
• It is also possible to set a customized speed alarm,
setting your own speed limits.
Select the desired option and touch Accept.
It is possible to customize the limit for each type of road.
In the User Preference menu, touch Customised speed,
then act on the arrows to adjust the speed limits for
Highways, major roads and street network. Touch Accept
to conrm.
90 - AvMap
Page 91

3. Multimedia Player
Geosat 6 can play multimedia les store in a SD memory
card.
ATTENTION: do not remove the AvMap SD card from the
navigator while you are in the satellite navigation mode.
In order to safely remove the SD card, exit from the satellite
navigation software touching the Exit button in the upper
left corner of the Navigation Menu. Only once you are in the
device Main menu, you can extract the SD card and insert your
own card preloaded with pictures, audio and videos.
Through the master/slave USB port you can connect Geosat 6
to external hard discs. USB keys etc
The audio-video player supports formats: Mp4, Mpeg4, DivX,
Mp3, Avi, Wave, Windows Media, Matroska, Audio Vorbis, FLV.
To open the audio – video player touch the corresponding
button in the device main menu.
AvMap - 91
Page 92

Multimedia Player
1.Open the player menu touching the button in the upper
left corner.
2.Touch le
3.Select the memory to be explored: Storage Card (SD
memory card), or Hard disc (external device connected
to the Geosat though a USB cable)
4.Select a folder or le to play and then touch add le, or
add all to select other les and then touch Play.
5.Touch the display to get a full screen view. Touch again
to go back to the reduced view. In this mode you will see
on the left side the following buttons: volume up, volume
down and mute, on the right side the buttons: cycle,
forward, play/pause, back. The lower bar will show the
name of the le.
To open the picture viewer touch the corresponding
button in the device main menu.
92 - AvMap
1.Touch the folder le to browse for images
2.Select the memory to be explored (as explained
earlier),
3.Select the le and touch on the magnifying glass icon
to view it.
4.Touch the display to get a full screen view. Touch again
to go back to the reduced view. In this mode you will
see on the left side the following buttons: Exit, open le,
zoom in, zoom out; on the right side: forward, backward,
cycle. The lower bar will show the name of the le.
Page 93

4. Digital TV
Does your navigator have the built-in Digital TV? Check
in the technical specications at the end of this manual
if your version does include the built-in Digital TV then
check in then Main Menu (when you switch on the device)
if you see the TV button.
Function available only for models equipped with DVB-T
antenna.
In areas with weak DVBT signal, the use of the external
TV antenna may improve the quality of reception. Please
insert the antenna carefully as shown in the illustration,
not to damage the connector.
.
4.1 Channel Scan
Open the TV application by touching the TV button in
the main menu. The software will automatically make
a quick scan. In order to be sure to get all the available
AvMap - 93
Page 94

Digital Television
frequencies you can also carry out an advanced
Scan. Enter Settings and in the Channel Scan tab
touch Advanced. A pop up window will warn that
the operation may take some minutes, touch Yes
and wait. When the scan is over, close the Settings
window by touching the X button. The list of available
channels will be displayed. You can perform a scan
any time you want by touching Settings. If you set
some channels as Favourites, they will be kept in
the channels list.
4.2 Choosing a Channel and watching it
Browse the channels List using the up and down
arrows and choose one. The preview will be displayed
on the left. Touch the preview to watch the channel,
in this control window you can adjust the volume or
browse the channels, to watch the TV full screen,
touch on the movie image. To go back to the control
94 - AvMap
window touch again the movie image.
4.3 Favourites List
You can create your favourite channels list. In
the available channels list select the channel you
would like to set as favourite and then touch Add
to favourites: a hearth icon will appear next to it.
To open the favourites list, touch the Favourite List
button in the Channels list. To remove a channel
from the favourites list, select it and touch Delete
from Favourites.
4.4 Channel’s info
Some Broadcasting stations provide detailed info on
their channels. To view them touch the Info button at
the right of each channel in the list. The full info page
will be opened; you can also scroll the list form here,
to see the full info pages of other channels. To go back
Page 95

Digital Television
to the available channels list touch Back to List. To see the
Channels programming, touch Programming.
4.5 Channel’s programming
The programming can be viewed both from the full info
page, and from the available channels list, by touching
the Programming button. To go back to the channel List
touch Back to list, to watch the channel touch Watch
Channel.
4.6 Channel’s Lock
The channel’s Lock allows you setting a password to
watch a channel, so that only who knows the password
can watch it. This is useful as a parental control if
you want to prevent your children to watch a specic
channel. To set the lock:
1.Select a channel.
2. Touch Lock Channel
AvMap - 95
Page 96

Digital Television
3. Follow the instructions and enter the 4 gures PIN
4. Touch Apply
The block is now active. A prohibition icon appears, and
if you select the channel the preview is not available.
To unlock the channel touch Unlock Channel and enter
the PIN code.
4.7 General Setup
To open the General Setup page touch the Settings menu
then touch the General Setup Tab. Here is possible
to change the language of the software and choose
different types of display modes. Touch Apply to save
the changes.
96 - AvMap
Page 97

4.8 Multi language
Some Broadcasting stations provide Multi language
programs, so there are more language options for
the audio and subtitles. Choose a channel and watch
it, then touch the Language button (the one with the
ags). Scroll with the arrows the available languages
for audio and or subtitles. Touch Apply to conrm the
changes or X to go back to the TV without changing
the language.
Digital Television
AvMap - 97
Page 98

5. Updates
5.1 Checking your software version
In order to get the best out of your navigator,
remember to keep the software updated.
To nd out which software version is installed on your
navigator:
1. Touch the setting button
2. Touch the system info button
3. Select the Software page. The software version
is indicated as V1.x. xxxR (a progressive number),
followed by the date ddmmyy.
Now you need to visit www.avmap.it to check
whether there is a more recent software release.
1. Enter the Support area of the web site, then select
Download and FAQ.
2. Select you product from the scroll down menu
3. The FAQ page for your product will be opened, click
on Software update, from the Download column on
98 - AvMap
the left.
4. In the software updates page read the software
version and compare it with the one installed in
your navigator. In case you software is older, you
need to update the software
5.2 Registering your product
The software updates are free. In order to download
them you need to register your product on www.
avmap.it.
1. Visit the Support section of www.avmap.it
2. Select Register
3. Fill the form and click on submit...
4. You will receive via email a Login name and a
Password.
5. From this moment you will be able to download
software updates for free using the login and
password received.
Page 99

Updates
5.3 Downloading the software updates
1. Enter the Support area of the www.avmap.it web
site, then select Download and FAQ.
2. Select you product from the scroll down menu
3. The FAQ page for your product will be opened, click
on Software update, from the Download column on
the left.
4. In the software update Page you will see the software
release name and description, click on download.
The le Geosat 6 Update_x.x.xx.zip will be saved on
your computer.
5. Remember to download the Manual Addendum for this
software version (par. I.II), introducing the changes
and innovations of the new release. You can nd the
addendum clicking on Manuals in the download menu
in the left Column.
5.4 Installing the software updates
1. Disconnect the navigator fro the power supply cable.
WARNING: do not feed the navigator when connecting
it to the PC, this could damage the device.
2. Turn on the navigator without feeding it and connect
it to the PC through the USB cable provided (the
navigator will be charged through the USB cable). Wait
for the Windows OS to recognise it.
3. Open the le ”Geosat 6 Update_x.x.xx.zip”. It is a
zip containing an executable le. Unzip it.
4. A dialog window will open. If Geosat 6 has been
correctly recognised, then a Geosat 6 icon will
appear on the left, and the button on the right will
be highlighted in blue. If this does not happen, make
sure that Geosat 6 is turned on, and that the cable is
correctly plugged both into the navigator and the PC.
5. Once Geosat 6 has been detected, click on the blue
button.
AvMap - 99
Page 100

Updates
6. The update will be installed automatically.
7. Once the update is completed, follow the
instructions.
Attention: to make sure that the device will work
correctly, carefully follow the instructions at the
end of the update procedure
5.5 Updating the Map
It is very important to keep you navigation system
up-to-date also with the latest maps for a safer and
more precise navigation. AvMap navigators work only
with AvMap original Maps. Maps updates are released
periodically by AvMap about three times a year.
To check which map version is pre-loaded on your
navigator:
1.Open the Navigation menu
2.Touch the Setting button
3.Touch System info
100 - AvMap
4.Select the Map page. The Map version is indicated
with a name e.g. ITALY, followed by a number V.x. (a
progressive number)
Now you need to visit www.avmap.it to check whether
there is a more recent Map available.
Visit www.avmap.it and open the Cartography page.
Select your product from the terrestrial scroll down
menu: all the available maps will be shown. Compare the
Version (v.x) with the one preloaded in your navigator.
If a newer version is available, you can buy the update.
The new map is preloaded together with the latest
software on a new SD memory card. You will just need
to substitute the old SD with the new one.
 Loading...