

AvMap Geosat 4 TRAVEL Europe User Manual
USER MANUAL
AvMap GEOSAT 4 TRAVEL
AvMap GEOSAT 4 TRAVEL Platinum
AvMap GEOSAT 4 TRAVEL Europe
Ver. 0.2


Dear Customer,
Congratulations on choosing Geosat 4 TRAVEL / Geosat 4
TRAVEL Platinum / Geosat 4 TRAVEL Europe navigator!
With Geosat 4 TRAVEL on board you will be able to
- receive your GPS position and view it on detailed Tele Atlas
mapping
- set your destination and be guided by written prompts
and voice instructions
- plan a complex trip
- obtain a list of nearby points of interest
- stroke your favourite location as marks on the map
- use the display to see movies or pictures
…. and much more.

Index
Warning 6
Maintenance 7
Battery disposal 7
1. Introduction
1.1 Box contents 8
1.2 Available accessories 8
1.3 Hardware features 9
1.4 Keyboard 9
1.5 Remote Control 10
2. Installation
2.1 Inserting the Secure Digital (SD) 11
2.2 Fixing the bracket 11
2.3 Fitting the optional external GPS antenna 12
2.4 Power connection 12
3. Setting the destination
3.1 Starting 14
3.2 Setting the first destination 14
3.3 Show on map 15
3.4 Drive me Home 16
4. Planning a route
4.1 Planning a route from A to B 16
4.2 Deleting a route 17
4.3 Reversing a route 17
4.4 Simulation 17
5. Advanced planning
5.1 Via points 18
5.2 Blocking roads 19
5.3 Reaching Walkways 20
5.4 Navigating Off road 20
5.5 Detour 21
6. Using the map
6.1 Exploring the map 21
6.2 Map Views 22
6.3 Driving mode 23
6.4 2D and 3D views 23
6.5 Night vision 23
6.6 Points of Interest (POI) 23
7. Managing Marks
7.1 Creating Marks 24
7.2 Mark folders 25
7.3 Mark list 25
7.4 Editing a Mark 26
7.5 Setting a Mark as HOME 27
7.6 Mark alarm 28
7.7 Sending and receiving Marks 28
7.8 File manager 28
8. Advanced search options
8.1 Duplicate place/road names 30
8.2 Searching by postcodes 30
8.3 Searching for intersections 30
8.4 Searching near to the cursor or to the GPS position 30
8.5 Searching nearest cities 31
8.6 Searching nearest POI 31
8.7 Searching POI by name 32
8.8 Searching nearest Marks 33
8.9 Searching Marks by name 33
8.10 Recently found 34
8.11 Searching by Latitude and Longitude 34

9. Trip Information
9.1 Trip computer 35
9.2 Data boxes 35
9.3 GPS information 36
13. Troubleshooting
13.1 Ram Clear 49
13.2 Recovery of damaged SD 49
13.3 Reset 50
10. Special functions
10.1 Video 37
10.2 Traffic Information (TMC) 37
10.3 Safety camera database 38
10.4 APRS 38
10.5 Connection to GSM localization devices 39
11. Setting preferences
11.1 System setup 39
11.2 General 40
11.3 Map 40
11.4 POI 41
11.5 Routing 42
11.6 Track 42
11.7 Alarms 43
11.8 Date & Time 43
11.9 Units 44
11.10 Text and Voice language 44
11.11 Simulator 45
11.12 Interface 45
11.13 TMC 46
11.14 Brightness 46
11.15 Volume 47
12. Updating Software and map
12.1 Updating the Software 47
12.2 Loading the map on the SD 48
12.3 Updating the Map 49
14. Warranty and Support
14.1 Warranty conditions 51
14.2 Repair and replacement under warranty 51
14.3 Tele Atlas User License 52
Appendix A: Technical specifications 56
Appendix B: POI index 57

6
Warning
The manufacturer and the distribution
chain disclaim any liability deriving from an
improper use of the device in a way that
may cause accidents or damages to things or
persons.
Using this navigator implies that the user
accepts and follows all these warnings and all
the instructions contained on this manual. The
driver is held responsible for using Geosat 4
TRAVEL in the correct way (passenger or non
passenger mode).
The User should ignore the indications
suggested by Geosat 4 TRAVEL in situations
that appear to be in contrast with the Highway
Code. The Manufacturer and the distribution
chain disclaim any liability deriving from an
improper use of the device in a way that may
violate the Highway Code.
The Tele Atlas cartographic data loaded in the
navigator may present some discrepancies
from the reality. This is due to the continuous
changes in the street network. Some areas
have a better coverage than others.
Important:
• Do not place the navigator in positions that
may obstruct the driver’s view
• Do not place the navigator in positions that
may interfere with the correct functioning of
the security/safety equipment of the vehicle
(e.g. airbags).
• Make sure that the navigator is correctly
attached to the bracket before driving.
• Do not rely exclusively on vocal
instructions. Depending on a variety of
factors, (speed, weather, GPS reception etc)
these instructions may not be correct or
timely. Always take the information provided
as indicative, and always respect the
Highway Code. Satellite navigators should be
considered merely as aids. The driver is held
responsible for safe driving and the choice of
the best route to take.
• Do not consult the navigator whilst driving
if this represents a danger for you and other
people.
• Do not program the navigator while
driving
• The precision of the GPS signal, in the
best possible conditions is guaranteed with a
deviation of 15 meters
N.B.: The information contained in this manual
is updated to March 2006. Any subsequent
changes in the system, in the functions, in the
tools bar or maps introduced after this date
will not be present in this manual.
Maintenance
• Do not leave the navigator in direct sunlight
for extended periods. This could compromise
the correct running of your Geosat 4 TRAVEL.
If you suspect that the navigator has been
over heated because of sunlight exposure, let
the temperature of the car cool down, and
wait for the device temperature to go down
to normal values before switching it on.
• The Secure Digital memory card should
not be formatted nor the content modified.
• Only C-MAP branded Secure Digital
memory cards are compatible with Geosat 4
TRAVEL.
• Avoid knocking against the display.
• Do not use oil based products to clean the
LCD surface.
• Keep away from water.
Battery disposal
This product is equipped with a built-in Li-Ion
battery. Do not use the product in damp or
corrosive environments. In order to lengthen
the life of the battery, do not recharge it at
temperatures higher than 60°C.
THE LI-ION BATTERY PROVIDED WITH
THE PRODUCT MUST BE RECYCLED OR
DISPOSED IN THE CORRECT WAY.
WEEE: Waste of Electric and
Electronic Equipment
The symbol shown here and on
the box indicates the conformity
to the WEEE directive. Do not
dispose of this WEEE product as
domestic waste; some substances contained
in electronic equipment can damage the
environment and harm human health if
misused or if they are not disposed of in
the correct way. Return the device to the
distributor when purchasing a new one. The
unlawful disposal of these wastes is punished
with sanctions.
Information about emissions for Canada:
this Class B digital device is in conformity
with the Canadian law ICES-003/NMB-003.
R&TTE DL2 Directive: this device is in
conformity with the UE directive 99/5/CE.
7
8
1. Introduction
1
2
3
4
6
5
8
7
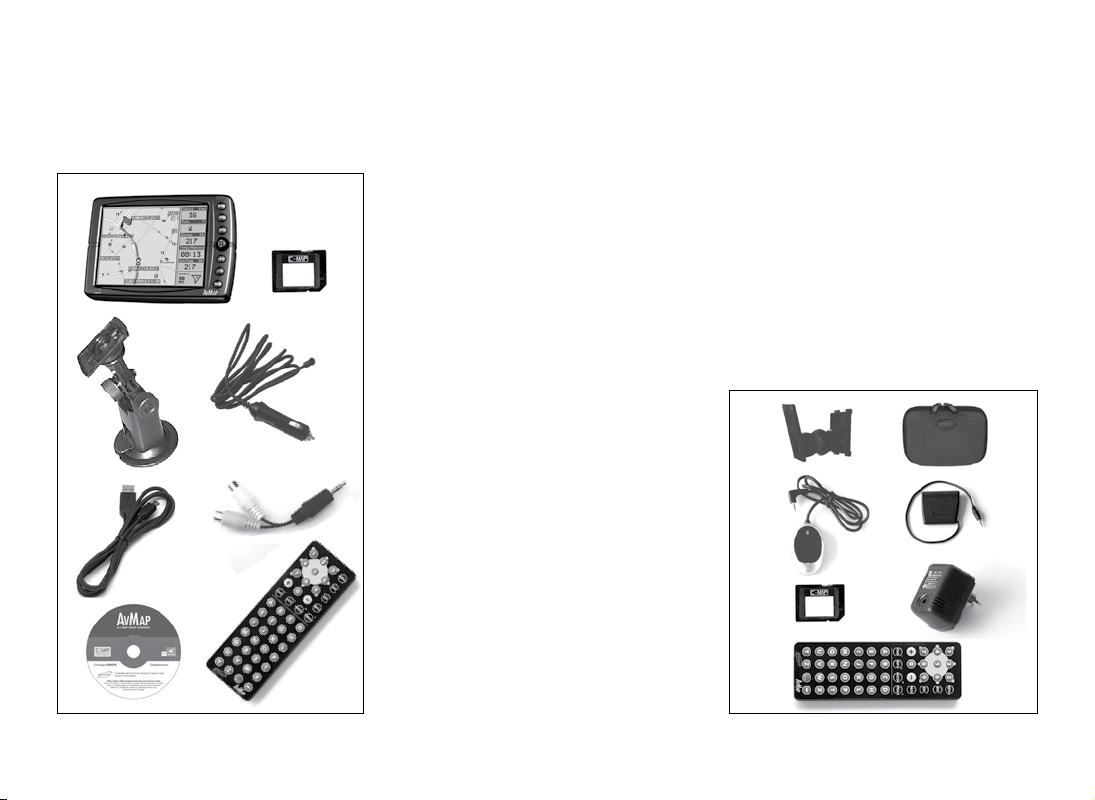
1.1 Box contents
Before using the product make sure the box
contains the following items:
1. Navigator (5” LCD TFT display)
2. Secure Digital memory card branded
C-Map preloaded with Tele Atlas
cartography
3. Flexible bracket with suction cup
4. Car charger
5. USB cable
6. Audio video cable
7. Remote control (only in Geosat 4 TRAVEL
Platinum / Geosat 4 TRAVEL Europe)
8. Europe on DVD (only in Geosat 4 TRAVEL
Platinum)
9. This manual
1.2 Available accessories
1. Fixed holder
2. Pochette
3. External GPS antenna
4. TMC receiver
5. Additional maps / maps updates
preloaded on SD
6. AC-DC Adaptor
7. Remote control (optional for Geosat 4
TRAVEL, included with Geosat 4 TRAVEL
Platinum, Geosat 4 TRAVEL Europe)
1 2
3
5
4
6
7
N.B.: images are for illustrative purpose only
front view
3
2
1
4
5
side view
6
11
9
12
10
78
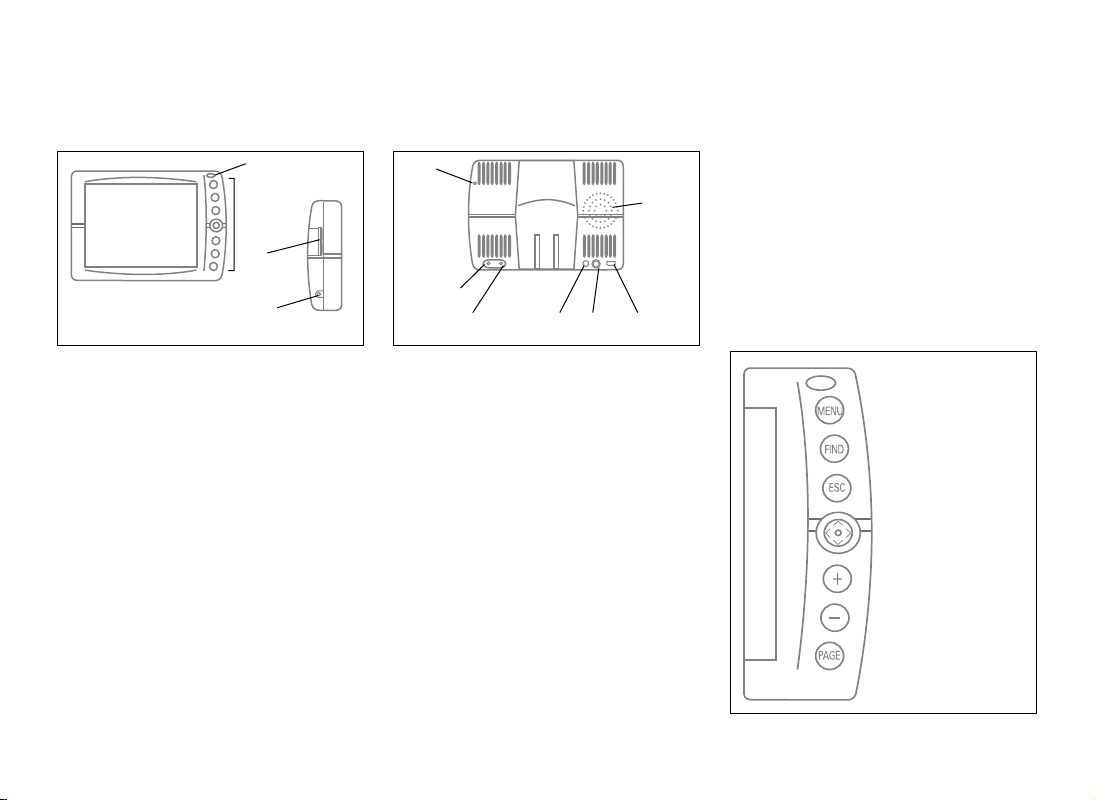
Centre of the JOYSTICK. When you are in a
menu this function is performed by the +
button
• + zooms in the map, ENTER function
• - zooms out the map
• PAGE: selects the different views for
the map, the instructions and the trip
computer
1.3 Hardware features
Looking at the navigator you can see the
following components:
1. Keyboard
2. 5” LCD TFT display
3. Infrared sensor
4. Slot for Secure Digital memory cards
5. Audio output
6. Brightness sensor
7. Power supply plug
8. Audio video input
9. Serial port for external GPS antenna
10. Serial port for TMC receiver
11. Speaker
12. USB port
1.4 Keyboard
• MENU: opens the main menus available
• FIND: opens find window to search for
addresses, marks, POI
• ESC: exits from the current menu and
switches into cursor mode or GPS mode
• JOYSTICK:
Upper arrow: moves the cursor up
Lower arrow: moves the cursor down
Right arrow: moves the cursor right
Left arrow: moves the cursor left
ENTER Function
The enter function is obtained pressing the
9

10
1.5 Remote control
The remote control is included in the box
with Geosat 4 TRAVEL Platinum and Geosat
4 TRAVEL Europe, while it is an optional
accessory for Geosat 4 TRAVEL.
1. Pull out the tab from the bottom end of
the remote control. The remote control is
ready to be used.
2. Point the remote control in direction of the
Geosat 4 TRAVEL infrared sensor.
• MENU: opens the main available menus
• ENT: enter function to confirm a selection,
corresponds to the central part of the
joystick or to the + button in the navigator
keyboard
• ESC: exits from the current menu and
switches into cursor mode or GPS mode
• PAGE: selects the different pages available:
map, instructions and trip computer
• Upper arrow: moves the cursor up
• Lower arrow: moves the cursor down
• Right arrow: moves the cursor right
• Left arrow: moves the cursor left
• Upper-right arrow: moves the cursor
toward the upper right corner
• Upper-left arrow: moves the cursor toward
the upper left corner
• Lower-right arrow: moves the cursor
toward the lower right corner
• Lower-left arrow: moves the cursor toward
the lower left corner
• + zooms in the map, ENTER function
• - zooms out the map
• FIND: opens find window to search for
addresses, marks, POI
• INFO: displays the complete info on the
point on the map indicated by the pointer.
• MODE: allows entry to in advanced
functions available with further software
updates
• SPEAK: repeats the last vocal instruction.
• Alphanumeric keyboard: can be used to
edit names in the find window or to name
marks
Brightness adjustment with the remote
control
To adjust brightness with the remote
control:
1. Press the PAGE button for 3 seconds.
2. Adjust the display brightness with the right
arrow and left arrow of the JOYSTICK.

2. Installation
Press the + button to quickly change the
brightness level.
In this window it is also possible to choose
among the
in the second case the Auto night vision
option is also activated.
Volume adjustment with the remote control
To adjust volume with the remote control:
1. Press the FIND button for 3 seconds.
2. Adjust the volume with the right arrow and
left arrow of the JOYSTICK. Press the FIND
button to quickly change the brightness
level.
Auto brightness and Night Vision,
Geosat 4 TRAVEL is ready to be used. All you
need to do is install the unit into the vehicle.
Carry out these operations in order:
1. Insert the Secure Digital card.
2. Fix the bracket on the windscreen.
3. Fix Geosat 4 TRAVEL on the bracket.
4. Plug the optional external antenna.
5. Plug in the car charger.
2.1 Inserting the Secure Digital (SD)
The Secure Digital card is pre-loaded with
the cartographic data utilised by the Geosat
4 TRAVEL and the navigation software. It is
also used to store the user data (Marks and
tracks).
To insert the memory card:
1. Ensure that the Geosat 4 TRAVEL is
switched off.
2. With the label facing up, gently push the
card into the slot.
To extract the memory card:
1. Ensure that the Geosat 4 TRAVEL is
switched off.
2. Push the card and release it: it will be
expelled.
3. Extract the memory card from its slot.
Do not try to extract the SD card before it has
been partially expelled.
Do not format or modify the contents of the
Secure Digital card. Any modifications could
compromise the correct functioning of the
navigator. Only use C-Map branded Secure
Digital memory cards.
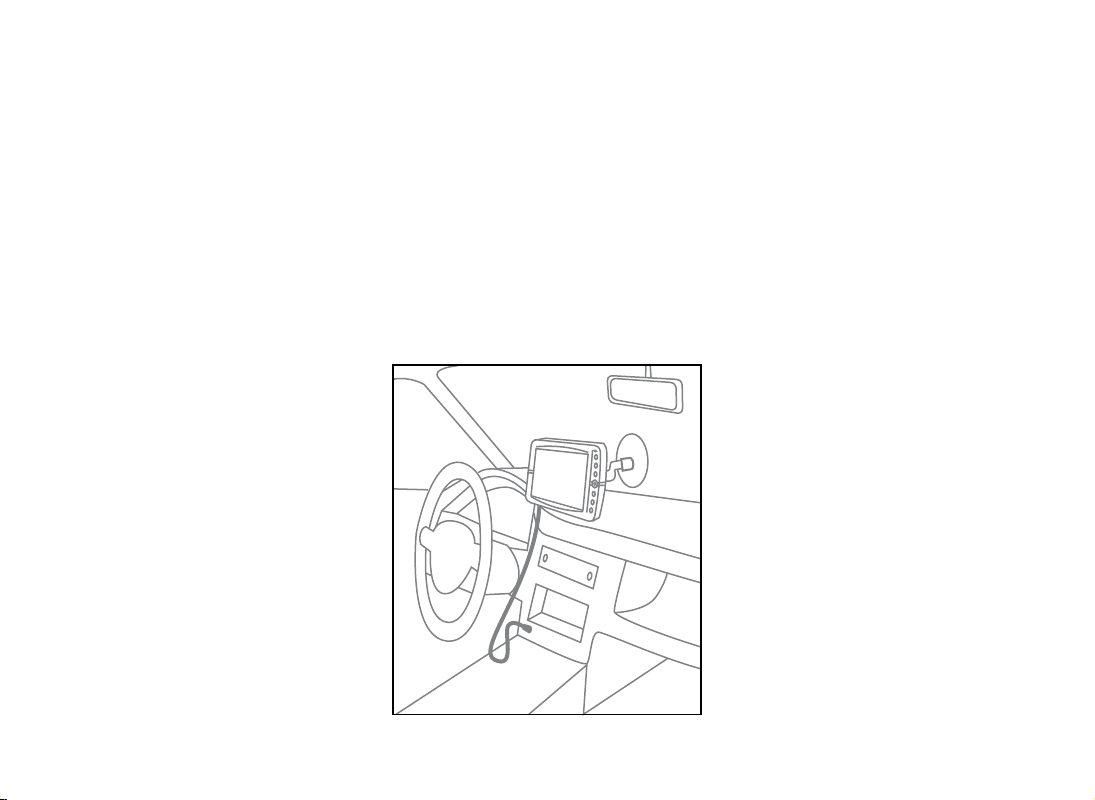
2.2 Fixing the bracket
Do not place the navigator on the passenger
seat, as this position could cause a dangerous
distraction for the driver.
The navigator should be fixed with the bracket provided.
The bracket with suction cup is included in
the box. There is also an optional fixed holder,
available upon request. In either case, please
follow the following instructions:
• Place the navigator in a position high
enough not to represent a risk of distraction
11
12
from driving
• Make sure that the bracket does not
represent a danger in case of accident or
sharp braking.
• Make sure that the bracket, the navigator
and the cables do not interfere with the
safety devices (e.g. airbag)
BRACKET WITH SUCTION CUP
The bracket should be fixed to the windscreen
via the suction cup. This will suit the majority
of vehicles. Before applying the suction cup,
carefully clean the glass.
1. Lightly moisten the suction cup and
place the flexible bracket in a position so
that the navigator will lie just above the
dashboard.
2. Fix the suction cup by pushing the locking
lever.
3. Fit the Geosat 4 TRAVEL on the bracket.
FIXED-MOUNT BRACKET
An alternative fixed-mount bracket is available, that requires the dashboard to be
drilled.
1. Drill into a flat area of the dashboard.
2. Fix the base of the bracket with screws.
3. Fit Geosat 4 TRAVEL on the bracket.
2.3 Fitting the optional external
GPS antenna
The Geosat 4 TRAVEL is equipped with a
built-in GPS antenna and with a port for an
optional external antenna. The external an-
tenna can be useful in case of shielded windscreens. The external antenna does not need
power.
The magnetic base of the external GPS an
tenna can be placed on any flat metallic surface, with the antenna facing up. The higher
the GPS antenna is placed, the better it will
receive the signal.
To guarantee a good signal place the external
antenna on the bonnet or on the roof. The
cable is made of a tear-proof material so that
it does not break if it is accidentally closed
between the door and the body of the vehi
cle. The antenna should not be covered with
shielding materials (e.g. metal). Do not put
the antenna in the boot or in the glove box.
After positioning the antenna take its cable
inside the vehicle, passing it through the passenger door seal and connect the end plug
into the Geosat 4 TRAVEL.
2.4 Power connection
Whilst the Geosat 4 TRAVEL is equipped with
a built-in Li-Io rechargeable battery, it is recommended that you power the unit via the
-
-

car cigarette lighter / 12 V power socket during your journey.
Geosat 4 TRAVEL comes with the battery un
charged, but the navigator can be used right
away with the car charger. The battery will
require 4 hours charging to be fully charged.
Geosat 4 TRAVEL can be fed with voltage
between 10 and 35 V. The car charger cable
provided in the box should be used to power
the Geosat via the car cigarette/12 V power
socket.
1. Plug the car charger cable into the Geosat
4 TRAVEL.
2. Remove the cigarette lighter from its slot
or remove the 12 V power socket cover.
3. Insert the other end of the cable into the
socket.
Some vehicles are equipped with additional
12 V plugs.
The red LED on the plug confirms the correct
functioning of the power supply. If the LED is
off, check the connections or try again with
the vehicle engine on.
The battery recharges when the navigator is
fed with the power supply cable, either if it is
on or if it has been switched off with the PAGE
button. In this case, the keyboard flashes un
til the Geosat 4 TRAVEL is fully charged.
ATTENTION when the device encounters in
ternal temperatures of higher than 60°, the
battery will not recharge and an alarm message will be displayed. This can happen if the
navigator is exposed for a long time to direct
sunlight in hot weather. In such cases, it is
suggested that you switch off the navigator
to recharge the battery.
Battery Functioning
Geosat 4 TRAVEL battery allows the navigator
to operate even without feeding it with the
power supply cable.
When the navigator is used without power
supply, an icon (battery) indicating the level
of charging of the battery is shown. If this
icon is half green, the level of charge of the
battery is equal or less than half, if the icon is
fully green, it means that the level of charge
is more than half.
When Geosat for travel is fed, another icon
(plug with batteries) is shown. There are two
status: if the icon is coloured in yellow, the
battery is recharing, if the icon is coloured
in green, it means that the battery is fully
charged.
-
The maximum autonomy of the battery in
optimal conditions ranges from 30 minutes
to 2 hours (according to the usage patterns).
It is possible to extend the autonomy of the
battery optimizing the energetic waste: in the
system setup it is possible to choose among
three levels of power save (no, medium,
maximum).
13

14
3. Set the destination
3.1 Starting
1. Switch on the navigator by pressing the
PAGE button.
2. Geosat 4 TRAVEL will display the software
and cartography display screen and then the
user is asked to choose the desired mode:
passenger or driver. An unaccompanied
driver should select the Driver mode.
3. Select one of the two buttons with the
JOYSTICK using the left or right arrow.
The selected button is outlined by a dotted
line.
4. Press + to confirm.
5. Wait for the satellite search to be completed
to see your position on the map.
Driving mode
The driver should NOT consult the navigator
while driving.
For this reason, when Driver mode is chosen,
the map view is automatically deactivated.
The only accessible pages are the trip
computer and the list of driving instructions.
For further details, read par. 5.2.
Passenger mode
This mode allows access to all the navigation
functions.
Powering down
To power down the Geosat 4 TRAVEL press
and hold the PAGE button for 4 seconds.
When the power supply cable is removed,
the message “powering off in 30 seconds”
appears. To avoid powering down, press
+. Press any other button to power down
immediately.
3.2 Setting the first destination
To plan a route, the easiest and fastest way is
take the current GPS position as the departure
point and insert the desired destination.
1. Press the FIND button. The Find menu will
now open.
2. In the Find menu select Address and press
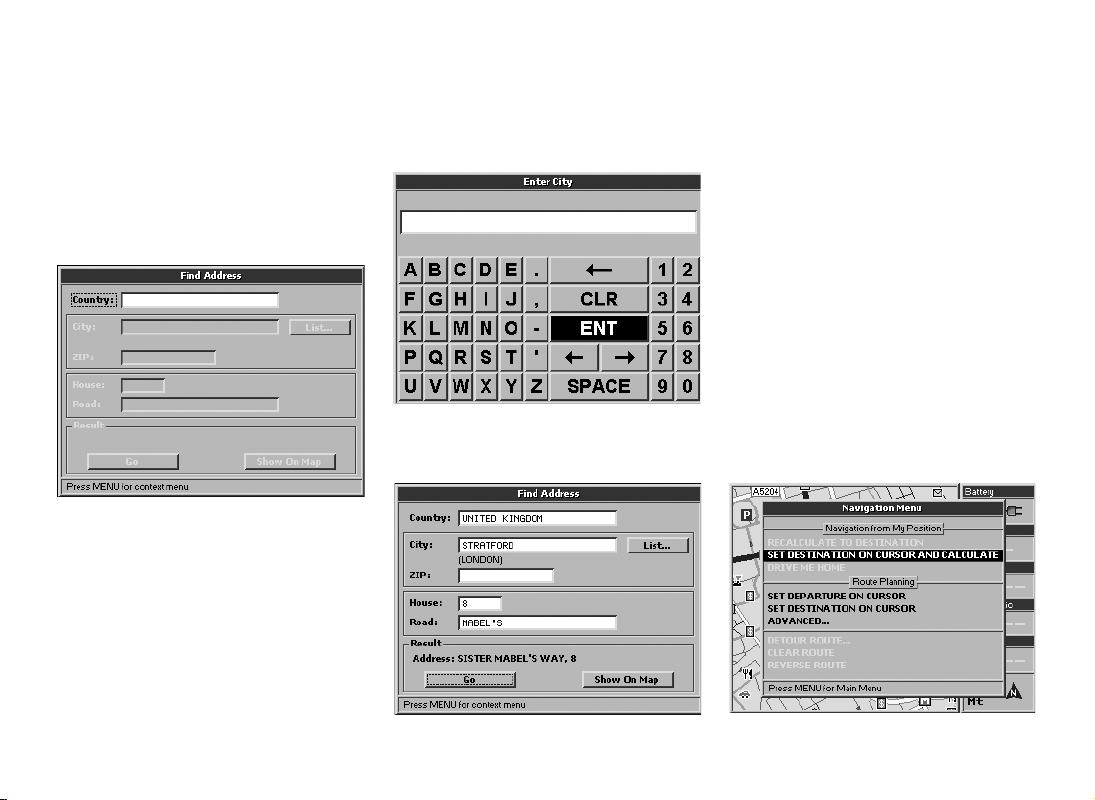
the + button.
3. The Find address menu will now open.
The Country field is outlined with a dotted
line. Press the + button.
4. The virtual keyboard will now open.
Input the name of the country using the
JOYSTICK. For each letter selected, press
the + button. For ease of operation, the
auto-filling function is activated.
5. When the name of the Country is
completed, select ENT on the virtual
keyboard and confirm by pressing the +
button. This operation has to be carried out
the first time you search for an address. The
country is saved for subsequent searches.
6. Using the JOYSTICK, select the fields City,
Street and House Number (or Postcode
and House Number) and repeat the
procedure described for the Country field.
7. Once all the fields are filled, select Go and
press the + button. The Geosat 4 TRAVEL
will calculate the route from the current
GPS position to the selected destination.
3.3 Show on map
The Show on Map button is useful for viewing
the inserted address on the map.
1. Select Show on Map and press the +
button.
2. Once the address has been checked, it
can be set as destination: ensure that the
15

16
4. Planning a route
cursor is on the required destination and
press MENU.
3. The Navigation menu will now open. From
Navigation from My position select Set
destination on cursor and calculate and
press the + button.
The Geosat 4 TRAVEL will calculate the route
from the current GPS position to the selected
destination.
Alternatively, from the Find Address menu,
press the MENU button, select Show on map
and press the + button.
3.4 Drive Me Home
After having set a Mark as Home (read par.
7.5) it is possible to set one’s own Home as
destination with a quick command:
1. Press the MENU button. The Navigation
menu will now open.
2. From Navigation from My Position select
Drive me Home and press the + button
to confirm.
4.1 Planning a route from A to B
You can plan a route setting both the departure and the destination. This function can be
useful if you are in position X and you want
to plan a route from A to B, or if want to plan
a route before leaving, without receiving the
GPS signal.
How to set the departure:
1. Insert the desired address as described in
par. 3.2.
2. Once all the fields in the Find menu have
been filled, press the MENU button.
3. The Find menu will now open. From Route
planning select Set as departure and press
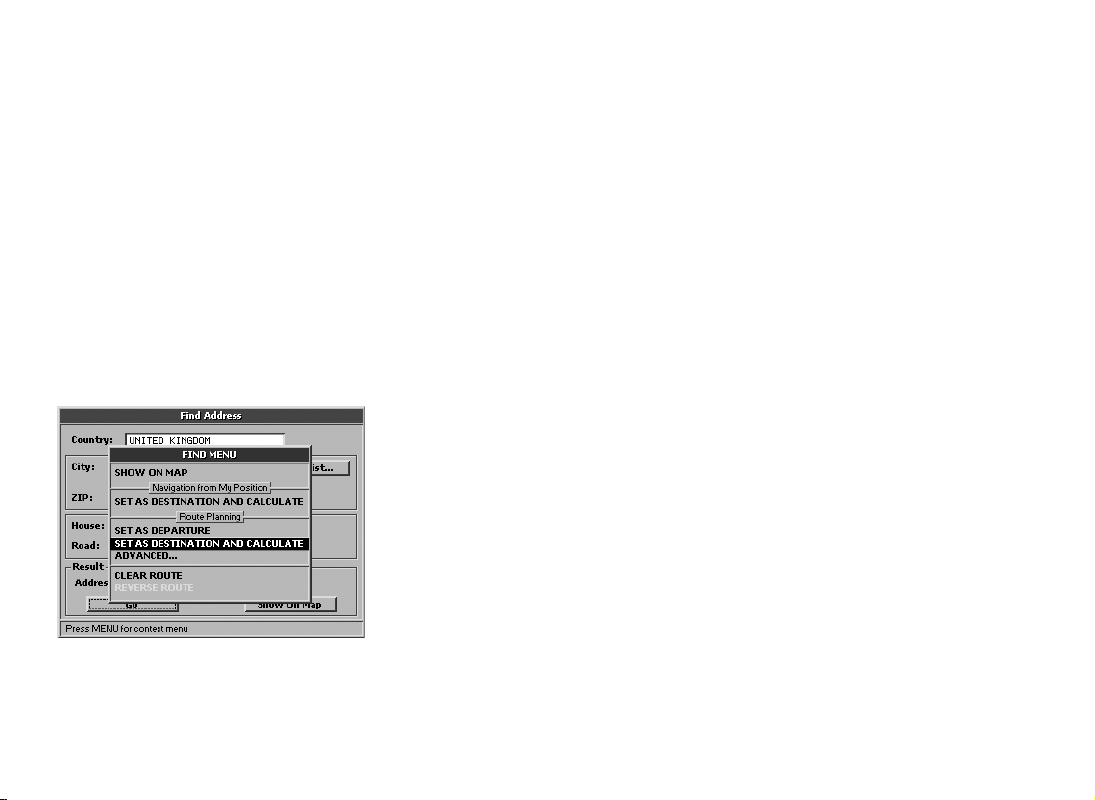
the + button.
How to set the destination:
1. Once the departure has been set, return
to the Find address menu. Insert the
destination address following the same
procedure as for the departure then press
MENU button.
2. The Find menu will now open. From Route
planning, select Set as destination and
calculate and press the + button.
4.2 Deleting a route
To delete the last route planned, follow these
instructions:
1. Press the MENU button. The Navigation
menu will now open.
2. Select Delete route.
3. Press the + button to confirm.
4.3 Reversing a route
To reverse the last route planned, follow
these instructions:
1. Press the MENU button. The Navigation
menu will now open.
2. Select Reverse route.
3. Press the + button to confirm.
4.4 Simulation
After having planned a route as described in
par. 3.4 it is possible to simulate the navigation.
1. Press the MENU button three times.
2. The System Setup menu will now open.
Move the JOYSTICK to the right to select
the Simulation folder and press the +
button to confirm.
3. Press the + button to start the simulation.
4. Select Speed with the JOYSTICK and press
the + button to confirm.
5. Select the numbers with the right and left
arrow, and set the value with the up arrow
or down arrow.
For further details read par. 11.11.
17
18
5. Advanced planning
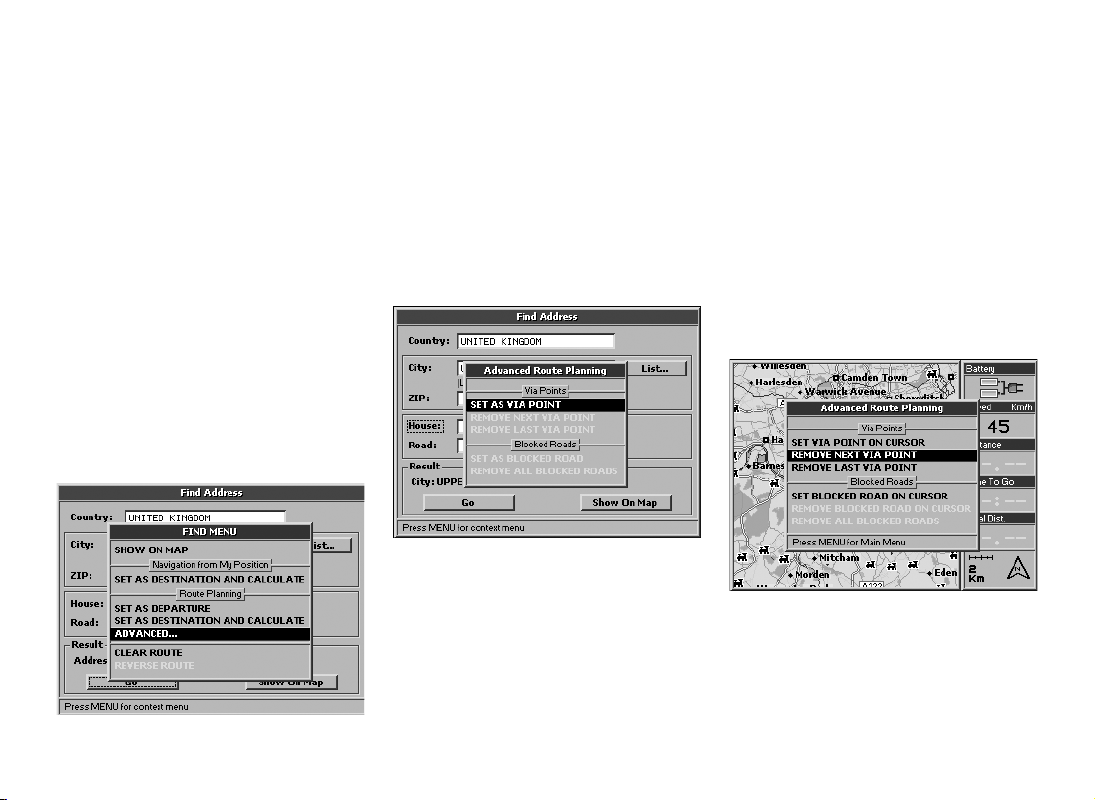
5.1 Via points
If you want to set a sequence of destinations
or if the route viewed on the map does not
meet your needs, you can modify it, adding
up to 10 Via points. The Via point is represented on the map by a black and green flag
with a number from 1 to 10.
How to set a via point:
1. When the route has been set, press the
FIND button to open the Find menu.
2. Fill out the City and Road fields (or the
Postcode field) as described in the par.
3.2.
3. When all the fields have been filled, press
the MENU button.
From Route planning, select Advanced
and press the + button.
4. The Advanced route-planning menu will
now open. From Via point select Set as via
point.
5. Press the + button to confirm. The Geosat
4 TRAVEL will calculate the new route.
You can set the Via point(s) first and then the
departure and destination points, or set the
departure point and then the Via point(s) followed by the destination. Via points must be
entered in the correct sequence.
How to remove a Via point:
1. Place the cursor on the first Via point
you want to remove then press the
MENU button. The Navigation menu will
now open. From Route planning, select
Advanced.
2. The Advanced route-planning menu will
open. From Via point select Remove next
Via point (to remove the next via point
with respect to the current GPS position)
or Remove last Via point (to remove the
last via point that has been set).
3. Press the + button to confirm.
Example: to go from Fleet to London via
 Loading...