

Page 1
USER MANUAL
updated to software version 2.14.162 R
Via Caboto, 9
54036 Marina di Carrara - MS - ITALIA
E-mail: info@avmap.it
Page 2

WARRANTY
AvMap warrants their GPS receiver and accessories to be free of defects in material and workmanship for a period of two years from the date of original purchase. This warranty applies only
to the original purchaser of this product. In the event of a defect, AvMap, at its option, will
repair or replace the product with no charge to the purchaser for parts or labor. The repaired
or replaced product will be warranted for ninety (90) days from the date of return shipment, or
for the balance of the original warranty, whichever is longer.
PURCHASER’S REMEDY - Purchaser’s Exclusive Remedy under this written warranty or any
implied warranty shall be limited to the repair or replacement, at AvMap’s option, of any
defective part of the receiver or accessories which are covered by this warranty. Repairs under
this warranty shall only be made by an authorized AvMap dealer.
PURCHASER’S DUTIES - To obtain warranty service, the purchaser must return the receiver
or accessories post paid, with proof of the date of original purchase and purchaser’s return
address to AvMap, or an authorized AvMap representative. AvMap will not be responsible for
any losses or damage to the product incurred while the product is in transit or is being shipped
for repair. Insurance is recommended.
LIMITATION OF IMPLIED WARRANTIES - Except as set forth above, all other expressed or implied
warranties, including those of fitness for any particular purpose and merchantability, are hereby
disclaimed. Some states do not allow limitations on warranties, so the above limitation may
not apply to you.
EXCLUSIONS - This warranty does not cover the following: Installation, Finishes, Defects resulting
from installation. Any damage due to accident, resulting from inaccurate satellite transmissions.
Inaccurate transmissions can occur due to changes in the position, health, or geometry of a
satellite. Any damage due to shipping, misuse, negligence, tampering or improper use. Servicing
performed or attempted by anyone other than an authorized AvMap representative.
Attenzione! L’esposizione del display ai raggi ultravioletti può accorciare la vita dei
cristalli liquidi usati nel vostro plotter cartografico. Questo limite è dovuto alla tecnologia costruttiva
degli attuali display. Evitare inoltre che il display si surriscaldi per non causare una diminuzione di
contrasto che, in casi estremi, può rendere lo schermo completamente nero. Tale condizione è
comunque reversibile durante il raffreddamento.
Warning! Exposure of display to UV rays may shorten life of the liquid crystals used in
your plotter. This limitation is due to the current technology of the LCD displays. Avoid overheating
which may cause loss of contrast and, in extreme cases, a darkening of the screen. Problems which
occur from overheating are reversible when temperature decreases.
Achtung! Ultraviolette Strahlen können die Lebensdauer vom Flüssigkristalldisplay
verkürzen. Die derzeitige LCD-Technologie bedingt diese verkürzte Lebensdauer.
Überhitzung des Displays durch Sonneneinstrahlung führt zu einem Kontrastverlust und in extremen
Fällen sogar in eine Schwär zung des Bildschirmes. Bei sinkenden Temperaturen normalisiert sich
der Kontrast wieder und die Bildschirminformation wird wieder ablesbar.
Attention! L’exposition de votre écran LCD aux ultra-violets lors de soleil intense
réduira la durée de vie de l’afficheur de votre lecteur. Cette contrainte est liée à la technologie des
écrans LCD. Une augmentation trop importante de température peut obscurer des zones de votre
écran et le rendre ainsi inutilisable (non couvert par la garantie).
Aviso! La exposición de la pantalla a los rayos UV puede acortar la vida del cristal líquido
usado en su ploter. Esta limitación se debe a la tecnología actual de las pantallas LCD. Evitar que
la pantalla se caliente en exceso pues puede causar pérdida de contraste y, en caso extremo, la
pantalla puede quedar totalmente negra. Este problema revierte al enfriarse la pantalla
2
Page 3

Warning!!!
A measure of knowledge by the user is required for proper and safe use of the chart plotter.
Read the User Manual and the Warranty completely.
Use Good Judgement
This product is an excellent navigation aid, but it does not replace the need for careful
pilotage and good judgement. Never rely solely on one means of naviga-tion.
Use Care to Avoid Inaccuracies
The Global Positioning System (GPS) is operated by the U.S. Government, which is solely
responsible for the accuracy and the maintenance of GPS. Certain conditions can make the
system less accurate.
Accuracy can also be affected by poor satellite geometry.
The accuracy of position fixes is subject to changes in accordance with the Department of
Defense civil GPS user policy and the Federal Radionavigation Plan.
Cleaning Procedure for the Chartplotter Screen
Cleaning of the chartplotter screen is a very important operation and must be done carefully.
Since the surface is covered by a antireflective coating, the procedure for cleaning all the
surfaces can be performed using the following procedure: You need a tissue or lens tissue
and a cleaning spray containing Isopropanol (a normal spray cleaner sold for the PC screen,
for example PolaClear by Polaroid). Fold the tissue or lens tissue into a triangular shape,
moisten the tip and use the index finger behind a corner to move the tissue across the
surface, in overlapping side to side strokes. If the tissue is too wet, a noticeable wet film will
be left in its path and you will need to repeat the process. If too dry, the tissue won’t glide
easily, and may damage the surface.
Copyright 2005 AvMap Italy - All rights reserved
No part of this User Manual may be reproduced or transmitted in any form or by any means,
electronic or mechanical, including photocopying and recording , for any purpose other than the
purchaser’s personal use without the written permission of AvMap.
3
Page 4

CONTENTS
1 INTRODUCTION
1.1 FEATURES 9
1.1.1 Specifications
1.2 BASIC 11
1.3 FLYING START 13
1.3.1 The Moving Map 13
1.3.2 The Main Menu 13
1.3.3 Moving Map Functions 13
1.3.4 Moving Map Icons 14
1.3.5 Course Predictor 14
1.3.6 GoTo 15
1.3.7 Crossed Airspaces Advisor 15
1.3.8 Database 15
1.3.9 Battery Compartment and Batteries 15
2 THE BASICS
2.1 THE KEYBOARD 16
2.2 TURNING THE EKP-IV ON/OFF 17
2.2.1 Turning On 17
2.2.2 Turning Off 18
2.3 CHANGING BRIGHTNESS & CONTRAST 18
2.4 SELECTING THE LANGUAGE 18
2.5 EXTERNAL CONNECTIONS 19
2.5.1 Internal/external GPS Source 19
2.5.2 NMEA Outputs 19
2.5.3 Down Or Up-load Flight Plans & Tracks 20
2.5.3.1 Download/Upload Waypoints 20
2.5.3.2 Download/Upload Flight Plan 20
2.5.3.3 Download Track 21
2.6 SYSTEM SETUP OPTIONS 21
2.7 DATA ENTRY 21
9
3 THE MOVING MAPS
3.1 OPERATING MODES 22
3.1.1 Cursor Mode 22
3.1.2 Home (Screen Amplifier) Mode 22
3.1.3 Auto Zoom Mode 22
3.2 DATA WINDOW 23
3.3 Automatic Info 23
3.4 Cursor Or Position Mode 23
3.4.1 Airspace Information 24
3.4.2 Full Information 24
3.4.3 Project Radial 24
3.4.4 A - B Function 24
3.4.5 Waypoint Handling 25
3.4.6 Flight Plan 25
3.5 MOVING MAP MENU 26
3.5.1 Viewed FP 27
3.5.2 Auto Position Mode 27
3.5.3 DATA WINDOW MODE 27
3.5.4 Setup Data Fields 2
4
8
Page 5

3.5.5 Default Datafields 29
3.5.6 Map Orientation 29
3.5.7 Map Presentation Menu 29
3.5.8 Automatic Information 30
3.5.9 Rangerings 3
3.5.10 Vfr, Airspace, Land, Marine And Other Settings 3
3.5.10.1 VFR Settings 30
3.5.10.2 Airspace Settings 30
3.5.10.3 Land Settings 32
3.5.10.4 Marine Settings 32
3.5.10.5 Other Settings 32
3.5.11 Terrains 32
3.5.11.1 Terrain “ON” 32
3.5.11.2 Terrain “OFF” 33
3.6 MAP PRESENTATION MENU 33
3.6.1 GENERIC 33
3.6.2 TAWS 33
3.6.3 Selective Display Settings 34
3.6.4 POI Settings 35
4 NAVIGATION & LOCATION
4.1 NAVIGATION & LOCATION DATA 36
4.2 SAVE CURRENT FIX AS USER WAYPOINT 37
5 THE HSI SCREEN
5.1 HSI DESCRIPTION 38
5.2 HSI MENU 38
5.2.1 Add Mark Under Fix 39
5.2.2 Setup Datafields 39
5.2.3 Default Datafields 39
5.2.4 Compass Orientation 39
0
0
6 FLIGHT PLAN
6.1 VIEWED FLIGHT PLAN 40
6.2 CREATING A FLIGHT PLAN FROM THE DATABASE 41
6.3 ACTIVATE & DEACTIVATE A FLIGHT PLAN 41
6.4 NAMING A FLIGHT PLAN 42
6.5 CLEAR A FLIGHT PLAN 42
6.6 REVERSE A FLIGHT PLAN 42
6.7 Crossed Airspaces Predictor 42
6.8 GoTo FLIGHT PLANS 43
6.8.1 GoTo - Database Mode 43
6.8.2 GoTo - Moving Map Mode 43
6.8.3 GoTo - Quick Info 43
6.9 NEAREST SEARCH FOR GOTO FLIGHT PLAN ACTIVATION 43
6.10 Saving Flight Plans 44
7 THE GLOBAL POSITIONING SYSTEM
7.1 GPS PAGE 45
7.2 GPS RECEIVER SPECIFICATIONS 46
7.3 HOW GPS WORKS 46
7.3.1 Accuracy 46
7.3.2 WAAS 4
6
5
Page 6

7.3.3 Differential GPS 46
7.3.4 Monitoring & Controlling The GPS 47
7.3.5 GPS Information Sources 47
8 WAYPOINT & DATABASE
8.1 USER WAYPOINTS – MOVING MAP 48
8.1.1 Creating User Waypoints – Moving Map 48
8.1.2 Saving Present Position – Moving Map Methods 48
8.1.3 Editing User Waypoints – Moving Map Methods 48
8.1.4 Deleting User Waypoints – Moving Map Methods 49
8.2 USER WAYPOINTS – DATABASE METHODS 49
8.2.1 Creating User Waypoints – Database Methods 49
8.2.2 Editing User Waypoints – Database Methods 49
8.2.3 Deleting User Waypoints – Database Methods 49
8.3 DATABASE 50
8.3.1 Database Menu 50
8.3.1.1 Selecting Database Search Fields 50
8.3.1.2 Displaying Sunrise and Sunset Information 51
8.3.2 File Manager 51
9 APPROACH DATA PROCEDURES
9.1 APPROACH FROM THE MOVING MAP 52
9.2 APPROACH FROM FLIGHT PLAN DATABASE 52
9.3 SELECT APPROACH FOR GOTO 53
10 CALCULATOR
10.1 COUNTDOWN TIMER 54
10.2 ELAPSED TIMER 54
10.3 TRIP COMPUTER 55
10.4 VERTICAL NAVIGATION 56
10.5 WIND CALCULATION 57
10.6 FUEL CONSUMPTION 58
11 THE CHECKLISTS
11.1 ENGINE START 60
11.2 GROUND CHECK 61
11.3 PRE TAKE-OFF 61
11.4 CRUISE IN FLIGHT 61
11.5 LANDING 61
12 SIMULATOR
12.1 SIMULATING STRAIGHT MODE 62
12.2 SIMULATING ROUTE MODE 62
12.3 TURNING THE SIMULATOR OFF 63
13 THE COMMUNICATION
13.1 NMEA OUTPUT 64
13.2 WAYPOINTS UPLOAD/DOWNLOADS 64
13.3 FLIGHT PLAN UPLOAD/DOWNLOAD 65
13.4 TRACK DOWNLOAD 65
6
Page 7

14 THE SYSTEM SET-UP MENU
14.1 GENERAL SET-UP 66
14.1.1 Beeper 6
14.1.2 Scale Format 6
14.1.3 Language 6
14.1.4 Military Frequency 6
14.1.5 Nearest Airports 6
14.1.6 Terrain Legend 67
14.1.7 Power Save 6
14.1.8 Layout 67
14.1.9 Data Window Color 68
14.1.10 Menu Color 6
14.2 FIX SET-UP 68
14.2.1 Fix Source 6
14.2.2 Differential Correction Source 68
14.2.3 Fix Symbol 68
14.2.4 Static Navigation 6
14.2.5 Course Predictor 69
14.2.6 Head Up Response 6
14.2.7 Fix Circe Range 69
14.2.8 GPS Restart Timeout 69
14.3 ALARM SET-UP 6
14.3.1 Arrival Alarm Radius 69
14.3.2 XTE Alarm Range 7
14.3.3 Waypoint Alarm Radius 70
14.3.4 TAWS Alarm 70
14.3.5 Altitude Alarm 7
14.3.6 Airspace Ahead Alarm 70
14.3.7 Event Log 7
14.3.8 Clear Event Log 71
14.4 TRACK SET-UP 71
14.4.1 Track Display 7
14.4.2 Track Line 71
14.4.3 Track Width 7
14.4.4 Track Color 71
14.4.5 Track Recording Step 71
14.4.6 Clear Track 7
14.4.7 Remaining Track 72
14.5 UNITS SET-UP 7
14.5.1 Date & Time Set-up 72
14.5.1.1 Time Format 72
14.5.1.2 Local Time Difference 7
14.5.1.3 Data Format 73
14.5.2 Distance Unit 7
14.5.3 Speed Units 73
14.5.4 Altitude Unit 73
14.5.5 Depth Unit 7
14.5.6 Fuel Unit 73
14.5.7 Vertical Speed 7
14.5.8 Temperature 74
14.5.9 North Reference 74
14.5.10 Coordinate System 7
14.6 XM Weather 74
14.7 CLEAR USER DATA 7
14.8 CLEAR ALL RADIALS 7
6
7
7
7
7
7
8
8
9
9
9
0
0
1
1
1
2
2
2
3
3
4
4
4
5
7
Page 8

14.9 FACTORY DEFAULTS 75
15 OPERATING REQUIREMENTS
15.1 ANTENNA ASSEMBLY & PLACEMENT 76
15.2 SECURING THE EKP-IV 76
15.3 DIMENSIONS 77
15.4 INSERT / CHANGE BATTERIES 78
15.5 TROUBLESHOOTING 78
15.5.1 Power 78
15.5.2 GPS Fix 78
15.5.3 When Nothing Else Works 79
15.5.4 Customer Support 80
15.6 SYSTEM TEST 80
15.6.1 RAM Menu 81
15.6.2 C-CARD Menu 81
15.6.3 Serial Ports 81
16 EKP IV PRO
16.1 Functions for the automatic creation of Search and 83
Rescue (S.A.R) flight pattern 83
16.2 Customized Regional Coverage Area 83
16.3 Place and Street Research 83
16.3.1 Place Research 83
16.3.2 Street Research 83
16.4 Connection to the radio localiz. system Telefix and/or 83
Kenwood APRS, Automatic Position Reporting System 83
APPENDIX A - TERMS 84
APPENDIX B - MAP DATUM 87
APPENDIX C - ICAO CODES 88
APPENDIX D - C-MAP AV. CARTRIDGE OPTIONS 94
APPENDIX E - C-MAP DATA TRANSFER 95
8
Page 9

1 INTRODUCTION
If you have not used a GPS Charting System before and intend to use your EKP-IV for navigating, we
suggest that you read this User Manual and make sure you are familiar with its contents. Throughout
this User Manual, the keys are shown in capital letters enclosed between single inverted commas,
for example ‘MENU’. Menu operations are in bold characters listed by keys sequence with the
menu names enclosed between quotes, for example ‘MENU’ 1 sec. + “SYSTEM SETUP” + ‘ENTER’
+ “FIX SETUP” + ‘ENTER’ means: press and hold down the ‘MENU’ key for 1 second, using the
cursor key selects the System Setup menu, press ‘ENTER’, using the cursor key selects the Fix Setup
menu and then press ‘ENTER’.
1.1 FEATURES
This electronic charting system integrates the remarkable accuracy of a GPS receiver with a detailed
moving map into a single, easy-to-use, computerized electronic map system. The EKP-IV contains a
built-in base map with coast/shorelines, names of states, major cities, highways, lakes and rivers.
When the EKP-IV is first opened, please check it for the following contents:
• C-MAP Navdata Compact Flash (inserted in the slot at the base of the unit)
• Antenna and 5 meter cable with SMB connector
• Power Cable (with cigarette lighter adapter)
• Velcro Leg Strap
• User Manual
Optional Accessories:
• PC/Data cable
1.1.1 Specifications
Main Characteristics
Recordable Individual points
• Waypoints :1000
• Type of User Waypoint Icons :16
Flight Plans
• Flight Plans : 15
• Max Waypoints per Flight Plan : 100
Tracking
• Tracks: 1
• Track Colors : 7
• Points per Track : many thousand of points
• Step by Distance : Auto, 20, 100, 500 Mt, 1Km; 5, 30 Sec, 1 Min
Cartographic Functions
• Worldwide Background
• Built-in Continental Cartography
• Coordinates System (DDD MM SS, DDD MM.mm, DDD MM.mmm, UTM, OSGB, MGRS)
• North Reference
9
Page 10

• Auto Zoom
• Map Presentation (Aero+Terrestrial, Aeronautical, Marine)
• POI Settings
• Selective and cycled Display
• VFR (Airports, VOR, NDB, Intersections, Vertical Obstructions, Aero Objects Id, Enroute
Communications)
• Airspace (Controlled Areas, Restricted Areas, FIR & UIR, MORA)
• Land (Roads, Road Labels, Railroads, City Names, Rives and Lakes, Cultural Features, Natural
Features, Landmarks, POI Objects)
• Marine (Lights, Chart Boundaries, Bathymetric & Soundings, Bathymetric & Soundings Range,
Depth Area Limit, Navigational Aids, Attention Areas, Tracks & Routes)
• Other Settings (User Points, Objects Overlap, Lat/Lon Grid)
Fix Functions
• DGPS
• WAAS
• Fix Symbol user selectable (Standard, Plane, Helicopter, Car)
• Static Navigation
• Course Predictor
• Map Orientation (Track-up, Course-up, North-up)
• Projected Radial
• A-B measurement
Data Page Options
• Nav/Location
• HSI Page
• Flight Plan
• GPS Page
• About Page
Special Functions
• Automatic Info (Aero+Terrestrial, Aeronautical, Terrestrial, Marine)
• Nearest search
• Direct-To navigation
• Date and Time Format
• Astronomic Data Calculation (Sun/Moon Info)
• Distance Unit selection (KM, NM, SM)
• Speed Unit selection (MPH, KTS, KMH)
• Altitude Unit selection (FT, FL, MT)
• Depth Unit selection (FT, FM, MT)
• Fuel Unit selection (GAL, LIT, LB, KG, BGAL)
• Descent Rate selection (FT/MIN, M/S, DEG)
• Temperature Unit (C/F)
• Alarms handling (Arrival, XTE, Waypoint Alarm Radius, Airspace)
• Database(Airports, VOR, NDB, Intersections, POI objects, User Waypoints, File Manager)
• Calculator (Countdown Timer, Elapsed Timer, Trip Computer, Vertical Navigation, Wind
Calculation, Fuel Consumption)
• Simulation mode (Speed, Heading)
• Checklists (Engine Start, Ground Check, Pre Take-Off, Landing)
• Communications (Waypoints Upload/Download, Flight Plan Upload/Download, Track Upload/
Download)
Interface
• Serial I/O port
10
Page 11

Physical Characteristics
Size
• 7.1” x 4,8” x 1,8” (2.3”)
Weight
• 670 g
LCD display
• color TFT 7” (16:9)
• resolution 800 x 480 pixels
Antenna dimensions
• 3” diameter, 0.625” height (76.2 mm diameter, 15.9 mm height) (Antenna includes a 5 mt
cable)
Power consumption
• Color 10 Watt, 10–35 Volt DC
• Operating Temperature Range 32°F to 131°F (0°C to 55°C)
Storage Temperature
• -13°F to 158°F (-25°C to 70°C)
Memory
• Non volatile with battery back-up
Keyboard
• Backlighted, silicon rubber
1.2 BASIC
The EKP-IV is controlled by using 10 keys and the cursor key. As you press a key, a single audio beep
confirms the key action; three rapid beeps indicates that no response is available.
POWER Key
will appear; the GPS status and current time are displayed at the bottom of this box.
Removal of Knee Mount. The knee mount is secured to the back of the EKP-IV with Velcro and snap
guides. To remove the knee mount place a few fingers under the top of the knee mount and apply
constant backpressure until the mount disengages from the Velcro. To reinstall the knee mount,
align the mount to the back of the unit and apply pressure until mount locks in place.
- For quick access to the GPS status tap the ‘POWER’ key. The Brightness and contrast
11
Page 12
12
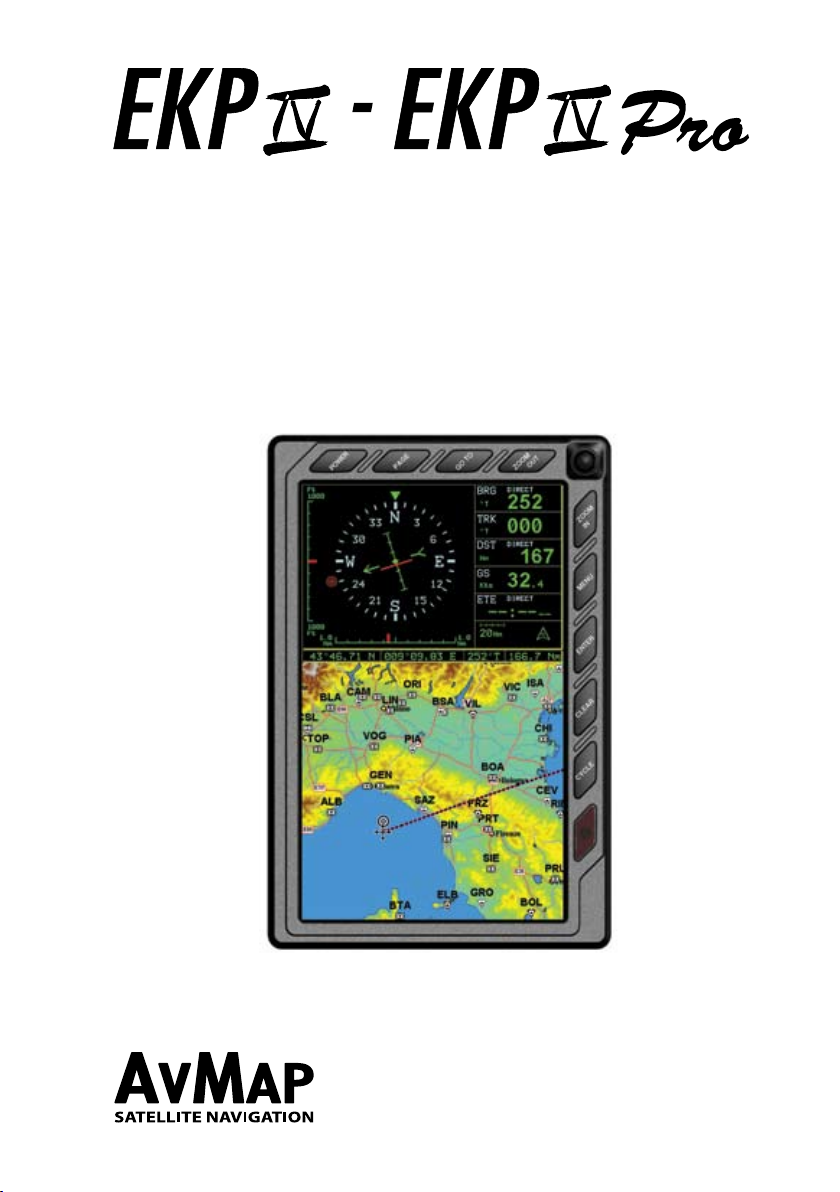
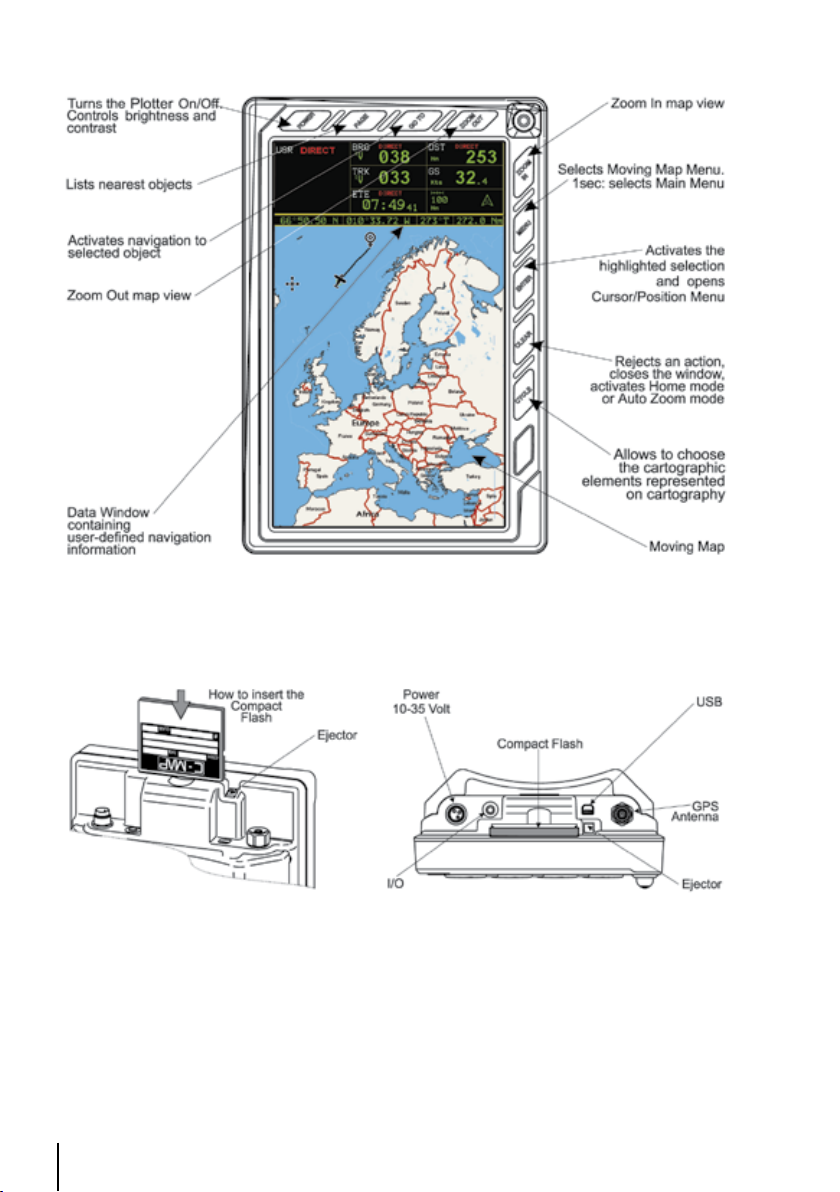
Fig. 1.2 - The EKP-IV
Fig. 1.2a - How to insert the Compact Flash
Page 13
1.3 FLYING START
These pages provide a very brief overview of several of the EKP-IV’s important features, the Main
Menu, the Moving Map, GoTo flights and locating a Waypoint in the Database. It does not replace
the User Manual, which should be read to get the fullest possible use from your EKP-IV.
Note
The EKP-IV is an aid to navigation. It does not replace paper charts and good judgement.
1.3.1 The Moving Map
Before starting, connect the EKP-IV to power and place the antenna with a clear view of the sky.
Turn On the unit pressing ‘POWER’. Press ‘ENTER’ to exit from the Warning page and enter the
Moving Map mode. The Moving Map is the default state displaying the Moving Map screen and the
Data Window. The Data Window contains navigation information boxes (See Chapter 3 for details
on Moving Map mode).
Note: If no Fix is available, red dashed cross is displayed over the map for increased Pilot
Awareness.
To Change the Scale of the Moving Map
Use ‘ZOOM IN’ and ‘ZOOM OUT’ to change the map display scale.
To Select Position
Use the cursor key to scroll to the location you want.
1.3.2 The Main Menu
From Moving Map press ‘MENU’ for 1 second to display the Main Menu:
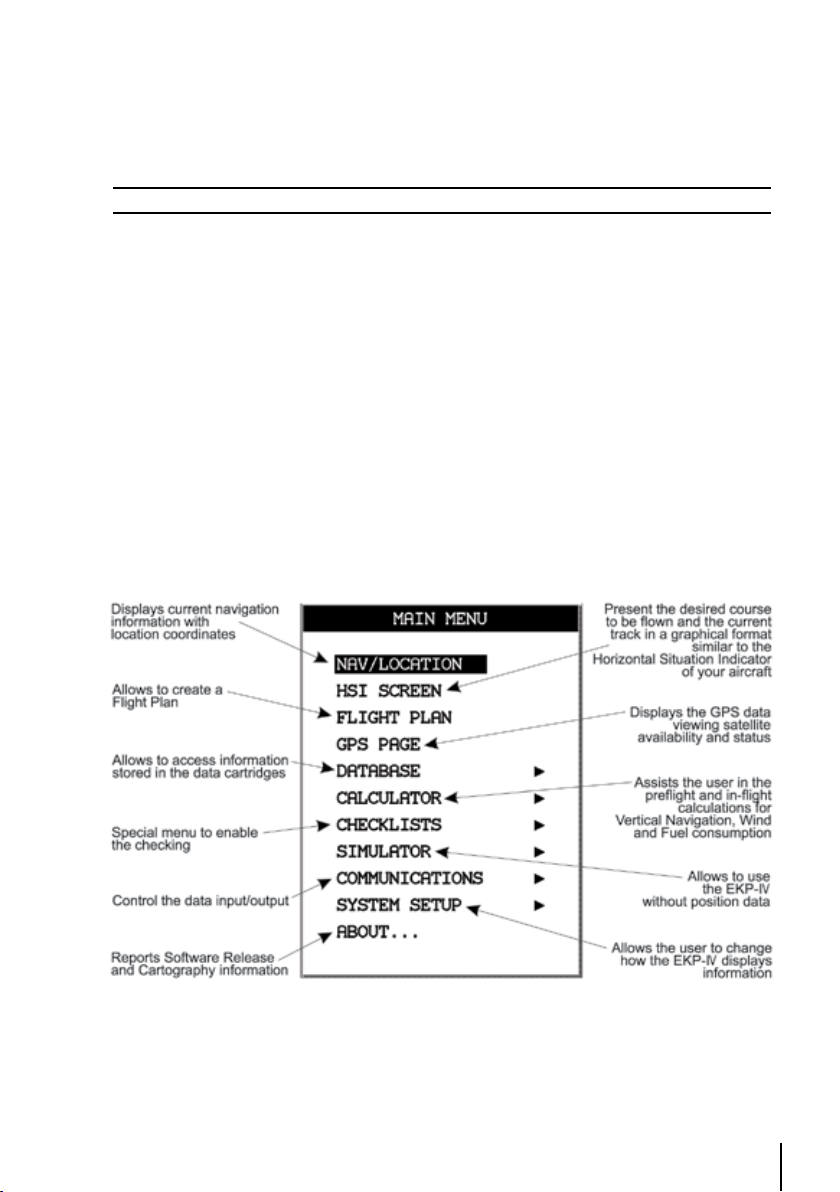
Fig. 1.3.2 - Main Menu
1.3.3 Moving Map Functions
The Moving Map operates in Auto Home, Auto Zoom, and Cursor Mode. The screen will behave
13
Page 14
differently based on the mode of operation selected. The Auto Home mode will allow the user to
pan away from his present position to view other parts of the map, and return to present position
automatically when no buttons are pushed for a pre-determined amount of seconds. Auto Zoom
mode will keep your present position, and your destination in the screen at all times. The screen
will automatically zoom in as you get closer. To shut off this function, simply select OFF.
The Cursor Mode (OFF Selected) will allow you to move the map to any position to view data or
details. To return to your present position, just press ‘CLEAR’ while in moving map.
The control for these functions is found in the Moving Map Menu, under Auto Position Mode.
1.3.4 Moving Map Icons
The following icons are displayed on the Moving Map to represent Waypoints, navigation aids and
airports.
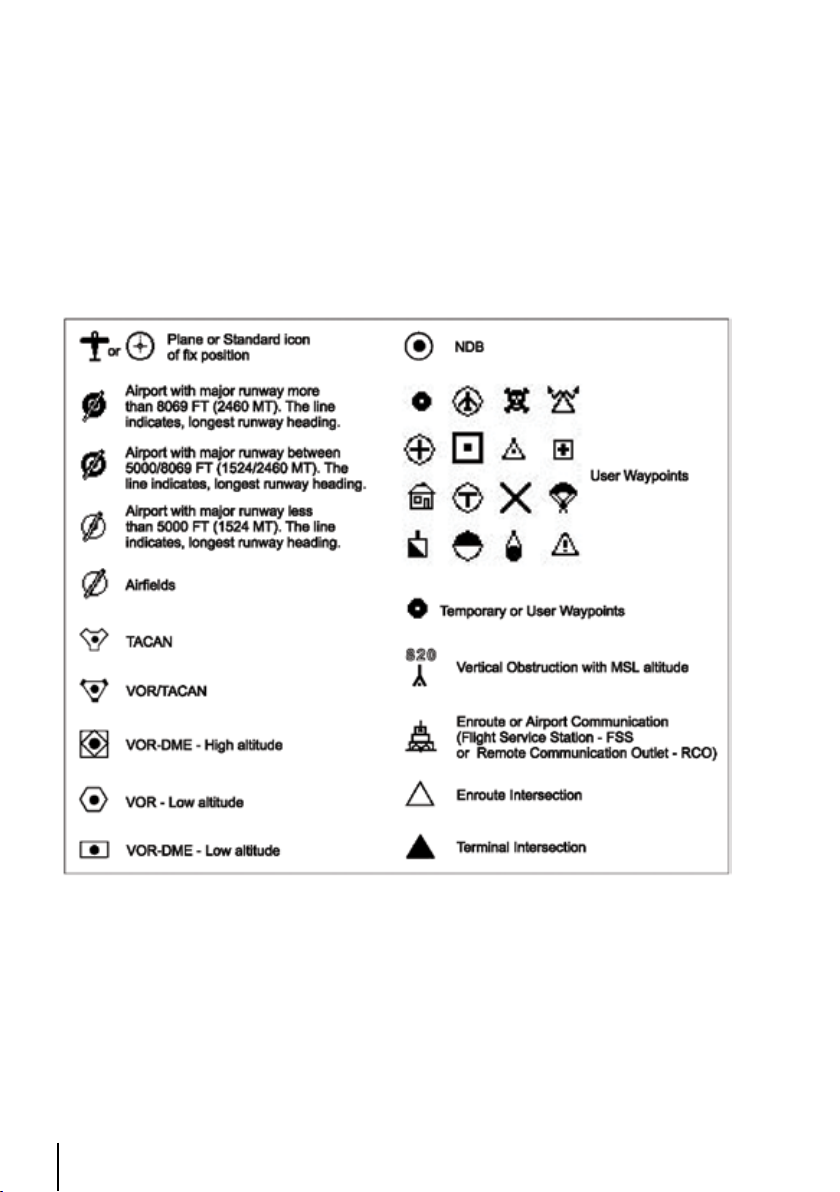
Fig. 1.3.4 - Moving Map Icons
1.3.5 Course Predictor
Indicates the projected position at the set time interval if the current speed and heading are kept.
This allows the pilot to correct for wind drift, in real time, right from the moving map. To select
course predictor:
> ‘MENU’ 1 sec. + “SYSTEM SETUP” + ‘ENTER’ + “FIX SETUP” + ‘ENTER’ + “COURSE
PREDICTOR” + ‘ENTER’
14
Page 15

1.3.6 GoTo
GoTo sets a 1-leg course from the present position to any location or selected Waypoint. To activate
a GoTo Flight Plan move the cursor to the desired location or Waypoint and press ‘GOTO’. The
GoTo menu box will open enabling you to activate the current cursor position or search the
Database for a specific object to fly to. To activate the current cursor position, highlight “CURSOR”
and press ‘ENTER’. To activate a GoTo Flight Plan to a specific Database item, select the category
and press ‘ENTER’. Select the database item and press ‘GOTO’ again to activate.
To deactivate, press ‘GOTO’ and select “DEACTIVATE”.
1.3.7 Crossed Airspaces Advisor
> GOTO + “CROSSED AIRSPACES ADVISOR”
When this function is enabled, every time a new leg of an active FP is entered, the navigator
warns with an alert whether the leg is approaching an airspace among the ones selected in the
function sub menu. The message contains the list of the approaching arispaces. As soon as a new
leg is entered, or a new destination is set with the Direct To function, an altitude check is made in
order to detect all the crossed airspaces in a 3D space at the current FIX altitude. The fix altitude is
registered, but when changes of more than 500 (five hundred) feet occur, the advisor triggers again
the check and saves the new altitude.
1.3.8 Database
The Database function allows the user to access information stored in the data cartridges on
Airports, VOR’s, NDB’s, Intersections and User Waypoints. Searching the Database allows the user
to activate GoTo Flight Plans and locate the item on the map. There are two methods of accessing
the Database information. The first is through the Database function within the Main Menu and the
second is directly from the Moving Map display (see Chapter 3).
1.3.9 Battery Compartment and Batteries
The EKP-IV is designed with a battery compartment for 6 rechargeable AA batteries. It is located
in the rear of the unit underneath the removable knee mount. The unit provides a ‘trickle’ charge
to the batteries when the unit is plugged into external power and powered ON. Rechargeable AA
batteries are required. Install them only after the batteries are fully charged. With fully-charged
batteries, the normal discharge time will be close to two hours, depending upon the condition of
the batteries, as well as the brightness and contrast of the screen settings. AvMap highly recommends
that NiMH AA batteries be used (available from AvMap/Navigation, or from any electronics shop).
DO NOT USE ALKALINE BATTERIES, as they may damage the unit and void the warranty.
15
Page 16

2 THE BASICS
This chapter provides general information about the functions of the keys and entering data
(connecting the EKP-IV to power and using the antenna are described in Chapter 15).
2.1 THE KEYBOARD
The EKP-IV has 10 keys, which access and control features. Some keys perform different tasks
based on the operation mode. A quick key guide is displayed at the bottom of many menus for
easy reference.
Below we indicate the keys in capital letters enclosed between single inverted commas, for example
‘MENU’. When a key, for example ‘MENU’, must be pressed and held down for more than 1
second it is shown as ‘MENU’ 1 sec.
The POWER key
‘POWER’: press and hold to turn the EKP-IV On.
‘POWER’ 3 seconds: once the EKP-IV has been turned On turns the EKP-IV Off.
‘POWER’: (immediately release!) once the EKP-IV has been turned On displays the Brightness and
the Contrast Menu.
The PAGE key
Displays a list of the 20 nearest objects, including private airports which contain runways of at least
500 ft. in lenght, relative to fix position or cursor position if no fix is available. Press and hold to
access the NavData Page.
The GOTO key
Activates a Flight Plan to the cursor position (in Moving Map) or to selected object (in other
modes).
The ZOOM-OUT key
Shows less detail of a larger area by changing the chart scale and zooming out on the map display.
The CURSOR key
Moves the cursor on the Moving Map, quickly and accurately. Also scrolls to the desired options
in menu page(s).
The ZOOM-IN key
Shows more detail of a smaller area by changing the chart scale and zooming in on the map
display.
The MENU key
‘MENU’: selects the Moving Map Menu.
‘MENU’ 1 sec.: opens Main Menu (equivalent to press ‘MENU’ twice).
The ENTER key
Selects the desired option or confirms selection. Also opens the Cursor/Position Menu.
The CLEAR key
Rejects an action, closes a window or activates Home or Auto Zoom mode. By pressing and holding
CLEAR button for 2 seconds the Fix icon can be positioned on the 20% central area of the map
display or on the exact center of the screen.
The CYCLE key
The EKP-IV is equipped with a Cycle Key that allows the user to choose among several map
16
Page 17

presentations and quickly filter mapping information on the display.
‘CYCLE’: selects the Cycle mode
There are three Cycle modes and holding the Cycle Key one to three times activates them. The
Cycle Key is defaulted in the Cycle 1 position that normally activates all features to be visible on the
display. By holding the Cycle Key once, Cycle 2 is activated and holding it a second time activates
Cycle 3, one last Cycle key activation and the display is back to Cycle 1.
To set user preferences for the Cycle Key:
>‘MENU’ + “SELECTIVE DISPLAY” + ‘ENTER’
‘CYCLE’ 1 sec: select the Map Presentation Menu
The menu enables the user to select between generic representation mode, three TAWS modes
(auto, low sep and high sep) and two Weather modes (North America only)
The Cycles appear in the first three columns and are labeled 1, 2 and 3. In order to adjust at which
Cycle features appear, use the Cursor Control key to highlight an item and hit ‘ENTER’ to remove
the item from appearing. Hit ENTER again to check the item so that it will appear on the display
when that Cycle is activated. Continue to use this procedure to activate features in Cycles 1 - 3 as
desired.
The indication of the current de-clutter CYCLE is displayed on the data window scale and north
indicator field.
2.2 TURNING THE EKP-IV ON/OFF
Before powering On the EKP-IV, check for the correct voltage (10-35 Volt DC).
2.2.1 Turning On
Press and hold ‘POWER’ for 1 second. The EKP-IV emits one rapid beep sound and a Title page
containing information about the Product name, Software version, library version and cartridges
installed is displayed. This data can also be viewed in the “About” page in the “Main Menu”.
17
Page 18

Fig. 2.2.1 - Title page
After a few seconds the Warning page is displayed, reminding you that the EKP-IV is an aid to
navigation and should be used with appropriate prudence. The electronic charts are not intended
to substitute for the official charts. Press ‘ENTER’ to open the Moving Map screen.
2.2.2 Turning Off
‘POWER’ 3 sec.: a countdown timer appears on the screen, if you release the key before the
countdown timer reaches zero, the EKP-IV will remain On.
2.3 CHANGING BRIGHTNESS & CONTRAST
Press and immediately release ‘POWER’ to adjust the brightness and the contrast of the display
and keyboard (do not press and hold the key or the “power-off” message will be displayed!).
To increase/decrease the brightness use respectively up/down cursor key. Similarly, to increase/
decrease the contrast use left/right cursor key. In addition the Time and the GPS State are shown. In
this menu you can also shift between the night and day palette: it is possible to set the night vision
for a safer consultation and flying at night. With the night vision, the colour palette is changed so
that menu and cartography are readable but not disturbing in absence of light.
2.4 SELECTING THE LANGUAGE
It is possible to select the language in which the information is displayed (for screen labels, menus
and options, but it does not affect the map information). The default setting is English.
> ‘MENU’ 1 sec. + “SYSTEM SETUP” + ‘ENTER’ + “GENERAL SETUP” + ‘ENTER’ +
18
Page 19

“LANGUAGE” + ‘ENTER’
Choose the language you want and press ‘ENTER’ again to confirm.
2.5 EXTERNAL CONNECTIONS
2.5.1 Internal/external GPS Source
The EKP-IV has an internal GPS Receiver. Be sure the Fix Source is set to Internal GPS to receive
data from this internal receiver.
> ‘MENU’ 1 sec. + “SYSTEM SETUP” + ‘ENTER’ + “FIX SETUP” + ‘ENTER’ + “FIX
SOURCE” + ‘ENTER’
Choose Internal GPS and press ‘ENTER’ to confirm. Otherwise if the EKP-IV is using an external
NMEA0183 positioning source, set the Fix Source as External NMEA0183. The recognized Input
NMEA0183 messages are the following: GGA, GLL, GSA, GSV, HDG, HDM, HDT, PCMPA, RMC,
VHW, VTG (see Appendix E for more details on NMEA sentences).
> ‘MENU’ 1 sec. + “SYSTEM SETUP” + ‘ENTER’ + “FIX SETUP” + ‘ENTER’ + “FIX
SOURCE” + ‘ENTER’
Choose External NMEA0183 and press ‘ENTER’ to confirm.
Fig. 2.5.1 - External Input
2.5.2 NMEA Outputs
The EKP-IV can be connected to external equipment that accepts NMEA0183 data input. Once
attached, the output of NMEA formatted position information can be enabled in the following
manner:
> ‘MENU’ 1 sec. + “COMMUNICATIONS” + ‘ENTER’ + “NMEA OUTPUT” + ‘ENTER’
The default setting is Off. The Output NMEA0183 messages are the following: APA, APB, BOD,
BWC, GGA, GSA, GSV, GLL, HSC, RMA, RMB, RMC, VTG, WCV, XTE (see Appendix F for more
details on NMEA sentences) BOD, BWC, GGA, GLL, HSC, RMA, RMB, RMC, VTG, WCV, XTE (see
Appendix F for more details on NMEA sentences).
Fig. 2.5.2 - NMEA Connections
19
Page 20
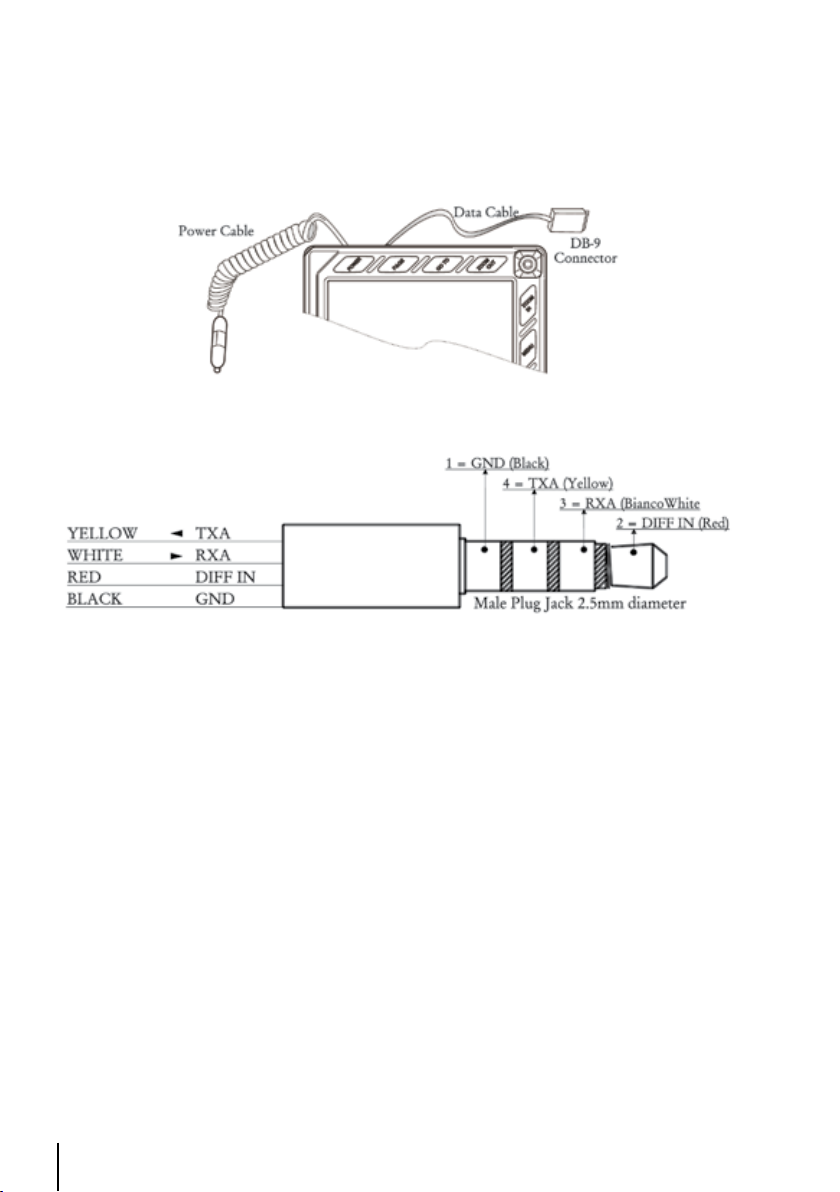
2.5.3 Down Or Up-load Flight Plans & Tracks
The EKP-IV can also send and receive Flight Plans from the AvMap Flight
Planner or another device compatible with it through the serial port (the USB port is for factory
use only). This requires an optional data cable that can be purchased from your avionics dealer or
AvMap/Navigation for a proper connection to the device (see following figures).
Fig. 2.5.3 - Optional Data Cable
Fig. 2.5.3a - directional Communicatons
2.5.3.1 Download/Upload Waypoints
The Download Waypoint function allows you to send the current Waypoints to the serial port using
the NMEA0183 $WPL sentence (see Appendix E):
> ‘MENU’ 1 sec. + “COMMUNICATIONS” + ‘ENTER’ + “WAYPOINTS DOWNLOAD”
+ ‘ENTER’
The Upload Waypoint function allows you to receive Waypoints from the serial port using the
NMEA0183 $WPL sentence (see Appendix E):
> ‘MENU’ 1 sec. + “COMMUNICATIONS” + ‘ENTER’ + “WAYPOINTS UPLOAD” +
‘ENTER’
2.5.3.2 Download/Upload Flight Plan
The Download Flight Plan function allows you to send the current Flight Plans to the serial port
using the NMEA0183 $WPL and $RTE sentences (see Appendix E):
> ‘MENU’ 1 sec. + “COMMUNICATIONS” + ‘ENTER’ + “FLIGHT PLAN DOWNLOAD”
+ ‘ENTER’
The Upload Flight Plan function allows you to receive Flight Plans from the serial port using the
NMEA0183 $WPL and $RTE sentences (see Appendix E):
20
Page 21

> ‘MENU’ 1 sec. + “COMMUNICATIONS” + ‘ENTER’ + “FLIGHT PLAN UPLOAD” +
‘ENTER’
The received Flight Plan is saved in the current Flight Plan. If the current Flight Plan contains data
the user should be asked to confirm the action (overwriting the existing Flight Plan) or choose
another Flight Plan.
2.5.3.3 Download Track
The Download Track function allows you to send Track data from the serial port using the CMAP
Proprietary NMEA0183 $PCMPT sentence (see Appendix E):
> ‘MENU’ 1 sec. + “COMMUNICATIONS” + ‘ENTER’ + “TRACK DOWNLOAD” +
‘ENTER’
2.6 SYSTEM SETUP OPTIONS
You may select how the EKP-IV displays primary information (such as how time is displayed) from
the System Setup Menu.
> ‘MENU’ 1 sec. + “SYSTEM SETUP” + ‘ENTER’
Refer to Chapter 14 for information about the System Setup Menu.
2.7 DATA ENTRY
Information is keyed into the EKP-IV when editing a Waypoint, entering a Flight Plan, using the
calculator and searching the Database. When the field is highlighted:
- Enter or edit data by pressing up/down cursor key to step through the available characters until
the desired character is displayed.
- Press right cursor key to move the cursor to the right.
- Use left cursor key to move the cursor to the left.
Some pilot-entered data requires either a +, - or a hemisphere identification:
- Move the cursor over the displayed symbol and press up/down cursor key until the desired
symbol appears.
- Press ‘ENTER’ to continue to the next line or to return to the previous menu.
21
Page 22

3 THE MOVING MAPS
The Moving Map is the default state of the software. This mode displays the Moving Map screen
and Data Window. The Moving Map displays map detail in Home, Auto Zoom or Cursor mode.
The operation mode will determine the options available within the screen. The Data Window
contains the navigation information pertaining to the active flight; these fields can be customized.
From the Moving Map screen you can obtain Automatic Info and Full Info for Database objects.
Here you can also open the Cursor/Position Menu for features related to Flight Plans, Waypoints
and airspace.
3.1 OPERATING MODES
3.1.1 Cursor Mode
In Cursor mode the screen is controlled by your movement of the cursor. When in Cursor mode, a
data field line will appear under the Data Window providing LAT/LON of the cursor position. If a fix
has been computed, a distance and bearing will also appear from the position fix to the cursor.
When in Cursor mode it is possible to scroll on the map such that the position fix will not be
displayed on the screen. When this occurs, you can quickly display your position by activating
Home mode (press ‘CLEAR’ once). At this time, the system will operate in Home mode (see below
Par. 3.1.2).
If you have a position fix, and would like to continue with the cursor at the last position, press
‘CLEAR’ again (if the cursor key have not been pressed between these two ‘CLEAR’ presses, the
cursor will revert to the original position). To activate the cursor from the current fix position, simply
press the cursor key and the Cursor mode becomes active at the present fix position. The cursor can
be used to create and edit Waypoints and Flight Plans; identify airspace, obtain info about objects,
project radial lines and measure distance (see Cursor Menu, Par. 3.6).
3.1.2 Home (Screen Amplifier) Mode
The Home mode (also called Screen Amplifier) is used to keep the fix position within the visible
map. The map is scrolled and redrawn automatically as your position moves. When this mode is
active the cursor is hidden. When in Home mode, there will be no position line displayed at the
bottom of the Data Window
Note
Auto Zoom must be selected to Off in the Moving Map Menu.
A slow flashing airplane icon will indicate your current position. The airplane will be pointing in the
direction of movement. Home mode can display the map in North-up, Course-up or Track-up (see
Moving Map Settings, Par. 3.5). To deactivate Home mode press ‘CLEAR’ activating the cursor at the
previous position or press a cursor key to enable the cursor under the current fix position.
3.1.3 Auto Zoom Mode
The Auto Zoom mode is used to keep the fix position and destination (Target) visible on the map.
The map is scrolled and zoomed automatically to keep the best view possible. When this mode is
active the cursor is hidden. When in Auto Zoom mode, there will be no position line displayed at
the bottom of the Data Window.
Note
Auto Zoom must be selected to On in the Moving Map Menu.
22
Page 23
To activate Auto Zoom mode press ‘CLEAR’ in Moving Map. Auto Zoom requires a position fix and
an active destination point. If a destination point is not present it works as Home mode.
To deactivate Auto Zoom mode press ‘CLEAR’ to enable the cursor at the previous position or press
a cursor key to enable the cursor under the current fix position. Instead if you press ‘ZOOM IN’ or
‘ZOOM OUT’ enables the cursor under the current fix position and zooms on the map.
3.2 DATA WINDOW
The Moving Map screen provides the option for a Data Window display for a user defined navigation
information panel. This window is fixed at the top of the screen. During Cursor mode, an additional
line is displayed at the bottom of this box with details on the cursor position. See Par. 3.5.3 and
3.5.4 for details on customizing the data fields display.
The data fields window is updated continuously during flight. For full information regarding
navigation and GPS data, you can select the Nav/Location screen from the Main Menu (see Chapter
4).
To view A-B BRG and DST, the “Info: A-B Function” must be selected for display in a Data window
field.
3.3 AUTOMATIC INFO
Automatic Info will provide details on cartographic objects, Waypoints and navaid items when the
cursor is placed over them. This is a user setting that can be defined in Moving Map Menu.
The default is Automatic Information to be displayed for aeronautical and terrestrial data.
When the Cursor mode is active, the Automatic Info window appears on the Moving Map screen
if there is an object under the cursor position. Depending on the cursor position the window is
opened in the top or bottom of the screen.
If additional information is available for the object, the box will indicate with the following message:
“Press and hold MENU to select”. By doing so, you will activate the information box and can then
select the item using the cursor key (if more than one item is displayed). With the item highlighted,
press ‘ENTER’ again and the additional details will be displayed. If the information is an airport, the
‘ENTER’ will toggle between the pages of data. Press ‘CLEAR’ to exit.
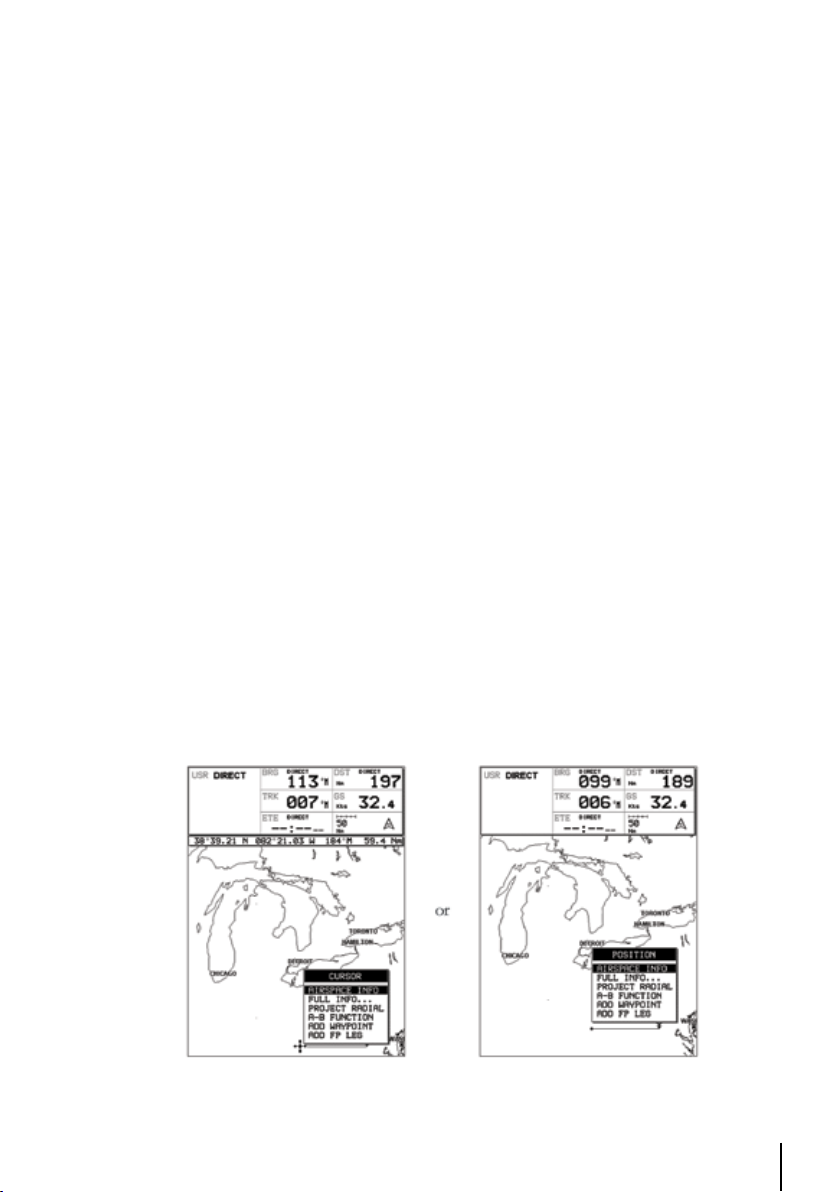
3.4 CURSOR OR POSITION MODE
The Moving Map page provides a sub-menu directly related to the cursor or position fix.
To activate from the Moving Map press ‘ENTER’. The menu displayed will be Cursor or Position
dependent upon the map mode (see map mode above).
Fig. 3.4 - Cursor/Position Menu
23
Page 24

3.4.1 Airspace Information
Airspace Info will display information about the airspace within the cursor/position fix. The selected
area(s) of airspace queried is highlighted.
>‘ENTER’ + “AIRSPACE INFO” + ‘ENTER’
Like Automatic Info the window is opened in the top or bottom part of the screen. One window
displays all airspace objects. Displayed information is the following: Name of air-space; type of
airspace; altitude range; tower frequency for airport traffic areas or main airport frequency for Class
B and Class C areas.
Single airspaces under the cursor can be highlighted. Hold MENU 1 sec, then select the airspace to
be highlighted and press ENTER. Press CLEAR in order to return to the Moving Map.
3.4.2 Full Information
Full Info window displays C-Map attribute information for the object under the cursor/position.
>‘ENTER’ + “FULL INFO” + ‘ENTER’
Found objects are presented using a tree structure. Using the cursor key highlight the object desired
and press ‘ENTER’ for further details.
3.4.3 Project Radial
The project radial feature creates a line at a given bearing and distance from a navaid or user
waypoint. If no object is present, an error message stating “Object not found” will appear on the
screen. The EKP-IV will store 10 radials. To project a radial, first select the object with the cursor,
then:
>‘ENTER’ + “PROJECT RADIAL” + ‘ENTER’
Using the cursor key enter the Bearing and press ‘ENTER’. The Distance box is now active; using the
cursor key enter the Distance for the line to extend and press ‘ENTER’. To remove a radial, select
the object icon or the radial line with the cursor, then:
>‘ENTER’ + “PROJECT RADIAL” + ‘ENTER’
A Warning message appears asking if you would like to remove the radial. Press ‘ENTER’ to confirm
or ‘CLEAR’ to exit. To remove all radials stored in the EKP-IV (see also Par. 14.9):
>‘MENU’ 1 sec. + “SYSTEM SETUP” + ‘ENTER’ + “CLEAR ALL RADIALS” + ‘ENTER’
3.4.4 A - B Function
The A-B Function allows you to calculate distance and bearing between two specified points (“A”
and “B”). The distance and bearing will appear in the A-B data field box at the top of the screen.
(This must be selected for display; see Data Window, Par. 3.2). To measure two points:
>Place the cursor at first position “A” + ‘ENTER’ + “A-B FUNCTION” + ‘ENTER’
>Place the cursor at second position “B” + ‘ENTER’ + “A-B FUNCTION” + ‘ENTER’
You can also measure distance from the current fix position using the A-B feature. From Home or
Auto Zoom mode:
>‘ENTER’ + “A-B FUNCTION” + ‘ENTER’
24
Page 25

This will place “A” at the current fix position, then:
>Place the cursor at second position “B” + ‘ENTER’ + “A-B FUNCTION” + ‘ENTER’
This line will remain on the screen until it is deactivated. To deactivate:
>‘ENTER’ + “A-B FUNCTION” + ‘ENTER’
3.4.5 Waypoint Handling
Associate Waypoint with User Waypoint Alarm: When editing the waypoint, select the icon for the
waypoint. Any Waypoint with this icon will activate a user Waypoint Arrival Alarm if this feature is
turned on in the System Setup - Alarm Setup Menu.
The EKP-IV provides storage for 1000 Waypoints. These can be a combination of User Waypoints or
Flight Plan Waypoint storage. User Waypoints can be edited, searched and used as Waypoints within
a Flight Plan. User Waypoints can be created from the Moving Map screen or via the Database page
(see Database, Chapter 8 for entering Waypoints from the Database).
Add Waypoint
>Place the cursor at position + ‘ENTER’ + “ADD WAYPOINT” + ‘ENTER’
Edit Waypoint
>Place the cursor over Waypoint + ‘ENTER’ + “EDIT WAYPOINT” + ‘ENTER’
The Edit Waypoint box will appear. Using the cursor key scroll through the alphanumerics to create
an eight character name, adjust the Latitude or Longitude or select an icon. Press ‘ENTER’ within
each character field to move to the next field. After completing the icon selection, the box will
close and the new data is stored. Remove Waypoint (present only if there is a Waypoint under the
cursor position):
>Place the cursor over Waypoint + ‘ENTER’ + “REMOVE WAYPOINT” + ‘ENTER’
A shadow of the icon will remain on the screen until the map is redrawn.
3.4.6 Flight Plan
The EKP-IV provides storage for 15 Flight Plans of 100 legs each. From the Moving Map screen you
can edit and create Flight Plans using the cursor. The Flight Plan edited or created will be the one
that is currently viewed by the software (see Chapter 6).
Creating a Flight Plan
To create a new Flight Plan from the Moving Map screen, be sure the current viewed Flight Plan
(see Chapter 6) is empty. Place the cursor at the desired position on the map, this can be an aero
object (APT, VOR, NDB, INT), User Waypoint or a spot on the map.
>‘ENTER’ + “ADD FP LEG” + ‘ENTER’
This will create the first Waypoint within your Flight Plan. Continue this way to add the remaining
Waypoints within your Flight Plan.
Note
If several aero objects are found under the cursor, the system will default the selection as follows: Airport, VOR,
NDB, INT. If no aero object is found, a temporary Waypoint is placed at the coordinates of the cursor and is
named “WPTxxx” (where xxx is a number).
25
Page 26
Add Waypoint
To add a Waypoint (leg) to the viewed (current) Flight Plan place the cursor over the position.
>‘ENTER’ + “ADD FP LEG” + ‘ENTER’
This will place another leg onto the end of the current viewed Flight Plan.
Remove Waypoint (present only if there is a Waypoint under the cursor position)
>Place the cursor over existing Waypoint + ‘ENTER’ + “REMOVE WAYPOINT” +
‘ENTER’
If the Waypoint was within the Flight Plan, the revised leg will be drawn on the screen.
Inserting a Waypoint
To edit a flight plan on the moving map, be sure the flight plan is selected as the “Viewed” flight
plan. (See Sec. 6.1). To insert a waypoint between two existing waypoints in the viewed flight plan,
move the cursor over the leg to be edited:
> ‘ENTER’ + “ADD FP LEG” + ‘ENTER’.
The new waypoint is now inserted into the flight plan.
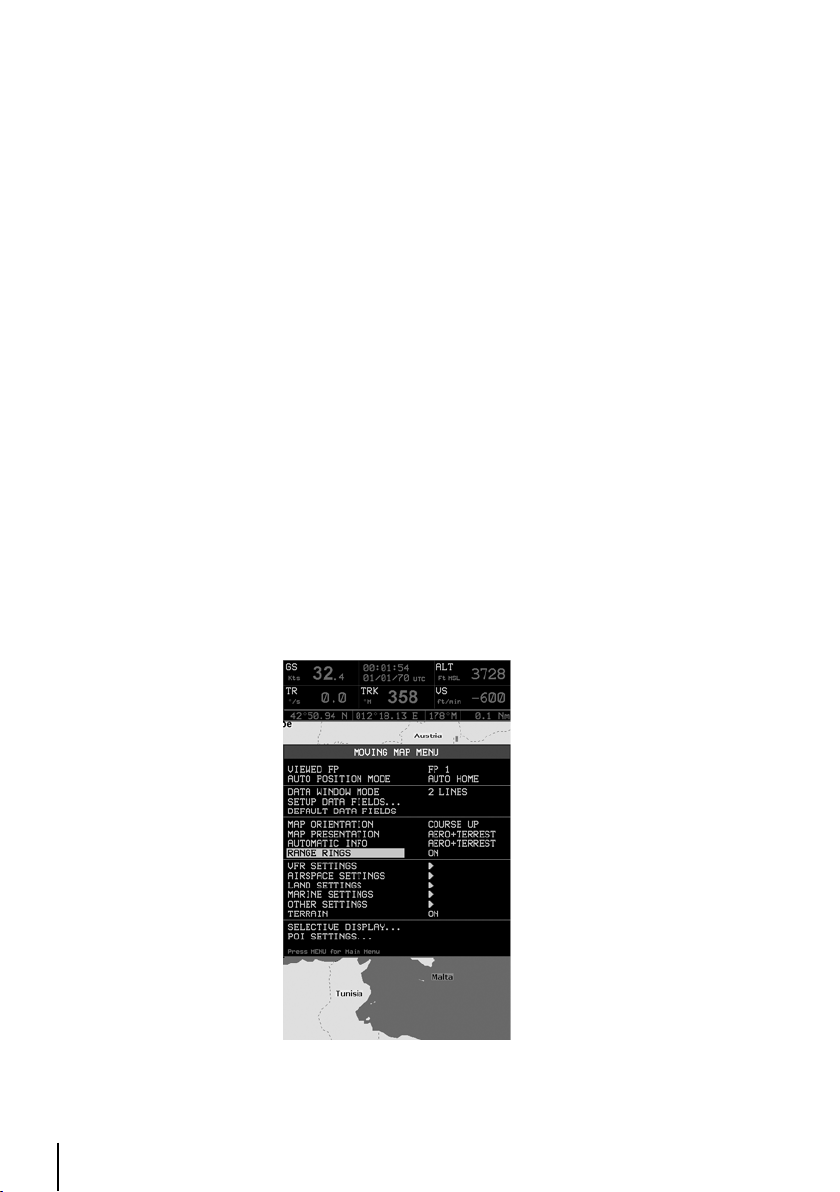
3.5 MOVING MAP MENU
The Moving Map Menu provides access to the set up functions of the Moving Map display.
Here you can define the items for display, Map Orientation, Auto Zoom, selective display and other
settings to customize the EKP-IV for your navigational needs. From Moving Map press ‘MENU’ to
display the Moving Map Menu. From here use the cursor key to select the item desired and press
‘ENTER’ to activate. At any time, press ‘CLEAR’ to back out of the menus and return to the Moving
Map.
26
Fig. 3.5 - Moving Map Menu
Page 27

3.5.1 Viewed FP
This item enables you to select the Flight Plan to display on the Moving Map from the list
of stored Flight Plans. The Flight Plan that is “Viewed” can then be edited or activated
from the Moving Map display.
> ‘MENU’ + “VIEWED FP” + ‘ENTER’
The Flight Plan list will display, using the cursor key, highlight the Flight Plan and press ‘ENTER’.
Select an EMPTY Flight Plan if you do not want a Flight Plan to display on the Moving Map, or to
create a new Flight Plan from the Moving Map.
3.5.2 Auto Position Mode
To set Auto Zoom or Auto Home mode:
> ‘MENU’ + “AUTO POSITION MODE” + ‘ENTER’
The following options are available:
OFF - The moving map display will remain in ‘CURSOR’ or ‘HOME’ mode as set by the user.
AUTO ZOOM - Used to keep the current position and the destination (Target) visible on the map.
The map is scrolled and zoomed automatically to keep the best view possible during all phases of
flight. When Auto Zoom is selected, and the cursor is active, the map will reposition the cursor to
the center point of the current position fix and the destination waypoint as needed to keep both
items visible on the display.
AUTO HOME - The Moving Map page will automatically change to the ‘HOME’ mode when no
cursor activity is present for 60 seconds. The default setting is AUTO HOME. Auto Zoom is On
the Auto Zoom mode is activated (see Par. 3.1.3).
> ‘MENU’ + “AUTO ZOOM” + “ON”+ ‘ENTER’
The Auto Zoom mode is used to keep the fix position and the destination (Target) visible on the
map. The map is scrolled and zoomed automatically to keep the best view possible.
3.5.3 DATA WINDOW MODE
The Data Window is displayed on the top of the Moving Map. This window provides navigation
information relating to the Flight Plan and GPS data. This screen can be customized to allow you to
select the information based on your flying needs.
>‘MENU’ + “DATA WINDOW MODE” + ‘ENTER’
The following options are available for the data window display:
OFF
1-line - Provides three fields for data display.
2-lines - Provides six fields for data display.
3-lines - Provides nine fields for data display.
HSI + Fields - Provides the HSI along with 6 data fields in the top half of the display window.
(Settings for the HSI display are selected in the HSI menu)
27
Page 28
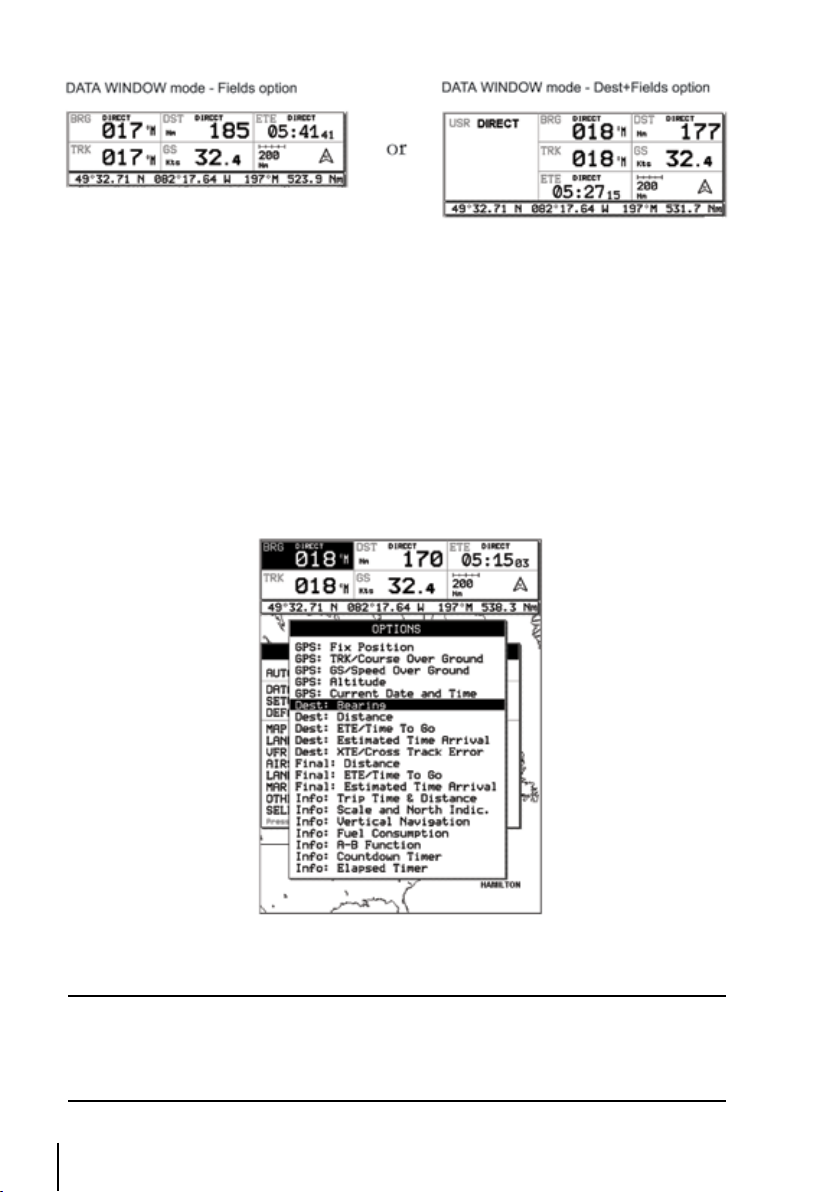
Fig. 3.5.3 - Data Window options
3.5.4 Setup Data Fields
You can select the item to be displayed in each of the fields of the Data Window. The following
figure displays the options available. The fields selected for each window mode option (1-line, 2lines, etc.) are independent; therefore, you can select different fields for each window view.
> ‘MENU’ + “SETUP DATA FIELDS” + ‘ENTER’
After pressing ‘ENTER’, a box in the Data Window will be highlighted. Using the cursor key, select
the box to be edited and press ‘ENTER’. The OPTIONS box will appear (see previous figure)
allowing you to select the item to display in the highlighted is box. Highlight the desired item from
the list and press ‘ENTER’ to accept. You can then scroll to another box and proceed as above.
Once all boxes are set up, press ‘CLEAR’ to exit.
Fig. 3.5.4 - Setup Data Fields
Note
The Dest: Wpt Info option requires 3 vertical fields for display; therefore, you can only select this option in a top
field on the 3-line display or the top field in the HSI + Fields display. If you attempt to select this item in another
filed, the system will beep three times and revert to the previous selection mode. If you have the Dest: Wpt Info
displayed and would like to change to three different items, select the top of the Destination Info box. The first
filed will display the one you selected and the bottom two fields will display default items.
28
Page 29
3.5.5 Default Datafields
This will restore data fields settings to default values
> ‘MENU’ + “DEFAULT DATA FIELDS” + ‘ENTER’
The message “DONE” will appear to the right confirming the action is complete. The Default Fields
will only be applied to the currently selected Data Window Option; i.e. 1-Line, 2-Lines, etc. .
3.5.6 Map Orientation
Map Orientation controls the direction that the Moving Map is pointing during Home and Auto
Zoom modes.
> ‘MENU’ + “MAP ORIENTATION” + ‘ENTER’
The options are:
Track-up - will rotate the map automatically to keep your Track pointed toward the top of the
display (see Par. 14.2.6; System Setup + Fix Setup + Head Up Response).
Course-up - will rotate the map automatically to keep your active leg pointed toward the top of
the display.
North-up - will rotate the map automatically to keep North pointing toward the top of the display.
During North - up mode the Screen Amplifier is active. Depending on the Heading, the fix icon
is placed on one of the 8 positions. For example, if the Heading is 45°, the fix icon is placed on
the bottom left part of the screen (see Fig. 3.5.5). This method of icon placement allows for the
maximum view ahead of the aircraft at the given direction of travel.
The default map orientation is set to TRACK-UP.
Fig. 3.5.6 - 8 marks at the areas where the icon may appear
If there is no Course defined, then COURSE UP mode NOT ALLOWED; if already in COURSE UP
mode with a destination, and DEACTIVATING it, then mode reverts to NORTH UP mode.
3.5.7 Map Presentation Menu
The Map Presentation Menu enables the user to switch quickly among several map presentation
modes: plain Land Elevation, TAWS and Weather (North America only).
29
Page 30

> ‘MENU’ + “MAP PRESENTATION” + ‘ENTER’
The default setting is generic. See paragraph 3.6 for further details.
3.5.8 Automatic Information
The display of Automatic Information is controlled by this setting. The category of detail selected
will be displayed on the Moving Map automatically when the cursor is placed over the object.
> ‘MENU’ + “AUTOMATIC INFO” + ‘ENTER’
The selection options are: OFF/AERO+TERREST /AERONAUTICAL/TERRESTRIAL/MARINE (refer
to Par. 3.3). If the category is turned Off, no details about objects will be displayed automatically.
(Full Info is can be viewed from the Cursor Menu.) The default setting is Aero + Terrest.
3.5.9 Rangerings
Range rings, 30 degrees radials, added cross at rings center is selectable in TRACK_UP or COURSE_
UP mode, in the Fix position for increased Pilot Awareness.
3.5.10 Vfr, Airspace, Land, Marine And Other Settings
The following menus enable/disable the display of categories of data.
> ‘MENU’ + “VFR/AIRSPACE/LAND/MARINE/OTHER SETTINGS” + ‘ENTER’
3.5.10.1 VFR Settings
The VFR Settings category relates to the aviation features found in the Navdata Compact Flash.
Airports: ON/OFF. The default setting is On.
VOR: ON/OFF. The default setting is On.
NDB: ON/OFF. The default setting is On.
Intersections: ON/OFF. The default setting is On.
Vertical Obstructions: ON/OFF. The default setting is On.
Aero Objects Id: OFF/SMALL/MEDIUM/LARGE. The default setting is Large.
Enroute Communications: ON/OFF. The default setting is On.
Note
The VFR Reporting points can be used as Route waypoints.
3.5.10.2 Airspace Settings
IThe Airspace Settings category relates to the airspace data found in the Navdata Compact Flash.
Low Airways: ON/OFF. The default setting is Off.
Note
Low Airways are only displayed below 50 Nm.
The Airline Airway, Control Airway and Direct Route Airway are displayed below 5 Nm.
This is the default setting. It is also possible to select them in the 50 Nm, 20 Nm, 10 Nm map scales.
The Official Designated Airway and RNAV Airway are displayed below the 50 Nm map scale.
To change from default settings, select ‘MENU’ + ‘SELECTIVE DISPLAY’, and scroll-down to any
of the following:
1. Airline Airway
2. Control Airway
3. Direct Route Airway
30
Page 31

4. Official Designated Airway
5. RNAV Airway
Refer to Section 3.5.12 for detailed information on how to customize the map display settings.
When routing to a specific leg, the Airline Airway, Control Airway, Direct Route Airway and Official
Designated Airway are displayed in blue, while the RNAV Airway (Area Navigation) are displayed
in purple.
Important Note: When the Low Airways are enabled, the Land Elevation (shading) display will be
disabled below the 50 Nm map scale. The land elevation can be determined by moving the cursor
to any area on the map display, and the elevation for that location will be displayed.
The QUICK INFO window gives you the data that refers to the selected airways. They are:
1. The Low Airways name
2. The outbound course: from the starting point of the selected airway leg
3. The length of the leg
4. The minimum altitude of the leg
In the QUICK INFO window, you may get duplicate information about the same airway. This
duplicate data refers to two different legs. An example of where this may occur is when you
place the CURSOR in the proximity of a User Waypoint or Navigational Aid where the two legs
connect.
In order to view additional data regarding the selected airway; in the Map mode, press the ENTER
key once, select FULL INFO and press ENTER again to confirm, select ‘Enroute Airways’ and
confirm pressing ENTER.
Please Note: The Enroute Airways information displayed in the FULL INFO page may present two
options:
1. Outbound = 0 designates the ending leg of the airway
2. Inbound = 0 designates the starting leg of the airway
In the GOTO menu you can find:
1. SELECT AIRWAY: by selecting this item, you will display the ENTER AIRWAY window. Using the
cursor key, you can edit the Low Airway name.
Note
Once you confirm the selection with the ENTER key, the airway is depicted in black.
2. CLEAR AIRWAY: selecting this item and pressing the ENTER key, the airway color will revert to
the original one.
Controlled Areas: ON/OFF displays/hides controlled areas on the moving map. The default
setting is On.
Restricted Areas: ON/OFF displays/hides restricted areas on the moving map. The default setting
is On.
Display Airspaces
chosen in Airspace Level
Airspaces Level: Sets the Altitude value that conditions the air spaces display if DISPLAY AIRSPACES
is set ABOVE or BELOW. If DISPLAY AIRSPACES is set ALL , AIRSPACE LEVEL is irrelevant.
FIR and UIR: ON/OFF displays/hides FIR and UIR on the moving map. The default setting is
OFF.
MORA
: ON/OFF displays/hides MORA on the moving map. The default setting is OFF.
: ALL/Below/Above enables to choose what airspaces cut basing on the threshold
31
Page 32

3.5.10.3 Land Settings
The Land Settings menu controls the level of cartographic detail shown.
Roads: ON/OFF. The default setting is On.
Road Labels: OFF/AMERICAN/EUROPEAN. The default setting is American.
Railroads: ON/OFF. The default setting is On.
City Names: ON/OFF. The default setting is On.
Rivers & Lakes: ON/OFF. The default setting is On.
Cultural Features: ON/OFF. The default setting is On.
Natural Features: ON/OFF. The default setting is On.
Landmarks: ON/OFF. The default setting is Off.
3.5.10.4 Marine Settings
Bathymetric & Soundings: ON/OFF. The default setting is On.
Navigational Aids: ON/OFF. The default setting is On.
3.5.10.5 Other Settings
User Points: OFF/ICON/ICON LABEL. The default setting is Icon/Label.
Objects Overlap: ON/OFF. The default setting is On. When more then one object is at the same
position, the selection of On allows the screen to draw the objects overlapping.
LAT/LON Grid: ON/OFF. The default setting is Off.
3.5.11 Terrains
The shaded elevation map — Terrain Depiction — and associated software features are designed
to aid pilots by graphically and numerically displaying the approximate elevation of any location on
the map. It is not designed to replace any onboard altitude/elevation instrumentation (i.e. altimeters
or other altitude/elevation measuring devices).Terrain Depiction can be displayed in either the
Vertical or Horizontal display modes.
The “Map Orientation” is set to Track-Up and the Terrain Depiction is set to ON at system start-up,
and can be changed as needed (see below for instructions on how to change the Map Orientation
from Track-Up to Course-Up or North-Up, as well as how to turn OFF the Terrain Depiction Shaded
Land Elevations).
Note
Course Up mode with Terrains (TAWS) is aligned to Track Up behaviour and Map rotation on TRACK UP mode is
made continuously in accord with the HEAD UP RESPONSE setting when in any TERRAIN mode.
3.5.11.1 Terrain “ON”
With the “Terrain” set to ON, the following occurs:
• With Map Orientation set to North-Up and Track-Up, the Terrain Depiction is displayed on all
mapping scales from 1 Nm and above. No Terrain Depiction is displayed with the mapping scale
from1/2 Nm and below.
• With the Map Orientation set to Course-Up, no Terrain
Depiction occurs on any map scale.
Note: Terrain Depiction is disabled at 1/2 mile and below to allow for a normal Track-Up Map
Orientation to be used thus allowing for airport traffic patterns to be displayed on the map.
To turn-on/off the land elevation mapping, follow these steps:
> ‘MENU’ + “TERRAIN” + ‘ENTER’
32
Page 33

To change map orientation:
> ‘MENU’ + “MAP ORIENTATION” + ‘ENTER’
3.5.11.2 Terrain “OFF”
With “Terrain” set to OFF, the following occurs: Normal mapping is displayed at all map scales
(without shading).
Determining the Elevation of any area on the map (with “Terrain” turned ON):
The cursor, when moved anywhere on the map, will open up a dialog box that will give the
approximate elevation of that point on the map. Units of measurement default to feet. To switch
to meters, go to MENU.
> ‘MENU’ x3+ “UNITS SETUP” + ‘ENTER’+”ALTITUDE”
3.6 MAP PRESENTATION MENU
The Map Presentation Menu enables the user to switch quickly among several map presentation
modes : plain Land Elevation, TAWS and Weather (North America only) . From here use the cursor
key to select the item desired and press ‘ENTER’ to activate. Hold CYCLE 1 sec from the Moving
Map to enter the Map Presentation Menu. At any time, press ‘CLEAR’ to back out of the menus and
return to the Moving Map.
3.6.1 GENERIC
Generic is the default presentation, the EKP IV will show just land elevation if selected in the
Moving Map Menu with neither TAWS or Weather information.
3.6.2 TAWS
TAWS (Terrain Awareness Warning System), depicts the separation that exists between the terrain
and the airplane. In order to properly display TAWS, you’ll need to configure the EKP-IV. In MAP
mode, press the MENU key, select TERRAIN and press ENTER. A menu is displayed. Select TAWS
and confirm by pressing ENTER.
Important Note: After TAWS is enabled; TAWS will not be displayed on the map. You will need to
acquire a position fix. The simulation mode can be used for training purposes. Press the MENU key
twice and select ‘Simulator’ from the Main Menu. Press ENTER, and set to “ON.”
Once TAWS has been enabled, the EKP-IV will display a legend in the lower left corner of the
display that depicts the TAWS color scheme:
Fig. 3.6.2- TAWS
33
Page 34

Please Note
When TAWS is enabled, the color scheme is always displayed. The rules for TAWS are divided into two levels:
1. L1=500 ft. agl / M1=1,000 ft. agl / H1=2,000 ft. agl
2. L2=1,000 ft. agl / M2=2,000 ft. agl / H2=3,000 ft. agl
The TAWS rules allow you to calculate the color scheme to be used for depicting the OCH: Obstacle Clearance
Height.
The OCH: Obstacle Clearance Height, is the difference of your own altitude (GPS Altitude) less
the Land Elevation:
OCH = ALT – LE
This calculation considers the Lowland and Highland definition, where:
A - Lowland is the terrain under 3,000 feet of elevation
B - Highland is the terrain over 3,000 feet of elevation
In the Lowland case, the TAWS colors will be red, yellow and green according to the following
values of the OCH:
§ Red: L1= from < 0 ft. up to 500 ft.
§ Yellow: M1= from </= 500 ft. up to 1,000 ft.
§ Green: H1= from </= 1,000 up to 2,000 ft.
§ Transparent (no color): > 2,000 ft.
In the Highland case, the TAWS colors will be red, yellow and green according to the following
rules of the OCH:
§ Red: L1= from < 0 ft. up to 1,000 ft.
§ Yellow: M1= from </= 1,000 ft. up to 2,000 ft.
§ Green: H1= from </= 2,000 up to 3,000 ft.
§ Transparent (no color): > 3,000 ft.
In the Auto case, the EKP-IV shifts the level of the TAWS depending terrain altitudre. In addition to
the TAWS legend in the lower left corner of the screen, all vertical obstructions (i.e. towers, tanks,
etc.) will be displayed in the appropriate TAWS color scheme.
Note
If no Fix and/or no Altitude are available, TAWS legend window content is displayed with red background and
warning message “NO ALTITUDE NO TAWS AVAILABLE” .
3.6.3 Selective Display Settings
In addition to the above Moving Map Settings the Selective Display feature allows you to further
customize the display by selecting the chart scale level at which the category of data will begin
displaying on the map. This feature is extremely useful in decluttering the screen in populated areas
or at times when you want to focus on a single category of data, i.e. medium airports only.
> ‘MENU’ + “SELECTIVE DISPLAY...” + ‘ENTER’
34
Page 35

Fig. 3.6.3 - Selective Display Settings
Scroll through the cells using the cursor key. To select the desired scale you would like the map
to begin displaying data for the category, place the cursor within the cell and press ‘ENTER’. (The
map scale for the cell is displayed at the top right.) Any box with an “X” indicates the feature is not
available at that chart scale.
All data for that category will begin to display at that chart scale checked and all scales below. It
is also possible tochoose the catrografic information to be shown based on the selected “Cycle”
program.
There are 3 programs available thatthe user can personalize through the 1/2/3 Cycle columns. For
each of them it is possible to activate/deactivate any cartographic object. To change the program
from the map pages it is necessary to press ‘CYCLE’.
3.6.4 POI Settings
This feature is similar to the Selective Display, but refers to the Points of Interest (POI).
‘MENU’ + “ POI SETTINGS...” + ‘ENTER’
Fig. 3.6.4 - POI Settings
35
Page 36

4 NAVIGATION & LOCATION
The Navigation and Location screen displays a full page of navigation information with location
coordinates. To access from the Main Menu:
> ‘MENU’ 1 sec. + “NAV/LOCATION” + ‘ENTER’
Fig. 4 - Nav/Location screen
4.1 NAVIGATION & LOCATION DATA
The Navigation data displayed in this window is based on the current Flight Plan leg or active
Waypoint. If no Flight Plan is active, only Ground Speed and Track can be displayed. The CDI is
a graphic display of Cross Track Error (XTE). The airplane remains at the center, with the course
line needle moving right and left in relation to the airplane icon. When the line is to the left of the
airplane, you are right off course and must turn left (fly to the line) to close on the course.
Note
Distances are measured horizontally.
If the icon rotates 180° and points toward the bottom of the display, you are moving away from the
destination. The numbers on either side of the CDI represent a full-scale deflection.
To change the CDI scale press the left/right cursor key.
The EKP-IV references navigation information to the next Waypoint in the active Flight Plan. When
you reach the destination of one leg, the EKP-IV automatically switches to the next leg.
This leg switching occurs when the airplane crosses the bisector of the 2 legs, as shown in
the diagram. The pilot may choose a different leg (forward of the present location) by using the
Flight Plan menu and activating the leg destination.
36
Page 37

> ‘MENU’ 1 sec. + “FLIGHT PLAN” + ‘ENTER’
Highlight the destination Waypoint of the desired leg and press ‘GOTO’ to activate that leg of the
Flight Plan.
Fig. 4.1 - Flight Plan
The Location information displayed on the Nav/Location screen includes the destination waypoint,
Bearing (BRG), Track (TRK), Estimated Time Enroute (ETE), Distance to waypoint (DST), Ground
Speed (GS), Cross Track Error (XTE), LAT/LON coordinates, GPS Altitude, Time to Descent, Estimated
Time of Arrival (ETA), and the current time.
Note
If you are using an external GPS, combinations of time, date and altitude may not be displayed. Normal GPS
altitude accuracy can be +/- 1000 feet.
The Altitude (ALT), distance and velocity units of measure are selected from Units Setup in the
System Setup Menu; the clock format (time and date) is selected from Time Format in Date & Time
Setup, also in the Setup Menu (refer to Chapter 14).
4.2 SAVE CURRENT FIX AS USER WAYPOINT
You can save your current position as a User Waypoint while viewing the Nav/Location page by
pressing ‘ENTER’. A warning box will appear to confirm your desire to add the Waypoint, displaying
the default Waypoint name. Press ‘ENTER’ to accept or ‘CLEAR’ to cancel.
This Waypoint is now stored in your User Waypoint Database.
37
Page 38

5 THE HSI SCREEN
The HSI screen presents the desired course to be flown and the current Track in a graphical format
similar to the Horizontal Situation Indicator of an aircraft; using the compass rose as the center of
the display. From Moving Map:
> ‘MENU’ 1 sec. + “HSI SCREEN” + ‘ENTER’
5.1 HSI DESCRIPTION
The HSI calculates user data (current Flight Plan and VNAV calculator data) with GPS data to
provide the visual display of the parameters of flight. While flying with the HSI mode, the Heading
Index and Course Indicator guide you to your destination.
Fig. 5.1 - HSI screen
The Vertical Situation Indicator (VSI) scale is displayed on the left side of the screen (rounded to the
nearest 100ft/min or 0.5 m/sec), while the Course Deviation Indicator (CDI) scale is displayed at the
bottom of the screen. Use the cursor keys up/down to change VSI scale among 250, 500 and 1000
FT. Use the cursor key left/right to change CDI scale among 0.1, 0.5, 1, 2, 5 and 10 NM.
The units of measure are selected from Units Setup in the System Setup Menu, (refer to Chapter
14).
Note
When the XTE is greater than the full scale indication, the deviation bar of the ruler changed with a ‘>’ or ‘<’
sign to display an “out of scale” condition.
5.2 HSI MENU
When on the HSI screen, pressing ‘MENU’ will access the HSI Menu with the following options:
Add Mark under Fix, Setup Data Fields, Default Data Fields and Compass Orientation.
38
Page 39

5.2.1 Add Mark Under Fix
While in HSI mode, it is possible to create a User Mark under the current position fix. From the
HSI screen:
> ‘MENU’ + “ADD MARK UNDER FIX” + ‘ENTER’
An information box will appear confirming the creation of the User Waypoint and informing of the
default name applied by the software; press ‘ENTER’ to accept. To edit this Mark see Par. 8.1.3 and
Par. 8.2.2.
5.2.2 Setup Datafields
The HSI Data Window can be customized by the user to display navigational data required for his
flight; similar to the Moving Map Data Window (see Par. 3.2). You can edit the data fields from the
HSI page:
> ‘MENU’ 1 sec. + “HSI SCREEN” + ‘ENTER’ + ‘MENU’ + “SETUP DATA FIELDS...” +
‘ENTER’
After pressing ‘ENTER’ a box in the Data Window will be highlighted. Select the box to be edited
and press ‘ENTER’. The OPTIONS box will appear allowing you to select the item to display in this
box. Once selected, press ‘ENTER’ to accept.
You can then scroll to another box and proceed as above. Once all boxes are set up, press ‘CLEAR’
to exit.
5.2.3 Default Datafields
This will restore the data field settings to the default values of Track (TRK), Ground Speed (GS), To
Descent, Distance (DST), Estimated Time Enroute (ETE) and Altitude (ALT). From the HSI screen:
> ‘MENU’ + “DEFAULT DATA FIELDS” + ‘ENTER’
5.2.4 Compass Orientation
The Compass Orientation allows you to set the orientation mode for the HSI compass to either
North-up or Track-up. The Compass Orientation controls the rotation such that track heading
(Track-up or North-up) always appears at the top of the screen.
> ‘MENU’ 1 sec + “HSI SCREEN” + ‘ENTER’ + ‘MENU’ + “COMPASS ORIENTATION”
+ ‘ENTER’
Note
Full screen HSI is displayed now with black background if “DARK” option is selected in “Data Window Color”
setting. The same rule that is applied to Data Window HSI thumbnail.
39
Page 40

6 FLIGHT PLAN
> ‘MENU’ 1 sec + “FLIGHT PLAN” + ‘ENTER’
The Flight Plan mode allows you to create a Flight Plan with User Points, Temporary Waypoints or
Jeppesen object as Waypoints. Flight Plans can be entered on the Moving Map (see Par. 3.5) or in
the Flight Plan Menu if all Waypoints are known objects. The EKP-IV can store up to 15 Flight Plans
with up to 100 individual legs each. Additional Flight Plans can be stored in the Compact Flash
entering File Manager (Database).
The Flight Plan Menu page provides the BRG, DST, ETA and Fuel data for the active/viewed Flight
Plan. By using the left/right cursor key it is possible to change the table columns displayed, choosing
between BRG, DST, ETA and DST, ETA, Fuel.
The Flight Plan Menu is where you can edit, view and activate Flight Plans. To open the Flight Plan
Menu press ‘MENU’ from the Flight Plan page.
Fig. 6 - Flight Plan page with Flight Plan menu box open
See section 3.4.6 regarding Flight Plan creation from the moving map page.
6.1 VIEWED FLIGHT PLAN
When you enter the Flight Plan Page, the information appearing on the screen is for the current
“Viewed” Flight Plan. The Flight Plan name will appear at the top of the page. All actions within the
Flight Plan menu are related to the currently “Viewed” Flight Plan.
To select the Flight Plan to view:
> ‘MENU’ 1 sec. + “FLIGHT PLAN” + ‘ENTER’ + ‘MENU’ + “VIEWED FP” + ‘ENTER’
Using the cursor key, select the Flight Plan desired for viewing/activating/editing.
The “Viewed” Flight Plan will display on the Moving Map. Select an Empty Flight Plan if you do not
40
Page 41

want a Flight Plan to display on the Moving Map. In addition, the viewed Flight Plan can be selected
from the Moving Map Menu. (See Sec. 3.5.1.)
6.2 CREATING A FLIGHT PLAN FROM THE DATABASE
> ‘MENU’ 1 sec. + “FLIGHT PLAN” + ‘ENTER’ + ‘MENU’
The Flight Plan Menu will open. You will need to select Flight Plan number to view. When creating
a Flight Plan select an “EMPTY” Flight Plan number:
> ‘MENU’ + “VIEWED FP” + ‘ENTER’ + “EMPTY” + ‘ENTER’ + ‘CLEAR’
Press ‘ZOOM IN’ to begin adding the Waypoints of your Flight Plan. The “Add Waypoint” box will
open allowing you to select the type of object for your first Waypoint. Use the cursor key to select
the object type and ‘ENTER’ to activate. This will bring up the Database Menu for that object. Select
the Database item desired (see Par. 8.3.1 in the Database Menu for details on selecting objects) and
press ‘CLEAR’ or ‘MENU’ to add to the Flight Plan. A warning box will appear asking you to confirm
your selection before adding it to the Flight Plan. Press ‘ENTER’ to accept or ‘CLEAR’ to quit.
Use the down cursor key to move the highlighted line to the next blank space and proceed as
above to continue adding legs to the Flight Plan. As each leg is added, the software will calculate
the bearing and distance between legs. The total distance will appear at the bottom of the screen.
During flight, the ETA and Fuel data will be calculated based on your actual flight conditions.
6.3 ACTIVATE & DEACTIVATE A FLIGHT PLAN
A Flight Plan must be activated to provide navigational data:
> ‘MENU’ 1 sec. + “FLIGHT PLAN” + ‘ENTER’
Be sure the Flight Plan you would like to activate is the “Viewed” Flight Plan appearing on the
screen. If it is not, you will need to select it from the Flight Plan menu:
> ‘MENU’ 1 sec. + “FLIGHT PLAN” + ‘ENTER’ + ‘MENU’ + “VIEWED FP” + ‘ENTER’
+ “FPXX” + ‘ENTER’ + ‘CLEAR’
Activation can be obtained in two ways:
1. The Flight Plan page displays each leg with the first Waypoint highlighted. To activate a leg of the
Flight Plan, use the cursor key to select the leg and press ‘GOTO’. This will activate navigation
to that Waypoint. This method is useful when continuing a Flight Plan after a stop. The letter “A”
(Activated) will be shown near the chosen Waypoint.
2. The Flight Plan Menu allows you to Activate/Deactivate the Flight Plan by the following
procedure:
> ‘MENU’ 1 sec. + “FLIGHT PLAN” + ‘ENTER’ + Select Waypoint + ‘MENU’ +
“ACTIVATE/DEACTIVATE FP” + ‘ENTER’ + ‘CLEAR’
Note
The first line of the Flight Plan menu will read “Activate”or “Deactivate” dependent upon the current status of the
Flight Plan mode.
It is necessary to deactivate a Flight Plan before activating another. Other Flight Plans can be created
or edited while another Flight Plan is “Active”. An active Flight Plan can be edited.
In addtioni, the Flight Plan can be activated/deactivated from the GOTO Menu box.
41
Page 42

> ‘GOTO’ + “ACTIVATE FP” OR “DEACTIVATE FP” + ‘ENTER’
This will activate/deactivate the currently Viewed Flight Plan (See Sec.3.5.1.).
Note
The current leg of the Active Flight Plan is displayed DASHED.
There is the possibility to navigate DIRECT to any FP WP (departure point included).
> ‘GOTO’ + “DIRECT TO FP WAYPOINT” + ‘ENTER’
In this case a “D” appears in front of the destination waypoint in the FLIGHT PLAN page.
Note
When there is a DIRECT go to waypoint a menu item “RESYNC DIRECT” is added to the GOTO menu.. With this
option you can resync from your current position to the destination waypoint.
6.4 NAMING A FLIGHT PLAN
The EKP-IV allows you to create a user defined name of 12 alphanumeric characters for each Flight
Plan. This name will appear at the top of the page when viewed and in the Flight Plans List when
viewing all Flight Plans. To edit the default name:
> ‘MENU’ 1 sec. + “FLIGHT PLAN” + ‘ENTER’ + ‘MENU’ + “RENAME FP” + ‘ENTER’
Use left/right cursor key to select the field and the up/down cursor key to insert the desired name.
At any time in the rename screen, ‘ENTER’ will activate the name change.
6.5 CLEAR A FLIGHT PLAN
This will delete the Flight Plan from the EKP-IV memory enabling another Flight Plan to be created
in this FP number:
> ‘MENU’ 1 sec. + “FLIGHT PLAN” + ‘ENTER’ + ‘MENU’ + “CLEAR FP” + ‘ENTER’
A Warning window will appear to confirm deletion: press ‘ENTER’ to confirm, ‘CLEAR’ to abort.
6.6 REVERSE A FLIGHT PLAN
The Flight Plans stored in the EKP-IV memory can be automatically reversed by:
>‘MENU’ 1 sec. + “FLIGHT PLAN” + ‘ENTER’ + ‘MENU’ + “REVERSE FP” + ‘ENTER’
The message “DONE” will appear to the right of the menu selection and the sequence of the
Waypoints change immediately on the screen.
6.7 CROSSED AIRSPACES PREDICTOR
> MENU 1 SEC + “FLIGHT PLAN” + ENTER + MENU + “CROSSED AIRSPACES
PREDICTOR”
With this function the pilot is able to check the airspaces crossed by the FP. In the Airspace Prediction
Setup the pilot can select which airspaces should be notified and the extimated altitude of flight. If
42
Page 43

the FP passes through one or more of the airspaces selected a popup window will appear showing a
list of them. The selectabel airspaces are : Class B, Class C, Towers & Control zones, Restricted Areas
and Moas & other Suas every one with a switch ON/OFF. Pressing ENTER on “Crossed Airspaces
Predictor” label will start the check.
6.8 GOTO FLIGHT PLANS
A GoTo Flight Plan is a one leg direct Flight Plan to a specified Database object or cursor position
on the Moving Map.
6.8.1 GoTo - Database Mode
To activate a GoTo Flight Plan within a Database page (see Chapter 8) press ‘GOTO’. Doing this will
deactivate the current Flight Plan and redraw the screen to the Moving Map page. All navigation
information is now related to this object.
To Deactivate the GoTo Flight Plan, from the Moving Map screen press ‘GOTO’. A GoTo Menu box
will appear with the option to deactivate. Pressing “DEACTIVATE FP” will cancel the navigation
data and place the EKP-IV in a Plotter Mode without an active Flight Plan.
If a Flight Plan was active prior to the GOTO, the Flight Plan will resume as active.
6.8.2 GoTo - Moving Map Mode
To activate a GoTo Flight Plan from the Moving Map, press ‘GOTO’. A “GoTo” Menu box will
appear on the screen. You can select the current cursor position or select a Database object
category. When selecting the Database category, the Database menu will appear (see Chapter 8 for
details on searching the Database Menu). Once the desired object has been found, press ‘GOTO’
to activate.
The ‘GoTo’ menu changes according the navigation :
No Navigation
- With NO FP displayed (currently in view EMPTY): the “ACTIVATE FP” option is removed
- With any non empty FP displayed the : “DIRECT TO FP WAYPOINT” option is added
Standard FP Navigation
- With any non empty FP displayed the : “DIRECT TO FP WAYPOINT” option is added
Direct to FP Waypoint Navigation
- With any non empty FP displayed the : “DIRECT TO FP WAYPOINT” and “DEACTIVATE
DIRECT TO FP WAYPOINT” options are added The “ACTIVATE FP” item is removed.
Direct to non FP Navigation
- With NO FP displayed (currently in view EMPTY): the “ACTIVATE FP” option is removed
- With any non empty FP displayed the : “DIRECT TO FP WAYPOINT” option is added
Note
GOTO’ creates a temporary Flight Plan that is not stored in the EKP-IV memory.
6.8.3 GoTo - Quick Info
From the QUICK INFO menu when there are many Aeronautical Objects near the CURSOR press
GO TO to navigate, PUSH and HOLD GO TO to ADD a LEG to the FLIGHT PLAN.
6.9 NEAREST SEARCH FOR GOTO FLIGHT PLAN ACTIVATION
Pressing ‘PAGE’ at any time will provide a list of the 13 Nearest Database objects. The first page to
appear will be the last chosen category of data. To select another category of data, press ‘MENU’
to display the available categories.
43
Page 44

Fig. 6.2 - Nearest function with Nearest menu opened
The Nearest page will display the identifiers, bearing To and From, Distance and Estimated Time
Enroute (ETE). Using the cursor key select the desired object and press ‘GOTO’ to activate a Route
to this item.
To obtain additional details regarding the object, press ‘ENTER’ and the Database page will
appear.
To locate the object on the Moving Map without creating a “GoTo” Flight Plan, press and hold
‘GOTO’ for 2 seconds.
Note
The Nearest list displayed is based on your current GPS position. If no GPS position is available, the list is based on
the current cursor position.
6.10 SAVING FLIGHT PLANS
It is possible to save all changes in Active FP from FP Page menu and the location for saving changes
in Active FP may be chosen by the user from the FP list.
44
Page 45

7 THE GLOBAL POSITIONING SYSTEM
The Global Positioning System (GPS) is a constellation of satellites that orbit the earth twice a day,
transmitting precise time and positioning information to anywhere on the globe, 24 hours a day.
The system was designed and deployed by the U.S. Department of Defense to provide continuous,
worldwide positioning and navigation data to U.S. and allied military forces. GPS broad commercial
applications were recognized early in the system’s development, and the U.S. government decided
to allow free access to GPS signals. Today, GPS is used in a wide variety of commercial and scientific
applications.
7.1 GPS PAGE
The GPS page shows GPS data in graphic mode, displaying satellite availability and status.
> ‘MENU’ 1 sec. + “GPS PAGE” + ‘ENTER’
Fig. 7.1 - The GPS page
This page displays the current status and location of all available satellites in the GPS constellation,
referenced to the initial position or last fix.
On the bottom half of the screen (see previous figure) there is a polar representation of the Azimuth
and Elevation of the satellites used to compute a position fix.
The Elevation is the height of the satellite above the horizon, with 5° (lowest) near the horizon and
90° (highest) being directly overhead (the EKP-IV does not normally use satellites with Elevations
lower than 10°). Azimuth is the satellite’s location in relation to true north, measured clockwise as
a bearing. A satellite with an Azimuth of 90° is to the east.
The circle contains a number indicating the number of the satellite and it is green (or blue for WAAS
satellites) when it is used for the fix solution (red otherwise). On the left side there are histograms
indicating the S/N ratio (SNR). The bar is green (or blue for WAAS satellites) when the satellite is
used for the fix (red otherwise). When a valid fix is received, the EKP-IV displays the current position
45
Page 46

coordinates, Date, Time, HDOP, VDOP,GS, TRK and ALT on the GPS page.
7.2 GPS RECEIVER SPECIFICATIONS
• Receiver: L1, C/A code, DGPS/WAAS Ready
• Channels: 15
• Max Solution Update Rate: 10 sec.
• Cold Start (avg): < 45 sec.
• Warm Start (avg): < 40 sec.
• Hot Start (avg): 8 sec.
7.3 HOW GPS WORKS
Each GPS satellite continuously broadcasts two signals: an SPS (Standard Positioning Service) signal
for worldwide civilian use and a PPS (Precise Positioning Service) signal for U.S. and Allied military
use. The SPS signal is a spread-spectrum signal broadcast at 1575.42 MHz. The signal is virtually
resistant to multipath and nighttime interference and is unaffected by weather and electrical noise.
All commercial and consumer GPS receivers are SPS receivers.
The SPS signal contains two types of orbit data: almanac and ephemeris. Almanac data contains the
health and approximate location of every satellite in the system. A GPS receiver collects almanac
data from any available satellite, then uses it to locate the satellites that should be visible at the
receiver’s location. Ephemeris data represents the precise orbital parameters of a specific satellite.
Receivers listen to signals from many satellites simultaneously and triangulate a position fix using
the interval between the transmission and reception of each satellite signal (a receiver tracks more
satellites than are actually needed for a position fix, so that if one satellite becomes unavailable, the
receiver knows exactly where to find the best possible replacement).
Three satellites are required for two-dimension positioning (which determines position only) and
four satellites are required for three-dimension positioning (to determine position and elevation).
7.3.1 Accuracy
In general, an SPS receiver can provide position information with an error of less than 25 Meters
and velocity information with an error of less than 5 Meters per second. For applications that require
much greater accuracy the effects of SA and environmentally produced errors can be overcome by
using a technique called Differential GPS (DGPS), which increases over-all accuracy.
7.3.2 WAAS
The Federal Aviation Administration (FAA), in cooperation with other DOT organizations and DOD,
is augmenting the GPS/SPS with a satellite-based Wide Area Augmentation System (WAAS). WAAS
will provide a signal-in-space to WAAS compatible receivers to support en route through precision
approach navigation. After achieving initial operational capability, WAAS will be incrementally
improved to expand the area of coverage, increase the availability of precision approaches, increase
signal redundancy and reduce operational restrictions.
7.3.3 Differential GPS
Differential GPS (DGPS) uses a GPS receiver at a fixed point with a known position of sub-meter
accuracy. This is the control unit. The receiver collects data for all visible satellites and computes
predicted satellite ranges, which are compared with actual ranges. The difference is the satellite
range error, which is converted to correction signals for use by a roving receiver.
It is assumed that this correction will be the same for other GPS receivers that are in the same
area and are using the same satellites for positioning. If the correction is communicated to other
receivers in the area (usually by a beacon on the same site), the range error can be removed from
satellite signals and precise fixes calculated by these receivers.
It should be noted that not all data errors can be corrected in this way. Errors that are caused
by receiver noise (which is inherent in any GPS receiver) and multipath problems cannot be
eliminated with differential corrections. (Multipath errors occur when the receiver’s antenna “sees”
46
Page 47

the reflections of signals that have bounced off of surrounding objects.)
Using DGPS to eliminate the effects of correctable errors requires that the user’s GPS receiver be
connected to a compatible differential beacon receiver and be within range of the broadcasting
beacon. The differential beacon receiver accepts and demodulates the broadcast corrections, which
are then relayed to the GPS receiver. The GPS receiver applies the corrections to the navigation
data it uses to compute a position solution and displays differentially corrected data. Care must be
taken to ensure that the DGPS receiver and the GPS receiver are compatible for this procedure to
be successful.
7.3.4 Monitoring & Controlling The GPS
The Global Positioning System is monitored and controlled by the U.S. Air Force, which is responsible
for updating and maintaining exact satellite position and signal data accuracy.
It is also responsible for performing maintenance on the satellites, which may require the satellite
being taken off-line. Since the system is subject to periodic updates and changes, the almanac data
broadcast by the satellites is current for a limited time — generally about 14 days.
7.3.5 GPS Information Sources
The needs of the worldwide civil GPS user community are served by the Civil GPS Information
Center (GPSIC) in Virginia. The GPSIC is operated and maintained by the U.S. Coast Guard for the
Department of Homeland Security.
Its primary function is to provide information on the Global Positioning System and satellite status
and to serve as a point of contact.
The GPSIC has general GPS literature available free upon request. The Center also maintains upto-date almanac data and Operational Advisory Broadcasts containing current constellation status
and planned satellite outages.
There are three ways to quickly obtain current information about the Global Positioning System
from the GPSIC:
1. Recorded phone message at (703) 313-5907
2. WebSite: www.navcen.uscg.mil
3. Live information at phone (703) 313-5900.
There are several GPS bulletin board services outside the United States, including:
South Africa +27 (12) 803 8318
Germany +49 (69) 6333 418 Internet via TELNET: 141.74.240.25
German X.25 Network, Datex-P (from Sprintnet preferred): 45050262720
Norway +47 32124045 or +47 32118369
United Kingdom +44 (602) 422111 full access is available only to members of the UK Civil
Satnav Group
There are other sources for GPS information, ranging from free, governmentally produced literature
to purchased professional literature and seminars. The geography department of your local college
or the local office of the National Geodetic Survey may be able to help.
47
Page 48

8 WAYPOINT & DATABASE
The EKP-IV uses three types of Waypoints:
Jeppesen Waypoints are contained in the Compact Flash and include Airport, VOR, NDB and
Intersection Waypoints. Each of these Waypoints is displayed on the Moving Map by an icon. These
Waypoints can be searched in the Database Menu and identified on the Moving Map with Quick
Info or Full Info. Each of these Waypoints can be used in a Flight Plan, for the Nearest Search or
GoTo functions. When used in a Flight Plan, details regarding the Waypoint are displayed in the
Destination box during flight (when DEST is chosen for display in the Data Window, see Par. 3.5.2).
Our Jeppesen library is updated every 28 days. The info regarding the Jeppesen cycle (the cycle
number, the validity period Start Date and Expiring Date) displayed on Title page and on About
page. Please contact your local C-MAP office for update orders and pricing.
User-Defined Waypoints
unique 8 character names and choose from 16 icons for each waypoint. Waypoints can be created
and edited both on the Moving Map and in the User Waypoint Database page. Like the Jeppesen
Waypoints, they can be used in a Flight Plan, for the Nearest Search or GoTo functions. The EKP-IV
can store up to 1,000 User-Defined Waypoints within the internal memory. The internal waypoint
memory capacity is shared with Flight Plan waypoints; i.e. if you have 15 flight plans with 10
waypoints stored in the unit memory, there is room for 900 User Waypoints.
Temporary Waypoints are created only on the Moving Map and are associated with a particular
Flight Plan. They are named in the format WPT001, WPT002 etc. Temporary Waypoints can be
used at the beginning, middle or end of Flight Plans. They can be used as the destination of a
Direct-To Flight Plan, but cannot be accessed in the Nearest function.
8.1 USER WAYPOINTS – MOVING MAP
8.1.1 Creating User Waypoints – Moving Map
From the Moving Map the User Waypoint is a saved cursor position. To create a User Waypoint at
the cursor position:
(also called User Waypoints) are created by the user. The user can create
> ‘ENTER’ + “ADD WAYPOINT” + ‘ENTER’
A name is automatically assigned in the format “USRxxx”, where “xxx” is a sequential number. You
may use the default display name, LAT/LON and symbol or edit them.
Note
When editing the waypoint, select the “picture” icon to associate the waypoint with the Waypoint Alarm (See Sec
14.3.3).
8.1.2 Saving Present Position – Moving Map Methods
To automatically save your present GPS position as a User Waypoint:
>‘ENTER’ 1 sec.
A name is automatically assigned in the format “USRxxx”, where “xxx” is a sequential number. The
default icon is an X. You may use the default display name, LAT/LON and symbol or edit them.
8.1.3 Editing User Waypoints – Moving Map Methods
You can edit the User Waypoint information from the default. From the Moving Map screen:
48
Page 49

> Place the cursor over the Waypoint + ‘ENTER’ + “EDIT WAYPOINT” + ‘ENTER’
To edit Name field (up to 8 characters): press left/right cursor key to select the character to be
changed and then up/down cursor key to scroll to the desired character. Press ‘ENTER’ to accept
and to pass to the next field. Repeat the same procedure to change the Coordinates and Icons
fields.
8.1.4 Deleting User Waypoints – Moving Map Methods
A Waypoint can be deleted only if it is not being used in a Flight Plan. To delete the User Waypoint
from the Moving Map screen:
> Place the cursor over the Waypoint + ‘ENTER’ + “REMOVE WAYPOINT” + ‘ENTER’
Note
Only User Waypoints may be deleted and only if they are not contained in a Flight Plan. If the option to Edit or
Remove Waypoint is not displayed in the Cursor/Position Menu, adjust the cursor closer to the object icon.
8.2 USER WAYPOINTS – DATABASE METHODS
8.2.1 Creating User Waypoints – Database Methods
A User Waypoint can be entered manually into the User Database Menu by selecting a display icon,
entering a name (up to 8 characters) and keying in the desired Coordinates. To enter a Waypoint
via the Database Menu page from the Moving Map:
> ‘MENU’ 1 sec. + “DATABASE” + ‘ENTER’ + “USER WAYPOINTS” + ‘ENTER’ +
‘ZOOM IN’
Edit the name (up to 8 characters) using the left/right cursor key to select the character to be changed
and then up/down cursor key to scroll to the desired character. Press ‘ENTER’ to accept and to pass
to the next field. Repeat the same procedure to change the Coordinates and Icons fields.
8.2.2 Editing User Waypoints – Database Methods
To edit a Waypoint already created within the Database from the Moving Map:
> ‘MENU’ 1 sec. + “DATABASE” + ‘ENTER’ + “USER WAYPOINTS” +’ENTER’ + select
Waypoint to edit + ‘ENTER’ Using the up/down and left/right keys, select a user icon and press
‘ENTER’ to move to the next column. Continue in this manner through each column. When you
have reached the last column and press ‘ENTER’ the Waypoint will be saved and sorted into the
table alphanumerically.
8.2.3 Deleting User Waypoints – Database Methods
A Waypoint can be deleted only if it is not being used in a Flight Plan. To delete a Waypoint via the
Database Menu from the Moving Map screen:
> ‘MENU’ 1 sec. + “DATABASE” + ‘ENTER’ + “USER WAYPOINTS” + ‘ENTER’ +
‘ZOOM OUT’
A warning box will appear asking you to confirm deletion of the Waypoint. Press ‘ENTER’ to confirm
or ‘CLEAR’ to cancel.
49
Page 50

8.3 DATABASE
The Database functions allow the user to search for and display information stored in the data
cartridges on Airports, VOR, NDB, Intersections and User Waypoints.
8.3.1 Database Menu
To access the main Database menu from the Moving Map:
> ‘MENU’ 1 sec + “DATABASE” + ‘ENTER’
Options are: Airports, VOR, NDB, Intersections, POI Objects, User Waypoints and File Manager.
A window shows the different categories of Database items within the EKP-IV. Highlight the
category to be searched and press ‘ENTER’. Depending upon the category of object, the Database
can be searched by one of three methods: identifier, name or city (and in the Pro version; Places,
Streets).
8.3.1.1 Selecting Database Search Fields
Upon entering the Database page for the selected item, (except User Waypoints) the EKP-IV will
default the ID box for search criteria by placing a box around the field name. If you would like
to search by another field, press the up/down cursor key to select the field and press ‘ENTER’ to
activate the chosen field. At that time a double sided cursor key will appear in the first character
field. The double sided cursor key allows you to scroll through the database alphanumerically.
Fig. 8.3.1.1 - Airport Database page with the arrow active on the ID
Or use the left/right cursor key to select the character to be changed and then the up/down cursor
key to scroll to the desired character. Press ‘ENTER’ or ‘CLEAR’ to obtain the full information for the
item displayed. From the Database page, pressing GOTO will begin a direct flight to the waypoint.
50
Page 51

Pressing GOTO for and holding will redraw the moving map centered on the object.
8.3.1.2 Displaying Sunrise and Sunset Information
With the Airport selected on the Database page, press ‘PAGE’ to display the Sun/Moon information
for the airport. If a GPS fix is present, the information will automatically display. If no GPS fix is
present, or you would like to see the information for another day, press ‘ENTER’ to activate the
SUN/MOON INFO box and select the date.
Note Searching The Airport Database
When searching by city for airports located within the same city, the double sided cursor key will scroll through
each airport within the city. When displaying Airport data, press the left/right cursor key for additional details on
the airport frequencies and runway data. Remember to key in the ICAO prefix (“K” for the United States) at the
beginning of airport identifiers, where applicable (see Appendix 4 for details).
8.3.2 File Manager
Using CF memory cards with different versions of the navigation software or updating the map data
may cause the loss of your user Routes, Tracks and Waypoints. To avoid this inconvenience it is
recommended that you save your Routes, Tracks and Waypoints that you have created.
To access the File Manager window :
> ‘MENU’ 1 sec + “DATABASE” + ‘ENTER’+’FILE MANAGER’+’ENTER’
You will enter in the File manager, now you can save, load and delete your user data in a special
database file. To Refresh or Initialize the FileManager press MENU, select one of the two options and
press ENTER. The unit automatically initializes the card in case there is no database file. Selecting
Initialize the navigator will just create a new databse file deleting the old one. No other file will be
touched by this procedure.
Note
The Initialization creates a new database file removing all the data stored in the card in case the database file is
already present.
To save user files press ZOOM IN. Edit the name (up to 8 characters) using the left/right cursor
key to select the character to be changed and then up/down cursor key to scroll to the desired
character. Press ‘ENTER’ to accept and to pass to the next field in order to choose the file type to
vbe saved (Routes, Tracks , Waypoints). Once the two fields are selected press ENTER again. A
warning box will appear asking you to confirm the deleting of the file. Press ‘ENTER’ to confirm
or ‘CLEAR’ to cancel. Wait for the STATUS tag at the top of the page to return “Idle”.The function
will save all user data of the selecte type at the moment on the navigator. Multiple saves won’t be
necessary in case of multiple data. (ex. in case there are 500 waypoints in the navigator, an unique
save sill store all of them in an unique file).
After a RAM clear or a software update you can reload previously saved data. To load user files use
the up/down cursor key to scroll to the desired data and press ENTER. A warning box will appear
asking you to confirm the loading of the file. Press ‘ENTER’ to confirm or ‘CLEAR’ to cancel.
To permanently delete user files use the up/down cursor key to scroll to the desired data and press
ENTER. A warning box will appear asking you to confirm the deleting of the file. Press ‘ENTER’ to
confirm or ‘CLEAR’ to cancel.
Note
It is not possible to overwrite the content of an existing file.
51
Page 52

9 APPROACH DATA PROCEDURES
WARNING!!!
The EKP-IV is not certified for use as the only navigation device during Instrument Flight Rules as established by the
FAA. Instrument approach points displayed in the unit are for information only and do not establish authority for
a pilot to fly the IFR approach procedure in actual instrument flying conditions. For IFR flight. The final “Approach
Segment & Missed Approach Point” the EKP-IV is to be used strictly as a monitoring instrument only.
An approach procedure is a series of pre-determined maneuvres for the orderly transfer of an
aircraft, under instrument flight conditions, from the beginning of the initial approach to a point
from which a safe landing may be made visually. Generally, the approach pattern and procedure is
not chosen until arrival in close proximity of the destination airport, since conditions may change on
route. To activate an “Approach” it is necessary to have an active “Flight Plan” or “GOTO”.
For each airport with at least one published final approach, there exists one or more named
approach procedures. Each approach procedure can be related to a runway and to nearby NavAids
(such as ILS, VOR, NDB, GPS...).
9.1 APPROACH FROM THE MOVING MAP
Note
You must start with an empty flight plan.
While navigating or planning in the moving map screen, the pilot will not be able to establish an
approach on a flight plan, without changing into the Flight Plan mode, but can place the cursor over
the selected airport. To display the quick data box press:
> ‘ENTER’ 1 sec + ‘ENTER’ (for detailed information).
The detailed information on the airport will be displayed, beginning with the general information
and frequencies. By pressing the cursor key on the left, the approaches for the chosen airport will
display in the box and the bearing for the viewed approach will display on the moving map. By
continuing to press the cursor key on the left the other approaches for the airport will display, the
last bearing for the last approach viewed will become white on the moving map and the bearing for
the viewed approach will be displayed in black on the moving map.
Note
The white approach bearings will disappear once the screen redraws itself.
9.2 APPROACH FROM FLIGHT PLAN DATABASE
Refer to Chapter 6 for Flight Planning.
Flight Plan mode allows the pilot to plan and activate up to ten flight plans with up to 100 individual
legs each. Now the EKP-IV allows the pilot to pre-program an approach at the destination end of
the flight plan and to change the approach as desired.
Once an airport is present as a final waypoint in the flight plan, press ‘MENU’ and “SELECT
APPROACH” + ‘ENTER’ and the available approaches for the destination airport will be displayed.
Highlight the approach desired, press ‘ENTER’ and the waypoints associated for that approach will
show in the flight plan list. Press ‘CLEAR’ + ‘CLEAR’ and the flight plan will appear on the moving
map.
52
Page 53

To change the desired approach for the airport, if one is selected
> ‘MENU’ + ‘MENU’ + “FLIGHT PLAN” + ‘ENTER’ + ‘MENU’ + “CHANGE APPROACH”
- select the approach + ‘ENTER’.
This will substitude the previous approach including the waypoints on the moving map for the new
approach and add the new waypoints to your flight plan and the moving map.
To remove desired approach
> ‘MENU’ + ‘MENU’ + “FLIGHT PLAN” + ‘ENTER’ + ‘MENU’ + “REMOVE APPROACH”
+ ‘ENTER’.
9.3 SELECT APPROACH FOR GOTO
If a ‘GOTO’ to an airport is active or an FP containins an airport as destination point, pressing
“GOTO” from the map will display the GOTO menu (regardless of your cursors position).
If an approach to the destination airport is not yet selected (the approach has to be present in the
Jeppesen® database), the “GOTO Menu” will display “Select Approach”.
If an approach is already selected, the “GOTO Menu” will show the options: “Change Approach”
or “Remove Approach”.
Selecting “Select Approach” or “Change Approach” will open a new window with available
approaches for the destination airport.
After selecting the desired approach, the EKP-IV will remove the GOTO destination airport
and replace it with the approach waypoints. The ‘GOTO’ destination is now the first approach
waypoint.
The EKP-IV will take you to the first point of the approach, and after passing through this point
automatically, will go to each of the other points of the approach. Selecting “Remove Approach”
removes the approach waypoints from the GOTO destination replacing them with the corresponding
airport waypoint (that was originally selected).
Activating a GOTO with an Approach from database
If you are in the airports database page
> ‘MENU’ + ‘MENU’ + “DATABASE” + “AIRPORTS”
and the screen is displaying approach information, by pressing ‘GOTO’ you will activate a ‘GOTO’
to the selected airport and automatically opened the “Select Approach” window.
If you don’t want to select any approaches just press ‘CLEAR’.
53
Page 54

10 CALCULATOR
The Calculator functions assist the user in preflight and in-flight calculations for Vertical Navigation,
Wind and Fuel consumption. In addition, clock functions and trip data can be found in this menu.
The Calculator uses GPS data and user data for computations.
All Calculator functions are based on the active Flight Plan. The active Flight Plan is selected and
activated on the Waypoint/Flight Plan menu (see Chapter 6).
> ‘MENU’ 1 sec. + “CALCULATOR” + ‘ENTER’
Fig. 10 - Calculator page
10.1 COUNTDOWN TIMER
The Countdown Timer will sound an alarm at the end of the set time interval. The time calculations
continue in the background of the software, even if you are not on the Calculator page or do not
display the timer data in the data fields window.
The system does require a GPS fix to begin the timer, as the calculation of time is based on the GPS
data. If the GPS fix is lost during this mode, the timer will display dashes in the right hand column.
The time calculation will continue to work in the background.
> ‘MENU’ 1 sec. + “CALCULATOR” + ‘ENTER’ + “COUNTDOWN TIMER” + ‘ENTER’
A box will appear in the right hand column allowing you to set the hours, minutes and seconds. Using
the cursor key select the number desired and press ‘ENTER’ to accept and begin the countdown.
Entering 00:00:00 equals Off. The default setting is Off (00:00:00).
10.2 ELAPSED TIMER
The Elapsed Timer will begin calculating time from zero when activated. The elapsed time will
54
Page 55

continue to calculate in the background of the software, even if you are not on the Calculator
screen or do not display the timer data in the data fields window.
The system does require a GPS fix to begin the timer, as the calculation of time is based on the GPS
data. If the GPS fix is lost during this mode, the timer will display dashes in the right hand column.
The time calculation will continue to work in the background.
> ‘MENU’ 1 sec. + “CALCULATOR” + ‘ENTER’ + “ELAPSED TIMER” + ‘ENTER’
This will begin the timer. To turn Off the timer, press ‘ENTER’ from this menu. A warning box will
appear on screen to confirm your action. Press ‘ENTER’ to confirm or ‘CLEAR’ to quit and continue
the timer calculation. The default setting is Off (00:00:00).
10.3 TRIP COMPUTER
The EKP-IV provides a calculation page which tracks speed, flying time, and distance traveled.
This data is statistical in nature and is calculated based on GPS parameters.
Note
The Fuel Calculator “Starting Fuel” entry will reset the partial trip data.
To select the Trip Computer page:
> ‘MENU’ 1 sec. + “CALCULATOR” + ‘ENTER’ + “TRIP COMPUTER” + ‘ENTER’
Fig. 10.3 - Trip Computer page
Flying Avg: Speed values above 35 knots divided by flying time.
Overall Avg: Speed values divided by Partial Distance.
Maximum Speed: Fastest speed reached
Current Speed: Current GPS speed.
55
Page 56

Flying Time: Total time when speed is greater than 35 knots.
Stopped Time: Total time unit was on with a GPS fix and speed was less than 2 knots.
Trip Time: Total time the unit is on regardless of GPS fix.
Partial Dist: Total distance since reset.
Trip Dist
: Total distance traveled since reset.
To Reset Partial totals to zero
press ‘ZOOM IN’ + ‘ENTER’ to confirm action.
To Clear all totals (all fields): While on the Trip Computer Page, press ‘ZOOM OUT’ + ‘ENTER’
to confirm action.
(all fields except trip distance): While on the Trip Computer Page,
10.4 VERTICAL NAVIGATION
The Vertical Navigation (VNAV) function prepares a descent profile and recommends a descent
to the altitude of the destination of the active Flight Plan or to some OFFSET point from the
destination. The Vertical Situation Indicator in the HSI display is activated with this function (the
units of measure used for the values entered here are selected from Units Setup menu in the System
Setup Menu, see Par. 14.5). This feature requires that a Flight Plan be activated.
> ‘MENU’ 1 sec.+ “CALCULATOR” + ‘ENTER’ + “VERTICAL NAVIGATION” +
‘ENTER’
User data is entered in the fields at the bottom half of the screen. To set Vertical Navigation
parameters use ‘ENTER’ to edit the selected field (a box appears around the active field) and the
cursor key to move between fields. Press ‘CLEAR’ to return to Calculator menu.
Note
The Vertical Navigation solution estimates the target altitude (altimeter reading) from glideslope, distance to the
Waypoint, and the total altitude change. GPS altitude is not accurate enough for stand alone vertical navigation.
Some values are automatically displayed. Time To Go, Distance, Descent Rate and Altitude From
are based on current GPS data. An Altitude To is displayed if a Traffic Pattern Altitude for the
destination exists in the Database. Altitude From, Altitude To, Offset Distance and Glide Slope can
be edited. Vertical Navigation is a full screen page with the following structure:
56
Fig. 10.4 - Vertical Navigation page
Page 57

Fig. 10.4a - Vertical Navigation function
Vertical Navigation can be activated (On) only if a Flight Plan is active (destination present).
Destination point for Vertical Navigation is the last point of the Route or destination of GoTo
mode.
Prior to the Descent Point being reached the Distance To Go displays TO, Time To Go to Descent
point and Descent Rate from the current position. After passing Descent point the system displays
TO, Time To Go to the Destination and Target altitude based on actual descent profile. Time To
Descent or Target ALT values can be displayed in the Data Window of Moving Map and HSI modes.
The Vertical Navigation value displayed in the HSI is calculated as a difference between current
altitude (from GPS) and Target altitude.
10.5 WIND CALCULATION
The Wind Calculation feature computes winds aloft by comparing Ground Speed and Track with
indicated heading, indicated air speed and Outside Air Temperature.
> ‘MENU’ 1 sec. + “CALCULATOR” + ‘ENTER’ + “WIND CALCULATION” + ‘ENTER’
User data is entered in the fields at the bottom half of the screen. To set Wind Calculation parameters
use ‘ENTER’ to edit the selected field (a box appears around the active field) and the cursor key to
move between fields. Press ‘CLEAR’ to return to Calculator menu.
Note
This function works best when the airplane is straight and level.
Wind Calculation is a full screen page with the following structure:
57
Page 58

Fig. 10.5 - Wind Calculation page
The EKP-IV computes wind velocity and direction from the information entered above and from
the current Ground Speed,Track and Altitude, which are derived from GPS data. ETE to Waypoint
is also based on GPS Ground Speed and Track. Wind information will be recomputed when the
heading, air speed, air temperature or Altitude values are edited.
Note
The wind calculator does not correct for local barometric pressure, which may not be known accurately enroute.
The values produced by the wind calculator may therefore differ from the true winds by up to 5%.
10.6 FUEL CONSUMPTION
The EKP-IV computes Fuel Consumption for each leg of the active Flight Plan or the fuel used in
flight, based on entries made by the pilot. This is a useful feature for flight planning purposes. Actual
Fuel Consumption will vary based on flight conditions and engine settings.
Fuel can be calculated in pounds, liters or gallons; the units of measure used for the valuesentered
here are selected from Units Setup menu in the System Setup Menu (see Par. 14.5).
> ‘MENU’ 1 sec. + “CALCULATOR” + ‘ENTER’ + “FUEL CONSUMPTION” + ‘ENTER’
CARBURANTE” + ‘ENTER’
58
Page 59

Fig. 10.6 - Fuel Consumption page
To set Fuel Consumption parameters use ‘ENTER’ to edit the selected field (a box appears around
the active field) and use the cursor key to move between fields. Press ‘CLEAR’ to return to the
Calculator Menu. If your current Ground Speed is over 20 Knots, the EKP-IV will display “Actual GS”
and will not allow you to edit the value.
The EKP-IV will compute and display Fuel Consumption for each leg of a Flight Plan, and total fuel
needed for the flight in the Flight Plan page (see Chapter 6). When selected for display, the data
fields window will provide information on the flight time remaining before the reserve fuel has
been reached.
Note
The Fuel Consumption represents calculated fuel use based on user data. The reserve does not represent actual
fuel available in the aircraft.
Fuel Consumption can be modified en route by increasing or decreasing the fuel burn rate to match
actual usage. The new fuel computation will be averaged over the full distance and provide a good
estimate of fuel remaining. When refueling en route, combine the amount of new fuel and the
remaining fuel to enter the new “Starting Fuel” total for true computation of To Reserve data.
Note
Fuel calculations are only as accurate as the entries made. Always double-check fuel calculations.
Fig. 10.6a - Sample Calculation
59
Page 60

11 THE CHECKLISTS
The EKP-IV provides a checklist of standard procedures for Engine Start, Ground Check, Pre-Takeoff, Cruise in Flight and Landing. The Checklists can be customized by inserting and/or deleting
aircraft procedures. Hit MENU + MENU + CHECKLISTS + ENTER + ENGINE START (or any
other Checklist field) + ENTER. Press “Zoom In” to INSERT a Checklist Item. Using the Toggle Key,
move up or down to select the letter desired. Scroll to the right and continue until the words or
abbreviations are completed. Hit ENTER to save. Use the “Zoom Out” key to append a checklist
item. Up to 16 Checklist Items can be created in the Vertical Mode. It is possible to save and load
more than 1 set CHECKLISTS (if one pilot flies more than one aircraft) data to/from a XML-file in
the CF and to DOWNLOAD/UPLOAD it from/to the EKP.
Note
Your aircraft may have additional items that require checking for each procedure. Consult your aircraft manual for
a complete list.
‘MENU’ 1 sec. + “CHECKLISTS” + ‘ENTER’
Fig. 11 - Checklists page
11.1 ENGINE START
>‘MENU’ 1 sec. + “CHECKLISTS” + ‘ENTER’ + “ENGINE START” + ‘ENTER’
After pressing ‘ENTER’ select each item (Doors/Belts, Parking Brake, CKT BRK, Carb. Heat, Throttle,
Mixture, Master Switch, Fuel Pump, Start Engine, RPM/Gauges).
Press ‘ENTER’ to mark each item after checking is completed. If all the items of the list are not
checked upon exit a warning message appears on the screen that states the check-list has not been
60
Page 61

completed. Press any key to accept.
11.2 GROUND CHECK
> ‘MENU’ 1 sec. + “CHECKLISTS” + ‘ENTER’ + “GROUND CHECK” + ‘ENTER’
After pressing ‘ENTER’ select each item (Brakes/Steer, Props/Mags, Vacuum, Oil Tmp/Press, Fuel
Pressure, Carb. Heat, Ammeter, Primer-Locked, Flt Controls, Lights).
Press ‘ENTER’ to mark each item after checking is completed. If all the items of the list are not
checked upon exit a warning message appears on the screen that states the check-list has not been
completed. Press any key to accept.
11.3 PRE TAKE-OFF
>‘MENU’ 1 sec. + “CHECKLISTS” + ‘ENTER’ + “PRE-TAKEOFF” + ‘ENTER’
After pressing ‘ENTER’ select each item (Instruments, Fuel Tanks, Prop/Mixture, Fuel Pump, Engine
Gauges, Carb. Heat-Off, Doors/Belts, Flaps/Trim, Transponder, Radios). Press ‘ENTER’ to mark each
item after checking is completed. If all the items of the list are not checked upon exit a warning
message appears on the screen that states the check-list has not been completed. Press any key to
accept.
11.4 CRUISE IN FLIGHT
>‘MENU’ 1 sec. + “CHECKLISTS” + ‘ENTER’ + “CRUISE” + ‘ENTER’
After pressing ‘ENTER’ select each item (Power as Required, Carburetor Heat Check, Mixture Lean,
Engine Parameters, Lights as Required, Electrical Load).
Press ‘ENTER’ to mark each item after checking is completed. If all the items of the list are not
checked upon exit a warning message appears on the screen that states the check-list has not been
completed. Press any key to accept.
11.5 LANDING
>‘MENU’ 1 sec. + “CHECKLISTS” + ‘ENTER’ + “LANDING” + ‘ENTER’
After pressing ‘ENTER’ select each item (Mixture, Prop/Mixture, Fuel Tanks, Fuel Pump, Carb. Heat,
Seat Belts, Trim, Flaps, Gear, Lights) .
Press ‘ENTER’ to mark each item after checking is completed. If all the items of the list are not
checked upon exit a warning message appears on the screen that states the check-list has not been
completed. Press any key to accept.
61
Page 62

12 SIMULATOR
The built-in Simulator function allows you to become proficient in the use of the EKP-IV before ever
taking it into the cockpit. No current position fix is required because the EKP-IV simulates position
data internally. The EKP-IV simulates flight in two ways: a straight flight path or following a selected
route. The Simulator will display various altitudes during simulation mode. Fix status displayed in
the GPS page during this mode is “Simulation”.
12.1 SIMULATING STRAIGHT MODE
For Straight Mode of Simulation, you enter the of Speed and Heading. The EKP-IV will then fly that
speed and heading indefinitely until a change is made, i.e. you adjust either parameter. The starting
position for the Simulation is the current cursor position.
To start the simulator:
> ‘MENU’ 1 sec. + “SIMULATOR” + ‘ENTER’ + “SPEED” + ‘ENTER’
Using the cursor key select the desired Speed and press ‘ENTER’.
> “HEADING” + ‘ENTER’
Using the cursor key select the desired Heading and press ‘ENTER’.
> “ALTITUDE” + ‘ENTER’
Using the cursor key select the desired Altitude and press ‘ENTER’. (Speed , Heading and Altitude
can be adjusted during the simulated flight.)
>“SIMULATION MODE” + ‘ENTER’ + ‘STRAIGHT’ + ‘ENTER’
Once the settings are selected, turn on the Simulator:
> “SIMULATION” + ‘ENTER’ + “ON” + ‘ENTER’
All functions of the EKP-IV will work as in normal flight except for Altitude related functions.
12.2 SIMULATING ROUTE MODE
To Simulate the flight of an existing Flight Plan, be sure the flight is the “Viewed” Flight Plan (see
Par. 6.3) Then enter the Simulator Menu and select the parameters of “Speed” and “Flight Plan
Mode”.
>‘MENU’ 1 sec. + “SIMULATOR” + ‘ENTER’ + “SPEED” + ‘ENTER’
Using the cursor key select the desired Speed and press ‘ENTER’. Speed can be adjusted during
the simulated flight.
>“SIMULATION MODE” + ‘ENTER’ + ‘ROUTE’ + ‘ENTER’
Once the settings are selected, turn on the Simulator:
>“SIMULATION” + ‘ENTER’ + “ON” + ‘ENTER’
The simulated aircraft position will now fly the active Flight Plan from the first Waypoint.
62
Page 63

All functions of the EKP-IV will work as in normal flight except for Altitude related functions.
Nota
As stated earlier, in the Simulation mode the EKP-IV retains full functionality. It is recommended that the Simulator
be used to experiment with the full range of capabilities contained within the EKP-IV so that you may get the most
out of it when used in the cockpit.
12.3 TURNING THE SIMULATOR OFF
The Simulator may be turned Off and the EKP-IV returned to normal operation as follows:
>‘MENU’ 1 sec. + “SIMULATOR” + ‘ENTER’ + “SIMULATION” + ‘ENTER’ + “OFF” +
‘ENTER’
If the EKP-IV had a position fix before the Simulation mode was entered, then normal operation will
resume. If there was no position fix, the EKP-IV begins a satellite search and should obtain a position
fix in the same manner as normal start-up.
63
Page 64

13 THE COMMUNICATION
The Communications Menu contains options that control the GPS data input:
>‘MENU’ 1 sec. + “COMMUNICATIONS” + ‘ENTER’
Fig. 13 - Communications Menu
13.1 NMEA OUTPUT
The EKP-IV can be attached to external equipment that accepts GPS data input (seeChapter 15
for wiring). Once attached, the output of NMEA formatted data can be enabledin the following
manner:
> ‘MENU’ 1 sec. + “COMMUNICATIONS” + ‘ENTER’ + “NMEA OUTPUT” + ‘ENTER’
+ “ON”
The default setting is Off. (See Appendix E for details on NMEA data formatting.).
NMEA Output Sentences can also be selected in the following manner:
> ‘MENU’1sec + “ COMMUNICATIONS”+ ‘ENTER’+ “SELECT NMEA MESSAGES” +’
ENTER’
Scroll-down to sentences desired, pressing ENTER for each one. When done, hit CLEAR to return
to Main Menu (see Appendix E in manual for details on NMEA Data Sentences).
13.2 WAYPOINTS UPLOAD/DOWNLOADS
The Upload Waypoint function allows the unit to receive a Waypoint from the USB port using the
NMEA0183 $WPL sentence (see Appendix E):
64
Page 65

> ‘MENU’ 1 sec. + “COMMUNICATIONS” + ‘ENTER’ + “WAYPOINTS UPLOAD” +
‘ENTER’
The Download Waypoint function allows the unit to send the current Waypoints to the USB port
using the NMEA0183 $WPL sentence (see Appendix E):
>‘MENU’ 1 sec. + “COMMUNICATIONS” + ‘ENTER’ + “WAYPOINTS DOWNLOAD”
+ ‘ENTER’
13.3 FLIGHT PLAN UPLOAD/DOWNLOAD
The Upload Flight Plan function allows the unit to receive a Flight Plan from the serial port using the
NMEA0183 $WPL and $RTE sentences (see Appendix E):
> ‘MENU’ 1 sec. + “COMMUNICATIONS” + ‘ENTER’ + “FLIGHT PLAN UPLOAD” +
‘ENTER’
The received Flight Plan is saved in the active Flight Plan. If the current Flight Plan contains data the
user will be asked to confirm the action (overwriting the existing Flight Plan) or to choose another
Flight Plan.
The Download Flight Plan function allows the unit to send the current Flight Plan to the serial port
using the NMEA0183 $WPL and $RTE sentences (see Appendix E):
> ‘MENU’ 1 sec. + “COMMUNICATIONS” + ‘ENTER’ + “FLIGHT PLAN DOWNLOAD”
+ ‘ENTER’
13.4 TRACK DOWNLOAD
The Download Track function allows the unit to send Track data from the serial port using the CMAP Proprietary NMEA0183 $PCMPT sentence (see Appendix E):
> ‘MENU’ 1 sec. + “COMMUNICATIONS” + ‘ENTER’ + “TRACK DOWNLOAD” +
‘ENTER’
65
Page 66

14 THE SYSTEM SET-UP MENU
The System Setup Menu allows the user to change how the EKP-IV displays information. System
Setup options are arranged in sub-menus. For example, all options that relate to the Fix functions
are in Fix Setup sub-menu and all options related to time or date are in Date Time Setup.
> ‘MENU’ 1 sec. + “SYSTEM SETUP” + ‘ENTER’
Once you are in the System Setup Menu, use the cursor key to highlight the sub-menu desired and
press ‘ENTER’ to activate or to proceed to the next selection.
Fig. 14 - The System Setup Menu
14.1 GENERAL SET-UP
The General Setup sub-menu controls the EKP-IV settings.
> ‘MENU’ 1 sec.+ “SYSTEM SETUP” + ‘ENTER’ + “GENERAL SETUP” + ‘ENTER’
14.1.1 Beeper
The EKP-IV makes a beep with each key press, warning or alarm message.
> ‘MENU’ 1 sec. + “SYSTEM SETUP” + ‘ENTER’ + “GENERAL SETUP” + ‘ENTER’ +
“BEEPER” + ‘ENTER’
Use the cursor key to select and ‘ENTER’ to accept. The Off selection of this menu will turn all
66
Page 67

beeper sounds Off. The default setting is On.
14.1.2 Scale Format
Selects the desired setting for display of the map scale in the Data Window field.
> ‘MENU’ 1 sec. + “SYSTEM SETUP” + ‘ENTER’ + “GENERAL SETUP” + ‘ENTER’ +
“SCALE FORMAT” + ‘ENTER’
The selection options are:
BAR - the width of the screen is equal to the bar length times the number displayed.
LEVEL - a letter associated with C-MAP’s chart cell level is displayed.
WIDTH - the width of the screen is displayed.
Use the cursor key to select and ‘ENTER’ to accept. The default setting is Bar.
14.1.3 Language
Selects the language in which you wish menu information to be displayed (i.e. screen labels, menus
and options). Map detail will remain in English.
> ‘MENU’ 1 sec. + “SYSTEM SETUP” + ‘ENTER’ + “GENERAL SETUP” ‘ENTER’ +
“LANGUAGE” + ‘ENTER’
Use the cursor key to select and ‘ENTER’ to accept. The default setting is English.
14.1.4 Military Frequency
The display of Military Frequency data can be set to ON or OFF (this data is found in European
Database cards).
> ‘MENU’ 1 sec. + “SYSTEM SETUP” + ‘ENTER’ + “GENERAL SETUP” + ‘ENTER’ +
“MILITARY FREQUENCY” + ‘ENTER’
Use the cursor key to select and ‘ENTER’ to accept. The default setting is Off.
14.1.5 Nearest Airports
This function allows to choose the airports to be displayed (All, Airports, Airfields ) when pressing
the PAGE button.
14.1.6 Terrain Legend
Enables/Disables the legend box in the lower left corner of the display when in the MOVING MAP
MENU any of the TAWS features is selected.
14.1.7 Power Save
Selects one of the three modes of power save when the batteries are used: Off, Minimum or
Maximum
> ‘MENU’ 1 sec. + “SYSTEM SETUP” + ‘ENTER’ + “GENERAL SETUP” + ‘ENTER’ +
“POWER SAVE” + ‘ENTER’
Use the cursor key to select and ‘ENTER’ to accept. The default setting is MIN.
14.1.8 Layout
The EKP-IV has the capability to orient the display in the Vertical or Horizontal mode.
67
Page 68

The Vertical mode is the default in order to use the unit with the attached leg mount.
The Horizontal mode can be used when the unit is placed on the panel or using one of the R-A-M
mounting options. While in the Moving Map Mode :
>’MENU’ 1 sec. + “SYSTEM SETUP” + ‘MENU’ + “GENERAL SETUP” + ‘ENTER’ +
“LAYOUT” + ‘ENTER’ + “VERTICAL” or “HORIZONTAL”
An information screen will appear to ensure the desire is to change and to notify that the unit will
restart. The Warning Page will show; hit ENTER to have the Moving Map appear. The unit will
restart in the new display mode selected.
14.1.9 Data Window Color
This setting controls the background color of the data window display.
14.1.10 Menu Color
This setting controls the background color of menus display.
14.2 FIX SET-UP
The Fix Setup sub-menu contains options relating to GPS data input and display.
> ‘MENU’ 1 sec. + “SYSTEM SETUP” + ‘ENTER’ + “FIX SETUP” + ‘ENTER’
14.2.1 Fix Source
The EKP-IV uses positioning information provided by the internal GPS-receiver or by an external
NMEA 0183, external Air Data, or External RNAVdata string.
> ‘MENU’ 1 sec. + “SYSTEM SETUP” + ‘ENTER’ + “FIX SETUP” + ‘ENTER’ + “FIX
SOURCE” + ‘ENTER’
Use the cursor key to select and ‘ENTER’ to accept. When connecting the EKP-IV to an external
source, be sure the data output of the external device is set for the correct format (see Sec. 2.5).
The default setting is Internal GPS.
14.2.2 Differential Correction Source
The EKP-IV can be connected to a DGPS Beacon Receiver that sends RTCM-104 data. To select the
Differential Correction source:
> ‘MENU’ 1 sec. + “SYSTEM SETUP” + ‘ENTER’ + “FIX SETUP” + ‘ENTER’ +
“DIFFERENTIAL CORRECTION SOURCE” + ‘ENTER’
Options are: NONE, WAAS, RTCM 1200, RTCM 2400, RTCM 4800, RTCM 9600, RTCM 19200,
RTCM 38400. The default setting is NONE. WAAS corrections are handled by the internal GPS
receiver and do not require additional equipment.
14.2.3 Fix Symbol
A flashing icon on the Moving Map displays the GPS position fix.
> ‘MENU’ 1 sec. + “SYSTEM SETUP” + ‘ENTER’ + “FIX SETUP” + ‘ENTER’ + “FIX
SYMBOL” + ‘ENTER’
This setting allows you to select among a Plane or Standard (circle with an “X”) icon. The default
setting is Plane.
68
Page 69

14.2.4 Static Navigation
A GPS-receiver can produce speed settings that are minimal when standing still. The Static
Navigation sets a threshold for the speed. When the speed received from the positioning device is
under 0.89 knots, the EKP-IV displays zero. The default setting is On.
> ‘MENU’ 1 sec. + “SYSTEM SETUP” + ‘ENTER’ + “FIX SETUP” + ‘ENTER’ + “STATIC
NAVIGATION” + ‘ENTER’
14.2.5 Course Predictor
The EKP-IV will display a line with a circle at the end to indicate the position your aircraft will reach
at the set time, based on current direction of travel and speed. This is continuously updated to
account for changes.
> ‘MENU’ 1 sec. + “SYSTEM SETUP” + ‘ENTER’ + “FIX SETUP” + ‘ENTER’ + “COURSE
PREDICTOR” + ‘ENTER’
Setting options are: OFF, INFINITE, 1 MIN, 3 MIN, 6 MIN, 10 MIN, 30 MIN, 1 HOUR, 2 HOURS.
The default setting is 10 MIN.
14.2.6 Head Up Response
The Head Up Response is related to the Track-up mode of operation. When displaying the position
fix in Track-up, the setting selected here will enable the heading to vary +/- the degree selected
before the map is redrawn. A higher number here will result in less redraw time.
> ‘MENU’ 1 sec. + “SYSTEM SETUP” + ‘ENTER’ + “FIX SETUP” + ‘ENTER’ + “HEAD
UP RESPONSE” + ‘ENTER’
Setting options are: +/-5, +/-10, +/-15, +/-45, +/-90. The default setting is +/-15.
14.2.7 Fix Circe Range
This function displays a circle of arbitrary range with the fix as its center on the moving map.
> ‘MENU’ 1 sec. + “SYSTEM SETUP” + ‘ENTER’ + “FIX SETUP” + ‘ENTER’ + “FIX
CYRCLE RANGE” + ‘ENTER’
Use the cursor key to select the desired range.
14.2.8 GPS Restart Timeout
This function enables to set a time range after which if fix is not present the GPS is automatically
restarted. If 0 Minutes are set, the function is not activated.
14.3 ALARM SET-UP
The EKP-IV provides alarm settings for various functions. Here you can set the system for your
navigational requirements.
> ‘MENU’ 1 sec. + “SYSTEM SETUP” + ‘ENTER’ + “ALARM SETUP” + ‘ENTER’
14.3.1 Arrival Alarm Radius
Specifies the radius of a circle around the Waypoint of a Route: when your aircraft reaches a point
within this circle an alarm sounds and the Waypoint Arrival box appears on screen. To set this alarm:
> ‘MENU’ 1 sec. + “SYSTEM SETUP” + ‘ENTER’ + “ALARM SETUP” + ‘ENTER’ +
“ARRIVAL ALARM RADIUS” + ‘ENTER’
69
Page 70

After pressing ‘ENTER’ a box will appear with 00.00. Using the cursor key select the number desired
and press ‘ENTER’. The default setting is Off (00.00).
14.3.2 XTE Alarm Range
Specifies the distance your Cross Track Error (XTE) can vary before the sound of an alarm.
To set this alarm:
> ‘MENU’ 1 sec. + “SYSTEM SETUP” + ‘ENTER’ + “ALARM SETUP” + ‘ENTER’ + “XTE
ALARM RANGE” + ‘ENTER’
After pressing ‘ENTER’ a box will appear with 00. Using the cursor key select the number desired
and press ‘ENTER’. The default setting is Off (00).
14.3.3 Waypoint Alarm Radius
Specifies the radius of a circle around the User Waypoint: when your aircraft reaches a point within
this circle an alarm sounds and the Waypoint Alarm box apprears on the screen.
Note
The alarm is only active for User Waypoints with this symbol selected for the icon: “alarm logo”.
To set the alarm:
> ‘MENU’ 1 sec + ‘MENU’ + “ALARM SETUP” + ‘ENTER’ + “AIRSPACE AHEAD ALARM”
+ ‘ENTER’
After pressing ‘ENTER’ a box will appear with 00.00. Using the cursor key, select the number
desired and press ‘ENTER’. The default setting is OFF (00.00). After pressing ‘ENTER’ a window is
displayed. In this files the 00.00. default value is set. Choose a parameter moving the arrows keys
and press ‘ENTER’ to confirm.
14.3.4 TAWS Alarm
Enables the TAWS alarm.
Note
Vertical “ALRM” string appears at the right down edge of the TAWS Legend BOX when the TAWS Alarm is
enabled.
14.3.5 Altitude Alarm
Specifies the bounds of minimum and maximum altitude.In case they are exceeded the alarm will
ring. Bounds set to “0” are considered OFF.
14.3.6 Airspace Ahead Alarm
If your projected track will cross an airspace sector, an alarm will sound and a warning box will
appear on the screen. If there is an altitude limitation to the airspace, we will display an alarm if
your current altitude is within 500 feet of the limitations. To set the time interval for the alarm:
> ‘MENU’ 1 sec + “ALARM SERUP: + ‘ENTER’ “AIRSPACE AHEAD ALARM” + ‘ENTER’
After pressing ‘ENTER’ a box will appear with 00.00. Using the cursor key, select the number
desired and press ‘ENTER’.
The default setting is OFF (00.00). In addition, you can select the category of airspace associated
with the alarm. To select the categories:
70
Page 71

> ‘MENU’ 1 sec ‘MENU; + “ALARM SETUP”
Use the cursor key to select each category of airspace and turn ON/OFF the alarm for that category.
The time interval set above is for all airspace selected as ON.
CLASS B, CTA on/off
CLASS C, TMA on/off
TOWERS, CONTROL ZONES on/off
RESTRICTED AREAS on/off
MOA AND OTHER SUA on/off
14.3.7 Event Log
The Event Log page contains information on Event as Power On, Power Off, GPS Fix Lost, and so
on. For each Event, the Event name, Time and Date are shown.
To Select the Event LOG page:
> ‘MENU’ 1 sec. + “SYSTEM SETUP” + ‘ENTER’ + “ALARM SETUP” + ‘ENTER’ +
“EVENT LOG...” + ‘ENTER’
14.3.8 Clear Event Log
Clears the Event Log memory and starts new:
> ‘MENU’ 1 sec. + “SYSTEM SETUP” + ‘ENTER’ + “ALARM SETUP” + ‘ENTER’ +
“CLEAR EVENT LOG” + ‘ENTER’
After pressing ‘ENTER’ a window appears: press ‘ENTER’ to confirm deletion (or ‘CLEAR’ to abort
function). The message “DONE” will appear confirming the action.
14.4 TRACK SET-UP
Track is the actual course traveled, which the EKP-IV can display as a series of connected dots. The
interval setting can be defined by the pilot.
> ‘MENU’ 1 sec. + “SYSTEM SETUP” + ‘ENTER’ + “TRACK SETUP” + ‘ENTER’
14.4.1 Track Display
Track display On will display track history on the Moving Map. All track data stored in the unit
memory will be displayed. The default setting is Off.
> ‘MENU’ 1 sec. + “SYSTEM SETUP” + ‘ENTER’ + “TRACK SETUP” + ‘ENTER’ +
“TRACK DISPLAY” + ‘ENTER’
14.4.2 Track Line
Defines how the line which represents the track is displayed : Solid or Dashed.
14.4.3 Track Width
Defines the width of the line which represents the track .
14.4.4 Track Color
Defines the color of the line which represents the track .
14.4.5 Track Recording Step
The EKP-IV stores many thousand of points data points to display a pattern of aircraft movement
(Track). After many thousand of points intervals the oldest is deleted with each new position fix
71
Page 72

point. The following options assist in getting the most track memory for your type of flying.
> ‘MENU’ 1 sec. + “SYSTEM SETUP” + ‘ENTER’ + “TRACK SETUP” + ‘ENTER’ +
“TRACK RECORDING STEP” + ‘ENTER’
Distance - will store a fix point at the specified interval of distance.
Time - will store a fix point at the specified interval of: 5 sec, 30 sec, 1 min.
Auto - this allows for the most efficient use of the memory as the software will determine when to
store a fix point based on straight and curved flight paths.
The default setting is Auto.
14.4.6 Clear Track
Deletes all of the Track history and begins new.
> ‘MENU’ 1 sec. + “SYSTEM SETUP” + ‘ENTER’ + “TRACK SETUP” + ‘ENTER’ +
“CLEAR TRACK” + ‘ENTER’
After pressing ‘ENTER’ a window appears; press ‘ENTER’ to confirm deletion or ‘CLEAR’ to abort
function. The message “DONE” will appear confirming the action.
14.4.7 Remaining Track
The remaining track memory is displayed on the Track Setup Menu page. The number displayed
will be points, time, or distance based on the recording step selection.
14.5 UNITS SET-UP
This sub-menu contains the various options that define how the EKP-IV displays units of
measurement.
> ‘MENU’ 1 sec. + “SYSTEM SETUP” + ‘ENTER’ + “UNITS SETUP” + ‘ENTER’
14.5.1 Date & Time Set-up
These functions control how the EKP-IV displays time and date settings.
> ‘MENU’ 1 sec. + “SYSTEM SETUP” + ‘ENTER’ + “DATE & TIME SETUP” + ‘ENTER’
14.5.1.1 Time Format
> ‘MENU’ 1 sec. + “SYSTEM SETUP” + ‘ENTER’ + “DATE & TIME SETUP” + ‘ENTER’ +
“TIME FORMAT” + ‘ENTER’
Using the cursor key select the desired setting and press ‘ENTER’.
Time can be displayed as 24/UTC (Zulu time), 12 hour or 24 hour local time. The default setting is
24/UTC. If you select a local time display, continue with the next step.
14.5.1.2 Local Time Difference
If you select local time above, you must key in an offset from UTC. The correct time difference must
be entered to calculate the local time.
> ‘MENU’ 1 sec. + “SYSTEM SETUP” + ‘ENTER’ + “DATE & TIME SETUP” + ‘ENTER’ +
“LOCAL TIME DIFFERENCE” + ‘ENTER’
After pressing ‘ENTER’ a window appears; using the cursor key, select the difference between local
time and UTC to the nearest 30 Minutes. Press ‘ENTER’ to activate.
72
Page 73

Note
If you are unsure what the time difference is for your area, get a position fix using the UTC format. Display the
Location page and note the displayed time. Compare UTC to your local time and note the difference. Key in the
difference as hours and minutes to the nearest half hour, using a negative value if you are in the western hemisphere
(for example, the difference in New York is -5 hours, or -4 hours on Daylight Savings Time).
14.5.1.3 Data Format
> ‘MENU’ 1 sec. + “SYSTEM SETUP” + ‘ENTER’ + “DATE & TIME SETUP” + ‘ENTER’ +
“DATE FORMAT” + ‘ENTER’
The EKP-IV displays dates as MM/DD/YY – Month/Day/Year or DD/MM/YY – Day/Month/Year. The
default setting is MM/DD/YY.
14.5.2 Distance Unit
> ‘MENU’ 1 sec. + “SYSTEM SETUP” + ‘ENTER’ + “UNITS SETUP” + ‘ENTER’ +
“DISTANCE” + ‘ENTER’
Distance measurements can be displayed in Statute Miles (SM), Nautical Miles (NM) or kilometers
(KM). The default setting is NM.
14.5.3 Speed Units
> ‘MENU’ 1 sec. + “SYSTEM SETUP” + ‘ENTER’ + “UNITS SETUP” + ‘ENTER’ +
“SPEED” + ‘ENTER’
Speed measurements can be displayed in miles per hour (MPH), Knots (KTS) or kilometers per hour
(KMH). The default setting is Knots.
14.5.4 Altitude Unit
> ‘MENU’ 1 sec. + “SYSTEM SETUP” + ‘ENTER’ + “UNITS SETUP” + ‘ENTER’ +
“ALTITUDE” + ‘ENTER’
Altitude measurements can be displayed in Feet (FT), Meters (MT) or Flight Levels (FL). The default
setting is Feet. It is possible for the altitude to be displaied negative.
Please Note: This may be due to the imprecision of the GPS engine vertical calculation. Caution
should be exercised; do not rely on GPS derived altitude.
14.5.5 Depth Unit
> ‘MENU’ 1 sec. + “SYSTEM SETUP” + ‘ENTER’ + “UNITS SETUP” + ‘ENTER’ +
“DEPTH” + ‘ENTER’
Depth measurements can be displayed in Feet (FT), Fathoms (FM) or Meters (MT). The default
setting is Feet.
14.5.6 Fuel Unit
Fuel units are used in the Fuel Consumption Calculator.
73
Page 74

> ‘MENU’ 1 sec. + “SYSTEM SETUP” + ‘ENTER’ + “UNITS SETUP” + ‘ENTER’ + “FUEL”
+ ‘ENTER’
You may select Gallons (GAL), Liters (LIT), Kilograms (KG), Pounds (LB) or British Gallons (BGAL).
The default setting is Gallons.
14.5.7 Vertical Speed
> ‘MENU’ 1 sec. + “SYSTEM SETUP” + ‘ENTER’ + “UNITS SETUP” + ‘ENTER’ +
“VERTICAL SPEED” + ‘ENTER’
The Vertical Speed is used in the Vertical Navigation calculation. It can be displayed as Feet per
Minute (FT/MIN) or Meters per second (M/S) or Degrees (DEG). The default setting is Feet per
Minute.
14.5.8 Temperature
> ‘MENU’ 1 sec. + “SYSTEM SETUP” + ‘ENTER’ + “UNITS SETUP” + ‘ENTER’ +
“TEMPERATURE” + ‘ENTER’
The Temperature is used in the Wind Calculation. You may select Fahrenheit (F) or Celsius (C). The
default setting is Celsius.
14.5.9 North Reference
> ‘MENU’ 1 sec. + “SYSTEM SETUP” + ‘ENTER’ + “UNITS SETUP” + ‘ENTER’ +
“NORTH REFERENCE” + ‘ENTER’
The North Reference for calculations can be shown as Magnetic or True (Magnetic uses an automatic
adjustment for local magnetic variation).
The North Reference used for wind computations and runway information is always Magnetic;
all other heading, bearing and Track computations are based on the user-selected reference. The
default setting is Magnetic.
14.5.10 Coordinate System
> ‘MENU’ 1 sec. + “SYSTEM SETUP” + ‘ENTER’ + “UNITS SETUP” + ‘ENTER’ +
“COORDINATE SYSTEM” + ‘ENTER+ ’
Sets the display of the Latitude/Longitude coordinates system among:
DDD MM SS (Degrees, Minutes, Seconds)
DDD MM.mm (Degrees, Minutes - to two decimals)
DDD MM.mmm (Degrees, Minutes - to three decimals)
UTM, OSGB
The default setting is DDD MM.mm.
14.6 XM WEATHER
See WX XM addendum booklet downloadable from AvMap website. This function is not available
outside North America.
14.7 CLEAR USER DATA
Deletes all Flight Plans, Track history and User Waypoints.
74
Page 75

> ‘MENU’ 1 sec. + “SYSTEM SETUP” + ‘ENTER’ + “CLEAR USER DATA” + ‘ENTER’
After pressing ‘ENTER’ a window appears; press ‘ENTER’ to confirm deletion, or ‘CLEAR’ to abort
function. The message “DONE” will appear confirming the action.
14.8 CLEAR ALL RADIALS
You can delete all stored Projected Radial lines displayed on the Moving Map with this one
function.
> ‘MENU’ 1 sec. + “SYSTEM SETUP” + ‘ENTER’ + “CLEAR ALL RADIALS” + ‘ENTER’
After pressing ‘ENTER’ a window appears; press ‘ENTER’ to confirm deletion, or ‘CLEAR’ to abort
function.
The message “DONE” will appear confirming the action.
14.9 FACTORY DEFAULTS
This will restore the EKP-IV to all factory default settings.
> ‘MENU’ 1 sec. + “SYSTEM SETUP” + ‘ENTER’ + “FACTORY DEFAULTS” + ‘ENTER’
After pressing ‘ENTER’ a window appears; press ‘ENTER’ to confirm , or ‘CLEAR’ to abort function.
The message “DONE” will appear confirming the action.
75
Page 76

15 OPERATING REQUIREMENTS
The EKP-IV must be connected to a 10–35 V DC power source and the antenna requires a clear
view of the sky in order to operate.
Fig. 15 - I/O Connector
Note
The cable that ends with wires is available as an optional part. Please contact your local C-MAP office for details.
15.1 ANTENNA ASSEMBLY & PLACEMENT
The antenna comes with a 5 meter cable with a SMB connector. The antenna is designed for use
inside the aircraft. It can be temporarily mounted on the aircraft’s dashboard using the included
velcro strip.
The antenna must have a clear view of the sky in order to receive satellite signals. GPS uses “line
of sight” signals to locate and track satellites. If the signals are obstructed by dense objects such as
aluminum, steel or even heavy ice, the EKP-IV will not operate properly.
Signals may also be blocked by heated wind screens (fiberglass, plexiglass and other plastics are
nor-mally transparent to GPS signals).
The antenna can be mounted to any convenient surface that has a clear view of the sky. If you
find that the EKP-IV does not locate and track satellites quickly or consistently, move the antenna.
Moving the location of the antenna a few inches often provides a better view of the sky.
15.2 SECURING THE EKP-IV
The EKP-IV was designed to be mounted on your leg for operation. This will put the EKP-IV close at
hand and in an easily visible location without interfering with other equipment.
Use the elastic strap provided to secure the EKP-IV to your leg. Position the elastic strap around
your leg with the long looped strip on top. Fasten with the hook and loop closure at each end of
the strap. Hold the EKP-IV over the strap on your leg and lower into place.
Press down a little to be sure the strips are secure. If you prefer there are after market mounts
available for attachment to the yoke assembly or the seat rail tracks. Please contact your dealer for
more details on these items.
Note
Yoke mounts may not be appropriate for your aircraft. Use care to ensure that the EKP-IV does not obscure the
primary instruments.
76
Page 77

15.3 DIMENSIONS
Fig. 15.3 - Dimensions
77
Page 78

15.4 INSERT / CHANGE BATTERIES
Note
High capacity NiMh rechargeable batteries are needed.DO NOT use non rechargeable alkaline batteries. The unit
provides a ‘trickle’ charge to the batteries when the unit is plugged into external power and powered ON. In case
you power the EKP with batteries, you need to recharge them later with external charger.
15.5 TROUBLESHOOTING
The following is a brief guide to some of the problems you may experience while using the EKP-IV
with common solutions.
15.5.1 Power
No Power — The power connections are loose or not fully engaged. Make sure all Power Cable
connections are secure. Make sure the power supply is operating properly. Check the fuse located
at the end of the cigarette plug. (To open unscrew the middle circle at the tip of the adaptor.)
15.5.2 GPS Fix
Position fix doesn’t change — The signal from one or more satellites has been lost; the positioning
information displayed is the most recent available.
Position fixes vary a lot — GPS accuracy is affected by several variables, the most prevalent of
which are the geometric quality of the fix. Therefore, the specified accuracy of 15 Meters RMS
in 2D is statistical, not absolute and assumes the absence of Selective Availability which was
discontinued in April 2000.
The EKP-IV is not obtaining position fixes — If the EKP-IV is using an internal GPS Receiver,
proceed to the GPS status screen:
>‘MENU’ 1 sec. + “GPS PAGE” + ‘ENTER’
Review the number of satellites in use. If zero, check that the antenna has a clear view of the
78
Page 79

sky and that the connections have been made properly. If less than four satellites are in use, the
GPS receiver may have difficulty receiving a fix. Try repositioning the antenna. A GPS fix requires
a minimum of three satellites and a poor Signal Quality on one or more satellites may preclude
receiving a position fix.
Verify the user setting for Fix Source is listed as Internal GPS:
> ‘MENU’ 1 sec. + “SYSTEM SETUP” + ‘ENTER’ + “FIX SETUP” + ‘ENTER’ + “FIX
SOURCE” + ‘ENTER’ + “INTERNAL GPS” + ‘ENTER’
If the EKP-IV is using an External GPS receiver, proceed to Fix functions screen:
> ‘MENU’ 1 sec. + “SYSTEM SETUP” + ‘ENTER’ + “FIX SETUP” + ‘ENTER’
Verify that the Fix Source is listed properly (External NMEA) as indicated in the System Setup section
(see Chapter 14) and that the Baud Rate is set correctly for your GPS receiver (the EKP-IV requires
9600- Baud Rate). Verify that the data cable connections are proper.
External device is not responding — The data port is not turned on or is not outputting messages
in the correct format. Refer to the external device’s user guide to determine the correct message
format. Check the Installation Settings menu and make any necessary changes. The EKP-IV may
not be properly connected to the external device. Check all connections to be sure they are
correctly made and secure.
Navigate feature does not work — Blanks are displayed in the navigation data fields until a GPS
fix has been obtained; this usually occurs within a few Minutes. Also a Flight Plan must be active
to display values for navigation-related information (such as Cross Track Error) and you must be
travelling at least 2 Knots to display values for velocity-related information (such as GS). Activate
a Flight Plan and/or increase your speed.
Fluctuations in positioning and navigation data — Small fluctuations in positioning and velocity-
related navigation is normal.
15.5.3 When Nothing Else Works
The list above should allow you to solve most of the operating problems you are likely to encounter.
Simply disconnecting the EKP-IV from power for a moment may solve your problem as well. If this
does not help, try resetting the EKP-IV to the factory defaults:
> ‘MENU’ 1 sec. + “SYSTEM SETUP” + ‘ENTER’ + “FACTORY DEFAULTS” + ‘ENTER’
79
Page 80

If this does not help, you can try one additional memory clear option. This is a factory default
RAM Clear that should only be tried after all other attempts have been made. When using the
RAM Clear feature, you will loose all user stored information and the EKP-IV will default to factory
settings. Before this step, you have the option of saving user Marks, Track history and Routes to a
User Compact Flash (this is an optional purchase from your dealer). To perform a RAM Clear see
Par. 15.5.1.
15.5.4 Customer Support
If you are unable to solve your operation problems, please contact C-MAP Aviation at 133 Falmouth
Road Mashpee, MA 02649, 508-539-3115 or 800.363.2627, reporting the Software Release and
Cartography information available in the About page.
>‘MENU’ 1 sec. + “About...” + ‘ENTER’
Fig. 15.4.4 - About page
If it is necessary to return your EKP-IV for repair, you must obtain a return authorization (RA)
number from C-MAP Aviation prior to shipping the system. Include with the EKP-IV a description
of the problem, your RA number, and your name and address. If your return shipping address is
different, please include it. All packages are to be returned postage paid. As we are not responsible
for packages in transit, we recommend you purchase insurance and tracking information.
15.6 SYSTEM TEST
If you have connected your EKP-IV according to the instructions and chosen the proper menu
selections and are still having problems a RAM Clear will bring the system back to factory default
settings. Many times this will clear the errors and bring the EKP-IV back to operating condition. RAM
CLEAR can be found in the System Test Menu.
80
Page 81

Note
The additional tests in the System Test Menu are intended for factory testing. Faulty findings within these menus
is not necessarily a true result, as factory settings and equipment are often used during these tests.
15.6.1 RAM Menu
Make sure the EKP-IV is turned Off. While pressing and holding any other key, turn the EKP-IV On.
A new menu will appear on the display. Use the cursor key to select the RAM Menu and press
‘ENTER’ to select RAM Test or RAM Clear.
• RAM Test
‘ENTER’ on RAM Test to verify the integrity of the RAM. If the message “ERROR” appears the RAM
is physically damaged.
• RAM Clear
‘ENTER’ on RAM Clear to to activate, press ‘ENTER’ again to confirm (at this time if you do not wish
to clear RAM press ‘CLEAR’).
This operation will erase all Marks, Flight Plans, stored Track plots and destinations. It will also
return all selections (Input Data Format, selective display etc.) to original default values.
15.6.2 C-CARD Menu
To check the Compact Flash and its connector.
• Compact Flash Test
To test the Compact Flash. There are the following possible situations:
1. If there is a Compact Flash inserted in the slot and there is not a malfunction, the name of the
Compact Flash zone and the message “OK” are shown.
2. If there is a Compact Flash inserted in the slot, but it is a damaged Compact Flash, the name of
the Compact Flash zone and the message “Faulty” are shown.
3. If there is not any Compact Flash inserted in the slot, the message “not present” is shown.
4. If there is an User Compact Flash inserted in the slot, the message “USER CARTRIDGE” is
shown.
• C-CARD Connector
Indicates if there is a malfunction in the connector. It is used only in production.
15.6.3 Serial Ports
If you are having problems receiving data from the position-finding instrument, this test should help
determine the problem.
• Change Parameters
To change the parameters of the serial interface. This menu allows to select the Port (Signal Source)
between UART0 or UART1, the Baud Rate between 4800 or 9600, the Data Bits (Word Length)
between 7 or 8, the Parity between EVEN, ODD or NONE, the Stop Bits between 1 or 2, the
Polarity between “+” or “-”. Default settings are: Port = UART1, Baud Rate = 4800, Data Bits =
8, Parity = NONE, Stop Bits = 1, Polarity = +.
• Input Data Display
To allow the chart plotter to act as a computer terminal and display the incoming data exactly as
it received.
If the data displayed on the screen is unrecognizable, you may have selected the wrong input
parameters for your particular receiver, for example, NMEA-0182 instead of NMEA-0183. Check
your receiver manual to be sure that you have selected the proper interface format. If the screen is
blank, you may have a broken connection, and no data is being received. Use ‘ZOOM IN’ to stop
81
Page 82

(or continue after pause) data displaying, ‘ENTER’ to show data in hex or ASCII mode (normal or
small) and ‘CLEAR’ to exit.
82
Page 83

16 EKP IV PRO
The following features aer new for the EKP IV PRO.
16.1 FUNCTIONS FOR THE AUTOMATIC CREATION OF SEARCH AND
RESCUE (S.A.R) FLIGHT PATTERN
IIn order to enter the Menu:
‘MENU’ 1sec+ “FLIGHT PLAN” + ‘ENTER’ + ‘MENU’
You may choose among three patterns: EXPANDING SQUARE, CREEPING LINE AHEAD and
CIRCULAR.
Using the arrow keys, select the values for each field and press ‘ENTER’ to move to the next item.
When all of the values are entered, press ‘ENTER’ to activate the creation of the related Flight
Plan.
Wait for a few seconds and press ‘ENTER’ to confirm the creation of the Flight Plan. Then press
‘CYCLE’ in order to close the Flight Plan Menu. Press ‘GOTO’ to activate the created Flight Plan.
16.2 CUSTOMIZED REGIONAL COVERAGE AREA
The AvMap customized regional coverage option supplies the opportunity to create a Compact
Flash loaded with the terrestrial data for your area. The present coverage will be fixed by the data
quantity available for your area. ‘ENTER’ to confirm.
16.3 PLACE AND STREET RESEARCH
16.3.1 Place Research
‘MENU’ 1sec + “DATABASE” + ‘ENTER’
In order to carry on the research for a place, select “PLACE” and then press ‘ENTER’. Press ‘ENTER’
again to edit the ‘Name’ field moving up or down the arrow keys. When the field is entered, press
‘ENTER’ to confirm.
16.3.2 Street Research
‘MENU’ 1sec + “DATABASE” + ‘ENTER’
In order to carry on the research for a street, select “STREET” and then press ‘ENTER’.
There are several fields to be entered: State, Country and Town. Press ‘ENTER’ and edit each field
moving up or down the arrow keys. When all the fields are entered, press ‘ENTER’ to confirm.
16.4 CONNECTION TO THE RADIO LOCALIZ. SYSTEM TELEFIX AND/OR
KENWOOD APRS, AUTOMATIC POSITION REPORTING SYSTEM
The EKP-IV Pro may be connected directly to Telefix, a localization system for fleet management
and/or Kenwood APRS. By means of these systems it is possible to send one’s own position to a
remote control management or from the control center it is possible to receive waypoints that are
automatically displayed on the EKP-IV Pro screen.
83
Page 84

APPENDIX A - TERMS
This section explains the terms that you may find unfamiliar.
ACQUISITION
AIRPORT DATABASE - A series of files of airport positions (described near the geographical center
of the airport and as defined by ICAO), with runways, frequencies (with sectors) and services
available information. Based on the
ARINC 424 - format for Jeppesen’s Database.
ALMANAC - Data on the general location and health of all satellites in the GPS constellation. Can
be collected from any available satellite in about 15 minutes.
ALT - ALTITUDE - Height above mean sea level. Density Altitude and the Altitude computed by a
GPS receiver may differ due to the effects of selective availability.
ARTCC - AIR ROUTE TRAFFIC CONTROL CENTER
ATTENTION AREAS
natural or man-made hazards, or sailing regulations and restrictions. Moreover a special symbol
(!) is placed inside the area selecting On’ or ‘Contour’ options. This is valid also for the categories:
FISHING FACILITY, MARINE FARM/CULTURE, MILITARY PRACTICE AREA, RESTRICTED AREA,
SEAPLANE LANDING AREA. When the area is small, it is identified only by the boundary.
ATIS
- AUTOMATIC TERMINAL INFORMATION SERVICE - Recorded information about weather
and other conditions at an airport, periodically updated when conditions change.
AUTOMATIC MODE - The mode of operation that uses 2D or 3D, depending on the number of
available satellites (preference is given to 3D; LAT, LON and ALT).
AUTOMATIC SWITCHING - Flight Plans automatically switch from one leg to the next when the
Waypoint is reached.
AUTO ZOOM
(Target) always visible on the map. The map is scrolled and zoomed automatically to have the
best view displaying fix and destination together on the screen. When this mode is active the
cursor is hidden.
AWOS
AZIMUTH - Bearing measured clockwise from true or magnetic north.
BATHYMETRIC LINES
BEACON - An airport rotating beacon (white or white and green).
BISECTOR - A straight line that divides an angle into two equal parts.
BRG - BEARING - The horizontal direction of a destination or Waypoint measured in relation to
true or magneticnorth.
- COURSE DEVIATION INDICATOR - A graphical representation of Cross Track Error (XTE)
CDI
showing distance left or right of course. An airplane icon indicates the direction of relative motion,
toward or away from the intended Track.
COG
- COURSE OVER GROUND - Direction of the path over ground actually followed.
CONSTELLATION - The satellites in the Global Positioning System (GPS). Positioned in six orbital
planes approximately 11,000 NM above the earth.
COORDINATES - A Latitude and Longitude position that corresponds to a specific point on the
earth’s surface.
COURSE
CTAF - Common Traffic Advisory Frequency - May be Unicom, Multicom or Tower Frequency.
CULTURAL FEATURES
CURSOR (mode) - In Cursor mode the screen is controlled by your movement of the cursor. When
in Cursor mode, a data field line will appear under the Data Window providing LAT/LON of the
cursor position. If a fix has been computed, a distance and bearing will also appear from the
position fix to the cursor. In this mode it is possible to scroll on the map such that the position fix
will not be displayed on the screen. When this occurs, you can quickly display your position by
activating Home mode.
- Occurs when the EKP-IV locates a signal and collects data from a satellite.
- Areas in which special attention by the mariner is required, because of
(mode) - The Auto Zoom mode is used to display fix position and destination
- AUTOMATIC WEATHER OBSERVATION STATION
- Imaginary lines connecting points of equal water depth.
- The planned line of travel: the line between your start position and the destination.
- Any man-made topographic feature as built-up area, buildings, roads, ...
84
Page 85

DATA WINDOW - Data Window is an information panel representing customized data fields. The
layout of these fields depends on the screen mode.
DATABASE - A collection of data that can be accessed by the user for airports, VORs, NDBs,
Intersections and User Waypoints.
DATUM - A method of assigning position coordinates to real-world locations. Based on an
underlying ellipsoidal model of the earth and subject to other scientific assumptions. Identified
by a unique name, such as WGS84 or NAD27.
DEFAULT - The value or setting automatically chosen by the EKP-IV unless directed otherwise.
DEGREE - 1/360th of a circle. On a Great Circle, 1° = 60 min.
DGPS - DIFFERENTIAL GPS - Provides even greater positioning accuracy than standard GPS.
DME - Distance Measuring Equipment
ELEVATION - Altitude above sea level (MSL). Usually refers to field Elevation of an airport. Also
refers to a satellite’s height above the horizon.
EPHEMERIS DATA - Data on the specific location of a satellite that is collected from that satellite
when it is first located and is periodically updated while the satellite is being tracked. Remains
current for up to 2 hours.
ETA - ESTIMATED TIME OF ARRIVAL - The estimated time of day the destination Waypoint will
be reached, based on your current speed and the distance to destination. If the arrival “ETA’ will
be from Sun Rise to Sun Set no special symbols will be displayed on the relative data fields (both
final and dest); if it will be from SS+60min to SR-60min (the official Night time) a red ‘N’ letter
will be displayed. If the arrival will be from SS +30 to SS+60min a red ‘T’ letter (Twilight) will
be displayed; if it will be from SR-60min to SR a yellow ‘T’ letter (Twilight) will be displayed. If
the arrival will be from SS to SS+30min (VFR day Landing allowed, but no Takeoff) a yellow ‘D’
letter will be displayed.
ETE - ESTIMATED TIME ENROUTE - The estimated time needed to reach your destination, based
on your current speed and the distance to destination.
FILE - It is collection of information (of the same type) stored on a User COMPACT FLASH. Each
file must have a unique name, ideally one that describes its contents. File names are kept in a
directory on each User COMPACT FLASH.
FP - FLIGHT PLAN - A planned course of travel, with one to twenty-five legs, each with its own
origin and destination.
FP LEG - The line connecting two waypoints within a Flight Plan.
FSS - FLIGHT SERVICE STATIONS - Provide pilot briefings en route.
FUEL - BURN RATE Fuel burn rate in a cruise configuration.
GLIDE SLOPE - The desired descent path for Vertical Navigation.
GPS - GLOBAL POSITIONING SYSTEM - A satellite based navigation system operated by the
US Department of Defense. It operates 24 hours a day, 365 days a year under any weather
conditions.
GQ - GEOMETRIC QUALITY - A measurement of the geometry of the satellites used to triangulate
the position. A low GQ is inaccurate and generates a GQ warning. Navigation data should be
used with caution when the GQ warning appears.
GREAT CIRCLE - Distance measured along the curved surface of the earth. Over long distances, a
Great Circle distance is more accurate than a Rhumb Line distance measured from a mercator
chart.
GS - GROUND SPEED - The speed over the ground; can vary from air speed as it is affected by
the prevailing winds.
HDG - HEADING - The direction your aircraft is facing, defined as an angle from true or magnetic
north.
HDOP - HORIZONTAL DILUTION OF PRECISION - It is the index for position-fixing accuracy. The
smaller the HDOP value, indicates a better position calculation.
HOME (mode) - The Home (called also Screen Amplifier) mode is used to keep the fix position
within the visible map. The map is scrolled and redrawn automatically when the fix position is
moved. When this mode is active the cursor is hidden.
ICON - A symbol shown on any display as a representation of a Waypoint .
IDENTIFIER - An abbreviated name that is assigned to an airport or navaid. The identifier may be
85
Page 86

any combination of letters and numbers, up to five characters in length.
INT - INTERSECTION - A Waypoint defined by any combination of courses or radials between two
or more navaids. Enroute and terminal intersections are part of the EKP-IV Database.
KTS - KNOTS - One Knot is a unit of speed equal to one Nautical Mile per hour.
LANDMARKS
which can be used in determining a location or a direction
LAT - LATITUDE - The distance north or south of the equator, measured in an arc with the equator
being 0° and the poles being 90°.
LON - LONGITUDE - The distance east or west of the Prime Meridian (0°), which intersects
Greenwich, England. The range is 0°–180°E, moving east of 0° and 0°–180°W, moving west of
0°.
LORAN - The Loran chains are groups of transmitting stations that use timed radio pulse
transmissions.
MAGNETIC NORTH - The migrating pole where the earth’s magnetic lines converge. The north
magnetic pole is some distance from true north at 76.1°N 100°W.
MARK - Reference points related to cursor position.
MASK ANGLE - The Elevation (height above the horizon, measured in Degrees) below which the
EKP-IV will not search for satellites. The Mask Angle used by the EKP-IV is variable. It starts at 8°
and under certain conditions, may drop as low as 0°.
MIN - MINUTE - A unit of measure, equal to1/60th of one Degree of a circle.
MORA - This Minimum Off-Route Altitude provides minimum altitudes for terrain and obstruction
clearance within the section outlined by the Latitude and Longitude lines. Mora values clear
all terrain and obstructions by 1,000’ in areas where the highest terrain and obstructions are
5,000’ MSL or lower. Mora values clear all terrain and obstructions by 2,000’ in areas where the
highest terrain and obstructions are 5,000’ MSL or higher. Moras are not shown where there is
no published data.
MOVING MAP - The Moving Map is the default state of the software. This mode represents the
Moving Map screen and Data Window.
MT - METER - A metric distance measurement equal to 39.37 inches.
NATURAL FEATURES - Any topographic feature formed by the action of natural processes:
coastlines, relief, glaciers, ...
NDB - NON-DIRECTIONAL BEACON - A low/medium-frequency navigation aid that sends non-
directional signals that can be used for navigation.
NM - NAUTICAL MILE - A distance measurement equal to 6,076 feet or 1.15 Statute Miles. Also
equal to one Minute of Latitude.
NMEA - NATIONAL MARINE ELECTRONICS ASSOCIATION - Professional organization that
defines and maintains the standard serial format used by marine electronic navigation equipment
and computer interfaces. NMEA format has been adopted by parts of the avionics industry.
OFFSET - Distance away from desired course.
OSGB - ORDNANCE SURVEY OF GREAT BRITAIN - A Coordinate System describing only Great
Britain. Generally used with GBR36 datum, which also describes only Great Britain. This
Coordinate System cannot be used in any other part of the world.
POSITION - A location that is obtained in real-time and expressed as coordinates. Sometimes
called a fix. Also a Waypoint location obtained from a chart or other source.
RECEIVER - The electronic components of the EKP-IV that receive satellite signals.
RHUMB LINE - A constant true Heading between a starting point and a completion point.
RMS - ROOT MEAN SQUARE - A measurement of error that is: the square root of the average of
the position errors, squared.
RTCM - RADIO TECHNICAL COMMITTEE MARITIME - The data format created by the
Radio Technical Committee Maritime (Special Committee 104) to transmit differential GPS
corrections.
- Any prominent object such as monument, building, silo, tower, mast, on land
86
Page 87

SA - SELECTIVE AVAILABILITY - The degradation of the GPS data broadcast by the SPS (Standard
Positioning Service), the U.S. Government discontinued the use of SA in April 2000.
SIMULATION - Enables use of the EKP-IV without a GPS fix.
SM - STATUTE MILE - A distance measurement equal to 5,280 feet or 0.87 Nautical Mile.
SOG
- SPEED OVER GROUND - A calculation of the rate of movement over the ground.
SPS - STANDARD POSITIONING SERVICE - The civilian-access signal broadcast by the GPS
satellites.
SQ - SIGNAL QUALITY - An indication of the signal-to-noise ratio of each satellite signal being
used. Ranges from 00 (lowest) to 99 (highest). A scale for indicating the strength of the signal and
the likelihood of the lock on the signal being lost.
TCA - TERMINAL CONTROL AREA - Class B airspace.
TPA - TRAFFIC PATTERN ALTITUDE - The Altitude required when entering the traffic pattern.
TRACK - The historical movement over the ground.
TRACKS & ROUTES - Recommended and established routes for ships at sea, including traffic
separation schemes, deep water routes.
TRUE NORTH - Geographic north, located at the earth’s north pole.
TTG - TIME TO GO - The estimated time needed to reach your destination, based on your current
speed and the distance to destination.
TWR - TOWER FREQUENCY - The radio frequency for contacting the tower.
UNICOM - UNICOM FREQUENCY - Used for general traffic advisories. Provides airport information
for non controlled airports.
UTC - UNIVERSAL TIME - The current time at the Prime Meridian. Abbreviated as UT or UTC. Also
ref. to as Zulu time (Z)
USER COMPACT FLASH - The EKP-IV uses the optional User COMPACT FLASH to save user data:
it is a convenient medium to store and retrieve your information.
USER WAYPOINT - Place on the chart identified by its coordinates and displayed on the screen
with a reference symbol .
UTM - Universal Transverse Mercator - Metric Grid system used on most large and intermediate
scale land topographic charts and maps.
VDOP - (Vertical Dilution Of Precision)
VNAV - Vertical Navigation - The actual path of the aircraft descending to a final destination.
Provides descent point, Altitude and rate information.
VORTAC - A navaid that provides a VOR, DME and TACAN at one site.
WAAS - Wide Area Augmentation System - The Federal Aviation Administration (FAA), in
cooperation with other DOT organizations and DOD, is augmenting the GPS/SPS with a
satellite-based augmentation system, the WAAS. It will provide a signal-in-space to WAAS users
to support en route through precision approach navigation. After achieving initial operational
capability, the WAAS will then be incrementally improved over the next years to expand the area
of coverage, increase the availability of precision approaches, increase signal redundancy and
reduce operational restrictions.
WAYPOINT - Any point to which one intends to navigate. A sequence of Waypoints makes up a
Flight Plan.
WGS84 - World Geodetic System 1984 Coordinates System or Datum developed by the Defense
Mapping Agency (DMA).
XTE - Cross Track Error - The perpendicular distance between the present position and the course
line. Given as a distance right or left of course when facing the destination. Displayed in NAV as
XTE or on the CDI as a deflection.
ZOOM IN - Shows more detail in a smaller area.
ZOOM OUT - Shows a wider area with less details.
APPENDIX B - MAP DATUM
A map datum is a mathematical description of the earth or a part of the earth and is based on the
87
Page 88

ellipsoid or the arc of an ellipsoid that most closely represents the area being described. In addition,
the datum is centered at a specific location (the datum origin). A datum may describe a small
part of the earth, such as California or Iceland or may describe the entire earth, such as WGS84,
depending on which ellipsoid or ellipsoidal arc is selected.
Since datums use different ellipsoids and origins, the LAT/LON coordinates of the same position
differs from one datum to another. The difference may be slight or great, depending on the datums
involved, but will affect the apparent accuracy of the positioning information provided by a GPS
receiver. GPS (and all of the EKP-IV cartridges) use the WGS84 datum, which is the model of the
earth that is the closest possible average of the planet as a whole. Your chart datum is usually found
in the legend. If the datum is not WGS84 means that position coordinates determined with the
EKP-IV may not appear to agree with coordinates determined from a printed chart.
APPENDIX C - ICAO CODES
The EKP-IV Database of airports is drawn from the system of ICAO (International Civil Aviation
Organization) identifiers. Unlike the IATA (International Airline Transport Association) identifiers
seen on charts and luggage tags, the ICAO codes minimize the possibility of duplicate identifiers
and allow pilots to identify an airport’s region and nearby large city. ICAO codes for international
airports use a 2-character identifier for the region, followed by 1 character that identifies the
airport’s general area, then 1 character of the airport.
For example, the ICAO code for Melbourne, Australia is YMML (IATA code MEL). All of Victoria and
Tasmania are in the YM region and the international airports in the Melbourne area start with “M”.
Therefore, Melbourne International Airport is YMML and the nearby Moorabbin Airport is YMMB.
In North America, the region containing Los Angeles begins with a “K” and the airport identifier of
L.A. International Airport is “KLAX”. Merrill Field in Anchorage, Alaska, begins with region code PA;
its identifier is PAMR.
The ICAO codes for the hundreds of smaller airports around the world whose names include
numbers are not preceded by a region prefix. For example, Barrie Executive Airport in Barrie,
Ontario, Canada is NA3.
The following pages contain maps and a table of ICAO codes. The map of the continental U.S.
contains the 2-character codes that identify the U.S. (“K”) and the area (the following number). The
world map shows the region codes only. The ICAO codes in the table are 2-character codes; like
“K2” and similar ICAO codes for the U.S., these codes identify both region (the first character) and
a geographical area within the region (the second character). Where necessary, the geographical
area or nearest nation is also included in parentheses. Please note that these regions and nations
are provided for loca-tion only and do not necessarily indicate possession by the nation indicated.
All areas are as described by the standard ARINC 424 format.
A list of worldwide ICAO codes is also available in book form from the International Civil Aviation
Organization. Ask for ICAO Location Indicators, document number 7910/70.
Document Sales Unit - International Civil Aviation Organization
1000 Sherbrooke Street West, Suite 400 - Montreal, Quebec, Canada
H3A 2R2 Tel.: 1 (514) 285-8219.
88
Page 89

Fig. C - ICAO Codes for areas included in the database
Fig. Ca - ICAO Codes for sub-continental areas
89
Page 90

ICAO
CODE NAME
A1 Antarctica (Aus/NZ)
BG Greenland
BI Iceland
CF Miquelon Island/St Pierre Island (Canada)
CY Canada
DA Algeria
DB Benin
DF Burkina Faso
DG Accra/Ghana
DI Ivory Coast
DN Nigeria
DR Niamey/Niger
DT Tunisia
DX Togo
EB Belgium
ED Germany
EE Estonia
EF Finland
EG Shanwick Oceanic/United Kingdom
EH Netherlands
EI Ireland
EK Denmark/Faroe Islands
EL Luxembourg
EN Norway
EP Poland
ES Sweden
ET Germany
FA Bophuthatswana/Ciskei/Johannesburg/Namibia/South African Republic/Southwest
FB Botswana
FC Brazzaville/Congo
FD Swaziland
FE Central African Republic
FG Equatorial Guinea
FH Acension/St. Helena
FI Mauritius
FJ British Indian Ocean Tr/Chagos Archipelago
FIC Cameroon
FL Zambia
FM Antananarivo/Cormors/Madagascar/Mayotte Island/Reunion
FN Angola
FO Gabon
FP Sao Tome and Principe
FQ Mozambique
FS Seychelles
FT Chad/N’Djameno
FV Zimbabwe
FW Malawi
FX Lesotho
FZ Zaire
F1 Antarctica (Afr.)
GA Mali
Africa/Transkei/ Venda
90
Page 91

ICAO
CODE NAME
GB Gambia
GC Canary Islands
GE Melilla
GF Sierra Leone
GG Guinea-Bissau
GL Liberia/Roberts
GM Dakhla and Laayoune/Morocco
GO Dakar/Dakar Oceanic/Senegal
GQ Mauritania
GU Guinea Republic
GV Cape Verde/Sal Oceanic
HA Ethiopia
HB Burundi
HC Somalia
HE Egypt
HF Djibouti
HK Kenya/Nairobi
HL Libya
HR Rwanda
HS Sudan
HT Tanzania
HU Uganda
K1 USA; Idaho, Montana, Oregon, Washington, Wyoming
K2 USA; Arizona, California, Colorado, Nevada, New Mexico, Utah
K3 USA; Iowa, Kansas, Minnesota, Missouri, Nebraska, North Dakota, South Dakota
K4 USA; Houston Oceanic Control Area, Arkansas, Louisiana, Oklahoma, Texas
K5 USA; Illinois, Indiana, Kentucky, Michigan, Ohio, Wisconsin
K6 USA; New York Oceanic Control Area, Connecticut, Delaware, District of Columbia,
K7 USA; Miami Oceanic Control Area, Alabama, Florida, Georgia, Mississippi, North
LA Albania
LB Bulgaria
LC Cyprus/Republic of North Cyprus
LE Spain
LF France
LG Greece
LH Hungary
LI Italy
LK Czecho Republic
LL Israel/Jerusalem
LM Malta
LO Austria
LP Azores/Madeira Island/Portugal/Santa Maria Oceanic
LQ Bosnia and Herzegovina
LR Romania
LS Switzerland
LT Turkey
LX Gibralter
LY Yugoslavia
LZ Slovakia
Maine, Maryland, Massachusetts, New Hampshire, New Jersey, New York, Pennsylvania,
Rhode Island, Vermont, Virginia, West Virginia
Carolina, South Carolina, Tennessee
91
Page 92

ICAO
CODE NAME
MB Caicos Islands/Turks Islands
MD Dominican Republic
MG Guatemala
MH Honduras
MK Jamaica
MM Mexico
MN Nicaragua
MP Panama
MR Costa Rica
MS El Salvador
MT Haiti
MU Cuba
MW Cayman Islands
MY Bahamas
MZ Belize
NC Cook Islands
NF Fiji Islands/Tonga
NG Kiribati/Tuvalu (S. Pacific)
NI Niue (S. Pacific)
NL Futuna Islands/Wallis Islands
NS American Samoa/Western Samoa
NT French Polynesia/Society Islands/Tuamotu Islands
NV Vanuatu
NW New Caledonia
NZ New Zealand
OA Afghanistan
OB Bahrain
OE Jedda/Saudi Arabia
OI Iran
OJ Jordan
OK Kuwait
OL Lebanon
OM United Arab Emirates
OO Oman
OP Pakistan
OR Iraq
OS Syria
OT Qatar
P Oakland OCTA
PA Alaska
PC Kiribati
PG Guam/Mariana Islands
PH Hawaii
PJ Johnston Atoll
PK Marshall Islands
PL Kiribati
PM Midway Island
PT Caroline Islands/Micronesia/Palau
PW Wake Island
QY Yemen Arab Republic
RC Taiwan
RJ Japan
92
Page 93

ICAO
CODE NAME
RK Korea
RO Japan
RP Philippines
SA Argentina
SB Brazil
SC Chile/Easter Island
SE Ecuador
SF Falkland Island
SG Paraguay
SK Colombia/San Andres
SL Bolivia
SM Suriname
SO French Guiana
SP Peru
SU Uruguay
SV Venezeula
SY Guyana
S1 Antarctica (Argentina, Chile)
TA Antigua
TB Barbados
TD Dominica
TF Guadeloupe/Martinique
TG Grenada
TI Virgin Islands
TJ Puerto Rico
TK St. Kitts/Nevis Island
TL St Lucia
TN Aruba/ Netherland Antille
TQ Anguilla
TR Montserrat Island
TT Tobago Island/Trinidad
TU British Virgin Islands
TV St Vincent
TX Bermuda
UA Kazakhstan/Kyrgyzstan/USSR
UB Azerbaijan/USSR
UE Russia/USSR
UG Armenia/Georgia/USSR
UH Russia/USSR
UI Russia/USSR
UK Moldova/Ukraine/USSR
UL Russia/USSR
UM Belarus/Latvia/Lithuania/Russia/USSR
UN Russia/USSR
UO Russia/USSR
UR Kazakhstan/Russia/USSR
US Russia/USSR
UT Kazakhstan/Tajikistan/Turkmenistan/USSR/Uzbekistan
UU Russia/USSR
UW Russia/USSR
VA India
VC Sri Lanka
93
Page 94

ICAO
CODE NAME
VD Kampuchea
VE India
VG Bangladesh
VH Hong Kong
VI India
VL Laos
VM Macau
VN Nepal
VO India
VQ Bhutan
VR Maldives
VT Thailand
VV Vietnam
VY Myanmar
WA Indonesia
WB Brunei/Malaysia
WI Indonesia
WM Malaysia
WP Indonesia
WR Indonesia
WS Singapore
YB Australia
YD Australia
YG Solomon Islands
YM Australia
YN Nauru (South Pacific)
YP Australia
YS Australia
YY Papua/New Guinea
ZB China, Peoples Republic of
ZG China, Peoples Republic of
ZH China, Peoples Republic of
ZK Korea, Democratic Peoples Republic of
ZL China, Peoples Republic of
ZM Mongolia
ZP China, Peoples Republic of
ZS China, Peoples Republic of
ZU China, Peoples Republic of
ZW China, Peoples Republic of
ZY China, Peoples Republic of
APPENDIX D - C-MAP AV. CARTRIDGE OPTIONS
The EKP-IV includes aeronautical data (Jeppesen Cycle) for Europe and Africa and Tele Atlas
terrestrial data loaded in the Compact Flash. You do not need extra Compact Flash. The scale is
1:30.000 Germany included; scale 1:500.000 eastern wards. Following are the data options for
the EKP-IV.
CONTINENTAL NAVDATA
Jeppesen Database that includes information about airports, VOR, NDB, Intersections and
airspace.
94
Page 95

SUB-CONTINENTAL
These Compact Flashs combine Jeppesen Navdata and land cartography for those customers
traveling outside The Americas to provide users with worldwide coverage.
NAVDATA UPDATES
AvMap supplies the file including the aeronautical data file. The Jeppesen cycle is released every 28
days. Contact info@avmap.it for more information about availability and payment conditions.
APPENDIX E - C-MAP DATA TRANSFER
The bi-directional data port outputs and inputs NMEA Data. NMEA messages sent/received at
48004N1, are defined as follows:
APA Autopilot Sentence “A” contains navigation receiver warning flag status, cross-track-
APB Autopilot message contains all of the above plus: heading to steer toward destination,
BOD Bearing Origin to Destination.
BW Bearing and Distance to Waypoint.
GGA GPS position, time, fix quality, number of satellites used, height of antenna, HDOP
GLL GPS-derived Latitude, Longitude and time of fix.
GSA GPS receiver operating mode, satellites used in the navigation solution reported by the
DOP (Dilution of Precision) values.
GSV Number of satellites in view, satellite numbers, elevation, azimuth, and SNR value.
HDG Heading, Deviation & Variation.
HDM Heading Magnetic.
HDT Heading True.
HSC Heading Steering Command.
PCMPA C-MAP Proprietary Sentence “A” contains Time, Fix Latitude/Longitude, SOG, COG,
PCMPT C-MAP Proprietary Sentence used to transfer Track history data and all additional
RMA Recommended Minimum Specific Loran-C Data.
RMB Data status, Cross Track Error, direction to steer, origin, destination Waypoint, Waypoint
RMC Time, Latitude, Longitude, Speed Over Ground, Course Over Ground and date.
RTE Routes RTE - Routes.
VHW Water Speed and Heading.
VTG Course Over Ground & Ground Speed.
WCV Waypoint Closure Velocity
WPL Waypoint Location.
XTE Cross-Track Error
error, Waypoint arrival status and initial bearing from origin Waypoint to the destination
Waypoint for the active navigation leg of the journey.
bearing from the present position to the destination (magnetic or true).
(Horizontal Dilution of Precision), differential reference information and age.
$— GGA sentence and
Date. For more information contact your local dealer.
information ssociated to the Track. For more information contact your local dealer.
location, bearing to destination and velocity toward the destination.
For information about the NMEA format specifications:
NMEA National Office
P.O. Box 3435
New Bern, NC 28564-3435 (U.S.A.)
Telephone: (252) 638-2626 - Fax: (252) 638-4885
E-mail: nmea@coastalnet.com - http://www.nmea.org
95
Page 96

 Loading...