

Page 1
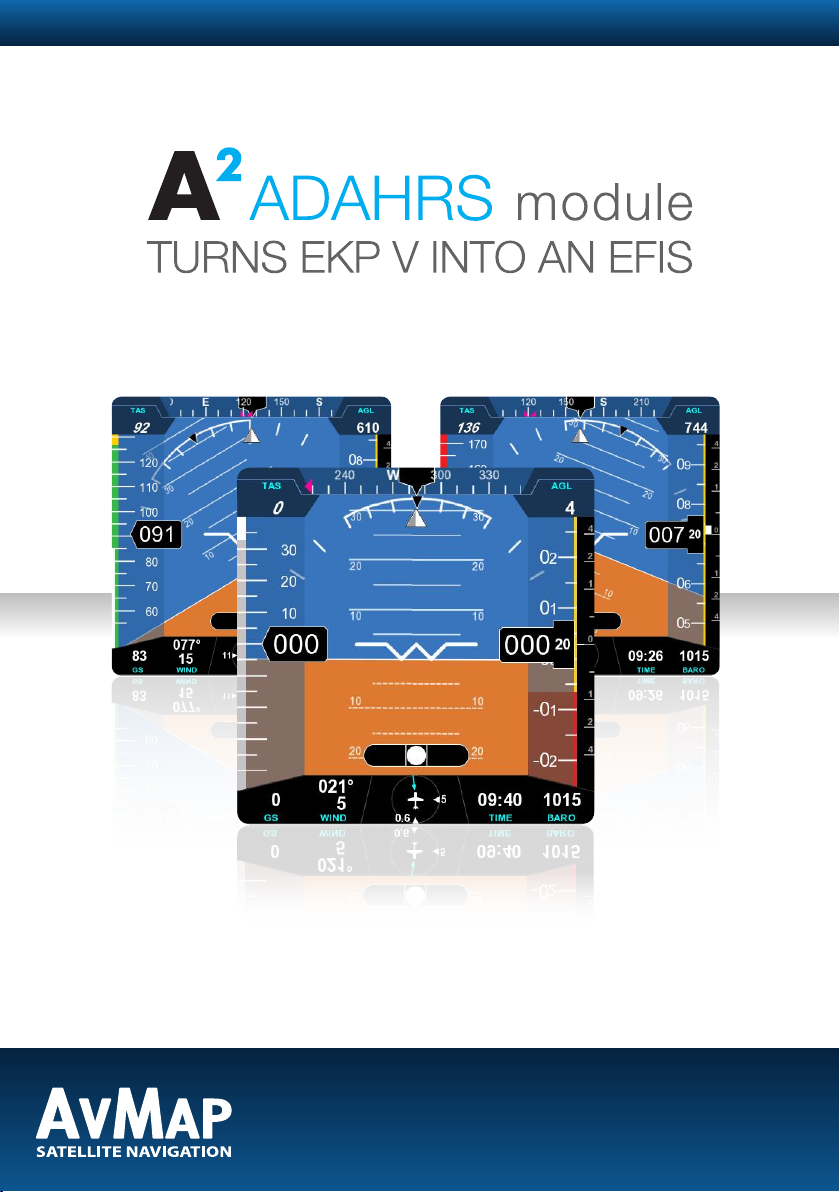
Bring attitude and airspeed
to your favourite moving map!
Your journey, Our technology
Page 2

Page 3

AvMap A2 ADAHRSINDEX
1. System Overview 4
2. System Operation 5
3. System Installation 7
4. System Calibration 10
5. Specications 14
DISCLAIMER & WARNINGS
This product is not TSO-certied and have received neither EASA nor FAA approval.
This product is not intended for installation in type-certicated aircraft and is not a
substitute for on-board instruments.
Avoid installing the product near heat sources or ensure adequate cooling is
provided. Avoid routing of the wiring near sources of heat, RF or EMI interference.
The pilot in command assumes total responsibility and risk associated with the use
of this device and remains solely responsible for ying in safe conditions.
AvMap disclaim any liability deriving from an improper use of the device, in a way
that may violate the ight and navigation rules, regulations and safety.
Page 4

4 - User and Installation Manual
AvMap A2 ADAHRS
User and Installation Manual - 5
AvMap A2 ADAHRS
1. System Overview
AvMap A2 ADAHRS extends the functionality of the EKP V Aeronautical Navigator and turns it
into AvMap EFIS (Electronic Flight Information System), a centralized display for both navigation
and primary ight information.
AvMap EFIS is composed by:
• EKP V Aeronautical Navigator, that acts as an integrated cockpit display and central
processing unit
• EKP V Cockpit Docking Station, that allows the EKP V to be installed into the cockpit and
provides connectivity to external modules
• AvMap A2 ADAHRS, a compact xed-install unit providing attitude, heading, altitude and
airspeed data to the system (Air Data, Attitude and Heading Reference System)
The core of the EFIS is AvMap A2 module. The module contains solid-state gyros, accelerometers,
magnetic eld sensors and air data sensors. The module is designed for xed installation inside
the aircraft and should be connected to the aircraft pitot-static system, in order to take full
advantage of its functionality.
It is suggested to install the A2 aligned with the aircraft longitudinal axis, as it simplies the attitude
calibration process. The A2 can be installed in any orientation, whereafter a proper calibration
needs to be performed (see Chapter 3. System Installation).
The A2 connects to the docking station via USB and provides the user with:
• Attitude (roll, pitch and heading angle)
• Airspeed
• Altitude
• Wind Estimation
• Side slip indication
• Vertical Speed
These information are collected and displayed to the pilot on the EKP V screen, when Primary
Flight Display mode (PFD Mode) is selected. (See Chapter 2. System Operation for more details
on the EFIS user interface).
Note: Although this user guide assumes the use of a Docking Station, it is also possible to connect
the A2 module to the USB port of the EKP V cigarette-lighter cable.
Page 5
User and Installation Manual - 5
AvMap A2 ADAHRS
2. System Operation
When the A2 module is connected to the EKP V a new MODE becomes available: Primary Flight
Display Mode (PFD).
This mode is activated by pushing MODE button and then selecting Primary Flight Display.
Note: Push MODE repeatedly until the desired mode is selected, the unit will automatically switch
to the new mode after a short time.
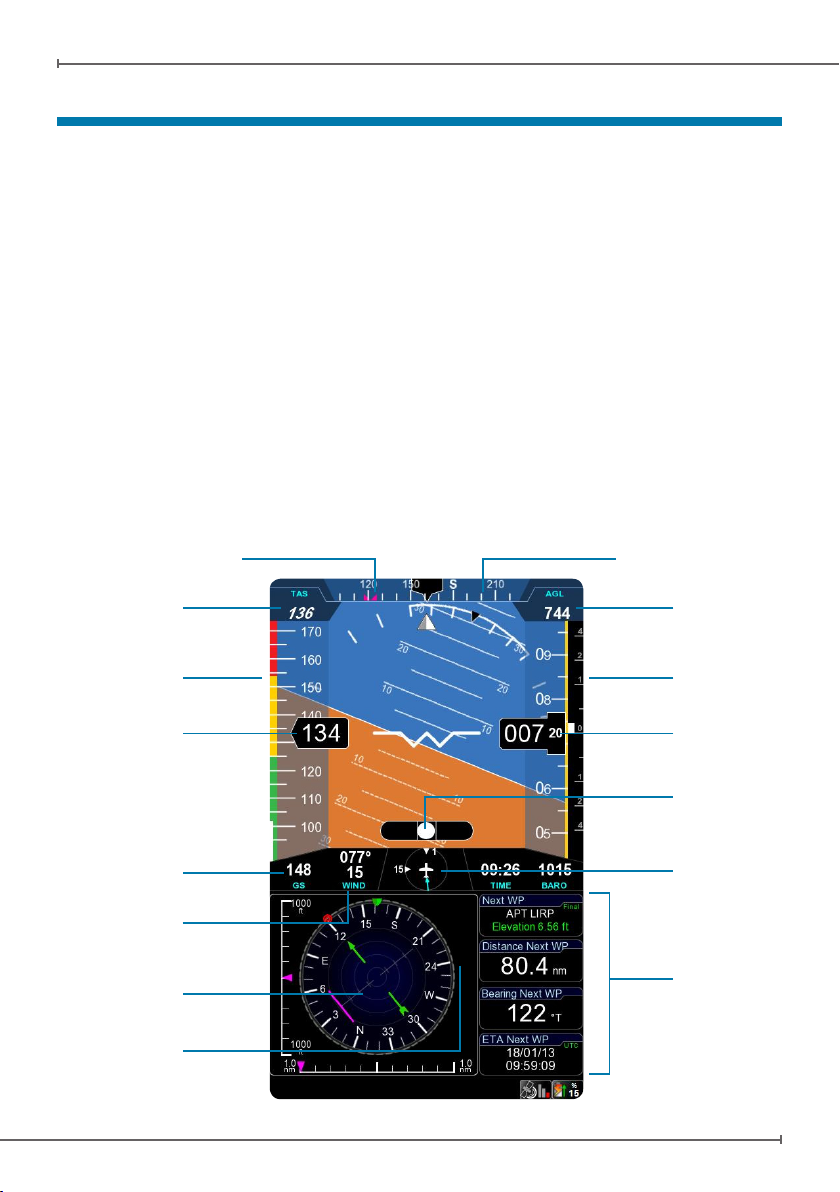
PFD screen
The PFD screen show the primary ight information using a digital presentation. A detailed
explanation of each instrument is given in Figure 1.
Notes:
• TAS: because Outside Air Temperature is not available to the system, TAS value is approximated
and based on current altitude only thus the TAS value is displayed in italic.
• Wind: wind data is approximated and displayed by the system when suitable GPS, compass
and IAS data are available.
True Air
Speed
Air Speed
Ranges
Air Speed
Indicator
Ground Speed
(GPS Speed)
Wind
(Absolute)
HSI
HSI Source
(GPS / Compass)
Heading
Reference
Compass
Above Ground
Level Height
Altimeter
(w / TAWS colors)
Vertical Speed
Indicator
Side Slip
Indicator
Wind
(Relative)
PFD
Data Boxes
Figure 1
Page 6

6 - User and Installation Manual
AvMap A2 ADAHRS
User and Installation Manual - 7
AvMap A2 ADAHRS
• Altimeter and terrain awareness: the altimeter tape includes a TAWS (Terrain Awareness
Warning System) bar and terrain depiction (In red).
Note: See AvMap EKP V User manual for more details on the TAWS feature.
• HSI Source: if no valid magnetic compass data is available (i.e. compass not yet calibrated),
the HSI display is based on GPS “Course over Ground” and the HSI source ag shows “GPS”.
When correct compass data is available the source indicator changes to “AHRS” and proper
magnetic heading is used to drive the instrument.
PFD settings
The PFD settings menu can be selected by pushing on the joystick when the unit is in Primary
Flight Display mode. The menu includes the following items:
• BARO: set the current pressure reference for the altimeter
• Heading (HDG) Ref Mode: selects the heading reference to be used. Possible options:
• Navigation: reference value is the course to the next waypoint (according to the active
ightplan or GOTO)
• Manual: show a heading value set by the pilot
• Off: disable heading reference
• HDG Ref: set the manual heading reference
• Setup data elds: allow the user to customize
the dataelds shown on the PFD.
EFIS Menu
The EFIS menu is located in MENU > TOOLS
> EFIS. The EFIS menu contains all options
related to the EFIS system conguration and
calibration.
Data Reception: (on/off) enable or disable the
A2 module
Full Attitude Calibration, Compass
Calibration, Horizon Alignment: see Chapter
4. System Calibration.
Reset Calibration Data: reset all A2 calibration
data to factory defaults.
Aircraft Prole: allows to set aircraft-specic
reference values. Refer to the aircraft operating
manual to nd the correct values.
Figure 2
Page 7

User and Installation Manual - 7
AvMap A2 ADAHRS
List of available reference values
V-speed values
(control the white/green/yellow and red arcs in the airspeed indicator on Figure 1 on page 5)
Vne Never to Exceed speed
Vno Maximum cruise speed
Vso Stall speed with aps & landing gear deployed
Vfe Maximum aps extended speed
Vs1 Stall speed with aps & landing gear retracted
Figure 3
3. System Installation
The AvMap EFIS installation is divided in the following steps:
1. EKP V Cockpit Docking station installation (for Cockpit Installation)
2. A2 ADAHRS module installation
3. A2 initial attitude calibration (depending on selected installation orientation)
4. Aircraft Prole Setup
5. Compass calibration and test ight
Note: The installation of the EKP V Cockpit Docking Station is covered in the relevant
documentation.
Installation requirements for the A2 ADAHRS module.
Location
The A2 can be installed in any location inside the aircraft. It is suggested to install the A2 aligned
with the aircraft longitudinal axis, as it simplies the attitude calibration process. To connect the
pitot and static lines to the A2 ADAHRS module it is advisable to select a location where such
lines are easily accessible (e.g. behind the instrument panel).
IMPORTANT: The A2 contains a magnetometer and other precision electrical sensors.
The location selected for installation should be clear of strong magnetic or electromagnetic
disturbances as much as possible. Avoid installing the A2 near electronic equipment (other
digital EFIS, radios, transponders, etc), AC or variable DC cables, alternators, electrical motors,
ferrous materials, etc. In such cases the proper behavior of the compass is not guaranteed (i.e.
the compass may be crossed as “out of order” or may give erroneous indications).
Hint: use a hand-held compass to verify the magnetic disturbance in the area selected for
installation. If the needle shows relevant changes or unstable indication, the location is not suitable
for installation. Make sure to perform this test with all on-board electronic devices switched ON.
Page 8

8 - User and Installation Manual
AvMap A2 ADAHRS
User and Installation Manual - 9
AvMap A2 ADAHRS
Orientation
It is suggested to install the A2 aligned with the aircraft longitudinal axis, as it simplies the
attitude calibration process. The A2 can be installed in any orientation, whereafter the proper
attitude calibration procedure needs to be executed after rst installation (see Chapter 4 AvMap
EFIS Calibration, Full Attitude Calibration).
Three installation scenarios are possible:
Scenario A. A2 is installed at (aligned with straight&level ight attitude) and is aligned with the
aircraft longitudinal axis: no attitude calibration procedure is required in this case.
Scenario B. A2 is aligned with the aircraft longitudinal axis, is not aligned with straight&level
ight attitude but pitch and roll offsets are present: simple Horizon Alignment Attitude Calibration
procedure is required.
Scenario C. A2 is not aligned with aircraft longitudinal axis, nor with straight&level ight attitude:
Full Attitude Calibration procedure is required.
Figure 4
A.
B.
Suggested Direction
C.
Page 9

User and Installation Manual - 9
AvMap A2 ADAHRS
Connection to the pitot-static system
In order to display accurate speed and altitude data the A2 needs to be connected to the aircraft
pitot-static system. First of all remove the two caps protecting the STATIC and PITOT ports.
Installation along with other mechanical or digital altimeters and airspeed indicators is supported
by mean of a T coupler (not included in the A2 box).
Connect the pitot line to the port labeled PITOT and the static line to the port labeled STATIC.
Make sure the tubes t tightly into the A2.
Note: Use exible plastic tubes with an inside diameter of 5 mm (0,2 inches).
IMPORTANT: We recommend to test the pitot-static system for leakage after any alteration.
Static
Port
Airspeed IndicatorAltimeter
Pitot Tube
Figure 5
USB > Docking Station
Connection to the Docking Station
The A2 includes a 1.5 m cable with a standard USB connector. Connect the USB cable to one
of the USB ports of the EKP V Cockpit Docking Station.
One of the USB ports is powered by the EKP V internal battery (see Figure 6). If AvMap EFIS is
the main source of primary ight information it is recommended to connect the A2 to this port, in
order to maintain PFD indications in case of electrical power loss.
Figure 6
Battery powered USB Port:
backup power provided by the
EKP V internal battery.
Page 10

10 - User and Installation Manual
AvMap A2 ADAHRS
User and Installation Manual - 11
AvMap A2 ADAHRS
4. System Calibration
Overview
The purpose of AvMap EFIS calibration procedure is to properly setup the system and to adapt
it to the installation environment.
There are two different types of calibration procedures:
1. Attitude calibration: compensates for non-standard installation attitude (required for
scenario B and C mentioned in Chapter 3).
2. Compass calibration: to compensate for any magnetic interference that could alter the
reading of the internal magnetometer (required in all Scenarios, A, B and C, mentioned in
Chapter 3).
The attitude calibration can be performed in three ways:
• Scenario A. No attitude calibration: if unit is aligned with aircraft axis
• Scenario B. Horizon Alignment: to compensate for pitch and roll offsets only
• Scenario C. Full Attitude Calibration: to compensate for pitch, roll and yaw offset between
A2 and aircraft
Note: Compass calibration is required in any case.
Note: Make sure the A2 module is connected to the EKP V to be able to access the EFIS menu
from the EKP V device. All EFIS calibration functions are available in MENU > TOOLS > EFIS
(see Figure 2).
Full Attitude calibration
The procedure needs to be performed on the ground to determine the offset in pitch, roll and yaw
between A2 installation attitude and the aircraft, and requires the user to set the aircraft in straight
and level ight attitude (use blocks or jacks) whereafter a pitch up (or down) maneuver as wide
as possible needs to be executed (see Figure 7).
Figure 7
Level & Straight
Flight Attitude
Pitch Up
Pitch Down
Page 11

User and Installation Manual - 11
AvMap A2 ADAHRS
To access the step-by-step procedure select MENU > TOOLS > EFIS > Full Attitude
Calibration.
1. Select if the maneuver will be pitch up or down. For tricycle aircraft the pitch up maneuver
can be performed by pushing the tail (pitch up), while taildraggers will execute a pitch down
maneuver by raising the tail.
2. Reset A2 ADAHRS calibration data; select Start. Wait until the reset phase is completed.
3. Set the aircraft in level and straight ight attitude by using jacks or blocks (or by asking a
friend to push or lift the tail and hold). Press ENTER (joystick click) to record the sample in
level & straight ight.
4. Set the aircraft in a pitch up (or down) attitude and press ENTER to record the pitch up/down
sample.
WARNING: be very careful not to change the aircraft heading while performing the
pitch up /down maneuver.
5. Set values to A2 by pressing ENTER.
Wait a few minutes for the sensor to stabilize and realign. If pitch and roll after a few minutes are
still not aligned ne-tune pitch and roll offset by executing a Horizon Alignment procedure.
Horizon Alignment
Execute this calibration procedure, either:
• to compensate only pitch/roll offset between the A2 and the aircraft axis.
• to perform a ne alignment of the pitch/roll values, after a full attitude calibration.
The procedure needs to be performed on the ground and can be started from MENU > TOOLS
> EFIS > Horizon Alignment.
Procedure:
1. Make sure the aircraft is in straight and level ight attitude
2. Press the joystick to record a sample of pitch and roll angles
Figure 8
Page 12

12 - User and Installation Manual
AvMap A2 ADAHRS
User and Installation Manual - 13
AvMap A2 ADAHRS
Compass Calibration and Test ight
The purpose of this procedure is to compensate magnetic disturbances the A2 is subject to,
due to aircraft metal structures and electromagnetic components. These disturbances, if not
compensated, could alter the heading value provided by the system.
For this reason the compass indicator is always marked as out of order (i.e. crossed) before the
Compass Calibration procedure is executed.
Note: Compass Calibration is required in all scenarios after a proper Attitude Calibration is
fullled.
WARNING: magnetometer calibration data is invalidated after every attitude calibration
procedure (full attitude calibration and horizon alignment). Make sure to properly calibrate attitude
before proceeding with Compass Calibration.
The Compass Calibration procedure must be executed in-ight and requires to steer the aircraft
in 4 directions and execute some pitch up/down maneuvers. The total duration for this procedure
is about 4 minutes.
Figure 9
Pitch up + 20°
Pitch down - 20°
Page 13

User and Installation Manual - 13
AvMap A2 ADAHRS
To start the guided procedure select MENU >
TOOLS > EFIS > Compass Calibration.
After starting the procedure the screen
switches to Primary Flight Display mode,
where a ight director (i.e. magenta box)
shows the maneuvers to perform. Follow the
magenta box until the procedure is nished.
Assuming the calibration is started with the
aircraft heading North, the steps required are:
1. Maintaining heading 000° execute: pitch
up + 20°, back to straight ight and then
pitch down -20°
2. Turn left to heading 270° by performing
a standard rate turn (the proper bank
will be shown by the ight director). The
target heading for each step is shown as
a magenta reference inside the heading
tape.
3. Execute pitch up/down maneuvers as
described in step #1
4. Repeat steps #2 and #3 for headings 180°
and 090°, until reaching again the original
heading.
At the end of a successful calibration
procedures the compass instruments is
enabled (i.e. red cross removed) and the HSI
instrument correctly shows AHRS as data
source, meaning that magnetic compass data
are now available to the EFIS system.
Note: it’s not required to start the procedure
heading north. Any starting direction is
acceptable.
Note: If the calibration fails or the compass
indicator is not enabled, repeat the calibration
procedure. If several calibration attempts
fails review the installation location of the A2.
Magnetic disturbance could be too high in the
area selected.
Figure 10
Page 14

5. Specifications
AvMap EFIS features
• Airspeed and Altitude from pitot-static system
• Attitude, side slip and heading information
• Integration of TAWS into the PFD with AGL Altitude indication
• Wind indicator with wind components
• Clear HSI display linked with EKP V ight planning function
A2 ADAHRS specications
• Dimensions (mm) 70 x 60 x 35 / (in) 2.76” x2.36” x 1.38”
• Weight < 50 g / 1,8 Oz
• Operational Temperature -25°C to +85°C / -13°F to +185°F
• 3-axis gyros, accelerometers and magnetometers
• Acceleration range (3 axis) +/- 8 g
• Rotation Range +/- 1600 deg/s
• Air data sensors: range 10 to 250 kts, -1000 to 40000 ft
• Advanced data fusion capability
• USB Interface (1.5 m cable)
• Can be installed in any orientation
• Guided Calibration Procedure
• UAV Navigation® technology inside
AvMap A2 ADAHRS
14 - User and Installation Manual
Page 15

Page 16

www.avmap.it
www.avmap.us
www.avmap.com.br
MAIM0AM0AE011
ÑMAIM0AM0AE011CÓ
 Loading...