

Page 1
Repeater
600
Configuration and Operation
Page 2

Table of Contents
• • • • • • • • • • • • • • • • • • • • • • • • • • • • • • • • • • • • • • • • • • • • • • • • • • • • • • • • • • • • • • • • • • • • • • • • • • • • • • • • • • • • • • • • • • • • • • •
Table of Contents
General Remarks...................................................................................................... 4
Safety Instructions ............................................................................................ 5
Instructions and Help ....................................................................................... 7
Device Data on the Type Label ....................................................................... 9
Package Contents ............................................................................................. 10
Functions and Structure ......................................................................................... 11
Functions ............................................................................................................. 12
Button.................................................................................................................... 13
LED ........................................................................................................................ 14
Requirements for Operation ........................................................................... 16
Connecting ................................................................................................................. 17
Connecting to FRITZ!Box................................................................................... 18
Connecting to Another Router......................................................................... 20
Finding the Ideal Location for FRITZ!Repeater............................................ 23
Mesh ........................................................................................................................... 25
Mesh of the FRITZ!Box...................................................................................... 26
Enabling Mesh for FRITZ!Repeater................................................................. 27
Connecting FRITZ!Repeater with Another Mesh Repeater......................... 28
Connecting Devices with FRITZ!Repeater............................................................ 30
Connecting Devices with the Wireless Radio Network ............................... 31
User Interface ........................................................................................................... 33
Opening the User Interface.............................................................................. 34
Configuring AVM Services for Diagnostics and Maintenance ................... 39
User Interface: Access to Home Network Menu................................................. 41
Access to Home Network Menu: Settings and Features............................. 42
Adopting Wireless LAN Settings from the Router (FRITZ!Box).................. 43
• • • • • • • • • • • • • • • • • • • • • • • • • • • • • • • • • • • • • • • • • • • • • • • • • • • • • • • • • • • • • • • • • • • • • • • • • • • • • • • • • • • • • • • • • • • • • • •
2FRITZ!Repeater600
Page 3

Table of Contents
• • • • • • • • • • • • • • • • • • • • • • • • • • • • • • • • • • • • • • • • • • • • • • • • • • • • • • • • • • • • • • • • • • • • • • • • • • • • • • • • • • • • • • • • • • • • • • •
User Interface: Network.......................................................................................... 45
The Network Menu: Settings and Features................................................... 46
Configuring the IP Address Manually............................................................. 47
User Interface: Wireless Menu............................................................................... 48
Wireless Menu: Settings and Features.......................................................... 49
Configuring a Schedule for the Wireless Radio Network ........................... 50
Changing the Name of the Wireless Network (SSID) .................................. 51
Configuring Wireless Guest Access .............................................................. 52
User Interface: System Menu................................................................................. 53
System Menu: Settings and Features............................................................ 54
Configuring Push Services .............................................................................. 55
Switching LED On and Off................................................................................. 57
Configuring a FRITZ!Repeater Password ..................................................... 58
Saving Settings ................................................................................................... 60
Loading Settings ............................................................................................... 61
Updating FRITZ!OS ............................................................................................ 62
Restoring Factory Settings ............................................................................. 63
Malfunctions .............................................................................................................. 64
Troubleshooting Procedures........................................................................... 65
Appendix..................................................................................................................... 68
Technical Specifications................................................................................... 69
Legal...................................................................................................................... 71
Information on Cleaning................................................................................... 75
Disposal ............................................................................................................... 76
Index............................................................................................................................ 77
• • • • • • • • • • • • • • • • • • • • • • • • • • • • • • • • • • • • • • • • • • • • • • • • • • • • • • • • • • • • • • • • • • • • • • • • • • • • • • • • • • • • • • • • • • • • • • •
3FRITZ!Repeater600
Page 4

General Remarks
• • • • • • • • • • • • • • • • • • • • • • • • • • • • • • • • • • • • • • • • • • • • • • • • • • • • • • • • • • • • • • • • • • • • • • • • • • • • • • • • • • • • • • • • • • • • • • •
General Remarks
Safety Instructions .................................................................................................... 5
Instructions and Help ............................................................................................... 7
Device Data on the Type Label ................................................................................ 9
Package Contents ...................................................................................................... 10
• • • • • • • • • • • • • • • • • • • • • • • • • • • • • • • • • • • • • • • • • • • • • • • • • • • • • • • • • • • • • • • • • • • • • • • • • • • • • • • • • • • • • • • • • • • • • • •
4FRITZ!Repeater600
Page 5

General Remarks
• • • • • • • • • • • • • • • • • • • • • • • • • • • • • • • • • • • • • • • • • • • • • • • • • • • • • • • • • • • • • • • • • • • • • • • • • • • • • • • • • • • • • • • • • • • • • • •
Safety Instructions
Overview
Before connecting the FRITZ!Repeater, observe the following security
instructions in order to protect yourself, the surroundings, and the
FRITZ!Repeater from harm.
Easy Accessibility
It must always be possible to disconnect the FRITZ!Repeater from
electrical power.
• Insert the FRITZ!Repeater into an electrical outlet that is easy to
reach.
Overheating
Heat accumulation can lead to overheating of the FRITZ!Repeater and
subsequently damage the FRITZ!Repeater.
• Install the FRITZ!Repeater in a place that is protected from direct
sunlight.
• Provide for sufficient air circulation around the FRITZ!Repeater.
• Make sure that the ventilation slits on the housing are always
unobstructed.
• Do not cover the FRITZ!Repeater.
• Avoid operation in the direct vicinity of a radiator or heating unit.
Moisture, Liquids and Vapors
Moisture, liquids and vapors that find their way into the
FRITZ!Repeater can cause electric shocks or short circuits.
• Only use the FRITZ!Repeater indoors.
• Never let liquids get inside the FRITZ!Repeater.
• Protect the FRITZ!Repeater from vapors and moisture.
• • • • • • • • • • • • • • • • • • • • • • • • • • • • • • • • • • • • • • • • • • • • • • • • • • • • • • • • • • • • • • • • • • • • • • • • • • • • • • • • • • • • • • • • • • • • • • •
5FRITZ!Repeater600
Page 6

General Remarks
• • • • • • • • • • • • • • • • • • • • • • • • • • • • • • • • • • • • • • • • • • • • • • • • • • • • • • • • • • • • • • • • • • • • • • • • • • • • • • • • • • • • • • • • • • • • • • •
Improper Cleaning
Improper cleaning with strong detergents, solvents or wet cloths can
cause damage to the FRITZ!Repeater.
• Please refer to the information about cleaning; see page 75.
Improper Opening and Repairs
Improper opening and improper repairs can present a hazard to users
of the FRITZ!Repeater.
• Do not open the FRITZ!Repeater.
Power Surges Caused by Lightning
During electrical storms, electrical surges caused by lightning present
a danger to connected electrical devices.
• Do not install the FRITZ!Repeater during an electrical storm.
• During a storm, disconnect the FRITZ!Repeater from the power
supply.
• • • • • • • • • • • • • • • • • • • • • • • • • • • • • • • • • • • • • • • • • • • • • • • • • • • • • • • • • • • • • • • • • • • • • • • • • • • • • • • • • • • • • • • • • • • • • • •
6FRITZ!Repeater600
Page 7

General Remarks
• • • • • • • • • • • • • • • • • • • • • • • • • • • • • • • • • • • • • • • • • • • • • • • • • • • • • • • • • • • • • • • • • • • • • • • • • • • • • • • • • • • • • • • • • • • • • • •
Instructions and Help
Instructions and Help
To connect, configure and operate your FRITZ!Repeater600, use the
following instructions and help:
Instructions,
Contents Location
Help
Manual
Status: current version of
en.avm.
de/service/manuals
FRITZ!OS
Connecting, configuration and
operation
Range of functions of your
FRITZ! device
Quick guide Connecting and configuration Is provided in print
with your
FRITZ!Repeater
Online help Instructions on configuration
http://fritz.repeater /
and operation
Knowledge
Base
Solutions for common prob
lems during connection,
en.avm.de/service
configuration and operation
Newsletter and
social media
The latest information on
FRITZ! products, updates, and
practical tips
en.avm.
de/newsletter
Facebook
Instagram
Twitter
YouTube
• • • • • • • • • • • • • • • • • • • • • • • • • • • • • • • • • • • • • • • • • • • • • • • • • • • • • • • • • • • • • • • • • • • • • • • • • • • • • • • • • • • • • • • • • • • • • • •
7FRITZ!Repeater600
Page 8

General Remarks
• • • • • • • • • • • • • • • • • • • • • • • • • • • • • • • • • • • • • • • • • • • • • • • • • • • • • • • • • • • • • • • • • • • • • • • • • • • • • • • • • • • • • • • • • • • • • • •
Symbols Used
The following symbols are used in this manual:
Symbol Meaning
Important message that should be complied with in order to
prevent material damage, errors or malfunctions
Useful tip for configuring and operating the FRITZ!Repeater
• • • • • • • • • • • • • • • • • • • • • • • • • • • • • • • • • • • • • • • • • • • • • • • • • • • • • • • • • • • • • • • • • • • • • • • • • • • • • • • • • • • • • • • • • • • • • • •
8FRITZ!Repeater600
Page 9
R987.321.65.498.777
00:00:00:00:00:00
3779 8981 1562 8981 1234
S/N:
Input: 230V~ 50Hz 40mA
WLAN network key:
MAC:
FRI !Repeater 600
AVM GmbH, 10547 Berlin
1
2
3
5
4
General Remarks
• • • • • • • • • • • • • • • • • • • • • • • • • • • • • • • • • • • • • • • • • • • • • • • • • • • • • • • • • • • • • • • • • • • • • • • • • • • • • • • • • • • • • • • • • • • • • • •
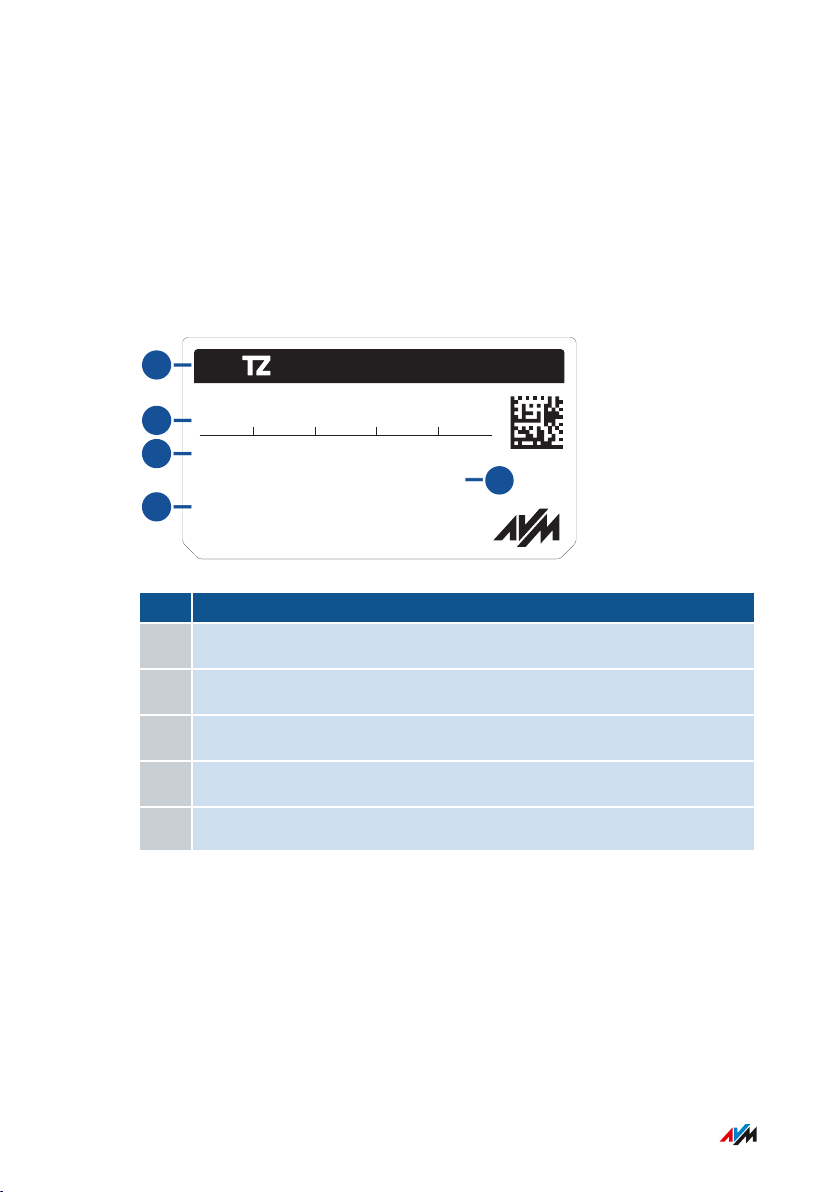
Device Data on the Type Label
Overview
Important device data on your FRITZ!Repeater device are presented on
the type label on the Back of the Device.
Device Data on the Type Label
No. Meaning
1 Product name
2 Network key (wireless LAN password)
3 Serial number
4 MAC address of the FRITZ!Repeater600
5 Power adapter specification
• • • • • • • • • • • • • • • • • • • • • • • • • • • • • • • • • • • • • • • • • • • • • • • • • • • • • • • • • • • • • • • • • • • • • • • • • • • • • • • • • • • • • • • • • • • • • • •
9FRITZ!Repeater600
Page 10

General Remarks
• • • • • • • • • • • • • • • • • • • • • • • • • • • • • • • • • • • • • • • • • • • • • • • • • • • • • • • • • • • • • • • • • • • • • • • • • • • • • • • • • • • • • • • • • • • • • • •
Package Contents
Package Contents
Number Supplied Part
1 FRITZ!Repeater600
1 CEE7/4 (Schuko) adapter (installed)
1 Quick guide
CEE7/4 (Schuko) adapter
To stabilize the FRITZ!Repeater in CEE7/4 (Schuko) outlets, a Schuko
adapter ring is premounted on the plug. If this adapter is not needed, it
can be removed.
• • • • • • • • • • • • • • • • • • • • • • • • • • • • • • • • • • • • • • • • • • • • • • • • • • • • • • • • • • • • • • • • • • • • • • • • • • • • • • • • • • • • • • • • • • • • • • •
10FRITZ!Repeater600
Page 11

Functions and Structure
• • • • • • • • • • • • • • • • • • • • • • • • • • • • • • • • • • • • • • • • • • • • • • • • • • • • • • • • • • • • • • • • • • • • • • • • • • • • • • • • • • • • • • • • • • • • • • •
Functions and Structure
Functions .................................................................................................................... 12
Button........................................................................................................................... 13
LED ............................................................................................................................... 14
Requirements for Operation ................................................................................... 16
• • • • • • • • • • • • • • • • • • • • • • • • • • • • • • • • • • • • • • • • • • • • • • • • • • • • • • • • • • • • • • • • • • • • • • • • • • • • • • • • • • • • • • • • • • • • • • •
11FRITZ!Repeater600
Page 12

Functions and Structure
• • • • • • • • • • • • • • • • • • • • • • • • • • • • • • • • • • • • • • • • • • • • • • • • • • • • • • • • • • • • • • • • • • • • • • • • • • • • • • • • • • • • • • • • • • • • • • •
Functions
Extending Wireless LAN
The wireless radio network of an internet router (FRITZ!Box) often
does not cover all rooms in an apartment or a house. With
FRITZ!Repeater600 wireless devices like computers, tablets and
smartphones get a connection to the internet router even where its
wireless radio network is poor or cannot be received at all. For this the
FRITZ!Repeater expands the wireless radio network of the internet
router (FRITZ!Box).
• • • • • • • • • • • • • • • • • • • • • • • • • • • • • • • • • • • • • • • • • • • • • • • • • • • • • • • • • • • • • • • • • • • • • • • • • • • • • • • • • • • • • • • • • • • • • • •
12FRITZ!Repeater600
Page 13
Connect
1
Functions and Structure
• • • • • • • • • • • • • • • • • • • • • • • • • • • • • • • • • • • • • • • • • • • • • • • • • • • • • • • • • • • • • • • • • • • • • • • • • • • • • • • • • • • • • • • • • • • • • • •
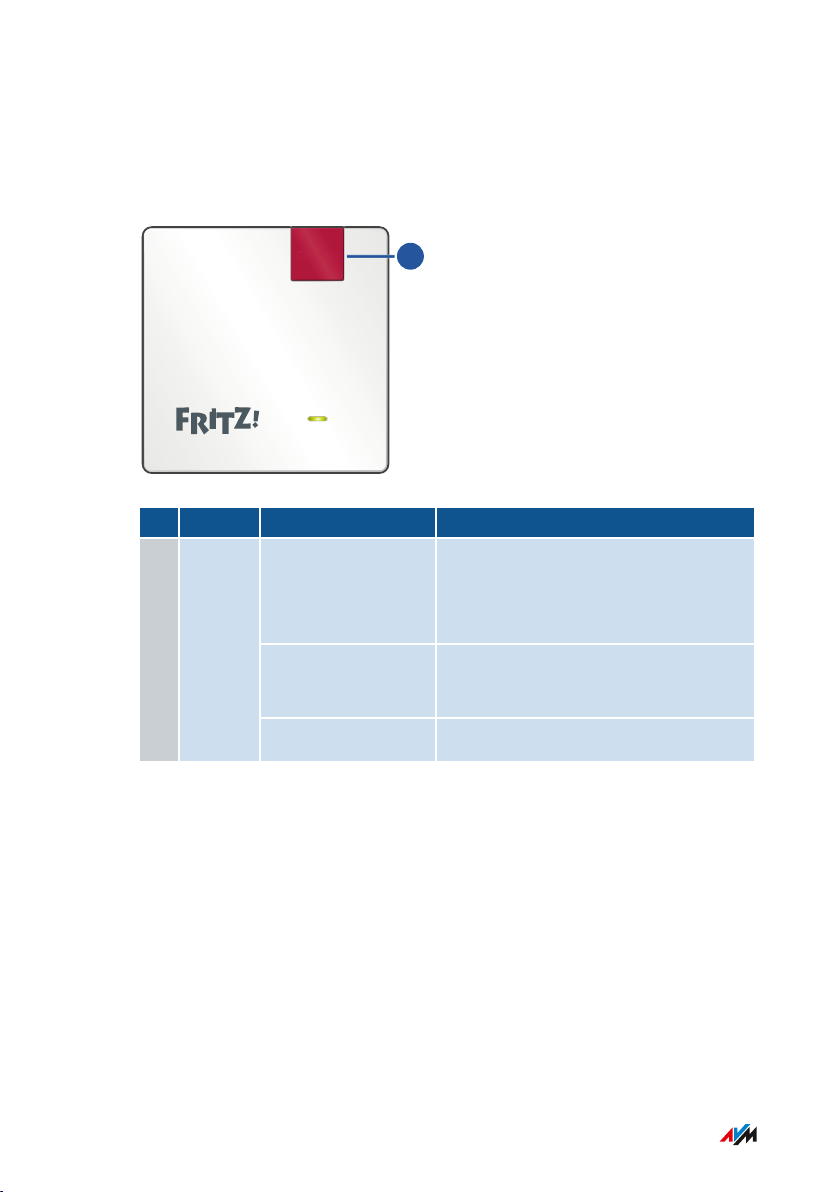
Button
Button Functions
No. Button Press Function
1 Connect
for 1second • Establishes a connection
(starts WPS)
• Enables Mesh
6seconds Connects with another wireless
access point
at least 15seconds Loads factory settings
• • • • • • • • • • • • • • • • • • • • • • • • • • • • • • • • • • • • • • • • • • • • • • • • • • • • • • • • • • • • • • • • • • • • • • • • • • • • • • • • • • • • • • • • • • • • • • •
13FRITZ!Repeater600
Page 14
1
Connect
Functions and Structure
• • • • • • • • • • • • • • • • • • • • • • • • • • • • • • • • • • • • • • • • • • • • • • • • • • • • • • • • • • • • • • • • • • • • • • • • • • • • • • • • • • • • • • • • • • • • • • •
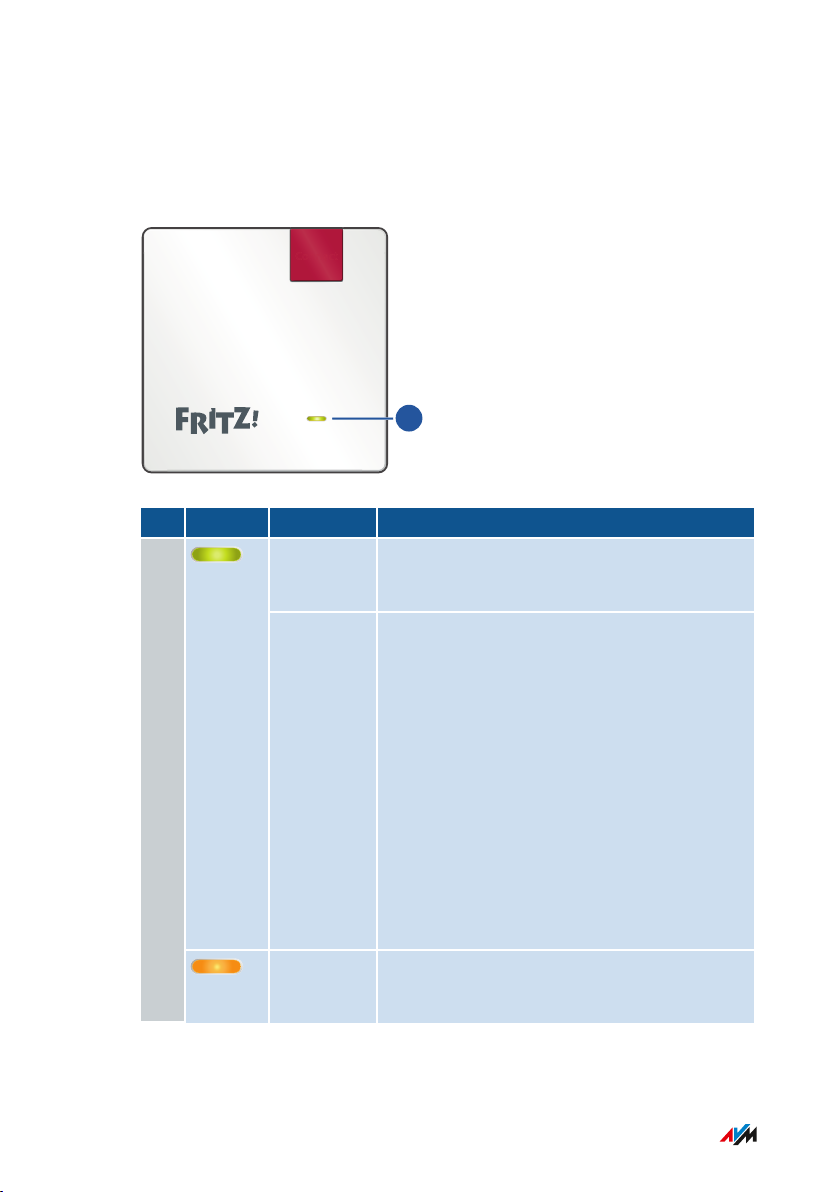
LED
Meaning of the LED
No. LED Condition Meaning
1
glows
green
flashes
green
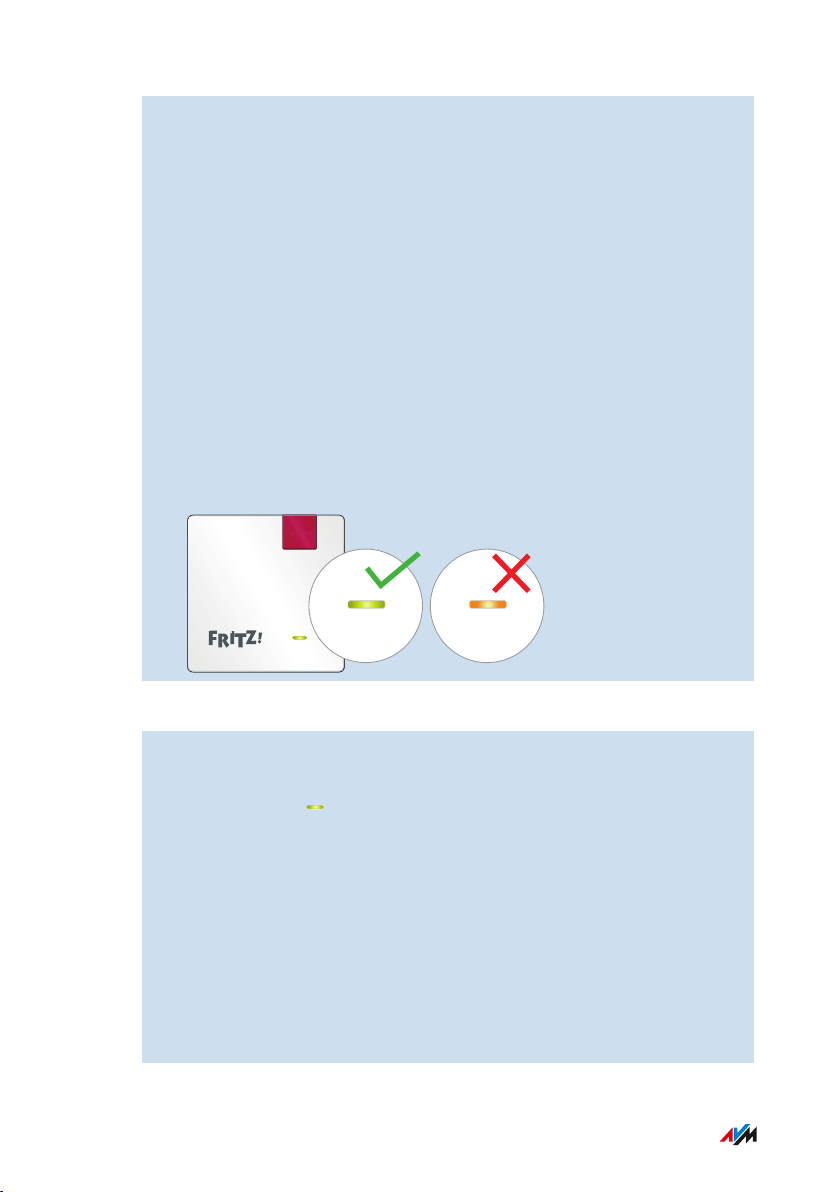
FRITZ!Repeater ready for operation, good
wireless connection to a router/repeater
slowly (every 2seconds)
• FRITZ!Repeater ready to configure a
connection
fast (twice per second)
• FRITZ!Repeater starting
• Registering with router
• Performing WPS
• Enabling Mesh
• FRITZ!OS update in progress
• Loading factory settings
glows
orange
• • • • • • • • • • • • • • • • • • • • • • • • • • • • • • • • • • • • • • • • • • • • • • • • • • • • • • • • • • • • • • • • • • • • • • • • • • • • • • • • • • • • • • • • • • • • • • •
Weak wireless connection to a
router/repeater
14FRITZ!Repeater600
Page 15

Functions and Structure
• • • • • • • • • • • • • • • • • • • • • • • • • • • • • • • • • • • • • • • • • • • • • • • • • • • • • • • • • • • • • • • • • • • • • • • • • • • • • • • • • • • • • • • • • • • • • • •
No. LED Condition Meaning
flashes
No connection to router/repeater1
orange
off • No electrical power
• Wireless switching schedule enabled
• • • • • • • • • • • • • • • • • • • • • • • • • • • • • • • • • • • • • • • • • • • • • • • • • • • • • • • • • • • • • • • • • • • • • • • • • • • • • • • • • • • • • • • • • • • • • • •
15FRITZ!Repeater600
Page 16

Functions and Structure
• • • • • • • • • • • • • • • • • • • • • • • • • • • • • • • • • • • • • • • • • • • • • • • • • • • • • • • • • • • • • • • • • • • • • • • • • • • • • • • • • • • • • • • • • • • • • • •
Requirements for Operation
Requirements
In order to operate the FRITZ!Repeater600, you must have the
following:
• FRITZ!Box or other wireless router compliant with IEEE802.11n,
802.11g or 802.11b in the 2.4-GHz frequency band
• Router with automatic IP address assignment (DHCP)
• For Mesh: FRITZ!Box with FRITZ!OS7.00 or higher
• • • • • • • • • • • • • • • • • • • • • • • • • • • • • • • • • • • • • • • • • • • • • • • • • • • • • • • • • • • • • • • • • • • • • • • • • • • • • • • • • • • • • • • • • • • • • • •
16FRITZ!Repeater600
Page 17

Connecting
• • • • • • • • • • • • • • • • • • • • • • • • • • • • • • • • • • • • • • • • • • • • • • • • • • • • • • • • • • • • • • • • • • • • • • • • • • • • • • • • • • • • • • • • • • • • • • •
Connecting
Connecting to FRITZ!Box........................................................................................... 18
Connecting to Another Router................................................................................. 20
Finding the Ideal Location for FRITZ!Repeater..................................................... 23
• • • • • • • • • • • • • • • • • • • • • • • • • • • • • • • • • • • • • • • • • • • • • • • • • • • • • • • • • • • • • • • • • • • • • • • • • • • • • • • • • • • • • • • • • • • • • • •
17FRITZ!Repeater600
Page 18

Connecting
• • • • • • • • • • • • • • • • • • • • • • • • • • • • • • • • • • • • • • • • • • • • • • • • • • • • • • • • • • • • • • • • • • • • • • • • • • • • • • • • • • • • • • • • • • • • • • •
Connecting to FRITZ!Box
Overview
Connect the FRITZ!Repeater to your FRITZ!Box as described below.
Requirements
• If the FRITZ!Repeater has already been in use: The factory settings
have been restored to the FRITZ!Repeater; see page 63.
Instructions: Establishing a Wireless Connection to the FRITZ!Box
1. Connect the FRITZ!Repeater to an electrical outlet in the vicinity
of the FRITZ!Box.
2. Wait until the LED starts flashing slowly.
3. Press the “Connect” key.
The LED flashes faster.
4. Start WPS on the FRITZ!Box. The procedure depends on the
buttons on the FRITZ!Box:
FRITZ!Box with
Start WPS
Button
“WPS” or
Press button briefly.
“Connect/WPS”
“WLAN” or “WLAN /
WPS”
Press and hold the button down for at
least 6seconds.
5. Wait until the LED on the FRITZ!Repeater lights up.
The wireless connection to the FRITZ!Box is established.
• • • • • • • • • • • • • • • • • • • • • • • • • • • • • • • • • • • • • • • • • • • • • • • • • • • • • • • • • • • • • • • • • • • • • • • • • • • • • • • • • • • • • • • • • • • • • • •
18FRITZ!Repeater600
Page 19
Connect
Connecting
• • • • • • • • • • • • • • • • • • • • • • • • • • • • • • • • • • • • • • • • • • • • • • • • • • • • • • • • • • • • • • • • • • • • • • • • • • • • • • • • • • • • • • • • • • • • • • •
6. Insert the FRITZ!Repeater into an electrical outlet where the
wireless radio network is to be expanded. The distance from the
FRITZ!Box should be about the same as the distance from the
wireless devices for which the radio network is being expanded.
The FRITZ!Repeater starts and reconnects to the FRITZ!Box (LED
flashes). A steady green LED indicates that the connection has
been established.
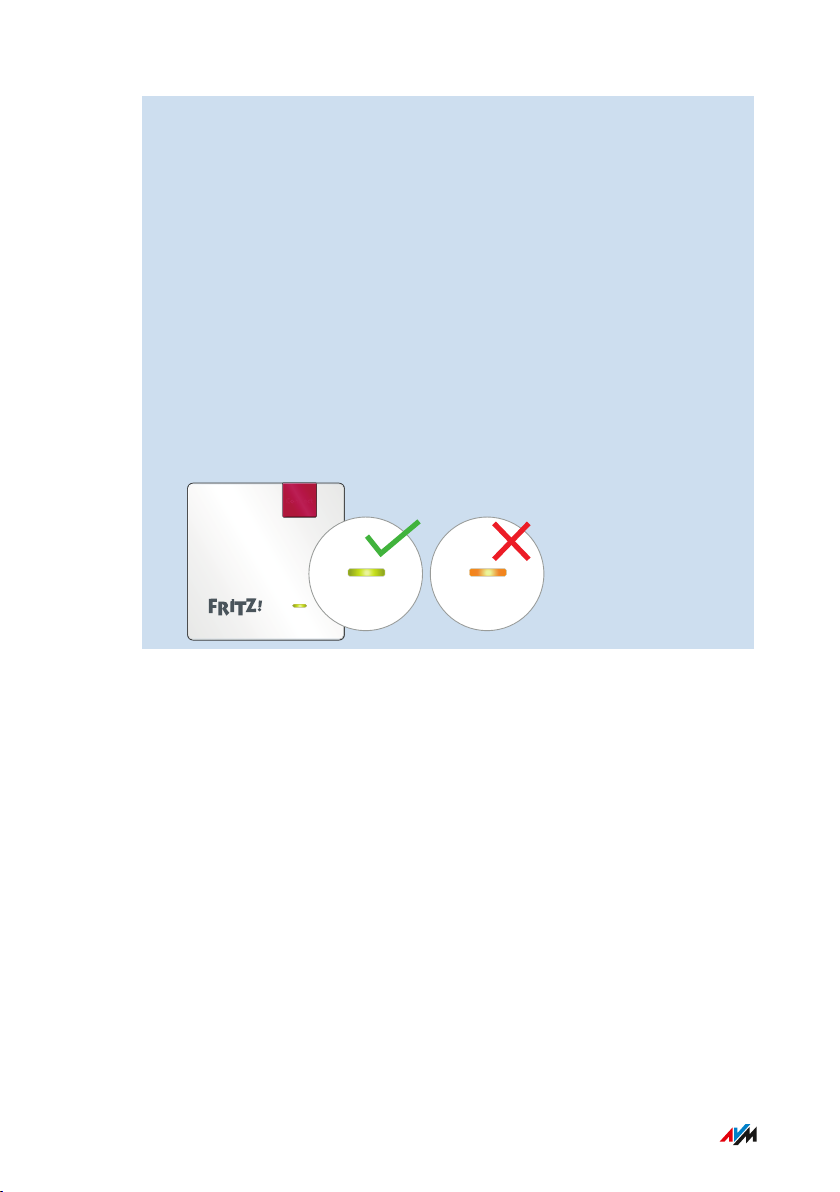
7. A green LED indicates that the FRITZ!Repeater is positioned in a
good location.
If the LED is orange or flashing orange, then the wireless
connection to the FRITZ!Box is weak or could not be established.
Test other outlets; see Finding the Ideal Location for
FRITZ!Repeater, page 23.
• • • • • • • • • • • • • • • • • • • • • • • • • • • • • • • • • • • • • • • • • • • • • • • • • • • • • • • • • • • • • • • • • • • • • • • • • • • • • • • • • • • • • • • • • • • • • • •
19FRITZ!Repeater600
Page 20

Connecting
• • • • • • • • • • • • • • • • • • • • • • • • • • • • • • • • • • • • • • • • • • • • • • • • • • • • • • • • • • • • • • • • • • • • • • • • • • • • • • • • • • • • • • • • • • • • • • •
Connecting to Another Router
Overview
Connect the FRITZ!Repeater as described below if your router is not a
FRITZ!Box.
You can establish the wireless connection via WPS. If the router does
not support WPS, you can use a wizard.
Requirements
• If the FRITZ!Repeater has already been in use: The factory settings
have been restored to the FRITZ!Repeater; see page 63.
• For wireless connections using WPS: The router must support
WPS and WPS must be enabled.
Rules
• When establishing a wireless connection, the FRITZ!Repeater
adopts the following wireless LAN settings from the router: wire
less network name/SSID, network key, and channel settings. If
you change these settings in the router, you have to adopt the
wireless settings for the repeater again; see page 43.
Instructions: Establishing a Wireless Connection to the Router with WPS
1. Connect the FRITZ!Repeater to an electrical outlet in the vicinity
of the router.
2. Wait until the LED starts flashing slowly.
3. Press the “Connect” key.
The LED flashes faster.
4. Start WPS on the router. See the documentation of the router for
instructions.
5. Wait until the LED on the FRITZ!Repeater lights up.
The wireless connection to the FRITZ!Box is established.
• • • • • • • • • • • • • • • • • • • • • • • • • • • • • • • • • • • • • • • • • • • • • • • • • • • • • • • • • • • • • • • • • • • • • • • • • • • • • • • • • • • • • • • • • • • • • • •
20FRITZ!Repeater600
Page 21
Connect
Connecting
• • • • • • • • • • • • • • • • • • • • • • • • • • • • • • • • • • • • • • • • • • • • • • • • • • • • • • • • • • • • • • • • • • • • • • • • • • • • • • • • • • • • • • • • • • • • • • •
6. Insert the FRITZ!Repeater into an electrical outlet where the
wireless radio network is to be expanded.
The distance from the wireless router should be about the same
as the distance from the wireless devices for which the radio
network is being expanded.
The FRITZ!Repeater starts and reconnects to the FRITZ!Box (LED
flashes). A steady green LED indicates that the connection has
been established.
7. A green LED indicates that the FRITZ!Repeater is positioned in a
good location.
If the LED is orange or flashing orange, then the wireless
connection to the wireless router is weak or could not be estab
lished. Test other outlets; see Finding the Ideal Location for
FRITZ!Repeater, page 23.
Instructions: Establishing a Wireless Connection to the Router with a Wizard
1. Connect the FRITZ!Repeater to an electrical outlet in the vicinity
of the router.
2. Wait until the LED starts flashing slowly.
3. Connect the FRITZ!Repeater to a computer using a LAN cable, or
establish a wireless connection to the FRITZ!Repeater on a
computer, tablet or smartphone.
The preset network key of the FRITZ!Repeater is located on the
Back of the Device.
4. Enter the address http://fritz.repeater in a web browser on a
computer.
• • • • • • • • • • • • • • • • • • • • • • • • • • • • • • • • • • • • • • • • • • • • • • • • • • • • • • • • • • • • • • • • • • • • • • • • • • • • • • • • • • • • • • • • • • • • • • •
The user interface of the FRITZ!Repeater appears.
21FRITZ!Repeater600
Page 22

Connect
Connecting
• • • • • • • • • • • • • • • • • • • • • • • • • • • • • • • • • • • • • • • • • • • • • • • • • • • • • • • • • • • • • • • • • • • • • • • • • • • • • • • • • • • • • • • • • • • • • • •
5. Enter a password for the user interface.
We recommend leaving the AVM services for diagnostics and
maintenance of the FRITZ!Repeater enabled. You can change
this setting at any time.
6. Click on “OK”.
7. Enable the connection type “Wireless bridge” and click on
“Next”.
8. Select the radio network of your router and click on “Next”.
9. Enter your network key for the router‘s wireless network, and
click on “Next” and then on “Finish”.
10. Wait until the LED on the FRITZ!Repeater lights up.
The wireless connection to the FRITZ!Box is established.
11. Insert the FRITZ!Repeater into an electrical outlet where the
wireless radio network is to be expanded.
The distance from the wireless router should be about the same
as the distance from the wireless devices for which the radio
network is being expanded.
The FRITZ!Repeater starts and reconnects to the FRITZ!Box (LED
flashes). A steady green LED indicates that the connection has
been established.
12. A green LED indicates that the FRITZ!Repeater is positioned in a
good location.
If the LED is orange or flashing orange, then the wireless
connection to the wireless router is weak or could not be estab
lished. Test other outlets; see Finding the Ideal Location for
FRITZ!Repeater, page 23.
• • • • • • • • • • • • • • • • • • • • • • • • • • • • • • • • • • • • • • • • • • • • • • • • • • • • • • • • • • • • • • • • • • • • • • • • • • • • • • • • • • • • • • • • • • • • • • •
22FRITZ!Repeater600
Page 23

Connecting
• • • • • • • • • • • • • • • • • • • • • • • • • • • • • • • • • • • • • • • • • • • • • • • • • • • • • • • • • • • • • • • • • • • • • • • • • • • • • • • • • • • • • • • • • • • • • • •
Finding the Ideal Location for FRITZ!Repeater
Overview
The position for the FRITZ!Repeater that optimizes expansion of the
wireless radio network can be found by applying the following rules. In
combination with a FRITZ!Box you can also use the FRITZ!AppWLAN.
Rules
• Space should be left between the FRITZ!Repeater and walls, radi
ators, large devices with metal housings, other wireless devices,
and transmitting devices like baby monitors, microwaves and
DECT base stations.
• The router’s wireless LAN should be available in high quality. The
LED should be green.
• The FRITZ!Repeater should not be located too close to the router.
With no obstructions between the devices, the distance should not
be much less than 3meters.
FRITZ!AppWLAN
FRITZ!AppWLAN includes a feature to evaluate the position of the
FRITZ!Repeater. This feature assists you in finding the best location for
the FRITZ!Repeater.
You can download FRITZ!AppWLAN for free:
Google Play Store App Store (iOS)
• • • • • • • • • • • • • • • • • • • • • • • • • • • • • • • • • • • • • • • • • • • • • • • • • • • • • • • • • • • • • • • • • • • • • • • • • • • • • • • • • • • • • • • • • • • • • • •
23FRITZ!Repeater600
Page 24

Connecting
• • • • • • • • • • • • • • • • • • • • • • • • • • • • • • • • • • • • • • • • • • • • • • • • • • • • • • • • • • • • • • • • • • • • • • • • • • • • • • • • • • • • • • • • • • • • • • •
Instructions: Positioning FRITZ!Repeater with FRITZ!AppWLAN
1. Start the FRITZ!AppWLAN.
2. In Android: Tap on the menu and select “Repeater”.
In iOS: Tap the “My Repeater Position” button.
3. Tap on “Evaluate Repeater Position”.
If the FRITZ!Repeater is not in an optimum position, you will
receive tips for improving the range of the wireless network.
• • • • • • • • • • • • • • • • • • • • • • • • • • • • • • • • • • • • • • • • • • • • • • • • • • • • • • • • • • • • • • • • • • • • • • • • • • • • • • • • • • • • • • • • • • • • • • •
24FRITZ!Repeater600
Page 25

Mesh
• • • • • • • • • • • • • • • • • • • • • • • • • • • • • • • • • • • • • • • • • • • • • • • • • • • • • • • • • • • • • • • • • • • • • • • • • • • • • • • • • • • • • • • • • • • • • • •
Mesh
Mesh of the FRITZ!Box.............................................................................................. 26
Enabling Mesh for FRITZ!Repeater......................................................................... 27
Connecting FRITZ!Repeater with Another Mesh Repeater................................ 28
• • • • • • • • • • • • • • • • • • • • • • • • • • • • • • • • • • • • • • • • • • • • • • • • • • • • • • • • • • • • • • • • • • • • • • • • • • • • • • • • • • • • • • • • • • • • • • •
25FRITZ!Repeater600
Page 26

Mesh
• • • • • • • • • • • • • • • • • • • • • • • • • • • • • • • • • • • • • • • • • • • • • • • • • • • • • • • • • • • • • • • • • • • • • • • • • • • • • • • • • • • • • • • • • • • • • • •
Mesh of the FRITZ!Box
Overview
Mesh connects the wireless networks of your FRITZ! devices to form a
combined wireless network. Your FRITZ!Box is the hub of the Mesh.
Requirements
• FRITZ!Box with FRITZ!OS7.00 or newer.
Features in the Mesh
• The FRITZ!Repeater adopts from the FRITZ!Box: wireless network
name (SSID), wireless network key, wireless guest access and
wireless switching schedule. Changes in the FRITZ!Box are auto
matically applied to the FRITZ!Repeater.
• Faster wireless connections: As Mesh Master, the FRITZ!Box uses
AP steering to ensure that wireless devices in the Mesh always
connect with the home network via the best access point.
• Updates for the FRITZ!Repeater and other FRITZ! devices in the
Mesh can be performed centrally in the user interface of the
FRITZ!Box.
• The “Mesh Overview” in the user interface of the FRITZ!Box shows
which devices are connected with the FRITZ!Repeater.
• You can connect multiple Mesh Repeaters with each other (in
series) to extend the range of the radio network in a certain direc
tion.
• • • • • • • • • • • • • • • • • • • • • • • • • • • • • • • • • • • • • • • • • • • • • • • • • • • • • • • • • • • • • • • • • • • • • • • • • • • • • • • • • • • • • • • • • • • • • • •
26FRITZ!Repeater600
Page 27

Mesh
• • • • • • • • • • • • • • • • • • • • • • • • • • • • • • • • • • • • • • • • • • • • • • • • • • • • • • • • • • • • • • • • • • • • • • • • • • • • • • • • • • • • • • • • • • • • • • •
Enabling Mesh for FRITZ!Repeater
Overview
After connecting to the FRITZ!Box, check whether Mesh is enabled for
the FRITZ!Repeater. If Mesh is not enabled yet, enable Mesh now.
Requirements
• FRITZ!Box with FRITZ!OS7.00 or newer.
Instructions: Enabling Mesh for the FRITZ!Repeater
1. Press the “Connect” button on the FRITZ!Repeater briefly.
2. Start WPS on the FRITZ!Box. The procedure depends on the
buttons on the FRITZ!Box:
FRITZ!Box with
Button
“WPS” or
“Connect/WPS”
“WLAN” or “WLAN /
WPS”
Start WPS
Press button briefly.
Press and hold the button down for at
least 6seconds.
• • • • • • • • • • • • • • • • • • • • • • • • • • • • • • • • • • • • • • • • • • • • • • • • • • • • • • • • • • • • • • • • • • • • • • • • • • • • • • • • • • • • • • • • • • • • • • •
27FRITZ!Repeater600
Page 28

Mesh
• • • • • • • • • • • • • • • • • • • • • • • • • • • • • • • • • • • • • • • • • • • • • • • • • • • • • • • • • • • • • • • • • • • • • • • • • • • • • • • • • • • • • • • • • • • • • • •
Connecting FRITZ!Repeater with Another Mesh Repeater
Overview
In the Mesh of a FRITZ!Box you can connect several Mesh Repeaters in
series. A MeshRepeater can be a FRITZ!Repeater, a FRITZ!Powerline
device, or a FRITZ!Box configured as a MeshRepeater.
Requirements
• Mesh is enabled for the FRITZ!Repeater.
Instructions:
1. Connect the FRITZ!Repeater to an electrical outlet in the vicinity
of the other MeshRepeater.
2. Wait until the LED starts flashing slowly.
3. Press the “Connect” key.
The LED flashes faster.
4. On the other MeshRepeater: Start the connection procedure:
Mesh Repeater Start Connecting
FRITZ!Box with
“WLAN” or
Press and hold the button down for at
least 6seconds.
“WLAN/WPS” button
Other FRITZ!Box Press the “Connect/WPS” or “WPS”
button briefly (for 1second).
FRITZ!Repeater Press the “Connect” or “WPS” button
briefly (for 1second).
FRITZ!Powerline Press the “Connect” or “WLAN/WPS”
button briefly (for 1second).
5. Wait until the LED on the FRITZ!Repeater lights up.
The wireless connection to the FRITZ!Box is established.
• • • • • • • • • • • • • • • • • • • • • • • • • • • • • • • • • • • • • • • • • • • • • • • • • • • • • • • • • • • • • • • • • • • • • • • • • • • • • • • • • • • • • • • • • • • • • • •
28FRITZ!Repeater600
Page 29

Connect
Mesh
• • • • • • • • • • • • • • • • • • • • • • • • • • • • • • • • • • • • • • • • • • • • • • • • • • • • • • • • • • • • • • • • • • • • • • • • • • • • • • • • • • • • • • • • • • • • • • •
6. Insert the FRITZ!Repeater into an electrical outlet where the
wireless radio network is to be expanded.
The FRITZ!Repeater starts (LED lights up green) and connects to
the other MeshRepeater (LED flashes orange). The LED lights
up once the connection has been established.
7. A green LED indicates that the FRITZ!Repeater is positioned in a
good location.
If the LED is orange or flashing orange, then the wireless
connection to the other Mesh Repeater is weak or could not be
established. Test other outlets; see Finding the Ideal Location
for FRITZ!Repeater, page 23.
• • • • • • • • • • • • • • • • • • • • • • • • • • • • • • • • • • • • • • • • • • • • • • • • • • • • • • • • • • • • • • • • • • • • • • • • • • • • • • • • • • • • • • • • • • • • • • •
29FRITZ!Repeater600
Page 30

Connecting Devices with FRITZ!Repeater
• • • • • • • • • • • • • • • • • • • • • • • • • • • • • • • • • • • • • • • • • • • • • • • • • • • • • • • • • • • • • • • • • • • • • • • • • • • • • • • • • • • • • • • • • • • • • • •
Connecting Devices with FRITZ!Repeater
Connecting Devices with the Wireless Radio Network ...................................... 31
• • • • • • • • • • • • • • • • • • • • • • • • • • • • • • • • • • • • • • • • • • • • • • • • • • • • • • • • • • • • • • • • • • • • • • • • • • • • • • • • • • • • • • • • • • • • • • •
30FRITZ!Repeater600
Page 31

Connecting Devices with FRITZ!Repeater
• • • • • • • • • • • • • • • • • • • • • • • • • • • • • • • • • • • • • • • • • • • • • • • • • • • • • • • • • • • • • • • • • • • • • • • • • • • • • • • • • • • • • • • • • • • • • • •
Connecting Devices with the Wireless Radio Network
Overview
Laptops, smartphones and other wireless devices can be connected
with the wireless radio network of the FRITZ!Repeater in two ways: Via
WPS or by entering the wireless network key.
WPS (Wi-Fi Protected Setup) is a feature with which you can establish
secure wireless LAN connections quickly and securely at the touch of a
button.
Requirements
• For wireless connections with WPS: The wireless device supports
WPS.
Rules
• The following instructions assume that the FRITZ!Repeater
adopted the wireless network name (SSID) and the wireless
network key from the router (FRITZ!Box). If you configured other
wireless LAN settings in the FRITZ!Repeater, then use the settings
of the FRITZ!Repeater to establish wireless connections.
Instructions: Connecting to an Android Device with WPS
All Android versions support WPS up to and including Android8.0.
1. On the Android device: Search for WPS in the settings. You can
find WPS by using the search function in the settings, or under
“Wi-Fi / Advanced”.
2. Start connecting with WPS. Use the push button method (also
called “Press WPS Button”, “PBC”, or “Push Button
Configuration”).
3. On FRITZ!Repeater: Press the “Connect” button.
The LED starts to flash. The wireless connection has been
established when the LED lights up.
• • • • • • • • • • • • • • • • • • • • • • • • • • • • • • • • • • • • • • • • • • • • • • • • • • • • • • • • • • • • • • • • • • • • • • • • • • • • • • • • • • • • • • • • • • • • • • •
31FRITZ!Repeater600
Page 32

Connecting Devices with FRITZ!Repeater
• • • • • • • • • • • • • • • • • • • • • • • • • • • • • • • • • • • • • • • • • • • • • • • • • • • • • • • • • • • • • • • • • • • • • • • • • • • • • • • • • • • • • • • • • • • • • • •
Instructions: Connecting with WPS in Windows10
1. In Windows10: Click with the right mouse button on the
Windows icon .
2. Select “Settings”.
3. Click on “Network and Internet”.
4. Click on “Wi-Fi”.
5. Click on “Show available networks”.
6. Click on the name of the wireless radio network of your router
(FRITZ!Box). If you configured a different wireless network name
for the FRITZ!Repeater, then click on that name.
The field for entering the network key appears, along with the
indication that “You can also connect by pressing the button on
the router”. (If this message does not appear, the computer does
not support WPS.)
7. On FRITZ!Repeater: Press the “Connect” button.
The LED starts to flash. The wireless connection has been
established when the LED lights up.
Instructions: Establishing a Wireless LAN Connection with a Network Key
1. Start the wireless LAN software on your wireless device and
search for wireless radio networks.
2. Select the wireless radio network of your router (FRITZ!Box).
3. Start the connection procedure and enter the wireless network
key of your router.
• • • • • • • • • • • • • • • • • • • • • • • • • • • • • • • • • • • • • • • • • • • • • • • • • • • • • • • • • • • • • • • • • • • • • • • • • • • • • • • • • • • • • • • • • • • • • • •
32FRITZ!Repeater600
Page 33

User Interface
• • • • • • • • • • • • • • • • • • • • • • • • • • • • • • • • • • • • • • • • • • • • • • • • • • • • • • • • • • • • • • • • • • • • • • • • • • • • • • • • • • • • • • • • • • • • • • •
User Interface
Opening the User Interface...................................................................................... 34
Configuring AVM Services for Diagnostics and Maintenance ........................... 39
• • • • • • • • • • • • • • • • • • • • • • • • • • • • • • • • • • • • • • • • • • • • • • • • • • • • • • • • • • • • • • • • • • • • • • • • • • • • • • • • • • • • • • • • • • • • • • •
33FRITZ!Repeater600
Page 34

User Interface
• • • • • • • • • • • • • • • • • • • • • • • • • • • • • • • • • • • • • • • • • • • • • • • • • • • • • • • • • • • • • • • • • • • • • • • • • • • • • • • • • • • • • • • • • • • • • • •
Opening the User Interface
Overview
Your FRITZ!Repeater has a user interface you can open in a web
browser on your computer, tablet or smartphone. In the user interface
you can configure your FRITZ!Repeater, enable or disable functions
and receive information on connections and ports.
AVM Services for Diagnostics and Maintenance
The first time the user interface is opened, you will be asked whether
you consent to the use of AVM services for diagnostics and mainte
nance. We recommend leaving the use of AVM services enabled. You
can change this setting at any time. For more information on AVM
services, see page 39.
• • • • • • • • • • • • • • • • • • • • • • • • • • • • • • • • • • • • • • • • • • • • • • • • • • • • • • • • • • • • • • • • • • • • • • • • • • • • • • • • • • • • • • • • • • • • • • •
34FRITZ!Repeater600
Page 35

User Interface
• • • • • • • • • • • • • • • • • • • • • • • • • • • • • • • • • • • • • • • • • • • • • • • • • • • • • • • • • • • • • • • • • • • • • • • • • • • • • • • • • • • • • • • • • • • • • • •
Areas of the User Interface
No. Display / Function
1 Menu
2 System information
• Current power consumption
• FRITZ!OS installed
3 Link to the online help
4 Type of connection (to the home network)
5 Configuration wizards
6 Connected devices and devices in the home network
7 Links
• Contents: all pages in the user interface
• Manual: FRITZ!Repeater600 (PDF)
• en.avm.de: AVM web pages
• • • • • • • • • • • • • • • • • • • • • • • • • • • • • • • • • • • • • • • • • • • • • • • • • • • • • • • • • • • • • • • • • • • • • • • • • • • • • • • • • • • • • • • • • • • • • • •
35FRITZ!Repeater600
Page 36

User Interface
• • • • • • • • • • • • • • • • • • • • • • • • • • • • • • • • • • • • • • • • • • • • • • • • • • • • • • • • • • • • • • • • • • • • • • • • • • • • • • • • • • • • • • • • • • • • • • •
Instructions: Opening the User Interface (One FRITZ!Repeater)
If you are using only one FRITZ!Repeater with wireless LAN in the
home network of your FRITZ!Box, open the user interface as follows:
1. Open a web browser on a computer, tablet or smartphone in the
home network.
2. Enter the address http://fritz.repeater.
• • • • • • • • • • • • • • • • • • • • • • • • • • • • • • • • • • • • • • • • • • • • • • • • • • • • • • • • • • • • • • • • • • • • • • • • • • • • • • • • • • • • • • • • • • • • • • •
36FRITZ!Repeater600
Page 37

1
1
2
2
User Interface
• • • • • • • • • • • • • • • • • • • • • • • • • • • • • • • • • • • • • • • • • • • • • • • • • • • • • • • • • • • • • • • • • • • • • • • • • • • • • • • • • • • • • • • • • • • • • • •
Instructions: Opening the User Interface (Multiple FRITZ!Repeaters)
If you are using more than one FRITZ!Repeater with wireless LAN in
the home network of your FRITZ!Box, open the user interface as
follows:
1. Open a web browser on a computer, tablet or smartphone in the
home network.
2. Enter the address http://fritz.box.
3. In the user interface of the FRITZ!Box, select “Home Network /
Mesh Overview”.
4. Click on the name of a FRITZ!Repeater (1) or enter its IP address
(2) in the web browser.
Instructions: Opening the User Interface (Other Internet Router)
If your internet router is not a FRITZ!Box, open the user interface of the
FRITZ!Repeater as follows:
1. Open the user interface of the internet router.
2. Check the IP address of FRITZ!Repeater600.
3. Enter the IP address in a web browser on a computer, tablet or
smartphone.
• • • • • • • • • • • • • • • • • • • • • • • • • • • • • • • • • • • • • • • • • • • • • • • • • • • • • • • • • • • • • • • • • • • • • • • • • • • • • • • • • • • • • • • • • • • • • • •
37FRITZ!Repeater600
Page 38

User Interface
• • • • • • • • • • • • • • • • • • • • • • • • • • • • • • • • • • • • • • • • • • • • • • • • • • • • • • • • • • • • • • • • • • • • • • • • • • • • • • • • • • • • • • • • • • • • • • •
Instructions: Opening the User Interface (No Connection to the Home Network)
If the FRITZ!Repeater is not integrated in the home network and does
not have a connection to the internet router, then open the user inter
face as follows:
1. Plug the FRITZ!Repeater into an outlet.
2. Connect a computer to the FRITZ!Repeater via LAN cable, or
establish a wireless connection to the FRITZ!Repeater on a
computer, tablet or smartphone. The preset network key of the
repeater is printed on the base of the device.
3. Open a web browser on your computer and enter the address
http://fritz.repeater or 192.168.178.2.
• • • • • • • • • • • • • • • • • • • • • • • • • • • • • • • • • • • • • • • • • • • • • • • • • • • • • • • • • • • • • • • • • • • • • • • • • • • • • • • • • • • • • • • • • • • • • • •
38FRITZ!Repeater600
Page 39

User Interface
• • • • • • • • • • • • • • • • • • • • • • • • • • • • • • • • • • • • • • • • • • • • • • • • • • • • • • • • • • • • • • • • • • • • • • • • • • • • • • • • • • • • • • • • • • • • • • •
Configuring AVM Services for Diagnostics and Maintenance
Overview
You can set up AVM services for diagnostics and maintenance. These
services support the security and further development of your
FRITZ!Repeater600 and keep the FRITZ!OS up to date.
AVM Services
AVM Service Function
Search for updates Your FRITZ!Repeater connects with the AVM
update server regularly to search for and
install FRITZ!OS updates.
Diagnostics data for
error analysis
Your FRITZ!Repeater transmits error reports
and technical diagnostics data to AVM upon
suspicion of misuse by third parties.
Diagnostics data for
system maintenance
In order to make the FRITZ!OS more secure and
develop it further, the FRITZ!Repeater trans
mits device-specific data like FRITZ!Repeater
model, FRITZ!OS version, basic settings and
your network provider to AVM.
Data Privacy
The diagnostics data and the device-specific data transmitted by your
FRITZ!Repeater to AVM do not contain any personalized data. The data
transmitted serve the exclusive purpose of technical adaptations and
optimizations of your FRITZ!Repeater. The exact wording of the data
privacy statement is presented under “Legal Notice / Data Privacy
Statement” in the online help.
Instructions: Configuring AVM Services
1. Open the user interface, see page 34.
• • • • • • • • • • • • • • • • • • • • • • • • • • • • • • • • • • • • • • • • • • • • • • • • • • • • • • • • • • • • • • • • • • • • • • • • • • • • • • • • • • • • • • • • • • • • • • •
39FRITZ!Repeater600
Page 40

User Interface
• • • • • • • • • • • • • • • • • • • • • • • • • • • • • • • • • • • • • • • • • • • • • • • • • • • • • • • • • • • • • • • • • • • • • • • • • • • • • • • • • • • • • • • • • • • • • • •
2. Select “Contents / AVM Services”.
3. For instructions, open the online help .
• • • • • • • • • • • • • • • • • • • • • • • • • • • • • • • • • • • • • • • • • • • • • • • • • • • • • • • • • • • • • • • • • • • • • • • • • • • • • • • • • • • • • • • • • • • • • • •
40FRITZ!Repeater600
Page 41

User Interface: Access to Home Network Menu
• • • • • • • • • • • • • • • • • • • • • • • • • • • • • • • • • • • • • • • • • • • • • • • • • • • • • • • • • • • • • • • • • • • • • • • • • • • • • • • • • • • • • • • • • • • • • • •
User Interface: Access to Home Network Menu
Access to Home Network Menu: Settings and Features.................................... 42
Adopting Wireless LAN Settings from the Router (FRITZ!Box)......................... 43
• • • • • • • • • • • • • • • • • • • • • • • • • • • • • • • • • • • • • • • • • • • • • • • • • • • • • • • • • • • • • • • • • • • • • • • • • • • • • • • • • • • • • • • • • • • • • • •
41FRITZ!Repeater600
Page 42

User Interface: Access to Home Network Menu
• • • • • • • • • • • • • • • • • • • • • • • • • • • • • • • • • • • • • • • • • • • • • • • • • • • • • • • • • • • • • • • • • • • • • • • • • • • • • • • • • • • • • • • • • • • • • • •
Access to Home Network Menu: Settings and Features
Overview
In the “Access to Home Network” menu you receive an overview of how
your FRITZ!Repeater is connected with the home network and the
internet router (FRITZ!Box). You can start a WPS connection in order to
adopt the radio network settings of the internet router automatically.
“Access to Home Network” menu
• • • • • • • • • • • • • • • • • • • • • • • • • • • • • • • • • • • • • • • • • • • • • • • • • • • • • • • • • • • • • • • • • • • • • • • • • • • • • • • • • • • • • • • • • • • • • • •
42FRITZ!Repeater600
Page 43

User Interface: Access to Home Network Menu
• • • • • • • • • • • • • • • • • • • • • • • • • • • • • • • • • • • • • • • • • • • • • • • • • • • • • • • • • • • • • • • • • • • • • • • • • • • • • • • • • • • • • • • • • • • • • • •
Adopting Wireless LAN Settings from the Router (FRITZ!Box)
Overview
You can adopt the wireless LAN settings of the router at the touch of a
button. You only need this feature if your router is not a FRITZ!Box, or if
your FRITZ!Box does not support Mesh.
In the Mesh of a FRITZ!Box, the FRITZ!Repeater automatically adopts
the wireless LAN settings when it is connected, and every time they
are changed in the FRITZ!Box; without Mesh, they are adopted only
upon connection.
The wireless LAN settings adopted are the wireless network name
(SSID), network key, channel settings, wireless guest access and wire
less switching schedule.
Example
Your router is not a FRITZ!Box and you changed the wireless network
name (SSID) in the router. The FRITZ!Repeater is to adopt the change.
Instructions: Adopting the Wireless LAN Settings of the Router at the Touch of a Button
1. Press the “Connect” button on the FRITZ!Repeater.
The LED flashes.
2. Start WPS on the router. The procedure depends on the router
you are using:
Router Start WPS
FRITZ!Box with
Press button briefly.
“WPS” or
“Connect/WPS”
button
• • • • • • • • • • • • • • • • • • • • • • • • • • • • • • • • • • • • • • • • • • • • • • • • • • • • • • • • • • • • • • • • • • • • • • • • • • • • • • • • • • • • • • • • • • • • • • •
43FRITZ!Repeater600
Page 44

User Interface: Access to Home Network Menu
• • • • • • • • • • • • • • • • • • • • • • • • • • • • • • • • • • • • • • • • • • • • • • • • • • • • • • • • • • • • • • • • • • • • • • • • • • • • • • • • • • • • • • • • • • • • • • •
Router Start WPS
FRITZ!Box with
“WLAN” or
Press and hold the button down for at
least 6seconds.
“WLAN/WPS”
button
Other router Instructions are provided by the manu
facturer, for instance, in the router
manual.
• • • • • • • • • • • • • • • • • • • • • • • • • • • • • • • • • • • • • • • • • • • • • • • • • • • • • • • • • • • • • • • • • • • • • • • • • • • • • • • • • • • • • • • • • • • • • • •
44FRITZ!Repeater600
Page 45

User Interface: Network
• • • • • • • • • • • • • • • • • • • • • • • • • • • • • • • • • • • • • • • • • • • • • • • • • • • • • • • • • • • • • • • • • • • • • • • • • • • • • • • • • • • • • • • • • • • • • • •
User Interface: Network
The Network Menu: Settings and Features........................................................... 46
Configuring the IP Address Manually..................................................................... 47
• • • • • • • • • • • • • • • • • • • • • • • • • • • • • • • • • • • • • • • • • • • • • • • • • • • • • • • • • • • • • • • • • • • • • • • • • • • • • • • • • • • • • • • • • • • • • • •
45FRITZ!Repeater600
Page 46

User Interface: Network
• • • • • • • • • • • • • • • • • • • • • • • • • • • • • • • • • • • • • • • • • • • • • • • • • • • • • • • • • • • • • • • • • • • • • • • • • • • • • • • • • • • • • • • • • • • • • • •
The Network Menu: Settings and Features
Overview
The “Network” menu presents you an overview of the network devices
connected with the FRITZ!Repeater600 in the network. You can also
define an IP address for the FRITZ!Repeater manually.
“Network” menu
Description of the Submenus
The online help of the user interface includes a detailed description of
the submenus.
• • • • • • • • • • • • • • • • • • • • • • • • • • • • • • • • • • • • • • • • • • • • • • • • • • • • • • • • • • • • • • • • • • • • • • • • • • • • • • • • • • • • • • • • • • • • • • •
46FRITZ!Repeater600
Page 47

User Interface: Network
• • • • • • • • • • • • • • • • • • • • • • • • • • • • • • • • • • • • • • • • • • • • • • • • • • • • • • • • • • • • • • • • • • • • • • • • • • • • • • • • • • • • • • • • • • • • • • •
Configuring the IP Address Manually
Overview
In the default setting, the FRITZ!Repeater600 automatically obtains an
IP address from the router (FRITZ!Box). You can also define the IP
address for the FRITZ!Repeater manually.
Application Scenario
• FRITZ!Repeater600 is to be used in a home network where there
is no DHCP server to assign IP addresses automatically.
Instructions: Configuring the IP Address Manually
1. Open the user interface, see page 34.
2. Select “Network / Network Settings”.
3. For instructions, open the online help .
• • • • • • • • • • • • • • • • • • • • • • • • • • • • • • • • • • • • • • • • • • • • • • • • • • • • • • • • • • • • • • • • • • • • • • • • • • • • • • • • • • • • • • • • • • • • • • •
47FRITZ!Repeater600
Page 48

User Interface: Wireless Menu
• • • • • • • • • • • • • • • • • • • • • • • • • • • • • • • • • • • • • • • • • • • • • • • • • • • • • • • • • • • • • • • • • • • • • • • • • • • • • • • • • • • • • • • • • • • • • • •
User Interface: Wireless Menu
Wireless Menu: Settings and Features.................................................................. 49
Configuring a Schedule for the Wireless Radio Network .................................. 50
Changing the Name of the Wireless Network (SSID) .......................................... 51
Configuring Wireless Guest Access ....................................................................... 52
• • • • • • • • • • • • • • • • • • • • • • • • • • • • • • • • • • • • • • • • • • • • • • • • • • • • • • • • • • • • • • • • • • • • • • • • • • • • • • • • • • • • • • • • • • • • • • •
48FRITZ!Repeater600
Page 49

User Interface: Wireless Menu
• • • • • • • • • • • • • • • • • • • • • • • • • • • • • • • • • • • • • • • • • • • • • • • • • • • • • • • • • • • • • • • • • • • • • • • • • • • • • • • • • • • • • • • • • • • • • • •
Wireless Menu: Settings and Features
Overview
In the “Wireless” menu you can change the security settings of the
wireless radio network. You can also configure a switching schedule
and wireless guest access.
“Wireless” menu
Description of the Submenus
The online help of the user interface includes a detailed description of
the submenus.
• • • • • • • • • • • • • • • • • • • • • • • • • • • • • • • • • • • • • • • • • • • • • • • • • • • • • • • • • • • • • • • • • • • • • • • • • • • • • • • • • • • • • • • • • • • • • • •
49FRITZ!Repeater600
Page 50

User Interface: Wireless Menu
• • • • • • • • • • • • • • • • • • • • • • • • • • • • • • • • • • • • • • • • • • • • • • • • • • • • • • • • • • • • • • • • • • • • • • • • • • • • • • • • • • • • • • • • • • • • • • •
Configuring a Schedule for the Wireless Radio Network
Overview
If there are regular times when you do not use wireless LAN, you can
set up a switching schedule for the wireless radio network. This way
you reduce both power consumption and wireless radiation.
Requirements
The following prerequisite must be met if the FRITZ!Repeater is
located in the Mesh of a FRITZ!Box:
• Adoption of the FRITZ!Box settings is disabled in the “Access to
Home Network” menu of the FRITZ!Repeater’s user interface.
Instructions: Configuring a Schedule
1. Open the user interface, see page 34.
2. Select “Wireless / Schedule”.
3. For instructions, open the online help .
• • • • • • • • • • • • • • • • • • • • • • • • • • • • • • • • • • • • • • • • • • • • • • • • • • • • • • • • • • • • • • • • • • • • • • • • • • • • • • • • • • • • • • • • • • • • • • •
50FRITZ!Repeater600
Page 51

User Interface: Wireless Menu
• • • • • • • • • • • • • • • • • • • • • • • • • • • • • • • • • • • • • • • • • • • • • • • • • • • • • • • • • • • • • • • • • • • • • • • • • • • • • • • • • • • • • • • • • • • • • • •
Changing the Name of the Wireless Network (SSID)
Overview
You can change the name of the wireless network (SSID) of your
FRITZ!Repeater.
Example
The FRITZ!Repeater has the same SSID as your internet router
(FRITZ!Box), but you would specifically like to select the wireless
network of the FRITZ!Repeater on a wireless device.
Instructions: Changing the Name of the Wireless Network (SSID)
1. Open the user interface, see page 34.
2. Select “Wireless / Radio Network”.
3. For instructions, open the online help .
• • • • • • • • • • • • • • • • • • • • • • • • • • • • • • • • • • • • • • • • • • • • • • • • • • • • • • • • • • • • • • • • • • • • • • • • • • • • • • • • • • • • • • • • • • • • • • •
51FRITZ!Repeater600
Page 52

User Interface: Wireless Menu
• • • • • • • • • • • • • • • • • • • • • • • • • • • • • • • • • • • • • • • • • • • • • • • • • • • • • • • • • • • • • • • • • • • • • • • • • • • • • • • • • • • • • • • • • • • • • • •
Configuring Wireless Guest Access
Overview
If the FRITZ!Repeater is connected with a FRITZ!Box, you can set up a
wireless guest access for your guests. With this your guests receive an
internet connection of their own for their smartphones, tablets or
laptops. Access to other devices in the home network (for instance,
shared files, printers) is not possible from the guest network. No
settings on the FRITZ!Box or FRITZ!Repeater can be changed via the
guest access.
By default, FRITZ!Repeater makes available the guest access config
ured in the FRITZ!Box. You can also configure your own guest access
for the repeater.
Instructions: Configuring Wireless Guest Access
1. Open the user interface, see page 34.
2. Select “Wireless / Guest Access”.
3. For instructions, open the online help .
• • • • • • • • • • • • • • • • • • • • • • • • • • • • • • • • • • • • • • • • • • • • • • • • • • • • • • • • • • • • • • • • • • • • • • • • • • • • • • • • • • • • • • • • • • • • • • •
52FRITZ!Repeater600
Page 53

User Interface: System Menu
• • • • • • • • • • • • • • • • • • • • • • • • • • • • • • • • • • • • • • • • • • • • • • • • • • • • • • • • • • • • • • • • • • • • • • • • • • • • • • • • • • • • • • • • • • • • • • •
User Interface: System Menu
System Menu: Settings and Features.................................................................... 54
Configuring Push Services ...................................................................................... 55
Switching LED On and Off......................................................................................... 57
Configuring a FRITZ!Repeater Password ............................................................. 58
Saving Settings .......................................................................................................... 60
Loading Settings ........................................................................................................ 61
Updating FRITZ!OS .................................................................................................... 62
Restoring Factory Settings ...................................................................................... 63
• • • • • • • • • • • • • • • • • • • • • • • • • • • • • • • • • • • • • • • • • • • • • • • • • • • • • • • • • • • • • • • • • • • • • • • • • • • • • • • • • • • • • • • • • • • • • • •
53FRITZ!Repeater600
Page 54

User Interface: System Menu
• • • • • • • • • • • • • • • • • • • • • • • • • • • • • • • • • • • • • • • • • • • • • • • • • • • • • • • • • • • • • • • • • • • • • • • • • • • • • • • • • • • • • • • • • • • • • • •
System Menu: Settings and Features
Overview
The “System” menu presents information on operating of the
FRITZ!Repeater. You can assign a device name and switch the LED on
and off.
You can also change the password for the user interface, back up your
settings, and specify how FRITZ!OS is updated.
“System” menu
Description of the Submenus
The online help of the user interface includes a detailed description of
the submenus.
• • • • • • • • • • • • • • • • • • • • • • • • • • • • • • • • • • • • • • • • • • • • • • • • • • • • • • • • • • • • • • • • • • • • • • • • • • • • • • • • • • • • • • • • • • • • • • •
54FRITZ!Repeater600
Page 55

User Interface: System Menu
• • • • • • • • • • • • • • • • • • • • • • • • • • • • • • • • • • • • • • • • • • • • • • • • • • • • • • • • • • • • • • • • • • • • • • • • • • • • • • • • • • • • • • • • • • • • • • •
Configuring Push Services
Overview
You can configure various push services. Push services are notification
services that inform you by email about the activities of
FRITZ!Repeater and assist you with configuration and operation.
Available Push Services
You can request push service mails to be notified about the following
activities:
Push Service Function
FRITZ!Repeater info Sends you regular email messages with data
usage and connections
Wireless guest
access
Sends a message whenever devices register
with or deregister from the wireless guest
access
New FRITZ!OS Informs you about new FRITZ!OS updates
Forgot password Sends you an access link to the specified email
address if you have forgotten your password
Save settings Before every update, and every time the factory
settings are restored: FRITZ!Repeater gener
ates a backup file of the settings and sends the
file to the specified email address
Change notice Sends you an email every time changes are
made to a setting or when potentially securityrelevant events occur.
Instructions: Configuring Push Service
1. Open the user interface, see page 34.
• • • • • • • • • • • • • • • • • • • • • • • • • • • • • • • • • • • • • • • • • • • • • • • • • • • • • • • • • • • • • • • • • • • • • • • • • • • • • • • • • • • • • • • • • • • • • • •
55FRITZ!Repeater600
Page 56

User Interface: System Menu
• • • • • • • • • • • • • • • • • • • • • • • • • • • • • • • • • • • • • • • • • • • • • • • • • • • • • • • • • • • • • • • • • • • • • • • • • • • • • • • • • • • • • • • • • • • • • • •
2. Select “System / Push Service”.
3. For instructions, open the online help .
• • • • • • • • • • • • • • • • • • • • • • • • • • • • • • • • • • • • • • • • • • • • • • • • • • • • • • • • • • • • • • • • • • • • • • • • • • • • • • • • • • • • • • • • • • • • • • •
56FRITZ!Repeater600
Page 57

User Interface: System Menu
• • • • • • • • • • • • • • • • • • • • • • • • • • • • • • • • • • • • • • • • • • • • • • • • • • • • • • • • • • • • • • • • • • • • • • • • • • • • • • • • • • • • • • • • • • • • • • •
Switching LED On and Off
Overview
You can switch the LED on or off permanently.
Instructions: Switching the LED On and Off
1. Open the user interface, see page 34.
2. Go to the “System / LEDs” menu.
3. Switch off LED: Enable the “Turn off the LED display” checkbox.
Switch on LEDs: Disable the checkbox.
4. Click on “Apply”.
• • • • • • • • • • • • • • • • • • • • • • • • • • • • • • • • • • • • • • • • • • • • • • • • • • • • • • • • • • • • • • • • • • • • • • • • • • • • • • • • • • • • • • • • • • • • • • •
57FRITZ!Repeater600
Page 58

User Interface: System Menu
• • • • • • • • • • • • • • • • • • • • • • • • • • • • • • • • • • • • • • • • • • • • • • • • • • • • • • • • • • • • • • • • • • • • • • • • • • • • • • • • • • • • • • • • • • • • • • •
Configuring a FRITZ!Repeater Password
Overview
Set up a password for the FRITZ!Repeater so that the FRITZ!Repeater
is protected even when there is no connection to the home network of
your FRITZ!Box.
Rules for Passwords
Comply with the following rules for setting passwords:
• Select a password with at least twelve characters, which includes
capitals and lower-case letters as well as numerals and special
characters.
Characters Allowed Illegal Characters
• Letters from a to z in lower
case and upper case
• The letter ß
• Umlauts ä, ö, ü in upper
and lower case
• Numerals 0 to 9
• Spaces
• Special characters: _ - ! " # $
Special characters: § ´
% & ’ ( ) * + , . / : ; < = > ? @ [ \
] ^ ‘ { | } ~
• Configure the “Forgot password” push service. When you have
forgotten a password, the FRITZ!Repeater sends an access link to
the email address you specified. Using this link you can set a new
password.
If you lose your FRITZ!Repeater password and did not configure the
“Forgot password” push service, you will have to restore the factory
settings to your FRITZ!Repeater.
• • • • • • • • • • • • • • • • • • • • • • • • • • • • • • • • • • • • • • • • • • • • • • • • • • • • • • • • • • • • • • • • • • • • • • • • • • • • • • • • • • • • • • • • • • • • • • •
58FRITZ!Repeater600
Page 59

User Interface: System Menu
• • • • • • • • • • • • • • • • • • • • • • • • • • • • • • • • • • • • • • • • • • • • • • • • • • • • • • • • • • • • • • • • • • • • • • • • • • • • • • • • • • • • • • • • • • • • • • •
Instructions: Configuring a FRITZ!Repeater Password
1. Open the user interface, see page 34.
2. Go to the “System / Password” menu.
3. For instructions, open the online help .
• • • • • • • • • • • • • • • • • • • • • • • • • • • • • • • • • • • • • • • • • • • • • • • • • • • • • • • • • • • • • • • • • • • • • • • • • • • • • • • • • • • • • • • • • • • • • • •
59FRITZ!Repeater600
Page 60

User Interface: System Menu
• • • • • • • • • • • • • • • • • • • • • • • • • • • • • • • • • • • • • • • • • • • • • • • • • • • • • • • • • • • • • • • • • • • • • • • • • • • • • • • • • • • • • • • • • • • • • • •
Saving Settings
Overview
All of the settings on your FRITZ!Repeater can be saved in a file. With
this backup file you can restore the settings to the same
FRITZ!Repeater device or load your settings to another
FRITZ!Repeater. This device must be the same FRITZ!Repeater model.
The settings are saved automatically before every FRITZ!OS update,
and every time factory settings are restored, if you configure the “Save
Settings” push service.
Instructions: Saving Settings
1. Open the user interface, see page 34.
2. Select “System / Backup / Save”.
3. For instructions, open the online help .
• • • • • • • • • • • • • • • • • • • • • • • • • • • • • • • • • • • • • • • • • • • • • • • • • • • • • • • • • • • • • • • • • • • • • • • • • • • • • • • • • • • • • • • • • • • • • • •
60FRITZ!Repeater600
Page 61

User Interface: System Menu
• • • • • • • • • • • • • • • • • • • • • • • • • • • • • • • • • • • • • • • • • • • • • • • • • • • • • • • • • • • • • • • • • • • • • • • • • • • • • • • • • • • • • • • • • • • • • • •
Loading Settings
Overview
FRITZ!Repeater settings you have previously saved can be restored.
• You can restore the settings to the same FRITZ!Repeater.
• You can load the settings to another FRITZ!Repeater.
Requirements
If you would like to load the settings saved from one FRITZ!Repeater to
another FRITZ!Repeater, the following prerequisite must be met:
• Both devices must be the same FRITZ!Repeater model.
Instructions: Loading Settings
1. Open the user interface, see page 34.
2. Select “System / Backup / Restore”.
3. For instructions, open the online help .
• • • • • • • • • • • • • • • • • • • • • • • • • • • • • • • • • • • • • • • • • • • • • • • • • • • • • • • • • • • • • • • • • • • • • • • • • • • • • • • • • • • • • • • • • • • • • • •
61FRITZ!Repeater600
Page 62

User Interface: System Menu
• • • • • • • • • • • • • • • • • • • • • • • • • • • • • • • • • • • • • • • • • • • • • • • • • • • • • • • • • • • • • • • • • • • • • • • • • • • • • • • • • • • • • • • • • • • • • • •
Updating FRITZ!OS
• • • • • • • • • • • • • • • • • • • • • • • • • • • • • • • • • • • • • • • • • • • • • • • • • • • • • • • • • • • • • • • • • • • • • • • • • • • • • • • • • • • • • • • • • • • • • • •
62FRITZ!Repeater600
Page 63

User Interface: System Menu
• • • • • • • • • • • • • • • • • • • • • • • • • • • • • • • • • • • • • • • • • • • • • • • • • • • • • • • • • • • • • • • • • • • • • • • • • • • • • • • • • • • • • • • • • • • • • • •
Restoring Factory Settings
Overview
You can restore factory settings to the FRITZ!Repeater.
Application Scenario
Reset the FRITZ!Repeater in the following cases, for instance:
• You forgot the password for the FRITZ!Repeater user interface
• The FRITZ!Repeater is to be passed on to other users.
• The FRITZ!Repeater is to be disposed of.
Consequences of Resetting
Restoring the factory settings has the following effect:
• All of the settings are reset to the preconfigured values. The
installed version of FRITZ!OS remains intact.
• The repeater name is reset to fritz.repeater.
• The FRITZ!Repeater password is reset.
Instructions: Restoring Factory Settings to FRITZ!Repeater
All of the settings you configured are deleted and reset to the factory
settings.
1. Open the user interface, see page 34.
2. Select “System / Backup”.
3. Select the “Factory Settings” tab.
4. Click on the “Load Factory Settings” button.
If you intend to restart operation of the FRITZ!Repeater after the reset,
we recommend updating the FRITZ!OS; see page 62.
• • • • • • • • • • • • • • • • • • • • • • • • • • • • • • • • • • • • • • • • • • • • • • • • • • • • • • • • • • • • • • • • • • • • • • • • • • • • • • • • • • • • • • • • • • • • • • •
63FRITZ!Repeater600
Page 64

Malfunctions
• • • • • • • • • • • • • • • • • • • • • • • • • • • • • • • • • • • • • • • • • • • • • • • • • • • • • • • • • • • • • • • • • • • • • • • • • • • • • • • • • • • • • • • • • • • • • • •
Malfunctions
Troubleshooting Procedures................................................................................... 65
• • • • • • • • • • • • • • • • • • • • • • • • • • • • • • • • • • • • • • • • • • • • • • • • • • • • • • • • • • • • • • • • • • • • • • • • • • • • • • • • • • • • • • • • • • • • • • •
64FRITZ!Repeater600
Page 65

Malfunctions
• • • • • • • • • • • • • • • • • • • • • • • • • • • • • • • • • • • • • • • • • • • • • • • • • • • • • • • • • • • • • • • • • • • • • • • • • • • • • • • • • • • • • • • • • • • • • • •
Troubleshooting Procedures
Overview
Use the following sources of help for various kinds of malfunctions:
Malfunction Help
• A wireless LAN connection to the
FRITZ!Box cannot be established.
• A wireless LAN connection to
another wireless router cannot be
established.
Problem with:
• Configuration
• Wireless
• Internet
• etc.
Troubleshooting chart and Knowledge
Base do not offer a solution.
Troubleshooting chart;
see page 66
Knowledge Base;
see page 67
Support; see page 67
• • • • • • • • • • • • • • • • • • • • • • • • • • • • • • • • • • • • • • • • • • • • • • • • • • • • • • • • • • • • • • • • • • • • • • • • • • • • • • • • • • • • • • • • • • • • • • •
65FRITZ!Repeater600
Page 66

Malfunctions
• • • • • • • • • • • • • • • • • • • • • • • • • • • • • • • • • • • • • • • • • • • • • • • • • • • • • • • • • • • • • • • • • • • • • • • • • • • • • • • • • • • • • • • • • • • • • • •
Troubleshooting Chart
Error Scenario Cause Solution
A wireless LAN
connection to
the FRITZ!Box
cannot be estab
lished.
Keylock of the
FRITZ!Box
enabled.
WPS is switched
off in FRITZ!Box.
The MAC
address filter of
the FRITZ!Box is
enabled.
WPS is switched
off in FRITZ!Box.
Disable the keylock in the user
interface of the FRITZ!Box
(http://fritz.box) under “System /
Buttons and LEDs”.
Enable the settings “WPS
enabled” and “Push-Button
method (WPS-PBC)” in the
FRITZ!Box.
Enable the “Allow all new wireless
devices” setting in the FRITZ!Box.
This setting is located under
“Wireless / Security” or “Wireless
/ Radio Network” in the user inter
face (http://fritz.box). The
Advanced view must be enabled in
the user interface.
Enable the settings “WPS
enabled” and “Push-Button
method (WPS-PBC)” in the
FRITZ!Box.
You can find the settings in the
user interface (http://fritz.box)
under “Wireless / Security / WPS
Quick Connection”.
A wireless LAN
connection to
another wire
less router
• • • • • • • • • • • • • • • • • • • • • • • • • • • • • • • • • • • • • • • • • • • • • • • • • • • • • • • • • • • • • • • • • • • • • • • • • • • • • • • • • • • • • • • • • • • • • • •
WPS is switched
off in the wire
less router.
66FRITZ!Repeater600
Enable WPS in the wireless
router. Instructions are provided
by the manufacturer, for instance,
in the device manual.
Page 67

Malfunctions
• • • • • • • • • • • • • • • • • • • • • • • • • • • • • • • • • • • • • • • • • • • • • • • • • • • • • • • • • • • • • • • • • • • • • • • • • • • • • • • • • • • • • • • • • • • • • • •
Error Scenario Cause Solution
cannot be estab
lished.
The MAC
address filter of
the wireless
router is
enabled.
Disable the wireless router’s MAC
address filter. Instructions are
provided by the manufacturer, for
instance, in the device manual.
After establishing the wireless
connection you can disable the
MAC address filter again.
Unsuitable wire
less encryption
configured in the
wireless router.
Enable the encryption method
WPA2 (CCMP) or WPA (TKIP) in the
wireless router. Instructions are
provided by the manufacturer, for
instance, in the device manual.
AVM Knowledge Base
The AVM Knowledge Base is available online at:
en.avm.de/service
Support
The Support team assists you in resolving any technical problems with
your FRITZ! products.
You can send an email to the support team using the support form on
our website. Our Support team will respond to your request by email
within one working day. The support form is available at:
en.avm.de/service
• • • • • • • • • • • • • • • • • • • • • • • • • • • • • • • • • • • • • • • • • • • • • • • • • • • • • • • • • • • • • • • • • • • • • • • • • • • • • • • • • • • • • • • • • • • • • • •
67FRITZ!Repeater600
Page 68

Appendix
• • • • • • • • • • • • • • • • • • • • • • • • • • • • • • • • • • • • • • • • • • • • • • • • • • • • • • • • • • • • • • • • • • • • • • • • • • • • • • • • • • • • • • • • • • • • • • •
Appendix
Technical Specifications........................................................................................... 69
Legal............................................................................................................................. 71
Information on Cleaning............................................................................................ 75
Disposal ....................................................................................................................... 76
• • • • • • • • • • • • • • • • • • • • • • • • • • • • • • • • • • • • • • • • • • • • • • • • • • • • • • • • • • • • • • • • • • • • • • • • • • • • • • • • • • • • • • • • • • • • • • •
68FRITZ!Repeater600
Page 69

Appendix
• • • • • • • • • • • • • • • • • • • • • • • • • • • • • • • • • • • • • • • • • • • • • • • • • • • • • • • • • • • • • • • • • • • • • • • • • • • • • • • • • • • • • • • • • • • • • • •
Technical Specifications
Device Properties
Property Value
Dimensions (WxHxD) approx. 64mm x 64mm x 64mm
Supply voltage 230V / 50Hz
Certification Conforms to CE standards
Ambient Conditions
Property Value
Operating temperature 0°C – +40°C
Relative humidity (operation) 10 % – 90 %
Active Power
Property Value
Average active power approx. 2W
Wireless LAN Radio Frequencies
Frequency Frequency Range Maximum Transmitter
Power
2.4GHz 2400MHz – 2483MHz 100mW
• • • • • • • • • • • • • • • • • • • • • • • • • • • • • • • • • • • • • • • • • • • • • • • • • • • • • • • • • • • • • • • • • • • • • • • • • • • • • • • • • • • • • • • • • • • • • • •
69FRITZ!Repeater600
Page 70

Appendix
• • • • • • • • • • • • • • • • • • • • • • • • • • • • • • • • • • • • • • • • • • • • • • • • • • • • • • • • • • • • • • • • • • • • • • • • • • • • • • • • • • • • • • • • • • • • • • •
Ports and Interfaces
Connected
Interface
via
Wireless Wireless access point with support for wireless LAN
radio networks (wireless standard – data rate)
• IEEE802.11b – 11Mbit/s
• IEEE802.11g – 54Mbit/s
• IEEE 802.11n – 600 Mbit/s
• • • • • • • • • • • • • • • • • • • • • • • • • • • • • • • • • • • • • • • • • • • • • • • • • • • • • • • • • • • • • • • • • • • • • • • • • • • • • • • • • • • • • • • • • • • • • • •
70FRITZ!Repeater600
Page 71

Appendix
• • • • • • • • • • • • • • • • • • • • • • • • • • • • • • • • • • • • • • • • • • • • • • • • • • • • • • • • • • • • • • • • • • • • • • • • • • • • • • • • • • • • • • • • • • • • • • •
Legal
Manufacturer’s Warranty
We offer a manufacturer’s warranty of 5 years on the hardware of this
original product. The warranty period begins with the date of purchase
by the first end user. Compliance with the warranty period can be
proven by submission of the original invoice or comparable docu
ments. This warranty does not restrict your warranty rights based on
the contract of sale or other statutory rights.
Within the warranty period, we will remove defects to the product
which are demonstrably due to faults in materials or manufacturing.
Our warranty does not cover defects which occur due to incorrect
installation, improper use, non-observance of instructions in the user
manual, normal wear and tear or defects in the environment of the
system (third-party hardware or software). We may, at our discretion,
repair or replace the defective product. Claims other than the right to
the removal of defects which is mentioned in these terms of warranty
are not constituted.
We guarantee that the software conforms with general specifications,
not, however, that the software meets your individual requirements.
Delivery costs will not be reimbursed. Products which have been
replaced revert to our ownership. Claims recognized under warranty
entail neither an extension or recommencement of the warranty
period. If we reject a warranty claim, this claim lapses no later than six
months after being rejected by us.
This warranty shall be governed by German substantive law, to the
exclusion of the United Nations Convention on Contracts for the Inter
national Sale of Goods (CISG).
Legal Notice
This documentation and the software it describes (both now called
“software”) are protected by copyright.
• • • • • • • • • • • • • • • • • • • • • • • • • • • • • • • • • • • • • • • • • • • • • • • • • • • • • • • • • • • • • • • • • • • • • • • • • • • • • • • • • • • • • • • • • • • • • • •
71FRITZ!Repeater600
Page 72

Appendix
• • • • • • • • • • • • • • • • • • • • • • • • • • • • • • • • • • • • • • • • • • • • • • • • • • • • • • • • • • • • • • • • • • • • • • • • • • • • • • • • • • • • • • • • • • • • • • •
Please inform us about contents that are erroneous or no longer up to
date at info@avm.de.
Software is delivered in machine-readable format only (object code
format). Under all AVM intellectual property rights, AVM hereby grants
licensee the non-exclusive right to use the software. Unless agreed for
a limited time period, the right to use the software is for an unlimited
time period. The licensee may create only one copy of the software,
which may be used exclusively for backup use. Unless granted by
mandatory law (including but not limited to Art.69 German Copyright
Act for decompiling), licensee shall not be entitled to modify, disas
semble, reverse engineer, decompile or otherwise alter the software
in whole or in part. AVM reserves all intellectual property rights except
as expressly granted herein. Licensee shall not be entitled to modify or
delete alpha-numerical or other identification codes on data media and
shall transfer such identification codes onto any legal backup copy.
Without the prior written approval of AVM, licensee shall not be enti
tled to transmit any information made available herein.
If licensee has received the software not for commercial purposes of
resale (end user), licensee shall be obliged to transmit the right to use
the software to a third party only in connection with the product
license acquired together with the software. In the event that licensee
transfers the right to use the software to a third party, licensee shall
ensure not to grant further rights to this third party than originally
granted to AVM, and licensee shall ensure to impose upon this third
party the obligations of the present license terms. In such case,
licensee shall not withhold any backup copy. Licensee shall not be
entitled to grant sublicenses. In the event licensee transmits the soft
ware to a third party, licensee shall be responsible for and shall
release AVM insofar from the compliance of export control laws and
obligations.
If and insofar AVM provides software for which AVM is only granted a
derived right to use (third party software), the license terms for such
third party software shall additionally apply and prevail. If and insofar
• • • • • • • • • • • • • • • • • • • • • • • • • • • • • • • • • • • • • • • • • • • • • • • • • • • • • • • • • • • • • • • • • • • • • • • • • • • • • • • • • • • • • • • • • • • • • • •
72FRITZ!Repeater600
Page 73

Appendix
• • • • • • • • • • • • • • • • • • • • • • • • • • • • • • • • • • • • • • • • • • • • • • • • • • • • • • • • • • • • • • • • • • • • • • • • • • • • • • • • • • • • • • • • • • • • • • •
certain third party software in object code format by Texas Instrument
(“TI software”) is provided together with this software, licensee may
only distribute such TI software pursuant to a written license agree
ment which restricts use to TI software embedded in the AVM hard
ware product licensee acquired together with the software and
prohibits (unless granted by mandatory law) copying, reverse engi
neering, decompiling or disassembling of TI software. If open source
software is provided, the license terms for such open source software
shall additionally apply and prevail. AVM shall provide licensee with
the corresponding source code of relevant open source software, if the
respective license terms of the open source software include such
obligation. AVM shall inform if the software contains third party soft
ware and/or open source software and make available the corre
sponding license terms on request.
The licensing conditions are presented in the help for the
FRITZ!Repeater600 user interface under the “Legal Notice” heading.
This documentation and the software have been produced with all due
care and checked for correctness in accordance with the best available
technology. AVM disclaims all liability and warranties, whether
express or implied, relating to this software's quality, performance or
suitability for any given purpose which deviates from the performance
specifications contained in the software description. AVM will not be
liable for damages arising directly or indirectly from the use of the
documentation or related software, nor for incidental or consequential
damages, except in case of intent or gross negligence. AVM explicitly
disclaims all liability for loss of or damage to hardware, software or
data in connection with direct or indirect errors or destruction, for
cases of damage (including fraud cases) incurred due to deficient or
incorrect configurations (including configurations that use insufficient
or no password protection) over connections (including, but not limited
to broadband connections like DSL, cable/DOCSIS and fiber optic, also
including VoIP or SIP connections), and for any and all costs, including
connection charges, related to the software supplied and its documen
tation or due to incorrect installations not performed by AVM.
• • • • • • • • • • • • • • • • • • • • • • • • • • • • • • • • • • • • • • • • • • • • • • • • • • • • • • • • • • • • • • • • • • • • • • • • • • • • • • • • • • • • • • • • • • • • • • •
73FRITZ!Repeater600
Page 74

Appendix
• • • • • • • • • • • • • • • • • • • • • • • • • • • • • • • • • • • • • • • • • • • • • • • • • • • • • • • • • • • • • • • • • • • • • • • • • • • • • • • • • • • • • • • • • • • • • • •
AVM accepts no obligations to perform software service. These require
a separate agreement. The information in this documentation and the
software it describes are subject to change without notice for the
purpose of technical improvement.
Marks: Marks like AVM, FRITZ! and FRITZ!Box (product names and
logos) are protected marks owned by AVM GmbH. Microsoft, Windows
and the Windows logo are marks owned by Microsoft Corporation in
the USA and/or other countries. Apple, App Store, iPhone, iPod and
iPad are marks owned by Apple Inc. in the USA and/or other countries.
IOS is a mark owned by Cisco Technology Inc. in den USA and/or other
countries. Google and Android are marks owned by Google Inc. in the
USA and/or other countries. All other product and company names are
trademarks of their respective owners.
Copyright
© AVM 2019. All rights reserved.
AVM Audiovisuelles Marketing
und Computersysteme GmbH
Alt-Moabit 95
D-10559 Berlin
AVM Computersysteme
Vertriebs GmbH
Alt-Moabit 95
D-10559 Berlin
AVM in the internet: en.avm.de
Declaration of CE Conformity
AVM declares herewith that the device is compliant with the basic
requirements and the relevant rules in directives 2014/53/EU,
2009/125/EC and 2011/65/EU.
The long version of the declaration of CE conformity is available at
en.avm.de/ce.
• • • • • • • • • • • • • • • • • • • • • • • • • • • • • • • • • • • • • • • • • • • • • • • • • • • • • • • • • • • • • • • • • • • • • • • • • • • • • • • • • • • • • • • • • • • • • • •
74FRITZ!Repeater600
Page 75

Appendix
• • • • • • • • • • • • • • • • • • • • • • • • • • • • • • • • • • • • • • • • • • • • • • • • • • • • • • • • • • • • • • • • • • • • • • • • • • • • • • • • • • • • • • • • • • • • • • •
Information on Cleaning
Rules
Keep the following rules in mind for cleaning your FRITZ!Repeater:
• Remove the FRITZ!Repeater from the mains before cleaning.
• Wipe the FRITZ!Repeater with a slightly moist, lint-free cloth or an
antistatic cloth.
• Do not use any strong detergents or solvents for cleaning.
• Do not use any wet cloths for cleaning.
• • • • • • • • • • • • • • • • • • • • • • • • • • • • • • • • • • • • • • • • • • • • • • • • • • • • • • • • • • • • • • • • • • • • • • • • • • • • • • • • • • • • • • • • • • • • • • •
75FRITZ!Repeater600
Page 76

Appendix
• • • • • • • • • • • • • • • • • • • • • • • • • • • • • • • • • • • • • • • • • • • • • • • • • • • • • • • • • • • • • • • • • • • • • • • • • • • • • • • • • • • • • • • • • • • • • • •
Disposal
Disposal of Used Devices
In accordance with European regulations, the FRITZ!Repeater, as well
as all devices and electronic components contained in the package,
may not be disposed with household waste.
After use, please dispose of the FRITZ!Repeater and all electronic
components and devices included with delivery at a collection point in
your local community for the disposal of electric and electronic appli
ances.
• • • • • • • • • • • • • • • • • • • • • • • • • • • • • • • • • • • • • • • • • • • • • • • • • • • • • • • • • • • • • • • • • • • • • • • • • • • • • • • • • • • • • • • • • • • • • • •
76FRITZ!Repeater600
Page 77

Index
• • • • • • • • • • • • • • • • • • • • • • • • • • • • • • • • • • • • • • • • • • • • • • • • • • • • • • • • • • • • • • • • • • • • • • • • • • • • • • • • • • • • • • • • • • • • • • •
Index
A
active power.............................................. 69
AVM services.........................................34, 39
B
button.......................................................... 13
C
cables......................................................... 10
CE conformity declaration...................... 74
choice of location...................................... 69
cleaning....................................................6, 75
configuration.........................................33, 34
configuring
push services..................................... 55
schedule.............................................. 50
connect
wireless devices................................ 31
connecting................................................. 17
FRITZ!Box............................................ 18
router ................................................ 20
connecting network devices................... 30
connection data........................................ 55
conventions............................................... 8
copyright.................................................... 74
corporate info............................................ 74
customer documentation........................ 7
D
data
push services..................................... 55
saving ................................................ 60
data protection.......................................... 39
declaration of CE conformity.................. 74
device properties...................................... 69
diagnostics and maintenance................ 34
disposal...................................................... 76
documentation.......................................... 7
F
factory settings.....................................13, 63
features..................................................11, 12
firmware update....................................... 62
flashing LEDs............................................ 14
FRITZ!OS
loading settings................................. 61
restoring settings.............................. 61
saving settings................................... 60
updating.............................................. 62
functions................................................ 11, 12
G
guest access.............................................. 52
GUI ........................................................... 33
H
hazard warnings....................................... 5
help with problems
troubleshooting chart....................... 66
hotspot (wireless LAN)............................ 52
humidity..................................................... 69
I
interfaces................................................... 70
IP address.................................................. 47
L
LED ........................................................... 14
meaning.............................................. 14
switching on/off................................. 57
legal notice................................................. 71
light-emitting diode.................................. 14
meaning.............................................. 14
log files....................................................... 55
log information......................................... 55
E
email notifications.................................... 55
• • • • • • • • • • • • • • • • • • • • • • • • • • • • • • • • • • • • • • • • • • • • • • • • • • • • • • • • • • • • • • • • • • • • • • • • • • • • • • • • • • • • • • • • • • • • • • •
FRITZ!Repeater600
77
Page 78

Index
• • • • • • • • • • • • • • • • • • • • • • • • • • • • • • • • • • • • • • • • • • • • • • • • • • • • • • • • • • • • • • • • • • • • • • • • • • • • • • • • • • • • • • • • • • • • • • •
M
manufacturer’s warranty....................... 71
menus in the user interface
access to home network.................. 41
network............................................... 45
System................................................ 53
Wireless.............................................. 48
Mesh............................................................ 25
N
network...................................................... 46
night service.............................................. 50
notification settings................................. 55
notifications............................................... 55
forgot password................................ 55
new FRITZ!OS..................................... 55
wireless guest access...................... 55
O
online help................................................. 7
operating system: FRITZ!OS
updating.............................................. 62
operating temperature............................ 69
operation requirements.......................... 16
P
package contents..................................... 10
password
configuration...................................... 58
forgot ............................................55, 58
setting up............................................ 58
password rules......................................... 58
ports............................................................ 70
power consumption................................. 69
power input................................................ 69
push services............................................ 55
Q
quick guide................................................. 7
R
radio network name (SSID).................... 51
recycling..................................................... 76
requirements for operation.................... 16
reset............................................................ 13
resetting..................................................... 63
resolving problems.................................. 64
roaming...................................................... 51
S
safety
safety instructions............................ 5
safety instructions................................... 5
schedule..................................................... 50
security
info mail.............................................. 55
password............................................ 58
push services..................................... 55
saving settings................................... 60
sending backup file........................... 55
settings....................................................... 33
loading ................................................ 61
notifications........................................ 55
restoring.............................................. 61
saving ................................................ 60
sending backup file........................... 55
user interface..................................... 33
software: FRITZ!OS
updating.............................................. 62
SSID ........................................................... 51
starting operation..................................... 17
storage temperature............................... 69
structure.................................................... 11
support....................................................... 7
symbols...................................................... 8
system settings........................................ 54
T
technical specifications........................... 69
ambient conditions............................ 69
device properties............................... 69
humidity.............................................. 69
temperature....................................... 69
wireless LAN radio frequencies..... 69
troubleshooting.......................................7, 64
documentation................................... 7
type label.................................................... 9
U
update......................................................... 62
usage data................................................. 55
• • • • • • • • • • • • • • • • • • • • • • • • • • • • • • • • • • • • • • • • • • • • • • • • • • • • • • • • • • • • • • • • • • • • • • • • • • • • • • • • • • • • • • • • • • • • • • •
FRITZ!Repeater600
78
Page 79

Index
• • • • • • • • • • • • • • • • • • • • • • • • • • • • • • • • • • • • • • • • • • • • • • • • • • • • • • • • • • • • • • • • • • • • • • • • • • • • • • • • • • • • • • • • • • • • • • •
user interface........................................33, 33
AVM services...................................... 34
factory settings.................................. 63
firmware update................................ 62
opening................................................ 34
updating FRITZ!OS............................ 62
W
warranty..................................................... 71
wireless connection
other router....................................20, 21
wireless guest access............................. 52
wireless LAN
configuring radio network............... 49
connect devices................................. 31
Mesh ................................................ 25
radio frequencies.............................. 69
schedule.............................................. 50
WPS ................................................ 20
wireless LAN frequency ranges............ 69
wireless LAN radio frequencies............ 69
wireless network
SSID ................................................ 51
standards............................................ 70
wireless network connection
FRITZ!Box............................................ 18
• • • • • • • • • • • • • • • • • • • • • • • • • • • • • • • • • • • • • • • • • • • • • • • • • • • • • • • • • • • • • • • • • • • • • • • • • • • • • • • • • • • • • • • • • • • • • • •
FRITZ!Repeater600
79
 Loading...