

Page 1

Manual FRITZ!Box 4060
Manual
Page 2

Table of Contents
• • • • • • • • • • • • • • • • • • • • • • • • • • • • • • • • • • • • • • • • • • • • • • • • • • • • • • • • • • • • • • • • • • • • • • • • • • • • • • • • • • • • • • • • • • • • • • • • • • • • • • • •
Table of Contents
General Information on the FRITZ!Box...................................................................... 7
Safety Instructions.................................................................................................... 8
Package Contents....................................................................................................11
Instructions and Help............................................................................................. 12
Symbols Used.......................................................................................................... 13
Information on Cleaning.........................................................................................14
Functions and Structure.............................................................................................15
Functions...................................................................................................................16
Device Data on the Type Label..............................................................................19
Connection Sockets.................................................................................................21
Buttons...................................................................................................................... 22
LEDs........................................................................................................................... 23
Requirements for Operation..................................................................................26
Connecting.................................................................................................................... 27
Overview: Connecting the FRITZ!Box...................................................................28
Placement.................................................................................................................29
Connecting to Electric Power................................................................................31
Connecting with the Internet: Via Modem or Router.........................................32
Connecting to the Internet Access: Via a DSL/VDSL Modem.......................... 33
Connecting to the Internet Access: Via a Cable Modem...................................34
Connecting to the Internet Access: Via a Fiber Optic Modem......................... 36
Connecting to the Internet Access: Via a Router............................................... 38
Connecting to the Internet Access: Via Mobile Network.................................. 40
Connecting a Computer Using a Network Cable................................................42
Connecting to Computers via Wi-Fi......................................................................44
Connecting Telephones.......................................................................................... 47
Connecting Smartphones...................................................................................... 49
User Interface...............................................................................................................51
• • • • • • • • • • • • • • • • • • • • • • • • • • • • • • • • • • • • • • • • • • • • • • • • • • • • • • • • • • • • • • • • • • • • • • • • • • • • • • • • • • • • • • • • • • • • • • • • • • • • • • • •
FRITZ!Box 4060 2
Page 3

Table of Contents
• • • • • • • • • • • • • • • • • • • • • • • • • • • • • • • • • • • • • • • • • • • • • • • • • • • • • • • • • • • • • • • • • • • • • • • • • • • • • • • • • • • • • • • • • • • • • • • • • • • • • • • •
Opening the User Interface....................................................................................52
Homepage of the User Interface.......................................................................... 53
Using the Wizard for Basic Configuration...........................................................55
Changing the FRITZ!Box Password......................................................................57
Logging Out of the User Interface........................................................................ 59
Configuring................................................................................................................... 60
Overview: Configuring FRITZ!Box.........................................................................61
Configuring Internet Access via DSL Modem.....................................................62
Configuring Internet Access via Cable Modem..................................................63
Configuring Internet Access via Fiber Optic Modem........................................ 64
Configuring Internet Access via Another Router...............................................66
Configuring Internet Access via Another Router: IP Client..............................68
Configuring Internet Access via a Wireless Device...........................................69
Configuring Internet Access via Mobile Network..............................................71
Configuring Telephones......................................................................................... 72
Saving Power with the FRITZ!Box........................................................................ 74
Mesh with FRITZ!......................................................................................................... 76
Expanding a Wi-Fi Network with Mesh............................................................... 77
Enabling Mesh for FRITZ!Repeater and FRITZ!Powerline...............................79
Using FRITZ!Box as a MeshRepeater..................................................................81
Using Telephony in the Mesh................................................................................ 82
User Interface: Internet Menu................................................................................... 83
Using AVM Services for Diagnostics and Maintenance.................................... 84
Configuring Parental Controls.............................................................................. 86
Creating and Assigning Access Profiles............................................................. 89
Editing Filter Lists................................................................................................... 91
Configuring Priorities for Internet Use................................................................93
Configuring Port Sharing....................................................................................... 94
Enabling Dynamic DNS...........................................................................................96
Remote Access to the FRITZ!Box..........................................................................97
Configuring VPN Remote Access..........................................................................99
• • • • • • • • • • • • • • • • • • • • • • • • • • • • • • • • • • • • • • • • • • • • • • • • • • • • • • • • • • • • • • • • • • • • • • • • • • • • • • • • • • • • • • • • • • • • • • • • • • • • • • • •
FRITZ!Box 4060 3
Page 4

Table of Contents
• • • • • • • • • • • • • • • • • • • • • • • • • • • • • • • • • • • • • • • • • • • • • • • • • • • • • • • • • • • • • • • • • • • • • • • • • • • • • • • • • • • • • • • • • • • • • • • • • • • • • • • •
Configuring IPv6.................................................................................................... 101
Configuring FRITZ!Box as a LISP Router.......................................................... 103
User Interface: Telephony Menu.............................................................................104
Configuring and Using the Telephone Book.....................................................105
Configuring and Using the Answering Machine.............................................. 108
Configuring Call Diversion...................................................................................110
Configuring Call Blocks........................................................................................111
Configuring Do Not Disturb................................................................................. 113
Setting an Alarm................................................................................................... 114
Configuring a Dialing Rule...................................................................................115
Reducing the Radiation of DECT Emissions..................................................... 116
Allowing Non-Encrypted DECT Connections....................................................118
User Interface: Home Network Menu.................................................................... 119
Overview of All Devices........................................................................................120
Managing Network Devices.................................................................................125
Changing IPv4 Settings........................................................................................ 128
Distributing IPv4 Addresses............................................................................... 131
Changing IPv6 Settings........................................................................................ 133
Configuring a Static IP Route.............................................................................. 135
Obtaining an IP Address Automatically............................................................ 137
Configuring the “WAN” Connection Socket.......................................................139
Configuring Wake on LAN....................................................................................141
Configuring USB Devices..................................................................................... 142
Configuring and Using the Media Server..........................................................148
Assigning a FRITZ!Box Name..............................................................................150
User Interface: Wi-Fi Menu......................................................................................151
Switching the Wi-Fi Network On and Off.......................................................... 152
Selecting the Wi-Fi Channel................................................................................153
Configuring Wi-Fi Guest Access.........................................................................154
User Interface: Smart Home Menu........................................................................ 158
Smart Home Devices............................................................................................159
• • • • • • • • • • • • • • • • • • • • • • • • • • • • • • • • • • • • • • • • • • • • • • • • • • • • • • • • • • • • • • • • • • • • • • • • • • • • • • • • • • • • • • • • • • • • • • • • • • • • • • • •
FRITZ!Box 4060 4
Page 5

Table of Contents
• • • • • • • • • • • • • • • • • • • • • • • • • • • • • • • • • • • • • • • • • • • • • • • • • • • • • • • • • • • • • • • • • • • • • • • • • • • • • • • • • • • • • • • • • • • • • • • • • • • • • • • •
Configuring a Group of Switchable Sockets and LED Lights........................ 161
Setting Up a Group of Radiator Controls.......................................................... 162
Configuring a Template for Switchable Sockets and LED Lights.................163
Configuring a Template for Radiator Controls.................................................164
User Interface: Diagnostics Menu.......................................................................... 165
Starting Function Diagnostics.............................................................................166
Starting Security Diagnostics............................................................................. 168
User Interface: System Menu..................................................................................171
Configuring Push Services.................................................................................. 172
Logging In with the User Interface as a FRITZ!Box User...............................174
Selecting Signaling of the “Info” LED................................................................ 178
Locking and Unlocking Buttons..........................................................................179
Setting the User Interface Language................................................................ 180
Changing Regional Options................................................................................. 181
Adjusting the Time Zone...................................................................................... 182
Saving Settings......................................................................................................183
Loading Settings....................................................................................................184
Restarting the FRITZ!Box.....................................................................................185
Restoring Factory Settings..................................................................................186
Performing a FRITZ!OSFRITZ!OS Update Automatically............................... 188
Performing a FRITZ!OS Update in the Mesh Overview.................................. 191
Performing a FRITZ!OS Update with the Wizard.............................................193
Performing a FRITZ!OS Update Manually.........................................................195
User Interface: Wizards Menu.................................................................................197
Using the Wizards................................................................................................. 198
FRITZ!NAS...................................................................................................................200
Using Features of FRITZ!NAS............................................................................. 201
Expanding FRITZ!Box Storage............................................................................ 203
Displaying FRITZ!Box Storage in a File Manager............................................204
Saving FRITZ!Box Storage...................................................................................205
MyFRITZ!..................................................................................................................... 206
• • • • • • • • • • • • • • • • • • • • • • • • • • • • • • • • • • • • • • • • • • • • • • • • • • • • • • • • • • • • • • • • • • • • • • • • • • • • • • • • • • • • • • • • • • • • • • • • • • • • • • • •
FRITZ!Box 4060 5
Page 6

Table of Contents
• • • • • • • • • • • • • • • • • • • • • • • • • • • • • • • • • • • • • • • • • • • • • • • • • • • • • • • • • • • • • • • • • • • • • • • • • • • • • • • • • • • • • • • • • • • • • • • • • • • • • • • •
What Is MyFRITZ!?.................................................................................................207
Creating a New MyFRITZ! Account.....................................................................210
Configuring MyFRITZ!App in Android................................................................211
Configuring MyFRITZ!App in iOS........................................................................ 212
Controlling FRITZ!Box with Keypad Codes........................................................... 213
Information on Keypad Codes.............................................................................214
Configuration on the Telephone......................................................................... 216
Operating on the Telephone................................................................................ 221
Restoring Factory Settings with the Telephone.............................................. 234
Malfunctions...............................................................................................................236
Troubleshooting Procedures...............................................................................237
Troubleshooting Chart..........................................................................................238
Opening the User Interface with the Emergency IP Address....................... 241
Knowledge Base....................................................................................................242
Support....................................................................................................................243
Decommissioning and Disposal............................................................................. 244
Decommissioning..................................................................................................245
Disposal.................................................................................................................. 246
Technical Specifications...........................................................................................247
Technical Specifications...................................................................................... 248
Legal............................................................................................................................ 252
Legal Notice............................................................................................................253
Index............................................................................................................................ 258
• • • • • • • • • • • • • • • • • • • • • • • • • • • • • • • • • • • • • • • • • • • • • • • • • • • • • • • • • • • • • • • • • • • • • • • • • • • • • • • • • • • • • • • • • • • • • • • • • • • • • • • •
FRITZ!Box 4060 6
Page 7

General Information on the FRITZ!Box
• • • • • • • • • • • • • • • • • • • • • • • • • • • • • • • • • • • • • • • • • • • • • • • • • • • • • • • • • • • • • • • • • • • • • • • • • • • • • • • • • • • • • • • • • • • • • • • • • • • • • • • •
General Information on the FRITZ!Box
Contents of this chapter:
Safety Instructions.........................................................................................................8
Package Contents........................................................................................................ 11
Instructions and Help..................................................................................................12
Symbols Used...............................................................................................................13
Information on Cleaning.............................................................................................14
• • • • • • • • • • • • • • • • • • • • • • • • • • • • • • • • • • • • • • • • • • • • • • • • • • • • • • • • • • • • • • • • • • • • • • • • • • • • • • • • • • • • • • • • • • • • • • • • • • • • • • • •
FRITZ!Box 4060 7
Page 8

General Information on the FRITZ!Box
• • • • • • • • • • • • • • • • • • • • • • • • • • • • • • • • • • • • • • • • • • • • • • • • • • • • • • • • • • • • • • • • • • • • • • • • • • • • • • • • • • • • • • • • • • • • • • • • • • • • • • • •
Safety Instructions
Overview
Before connecting the FRITZ!Box, observe the following security instructions in order to protect yourself, the surroundings, and the
FRITZ!Box from harm.
Fires and Electrical Shocks
Overloaded outlets, extension cords and power strips can cause fires
or electric shocks.
• Avoid using socket strips and extension cords if at all possible.
• Do not connect multiple extension cords or socket strips to each
other.
Overheating
Heat accumulation can cause the FRITZ!Box to overheat. This can result in damage to the FRITZ!Box.
• Provide for sufficient air circulation around the FRITZ!Box.
• Make sure that the ventilation slits on the FRITZ!Box housing are always unobstructed.
• The FRITZ!Box should not be placed on carpets or upholstery.
• Do not cover the FRITZ!Box.
Power Surges Caused by Lightning
During electrical storms, electrical surges caused by lightning present
a danger to connected electrical devices.
• Do not install the FRITZ!Box during an electrical storm.
• During a storm, disconnect the FRITZ!Box from the power supply.
• • • • • • • • • • • • • • • • • • • • • • • • • • • • • • • • • • • • • • • • • • • • • • • • • • • • • • • • • • • • • • • • • • • • • • • • • • • • • • • • • • • • • • • • • • • • • • • • • • • • • • • •
FRITZ!Box 4060 8
Page 9

General Information on the FRITZ!Box
• • • • • • • • • • • • • • • • • • • • • • • • • • • • • • • • • • • • • • • • • • • • • • • • • • • • • • • • • • • • • • • • • • • • • • • • • • • • • • • • • • • • • • • • • • • • • • • • • • • • • • • •
Moisture, Liquids, and Vapors
Moisture, liquids, and vapors that find their way into the FRITZ!Box can
cause electric shocks or short circuits.
• Only use the FRITZ!Box indoors.
• Never let liquids get inside the FRITZ!Box.
• Protect the FRITZ!Box from vapors and moisture.
Improper Cleaning
Improper cleaning with strong detergents, solvents or wet cloths can
cause damage to the FRITZ!Box.
• Please refer to the information about how to clean your FRITZ!Box;
see page14.
Improper Opening and Repairs
The device contains hazardous components and should only be opened
by authorized repair technicians.
• Do not open the FRITZ!Box housing.
• If the FRITZ!Box needs to be repaired, please take it to a specialized
vendor.
Internet Security
Comprehensive information about how to protect your FRITZ!Box and
your home network from access by strangers is presented in the internet at:
en.avm.de/guide
Radio and Electromagnetic Interference
Radio interference can be generated by every device that emits electromagnetic signals. With so many devices transmitting and receiving
radio waves, interference can occur when radio waves overlap.
• Do not use the FRITZ!Box in places where the use of radio devices is
prohibited.
• • • • • • • • • • • • • • • • • • • • • • • • • • • • • • • • • • • • • • • • • • • • • • • • • • • • • • • • • • • • • • • • • • • • • • • • • • • • • • • • • • • • • • • • • • • • • • • • • • • • • • • •
FRITZ!Box 4060 9
Page 10

General Information on the FRITZ!Box
• • • • • • • • • • • • • • • • • • • • • • • • • • • • • • • • • • • • • • • • • • • • • • • • • • • • • • • • • • • • • • • • • • • • • • • • • • • • • • • • • • • • • • • • • • • • • • • • • • • • • • • •
• Follow any instructions to switch off radio devices – especially in
hospitals, outpatient treatment centers, medical practices, and other medical facilities – in order to prevent interference with sensitive
medical equipment.
• Consult your doctor and the manufacturer of your medical device
(pacemaker, hearing aid, electronically controlled implant, etc.)
to find out whether it could be affected by interference from your
FRITZ!Box.
• If applicable, maintain the recommended minimum distance of
15cm recommended by the manufacturers of medical devices in
order to prevent malfunctions of your medical device.
Potentially Explosive Environments
Under unfavorable conditions, radio waves in the vicinity of explosive
environments can cause fires or explosions.
• Do not install and operate your FRITZ!Box in the vicinity of explosive environments, flammable gases, areas in which the air contains chemicals or particles like grain, dust or metal powder, or in
the vicinity of detonation grounds.
• In locations with potentially explosive atmospheres, and in the
vicinity of detonation grounds, follow the instructions to switch off
electronic devices in order to prevent interference with detonation
and ignition systems.
• • • • • • • • • • • • • • • • • • • • • • • • • • • • • • • • • • • • • • • • • • • • • • • • • • • • • • • • • • • • • • • • • • • • • • • • • • • • • • • • • • • • • • • • • • • • • • • • • • • • • • • •
FRITZ!Box 4060 10
Page 11

General Information on the FRITZ!Box
• • • • • • • • • • • • • • • • • • • • • • • • • • • • • • • • • • • • • • • • • • • • • • • • • • • • • • • • • • • • • • • • • • • • • • • • • • • • • • • • • • • • • • • • • • • • • • • • • • • • • • • •
Package Contents
Package Contents
Amt. Supplied Part Details
1 FRITZ!Box 4060
1 Power adapter White
1 Network cable Also LAN cable, white
1 Quick guide Instructions for connecting the
FRITZ!Box
• • • • • • • • • • • • • • • • • • • • • • • • • • • • • • • • • • • • • • • • • • • • • • • • • • • • • • • • • • • • • • • • • • • • • • • • • • • • • • • • • • • • • • • • • • • • • • • • • • • • • • • •
FRITZ!Box 4060 11
Page 12

General Information on the FRITZ!Box
• • • • • • • • • • • • • • • • • • • • • • • • • • • • • • • • • • • • • • • • • • • • • • • • • • • • • • • • • • • • • • • • • • • • • • • • • • • • • • • • • • • • • • • • • • • • • • • • • • • • • • • •
Instructions and Help
Instructions and Help
Use the comprehensive customer documentation to connect, configure,
and operate your FRITZ!Box.
The latest information on products, important developments, and updates is presented on social media.
Tip
After a FRITZ!OS update, download the latest manual from en.avm.de/
service/manuals.
Medium Contents Location
Manual • Status FRITZ!OS version
07.28
• Connecting, configuration,
and operation
• Range of functions of your
FRITZ!Box
en.avm.de/service/
manuals
Quick guide Connecting and configuration Provided in print with
your FRITZ!Box
Online help • Instructions on configura-
http://fritz.box
tion and operation
• Help on the functions and
settings options in the user
interface
Knowledge
Base
Solutions for common problems during connection, con-
en.avm.de/service
figuration, and operation
Social media The latest about the
FRITZ!Box, your FRITZ!Box
home network, and your
FRITZ! device
• • • • • • • • • • • • • • • • • • • • • • • • • • • • • • • • • • • • • • • • • • • • • • • • • • • • • • • • • • • • • • • • • • • • • • • • • • • • • • • • • • • • • • • • • • • • • • • • • • • • • • • •
FRITZ!Box 4060 12
Facebook
Instagram
Twitter
YouTube
Page 13

General Information on the FRITZ!Box
• • • • • • • • • • • • • • • • • • • • • • • • • • • • • • • • • • • • • • • • • • • • • • • • • • • • • • • • • • • • • • • • • • • • • • • • • • • • • • • • • • • • • • • • • • • • • • • • • • • • • • • •
Symbols Used
Symbols Used
The following symbols are used in this manual:
Meaning
Important message that should be complied with in order to
prevent material damage, errors or malfunctions
Useful tip for configuring and operating the FRITZ!Box
• • • • • • • • • • • • • • • • • • • • • • • • • • • • • • • • • • • • • • • • • • • • • • • • • • • • • • • • • • • • • • • • • • • • • • • • • • • • • • • • • • • • • • • • • • • • • • • • • • • • • • • •
FRITZ!Box 4060 13
Page 14

General Information on the FRITZ!Box
• • • • • • • • • • • • • • • • • • • • • • • • • • • • • • • • • • • • • • • • • • • • • • • • • • • • • • • • • • • • • • • • • • • • • • • • • • • • • • • • • • • • • • • • • • • • • • • • • • • • • • • •
Information on Cleaning
Rules
Keep the following rules in mind for cleaning your FRITZ!Box:
• Remove the FRITZ!Box from the mains before cleaning.
• Wipe the FRITZ!Box with a slightly moist, lint-free cloth or an antistatic cloth.
• Do not use any strong detergents or solvents for cleaning.
• Do not use any wet cloths for cleaning.
• • • • • • • • • • • • • • • • • • • • • • • • • • • • • • • • • • • • • • • • • • • • • • • • • • • • • • • • • • • • • • • • • • • • • • • • • • • • • • • • • • • • • • • • • • • • • • • • • • • • • • • •
FRITZ!Box 4060 14
Page 15

Functions and Structure
• • • • • • • • • • • • • • • • • • • • • • • • • • • • • • • • • • • • • • • • • • • • • • • • • • • • • • • • • • • • • • • • • • • • • • • • • • • • • • • • • • • • • • • • • • • • • • • • • • • • • • • •
Functions and Structure
Contents of this chapter:
Functions.......................................................................................................................16
Device Data on the Type Label..................................................................................19
Connection Sockets.....................................................................................................21
Buttons...........................................................................................................................22
LEDs............................................................................................................................... 23
Requirements for Operation......................................................................................26
• • • • • • • • • • • • • • • • • • • • • • • • • • • • • • • • • • • • • • • • • • • • • • • • • • • • • • • • • • • • • • • • • • • • • • • • • • • • • • • • • • • • • • • • • • • • • • • • • • • • • • • •
FRITZ!Box 4060 15
Page 16

Functions and Structure
• • • • • • • • • • • • • • • • • • • • • • • • • • • • • • • • • • • • • • • • • • • • • • • • • • • • • • • • • • • • • • • • • • • • • • • • • • • • • • • • • • • • • • • • • • • • • • • • • • • • • • • •
Functions
Internet Router
The FRITZ!Box 4060 is a router which is connected to an internet access device. The FRITZ!Box 4060 can be used on the following internet
access devices:
• DSL or VDSL modem
• Cable modem
• Fiber optic modem
• Router
• USB mobile broadband dongle
Telephone System
The following devices can be connected to the FRITZ!Box:
• 6 cordless (DECT) telephones
• 10 IP telephones (FRITZ!AppFon, for instance)
Up to five integrated answering machines can be used to save voice
messages and, upon request, send them to you by email.
Wireless Access Point
The FRITZ!Box is a wireless access point for any wireless devices, for
instance:
• Notebooks
• Tablets
• Smartphones
• Wireless printers
• • • • • • • • • • • • • • • • • • • • • • • • • • • • • • • • • • • • • • • • • • • • • • • • • • • • • • • • • • • • • • • • • • • • • • • • • • • • • • • • • • • • • • • • • • • • • • • • • • • • • • • •
FRITZ!Box 4060 16
Page 17

Functions and Structure
• • • • • • • • • • • • • • • • • • • • • • • • • • • • • • • • • • • • • • • • • • • • • • • • • • • • • • • • • • • • • • • • • • • • • • • • • • • • • • • • • • • • • • • • • • • • • • • • • • • • • • • •
Hub in the Home Network
The FRITZ!Box is the hub in the home network. All of the devices
connected with the FRITZ!Box make up the home network. With the
FRITZ!Box you can keep track of all devices. The functions available for
the home network include:
• A media server for transmission of music, pictures, and video to
playback device in the home network
• MyFRITZ!, for access to your own FRITZ!Box over the internet from
anywhere
• FRITZ!NAS, for easy access to all files in the network
USB Port
The FRITZ!Box has a USB3.0 port to which you can connect the following devices:
• USB storage devices (for example, flash drives, external hard drives, card readers)
• USB printers, USB all-in-one printers, USB scanners
• USB mobile network dongles or smartphones with USB tethering
• USB hubs
DECT Base Station
The FRITZ!Box is a DECT base station that supports the DECTULE standard. The following DECT devices can be operated simultaneously on
the FRITZ!Box:
• Up to 6 cordless (DECT) telephones
• Smart Home devices
• • • • • • • • • • • • • • • • • • • • • • • • • • • • • • • • • • • • • • • • • • • • • • • • • • • • • • • • • • • • • • • • • • • • • • • • • • • • • • • • • • • • • • • • • • • • • • • • • • • • • • • •
FRITZ!Box 4060 17
Page 18

Functions and Structure
• • • • • • • • • • • • • • • • • • • • • • • • • • • • • • • • • • • • • • • • • • • • • • • • • • • • • • • • • • • • • • • • • • • • • • • • • • • • • • • • • • • • • • • • • • • • • • • • • • • • • • • •
Smart Home
The following Smart Home devices can be registered with the
FRITZ!Box at the same time, and configured and controlled via the
FRITZ!Box:
Type of Device Number Features
Smart plugs
• FRITZ!DECT210
• FRITZ!DECT200
Up to 10 • Control the power supply to
connected devices.
• Measure the power consump-
tion of connected devices.
Radiator controls
• FRITZ!DECT301
• FRITZ!DECT300
• Comet DECT
Switches
• FRITZ!DECT440
• FRITZ!DECT400
FRITZ!DECT500 LED
light
Smart Home devices
via HANFUN
Up to 12 Control the room temperature
automatically and save energy
costs.
Up to 10 Switch and control FRITZ!DECT
devices.
Up to 10 Control white and color lighting.
Up to 10 Connect Smart Home devices
from other manufacturers with
the FRITZ!Box.
• • • • • • • • • • • • • • • • • • • • • • • • • • • • • • • • • • • • • • • • • • • • • • • • • • • • • • • • • • • • • • • • • • • • • • • • • • • • • • • • • • • • • • • • • • • • • • • • • • • • • • • •
FRITZ!Box 4060 18
Page 19

FRI!Box 4060
Wi-Fi n etwork (SSI D):
Serial no.:
CWMP account:
Article no.: 2000 2931
AVM GmbH, 10547 B erlin
FRITZ!Box password:
Power units: 311P0W135, 311P0W185 12V 2A
Wi-Fi p assword (WPA 2):
FRITZ!Box 4060 AF
H515.123.45.678.901
00040E-123456789012
afbecd1234
3779 8981 1562 8981 0123
123
456
7
Functions and Structure
• • • • • • • • • • • • • • • • • • • • • • • • • • • • • • • • • • • • • • • • • • • • • • • • • • • • • • • • • • • • • • • • • • • • • • • • • • • • • • • • • • • • • • • • • • • • • • • • • • • • • • • •
Device Data on the Type Label
Overview
Important device data on your FRITZ!Box are presented on the type label on the bottom. There you find the preset network key for Wi-Fi connections with the FRITZ!Box, the preconfigured FRITZ!Box password
for the user interface, the serial number for support queries, and additional data.
Device Data on the Type Label
No. Meaning
1 Product name
2 Name of Wi-Fi network (SSID)
3 Network key (Wi-Fi password)
4 Password of user interface
5 Serial number
6 Power adapter specification
7 Article number
• • • • • • • • • • • • • • • • • • • • • • • • • • • • • • • • • • • • • • • • • • • • • • • • • • • • • • • • • • • • • • • • • • • • • • • • • • • • • • • • • • • • • • • • • • • • • • • • • • • • • • • •
FRITZ!Box 4060 19
Page 20

1G2.5G
Power WAN LAN 1 LAN 2 LAN 3 USB
WLAN-Zugang
1
Functions and Structure
• • • • • • • • • • • • • • • • • • • • • • • • • • • • • • • • • • • • • • • • • • • • • • • • • • • • • • • • • • • • • • • • • • • • • • • • • • • • • • • • • • • • • • • • • • • • • • • • • • • • • • • •
QR Code to Access Wi-Fi
No. Name Meaning/Function
1 Access to Wi-Fi QR code for Wi-Fi access with the preconfig-
ured Wi-Fi access information
• • • • • • • • • • • • • • • • • • • • • • • • • • • • • • • • • • • • • • • • • • • • • • • • • • • • • • • • • • • • • • • • • • • • • • • • • • • • • • • • • • • • • • • • • • • • • • • • • • • • • • • •
FRITZ!Box 4060 20
Page 21

1G2.5G
Power WAN LAN 1 LAN 2 LAN 3 USB
4
3
2
1
Functions and Structure
• • • • • • • • • • • • • • • • • • • • • • • • • • • • • • • • • • • • • • • • • • • • • • • • • • • • • • • • • • • • • • • • • • • • • • • • • • • • • • • • • • • • • • • • • • • • • • • • • • • • • • • •
Connection Sockets
Connector Panel
No. Name Function
1 Power Socket for plugging in the power supply
2 WAN RJ45 socket for connecting to a modem or a
router for internet access
3 LAN 1 - LAN 3 Port for connecting computers and other net-
work devices like game consoles and network
hubs
4 USB USB3.0 sockets for connecting USB devices
like printers or storage media
• • • • • • • • • • • • • • • • • • • • • • • • • • • • • • • • • • • • • • • • • • • • • • • • • • • • • • • • • • • • • • • • • • • • • • • • • • • • • • • • • • • • • • • • • • • • • • • • • • • • • • • •
FRITZ!Box 4060 21
Page 22

Connect
Power/ Internet
WLAN
Fon
Info
1
Functions and Structure
• • • • • • • • • • • • • • • • • • • • • • • • • • • • • • • • • • • • • • • • • • • • • • • • • • • • • • • • • • • • • • • • • • • • • • • • • • • • • • • • • • • • • • • • • • • • • • • • • • • • • • • •
Buttons
Button Functions
No. Button Function
1 Connect • Register wireless devices with the
FRITZ!Box via WPS; see page45
• Enabling Mesh for FRITZ!Repeaters and
FRITZ!Powerline; see page79
• Register cordless telephones with the
FRITZ!Box; see page47
• Register Smart Home devices with the
FRITZ!Box
• • • • • • • • • • • • • • • • • • • • • • • • • • • • • • • • • • • • • • • • • • • • • • • • • • • • • • • • • • • • • • • • • • • • • • • • • • • • • • • • • • • • • • • • • • • • • • • • • • • • • • • •
FRITZ!Box 4060 22
Page 23

Connect
Power/ Internet
WLAN
Fon
Info
5
4
3
2
1
Functions and Structure
• • • • • • • • • • • • • • • • • • • • • • • • • • • • • • • • • • • • • • • • • • • • • • • • • • • • • • • • • • • • • • • • • • • • • • • • • • • • • • • • • • • • • • • • • • • • • • • • • • • • • • • •
LEDs
Meaning of the LEDs
• • • • • • • • • • • • • • • • • • • • • • • • • • • • • • • • • • • • • • • • • • • • • • • • • • • • • • • • • • • • • • • • • • • • • • • • • • • • • • • • • • • • • • • • • • • • • • • • • • • • • • • •
FRITZ!Box 4060 23
Page 24

Functions and Structure
• • • • • • • • • • • • • • • • • • • • • • • • • • • • • • • • • • • • • • • • • • • • • • • • • • • • • • • • • • • • • • • • • • • • • • • • • • • • • • • • • • • • • • • • • • • • • • • • • • • • • • • •
No. LED Condition Meaning
1 Info
on • AVM Stick&Surf procedure with the
FRITZ!WLANStick concluded.
• Adjustable, see page178
flashing • Updating FRITZ!OS.
• AVM Stick&Surf procedure with the
FRITZ!WLANStick in progress.
• Time budget for online time has been
reached.
• Adjustable, see page178
4 Power
Internet
red
or
flashing
red
Error:
1. Open the user interface; see
page52.
2. Follow the instructions on the
“Overview” page in the user interface.
on A telephone call is being conducted.2 Fon
flashing Messages in your voice mailbox.
(Function must be supported by the telephony provider.)
on Wi-Fi is enabled.3 WLAN
flashing • Switching Wi-Fi on or off.
• Applying changes to the Wi-Fi settings.
on Device has electric power and the inter-
net connection has been established.
flashing Power supply is connected and the in-
ternet connection is being established or
has been interrupted.
• • • • • • • • • • • • • • • • • • • • • • • • • • • • • • • • • • • • • • • • • • • • • • • • • • • • • • • • • • • • • • • • • • • • • • • • • • • • • • • • • • • • • • • • • • • • • • • • • • • • • • • •
FRITZ!Box 4060 24
Page 25

Functions and Structure
• • • • • • • • • • • • • • • • • • • • • • • • • • • • • • • • • • • • • • • • • • • • • • • • • • • • • • • • • • • • • • • • • • • • • • • • • • • • • • • • • • • • • • • • • • • • • • • • • • • • • • • •
No. LED Condition Meaning
5 Connect
flashing Registration in progress for a wireless,
DECT, Smart Home or powerline device.
flashing
fast
Registration aborted: more than 1 device
registering with the FRITZ!Box. Repeat
the registration: 1 device per registration.
• • • • • • • • • • • • • • • • • • • • • • • • • • • • • • • • • • • • • • • • • • • • • • • • • • • • • • • • • • • • • • • • • • • • • • • • • • • • • • • • • • • • • • • • • • • • • • • • • • • • • • • •
FRITZ!Box 4060 25
Page 26

Functions and Structure
• • • • • • • • • • • • • • • • • • • • • • • • • • • • • • • • • • • • • • • • • • • • • • • • • • • • • • • • • • • • • • • • • • • • • • • • • • • • • • • • • • • • • • • • • • • • • • • • • • • • • • • •
Requirements for Operation
Requirements
• For internet access via a DSL modem: DSL line with DSL modem
• For internet access via a cable modem: cable connection with cable
modem
• For internet access via a fiber optic modem: fiber optic connection
with fiber optic modem
• For internet access via router: existing router with internet connection
• For internet access via mobile network: USB modem with mobile
network connection
• For configuration of the FRITZ!Box: a network device (computer or
tablet) with network connection or Wi-Fi support and up-to-date
web browser
For comprehensive technical information about your FRITZ!Box, see
page247.
• • • • • • • • • • • • • • • • • • • • • • • • • • • • • • • • • • • • • • • • • • • • • • • • • • • • • • • • • • • • • • • • • • • • • • • • • • • • • • • • • • • • • • • • • • • • • • • • • • • • • • • •
FRITZ!Box 4060 26
Page 27

Connecting
• • • • • • • • • • • • • • • • • • • • • • • • • • • • • • • • • • • • • • • • • • • • • • • • • • • • • • • • • • • • • • • • • • • • • • • • • • • • • • • • • • • • • • • • • • • • • • • • • • • • • • • •
Connecting
Contents of this chapter:
Overview: Connecting the FRITZ!Box.......................................................................28
Placement..................................................................................................................... 29
Connecting to Electric Power.................................................................................... 31
Connecting with the Internet: Via Modem or Router.............................................32
Connecting to the Internet Access: Via a DSL/VDSL Modem.............................. 33
Connecting to the Internet Access: Via a Cable Modem....................................... 34
Connecting to the Internet Access: Via a Fiber Optic Modem............................. 36
Connecting to the Internet Access: Via a Router................................................... 38
Connecting to the Internet Access: Via Mobile Network...................................... 40
Connecting a Computer Using a Network Cable....................................................42
Connecting to Computers via Wi-Fi..........................................................................44
Connecting Telephones.............................................................................................. 47
Connecting Smartphones...........................................................................................49
• • • • • • • • • • • • • • • • • • • • • • • • • • • • • • • • • • • • • • • • • • • • • • • • • • • • • • • • • • • • • • • • • • • • • • • • • • • • • • • • • • • • • • • • • • • • • • • • • • • • • • • •
FRITZ!Box 4060 27
Page 28

Connecting
• • • • • • • • • • • • • • • • • • • • • • • • • • • • • • • • • • • • • • • • • • • • • • • • • • • • • • • • • • • • • • • • • • • • • • • • • • • • • • • • • • • • • • • • • • • • • • • • • • • • • • • •
Overview: Connecting the FRITZ!Box
Overview
Connecting the FRITZ!Box entails the following steps:
Instructions
Place the FRITZ!Box in a suitable location.
Connect the FRITZ!Box to the power supply.
Connect the FRITZ!Box to your internet connection.
Connect your computers and network devices to the FRITZ!Box.
Connect your telephones to the FRITZ!Box.
• • • • • • • • • • • • • • • • • • • • • • • • • • • • • • • • • • • • • • • • • • • • • • • • • • • • • • • • • • • • • • • • • • • • • • • • • • • • • • • • • • • • • • • • • • • • • • • • • • • • • • • •
FRITZ!Box 4060 28
Page 29

Connecting
• • • • • • • • • • • • • • • • • • • • • • • • • • • • • • • • • • • • • • • • • • • • • • • • • • • • • • • • • • • • • • • • • • • • • • • • • • • • • • • • • • • • • • • • • • • • • • • • • • • • • • • •
Placement
Rules for Setting Up the FRITZ!Box
• Only use the FRITZ!Box indoors.
• Position the FRITZ!Box near an electrical outlet that is easy to
reach, so that you can unplug the FRITZ!Box at any time.
• Position the FRITZ!Box in a dry location that is free of dust.
• Do not place the FRITZ!Box on heat-sensitive surfaces like furniture
with sensitive paintwork.
• To avoid heat accumulation, the FRITZ!Box should not be placed on
carpets or upholstered furniture.
• Provide for sufficient air circulation around the FRITZ!Box and do
not cover up the FRITZ!Box. The ventilation slits must never be obstructed.
Rules for Optimum Wi-Fi Reception
Radio wave propagation during Wi-Fi operation is strongly dependent
on the position of your FRITZ!Box. Keep the following rules in mind for
good reception:
• Position the FRITZ!Box in a central location.
• Position the FRITZ!Box in an elevated location.
• Keep sufficient distance from potential sources of interference like
DECT base stations, microwave devices or electric devices with
large metal housings.
• Position the FRITZ!Box so that it is not covered by other objects and
there are as few walls or other obstacles as possible between it
and the other wireless devices.
• Make sure that the FRITZ!Box uses frequency ranges that are used
by as few other devices as possible.
• • • • • • • • • • • • • • • • • • • • • • • • • • • • • • • • • • • • • • • • • • • • • • • • • • • • • • • • • • • • • • • • • • • • • • • • • • • • • • • • • • • • • • • • • • • • • • • • • • • • • • • •
FRITZ!Box 4060 29
Page 30

Connecting
• • • • • • • • • • • • • • • • • • • • • • • • • • • • • • • • • • • • • • • • • • • • • • • • • • • • • • • • • • • • • • • • • • • • • • • • • • • • • • • • • • • • • • • • • • • • • • • • • • • • • • • •
Tip
By slightly shifting the position of the FRITZ!Box you can improve the
Wi-Fi connection. If these measures are not sufficient, then you can
extend the range of your Wi-Fi network with a wireless repeater and
Mesh with FRITZ!; see page77.
Instructions: Setting Up the FRITZ!Box
1. In compliance with the rules mentioned above, select a suitable
location for the FRITZ!Box.
2. Place the FRITZ!Box in this location.
• • • • • • • • • • • • • • • • • • • • • • • • • • • • • • • • • • • • • • • • • • • • • • • • • • • • • • • • • • • • • • • • • • • • • • • • • • • • • • • • • • • • • • • • • • • • • • • • • • • • • • • •
FRITZ!Box 4060 30
Page 31

1G2.5G
Power WAN LAN 1 LAN 2 LAN 3 USB
Connecting
• • • • • • • • • • • • • • • • • • • • • • • • • • • • • • • • • • • • • • • • • • • • • • • • • • • • • • • • • • • • • • • • • • • • • • • • • • • • • • • • • • • • • • • • • • • • • • • • • • • • • • • •
Connecting to Electric Power
Overview
Connect the FRITZ!Box to the power supply.
Rules
• If possible, avoid using any power strips or extension cords.
• If it is not possible to avoid using socket strips and extension cords,
then do not connect multiple extension cords or socket strips to
each other.
• Use only the power adapter included with delivery.
Instructions: Plugging In to Electrical Power
1. Connect the power adapter to the socket on the FRITZ!Box labeled
“Power”.
2. Plug the other end into a electrical outlet.
• • • • • • • • • • • • • • • • • • • • • • • • • • • • • • • • • • • • • • • • • • • • • • • • • • • • • • • • • • • • • • • • • • • • • • • • • • • • • • • • • • • • • • • • • • • • • • • • • • • • • • • •
FRITZ!Box 4060 31
Page 32

Connecting
• • • • • • • • • • • • • • • • • • • • • • • • • • • • • • • • • • • • • • • • • • • • • • • • • • • • • • • • • • • • • • • • • • • • • • • • • • • • • • • • • • • • • • • • • • • • • • • • • • • • • • • •
Connecting with the Internet: Via Modem or Router
Overview
The FRITZ!Box is connected with the internet access via the “WAN”
socket. For this you need a network cable and an access device appropriate for the connection type.
The following connection types are possible:
Type of Connection Access Device for the Connection Type
DSL or VDSL line DSL or VDSL modem
Cable connection Cable modem
Fiber optic connection Fiber optic modem (FTTH-ONT/media
converter)
Any internet connection Internet router
• • • • • • • • • • • • • • • • • • • • • • • • • • • • • • • • • • • • • • • • • • • • • • • • • • • • • • • • • • • • • • • • • • • • • • • • • • • • • • • • • • • • • • • • • • • • • • • • • • • • • • • •
FRITZ!Box 4060 32
Page 33

1G2.5G
Power WAN LAN 1 LAN 2 LAN 3
USB
Connecting
• • • • • • • • • • • • • • • • • • • • • • • • • • • • • • • • • • • • • • • • • • • • • • • • • • • • • • • • • • • • • • • • • • • • • • • • • • • • • • • • • • • • • • • • • • • • • • • • • • • • • • • •
Connecting to the Internet Access: Via a DSL/VDSL Modem
Overview
You can connect the FRITZ!Box to a DSL modem in order to connect it
with the DSL or VDSL line.
Requirements
• A DSL modem connected to your DSL or VDSL line
• A network cable (for instance, from the FRITZ!Box package)
• The “WAN” socket is configured for “WAN” operation; see
page139.
Instructions: Connecting to the DSL Modem
1. Insert one end of the network cable into the “WAN” port on the
FRITZ!Box.
2. Insert the other end of the network cable into the LAN (Ethernet)
• • • • • • • • • • • • • • • • • • • • • • • • • • • • • • • • • • • • • • • • • • • • • • • • • • • • • • • • • • • • • • • • • • • • • • • • • • • • • • • • • • • • • • • • • • • • • • • • • • • • • • • •
FRITZ!Box 4060 33
socket on the cable modem.
Page 34

Connecting
• • • • • • • • • • • • • • • • • • • • • • • • • • • • • • • • • • • • • • • • • • • • • • • • • • • • • • • • • • • • • • • • • • • • • • • • • • • • • • • • • • • • • • • • • • • • • • • • • • • • • • • •
Connecting to the Internet Access: Via a Cable Modem
Overview
If you have a cable connection with a cable modem, you can connect
the FRITZ!Box to the cable modem, from where it interfaces with the
cable connection. Use a network cable.
Requirements
• A cable modem that is connected to your cable connection
• A network cable (for instance, from the FRITZ!Box package)
• The “WAN” socket is configured for “WAN” operation; see
page139.
Example Configuration
• • • • • • • • • • • • • • • • • • • • • • • • • • • • • • • • • • • • • • • • • • • • • • • • • • • • • • • • • • • • • • • • • • • • • • • • • • • • • • • • • • • • • • • • • • • • • • • • • • • • • • • •
FRITZ!Box 4060 34
Page 35

Connecting
• • • • • • • • • • • • • • • • • • • • • • • • • • • • • • • • • • • • • • • • • • • • • • • • • • • • • • • • • • • • • • • • • • • • • • • • • • • • • • • • • • • • • • • • • • • • • • • • • • • • • • • •
Instructions: Connecting to a Cable Modem
1. Connect one end of the network cable to the LAN (Ethernet) port
on the cable modem.
2. Insert the other end of the network cable into the “WAN” port on
the FRITZ!Box.
3. Connect a computer with the FRITZ!Box, see page42 or see
page44.
4. Set up the internet connection for connections via cable in the
FRITZ!Box; see page63.
• • • • • • • • • • • • • • • • • • • • • • • • • • • • • • • • • • • • • • • • • • • • • • • • • • • • • • • • • • • • • • • • • • • • • • • • • • • • • • • • • • • • • • • • • • • • • • • • • • • • • • • •
FRITZ!Box 4060 35
Page 36

Connecting
• • • • • • • • • • • • • • • • • • • • • • • • • • • • • • • • • • • • • • • • • • • • • • • • • • • • • • • • • • • • • • • • • • • • • • • • • • • • • • • • • • • • • • • • • • • • • • • • • • • • • • • •
Connecting to the Internet Access: Via a Fiber Optic Modem
Overview
If you have a fiber optic connection with a fiber optic modem, you can
connect the FRITZ!Box to the fiber optic modem (FTTH ONT) in order to
connect it with the fiber optic connection.
Requirements
• A fiber optic modem that is connected to your fiber optic connection
• A network cable (for instance, from the FRITZ!Box package)
• The “WAN” socket is configured for “WAN” operation; see
page139.
Example Configuration
• • • • • • • • • • • • • • • • • • • • • • • • • • • • • • • • • • • • • • • • • • • • • • • • • • • • • • • • • • • • • • • • • • • • • • • • • • • • • • • • • • • • • • • • • • • • • • • • • • • • • • • •
FRITZ!Box 4060 36
Page 37

Connecting
• • • • • • • • • • • • • • • • • • • • • • • • • • • • • • • • • • • • • • • • • • • • • • • • • • • • • • • • • • • • • • • • • • • • • • • • • • • • • • • • • • • • • • • • • • • • • • • • • • • • • • • •
Instructions: Connecting to a Fiber Optic Modem
1. Insert one end of the network cable into the “WAN” port on the
FRITZ!Box.
2. Insert the other end of the network cable into the LAN (Ethernet)
socket on the fiber optic modem.
• • • • • • • • • • • • • • • • • • • • • • • • • • • • • • • • • • • • • • • • • • • • • • • • • • • • • • • • • • • • • • • • • • • • • • • • • • • • • • • • • • • • • • • • • • • • • • • • • • • • • • • •
FRITZ!Box 4060 37
Page 38

Connecting
• • • • • • • • • • • • • • • • • • • • • • • • • • • • • • • • • • • • • • • • • • • • • • • • • • • • • • • • • • • • • • • • • • • • • • • • • • • • • • • • • • • • • • • • • • • • • • • • • • • • • • • •
Connecting to the Internet Access: Via a Router
Overview
You can connect the FRITZ!Box to a router that is connected with the internet. In this way the FRITZ!Box can use the router’s internet connection.
Requirements
• A router connected directly with the internet access
• A network cable (for instance, from the FRITZ!Box package)
• If the FRITZ!Box is operated as a router and generates its own IP
network, then it is connected to the router via the “WAN” socket.
The “WAN” socket must be configured for “WAN” operation; see
page139.
• If the FRITZ!Box is operated as an IP client on the router, then it
must be connected to a LAN socket on the router. The “WAN” socket
can be configured as a LAN port; see page139.
• • • • • • • • • • • • • • • • • • • • • • • • • • • • • • • • • • • • • • • • • • • • • • • • • • • • • • • • • • • • • • • • • • • • • • • • • • • • • • • • • • • • • • • • • • • • • • • • • • • • • • • •
FRITZ!Box 4060 38
Page 39

Connecting
• • • • • • • • • • • • • • • • • • • • • • • • • • • • • • • • • • • • • • • • • • • • • • • • • • • • • • • • • • • • • • • • • • • • • • • • • • • • • • • • • • • • • • • • • • • • • • • • • • • • • • • •
Example Configuration
Instructions: Connecting to the Router with a Network Cable
1. Insert one end of the network cable into the “WAN” port on the
FRITZ!Box.
If the FRITZ!Box is to be operated as an IP client, then configure
the “WAN” socket as a LAN port; see page139. Alternatively,
you can insert the network cable into one of the LAN sockets.
2. Insert the other end of the cable into the network socket on the
internet router.
• • • • • • • • • • • • • • • • • • • • • • • • • • • • • • • • • • • • • • • • • • • • • • • • • • • • • • • • • • • • • • • • • • • • • • • • • • • • • • • • • • • • • • • • • • • • • • • • • • • • • • • •
FRITZ!Box 4060 39
Page 40

Connecting
• • • • • • • • • • • • • • • • • • • • • • • • • • • • • • • • • • • • • • • • • • • • • • • • • • • • • • • • • • • • • • • • • • • • • • • • • • • • • • • • • • • • • • • • • • • • • • • • • • • • • • • •
Connecting to the Internet Access: Via Mobile Network
Overview
The FRITZ!Box can connect to the internet via the mobile network.
Supported Devices and Mobile Communication Standards
• USB mobile network dongles for LTE/UMTS/HSPA
• Mobile network dongles and smartphones that support USB tethering
• Smartphones configured as Wi-Fi hotspots
Requirements
• A mobile network device for internet access via LTE, UMTS or HSPA
• A SIM card from a mobile network provider
Restrictions by the Mobile Network Provider
Tip
Due to technical limitations on the part of the mobile network
providers, some limitations may arise for internet telephone calls and
for applications requiring an incoming connection. This is also true for
using port sharing, releasing USB storage media for sharing, remote
maintenance over HTTPS, Dynamic DNS, and VPN. Contact your network provider for details on any restrictions that may apply.
• • • • • • • • • • • • • • • • • • • • • • • • • • • • • • • • • • • • • • • • • • • • • • • • • • • • • • • • • • • • • • • • • • • • • • • • • • • • • • • • • • • • • • • • • • • • • • • • • • • • • • • •
FRITZ!Box 4060 40
Page 41

Connecting
• • • • • • • • • • • • • • • • • • • • • • • • • • • • • • • • • • • • • • • • • • • • • • • • • • • • • • • • • • • • • • • • • • • • • • • • • • • • • • • • • • • • • • • • • • • • • • • • • • • • • • • •
Example Configuration
Instructions: Connecting the Mobile Broadband Dongle
1. Insert the mobile broadband dongle in the USB port of the
FRITZ!Box.
Instructions: Connecting with the Smartphone via USB
1. Connect the smartphone to the USB port on the FRITZ!Box using a
USB cable.
Connecting with the Smartphone via Wi-Fi
You can establish the connection to the smartphone via Wi-Fi; see
page69.
• • • • • • • • • • • • • • • • • • • • • • • • • • • • • • • • • • • • • • • • • • • • • • • • • • • • • • • • • • • • • • • • • • • • • • • • • • • • • • • • • • • • • • • • • • • • • • • • • • • • • • • •
FRITZ!Box 4060 41
Page 42

1G2.5G
Power WAN LAN 1 LAN 2 LAN 3 USB
Connecting
• • • • • • • • • • • • • • • • • • • • • • • • • • • • • • • • • • • • • • • • • • • • • • • • • • • • • • • • • • • • • • • • • • • • • • • • • • • • • • • • • • • • • • • • • • • • • • • • • • • • • • • •
Connecting a Computer Using a Network Cable
Overview
You can connect computers and other network devices with the
FRITZ!Box using a network cable. This is recommended especially for
the initial configuration of your FRITZ!Box. The way a computer is connected is the same regardless of the computer’s operating system.
Rules
• The network cable used to connect a computer or another network
device to the FRITZ!Box may be no longer than 100m.
Instructions: Connecting a Computer Using a Network Cable
1. Insert the network cable into the LAN socket of the computer.
2. Insert the free end of the cable into a LAN socket on the
FRITZ!Box.
Instructions: Connecting a Network Hub or Network Switch
1. Insert the network cable included in the package into the uplink
• • • • • • • • • • • • • • • • • • • • • • • • • • • • • • • • • • • • • • • • • • • • • • • • • • • • • • • • • • • • • • • • • • • • • • • • • • • • • • • • • • • • • • • • • • • • • • • • • • • • • • • •
FRITZ!Box 4060 42
port of the network hub or network switch.
Page 43

Connecting
• • • • • • • • • • • • • • • • • • • • • • • • • • • • • • • • • • • • • • • • • • • • • • • • • • • • • • • • • • • • • • • • • • • • • • • • • • • • • • • • • • • • • • • • • • • • • • • • • • • • • • • •
2. Insert the free end of the cable into a LAN socket on the
FRITZ!Box.
• • • • • • • • • • • • • • • • • • • • • • • • • • • • • • • • • • • • • • • • • • • • • • • • • • • • • • • • • • • • • • • • • • • • • • • • • • • • • • • • • • • • • • • • • • • • • • • • • • • • • • • •
FRITZ!Box 4060 43
Page 44

Connecting
• • • • • • • • • • • • • • • • • • • • • • • • • • • • • • • • • • • • • • • • • • • • • • • • • • • • • • • • • • • • • • • • • • • • • • • • • • • • • • • • • • • • • • • • • • • • • • • • • • • • • • • •
Connecting to Computers via Wi-Fi
Overview
You can connect computers and other network devices to the
FRITZ!Box without cables via Wi-Fi.
Secure Wi-Fi Connections
Wi-Fi connections can be secured using encryption. Two things are required for this:
• An encryption method
• A key
The encryption method WPA2 and a network key (see the type label on
the bottom of the device) are preconfigured in the FRITZ!Box. A wireless device that would like to connect with the FRITZ!Box must register
with the FRITZ!Box using the network key. This can be done in the following ways:
• by entering the network key manually
• by transmitting the Wi-Fi network key via WPS
Encryption
The FRITZ!Box supports connections with the WPA (Wi-Fi Protected Access) standard for encryption and authentication in Wi-Fi networks. In
this standard, WPA3 mode offers the highest security. The FRITZ!Box
supports WPA3 in combination with the common WPA2 mode, since
there are still only a few wireless devices that support WPA3. The following settings are available in the FRITZ!Box:
Encryption/WPA Mode Function
WPA2+WPA3 If a wireless device supports WPA3, the
FRITZ!Box uses WPA3; otherwise, WPA2.
WPA2 (CCMP) Preset in the FRITZ!Box.
The FRITZ!Box uses WPA2 for all connections.
• • • • • • • • • • • • • • • • • • • • • • • • • • • • • • • • • • • • • • • • • • • • • • • • • • • • • • • • • • • • • • • • • • • • • • • • • • • • • • • • • • • • • • • • • • • • • • • • • • • • • • • •
FRITZ!Box 4060 44
Page 45

Connecting
• • • • • • • • • • • • • • • • • • • • • • • • • • • • • • • • • • • • • • • • • • • • • • • • • • • • • • • • • • • • • • • • • • • • • • • • • • • • • • • • • • • • • • • • • • • • • • • • • • • • • • • •
Comprehensive information about how to protect your FRITZ!Box and
the Wi-Fi network from access by strangers is presented in the internet at en.avm.de/guide.
Requirements
• Wi-Fi is enabled in the FRITZ!Box (the “WLAN” LED is on)
Instructions: Entering the Network Key Manually
1. With the wireless device, search for the Wi-Fi network of the
FRITZ!Box. For more information, see the documentation of your
wireless device.
The preconfigured name of the FRITZ!Box Wi-Fi network is composed of “FRITZ!Box 4060” and two random letters (for instance,
“XY”) and is printed on the type label on the bottom.
2. Click on “OK”.
3. Enter the network key of the FRITZ!Box.
The network key is printed on the type label on the bottom; see
page19.
The Wi-Fi connection will be established.
Instructions: Transferring the Network Key Using WPS
With WPS (Wi-Fi Protected Setup) you can connect a wireless device
with the FRITZ!Box quickly and easily without entering the Wi-Fi network key of your FRITZ!Box. This key is transmitted to the wireless device automatically.
1. With the wireless device, search for the Wi-Fi network of the
FRITZ!Box. For more information, see the documentation of your
wireless device.
The preconfigured name of the FRITZ!Box Wi-Fi network is composed of “FRITZ!Box 4060” and two random letters (for instance,
“XY”) and is printed on the type label on the bottom.
2. Start the connection procedure via WPS (see the documentation
of your wireless device).
• • • • • • • • • • • • • • • • • • • • • • • • • • • • • • • • • • • • • • • • • • • • • • • • • • • • • • • • • • • • • • • • • • • • • • • • • • • • • • • • • • • • • • • • • • • • • • • • • • • • • • • •
FRITZ!Box 4060 45
Page 46

Connect
Power/Internet
WLAN
Fon
Info
Connecting
• • • • • • • • • • • • • • • • • • • • • • • • • • • • • • • • • • • • • • • • • • • • • • • • • • • • • • • • • • • • • • • • • • • • • • • • • • • • • • • • • • • • • • • • • • • • • • • • • • • • • • • •
3. On the FRITZ!Box: Press the “Connect” button briefly.
The “Connect” LED flashes.
The Wi-Fi connection will be established.
• • • • • • • • • • • • • • • • • • • • • • • • • • • • • • • • • • • • • • • • • • • • • • • • • • • • • • • • • • • • • • • • • • • • • • • • • • • • • • • • • • • • • • • • • • • • • • • • • • • • • • • •
FRITZ!Box 4060 46
Page 47
1G2.5G
Power WAN LAN 1 LAN 2 LAN 3 USB
Connect
Power/Inte rnet
WLAN
Fon
Info
DECT
Connecting
• • • • • • • • • • • • • • • • • • • • • • • • • • • • • • • • • • • • • • • • • • • • • • • • • • • • • • • • • • • • • • • • • • • • • • • • • • • • • • • • • • • • • • • • • • • • • • • • • • • • • • • •
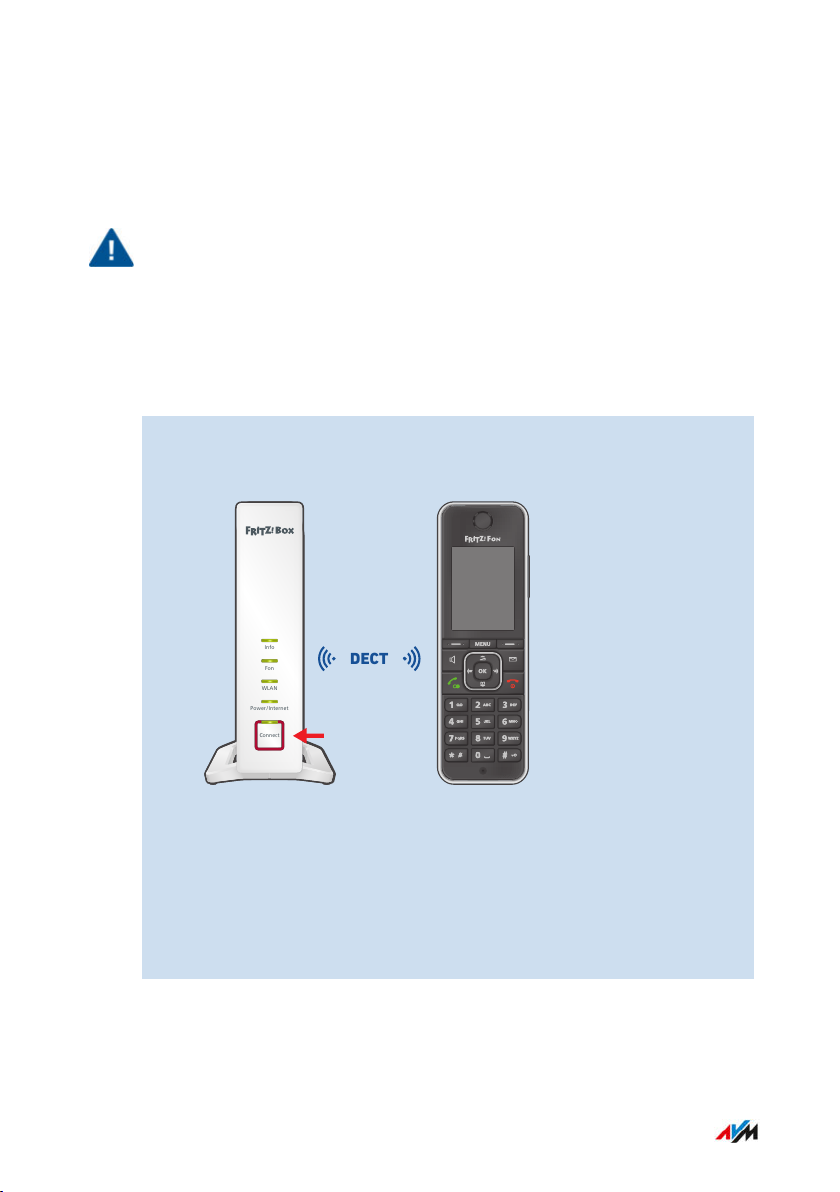
Connecting Telephones
Overview
Important
During a power outage you cannot make any telephone calls with the
connected telephones.
Instructions: Registering a Cordless Telephone
You can register up to six cordless telephones like FRITZ!Fon with the
FRITZ!Box.
1. On a cordless telephone: Start registration with a base station.
2. On the FRITZ!Box: Press the “Connect” button.
The “Connect” LED flashes.
3. On a cordless telephone: Enter the PIN of the FRITZ!Box on the
telephone (preset value: 0000).
4. In the user interface of your FRITZ!Box: Configure the telephone;
see page72.
• • • • • • • • • • • • • • • • • • • • • • • • • • • • • • • • • • • • • • • • • • • • • • • • • • • • • • • • • • • • • • • • • • • • • • • • • • • • • • • • • • • • • • • • • • • • • • • • • • • • • • • •
FRITZ!Box 4060 47
Page 48

Connecting
• • • • • • • • • • • • • • • • • • • • • • • • • • • • • • • • • • • • • • • • • • • • • • • • • • • • • • • • • • • • • • • • • • • • • • • • • • • • • • • • • • • • • • • • • • • • • • • • • • • • • • • •
Instructions: Connecting an IP Telephone
1. Connect the IP telephone to the FRITZ!Box using a network cable
or Wi-Fi.
2. In the user interface of your FRITZ!Box: Configure the telephone;
see page72.
• • • • • • • • • • • • • • • • • • • • • • • • • • • • • • • • • • • • • • • • • • • • • • • • • • • • • • • • • • • • • • • • • • • • • • • • • • • • • • • • • • • • • • • • • • • • • • • • • • • • • • • •
FRITZ!Box 4060 48
Page 49

Connecting
• • • • • • • • • • • • • • • • • • • • • • • • • • • • • • • • • • • • • • • • • • • • • • • • • • • • • • • • • • • • • • • • • • • • • • • • • • • • • • • • • • • • • • • • • • • • • • • • • • • • • • • •
Connecting Smartphones
Overview
You can register your iPhone or Android smartphone with the
FRITZ!AppFon using the FRITZ!Box. Then you can make calls with the
your smartphone at home, using the telephone numbers configured
in the FRITZ!Box. The smartphone can also be reached at your mobile
telephone number.
Requirements
• iPhone or Android smartphone
• The setting “Allow access for applications” is enabled in the
FRITZ!Box (in the user interface under “Home Network / Network /
Network Settings”)
Instructions: Connecting a Smartphone
1. Establish a Wi-Fi connection to the FRITZ!Box on your smartphone.
2. Install FRITZ!AppFon on your smartphone. FRITZ!AppFon is
available from the Google Play Store and the Apple App Store.
3. Start the FRITZ!AppFon. FRITZ!AppFon is automatically configured as an IP telephone in the FRITZ!Box.
4. In the user interface of your FRITZ!Box: Configure the IP telephone “FRITZ!AppFon”; see page72.
Connection Status of FRITZ!AppFon
The icon in the FRITZ!AppFon title bar shows the status of the connection with the FRITZ!Box.
Icon Meaning
Wi-Fi connection to the FRITZ!Box is active.
• • • • • • • • • • • • • • • • • • • • • • • • • • • • • • • • • • • • • • • • • • • • • • • • • • • • • • • • • • • • • • • • • • • • • • • • • • • • • • • • • • • • • • • • • • • • • • • • • • • • • • • •
FRITZ!Box 4060 49
Page 50

Connecting
• • • • • • • • • • • • • • • • • • • • • • • • • • • • • • • • • • • • • • • • • • • • • • • • • • • • • • • • • • • • • • • • • • • • • • • • • • • • • • • • • • • • • • • • • • • • • • • • • • • • • • • •
Icon Meaning
You can make calls via the FRITZ!Box with your smartphone.
• • • • • • • • • • • • • • • • • • • • • • • • • • • • • • • • • • • • • • • • • • • • • • • • • • • • • • • • • • • • • • • • • • • • • • • • • • • • • • • • • • • • • • • • • • • • • • • • • • • • • • • •
FRITZ!Box 4060 50
Page 51

User Interface
• • • • • • • • • • • • • • • • • • • • • • • • • • • • • • • • • • • • • • • • • • • • • • • • • • • • • • • • • • • • • • • • • • • • • • • • • • • • • • • • • • • • • • • • • • • • • • • • • • • • • • • •
User Interface
Contents of this chapter:
Opening the User Interface........................................................................................52
Homepage of the User Interface...............................................................................53
Using the Wizard for Basic Configuration...............................................................55
Changing the FRITZ!Box Password..........................................................................57
Logging Out of the User Interface............................................................................ 59
• • • • • • • • • • • • • • • • • • • • • • • • • • • • • • • • • • • • • • • • • • • • • • • • • • • • • • • • • • • • • • • • • • • • • • • • • • • • • • • • • • • • • • • • • • • • • • • • • • • • • • • •
FRITZ!Box 4060 51
Page 52

http://fritz.box
User Interface
• • • • • • • • • • • • • • • • • • • • • • • • • • • • • • • • • • • • • • • • • • • • • • • • • • • • • • • • • • • • • • • • • • • • • • • • • • • • • • • • • • • • • • • • • • • • • • • • • • • • • • • •
Opening the User Interface
Overview
Open the user interface of the FRITZ!Box in a web browser. In the user
interface you configure the FRITZ!Box, and receive information on connections, interfaces, and on the entire home network.
Requirements
• Your computer, tablet or smartphone is connected with the
FRITZ!Box via Wi-Fi or with the network cable.
Instructions: Opening the User Interface
1. Start a web browser on your computer or mobile device and enter
http://fritz.box in the address bar.
2. Enter the preset FRITZ!Box password and click on “Log In”.
The preconfigured FRITZ!Box password is printed on the type la-
bel on the bottom of the FRITZ!Box and on the “FRITZ!Notes” service card.
If you already changed the preset FRITZ!Box password, or if a
FRITZ!Box user has already been created, then log in with the
changed login information; see page174.
The FRITZ!Box user interface opens to display the “Overview” homepage.
• • • • • • • • • • • • • • • • • • • • • • • • • • • • • • • • • • • • • • • • • • • • • • • • • • • • • • • • • • • • • • • • • • • • • • • • • • • • • • • • • • • • • • • • • • • • • • • • • • • • • • • •
FRITZ!Box 4060 52
Page 53

User Interface
• • • • • • • • • • • • • • • • • • • • • • • • • • • • • • • • • • • • • • • • • • • • • • • • • • • • • • • • • • • • • • • • • • • • • • • • • • • • • • • • • • • • • • • • • • • • • • • • • • • • • • • •
Homepage of the User Interface
Overview
The “Overview” menu is the start page of your FRITZ!Box user interface. In addition to a clear menu structure and wizards offering stepby-step instructions, the homepage displays important information on
the FRITZ!Box and all of the devices connected in the home network.
Overview of Settings on the Homepage
The homepage displays all of the basic information on the status of
your FRITZ!Box as well as an overview of all FRITZ!Box settings and
devices in the home network. The homepage also presents important
notifications for secure, reliable operation of your FRITZ!Box.
• Links take you directly to the pages in the user interface on which
you can configure settings for FRITZ!Box features.
• Links to FRITZ! products in the home network open their user interfaces in their own browser tabs.
Area Function / Display
System • Product name or individually assigned name
of the FRITZ!Box
• FRITZ!OS installed
• Current power consumption
• Important notifications for secure, reliable
operation of your FRITZ!Box
• • • • • • • • • • • • • • • • • • • • • • • • • • • • • • • • • • • • • • • • • • • • • • • • • • • • • • • • • • • • • • • • • • • • • • • • • • • • • • • • • • • • • • • • • • • • • • • • • • • • • • • •
FRITZ!Box 4060 53
Page 54

User Interface
• • • • • • • • • • • • • • • • • • • • • • • • • • • • • • • • • • • • • • • • • • • • • • • • • • • • • • • • • • • • • • • • • • • • • • • • • • • • • • • • • • • • • • • • • • • • • • • • • • • • • • • •
Area Function / Display
Connections and Interfaces
• Information on internet and telephony con-
nections and on all FRITZ!Box interfaces
• Information on telephone calls and voice
messages on the integrated answering machine
• Devices connected to the FRITZ!Box, such as
computers, smartphones, network storage,
printers, or Smart Home devices
• Configured convenience features
• • • • • • • • • • • • • • • • • • • • • • • • • • • • • • • • • • • • • • • • • • • • • • • • • • • • • • • • • • • • • • • • • • • • • • • • • • • • • • • • • • • • • • • • • • • • • • • • • • • • • • • •
FRITZ!Box 4060 54
Page 55

User Interface
• • • • • • • • • • • • • • • • • • • • • • • • • • • • • • • • • • • • • • • • • • • • • • • • • • • • • • • • • • • • • • • • • • • • • • • • • • • • • • • • • • • • • • • • • • • • • • • • • • • • • • • •
Using the Wizard for Basic Configuration
Overview
The first time the user interface is opened, the Wizard for Basic Configuration of the FRITZ!Box is started. This wizard assists you in entering
your account information to connect to the internet and use your telephones.
Tip
The wizard can be restarted at any time via the “Wizards” menu in the
FRITZ!Box user interface.
Requirements
• The FRITZ!Box password has been supplied. The preconfigured FRITZ!Box password is printed on the type label on the
“FRITZ!Notes” FRITZ!Box service card and on the type label on the
bottom of your FRITZ!Box.
• The account information has been supplied by your internet service
provider.
• The telephone numbers have been supplied by your telephony
provider.
Instructions: Using the Wizard for Basic Configuration
1. Enter the preset FRITZ!Box password and click on “Log In”.
The preconfigured FRITZ!Box password is printed on the bottom
of the FRITZ!Box.
2. Choose whether you would like to use the AVM services for diagnostics and maintenance. We recommend leaving this option enabled. You can always change the setting later.
3. Click on “Next”.
4. Follow the wizard’s instructions.
• • • • • • • • • • • • • • • • • • • • • • • • • • • • • • • • • • • • • • • • • • • • • • • • • • • • • • • • • • • • • • • • • • • • • • • • • • • • • • • • • • • • • • • • • • • • • • • • • • • • • • • •
FRITZ!Box 4060 55
Page 56

User Interface
• • • • • • • • • • • • • • • • • • • • • • • • • • • • • • • • • • • • • • • • • • • • • • • • • • • • • • • • • • • • • • • • • • • • • • • • • • • • • • • • • • • • • • • • • • • • • • • • • • • • • • • •
Once the wizard is complete, the basic configuration of the FRITZ!Box
has been concluded. The FRITZ!Box is ready for the internet and for
telephony.
• • • • • • • • • • • • • • • • • • • • • • • • • • • • • • • • • • • • • • • • • • • • • • • • • • • • • • • • • • • • • • • • • • • • • • • • • • • • • • • • • • • • • • • • • • • • • • • • • • • • • • • •
FRITZ!Box 4060 56
Page 57

User Interface
• • • • • • • • • • • • • • • • • • • • • • • • • • • • • • • • • • • • • • • • • • • • • • • • • • • • • • • • • • • • • • • • • • • • • • • • • • • • • • • • • • • • • • • • • • • • • • • • • • • • • • • •
Changing the FRITZ!Box Password
Overview
Within the FRITZ!Box home network you can log in with the FRITZ!Box
using a FRITZ!Box password without a username. For the first login
with the FRITZ!Box, use the FRITZ!Box password preset for your
FRITZ!Box, which you can find on the “FRITZ!Notes” service card and
printed on the FRITZ!Box housing. You can change the preconfigured
FRITZ!Box password.
Requirements
• You have not yet changed the username automatically created for
the FRITZ!Box password; see page174.
Instructions: Changing the FRITZ!Box Password
1. Open the FRITZ!Box user interface. In the browser, enter the address http://fritz.box.
2. Log in using the preconfigured FRITZ!Box password.
If you already changed the preset FRITZ!Box password, then log
in with the changed FRITZ!Box password.
3. Click on the menu with the three dots in the header of the
FRITZ!Box user interface:
4. Click on “Change Password” in the menu.
5. Enter a new password. Remember to comply with the rules for
passwords; see page176.
• • • • • • • • • • • • • • • • • • • • • • • • • • • • • • • • • • • • • • • • • • • • • • • • • • • • • • • • • • • • • • • • • • • • • • • • • • • • • • • • • • • • • • • • • • • • • • • • • • • • • • • •
FRITZ!Box 4060 57
Page 58

User Interface
• • • • • • • • • • • • • • • • • • • • • • • • • • • • • • • • • • • • • • • • • • • • • • • • • • • • • • • • • • • • • • • • • • • • • • • • • • • • • • • • • • • • • • • • • • • • • • • • • • • • • • • •
Note
We recommend configuring the “Forgot Password” push service; see page172. When you have forgotten a password, the
FRITZ!Box sends an access link to the email address you specified. Using this link you can set a new password.
6. Click on “Apply”.
• • • • • • • • • • • • • • • • • • • • • • • • • • • • • • • • • • • • • • • • • • • • • • • • • • • • • • • • • • • • • • • • • • • • • • • • • • • • • • • • • • • • • • • • • • • • • • • • • • • • • • • •
FRITZ!Box 4060 58
Page 59

User Interface
• • • • • • • • • • • • • • • • • • • • • • • • • • • • • • • • • • • • • • • • • • • • • • • • • • • • • • • • • • • • • • • • • • • • • • • • • • • • • • • • • • • • • • • • • • • • • • • • • • • • • • • •
Logging Out of the User Interface
Overview
Session IDs are assigned for access to the FRITZ!Box user interface.
The use of session IDs offers effective protection from attacks from the
internet in which attackers send unauthorized data to a web application. For security reasons, we therefore recommend that you log out of
the user interface before surfing the web.
Tip
Use push services to have yourself notified each time someone logs
into or out of your FRITZ!Box; see page172.
Automatic Logout when Idle
If you have not logged out of the FRITZ!Box user interface, and have not
been active in the browser for 20minutes, you will be logged out automatically.
Instructions: Manual Logout
1. Click on the menu with the three dots in the header of the
FRITZ!Box user interface:
2. Click on “Log Off” in the menu.
You have logged out of the FRITZ!Box user interface.
• • • • • • • • • • • • • • • • • • • • • • • • • • • • • • • • • • • • • • • • • • • • • • • • • • • • • • • • • • • • • • • • • • • • • • • • • • • • • • • • • • • • • • • • • • • • • • • • • • • • • • • •
FRITZ!Box 4060 59
Page 60

Configuring
• • • • • • • • • • • • • • • • • • • • • • • • • • • • • • • • • • • • • • • • • • • • • • • • • • • • • • • • • • • • • • • • • • • • • • • • • • • • • • • • • • • • • • • • • • • • • • • • • • • • • • • •
Configuring
Contents of this chapter:
Overview: Configuring FRITZ!Box.............................................................................61
Configuring Internet Access via DSL Modem.........................................................62
Configuring Internet Access via Cable Modem...................................................... 63
Configuring Internet Access via Fiber Optic Modem.............................................64
Configuring Internet Access via Another Router...................................................66
Configuring Internet Access via Another Router: IP Client..................................68
Configuring Internet Access via a Wireless Device...............................................69
Configuring Internet Access via Mobile Network.................................................. 71
Configuring Telephones..............................................................................................72
Saving Power with the FRITZ!Box............................................................................ 74
• • • • • • • • • • • • • • • • • • • • • • • • • • • • • • • • • • • • • • • • • • • • • • • • • • • • • • • • • • • • • • • • • • • • • • • • • • • • • • • • • • • • • • • • • • • • • • • • • • • • • • • •
FRITZ!Box 4060 60
Page 61

Configuring
• • • • • • • • • • • • • • • • • • • • • • • • • • • • • • • • • • • • • • • • • • • • • • • • • • • • • • • • • • • • • • • • • • • • • • • • • • • • • • • • • • • • • • • • • • • • • • • • • • • • • • • •
Overview: Configuring FRITZ!Box
Overview
Configuration of the FRITZ!Box entails the following steps:
Instructions
Set up the internet connection in the FRITZ!Box.
Set up the connected telephones and their telephone numbers in
the FRITZ!Box.
Configure your smartphone in the FRITZ!Box (optional).
Requirements
• The FRITZ!Box is connected with the internet access.
• You have connected all of the telephones you want to use with the
FRITZ!Box.
• • • • • • • • • • • • • • • • • • • • • • • • • • • • • • • • • • • • • • • • • • • • • • • • • • • • • • • • • • • • • • • • • • • • • • • • • • • • • • • • • • • • • • • • • • • • • • • • • • • • • • • •
FRITZ!Box 4060 61
Page 62

Configuring
• • • • • • • • • • • • • • • • • • • • • • • • • • • • • • • • • • • • • • • • • • • • • • • • • • • • • • • • • • • • • • • • • • • • • • • • • • • • • • • • • • • • • • • • • • • • • • • • • • • • • • • •
Configuring Internet Access via DSL Modem
Overview
You can connect the FRITZ!Box to a DSL modem which provides the internet connection.
Operating Mode of the FRITZ!Box
If the FRITZ!Box is connected with the Internet access via DSL modem,
the following apply:
• The FRITZ!Box obtains the public IP address from the Internet service provider via DHCP or PPPoE.
• The FRITZ!Box establishes the internet connection itself.
• The FRITZ!Box functions as a router.
• The FRITZ!Box opens up its own IP network.
• The firewall of the FRITZ!Box is enabled.
Requirements
• The FRITZ!Box is connected to a DSL modem, which is connected
with the DSL or VDSL line; see page33.
• The “WAN” socket is configured for “WAN” operation; seeConfigur-
ing the “WAN” Connection Socket, page139.
Instructions: Configuring Internet Access on the DSL Connection
1. Open the user interface; see page52.
2. Select the “Internet / Account Information” menu and the
“Internet Connection” tab.
3. Select the “DSL or fiber optic modem” entry from the “Internet
connection via” list.
4. For further settings, use the online help of the FRITZ!Box.
• • • • • • • • • • • • • • • • • • • • • • • • • • • • • • • • • • • • • • • • • • • • • • • • • • • • • • • • • • • • • • • • • • • • • • • • • • • • • • • • • • • • • • • • • • • • • • • • • • • • • • • •
FRITZ!Box 4060 62
Page 63

Configuring
• • • • • • • • • • • • • • • • • • • • • • • • • • • • • • • • • • • • • • • • • • • • • • • • • • • • • • • • • • • • • • • • • • • • • • • • • • • • • • • • • • • • • • • • • • • • • • • • • • • • • • • •
Configuring Internet Access via Cable Modem
Overview
You can connect the FRITZ!Box to a cable modem which provides the
internet connection.
Operating Mode of the FRITZ!Box
If the FRITZ!Box is connected with the internet access via cable modem, the following apply:
• The FRITZ!Box obtains its public IP address from the internet service provider via DHCP.
• The FRITZ!Box establishes the internet connection itself.
• The FRITZ!Box functions as a router.
• The FRITZ!Box opens up its own IP network.
• The firewall of the FRITZ!Box is enabled.
Requirements
• The FRITZ!Box is connected to a cable modem, which is connected
with the cable junction; see page34.
• The “WAN” socket is configured for “WAN” operation; see
page139.
Instructions: Setting Up Internet Access on the Cable Connection
1. Open the user interface; see page52.
2. Select the “Internet / Account Information” menu and the
“Internet Connection” tab.
3. Select the “Cable modem or internet router” entry in the
“Internet connection via” field.
4. For further settings, use the online help.
• • • • • • • • • • • • • • • • • • • • • • • • • • • • • • • • • • • • • • • • • • • • • • • • • • • • • • • • • • • • • • • • • • • • • • • • • • • • • • • • • • • • • • • • • • • • • • • • • • • • • • • •
FRITZ!Box 4060 63
Page 64

Configuring
• • • • • • • • • • • • • • • • • • • • • • • • • • • • • • • • • • • • • • • • • • • • • • • • • • • • • • • • • • • • • • • • • • • • • • • • • • • • • • • • • • • • • • • • • • • • • • • • • • • • • • • •
Configuring Internet Access via Fiber Optic Modem
Overview
You can connect the FRITZ!Box to a fiber optic modem which provides
the internet connection.
Operating Mode of the FRITZ!Box
If the FRITZ!Box is connected with the internet access via fiber optic
modem, the following apply:
• The FRITZ!Box obtains its public IP address from the internet service provider via DHCP or PPPoE.
• The FRITZ!Box establishes the internet connection itself.
• The FRITZ!Box functions as a router.
• The FRITZ!Box opens up its own IP network.
• The firewall of the FRITZ!Box is enabled.
Requirements
• The FRITZ!Box is connected to a fiber optic modem, which is connected with the fiber optic connection; see page36.
• The “WAN” socket is configured for “WAN” operation; see
page139.
Instructions: Setting Up Internet Access on the Fiber Optic Connection
1. Open the user interface; see page52.
2. Select the “Internet / Account Information” menu and the
“Internet Connection” tab.
3. Select the “DSL or fiber optic modem” entry from the “Internet
connection via” field.
4. Select your fiber optic operator. If your fiber optic provider is not
included in the list, select the “other internet service provider”
entry.
• • • • • • • • • • • • • • • • • • • • • • • • • • • • • • • • • • • • • • • • • • • • • • • • • • • • • • • • • • • • • • • • • • • • • • • • • • • • • • • • • • • • • • • • • • • • • • • • • • • • • • • •
FRITZ!Box 4060 64
Page 65

Configuring
• • • • • • • • • • • • • • • • • • • • • • • • • • • • • • • • • • • • • • • • • • • • • • • • • • • • • • • • • • • • • • • • • • • • • • • • • • • • • • • • • • • • • • • • • • • • • • • • • • • • • • • •
5. For further settings, use the online help of the FRITZ!Box.
• • • • • • • • • • • • • • • • • • • • • • • • • • • • • • • • • • • • • • • • • • • • • • • • • • • • • • • • • • • • • • • • • • • • • • • • • • • • • • • • • • • • • • • • • • • • • • • • • • • • • • • •
FRITZ!Box 4060 65
Page 66

Configuring
• • • • • • • • • • • • • • • • • • • • • • • • • • • • • • • • • • • • • • • • • • • • • • • • • • • • • • • • • • • • • • • • • • • • • • • • • • • • • • • • • • • • • • • • • • • • • • • • • • • • • • • •
Configuring Internet Access via Another Router
Overview
You can operate the FRITZ!Box as a router on another router. The other
router provides the internet connection.
Operating Mode of the FRITZ!Box
The following applies to this kind of internet connection:
• The FRITZ!Box receives an IP address from the upstream router via
DHCP (default setting).
• The FRITZ!Box functions as its own router.
• The FRITZ!Box opens up its own IP network.
• The firewall of the FRITZ!Box is enabled.
Requirements
• The FRITZ!Box is connected with a router that provides the internet
connection; see page38.
• The “WAN” socket is configured for “WAN” operation; see
page139.
Instructions: Setting Up Internet Access via WAN (as a Router)
1. Open the user interface; see page52.
2. Select the “Internet / Account Information” menu and the
“Internet Connection” tab.
3. In the “Internet Service Provider” area, select the settings “More
internet service providers” and then “Other internet service
provider”.
4. From the “Connect via” area, select the “Connection to an
external modem or router” option.
5. Select the “Cable modem or internet router” entry in the
“Internet connection via” field.
• • • • • • • • • • • • • • • • • • • • • • • • • • • • • • • • • • • • • • • • • • • • • • • • • • • • • • • • • • • • • • • • • • • • • • • • • • • • • • • • • • • • • • • • • • • • • • • • • • • • • • • •
FRITZ!Box 4060 66
Page 67

Configuring
• • • • • • • • • • • • • • • • • • • • • • • • • • • • • • • • • • • • • • • • • • • • • • • • • • • • • • • • • • • • • • • • • • • • • • • • • • • • • • • • • • • • • • • • • • • • • • • • • • • • • • • •
6. For further settings, use the online help of the FRITZ!Box.
• • • • • • • • • • • • • • • • • • • • • • • • • • • • • • • • • • • • • • • • • • • • • • • • • • • • • • • • • • • • • • • • • • • • • • • • • • • • • • • • • • • • • • • • • • • • • • • • • • • • • • • •
FRITZ!Box 4060 67
Page 68

Configuring
• • • • • • • • • • • • • • • • • • • • • • • • • • • • • • • • • • • • • • • • • • • • • • • • • • • • • • • • • • • • • • • • • • • • • • • • • • • • • • • • • • • • • • • • • • • • • • • • • • • • • • • •
Configuring Internet Access via Another Router: IP Client
Overview
You can connect the FRITZ!Box as an IP client to a router which provides the internet connection.
Operating Mode of the FRITZ!Box
The following apply in IP client mode:
• The FRITZ!Box receives an IP address from the upstream router via
DHCP (default setting).
• The FRITZ!Box becomes a part of the router’s IP network.
• The network devices connected to the FRITZ!Box receive their IP
addresses from the upstream router.
• The firewall of the FRITZ!Box is disabled.
Requirements
• The FRITZ!Box is connected with a router that provides the internet
connection. There are two possibilities for connecting the FRITZ!Box
with the router:
- Via the WAN socket. The socket must be configured as a LAN
port; see page139.
- Via one of the LAN sockets.
Instructions: Setting Up Internet Access via LAN (as an IP Client)
1. Open the user interface; see page52.
2. Select the “Internet / Account Information” menu and the
“Internet Connection” tab.
3. Select “Internet router as IP client” from the “Internet connection
via” list.
4. For further settings, use the online help of the FRITZ!Box.
• • • • • • • • • • • • • • • • • • • • • • • • • • • • • • • • • • • • • • • • • • • • • • • • • • • • • • • • • • • • • • • • • • • • • • • • • • • • • • • • • • • • • • • • • • • • • • • • • • • • • • • •
FRITZ!Box 4060 68
Page 69

Configuring
• • • • • • • • • • • • • • • • • • • • • • • • • • • • • • • • • • • • • • • • • • • • • • • • • • • • • • • • • • • • • • • • • • • • • • • • • • • • • • • • • • • • • • • • • • • • • • • • • • • • • • • •
Configuring Internet Access via a Wireless Device
Overview
You can use the FRITZ!Box on an existing internet connection by connecting to it via Wi-Fi. The FRITZ!Box can share the internet connection
of another device via a wireless connection. The other device can be a
router, for instance, or a smartphone configured as a hotspot.
Operating Mode of the FRITZ!Box
The following applies to this kind of internet connection:
• The FRITZ!Box receives an IP address from the upstream router via
DHCP (default setting).
• The FRITZ!Box functions as its own router.
• The FRITZ!Box opens up its own IP network.
• The firewall of the FRITZ!Box is enabled.
Requirements
• The Wi-Fi network transmits in the 2.4-GHz frequency range.
• The connection is encrypted using WPA2 or WPA3.
• The Wi-Fi network allows the FRITZ!Box to set up a Wi-Fi connection.
Instructions: Configuring Internet Access via Wi-Fi
1. Open the user interface; see page52.
2. Select the “Internet / Account Information” menu.
3. Select the “Existing connection over Wi-Fi” entry from the
“Internet service provider” list.
A list of the Wi-Fi networks in the vicinity is displayed.
4. Select the Wi-Fi network you want to connect the FRITZ!Box with.
• • • • • • • • • • • • • • • • • • • • • • • • • • • • • • • • • • • • • • • • • • • • • • • • • • • • • • • • • • • • • • • • • • • • • • • • • • • • • • • • • • • • • • • • • • • • • • • • • • • • • • • •
FRITZ!Box 4060 69
Page 70

Configuring
• • • • • • • • • • • • • • • • • • • • • • • • • • • • • • • • • • • • • • • • • • • • • • • • • • • • • • • • • • • • • • • • • • • • • • • • • • • • • • • • • • • • • • • • • • • • • • • • • • • • • • • •
5. Enter the network key of the Wi-Fi network in the “Network key”
field in the “Security” area.
6. Save your settings by clicking “Apply”.
The FRITZ!Box is configured as a router and the network range is
changed automatically. The FRITZ!Box, along with the connected network devices, forms its own self-contained network.
• • • • • • • • • • • • • • • • • • • • • • • • • • • • • • • • • • • • • • • • • • • • • • • • • • • • • • • • • • • • • • • • • • • • • • • • • • • • • • • • • • • • • • • • • • • • • • • • • • • • • • • •
FRITZ!Box 4060 70
Page 71

Configuring
• • • • • • • • • • • • • • • • • • • • • • • • • • • • • • • • • • • • • • • • • • • • • • • • • • • • • • • • • • • • • • • • • • • • • • • • • • • • • • • • • • • • • • • • • • • • • • • • • • • • • • • •
Configuring Internet Access via Mobile Network
Overview
In the FRITZ!Box you can configure internet access via the mobile network.
Requirements
• A mobile broadband dongle or an Android smartphone with
USB tethering enabled must be connected to the USB port of the
FRITZ!Box; see page40.
Instructions: Configuring the Internet Connection via the Mobile Network
1. Open the user interface; see page52.
2. Select “Internet / Mobile Network”.
3. For instructions, open the online help .
• • • • • • • • • • • • • • • • • • • • • • • • • • • • • • • • • • • • • • • • • • • • • • • • • • • • • • • • • • • • • • • • • • • • • • • • • • • • • • • • • • • • • • • • • • • • • • • • • • • • • • • •
FRITZ!Box 4060 71
Page 72

Configuring
• • • • • • • • • • • • • • • • • • • • • • • • • • • • • • • • • • • • • • • • • • • • • • • • • • • • • • • • • • • • • • • • • • • • • • • • • • • • • • • • • • • • • • • • • • • • • • • • • • • • • • • •
Configuring Telephones
Overview
Once you have connected your telephony devices, configure these devices in the FRITZ!Box. For each device, specify:
• Telephone number for outgoing calls to the public telephone network
• How incoming calls should be handled: Should the device react
(ring, for instance) to every call, or only respond to calls for certain
telephone numbers?
• Further settings that depend on the kind of device.
Requirements
• Your own telephone numbers are set up in the FRITZ!Box.
Rules
The following rules apply for IP telephones:
• IP telephones are configured in the FRITZ!Box such that no international calls are possible. You can disable this security feature, see
page73.
• Various FRITZ!Box features are not available for IP telephones, including telephone books, fax and data connections, routing, busy on
busy, controlling FRITZ!Box functions (for instance, switching Wi-Fi
on and off).
Instructions: Configuring Telephones and Other Devices
1. Open the user interface; see page52.
2. Select “Telephony / Telephony Devices”.
• • • • • • • • • • • • • • • • • • • • • • • • • • • • • • • • • • • • • • • • • • • • • • • • • • • • • • • • • • • • • • • • • • • • • • • • • • • • • • • • • • • • • • • • • • • • • • • • • • • • • • • •
FRITZ!Box 4060 72
Page 73

Configuring
• • • • • • • • • • • • • • • • • • • • • • • • • • • • • • • • • • • • • • • • • • • • • • • • • • • • • • • • • • • • • • • • • • • • • • • • • • • • • • • • • • • • • • • • • • • • • • • • • • • • • • • •
3. If the device to be configured is not yet included in the list of
telephony devices, click on “Configure New Device”. The wizard
guides you through the assignment of telephone numbers and
enters the device in the list.
4. To configure further settings for a device in the list, click on the
“Edit”
button of the device. The kind of device determines
which additional settings are available.
Instructions: Enabling International Calls for an IP Telephone
An IP telephone is configured in the FRITZ!Box such that only domestic calls and calls to emergency numbers are possible. You can disable
this security feature:
1. Open the user interface; see page52.
2. Under “Telephony / Telephone Numbers”, select the “Line
Settings” tab.
3. Under “Security”, click on “ChangeSelection”.
4. Disable the checkbox next to the desired IP telephone and click
on “OK”.
5. Save your settings by clicking “Apply”.
• • • • • • • • • • • • • • • • • • • • • • • • • • • • • • • • • • • • • • • • • • • • • • • • • • • • • • • • • • • • • • • • • • • • • • • • • • • • • • • • • • • • • • • • • • • • • • • • • • • • • • • •
FRITZ!Box 4060 73
Page 74

Configuring
• • • • • • • • • • • • • • • • • • • • • • • • • • • • • • • • • • • • • • • • • • • • • • • • • • • • • • • • • • • • • • • • • • • • • • • • • • • • • • • • • • • • • • • • • • • • • • • • • • • • • • • •
Saving Power with the FRITZ!Box
Overview
The FRITZ!Box offers various settings for energy-saving operation. The
following section describes how you can configure these settings and
what potential energy savings can be expected.
Viewing Information on Energy Consumption
The current power consumption of the total FRITZ!Box system is displayed on the “Overview” page of the user interface.
Information on the power consumption of the individual areas, and on
the average power consumption over the last 24hours, is presented in
the FRITZ!Box user interface under “System / Energy Monitor / Power
Consumption”.
Using Savings Potential
What How to Where
Wi-Fi
Configure a schedule; see
page152
Switch off Wi-Fi; see
page152
Reduce the maximum transmitter power
USB Use the USB port in ener-
gy-saving (Green) mode; see
page147
“Wi-Fi / Schedule” menu
• “Wi-Fi / Wi-Fi Network” menu
“Wi-Fi / Wi-Fi Channel / Wi-Fi
Channel Settings / Additional
settings” menu
“Home Network / USB/Storage /
USB Settings” menu
• • • • • • • • • • • • • • • • • • • • • • • • • • • • • • • • • • • • • • • • • • • • • • • • • • • • • • • • • • • • • • • • • • • • • • • • • • • • • • • • • • • • • • • • • • • • • • • • • • • • • • • •
FRITZ!Box 4060 74
Page 75

Configuring
• • • • • • • • • • • • • • • • • • • • • • • • • • • • • • • • • • • • • • • • • • • • • • • • • • • • • • • • • • • • • • • • • • • • • • • • • • • • • • • • • • • • • • • • • • • • • • • • • • • • • • • •
Saving Power with Smart Home
With intelligent Smart Home devices like FRITZ!DECT, electrical appliances are integrated into the home network. This way they can be
switched on and off by schedule. At the same time, they inform the
FRITZ!Box about consumption, energy costs incurred, and the CO2 footprint.
Instructions: Configuring a Schedule for Electrical Appliances in the Home Network
1. Open the user interface; see page52.
2. Select “Smart Home / Device Management / Edit Socket /
Automatic Switching”.
3. For instructions, open the online help .
• • • • • • • • • • • • • • • • • • • • • • • • • • • • • • • • • • • • • • • • • • • • • • • • • • • • • • • • • • • • • • • • • • • • • • • • • • • • • • • • • • • • • • • • • • • • • • • • • • • • • • • •
FRITZ!Box 4060 75
Page 76

Mesh with FRITZ!
• • • • • • • • • • • • • • • • • • • • • • • • • • • • • • • • • • • • • • • • • • • • • • • • • • • • • • • • • • • • • • • • • • • • • • • • • • • • • • • • • • • • • • • • • • • • • • • • • • • • • • • •
Mesh with FRITZ!
Contents of this chapter:
Expanding a Wi-Fi Network with Mesh....................................................................77
Enabling Mesh for FRITZ!Repeater and FRITZ!Powerline................................... 79
Using FRITZ!Box as a MeshRepeater......................................................................81
Using Telephony in the Mesh.....................................................................................82
• • • • • • • • • • • • • • • • • • • • • • • • • • • • • • • • • • • • • • • • • • • • • • • • • • • • • • • • • • • • • • • • • • • • • • • • • • • • • • • • • • • • • • • • • • • • • • • • • • • • • • • •
FRITZ!Box 4060 76
Page 77

Mesh with FRITZ!
• • • • • • • • • • • • • • • • • • • • • • • • • • • • • • • • • • • • • • • • • • • • • • • • • • • • • • • • • • • • • • • • • • • • • • • • • • • • • • • • • • • • • • • • • • • • • • • • • • • • • • • •
Expanding a Wi-Fi Network with Mesh
Overview
If the Wi-Fi network of the FRITZ!Box does not reach all of your rooms,
then you can extend it with a FRITZ!Repeater, a FRITZ!Powerline with
Wi-Fi functionality, or with an additional FRITZ!Box. Mesh combines the
individual Wi-Fi networks of the FRITZ! devices into a single powerful
Wi-Fi network.
Mesh is available in FRITZ!OS version7.00 or later.
Tip
Only FRITZ! devices can be integrated into the FRITZ!Box Mesh. If you
expand the Wi-Fi network with a wireless repeater from another manufacturer, the Mesh functions are not available.
FRITZ! Devices with Mesh
With the following FRITZ! devices you can expand the Wi-Fi network of
the FRITZ!Box:
FRITZ! Device Type of Connection to the FRITZ!Box
FRITZ!Repeater • Wi-Fi
• LAN cable
(only for FRITZ!Repeater devices with a
LAN socket)
More information at en.avm.de/products/
fritzwlan.
FRITZ!Powerline • Electrical wiring
For more information, see en.avm.de/prod-
ucts/fritzpowerline.
second FRITZ!Box
The FRITZ!Box must
support the “Mesh
Repeater” function.
• • • • • • • • • • • • • • • • • • • • • • • • • • • • • • • • • • • • • • • • • • • • • • • • • • • • • • • • • • • • • • • • • • • • • • • • • • • • • • • • • • • • • • • • • • • • • • • • • • • • • • • •
FRITZ!Box 4060 77
See the FRITZ!Box manual at en.avm.de/ser-
vice/manuals
.
For your FRITZ!Box 4060, see seeUsing
FRITZ!Box as a MeshRepeater, page81.
Page 78

Mesh with FRITZ!
• • • • • • • • • • • • • • • • • • • • • • • • • • • • • • • • • • • • • • • • • • • • • • • • • • • • • • • • • • • • • • • • • • • • • • • • • • • • • • • • • • • • • • • • • • • • • • • • • • • • • • • •
Features in the Mesh
The FRITZ!Box is the hub of the Mesh, the MeshMaster. Other FRITZ!
devices in the Mesh are MeshRepeaters. The following features provide for high-performance connections between the devices and for
convenience in the Mesh:
• Consistent Wi-Fi settings: MeshRepeaters adopt from the Mesh
Master the network name (SSID), network key, Wi-Fi guest access
and Wi-Fi schedule.
• Mesh overview in the user interface of the Mesh Master: Here you
can perform updates for all FRITZ! devices in the Mesh.
• Improved information exchange among FRITZ! devices provides for
faster wireless connections.
• Mesh Wi-Fi Steering (access point steering, FRITZ!OS7.10 or later):
The Mesh Master can select the best FRITZ! device for each wireless device to use to access the home network.
• • • • • • • • • • • • • • • • • • • • • • • • • • • • • • • • • • • • • • • • • • • • • • • • • • • • • • • • • • • • • • • • • • • • • • • • • • • • • • • • • • • • • • • • • • • • • • • • • • • • • • • •
FRITZ!Box 4060 78
Page 79

Mesh with FRITZ!
• • • • • • • • • • • • • • • • • • • • • • • • • • • • • • • • • • • • • • • • • • • • • • • • • • • • • • • • • • • • • • • • • • • • • • • • • • • • • • • • • • • • • • • • • • • • • • • • • • • • • • • •
Enabling Mesh for FRITZ!Repeater and FRITZ!Powerline
Overview
In order to benefit from the advantages of Mesh, enable Mesh for all
FRITZ!Repeaters and FRITZ!Powerline devices located in the home network of your FRITZ!Box.
Requirements
• FRITZ!OS7.00 or later is installed on the FRITZ!Box.
• FRITZ!Repeater version7.00 or later is installed on the
FRITZ!Powerline or FRITZ!OS.
• The FRITZ!Repeater or FRITZ!Powerline is located in the home network of the FRITZ!Box.
Instructions: Enabling Mesh for a FRITZ!Repeater
1. Open the FRITZ!Box user interface; see page52.
2. Select “Home Network / Mesh”.
3. The FRITZ!Box is displayed in the overview with the “Mesh
enabled”
then Mesh is already enabled for the FRITZ!Repeater. If the icon
is missing next to the FRITZ!Repeater, continue with the next
step.
4. Press the button on the FRITZ!Repeater.
icon. If the icon is also displayed for FRITZ!Repeater,
After the button is released, the “WLAN” or “Connect” LED on the
FRITZ!Repeater flashes rapidly.
5. Within 2minutes, start WPS on the FRITZ!Box. Do this by pressing
the “Connect” button until the “Info” LED starts flashing.
Mesh is enabled and the FRITZ!Repeater is displayed in the overview
marked with the “Mesh enabled” icon.
• • • • • • • • • • • • • • • • • • • • • • • • • • • • • • • • • • • • • • • • • • • • • • • • • • • • • • • • • • • • • • • • • • • • • • • • • • • • • • • • • • • • • • • • • • • • • • • • • • • • • • • •
FRITZ!Box 4060 79
Page 80

Mesh with FRITZ!
• • • • • • • • • • • • • • • • • • • • • • • • • • • • • • • • • • • • • • • • • • • • • • • • • • • • • • • • • • • • • • • • • • • • • • • • • • • • • • • • • • • • • • • • • • • • • • • • • • • • • • • •
Instructions: Enabling Mesh for a FRITZ!Powerline
1. Open the FRITZ!Box user interface; see page52.
2. Select “Home Network / Mesh”.
3. The FRITZ!Box is displayed in the overview with the
“Mesh enabled”
icon. If the icon is also displayed
for FRITZ!Powerline, then Mesh is already enabled for
the FRITZ!Powerline. If the icon is missing next to the
FRITZ!Powerline, continue with the next step.
4. Press the connect button on FRITZ!Powerline:
FRITZ!Powerline Model Connection Button
1260E Connect
1240E, 546E, 540E WLAN/WPS
All of the LEDs on FRITZ!Powerline will be flashing when you release the button.
5. Within 2minutes, start WPS on the FRITZ!Box. Do this by pressing
the “Connect” button until the “Info” LED starts flashing.
Mesh is enabled and the FRITZ!Powerline is displayed in the overview
marked with the “Mesh enabled” icon.
• • • • • • • • • • • • • • • • • • • • • • • • • • • • • • • • • • • • • • • • • • • • • • • • • • • • • • • • • • • • • • • • • • • • • • • • • • • • • • • • • • • • • • • • • • • • • • • • • • • • • • • •
FRITZ!Box 4060 80
Page 81

Mesh with FRITZ!
• • • • • • • • • • • • • • • • • • • • • • • • • • • • • • • • • • • • • • • • • • • • • • • • • • • • • • • • • • • • • • • • • • • • • • • • • • • • • • • • • • • • • • • • • • • • • • • • • • • • • • • •
Using FRITZ!Box as a MeshRepeater
Overview
You can use your FRITZ!Box 4060 as a Mesh Repeater. As Mesh Repeater, the FRITZ!Box 4060 expands the Wi-Fi network of another FRITZ!Box which is connected to the internet connection. The
other FRITZ!Box is the Mesh Master, and the Wi-Fi networks of
both FRITZ!Box products are combined to make the Mesh Wi-Fi. All
MeshRepeaters automatically adopt the Wi-Fi network settings from
the MeshMaster (network name, network key, guest access, schedule)
and expand the Wi-Fi network.
Requirements
• FRITZ!OS7.00 or later is installed on the FRITZ!Box.
Instructions: Configuring FRITZ!Box as a MeshRepeater
1. Open the user interface; see page52.
2. Select “Home Network / Mesh / Mesh Settings”.
3. For instructions, open the online help .
Instructions: Using the Telephone Book of the MeshMaster
On the Mesh Repeater you can use the telephone books on the Mesh
Master. Then telephone books that are saved on the MeshRepeater itself can no longer be used.
1. On the Mesh Repeater: Open the user interface; see page52.
2. Select “Home Network / Mesh / Mesh Settings”.
3. Enable the "Use the telephone book of the Mesh Master" checkbox.
4. Click on “Apply”.
• • • • • • • • • • • • • • • • • • • • • • • • • • • • • • • • • • • • • • • • • • • • • • • • • • • • • • • • • • • • • • • • • • • • • • • • • • • • • • • • • • • • • • • • • • • • • • • • • • • • • • • •
FRITZ!Box 4060 81
Page 82

Mesh with FRITZ!
• • • • • • • • • • • • • • • • • • • • • • • • • • • • • • • • • • • • • • • • • • • • • • • • • • • • • • • • • • • • • • • • • • • • • • • • • • • • • • • • • • • • • • • • • • • • • • • • • • • • • • • •
Using Telephony in the Mesh
Overview
In a Mesh with more than one FRITZ!Box, you can configure your telephone numbers in one FRITZ!Box (the MeshMaster) and adopt them
automatically on every other FRITZ!Box in the Mesh.
Whenever you add or change telephone numbers in the MeshMaster,
the changes are automatically applied to the other FRITZ!Boxes.
Requirements
• Your telephone numbers are registered in the FRITZ!Box that is
configured as the Mesh Master.
• All FRITZ!Boxes on which you would like to adopt the telephone
numbers are configured as MeshRepeaters.
Instructions: Setting up Telephony in the Mesh
1. Open the user interface; see page52.
2. Select “Home Network / Mesh / Mesh Settings”.
3. For instructions, open the online help .
• • • • • • • • • • • • • • • • • • • • • • • • • • • • • • • • • • • • • • • • • • • • • • • • • • • • • • • • • • • • • • • • • • • • • • • • • • • • • • • • • • • • • • • • • • • • • • • • • • • • • • • •
FRITZ!Box 4060 82
Page 83

User Interface: Internet Menu
• • • • • • • • • • • • • • • • • • • • • • • • • • • • • • • • • • • • • • • • • • • • • • • • • • • • • • • • • • • • • • • • • • • • • • • • • • • • • • • • • • • • • • • • • • • • • • • • • • • • • • • •
User Interface: Internet Menu
Contents of this chapter:
Using AVM Services for Diagnostics and Maintenance........................................ 84
Configuring Parental Controls...................................................................................86
Creating and Assigning Access Profiles................................................................. 89
Editing Filter Lists....................................................................................................... 91
Configuring Priorities for Internet Use....................................................................93
Configuring Port Sharing........................................................................................... 94
Enabling Dynamic DNS...............................................................................................96
Remote Access to the FRITZ!Box..............................................................................97
Configuring VPN Remote Access..............................................................................99
Configuring IPv6........................................................................................................ 101
Configuring FRITZ!Box as a LISP Router.............................................................. 103
• • • • • • • • • • • • • • • • • • • • • • • • • • • • • • • • • • • • • • • • • • • • • • • • • • • • • • • • • • • • • • • • • • • • • • • • • • • • • • • • • • • • • • • • • • • • • • • • • • • • • • • •
FRITZ!Box 4060 83
Page 84

User Interface: Internet Menu
• • • • • • • • • • • • • • • • • • • • • • • • • • • • • • • • • • • • • • • • • • • • • • • • • • • • • • • • • • • • • • • • • • • • • • • • • • • • • • • • • • • • • • • • • • • • • • • • • • • • • • • •
Using AVM Services for Diagnostics and Maintenance
Overview
The AVM services for diagnostics and maintenance keep your FRITZ!
Box and the FRITZ!OS operating system up to date and support the security and further development of your FRITZ!Box.
Tip
We recommend leaving the use of all AVM services enabled for your
FRITZ! device.
AVM Services
The following AVM services are provided by your FRITZ!Box:
AVM Service Explanation
Search for updates Your FRITZ!Box connects with the AVM update
server regularly to search for and install new
versions of FRITZ!OS.
Diagnostics data for
error analysis
Diagnostics data for
system maintenance
Upon suspicion of misuse by third parties, your
FRITZ!Box transmits error reports or technical
diagnostics data to AVM for analysis.
Your FRITZ!Box transmits device-specific data
to AVM for the development of security updates
and to further develop FRITZ!OS.
Data Protection
The diagnostics data and the device-specific data transmitted by your
FRITZ!Box to AVM do not contain any personalized data. The data
transmitted serve the exclusive purpose of technical adaptations and
optimizations of your FRITZ!Box. Also, AVM does not pass these data
on to third parties. The exact wording of the data privacy statement is
presented under “Legal Notice / Data Privacy Statement” in the online
help.
• • • • • • • • • • • • • • • • • • • • • • • • • • • • • • • • • • • • • • • • • • • • • • • • • • • • • • • • • • • • • • • • • • • • • • • • • • • • • • • • • • • • • • • • • • • • • • • • • • • • • • • •
FRITZ!Box 4060 84
Page 85

User Interface: Internet Menu
• • • • • • • • • • • • • • • • • • • • • • • • • • • • • • • • • • • • • • • • • • • • • • • • • • • • • • • • • • • • • • • • • • • • • • • • • • • • • • • • • • • • • • • • • • • • • • • • • • • • • • • •
Instructions: Configuring AVM Services
1. Open the user interface; see page52.
2. Select “Internet / Account Information / AVM Services”.
3. For instructions, open the online help .
• • • • • • • • • • • • • • • • • • • • • • • • • • • • • • • • • • • • • • • • • • • • • • • • • • • • • • • • • • • • • • • • • • • • • • • • • • • • • • • • • • • • • • • • • • • • • • • • • • • • • • • •
FRITZ!Box 4060 85
Page 86

User Interface: Internet Menu
• • • • • • • • • • • • • • • • • • • • • • • • • • • • • • • • • • • • • • • • • • • • • • • • • • • • • • • • • • • • • • • • • • • • • • • • • • • • • • • • • • • • • • • • • • • • • • • • • • • • • • • •
Configuring Parental Controls
Overview
With parental controls you can control network devices’ internet use.
For each individual network device, you can limit the duration and content of internet use. The specifications for temporal and content-related restrictions are created and saved as access profiles. You assign
these access profiles to the network devices.
• You can create multiple different access profiles; see page89.
• With the device block you can block all internet use for a network
device without using a special access profile; see page87.
• With tickets you can extend the restricted use time for individual
network devices. A ticket is redeemed on the network device and
extends the use time for 45 minutes. Tickets can be redeemed before the use time has been exhausted to avoid interruption of online
time. Distribute ticket for extended use time; seeInstructions: Dis-
tributing a Ticket for Extended Use Time, page88.
• The remaining online time permitted can be queried on any network
device with restricted online time; seeInstructions: Querying Re-
maining Online Time, page88.
Example
You have three children, all of whom use various devices that access
the internet via FRITZ!Box. You would like to restrict your children’s
use of the internet as follows:
• Their daily time online is to be restricted to a few hours.
• Access to websites with adult content is to be blocked.
With parental controls you can restrict the internet use of each child individually.
• • • • • • • • • • • • • • • • • • • • • • • • • • • • • • • • • • • • • • • • • • • • • • • • • • • • • • • • • • • • • • • • • • • • • • • • • • • • • • • • • • • • • • • • • • • • • • • • • • • • • • • •
FRITZ!Box 4060 86
Page 87

User Interface: Internet Menu
• • • • • • • • • • • • • • • • • • • • • • • • • • • • • • • • • • • • • • • • • • • • • • • • • • • • • • • • • • • • • • • • • • • • • • • • • • • • • • • • • • • • • • • • • • • • • • • • • • • • • • • •
Requirements
• The FRITZ!Box establishes its own connection to the internet. If the
FRITZ!Box is configured as an IP client that uses the internet connection of another router, you must use the parental controls set on
the other router.
Instructions: Configuring Parental Controls for a Network Device
1. Open the user interface; see page52.
2. Select “Internet / Filters / Access Profiles”.
3. If there is no access profile with the restrictions you want, then
create an access profile:
– For instructions, open the online help .
4. Select “Internet / Filters / Parental Controls”.
5. Click on the “Change Access Profile” button.
6. Assign to the network device the access profile with the desired
restrictions:
– For instructions, open the online help .
Instructions: Blocking a Device
1. Open the user interface; see page52.
2. Select “Internet / Filters / Parental Controls”.
3. Select the network device in the device overview and click on the
“Block” link.
Internet access is blocked for this network device. It is no longer possible to access the internet from this device.
• • • • • • • • • • • • • • • • • • • • • • • • • • • • • • • • • • • • • • • • • • • • • • • • • • • • • • • • • • • • • • • • • • • • • • • • • • • • • • • • • • • • • • • • • • • • • • • • • • • • • • • •
FRITZ!Box 4060 87
Page 88

User Interface: Internet Menu
• • • • • • • • • • • • • • • • • • • • • • • • • • • • • • • • • • • • • • • • • • • • • • • • • • • • • • • • • • • • • • • • • • • • • • • • • • • • • • • • • • • • • • • • • • • • • • • • • • • • • • • •
Instructions: Distributing a Ticket for Extended Use Time
1. Open the user interface; see page52.
2. Select “Internet / Filters / Access Profiles”.
In the “Tickets for Additional Online Time” area a list with 10 tickets is displayed.
3. Distribute the tickets by printing out the list with the tickets.
– Click on “Print Tickets”.
› The 10 tickets are shown in the “Tickets for Online Access”
window.
– Print out the list and distribute the tickets to the users of the
network devices whose online time is to be extended.
4. If you want to distribute only one single ticket, then click on
“Share Ticket”.
A ticket is saved to the clipboard and can be sent to the user of a
network device however you like. In the list of tickets, that ticket
is displayed crossed out in gray.
Instructions: Querying Remaining Online Time
1. Open a browser on the network device for which the remaining
online time is to be queried.
2. Enter “fritz.box” in the address bar of the browser.
The time remaining before the permitted online time has been
exhausted is shown in the “Parental Controls” window. If the user
has a ticket to extend online time, it can be redeemed here.
• • • • • • • • • • • • • • • • • • • • • • • • • • • • • • • • • • • • • • • • • • • • • • • • • • • • • • • • • • • • • • • • • • • • • • • • • • • • • • • • • • • • • • • • • • • • • • • • • • • • • • • •
FRITZ!Box 4060 88
Page 89

User Interface: Internet Menu
• • • • • • • • • • • • • • • • • • • • • • • • • • • • • • • • • • • • • • • • • • • • • • • • • • • • • • • • • • • • • • • • • • • • • • • • • • • • • • • • • • • • • • • • • • • • • • • • • • • • • • • •
Creating and Assigning Access Profiles
Overview
In an access profile you can enter the time and content restrictions for
internet use. The network devices can have different access profiles.
An access profile can be assigned to one or multiple network devices.
A network device then accesses the internet exactly as specified in the
access profile.
Access Profile: Definition
An access profile is a provision that describes exactly what is allowed
during internet use. An access profile takes into consideration three
aspects of internet use:
Aspect Description
Time limit With time limits you can define when and
for how long internet use is permitted each
day.
Filters for websites With the filter lists you can specify which
websites are allowed to be accessed.
Blocked network applications
With the list of blocked network applications you specify which network applications are allowed to communicate over the
internet. This list can contain, for instance,
file sharing programs or chat software.
Example
You have three children and would like to control the internet use of
each child in different ways.
• Create an individual access profile for each child.
• Include in this access profile the time and content restrictions to be
imposed on the given child.
• • • • • • • • • • • • • • • • • • • • • • • • • • • • • • • • • • • • • • • • • • • • • • • • • • • • • • • • • • • • • • • • • • • • • • • • • • • • • • • • • • • • • • • • • • • • • • • • • • • • • • • •
FRITZ!Box 4060 89
Page 90

User Interface: Internet Menu
• • • • • • • • • • • • • • • • • • • • • • • • • • • • • • • • • • • • • • • • • • • • • • • • • • • • • • • • • • • • • • • • • • • • • • • • • • • • • • • • • • • • • • • • • • • • • • • • • • • • • • • •
Preconfigured Access Profiles
Name Properties
Standard • Set by default to unrestricted use
• Automatic access profile for network devices reg-
istering with the home network for the first time
• Can be changed
Guest • Automatic, exclusive access profile for network
devices registering with the guest network
• Can be changed
Unrestricted • Unrestricted internet use
• Cannot be changed
Instructions: Creating an Access Profile
1. Open the user interface; see page52.
2. Select “Internet / Filters / Access Profiles”.
3. For instructions, open the online help .
Instructions: Assigning an Access Profile
1. Open the user interface; see page52.
2. Select “Internet / Filters / Parental Controls”.
3. For instructions, open the online help .
• • • • • • • • • • • • • • • • • • • • • • • • • • • • • • • • • • • • • • • • • • • • • • • • • • • • • • • • • • • • • • • • • • • • • • • • • • • • • • • • • • • • • • • • • • • • • • • • • • • • • • • •
FRITZ!Box 4060 90
Page 91

User Interface: Internet Menu
• • • • • • • • • • • • • • • • • • • • • • • • • • • • • • • • • • • • • • • • • • • • • • • • • • • • • • • • • • • • • • • • • • • • • • • • • • • • • • • • • • • • • • • • • • • • • • • • • • • • • • • •
Editing Filter Lists
Overview
You can use a filter list to block access to websites with inappropriate
content. Upon delivery, there are two empty lists in the FRITZ!Box. You
can enter websites in these lists. These lists can then be used as filters
in the access profiles.
Types of Lists
There is the “Permitted websites” list and the “Blocked websites” list.
Use one of the lists to block access to websites with inappropriate contents. The lists work in the following way:
Filter List Function and Use
Permitted
websites
• Websites included in the permitted websites list can
be accessed.
• Use the permitted websites list if most websites are
to be blocked and only a few are permitted.
Blocked websites
• Websites included in the blocked websites list are
blocked.
• Use the blocked websites list if most websites are
to be permitted and only a few are to be blocked.
Requirements
• The FRITZ!Box establishes its own connection to the internet. If the
FRITZ!Box is configured as an IP client that uses the internet connection of another router, you must use the filter functions set on
the other router.
Instructions: Editing Filter Lists
1. Open the user interface; see page52.
2. Select “Internet / Filters / Lists”.
• • • • • • • • • • • • • • • • • • • • • • • • • • • • • • • • • • • • • • • • • • • • • • • • • • • • • • • • • • • • • • • • • • • • • • • • • • • • • • • • • • • • • • • • • • • • • • • • • • • • • • • •
FRITZ!Box 4060 91
Page 92

User Interface: Internet Menu
• • • • • • • • • • • • • • • • • • • • • • • • • • • • • • • • • • • • • • • • • • • • • • • • • • • • • • • • • • • • • • • • • • • • • • • • • • • • • • • • • • • • • • • • • • • • • • • • • • • • • • • •
3. For instructions, open the online help .
• • • • • • • • • • • • • • • • • • • • • • • • • • • • • • • • • • • • • • • • • • • • • • • • • • • • • • • • • • • • • • • • • • • • • • • • • • • • • • • • • • • • • • • • • • • • • • • • • • • • • • • •
FRITZ!Box 4060 92
Page 93

User Interface: Internet Menu
• • • • • • • • • • • • • • • • • • • • • • • • • • • • • • • • • • • • • • • • • • • • • • • • • • • • • • • • • • • • • • • • • • • • • • • • • • • • • • • • • • • • • • • • • • • • • • • • • • • • • • • •
Configuring Priorities for Internet Use
Overview
For network devices or network applications you can define different
priorities for access to the internet connection.
Prioritization Categories
There are three prioritization categories for network applications:
• Real-time applications have the highest priority. This category is intended for applications with high demands on transmission speed
and reaction times (for example, internet telephony, IPTV, video on
demand). If an application of this category uses the internet connection to full capacity, no other data will be transmitted.
• Prioritized applications have intermediate priority. This category is
intended for applications that require fast reaction times (for example, company access, terminal applications, games). These applications will be granted higher priority. When an application of this category uses the full capacity of the internet connection, the data of
other applications will be transferred with lower priority.
• Background applications have the lowest priority. This category is
for applications that run in the background, which are treated with
low priority when the internet connection is running at capacity (for
instance, automatic updates, peer-to-peer services). If no other network applications are active, then the background applications receive the entire bandwidth.
Instructions: Configuring Priorities
1. Open the user interface; see page52.
2. Select “Internet / Filters / Prioritization”.
3. For instructions, open the online help .
• • • • • • • • • • • • • • • • • • • • • • • • • • • • • • • • • • • • • • • • • • • • • • • • • • • • • • • • • • • • • • • • • • • • • • • • • • • • • • • • • • • • • • • • • • • • • • • • • • • • • • • •
FRITZ!Box 4060 93
Page 94

User Interface: Internet Menu
• • • • • • • • • • • • • • • • • • • • • • • • • • • • • • • • • • • • • • • • • • • • • • • • • • • • • • • • • • • • • • • • • • • • • • • • • • • • • • • • • • • • • • • • • • • • • • • • • • • • • • • •
Configuring Port Sharing
Overview
With default settings in the FRITZ!Box, programs on your computer and
LAN cannot be accessed from the internet. For applications like online
games and file sharing software, or server services like HTTP, FTP,
VPN, terminal and remote access servers, you have to make your computer accessible to other internet users.
Port Sharing
Using port sharing you allow incoming connections from the internet.
By releasing certain ports for incoming connections, you grant other
internet users controlled access to the computers in your network.
Port Sharing on Protocols
Port sharing in the FRITZ!Box is possible on the following protocols:
Protocol Internet Protocol Explanation
PING IPv6 The FRITZ!Box responds to ping in-
quiries from the internet addressed to
the IPv6 address of the FRITZ!Box. Additionally, you can set up PING6 port
forwarding rules for each computer in
the home network since each computer has its own globally valid IPv6 address.
TCP
UDP
IPv4 Within IPv4 networks you can open
the FRITZ!Box firewall for the TCP and
UDP protocols when entering the port
range. One port can be opened for exactly one computer.
• • • • • • • • • • • • • • • • • • • • • • • • • • • • • • • • • • • • • • • • • • • • • • • • • • • • • • • • • • • • • • • • • • • • • • • • • • • • • • • • • • • • • • • • • • • • • • • • • • • • • • • •
FRITZ!Box 4060 94
Page 95

User Interface: Internet Menu
• • • • • • • • • • • • • • • • • • • • • • • • • • • • • • • • • • • • • • • • • • • • • • • • • • • • • • • • • • • • • • • • • • • • • • • • • • • • • • • • • • • • • • • • • • • • • • • • • • • • • • • •
Protocol Internet Protocol Explanation
IPv6 Within IPv6 networks you can open
the FRITZ!Box firewall for the TCP and
UDP protocols when entering the port
range. One port can be opened for each
computer in the network.
ESP
GRE
IPv4 Within IPv4 networks you can open the
firewall for the two protocols ESP and
GRE, which do not use ports.
Instructions: Configuring Port Sharing
1. Open the user interface; see page52.
2. Select “Internet / Permit Access / Port Sharing”.
3. For instructions, open the online help .
• • • • • • • • • • • • • • • • • • • • • • • • • • • • • • • • • • • • • • • • • • • • • • • • • • • • • • • • • • • • • • • • • • • • • • • • • • • • • • • • • • • • • • • • • • • • • • • • • • • • • • • •
FRITZ!Box 4060 95
Page 96

User Interface: Internet Menu
• • • • • • • • • • • • • • • • • • • • • • • • • • • • • • • • • • • • • • • • • • • • • • • • • • • • • • • • • • • • • • • • • • • • • • • • • • • • • • • • • • • • • • • • • • • • • • • • • • • • • • • •
Enabling Dynamic DNS
Overview
Every time the internet connection is interrupted, the internet service
provider reassigns the IP address. The IP address may change in the
process. Dynamic DNS is an internet service that makes it possible for
the FRITZ!Box to remain accessible from the internet at all times under a fixed name, the domain name, even when the public IP address
changes.
You must register with a dynamic DNS provider to use this service.
Every time the IP address changes, the FRITZ!Box transmits the new IP
address to the dynamic DNS provider in the form of an update request.
Then the domain name is assigned to the current IP address by the dynamic DNS provider.
Dynamic DNS and MyFRITZ!
MyFRITZ! can be used as an alternative to dynamic DNS. The two services can also be used in parallel. For more information on MyFRITZ!;
see page206.
Requirements
• You are registered with a dynamic DNS provider and have set up a
domain name.
Instructions: Enabling Dynamic DNS
1. Open the user interface; see page52.
2. Select “Internet / Permit Access / DynDNS”.
3. For instructions, open the online help .
• • • • • • • • • • • • • • • • • • • • • • • • • • • • • • • • • • • • • • • • • • • • • • • • • • • • • • • • • • • • • • • • • • • • • • • • • • • • • • • • • • • • • • • • • • • • • • • • • • • • • • • •
FRITZ!Box 4060 96
Page 97

User Interface: Internet Menu
• • • • • • • • • • • • • • • • • • • • • • • • • • • • • • • • • • • • • • • • • • • • • • • • • • • • • • • • • • • • • • • • • • • • • • • • • • • • • • • • • • • • • • • • • • • • • • • • • • • • • • • •
Remote Access to the FRITZ!Box
Overview
Over the internet it is possible to access the user interface of the
FRITZ!Box. With a laptop, smartphone or tablet you can configure settings in the FRITZ!Box user interface.
HTTPS, FTP and FTPS
Protocol Function
HTTPS (Hypertext Transfer
Protocol Secure)
FTP (File Transfer Protocol)
HTTPS is an internet protocol for bugproof communication between the web
server and the browser in the World Wide
Web.
Enable this protocol to allow access to the
FRITZ!Box from the internet.
FTP is a network protocol for transmitting
files in IP networks.
Enable this protocol to allow access by
FTP to the FRITZ!Box storage media from
the Internet.
FTPS (FTP over SSL) FTPS is a method for encrypting the FTP
protocol.
Enable this protocol to secure transmission over FTP.
Requirements
• Access to the user interface: Every user who would like to access
the FRITZ!Box externally from the internet requires a FRITZ!Box
user account which is authorized for access from the internet.
• • • • • • • • • • • • • • • • • • • • • • • • • • • • • • • • • • • • • • • • • • • • • • • • • • • • • • • • • • • • • • • • • • • • • • • • • • • • • • • • • • • • • • • • • • • • • • • • • • • • • • • •
FRITZ!Box 4060 97
Page 98

User Interface: Internet Menu
• • • • • • • • • • • • • • • • • • • • • • • • • • • • • • • • • • • • • • • • • • • • • • • • • • • • • • • • • • • • • • • • • • • • • • • • • • • • • • • • • • • • • • • • • • • • • • • • • • • • • • • •
• Access to storage: Every user who would like to access the storage
of the FRITZ!Box externally from the internet requires a FRITZ!Box
user account with the rights to access from the internet and to access the contents on the storage media.
• The protocols for the desired access must be enabled in the
FRITZ!Box.
Instructions: Enabling HTTPS, FTP and FTPS in the FRITZ!Box
1. Open the user interface; see page52.
2. Select “Internet / Permit Access / FRITZ!Box Services”.
3. For instructions, open the online help .
• • • • • • • • • • • • • • • • • • • • • • • • • • • • • • • • • • • • • • • • • • • • • • • • • • • • • • • • • • • • • • • • • • • • • • • • • • • • • • • • • • • • • • • • • • • • • • • • • • • • • • • •
FRITZ!Box 4060 98
Page 99

User Interface: Internet Menu
• • • • • • • • • • • • • • • • • • • • • • • • • • • • • • • • • • • • • • • • • • • • • • • • • • • • • • • • • • • • • • • • • • • • • • • • • • • • • • • • • • • • • • • • • • • • • • • • • • • • • • • •
Configuring VPN Remote Access
Overview
VPN stands for Virtual Private Network. Via VPN, secure remote access
to the network of the FRITZ!Box can be established. The connection
is established via the internet. The data are transmitted in encrypted form via what is known as a tunnel. This excludes the possibility of
unauthorized access to the data. This way field representatives, for instance, can connect with the corporate network via VPN.
Example Configuration
• • • • • • • • • • • • • • • • • • • • • • • • • • • • • • • • • • • • • • • • • • • • • • • • • • • • • • • • • • • • • • • • • • • • • • • • • • • • • • • • • • • • • • • • • • • • • • • • • • • • • • • •
FRITZ!Box 4060 99
Page 100

User Interface: Internet Menu
• • • • • • • • • • • • • • • • • • • • • • • • • • • • • • • • • • • • • • • • • • • • • • • • • • • • • • • • • • • • • • • • • • • • • • • • • • • • • • • • • • • • • • • • • • • • • • • • • • • • • • • •
VPN Service Portal
Under en.avm.de/vpn, the AVM website presents comprehensive information on VPN in general and in connection with the FRITZ!Box.
Also on the VPN Service Portal is the “FRITZ!VPN” software for free
downloading. The “FRITZ!VPN” program is a VPN client for Windows.
Install the program on the network devices from which you would like
to reach the FRITZ!Box over a VPN connection.
Instructions: Configuring VPN in the FRITZ!Box
1. Open the user interface; see page52.
2. Select “Internet / Permit Access / VPN”.
3. For instructions, open the online help .
• • • • • • • • • • • • • • • • • • • • • • • • • • • • • • • • • • • • • • • • • • • • • • • • • • • • • • • • • • • • • • • • • • • • • • • • • • • • • • • • • • • • • • • • • • • • • • • • • • • • • • • •
FRITZ!Box 4060 100
 Loading...