

Page 1
NetDeliver @V1800 User's Manual
Page 2

Trademarks
The brands and product names herein are trademarks or registered trademarks of their
respective holders.
Copyright
© 2000 Avision Inc. All rights reserved. No part of this publication may be
reproduced, transmitted, transcribed, stored in a retrieval system, or translated into
any language or computer language, in any form or by any means, electronic,
mechanical, magnetic, optical, chemical, manual, or otherwise, without the prior
written permission of the manufacturer.
Warranty
The information contained in this document(s) is subject to change without notice.
The manufacturer makes no warranty of any kind with regard to this material,
including, but not limited to, the implied warranties of fitness for a particular purpose.
The manufacturer shall not be liable for errors contained herein or for incidental or
consequential damages in connection with the furnishing, performance, or use of this
material.
ii
Page 3

The Federal Communications Commission Statement
This equipment has been tested and found to comply with the limits for a class B
digital device, pursuant to Part 15 of the FCC rules. These limits are designed to
provide reasonable protection against harmful interference in a residential installation.
This equipment generates, uses, and can radiate radio frequency energy and, if not
installed and used in accordance with the instruction manual, may cause harmful
interference to radio communication. However, there is no guarantee that
interference will not occur in a particular installation. If this equipment does cause
harmful interference to radio or television reception, which can be determined by
turning the equipment off and on, the user is encouraged to try to correct the
interference by one or more of the following measures:
− Reorient or relocate the receiving antenna.
− Increase the separation between the equipment and receiver.
− Connect the equipment into an outlet on a circuit different from that to which the
receiver is connected.
− Consult the dealer or an experienced radio/TV technician for help.
You are cautioned that changes or modifications not expressly approved by the party
responsible for the compliance could void your authority to operate the equipment.
@V1800 User’s Manual iii
Page 4

EC Declaration of Conformity
Update with final regulations
According to EN55022 and EN55024
Manufacturer’s Name: Avision Inc.
Manufacturer’s Address: No. 20, Creation Road I,
Science- based Industrial Park, Hsinchu
Taiwan, ROC
Declare that the product
Model Name: NetDeliver @V1800
Conforms to the following Product Specification
Emission: EN 50081-1
Immunity: EN 55024
EN 55022
EN 61000-3-2
EN 61000-3-3
EN 60950
IEC 61000-4-2
IEC 61000-4-3
IEC 61000-4-4
IEC 61000-4-5
IEC 61000-4-6
IEC 61000-4-8
IEC 61000-4-11
iv
Page 5

Table of Contents
1 GETTING STARTED.........................................................................................................................1-1
PRECAUTIONS............................................................................................................................................1-1
INTRODUCTION.........................................................................................................................................1-2
FEATURES..................................................................................................................................................1-2
EXTERNAL V IEW.......................................................................................................................................1-4
The front view .................................................................................................................................1-4
The rear view ...................................................................................................................................1-5
CONTROL PANEL......................................................................................................................................1-6
PRE INSTALLATION INFORMATION........................................................................................................1-9
INTERNET COMMUNICATION FEATURES.............................................................................................1-11
e-mail forwarding.........................................................................................................................1-11
2 SETTING UP YOUR MACHINE......................................................................................................2-1
MINIMUM CONFIGURATION REQUIREMENTS.......................................................................................2-1
CHECKING PACKAGE CONTENTS...........................................................................................................2-2
UNLOCKING THE SCAN UNIT..................................................................................................................2-3
INSTALLING THE PAPER FEED TRAY......................................................................................................2-4
CONNECTING THE CABLES......................................................................................................................2-5
Connecting the Ethernet cable..................................................................................................2-5
Connecting the keyboard cable.................................................................................................2-5
Connecting the printer cable.....................................................................................................2-6
Connecting the ADF Cable...........................................................................................................2-6
Connecting the Power and Turning on the Machine .......................................................... 2-7
SETTING UP Y OUR NETWORK PARAMETERS........................................................................................2-9
3 ADMINISTERING...............................................................................................................................3-1
@V1800 User’s Manual v
Page 6

TO ADMINISTER VIA THE LCD-DISPLAY...............................................................................................3-1
TO ADMINISTER VIA THE @V1800 WEB PAGE....................................................................................3-2
SUMMARY OF ADMINISTRATOR ACTIVITIES........................................................................................3-3
4 MANAGING THE ADDRESS BOOK............................................................................................4-1
MANAGING Y OUR E-MAIL ADDRESS BOOK.........................................................................................4-1
adding email addresses ................................................................................................................4-1
Modifying e-mail addresses.........................................................................................................4-4
Deleting E-mail Addresses...........................................................................................................4-5
MANAGING Y OUR GROUPS.....................................................................................................................4-6
adding new groups..........................................................................................................................4-6
Modifying groups.............................................................................................................................4-7
Deleting groups................................................................................................................................4-8
5 OPERATION.......................................................................................................................................5-1
LOADING PAPER .......................................................................................................................................5-2
notice on using the adf.................................................................................................................5-2
placing document(s) in the adf.................................................................................................5-3
placing document(s) on the glass.............................................................................................5-4
SENDING EMAILS......................................................................................................................................5-5
MAKING COPIES........................................................................................................................................5-7
Before making copies ....................................................................................................................5-7
basic operating steps.....................................................................................................................5-8
Printer Compatibility list............................................................................................................5-9
accessing Copy Features.............................................................................................................5-10
USING THE MANUAL FEED BUTTON....................................................................................................5-16
6 TROUBLESHOOTING ......................................................................................................................6-1
INFORMATION CODES/MESSAGE ............................................................................................................6-1
Information Codes During Scanning and Copying ...............................................................6-1
Information Codes During Networking....................................................................................6-2
vi
Page 7

Information Codes During E-Mailing........................................................................................6-3
CLEARING A PAPER JAM..........................................................................................................................6-5
CLEANING THE ADF................................................................................................................................6-6
CLEANING THE G LASS.............................................................................................................................6-6
CLEANING THE G LASS.............................................................................................................................6-7
REPLACING THE SNAP- IN PAD MODULE ...............................................................................................6-8
FREQUENTLY ASKED QUESTIONS AND ANSWERS.............................................................................6-10
E-Mail Transmission.....................................................................................................................6-10
Copy ...................................................................................................................................................6-11
Others................................................................................................................................................6-11
TECHNICAL SUPPORT .............................................................................................................................6-13
APPENDIX....................................................................................................................................................A
QUICK G UIDE...............................................................................................................................................A
SPECIFICATIONS...........................................................................................................................................C
G LOSSARY....................................................................................................................................................E
@V1800 User’s Manual vii
Page 8

1 Getting Started
Precautions
• Keep the machine out of direct sunlight. Direct exposure to the sun
or excessive heat may cause damage to the unit.
• Do not install the machine near heating or air conditioning units.
• Do not install the machine in a humid or dusty place.
• Be sure to use the proper AC power source.
• Only use the AC adapter (model name ADP-50ZB made by Delta
Electronics, Inc.) included with the machine. Using other AC adapters
may damage the machine and void the warranty.
• Place the machine securely on an even, flat surface. Tilted or uneven
surfaces may cause mechanical or paper-feeding problems.
• Retain the box and packing materials for shipping purposes.
@V1800 User’s Manual Getting Started 1-1
Page 9

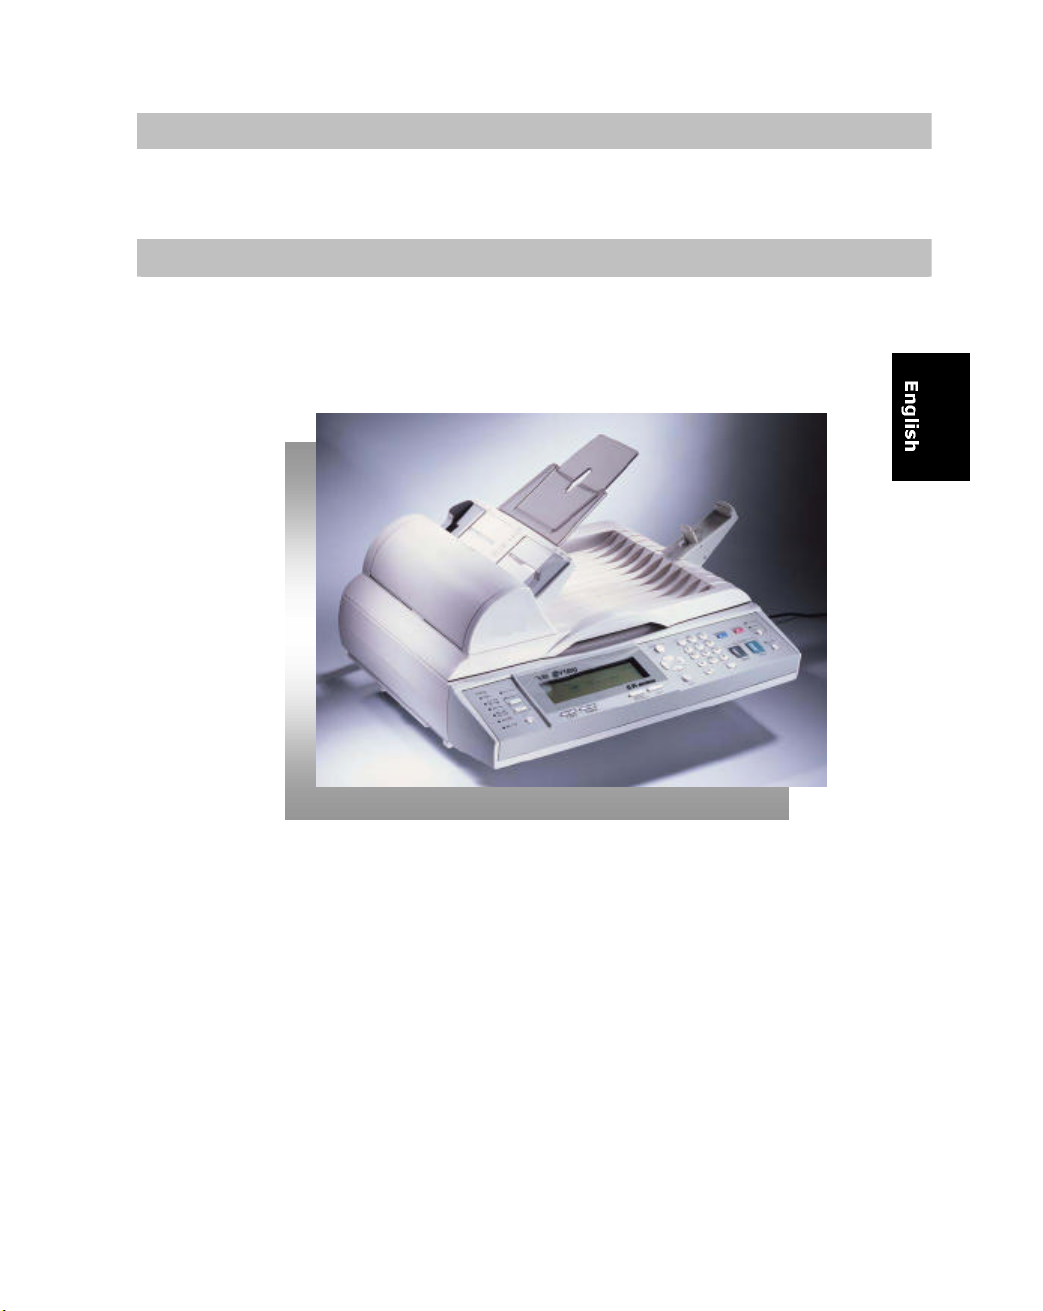
Introduction
Thank you for purchasing the Avision NetDeliver @V1800. The NetDeliver
@V1800 offers business professionals a fast and cost-effective way to
transmit paper documents electronically over the internet. With the
speed and cost of e-mails, the @V1800 significantly increases productivity
and reduces the cost on document distribution.
Best of all, with the addition of a laser printer and a fax module, the
@V1800 is able to perform digital copying. The innovation provides
business users a cost-saving way to upgrade office equipments to digital
ones and to increase more business-to-business e-Commerce.
Features
E-mail Forwarding:
Connected to an Ethernet network and a SMTP server, the @V1800 allows
you to transmit document(s) over the internet via email. With a touch of
the e-mai l button and the selection of your recipients' e-mail addresses,
the document(s) is first scanned and converted into an image file, and
then transmitted to remote recipients within minutes.
Digital Copying:
Connected to a color or black and white laser printer, the @V1800
becomes a digital copier. With an intuitive control panel, making digital
copies becomes fast and easy.
Multiple Pages Sending:
With the built-in Auto Document Feeder, the @V1800 allows a stack of 25
page document(s) to be continuously scanned at one time in reliable
quality to increase your efficiency.
Getting Started 1-2
Page 10

Address/Phone Book Managing:
The @V1800 provides a convenient way to manage the address book.
Simply typing the machine's IP address in the URL field of your browser,
the @V1800 web page will be prompted. This web page allows the
administrator to create a list of e-mail addresses and most important it
allows the administrator to create password for security purpose.
@V1800 User’s Manual Getting Started 1-3
Page 11

External View
1
3
5 6
2
THE FRONT VIEW
4
1. ADF Front Cover 4. ADF Paper Support
2. LCD-display 5. Document(s) Cover
3. ADF Paper Tray 6. Control Panel
Getting Started 1-4
Page 12

THE REAR VIEW
2
1
5
3
4
1. Paper Feed Tray 5. Power Switch
2. ADF Cable 6. Power Jack
3. Keyboard Port 7. ADF Port
4. RJ-45 Network Port 8. Printer Port
6
7
8
@V1800 User’s Manual Getting Started 1-5
Page 13
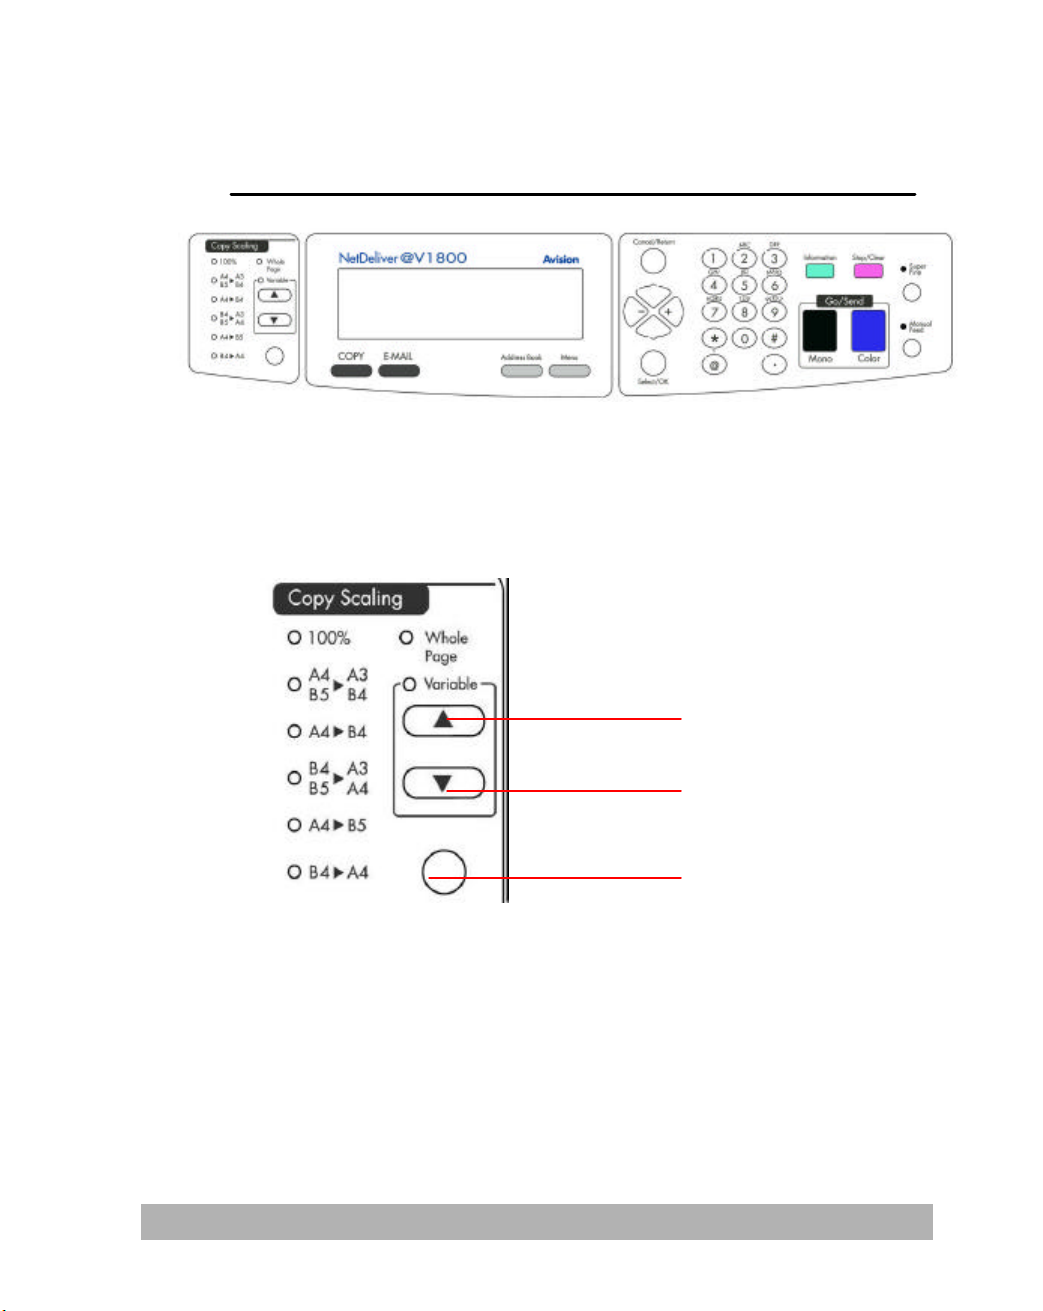
Control Panel
1
u
w x
v
u Scaling Area:
Used to reduce document(s) down to 25% or enlarge it up to 400%.
(93%)
(141%)
(122%)
(115%)
(86%)
(81%)
Getting Started 1-6
2
1. Increase scaling in 1% increment
2. Decrease scaling in 1% Decrement
3. Select scaling from the preset percentage
3
Page 14
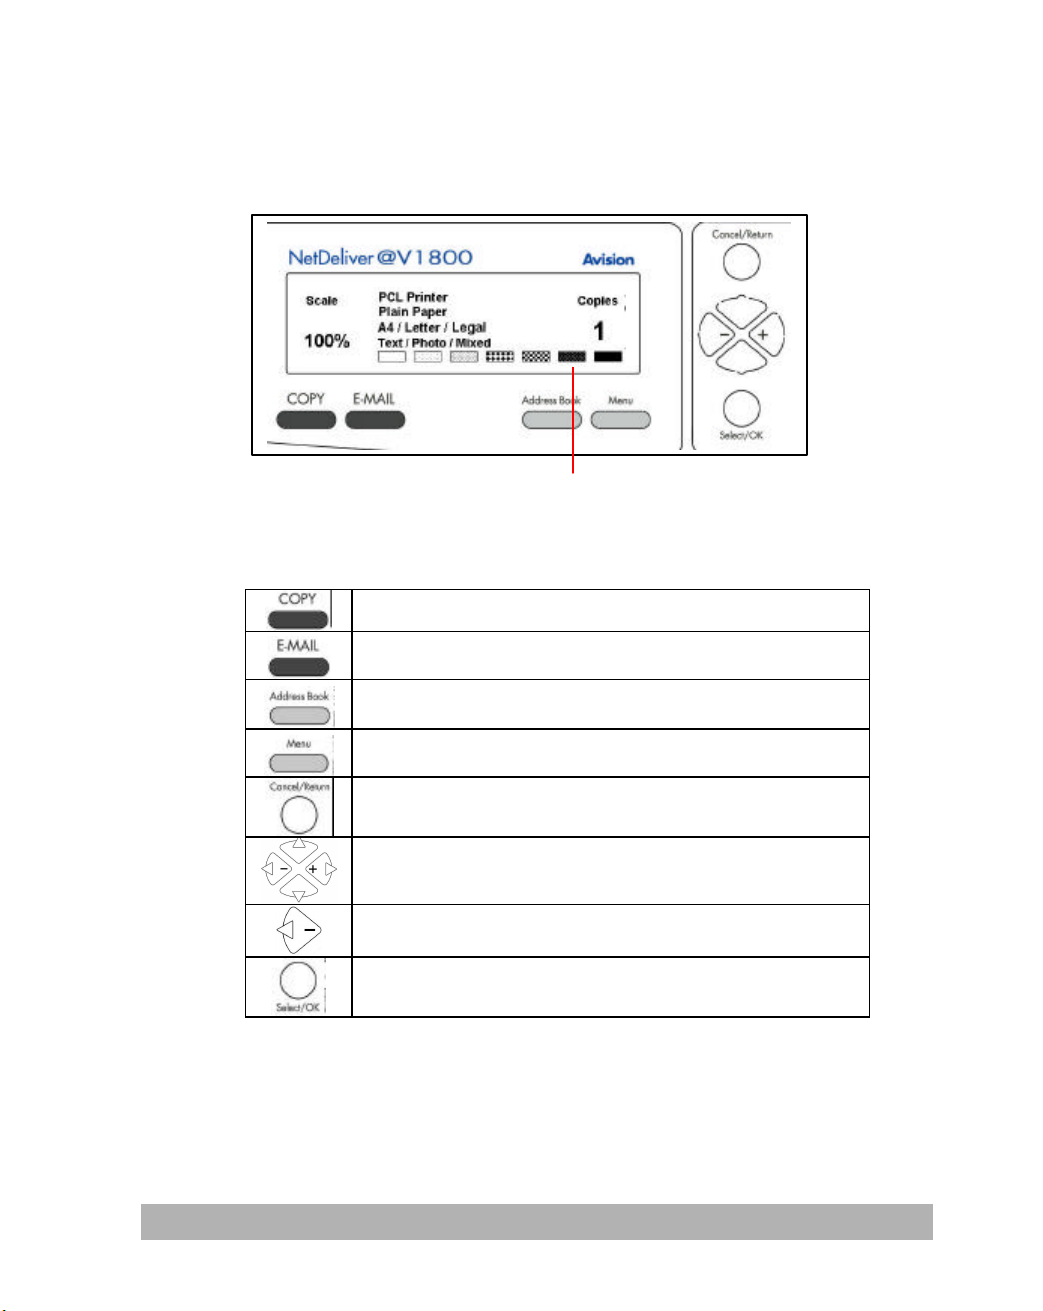
v LCD-display & Function Keys:
Used to display current operation and select key working mode.
Function Keys and others:
Press to use the Copy function.
Press to use the email function.
Press to select an email address from an address book.
LCD-display
Press to setup the machine.
Used to cancel previous input.
Used to move to up/down/left/right.
Used to move to the left or to delete last input.
Used to select or execute your command.
@V1800 User’s Manual Getting Started 1-7
Page 15
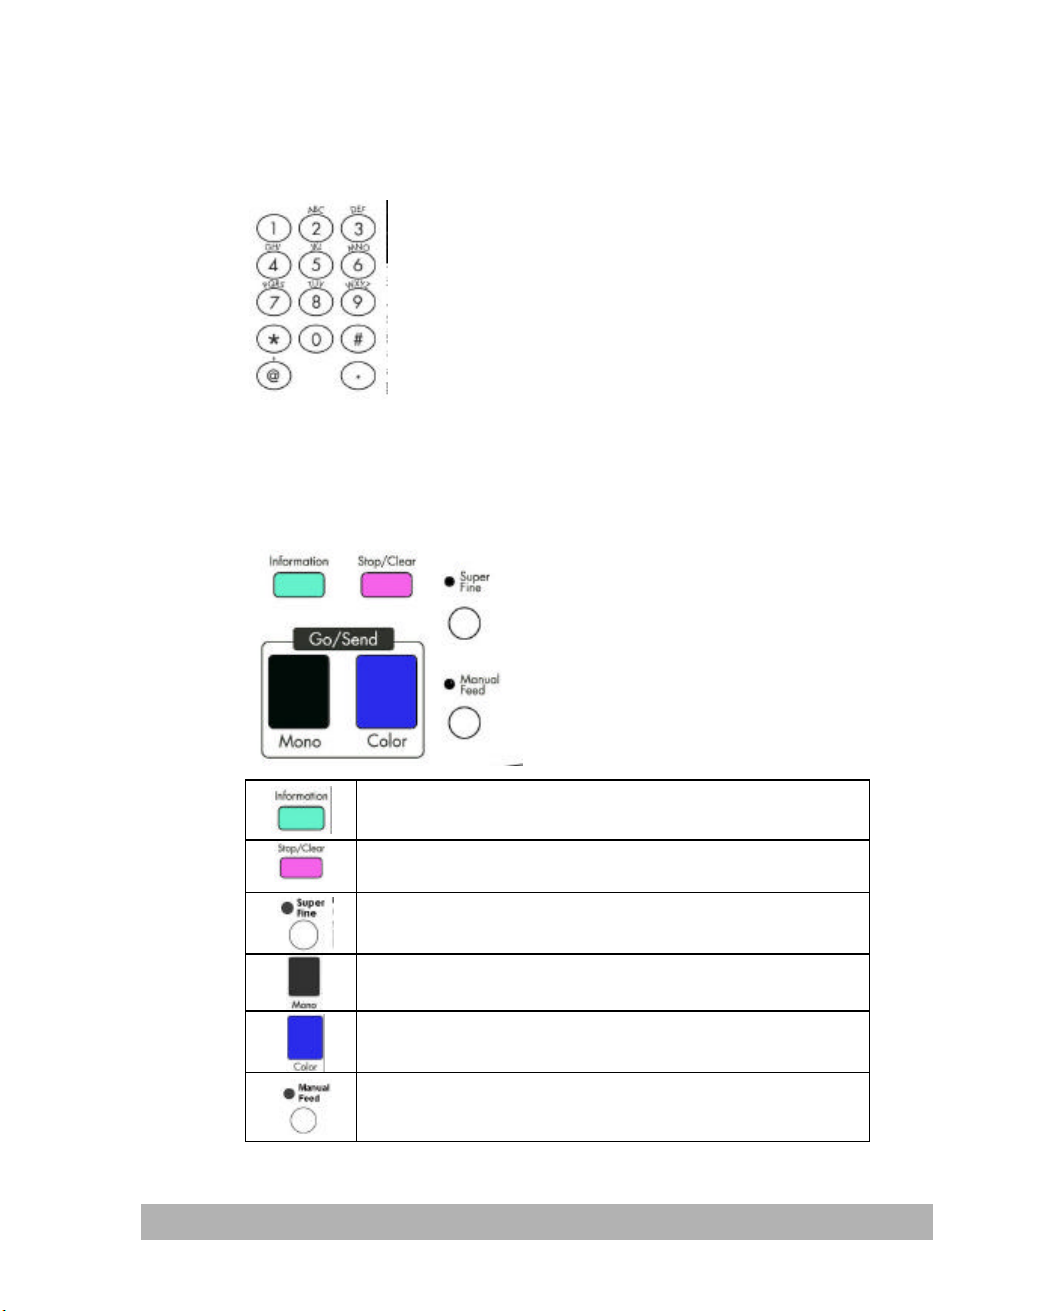
w The Numeric/Character Keypad:
Used to manually enter e-mail address.
x Start & Other Keys:
Used to select scanning resolution and start sending or copying
document(s).
Used to show serial number, IP address, firmware
version,etc.
Used to stop sending process or clear previous
operation.
Stands for Super Fine. Used to enhance scanning
resolution.
Used to scan and send document(s) in black and
white.
Used to scan and send document(s) in color.
Used to scan and send multi-page document on the
document glass manually one page by one page.
Getting Started 1-8
Page 16

Pre Installation Information
The @V1800 has to be setup p roperly on your network to perform email
and fax forwarding functions. The following network parameters have to
be set. For required information and LAN connection, please contact your
network administrator.
Important !
Make a copy of the following table and ask your Network Administrator
to complete the information.
1. *IP Address: . . .
2. *Net Mask: . . .
3. *Gateway IP : . . .
4. *SMTP Server: . . .
5. SMTP Port 25 (default)
6. DNS Server: . . .
Note: “*” requests an IP address you must fill.
Explanation of contents:
1. *IP Address: The Internet Protocol (IP) address assigned to
your machine by your network administrator.
2. Subnet Mask:
3. Gateway IP: The gateway IP address assigned by your network
4. *SMTP Server:
5. SMTP Port:
6. DNS Server: The IP address of your *DNS server.
The net mask address assigned by your network
administrator.
administrator.
The IP address of your SMTP Mail Server assigned
by your network administrator.
The port number for SMTP connection.
@V1800 User’s Manual Getting Started 1-9
Page 17

Note:
1. *IP Address: An IP (Internet Protocol) address uniquely identifies
a host connection to an IP network. System administrator or
network designer assigns the IP address. The IP address consists
of two parts, one identifying the network and the one identifying
your node.
The IP address is usually written as four numbers separated by
period. Each number can be zero to 255. For example,
10.1.30.186 could be an IP address.
2. *SMTP: Stands for Simple Mail Transfer Protocol. It is the main
communication protocol used to send and receive email on the
Internet.
3. *SMTP Port: This setting defines the TCP/IP port for incoming mail.
By default, this setting uses port 25 that is the Internet standard for
receiving SMTP mail. If your SMTP server listens on a non -standard
port, change this value accordingly.
4. *DNS: Short for Domain Name Service, an internet service that
translates domain names into IP addresses. Every time you use a
domain name, a DNS service must translate the name into the
corresponding IP address. For example, the domain name
www.examle.com might translate to 198.105.232.4.
Getting Started 1-10
Page 18

Internet Communication Features
E-MAIL FORWARDING
The @V1800 allows you to transmit document(s) over the Internet via
email. The document is first scanned and converted into a
jpeg-formatted or a pdf-formatted file, and then transmitted to a
remote recipient as an attachment to an email.
When you send an email to someone via the @V1800, the @ V1800 uses
Simple Mail Transfer Protocol (SMTP) to transfer your outgoing mail to
your SMTP mail server, and then to send your mail to the Internet.
@V1800 User’s Manual Getting Started 1-11
Page 19

2 Setting up Your Machine
Minimum Configuration Requirements
To make the best of the @V1800, the following configuration is required:
To send emails from the @V1800:
• TCP/IP network
• A SMTP server
To make copies from the @V1800:
• A laser printer
Note:
If you are not familiar with these terms, contact your network
administrator to set up the @V1800 on your network properly.
@V1800 User’s Manual Setting up Your Machine
2-1
Page 20
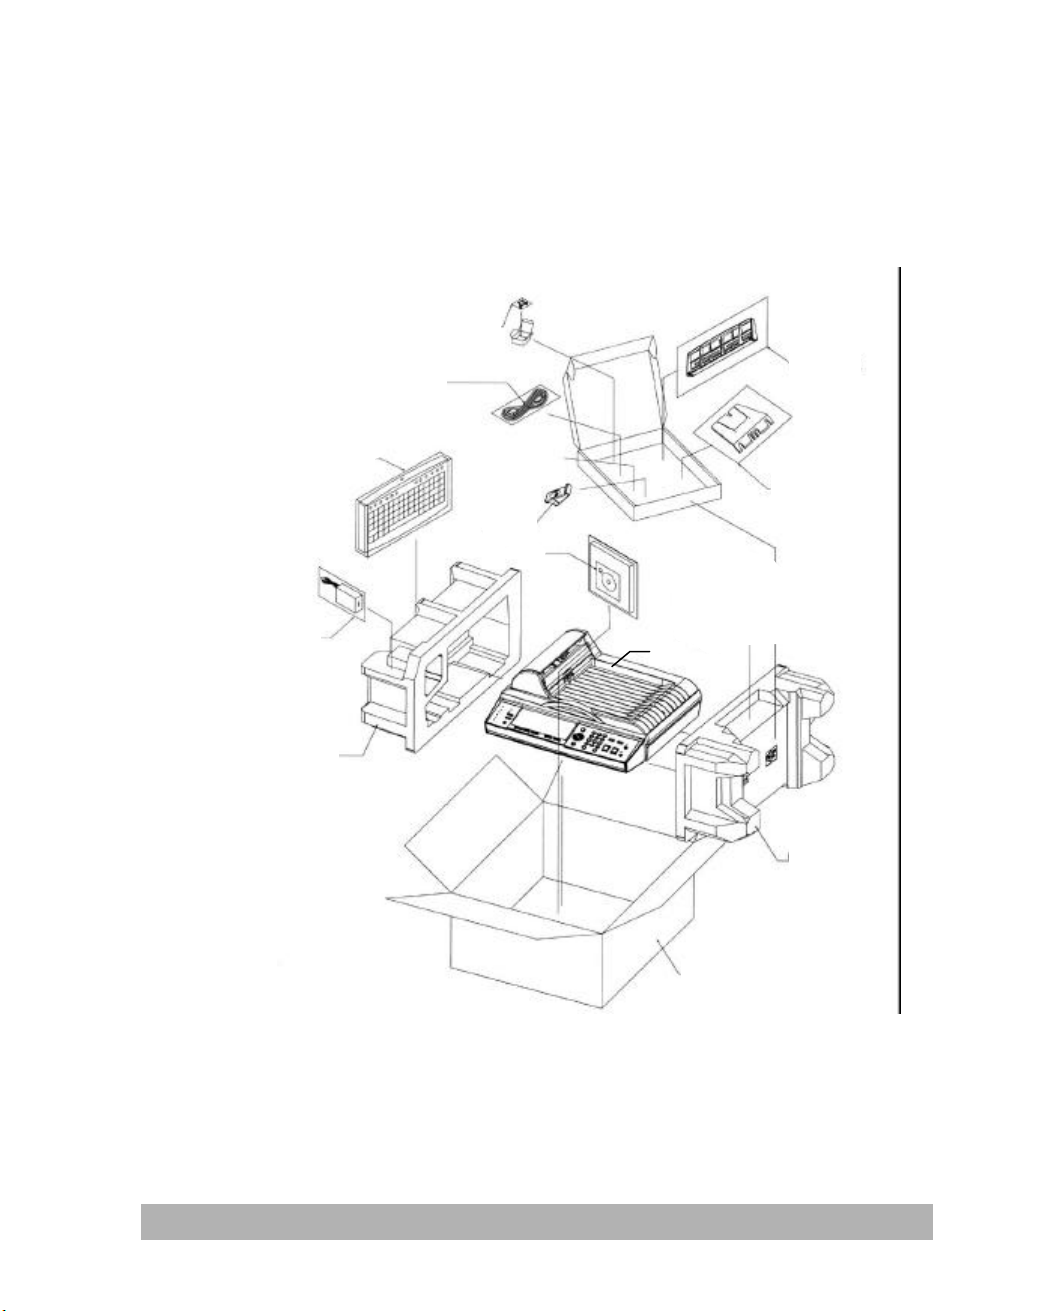
Checking Package Contents
1. Paper Feed Tray
7.
ADF Pad
4
8
11 6 6
Unpack the box and check its components. If there is any item missing,
contact your dealer immediately.
7
1
10
2
9
3
4
2. Paper Support 8. Power Cord
3. CD, User’s Manual, Quick Guide 9. Paper Stopper
4. @V1800 Main Body 10. Keyboard
5. Cushion 11. Power Adapter
6. Carton
2-2
Setting up Your Machine
5
Page 21
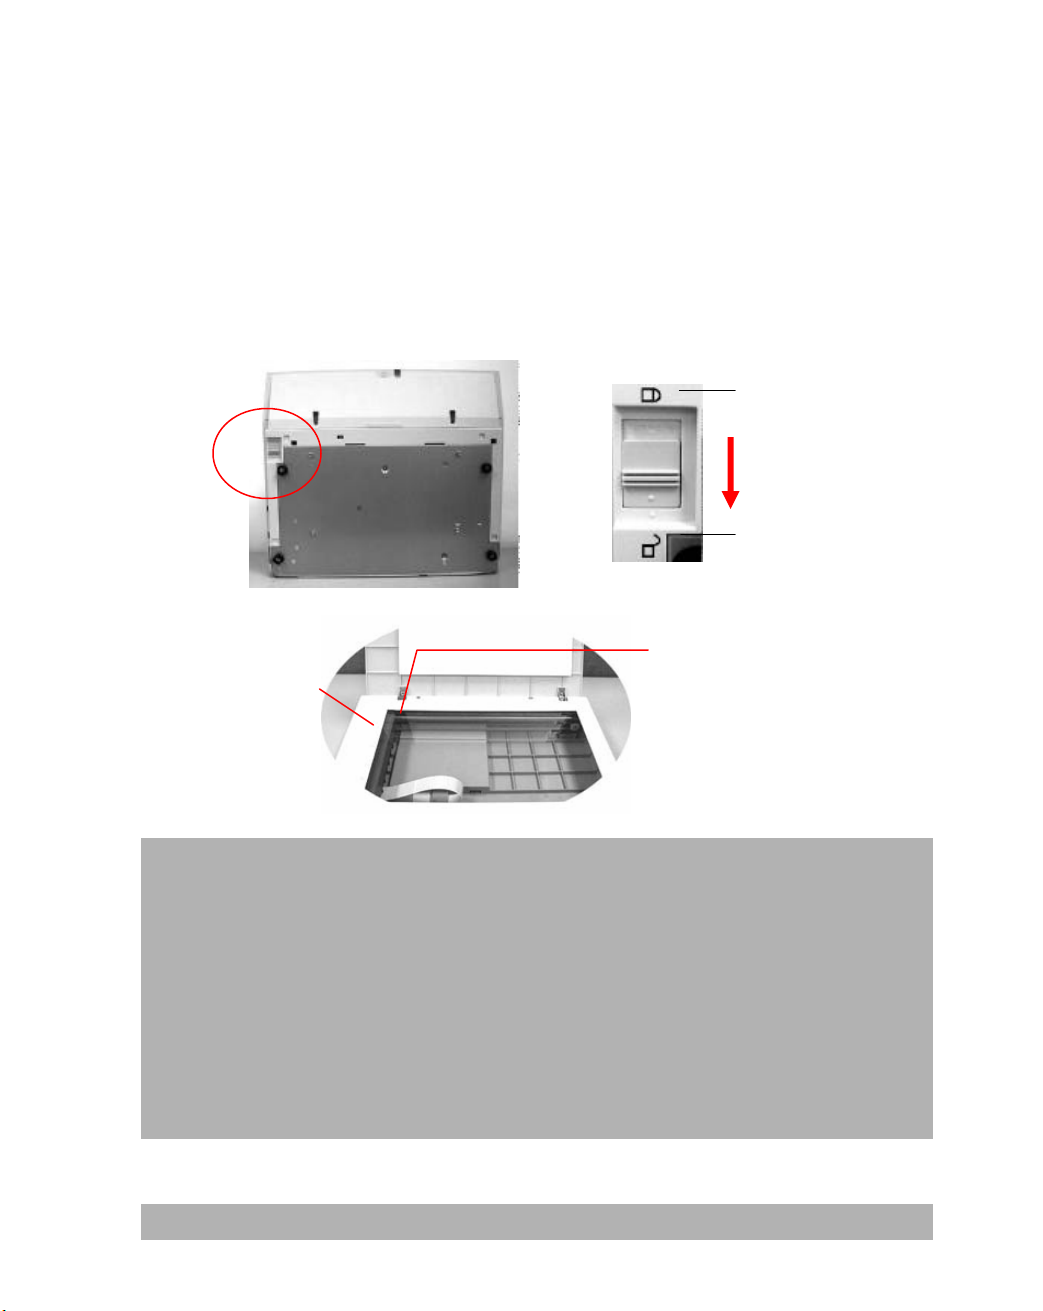
Unlocking the Scan Unit
“
Unlocked Position
”
The scanning unit at this
The scan unit is locked during transport to protect the scanning mechanism
from being damaged. Be sure to unlock the scan unit before using the
machine.
1). Locate the lock switch underneath
the machine.
2). Move the lock switch to the
" unlocked position".
“Locked Position”
position before locking
the switch
Note:
@V1800 User’s Manual Setting up Your Machine
If you need to move your @ V1800 for repair or any other reason, be
sure to lock your @V1800 before moving. To lock your @V1800, please
do the following,
1. Turn off your @V1800.
2. If the scanning head is not located at the front of the glass, turn the
@V1800 on to return the scanning head to the front of the glass.
After the scanning head is returned to the home position, turn the
power supply off.
3. Move the lock switch to the “Locked Position”.
2-3
Page 22

Installing the Paper Feed Tray
Paper
Paper Feed
1). Attach the Paper Support to the Paper Feed Tray.
Tray
Support
2). Then, attach the Paper Feed Tray to the machine.
2-4
Setting up Your Machine
Page 23
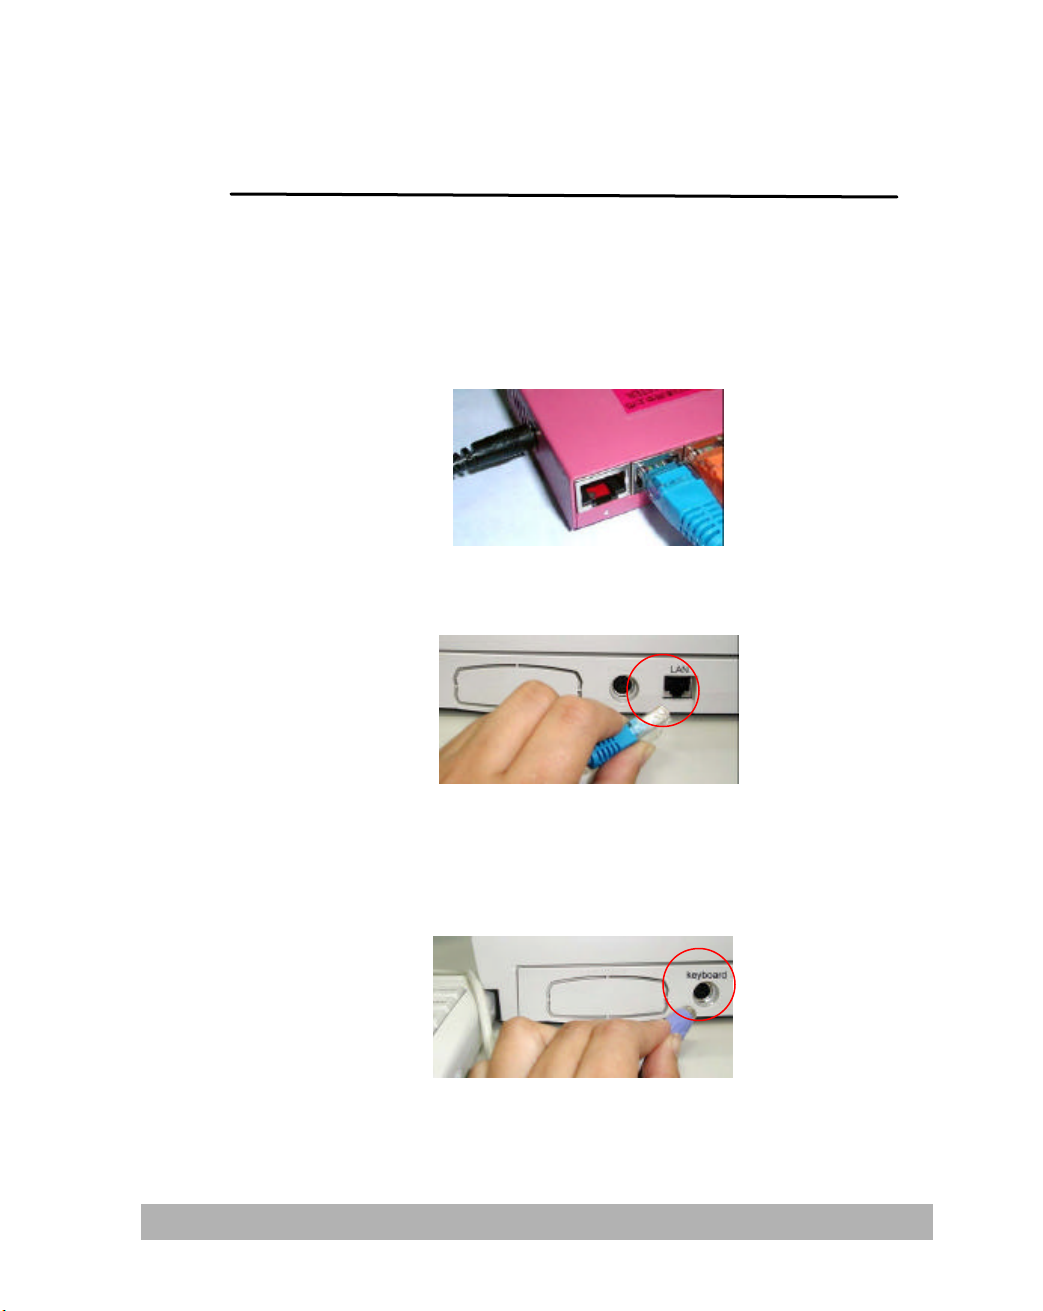
Connecting the Cables
CONNECTING THE ETHERNET CABLE
1. Connect one end of your Ethernet LAN cable to an available port
of your Ethernet Hub.
2. Connect the other end to the network port at the back of your
@V1800.
CONNECTING THE KEYBOARD CABLE
1. Connect the cable of the keyboard to the PS2 port at the back of
the @V1800.
@V1800 User’s Manual Setting up Your Machine
2-5
Page 24
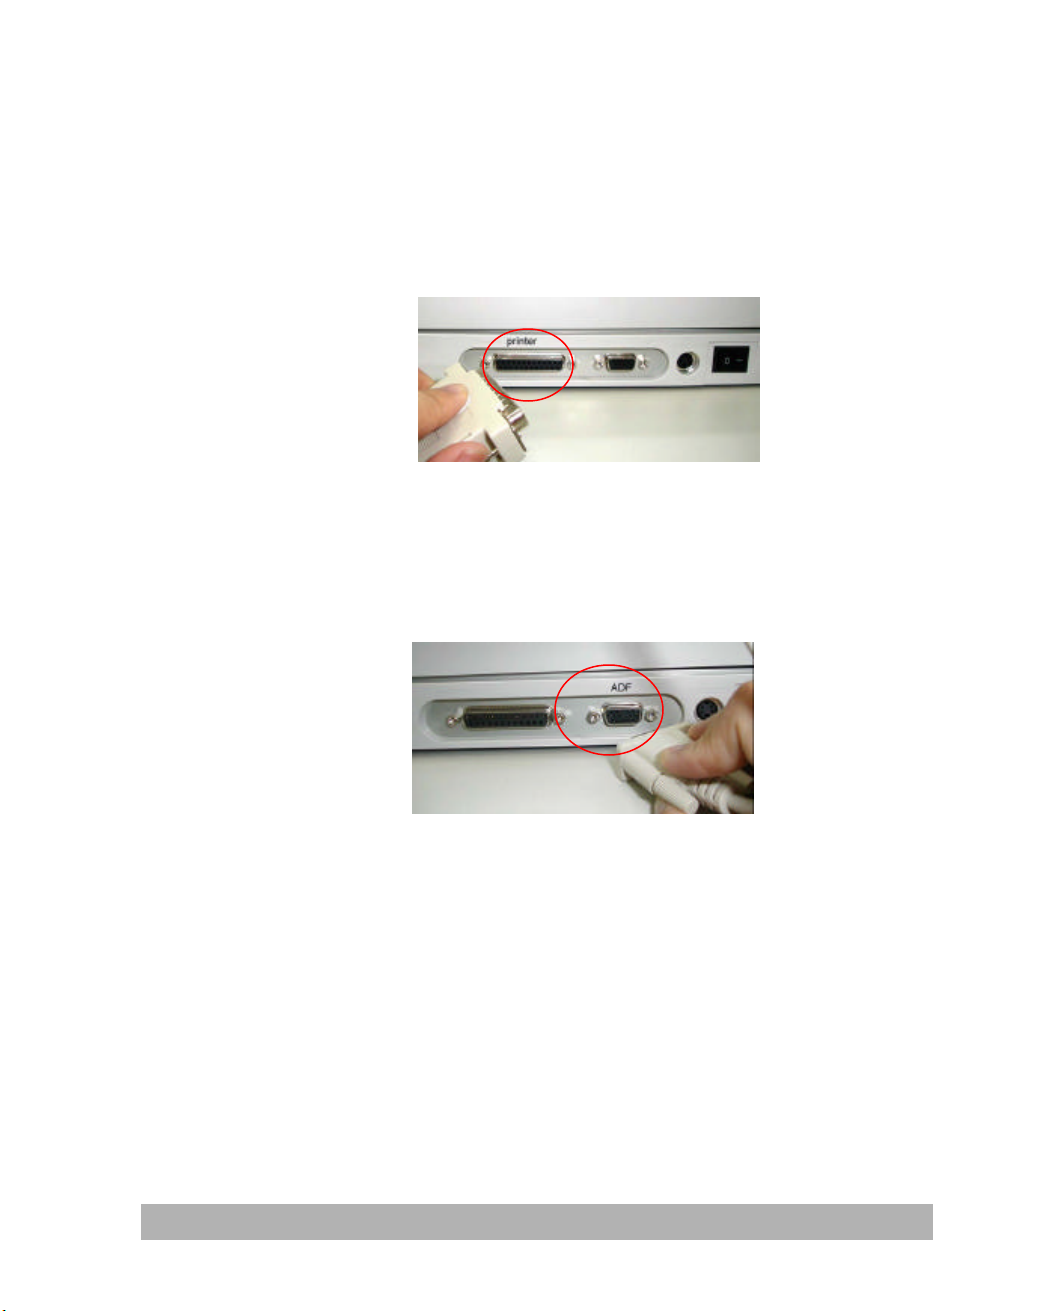
CONNECTING THE PRINTER CABLE
1. Connect one end of the printer cable (not included) to your
printer.
2. Connect the other end to the printer port of your @ V1800.
CONNECTING THE ADF CABLE
Connect the ADF (Auto Document Feeder) cable (attached to the
document(s) cover) to the ADF port at the back of the @ V1800.
2-6
Setting up Your Machine
Page 25

CONNECTING THE POWER AND TURNING ON THE M ACHINE
1. Press the power switch to the “0” position to turn off the
@V1800.
2. Connect the small end of the power cable to the power port of
your @V1800.
3. Connect the other end to an appropriate power outlet.
4. Press the power switch to the "I" position to turn on your
@V1800. After showing the warming up message, the LCD
display prompts the Copy ready status (present) as shown below.
@V1800 User’s Manual Setting up Your Machine
2-7
Page 26

Note: You can leave your @V1800 ON at all times since the @V1800 is designed
with a power saving function. If the @V1800 is idle for four hours, it
automatically shuts off the scanning lamp.
2-8
Setting up Your Machine
Page 27

Setting up Your Network Parameters
Before using the @ V1800, please setup the @V1800 properly on your
network to perform email and fax forwarding functions. The following
network parameters have to be set. For required information and LAN
connection, please contact your network administrator.
To set up the network parameters via the control panel,
1. After turning on the @V1800, press the Menu button and select the
“Network Configuration”. A Login screen appears. Press the
Select/OK button to skip to prompt the Network Configuration screen
(see below) in the LCD- display. (If you have changed the login name
and password, the new login name and password are required each
time you select the “Network Configuration” or “Administrator” .)
1. General
2. Network Configuration
3. Copy
4. E-Mail
5. Function Buttons
6. Administrator
9. Information
The Menu items The Network Configuration
2. Consult your network administrator for the network parameters and
enter them respectively.
1. IP Address: . . .
2. Subnet Mask: . . .
3. Gateway IP: . . .
4. SMTP Server: . . .
5. SMTP Port:
6. DNS Server: . . .
7. Save & Exit: . . .
8. Exit
3. Use the q key to scroll the Save & Exit menu and press the Select/OK
button to save your setting.
@V1800 User’s Manual Setting up Your Machine
2-9
Page 28

Note:
1. If you wish to assign a login name, please press the “Menu” button and
select the “Administrator”>”Admin. Login Name”> and then enter your
login name. (Up to 8 characters)
2. If you wish to assign a password, please press the “Menu” button and select
the “Administrator”>”Admin. Password”> and then enter your password.
(Up to 8 characters)
3. Please make a note of your new login name and password. The new login
name and password are required each time you select the “Network
Configuration” and “Administrator” item.
4. To send document via e-mail from the @V1800, you are required to enter
at least the IP address/Subnet Mask/Gateway IP/SMTP server.
2-10
Setting up Your Machine
Page 29

3-1
3 Administering
This chapter describes how to perform the administrator activities either
on the control panel or on the @ V1800 web page.
The access to the administrator activities is blocked by the administrator
password. It is recommended that administrator create a password
before performing these activities.
To Administer via the LCD-display
1. Press the Menu button ( ) on the Control Panel and select
“Network Configuration” . A Login screen appears. Press the
Select/OK button to skip and prompt the Network Configuration
screen as shown below.
1. General
2. Network Configuration
3. Copy
4. E-Mail
5. Function Buttons
6. Administrator
7. Information
The Menu items The Network Configuration
1. IP Address: . . .
2. Subnet Mask: . . .
3. Gateway IP: . . .
4. SMTP Server: . . .
5. SMTP Port:
6. DNS Server: . . .
7. Save & Exit: . . .
9. Exit
2. Use the or the key to move between the menus.
3. For the contents of each menu, please see the subsequent section,
Summary of Administrator Activities.
@V1800 User’s Manual Administering
Page 30

To Administer via the @V1800 Web Page
1. Start your browser, either Netscape 4.0 or the I.E. 4.0.
2. Type the IP address of your @V1800 in the URL field of your browser.
The @V1800 web page appears.
3. Click on Administrator to prompt the Administrator Login dialog.
3. Enter your name and password and click Submit. The Setting screen
appears as below.
4. For the contents of each menu, please see the subsequent section,
Summary of Administrator Activities.
3-2
Administering
Page 31

3-3
Summary of Administrator Activities
Configuration Settings
Fine Resolution for
Description
Setup Menu
General
Device Name Displays the model name.
Network Configuration
IP Address IP address of your @V1800.
Subnet Mask The IP address of your subnet mask.
Gateway The IP address of your gateway.
SMTP Server IP address of your SMTP Server.
SMTP Port The port number for SMTP connection. (Default: 25)
DNS Server IP address of your DNS server.
Copy
Printer Name PCL printer
Paper Size Choice: Letter, A4, Legal
Remove Background Remove background to sharpen text.(only for B&W original)
E-Mail
Default Subject
B/W File Format File format for documents to be sent in black and white via
Color File Format File format of the color documents to be sent in color via
B&W
Super Fine
Resolution
for B&W
Fine Resolution for
Color
Super Fine
Resolution
for Color
Default text for the Subject field in email messages from the
@V1800. Up to 64 characters are allowed. The default
subject is used only when users fail to enter anything in the
Subject field in email message from the @V1800.
e-mail from @V1800.
Choice: PDF or TIF
e-mail from @V1800.
Choice: TIF, JPG, and PDF
The scanning resolution you choose to scan from the @V1800.
Choice: Fine (75/100/150/200/300/400 dpi)
The enhanced scanning resolution you choose to scan from the
@V1800.
Choice: S. Fine (100/150/200/300/400/600 dpi)
The scanning resolution you choose to scan from the @V1800.
Choice: Fine (75/100/150/200/300/400 dpi)
The enhanced scanning resolution you choose to scan from the
@V1800.
Choice: S. Fine (100/150/200/300/400/600 dpi)
@V1800 User’s Manual Administering
Page 32

. Up to 2000 email
The login name for the administrator. If the administrator
Activities Description
Setup Menu
E-Mail
Document Type The contents for your document.
Choice: Text, Photo, and Mixed
Compression Rate The compression level for the documents you send from
the @V1800.
Choice: Low, Medium, and High
*This machine supports JPG and PDF compression only.
Enable Background
Remove
Function Buttons
Button #1~6 Set the most frequent cover message for the Fn#1~6 keys
Address Book Menu
Email The email address sets for the @V1800
Group The group of more than one email address or numbers of
Activities Description
User Profile
Local User Create and display registered users of this machine if
Administrator
Login Name
Enter New
Login Name
Verification Confirmation of the new login name.
Remove color background to sharpen your text.
Choice: Yes, No
in the supplied PS2 keyboard.
Choice: Copy, E-mail
addresses can be set.
Menus: Add, Delete, and Modify
fax destination. Up to 200 groups can be set. Up to 99
e-mails or fax destinations can be set in one group.
Menus: Add, Delete, and Modify
“Enable Security For Email ”.
Menu: Add, Delete, and Modify
wishes to change current name, enter new login name in
the field.
Note: The login name is case-sensitive and allows up to
16 characters.
New login name for the administrator if the administrator
wishes to create a new one.
Note: The login name is case-sensitive and is up to 8
characters.
3-4
Administering
Page 33

3-5
Administrator’s E-Mail
Address
Enter New
E-Mail Address
Verification
Password Current password for the administrator. If the
Enter Previous password
Enter New
Password
Verification
Enable Security for
Emails
Add "To" Address After
Sending
Activities Description
Administrator Menu
E-mail Default From Default e-mail address for the From field in email
Save Current Settings as
Default
The email address for the administrator. Update
administrator's email address in this field.
New e-mail address for the administrator if the
administrator wishes to create a new one.
Note: The address is case-sensitive and is up to 64
characters can be entered in the e-mail address.
Confirmation of the new e-mail address.
administrator wishes to change current password, double
click Password to prompt Change Password dialog.
Previous password for the administrator.
New password for the administrator if the administrator
wishes to create a new one.
Note: The password is case-sensitive and is up to 8
characters are allowed.
Confirmation of the new password.
Scroll to Yes to prevent any non -registered users to send
emails from the @V1800.
Scroll to Yes and a dialog appears asking you if you need to
add the new email address into the address book after
sending your document(s).
message from the @V1800. Up to 64 characters are
allowed. The default address is used only when users
fail to enter anything in the Form field in email message
from the @V1800.
Save changed settings to be default settings.
@V1800 User’s Manual Administering
Page 34

4 Managing the Address
Book
Avision Java-Manager is a convenient browser- based tool to manage the
address book of the @V1800 remotely. Since only the administrator can
manage the address book, it is highly recommended that the administrator
read this chapter before using the @V1800.
Managing Your E-mail Address Book
ADDING EMAIL ADDRESSES
To add e-mail addresses,
1. Start your browser, for example Netscape Communicator or
Microsoft I.E.
2. Type your IP address in the URL field.
for example, http://xxx.xxx.xxx.xxx
The Avision @V1800 web page appears as shown below.
Note: The web page is best viewed at a 1024 x 768 dpi resolution.
@V1800 User’s Manual Managing the Address Book
4-1
Page 35

3. Press the Administrator button to prompt the Login dialog.
4. Enter the name and passwo rd of the administrator and press the
"Submit" button. The Administrator screen appears.
5. Press "@ddress" to prompt the Address Book dialog.
6. Press the E- mail icon and choose "Add" to prompt the Add A New
E-mail Address dialog.
4-2
Managing the Address Book
Page 36

7. Enter a local user's name and password and the email address and click
"Continue" for the next input or "Finish" to save and exit.
@V1800 User’s Manual Managing the Address Book
4-3
Page 37

MODIFYING E-MAIL ADDRESSES
To modify e- mail addresses,
1. Repeat Step 1 to Step 5 from the previous section, Adding E-mail
Addresses . The Address book dialog appears.
2. Click the E- mail icon and choose the address you want to modify
from the list. A Modify E-mail address dialog appears.
3. Modify your address.
4. Click "Update" to save or "Cancel" to exit.
4-4
Managing the Address Book
Page 38

DELETING E-MAIL ADDRESSES
To delete e- mail addresses,
1. Repeat Step 1 to Step 5 from the previous section, Adding E-mail
Addresses . The Address Book dialog appears.
2. Click the E- mail icon on the top and choose the addresses you
want to delete from the list.
3. Click "Delete" to erase the address. A warning message appears
to confirm your deletion. Click "OK" to activate or "Cancel" to
cancel the deletion.
@V1800 User’s Manual Managing the Address Book
4-5
Page 39

Managing Your Groups
ADDING NEW GROUPS
To add new groups,
1. Repeat Step 1 to Step 5 from the previous section, Adding E-mail
Addresses . The Address book dialog appears.
2. Click the Group icon and choose "Add" to prompt the Add A New
Group dialog.
3. Enter your group name.
4. Choose the address from the right side and click Ù to add to the
group.
5. Click "Update" to continue or " Cancel" to exit.
4-6
Managing the Address Book
Page 40

MODIFYING GROUPS
To modify groups,
1. Repeat Step 1 to Step 5 from the previous section, Adding E-mail
Addresses . The Address book dialog appears.
2. Click the Group icon on the top and choose " Modify" to display
the Modify E-mail dialog.
3. Choose one member you want to delete from the group and click
the Ú key to delete or insert a new member from the current
addresses by choosing the address on the right side and clicking
the Ù key to insert to the group.
4. Click "Update" to modify and exit or "Cancel" to exit.
@V1800 User’s Manual Managing the Address Book
4-7
Page 41

DELETING GROUPS
To delete groups,
1. Repeat Step 1 to Step 5 from the previous section, Adding E-mail
Addresses . The Address Book dialog appears.
2. Click the Group icon and choose the grou p name you want to
delete from the list.
3. Click "Delete" to erase the number. A warning message appears
to confirm your deletion. Click "OK" to confirm or "Cancel" to
exit.
Note:
4-8
Managing the Address Book
A Group can be a combination of several email addresses and fax
numbers.
Page 42

5 Operation
With an intuitive control panel, the @V1800 is designed to be easy-to- use.
Basically, to operate the @V1800 takes three simply steps:
1. Load your paper either in the ADF or on the glass.
2. Type or select your recipient's destination.
3. Press the "Mono" button ( ) or the "Color" button ( ) to send
your document(s).
The following sections describe in detail the things you should know and
the advanced features on how to send your document(s) and make copies
with the @ V1800.
@V1800 User’s Manual Operation
5-1
Page 43

Loading Paper
The @V1800 can scan and send document(s) either in the ADF
(Automatic Document Feeder) or on the glass. If you need to send
multiple pages, please load your papers in the ADF. The ADF can hold
up to 30 pages at one time. If you need to send pages from books,
newspaper clippings, paper with wrinkles or curls, please place your
paper on the glass.
NOTICE ON USING THE ADF
Before using the ADF, please make sure that your paper meets the
following specifications:
• Document(s) can range in size from 4.5 by 5.5 inches to 8.5 by 14
inches (Legal).
• Document(s) can range in weight from 14 to 28 lbs (0.002" to
0.006").
• Document(s) should be square or rectangular and in good condition
(not fragile or worn).
• Document(s) should be free of curl, wrinkle, tears, wet ink, or
punch holes.
• Document(s) should be free of staples, paper clips, paper sticky
notes.
** To transmit irregular types of document(s), place the document(s)
on the glass or make a copy first and then transmit the copy
instead.
5-2
Operation
Page 44

PLACING DOCUMENT(S) IN THE ADF
1. Make sure your document is free of staples, paper clips and is
not torn out.
2. If you have multiple pages, fan your document(s) to avoid
occasional paper jam. The ADF can hold up to 25 pages at one
time.
3. Place your document(s) with the text FACE UP in the ADF and
make sure that the top of the pages is fed in first.
4. Adjust the Paper Guides to center the document(s) in the ADF.
@V1800 User’s Manual Operation
5-3
Page 45

PLACING DOCUMENT(S) ON THE GLASS
1. Open the document(s) cover to reveal the glass.
2. Place your document(s) with the text FACE DOWN on the glass
and align the document(s) in the upper- right corner of the glass.
3. Close the document cover.
5-4
Operation
Page 46

Sending Emails
1. Place your document(s) face up in the ADF or face down on the glas s.
2. Press the key. The LCD displays the Email screen.
From:
Subj:
To:
CC:
BCC:
Memo:
You can temporarily select your scanning resolution between Fine
(75 dpi, 100 dpi, 150 dpi, 200 dpi, 300 dpi, 400 dpi) and Super
Fine (100 dpi, 150 dpi, 200 dpi,300 dpi, 400 dpi, 600 dpi) by
pressing the Menu button and selecting E- mail then Fine
Resolution or S. Fine Resolution.
Or you can press the F. Resolution button on the control panel to
enable the default Fine Resolution value.
3. Enter your email address manually with the keyboard.
Or select the email address from the address book via the
button and the button.
4. Enter your e-mail message with the keyboard.
5. Press the key to send your document(s) in black and white.
Or press the key to send your document(s) in color.
@V1800 User’s Manual Operation
5-5
Page 47

Note:
The LCD displays the scanning progress on the sending of your
document(s) via email.
Page 1 100%
E-Mail OK
1. You can send your document to e-mail addresses or to fax
destinations simultaneously.
2. If the "Enable Security for Email" box has been checked, you
have to enter the password to access the e-mail forwarding
function.
3. If you make a mistake during the transmission process, press the
Stop/Clear key to cancel.
4. If you have stopped typing in the From, Subject, To, CC, or BCC
fields for three minutes, the LCD-display automatically clears
what you have typed.
5. Up to 18 lines of text on the LCD-display (each line includes 34
characters) can be shown in the Memo field.
5-6
Operation
Page 48

Making Copies
BEFORE MAKING COPIES
Before making copies through the control panel, please do the
following:
1. Make sure that your printer supports PCL or Postscript printer
language.
2. Check if your printer has been properly connected to the
@V1800.
@V1800 User’s Manual Operation
5-7
Page 49

Note:
BASIC OPERATING STEPS
To make simple copies,
1. Place your document(s) either in the ADF or on the glass.
2. Press the key to send your document(s) in black and white.
Or press the key to send your document(s) in color.
The LCD displays the scanning progress of the printing of your
document(s) from your printer.
Copying 80%
If you make a mistake during the transmission process, press the
key to cancel.
5-8
Operation
Page 50

PRINTER COMPATIBILITY LIST
Before using the copy features, make sure that you have connected a
color or black and white laser printer to your @V1800.
Please also note that the @V1800 can be connected to various brands
of laser printers as long as they are PCL-compliant (it even supports
some PostScript printers). The supported printer list is as follows:
Brand name Model name
Tektronix
Mita
HP
Kyocera
Lexmark
Oki
Samsung
...More in the future
Phase 740/Phaser 750
Ci 1100
4500
FS-800/FS -3750
T614/C710
8C
QL-7000/QwikLaser
Note:
For the most updated printer list, please visit the Avision’s web site at
http://www.avision.com
@V1800 User’s Manual Operation
5-9
Page 51

ACCESSING COPY FEATURES
You can access a variety of copy features before pressing the "Mono"
or "Color" buttons. These features include:
• Changing Scaling
• Adjusting Density
• Choosing Copy Quality
• Choosing Paper Size
• Increasing Copy Count
• Focusing on Photo/Text/Auto
CHANGING SCALING
To reduce or enlarge the original document,
1. Press the Copy button on the panel to prompt the Copy screen.
2. Press the s key to enlarge your document in 1 percent increment.
Or press the ‚ key to reduce your document in 1 percent
decrement.
Or, press the round button to choose your scaling from preset scaling
from 141%, 122%, 115%, 93% (whole page) 86%, 81%.
** After you have made your copies, the settings you have just made will
remain in the LCD-display for three minutes. After three minutes,
the machine will automatically return to the factory default settings.
5-10
Operation
Page 52

ADJUSTING DENSITY
The @V1800 is preset to the Normal level of density. If your original
document comes with a lighter or darker contrast, your can improve
the quality using the Adjusting Density feature.
To change your density,
1. Press the Copy button on the panel to prompt the Copy screen.
2. Press the key to move your cursor down to the Density
field.
3. Choose your desired density with the
** After you have made your copies, the settings you have just made
will remain in the LCD-display for three minutes. After three
minutes, the machine will automatically return to the factory
default settings.
@V1800 User’s Manual Operation
or
keys.
5-11
Page 53

CHOOSING COPY QUALITY
The @V1800 is preset to Fine copy quality, the setting suitable for
most business document(s). If necessary, this setting can be changed
to Super Fine copy quality.
To choose your copy quality,
Press the key to enhance your copy quality.
The Super Fine button appears with a lit LED.
** After you have made your copies, the settings you have just made
will remain in the LCD-display for three minutes. After three
minutes, the machine will automatically return to the factory
default settings.
5-12
Operation
Page 54

CHOOSING PAPER SIZE
Your machine is preset to Letter size. If your output paper size is
different from Letter, change your output size with the touch of the
buttons.
To change your output paper size,
1. Press the Menu button ( ) on the Control Panel.
2. Press the key to scroll down to the Copy menu and press
the Select button ( ). The Copy menu appears.
3. Press the key to scroll down to Paper Size and press the
Select button to prompt the option. (Letter/A4/Legal)
4. Choose the paper size with the
Select/OK button.
** After you have made your copies, the settings you have just made
will remain in the LCD-display for three minutes. After three
minutes, the machine will automatically return to the factory
default settings.
1. Printer Name:
2. Paper Type:
3. Paper Size:
or
keys and press the
@V1800 User’s Manual Operation
5-13
Page 55

INCREASING COPY COUNT
The @V1800 is preset to 1 copy count. If you wish to increase the
number of copies, choose your desired copy count with the numeric
keypad or keyboard.
To increase your copy count,
1. Press the Copy button on the Control Panel to prompt the Copy
screen.
2. Enter your desired copy count with the numeric keypad. The LCD
display shows the number of your copy count.
55
** After you have made your copies, the settings you have just made
will remain in the LCD-display for three minutes. After three
minutes, the machine will automatically return to the factory
default settings.
5-14
Operation
Page 56

FOCUSING ON PHOTO OR TEXT
The machine is preset to auto mode. If required, you can change to
photo or text if you wish to focus your copies res ult on photo or on
text.
To change your focus on photo or text,
1. Press the Copy button on the Control Panel to prompt the Copy
screen.
2. Press the key to scroll down to the Text/Photo/Mixed field.
3. Choose your focus with the
** After you have made your copies, the settings you have just made
will remain in the LCD-display for three minutes. After three
minutes, the machine will automatically return to the factory
default settings.
or
keys.
@V1800 User’s Manual Operation
5-15
Page 57

Using the Manual Feed Button
The “Manual Feed” button allows you to scan multi-page document
manually on the document glass one page by one page. With the “Manual
Feed” button, the recipient can receive your multi-page documents in one
mail.
To use the “Manual Feed” button,
1. Press the “Manual Feed” button ( ) . The “Manual Feed”
button appears with a lit LED.
2. Press the e-mail button on the Control Panel.
3. Enter your “From” and “To” address n the E-mail screen.
4. Press the Mono or Color button to start sending your document.
5. When the machine completing scanning your first page, the
LCD-display will guide you to place your next page.
6. Place your next page on the document glass, then press the
“Color” or “Mono” button according to the LCD-display.
7. Press the “Manual Feed” button ( ) again if you want to stop
scanning. The LCD light of the “Manual Feed” will be off.
8. The LCD-display shows the finish message. And the recipient can
receive your multi-page documents in one e-mail.
5-16
Operation
Page 58

6 Troubleshooting
ADF error.
Information Codes/Message
INFORMATION CODES DU RING SCANNING AND COPYING
Info
code
10001 SRAM
10002 DRAM
10003,
10004
10005 Home
10006 Lamp
10007 Lock error 1. Turn off your @V1800.
10008,
10009
10201 Z1 access
10202 Z1 SRAM
Meaning
error
error
Lamp
error
sensor
error
error
error
error
Action Page
Restart your @V1800. (Turn off and on again.)
If the code still appears, contact your dealer.
Restart your @V1800.
If the code still appears, contact your dealer.
Restart your @V1800.
If the code still appears, contact your dealer.
Restart your @V1800.
If the code still appears, contact your dealer.
Restart your @V1800.
If the code still appears, contact your dealer.
2. Find the lock switch underneath the machine
and unlock the machine.
3. Restart your @V1800.
If the code still appears, contact your dealer.
ADF paper jam.
Open the ADF cover and remove the paper from the
ADF.
If the code still appears, contact your dealer.
Restart your @V1800.
If the code still appears, contact your dealer
Restart your @V1800.
If the code still appears, contact your dealer
--
--
--
--
--
2-3
6-2
--
--
@V1800 User’s Manual Troubleshooting
6-1
Page 59

MESSAGE DURING SCANNING AND COPYING
For example,
LCD Message Action Page
Copy function
disables.
Check printer
cable or status.
Please download the printer profile. --
1. Check if the printer cable has been correctly
connected.
2. Check if the printer is turned on.
3. Restart the @V1800 and your printer.
4. If the message still appears, contact your
dealer.
--
INFORMATION CODES DU RING NETWORKING
Info
Code
20512 The connection
20519 The destination
20530 Network is down.
20531 Network is
20533 The connection
20534 The connection reset
20540 Connection time d out
20541 The attempt to
20545 The destination host
Meaning Action Page
failed.
address is invalid .
unreachable.
aborted by the
server.
by the server.
connect failed.
is not able to reach.
Ping the IP address of the @V1800 from
another PC in DOS prompt.
type “Ping 10.1.20.144” in Dos prompt.
If the @V1800 has no response, then
perform the following steps.
1. Check if the RJ-45 connector is firmly
plugged-in.
2. Check the Ethernet cable.
3. Check the @V1800 IP address.
4. Check the destination IP address.
5. Check Subnet Mask.
6.Check Gateway IP.
2-5,
2-9
Troubleshooting
6-2
Page 60

taken: insufficient system
Check if the Device Name is valid.
by
not
INFORMATION CODES DU RING E-MAILING
Info
Code
30421
31421
32421
31450 Requested mail action
31451
32451
31452
32452
30454
31454
30500
31500
32500
33500
30501
31501
32501
31503
32503
30504 Command parameters
Service not available ,
closing transmission
channel. The Server is
going to shut down.
not taken: mailbox
unavailable
Requested action
aborted: local error in
processing
Requested action not
storage
Temporary
authentication failure:
The authentication failed
due to a temporary
server failure.
Syntax error, command
unrecognized
Syntax error in
parameters or arguments
Bad sequence of
commands
implemented
Meaning Action Page
Contact the network administrator .
Check the “To” address.
Contact the network administrator .
Contact the network administrator .
Contact your network administrator
for further help on mail server’s
authentication mechanism.
Turn off the mail server’s
authentication, and try again.
Reboot the machine, and try again.
If the error still appears, contact
your dealer.
1.
The Device Name can be found
pressing the “Menu” button and
choose the “General” item.
2. Check the “From” address.
3. Check the “To” address.
4. Contact the network
administrator.
Restart the machine, and try later.
If the error still appears, contact
your dealer.
Check if the Device Name is valid.
The Device Name can be found by
pressing the “Menu” button and
choose the “General” item.
--
@V1800 User’s Manual Troubleshooting
6-3
Page 61

31550 Requested action not
Connection broken during
Check if the disk space of email
taken: mailbox
unavailable
[E.g., mailbox not found,
no access]
31551 User not local: please try
31551
32552
33552
31553
32554
32999
again.
Requested mail action
aborted: exceeded
storage allocation
Requested action not
taken:
Mailbox name not
allowed
Transaction failed
data transmission.
Check the “To” address.
Check the “To” address.
1. Check the “To” address.
2. Check mailbox storage allocation.
3. Contact your network
administrator for further help.
Check the “To” address.
Contact your network administrator
for further help.
1. Check network environment.
2.
attachment is larger than the
mailbox quota.
--
Troubleshooting
6-4
Page 62

Clearing a Paper Jam
In the event of a paper jam, follow the procedures below to remove the
paper:
1. Gently open the ADF front cover to the left.
2. Carefully pull the paper out of the ADF unit.
3. Close the ADF front cover. Your @V1800 is now ready to use.
@V1800 User’s Manual Troubleshooting
6-5
Page 63

Cleaning the ADF
v
w
From time to time the pad assembly and feeding rollers may become
contaminated with ink, toner particles or paper dust. In this case the
@V1800 may not feed documents smoothly. If this occurs please follow
the cleaning procedures to return your machine to its original state.
1. Moisten a cotton swab with isopropyl alcohol (95%).
2. Gently open the ADF front cover. Wipe the feeding rollers by moving
the swab from side to side. Rotate the rollers forward with your
finger and repeat the above cleaning procedures until the rollers are
clean. Be careful not to snag or damage the pick springs.
3. Wipe the pad in the direction from top to bottom. Be careful not to
hook the pick springs.
4. Close the ADF unit. Your machine is now ready to use.
u
Troubleshooting
6-6
Feeding Roller
Pick Spring
ADF Pad
Page 64

Cleaning the Glass
1.
Document Cover
The @V1800 is designed to be maintenance-free. However, it still needs
to be cleaned occasionally to ensure optimum image quality and
performance.
To clean the glass,
1. Open the document cover as shown below.
2. Dip a soft clean cloth with isopropyl alcohol (95%).
3. Gently wipe the document glass and the white sheet beneath the
document cover to remove the dust or any toner particles.
4. Close the document cover. The @V1800 is now ready for use.
1
2
2. Document Glass
@V1800 User’s Manual Troubleshooting
6-7
Page 65

Replacing the Snap-in Pad Module
v w
After scanning approximately 50,000 pages through the ADF, the pad may
be worn out and you may experience problems with document feeding. In
this case, it is highly recommended to replace the pad module with a new
one. For ordering the pad module, please consult your nearest dealer and
follow the procedure below to replace it.
Disassembling Procedure
1. Gently open the ADF front cover to the left.
2. Press both arms of the ADF snap-in pad module inwardly with your
fingers to pull out the ADF snap-in pad module.
ADF Pad
u
Troubleshooting
6-8
Page 66

Assembling Procedure
1. Take out the ADF pad module from the box.
2. Press both arms of the ADF snap-in pad module inwardly with your
two fingers
3. Place it into the holes until it snaps into place.
@V1800 User’s Manual Troubleshooting
6-9
Page 67

Frequently Asked Questions and Answers
E-MAIL TRANSMISSION
Q: Can I adjust the image contrast when sending e-mails from the
@V1800?
A: No, when you are sending the image, you are unable to adjust the
image contrast since it has been optimized. Yet, your recipient is able to
adjust it in the Image Editing software application.
Q: Is it possible to scan and generate multi page documents from
flatbed?
A: Yes, please press the "Manual Feed" button before pressing the
E-Mail, or Copy function button. After the scanning of your first page has
been completed, the LCD- display would indicate to continue or end your
scanning. Follow the instruction to complete the request. After
completing scanning all your pages, press the “Manual Feed” button again
to disable the function.
Troubleshooting
6-10
Page 68

COPY
Q: Is the @V1800 compatible with Inkjet color printer?
A: So far the @V1800 is only compatible with laser printer with PCL-
compliant printer language.
OTHERS
Q: How to know the version of my @V1800?
A: Press the Menu key on the control panel, choose #9 Information. All
information including the IP address, serial number, and the firmware
version appear.
Q: How to use the function button #1 to #6 from the keyboard
provided by Avision?
A: Function button #1 to #6 are used store your favorite settings, for
example, your most frequently used copy setting, and e-mail setting
setting. To set your function button, simply follow these steps.
Press the “Menu” button on the Control Panel and then select “Function
Buttons“ >“Function Button#1”> “Copy, or Email ” in succession and
then set your favorite copy, e-mail settings. Finally, select “Save & Exit”
to save the settings.
@V1800 User’s Manual Troubleshooting
6-11
Page 69

To use the function button is easy. For example, when you need to copy,
simply press the “ Fn#1”(If your previously set function button #1 is Copy
setting), the Copy screen will appears. Press the Go button, then your
document will be printed out according to the previously setting in
Function Button #1.
Likewise, if you need to e-mail, simply press the “ Fn#2”(If your previously
set function button #2 is E- mail setting), the E-mail screen will appears.
Press the Go button, then your document will be converted and emailed
according to the previously setting in Function Button #2.
Q: If the keyboard supplied from Avision is defective, can I use
another set of keyboard? And does the function buttons still work?
A: Yes, you can replace with any other keyboard as long as it is PS2 type.
Type characters and numbers as usual. However, the function button and
the control keys may not work properly.
Troubleshooting
6-12
Page 70

Technical Support
If your problem still exists after trying the above solution, please prepare
the following information and then contact the technical support of
Avision.
• Serial number of your machine
• Your network parameters
• Error Code and its description if any
• Brand and model name of the Printer connected to the machine
Headquarter
Avision Inc.
No. 20, Creation Road I, Science-Based Industrial Park,
Hsinchu 300, Taiwan, ROC
TEL: +886 (3) 578-2388
FAX: +886 (3) 577-7017
EMAIL: service@avision.com.tw
Web Site: http://www.avision.com
US and Canada
Avision Labs., Inc.
6815 Mowry Ave., Newark CA 94560, USA
TEL: +1 (510) 739-2369
FAX: +1 (510) 739-6060
EMAIL: support@avision-labs.com
Web Site: http://www.avision.com
@V1800 User’s Manual Troubleshooting
6-13
Page 71

Appendix
Quick Guide
u
Placing Your Documents
For multi-page transmission
Place your document FACE UP in the ADF.
For single-page transmission
Place your documents FACE DOWN on the glass.
12.
a
Page 72

button to make
button to make
to select
send your document in color.
w
+
v
Making Copies Through Your Printer
Press the Copy button.
Sending Your Docum ent via Emails
Enter your copy count via the
numeric keypad
Enter an email address with your
keyboard or with the character
keypad
Press the Mono
B&W copies.
Press the Color
color copies.
Press the Mono button to
send your document in
Black & white.
Press the E- Mail button.
b
or press "Address/Phone Book"
from the list
(i.e . )
+
Press the Color button to
Page 73

Specifications
Items Specifications
System Overview
System Description Stand-alone Internet Appliance
Output Quality 600 dpi, 36 bit color
External Connections 1. RJ-45 (for Network connection)
2. SPP (for Copy application)
3. RJ-11 (option, for PSTN connection)
4. PS2 (option, for External standard PS2
keyboard)
Internet Transmission Speed
(ADF, Letter, B/W, Gray,
Color)
Copy Speed
(ADF, A4, 300 dpi)
Network Connection Yes, 10/100 Mbits auto-negotiation
Networked Workgroup
Solution for:
Output Format PDF, JPEG, PNG, Postscript, PCL
CPU 32 bit RISC CPU
Memory Size Flash: 2 MB
ADF Document Size 4.5” x 5.5” ~ 8.5” x 14”
ADF Document
Weight/Thickness
ADF Capacity 25 sheets
Paper Feed Face Up
Dimension 447x365x275(mm)
Weight 6 kgs
Power Supply 24V DC, 2A external power adapter
Power Consumption Less than 30W
200 dpi: 8 PPM
B/W: 9 PPM
Color: 1.5 PPM
Stand-alone Copy
E-Mail via Internet/Intranet
DRAM: 8 MB
14 ~ 28 lb / 0.002” ~ 0.006”
c
Page 74

Copy
Output Format Postscript, PCL
Speed for Local Copy B/W: 9 PPM
Color: 1.5 PPM
Multiple Copies Up to 99
Copy Mode Standard, High Quality
Enlarge / Reduce Whole Page (97%)
25%~400% in 1% increment/decrement
Pre-set Scales
Customized
Network/Internet Applications
Connectivity Ethernet 10BaseT/100BaseTX auto-negotiation
with RJ-45 connector
Communication Protocol TCP/IP, SMTP, FTP, HTTP, MIME, LDAP
File Formats PDF, JPEG, TIFF
Supported Browsers Microsoft IE 4.1 or higher
Netscape Navigator 4.0 or higher
Configuration Requirement 1. IP address & subnet mask
2. Gateway
3. SMTP server/Gateway
System Capacity E-mail Addresses/Fax numbers: 2000
Group: 100
Number of Email in one group: 99
Security Yes
Network Management Configuration and administration via standard
Web Browsers
d
Page 75

Glossary
ADSL - Asymmetrical Digital Subscriber Line
Asymmetrical Digital Subscriber Line, a high speed communications line
Client/server
A client is a computer that requests service from another computer
(server).
Dial-up connection
A connection to the Internet made via phone & modem.
Direct connection
A connection made directly to the Internet.
Ethernet
Ethernet is a standard for connecting computers into a local area network
(LAN). The most common form of Ethernet is called 10BaseT, which
denotes a peak transmission speed of 10 mbps using copper twisted-pair
cable.
Gateway
An interface that connects two different networks (a LAN can be
connected to the Internet through some kind of gateway.)
Hub
This chunk of hardware is used to network computers together (usually
over an Ethernet connection). It serves as a common wiring point so that
information can flow through one central location to any other computer
on the net work.
IP Address
Internet Protocol Address – every computer on the Internet has a unique
identifying number, like 191.2.24.2
e
Page 76

LAN
Local Area Network – a network of computers installed within a small area,
such as an office building.
Modem (MOdulator, DEModulator)
A device that you connect to your computer & to a phone line, that allows
the computer to talk to other computer through the phone system.
Basically, modems do for computers what a telephone does for a human.
Network
Groups of computer that are connected together so that they can share
resources and exchange data.
Node
Any server connected to the Internet.
POP
Post Office Protocol – Internet protocol used by your ISP to handle emails
for its subscribers. A POP account is just a synonym for an email account.
Protocol
A set of rules and conventions that describes the behaviors that computer
must follow in order to understand each other.
Router
A piece of equipment which connect two or more networks.
SMTP
Simple Mail Transfer Protocol – a main protocol to send and receive email
between servers on the Internet.
SMTP Port
This setting defines the TCP/IP port for incoming mail. By default, this
setting uses port 25 that is the Internet standard for receiving SMTP mail.
If your SMTP server listens on a non-standard port, change this value
accordingly.
f
Page 77

Subnet mask
A mask used to determine what subnet an IP address belongs to. An IP
address has two components, the network address and the host address.
For example, consider the IP address 150.215.017.009. Assuming this is
part of a Class B network, the first two numbers (150.215) represent the
Class B network address, and the second two numbers (017.009) identify a
particular host on this network.
TCP/IP
Transmission Control Protocol/Internet Protocol – a suite of communication
protocol that defines the basic working of the Internet. In fact, TCP/IP is
the protocol of the Internet because it’s the language by which all Internet
computers talk to each other.
g
 Loading...