

Page 1
Document Scanner
Getting Started Guide
Trademarks
Microsoft is a U.S. registered trademark of Microsoft
Corporation.
Windows, Windows Vista, Windows 7 and Windows 8 are either
registered trademarks or trademarks of Microsoft Corporation in
the United States and/or other countries.
Other brands and product names herein are trademarks or
registered trademarks of their respective holders.
Copyright© 2013 Avision Inc. All rights reserved.
English
Page 2

ii
Table of Contents
1. Introduction ................................................. 1
2. Scanner Installation ..................................... 2
2.1 Unlocking your scanner ...................................2
2.2 Installing the Scanner Driver and Connecting
the Cables .....................................................3
3. Completing Your First Scan .......................... 6
3.1 Loading Your Paper .........................................6
3.2 Placing paper on the document glass ................8
3.3 Verifying Your Scanner Installation ...................8
3.4 A Glance of the Scanner Properties Dialog Box . 10
4. ISIS Interface Operation ............................ 11
5. Using the Buttons ...................................... 12
5.1 Installing Button Manager V2 ......................... 12
5.2 Checking the Button Configurations before
Scanning ..................................................... 12
5.3 Scanning From One Touch of the Buttons ........ 14
6. Maintenance ............................................... 15
6.1 Cleaning the Glass ........................................ 15
6.2 Cleaning the ADF.......................................... 16
7. Troubleshooting ......................................... 17
7.1 Removing the abnormal lines on your scanned
image ......................................................... 17
7.2 Clearing a Paper Jam .................................... 18
Page 3
1
1. Introduction
Congratulations on your purchase of the color image
scanner. Avision is one of the leading companies to make
high quality color image scanner.
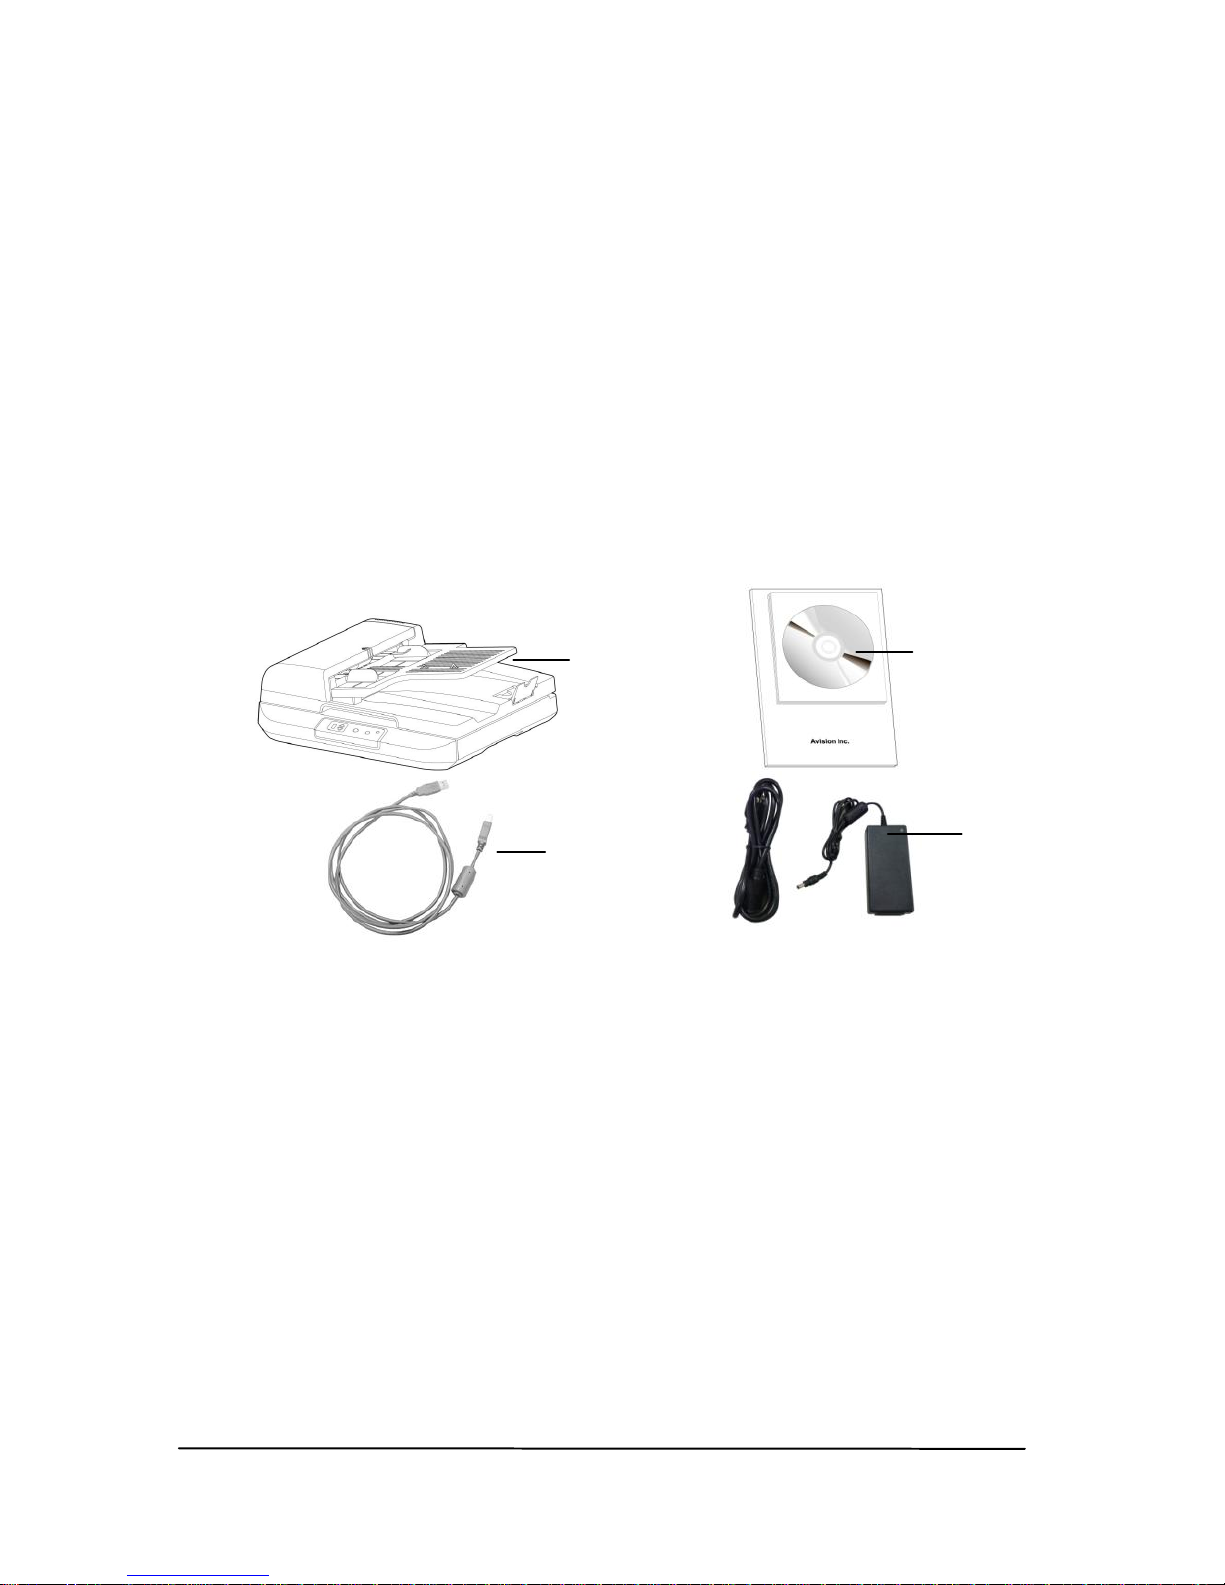
The following figure indicates the package contents. Please
check all the items against your checklist. If you do not
receive all the items, please contact your authorized local
dealer immediately.
1. Scanner Main Unit
2. Software CD/Quick Guide
3. USB Cable
4. Power Adapter & Power Cord
1
3
4
2
Page 4
2
2. Scanner Installation
2.1 Unlocking your scanner
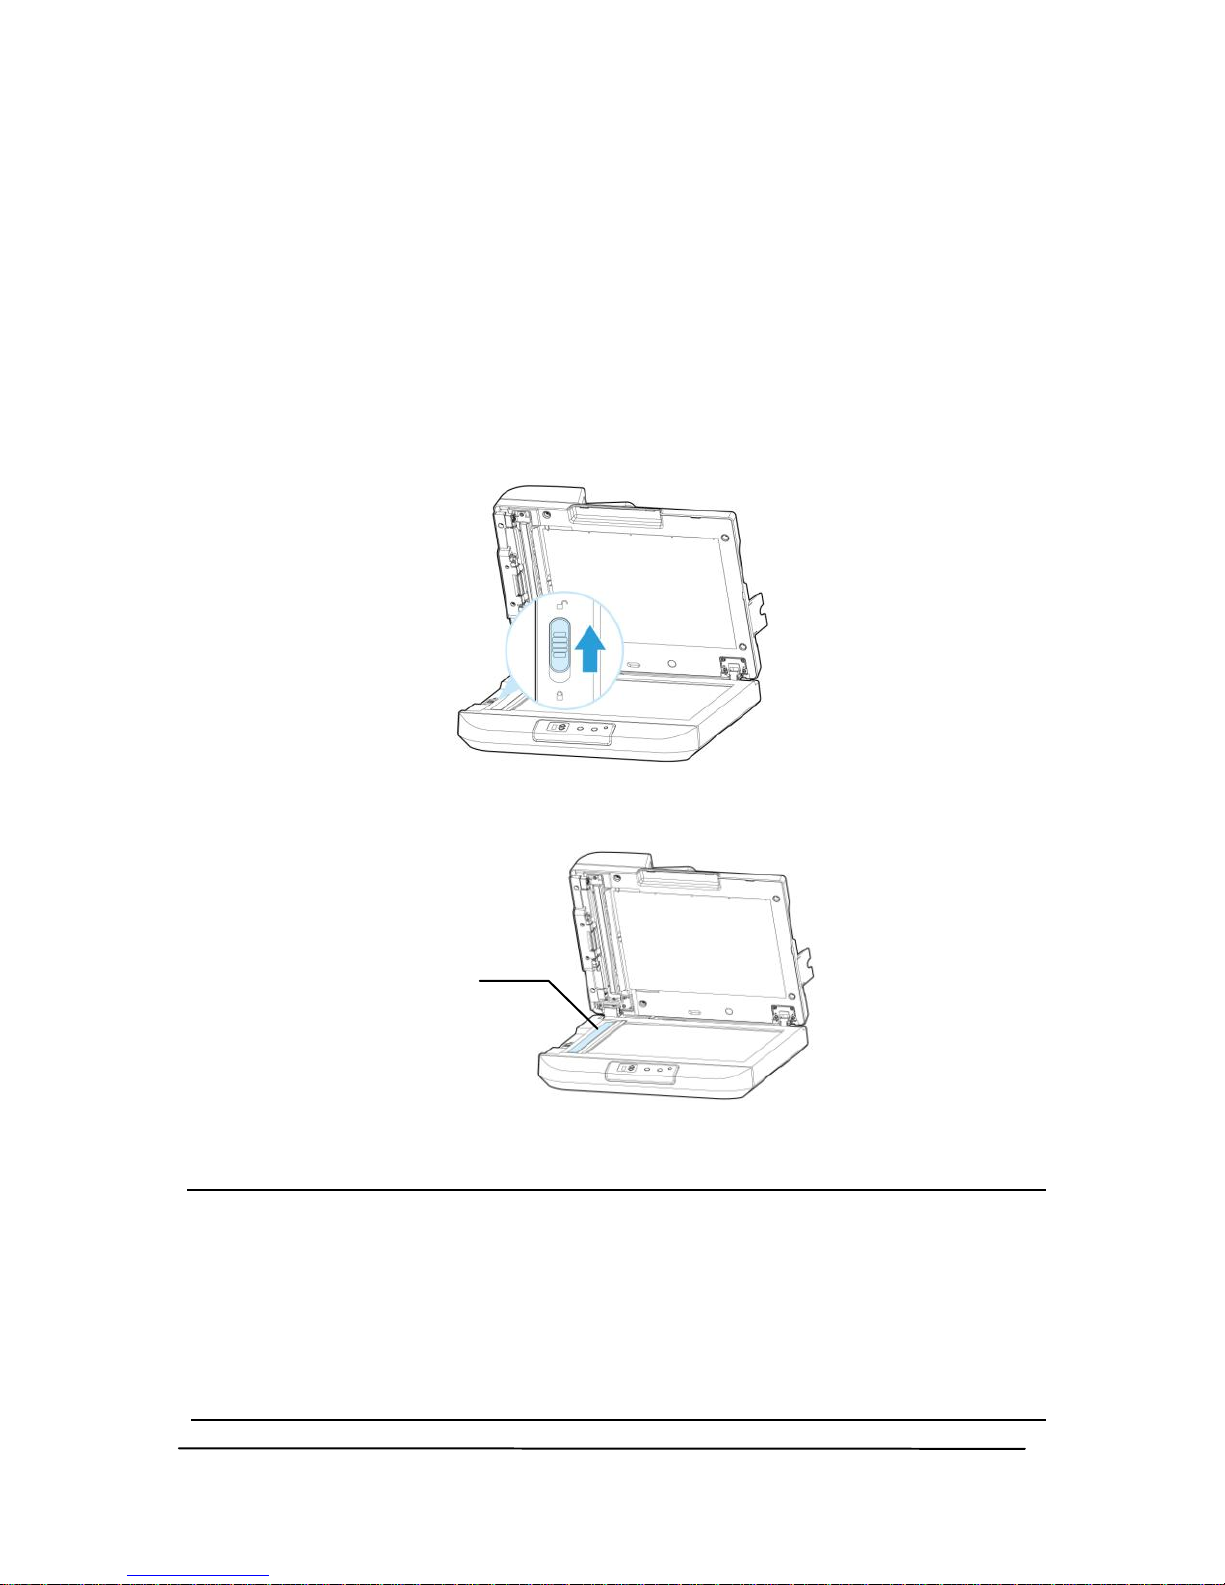
To protect the scanning unit from damage during transportation,
a lock switch is designed to keep the scanning unit from
moving. To unlock the scanner, move the lock switch to the
unlock position as shown in Fig. 2-1.
Figure 2-1 Unlocking the Scanner
Figure 2-2 Home position
Note: If the scanning unit is not located at the front of the
scanner before transporting the scanner, be sure to do the
follows:
1. Turn on the scanner. The scanning unit should move to
the front of the scanner.
2. Press the lock switch down to the “Lock position”.
3. The scanner is now ready to transport.
Scanning unit at
this position
before locking the
scanner
Page 5
3
2.2 Installing the Scanner Driver and Connecting the
Cables
NOTE:
1). The Windows system CD may be required when installing
on some PC’s.
2). To ensure your computer can identify the USB scanner,
please install scanner driver first before connecting the
scanner to your computer.
3). The scanner driver contains TWAIN, ISIS and WIA driver.
If you are running Windows Me, Windows XP, or Windows
Vista, after the installation of scanner driver is completed,
this scanner allows you to scan via a TWAIN, ISIS, or a
WIA interface. Start your TWAIN-compliant image editing
software application to select a TWAIN or WIA user
interface or your ISIS software to select an ISIS user
interface. You may also launch Microsoft’s Scanner and
Camera Wizard to scan via a WIA user interface.
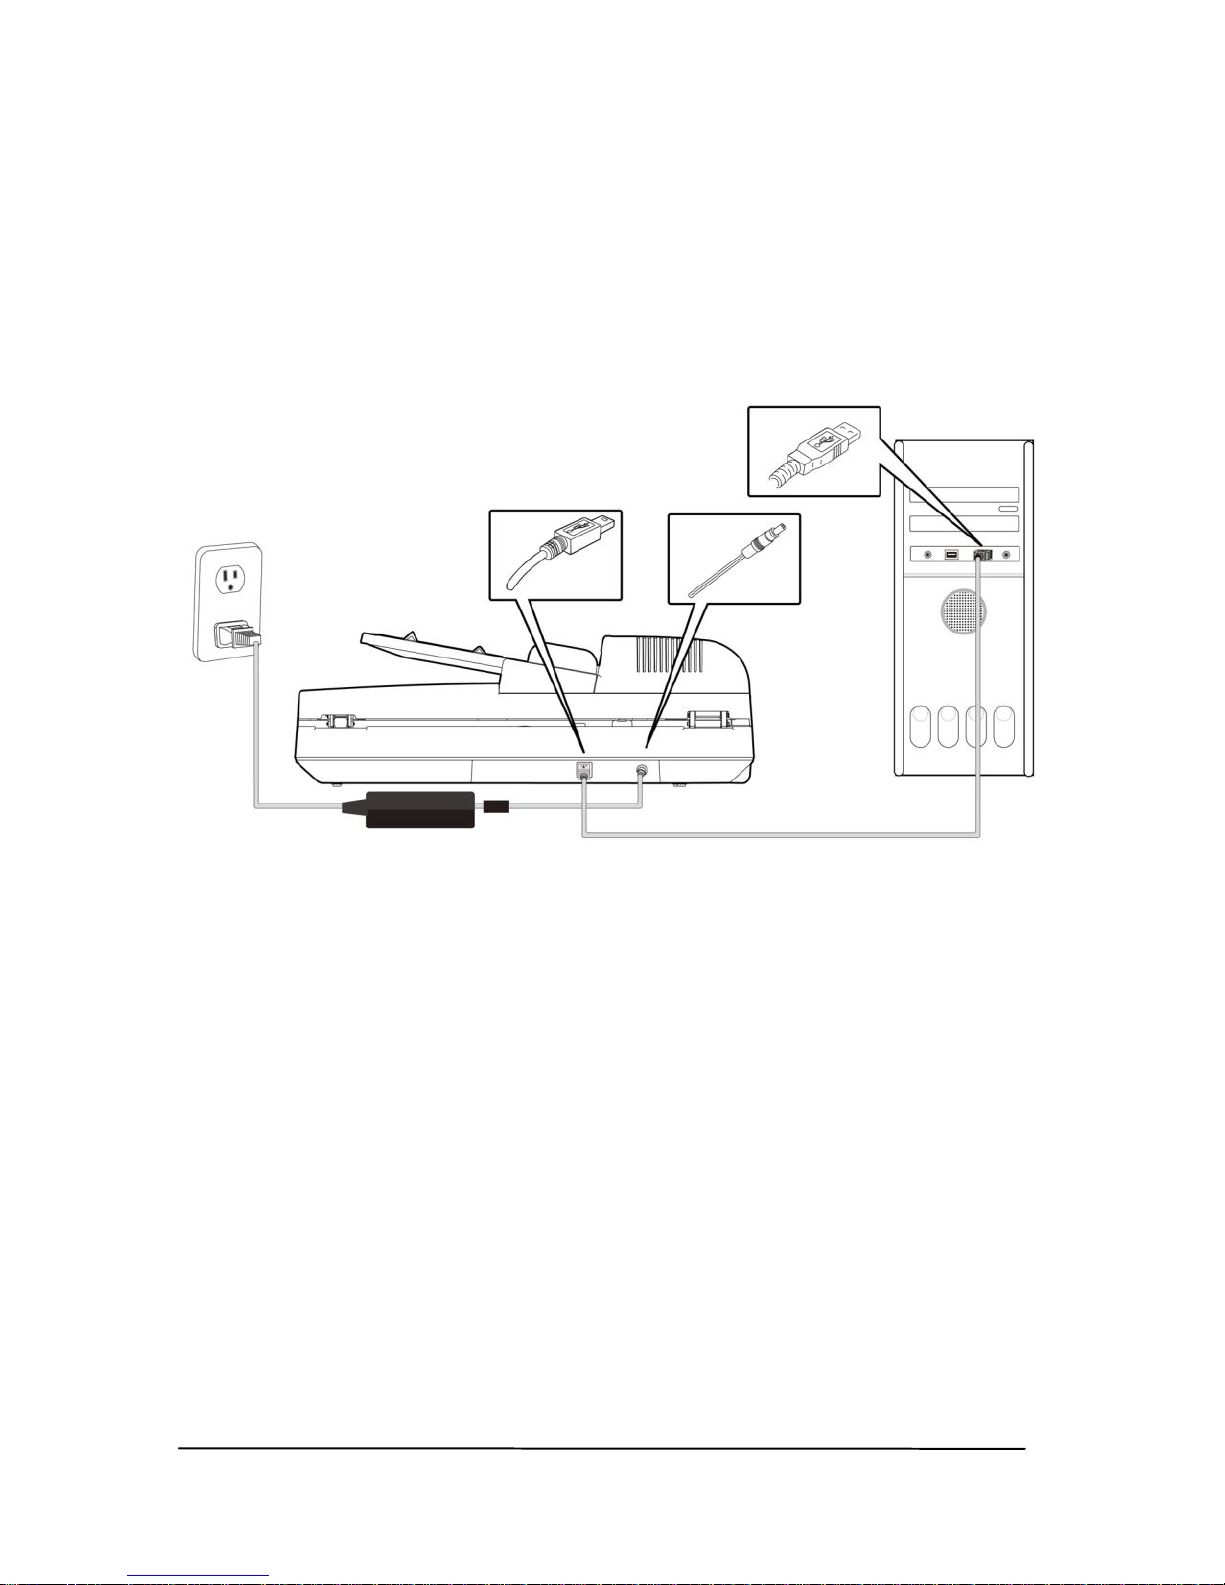
2.2.1 Connecting to Power
Before connecting, make sure the power switch is off.
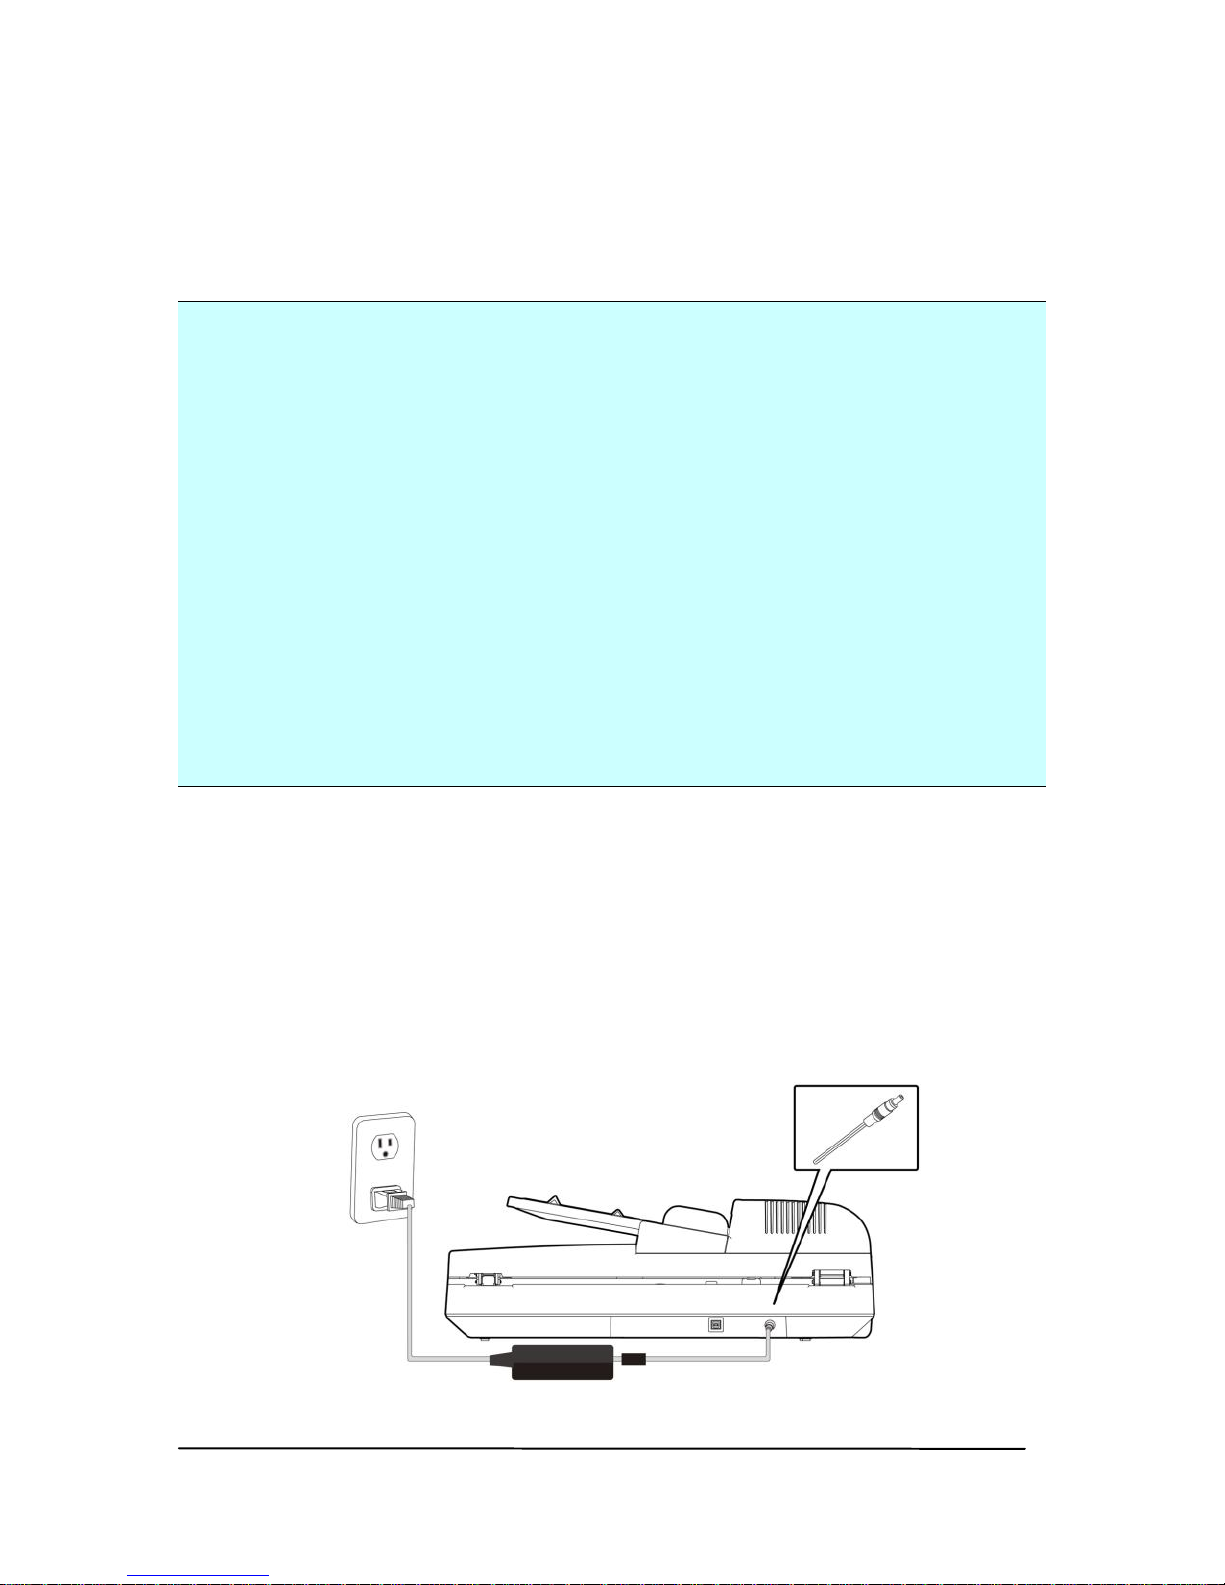
Plug the small end of the power adaptor into the power jack of
your scanner. Insert the other end to an appropriate power
outlet.
Page 6
4
2.2.2 Turning on the Power
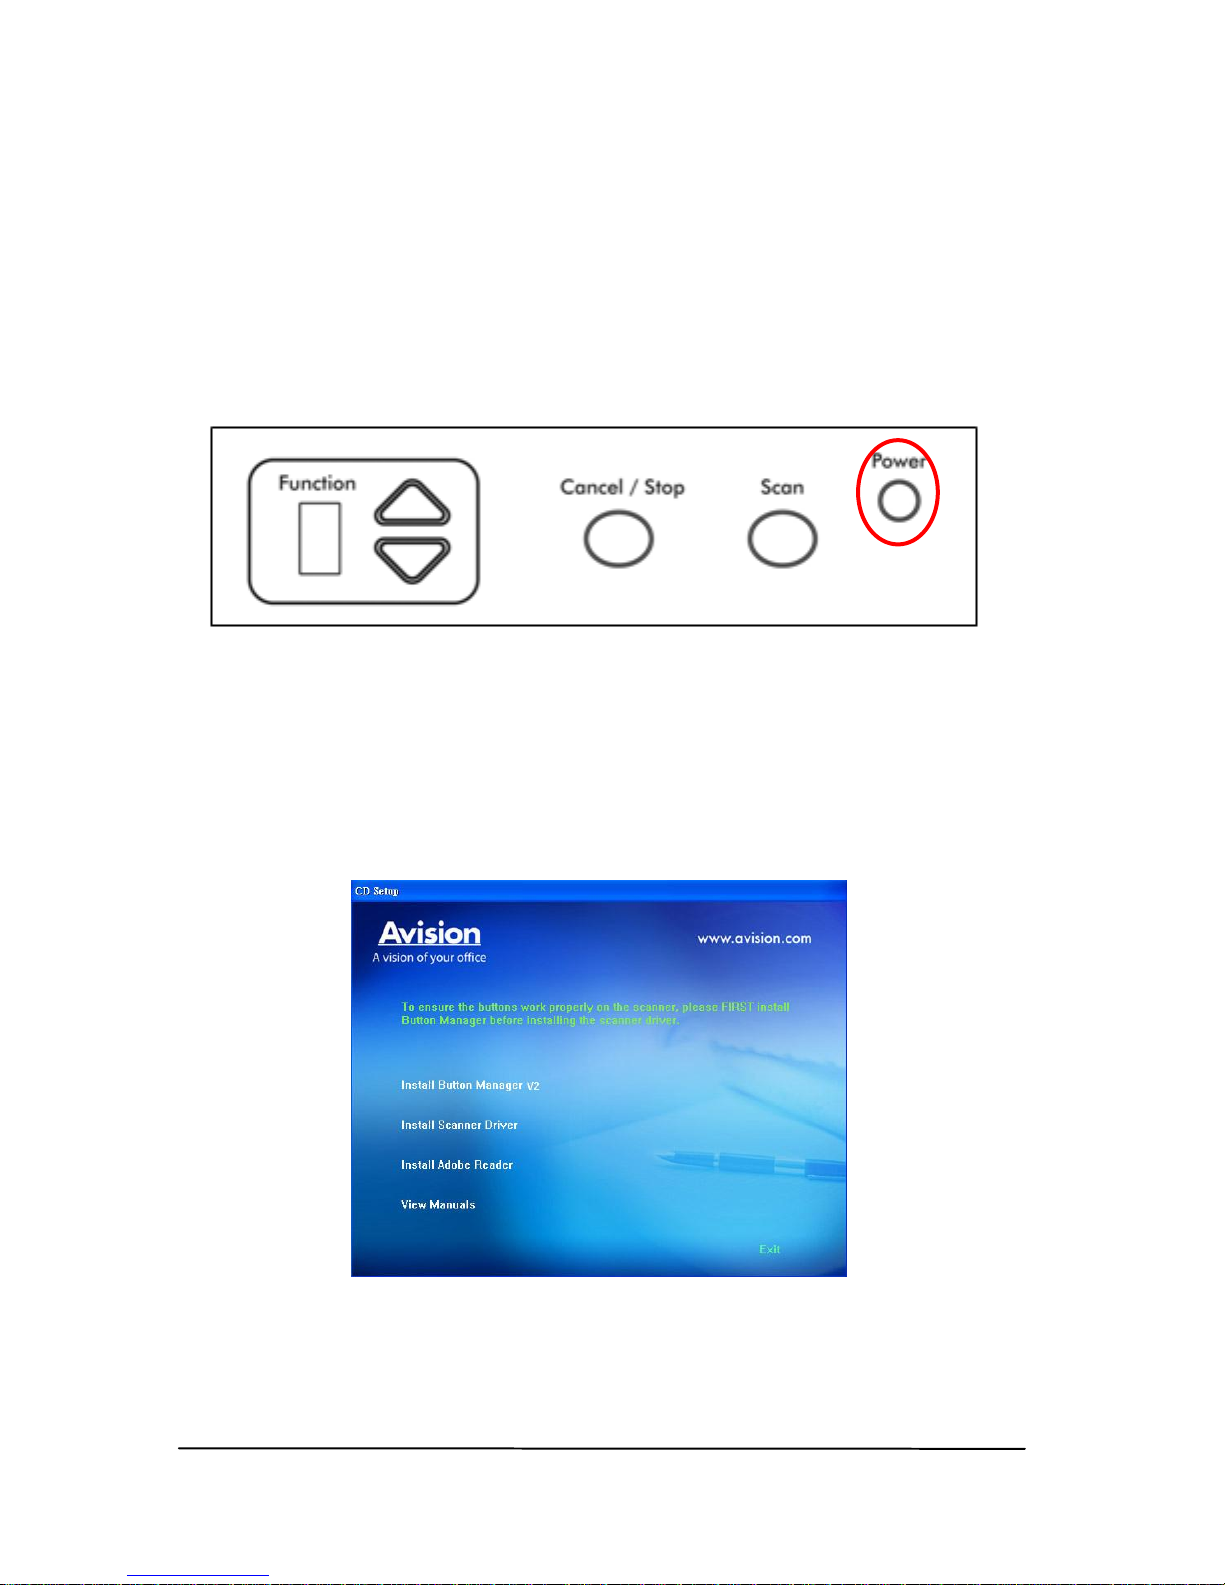
Press the Power Switch button on the front panel, the Power
LED will be lit. To turn off the scanner, press the Power
Switch button for about 3 seconds, the Power LED will be off.
2.2.3 Installing the Scanner Driver
1. Place the supplied CD-ROM onto your CD-ROM drive.
2. The software installation graphic appears. If not, run
“setup.exe”.
3. Click Install Button Manager V2 to install the Button
Manager V2 software and then click Install Scanner
Driver to install the scanner driver on your computer.
Page 7
5
2.2.4 Connecting to Computer
1. Connect the square end of the USB cable to the USB port of
your scanner. Connect the rectangle end to the USB port of
your computer.
2. The computer should detect a new USB device and prompt
a “New Hardware Found” message.
3. In Windows XP or later, click the Next button to continue.
When the XP certification screen appears, click Continue
Anyway to complete the installation.
4. When the Finish dialog is prompted, click the Finish
button.
Page 8

6
3. Completing Your First
Scan
3.1 Loading Your Paper
3.1.1 Notice on Using the ADF
Before using the ADF, please make sure that your paper meets
the following specifications:
Document(s) can range in size from 5.8” x 8.3” (148 x
210 mm) to 11.7” x 16.5” (297 x 420 mm)
Document(s) can range in weight from 16 to 28 lbs
(60~105 g/m2)
Document(s) should be square or rectangular and in good
condition (not fragile or worn).
Document(s) should be free of curl, wrinkle, tears, wet ink,
or punch holes.
Document(s) should be free of staples, paper clips, paper
sticky notes.
Page 9
7
3.1.2 Placing Your Document in the ADF Paper Tray
Fanning Your Document
Standard paper size should feed easily through the scanner.
To avoid occasional paper jam when automatically feeding
multiple documents, loosen the paper before loading.
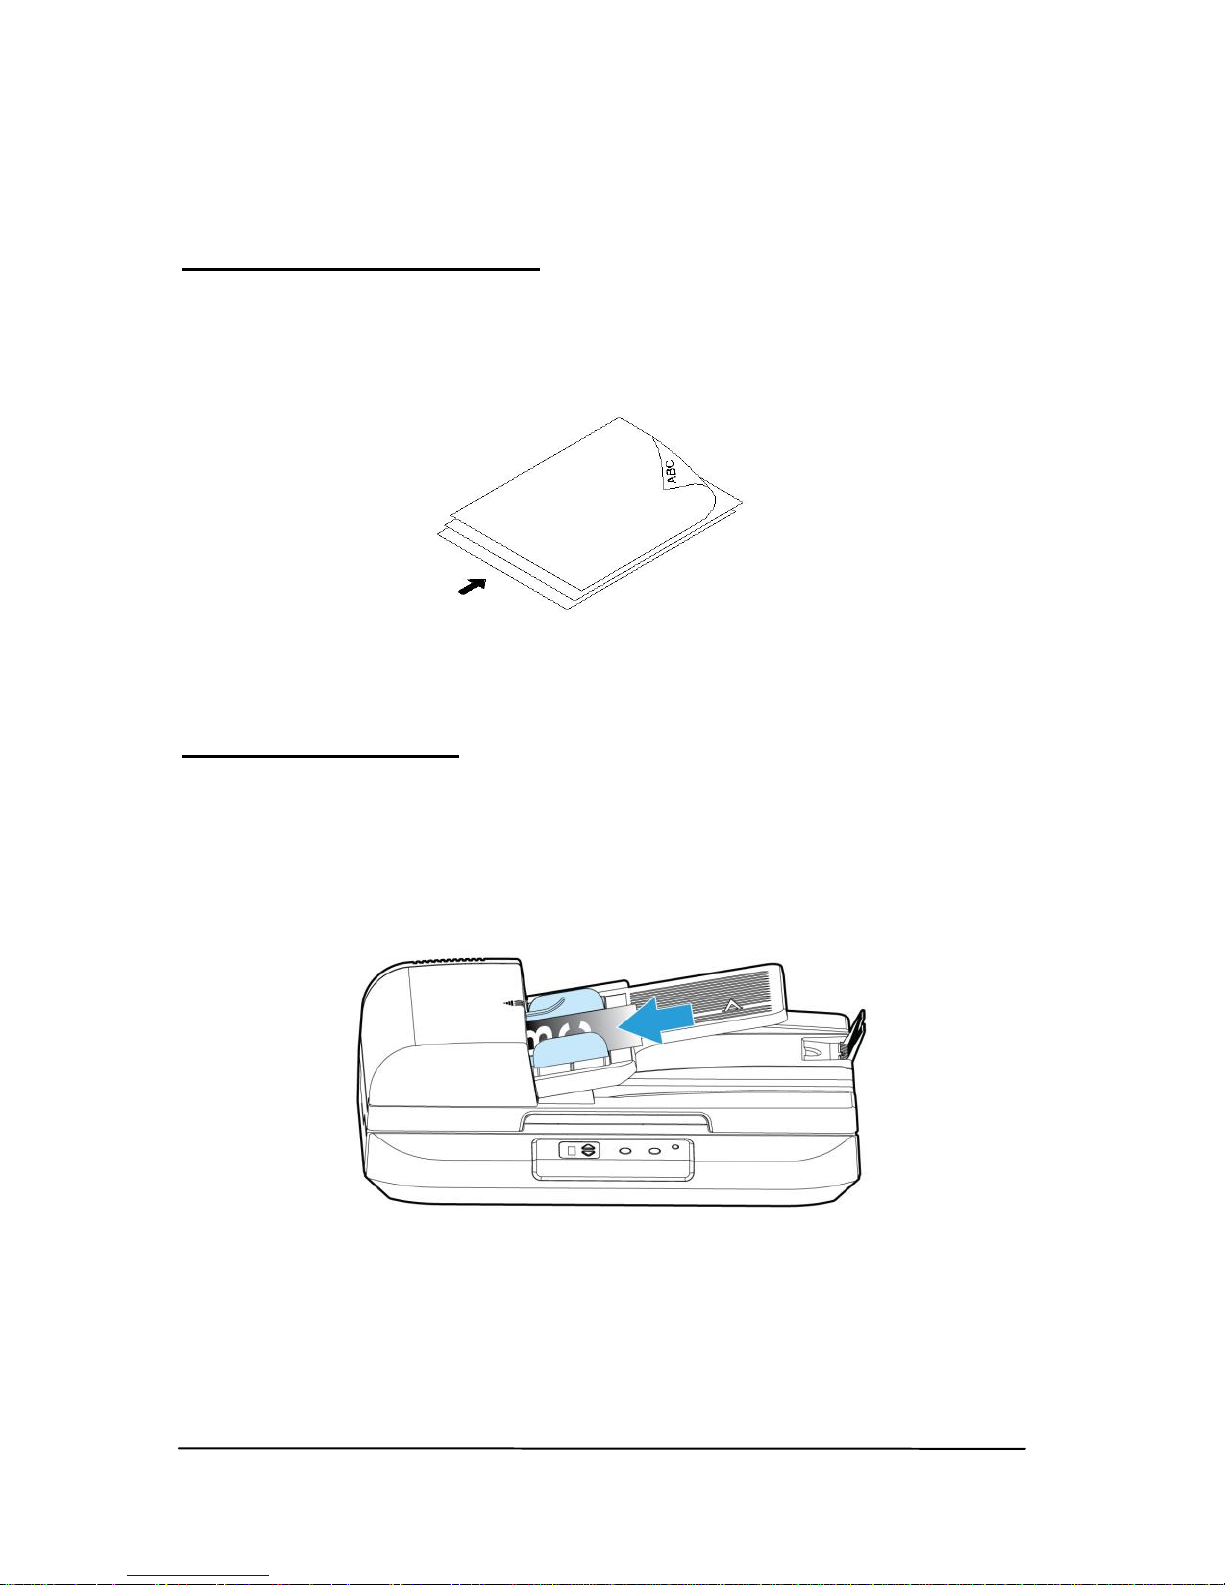
Document Feeding
Place your document with the text face up and make the top
of the page point to the document feeder as shown below.
Center your document with the paper guides and make sure
the edge of document touch the paper guides.
Page 10
8
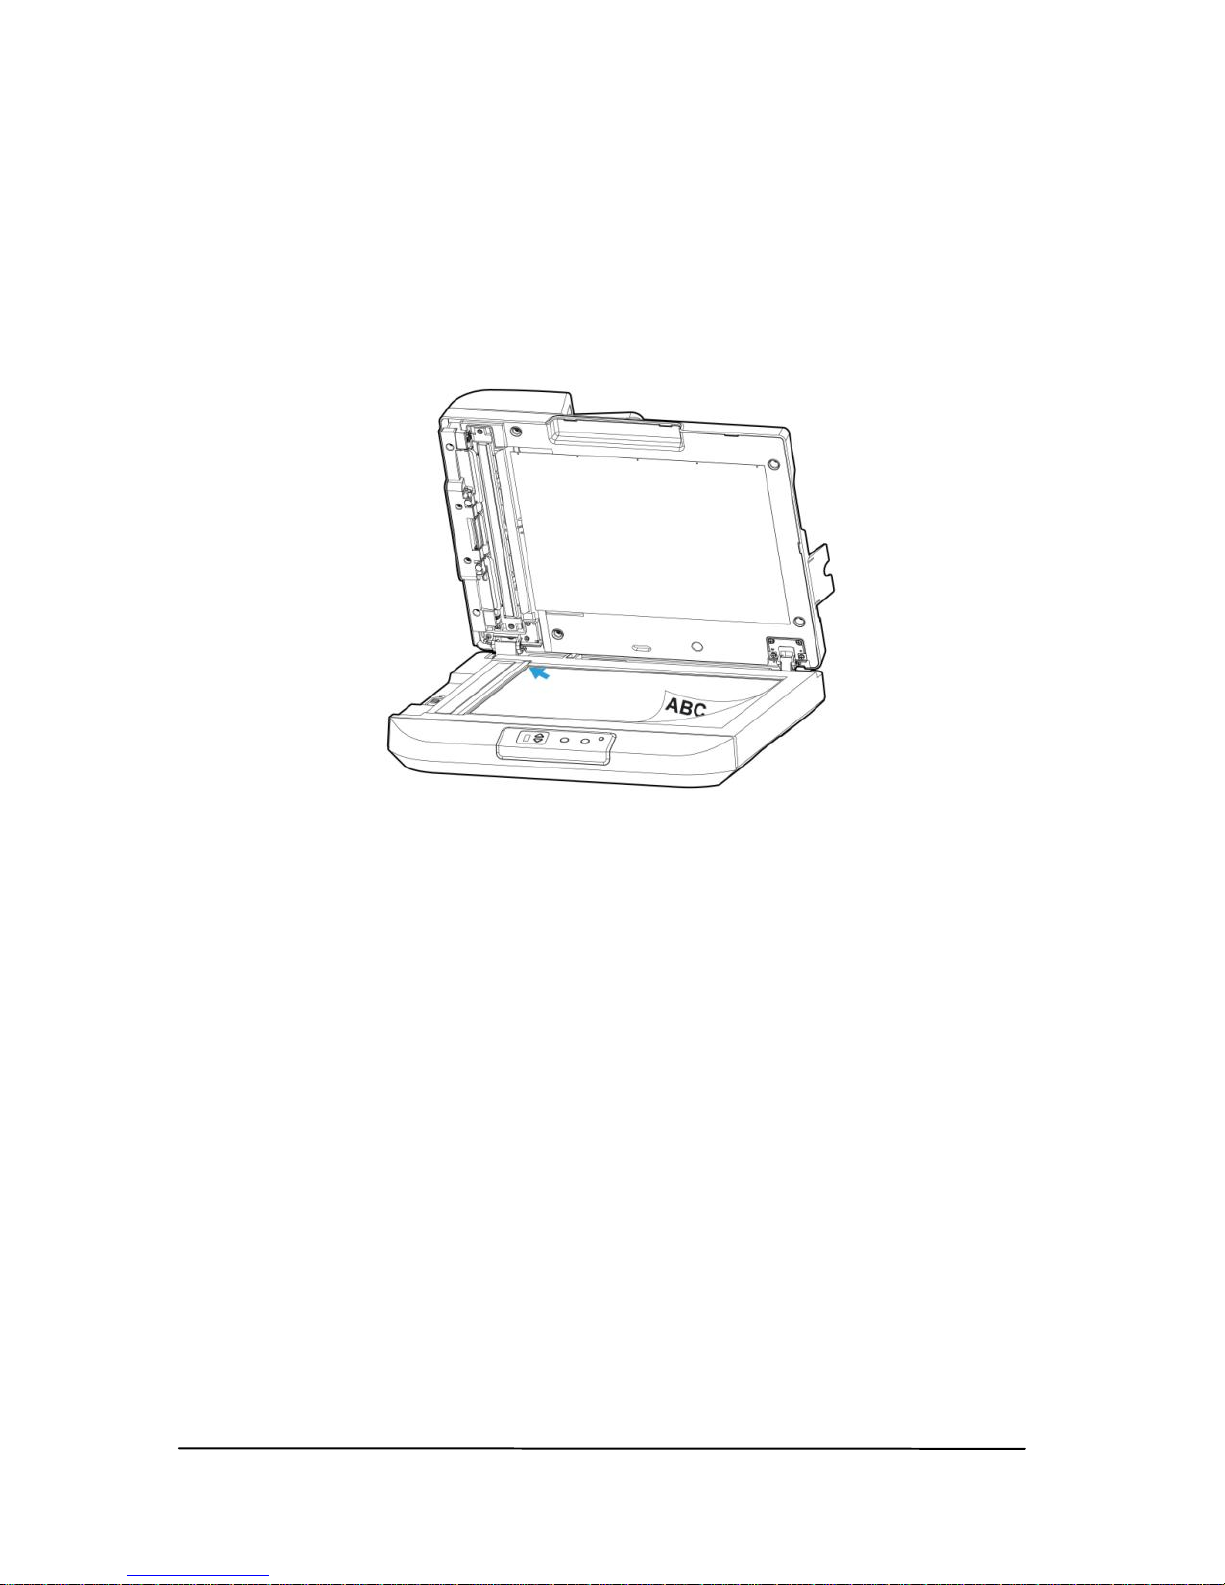
3.2 Placing paper on the document glass
Place your document face down on the document glass and
align the document to the reference mark as indicated.
3.3 Verifying Your Scanner Installation
To verify if your scanner installation is correct, Avision provides
you a useful test program called Avision Capture Tool. With
this tool, you can perform simple scans and view the captured
images. In addition, it helps you complete your scan at a rated
speed.
The following procedure describes how to verify your scanner
installation. If the installation is not correct, please review the
preceding section to check if the cable connection and scanner
driver have been successfully installed.
Before you begin, be sure the scanner is on.
1. Select Start>Programs>Avision AVxxx Scanner>Avision
Capture Tool.
Page 11
9
Note: If Avision Capture Tool does not appear on “All
Programs” of your Start menu, please access from the
following path:
C\Windows\TWAIN_32\Avision\Avxxx\Avision Capture
Tool.exe
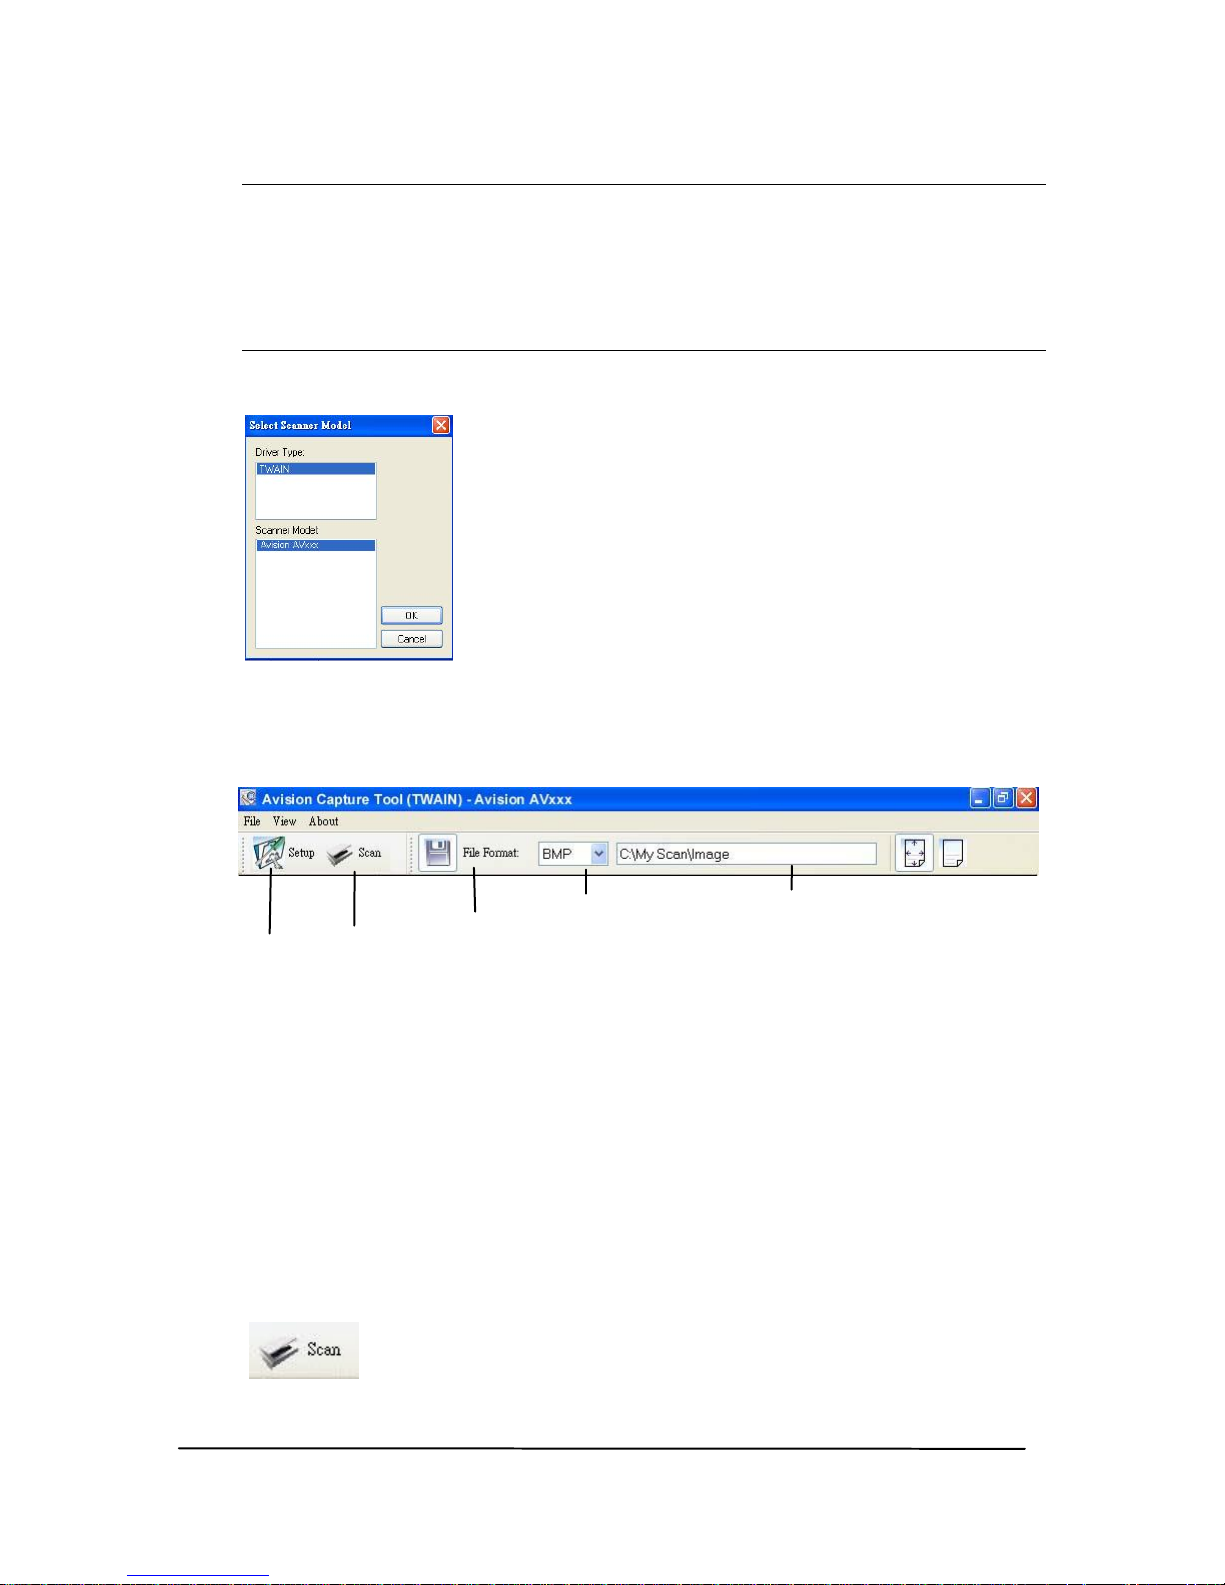
The Select Scanner Model dialog box will be displayed.
2. Select your driver type and scanner model and click OK.
The following Avision Capture Tool dialog box will be
displayed.
3. Choose your desired file format from the File Format drop
down list box. (Default is BMP, other choice includes TIFF,
MTIFF, PDF, MPDF, GIF, and JPEG.) The supported file
formats vary depending on your scanner model.
4. Type your desired folder name and file name in the File
Path box. (Default is C:\My Scan\Image.)
5. Place your document face down on the document glass or
face up in the auto document feeder.
6. In the Scan Validation dialog box, click the Scan button
( ) or choose Scan from the File menu.
Setup
Scan
File Format
Save File Path
Page 12
10
7. The document will be scanned and displayed in the Scan
Validation screen. After the scanned images have been
displayed, your scanner installation verification is
completed.
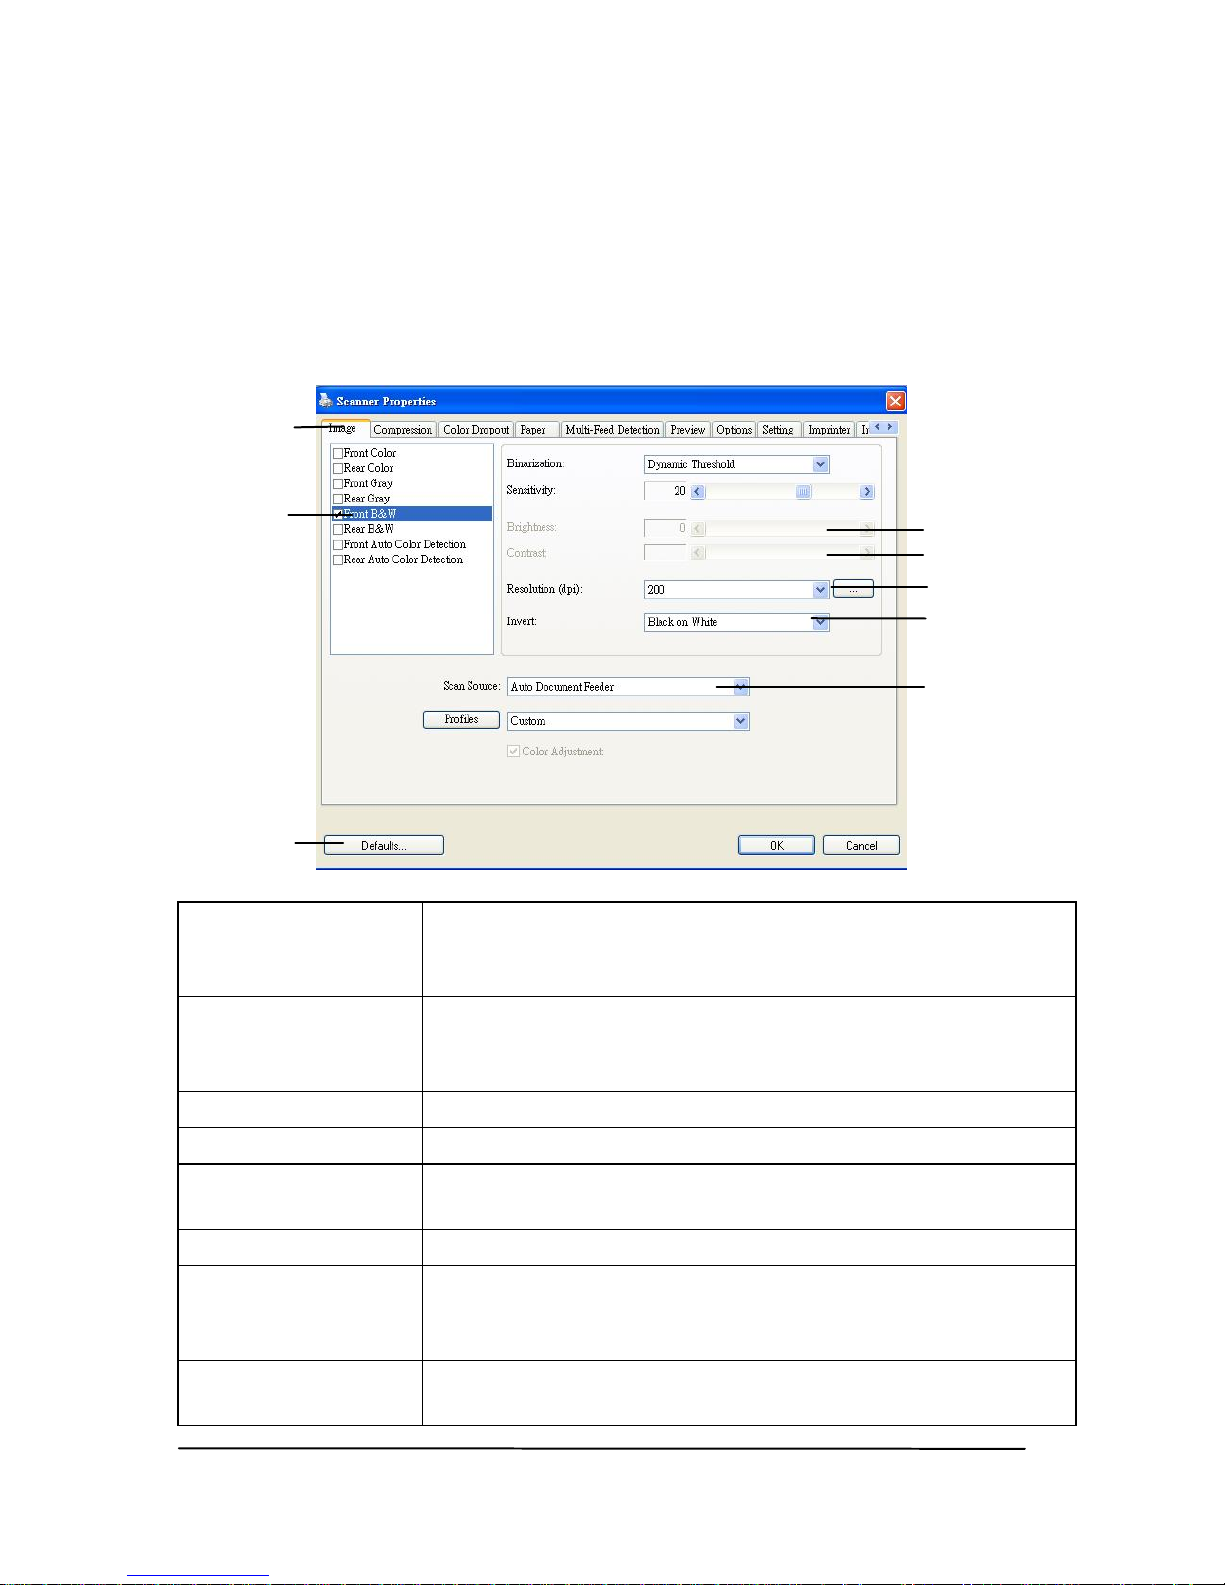
3.4 A Glance of the Scanner Properties Dialog Box
1. Tab Options
Choice: Image, Compression, Color Dropout,
Paper, Multi-Feed Detection, Preview, Options,
Settings, Information.
2. Image
Selection Box
Choose your image type and the side of document
you wish to scan. Options vary based on type of
scanner.
3. Brightness
Adjust the brightness level from –100 to +100.
4. Contrast
Adjust the contrast level from –100 to +100.
5. Resolution
Determine the quality of the scanned image. The
industry standard is 200 dpi.
6. Invert
Reverse the color of your scanned image.
7. Scan Source
Choice: Auto Document Feeder, Flatbed, Flatbed
(Book), Automatic (varies due to different scanner
model)
8. Defaults
Reset all values on the tabs to the factory default
settings.
3
4
5
6
7
1
2
8
Page 13
11
4. ISIS Interface Operation
* Please refer to the preceding chapter, Scanner Installation, to
install ISIS scanner driver. You may start the supplied
QuickScan software application to scan via the ISIS user
interface.
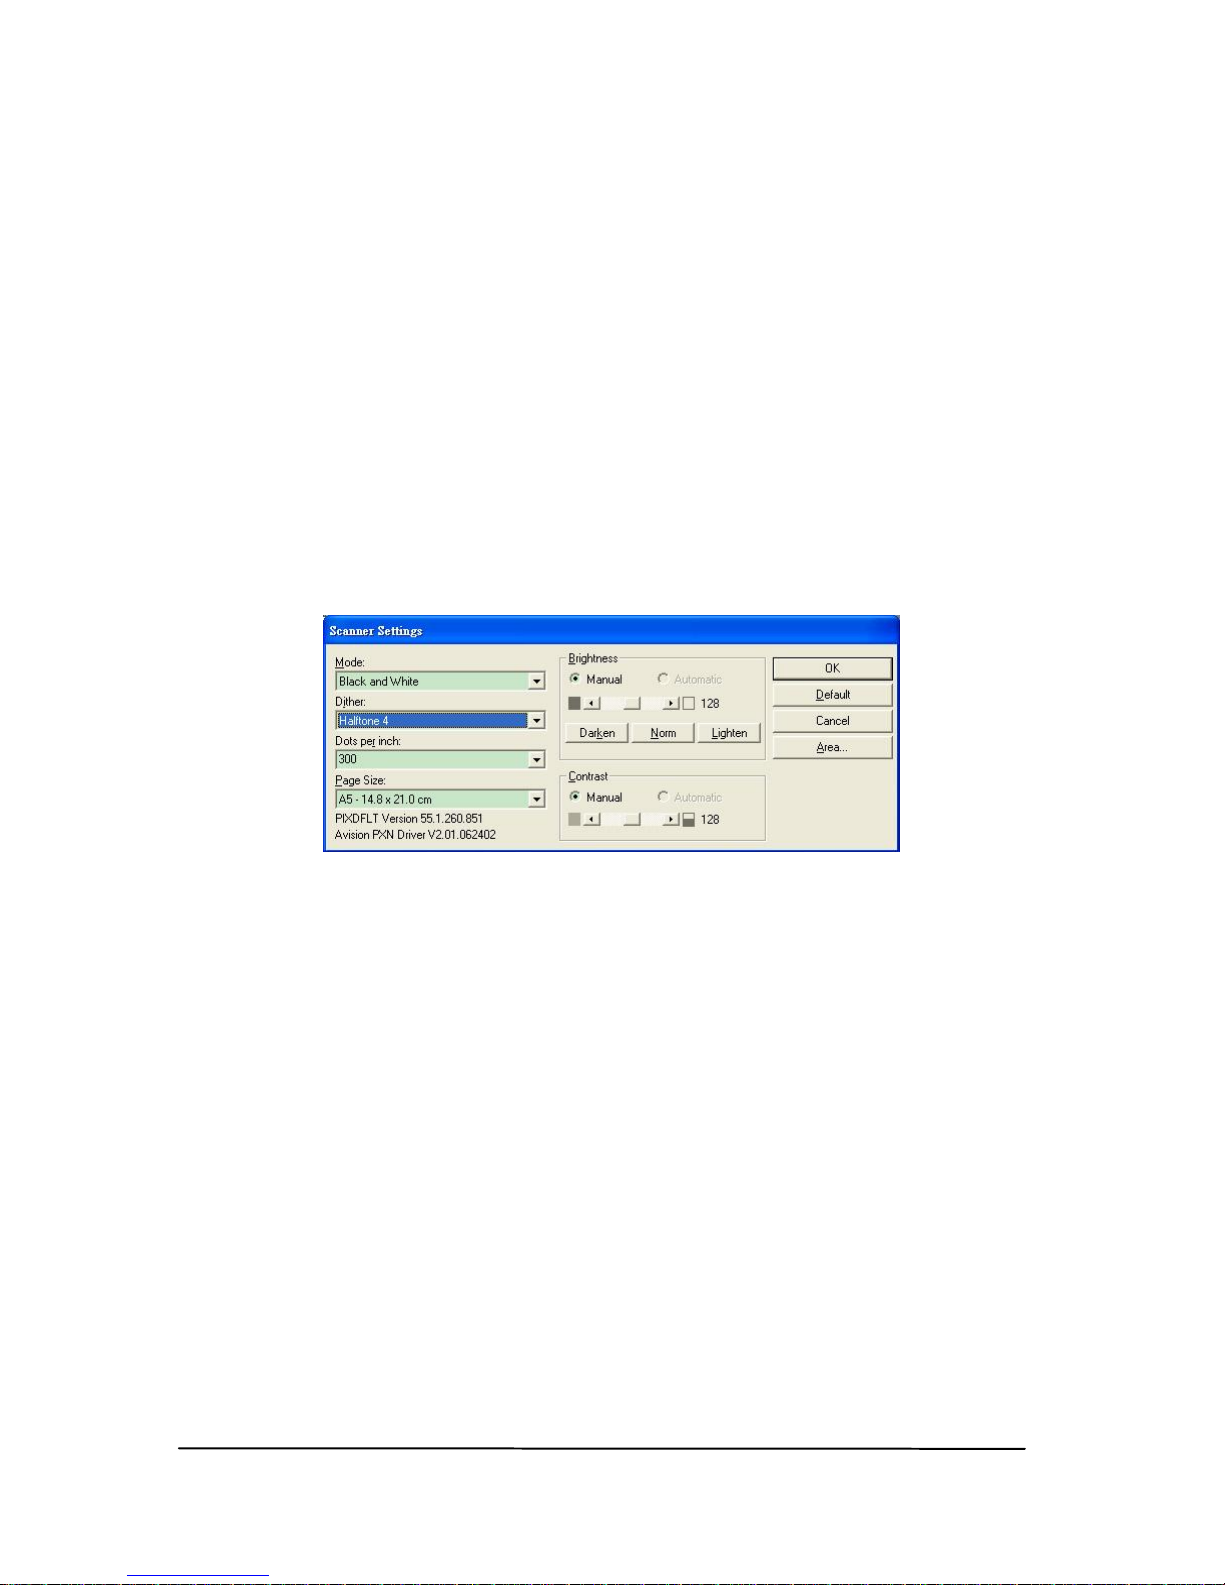
The ISIS driver operation method is similar to the TWAIN’s.
Every function on the ISIS interface screen is briefly described
as below:
Mode: Select one of scan modes, including B&W, gray, color
options.
Dither: 5 halftone levels available, can be disabled.
Dots per inch: Select your desired resolution.
Paper Size: Select your desired paper size.
Brightness: Adjust your scan image brightness or darkness.
Contrast: Adjust the range between the darkest and the
lightest shades in the image.
Default: Click to reset all settings.
Area: Select your desired scan area or position.
Page 14
12
5. Using the Buttons
5.1 Installing Button Manager V2
Button Manager V2 provides you an easy way to scan your
document and then link the scanned image to your designated
software application. All this can be done by a simple touch of
the button on the scanner. Yet, before you scan, it is
recommended to check the button configurations first to ensure
a proper file format and a destination application.
5.2 Checking the Button Configurations before Scanning
1. Button Manager V2 runs from the system tray. After Button
Manager V2 and the scanner driver are properly installed,
Button Manager V2 is started and the Button icon will be
displayed on the system tray at the bottom right corner of
your computer screen.
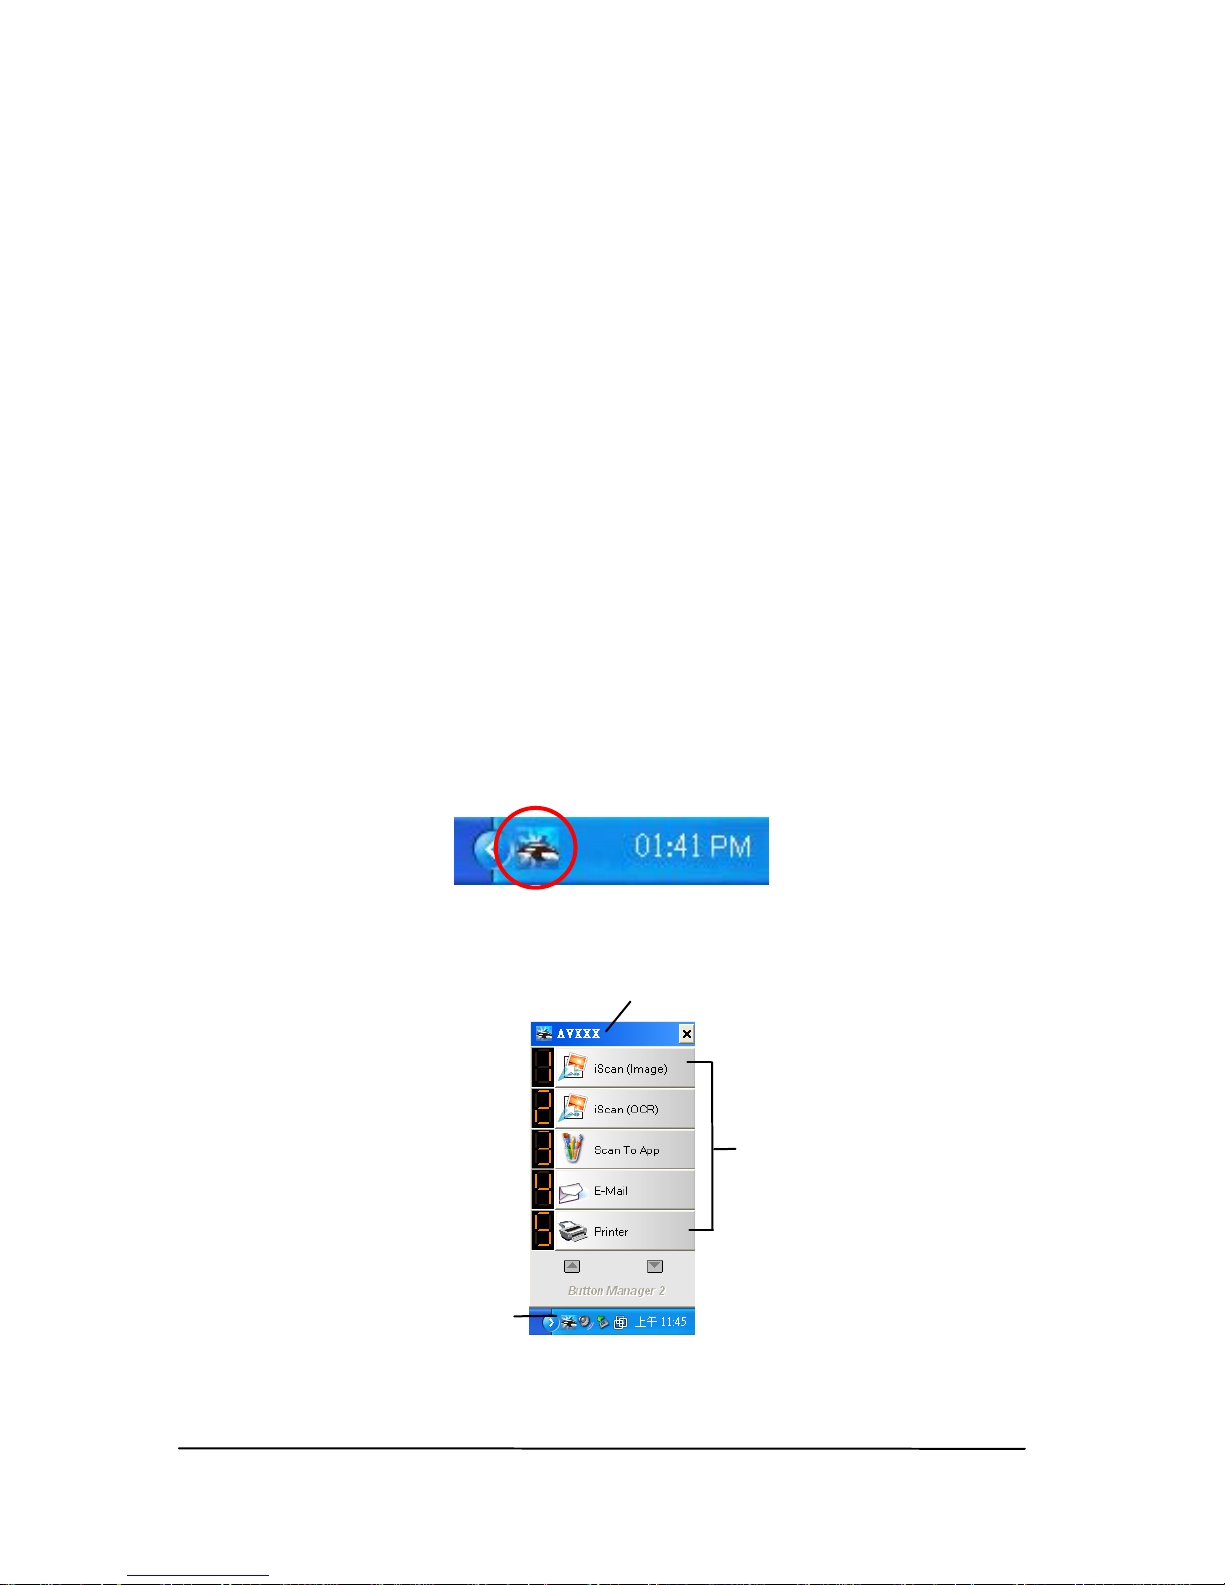
2. Left-click the Button Manager V2 icon to prompt the
following Button Panel.
The Button Panel
This indicates the scanner model
The Button
Icon
The Function
Icon
(The number of
function icons
vary based on
type of
scanner.)
Page 15
13
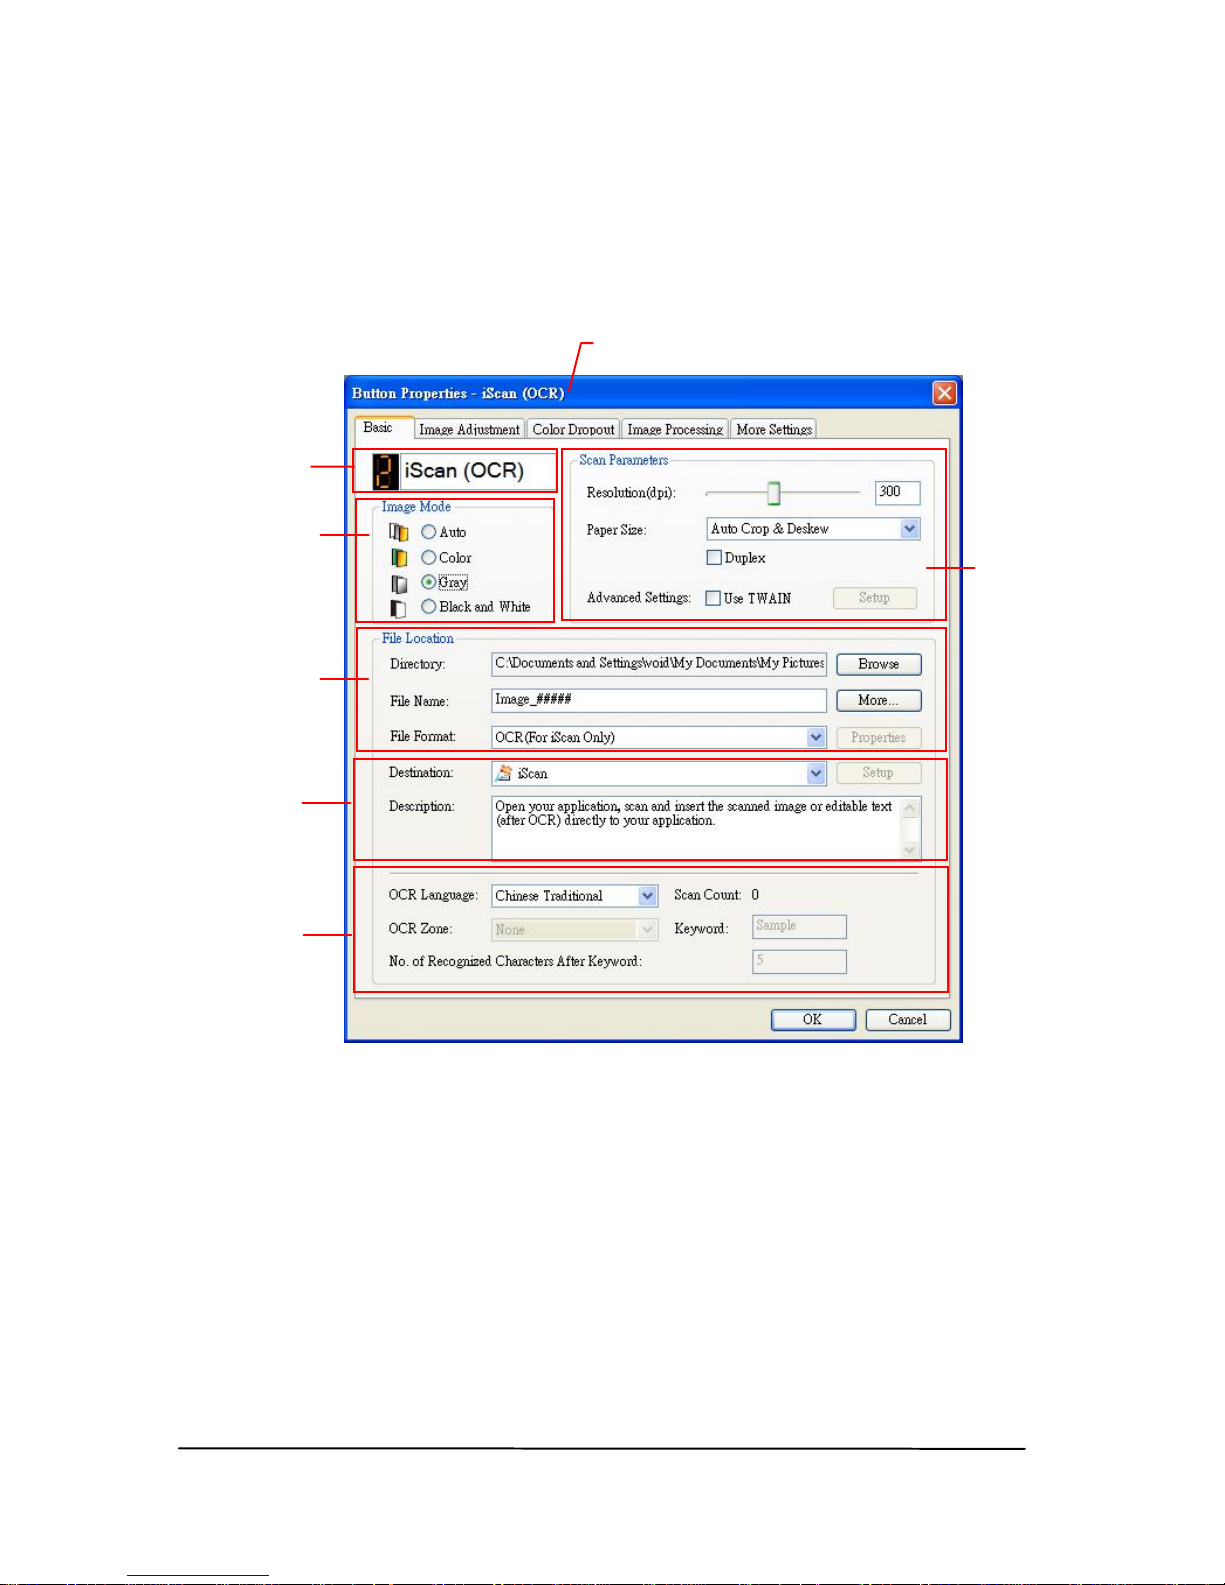
3. The Button Panel shows the first five scanning buttons.
Right-click the button (function) you wish to check. The
Button Properties window appears.
If you wish to change the setting, use this window to reset
the setting for the file format, destination application, or
other scan settings.
4. Click the OK button to leave the window.
Folder and
file name
for the
scanned
image
Image Mode
Selection
Box
Name of the Selected Button
Scan To
destination
and settings
Button
Name
OCR
settings
Basic Scan
Parameters
Page 16
14
5.3 Scanning From One Touch of the Buttons
1. Adjust the paper guide for the width of paper and load the
document with their tops into the automatic document
feeder.
2. Check the number on the LED screen to ensure if you are
selecting the proper scan settings and destination
application. (For example, if you want to scan with button
#3, which open Microsoft Paint and display the scanned
image in the main window of Microsoft Paint, the LED
screen should show 3).
3. Press the Scan button on scanner.
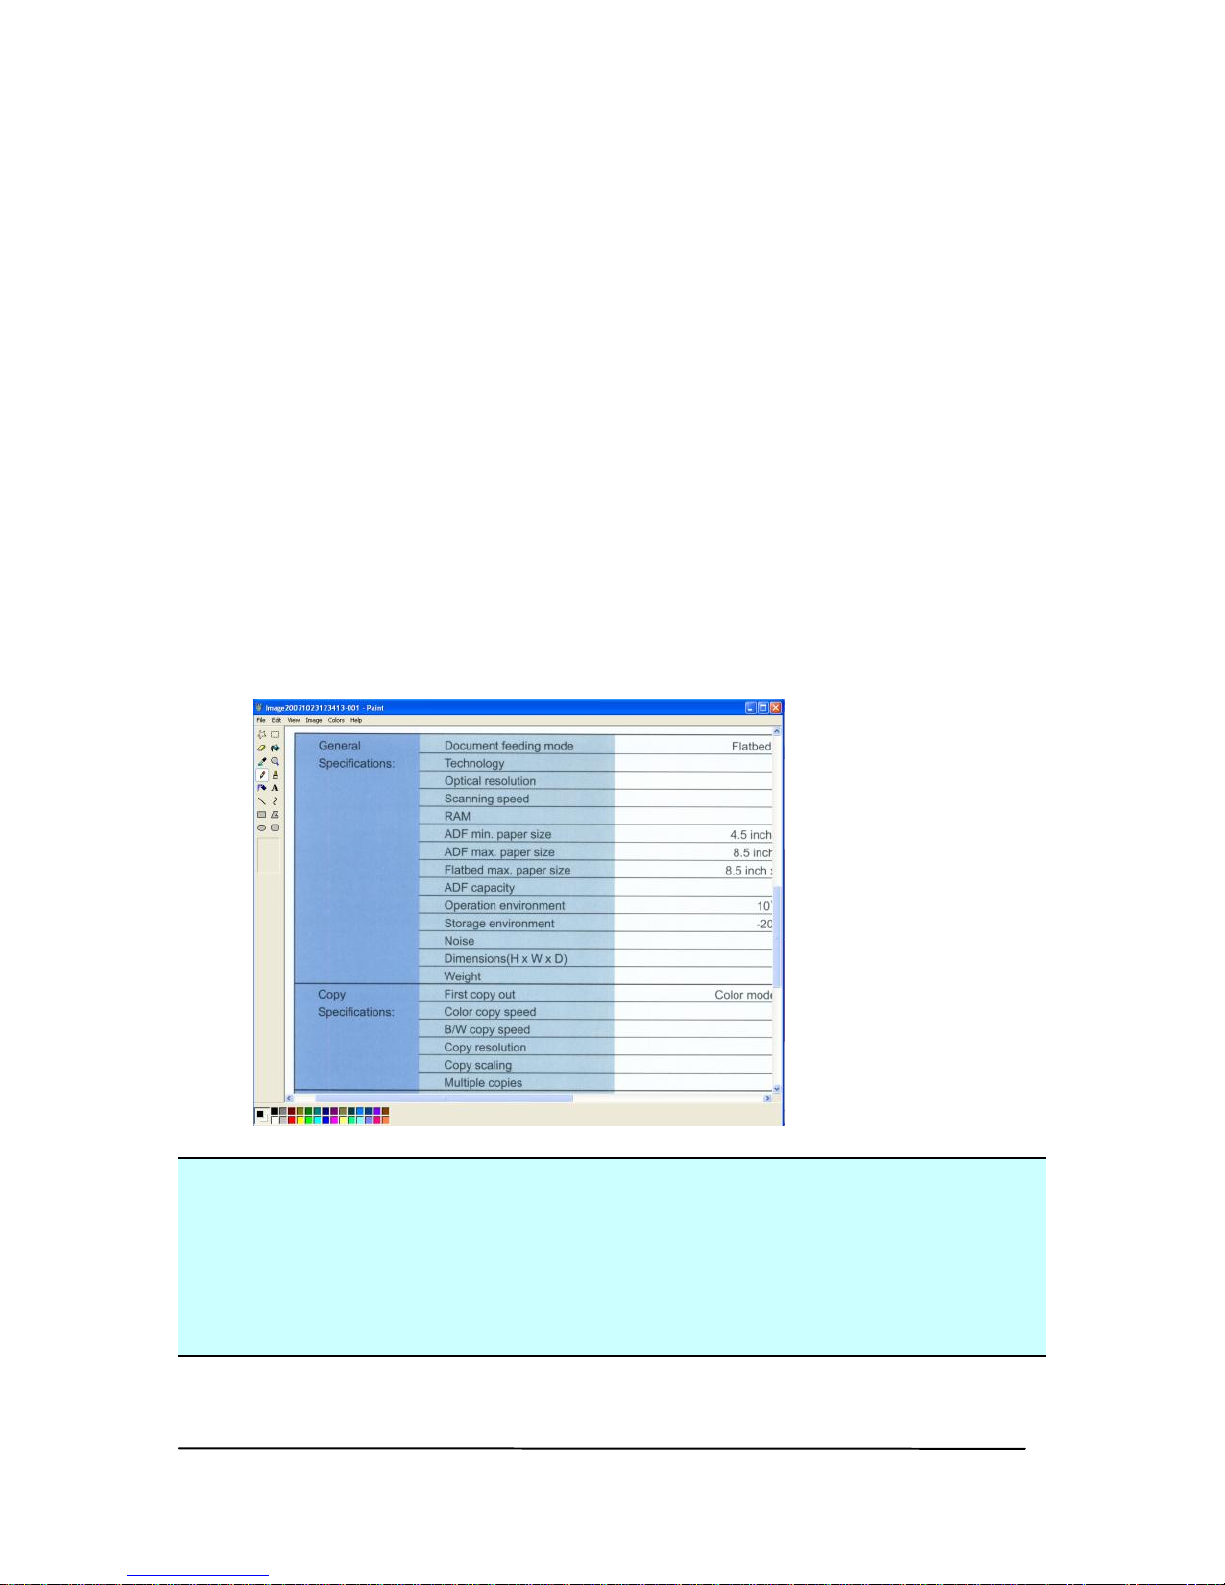
4. After the scanning is finished, the Microsoft Paint software
will be launched and the scanned image appears in the
main window of Microsoft Paint as below.
Note:
1. For details information on how to use the Button Manager
V2, please refer to the user’s manual in the supplied CD.
2. You may also using Button Manager V2 on your desktop by
starting Button Manager V2 from All Programs or double
clicking the Avision Scanner Utility from the Control Panel.
Page 17
15
6. Maintenance
6.1 Cleaning the Glass
The procedures
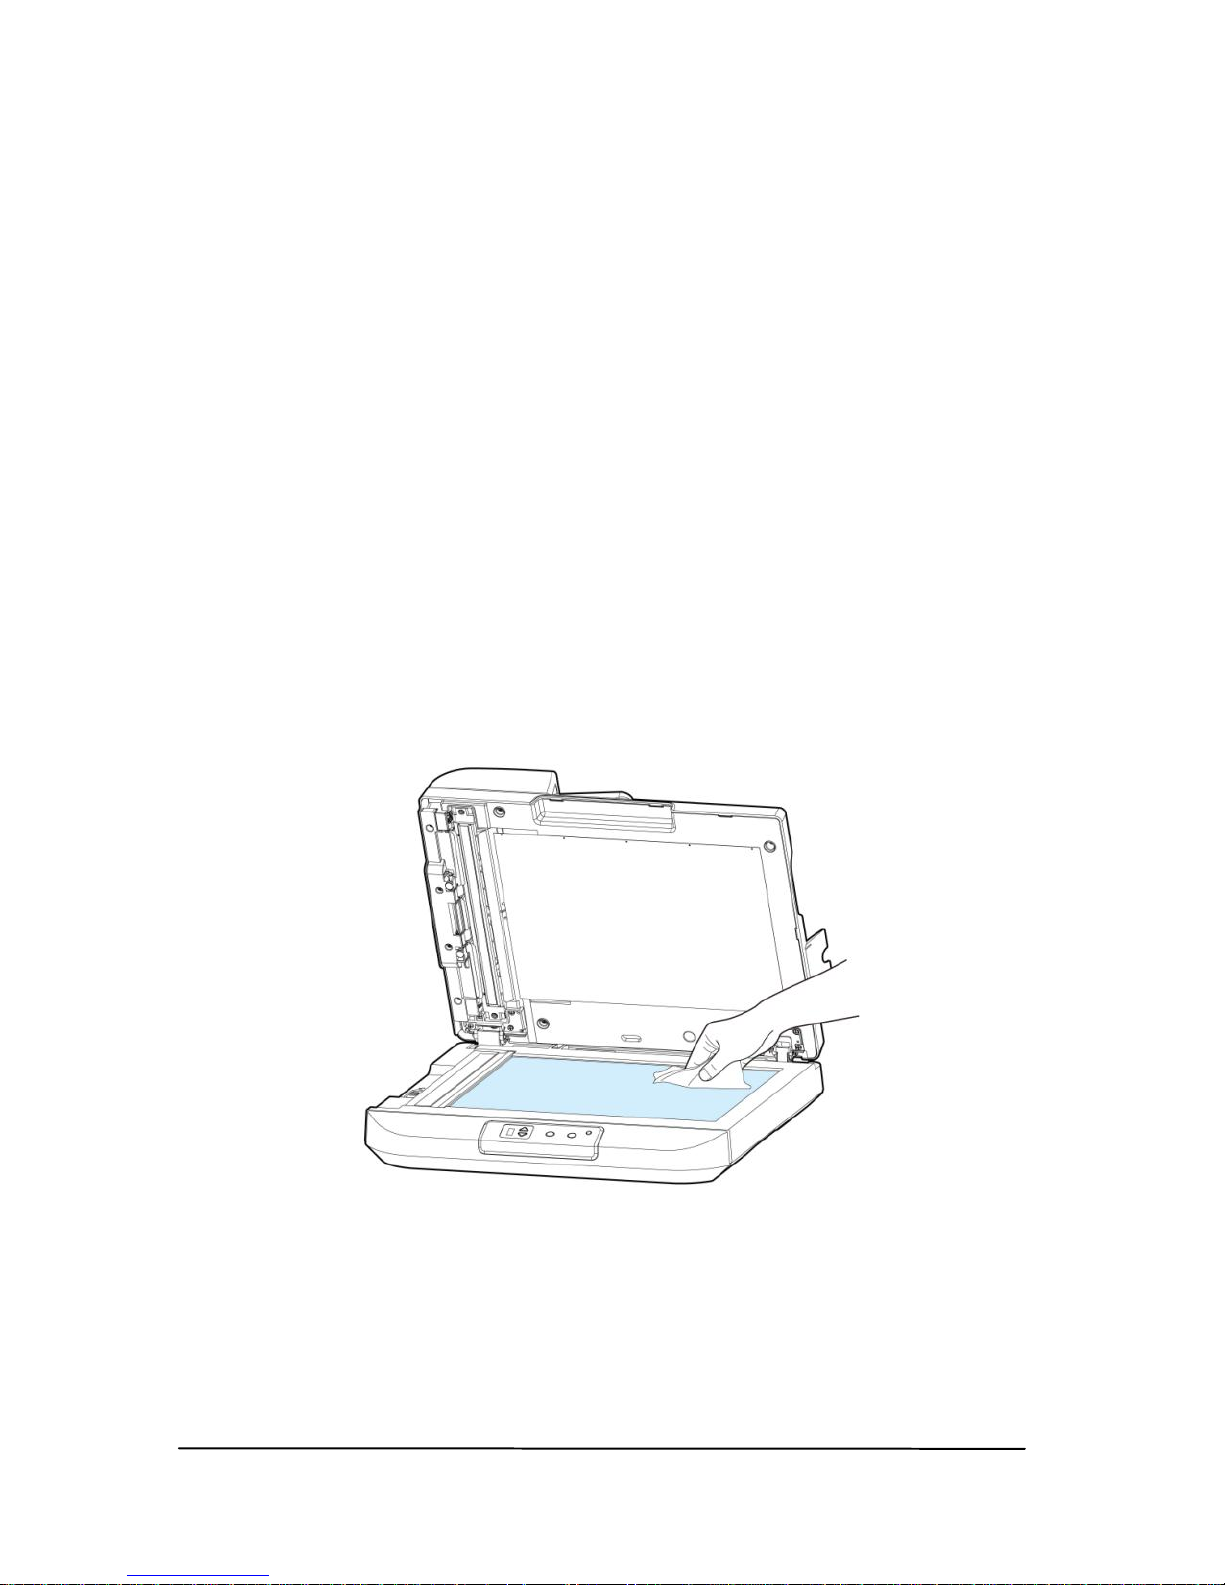
1. Use a clean and lint-free cloth wet with isopropyl alcohol.
(95%)
2. Open the document cover as shown in Figure 7-1. Wipe
the document glass.
3. Close the document cover. Your scanner is now ready for
use.
Figure 7-1 The cleaning area
Page 18
16
6.2 Cleaning the ADF
The scanner parts may be contaminated with ink, toner
particles or paper coatings. As a result, the scanner needs to
be cleaned occasionally particularly in the following cases:
1. Documents do not feed smoothly or easily;
2. Several documents feed at one time.
The cleaning procedures
1. Wet a soft lint-free cloth with some isopropyl alcohol. (95%)
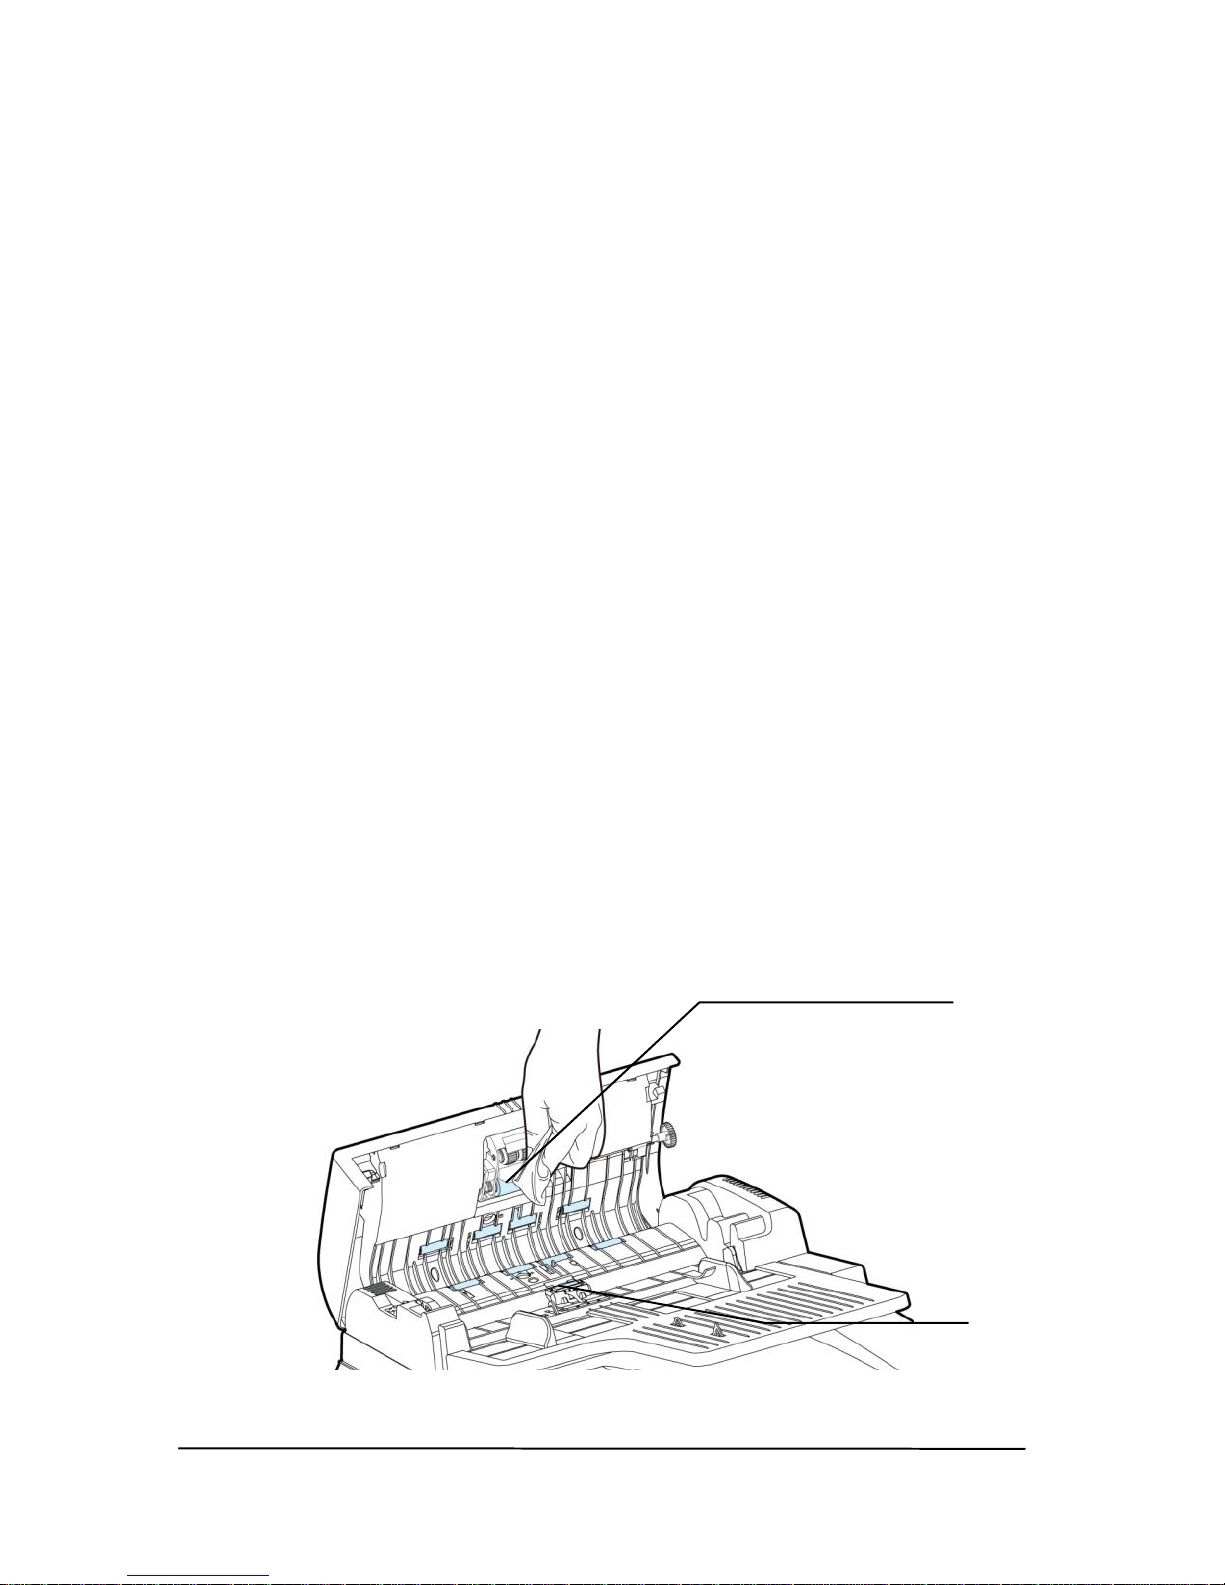
2. Open the front ADF unit as shown below and wipe the
feeding rollers. Rotate the rollers forward with your finger
and repeat the above cleaning procedures until the entire
rollers are cleaned. Be careful not to snag or damage the
pick springs.
3. Wipe the pad in the direction from top to bottom. Be
careful not to hook the pick springs.
4. Close the front ADF unit.
5. Close the document cover. Your scanner is now ready for
use.
ADF
Roller
ADF
Pad
Page 19
17
7. Troubleshooting
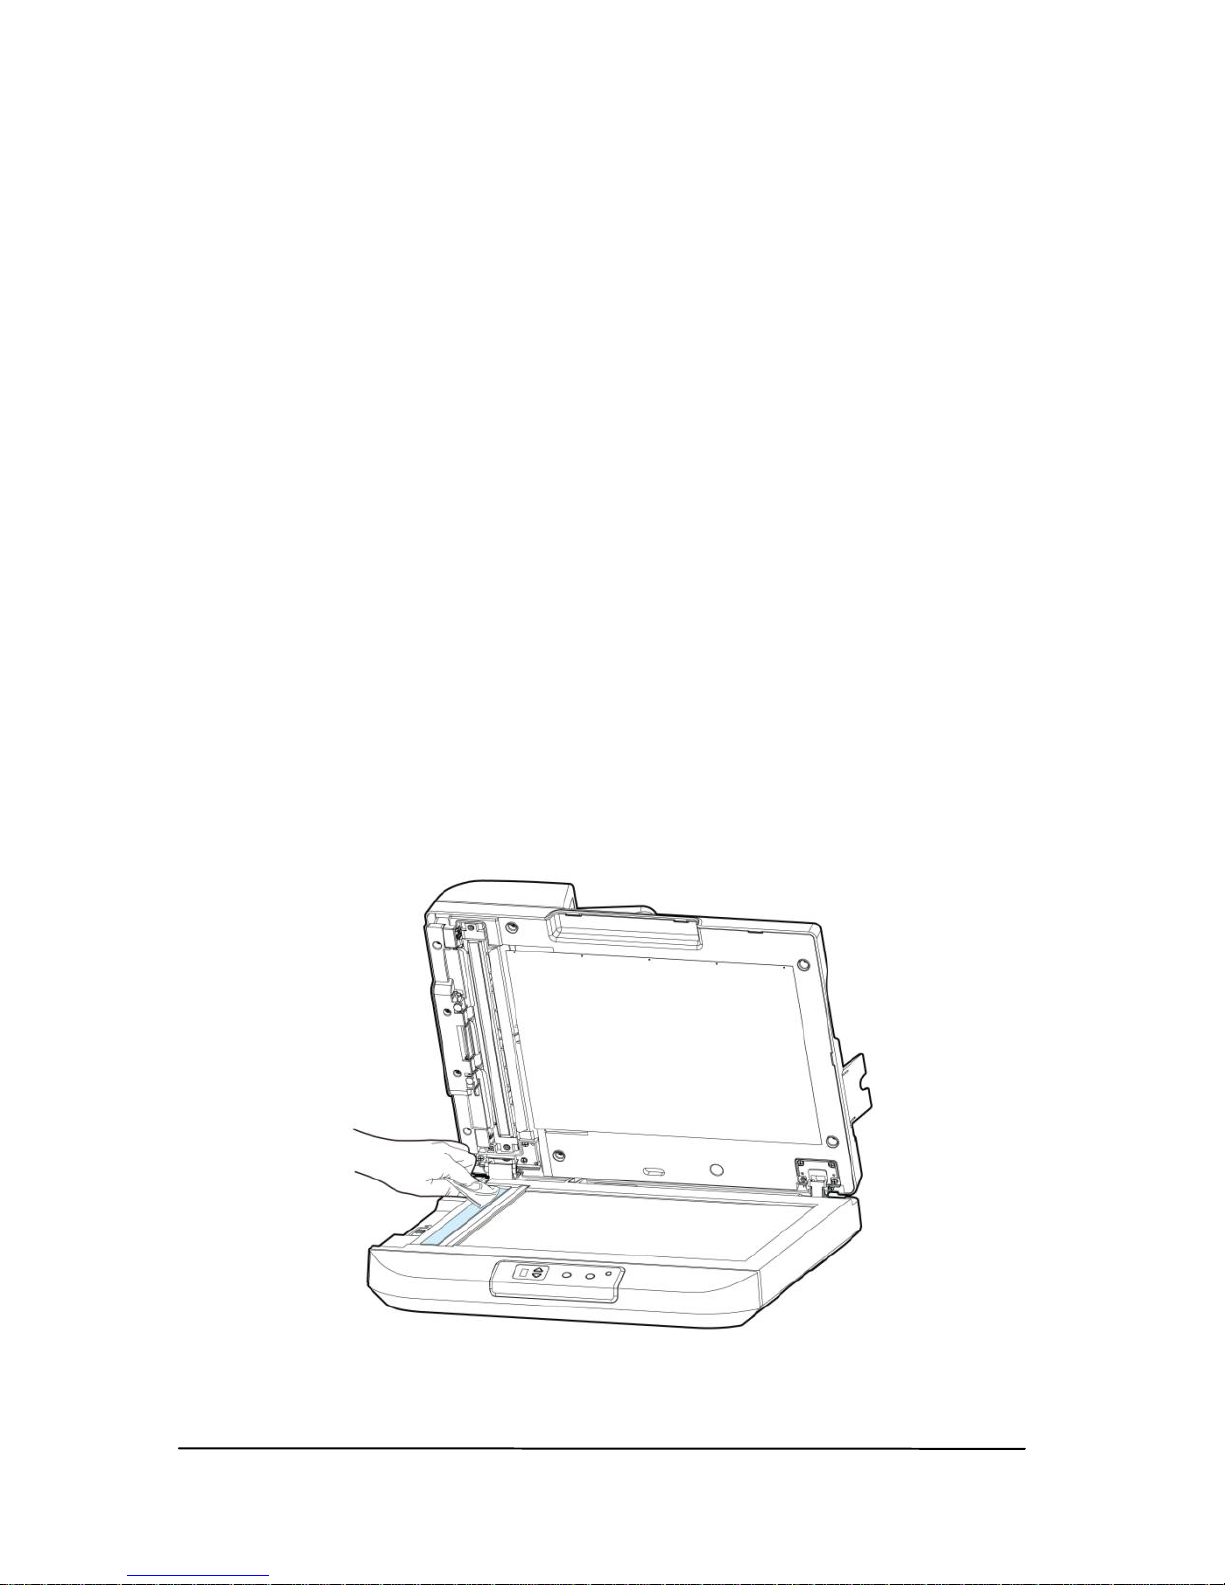
7.1 Removing the abnormal lines on your scanned image
If your scanned image is shown with abnormal lines on it, it is
probably caused by the dust or toner particle on the strip of
document glass.
To remove the dust or toner particle,
1. Dip a soft clean cloth with isopropyl alcohol (95%).
2. Wipe the strip of document glass as shown below.
3. Close the document cover. The product is now ready for
use.
Page 20
18
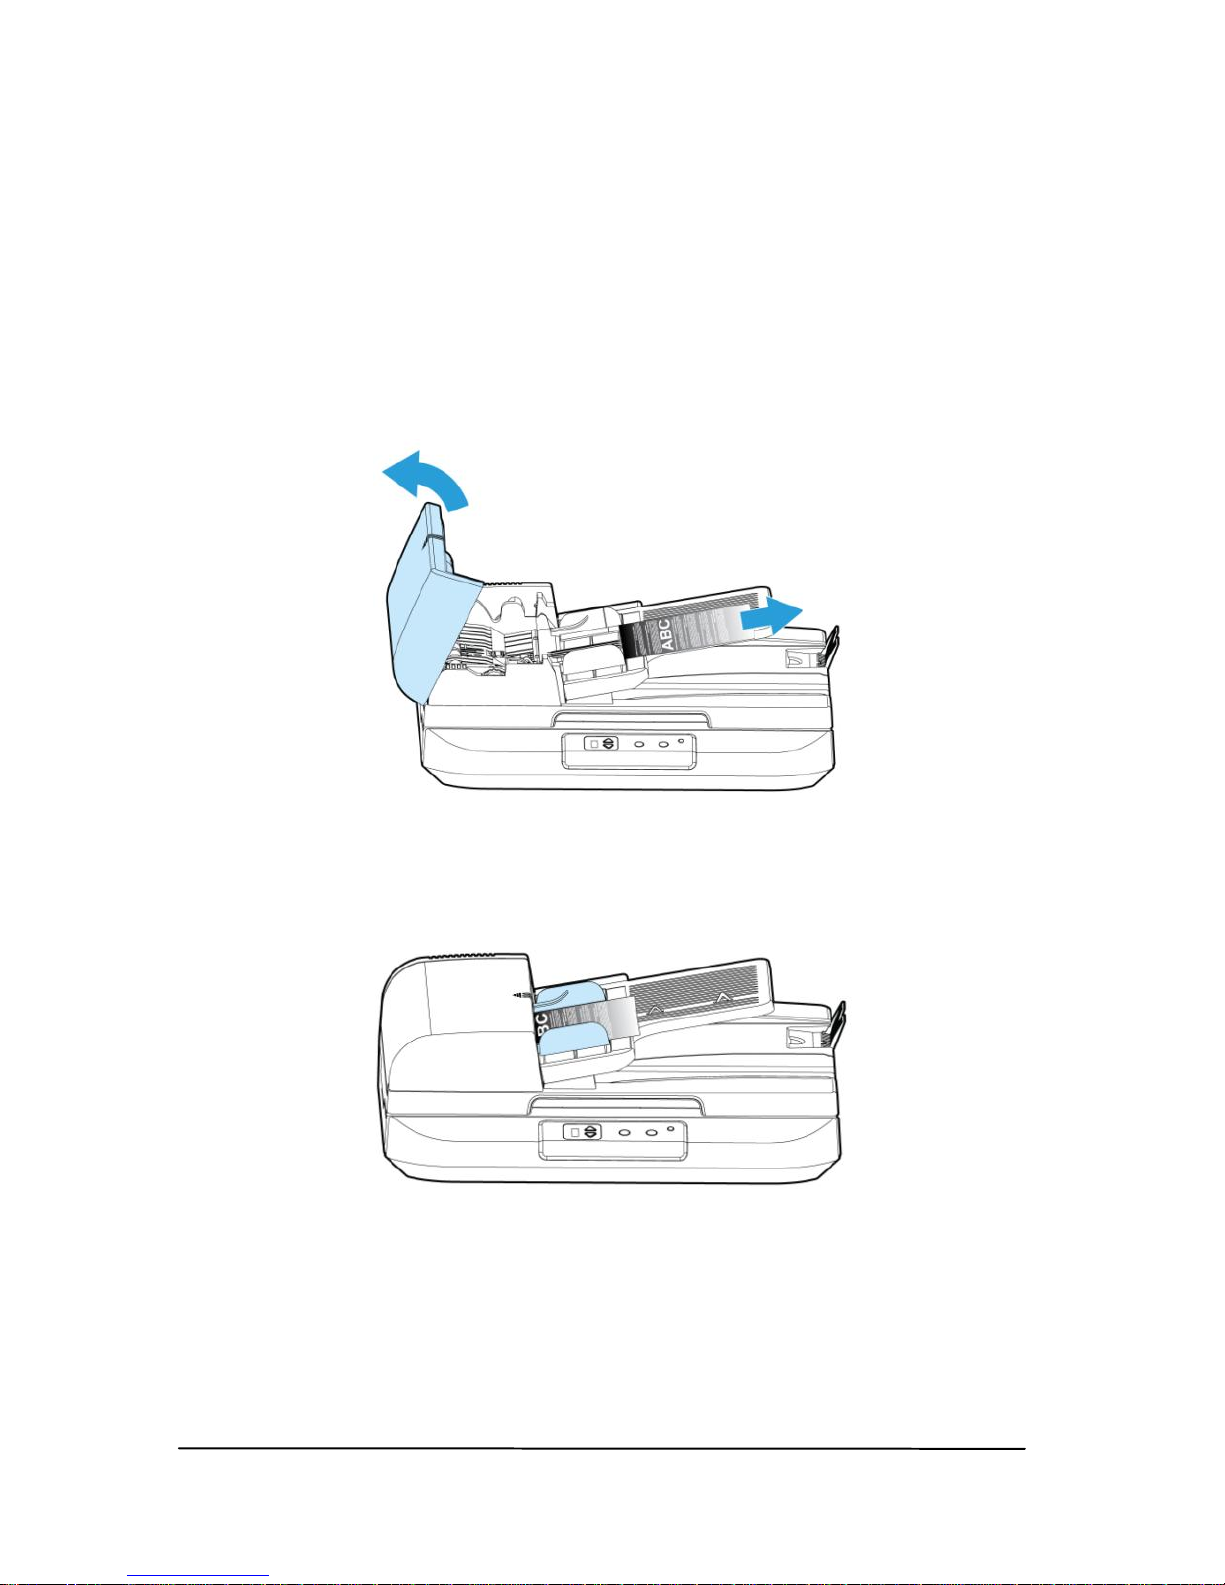
7.2 Clearing a Paper Jam
In the event of a paper jam, follow the procedures below to
remove the paper:
1. Gently open the ADF front cover to the left.
2. Carefully pull the paper out of the ADF unit.
3. Close the ADF front cover. The product is now ready to
use.
 Loading...