

Page 1

AV261C
Color Image Scanner
User's Manual
(D/N 250-0207-E Rev. A)
Avision Inc. 1998
Page 2

Trademarks
Microsoft is a U.S. registered trademark of Microsoft Corporation.
Windows and MS-DOS are trademarks of Microsoft Corporation.
IBM, PC, AT, XT are registered trademarks of International Business
Machines Corp.
Other brands and product names herein are trademarks or registered
trademarks of their respective holders.
Copyright
All rights reserved. No part of this publication may be reproduced,
transmitted, transcribed, stored in a retrieval system, or translated into any
language or computer language, in any form or by any means, electronic,
mechanical, magnetic, optical, chemical, manual, or otherwise, without the
prior written permission of Avision.
Material scanned by this product may be protected by governmental laws
and other regulations, such as copyright laws, the customer is solely
responsible for complying with all such laws and regulations.
ii
Page 3

Warranty
The information contained in this document is subject to change without
notice.
Avision makes no warranty of any kind with regard to this material,
including, but not limited to, the implied warranties of fitness for a
particular purpose.
Avision shall not be liable for errors contained herein or for incidental or
consequential damages in connection with the furnishing, performance, or
use of this material.
iii
Page 4

FCC Radio Frequency Interference Statement
This equipment has been tested and found to comply with the limits for
a Class B digital device, pursuant to Part 15 of the FCC rules. These
limits are designed to provide reasonable protection against harmful
interference in a residential installation. This equipment generates,
uses, and can radiate radio frequency energy and, if not installed and
used in accordance with the instructions, may cause harmful
interference to radio communication. However, there is no guarantee
that interference will not occur in a particular installation. If this
equipment does cause harmful interference to radio or television
reception, which can be determined by turning the equipment off and
on, the user is encouraged to try to correct the interference by one or
more of the following measures:
* Reorient or relocate the receiving antenna.
* Increase the separation between the equipment and receiver.
* Connect the equipment into an outlet on a circuit different from
that to which the receiver is connected.
* Consult the dealer or an experienced radio/TV technician for help.
FCC CAUTION: To assure continued compliance,(example- use only
shielded interface cables when connecting to computer or peripheral
devices). Any changes or modifications not expressly approved by the party
responsible for compliance could void the user's authority to operate the
equipment.
This device complies with Part 15 of the FCC Rules. Operation is subject to
the following two conditions: (1) This device may not cause harmful
interference, and (2) this device must accept any interference received,
including interference that may cause undesired operation.
Responsible Party:
Telephone No.: +1 (510) 739-2369
AVISION LABS INC.
6815 Mowry Ave. Newark CA 94560,
iv
Page 5
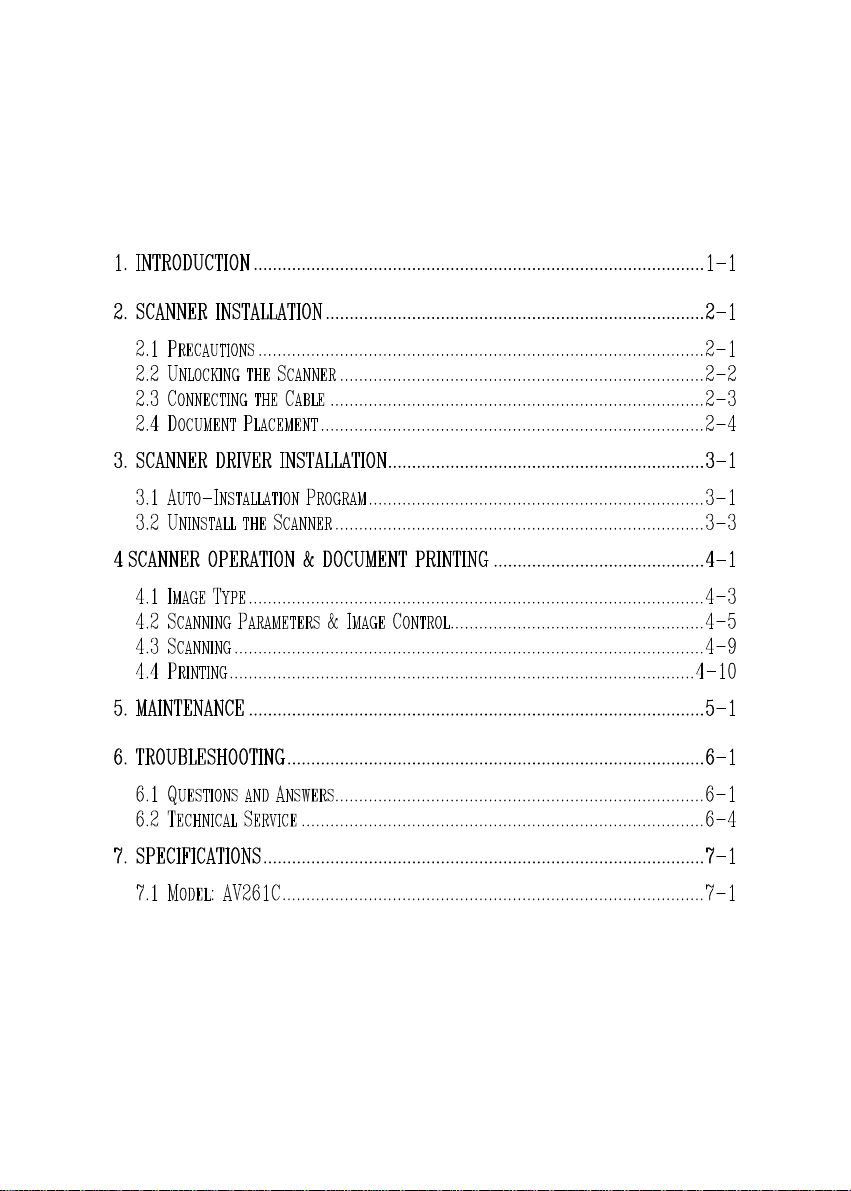
Table of Contents
v
Page 6

1. Introduction
Congratulations on your purchase of Avision AV261C color
image scanner. The AV261C is compact and small to save desk
space.
You can scan both normal printing material including
photographs as well as the transparency to store them into your
computer. Then you can modify them for a variety of purposes
on your computer.
The following sections introduce the unpacking, hardware and
software installation, the operation, and maintenance information
to you. Please do take a few minutes to read through them to
keep quality scanning result possible.
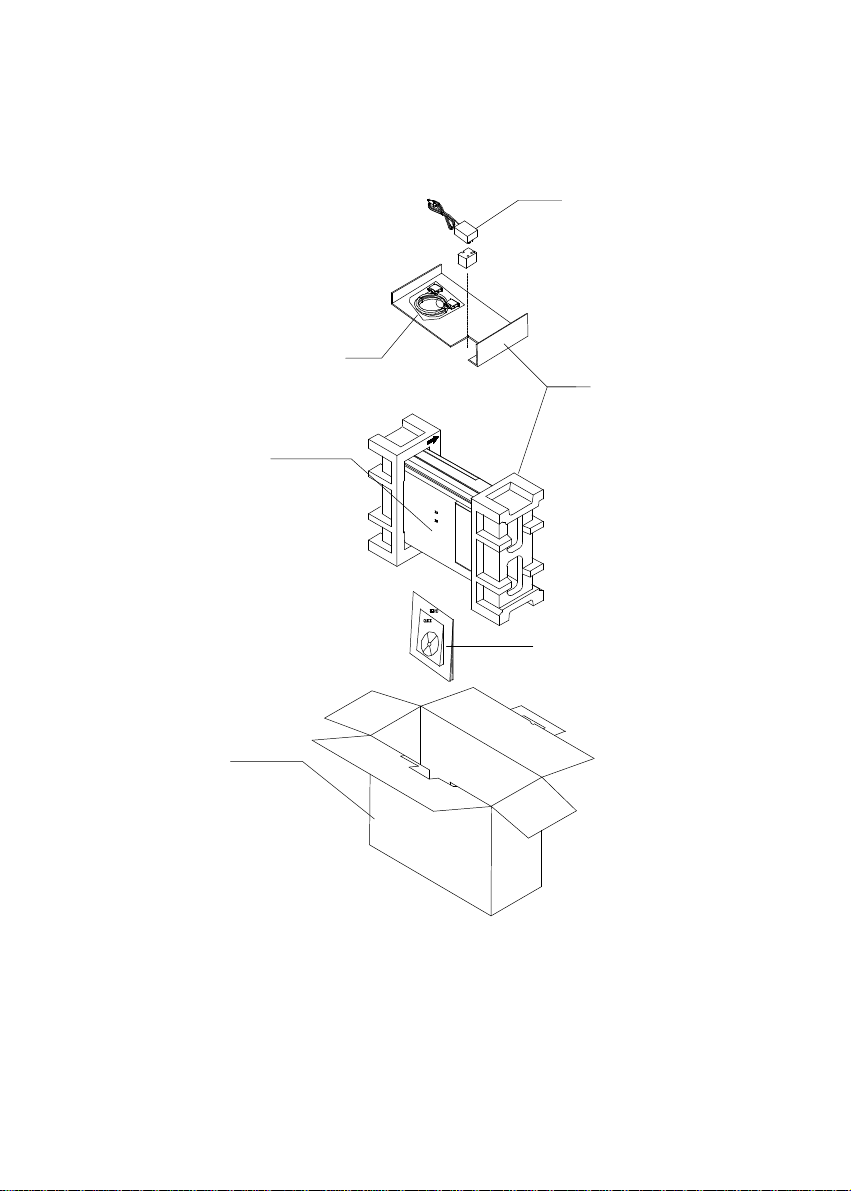
Figure 1-1 shows how the scanner is packed. Please check all
the items against your checklist contained in the box or against
Figure 1-1. If there is any missing or damaged, please contact
your nearest dealer immediately for the replacement.
1-1
Page 7
1
4
2
5
3
6
1. Power Adapter, 2. Cushion 3. Manual,Driver Kit CD.
4. D25P Cable, etc 5. Scanner 6. Carton
Figure 1-1 Scanner packing
1-2
Page 8

2. Scanner Installation
2.1 Precautions
Ÿ Keep the scanner out of direct sunlight. Direct
exposure to the sun or excessive heat may cause
damage to the unit.
Ÿ Do not install the scanner in a humid or dusty place.
Ÿ Be sure to use the proper AC power source.
Ÿ Place the scanner securely on an even, flat surface.
Tilted or uneven surfaces may cause mechanical or
paper-feeding problems.
Ÿ Retain the scanner box and packing materials for
shipping purposes.
2-1
Page 9
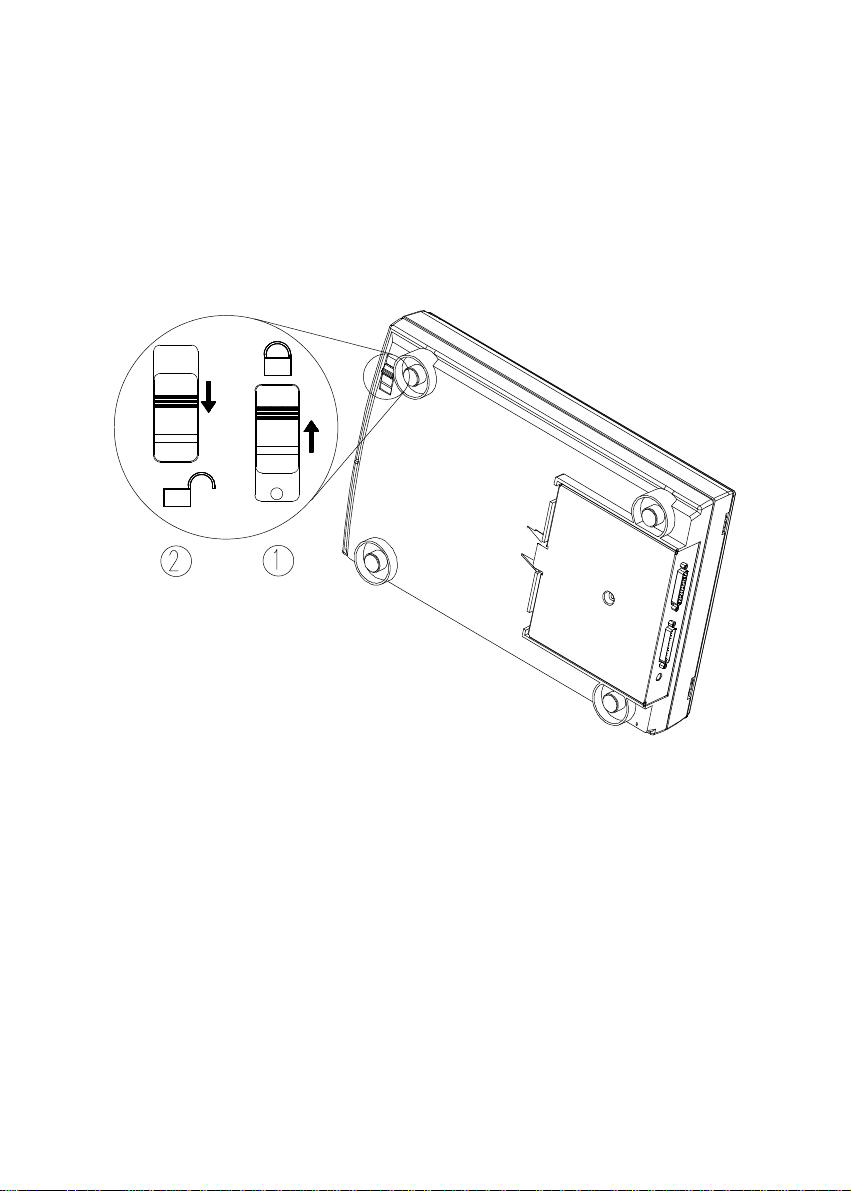
2.2 Unlocking the Scanner
As shown below, unlock the scanner by turning the
scanner lock to the Use position.
1. “Shipping” Position 2. “Use” Position
Figure 2-1 Unlocking the Scanner
2-2
Page 10
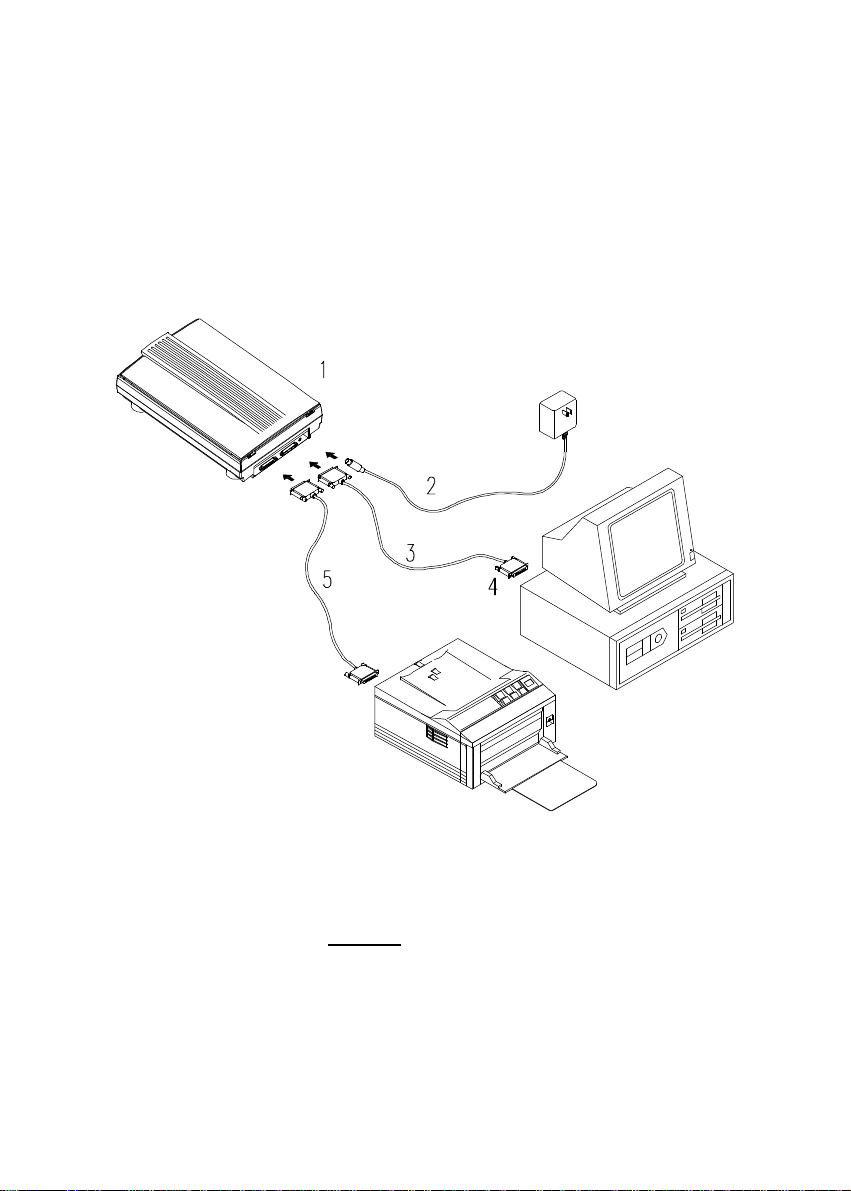
2.3 Connecting the Cable
Connect the power cable and signal cable as shown
below.
1. Scanner 2. Power Supply
3. D25P Cable 4. PC Parallel Port
5. Printer Cable
Figure 2-2 AV261C scanner cable connection
2-3
Page 11
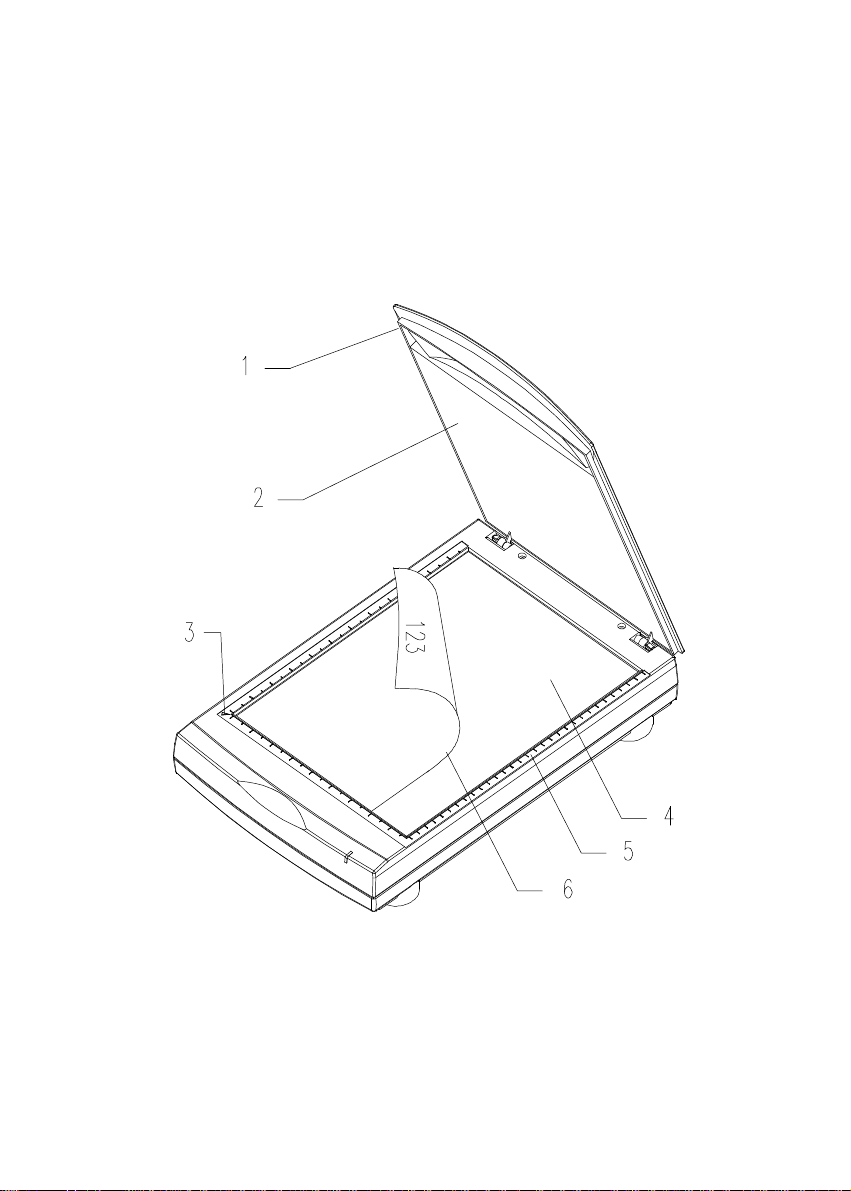
2.4 Document Placement
As shown in Figure 2-3, place the document on the glass
with the text facing away from you.
1. Document Cover 2. Document Pad
3. Reference Frame 4. Glass
5. Document Board 6. Document
Figure 2.3 Document Placement
2-4
Page 12

3. Scanner Driver Installation
To run at optimum speed, the AV261C color image
scanner is recommended to have the following minimum
requirements:
* IBM compatible PC 386/486, Pentium or later;
* Microsoft Windows 3.1,Windows 95, Windows NT;
* One printer port available (enhanced parallel port
recommended);
* 20 Megabytes of available hard disk space for
installation;
* 8 Megabytes of RAM (16 Megabytes or higher
recommended);
* A video graphics array (VGA) monitor;
* A Microsoft Windows-compatible pointing device (e.g.,
mouse);
* A CD ROM drive.
3.1 to-Installation Program
Installation procedures of AV261C Scanner driver with
Avision Auto-installation Program are as follows:
1. Start Windows 3.1 or Windows 95.
2. Insert AV261C CD into your CD ROM drive.
3. From the File Menu, choose RUN, type
d:\driver\AV261C.exe (d represents the letter for your
current CD ROM drive). Click O.K.
3-1
Page 13
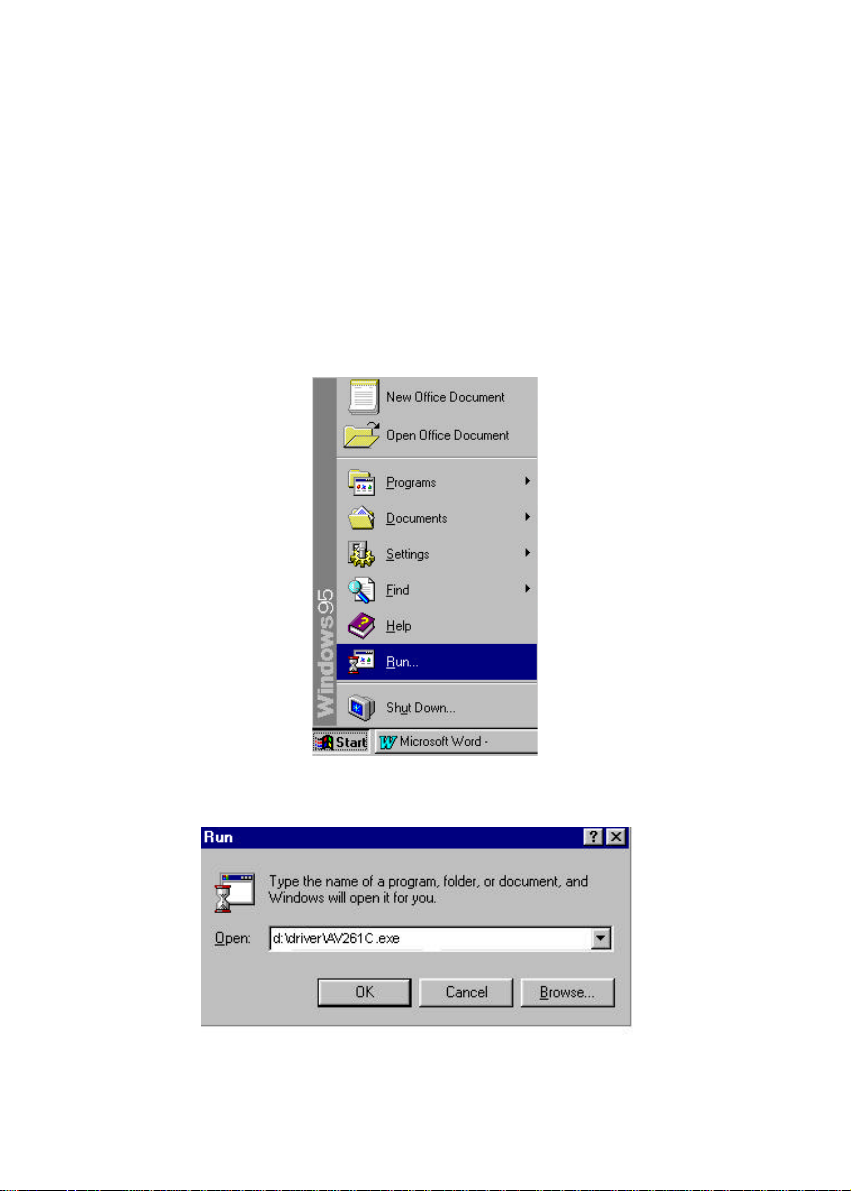
In Windows 95 or Windows NT
3. Press the Start button, choose RUN, type
d:\driver\AV261C.exe (d: the CD ROM drive in use), and
then click O.K. (See Figure 3-1,3-2)
4. Follow the on-screen instructions to complete the
installation.
Fig. 3.1
Fig. 3.2
3-2
Page 14

3.2 Uninstall the Scanner
You can uninstall the scanner by selecting
Start….Programs….Avision Scanner AV261C and double
clicking on the Uninstall command from the Avision
Scanner AV261C.
3-3
Page 15

4. Scanner Operation & Document
Printing
Scanning Images from within an Application
(TWAIN)
1. Open your application and choose Select
Source from the File menu. If the Select
Source menu options are not available from the
File menu, see the user guide of your
application to learn how the TWAIN link is
used.
2. A dialog box appears containing the different
TWAIN sources that you can choose from to
bring an image into your application.
3. Select AV261C/xx VX.xx as the source.
4. When you have used the dialog box to select a
different source, you will need to select
AV261C as the source again before you can
reuse the AV261C scanner.
5. Place the image to be scanned face down on the
glass.
6. From the File menu, select Acquire.
7. AV261C TWAIN user interface will pop up on
the screen. Click on the Preview or Scan button
to get the image.
4-1
Page 16
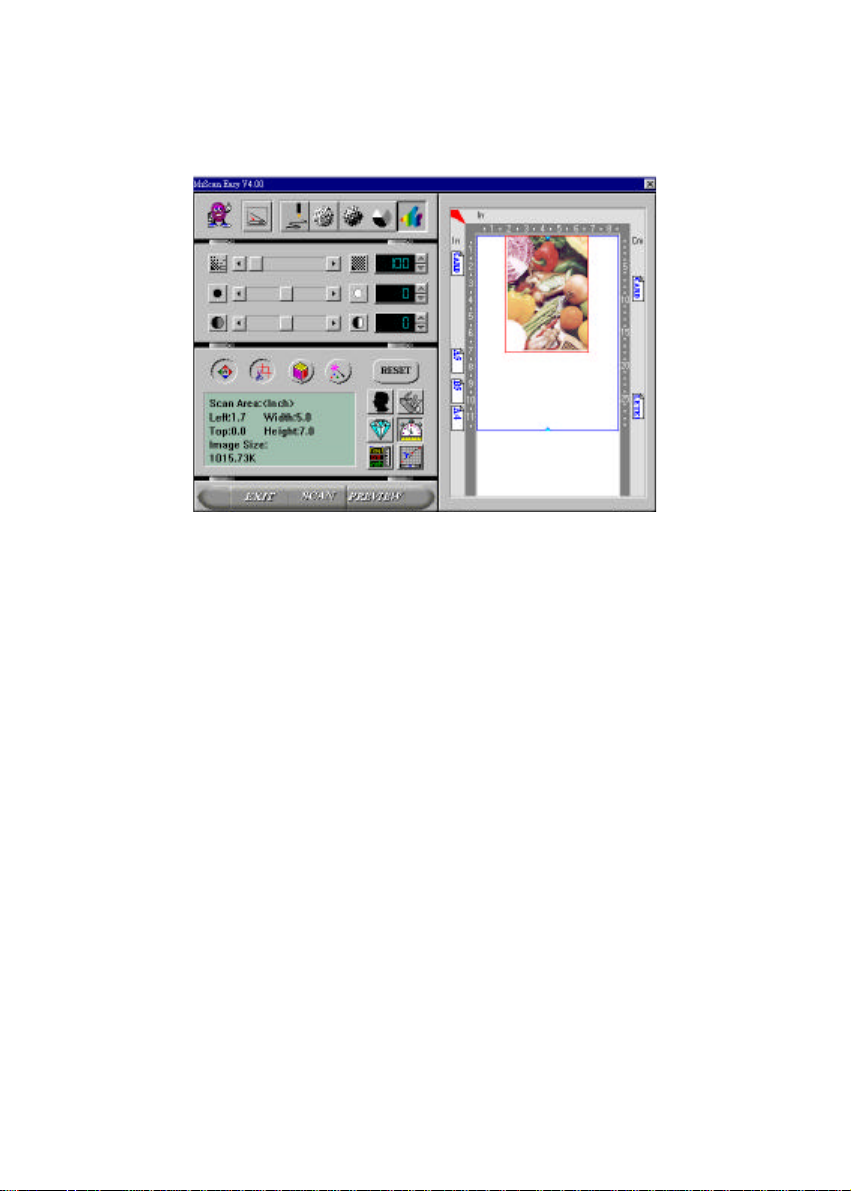
AV261C TWAIN user interface:
4-2
Page 17
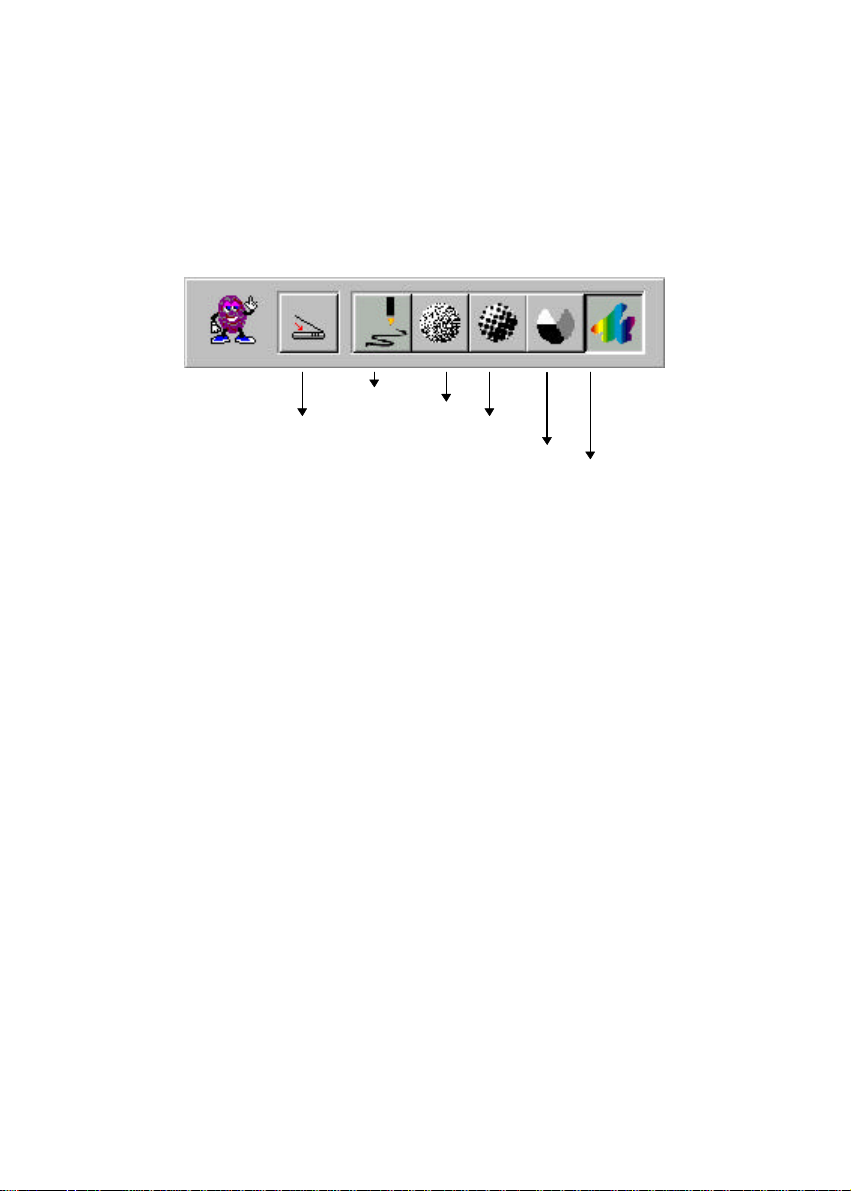
4.1 Image Type
AV261C provides five image types as explained in below:
Scanning Source Halftone
Scanning Source
Two scanning sources are provided- flatbed as
well as transparency.
Line art
Line art presents the image in black and white
only and there are no intermediate shades of gray
in between.
Line art
Error Diffusion
Gray
Color
Halftone
In addition to the black and white display,
Halftone can present a somehow gray shade of
image by using different size of dots.
Error Diffusion
While taking up but a minimum storage space,
error diffusion gives good image texture and
excellent image details.
Gray (4096 levels gray scale)
Gray presents a 4096 shades of gray in an image.
4-3
Page 18

Color
The 36 bits True Color presents 68.7 billion
colors and gives much more tonal range and
details in a color image.
4-4
Page 19
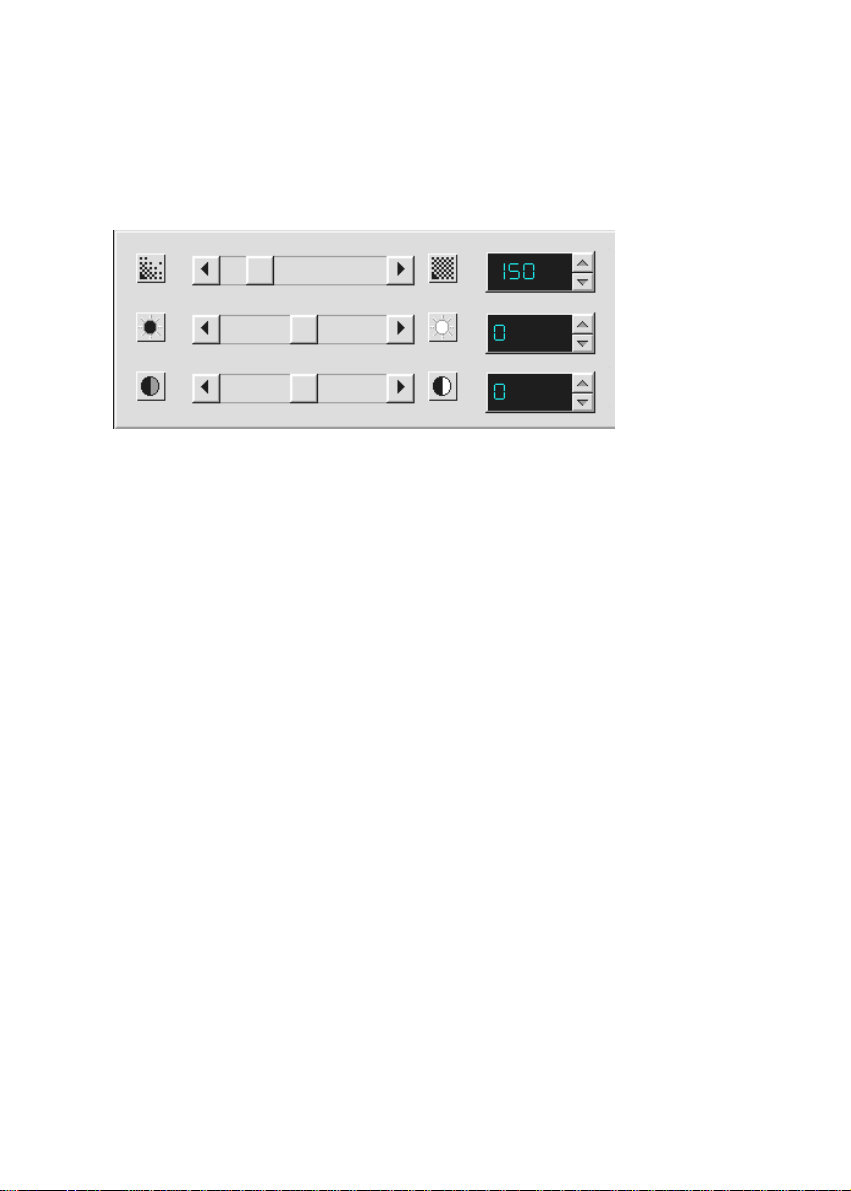
4.2 Scanning Parameters & Image Control
Resolution: The number of dpi (dots per inch) that AV261C
uses for a scan. Usually the greater the number,
the higher the resolution. Yet up to a certain
level, the resolution will not be visually increased
but the disk space will be increased.
Brightness: Adjusts the lightness or darkness of an image.
The higher the value, the brighter the image.
Contrast: Adjusts the range between the darkest and the
lightest shades in the image. The higher the
contrast, the bigger the different gray scales.
4-5
Page 20
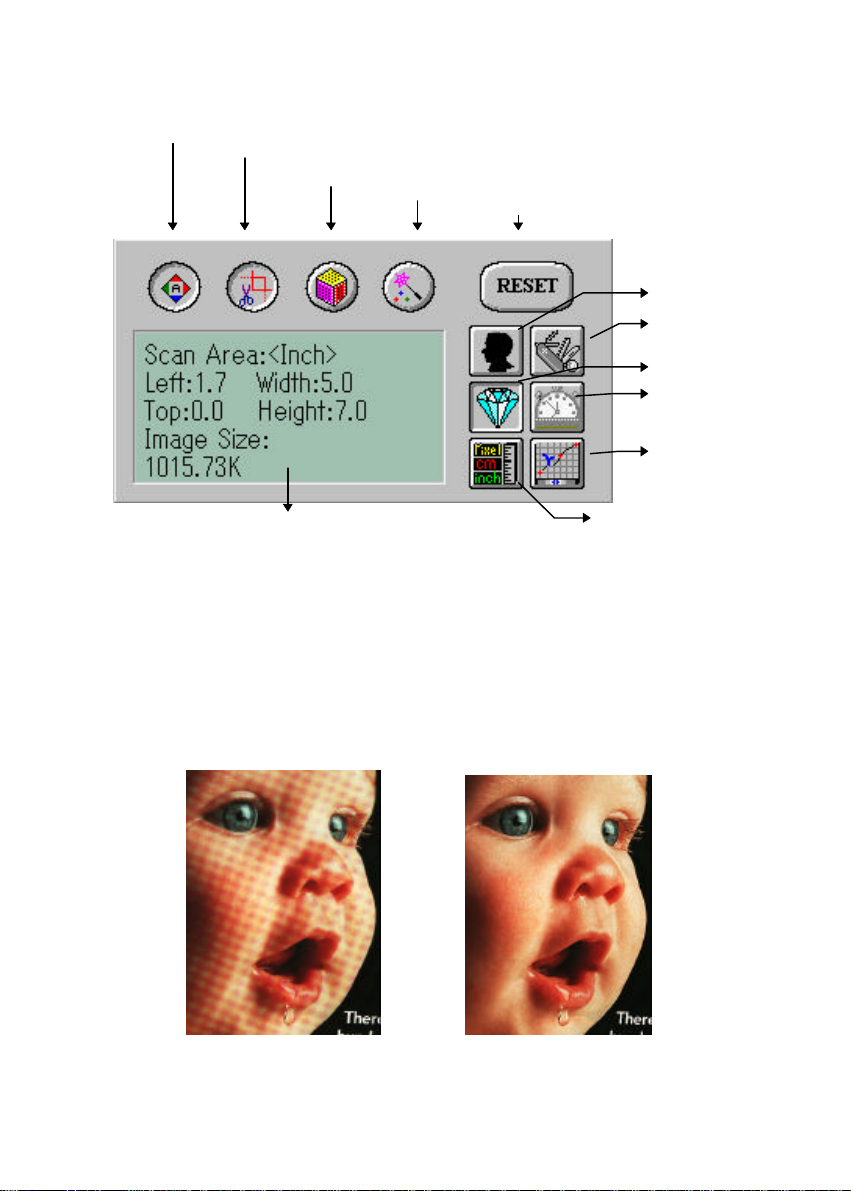
Auto Level
Invert
Auto Area
Descreen
Color Match
Reset
Advance_Settings
Quality Mode
Speed Mode
Set Gamma
Image Information
Auto Level: Optimizes the scanned image.
Auto Area: Automatically sets the whole document as the
scan area, no matter what its size.
Descreen: Eliminates the Moire patterns commonly found in
printed matter.
Before descreen After descreen
Pixel/Inch/CM
4-6
Page 21

Color Match:Adjusts the color quality of the image to make it
close to the original. This function uses default
parameters to adjust the image.
Reset: Resets the scanning parameters you set.
Invert: The invert command reverses the brightness and
the color in the image. For color images, each
pixel will be changed into its complementary color
at the command of Invert.
Advance_Settings:
Provides a color background-removal function to
sharp scanned output.
Quality/Speed Mode:
Users can select the mode to perform scanning
according to their own need. Select quality mode
scanning if your emphasis is on the quality of the
scanned image. Or you can select speed mode
scanning if you want to speed up the scanning
process.
Pixel/Inch/Cm:
Represents the different measuring systems to be
used in each scan.
4-7
Page 22

Set Gamma: Adjusts the midtone of the image yet without
losing details of the lightest and the darkest areas
at the same time.
Image Information:
Gives related information of the scanned image.
4-8
Page 23
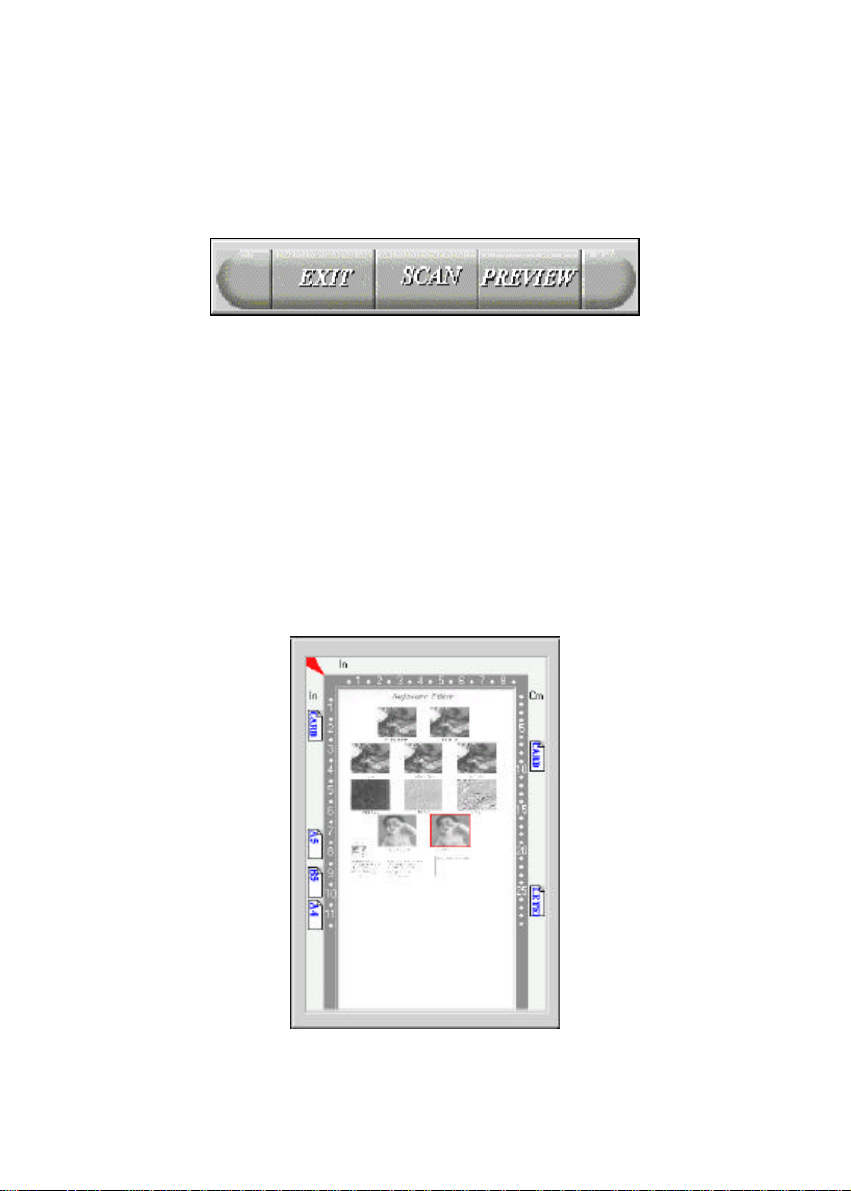
4.3 Scanning
Preview: Previews your image roughly and allocates the
area to be scanned.
Scan: Execute the Scans action.
Exit: Cancels the current job.
Document Size: To designate the size of your document, just click
on its icon on the margin of the preview window
As shown in the figure below, in the Preview window, you can
define the area to be scanned by dragging the four cursor auxiliary
lines.
4-9
Page 24
4.4 Printing
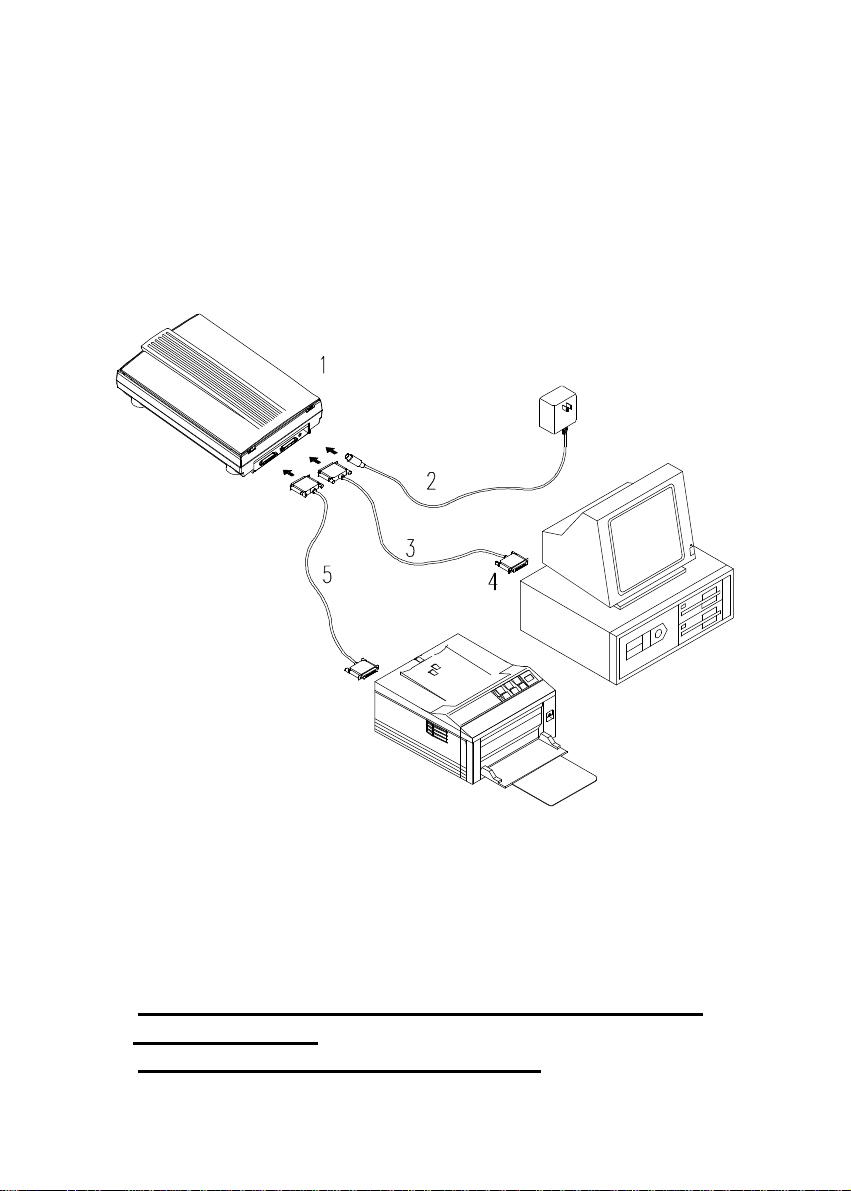
Connect the printer cable as shown below.
1. Scanner 2. Power Supply
3. D25P Cable 4. PC Parallel port
5. Printer Cable
Caution:
1. Be sure to power on the scanner if you want to do pass-
through printing.
2. Do not scan and print at the same time.
4-10
Page 25

3. If your PC does not support EPP mode or have pass-through
compatibility problem, please contact your authorized local
dealer for an EPP card or an additional interface card.
4-11
Page 26
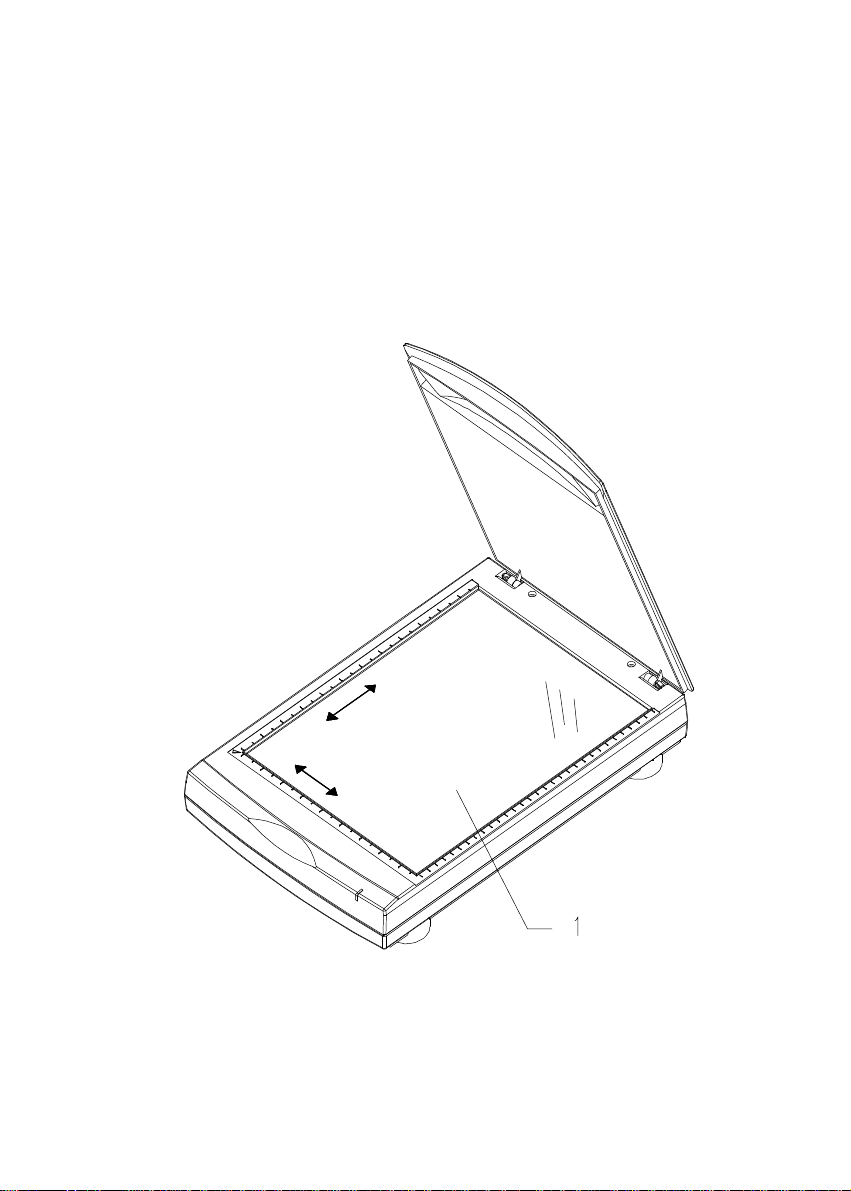
5. Maintenance
Clean the Document Board Glass:
As shown in Figure 5-1, wipe the scanner glass with a piece of
soft clean cloth to rid the glass of dust or toner particles.
1. Document Board Glass
Figure 5-1 Clean the document board glass.
5-1
Page 27

6. Troubleshooting
If you have any operational problem, please check the
following troubleshooting hints.
6.1 Questions and Answers
Question: Why the scanned image always comes out to be
too dark?
Answer: 1) Modify the Gamma setting to 1.8 for your
monitor and, when printing, set Gamma to
2.2 for your printer.
2) Use the Brightness setting of the TWAIN
user interface to get a brighter image.
Question: The scanning speed of my scanner is much
slower than that of those installed at other
computers. Can I speed it up?
Answer: Set you PC printer port to the EPP mode from
BIOS setting.
Question: Why does my scanner scan at a very low speed?
Answer: If you have installed Works for Windows, it will
install Window Printing System (WPS) in your
WIN.INI file. This will take up the printer port
time remarkably. You can remove the WPS
from your WIN.INI file, as follows:
6-1
Page 28

From:
[MS Text Converters]
MSWorksWin=Works for Windows 2.0,C:\WINDOWS\MSAPPS\TEXTCONV\worksdos.cnv,wps
Works for Dos 2.0=Works for DOS 2.0 MSAPPS\TEXTCONV\workswin.con,wps
To:
[MS Text Converters]
MSWorksWin=Works for Windows 2.0,C:\WINDOWS\MSAPPS\TEXTCONV\worksdos.cnv
Works for DOS 2.0=Works for DOS 2.0, C:\WINDOWS\MSAPPS\TEXTCONV\workswin.con
Question: The printer does not print the documents. Why?
Answer: Pass-through printing may pose a problem for
some printers. It is suggested to add a second
printer card for printing purpose, or you may call
your authorized local dealer for further support.
Question: Does it take long for the scanner to initialize?
Answer: If your printer port supports SPP mode only, it
takes about two minutes for the scanner to
initialize. If your printer port supports EPP
mode, the initialization speed is much faster,
about 20 seconds.
Question: Why sometimes pass-through printing does not
work at all?
Answer: It may be that you fail to power on the scanner.
When doing pass-through printing, please be
sure to power on the scanner. Else, without
power, the scanner can not transfer the printing
data/signals to the printer.
6-2
Page 29

Question: Why my GDI printer does not work with the
AV261C?
Answer: Disable the Auto Scan function in the
application, then your printer will function in
normal working condition.
Question: Why some parallel port devices and software’s
keypro do not work with the AV261C?
Answer: The AV261C can do pass-through printing all
right , but the pass-through printing may not
work if you connect the parallel port with
devices other than printer. Therefore, if you
would like to connect some parallel port devices
other than printer, please do not connect them to
the same parallel port that AV261C currently
uses. It is suggested to use other parallel ports
to connect these devices or keypro. For
instance, you can connect the AV261C to LPT1,
and connect other parallel port devices to LPT2.
Or you can add a data switch to avoid the
problem.
6-3
Page 30

6.2 Technical Service
Technical support for Avision scanner is provided at the
Avision Technical Assistance Center. Before you contact
us, please prepare the following information for a quick
solution:
Ÿ Scanner serial & revision number (located on the
bottom of the scanner);
Ÿ Hardware configuration (e.g., your host CPU type,
RAM size, free disk space, display card, interface
card);
Ÿ The name and version of your scanning software
application;
Ÿ The version of your scanner driver.
Ÿ The brand and model name of your printer.
AVISION LABS INC.
6815 Mowry Ave. Newark CA 94560, USA
TEL: +1 (510) 739-2369
FAX: +1 (510) 739-6060
Web Site: http://www.avision.com
E-mail: [email protected]
AVISION INC.
No. 20 Creation Rd. 1, Science-Based Industrial Park,
Hsinchu 300, Taiwan, R.O.C.
TEL: +886 (3) 578-2388
FAX: +886 (3) 577-7017
Web Site: http://www.avision.com.tw
E-mail: [email protected]
6-4
Page 31

7. Specifications
All specifications are subject to change without
notice.
7.1 Model: AV261C
Scanner Type: Flatbed Scanner
Optical Resolution: Up to 300 dpi * 600 dpi
Maximum Resolution: 9600 dpi
Scanning Modes: Black & White mode
Document Size A4, B5, A5, business card
Interface: Printer port (supports
Power Source: 100Vac~240Vac,
Power Consumption: 12 watts (12Vdc,1A)
Dimensions: (WxDxH) 399 x 260 x 95 (mm)
Weight: 2.7kg
(H*V)
Halftone mode (64-step)
Error diffusion
12-bit gray scale
36-bit color
SPP/EPP for PC)
50~60Hz, external
7-1
Page 32

EC Declaration of Conformity
According to EN45014
Manufacturer's Name: Avision Inc.
Manufacturer's Address: No. 20 Creation Rd. 1,
Science- Based Industrial Park,
Hsinchu 300, Taiwan, R.O.C.
declare that the product
Model Number : AV261C
conforms to the following Product Specifications:
Emission: EN 50081-1 (1992)
EN 55022 (Class B)
(Conducted Radiated) (1994)
EN 60555-2 (Harmonics) (1987)
EN 60555-3 (Flicker) (1987)
Immunity:
EN50082-1 (1992)
IEC 1000-4-2 (ESD) (1995)
IEC 1000-4-3 (RS) (1995)
IEC 1000-4-4 (EFT/Burst)
(1995)
IEC 1000-4-5 (SURGE) (1995)
Date: December 1995
7-2
 Loading...