

Page 1
1
NOTICE D’UTILISATION
AVU52SX(/IX) AVU53CDZA AVU54SXDZA(/IX) PRO51C/1
Cave de service pose libre et encastrable sous plan
AVU8X(/IX) AVU23SX(/IX) AVU41SXDPA(/IX)
FR – MANUEL D’UTILISATION p. 3 GB – USE INSTRUCTIONS p. 38
D – GEBRAUCHSANWEISUNG p. 72 NL – HANDLEIDING p. 107
SP – MANUAL DE UTILIZACION p. 143 IT – MANUAL D‘USO p. 178
CZ – NÁVOD K OBSLUZE p. 214 SK – NÁVOD NA OBSLUHU p. 249
Page 2

2
Page 3

3
Avant toute utilisation, merci de lire et appliquer les règles de sécurité et d'utilisation du présent
manuel.
Tout d’abord, nous vous remercions d’avoir fait confiance à la marque AVINTAGE en acquérant cet
appareil et espérons qu’il satisfera pleinement vos attentes.
Cet appareil vous permet au choix de chambrer vos bouteilles (à température ambiante) ou de les mettre
à température de service (selon vos bouteilles) grâce à sa plage de réglage étendue.
1. CONSIGNES GÉNÉRALES DE SECURITÉ
Avant d’utiliser votre appareil pour la première fois, veuillez lire
attentivement ce manuel d’utilisation. Conservez-le
précieusement de façon à pouvoir vous y référer au besoin. Afin
de réduire le risque d’incendie, de choc électrique ou de blessure
lors de l’utilisation de votre cave, merci de suivre les précautions
données.
D'une manière générale, votre appareil doit être entretenu par un
professionnel qualifié.
Pour votre sécurité et pour une utilisation correcte de l’appareil,
avant d’installer et d’utiliser l’appareil pour la première fois, lisez
attentivement cette notice, y compris les mises en garde et les
conseils utiles qu’elle contient. Afin d’éviter d’endommager
l’appareil et/ou de vous blesser inutilement, il est important que
les personnes amenées à utiliser cet appareil aient pris
entièrement connaissance de son fonctionnement ainsi que de
ses instructions de sécurité. Conservez ces consignes pour plus
tard et pensez à les ranger à côté de l’appareil, afin qu’elles
soient transmises avec ce dernier en cas de vente ou de
déménagement. Cela permettra de garantir un fonctionnement
optimal de l’appareil.
Pour éviter tout risque de blessure, conservez cette notice. Le
fabricant ne saurait en effet être tenu responsable en cas de
mauvaise manipulation de l’appareil.
Page 4

4
Cet appareil est destiné exclusivement à un usage domestique et
est prévu pour le stockage de boissons spéciales à une
température de stockage plus élevée que celle d'un compartiment
pour produits frais. En aucun cas cet appareil est destiné à
maintenir des produits alimentaires frais.
Assurez-vous que votre installation électrique (voltage)
corresponde à celle indiquée sur la plaque signalétique : l'appareil
doit être connecté à une prise terre règlementaire. Des
réparations ou des connexions incorrectes peuvent entraîner des
risques pour la sécurité. Faites vérifier votre installation électrique
par un professionnel si vous avez le moindre doute.
Pour votre protection, cet appareil doit être correctement
connecté à une prise terre. Ne pas couper ou retirer le fil de terre
du câble d’alimentation fourni.
Pour des raisons de sécurité, ne pas utiliser une rallonge
électrique.
Si votre appareil est endommagé (par un impact majeur, par
exemple) ou s’il subit un dommage (surtension due à la foudre,
inondation, incendie), il peut être dangereux à utiliser.
Débranchez la prise secteur et faites contrôler l'appareil par un
réparateur professionnel agréé.
Pour éviter tout danger, ne pas remplacer vous-même un câble
secteur endommagé. Contactez votre revendeur, un centre de
service agréé ou un réparateur professionnel.
Cet appareil doit être positionné de telle sorte que la prise secteur
soit accessible. Ne pas déplacer l'appareil une fois qu'il est plein :
vous pourriez déformer sa carrosserie en plus d’entrainer des
réparations. Les composants électriques ne doivent pas être
Page 5

5
directement accessibles.
Maintenir les enfants éloignés de l’appareil
Ne pas utiliser l’appareil à l’extérieur
Dans le cas où du liquide serait accidentellement renversé
(bouteille cassée, etc.) sur des composants électriques (moteur,
etc.), veuillez débrancher immédiatement la prise secteur.
Pour éviter tout risque d'incendie, d'électrocution ou de blessure,
ne pas immerger le câble d'alimentation, la prise ou l'appareil lui-
même dans l'eau ou tout autre liquide. Ne pas manipuler
l'appareil avec les mains mouillées.
Maintenez l’appareil éloigné de toute source de chaleur et ne
l’exposez pas directement au soleil.
Ne laissez pas pendre le câble d’alimentation d'une table ou être
en contact avec des coins tranchants ou des surfaces chaudes.
Ne tirez pas sur le câble d'alimentation, saisissez la prise pour
débrancher l'appareil.
Assurez-vous que la zone où votre appareil est situé est capable
de supporter son poids lorsqu'il est chargé (une bouteille de 75 cl
pèse environ 1,3 kg). Votre cave doit être placée sur une surface
plane. Si vous devez la placer sur un tapis ou sur une moquette,
placez un support en-dessous.
Pour prévenir tout dommage du joint de la porte, assurez-vous
que la porte est entièrement ouverte lorsque vous souhaitez tirer
une clayette.
Page 6

6
Sécurité des enfants et des autres personnes vulnérables
Cet appareil peut être utilisé par des enfants ayant 8 ans et
plus, et par des personnes ayant des capacités physiques,
sensorielles ou mentales réduites ou un manque d’expérience et
de connaissances, à condition qu’elles soient supervisées ou
qu’elles aient reçu des instructions concernant l’utilisation de
l’appareil en toute sécurité et qu’elles comprennent les dangers
encourus.
Le nettoyage et l’entretien par l’usager ne doivent pas être
effectués par des enfants, sauf s’ils ont plus de 8 ans et qu’ils
sont surveillés.
Conservez tous les emballages hors de portée des enfants
car il existe un risque de suffocation.
Risque que l’enfant se retrouve coincé : qu’un enfant se
retrouve bloqué dans l’appareil ou y suffoque ne sont pas des
faits du passé. Toutefois, des appareils jetés ou abandonnés
demeurent dangereux, même s'ils sont "juste laissés dans le
garage quelques jours".
Si vous décidez de mettre au rebut l’appareil, débranchez-le
de la prise murale, coupez le câble d’alimentation (aussi proche
de l’appareil que vous le pouvez) et retirez la porte afin
d’empêcher les enfants de jouer avec, de subir un choc électrique
ou de s’enfermer à l’intérieur.
Si l’appareil, doté d’un joint de porte magnétique, doit être
remplacé par un autre appareil doté d’un loquet sur la porte ou
sur le joint, vérifiez bien que le loquet est hors d’état de
fonctionner avant de vous débarrasser de l’ancien appareil. Cela
évitera de transformer cet appareil en piège pour les enfants.
Maintenir l’appareil et son cordon hors de portée des enfants
de moins de 8 ans.
Avant de jeter votre cave, veillez à bien retirer la porte.
Page 7

7
Laissez également les clayettes qui étaient à l’intérieur de
l’appareil de manière à ce que les enfants ne puissent pas
grimper à l’intérieur.
Sécurité générale
ATTENTION — Cet appareil est conçu pour fonctionner dans un
foyer domestique ou pour une utilisation similaire comme :
Les zones de cuisine réservées au personnel des magasins,
des ateliers et autres milieux professionnels,
Les maisons secondaires et lieux utilisés par des clients de
l'hôtel, motels et autres environnements résidentiels,
Les environnements comme les chambres d'hôtel,
Les restaurants et établissements similaires, sauf détaillants.
ATTENTION — Afin d’éviter tout danger dû à l’instabilité de
l’appareil, il est important de le fixer et le monter selon les
instructions d’installation.
ATTENTION — Ne rangez jamais de substances inflammables
comme des aérosols à l’intérieur de cet appareil car elles
pourraient s’y déverser.
ATTENTION — Si le cordon d’alimentation est endommagé, vous
devez le remplacer immédiatement auprès de votre fabricant ou
d’un revendeur qualifié afin d’éviter tout risque d’électrocution.
ATTENTION — Maintenez la ventilation bien ouverte et vérifiez
bien que l’air peut circuler par les ouvertures, surtout si l’appareil
est encastré dans le mur.
ATTENTION — N’utilisez pas de dispositifs mécaniques ou autres
moyens pour accélérer le processus de dégivrage, autres que
Page 8

8
ceux recommandés par le fabricant.
ATTENTION — N’endommagez pas le circuit de réfrigération.
ATTENTION — N’utilisez pas d’appareils électriques à l’intérieur
du compartiment, sauf si ces derniers sont tolérés par le
fabricant.
ATTENTION — Le gaz réfrigérant et le gaz isolant sont
inflammables. Lors de l'élimination de l'appareil, faites appel à un
centre de retraitement ou d’élimination des déchets agréé.
N’exposer pas l’appareil à une flamme.
ATTENTION — Le gaz réfrigérant de cet appareil est le R600a,
tout produit inflammable et explosif ne doit pas être mis dans la
cave ou près de celle-ci afin d’éviter le déclenchement d’un feu
ou d’une explosion.
Liquide réfrigérant
De l’isobutane réfrigérant (R600a) est utilisé dans le circuit
réfrigérant de l’appareil. Il s’agit d’un gaz naturel hautement
inflammable, et donc dangereux pour l’environnement. Pendant
les transports et l’installation de l’appareil, vérifiez qu’aucun des
composants du circuit de réfrigération ne soit endommagé. Le
réfrigérant (R600a) est un liquide inflammable.
Attention : risque d’incendie
Si le circuit de réfrigération est endommagé :
Évitez les flammes nues et toute source d’incendie.
Ventilez bien la pièce où se trouve l’appareil. Il est
dangereux de modifier la composition de cet appareil, de quelque
manière que ce soit.
Page 9

9
Tout dommage fait au cordon peut provoquer un court-circuit,
et/ou une électrocution.
Sécurité électrique
Nous ne pouvons pas être tenus pour responsables de tout
incident causé par une mauvaise installation électrique.
Le cordon d’alimentation ne doit pas être rallongé. N’utilisez
ni prolongateur, ni adaptateur, ni prise multiple.
Vérifiez bien que la prise murale n’est pas endommagée.
Une prise murale en mauvais état pourrait entrainer une
surchauffe de l’appareil et son explosion.
Vérifiez bien que vous pouvez accéder à la prise murale de
l’appareil.
Ne tirez jamais sur le câble principal.
Ne supprimez jamais la mise à la terre.
Si la prise murale est lâche, ne branchez pas le cordon. Il
existe un risque d’électrocution ou d’incendie.
Vous ne devez jamais utiliser l’appareil si le cache de
l’éclairage intérieur n’est pas en place.
Débranchez votre appareil avant de procéder au
changement de l'ampoule.
Cet appareil fonctionne sur un courant à phase unique de
220~240V/50Hz.
Si le câble d’alimentation est endommagé, ne procédez pas
à son remplacement mais contactez votre service après-vente.
La prise de courant doit être facilement accessible mais hors
de portée des enfants. En cas d’incertitude, adressez-vous à
votre installateur.
Page 10

10
Utilisation quotidienne
Cet appareil est uniquement destiné à mettre à température
des bouteilles de vin.
Ne stockez jamais de substances ou de liquides
inflammables à l’intérieur de l’appareil, cela provoquerait un
risque d’explosion.
Ne faites pas fonctionner d’autres appareils électriques à
l’intérieur de cet appareil (mixeurs, turbines à glace électrique,
etc.).
Lorsque vous débranchez l’appareil, tenez toujours la prise
dans vos mains et ne tirez pas sur le cordon.
Ne placez pas d’objets chauds près des composants en
plastique de cet appareil.
Les recommandations du fabricant quant au stockage de
l'appareil doivent être strictement respectées. Référez-vous aux
instructions correspondantes.
L’appareil doit être tenu éloigné des bougies, luminaires et
autres flammes nues afin d’éviter les risques d’incendie.
L'appareil est destiné à garder des boissons pour une
utilisation normale domestique comme expliqué dans ce manuel
d’utilisation.
L’appareil est lourd. Soyez prudent lorsque vous le déplacez.
Si votre appareil est équipé de roulettes, rappelez-vous qu’elles
servent uniquement à faciliter les petits mouvements. Ne le
déplacez pas sur de plus longs trajets.
N’utilisez jamais l’appareil ou ses éléments pour vous
appuyer.
Pour éviter les chutes d’objets et empêcher de détériorer
l’appareil, ne surchargez pas les compartiments de l’appareil.
Page 11

11
Attention : nettoyage et entretien
Avant tout entretien, débranchez l’appareil et coupez le
courant.
Ne nettoyez pas l’appareil avec des objets métalliques, un
système à vapeur, des huiles volatiles, des solvants organiques
ou des composants abrasifs.
Ne nettoyez aucune partie de l’appareil avec des produits
inflammables. Les vapeurs peuvent provoquer un risque
d'incendie ou d'explosion.
N’utilisez pas d’objets tranchants ou pointus pour retirer la
glace. Utilisez un grattoir en plastique.
Informations importantes à propos de l’installation
Évitez d’installer votre appareil dans des zones humides.
Gardez l'appareil éloigné de la lumière directe du soleil et
des sources de chaleur (poêle, chauffage, radiateur, etc.). Une
exposition directe à la lumière solaire peut affecter le revêtement
acrylique et les sources de chaleur peuvent augmenter la
consommation électrique. Des températures ambiantes
extrêmement froides ou chaudes peuvent aussi entrainer une
mauvaise performance de l’appareil.
Branchez votre cave à vin à une prise terre murale
exclusivement et uniquement réglementaire. En aucun cas vous
ne devez réduire ou supprimer la troisième broche de mise à la
terre du cordon d'alimentation. Toutes les questions concernant la
puissance et /ou mise à la terre doivent être adressées à un
électricien certifié ou un centre de service autorisé.
Pour que les branchements électriques soient corrects,
suivez bien les consignes livrées dans ce manuel.
Déballez l’appareil et vérifiez qu’il n’est pas endommagé
visuellement. Ne branchez pas l’appareil si ce dernier est
Page 12

12
endommagé. Signalez tout dommage au point de vente où vous
l’avez acheté. Dans ce cas, conservez l’emballage.
Il est recommandé d’attendre au moins 24 heures avant de
brancher l’appareil au courant, afin que le compresseur soit bien
alimenté en huile.
Une bonne circulation de l’air est nécessaire, afin d’éviter les
risques de surchauffe. Pour que la ventilation soit suffisante,
suivez bien les consignes d’installation fournies.
Dès que possible, évitez que l’appareil ne touche les parois
murales et/ou ne soit en contact avec des éléments chauds
(compresseur, condensateur) afin d’éviter les risques d’incendie.
Respectez toujours bien les consignes d’installation.
L’appareil ne doit pas être situé à côté de radiateurs ou de
feux de cuisson.
Vérifiez bien que les prises sont accessibles une fois
l’appareil installé.
Économies d’énergie
Pour limiter la consommation électrique de votre appareil :
Installez-le dans un endroit approprié (voir chapitre «
Instructions d’installation »).
Gardez les portes ouvertes le moins de temps possible.
Veillez au fonctionnement optimal de votre appareil en
nettoyant périodiquement le condenseur (voir chapitre «
Nettoyage et entretien »).
Contrôlez périodiquement les joints des portes et assurez-
vous qu’elles ferment toujours de manière efficace. Si ce n’est
pas le cas, adressez-vous à votre service après-vente.
Page 13
13
Dépannage
Toute opération électrique doit être effectuée par un
technicien qualifié et compétent.
Cet appareil doit être dépanné par un Centre de Réparation
Agréé, et seules des pièces d’origine doivent être utilisées.
Cet appareil est réservé à un usage exclusivement domestique.
Le fabricant ne saurait être tenu responsable d’une autre
utilisation.
R600a
Instructions de sécurité
Attention — N’obstruer aucune grille de ventilation de l’appareil,
veillez à ce que les ouvertures d'aération soient toujours libres.
Attention — Ne pas stocker de substances explosives comme les
bombes d'aérosol avec un propulseur inflammables dans cet
appareil.
Attention — Ne pas endommager le circuit frigorifique de
l’appareil.
Attention — Les unités de réfrigération fonctionnant avec de
l'isobutane (R600a) ne peuvent être placées dans une zone avec
des sources d'ignition (par exemple, descellé contacts électriques
ou lorsque le fluide frigorigène pourrait rassembler en cas de
fuite). Le type de fluide frigorigène est indiqué sur la plaque
signalétique de l'armoire.
Attention — Ne pas utiliser d'appareils électriques dans les
compartiments de l'appareil, sauf s’ils sont du type recommandé
par le fabricant.
Page 14
14
Cet appareil est conforme à toutes les directives européennes en vigueur et à leurs modifications
éventuelles et est conforme notamment aux normes suivantes :
2011/65/EU (ROHS)
2014/35/EU relative à la sécurité électrique
2014/30/EU relative à la compatibilité électromagnétique
643/2009/CE relative à l’étiquetage énergétique
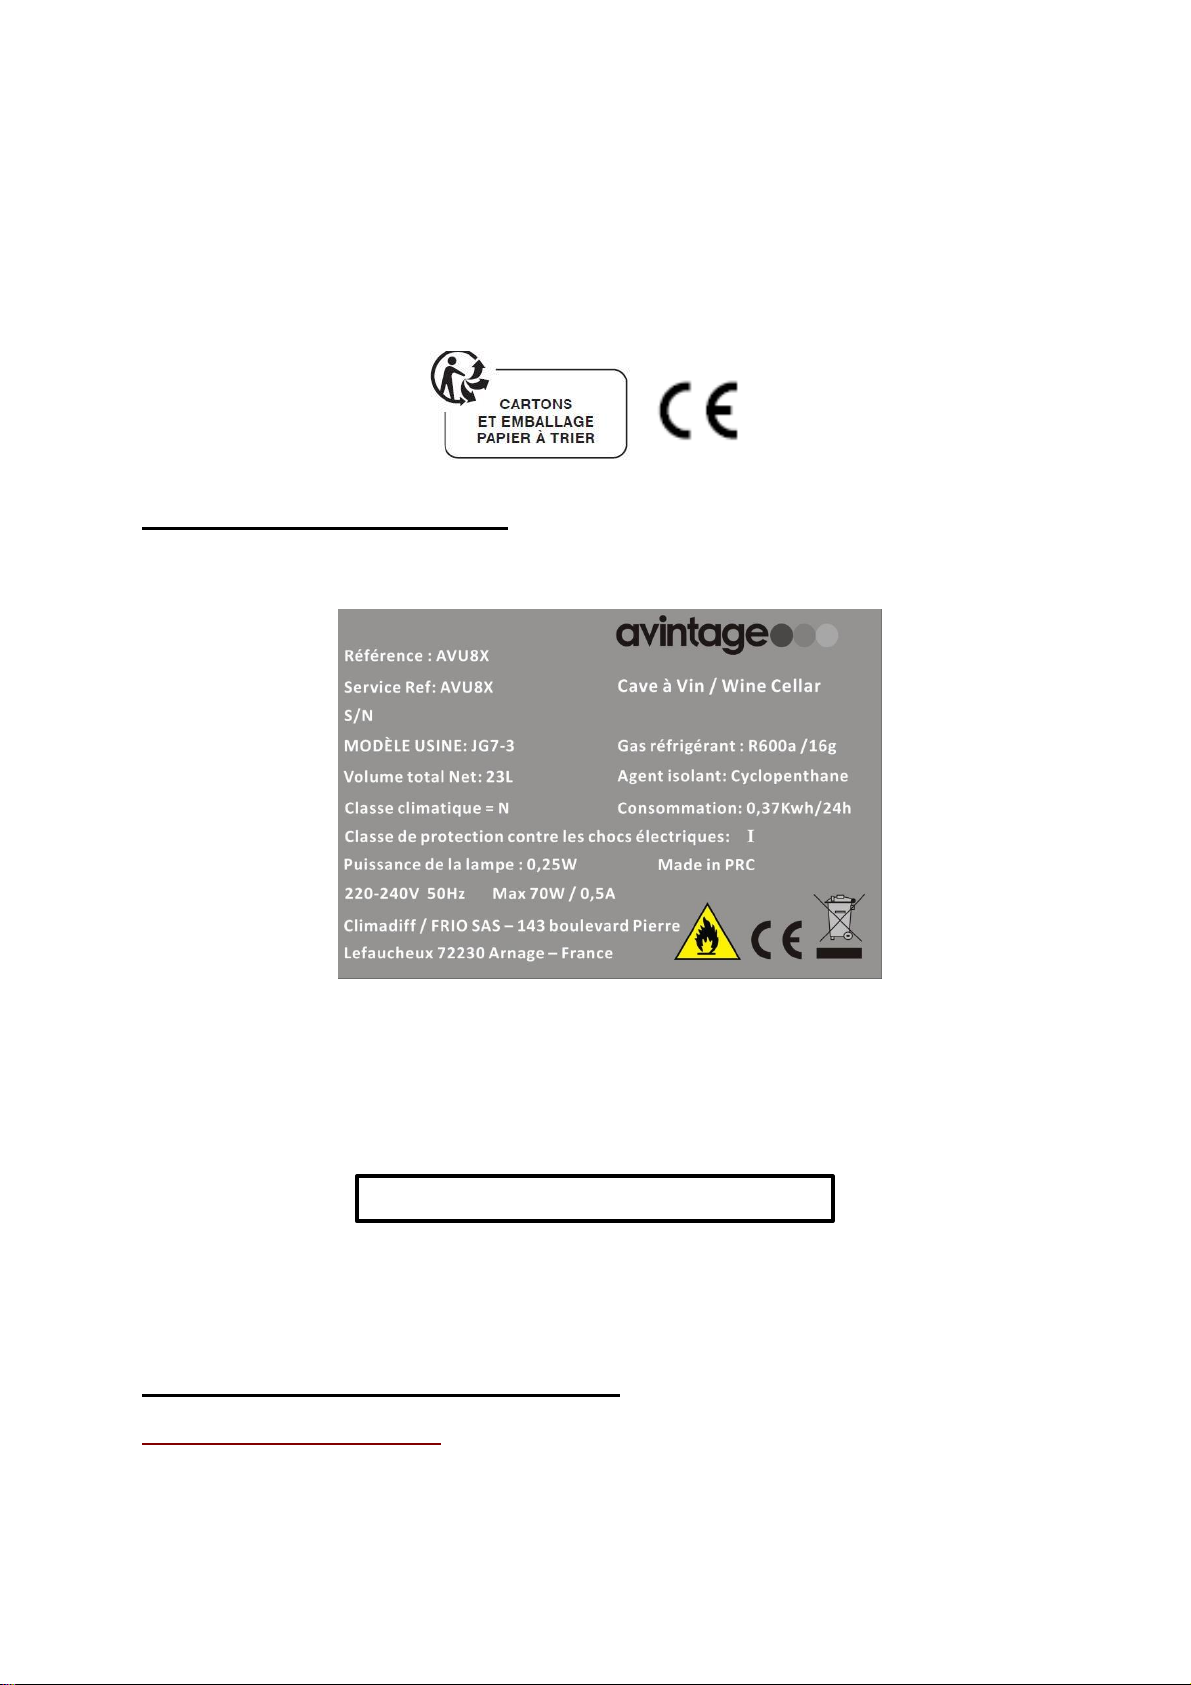
2. PLAQUE SIGNALÉTIQUE
Ci-dessous l’exemple d’une plaque signalétique :
La plaque signalétique collée à l’intérieur ou à l’arrière de l’appareil (selon modèle) comporte toutes les
informations spécifiques à votre appareil.
Nous vous conseillons de noter son numéro de série sur ce livret avant son installation, pour vous y
référer si nécessaire ultérieurement (intervention technique, demande d’assistance, etc.).
En effet, une fois l’appareil installé et chargé, son accès y est plus compliqué.
ATTENTION : aucune assistance ne pourra vous être donnée sans ces informations.
3. INSTRUCTIONS D’INSTALLATION
Avant d’utiliser votre cave à vin
Enlevez l’emballage extérieur et intérieur.
Laissez votre appareil en position verticale au repos pendant environ 24h avant sa mise en service.
Cela permettra de réduire la possibilité d'un dysfonctionnement du système de refroidissement dû au
Page 15
15
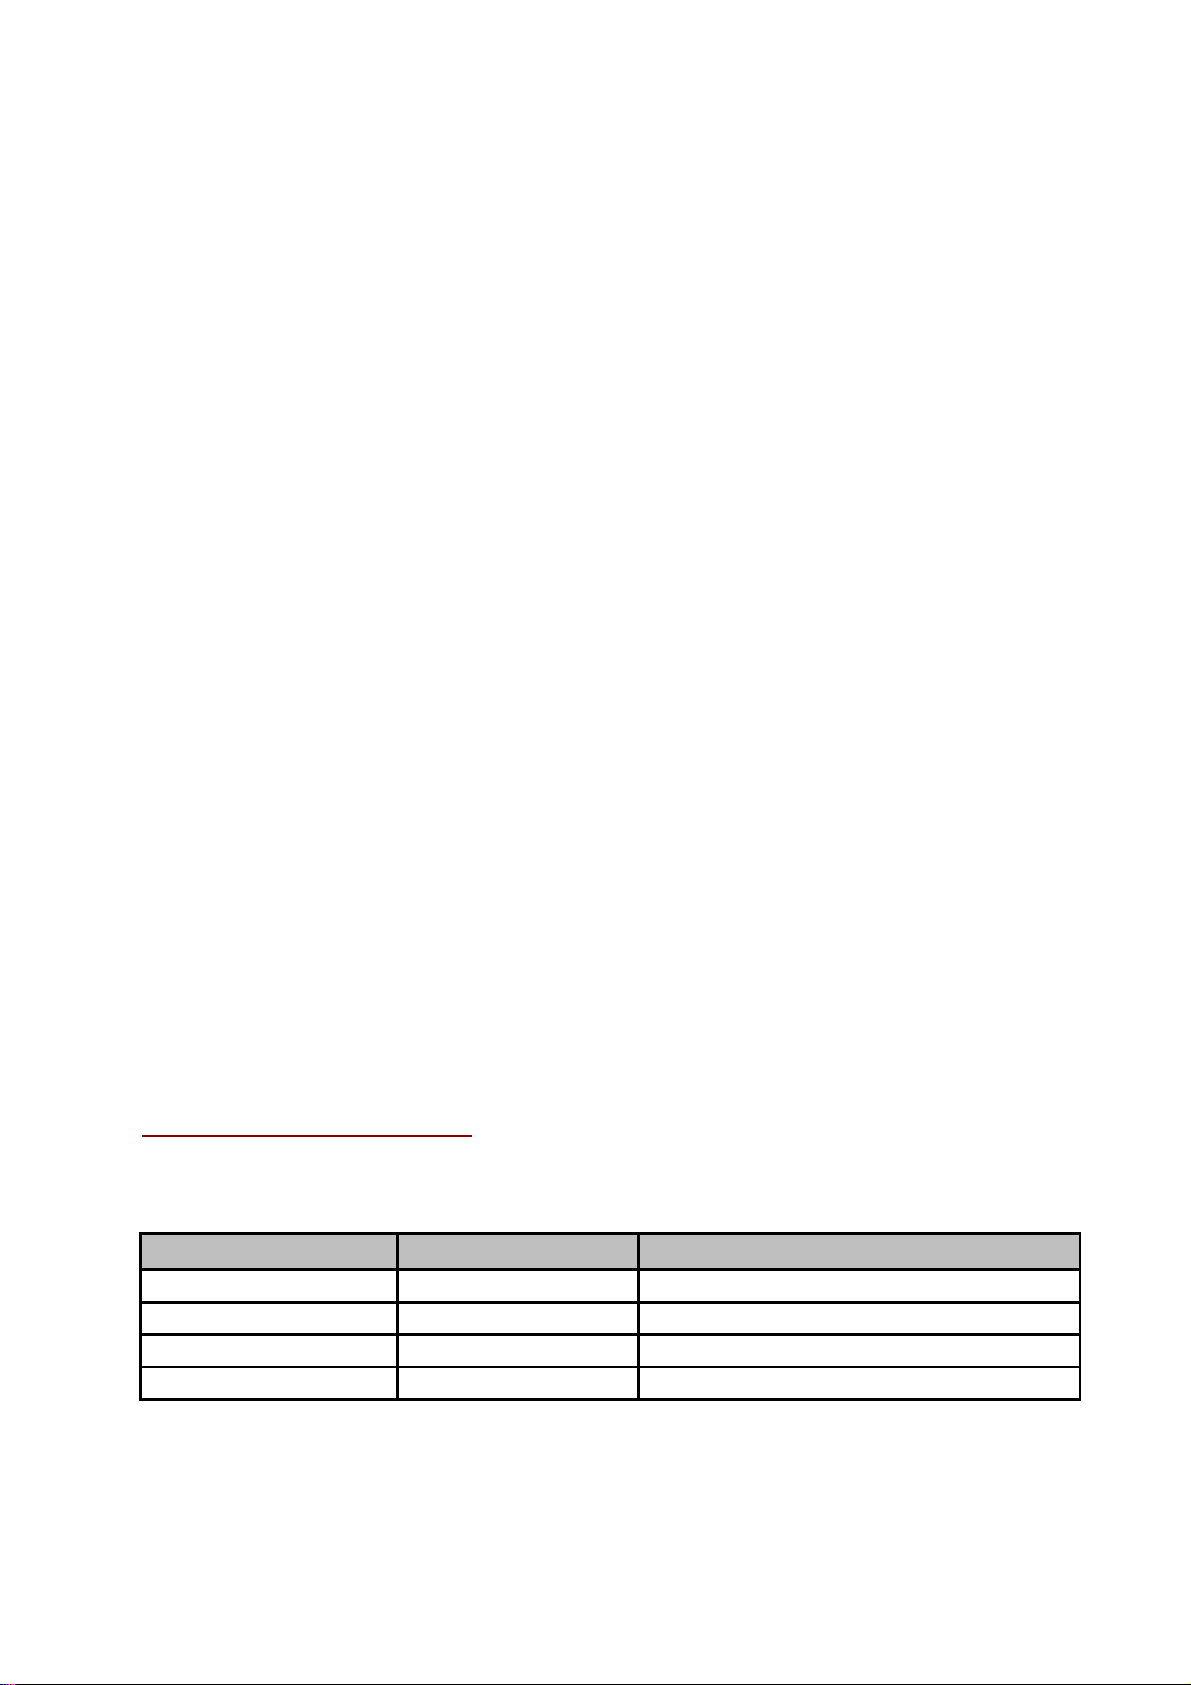
CLASSE
SYMBOLE
PLAGE DE TEMPÉRATURE AMBIANTE (°C)
Tempérée élargie
SN
De +10 à +32
Tempérée N De +16 à +32
Subtropicale
ST
De +16 à +38
Tropicale T De +16 à +43
transport.
Nettoyez l’intérieur à l’aide d’un chiffon doux et d’eau tiède.
Lorsque vous installez votre appareil, merci de choisir un lieu autorisé.
Placez votre appareil sur un sol qui est assez résistant pour le soutenir lorsqu’il est entièrement
chargé. Veuillez ajuster les pieds de votre appareil afin de mettre à niveau votre cave.
Une ventilation adéquate est nécessaire, n’obstruez aucune sortie d’air.
N’est pas conçu pour être place dans un garage, sous-sol ou autre lieu du même type.
L’appareil est destiné à un usage seulement intérieur.
Cet appareil est destiné à être installé en pose libre ou de façon encastrée.
Branchez la cave à une prise unique, laissez un espace de 30 mm entre l’arrière de la cave et le mur.
Veillez à la caler parfaitement et à ajuster l’horizontalité de votre cave à vin (l’utilisation d’un niveau à
bulles est conseillée). Ceci évitera tout mouvement dû à l’instabilité, générateur de bruit et de vibration
et assurera la parfaite herméticité de la porte.
Cet appareil est uniquement réservé au stockage de vins.
Cet appareil utilise du gaz réfrigérant inflammable, veuillez donc à ne jamais endommager le tuyau de
refroidissement pendant le transport.
Attention
Stockez des bouteilles fermées.
Ne surchargez pas l’appareil.
N’ouvrez pas la porte plus que nécessaire.
Ne couvrez pas les clayettes avec des feuilles d’aluminium ou tout autre matériau qui pourrait
empêcher une bonne circulation de l’air.
Si la cave à vin doit être laissée vide pendant une longue période, il est suggéré de débrancher
l’appareil et, après un nettoyage très soigneux, de laisser la porte entrouverte pour laisser l’air circuler
et prévenir la formation de moisissures et d’odeurs.
ATTENTION : merci d’éloigner l’appareil de toute substance qui pourrait entrainer un risque
d’incendie.
Plages de températures ambiantes
Cet appareil est indiqué pour un fonctionnement dans des pièces dont la température ambiante est bien
spécifique, cette classe climatique est indiquée sur la plaque signalétique.
Page 16
16
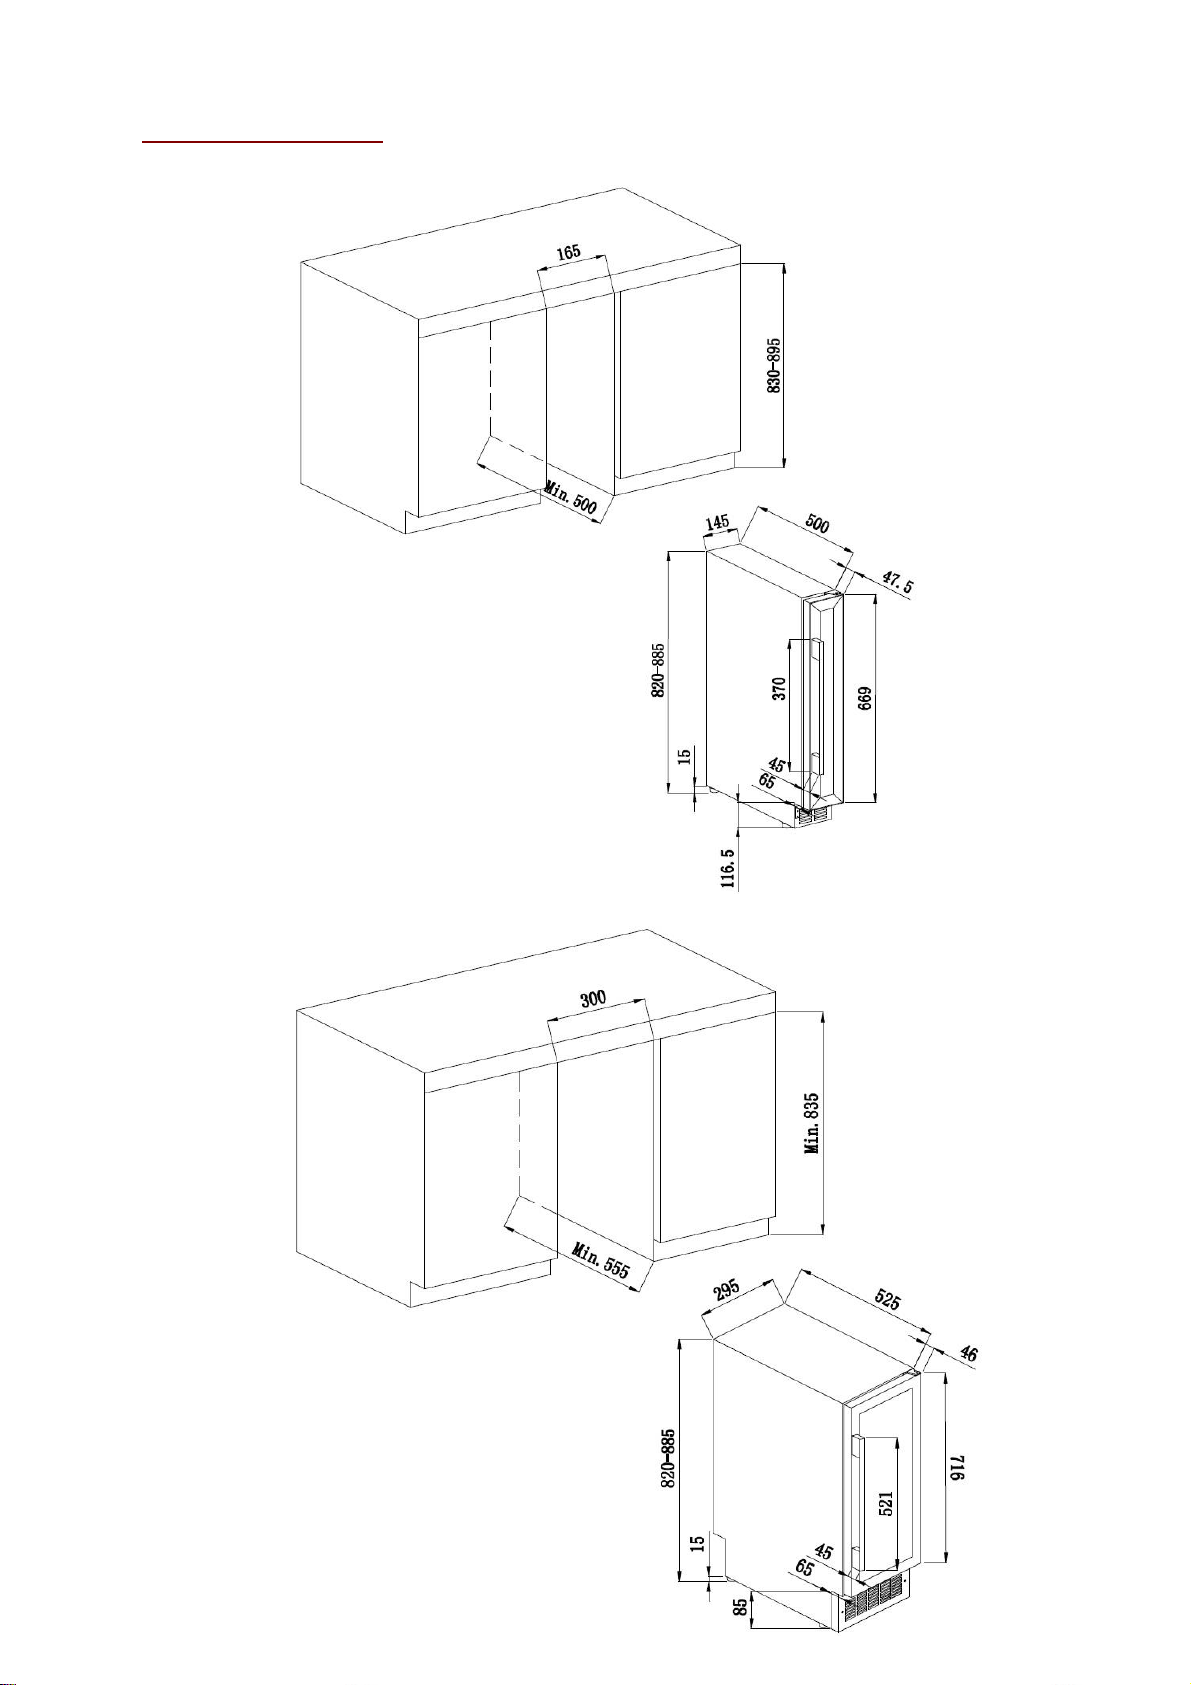
Schémas d’encastrement
AVU8X(/IX)
AVU23SX(/IX)
Page 17
17
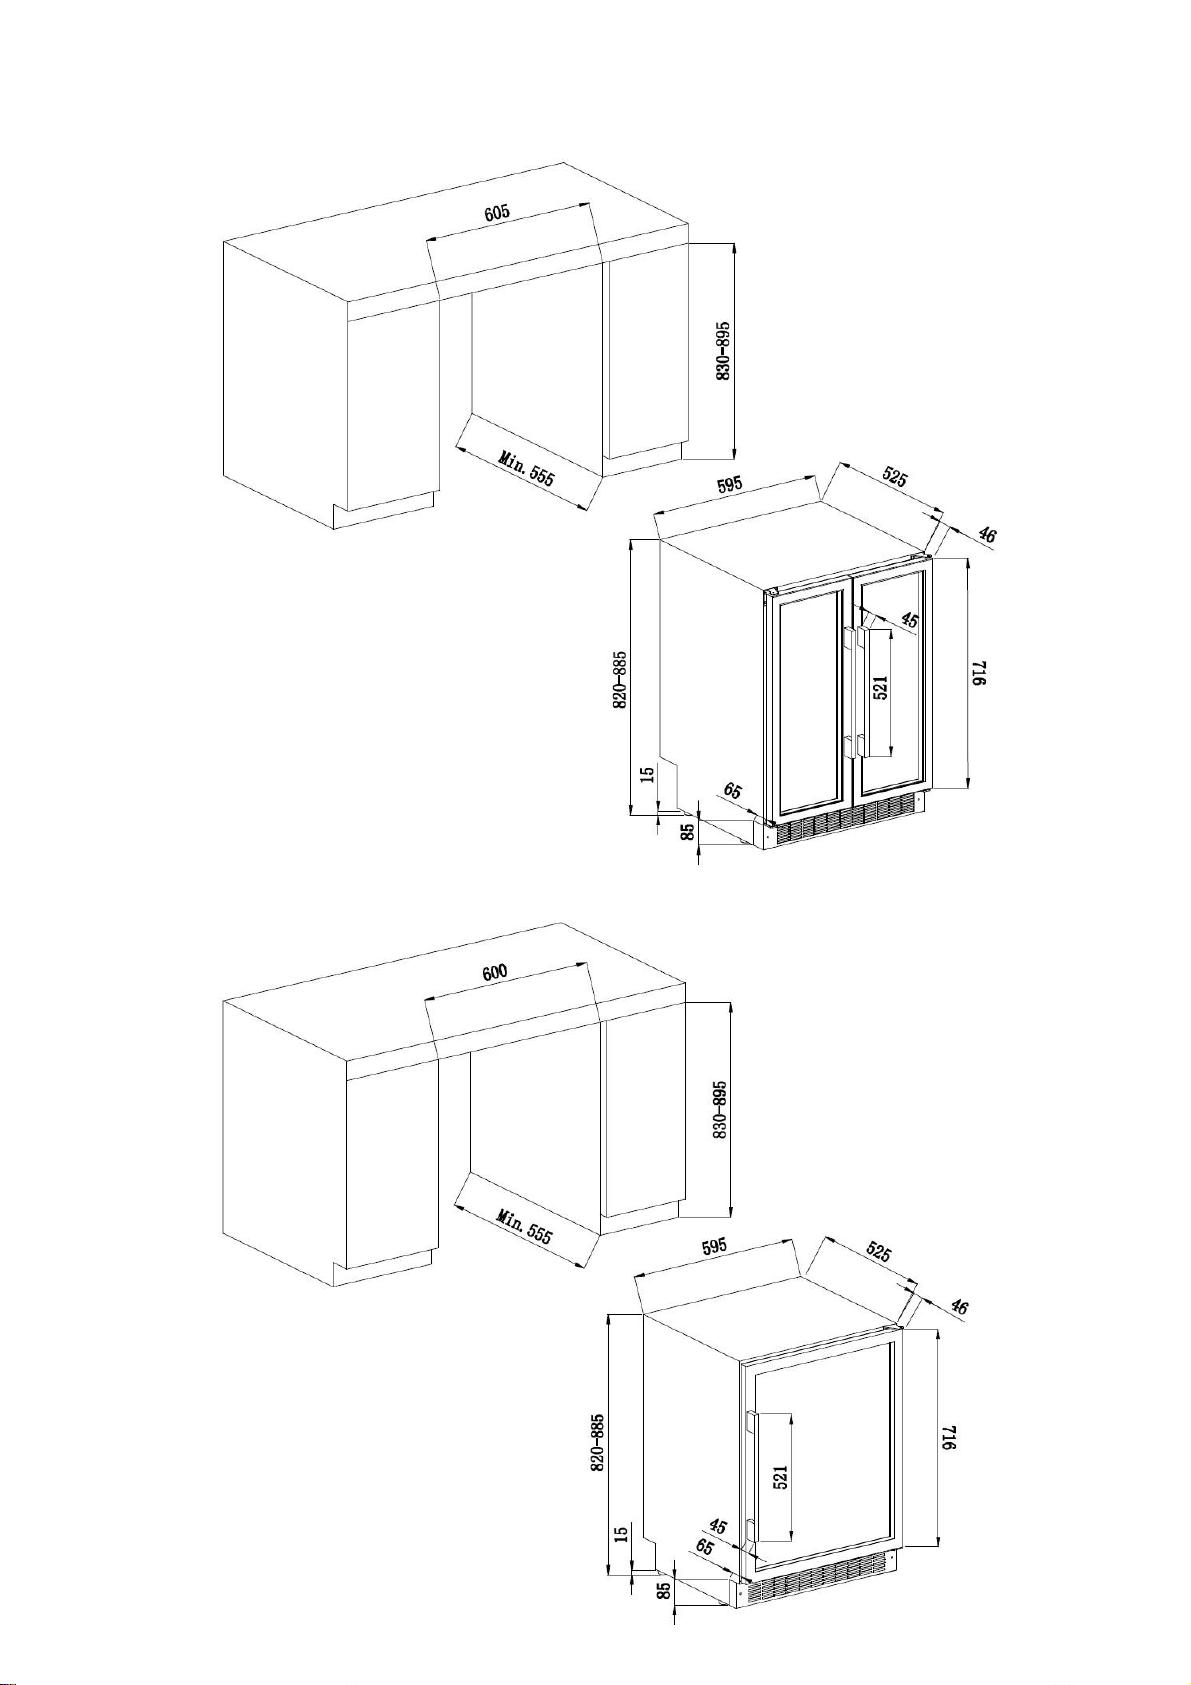
AVU41SXDPA(/IX)
AVU52SX(/IX) AVU54SXDZA(/IX)
Page 18
18
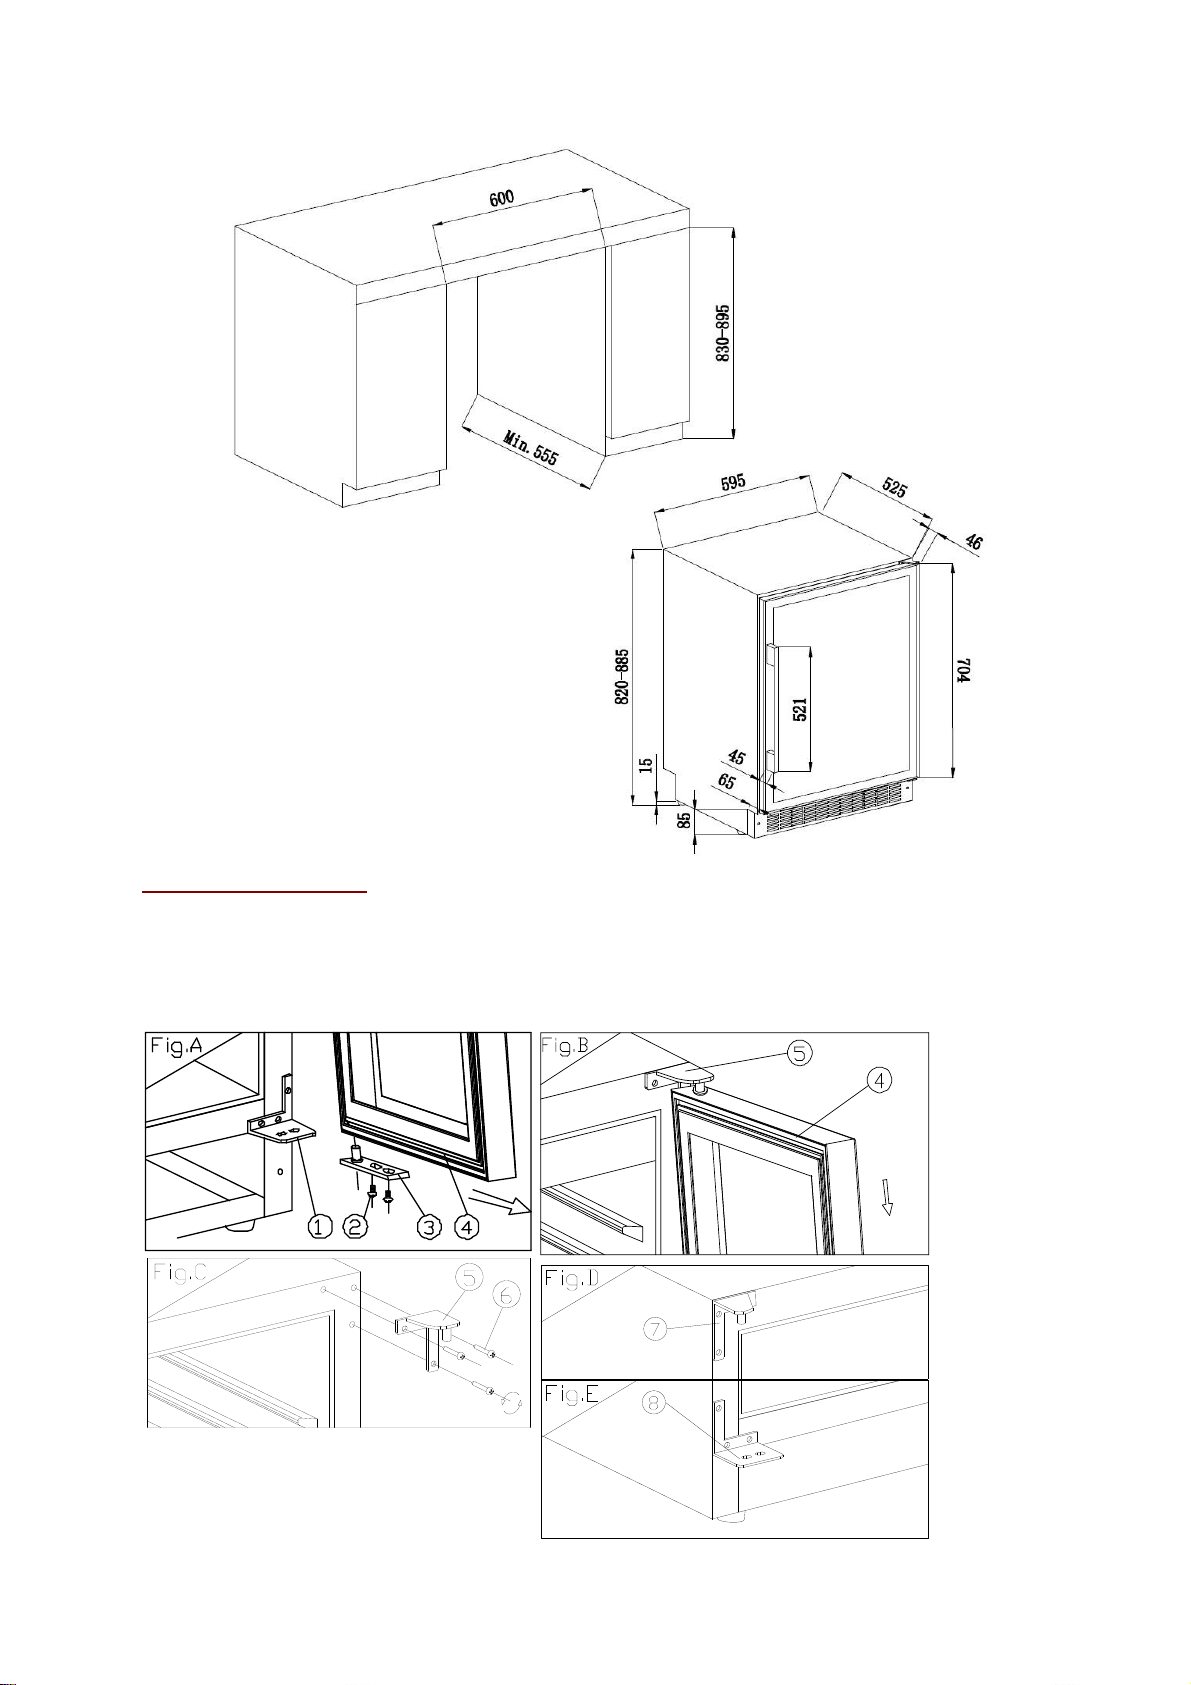
AVU53CDZA PRO51C/1
Réversibilité de la porte
Si vous désirez inverser le sens d’ouverture de la porte, qui initialement s’ouvre de gauche à droite,
procédez comme suit.
AVU8X(/IX)
Page 19
19
1. Charnière inf. (droite) 2. Vis 3. Axe de la porte
4. Porte 5. Charnière sup. (droite) 6. Vis des charnières
7. Charnière sup. (gauche) 8. Charnière inf. (gauche)
1. Ouvrez la porte à 90 degrés. Dévissez deux vis (2) de l’axe inférieur de la porte, puis retirez la porte
(4) et l’axe de la porte (Fig. A). Positionnez correctement la porte (4) (Fig. A et B).
2. Retirez 3 vis (6) de la charnière supérieure (droite) (5) et ôtez celle-ci ainsi que la charnière inférieure
droite (Fig. C)
3. Installez la charnière supérieure de rechange (gauche) (7) sur le côté supérieur gauche à l’aide de
trois vis (Fig. D). Toujours selon la procédure ci-dessus, procédez à l’installation de la charnière
inférieure de rechange (gauche) (8) (Fig. E).
4. La porte s’ouvre à 180 degrés. La méthode d’installation de la porte est la même que celle de son
démontage ; alignez correctement la porte et fixez-la.
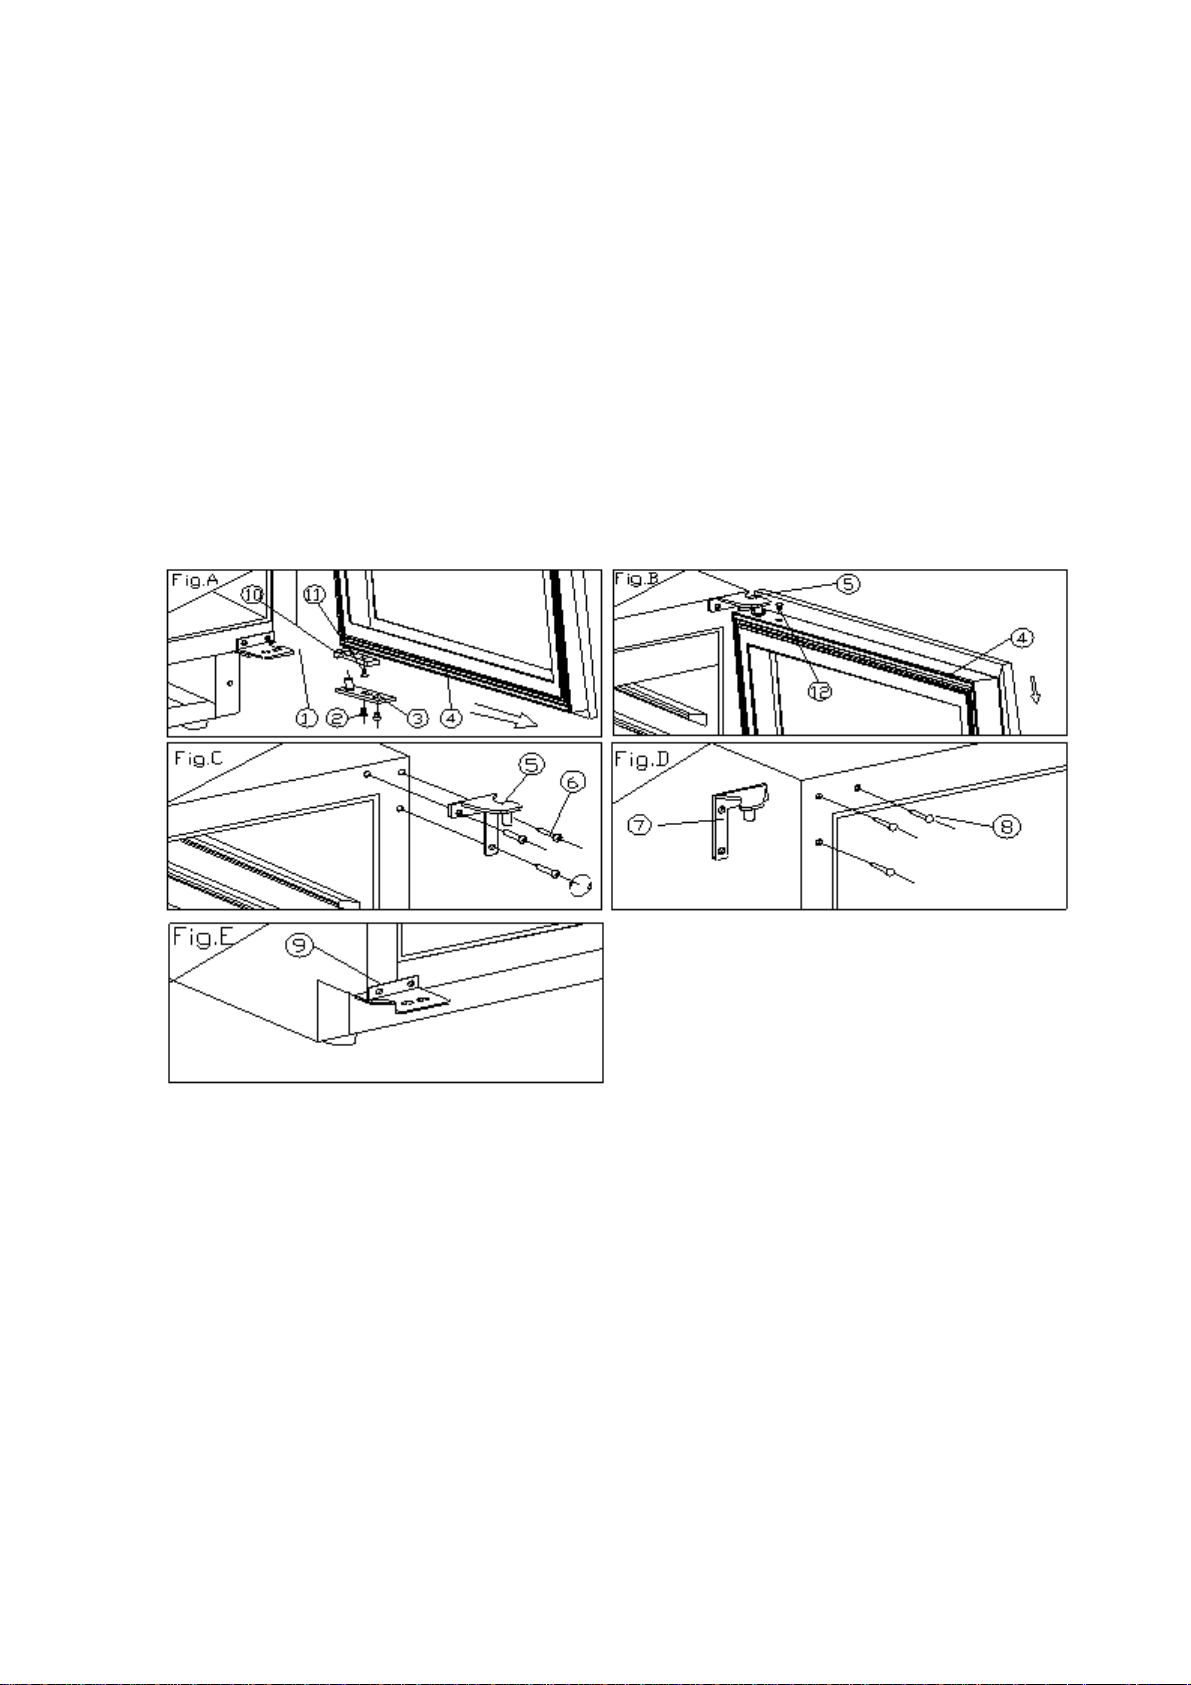
AVU23SX(/IX) AVU52SX(/IX)
1. Charnière inf. (droite) 2. Vis 3. Axe de la porte
4. Porte 5. Charnière sup. (droite) 6. Vis des charnières
7. Charnière sup. (gauche) 8. Clou décoratif 9. Charnière inf. (gauche)
10. Dispositif de retenue 11. Vis 12. Bouchon
1. Ouvrez la porte à 90 degrés. Dévissez deux vis (2) de l’axe inférieur de la porte, puis retirez la porte
(4) et l’axe de la porte (Fig. A).
2. Positionnez correctement la porte (4) et retirez le bouchon (12) de la partie supérieure du cadre de la
porte ; dévissez l’une des vis (11) inférieures et ôtez le dispositif de retenue (10). Installez ensuite ce
dispositif sur la partie supérieure du cadre de la porte. Il est préférable d’utiliser un bouchon de
rechange (12) pour obturer le trou sur la partie supérieure du cadre (Fig. A/B).
3. Retirez 3 vis (6) de la charnière supérieure (droite) (5) et ôtez celle-ci (Fig. C).
4. Retirez les clous décoratifs (8) du côté supérieur gauche de l’appareil et installez la charnière
supérieure de rechange (gauche) (7) sur le côté supérieur gauche à l’aide de trois vis (Fig. D).
5. Toujours selon la procédure ci-dessus, procédez à l’installation de la charnière inférieure de rechange
Page 20

20
(gauche) (9) (Fig. E).
6. La porte s’ouvre à 180 degrés. La méthode d’installation de la porte est la même que celle de son
démontage ; alignez correctement la porte et fixez.
7. Obturez le trou situé en haut à droite de l’appareil avec un clou décoratif (8).
AVU53CDZA AV U54SXDZA(/IX) PRO51C/1
1. Charnière inf. (droite) 2. Vis 3. Axe de la porte
4. Porte 5. Charnière sup. (droite) 6. Vis des charnières
7. Charnière sup. (gauche) 8. Clou décoratif 9. Charnière inf. (gauche)
1. Ouvrez la porte à 90 degrés. Dévissez deux vis (2) de l’axe inférieur de la porte, puis retirez la porte
(4) et l’axe de la porte (Fig. A).
2. Positionnez correctement la porte (4).
3. Retirez 3 vis (6) de la charnière supérieure (droite) (5) et ôtez celle-ci (Fig. C).
4. Retirez les clous décoratifs (8) du côté supérieur gauche de l’appareil et installez la charnière
supérieure supplémentaire (gauche) (7) sur le côté supérieur gauche à l’aide de trois vis (Fig. D).
5. Toujours selon la procédure ci-dessus, procédez à l’installation de la charnière inférieure restante
(gauche) (9) (Fig. E).
6. La porte s’ouvre à 180 degrés. La méthode d’installation de la porte est la même que celle de son
démontage ; alignez correctement la porte et fixez.
7. Obturez le trou situé en haut à droite de l’appareil avec un clou décoratif (8).
Page 21
21
4. INSTRUCTIONS D’UTILISATION
Il est recommandé d’installer votre appareil dans un endroit où la température ambiante est comprise
entre 16-32°C. Si la température ambiante est supérieure ou inférieure à la température recommandée,
le rendement de l'unité peut être influencé et il peut être impossible d'obtenir la température entre 5-20°C
ou 5-10°C/10-20°C (selon modèle).
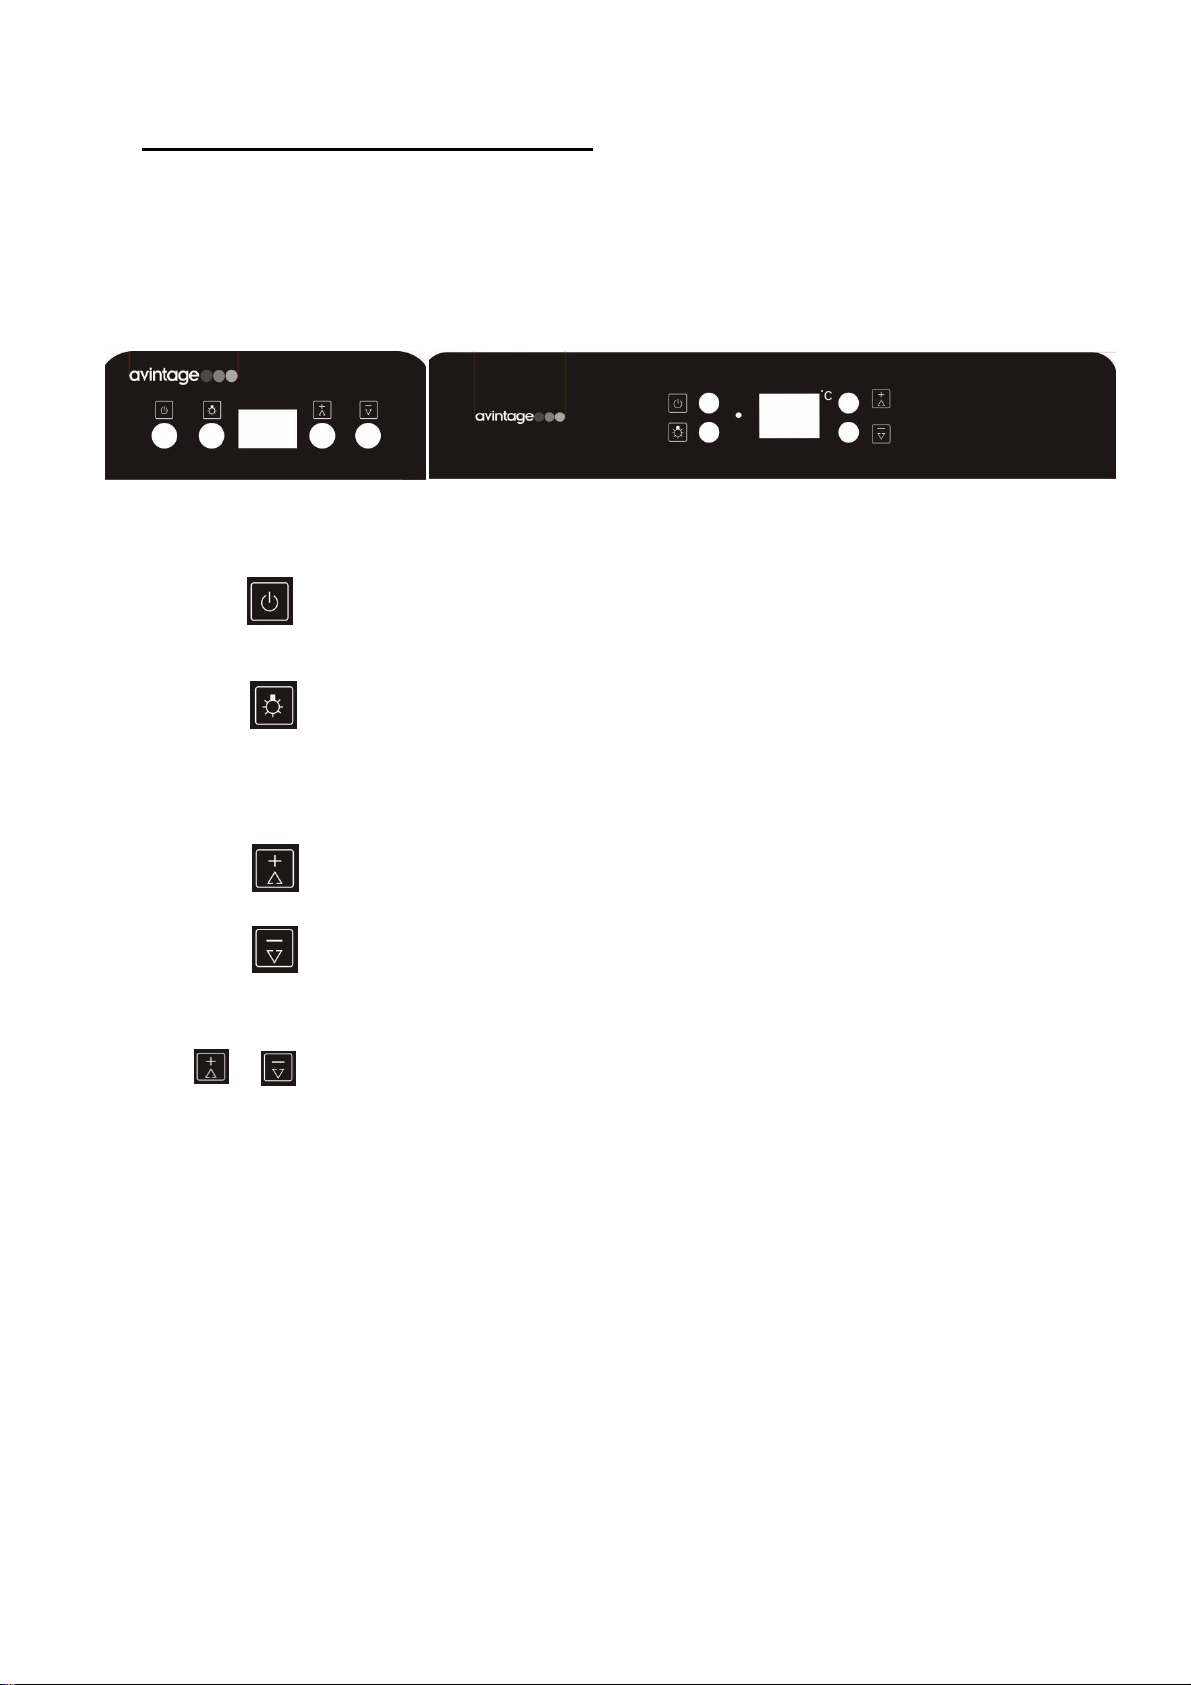
AVU8X(/IX) / AVU23SX(/IX) AVU41SXDPA(/IX) AVU52SX(/IX) PRO51C/1
“RUN”
Indicateur de mise sous tension
Bouton
Pour allumer/éteindre l’appareil.
Appuyez et maintenez le bouton pendant environ 3 secondes.
Bouton
Bouton de contrôle de la lumière intérieure
Écran d’affichage
Afficheur électronique de la température
Bouton
Bouton de réglage de la température +
Bouton
Bouton de réglage de la température -
Vous pouvez choisir la température que vous souhaitez dans le compartiment en pressant les touches
“ / ” . La température que vous souhaitez programmer augmentera/diminuera de 1ºC à
chaque pression sur les boutons.
La température peut être choisie entre 5 et 20°C ou entre 5 et 10°C / 10 et 20°C (selon modèle). Une fois
sélectionnée, l’afficheur clignotera environ 5s avant d’indiquer la température interne instantanée de la
cave. À tout moment, la température de réglage est visible en appuyant 5s sur les touches de sélection
de température.
Dans le cas d’une coupure de courant, toutes les températures précédemment choisies seront effacées
et chaque compartiment reviendra par défaut à la valeur de température préprogrammée d’usine soit
12°C.
Page 22
22
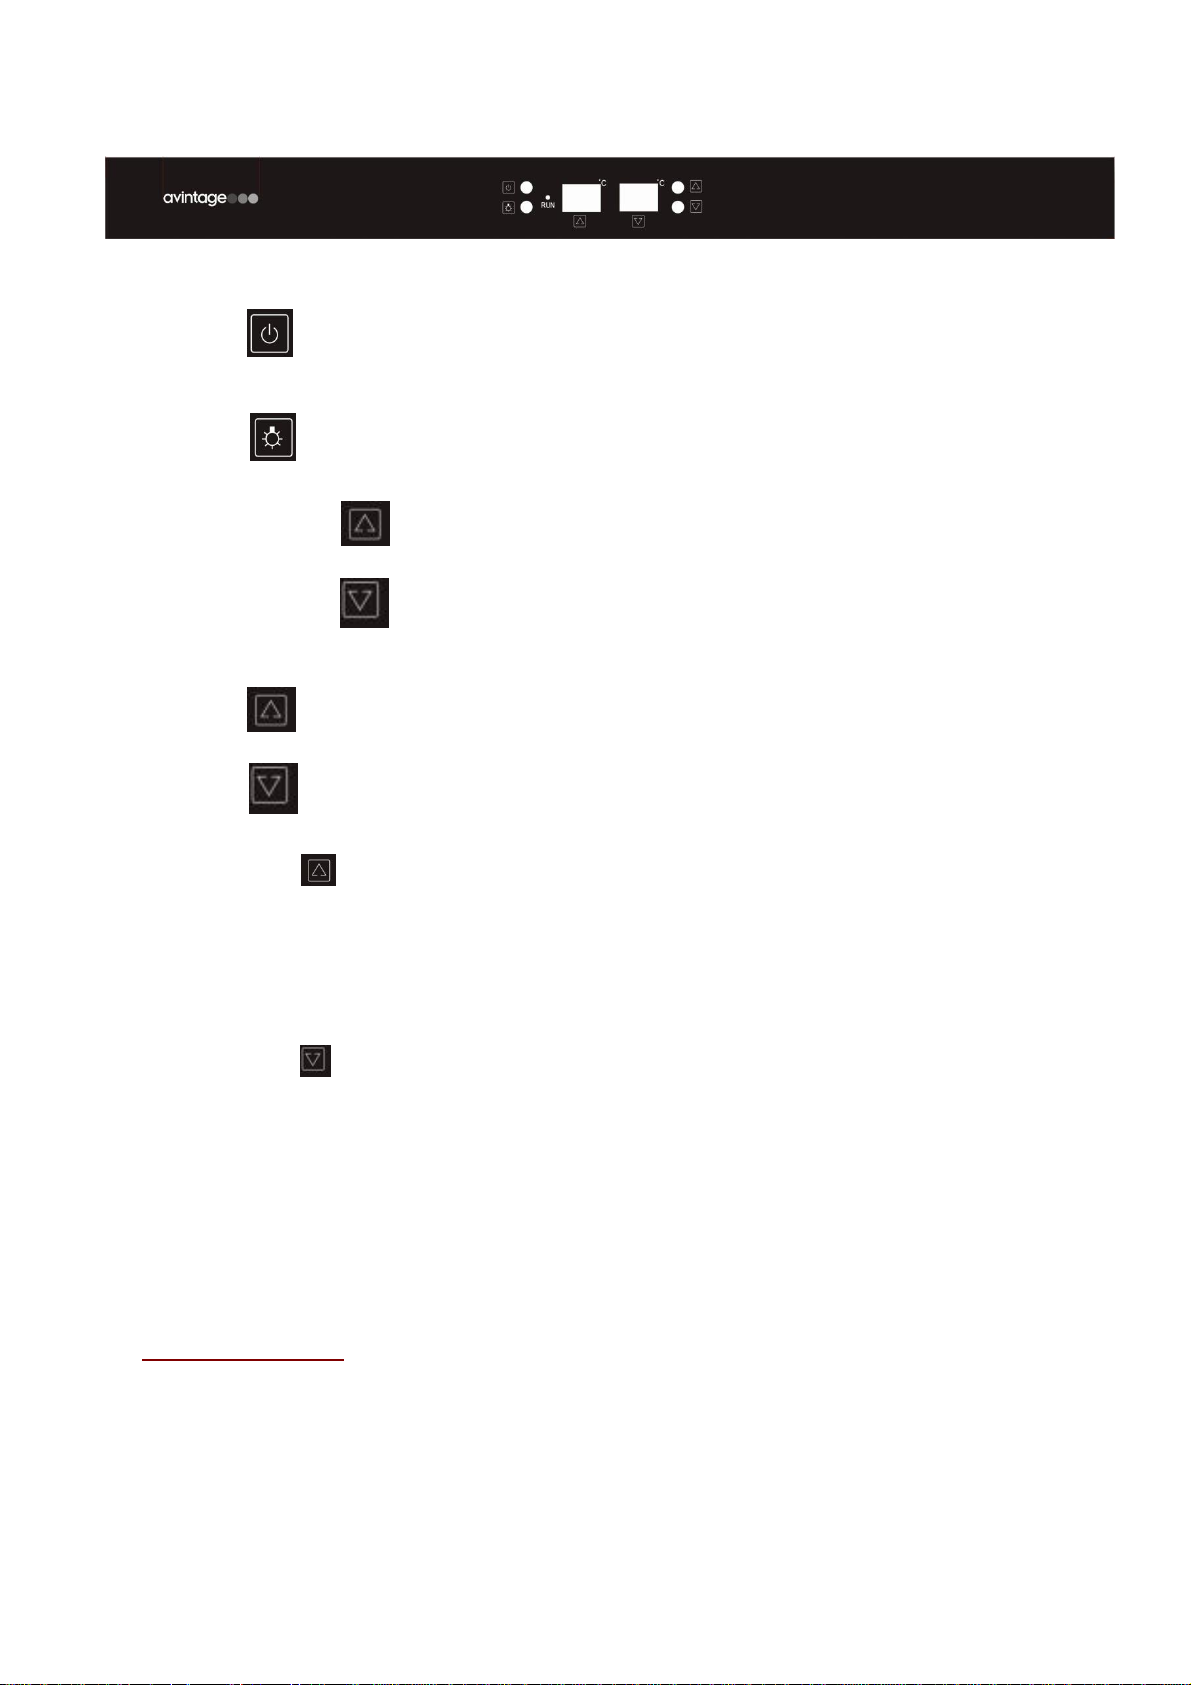
AVU53CDZA AV U54SXDZA(/IX)
“RUN”
Indicateur de mise sous tension
Bouton
Pour allumer/éteindre l’appareil.
Appuyez et maintenez le bouton pendant environ 3 secondes.
Bouton
Bouton de contrôle de la lumière intérieure
Écran d’affichage
Afficheur électronique de la température du compartiment supérieur
Écran d’affichage
Afficheur électronique de la température du compartiment inférieur
Bouton
Bouton de réglage de la température du compartiment supérieur
Bouton
Bouton de réglage de la température du compartiment inférieur
Appuyez sur “ ” pour régler la température du compartiment supérieur. L’afficheur relatif au
compartiment se met alors à clignoter et chaque pression vous permet de faire varier la température de
1°C. Une fois la température de réglage la plus basse atteinte 5°C, l’afficheur se repositionne
automatiquement sur la température de réglage la plus élevée 10°C. Une fois sélectionnée, l’afficheur
clignotera environ 5s avant d’indiquer la température interne instantanée de la cave. À tout moment, la
température de réglage est visible en appuyant 5s sur les touches de sélection de température.
Appuyez sur “ ” pour régler la température du compartiment inférieur. L’afficheur relatif au
compartiment se met alors à clignoter et chaque pression vous permet de faire varier la température de
1°C. Une fois la température de réglage la plus basse atteinte 10°C, l’afficheur se repositionne
automatiquement sur la température de réglage la plus élevée 20°C. Une fois sélectionnée, l’afficheur
clignotera environ 5s avant d’indiquer la température interne instantanée de la cave. À tout moment, la
température de réglage est visible en appuyant 5s sur les touches de sélection de température.
Dans le cas d’une coupure de courant, toutes les températures précédemment choisies seront effacées
et chaque compartiment reviendra par défaut à la valeur de température préprogrammée d’usine soit 6°C
pour le compartiment haut et 12°C pour le compartiment bas.
Fonction d’utilisation
Alarme de température :
Si la température intérieure est supérieure à 23°C après 10 heures de fonctionnement, l’écran
affichera ”HI” puis une alarme sonore retentira au bout d’une heure. Cette alarme vous informera que
la température intérieure est trop élevée, merci de vérifier quelle pourrait en être la raison. Si la
température intérieure est inférieure à 0°C, l’écran affichera “LO” et une alarme sonore retentira.
Fonction de mémorisation de la température :
Dans le cas d’une coupure de courant, la cave va mémoriser les derniers paramétrages et, lorsque
Page 23

23
l’électricité reviendra, ces mêmes paramètres seront à nouveau opérationnels.
Lumière intérieure
Afin de réduire la consommation d’énergie, la lumière intérieure de cette cave à vin s’éteint
automatiquement au bout de 10 minutes.
Si vous souhaitez que la lumière intérieure de votre appareil soit constamment allumée, veuillez appuyer
sur le bouton pendant 5 secondes : sur l’écran apparaitra alors le message « LP ». Après 4
secondes, l’écran reviendra à la normale et la lumière restera allumée jusqu’à ce que vous l’éteigniez.
Si vous souhaitez revenir au paramétrage initial et économiser l’énergie (recommandé), veuillez appuyer
sur le bouton pendant 5 secondes : sur l’écran apparaitra alors le message « LF ». Après 4
secondes, l’écran reviendra à la normale et la lumière s’éteindra automatiquement après 10 minutes.
5. ÉQUIPEMENT
Le système de climatisation
Selon l’avis des spécialistes, la température idéale de conservation des vins se situe autour de 12°C,
dans une fourchette de 10° à 14°C. Ne pas confondre avec la température de service, qui elle varie selon
la spécificité de chaque type de vin de 5 à 20°C.
Il est surtout important d’éviter les variations brutales de température. Conçu par des spécialistes pour
des œnophiles, cet appareil, contrairement au simple réfrigérateur, prend en compte la sensibilité des
grands crûs aux variations brutales de températures en assurant un contrôle fin d’une température
moyenne constante.
Le système anti-vibration
Le compresseur frigorifique est équipé d’amortisseurs spéciaux (les silent-blocks) et la cuve intérieure est
isolée de la carrosserie par une épaisse couche de mousse de polyuréthane. Ces caractéristiques
permettent d’éviter la transmission de vibration à vos vins.
Le système d’humidification
Cet appareil est équipé d’un bac (selon modèle) qui maintient un niveau correct d’humidité. Si l’humidité
est trop basse, remplissez le niveau du réservoir aux ¾ de sa capacité. Vérifiez le niveau d’eau de temps
en temps et ajoutez de l’eau si nécessaire. Veillez à ce que le bac contienne toujours de l’eau.
Conçu par des spécialistes pour des œnophiles, la marque Avintage a donc pris en compte la sensibilité
des bouchons à une humidité ambiante trop basse. C’est pourquoi le bac est à placer sur la clayette sous
le ventilateur situé au fond afin d’apporter une humidité minimale. Attention à contrôler le niveau d’eau si
vous stockez vos vins sur une longue période et que vous ne dédiez pas l’appareil uniquement à leur
mise à température de service (avec des rotations rapides de vos bouteilles).
Assurez-vous que le bac rempli d’eau est bien stable pour éviter toute chute ou fuite d’eau.
Le système anti-UV
La lumière accélère le vieillissement de vos vins. Dans nos caves à porte pleine, vos vins sont
naturellement à l’abri, sous réserve bien entendu d’ouvertures pas trop fréquentes. Ce modèle à porte
vitrée a fait l’objet d’un traitement particulier, qui filtre les rayons ultra-violets néfastes ; vos vins sont donc
parfaitement à l’abri.
Page 24
24
Dégivrage
Votre appareil est équipé d’un cycle automatique de dégivrage. Pendant l’arrêt du cycle de
refroidissement, les surfaces réfrigérées de l’appareil dégivrent automatiquement. L’eau de dégivrage
ainsi récupérée est évacuée vers un bac d’évaporation des condensas qui est situé à l’arrière de
l’appareil près du compresseur. La chaleur produite par le compresseur évapore ensuite les condensas
récupérés dans le bac.
Le système hiver (selon modèle)
Le kit hiver est un système hors gel qui permet à la cave de fonctionner dans un environnement ou la
température est comprise entre 0 et 32°C. Une sonde située à l’intérieur de l’appareil déclenche une
résistance électrique de faible puissance lorsque la température de la cave devient inférieure de 3°C à la
température programmée. Cette résistance est de faible puissance pour éviter une remontée brutale de
la température du vin et ainsi éviter les chocs thermiques préjudiciables pour la préservation du vin.
Le kit est destiné à réchauffer la température interne de la cave avant même qu’un échange thermique ne
se soit fait avec les bouteilles. Le système hiver permet de maintenir la température à l'intérieur de la
cave à l’identique de la température programmée. Lorsque le système s'active et que la température
intérieure atteint la température réglée, le système s'arrête.
Clayettes
Pour éviter d’endommager le joint de la porte, assurez-vous que la porte soit bien ouverte avant de
tirer les clayettes pour mettre ou enlever les bouteilles.
Pour un accès plus simple au contenu des clayettes, vous devez faire glisser la clayette vers
l’extérieur d’environ 1/3. Cependant, elles sont conçues avec une butée d’arrêt de chaque côté pour
éviter que les bouteilles ne tombent.
Pour retirer ou positionner les clayettes, inclinez la clayette comme indiqué sur le schéma et tirez ou
poussez selon les cas.
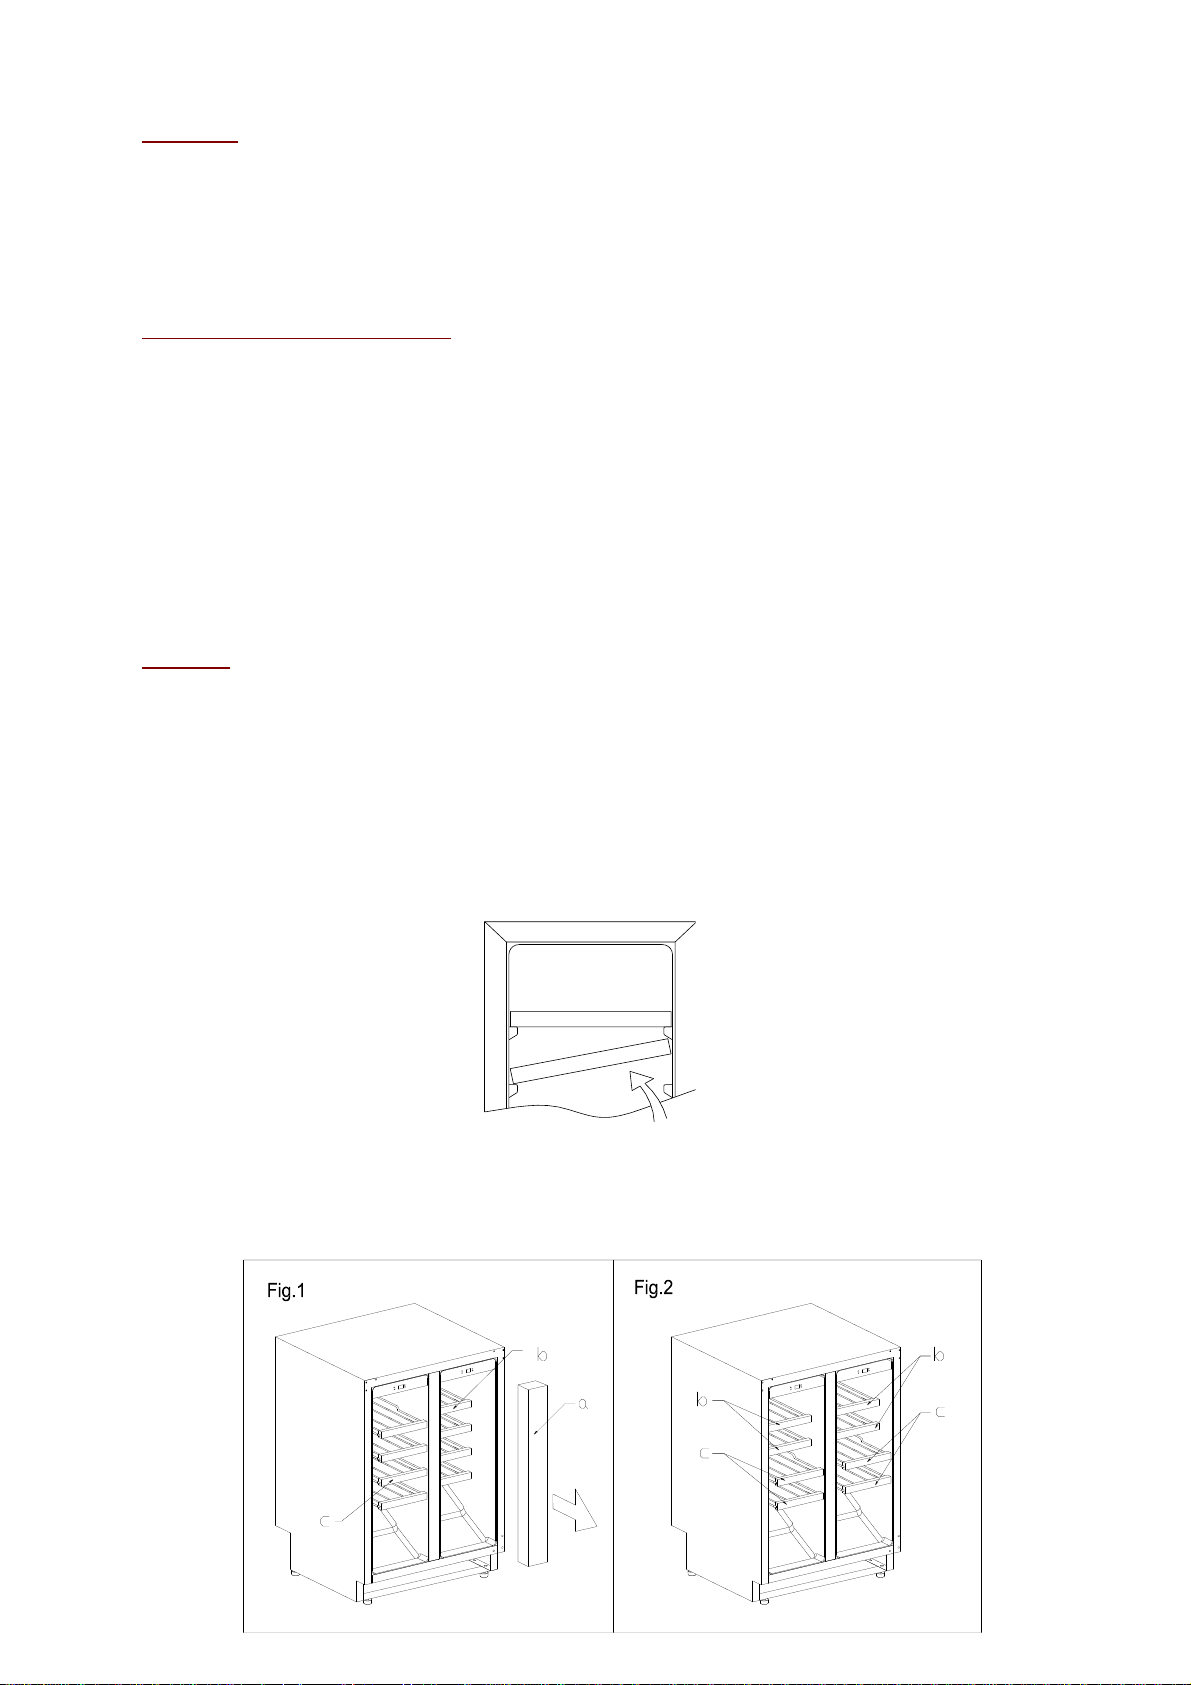
AVU41SXDPA(/IX)
Placez les clayettes aux emplacements adaptés.
Page 25
25
Arrière
Avant
Front
Back
Arrière
Avant
Stabilisateurs de pieds
a. Boîte en carton de pièces de rechange b. Petite clayette c. Grande clayette
1. Après avoir retiré l’emballage, sortez le carton contenant les pièces de rechange de l’appareil.
2. 4 petites clayettes (b) sont présentes dans le compartiment de gauche. Retirez les deux clayettes
inférieures.
3. Dans le compartiment de droite, on peut trouver 4 grandes clayettes (c). Retirez les deux clayettes
supérieures.
4. La position des petites et grandes clayettes doit alors être inversée (fig.2). Dans chaque
compartiment, placez deux petites clayettes en haut et deux grandes clayettes en bas.
5. Une fois les clayettes correctement positionnées, votre cave à vin peut être utilisée conformément
aux instructions figurant dans le manuel d’utilisation.
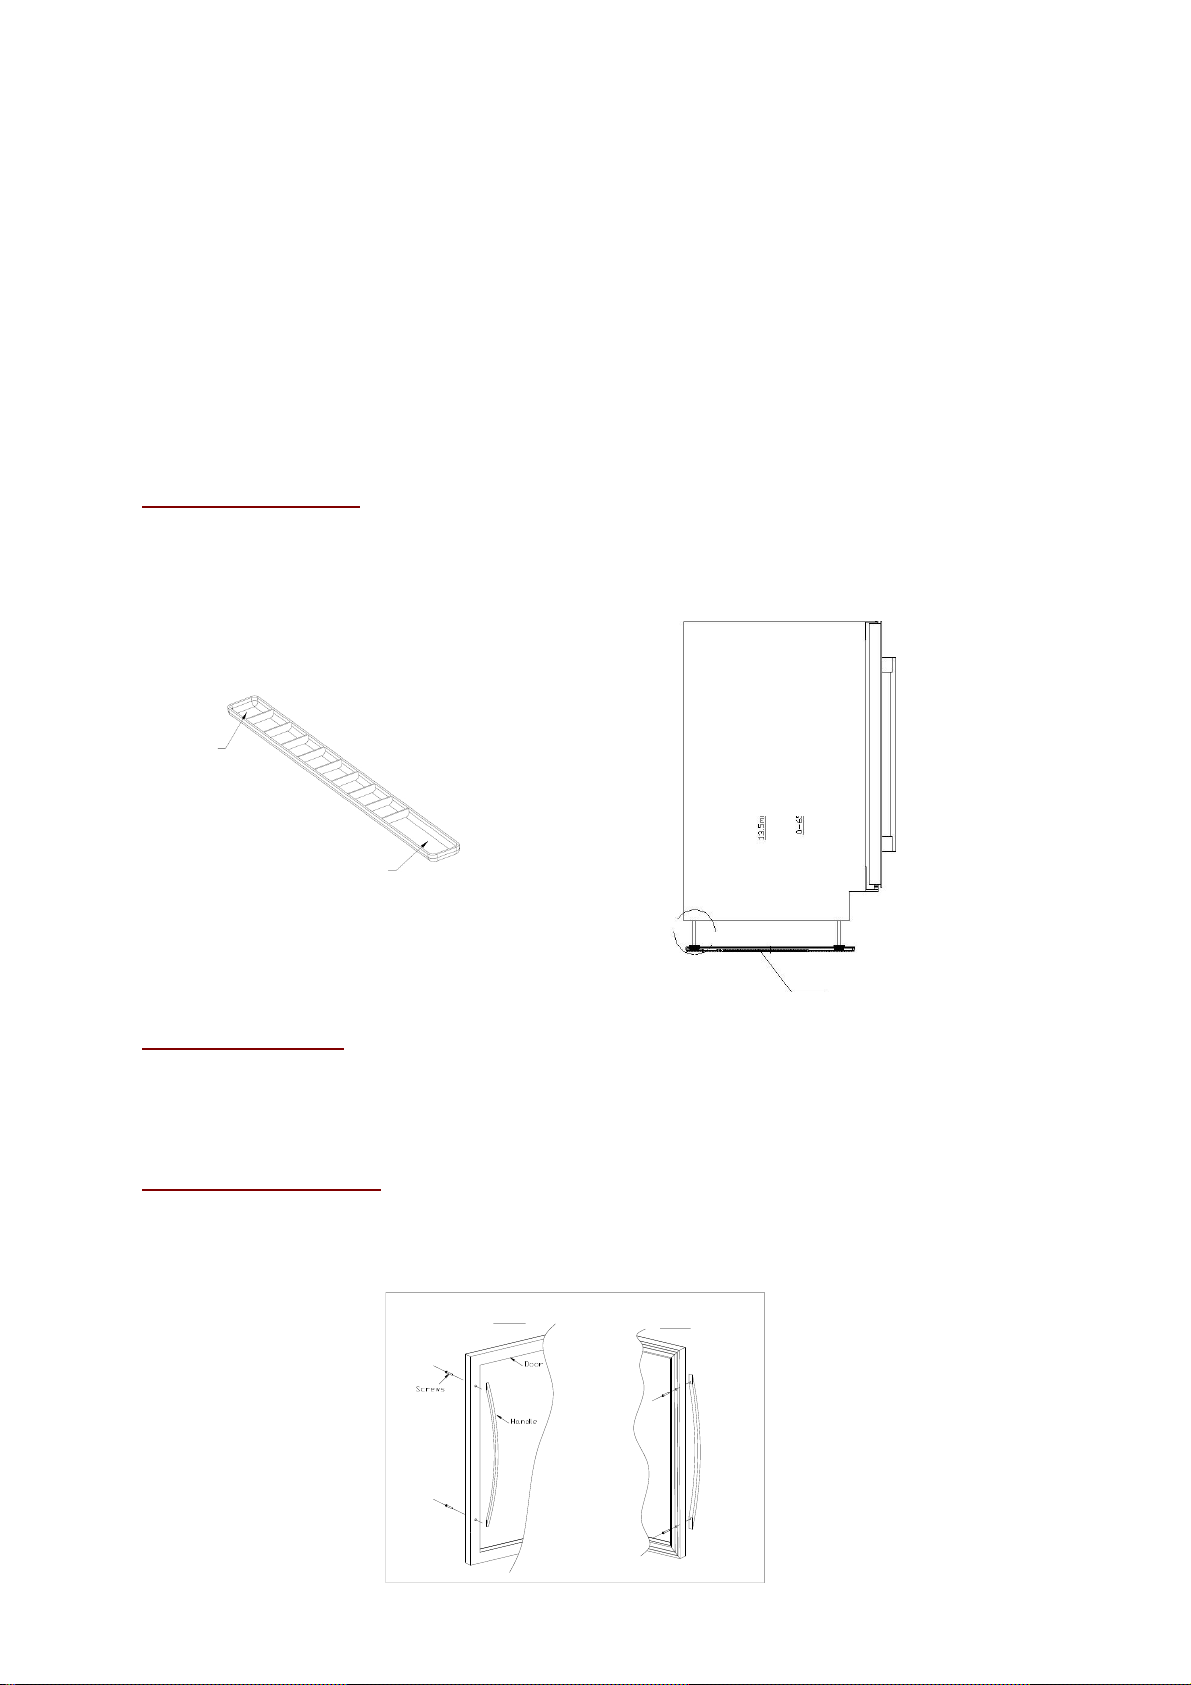
Stabilisateurs de pieds
Deux stabilisateurs de pieds sont fournis avec votre appareil, vous permettant ainsi de le déplacer
aisément lorsque vos pieds sont ajustés à hauteur maximale. Les stabilisateurs se mettent sous les
pieds, de façon parallèle en respectant bien l’emplacement pour l’avant et pour l’arrière.
La sécurité renforcée
Cette gamme d’appareils étant destinée au stockage d’objets de valeur, nous avons pris soin de
sélectionner des composants de qualité et de concevoir des techniques de fabrication propres à assurer
une sécurité optimale de fonctionnement.
Installation de la poignée
Votre appareil est équipé d’une poignée en acier inoxydable. Pour l’installer, vissez-la simplement sur la
porte avec les vis fournies, suivant le schéma ci-dessous en ayant préalablement retiré le joint
magnétique.
Page 26

26
6. CHARGEMENT
Les quantités maximales de chargement annoncées de bouteilles sont données à titre indicatif, ne sont
pas contractuelles, et permettent (comme les litrages des réfrigérateurs) d’avoir une estimation rapide de
la taille de l’appareil.
Elles correspondent à des tests effectués avec une bouteille étalon : la bouteille de type « bordelaise
tradition en 75 cl » (la normalisation reconnaît pour chaque forme de bouteille, une origine géographique :
bordelaise, bourguignonne, provençale, etc. et un type : tradition, lourde, allégée, flûte, etc., comportant
chacune des diamètres et des hauteurs qui leurs sont propres).
Dans la réalité, on pourrait ranger, à l’extrême, plus de bouteilles en empilage monotype et sans clayettes
mais une « cave variée » se constitue d’une grande variété de bouteilles et l’aspect « pratique » de la
gestion quotidienne d’une cave limite son chargement. Vous en chargerez donc probablement un peu
moins que le maximum annoncé.
Types de bouteilles :
Nous voyons ici 4 sortes de bouteilles 75 cl, Bourgogne et Bordelaise, de dimensions différentes. Il en
existe de nombreuses autres de toutes contenances et toutes formes. Vous noterez les différences de
rangement selon hauteur des bouteilles, diamètre et méthode de croisement.
A titre d’exemple, si l’on charge exclusivement une cave de bouteilles de Bourgogne, on remarquera être
environ 30% sous la quantité initiale calculée à partir de Bordeaux.
Types de croisement
Tête bêche col à col :
Notez bien la différence de profondeur !
Tête bêche col entre fûts :
Chargement accru
Page 27

27
Exemples de températures de service
À respecter lors de vos dégustations pour éviter de passer à côté de la richesse des arômes de vos vins !
Les opinions varient, la température ambiante également mais beaucoup s’accordent sur :
Grands vins de Bordeaux – Rouges 16 – 17°C
Grands vins de Bourgogne – Rouges 15 – 16°C
Grands crûs de vins blancs secs 14 – 16°C
Rouges légers, fruités, jeunes 11 – 12°C
Rosés de Provence, vins de primeur 10 – 12°C
Blancs secs et vins de pays rouges 10 – 12°C
Vins de pays blancs 8 – 10°C
Champagnes 7 – 8°C
Vins liquoreux 6°C
7. NETTOYAGE ET ENTRETIEN
Avant de nettoyer votre appareil (opération à faire régulièrement), débranchez l’appareil en retirant la
prise de courant ou en débranchant le fusible dont elle dépend.
Nous vous conseillons, avant la première utilisation et de façon régulière, de nettoyer l’intérieur comme
l’extérieur (face avant, latérales et dessus) avec un mélange d’eau tiède et de produit de lavage doux.
Rincez avec de l’eau pure, laissez sécher totalement avant de rebrancher. N’utilisez ni solvants, ni agents
abrasifs. Lavez la plastification des clayettes acier avec une solution détergente douce puis séchez avec
un chiffon sec et doux. Les clayettes en bois ne demandent pas d’entretien particulier.
Lors de la première mise sous tension, des odeurs résiduelles peuvent subsister. Dans ce cas, faites
fonctionner l’appareil à vide pendant quelques heures, en paramétrant la température la plus froide. Le
froid annihilera ces odeurs possibles.
En cas de coupure de courant
La majorité des coupures de courant sont résolues pendant une courte période. Une coupure de 1 ou 2
heures n’affectera pas les températures de votre cave. Afin de protéger vos vins pendant les coupures de
courant, pensez à minimiser le nombre d’ouvertures de porte. Pour des coupures de courant de très
longue durée, prenez les mesures nécessaires pour protéger votre vin.
Si l’appareil est débranché, éteint ou s’il y a une coupure de courant vous devez attendre de 3 à 5
minutes avant de le redémarrer. Si vous essayez de le redémarrer avant ce délai, le compresseur se
mettra en fonction seulement au bout de 3/5 minutes (si la température le nécessite).
Au premier démarrage et suite à un arrêt prolongé de la cave, il est possible qu’au moment du
redémarrage les températures choisies et celles affichées ne correspondent pas. Ceci est normal. Il
sera alors nécessaire d’attendre quelques heures avant que les températures retrouvent leur stabilité.
Si vous partez en vacances
Courts séjours : laissez votre cave fonctionner pendant votre séjour si celui-ci dure moins de 3
semaines.
Longs séjours : si votre appareil venait à ne pas être utilisé pendant plusieurs mois, retirez toutes les
bouteilles et tous les accessoires, éteignez et débranchez l’appareil de la prise de courant. Nettoyez
et séchez soigneusement l’intérieur et l’extérieur de l’appareil. Laissez également la porte ouverte, en
la bloquant si nécessaire, pour éviter la formation de condensas, odeurs, moisissure.
Page 28

28
Si vous devez déplacer votre cave à vin
Débranchez votre cave avant toute opération.
Enlevez toutes les bouteilles présentes dans la cuve et fixez les éléments mobiles.
Pour éviter d’endommager les vis de mise à niveau des pieds, vissez-les à fond dans leur base.
Fermez entièrement la porte.
Déplacez l’appareil en position verticale de préférence ou notez à partir des inscriptions portées sur
l’emballage, le sens sur lequel peut être couché l’appareil. Protégez également votre appareil avec
une couverture ou un tissu similaire.
Économies d’énergie
L’appareil doit être placé dans un local frais (mais au-dessus de +16°C), loin de toute source de
chaleur (autres appareils ménager) et d’une exposition directe au soleil.
Le local où est placé l’appareil doit être ventilé. Ne couvrez jamais les aérations.
N’ouvrez pas la porte plus que nécessaire.
8. EN CAS DE PANNE
Malgré tout le soin que nous apportons à nos fabrications, une panne n’est jamais totalement exclue.
Avant de contacter le service après-vente de votre revendeur, vérifiez néanmoins que :
La prise de courant est toujours en place
Il n’y a pas de coupure de courant
Que la panne n’a pas pour origine l’une de celles décrites dans le tableau en fin de ce manuel
IMPORTANT : si le cordon d’alimentation fourni est endommagé, il doit être remplacé par le
fabricant, un service agréé de la marque ou du revendeur. Dans tous les cas, il doit être remplacé
par un personnel qualifié pour éviter tout risque de blessure.
SI CES CONTROLES NE DONNENT RIEN, CONTACTEZ ALORS LE SERVICE APRES-VENTE DE VOTRE REVENDEUR.
ATTENTION !
Débranchez la prise murale avant toute opération d’entretien
ou réparation !
Page 29

29
PROBLEME
CAUSE POSSIBLE
La cave ne démarre pas
La prise n’est pas branchée
Le bouton marche/arrêt est sur la position arrêt
Le fusible a sauté au niveau de votre
installation électrique
La cave ne refroidit pas assez
Contrôlez la température choisie
La température externe est au-delà de la
température d’application de la cave
La porte de la cave est ouverte trop souvent
La porte n’est pas bien fermée
Le joint de la porte n’est pas étanche
Le compresseur démarre et s’arrête
fréquemment
La température externe est trop élevée
Une grosse quantité de bouteilles a été mise
dans la cave
La porte de la cave est ouverte trop
fréquemment
La porte n’est pas bien fermée
Le réglage n’a pas été fait correctement
Le joint de la porte n’est pas étanche.
La lumière ne fonctionne pas
La prise n’est pas branchée
Le fusible a sauté au niveau de votre
installation électrique
Le LED est hors service/a grillé, contactez le
service après-vente
Le bouton de la lumière est sur arrêt
Vibrations
Contrôlez et assurez-vous que la cave soit bien
au niveau
La cave semble faire beaucoup de bruit
Un bruit qui ressemble à de l’eau qui circule est
produit par le gaz réfrigérant, ce qui est normal
En fin de cycle du compresseur, il est possible
d’entendre un bruit d’eau qui circule
Des contractions et des expansions des parois
internes peuvent provoquer des claquements
La cave n’est pas à niveau
La porte ne se ferme pas bien
La cave n’est pas à niveau
Le joint de la porte est sale ou abîmé
Les clayettes ne sont pas bien positionnées
Une partie du contenu empêche la porte de se
fermer
9. PROBLEME ET CAUSE POSSIBLE
Vous pouvez résoudre de nombreux problèmes simples de votre cave à vin, en évitant de faire appel à
votre service après-vente. Essayez avec les suggestions ci-dessous.
Page 30
30
Remplacement de la lampe d’éclairage
Cet appareil est constitué de diodes électroluminescentes (LED). Ce type de diode ne peut être changé
par le consommateur. La durée de vie de ces LED est normalement suffisante pour qu’aucun
changement ne soit effectué. Si toutefois, et malgré tout le soin apporté lors de la fabrication de votre
cave à vin, les LED étaient défectueuses, veuillez contacter votre service après-vente pour toute
intervention.
10. ENVIRONNEMENT
Ce produit est conforme à la Directive UE 2012/19/CE relative aux déchets d'équipements
électriques et électroniques (DEEE). En vous assurant que ce produit est éliminé
correctement, vous aiderez à prévenir les conséquences négatives potentielles pour
l'environnement et la santé humaine qui pourraient être dues à la manipulation inappropriée
des déchets de ce produit.
Le symbole de poubelle barrée apposé sur l’appareil indique que ce produit devra, à la fin de son cycle
de vie, être traité séparément des autres déchets domestiques. Il devra donc être emmené dans un
centre de collecte sélective destiné aux appareils électriques et/ou électroniques ou bien, si vous achetez
un appareil équivalent, au revendeur de ce nouvel appareil.
L’utilisateur est responsable d’apporter l’appareil en fin de vie aux structures de collecte appropriées. Une
collecte sélective et adéquate visant à envoyer l’appareil inutilisé au recyclage, au traitement et à une
élimination compatible avec l’environnement, contribue à éviter les effets négatifs possibles sur
l’environnement, sur la santé et favorise le recyclage des matériaux dont le produit est composé.
Pour obtenir des renseignements plus détaillés sur les systèmes de collecte disponibles, s’adresser au
service local d’élimination des déchets ou bien au magasin où l’appareil a été acheté.
11. AVERTISSEMENT
Dans un souci d’amélioration constante de nos produits, nous nous réservons la possibilité de modifier
les caractéristiques techniques sans préavis.
Les garanties des produits de la marque AVINTAGE sont exclusivement énoncées par les distributeurs
que nous avons choisis. Aucun élément des présentes ne peut être interprété comme une garantie
supplémentaire.
La société FRIO ENTREPRISE ne peut être tenue responsable des erreurs ou des omissions techniques
et de rédaction dans les présentes.
Document non contractuel.
Page 31

31
MARQUE
AVINTAGE
RÉFÉRENCE COMMERCIALE
AVU8X(/IX)
DONNÉES ÉLECTRIQUES
220-240 V / 50 Hz
DIMENSIONS DU PRODUIT (L x P x H)
145 x 547,5 x 820 mm
POIDS NET
20 kg
CATÉGORIE DE L’APPAREIL
2
CLASSE ÉNERGÉTIQUE
A
CONSOMMATION ÉLECTRIQUE
Consommation d’énergie de 135 kWh par
an, calculée sur la base du résultat
obtenu pour 24 heures dans des
conditions d’essai normalisées. La
consommation d’énergie réelle dépend
des conditions d’utilisation et de
l’emplacement de l’appareil.
VOLUME NET
23 L
TEMPÉRATURE AJUSTABLE
5 – 20°C
DÉGIVRAGE
Dégivrage automatique
CLASSE CLIMATIQUE
Classe climatique : N
Cet appareil est conçu pour être utilisé à
une température ambiante comprise entre
16°C (température la plus basse) et 32°C
(température la plus haute).
NIVEAU SONORE dB(A) RE 1 pW
44 dB(A)
TYPE DE POSE
Encastrable sous plan
FICHE PRODUIT EUROPÉENNE
selon la réglementation (UE) N°1060/2010
-
CAVE DE SERVICE
Cet appareil est destiné uniquement au stockage du vin.
Page 32

32
MARQUE
AVINTAGE
RÉFÉRENCE COMMERCIALE
AVU23SX(/IX)
DONNÉES ÉLECTRIQUES
220-240 V / 50 Hz
DIMENSIONS DU PRODUIT (L x P x H)
295 x 571 x 820 mm
POIDS NET
28 kg
CATÉGORIE DE L’APPAREIL
2
CLASSE ÉNERGÉTIQUE
A
CONSOMMATION ÉLECTRIQUE
Consommation d’énergie de 140 kWh par
an, calculée sur la base du résultat
obtenu pour 24 heures dans des
conditions d’essai normalisées. La
consommation d’énergie réelle dépend
des conditions d’utilisation et de
l’emplacement de l’appareil.
VOLUME NET
56 L
TEMPÉRATURE AJUSTABLE
5 – 20°C
DÉGIVRAGE
Dégivrage automatique
CLASSE CLIMATIQUE
Classe climatique : N
Cet appareil est conçu pour être utilisé à
une température ambiante comprise entre
16°C (température la plus basse) et 32°C
(température la plus haute).
NIVEAU SONORE dB(A) RE 1 pW
43 dB(A)
TYPE DE POSE
Pose libre et encastrable sous plan
FICHE PRODUIT EUROPÉENNE
selon la réglementation (UE) N°1060/2010
-
CAVE DE SERVICE
Cet appareil est destiné uniquement au stockage du vin.
Page 33

33
MARQUE
AVINTAGE
RÉFÉRENCE COMMERCIALE
AVU41SXDPA(/IX)
DONNÉES ÉLECTRIQUES
220-240 V / 50 Hz
DIMENSIONS DU PRODUIT (L x P x H)
595 x 571 x 820 mm
POIDS NET
48 kg
CATÉGORIE DE L’APPAREIL
2
CLASSE ÉNERGÉTIQUE
A
CONSOMMATION ÉLECTRIQUE
Consommation d’énergie de 144 kWh par
an, calculée sur la base du résultat
obtenu pour 24 heures dans des
conditions d’essai normalisées. La
consommation d’énergie réelle dépend
des conditions d’utilisation et de
l’emplacement de l’appareil.
VOLUME NET
59,5 L x 2
TEMPÉRATURE AJUSTABLE
5 – 20°C
DÉGIVRAGE
Dégivrage automatique
CLASSE CLIMATIQUE
Classe climatique : N
Cet appareil est conçu pour être utilisé à
une température ambiante comprise entre
16°C (température la plus basse) et 32°C
(température la plus haute).
NIVEAU SONORE dB(A) RE 1 pW
43 dB(A)
TYPE DE POSE
Pose libre et encastrable sous plan
FICHE PRODUIT EUROPÉENNE
selon la réglementation (UE) N°1060/2010
-
CAVE DE SERVICE
Cet appareil est destiné uniquement au stockage du vin.
Page 34

34
MARQUE
AVINTAGE
RÉFÉRENCE COMMERCIALE
AVU52SX(/IX)
DONNÉES ÉLECTRIQUES
220-240 V / 50 Hz
DIMENSIONS DU PRODUIT (L x P x H)
595 x 571 x 820 mm
POIDS NET
44 kg
CATÉGORIE DE L’APPAREIL
2
CLASSE ÉNERGÉTIQUE
A
CONSOMMATION ÉLECTRIQUE
Consommation d’énergie de 145 kWh par
an, calculée sur la base du résultat
obtenu pour 24 heures dans des
conditions d’essai normalisées. La
consommation d’énergie réelle dépend
des conditions d’utilisation et de
l’emplacement de l’appareil.
VOLUME NET
146 L
TEMPÉRATURE AJUSTABLE
5 – 20°C
DÉGIVRAGE
Dégivrage automatique
CLASSE CLIMATIQUE
Classe climatique : N
Cet appareil est conçu pour être utilisé à
une température ambiante comprise entre
16°C (température la plus basse) et 32°C
(température la plus haute).
NIVEAU SONORE dB(A) RE 1 pW
44 dB(A)
TYPE DE POSE
Pose libre et encastrable sous plan
FICHE PRODUIT EUROPÉENNE
selon la réglementation (UE) N°1060/2010
-
CAVE DE SERVICE
Cet appareil est destiné uniquement au stockage du vin.
Page 35

35
MARQUE
AVINTAGE
RÉFÉRENCE COMMERCIALE
AVU53CDZA
DONNÉES ÉLECTRIQUES
220-240 V / 50 Hz
DIMENSIONS DU PRODUIT (L x P x H)
595 x 571 x 820 mm
POIDS NET
50 kg
CATÉGORIE DE L’APPAREIL
2
CLASSE ÉNERGÉTIQUE
A
CONSOMMATION ÉLECTRIQUE
Consommation d’énergie de 145 kWh par
an, calculée sur la base du résultat
obtenu pour 24 heures dans des
conditions d’essai normalisées. La
consommation d’énergie réelle dépend
des conditions d’utilisation et de
l’emplacement de l’appareil.
VOLUME NET
134 L
TEMPÉRATURE AJUSTABLE
5 – 10°C / 10 – 20°C
DÉGIVRAGE
Dégivrage automatique
CLASSE CLIMATIQUE
Classe climatique : N
Cet appareil est conçu pour être utilisé à
une température ambiante comprise entre
16°C (température la plus basse) et 32°C
(température la plus haute).
NIVEAU SONORE dB(A) RE 1 pW
45 dB(A)
TYPE DE POSE
Pose libre et encastrable sous plan
FICHE PRODUIT EUROPÉENNE
selon la réglementation (UE) N°1060/2010
-
CAVE DE SERVICE
Cet appareil est destiné uniquement au stockage du vin.
Page 36

36
MARQUE
AVINTAGE
RÉFÉRENCE COMMERCIALE
AVU54SXDZA(/IX)
DONNÉES ÉLECTRIQUES
220-240 V / 50 Hz
DIMENSIONS DU PRODUIT (L x P x H)
595 x 571 x 820 mm
POIDS NET
50 kg
CATÉGORIE DE L’APPAREIL
2
CLASSE ÉNERGÉTIQUE
A
CONSOMMATION ÉLECTRIQUE
Consommation d’énergie de 145 kWh par
an, calculée sur la base du résultat
obtenu pour 24 heures dans des
conditions d’essai normalisées. La
consommation d’énergie réelle dépend
des conditions d’utilisation et de
l’emplacement de l’appareil.
VOLUME NET
134 L
TEMPÉRATURE AJUSTABLE
5 – 10°C / 10 – 20°C
DÉGIVRAGE
Dégivrage automatique
CLASSE CLIMATIQUE
Classe climatique : N
Cet appareil est conçu pour être utilisé à
une température ambiante comprise entre
16°C (température la plus basse) et 32°C
(température la plus haute).
NIVEAU SONORE dB(A) RE 1 pW
45 dB(A)
TYPE DE POSE
Pose libre et encastrable sous plan
FICHE PRODUIT EUROPÉENNE
selon la réglementation (UE) N°1060/2010
-
CAVE DE SERVICE
Cet appareil est destiné uniquement au stockage du vin.
Page 37

37
MARQUE
AVINTAGE
RÉFÉRENCE COMMERCIALE
PRO51C/1
DONNÉES ÉLECTRIQUES
220-240 V / 50 Hz
DIMENSIONS DU PRODUIT (L x P x H)
595 x 571 x 820 mm
POIDS NET
48 kg
CATÉGORIE DE L’APPAREIL
2
CLASSE ÉNERGÉTIQUE
A
CONSOMMATION ÉLECTRIQUE
Consommation d’énergie de 145 kWh par
an, calculée sur la base du résultat
obtenu pour 24 heures dans des
conditions d’essai normalisées. La
consommation d’énergie réelle dépend
des conditions d’utilisation et de
l’emplacement de l’appareil.
VOLUME NET
146 L
TEMPÉRATURE AJUSTABLE
5 – 20°C
DÉGIVRAGE
Dégivrage automatique
CLASSE CLIMATIQUE
Classe climatique : N
Cet appareil est conçu pour être utilisé à
une température ambiante comprise entre
16°C (température la plus basse) et 32°C
(température la plus haute).
NIVEAU SONORE dB(A) RE 1 pW
45 dB(A)
TYPE DE POSE
Pose libre et encastrable sous plan
FICHE PRODUIT EUROPÉENNE
selon la réglementation (UE) N°1060/2010
-
CAVE DE SERVICE
Cet appareil est destiné uniquement au stockage du vin.
Page 38

38
Before use, please read and follow the safety rules and operating instructions in this manual.
Firstly, we would like to thank you for purchasing an AVINTAGE product and hope that this appliance fully
lives up to your expectations.
This appliance enables you to bring your bottles at room temperature or bring them to service
temperature (depending on the bottles) thanks to its wide adjustment range.
1. GENERAL SAFETY INSTRUCTIONS
Before you use your appliance for the first time, please read this
user manual carefully. Store it carefully so that you can refer to it
in the future, if necessary. To reduce the risk of fire, electrical
shock, or injury when using your appliance, follow these basic
precautions.
Generally speaking, your appliance must be maintained by a
qualified professional.
For your safety and correct usage, before installing and first using
the appliance, read this user manual carefully, including its hints
and warnings. To avoid unnecessary mistakes and accidents or to
avoid damage to the appliance, it is important to make sure that all
people using the appliance are thoroughly familiar with its
operation and safety features. Save these instructions and be
sure that they remain with the appliance if it is moved or sold, so
that anyone using it throughout its life will be properly informed on
its usage and safety notices. This will ensure optimum operation
of the appliance.
For the safety of life and property and to avoid any risk of injury,
keep the precautions of these user's instructions as the
manufacturer is not responsible for damages caused by omission.
This appliance is intended exclusively for domestic use and is
intended for the storage of special drink products at a storage
temperature higher than that of a storage compartment for fresh
Page 39

39
products. Under no circumstances is it intended to keep food
products fresh.
Make sure that your electrical installation's voltage corresponds
to that on the appliance’s nameplate; the appliance must be
connected to an approved, earthed system. Incorrect repairs or
connections can cause safety hazards. Have your electrical
installation checked by a professional, if you are in any doubt.
This unit must be correctly connected to an earthed socket for
your protection. Do not cut off or remove the earth wire on the
mains cable supplied.
For safety reasons, do not use an electrical extension cable.
If your appliance is damaged (e.g. a major impact) or suffers
harm (power surge due to lightning, flood, fire), it may be
dangerous to use. Disconnect the mains plug and have the
appliance checked by an approved professional repairer.
To prevent any danger, do not replace a damaged mains cable
yourself. Contact your retailer, an approved service center or
professional repairer.
This appliance must be positioned such that the mains socket is
accessible. Do not move the appliance once it is full: you might
distort its body beyond repair. The electrical parts must not be
directly accessible.
Keep children away from the appliance.
Do not use this appliance outdoors.
In the event that liquid is accidentally spilled (broken bottle,
Page 40

40
etc.) on electrical components (motor, etc.), disconnect the
mains plug immediately.
To prevent any risk of fire, electrocution or injury, do not
immerse the mains cable, plug or the appliance itself in water or
any other liquid. Do not handle the appliance with wet hands.
Keep the appliance away from any source of heat and out of
direct sunlight.
Do not allow the mains cable to hang from a table or be in
contact with sharp edges or hot surfaces.
Do not pull on the mains cable - take hold of the plug to
disconnect the appliance.
Ensure that the area where your appliance is positioned can
support its weight when loaded (a 75 cl bottle weighs
approximately 1.3 kg). Your cellar must be placed on a flat
surface. If you have to position it on a rug or carpet, place a
support underneath.
To prevent damaging the door gasket, make sure the door is fully
open when pulling shelves out of the rail compartment.
Safety of children and other vulnerable persons
This appliance can be used by children aged from 8 years and
above, and by persons with reduced physical, sensory or
mental capabilities or lack of experience and knowledge if they
have been given supervision or instruction concerning use of
the appliance in a safe way and understand the hazards
involved.
User cleaning and servicing operations should not be carried
Page 41

41
out by children, unless they are more than 8 years old and are
supervised.
Keep all packaging away from children as there is risk of
suffocation.
Risk of child entrapment. Child entrapment and suffocation are
not problems of the past. Junked or abandoned appliances are
still dangerous, even if they will “just sit in the garage a few
days”.
If you are discarding the appliance, pull the plug out of the
socket, cut the connection cable (as close to the appliance as
you can) and remove the door to prevent children playing from
suffering an electric shock or from closing themselves inside it.
If this appliance, featuring a magnetic door seals, is to replace
an older appliance having a spring lock (latch) on the door or
lid, be sure to make the spring lock unusable before you discard
the old appliance. This will prevent it from becoming a death
trap for a child.
Keep the appliance and its power cable out of reach of children
less than 8 years old.
Before you throw away your old wine cooler: take off the door.
Leave the shelves in place so that children may not easily climb
inside.
General safety
WARNING — This appliance is intended to be used in household
and similar applications such as:
Staff kitchen areas in shops, offices and other working
environments,
Farm houses and by clients in hotels, motels and other
residential type environments,
Bed and breakfast type environments,
Page 42

42
Catering and similar non-retail applications.
WARNING — To avoid a hazard due to instability of the
appliance, it must be fixed in accordance with the instructions.
WARNING — Do not store explosive substances such as aerosol
cans with a flammable propellant in this appliance, as they could
leak or release fluids.
WARNING — If the supply cord is damaged, it must be replaced
by the manufacturer, its service agent or similarly qualified
persons in order to avoid a hazard.
WARNING — Keep ventilation openings, in the appliance
enclosure or in the built-in structure, clear of
obstruction and ensure that air can circulate, especially if the appli
ance is recessed into a wall.
WARNING — Do not use mechanical devices or other means to
accelerate the defrosting process, other than those recommended
by the manufacturer.
WARNING — Do not damage the refrigerant circuit.
WARNING — Do not use electrical appliances inside the food
storage compartments of the appliance, unless they are of the
type recommended by the manufacturer.
WARNING — The refrigerant and insulation blowing gas are
flammable. When disposing of the appliance, do so only at an
authorized waste disposal center. Do not expose to flame.
WARNING — The refrigerant of these appliances is R600a,
flammable and explosive articles should not be put in or near the
Page 43

43
cabinet, to avoid the fire or explode caused.
Refrigerating fluid
The refrigerating circuit in the appliance uses refrigerating
isobutene (R600a), which is a highly inflammable natural gas and
is therefore dangerous for the environment. When transporting or
installing the appliance, ensure that no element of the
refrigerating circuit is damaged. The refrigerating fluid (R600a) is
inflammable.
Caution: risk of fire
If the refrigerant circuit should be damaged:
Avoid opening flames and sources of ignition.
Thoroughly ventilate the room in which the appliance is
situated. It is dangerous to alter the specifications or modify
this product in any way.
Any damage to the cord may cause a short circuit, fire, and/or
electric shock.
Electrical safety
We decline any liability in respect of incidents caused by poor
electrical installation.
The power cord must not be lengthened. Do not use an
extension cable, or adapter, or multi-way socket.
Make sure that the power plug is not crushed or damaged. A
crushed or damaged power plug may overheat and cause a
fire.
Make sure that you can access the main plug of the appliance.
Do not pull the main cable.
Ensure that the appliance is always electrically earthed.
Page 44

44
If the power plug socket is loose, do not insert the power plug.
There is a risk of electric shock or fire.
You must not operate the appliance without the interior lighting
lamp cover.
Disconnect the appliance before replacing the lighting bulb.
The cellar is only applied with power supply of single phase
alternating current of 220~240V/50Hz.
Do not attempt to replace a damaged power cable, contact your
after-sales service.
The power socket must be easily accessible but out of reach of
children. In case of doubt, contact your installation technician.
Daily use
This appliance is intended to be used exclusively for the
storage of wine.
Do not store flammable gas or liquids in the appliance. There is
a risk of an explosion.
Do not operate any electrical appliances in the appliance
(electric ice cream makers, mixers etc.).
When unplugging always pull the plug from the mains socket
and do not pull on the cable.
Do not place hot items near the plastic components of this
appliance.
The appliance manufactures storage recommendations should
be strictly adhered to. Refer to relevant instructions for storage.
Keep burning candles lamps and other items with naked flames
away from the appliance so that do not set the appliance on
fire.
The appliance is intended for keeping beverages in normal
Page 45

45
household as explained in this instruction booklet.
The appliance is heavy. Care should be taken when moving it. If
your appliance is equipped with castors, remember that these
are only designed to facilitate minor movements. Do not move
the appliance over long distances.
Never use the base, drawers, doors etc. to stand on or as
supports.
To avoid items falling and causing injury or damage to the
appliance, do not overload the door racks or put food in the
crisper drawers.
Caution: cleaning and servicing
Before carrying out servicing, switch off the power supply and
disconnect the appliance.
When cleaning the appliance, do not use metal objects, steam
systems, volatile fluids, organic solvents or abrasive
substances.
Never clean appliance parts with flammable fluids. The fumes
can create a fire hazard or explosion.
Do not use sharp or pointed objects to remove ice. Use a
plastic scraper.
Important information concerning installation
Avoid locating the unit in moist areas.
Keep the appliance away from direct sunlight and sources of
heat (stove, heater, radiator, etc.). Direct sunlight may affect the
acrylic coating and heat sources may increase electrical
consumption. Extreme cold or hot ambient temperatures may
also cause the appliances not to perform properly.
Plug the wine cooler into an exclusive, properly installed-
Page 46

46
grounded wall outlet. Do not under any circumstances cut or
remove the third (ground) prong from the power cord. Any
questions concerning power and/or grounding should be
directed toward a certified electrician or an authorized products
service center.
To ensure proper electrical connection, follow the
recommendations given in the present manual.
Unpack the appliance and visually check that it is not damaged.
Do not connect a damaged appliance. Inform your retailer or
point of sale of any damage. In such a case, keep the
packaging.
It is recommended that the appliance be allowed to settle for at
least 24 hours before connecting the electrical power supply, so
that the compressor fluid feed is correct.
Proper air circulation is necessary to avoid overheating. To
ensure sufficient ventilation, observe the installation
recommendations provided.
In order to avoid fire risk, wherever possible, ensure that the
appliance is not in contact with walls or with any hot element
(compressor, condenser). Observe the installation
recommendations.
The appliance should not be placed close to radiators or
cooking hot plates or gas rings.
Check that electrical sockets remain accessible when the
appliance is installed.
Power saving
To limit the electricity consumption of your appliance:
Install it in an appropriate place (see “Installation
instructions”).
Leave the doors open as little time as possible.
Page 47

47
To ensure that the appliance operates properly, clean the
condenser regularly (see “Maintenance”).
Regularly inspect the door seals and ensure that they are
still closing properly. If this is not the case, contact your aftersales service.
Trouble shooting
Any electrical work should be carried out by a qualified and
skilled technician.
The appliance should be repaired by an accredited repair
centre, using only manufacturer’s original spare parts.
The appliance is designed for home use only. The manufacturer
declines any liability whatsoever in the case of other use.
R600a
Safety instructions
Caution — Do not obstruct the ventilation grills on the appliance.
Keep ventilation openings in the appliance enclosure or in the
structure for building-in clear of obstruction.
Caution — Do not store explosive substances, such as aerosol
cans containing an inflammable propellant, in the appliance.
Caution — Do not damage the refrigerating circuit in the
appliance.
Caution — The refrigerating units use isobutane (R600a), and
should not be placed close to ignition sources (for example,
electrical contacts that are exposed or open contacts that could
be closed by the refrigerating fluid in the event of a leak). The
Page 48

48
refrigerating fluid type is specified on the power cabinet
identification plate.
Caution — Do not use electrical equipment in the compartments
of the appliance, unless they are of the type recommended by the
manufacturer.
This appliance meets the requirements of all applicable European directives and their amendments,
and notably complies with the following standards:
2011/65/EU (ROHS)
2014/35/EU on electrical safety
2014/30/EU on electromagnetic compatibility
643/2009/CE relating to energy labels
2. TECHNICAL DATA
Below is an example of the nameplate:
The nameplate attached to the inside or rear of the appliance (depending on the model) includes the
entire information specific to your appliance.
We recommend that you make a note of its serial number in this booklet prior to installation, so that you
can refer to it later (technical work, request for assistance, etc.).
Once the appliance is installed and loaded, access to it is not so easy.
CAUTION: no assistance can be provided without this information.
Page 49

49
CLASS
SYMBOL
AMBIENT TEMPERATURES RANGE (°C)
Extended temperate
SN
From +10 to +32
Temperate
N
From +16 to +32
Subtropical
ST
From +16 to +38
Tropical
T
From +16 to +43
3. INSTALLATION INSTRUCTIONS
Before using this appliance
Remove the exterior and interior packing.
Before connecting the appliance to the power source, let it stand upright for approximately 24 hours.
This will reduce the possibility of a malfunction in the cooling system from handling during
transportation.
Clean the interior surface with lukewarm water using a soft cloth.
When disposing your appliance, please choose an authorized disposal site.
Place your wine cooler on a floor that is strong enough to support it when it is fully loaded. To level
your Wine cooler, adjust the front leveling leg at the bottom of the wine cooler.
Adequate ventilation is required, do not block the front air outlet.
Not designed for placement in adage or basement.
The appliance is for indoor use only.
This wine cellar is designed for free-standing or built-under installation.
Connect the cellar to a single socket, leaving a 30 mm gap between the back of the cellar and the
wall. Be careful to support it, so that your wine cellar is perfectly level (use of a spirit level is
recommended). This will prevent any movement due to instability, causing noise and vibration, and will
ensure that the door seals perfectly.
This appliance is intended to be used exclusively for the storage of wine.
This appliance is using flammability refrigerant. So never damage the cooling pipe work during the
transportation.
Attention
Store wine in sealed bottles.
Do not overload the cabinet.
Do not open the door unless necessary.
Do not cover shelves with aluminum foil or any other shelf material which may prevent air circulation.
Should the wine cooler be left empty for long periods it is suggested that the appliance is unplugged,
and after careful cleaning, leave the door ajar to allow air to circulate inside the cabinet in order to
avoid possible condensation, mold or odors forming.
CAUTION: please keep the appliance away from substance, which can cause ignition.
Ambient room temperature limits
This appliance is designed to operate in ambient temperatures specified by its temperature class marked
on the rating plate.
Page 50

50
Built-in installation drawings
AVU8X(/IX)
AVU23SX(/IX)
Page 51

51
AVU41SXDPA(/IX)
AVU52SX(/IX) AVU54SXDZA(/IX)
Page 52

52
AVU53CDZA PRO51C/1
Reversing the door
The door can be changed from left and right side. No special requirement, all the door is opened from left
side. If required to open from right side please refer to the following direction.
AVU8X(/IX)
Page 53

53
1. Lower hinge (right) 2. Screws 3. Door axis
4. Door 5. Top hinge (right) 6. Hinge screws
7. Top hinge (left) 8. Lower hinge (left)
1. Open the door to 90 degrees, take out two screws (2) from the lower door axis (3), remove the door
(4) and door axis (Fig. A). Position the door (4) safely (Fig. A and B).
2. Take out three hinge screws (6) from the top hinge (right) (5) and remove it as well as the lower hinge
(right) (Fig. C).
3. Install the spare top hinge (left) (7) on the top left of the cabinet with three screws (Fig. D). Install the
spare lower hinge (left) (8) according to the above procedure (Fig. E).
4. The door opens to 180 degrees. Install the door in the same way as it was removed and fix it so that
the door is aligned.
AVU23SX(/IX) AVU52SX(/IX)
1. Lower hinge (right) 2. Screws 3. Door axis
4. Door 5. Top hinge (Right) 6. Hinge screws
7. Top hinge (left) 8. Decorative nail 9. Lower hinge (left)
10. Door limit device 11. Screw 12. Plug
1. Open the door to 90 degrees, remove the two screws (2) from the lower door axis (3), remove the door
(4) and door axis (Fig. A).
2. Position the door (4) safely and remove the plug (12) from the top of the door frame. Unscrew one
screw (11) at the bottom and remove the door limit device (10). Install the door limit device (10) at the
top of the door frame. Please use the spare plug (12) to block the hole at the top of the door frame
(Fig. A/B).
3. Take out three hinge screws (6) from the upper hinge (right) (5) and remove it (Fig. C).
4. Remove the decorative nail (8) from the top left of the cabinet and install the spare top hinge (left) (7)
on the top left of the cabinet with three screws (Fig. D).
5. Install the spare lower hinge (left) (9) according to the above procedure (Fig. E).
Page 54

54
6. The door opens to 180 degrees. Install the door in the same way as it was removed and fix it so that
the door is aligned.
7. Block the hole at the top right of the cabinet with the spare decorative nail (8).
AVU53CDZA AV U54SXDZA(/IX) PRO51C/1
1. Lower hinge (right) 2. Screws 3. Door axis
4. Door 5. Top hinge (right) 6. Hinge screws
7. Top hinge (left) 8. Decorative nail 9. Lower hinge (left)
1. Open the door to 90 degrees, take out two screws (2) from the lower door axis (3), remove the door
(4) and door axis (Fig. A).
2. Position the door (4) safely.
3. Take out three hinge screws (6) from the top hinge (right) (5) and remove it. (Fig. C)
4. Remove the decorative nail (8) from the top left of the cabinet and install the spare top hinge (Left) (7)
on the top left of the cabinet with three screws. (Fig. D)
5. Install the spare lower hinge (left) (9) according to the above procedure. (Fig. E)
6. The door opens to 180 degrees. Install the door in the same way as it was removed and fix it so that
the door is aligned.
7. Block the hole at the top right of the cabinet with the spare decorative nail (8).
Page 55

55
4. OPERATING INSTRUCTIONS
It is recommended that you installed your appliance in a place where the ambient temperature is
between 16-32°C. If the ambient temperature is above or below recommended temperatures, the
performance of the unit may be affected and it may not be possible to obtain temperature between 520°C or 5-10°C/10-20°C (depending on the model).
AVU8X(/IX) / AVU23SX(/IX) AVU41SXDPA(/IX) AVU52SX(/IX) PRO51C/1
“RUN”
Power indicator
button
To turn the appliance on or off.
Press and hold this button for around 3 seconds.
button
Inner lighting control button
Display
Electronic temperature display
button
+ temperature setting button
button
- temperature setting button
You can choose the desired chamber temperature by using the “ / ” buttons. The temperature
selected increases/decreases by 1°C with each button press.
Temperatures between 5 and 20°C or between 5 and 10°C / 10 and 20°C (depending on the model) can
be selected. Once the desired temperature has been selected, the display will flash for 5s before showing
the current internal cooler temperature. The set temperature can be viewed at any time by pressing and
holding the temperature select buttons for 5s.
In the event of a power cut, all previously selected temperature settings will be deleted and each chamber
will re-initialize to the factory-preset temperature of 12°C.
Page 56

56
AVU53CDZA AV U54SXDZA(/IX)
“RUN”
Power indicator
button
To turn the appliance on or off.
Press and hold this button for around 3 seconds.
button
Inner lighting control button
Display
Upper chamber electronic display
Display
Lower chamber electronic display
Bouton
Upper chamber temperature setting button
Bouton
Lower chamber temperature setting button
Press “ ” to adjust the upper chamber temperature. The relevant chamber display will start to flash
and each press on the button will alter the temperature by 1°C. Once the lowest set temperature of 5°C is
reached, the display automatically changes to the highest set temperature of 10°C. Once selected, the
display will flash for approximately 5s before showing the current internal temperature of the cellar. The
set temperature can be viewed at any time by pressing and holding the temperature select buttons for 5s.
Press “ ” to set the upper chamber temperature.. The relevant chamber display will start to flash
and each press on the button will alter the temperature by 1°C. Once the lowest set temperature of 10°C
is reached, the display automatically changes to the highest set temperature of 20°C. Once selected, the
display will flash for approximately 5s before showing the current internal temperature of the cellar. The
set temperature can be viewed at any time by pressing and holding the temperature select buttons for 5s.
In the event of a power cut, all previously selected temperature settings will be deleted and each chamber
will re-initialize to the factory-preset temperature of 6°C for the upper chamber and 12°C for the lower
chamber.
Function instruction
Temperature alarm:
If inner temperature is higher than 23°C after running 10 hours with power, the “HI” is shown in display
panel, and the buzzer alarm after one hour continuously. It informs that the inner temperature is too
high, please check the reason. If inner temperature is lower than 0°C, the “LO” is shown in display
panel, and the buzzer alarm too will sound.
Temperature recollection function:
In the event of a power interruption, wine cabinet will remember the previous temperature settings and
when the power is recovered, the cabinet temperature will go back the same setting temperature as
power off.
Page 57

57
Internal light
In order to reduce energy consumption, this wine cabinet will automatically switch off the LED lights after
10 minutes.
If you want the LED light to remain on continuously, this is possible. Please press and hold the
button for 5 seconds, the display will show "LP". After 4 seconds the display will revert back to normal,
and the light will remain on until manually switched off.
If you want to revert back and conserve energy (recommended), please press and hold the button for
5 seconds, the display will show "LF". After 4 seconds the display will revert back to normal, and the light
will automatically switch off after 10 minutes.
5. EQUIPMENT
The climate control system
According to advice from specialists, the ideal temperature for storing wine is around 12°C, within a
bracket of 10 to 14°C. Do not confuse this with service temperature, which varies between 5 and 20°C,
depending on the specific nature of the wine.
It is especially important to avoid sudden changes in temperature. Designed by specialists for oenophiles,
this appliance, unlike a simple refrigerator, takes into account the sensitivity of grand cru wines to sudden
variations in temperature by ensuring the close control of a constant average temperature.
The anti-vibration system
The refrigeration compressor is equipped with special dampers (silent-blocks) and the inner space is
insulated from the body by a thick layer of polyurethane foam. These characteristics prevent the
transmission of vibration to your wines.
The humidification system
This appliance is fitted with a tray (according to the model) that maintains the correct level of humidity. If
the humidity is too low, top up the level in the reservoir to three quarters of its capacity. Check the level
from time to time and add water if necessary. Ensure that the tray always contains water.
Designed by specialists for oenophiles, Avintage brand has taken into account the sensitivity of corks to
too low a level of ambient humidity. This is why the tray should be placed on the shelf below the fan
situated in the bottom, to provide minimum humidity. Be sure to check the water level, if you are storing
wines over a long period and you are not using the appliance solely for bringing wines to service
temperature (with a quick rotation of bottles).
Make sure that the tray full of water is completely stable to avoid any water falls or leaks.
The anti-UV system
Light accelerates the ageing of wine. In our solid door cellars, your wines are naturally protected, on
condition, of course, that the door is not opened too often. This glass-door model has been specially
treated and filters out harmful ultraviolet rays, thus ensuring your wines are perfectly shielded.
Defrosting
Your appliance is equipped with an automatic defrost cycle. When a cooling cycle finishes, the
appliance’s refrigerated surfaces are defrosted automatically. The defrost water is channeled into a
condensates evaporation tray which is located in the back of the appliance near the compressor. The
heat produced by the compressor then evaporates the condensates collected in the tray.
Page 58

58
The winter system (depending on the model)
The winter kit is a frost protection system which enables the cellar to operate in an environment where the
temperature is between 0 and 32°C. A sensor located inside the appliance triggers a low power electrical
element when the inner temperature of the wine cellar becomes inferior by 3°C than the set temperature.
This is a low power element to avoid sudden rises in the temperature of the wine and so avoid thermal
shocks that are damaging to the preservation of the wine. The kit is intended to raise the cellar’s internal
temperature even before there is a thermal exchange with the bottles.
The kit is designed to heat the internal temperature of the cellar even before a heat exchange has
occurred with the bottles. The winter system keeps the temperature inside the wine cellar the same as the
programmed temperature. When the system is activated and the internal temperature reaches the set
temperature, the system stops.
Shelves
To prevent damage to the door seal, ensure that the door is fully open before pulling out the shelves
to add or remove bottles.
For easier access to the contents of the shelves, slide the shelf out approximately one third of the
way. The shelves are, however, fitted with a stop to prevent the bottles falling out.
To remove or reposition the shelves, incline the shelf as indicated in the diagram, then push or pull as
required.
For AVU41SXDPA(/IX)
Place the shelves in the spaces provided.
a. Spare part cardboard box b. Small shelf c. Large shelf
1. After removing the wrapping, take the spare parts cardboard box (a) out of the cabinet.
Page 59

59
Front
Back
Back
Front
Back
Front
Foot sliders
2. There are four small shelves (b) in the left compartment. Remove the two lower shelves.
3. There are four large shelves(c) in the right compartment. Remove the two upper shelves.
4. Swap the large and small shelves (fig 2). Place the two small shelves in the upper positions and the
two large shelves in the lower positions in both compartments.
5. When the shelves have been positioned correctly, you can use the wine cooler according to the
instruction manual.
Foot sliders
Two foot sliders are provided with your appliance, allowing you to move it easily when your feet are
adjusted to maximum height. The foot sliders have to be installed in parallel under the feet in accordance
with the location for the front and for the back.
Enhanced safety
Since this range of appliances is intended for storing items of value, we have been careful to select
quality components and to design suitable manufacturing techniques to ensure optimum safety in
operation.
Installing the handle
Your appliance has a stainless steel handle. To fit it, simply screw it onto the door with the screws
supplied as per the diagram below, having first removed the seal.
Page 60

60
6. LOADING
The maximum recommended loading quantities for bottles are given as guidelines and are indicative only;
they provide a quick estimate of the size of the appliance (similar to the capacity of a refrigerator
expressed in liters).
They correspond to tests conducted with a standard bottle: the standard “75 cl light Bordeaux” bottle standards apply the geographical origin of each bottle shape (Bordeaux, Burgundy, Provence, etc.) and a
type (traditional, heavy, light, flute, etc.), each with its own diameter and height.
In reality and in extreme cases, you could store more bottles by stacking the same type of bottle without
using shelves, but a varied cellar comprises a wide variety of bottles and the practical aspect of everyday
cellar management limits its capacity. You will therefore probably load the appliance a little less than the
recommended maximum.
Types of bottle:
We see here 4 kinds of 75 cl wine bottles: Burgundy and Bordeaux wine bottles of different dimensions.
There are many others of all shapes and sizes. You will note the storage differences depending on bottle
heights, diameters and alternating position method.
For example, if a wine cellar is loaded only with Burgundy wine bottles, there will be approximately 30%
fewer bottles than the initial quantity calculated for Bordeaux bottles.
Criss-crossing types
Top-to-bottom neck-to-neck:
Note the difference in depth!
Top-to-bottom neck between bottle bodies:
Increased loading.
Page 61

61
Examples of serving temperatures
Opinions vary, and the ambient temperature too, but many people agree on the following:
Prestigious Bordeaux wines – Reds 16 – 17°C
Prestigious Burgundy wines – Reds 15 – 16°C
Prestigious dry white vintages 14 – 16°C
Light, young, fruity reds 11 – 12°C
Provence rosés, primeur wines 10 – 12°C
Dry whites and vin de pays reds 10 – 12°C
Vin de pays whites 8 – 10°C
Champagnes 7 – 8°C
Sweet wines 6°C
7. CARE AND MAINTENANCE
Before cleaning your appliance (something that should be done regularly), disconnect it by removing the
plug or by pulling the fuse on the circuit.
Before using your appliance for the first time and regularly after that, we recommend that you clean the
inside and outside (front, side and top) with warm mixed with a gentle cleaning product. Rinse with clean
water and allow drying before reconnecting. Do not use solvents or abrasives.
When the appliance is switched on for the first time, there may be a residual odor. In that case, runt the
appliance empty for a few hours at the coldest possible temperature. The cold will kill any odors.
In case of a power cut
Most power cuts are resolved within a short time. A power cut of 1 or 2 hours will not affect the
temperature in your cabinet. To protect your wines during a power cut, avoid opening the door as much
as possible. During very long power cuts, take the necessary measures to protect your wine.
If the appliance is disconnected or if there is a power cut, you must wait three to five minutes before
re- starting. If you try to re-start before this time, the compressor will only re-start after 3 to 5 minutes
(if the temperature requires).
When switching on for the first time or following a prolonged shutdown, it is possible that when re-
starting, the temperatures selected and those displayed are not the same. This is normal. It will take a
few hours before they stabilize.
Vacation time
Short vacations: leave the wine cooler operating during vacations of less than three weeks.
Long vacations: if the appliance will not be used for several months, remove all items and turn off the
appliance. Clean and dry the interior thoroughly. To prevent odor and mold growth, leave the door
open slightly: blocking it open if necessary.
Moving your wine cooler
Remove all items.
Securely tape down all loose items (shelves) inside your appliance.
Turn the adjustable leg up to the base to avoid damage.
Tape the door shut.
Be sure the appliance stays secure in the upright position during transportation. Also protect outside
of appliance with a blanket, or similar item.
Page 62

62
Energy saving tips
The wine cooler should be located in the coolest area of the room (but at least at 16°C), away from
heat producing appliances, and out of the direct sunlight.
Ensure that the unit is adequately ventilated. Never cover air vents.
Only open the door for as long as necessary.
8. IN THE EVENT OF A BREAKDOWN
Despite the care we take during production, a breakdown can never be totally ruled out. Before contacting
your retailer’s after-sales department, please check that:
The appliance is properly plugged in
There is not a power cut in progress
The breakdown is not one of those described in the table at the end of this manual
IMPORTANT: if the power cable supplied is damaged, it must be replaced by the manufacturer, a
service centre approved by the brand or the retailer. In all events, it must be replaced by qualified
personnel in order to avoid any risk of injury.
IF THESE CHECKS REVEAL NOTHING, THEN CONTACT YOUR RETAILER’S AFTER-SALES DEPARTMENT.
CAUTION!
Unplug the appliance before carrying out any maintenance or
repair work.
Page 63

63
PROBLEM
POSSIBLE CAUSE
Wine cooler does not operate
Not plugged in
The appliance is turned off
The circuit breaker tripped or a blown fuse
Wine cooler is not cold enough
Check the temperature control setting
External environment may require a higher
setting
The door is opened too often
The door is not closed completely
The door gasket does not seal properly
Turns on and off frequently
The room temperature is hotter than normal
A large amount of contents has been added to
the wine cooler.
The door is open too often
The door is not closed completely
The temperature control is not set correctly
The door gasket does not seal properly
The light does not work
Not plugged in
The circuit breaker tripped or a blown fuse
The bulb has burned out, contact your after-
sales service
The light switch is “OFF”
Vibrations
Check to assure that the wine cooler is level
The wine cooler seems to make too much noise
The rattling noise may come from the flow of
the refrigerant, which is normal
As each cycle ends, you may hear gurgling
sounds caused by the flow of refrigerant in your
wine cooler
Contraction and expansion of the inside walls
may cause popping and crackling noises
The wine cooler is not level
The door will not close properly
The wine cooler is not level
The door was reversed and not properly
installed
The gasket is dirty
The shelves are out of position
9. TROUBLE SHOOTING
You can solve many common Wine cooler problems easily, saving you the cost of a possible service call.
Try the suggestions below to see if you can solve the problem before calling the servicer.
Replacing light
This appliance consists of light-emitting diodes (LEDs). This type of diode cannot be changed by the
consumer. The lifetime of these LEDs is normally sufficient for no change to be made. If however, and
despite all the care taken during the manufacture of your wine cellar, the LEDs were defective, please
contact your after-sales service for any intervention.
Page 64

64
10. ENVIRONMENT
This appliance is marked according to the European directive 2012/19/CE on Waste
Electrical and Electronic Equipment (WEEE). By ensuring this product is disposed of
correctly, you will help prevent potential negative consequences for the environment and
human health, which could otherwise be caused by inappropriate waste handling of this
product.
The symbol on the product, or on the documents accompanying the product, the Crossed Out Wheelie
Bin, indicates that this appliance may not be treated as household waste. Instead it shall be handed over
to the applicable collection point for the recycling of electrical and electronic equipment, or, if you are
buying an equivalent product, to the retailer of the new product.
The user is responsible for taking the appliance to the appropriate collection center at the end of its useful
life. Selective and appropriate collection for the recycling of no longer used appliances and their disposal
and destruction in an environmentally friendly manner, helps to prevent potential negative effects on the
environment and health, and encourages the recycling of materials used to make the product.
For more detailed information about treatment, recovery and recycling of this product, please contact your
local authority, your household waste disposal service or the retailer where you purchased the product.
11. WARNING
As we continuously improve our products for the benefit of our customers, we reserve the right to modify
technical characteristics without notice.
Warranties for AVINTAGE brand products are offered exclusively by selected retailers. No part of these
instructions may be considered as a supplementary guarantee.
FRIO ENTREPRISE cannot be held liable for errors or technical or editorial omissions in this document.
Non-binding document.
Page 65

65
BRAND
AVINTAGE
COMMERCIAL REFERENCE
AVU8X(/IX)
POWER SUPPLY
220-240 V / 50 Hz
PRODUCT DIMENSIONS (W x D x H)
145 x 547.5 x 820 mm
NET WEIGHT
20 kg
APPLIANCE CATEGORY
2
ENERGY EFFICIENCY CLASS
A
ENERGY CONSUMPTION
Energy consumption 135 kWh per year
calculated on the basis of results obtained
over 24 hours in standardized test
conditions. Actual energy consumption
depends on conditions of use and the
location of the appliance.
NET VOLUME
23 L
ADJUSTABLE TEMPERATURES
5 – 20°C
NO FROST
Automatic defrost
CLIMATE CLASS
Climate class: N
This appliance is designed to be used at
an ambient temperature of between 16°C
(lowest) and 32°C (highest).
ACOUSTIC EMISSIONS IN AIR IN dB(A) RE 1 pW
44 dB(A)
INSTALLATION TYPE
Built-under installation
EUROPEAN DATA SHEET
according to the regulations (UE) N°1060/2010
-
SERVICE WINE CABINET
This appliance is intended exclusively for the storage of wine.
Page 66

66
BRAND
AVINTAGE
COMMERCIAL REFERENCE
AVU23SX(/IX)
POWER SUPPLY
220-240 V / 50 Hz
PRODUCT DIMENSIONS (W x D x H)
295 x 571 x 820 mm
NET WEIGHT
28 kg
APPLIANCE CATEGORY
2
ENERGY EFFICIENCY CLASS
A
ENERGY CONSUMPTION
Energy consumption 140 kWh per year
calculated on the basis of results obtained
over 24 hours in standardized test
conditions. Actual energy consumption
depends on conditions of use and the
location of the appliance.
NET VOLUME
56 L
ADJUSTABLE TEMPERATURES
5 – 20°C
NO FROST
Automatic defrost
CLIMATE CLASS
Climate class: N
This appliance is designed to be used at
an ambient temperature of between 16°C
(lowest) and 32°C (highest).
ACOUSTIC EMISSIONS IN AIR IN dB(A) RE 1 pW
43 dB(A)
INSTALLATION TYPE
Free-standing and built-under installation
EUROPEAN DATA SHEET
according to the regulations (UE) N°1060/2010
-
SERVICE WINE CABINET
This appliance is intended exclusively for the storage of wine.
Page 67

67
BRAND
AVINTAGE
COMMERCIAL REFERENCE
AVU41SXDPA(/IX)
POWER SUPPLY
220-240 V / 50 Hz
PRODUCT DIMENSIONS (W x D x H)
595 x 571 x 820 mm
NET WEIGHT
48 kg
APPLIANCE CATEGORY
2
ENERGY EFFICIENCY CLASS
A
ENERGY CONSUMPTION
Energy consumption 144 kWh per year
calculated on the basis of results obtained
over 24 hours in standardized test
conditions. Actual energy consumption
depends on conditions of use and the
location of the appliance.
NET VOLUME
59.5 L x 2
ADJUSTABLE TEMPERATURES
5 – 20°C
NO FROST
Automatic defrost
CLIMATE CLASS
Climate class: N
This appliance is designed to be used at
an ambient temperature of between 16°C
(lowest) and 32°C (highest).
ACOUSTIC EMISSIONS IN AIR IN dB(A) RE 1 pW
43 dB(A)
INSTALLATION TYPE
Free-standing and built-under installation
EUROPEAN DATA SHEET
according to the regulations (UE) N°1060/2010
-
SERVICE WINE CABINET
This appliance is intended exclusively for the storage of wine.
Page 68

68
BRAND
AVINTAGE
COMMERCIAL REFERENCE
AVU52SX(/IX)
POWER SUPPLY
220-240 V / 50 Hz
PRODUCT DIMENSIONS (W x D x H)
595 x 571 x 820 mm
NET WEIGHT
44 kg
APPLIANCE CATEGORY
2
ENERGY EFFICIENCY CLASS
A
ENERGY CONSUMPTION
Energy consumption 145 kWh per year
calculated on the basis of results obtained
over 24 hours in standardized test
conditions. Actual energy consumption
depends on conditions of use and the
location of the appliance.
NET VOLUME
146 L
ADJUSTABLE TEMPERATURES
5 – 20°C
NO FROST
Automatic defrost
CLIMATE CLASS
Climate class: N
This appliance is designed to be used at
an ambient temperature of between 16°C
(lowest) and 32°C (highest).
ACOUSTIC EMISSIONS IN AIR IN dB(A) RE 1 pW
44 dB(A)
INSTALLATION TYPE
Free-standing and built-under installation
EUROPEAN DATA SHEET
according to the regulations (UE) N°1060/2010
-
SERVICE WINE CABINET
This appliance is intended exclusively for the storage of wine.
Page 69

69
BRAND
AVINTAGE
COMMERCIAL REFERENCE
AVU53CDZA
POWER SUPPLY
220-240 V / 50 Hz
PRODUCT DIMENSIONS (W x D x H)
595 x 571 x 820 mm
NET WEIGHT
50 kg
APPLIANCE CATEGORY
2
ENERGY EFFICIENCY CLASS
A
ENERGY CONSUMPTION
Energy consumption 145 kWh per year
calculated on the basis of results obtained
over 24 hours in standardized test
conditions. Actual energy consumption
depends on conditions of use and the
location of the appliance.
NET VOLUME
134 L
ADJUSTABLE TEMPERATURES
5 – 10°C / 10 – 20°C
NO FROST
Automatic defrost
CLIMATE CLASS
Climate class: N
This appliance is designed to be used at
an ambient temperature of between 16°C
(lowest) and 32°C (highest).
ACOUSTIC EMISSIONS IN AIR IN dB(A) RE 1 pW
45 dB(A)
INSTALLATION TYPE
Free-standing and built-under installation
EUROPEAN DATA SHEET
according to the regulations (UE) N°1060/2010
-
SERVICE WINE CABINET
This appliance is intended exclusively for the storage of wine.
Page 70

70
BRAND
AVINTAGE
COMMERCIAL REFERENCE
AVU54SXDZA(/IX)
POWER SUPPLY
220-240 V / 50 Hz
PRODUCT DIMENSIONS (W x D x H)
595 x 571 x 820 mm
NET WEIGHT
50 kg
APPLIANCE CATEGORY
2
ENERGY EFFICIENCY CLASS
A
ENERGY CONSUMPTION
Energy consumption 145 kWh per year
calculated on the basis of results obtained
over 24 hours in standardized test
conditions. Actual energy consumption
depends on conditions of use and the
location of the appliance.
NET VOLUME
134 L
ADJUSTABLE TEMPERATURES
5 – 10°C / 10 – 20°C
NO FROST
Automatic defrost
CLIMATE CLASS
Climate class: N
This appliance is designed to be used at
an ambient temperature of between 16°C
(lowest) and 32°C (highest).
ACOUSTIC EMISSIONS IN AIR IN dB(A) RE 1 pW
45 dB(A)
INSTALLATION TYPE
Free-standing and built-under installation
EUROPEAN DATA SHEET
according to the regulations (UE) N°1060/2010
-
SERVICE WINE CABINET
This appliance is intended exclusively for the storage of wine.
Page 71

71
BRAND
AVINTAGE
COMMERCIAL REFERENCE
PRO51C/1
POWER SUPPLY
220-240 V / 50 Hz
PRODUCT DIMENSIONS (W x D x H)
595 x 571 x 820 mm
NET WEIGHT
48 kg
APPLIANCE CATEGORY
2
ENERGY EFFICIENCY CLASS
A
ENERGY CONSUMPTION
Energy consumption 145 kWh per year
calculated on the basis of results obtained
over 24 hours in standardized test
conditions. Actual energy consumption
depends on conditions of use and the
location of the appliance.
NET VOLUME
146 L
ADJUSTABLE TEMPERATURES
5 – 20°C
NO FROST
Automatic defrost
CLIMATE CLASS
Climate class: N
This appliance is designed to be used at
an ambient temperature of between 16°C
(lowest) and 32°C (highest).
ACOUSTIC EMISSIONS IN AIR IN dB(A) RE 1 pW
45 dB(A)
INSTALLATION TYPE
Free-standing and built-under installation
EUROPEAN DATA SHEET
according to the regulations (UE) N°1060/2010
-
SERVICE WINE CABINET
This appliance is intended exclusively for the storage of wine.
Page 72

72
Lesen Sie vor dem Gebrauch bitte die Bedienungsanleitung durch und befolgen Sie die darin
angegebenen Sicherheits- und Gebrauchsanweisungen.
Zunächst danken wir Ihnen für das Vertrauen, das Sie der AVINTAGE Gruppe mit dem Erwerb dieses
Gerätes entgegen gebracht haben und hoffen, dass es Ihren Erwartungen voll gerecht wird.
Durch den breit angelegten Temperatur-Einstellbereich haben Sie mit diesem Gerät die Wahl, Ihre
Flaschen (je nachdem, über welche Flaschen Sie verfügen) zu lagern oder sie auf Serviertemperatur zu
bringen.
1. ALLGEMEINE SICHERHEITSHINWEISE
Vor der Erstinbetriebnahme des Gerätes bitte die
Bedienungsanleitung sorgfältig lesen. Sie sorgsam aufbewahren,
um später bei Bedarf darin nachschlagen zu können. Um die
Gefahr eines Brandes oder Stromschlags und von Verletzungen
zu verringern, sollten Sie bei der Benutzung Ihres Geräts die
folgenden grundlegenden Sicherheitshinweise beachten.
Das Gerät muss grundsätzlich durch eine qualifizierte Fachkraft
gewartet werden.
Lesen Sie die Bedienungsanleitung, einschließlich der darin
enthaltenen Warnhinweise und nützlichen Tipps, zu Ihrer
Sicherheit und zum korrekten Gebrauch des Geräts vor der
Installation und Inbetriebnahme des Geräts aufmerksam durch.
Um das Gerät nicht zu beschädigen und/oder unnötige
Verletzungen zu vermeiden, ist es wichtig, dass die Personen, die
das Gerät benutzen, seine Funktionsweise sowie seine
Sicherheitsfunktionen gut kennen. Bewahren Sie die
Bedienungsanleitung zum späteren Nachschlagen auf und
verstauen Sie sie neben dem Gerät, damit sie beim Verkauf bzw.
Umzug zusammen mit dem Gerät übergeben wird. So kann
gewährleistet werden, dass das Gerät optimal funktioniert.
Bewahren Sie die Bedienungsanleitung auf, um der
Verletzungsgefahr vorzubeugen. Der Hersteller kann nicht für
Schäden durch unsachgemäßen Umgang mit dem Gerät haftbar
Page 73

73
gemacht werden.
Das Gerät ist ausschließlich für den Hausgebrauch und die
Lagerung von bestimmten Getränken bei einer Lagertemperatur
bestimmt, die höher ist als diejenige eines Lagerfachs für
Frischprodukte. Es ist unter keinen Umständen zum Frischhalten
von Lebensmitteln bestimmt.
Sich vergewissern, dass die Spannung der elektrischen
Installation derjenigen auf dem Typenschild des Geräts entspricht.
Das Gerät muss an eine vorschriftsmäßig geerdete Steckdose
angeschlossen werden. Fehlerhafte Reparaturen oder
Anschlüsse können zu Sicherheitsrisiken führen. Im Zweifel ist
die elektrische Installation durch eine Elektrofachkraft prüfen zu
lassen.
Zu Ihrem Schutz muss das Gerät ordnungsgemäß an eine
Schukosteckdose angeschlossen werden. Auf keinen Fall den
Schutzleiter am mitgelieferten Netzkabel abschneiden oder
entfernen.
Aus Sicherheitsgründen kein Verlängerungskabel verwenden.
Ist das Gerät beschädigt (z.B. durch einen starken Stoß) oder hat
es Schaden erlitten (Stromstoß infolge Blitzschlag,
Wasserschaden, Brand), kann sich sein Gebrauch als gefährlich
erweisen. Den Netzstecker aus der Steckdose ziehen und das
Gerät durch eine zugelassene Reparaturwerkstatt prüfen lassen.
Zur Vorbeugung von Gefahren ein beschädigtes Netzkabel nicht
selbst austauschen. Den Händler, eine zugelassene
Reparaturwerkstatt oder eine Elektrofachkraft kontaktieren.
Das Gerät muss so aufgestellt werden, dass die Netzsteckdose
Page 74

74
erreichbar ist. Das Gerät nicht verstellen, wenn es gefüllt ist – das
Gehäuse könnte sich verziehen und völlig unbrauchbar werden.
Die Elektroteile dürfen nicht direkt erreichbar sein.
Kinder von dem Gerät fernhalten.
Das Gerät nicht im Freien verwenden.
Sollte versehentlich Flüssigkeit (zerbrochene Flasche, usw.) auf
elektrische Bauteile (Motor, usw.) auslaufen, sofort den
Netzstecker aus der Steckdose ziehen.
Zur Vorbeugung der Brand-, Stromschlag- oder
Verletzungsgefahr das Netzkabel, den Netzstecker bzw. das
Gerät nicht in Wasser oder sonstige Flüssigkeiten tauchen. Das
Gerät nicht mit feuchten Händen anfassen.
Das Gerät von Wärmequellen fernhalten und vor direkter
Sonnenbestrahlung schützen.
Das Netzkabel nicht von einem Tisch hängen und mit scharfen
Kanten oder heissen Flächen in Berührung kommen lassen.
Nicht am Netzkabel, sondern am Netzstecker ziehen, um das
Gerät vom Stromnetz zu trennen.
Sicherstellen, dass die Fläche, auf der das Gerät aufgestellt wird,
sein Gewicht tragen kann, wenn es gefüllt ist (eine 75 cl Flasche
wiegt ungefähr 1.3 kg). Der Weinschrank muss auf einer ebenen
Fläche platziert werden. Beim Aufstellen des Gerätes auf einem
Teppich bzw. Teppichboden eine Unterlage darunter legen.
Um Schäden an der Türdichtung zu vermeiden, müssen Sie vor
dem Herausnehmen der Roste aus den Fächern sicherstellen,
Page 75

75
dass die Tür ganz offen ist.
Sicherheit von Kindern und hilfsbedürftigen Personen
Das Gerät kann von Kindern im Alter von 8 Jahren und mehr
sowie Personen mit eingeschränkten körperlichen,
sensorischen oder geistigen Fähigkeiten oder die den
Gebrauch des Gerätes nicht erlernt haben, benutzt werden,
wenn sie von einer sachkundigen Person, die sich der damit
verbundenen Risiken bewusst ist, betreut werden. Kinder
dürfen nicht mit dem Gerät spielen.
Die Reinigung und Benutzerwartung dürfen nicht von Kindern
durchgeführt werden, außer sie sind mindestens 8 Jahre alt und
werden dabei überwacht.
Alle Verpackungen außerhalb der Reichweite von Kindern
aufbewahren, da Erstickungsgefahr besteht.
Es besteht die Gefahr, dass Kinder im Gerät eingeschlossen
werden. Leider kommt es immer wieder vor, dass Kinder in
solchen Geräten eingeschlossen werden und ersticken.
Weggeworfene oder zurückgelassene Geräte sind immer noch
gefährlich, auch wenn man sie „nur für ein paar Tage“ in der
Garage abstellt.
Bei der Entsorgung des Gerätes den Netzstecker aus der
Steckdose ziehen und das Netzkabel abschneiden (möglichst
dicht am Gerät) und die Tür entfernen, damit Kinder nicht damit
spielen und einen Stromschlag erleiden oder sich im
Geräteinneren einschließen können.
Muss das mit einer magnetischen Türdichtung ausgestattete
Gerät durch ein anderes Gerät mit einem Schnappschloss an
der Tür bzw. Dichtung ersetzt werden, vor der Entsorgung des
Altgerätes prüfen, dass das Schnappschloss funktionsunfähig
ist. So lässt sich vermeiden, dass das Gerät zu einer Falle für
Kinder wird.
Page 76

76
Das Gerät und das Netzkabel außerhalb der Reichweite von
Kindern unter 8 Jahren aufbewahren.
Vor der Entsorgung Ihres ausgedienten Weinklimaschranks
sollten Sie die Gerätetür entfernen. Lassen Sie die
Zwischenböden im Kühlschrank, damit Kinder nicht einfach
hineinklettern können.
Allgemeine Sicherheit
ACHTUNG — Das Gerät ist für den Hausgebrauch und ähnliche
Anwendungen bestimmt, wie z.B
Personalküchen in Geschäften, Büros und sonstigen
Arbeitsumgebungen,
Gästehäuser, Hotels, Motels und sonstige
Wohnumgebungen,
Umgebungen vom Typ Bed and Breakfast,
Verpflegung und ähnliche Großhandelsanwendungen.
ACHTUNG — Um eine Gefährdung infolge einer Instabilität des
Geräts zu vermeiden, muss es gemäß den Anweisungen befestigt
werden.
ACHTUNG — Bewahren Sie keine entzündlichen Stoffe, wie z.B.
Spraydosen, im Inneren des Gerätes auf, da sie dort auslaufen
können.
ACHTUNG — Ist das Netzkabel beschädigt, muss es zur
Vermeidung der Stromschlaggefahr umgehend durch den
Hersteller oder einen Fachhändler ausgetauscht werden.
ACHTUNG — Die Lüftungsöffnungen dürfen nicht versperrt
werden. Prüfen Sie, dass die Luft frei durch die Öffnungen
zirkulieren kann, vor allem bei Einbaugeräten.
Page 77

77
ACHTUNG — Keine mechanischen Vorrichtungen oder sonstige
Hilfsmittel zum Beschleunigen des Abtauvorgangs verwenden,
die nicht vom Hersteller empfohlen wurden.
ACHTUNG — Den Kältekreislauf auf keinen Fall beschädigen.
ACHTUNG — Im Inneren des Kühlfachs keine Elektrogeräte
verwenden, außer diese sind vom Hersteller zugelassen.
ACHTUNG — Kältemittel und das Treibmittel der Isolierung sind
brennbar. Das Gerät nur in einer amtlich zugelassenen
Entsorgungsanlage entsorgen. Keinem offenen Feuer aussetzen.
ACHTUNG — Diese Geräte enthalten das Kühlmittel R600a
(Isobutan), stellen Sie keine brenn- oder entzündbaren und
explosionsgefährlichen Artikel in den Kühlschrank oder in seine
Nähe, um jede Brand- und Explosionsgefahr auszuschließen.
Kältemittel
Im Kältekreislauf des Geräts wird Isobutan (R600a) eingesetzt.
Es handelt sich dabei um ein hochentzündliches Gas, das
umweltschädigend ist. Beim Transport und der Installation des
Geräts prüfen, dass keine Komponenten des Kältekreislaufs
beschädigt sind. Das Kältemittel (R600a) ist eine entzündbare
Flüssigkeit.
Achtung! Brandgefahr
Bei Beschädigungen des Kältekreislaufs:
Offene Flammen und sonstige Zündquellen vermeiden.
Den Raum, in dem sich das Gerät befindet, gut lüften. Es ist
gefährlich, irgendwelche Änderungen an der
Zusammensetzung des Geräts vorzunehmen.
Page 78

78
Schäden am Netzkabel können einen Kurzschluss und/oder
elektrischen Schlag verursachen.
Elektrische Sicherheit
Wir können nicht für Schäden haftbar gemacht werden, die
durch eine fehlerhafte Elektroinstallation verursacht werden.
Das Netzkabel darf nicht verlängert werden. Kein
Verlängerungskabel, keinen Adapter und keine
Mehrfachsteckdose verwenden.
Prüfen, dass der Netzstecker nicht zerdrückt oder beschädigt
ist. Ein zerdrückter oder beschädigter Netzstecker kann
überhitzen und einen Brand verursachen.
Sicherstellen, dass der Netzstecker des Gerätes leicht
erreichbar ist.
Nicht am Netzkabel ziehen.
Den Schutzkontakt auf keinen Fall entfernen.
Wenn die Wandsteckdose locker ist, den Netzstecker nicht
anschließen. Es besteht Stromschlag- bzw. Brandgefahr.
Das Gerät darf nicht ohne die Leuchtenabdeckung der
Innenbeleuchtung betrieben werden.
Der Weinschrank darf nur an eine Stromversorgung mit
220~240V/50Hz Einphasenwechselstrom angeschlossen
werden.
Ist das Netzkabel beschädigt, es nicht selbst austauschen,
sondern den Kundendienst kontaktieren.
Der Netzstecker muss leicht erreichbar sein, aber außerhalb
der Reichweite von Kindern liegen. Bei Zweifeln wenden Sie
sich bitte an Ihren Elektroinstallateur.
Page 79

79
Täglicher Gebrauch
Dieses Gerät ist ausschließlich für die Lagerung von Wein
bestimmt.
Keine entzündlichen Stoffe oder Flüssigkeiten im Geräteinneren
aufbewahren, da Explosionsgefahr besteht.
Keine anderen Elektrogeräte (Mixer, Eismaschinen, usw.) im
Geräteinneren betreiben.
Beim Abtrennen des Gerätes von der Stromversorgung am
Netzstecker und nicht am Kabel ziehen.
Keine heißen Gegenstände in der Nähe der
Kunststoffkomponenten des Gerätes platzieren.
Die Empfehlungen des Geräteherstellers zur Lagerung sind
genau zu befolgen. Für die Lagerung die entsprechenden
Anweisungen befolgen.
Das Gerät muss von Kerzen, Beleuchtungskörpern und offenen
Flammen ferngehalten werden, um der Brandgefahr
vorzubeugen.
Das Gerät ist für die Aufbewahrung von Lebensmitteln und/oder
Getränken in normalen Haushalten bestimmt, wie in der
Bedienungsanleitung erläutert.
Das Gerät ist schwer. Seien Sie vorsichtig, wenn Sie das Gerät
verstellen. Bei Geräten, die mit Rollen ausgestattet sind, ist zu
beachten, dass diese nur dazu dienen, kurze Bewegungen zu
erleichtern. Das Gerät nicht über längere Strecken verschieben.
Nicht auf das Gehäuseunterteil, die Schubkästen, Türen, usw.
steigen oder sich darauf abstützen.
Um das Herabstürzen von Gegenständen und Beschädigungen
des Gerätes zu vermeiden, die Fächer des Gerätes nicht
überladen.
Page 80

80
Achtung: Reinigung und Pflege
Vor der Reinigung den Netzstecker aus der Steckdose ziehen
und den Strom abstellen.
Das Gerät nicht mit metallischen Gegenständen,
Dampfreinigern, flüchtigen Ölen, organischen Lösemitteln oder
Scheuermitteln reinigen.
Die einzelnen Geräteteile niemals mit brennbaren Flüssigkeiten
reinigen. Durch die Dämpfe könnten Brand- und
Explosionsgefahren entstehen.
Zum Entfernen von Eis keine scharfen oder spitzen
Gegenstände verwenden. Stattdessen einen Kunststoffschaber
verwenden.
Wichtiger Hinweis zur Installation!
Vermeiden Sie es, das Gerät an einem feuchten Standort
aufzustellen.
Das Gerät von direkter Sonnenbestrahlung und Wärmequellen
(Ofen, Heizgerät, Heizkörper, usw.) fernhalten. Direkte
Sonnenbestrahlung kann die Acrylbeschichtung beschädigen
und Wärmequellen können den Stromverbrauch erhöhen.
Extrem kalte oder warme Raumtemperaturen können ebenfalls
dazu führen, dass das Gerät nicht richtig funktioniert.
Schließen Sie den Weinklimaschrank nur an einer
vorschriftsmäßig installierten und geerdeten Wandsteckdose an
(keine Mehrfachsteckdose verwenden). Entfernen oder
unterbrechen Sie niemals den dritten Zinken (Erdungszinken)
des mitgelieferten Netzkabels. Bei Fragen zu Stromversorgung
und/oder Erdung wenden Sie sich direkt an einen
Elektroinstallateur oder ein autorisiertes Kundendienstzentrum.
Zur ordnungsgemäßen Ausführung der elektrischen Anschlüsse
die Vorschriften in der Bedienungsanleitung beachten.
Page 81

81
Das Gerät auspacken und visuell prüfen, dass es nicht
beschädigt ist. Das Gerät nicht anschließen, wenn es
beschädigt ist. Etwaige Schäden der Verkaufsstelle melden, wo
Sie das Gerät gekauft haben. In diesem Fall die Verpackung
aufbewahren.
Es wird empfohlen, vor dem Anschluss des Gerätes an die
Stromversorgung mindestens vierundzwanzig Stunden zu
warten, damit der Kompressor ordnungsgemäß mit Öl gefüllt ist.
Eine gute Luftzirkulation ist notwendig, um die Gefahr der
Überhitzung zu vermeiden. Zur Gewährleistung einer
ausreichenden Belüftung die angegebenen
Installationshinweise beachten.
Möglichst vermeiden, dass das Gerät die Wand berührt
und/oder mit heissen Bauteilen (Kompressor, Kondensator) in
Berührung kommt, um der Brandgefahr vorzubeugen. Prinzipiell
die Installationsvorschriften beachten.
Das Gerät darf nicht neben Heizkörpern oder Kochplatten
aufgestellt werden.
Prüfen, dass die Steckdosen erreichbar sind, nachdem das
Gerät installiert wurde.
Energieeinsparungen
Zur Begrenzung des Stromverbrauchs des Gerätes:
Das Gerät an einem geeigneten Ort aufstellen (siehe
Abschnitt " Installationsanweisungen").
Die Türen nur so lange wie unbedingt nötig öffnen.
Durch die periodische Reinigung des Kondensators den
optimalen Betrieb des Gerätes sicherstellen (siehe Abschnitt
"Pflege").
Die Türdichtungen periodisch kontrollieren und prüfen, dass
die Türen gut schließen. Ist dies nicht der Fall, wenden Sie
Page 82

82
sich bitte an den Kundendienst.
Störungsbehebung
Alle elektrischen Arbeiten müssen von einer sachkundigen
Elektrofachkraft durchgeführt werden.
Das Gerät muss von einer zugelassenen Reparaturstelle
repariert werden. Für die Reparatur dürfen nur
Originalersatzteile verwendet werden.
Das Gerät ist ausschließlich für den Hausgebrauch bestimmt. Der
Hersteller kann nicht für die unsachgemäße Verwendung haftbar
gemacht werden.
R600a
Achtung! Die Lüftungsgitter des Gerätes nicht versperren.
Achtung! In dem Gerät keine explosionsfähigen Stoffe, wie z.B.
Spraydosen mit entzündlichem Treibgas, lagern.
Achtung! Den Kältemittelkreislauf des Gerätes nicht
beschädigen.
Achtung! Die Kühleinheiten funktionieren mit Isobutan (R600a)
und dürfen daher nicht in einem Bereich mit Zündquellen
aufgestellt werden (z.B. offene elektrische Kontakte oder
auslaufendes Kältemittel). Der Kältemitteltyp ist auf dem
Typenschild des Gerätes angegeben.
Achtung! In den Fächern des Gerätes keine Elektrogeräte
verwenden, außer sie wurden vom Hersteller ausdrücklich
empfohlen.
Page 83

83
Das Gerät entspricht allen geltenden europäischen Richtlinien und ihren etwaigen Änderungen
und ist insbesondere konform mit den folgenden Normen:
2011/65/EU (ROHS)
2014/35/EU Niederspannungsrichtlinie
2014/30/EU Richtlinie über die elektromagnetische Verträglichkeit
643/2009/CE über die Kennzeichnung von Haushaltskühlgeräten in Bezug auf den
Energieverbrauch
2. TECHNISCHE DATEN
Nachstehend als Beispiel ein Typenschild:
Das Typenschild befindet sich im Geräteinneren bzw. an der Geräterückseite (modellabhängig). Es
enthält alle gerätespezifischen Angaben.
Wir raten Ihnen, die Seriennummer vor der Installation in der Bedienungsanleitung zu notieren, um sie
später bei Bedarf griffbereit zu haben (Reparatur, Kundendienstanfrage).
Ist das Gerät erst einmal installiert und gefüllt, ist der Zugriff auf die Seriennummer erschwert.
ACHTUNG: ohne diese Angaben kann Ihnen der Kundendienst nicht weiterhelfen.
3. INSTALLATIONSANWEISUNGEN
Vor dem Gebrauch des Gerätes
Die Außen- und Innenverpackung entfernen.
Das Gerät vor dem Anschließen an das Stromnetz ungefähr 24 Stunden lang aufrecht stehen lassen.
Page 84

84
KLASSE
SYMBOL
UMGEBUNGSTEMPERATURBEREICH (°C)
Erweitert temperiert
SN
Von +10 bis +32
Temperiert
N
Von +16 bis +32
Subtropisch
ST
Von +16 bis +38
Tropisch
T
Von +16 bis +43
Dies verringert die Gefahr von Funktionsstörungen des Kühlsystems durch die Handhabung beim
Transport.
Das Gerät innen mit einem weichen, mit lauwarmem Wasser getränkten Tuch reinigen.
Wählen Sie beim Aufstellen des Geräts einen geeigneten Standort.
Stellen Sie Ihren Weinschrank auf einen Untergrund, der über eine ausreichende Tragfähigkeit für den
vollgefüllten Schrank verfügt. Zum Ausrichten des Weinschranks den vorderen Einstellfuß unten am
Weinschrank einstellen.
Es ist eine ausreichende Belüftung erforderlich, den Luftaustritt an der Vorderseite nicht versperren.
Nicht für die Aufstellung im Keller bestimmt.
Das Gerät ist nur für den Gebrauch in Innenräumen bestimmt.
Dieser Schrank kann sowohl „frei stehend“, als auch als „Einbaugerät“ installiert werden.
Den Weinschrank an eine Einzelsteckdose anschließen, dabei einen Abstand von 30 mm zwischen
der Geräterückseite und der Mauer lassen. Justieren Sie Ihren Weinschrank aus und bringen Sie ihn
in die waagrechte Stellung (am besten mit einer Wasserwaage). Dies verhindert Bewegungen
aufgrund mangelnder Stabilität, die Geräusche und Vibrationen erzeugen können, und garantiert, dass
die Türe absolut dicht verschlossen wird.
Dieses Gerät ist ausschließlich zum Lagern von Wein bestimmt.
Dieses Gerät arbeitet mit einem brennbaren Kältemittel. Achten Sie deshalb darauf, das
Kühlrohrleitungssystem beim Transport nicht zu beschädigen.
Achtung
Lagern Sie die Flaschen im geschlossenen Zustand.
Überladen Sie das Gerät nicht.
Öffnen Sie die Tür nicht öfter als unbedingt notwendig.
Decken Sie die Roste nicht mit Alufolie oder anderem Material ab, das verhindert die gute Zirkulation
der Luft.
Wenn der Weinschrank während längerer Zeit leer stehen soll, empfehlen wir, das Gerät nach einem
sorgsamen Reinigen vom Netzstrom abzustecken und die Tür leicht geöffnet zu lassen, damit Luft
zirkulieren und das Entstehen von Schimmelpilzen und Gerüchen verhindert werden kann.
ACHTUNG: das Gerät von entzündlichen Stoffen fernhalten.
Raumtemperaturgrenzen
Dieses Gerät ist für den Betrieb unter Raumtemperaturbedingungen bestimmt, die durch die
Temperaturklasse bestimmt werden, die am Typenschild angeführt ist.
Page 85

85
Einbauschema
AVU8X(/IX)
AVU23SX(/IX)
Page 86

86
AVU41SXDPA(/IX)
AVU52SX(/IX) AVU54SXDZA(/IX)
Page 87

87
AVU53CDZA PRO51C/1
Türumkehrung
Türanschlag wechseln: Die Tür kann links oder rechts befestigt werden. Werksseitig ist das Scharnier
rechts, so dass die Tür von links geöffnet wird. Sollte die Tür von rechts geöffnet werden, gehen Sie wie
folgt vor:
AVU8X(/IX)
Page 88

88
1. Unteres Scharnier (rechts) 2. Schraube 3. Türachse
4. Tür 5. Oberes Scharnier (rechts) 6. Scharnierschrauben
7. Oberes Scharnier (links) 8. Unteres Scharnier (links)
1. Öffnen Sie die Tür im rechten Winkel. Lösen Sie die beiden Schrauben (2) der unteren Achse der Tür
und nehmen Sie die Tür (4) und die Türachse ab (Abb. A). Positionieren Sie die Tür (4) (Fig. A und B).
2. Schrauben Sie drei Schrauben (6) aus dem oberen Scharnier (rechts) (5) und nehmen Sie es ab
und unteres Scharnier (rechts). (Abb. C).
3. Ziehen Sie die Ziernägel (8) links oben aus dem Gerät und bringen Sie das obere Zusatzscharnier
(links) (7) links oben mithilfe der drei Schrauben an (Abb. D). Bauen Sie das verbliebene untere
Scharnier (links) (8) ebenso wie oben beschrieben ein (Abb. E).
4. Die Tür öffnet sich 180°C weit. Die Tür ist so einzubauen, wie sie ausgebaut wurde; setzen Sie die
Tür richtig an und befestigen Sie sie.
AVU23SX(/IX) AVU52SX(/IX)
1. Unteres Scharnier (rechts) 2. Schraube 3. Türachse
4. Tür 5. Oberes Scharnier (rechts) 6. Scharnierschrauben
7. Oberes Scharnier (links) 8. Ziernagel 9. Unteres Scharnier (links)
10. Rückhaltevorrichtung 11. Schraube 12. Stopfen
1. Öffnen Sie die Tür im rechten Winkel. Lösen Sie die beiden Schrauben (2) der unteren Achse der Tür
und nehmen Sie die Tür (4) und die Türachse ab (Abb. A).
2. Positionieren Sie die Tür (4) und ziehen Sie den Stopfen (12) aus dem oberen Abschnitt des
Türrahmens; lösen Sie eine der unteren Schrauben (11) und entfernen Sie die Rückhaltevorrichtung
(10). Bringen Sie diese Vorrichtung anschließend im oberen Abschnitt des Türrahmens an. Es sollte
vorzugsweise ein Austauschstopfen (12) verwendet werden, um das Loch im oberen Abschnitt des
Rahmens zu verschließen (Abb. A/B).
3. Schrauben Sie drei Schrauben (6) aus dem oberen Scharnier (rechts) (5) und nehmen Sie es ab
(Abb. C).
4. Entfernen Sie die Ziernägel (8) oben links am Gerät und bringen Sie das obere Austauschscharnier
Page 89

89
(links) (7) oben links mithilfe von drei Schrauben an (Abb. D).
5. Bauen Sie das untere Austauschscharnier (links) (9) ebenso wie oben beschrieben ein (Abb. E).
6. Die Tür öffnet sich 180°C weit. Die Tür ist so wieder einzubauen, wie sie ausgebaut wurde; setzen
Sie die Tür richtig an und befestigen Sie sie.
7. Verschließen Sie das Loch oben rechts am Gerät mit einem Ziernagel (8).
AVU53CDZA AV U54SXDZA(/IX) PRO51C/1
1. Unteres Scharnier (rechts) 2. Schraube 3. Türachse
4. Tür 5. Oberes Scharnier (rechts) 6. Scharnierschrauben
7. Oberes Scharnier (links) 8. Ziernagel 9. Unteres Scharnier (links)
1. Öffnen Sie die Tür im rechten Winkel. Lösen Sie die beiden Schrauben (2) der unteren Achse der Tür
und nehmen Sie die Tür (4) und die Türachse ab (Abb. A).
2. Positionieren Sie die Tür (4).
3. Schrauben Sie drei Schrauben (6) aus dem oberen Scharnier (rechts) (5) und nehmen Sie es ab.
(Abb. C).
4. Ziehen Sie die Ziernägel (8) links oben aus dem Gerät und bringen Sie das obere Zusatzscharnier
(links) (7) links oben mithilfe der drei Schrauben an (Abb. D).
5. Bauen Sie das verbliebene untere Scharnier (links) (9) ebenso wie oben beschrieben ein (Abb. E).
6. Die Tür öffnet sich 180°C weit. Die Tür ist so einzubauen, wie sie ausgebaut wurde; setzen Sie die
Tür richtig an und befestigen Sie sie.
7. Verschließen Sie das Loch oben rechts am Gerät mit einem Ziernagel (8).
Page 90

90
4. BETRIEB DES GERÄTES
Es wird empfohlen, das Gerät an einem Ort aufzustellen, an dem die Raumtemperatur zwischen 1632°C beträgt. Liegt die Raumtemperatur über oder unter den empfohlenen Temperaturen, kann die
Leistung des Gerätes beeinträchtigt und die Temperatur zwischen 5-20°C oder 5-10°C/10-20°C ggf. (je
nach Modell) nicht erreicht werden.
AVU8X(/IX) / AVU23SX(/IX) AVU41SXDPA(/IX) AVU52SX(/IX) PRO51C/1
“RUN”
Betriebsanzeige
Taste
Zum Einschalten/Ausschalten des Geräts.
Die Taste für ca. 3 Sekunden gedrückt halten.
Taste
Beleuchtungstaste
Temperaturanzeige
Elektronische Temperaturanzeige
Taste
Temperatureinstellknopf +
Taste
Temperatureinstellknopf -
Durch Drücken der Tasten / können Sie die gewünschte Temperatur im Fach auswählen.
Bei jedem Tastendruck erhöht/verringert sich die programmierte Temperatur um 1°C.
Sie können eine Temperatur zwischen 5 und 20°C oder 5 und 10°C / 10 und 20 °C auswählen (je nach
Modell). Sobald die Auswahl stattgefunden hat, blinkt die Anzeige etwa 5s lang, und zeigt dann die IstTemperatur im Inneren des Weinschrankes an. Die Einstelltemperatur kann jederzeit angezeigt werden,
indem man 5s lang auf die Temperaturauswahltasten drückt.
Bei einem Stromausfall werden alle vorher ausgewählten Temperaturen gelöscht und jedes Fach wird
standardmäßig auf die werkseitig vorprogrammierte Temperatur von 12°C zurückgesetzt.
AVU53CDZA AV U54SXDZA(/IX)
“RUN”
Betriebsanzeige
Taste
Zum Einschalten/Ausschalten des Geräts.
Page 91

91
Die Taste für ca. 3 Sekunden gedrückt halten.
Taste
Beleuchtungstaste
Temperaturanzeige
Elektronische Anzeige für das obere Fach
Temperaturanzeige
Elektronische Anzeige für das untere Fach
Taste
Temperaturauswahltaste für das obere Fach
Taste
Temperaturauswahltaste für das untere Fach
Drücken Sie auf “ ”, um die Temperatur des oberen Faches einzustellen. Die Anzeige des
entsprechenden Faches beginnt dann zu blinken und jeder Tastendruck verändert die Temperatur um
jeweils 1°C. Sobald die tiefste Einstelltemperatur von 5°C erreicht ist, springt die Anzeige automatisch
wieder auf die höchste Einstelltemperatur von 10°C zurück. Sobald die Auswahl stattgefunden hat, blinkt
die Anzeige etwa 5s lang, und zeigt dann die Ist-Temperatur im Inneren des Weinschrankes an. Die
Einstelltemperatur kann jederzeit angezeigt werden, indem man 5s lang auf die
Temperaturauswahltasten drückt.
Drücken Sie auf “ ”, um die Temperatur des unteren Faches einzustellen. Die Anzeige des
entsprechenden Faches beginnt dann zu blinken und jeder Tastendruck verändert die Temperatur um
jeweils 1°C. Sobald die tiefste Einstelltemperatur von 10°C erreicht ist, springt die Anzeige automatisch
wieder auf die höchste Einstelltemperatur von 20°C zurück. Sobald die Auswahl stattgefunden hat, blinkt
die Anzeige etwa 5s lang, und zeigt dann die Ist-Temperatur im Inneren des Weinschrankes an. Die
Einstelltemperatur kann jederzeit angezeigt werden, indem man 5s lang auf die
Temperaturauswahltasten drückt.
Bei einem Stromausfall werden alle vorher ausgewählten Temperaturen gelöscht und jedes Fach wird
standardmäßig auf die werkseitig vorprogrammierte Temperatur von 6°C im oberen, und 12°C im unteren
Fach zurückgesetzt.
Hinweise für den Betrieb
Temperaturalarm:
Wenn die Innentemperatur über 23 °C steigt, wird auf dem Bedienfeld „HI“ angezeigt und nach einer
Stunde ertönt ein durchgehendes akustisches Alarmsignal. Es zeigt an, dass die Innentemperatur zu
hoch ist. Überprüfen Sie den Grund dafür! Wenn die Innentemperatur unter 0 °C fällt, wird auf dem
Bedienfeld „LO“ angezeigt, gleichzeitig ertönt das akustische Alarmsignal und die Kontrollleuchte zur
Störungsanzeige leuchtet auf.
Wiederherstellung der Temperatur:
Für den Fall eines Stromausfalls speichert der Weinklimaschrank die Temperatureinstellungen. Sobald
die Stromversorgung wiederhergestellt ist, stellt der Weinklimaschrank die vor dem Stromausfall
eingestellte Temperatur wieder her.
Page 92

92
Innenbeleuchtung
Um Energie einzusparen schaltet dieser Weinkühlschrank die LED-Beleuchtung nach 10 Minuten
automatisch ab.
Es ist möglich, die LED-Beleuchtung durchgehend eingeschaltet zu lassen. Dafür halten Sie die Taste
dsds5 Sekunden gedrückt, auf der Digitalanzeige erscheint nun „LP“. Nach 4 Sekunden kehrt das Display
auf die Normalanzeige zurück; die Beleuchtung bleibt an, bis sie von Hand ausgeschaltet wird.
Um wieder in den Energiesparmodus zu wechseln (empfohlene Betriebsart), halten Sie die Taste
5 Sekunden gedrückt. Auf der Digitalanzeige erscheint „LF“. Nach 4 Sekunden kehrt das Display auf
die Normalanzeige zurück und die Beleuchtung schaltet nach 10 Minuten automatisch ab.
5. AUSSTATTUNG
Die Klimatisierung
Entsprechend der Meinung von Fachleuten liegt die optimale Lagertemperatur für Weine um 12°C, in
einer Bandbreite zwischen 10° und 14°C. Diese ist jedoch nicht mit der Serviertemperatur zu
verwechseln, die ihrerseits je nach Eigenheit und Beschaffenheit des Weines zwischen 5 und 20°C liegt.
Abrupte Temperaturschwankungen sind in jedem Fall zu vermeiden. Dieses Gerät wurde von Fachleuten
für Weinliebhaber entwickelt, und berücksichtigt im Gegensatz zum einfachen Kühlschrank die
Empfindlichkeit der Grand Crus hinsichtlich abrupter Temperaturschwankungen mit der genauen
Kontrolle einer konstanten Durchschnittstemperatur.
Schwingungsdämpfung
Der Kühlkompressor ist mit speziellen Schwingungsdämpfern (Silent-Blocks) ausgestattet und das
Innengehäuse ist durch eine dicke Schicht an Polyurethan-Schaum vom Außengehäuse isoliert. Durch
diese Merkmale wird verhindert, dass sich die Schwingungen auf Ihre Weine übertragen.
Befeuchtung
Da dieses Gerät über keinen Kohlefilter verfügt, ist es mit einem Behälter ausgestattet, (je nach Modell),
der die Feuchtigkeit auf einem korrekten Niveau hält. Wenn nicht genügend Feuchtigkeit vorhanden ist,
füllen Sie den Tank bitte ¾ voll auf. Überprüfen Sie von Zeit zu Zeit den Wasserstand und füllen Sie bei
Bedarf Wasser nach. Achten Sie darauf, dass immer Wasser im Behälter ist.
Avintage wurde von Fachleuten für Weinliebhaber entwickelt, und berücksichtigt deshalb auch die
Empfindlichkeit der Korken hinsichtlich einer zu niedrigen Luftfeuchtigkeit. Deshalb ist der Behälter auf
den Rost unterhalb der Lüftung an der Rückseite zu stellen, um ein Mindestmaß an Feuchtigkeit zu
gewährleisten. Vergessen Sie nicht, den Wasserstand zu prüfen, wenn Sie Ihre Weine über einen langen
Zeitraum hinweg lagern, und das Gerät nicht nur zu Temperierungszwecken vor dem Servieren (mit einer
häufigen Flaschenrotation) nutzen.
Vergewissern Sie sich, dass das Tablett voll Wasser vollständig stabil ist, um Wasserfälle oder
Lecks zu vermeiden.
UV-Filterung
Licht beschleunigt den Alterungsprozess Ihrer Weine. In unseren Schränken mit Volltüren sind Ihre
Weine natürlich geschützt, wenn Sie davon Abstand nehmen, die Türen zu oft zu öffnen. Dieses Modell
mit Glastür ist mit einer besonderen Beschichtung versehen, die schädliche UV-Strahlen abweist; Ihre
Weine sind somit absolut geschützt.
Page 93

93
Abtauen
Ihr Gerät ist mit einem automatischen Abtauzyklus ausgestattet. Bei Stillstand des Kühlzyklus tauen die
gekühlten Oberflächen des Gerätes automatisch ab. Das so aufgefangene Abtauwasser wird in die
Verdunstungsschale für Kondenswasser abgeleitet, die sich an der Geräterückseite in der Nähe des
Kompressors befindet. Die vom Kompressor erzeugte Abwärme verdampft danach das im Behälter
gesammelte Kondenswasser.
Wintersystem (je nach Modell)
Das Winterkit ist ein Frostschutzsystem mithilfe dessen der Weinschrank in einer Umgebung mit einer
Temperatur zwischen 0° und 32°C betrieben werden kann. Wenn die Temperatur des Weinschranks mehr
als 3°C unter die eingestellte Temperatur sinkt, wird ein elektrisches Heizelement mit geringer Leistung
eingeschaltet, um die Innentemperatur auf die gewählte Temperatur anzuheben. Dieses Heizelement mit
niedriger Leistung verhindert plötzliche Anstiege der Weintemperatur und Temperaturstöße, die sich
schädlich auf die Alterung des Weins auswirken.
Das automatische System dient zur Erhöhung der Weinschranktemperatur bevor es zu einem
Wärmeaustausch mit den Flaschen kommt. Wenn die Innentemperatur nach dem Einschalten des
Systems die eingestellte Temperatur erreicht, wird es ausgeschaltet.
Roste
Um Beschädigungen an der Türdichtung zu vermeiden, muss sichergestellt sein, dass die Türe weit
geöffnet ist, bevor man den Rost zum Einlegen oder Herausnehmen von Flaschen herauszieht.
Um leichter auf den Inhalt der Roste zugreifen zu können sollten Sie die Roste um etwa 1/3 ihrer
Länge herausziehen, wobei selbige beiderseits mit einem Anschlag ausgestattet sind, um ein
Herausfallen der Flaschen zu vermeiden.
Zum Herausnehmen oder Einlegen der Roste sind diese, wie auf der Abbildung dargestellt, zu neigen
und je nach Bedarf herauszuziehen oder einzuschieben.
AVU41SXDPA(/IX)
Setzen Sie die Roste an den passenden Stellen ein.
Page 94

94
Front
Back
Hinter
Vor
Hinter
Vor
Fuß-Schieberegler
a. Karton mit den Ersatzteilen b. kleiner Rost c. großer Rost
1. Nehmen Sie nach dem Auspacken den Karton mit den Ersatzteilen für das Gerät heraus.
2. 4 kleine Roste (b) sind im linken Fach enthalten. Nehmen Sie die beiden unteren Roste heraus.
3. Im rechten Fach befinden sich 4 große Roste (c). Nehmen Sie die beiden oberen Roste heraus.
4. Die Position der kleinen und großen Roste muss also umgekehrt sein (Abb.2). Setzen Sie in jedes
Fach oben zwei kleine Roste und unten zwei große Roste ein.
5. Sobald die Roste richtig eingesetzt sind, können Sie Ihren Weinschrank entsprechend den
Vorschriften aus der Gebrauchsanweisung verwenden.
Fuß-Schieberegler
Zwei Fuß Schieber mit Ihrem Gerät zur Verfügung gestellt, so dass Sie sie leicht zu bewegen, wenn Sie
Ihre Füße sind, um eine maximale Höhe eingestellt. Die Fuß-Schieberegler müssen parallel unter den
Füßen in Übereinstimmung mit der Position für die vorderen und für den Rücken montiert werden.
Verstärkte Sicherheit
Da diese Gerätereihe zum Lagern von wertvollen Gegenständen bestimmt ist, haben wir darauf geachtet,
nur Bauteile von hoher Qualität zu verarbeiten, und Herstellungstechniken anzuwenden, die eine
optimale Betriebssicherheit gewährleisten.
Türgriffmontage
Ihr Gerät ist mit einem Edelstahl-Türgriff ausgestattet. Nehmen Sie die Türdichtung ab und befestigen Sie
den Türgriff gemäß nachfolgendem Schema mit den mitgelieferten Schrauben an der Tür.
Page 95

95
6. BEFÜLLUNG
Die Angaben zur maximalen Flaschenanzahl sind unverbindlich und ermöglichen (wie der Volumeninhalt
von Kühlschränken) eine grobe Einschätzung der Gerätegröße.
Sie entsprechen Tests, die mit einer Standardflasche durchgeführt wurden (in diesem Fall eine leichte 75
cl Bordeaux-Flasche). In der Normierung hat jede Flaschenform einen eigenen geografischen Ursprung
(z.B. Bordeaux, Burgund, Provence, usw.) und Typ (z.B. Tradition, schwer, leicht, Flöte, usw.) mit jeweils
individuellem Durchmesser und individueller Höhe.
In Wirklichkeit könnte man im Extremfall mehr Flaschen einförmig und ohne Roste übereinander stapeln,
aber ein reichhaltiger Weinschrank umfasst eine große Vielzahl verschiedener Flaschen und durch den
praktischen Aspekt der alltäglichen Nutzung des Weinschranks bleibt die Flaschenanzahl begrenzt. Sie
werden das Gerät daher wahrscheinlich mit etwas weniger Flaschen befüllen als die angegebene
Höchstzahl.
Flaschentypen:
Hier sehen Sie vier Sorten von 75 cl Flaschen, Burgunder und Bordeaux, mit unterschiedlicher Größe. Es
gibt zahlreiche weitere Flaschen mit allen möglichen Fassungsvermögen und Formen.
Wird ein Weinschrank beispielsweise nur mit Burgunderflaschen gefüllt, liegt man rund 30% unter der
ursprünglich für Bordeaux berechneten Menge.
Gegeneinander Lagerung
„Kopf bei Fuß“ Hals an Hals:
Beachten Sie die unterschiedliche Tiefe!
Kopf bei Fuß Hals zwischen den Bäuchen:
Erhöhte Befüllung.
Page 96

96
Beispiele von Serviertemperaturen
Bei Verkostungen zu beachten, um die volle Geschmacksvielfalt der Weine genießen zu können! Die
Meinungen gehen auseinander, die Umgebungstemperatur auch, aber viele sind sich über folgendes
einig:
Große Bordeaux-Weine / Rotwein 16 - 17°C
Große Burgunder-Weine / Rotwein 15 - 16°C
Grands Crus trockener Weißweine 14 - 16°C
Leichte, fruchtige, junge Rotweine 11 - 12°C
Rosé de Provence, Jungweine 10 - 12°C
Trockene Weißweine und rote Tafelweine 10 - 12°C
Weißer Tafelwein 8 - 10°C
Champagner 7 - 8°C
Zuckerreiche Weine 6°C
7. PFLEGE
Ziehen Sie vor der Reinigung des Gerätes (regelmäßig durchzuführen) den Netzstecker aus der
Steckdose oder nehmen Sie die entsprechende Sicherung heraus.
Wir raten Ihnen, das Gerät vor der Erstinbetriebnahme und dann regelmäßig innen und außen
(Frontseite, Seitenwände und Oberseite) mit lauwarmem Wasser und einem milden Reinigungsmittel zu
reinigen. Mit klarem Wasser abspülen und vor dem Wiedereinschalten gut trocknen lassen. Auf keinen
Fall Löse- bzw. Scheuermittel verwenden.
Bei der Erstinbetriebnahme können noch Restgerüche vorhanden sein. Lassen Sie das Gerät in diesem
Fall mehrere Stunden ohne Befüllung mit der niedrigsten Temperatur laufen. Durch die Kälte werden
etwaige Gerüche beseitigt.
Was tun bei Stromausfällen?
Die meisten Stromausfälle sind nur von kurzer Dauer. Ein ein- bis zweistündiger Stromausfall hat keinen
Einfluss auf die Temperatur im Weinschrank. Achten Sie bei Stromausfällen darauf, die Tür nicht unnötig
zu öffnen, um den Wein zu schützen. Bei sehr langen Stromausfällen ergreifen Sie bitte die notwendigen
Maßnahmen zum Schutz des Weines.
Falls der Stecker gezogen, das Gerät ausgeschaltet ist oder ein Stromausfall aufgetreten ist, müssen
Sie 3 bis 5 Minuten zuwarten, bevor Sie es wieder einschalten. Wenn Sie versuchen, es vor Ablauf
dieser Zeitspanne einzuschalten, wird der Kompressor erst nach etwa 3/5 Minuten anlaufen (falls laut
Temperatureinstellung nötig).
Bei der Erstinbetriebnahme und nach einer längeren Abschaltung des Schrankes kann es beim
Wiedereinschalten vorkommen, dass die ausgewählten und die angezeigten Temperaturen nicht
übereinstimmen. Das ist normal! Warten Sie einfach einige Stunden zu, bis sich die Temperaturen
wieder einpendeln.
Bei längerer Abwesenheit
Kurzer Urlaub: Lassen Sie den Weinklimaschrank während einer Abwesenheit von weniger als drei
Wochen in Betrieb.
Längere Abwesenheit: Sollte das Gerät mehrere Monate nicht benutzt werden, entfernen Sie den
gesamten Inhalt und schalten Sie das Gerät aus. Reinigen und trocknen Sie den Innenraum sorgfältig.
Um Geruchsentwicklung und Schimmelbefall vorzubeugen, lassen Sie die Tür leicht geöffnet: falls
nötig blockieren, um zu verhindern, dass die Tür zufällt.
Page 97

97
Ortswechsel des weinschranks
Nehmen Sie alle Flaschen aus dem Gerät, befestigen Sie bewegliche Elemente.
Um Schäden an den Nivellierschrauben der Füße zu vermeiden, sollten Sie diese ganz in die Basis
des Geräts schrauben.
Kleben Sie die geschlossene Tür mit Klebeband zu.
Bewegen Sie das Gerät nur in senkrechter Stellung. Schützes Sie es mit Decken oder Ähnlichem vor
Schäden.
Energiesparen
Stellen Sie das Gerät in einem kühlen Raum (aber über 16 °C), von Hitzequellen (andere
Elektrogeräte) und direkter Sonnenbestrahlung entfernt auf.
Der Raum, in dem das Gerät installiert wird, muss über eine Belüftung verfügen. Decken Sie die
Belüftungsöffnungen des Geräts auf keinen Fall ab.
Öffnen Sie die Tür nicht öfter als unbedingt notwendig.
8. IM PANNENFALL
Trotz aller Sorgfalt, die wir für unsere Produkte aufwenden, kann eine Störung niemals völlig
ausgeschlossen werden. Bevor Sie sich mit dem Kundendienst Ihres Händlers in Verbindung setzen,
prüfen Sie bitte folgende Punkte:
Der Netzstecker ist in der Steckdose
Es liegt kein Stromausfall vor
Die Störung ist nicht auf eine der Ursachen zurückzuführen, die in der Tabelle am Ende der
Bedienungsanleitung beschrieben sind
WICHTIGER HINWEIS: Ist das Gerätenetzkabel beschädigt, muss es vom Hersteller, einem von der
Marke anerkannten Fachbetrieb oder dem Händler ausgetauscht werden. Zur Vermeidung der
Verletzungsgefahr muss es auf jeden Fall von einer qualifizierten Fachkraft ausgetauscht werden.
SOLLTEN DIESE KONTROLLEN ZU NICHTS FÜHREN, KONTAKTIEREN SIE BITTE DEN KUNDENDIENST IHRES
HÄNDLERS.
ACHTUNG!
Ziehen Sie vor Reinigungs- bzw. Reparaturarbeiten prinzipiell
den Netzstecker aus der Steckdose!
Page 98

98
PROBLEM
MÖGLICHE URSACHE
Der Weinschrank schaltet sich nicht ein
Das Netzkabel wurde nicht angesteckt
Der Ein-/Ausschalter steht auf Aus
Die entsprechende Sicherung Ihrer
Elektroanlage ist durchgebrannt
Der Weinschrank kühlt nicht genug
Kontrollieren Sie die ausgewählte Temperatur
Die Außentemperatur im Raum überschreitet
die
Der Weinschrank wird zu oft geöffnet
Die Tür wird nicht gut geschlossen
Die Türdichtung ist nicht dicht
Der Kompressor startet und stoppt häufig
Die Raumtemperatur um den Weinschrank ist
hoch
Sie haben soeben viele neue Flaschen
eingelegt
Der Weinschrank wird zu oft geöffnet
Die Tür wird nicht gut geschlossen
Die Einstellung der Temperatur ist nicht richtig
Die Türdichtung ist nicht dicht
Die Beleuchtung funktioniert nicht
Das Netzkabel wurde nicht angesteckt
Die entsprechende Sicherung Ihrer
Elektroanlage ist durchgebrannt
Die LED ist außer Betrieb, wenden Sie sich
an den Kundendienst
Der Beleuchtungsknopf steht auf Aus
Schwingungen
Stellen Sie absolut sicher, dass der
Weinschrank ganz eben steht.
Der Weinschrank scheint sehr laut zu
funktionieren
Ein Geräusch wie zirkulierendes Wasser
entsteht durch das Kühlgas und ist normal
Am Ende des Kompressorzyklus hört man
gelegentlich ein Geräusch fließenden
Wassers
Das Zusammenziehen und Dehnen der
Innenwände kann krachende Geräusche
ergeben
Der Weinschrank steht nicht eben
Die Tür schließt nicht ganz
Der Weinschrank steht nicht eben
Die Türdichtung ist schmutzig oder defekt
Die Roste sind schlecht positioniert
9. STÖRUNGSBEHEBUNG
Sie können viele einfache Probleme mit dem Temperierschrank selbst lösen, ohne den Kundendienst
einzuschalten. Versuchen Sie es mit den nachfolgenden Vorschlägen.
Austausch der Beleuchtung
Dieses Gerät verfügt über Leuchtdioden (LED). Dieser Diodentyp kann vom Verbraucher nicht selbst
gewechselt werden. Die Lebensdauer dieser LEDs ist normalerweise lang genug, so dass sie nicht
gewechselt werden müssen. Sollte es jedoch trotz aller Sorgfalt bei der Fertigung Ihres Weinschranks zu
einem Defekt der LEDs kommen, wenden Sie sich bitte auf jeden Fall an den Kundendienst.
Page 99

99
10. UMWELT
Das Gerät ist entsprechend der europäischen Richtlinie 2012/19/CE über Elektro- und
Elektronik-Altgeräte (WEEE) gekennzeichnet. Durch die Gewährleistung der
ordnungsgemäßen Entsorgung des Produkts helfen Sie, die potenziellen negativen
Auswirkungen auf die Umwelt und menschliche Gesundheit zu verhindern, die anderenfalls
durch die unsachgemäße Abfallbehandlung des Produkts entstehen können.
Das auf dem Gerät angebrachte Symbol der durchgestrichenen Abfalltonne auf Rädern zeigt an, dass
das Produkt am Ende seiner Lebensdauer vom restlichen Hausmüll getrennt entsorgt werden muss. Es
muss daher zu einer Sammelstelle für Elektro- und Elektronikgeräte bzw. beim Kauf eines gleichwertigen
Gerätes zum Händler des neuen Gerätes gebracht werden.
Der Benutzer ist dafür verantwortlich, dass das Gerät am Ende seiner Lebensdauer einer geeigneten
Sammelstelle zugeführt wird. Eine zweckmäßige, getrennte Sammlung zur Weiterleitung des
unbenutzten Gerätes zum Recycling, zur Aufbereitung und umweltgerechten Entsorgung trägt dazu bei,
mögliche negative Auswirkungen auf Umwelt und Gesundheit zu vermeiden und fördert das Recycling
der Wertstoffe, aus denen das Produkt besteht.
Um genauere Auskünfte zu den bestehenden Sammelsystemen zu erhalten, wenden Sie sich bitte an
das örtliche Amt für Abfallentsorgung oder das Geschäft, in dem Sie das Gerät gekauft haben.
11. WARNHINWEIS
In dem Bestreben der kontinuierlichen Qualitätsverbesserung unserer Produkte behalten wir uns die
Möglichkeit vor, die technischen Merkmale ohne Vorankündigung zu ändern.
Die Garantien für die Produkte der Marke AVINTAGE werden ausschließlich durch unsere
Vertragshändler gewährt. In dieser Bedienungsanleitung gemachte Angaben können nicht als eine
Zusatzgarantie ausgelegt werden.
Die Firma FRIO ENTREPRISE kann nicht für Fehler bzw. technische und redaktionelle Versäumnisse in
dieser Bedienungsanleitung haftbar gemacht werden.
Unverbindliche Unterlage.
Page 100

100
HERSTELLER
AVINTAGE
HANDELSBEZEICHNUNG
AVU8X(/IX)
STROMVERSORGUNG
220-240 V / 50 Hz
ABMESSUNGEN (B x T x H)
145 x 547,5 x 820 mm
NETTOGEWICHT
20 kg
GERÄTEKATEGORIE
2
ENERGIEEFFIZIENZKLASSE
A
ENERGIEVERBRAUCH
Energieverbrauch 135 kWh/Jahr, auf der
Grundlage von Ergebnissen der
Normprüfung über 24 Stunden. Der
tatsächliche Verbrauch hängt von der
Nutzung und vom Standort des Geräts ab.
NETTOVOLUMEN
23 L
TEMPERATUR-EINSTELLBEREICH
5 – 20°C
FROSTFREI
Automatischer Abtauvorgang
KLIMAKLASSE
Klimaklasse: N
Dieses Gerät ist für den Betrieb bei einer
Umgebungstemperatur zwischen 16 °C
(niedrigste Temperatur) und 32 °C
(höchste Temperatur) bestimmt.
LUFTSCHALLEMISSIONEN IN dB(A) RE 1 pW
44 dB(A)
GERÄTETYP
Einbaugerät
PRODUKTDATENBLATT
gemäß der delegierten Verordnung (EU) Nr. 1060/2010
-
WEINSCHRANK
Dieses Gerät ist ausschließlich zur Lagerung von Wein bestimmt.
 Loading...