

Page 1

Web Interface
User Guide
Avigilon H.264 HD IP Models:
H3-B1, H3-B2, H3-B3, H3-D1, H3-D2, H3-DC1, H3-DC2, H3-DO1,
H3-DO2, H3-DP1, H3-DP2, H3-BO1-IR, H3-BO2-IR, H3M-DO1, H3PTZ
and ENC-4P-H264
UG-H3-C-Rev1
Page 2

© 2011 — 2013 Avigilon Corporation. All rights reserved. Unless expressly granted
in writing, no license is granted with respect to any copyright, industrial design,
trademark, patent or other intellectual property rights of Avigilon Corporation or its
licensors.
AVIGILON, CAPTURE IT WITH CLARITY, HDSM, HIGH DEFINITION STREAM
MANAGEMENT (HDSM), THE BEST EVIDENCE and LIGHTCATCHER are
unregistered and/or registered trademarks of Avigilon Corporation in Canada and
other jurisdictions worldwide. Other product names mentioned herein may be the
unregistered and/or registered trademarks of their respective owners. ™ and ® are
not used in association with each trademark in this document.
Avigilon
Tel +1.604.629.5182
Fax +1.604.629.5183
http://www.avigilon.com
UG-H3-C: 12/6/13
Revision: 1
Page 3

English
Table of Contents
Introduction . . . . . . . . . . . . . . . . . . . . . . . . . . . . . . . . . . . . 1
System Requirements . . . . . . . . . . . . . . . . . . . . . . . . . . . . . . . . . 1
Accessing the Camera Web Interface . . . . . . . . . . . . . . 2
Live View . . . . . . . . . . . . . . . . . . . . . . . . . . . . . . . . . . . . . . .3
Using the Camera Zoom and Focus Controls . . . . . . . . . . . .3
Using Camera Presets . . . . . . . . . . . . . . . . . . . . . . . . . . . . . . . . . 4
Using the PTZ Camera Controls . . . . . . . . . . . . . . . . . . . . . . . .5
Using the Encoder PTZ Controls . . . . . . . . . . . . . . . . . . . . . . . .6
Setup . . . . . . . . . . . . . . . . . . . . . . . . . . . . . . . . . . . . . . . . . .7
General . . . . . . . . . . . . . . . . . . . . . . . . . . . . . . . . . . . . . . . . . . . . . 7
Network . . . . . . . . . . . . . . . . . . . . . . . . . . . . . . . . . . . . . . . . . . . . .8
Image and Display . . . . . . . . . . . . . . . . . . . . . . . . . . . . . . . . . . . .9
Compression and Image Rate . . . . . . . . . . . . . . . . . . . . . . . . . 12
Configuring RTSP Stream URI . . . . . . . . . . . . . . . . . 13
Accessing the Still Image URI . . . . . . . . . . . . . . . . . 14
Motion Detection . . . . . . . . . . . . . . . . . . . . . . . . . . . . . . . . . . . . 14
Privacy Zones . . . . . . . . . . . . . . . . . . . . . . . . . . . . . . . . . . . . . . . 16
Storage . . . . . . . . . . . . . . . . . . . . . . . . . . . . . . . . . . . . . . . . . . . . 17
Enabling Onboard Storage . . . . . . . . . . . . . . . . . . . . 17
Downloading Recorded Video From the
Web Interface . . . . . . . . . . . . . . . . . . . . . . . . . . . . . . . 18
Downloading Recorded Video From the SD Card 19
Deleting Recorded Video . . . . . . . . . . . . . . . . . . . . 20
Digital Inputs and Outputs . . . . . . . . . . . . . . . . . . . . . . . . . . . 20
Microphone . . . . . . . . . . . . . . . . . . . . . . . . . . . . . . . . . . . . . . . . . 21
Speaker . . . . . . . . . . . . . . . . . . . . . . . . . . . . . . . . . . . . . . . . . . . . 21
Users . . . . . . . . . . . . . . . . . . . . . . . . . . . . . . . . . . . . . . . . . . . . . 22
Adding a User . . . . . . . . . . . . . . . . . . . . . . . . . . . . . . 22
Editing Users and Passwords . . . . . . . . . . . . . . . . 23
System . . . . . . . . . . . . . . . . . . . . . . . . . . . . . . . . . . . . . . . . . . . . 23
Upgrading the Camera Firmware . . . . . . . . . . . . . 23
Device Log . . . . . . . . . . . . . . . . . . . . . . . . . . . . . . . . . . . . . . . . 24
PTZ Camera . . . . . . . . . . . . . . . . . . . . . . . . . . . . . . . . . . 25
PTZ Tours . . . . . . . . . . . . . . . . . . . . . . . . . . . . . . . . . . . . . . . . . 25
Editing PTZ Tours . . . . . . . . . . . . . . . . . . . . . . . . . . 26
PTZ Limits . . . . . . . . . . . . . . . . . . . . . . . . . . . . . . . . . . . . . . . . . .27
Encoder . . . . . . . . . . . . . . . . . . . . . . . . . . . . . . . . . . . . . . 29
Selecting a Port or Channel Option . . . . . . . . . . . . . . . . . . . 29
Enabling Video Input Termination . . . . . . . . . . . . . . . . . . . . . 29
Setting Up PTZ . . . . . . . . . . . . . . . . . . . . . . . . . . . . . . . . . . . . . 29
Page 4

English
Page 5

1
English
Introduction
All Avigilon™ high definition H.264 IP cameras and encoders contain a web
interface that allows you to view live video and configure the device
through a web browser.
Before you access the web interface, make sure you complete all the
procedures described in the device installation guide.
System Requirements
The web interface can be accessed from any Windows, Mac or mobile
device using one of the following browsers:
• Windows Internet Explorer browser version 7.0 or later
• Mozilla Firefox browser version 3.6 or later
• Opera browser 9.0 or later
• Chrome browser 8.0 or later
• Safari 5.0 or later
• Android 2.2 (Froyo) browser or later
• Apple iOS 5.0 browser or later.
Page 6

2
English
Accessing the Camera Web Interface
After the camera or encoder has been installed, you need the device’s IP
address to access the web interface. The IP address can be found in one
of the following places:
• Avigilon Camera Installation Tool: click the Connect to Camera
button to see the details of the connected camera or encoder.
• Avigilon Control Center Client: open the Setup dialog box to see
the details of the selected device.
Once you have the IP address, complete the following procedure to
access the web interface:
NOTE: The web browser must be configured to accept cookies or the
camera web interface will not function correctly.
1. On a computer with internet access, enter the device’s IP address
into a web browser:
http://<camera IP address>/
For example, http://192.168.1.40/
2. You will automatically be prompted to enter your username and
password to access the device.
The default username is admin, and the default password is
admin. It is recommended that you change the default password
after your first login. For more information, see Editing Users and
Passwords on page 23.
NOTE: You can only change the device password in the web interface. The
password cannot be changed in the network video management
software.
Page 7

3
English
Live View
After you login, the first page you see is the Live View. The Live View
contains an image panel that displays the live video stream.
The menu links at the top left corner takes you to each of the pages in the
web interface. Click Live View any time to return to this page.
The following sections describe the buttons that may be displayed under
the image panel if users have access to PTZ controls. To give a user PTZ
controls, see Adding a User on page 22.
NOTE: Some options are disabled if they are not supported by the camera.
Using the Camera Zoom and Focus Controls
• To zoom out, move the slider towards the right.
• To zoom in, move the slider towards the left.
Page 8
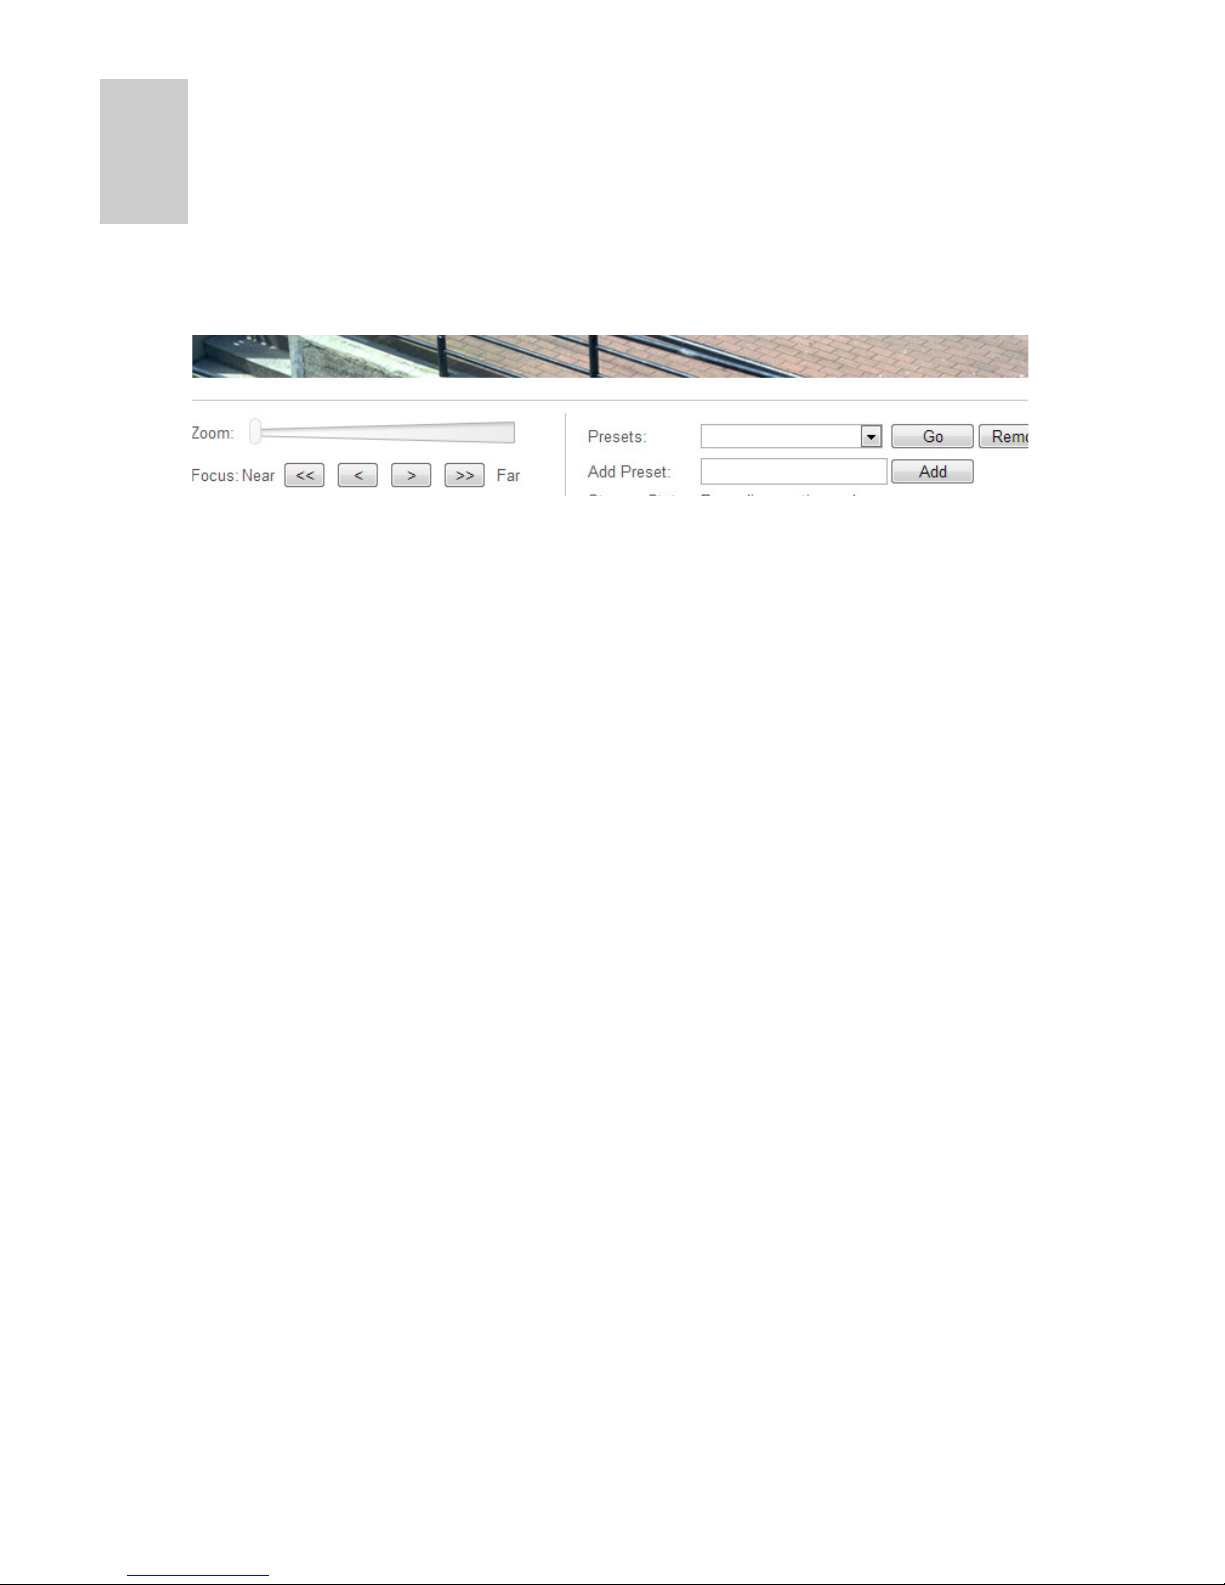
4
English
• To focus towards zero, click << to take a large step or < to take a
small step.
• To focus towards infinity, click >> to take a large step or > to take a
small step.
Using Camera Presets
1. On the Live View page, use the Zoom and Focus controls to focus
the camera on a specific point in the video image.
2. To add this camera position as a preset, enter a name in the Add
Preset field then click Add.
3. To use a preset, select a configured preset from the Presets drop
down list and click Go.
4. To delete a preset, select a preset from the drop down list then
click Remove.
The presets can also be configured in the Avigilon Control Center Client
software through the PTZ controls.
Page 9
5
English
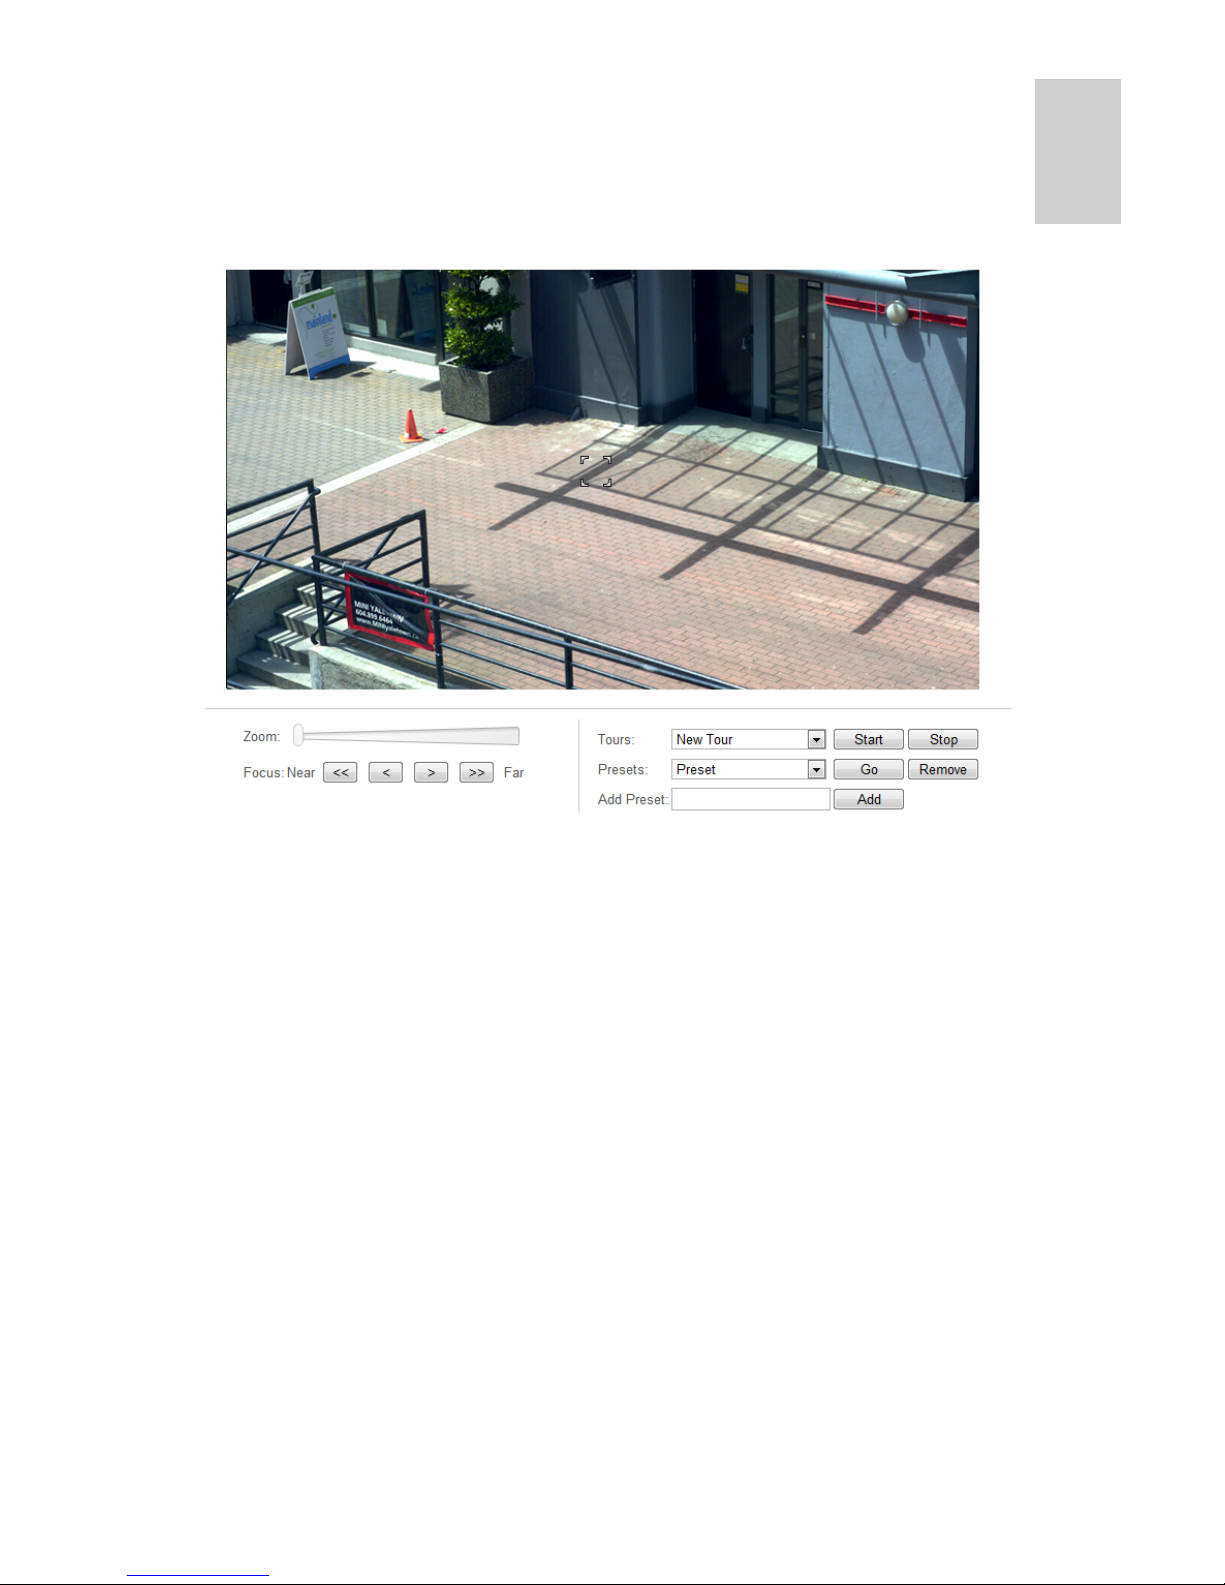
Using the PTZ Camera Controls
If you are accessing a standalone pan-tilt-zoom (PTZ) camera, you can
control Focus and Presets in the same way as other cameras but you also
have access to other features that are specific to the PTZ camera.
1. To zoom the camera:
• Adjust the Zoom slider.
• Or, click and drag to create a green box on the image panel
to define the area you want to zoom in and see.
2. To move the camera:
• Click anywhere on the image panel to center the camera to
that point.
• Or, drag your mouse from center to move the camera in that
direction. The farther the arrow is from center, the faster the
camera will move.
3. To perform a guard tour, select a tour from the drop down list then
click Start. To setup a tour, see PTZ Tours on page 25.
4. To stop a guard tour, click Stop. You can pause a tour at any time
just by using the other PTZ controls.
Page 10
6
English
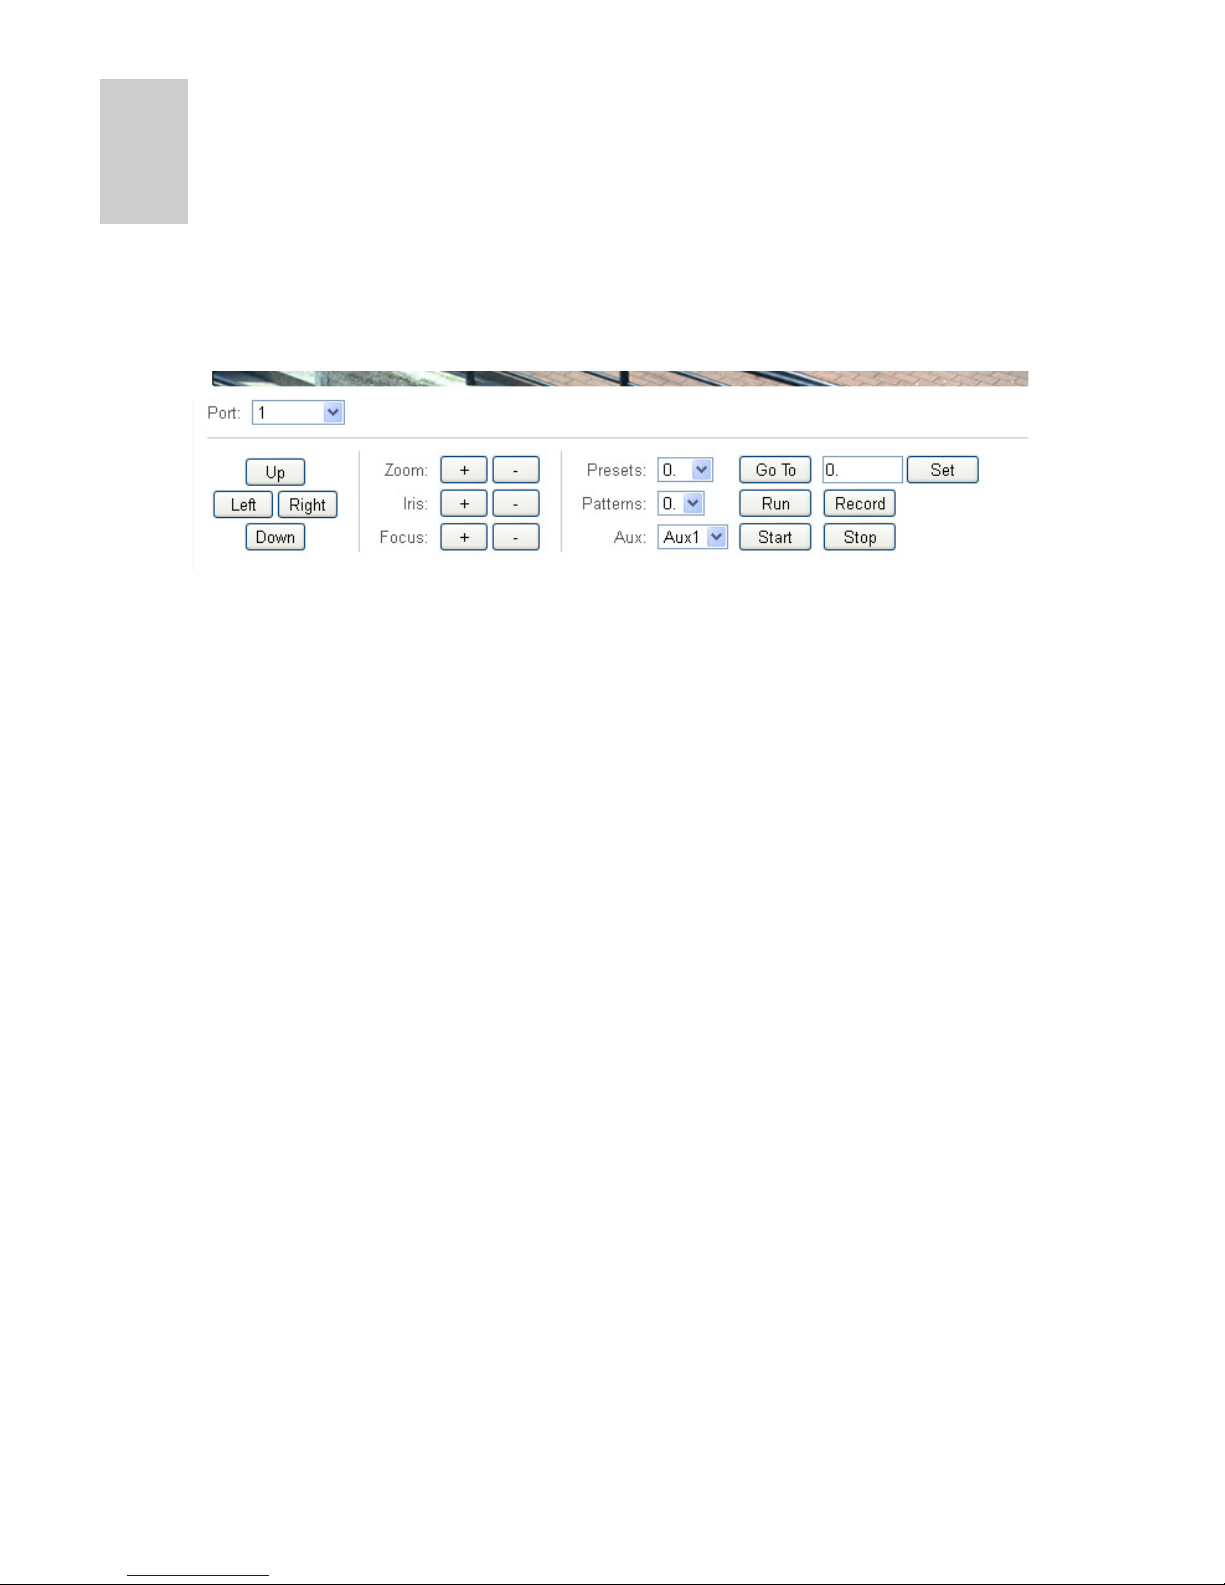
Using the Encoder PTZ Controls
Any camera that is connected to an H.264 encoder can have the PTZ
option enabled. Once enabled, the full pan, tilt and zoom controls are
displayed in the Live View for that camera.
To enable PTZ for cameras that are connected to an encoder, see Setting
Up PTZ on page 29.
1. Select a camera from the Port drop down list.
NOTE: The PTZ controls are only displayed when the camera is displayed
by itself.
2. To move the camera field of view, click one of the directional
buttons on the far left.
3. To control the camera’s Zoom, Iris or Focus, click the + or buttons.
4. For Presets, you can perform any of the following:
• To add a preset, move the camera’s field of view into position
then give the preset a name and click Set.
• To use a preset, select a name or number from the drop
down list and click Go To.
5. For Patterns, you can perform any of the following:
• To record a pattern, select a number from the drop down list
then click Record. Use the directional buttons to move the
camera and create the pattern. When you are done, click
Stop.
• To run a pattern, select a number from the drop down list and
click Run.
6. To activate an auxiliary command, select an Aux# from the drop
down list and click Start. When you are finished, click Stop.
Page 11
7
English
Setup
NOTE: Some options are disabled if they are not supported by the camera,
or if you do not have the required user permissions.
The device’s factory default settings allow you to use the camera or
encoder immediately after installation. If you have special requirements,
you can customize the settings through the web interface.
A Restore Default button is available on each Setup page to allow you to
restore the factory default settings.
Be aware that some of the settings are only available through the camera
web interface and can not be changed in the network video management
software.
For the settings that are specific to PTZ cameras, see PTZ Camera on
page 25.
For the settings that are specific to encoders, see Encoder on page 29.
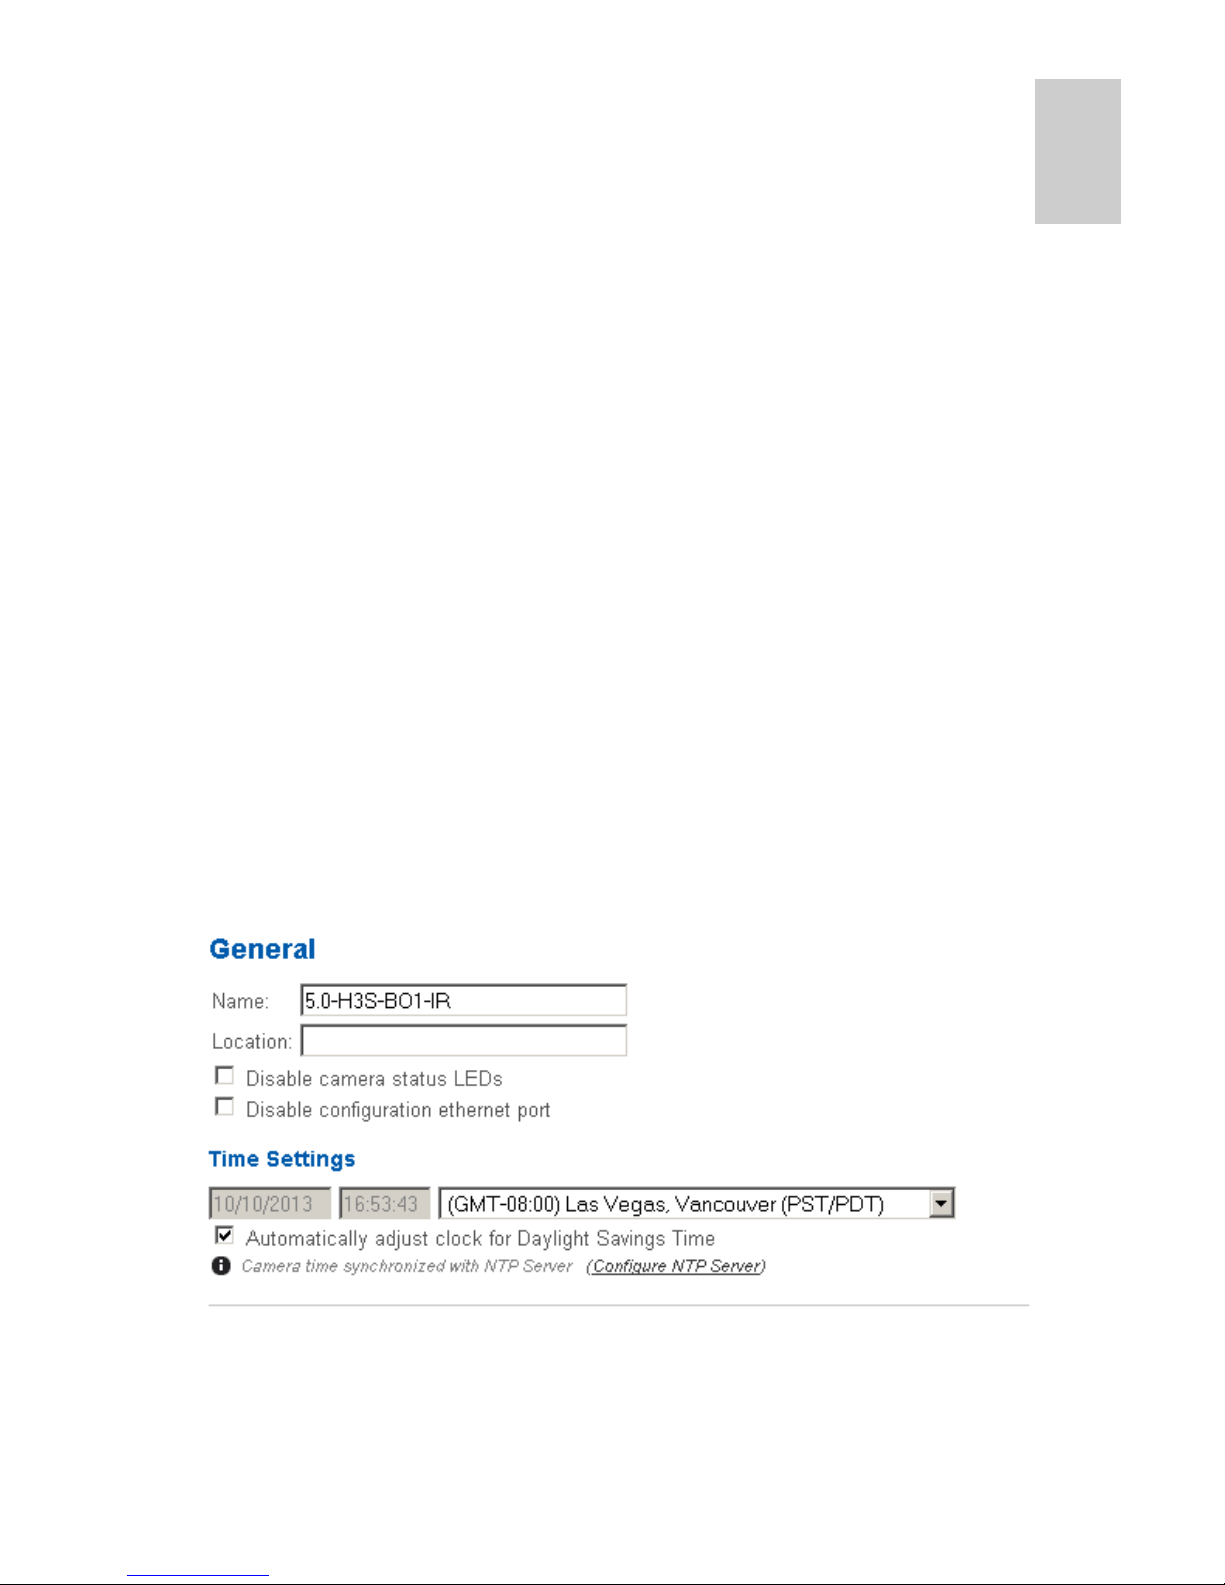
General
When you select the Setup link, the first page you see is the General page.
The General page allows you to set the device identity.
1. In the Name field, give the device a meaningful name.
2. In the Location field, describe the device’s location.
3. Select the Disable camera status LEDs check box to disable the
LEDs located on the device.
Page 12

8
English
4. If the camera is not connected to the Avigilon Control Center
software, set the time.
• If you prefer to manually set the camera’s date and time,
enter the date, time and time zone on this page.
It is recommended that you always set the camera’s time zone if
the onboard storage feature is enabled.
• If you prefer to auto-synchronize the camera’s date and time
with an NTP server, configure the NTP server on the Network
page. See Network on page 8 for more information.
5. (HD Bullet Camera only) Select the Disable configuration
ethernet port check box to disable the secondary ethernet port
underneath the camera.
6. Click Apply.
Network
On the Network page, you can change how the device connects to the
server network and choose how the device keeps time.
NOTE: You can only set the HTTPS port, the RTSP port, and the NTP
Server in the camera web interface.
1. In the Address and Hostname area, select how the device obtains
an IP address:
• Obtain an IP address automatically: select this option to
connect to the network through an automatically assigned IP
address.
The IP address is obtained from a DHCP server. If it can not,
the IP address will default to addresses in the 169.254.x.x
range.
• Use the following IP address: select this option to manually
assign a static IP address.
Enter the IP Address, Subnet Mask, and the Default Gate-
way you want to use.
2. If you need to customize the hostname, enter it in the Hostname
field.
3. In the Control Ports area, you can specify which control ports are
used to access the device. You can enter any port number
between 1 and 65534. The default port numbers are:
Page 13

9
English
• HTTP Port: 80
• HTTPS Port: 443
• RTSP Port: 554
4. In the NTP Server area, decide if you want the camera to use a
Network Time Protocol (NTP) server to keep time.
By default, the camera keeps time through the Avigilon Control
Center software. If the camera is connected to a different network
video management software, select one of the following options:
• DHCP: select this option to automatically use the same NTP
server as the rest of the network.
• Manual: select this option to manually set which NTP server
is used.
5. Click Apply when you are done.
Image and Display
NOTE: This setup page is not available for encoders, and some options
are not available if they are not supported by the camera
On the Image and Display
page, you can control the
camera’s video display
settings.
The Image and Display
page includes an image
panel that displays the
camera’s live video
stream. When you click
Apply to save your
changes, the video stream
is updated.
Avigilon cameras have
electronic zoom and focus
controls, so you can set
the camera’s zoom and
focus through this page
as well.
Page 14

10
English
1. Use the Zoom controls to adjust the camera’s zoom position.
2. If the camera has a built-in auto focus feature, you can select the
Continuous Focus option to enable the camera to focus itself
whenever the scene changes.
3. To manually focus the camera, select Open in the Iris drop down
list then use the Focus buttons to focus the camera.
The left arrow buttons focus the camera towards Zero (0), and the
right arrow buttons focus the camera towards Infinity. Click the
Auto Focus button to enable the camera to automatically focus
once.
NOTE: Once the focus is manually set, it will not change.
4. To adjust the video image, make changes to any of the following
settings as required..
Option Description
Exposure You can allow the camera to control the exposure by
selecting Automatic, or you can set a specific
exposure rate.
NOTE: Increasing the manual exposure time may
affect the image rate.
Iris You can allow the camera to control the iris by
selecting Automatic, or you can manually set it to
Open or Closed.
IR Cut Filter You can allow the camera to control the infrared cut
filter by selecting Automatic, or set the camera to
Color or Monochrome mode.
Flicker Control If your video image flickers because of the fluorescent
lights around the camera, you can reduce the effects
of the flicker by setting the Flicker Control to the same
frequency as your lights. Generally, Europe is 50Hz
and North America is 60Hz.
Backlight
Compensation
If your scene has areas of intense light that cause the
overall image to be too dark, change the Backlight
Compensation value until you achieve a well exposed
image
Maximum
Exposure
You can limit the automatic exposure setting by
selecting a maximum exposure level.
By setting a maximum exposure level for low light
situations, you can control the camera's exposure time
to let in the maximum amount of light without creating
blurry images.
Page 15

11
English
Maximum Gain You can limit the automatic gain setting by selecting a
maximum gain level.
By setting the maximum gain level for low light
situations, you can maximize the detail of an image
without creating excessive noise in the images.
Priority You can set Image Rate or Exposure as the priority.
When set to Image Rate, the camera will maintain the
set image rate as the priority and will not adjust the
exposure beyond what can be recorded for the set
image rate.
When set to Exposure the camera will maintain the
exposure setting as the priority, and will override the
set image rate to achieve the best image possible.
Saturation You can adjust the video’s color saturation by entering
a percentage number. 0 creates a black and white
image, while 100 creates intense color images.
Sharpness You can adjust the video’s sharpness by entering a
percentage number. 0 applies the least amount of
sharpening, while 100 applies the most sharpening to
make the edges of objects more visible.
Brightness You can adjust the video’s brightness by entering a
percentage number. 0 creates a dark image, while 100
creates a light-filled image.
Contrast You can adjust the video’s contrast by entering a
percentage number. 0 applies the least amount of
contrast, while 100 applies the most contrast.
White Balance You can control the white balance settings to adjust for
differences in light.
You can allow the camera to control the white balance
by selecting Automatic, or select Custom and
manually set the Red and Blue settings.
WDR You can enable automatic color adjustments through
Wide Dynamic Range (WDR). This allows the camera to
adjust the video image to accommodate scenes where
bright light and dark shadow are clearly visible.
Adaptive IR
Compensation
You can enable automatic infrared adjustments
through Adaptive IR Compensation. This allows the
camera to automatically adjust the video image for
saturation caused by IR illumination.
Option Description
Page 16

12
English
Compression and Image Rate
On the Compression and Image Rate page, you can change the camera’s
compression and image quality settings for sending video over the
network.
To enable easy access and lower bandwidth usage, the web interface only
displays video in JPEG format and cannot be changed. The settings on this
page only affect the video transmitted to the network video management
software.
Avigilon cameras have dual stream capabilities, so even when the
camera’s streaming format is set to H.264, the camera's web interface can
still display live video in JPEG format.
However, cameras that are connected to an Avigilon encoder do not
typically have multi-stream capabilities. So once you set the video
streaming format to H.264, live video from that camera is no longer
displayed in the web interface.
NOTE: You can only set the RTSP stream settings in the camera web
interface.
Page 17

13
English
1. In the Format drop down list, select the preferred streaming
format for displaying the camera video in the network video
management software.
If you are using the Onboard Storage feature, select H.264. For
more information, see Enabling Onboard Storage on page 17.
2. In the Image Rate field, enter a number between 1-30 to indicate
how many images per second you want the camera to stream
over the network.
3. In the Quality drop down list, select the desired image quality
level.
Image quality setting of 1 will produce the highest quality video
and require the most bandwidth.
4. In the Max Bitrate field, enter the maximum bandwidth the camera
can use. You can enter any number between 200-12000 kbps.
5. In the Resolution drop down list, select the preferred image
resolution.
6. In the Keyframe Interval field, enter the number of frames
between each keyframe. You can enter any number between 2-
64.
7. Click Apply to save your changes.
Configuring RTSP Stream URI
In the Compression and Image Rate page, you can also configure the
camera’s real time streaming protocol (RTSP). The RTSP Stream URI allows
you to watch the camera’s live video stream from any application that
supports viewing RTSP streams, including many video players.
1. To set the protocol, select either Unicast or Multicast in the RTSP
Stream URI area then click Apply.
2. To watch the camera’s live video stream from an external video
player, click Generate RTSP Stream URI.
a. Copy and paste the generated address in to your video
player. DO NOT open the live video stream yet.
b. Add your username and password to the beginning of the
address in this format:
rtsp://<username>:<password>@<generated RTSP Stream URI>/
For example: rtsp://admin:admin@192.168.1.79/
defaultPrimary?streamType=u
Page 18

14
English
c. Open the live video stream.
Accessing the Still Image URI
In the Compression and Image Rate page, you can access the last still
image frame the camera recorded.
• To access the still image, click the link in the Still Image URI
section.
The last recorded frame of video from the camera’s primary stream is
displayed. You can choose to save or print the image directly from the
browser.
Motion Detection
On the Motion Detection page, you can define the green motion detection
areas in the camera’s field of view. Motion detection is ignored in areas not
highlighted in green.
To help you define motion sensitivity and threshold, motion is highlighted
in red in the image panel.
Page 19

15
English
1. The entire field of view is highlighted for motion detection by
default. To define the motion detection area, use any of the
following tools:
• Click Clear All to remove all motion detection areas on the
video image.
• Click Set All to set the motion detection area to span the
entire video image.
• To set a specific motion detection area, click Select Area
then click and drag anywhere on the video image.
• To clear a specific motion detection area, click Clear Area
then click and drag over any motion detection area.
• Use the Zoom In and Zoom Out buttons to locate specific
areas in the video image.
2. In the Sensitivity field, enter a percentage number to define how
much each pixel must change before it is considered in motion.
The higher the sensitivity, the smaller the amount of pixel change
is required before motion is detected.
3. In the Threshold field, enter a percentage number to define how
many pixels must change before the image is considered to have
motion.
The higher the threshold, the higher the number of pixels must
change before the image is considered to have motion.
4. Click Apply to save your changes.
Page 20

16
English
Privacy Zones
On the Privacy Zones page, you can set privacy zones in the camera’s field
of view to block out areas that you do not want to see or record. The
camera supports up to four privacy zones.
1. To add a privacy zone, click Add. A privacy zone box is added to
the video image.
2. To define the privacy zone area, perform any of the following:
a. Drag the bottom or right side of the box to resize the privacy
zone.
NOTE: Privacy zones can only be rectangular in shape.
b. Click the center of the box then drag to move the privacy
zone.
c. Click the X at the top right corner of the gray box to delete
the privacy zone.
3. Click Apply to save the privacy zone settings.
4. If you are using a PTZ camera, a list of privacy zones is available at
the bottom of the page. When you click one of the privacy zones,
the camera moves and highlights that privacy zone in the image
panel.
Page 21

17
English
Storage
On the Onboard Storage page, you can enable the camera’s Onboard
Storage feature and download recorded video directly from the camera.
Enabling Onboard Storage
To use the camera’s onboard storage feature, you must first insert an SD
card into the camera. Refer to the camera’s installation manual for the
location of the SD card slot.
1. On the Onboard Storage page, select the Enable Onboard
Storage check box.
2. If you prefer, select the Record only when server connection is
interrupted check box. Otherwise, the camera will record video to
the network video management server and to the SD card.
3. Select one of the following recording modes:
Page 22

18
English
• Continuous: the camera never stops recording to the SD
card.
• On Motion: the camera only records when there is motion in
the scene.
The recorded video will be divided into files no more than five
minutes in length or 100MB in size.
4. On the Compression and Image Rate page, make sure the format
is set to H.264 to maximize the SD card recording capacity and
performance.
Downloading Recorded Video From the Web
Interface
Listed in the Recordings section are all the videos that have been
recorded to the SD card.
It is recommended that you download recorded video from the web
interface. However, if your bandwidth is limited, you can choose to
download the recorded video directly from the SD card. For more
information, see Downloading Recorded Video From the SD Card on
page 19.
To download recorded video from the web interface, perform the
following:
1. On the Storage page, select the check box beside all the videos
you want to download.
• To help you find the video you want, you can filter the videos
by date and time. Select the Filter check box then select the
time range.
2. Click Download.
The selected video files are automatically downloaded to your browser’s
default Downloads folder. If you are prompted by the browser, allow the
download to occur.
NOTE: Do not close your browser window until the download is complete
or the file may not download correctly. This is important if you are
downloading multiple video files because the files are downloaded
one by one.
Page 23

19
English
Downloading Recorded Video From the SD Card
If you do not have enough bandwidth to download recorded video directly
from the web interface, you can choose to download the recorded video
directly from the SD card.
To download recorded video directly from the SD card, perform the
following:
1. In the Onboard Storage page, disable onboard storage by
clearing the Enable Onboard Storage check box then click Apply.
2. Remove the SD card from the camera.
3. Insert the SD card into a card reader.
4. When the Windows AutoPlay dialog box appears, select Open
folder to view files.
5. Open the Avigilon Camera Footage application.
The Avigilon Camera Footage window lists all the video files that
are stored in the SD card.
• To download all the recorded video, click Download All.
• To download specific video, select the video files you want
then click Download Selected.
6. When you are prompted, choose a location to save the video files.
Page 24

20
English
The files start downloading from the SD card and are saved to the
selected location.
7. When you are ready, eject the SD card.
8. Insert the SD card back in to the camera then enable Onboard
Storage to begin recording to the SD card again.
Deleting Recorded Video
As the SD card becomes full, the camera automatically starts overwriting
the oldest recorded video. You can also choose to manually delete video
to make extra room for new recordings.
On the OnBoard Storage page, you can choose to delete video in the
following ways:
• To delete individual video files, select all files you want to delete
from the Recordings list then click Delete.
• To delete all recorded video files, click Format Card to format the
SD card.
Digital Inputs and Outputs
On the Digital Inputs and Outputs page, you can set up the external input
and output devices that are connected to the camera.
1. In the Digital Inputs area, name the digital input and select the
digital input’s circuit state.
2. In the Digital Outputs area, name the digital output and select the
digital output’s circuit state.
Page 25

21
English
3. In the Digital Outputs Duration field, enter how long the digital
output is active for when triggered. You can enter any number
between 100-3,600,000 milliseconds.
4. Click Trigger to manually trigger the digital output from the web
interface.
5. Click Apply to save your changes.
Microphone
If a microphone is connected to the camera, you can adjust the gain on the
Microphone page. The higher the gain setting, the higher the microphone
volume.
• Enter a number between the available range displayed on the
right then click Apply.
Speaker
If a speaker is connected to the camera, you can adjust the volume on the
Speakers page.
• Enter a number between 0-100 to set the speaker volume then
click Apply.
Page 26

22
English
Users
On the Users page, you can add new users, edit existing users, and
change passwords.
Adding a User
1. On the Users page, click Add....
2. On the Add User page, enter a username and password for the
new user.
3. In the Security Group drop down list, select the access
permissions available to this new user.
• Administrator: full access to all the available features in the
camera web interface, including PTZ controls.
• Operator: has access to the Live View and PTZ controls but
limited access to the Setup features. The new user can only
access the Image and Display page, Compression and Image
Rate page, Motion Detection page, Privacy Zones page,
Digital Inputs and Outputs page, Microphone page and the
Speaker page. The new user can also configure onboard
storage settings but cannot delete video recordings or format
the SD card.
• User: has access to the Live View and optional PTZ controls,
but cannot access any of the Setup pages. To enable the PTZ
controls, select the Use PTZ Controls check box.
4. Click Apply to add the user.
Page 27

23
English
Editing Users and Passwords
1. On the Users page, select a user from the User Name list and click
Modify.
2. To change the user’s password, enter a new password for the
user.
3. To change the user’s security group, select a different group from
the Security Group drop down list.
NOTE: You cannot change the security group for the admin account.
4. Click Apply to save your changes.
System
On the System page, you can manually upgrade the camera firmware,
reboot the camera, and restore all of the camera’s factory default settings.
Upgrading the Camera Firmware
To manually upgrade the camera’s firmware, download the latest version
of the firmware .bin file from the Avigilon website (http://avigilon.com/
support-and-downloads/for-cameras-and-hardware/firmware-updatesand-downloads/) and complete the following procedure:
Page 28

24
English
1. Click Browse and locate the downloaded firmware file.
2. Click Upgrade. Wait until the camera upgrade is complete.
Device Log
The Device Log page allows you to view the camera’s system logs and the
camera access logs.
1. In the Type drop down list, select either Access Logs or System
Logs.
2. In the Minimum Log Level drop down list, select the log messages
you want to see.
3. In the Maximum Number of Logs drop down list, select the
number of log messages you want displayed each time.
4. Click Update. The logs are displayed below.
Page 29

25
English
PTZ Camera
Avigilon H.264 PTZ cameras use many of the same settings as the other
cameras. The following settings are only available to PTZ cameras.
PTZ Tours
For PTZ cameras, you have the option of running a Tour on the Live View
page. Tours allow the PTZ camera to automatically move between a series
of preset positions, and can be set to pause at each preset for a specific
amount of time for video monitoring.
To create a tour, complete the following:
NOTE: All the required presets must be added before a new tour can be
created. See Using Camera Presets on page 4 for more
information.
1. Among the Setup options, click PTZ Tours.
2. Click Create New Tour.
Page 30

26
English
3. Give the tour a name.
4. In the Mode drop down list, select one of the following:
• Sequential: the PTZ camera will go to each preset in the set
order.
• Random: the PTZ camera will go to each preset in random
order.
5. Select the Set as default tour check box if you want this tour to
run automatically.
• The Default Tour Idle Start Time field is now enabled, enter
the amount of time the PTZ camera must be idle for before
this tour automatically begins.
6. To add a preset, click Add Preset and a preset is added to the list.
a. In the Preset column, select a preset from the drop down list.
b. In the Move Speed column, enter how fast you want the PTZ
camera to move to this preset. The speed is 80% by default.
c. In the View Time column, enter the amount of time you want
the PTZ camera to stay at this preset position. The view time
is 10 seconds by default.
d. Continue until all the presets for this tour have been added.
7. To remove a preset, click the (x) icon to the far right of the preset.
8. To re-order a preset, click the up and down arrows or click and
drag the left edge of the preset through the list.
9. Click Apply to save the tour.
Editing PTZ Tours
1. Among the Setup options, click PTZ Tours.
2. Click Edit.
3. Make the changes you need.
4. To undo the changes that you’ve made, click Discard Changes.
5. Click Apply to save your changes.
6. To delete the tour, click Delete Tour. When the confirmation dialog
box appears, click OK.
Page 31

27
English
PTZ Limits
Depending on where the PTZ camera is installed, you may want to limit the
movement and zoom of the camera so that obstructions are never in view.
For example, if the PTZ camera is installed close to the side of a building,
you can set the limits so that the PTZ camera cannot move to show the
wall it is installed against.
1. Among the Setup options, click PTZ Limits.
2. To limit the maximum movement range, you can do one of the
following:
• In the image panel, move the PTZ camera as far left as you
want to display then click the From icon for the Pan Limit.
Move the camera to the farthest point to the right and click
the To icon. Repeat this procedure for the Tilt Limit, only
move the camera up and down. For information about
Page 32

28
English
moving the PTZ camera, see Using the PTZ Camera Controls
on page 5.
• Below the image panel, you can set the Pan and Tilt Limit by
adjusting the position of the two black dots on each circle.
The gray area shows the set degree of movement. The Pan
Limit sets the horizontal movement range and the Tilt Limit
sets the vertical movement range.
3. To set the Lens Zoom Limit, enter a maximum zoom level.
4. To set the Maximum Move Speed, enter a maximum number of
degrees per second.
5. To allow the camera to automatically correct the video image
when the camera tilts more than 90°, select the Enable E-Flip
check box. When this option is disabled, the video image is upside
down when the camera tilts more than 90°.
6. Click Apply to save your settings.
Page 33

29
English
Encoder
Avigilon H.264 encoders use many of the same settings as the cameras,
but the following settings are only available to encoders.
Selecting a Port or Channel Option
An encoder can have up to 4 cameras and 4 audio devices connected at
one time, so some pages in the web interface include a set of options for
each port or channel on the encoder.
On pages with live video options, like Live View and Motion Detection, you
can change the displayed camera by selecting a Port number from the
drop down list.
On setup pages without video, the options are divided by video port or
audio channel so that different options can be applied to each.
Enabling Video Input Termination
• To enable the video input termination, select a Port check box on
the General page.
Setting Up PTZ
The H.264 encoders have pan, tilt and zoom (PTZ) setup options. Once
enabled, the Live View will display the PTZ controls for the camera.
1. Among the Setup options, click PTZ.
2. Select a Baud Rate and Parity.
3. For each port that is connected to a PTZ camera, select the
Enable PTZ check box.
4. Select a Protocol and enter a Dip Switch Address.
5. Click Apply.
6. To use the PTZ controls, see Using the Encoder PTZ Controls on
page 6.
Page 34

 Loading...