

Page 1

Avigilon Control Center 5
System Integration Guide
with Gallagher Command Centre
INT-CARDAX-D-Rev1
Page 2

Copyright © 2013 Avigilon. All rights reserved.
No copying, distribution, publication, modification, or incorporation of this document, in whole or part, is
permitted without the express written permission of Avigilon. In the event of any permitted copying,
distribution, publication, modification, or incorporation of this document, no changes in or deletion of author
attribution, trademark legend, or copyright notice shall be made. No part of this document may be reproduced,
stored in a retrieval system, published, used for commercial exploitation, or transmitted, in any form by any
means, electronic, mechanical, photocopying, recording, or otherwise, without the express written permission
of Avigilon.
Gallagher and Gallagher Command Centre are registered trademarks of Gallagher Group, Limited.
Avigilon has made every effort to identify trademarked properties and owners on this page. All brands and
product names used in this document are for identification purposes only and may be trademarks or registered
trademarks of their respective companies.
Avigilon
Tel +1.604.629.5182
Fax +1.604.629.5183
http://www.avigilon.com
Revised 2013-11-15
Page 3

Table of Contents
Introduction . . . . . . . . . . . . . . . . . . . . . . . . . . . . . . . . . . . . 1
Requirements . . . . . . . . . . . . . . . . . . . . . . . . . . . . . . . . . . . . . . . . 1
Upgrading from Avigilon Control Center 4 . . . . . . . . . . . . . . . 1
For More Information . . . . . . . . . . . . . . . . . . . . . . . . . . . . . . . . . 2
Installation . . . . . . . . . . . . . . . . . . . . . . . . . . . . . . . . . . . . . 3
Server . . . . . . . . . . . . . . . . . . . . . . . . . . . . . . . . . . . . . . . . . . . . . . 3
Client Computer . . . . . . . . . . . . . . . . . . . . . . . . . . . . . . . . . . . . . . 3
Checking the Licence . . . . . . . . . . . . . . . . . . . . . . . . . . . . . . . . . 3
Basic Configuration . . . . . . . . . . . . . . . . . . . . . . . . . . . . . 4
Adding an Integration User in Avigilon . . . . . . . . . . . . . . . . . . 4
Gallagher DVR Configuration . . . . . . . . . . . . . . . . . . . . . . . . . . 4
Trigger and Acknowledge Avigilon Alarms
from Gallagher . . . . . . . . . . . . . . . . . . . . . . . . . . . . . . . . . . 7
Avigilon Alarm Configuration . . . . . . . . . . . . . . . . . . . . . . . . . . . 7
Configuring Gallagher to Trigger and Acknowledge
Avigilon Alarms . . . . . . . . . . . . . . . . . . . . . . . . . . . . . . . . . . . . . 8
Alarm monitoring in Avigilon Control Center Client . . . . . . . . 9
View Avigilon Image Data and Events in Gallagher . . 10
Configuring Cameras . . . . . . . . . . . . . . . . . . . . . . . . . . . . . . . . 10
Assigning Logical IDs to Cameras . . . . . . . . . . . . . 10
Gallagher Camera Setup . . . . . . . . . . . . . . . . . . . . . .11
Testing the Connection . . . . . . . . . . . . . . . . . . . . . . .11
Viewing Live Video and Controlling PTZ . . . . . . . . . . . . . . . . 12
Configuring and Viewing Recorded Video . . . . . . . . . . . . . . 13
Adding Avigilon Cameras to a Gallagher
Action Plan . . . . . . . . . . . . . . . . . . . . . . . . . . . . . . . . . 13
Assigning Action Plans to Events in Gallagher . . . 13
Viewing Recorded Video . . . . . . . . . . . . . . . . . . . . . 14
Configuring Avigilon System Events in Gallagher . . . . . . . . 14
Configuring Action Plans for Avigilon Events . . . . . . . . . . . . 15
Troubleshooting . . . . . . . . . . . . . . . . . . . . . . . . . . . . . . . 17
Avigilon Gallagher Integration Fails . . . . . . . . . . . . . . . . . . . . 17
Avigilon Camera Will Not Display Video . . . . . . . . . . . . . . . . 17
Appendix . . . . . . . . . . . . . . . . . . . . . . . . . . . . . . . . . . . . . 18
Page 4

Page 5

Avigilon Control Center 5 System Integration Guide with Gallagher Command Centre
Introduction
The Avigilon Gallagher Integration allows the Gallagher Command Centre to utilize
Avigilon surveillance technology. Integration features include:
• Viewing live video from cameras connected to the Avigilon system and control
PTZ devices in the Gallagher Command Centre software
• Viewing recorded video in the Gallagher Command Centre software
• Viewing events from the Avigilon Control Center in the Gallagher Command
Centre software
• Controlling Avigilon Control Center alarms from the Gallagher Command
Centre software
Requirements
Vendor Requirements
Avigilon Control Center Server Software 5.0 and later.
Avigilon Avigilon 3rd party licence:
ACC5-GLGR-CMNDC
Avigilon Avigilon Gallagher integration executable file
AvigilonGallagher7.exe
Gallagher Gallagher Command Centre 7.0 or 7.1
The Avigilon Gallagher integration file can be downloaded from the Avigilon website:
http://avigilon.com/support-and-downloads/for-software/acc-integration-and-plug-indownloads/
Upgrading from Avigilon Control Center 4
If you are upgrading to Avigilon Control Center 5 and the latest version of the Avigilon
Gallagher integration software, be aware that the Avigilon Control Center uses a new
default port number (38880) for server communication.
After you install the Avigilon Control Center 5 upgrade, you must manually update the
DVR port number as described in Gallagher DVR Configuration on page 4. If you had set a
custom port number, the system will continue to use the custom port number.
1
Page 6

Avigilon Control Center 5 System Integration Guide with Gallagher Command Centre
For More Information
For more detailed information about the procedures outlined in this guide, refer to the
specific software documentation.
• Avigilon Control Center Client User Guide
• Avigilon Control Center Server User Guide
• Gallagher Command Centre User Classic User Guide
• Gallagher Controller API Developers Guide
2
Page 7

Avigilon Control Center 5 System Integration Guide with Gallagher Command Centre
Installation
Server
1. Install the Gallagher Command Centre Server software.
2. Install the Gallagher Controller API (FTCAPI) on the Gallagher Command
Centre Server.
a. Set the Gallagher Controller IP port. Refer to the “API Location” topic in the
Gallagher Controller API Developers Guide.
b. Verify that FTCAPI is installed correctly by running the FTCAPI test
harness. It should start with no errors.
3. Install the Avigilon Gallagher integration software (AvigilonGallagher7.exe).
4. Apply the Avigilon integration license to one of the Avigilon Control Center 5
Servers in your system.
As you configure the integration, all references to the Avigilon server needs to
point to this server.
Client Computer
Complete the following steps for all Gallagher Workstations that require the Avigilon
Gallagher integration.
1. Install the Gallagher Command Centre Workstation software.
2. Install the Avigilon Gallagher integration software (AvigilonGallagher7.exe).
Checking the Licence
After you have installed all the required software, you can check if the ACC5-GLGR-CMNDC
licence has been properly applied:
NOTE: If you have a multi-server Site, only one server needs to have the integration
license.
1. Open the Avigilon Control Center Admin Tool.
2. Select the Settings tab and click Licensing. The License Activation dialog box
appears.
The dialog box must say
properly licensed.
Integration Connections: Yes or the software was not
3
Page 8

Avigilon Control Center 5 System Integration Guide with Gallagher Command Centre
Basic Configuration
The basic configuration establishes the link between Avigilon servers and Gallagher
servers. This allows the two servers to communicate.
Adding an Integration User in Avigilon
To protect the security of the Avigilon Control Center Server, add a user to the Avigilon
software specifically for connecting to the integration. See the Avigilon Control Center Client
User Guide
This user must have the following permissions to enable all the integration features:
for details about how to add users.
• View Live Images
o Use PTZ Controls
o Lock PTZ Controls
• View Recorded Images
The integration username and password is used to add Avigilon servers to the Gallagher
Command Centre.
Gallagher DVR Configuration
This configuration allows for communication between the Avigilon server and the
Gallagher server.
1. In the Gallagher Command Centre, open the External Systems Master List
Window.
2. Right-click and select New > DVR System.
The New DVR System—Properties dialog box appears.
3. In the General tab, enter a name for the Avigilon server.
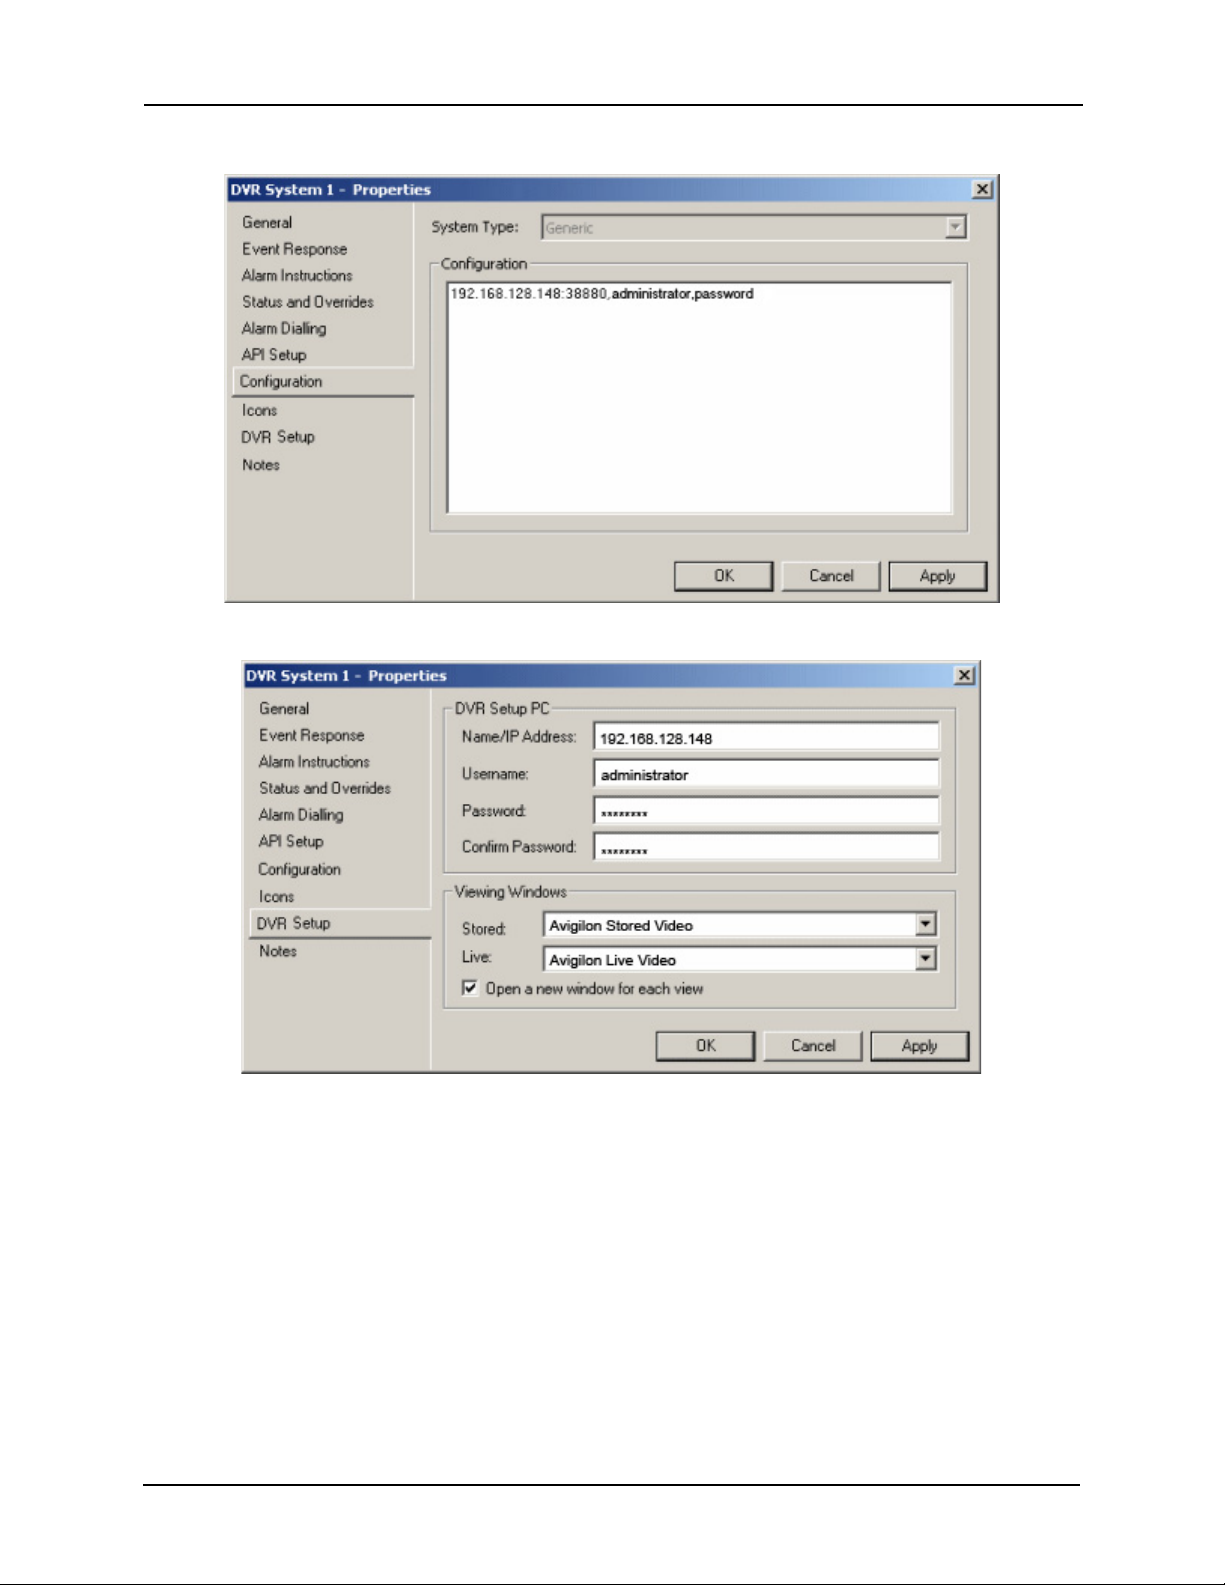
4. In the Configuration tab, enter the server IP address, port, username and
password used to access the Avigilon server. Use the username and password
you created in the
Adding an Integration User in Avigilon procedure.
Use the format
<Server Address:Port>,<Username>,<Password>
4
Page 9
Avigilon Control Center 5 System Integration Guide with Gallagher Command Centre
For example: 192.168.128.148:38880,administrator,password
5. Select the DVR Setup tab then complete the following fields:
o Name/IP Address: enter the IP address for the Avigilon server that is
licensed for the integration.
o Username and Password: enter the same username and password that
was used in the Configuration tab.
oIn the Stored drop down list, select Avigilon Stored Video.
oIn the Live drop down list, select Avigilon Live Video.
6. Select the API Setup tab.
5
Page 10

Avigilon Control Center 5 System Integration Guide with Gallagher Command Centre
Complete the following fields:
o Select a controller to associate with the Avigilon server.
oIn the Middleware PC Name/IP Address field, enter the name or IP
address of the server that is running the FTCAPI.
oIn the Identity area, give the Avigilon Site a Unique identity.
7. Select the Event Response tab then select an Alarm Zone for all Events for
the server.
8. Click OK.
6
Page 11

Avigilon Control Center 5 System Integration Guide with Gallagher Command Centre
Trigger and Acknowledge Avigilon Alarms from Gallagher
Create alarms in the Avigilon Control Center Client software that can be managed by the
Gallagher Command Centre software.
Avigilon Alarm Configuration
Set up alarms in the Avigilon Control Center Client before you configure Gallagher to
manage all the alarms.
NOTE: The alarm name is case sensitive and must be unique to the server.
1. In the Avigilon Control Center Client software, right-click the Site in the System
Explorer and select Setup.
2. In the Setup tab, click Alarms.
3. On the Add Alarm dialog box, click Add.
4. On the Select Alarm Trigger Source page, select External Software Event from
the Alarm Trigger Source drop down list and click Next.
5. On the Select Linked Cameras page, select the cameras to link to this alarm,
and set the Pre-Alarm Record Time and the Recording Duration. Click Next.
6. Select the groups or users who should receive alarm notifications, then click
Next.
7. (Optional) If you would like to trigger an action when an alarm is
acknowledged, select the Activate selected digital output(s) on alarm
acknowledgement check box.
a. Select the digital outputs to be activated and specify the duration.
b. Select the Require user confirmation before activating digital output
check box if users need to confirm the alarm before the digital output
action is initiated.
c. Click Next.
8. Enter a Name for the alarm and set the alarm Priority. The alarm name is used
to identify the alarm during the integration.
9. Ensure the Enable Alarm check box is selected and click Finish.
7
Page 12

Avigilon Control Center 5 System Integration Guide with Gallagher Command Centre
Configuring Gallagher to Trigger and Acknowledge Avigilon Alarms
Configure the Gallagher Command Centre to manage Avigilon alarms. The Gallagher
Command Centre uses FTCAPI strings to send alarm triggers and acknowledgements to
the Avigilon Control Center.
1. In Gallagher Command Center, open the External Systems Master List Window.
2. Right-click the camera associated with an alarm and select Properties.
3. Select the Trigger-Output tab.
4. Open the Hardware Master List Window.
5. From the Hardware Master List Window, drag the output that will trigger the
alarm into the Trigger—Outputs tab in the Properties dialog box.
Outputs can include magnetic locks, alarm bells, or warning lights. A change in
any of the outputs will send a FTCAPI string that can be used to trigger or
acknowledge an Avigilon alarm.
6. Click OK.
7. In the Hardware Master List Window, right-click the selected output and select
Properties.
8
Page 13

Avigilon Control Center 5 System Integration Guide with Gallagher Command Centre
8. Select the Messages tab.
9. In the FT Controller API strings area, enter the alarm trigger information in the
On field in the following format:
alarmTrigger <Licensed Avigilon Server Address> <Alarm Name>
For example: alarmTrigger 192.168.128.162 burg alarm
NOTE: The case sensitive alarm name is configured in the Avigilon Control Center Client.
See Avigilon Alarm Configuration on page 7 for more information.
10. You have the option of adding an acknowledgement string in the Off field to
automatically acknowledge the alarm in the Avigilon system. Use the following
format:
alarmAck <icensed Avigilon Server Address> <Ack Permission> <Alarm Name>
For example: alarmAck 192.168.128.162 normal burg alarm
NOTE:
<Ack Permission> can be set to normal, grant or deny. The grant and deny
settings can only be used when the alarm requires user confirmation to activate a
digital output. See
Avigilon Alarm Configuration on page 7 for more information.
Alarm monitoring in Avigilon Control Center Client
All alarms configured in the Avigilon Control Center can be monitored in the Avigilon
Control Center Client. See the
information.
Avigilon Control Center Client User Guide for more
9
Page 14

Avigilon Control Center 5 System Integration Guide with Gallagher Command Centre
View Avigilon Image Data and Events in Gallagher
Gallagher can be configured to view live and recorded video from Avigilon cameras, and
receive Avigilon events. Gallagher associates recorded video with specific alarms, so you
must configure an action plan in Gallagher before you can review recorded video in
Gallagher.
Configuring Cameras
Before Avigilon cameras can be viewed in the Gallagher Command Centre, the cameras
must be added to the Gallagher Command Centre software. Complete the following
procedures:
Assigning Logical IDs to Cameras
In the Avigilon Control Center Client software, assign a logical ID to each camera. The
Command Centre software will only detect cameras with a logical ID. By default, cameras
do not have a logical ID.
1. In the Avigilon Control Center Client software, right-click a camera in the
System Explorer and select Setup.
2. In the camera Setup tab, click General.
3. In the General settings dialog box, enter a Logical ID for the camera.
The logical ID must be unique number.
10
Page 15

Avigilon Control Center 5 System Integration Guide with Gallagher Command Centre
Gallagher Camera Setup
1. In the Gallagher Command Centre, open the External Systems Master List
Window.
2. Right-click the window and select New > DVR System Camera.
3. In the General tab, name the Avigilon camera.
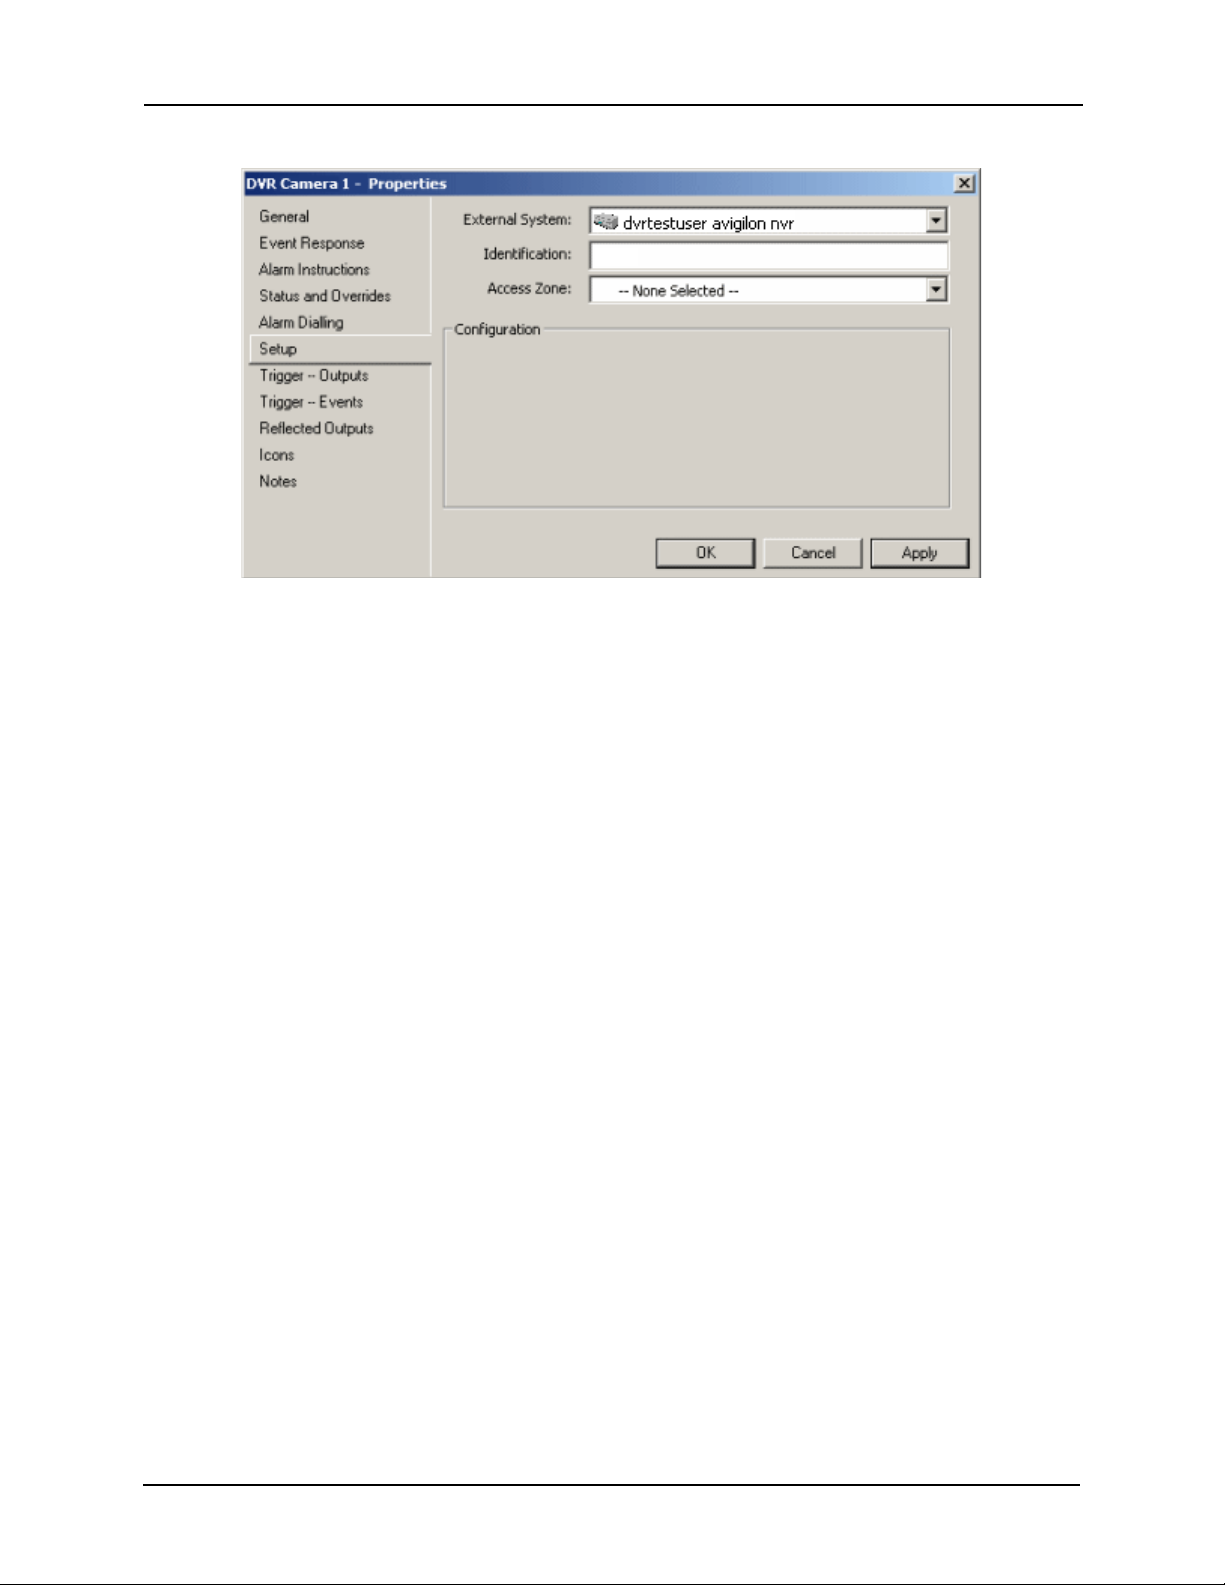
4. Select the Setup tab, and complete the following fields:
o DVR System: select the Avigilon server the camera is connected to.
o Identification: enter the Logical ID assigned to the camera in the
Avigilon system. See Assigning Logical IDs to Cameras on page 10 for
more information.
5. Select the Event Response tab then select an Alarm Zone for all Events for
the camera.
6. Click OK.
Testing the Connection
Once the cameras and software have been configured to support the integration, test the
connection to confirm that the integration was successful.
In the Gallagher Command Centre, perform the following:
• In the External Systems Master List Window, right-click an Avigilon camera and
select Watch.
If you are able to watch live video, the connection was successful.
11
Page 16

Avigilon Control Center 5 System Integration Guide with Gallagher Command Centre
If you are unable to watch live video and a symbol appears over the camera,
the connection was unsuccessful. Confirm the following then test the
connection again:
o The camera is connected to the Avigilon Server it was assigned to in the
Gallagher Camera Setup procedure.
o The camera’s logical ID matches the Identification assigned to the
camera during the
Gallagher Camera Setup procedure.
o The FTCAPI was installed properly.
o The installation and configuration procedures were completed in full.
If the connection continues to be unsuccessful, contact Avigilon support at support@avigilon.com.
Viewing Live Video and Controlling PTZ
• In the Gallagher Command Centre, open the External Systems Master List
Window, right-click a camera and select Watch.
If the Avigilon camera is configured for pan, tilt, and zoom (PTZ), the PTZ controls will
automatically appear when you view live video.
12
Page 17

Avigilon Control Center 5 System Integration Guide with Gallagher Command Centre
Configuring and Viewing Recorded Video
You can only view recorded video from Avigilon cameras when the cameras are part of a
Gallagher alarm. Gallagher alarms are generated from events with an action plan. Avigilon
cameras must be added to an action plan to become part of a Gallagher alarm.
Adding Avigilon Cameras to a Gallagher Action Plan
Create an action plan to enable Avigilon cameras to record when a Gallagher alarm is
triggered.
1. In the Gallagher Command Centre, open the Action Plan Master List Window
and the External Systems Master List Window.
2. Right-click the Action Plan Master List Window and select New > Action Plan.
3. In the General tab, name the new action plan.
4. Select one of the following tabs:
o Select the Armed tab if the action plan is to be associated with an
Armed Alarm Zone.
o Select the Disarm tab if the action plan is to be associated with a
Disarmed Alarm Zone.
5. In the Alarm Priority drop down list, select an available alarm priority.
6. For the Cameras, Macros and External System Items box, drag a camera from
the External Systems Master List Window into the box.
7. Click OK.
Assigning Action Plans to Events in Gallagher
Once an action plan has been created to include Avigilon cameras, the action plan must
be attached to an event to trigger alarms.
13
Page 18

Avigilon Control Center 5 System Integration Guide with Gallagher Command Centre
To assign an action plan to an event in Gallagher, see the Gallagher Command Centre
Classic User Guide
.
Viewing Recorded Video
Once an alarm is triggered by an event that includes an Avigilon camera action plan,
recorded video can be viewed.
NOTE: If an alarm is deleted, the event cannot be viewed.
1. In the Gallagher Command Center, open the Alarm Viewer.
2. Right-click the alarm, then select View and select the camera.
If the video does not display, the event may still be occurring and the Avigilon server has
not finished recording the event. Wait a few seconds then try again, or watch the live
video.
If you cannot locate the alarm, use the Find Tool to locate the recorded video.
Configuring Avigilon System Events in Gallagher
To monitor Avigilon system events in Gallagher, you must create three placeholder
cameras to receive event information from Avigilon. This allows you to monitor the health
of the Avigilon Control Center system in the Gallagher Command Centre. Avigilon system
events can include server errors, database issues and low storage availability.
1. In the Gallagher Command Centre, open the External Systems Master List
Window.
2. Right-click the window and select New > DVR System Camera.
3. In the General tab, give the placeholder a name.
14
Page 19
Avigilon Control Center 5 System Integration Guide with Gallagher Command Centre
4. Select the Setup tab, and complete the following fields:
o DVR System: select the Avigilon Site you want to receive system
information from.
o Identification: enter one of the following. Make sure the Identification is
spelled exactly as listed or the system events will not be received by the
Gallagher software.
• ACC Server Events - for Avigilon Control Center Server events.
• ACC Database Events - for video indexing, video metadata and configuration
data related events.
• ACC Storage Events - for network video recorder storage events.
5. Click OK.
6. Repeat this procedure until you have a placeholder for each of the three event
types.
Each of the events are mapped to an External Event Group ID in Gallagher. When an
event occurs, the Gallagher Command Centre will respond using the action plan assigned
to the event. To change the action plan, see
Configuring Action Plans for Avigilon Events on
page 15.
Configuring Action Plans for Avigilon Events
Configure an action plan to respond to events generated by the Avigilon system and
cameras.
1. In the External System Master List Window, right-click an Avigilon camera or
placeholder and select Properties.
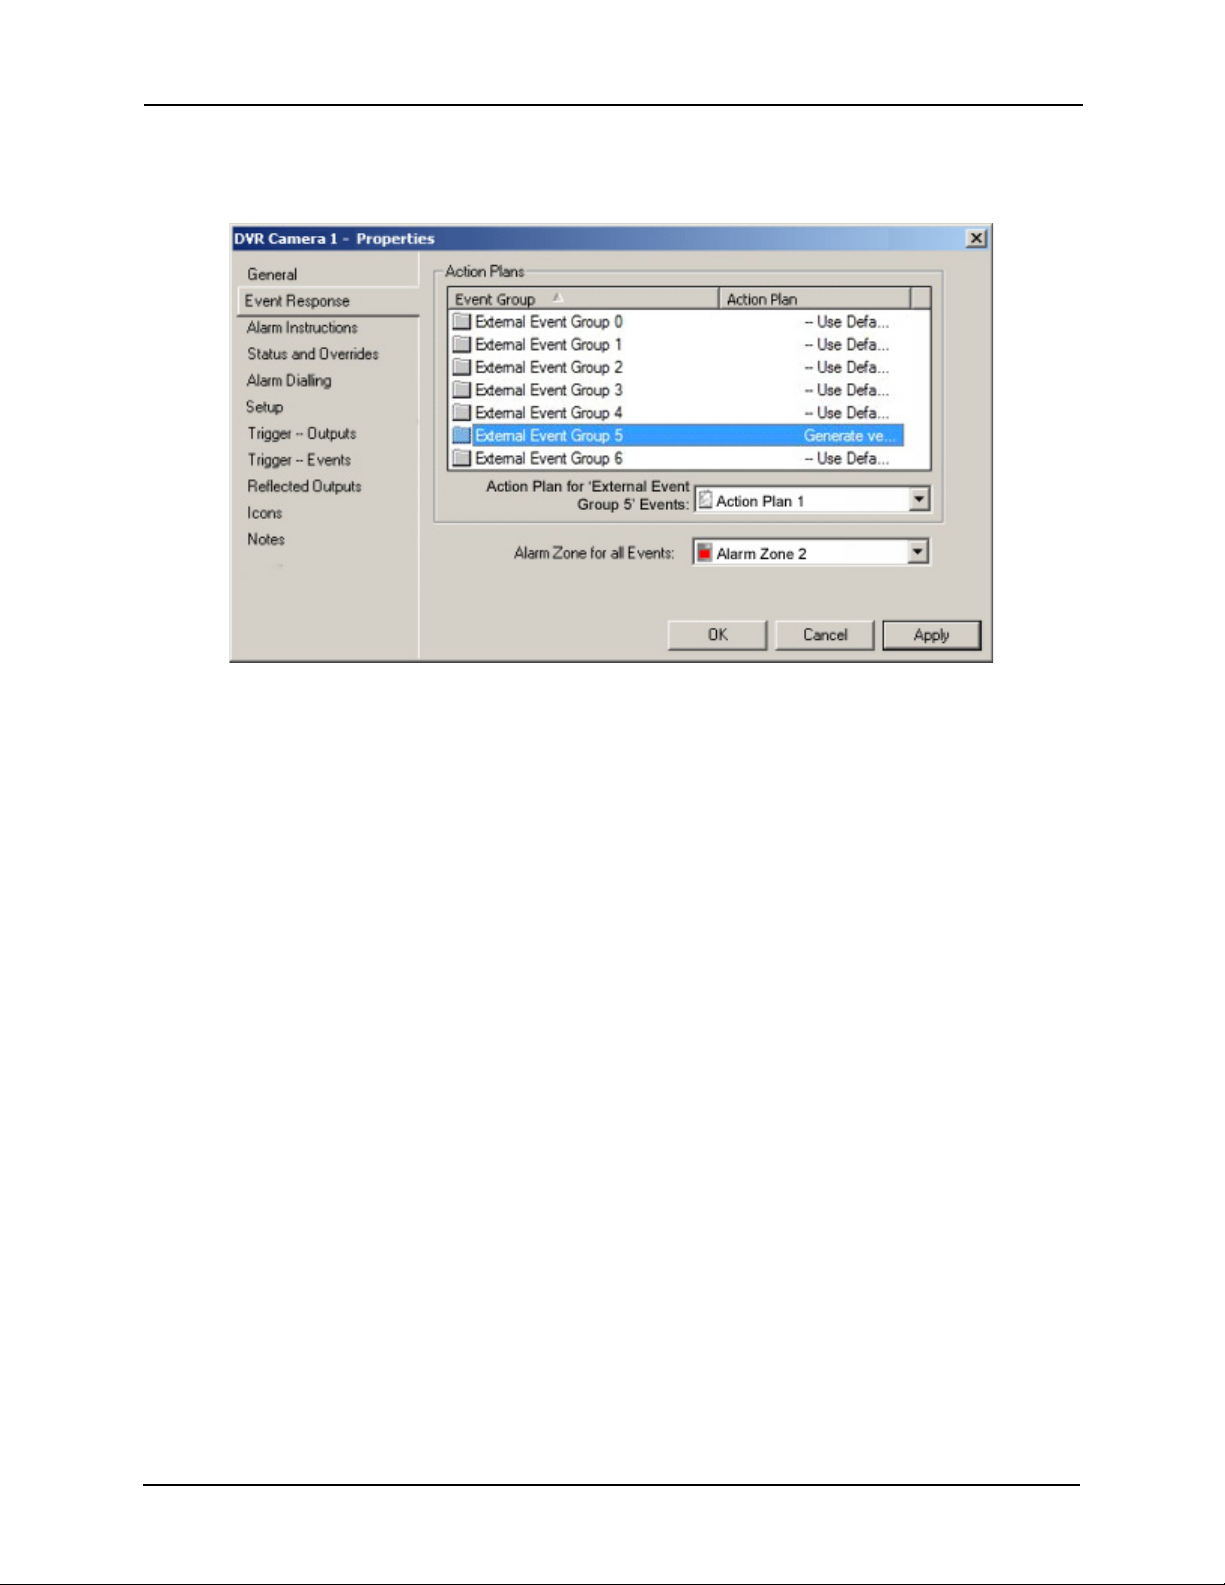
2. In the DVR Camera—Properties dialog box, select the Event Response tab.
15
Page 20
Avigilon Control Center 5 System Integration Guide with Gallagher Command Centre
3. In the Event Group list, select the External Event Group you want to edit. For a
detailed list of the External Event Group ID assigned to each Avigilon event,
see Appendix on page 18.
4. In the Action Plan for External Event Group drop down list, select an action
plan.
If you want to view the recorded video for a motion event, select an action plan
that includes the Avigilon camera. See Adding Avigilon Cameras to a Gallagher
Action Plan
on page 13 for more information.
5. In the Alarm Zone for all Events drop down list, select an alarm zone for this
alarm.
6. Click OK.
16
Page 21

Avigilon Control Center 5 System Integration Guide with Gallagher Command Centre
Troubleshooting
If the following troubleshooting solutions do not resolve your issue, contact Avigilon
Technical Support – http://avigilon.com/support-and-downloads/
Avigilon Gallagher Integration Fails
After you install the integration, you are able to add the Avigilon server and cameras but
all the devices are displayed as offline in the Gallagher software. When you open the
Avigilon Control Center Client software, the server and cameras are online and
functioning.
The issue may occur if there is a port conflict between Gallagher Command Centre and
the Gallagher Controller API (FTCAPI). To resolve the issue, complete the following steps:
1. Make sure the FTCAPI is installed on the Gallagher Command Centre Server.
2. Set the Gallagher Controller IP port. Refer to the “API Location” topic in the
Gallagher Controller API Developers Guide.
3. Verify that FTCAPI is installed correctly by running the FTCAPI test harness. It
should start with no errors.
When you launch the Gallagher Command Centre software again, the Avigilon server and
cameras should be listed as online.
Avigilon Camera Will Not Display Video
You are unable to watch live video from an Avigilon camera and a symbol is displayed
over the camera in the Gallagher software. When you try to display live video from the
same camera in the Avigilon Control Center software, it displays correctly.
This issue occurs if the integration was unable to connect with the camera. Confirm the
following then test the connection again:
o The camera is connected to the Avigilon Server it was assigned to in the
Gallagher Camera Setup procedure.
o The camera’s logical ID matches the Identification assigned to the
camera during the
o The FTCAPI was installed properly.
o The installation and configuration procedures were completed in full.
Gallagher Camera Setup procedure.
17
Page 22

Avigilon Control Center 5 System Integration Guide with Gallagher Command Centre
Appendix
To change the way Gallagher handles each Avigilon event, change the action plan
assigned to the Gallagher External Event Group ID. For more information, see
Action Plans to Events in Gallagher
Avigilon Event Gallagher External Event
Network Interface Removed 9
Device Connection Error 7
Out of Resources 6
Hardware Event 5
Server Terminated Unexpectedly 4
Server Stopped 3
License Expiry 2
Database Lost 5
Database Environment and Databases Forcefully Deleted 4
on page 13.
Group ID
ACC Server Events
ACC Database Events
Assigning
Database Environment Deleted 3
Database Reindex 2
Database Environment Recovered 1
ACC Storage Events
Volume Failed 9
Image Volume Initialization 8
Writes Failed 7
Writes Blocked 6
Write Queue Full 5
Low Disk Space 4
Device Specific Events
Communication Error 9
Recording Interrupted 8
Video Signal Lost 7
No Camera Data 6
Motion Started 5
Lost Frame Packets 4
License Plate Match 3
Firmware Upgrade Error 2
18
 Loading...