

Page 1

Avigilon™ Control Center Server
User Guide
Version 5.2
PDF-SERVER5-B-Rev1
Page 2

© 2006 - 2014 Avigilon Corporation. All rights reserved. Unless expressly granted in writing, no license is granted with respect to
any copyright, industrial design, trademark, patent or other intellectual property rights of Avigilon Corporation or its licensors.
AVIGILON, CAPTURE IT WITH CLARITY, HDSM, HIGH DEF INITION STREAM MANAGEMENT (HDSM), THE BEST EVIDENCE,
LIGHTCATCHER and the ACC logo are registered and/or unregistered trademarks of Avigilon Corporation in Canada and other
jurisdictions worldwide. Other product names mentioned herein may be the unregistered and/or registered trademarks of their
respective owners. ™ and ® are not used in association with each trademark in this document.
This manual has been compiled and published covering the latest product descriptions and specifications. The contents of this
manual and the specifications of this product are subject to change without notice. Avigilon reserves the right to make changes
without notice in the specifications and materials contained herein and shall not be responsible for any damages (including
consequential) caused by reliance on the materials presented, including but not limited to typographical and other errors relati ng to
the publication.
Avigilon
http://www.avigilon.com
Revised 2014-04-15
Page 3

Table of Contents
Introduction .............................................................................................................................. 1
What is the Avigilon™ Control Center Server? ........................................................................................ 1
System Requirements .............................................................................................................................. 1
For More Information ................................................................................................................................ 2
Avigilon Training Center ....................................................................................................................... 2
Support ................................................................................................................................................. 2
Upgrades .............................................................................................................................................. 3
Feedback .............................................................................................................................................. 3
Navigating the Application ...................................................................................................... 4
Control Center Server ............................................................................................................................... 4
Admin Tool ................................................................................................................................................ 5
Accessing the Admin Tool .................................................................................................................... 5
Admin Tool Window.............................................................................................................................. 6
Setup ......................................................................................................................................... 8
Licensing the Server ................................................................................................................................. 8
Accessing the Server Licensing Settings ............................................................................................. 8
Activating a License Over the Internet ............................................................................................... 10
Activating a License Manually ............................................................................................................ 13
Configuring the Server Storage Sett in gs ................................................................................................ 23
Accessing the Server Storage Configuration ..................................................................................... 23
Setting Up the Initial Server Storage Configuration ........................................................................... 25
Changing the Storage Configuration .................................................................................................. 25
iii
Page 4

Avigilon Control Center Server User Guide
Erasing the Storage Configuration ..................................................................................................... 27
Configuring the Server Back up Setti ngs ................................................................................................. 27
Configuring the Server Network Settings ............................................................................................... 29
Using the Admin Tool .............................................................................................................31
Starting Up and Shutting Down the Avigilon Control Center Server ...................................................... 31
Shutting Down the Control Center Server .......................................................................................... 31
Starting up the Control Center Server ................................................................................................ 32
Starting the Avigilon Contro l Center Client ............................................................................................. 33
Viewing Application Logs ........................................................................................................................ 33
Appendix .................................................................................................................................35
Resetting the Administrator Password ................................................................................................... 35
Resetting the Administrator Password ................................................................................................... 36
Deactivating Licenses ............................................................................................................................. 36
iv
Page 5

32MB/s
10MB/s
Up to 64 cameras
*Can view live and recorded images locally
Introduction
What is the Avigilon™ Control Center Server?
The Avigilon Control Center Server software is the application that captures and records surveillance data
from network cameras and encoders. The captured data is then sent to the Avigilon™ Control Center
Client software for you to review.
The Avigilon Control Center Server software contains two key parts — the Control Center Server
Windows service and the Admin Tool. The Control Center Server Windows service directs video to where
it needs to be stored or streamed in the network. While the Admin Tool is the interface that allows you to
configure the Control Center Server's administrative settings.
There are three editions of the Server software available: Core, Standard and Enterprise. The edition of
the Server software determines how many cameras can be connected to the system and the number of
simultaneous client connections. The edition of the Server software also determines what features are
available in the Avigilon Control Center Client software. Visit the Avigilon website for an overview of the
features available with each editi on lice ns e: http://avigilon.com/products/avigilon-control-center/editions/
System Requirements
Recording
capacity:
OS
Up to 128 cameras
*Remote viewing only.
Windows Server 2003 SP2,
Windows Server 2008 or Windows
7
A 64-bit operating system i s
recommended
Windows Server 2003 SP2,
Windows Server 2008, or Windows
7
A 64-bit operating system i s
recommended
CPU
Intel Quad Core Xeon 2.0 GHz
processor
Intel Quad Core Xeon 2.0 GHz
processor
1
Page 6

Avigilon Control Center Server User Guide
System RAM 4 GB DDR2 4 GB DDR2
Video card n/a nVidia Quadro FX 570 dual DVI
1 Gbps Intel Pro/1000 or
Network card
Broadcom NetXtreme II Server
Adapters
1 Gbps
Hard drives
SATA-II 7200 RPM Enterprise
Class Hard Drives
SATA-II 7200 RPM Hard Drives
For More Information
Visit Avigilon at http://www.avigilon.com/ for additional product documentation.
Avigilon Training Center
The Avigilon Training Center provides free online training videos that demonstrate how to set up and use
the Avigilon Surveillance Sy s tem. Regis ter online at the Avigilon Partner Portal site to begin:
http://avigilon.force.com/login
Support
For additional support information, visit http://avigilon.com/support-and-downloads/.
The Avigilon Partner Portal also provides self-directed support resources - register and login at
http://avigilon.force.com/login.
Regular Avig il on Technical Support is available Monday to Friday from 12:00 a.m. to 6:00 p.m. Pacific
Standard Time (PST):
North America: +1.888.281.5182 option 1
International: +800.4567. 89 88 or +1. 604. 62 9.51 82 option 1
Emergency Technical Support is available 24/7:
North America: +1.888.281.5182 option 1 then dial 9
International: +800.4567. 89 88 or +1. 604. 62 9.51 82 option 1 then dial 9
2
Page 7

Introduction
E-mails can be sent to: support@avigilon.com
.
Upgrades
Software and firmware upgrades will be made available for download as they become available. Check
http://avigilon.com/support-and-downloads/
for available upgrades.
Feedback
We value your feedback. Please send any comments on our products and services to
feedback@avigilon.com
3
Page 8

Navigating the Application
The Avigilon Control Center Server software contains two parts: the Control Center Server Windows
service and the Admin Tool.
The Control Center Server Windows service runs automatically when your computer starts.
The Admin Tool is used to configure the Control Center Server Windows service. For example, from the
Admin Tool you can add licenses, define the network, and configure the backup and storage settings for
the Avigilon Control Center.
Control Center Server
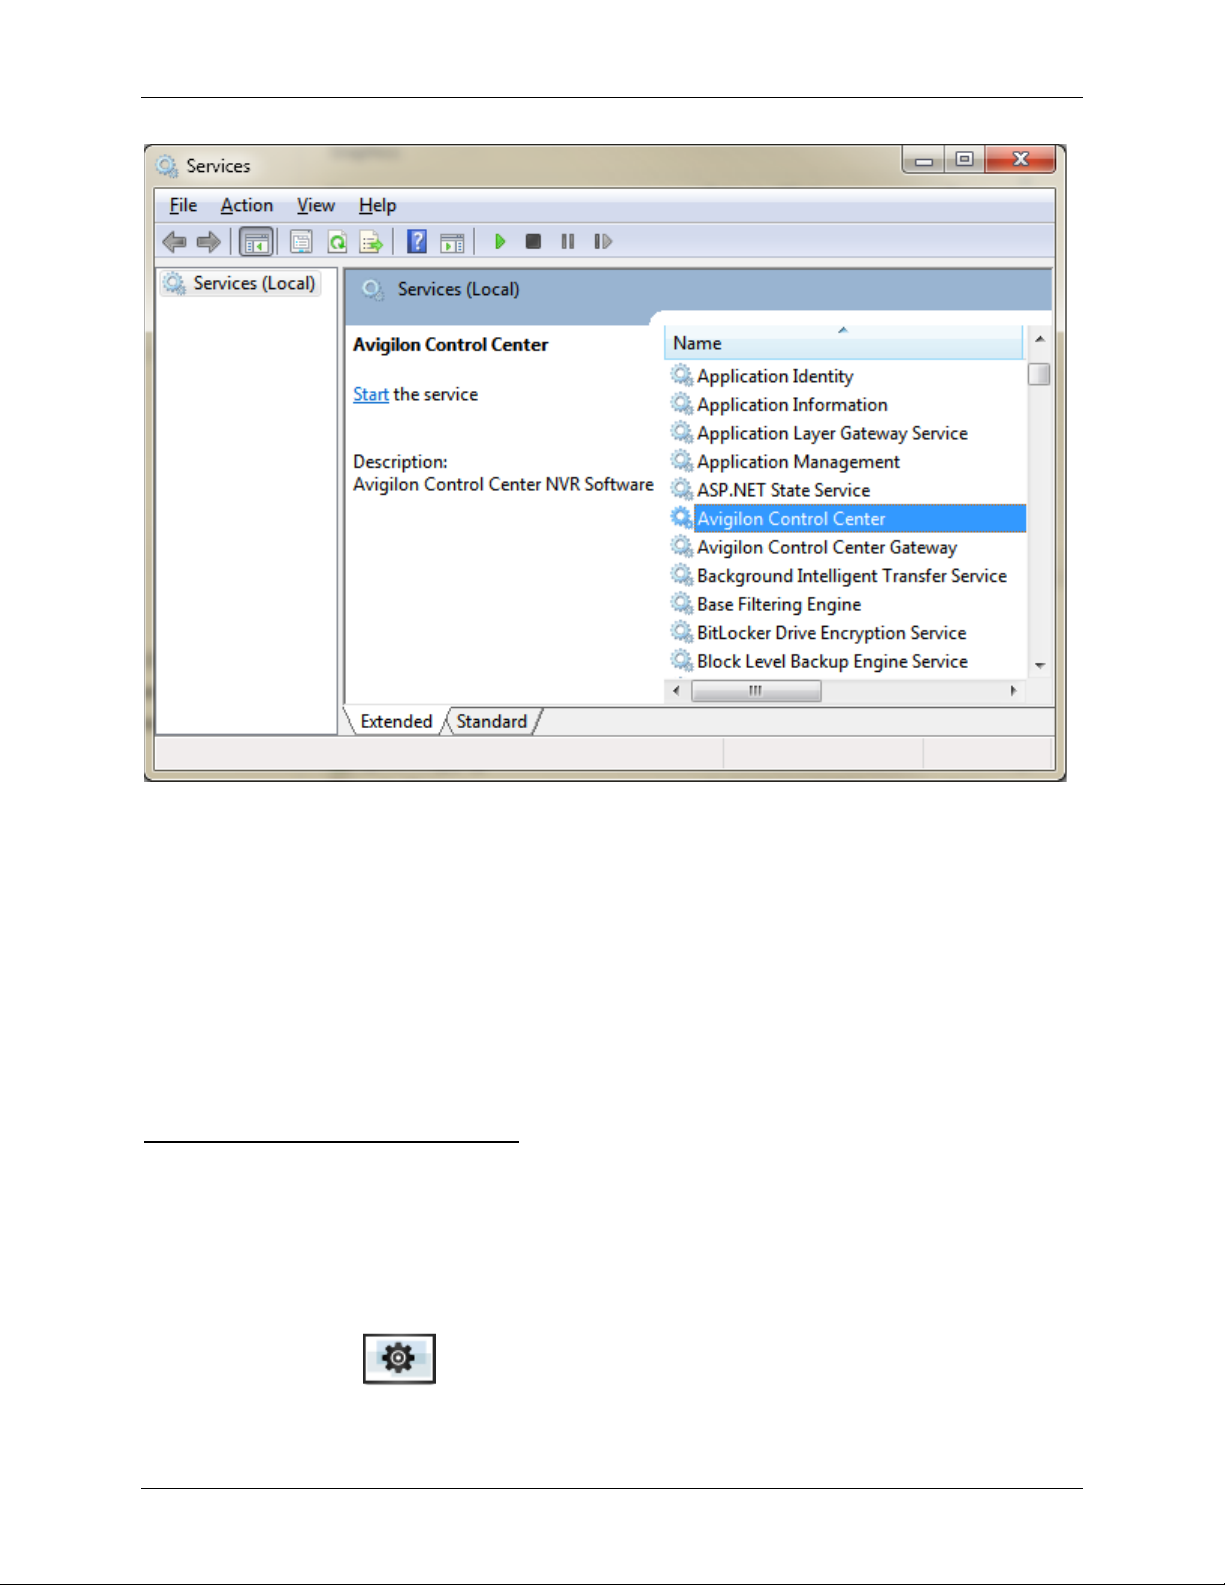
The Control Center Server is a Windows service, so it runs automatically in the background.
If required, you can configure the Control Center Server properties in the Services window.
4
Page 9
Navigating the Application
Figure A. Services window
Admin Tool
The Admin Tool is used to configure your Control Center Server settings. From the Admin Tool, you can
configure the size of the surveillance data storage space, where files are backed up, the licenses for the
Avigilon Control Center, and network ports.
Accessing the Admin Tool
The Admin Tool can be accessed in the following ways:
In Windows, select All Programs or All Apps > Avigilon > Avigilon Control Center Server >
Avigilon Control Center Server Admi n T oo l
Double-click the
shortcut icon on the desktop.
5
Page 10

Avigilon Control Center Server User Guide
Figure A. Avigilon Control Center icon:
Figure B. Avigilon Control Center icon:
Feature
Description
Double-click the Avigilon Control Center icon in the system tray.
The Avigilon Control Center icon in the system tray changes color depending on the Server
software status.
Control Center Server is Running
Control Center Server is Not Running
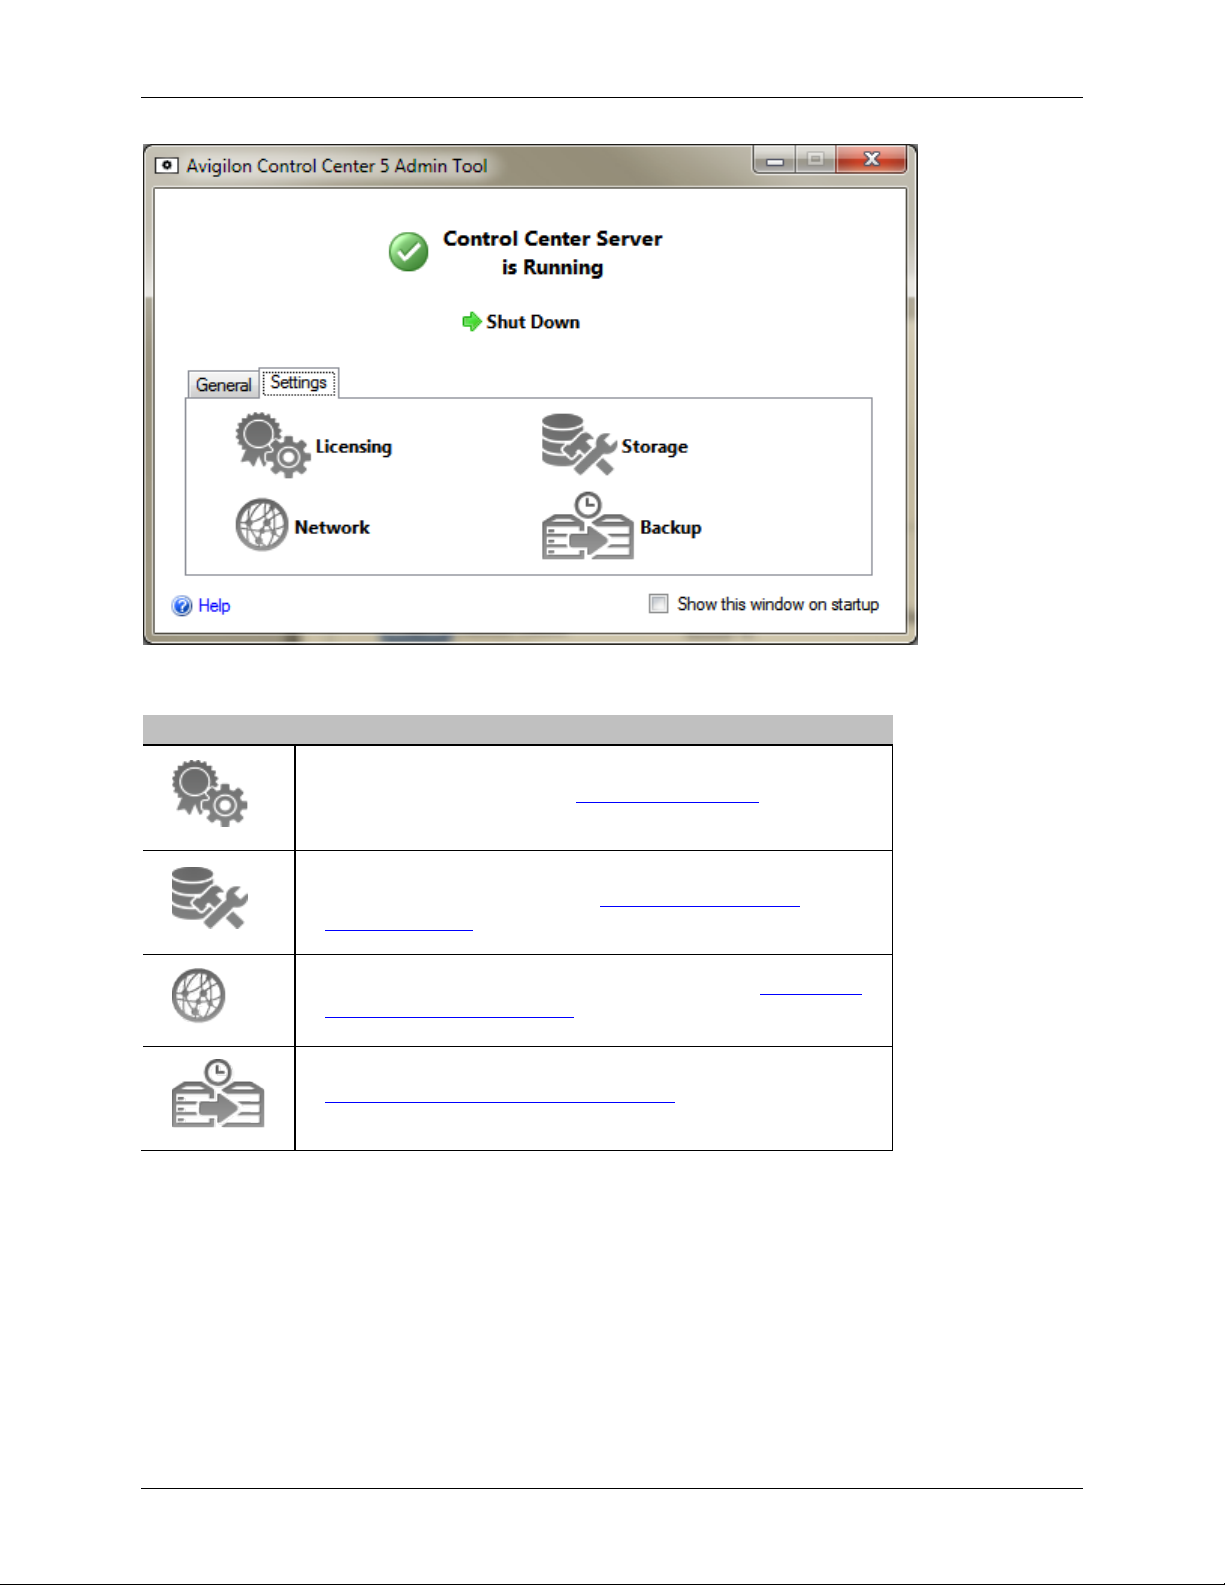
Admin Tool Window
From the Admin Tool, you can start up or shut down the Control Center Server at any time. See Starting
Up and Shutting Down the Avigilon Control Center Server.
The Admin Tool window contains two tabs: the General tab and the Settings tab.
Figure C. Admin Tool, General tab
6
Click this button to start the Avigilon Control Center Client
software.
Click this button to view the Control Center Server error logs.
Page 11
Navigating the Application
Feature
Description
Figure D. Admin Tool, Settings tab
Click this button to view and add licenses to your Avigilon
Control Center system. See Licensing the Server for more
information.
Click this button to define the amount of server space for
surveillance data storage. See Configuring the Server
Storage Settings for more information.
Click this button to define the network ports. See Configuring
the Server Network Settings for more information.
Click this button to define where backup files are stored. See
Configuring the Server Back up Setti ngs for more
information.
7
Page 12

Setup
Complete the following procedures to configure the Avigilon Control Center Server to fit your
requirements.
Licensing the Server
After the Avigilon Control Center Server software has been installed, you must apply your software
license to the application or the Control Center Server will not run.
Your server can be licensed for the Core, Standard or Enterprise edition. If you are running the Enterprise
edition, this procedure is also used to add integration licenses.
Accessing the Server Licensing Settings
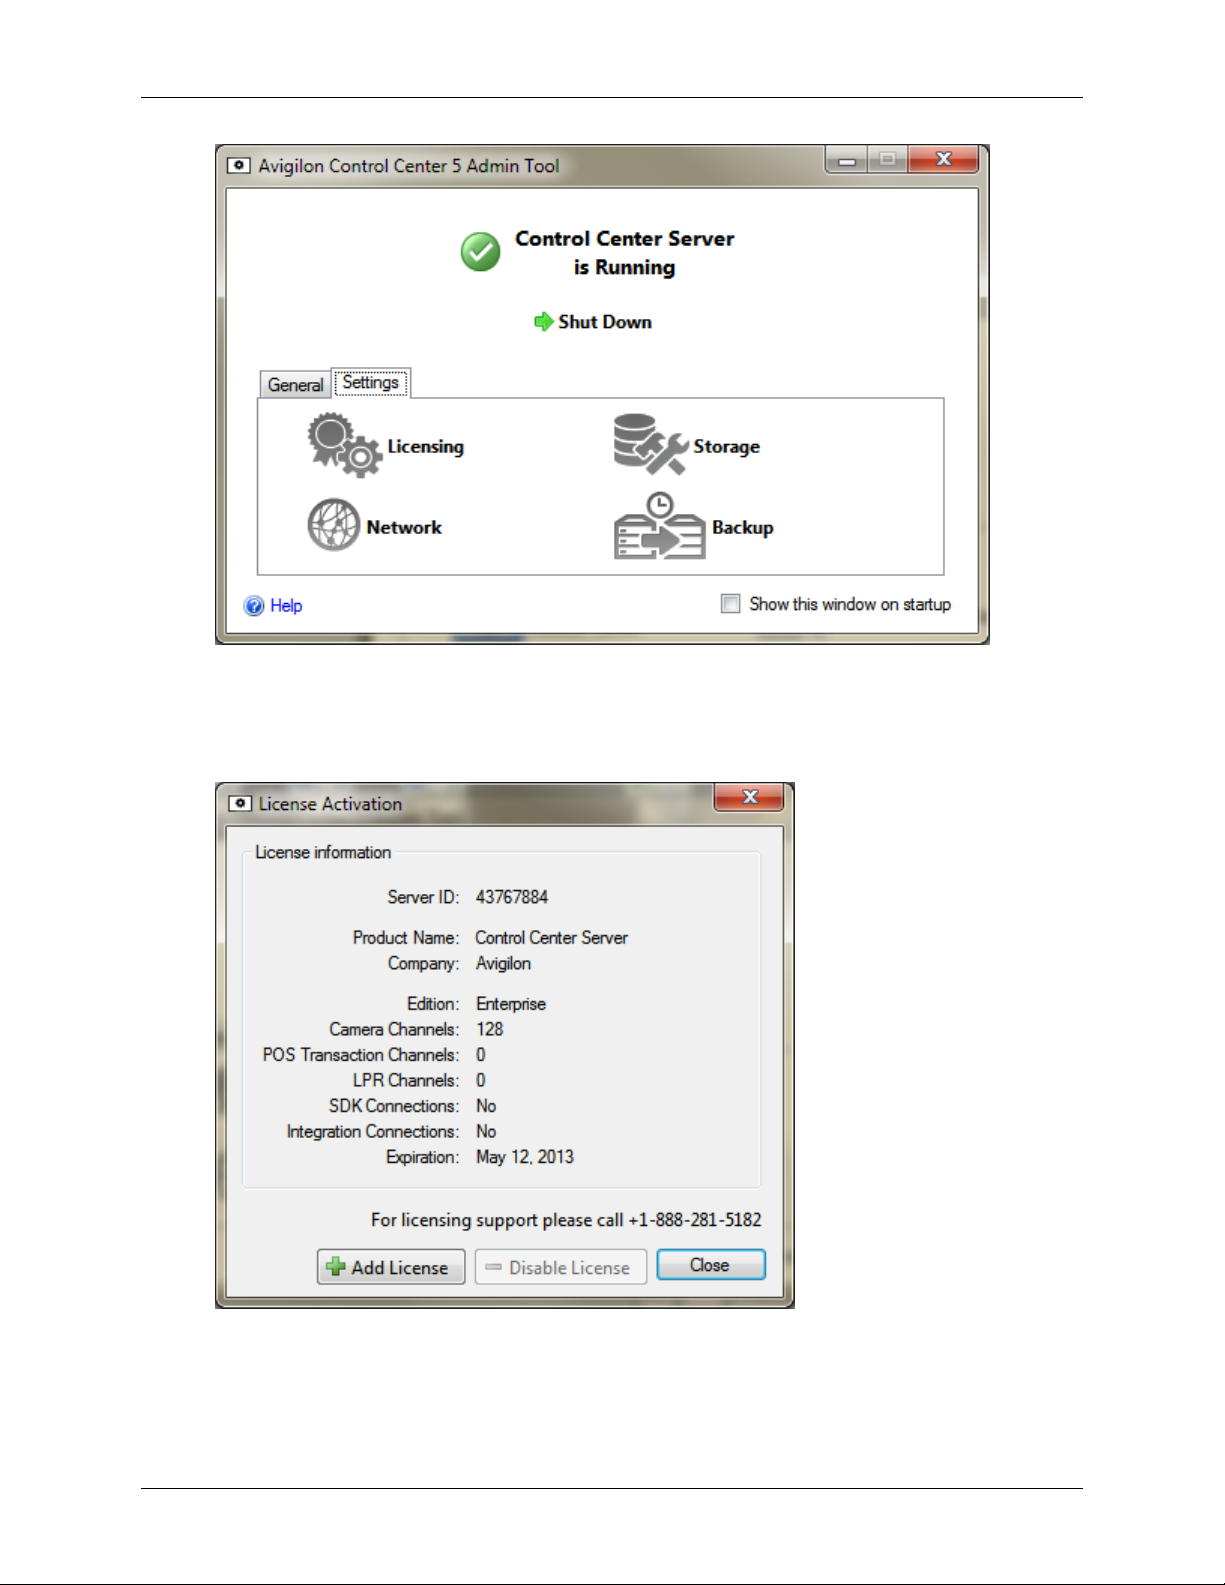
1. In the Admin Tool, select Settings > .
8
Page 13
Setup
Figure A. Control Center Admin Tool
2. In the License Activation dialog box, you can see the server's license edition and optional license
features.
Figure B. License Activation dialog box
The Server ID is unique to each server running the Avigilon Control Center software. If you need help
licensing the software, call Avigilon Technical Support and give them the server ID.
9
Page 14

Avigilon Control Center Server User Guide
If you ever need to upgrade your server hardware, you can disable the license on the current server and
reuse the license on the new server. For more information, see Deactivating a License
.
Activating a License Over the Internet
If you have internet access, the Admin Tool connects to the internet automatically and helps you activate
your license.
1. In the Admin Tool, select Settings >
2. In the License Activation dialog box, click
3. If an internet connection was detected, click Internet Activation (Recommended).
If an internet connection was not detected, see Activating a License Manually
.
.
.
Figure A. Activate Control Center Server page
4. Enter the product key, a check mark will appear if it is valid. If you have multiple product keys,
click Add additional key and enter the next product key. When all the licenses for this server
have been added, click Next.
10
Page 15

Setup
Figure B. Enter Product Key page
5. Complete the Product Registration page to receive product updates from Avigilon, then click
Next.
11
Page 16

Avigilon Control Center Server User Guide
Figure C. Product Registration page
6. The Admin Tool connects to the Avigilon licensing server and activates the license. When the
Activation Succeeded message appears, click Finish.
12
Page 17

Setup
Figure D. Internet Activation Successful page
Activating a License Manually
If your server does not have internet access, you can activate your license manually by downloading the
license file and activating the license on a computer with internet access.
1. In the Admin Tool, select Settings >
2. In the License Activation dialog box, click
3. If an internet connection was not detected, click Manual Activation.
.
.
13
Page 18

Avigilon Control Center Server User Guide
Figure A. Activate Control Center Server page
4. Click Step 1: Generate Activation File.
14
Page 19

Setup
Figure B. Manual Activation page
5. Enter the product key, a check mark will appear if it is valid. If you have multiple product keys,
click Add additional key and enter the next product key. When all the licenses for this server
have been added, click Next.
15
Page 20

Avigilon Control Center Server User Guide
Figure C. Enter Product Key page
6. Select the location and file name for the activation file, then click Next.
16
Page 21

Setup
Figure D. Select Activation File page
7. The activation file is saved at the location you specified, then click Next.
17
Page 22

Avigilon Control Center Server User Guide
Figure E. Activation File Saved page
8. Copy the saved activation file to a computer with internet access.
9. Open a web browser and go to http://activate.avigilon.com
.
10. Browse to the location of your activation file then click Upload.
18
Page 23

Setup
Figure F. Activation Website
The activated license file should downloaded automatically. If not, allow the download to occur
when you are prompted.
11. Complete the product registration page to receive product updates from Avigilon, then click
Register.
19
Page 24

Avigilon Control Center Server User Guide
Figure G. Registration Website
12. Copy the downloaded license file onto the server you are activating.
13. Click Step 2: Add License File.
20
Page 25

Setup
Figure H. Manual Activation page
14. Enter the location of the license file then click Next.
21
Page 26

Avigilon Control Center Server User Guide
Figure I. Import License File page
15. When the Activation Succ e eded message appears, click Finish.
22
Page 27

Setup
Figure J. Manual Activation Successful page
Configuring the Server Storage Settings
You must configure the server storage settings so the Avigilon Control Center Server software knows how
much space is for storing surveillance data, and where it should be located.
If the Admin Tool detects that there is no existing storage configuration, it will launch the Set Up Storage
Configuration dialog box.
Accessing the Server Storage Configuration
1. In the Admin Tool, click Shut Down. The Control Center Server must be shut down before the
storage configuration can be viewed or edited.
2. In the Settings tab, click
.
23
Page 28

Avigilon Control Center Server User Guide
Figure A. Avigilon Control Center Admin Tool
3. In the Storage dialog box, you can see the current storage configuration.
24
Figure B. Storage dialog box
Page 29

Setup
Setting Up the Initial Server Storage Configuration
When the Admin Tool detects that there is no existing storage configuration, it will launch the Set Up
Storage Configuration dialog box with the recommended storage configuration.
By default the software will assign most of the available storage to the Primary Data Volume for storing
recorded video.
If the recommended configuration is acceptable, click Finish
If you want to change the configuration click Change Storage Configuration. See
Storage Configuration for more information.
Changing the
Figure A. Set Up Storage Configuration dialog box
Changing the Storage Configuration
You may need to change the storage configuration in the following situations:
If you are unsatisfied with the storage configuration suggested by the application, click Change
Storage Configuration to define the storage settings to fit your needs.
25
Page 30

Avigilon Control Center Server User Guide
If you recently chose to Erase All Data, you must reset the Storage configuration before you may
continue.
Complete the following procedure in the Storage dialog box:
If the Storage dialog box is not already open, see Accessing the Server Storage Configuration
information.
1. In the Storage dialog box, select the drive for storing the Config Volume and click Set Config
Volume.
for more
Figure A. Storage dialog box
Note: Some of the buttons in the figure may not be available if the drive cannot
accommodate the setting.
2. To add a data volume, select the drive and click Add Data Volume. The button is not available if
the drive already has a data volume.
o In the Add Data Volume dialog box, enter the preferred data volume size then click OK.
26
Page 31

Setup
Figure B. Add Data Volume dialog box
3. To delete a Secondary Data Volume, select the drive and click Delete Data Volume. Deleting a
data volume will erase all recorded data from that drive.
Note: You cannot delete a Primary Data Volume, you can only erase all data. See
Erasing the Storage Configuration for more inf or mat io n.
4. If you are not satisfied with the location of the Primary Data Volume, select the drive you prefer
and click Set Primary Data Volume.
The Primary Data Volume contains the database that indexes the surveillance data.
Note: The drive must have a data volume before it can be set as the Primary Data
Volume.
5. When you are satisfied with the storage configuration, click OK.
Erasing the Storage Configuration
Note: If you choose to erase all stored data, be aware that all recorded surveillance data and server
settings will be lost.
1. Open the Storage dialog box. For more information, see Acc es sing the Ser ver Sto r age
Configuration.
2. Click Erase All Data.
3. When the confirmation dialog box appears, click Yes.
4. You will need to create a new storage configuration before you can start up the Control Center
Server again. See Changing the Storage Configuration
for more information.
Configuring the Server Backup Settings
To allow the system to automatically backup recorded video, you must enable it in the Admin Tool and
assign a backup location for the backup files.
27
Page 32

Avigilon Control Center Server User Guide
1. In the Admin Tool, select Settings > .
Figure A. Control Center Admin Tool
2. In the Backup dialog box, select the Enable Backup check box to allow the server to backup
video files.
Figure B. Backup dialog box
3. Enter the location of the backup folder. Click [...] to browse to the backup folder location.
4. Click OK.
To initiate a backup or setup automatic backups, see the Avigilon Control Center Client User Guide.
28
Page 33

Setup
Configuring the Server Network Settings
The server communicates with the Avigilon Control Center Client software through a range of UDP and
TCP ports. The port ranges only need to be changed if the Client software is trying to access two or more
servers that are behind the same NAT device (e.g. router); or if there is a port conflict with other software
running on the same computer as the Avigilon Control Center Server software.
1. In the Admin Tool, select Settings >
Figure A. Control Center Admin Tool
.
2. In the Network dialog box, enter the desired base port then click OK.
29
Page 34

Avigilon Control Center Server User Guide
Figure B. Network dialog box
o The service ports used by the Server software are updated as the base port changes.
o The RTP port range must be accessible by the client computer and can be forwarded on
any router or network address translation point between the client and server.
30
Page 35

Using the Admin Tool
Besides configuring the server, the Admin Tool can also be used to start and shut down the Control
Center Server software, launch the Client software and display the application logs.
Starting Up and Shutting Down the Avigilon Control Center Server
The Control Center Server software automatically starts when Windows starts but it can be manually shut
down and started through the Admin Tool.
Shutting Down the Control Center Server
When the Control Center Server is shut down, all video recording is stopped until the Control Center
Server is started again.
1. In the Admin Tool, click Shut Down.
31
Page 36

Avigilon Control Center Server User Guide
2.
Figure A. Admin Tool: Control Center Server is Running
When the Control Center Server has shut down properly, the Admin Tool will display - Control Center
Server is Not Running.
Starting up the Control Center Server
1. In the Admin Tool, click Start Up.
32
2.
Page 37

Using the Admin Tool
Figure B. Admin Tool: Control Center Server is Not Running
When Control Center Server has started properly, the Admin Tool will display - Control Center Server is
Running.
Starting the Avigilon Control Center Client
The Avigilon Control Center Client software can be started through the Avigilon Control Center Admin
Tool.
1. In the Admin Tool, select General >
Figure A. Admin Tool
.
If the Client software is not installed, the Admin Tool will prompt you to install it.
Viewing Application Logs
You can view the Avigilon Control Center application error logs through the Admin Tool. This can assist in
diagnosing problems with your system.
1. In the Admin Tool, select General >
.
33
Page 38

Avigilon Control Center Server User Guide
Figure A. Admin Tool
2. The Application Logs dialog box appears. Double-click an error to view the details.
Figure B. Application Logs dialog box
3. Click OK to close the dialog box.
34
Page 39

Appendix
Resetting the Administrator Password
To reset the administrator password, you must delete all existing user and group account information
from the server Config Volume.
Tip:
You can avoid this procedure if you have a user account that has all the same permissions as an
administrator. You can use this user account to reset the administrator password in the Avigilon Control
Center Client software.
1. In the Admin Tool, click Shut Down. If you have multiple servers in your Site, you need to shut
down all the servers in your Site.
2. Select Settings >
3. In the Storage dialog box, make note of which drive holds the Config Volume.
4. Access the Config Volume drive and navigate to the
AvigilonConfig\Db\DirectoryShared\Users folder.
For example, D:\AvigilonConfig\Db\DirectoryShared\Users.
5. Delete all the files in this folder. If you have multiple servers in your Site, you need to delete this
folder from every server in your Site before you perform the last step.
The server automatically resets all the users and groups settings back to the factory default.
6. In the Admin Tool, click Start Up. Repeat for each server in your Site.
Once all the servers have come back online, you can login to the Site using the default administrator
password:
Username: administrator
.
Password: <leave blank>
To add users and groups to the server, see the Avigilon Control Center Client User Guide.
35
Page 40

Avigilon Control Center Server User Guide
Resetting the Administrator Password
To reset the administrator password, you must delete all existing user and group account information
from the server Config Volume.
Tip:
You can avoid this procedure if you have a user account that has all the same permissions as an
administrator. You can use this user account to reset the administrator password in the Avigilon Control
Center Client software.
1. In the Admin Tool, click Shut Down. If you have multiple servers in your Site, you need to shut
down all the servers in your Site.
2. Select Settings >
3. In the Storage dialog box, make note of which drive holds the Config Volume.
4. Access the Config Volume drive and navigate to the
AvigilonConfig\Db\DirectoryShared\Users folder.
For example, D:\AvigilonConfig\Db\DirectoryShared\Users.
5. Delete all the files in this folder. If you have multiple servers in your Site, you need to delete this
folder from every server in your Site before you perform the last step.
The server automatically resets all the users and groups settings back to the factory default.
6. In the Admin Tool, click Start Up. Repeat for each server in your Site.
Once all the servers have come back online, you can login to the Site using the default administrator
password:
Username: administrator
Password: <leave blank>
To add users and groups to the server, see the Avigilon Control Center Client User Guide.
.
Deactivating Licenses
If you are replacing your current server with a new one, you must manually deactivate the license on the
old server before the license can be reused on the new server.
If you are unable to access your old server to deactivate the license, contact Avigilon Technical Support
for more information.
36
Page 41

Appendix
Note: You cannot deactivate individual licenses. When you deactivate licenses in the Admin Tool, you
are deactivating all the licenses on the server.
1. In the Admin Tool, select Settings > .
2. In the License Activation dialog box, click
.
3. Select a deactivation method.
Like the license activation procedure, you have the option of deactivating the license over the
internet or manually.
37
Page 42

Avigilon Control Center Server User Guide
4. Click Copy To Clipboard then paste the product key into a text file for reference.
It is recommended that the product key be saved to a flash drive so that you can easily access
the product key on the new server.
5. Click Next.
o If you selected Internet Deactivation, the system will automatically deactivate the server
license.
o If you selected Manual Deactivation, complete the following steps:
a. On the following page, download the DeactivationFile.key.
b. Copy the saved deactivation file to a computer with internet access.
c. Open a web browser and go to http://activate.avigilon.com
.
d. Browse to the location of your deactivation file then click Upload.
When you see the confirmation message, the license has been deactivated.
Once a license has been deactivated, you can reuse the product key on the new server. For more
information about activating a license on a server, see Activating a License over the Internet
.
38
 Loading...