

Page 1

Alarm and Event Monitoring
Operator Manual
Ver si on 5.0
Page 2

AV03-1213, December, 2013
Version 5.0
Copyright© 2013 Avigilon Corporation
Avigilon Inc.
Box 378
#101-1001 West Broadway
Vancouver, British Columbia
V6H 4E4
Canada
Phone:888.281.5182
Web:www.avigilon.com
Alarm and Event Monitoring Operator Manual
ii
Page 3

Alarm and Event Monitoring Operator Manual
Getting Help
If you encounter a problem that is not discussed in available Access Control Manager user guides
or on-line help files, and need technical support, please contact your local Value Added Reseller
(VAR) or Access Control Manager provider.
When contacting your VAR, please be sure to have your software version number available.
For future reference, record these numbers here.
Version Number: ________________________________
VAR: __________________________________________
VAR Phone #: __________________________________
iii
Page 4

Table of Contents
Getting Help . . . . . . . . . . . . . . . . . . . . . . . . . . . . . . . . . . . . . . . . . . . . iii
Alarm & Event Monitoring. . . . . . . . . . . . . . . . . . . . . . . . . . . . . . . . . 1
Opening the Monitor Feature . . . . . . . . . . . . . . . . . . . . . . . . . . . . . . . . . . . . . . 1
Monitoring Events . . . . . . . . . . . . . . . . . . . . . . . . . . . . . . . . . . . . . . . . . . . . . . . 2
Clearing Events . . . . . . . . . . . . . . . . . . . . . . . . . . . . . . . . . . . . . . . . . 2
Making a Note . . . . . . . . . . . . . . . . . . . . . . . . . . . . . . . . . . . . . . . . . . 2
Getting Instructions . . . . . . . . . . . . . . . . . . . . . . . . . . . . . . . . . . . . . . 3
Tracking an Event History . . . . . . . . . . . . . . . . . . . . . . . . . . . . . . . . 3
Viewing Identity Information . . . . . . . . . . . . . . . . . . . . . . . . . . . . . . 4
Viewing Video Feed . . . . . . . . . . . . . . . . . . . . . . . . . . . . . . . . . . . . . 4
Reviewing Recording Video . . . . . . . . . . . . . . . . . . . . . . . . . . . . . . 5
Playing Back Recorded Video . . . . . . . . . . . . . . . . . . . . . . . . . . . . 5
Monitoring Alarms . . . . . . . . . . . . . . . . . . . . . . . . . . . . . . . . . . . . . . . . . . . . . . . 6
Acknowledging Alarms . . . . . . . . . . . . . . . . . . . . . . . . . . . . . . . . . . 7
Acknowledge All Alarms . . . . . . . . . . . . . . . . . . . . . . . . . . . . . . . . . 7
Clearing Alarms . . . . . . . . . . . . . . . . . . . . . . . . . . . . . . . . . . . . . . . . . 7
Clearing All Alarms . . . . . . . . . . . . . . . . . . . . . . . . . . . . . . . . . . . . . . 8
Making a Note . . . . . . . . . . . . . . . . . . . . . . . . . . . . . . . . . . . . . . . . . . 8
Getting Instructions . . . . . . . . . . . . . . . . . . . . . . . . . . . . . . . . . . . . . . 8
Tracking an Alarm History . . . . . . . . . . . . . . . . . . . . . . . . . . . . . . . . 9
Viewing Identity Information . . . . . . . . . . . . . . . . . . . . . . . . . . . . . . 9
Viewing Video Feed . . . . . . . . . . . . . . . . . . . . . . . . . . . . . . . . . . . . . 9
Playing Back Recorded Video . . . . . . . . . . . . . . . . . . . . . . . . . . . .10
Turning Sound On/Off . . . . . . . . . . . . . . . . . . . . . . . . . . . . . . . . . . . 11
Searching for Events and Alarms . . . . . . . . . . . . . . . . . . . . . . . . . . . . . . . . . . 11
Verifying Door and Identity Status . . . . . . . . . . . . . . . . . . . . . . . . . . . . . . . . .13
Monitoring Hardware Status . . . . . . . . . . . . . . . . . . . . . . . . . . . . . . . . . . . . . . 14
Controlling System Hardware . . . . . . . . . . . . . . . . . . . . . . . . . . . . . . . . . . . . .16
Monitoring Alarms and Events From Maps . . . . . . . . . . . . . . . . . . . . . . . . . . 17
Page Descriptions . . . . . . . . . . . . . . . . . . . . . . . . . . . . . . . . . . . . . . . . . . . . . . .21
Events Page . . . . . . . . . . . . . . . . . . . . . . . . . . . . . . . . . . . . . . . . . . . .21
Search Page . . . . . . . . . . . . . . . . . . . . . . . . . . . . . . . . . . . . . . . . . . . 23
Alarms Page . . . . . . . . . . . . . . . . . . . . . . . . . . . . . . . . . . . . . . . . . . . 25
Verification Page . . . . . . . . . . . . . . . . . . . . . . . . . . . . . . . . . . . . . . . 27
Hardware Status Page . . . . . . . . . . . . . . . . . . . . . . . . . . . . . . . . . . 27
Maps Page . . . . . . . . . . . . . . . . . . . . . . . . . . . . . . . . . . . . . . . . . . . . 32
Notes Page . . . . . . . . . . . . . . . . . . . . . . . . . . . . . . . . . . . . . . . . . . . 33
Instructions Page . . . . . . . . . . . . . . . . . . . . . . . . . . . . . . . . . . . . . . 34
History Display . . . . . . . . . . . . . . . . . . . . . . . . . . . . . . . . . . . . . . . . . 34
Identity Display . . . . . . . . . . . . . . . . . . . . . . . . . . . . . . . . . . . . . . . . 35
Camera Video Window . . . . . . . . . . . . . . . . . . . . . . . . . . . . . . . . . 36
Recorded Video Window . . . . . . . . . . . . . . . . . . . . . . . . . . . . . . . . 37
Alarm and Event Monitoring Operator Guide
iv
Page 5
Alarm & Event Monitoring Operator Guide
Click this icon
Alarm & Event Monitoring
This short guide provides the necessary information you will need to use the Access Control
Manager application Monitor feature.
This feature enables you, the operator, to oversee all security activities throughout the facility that
this Access Control Manager application monitors.
Opening the Monitor Feature
To use the Monitor feature, follow these simple instructions:
1. If closed, open the Access Control Manager application.
If already open, skip to Step 2.
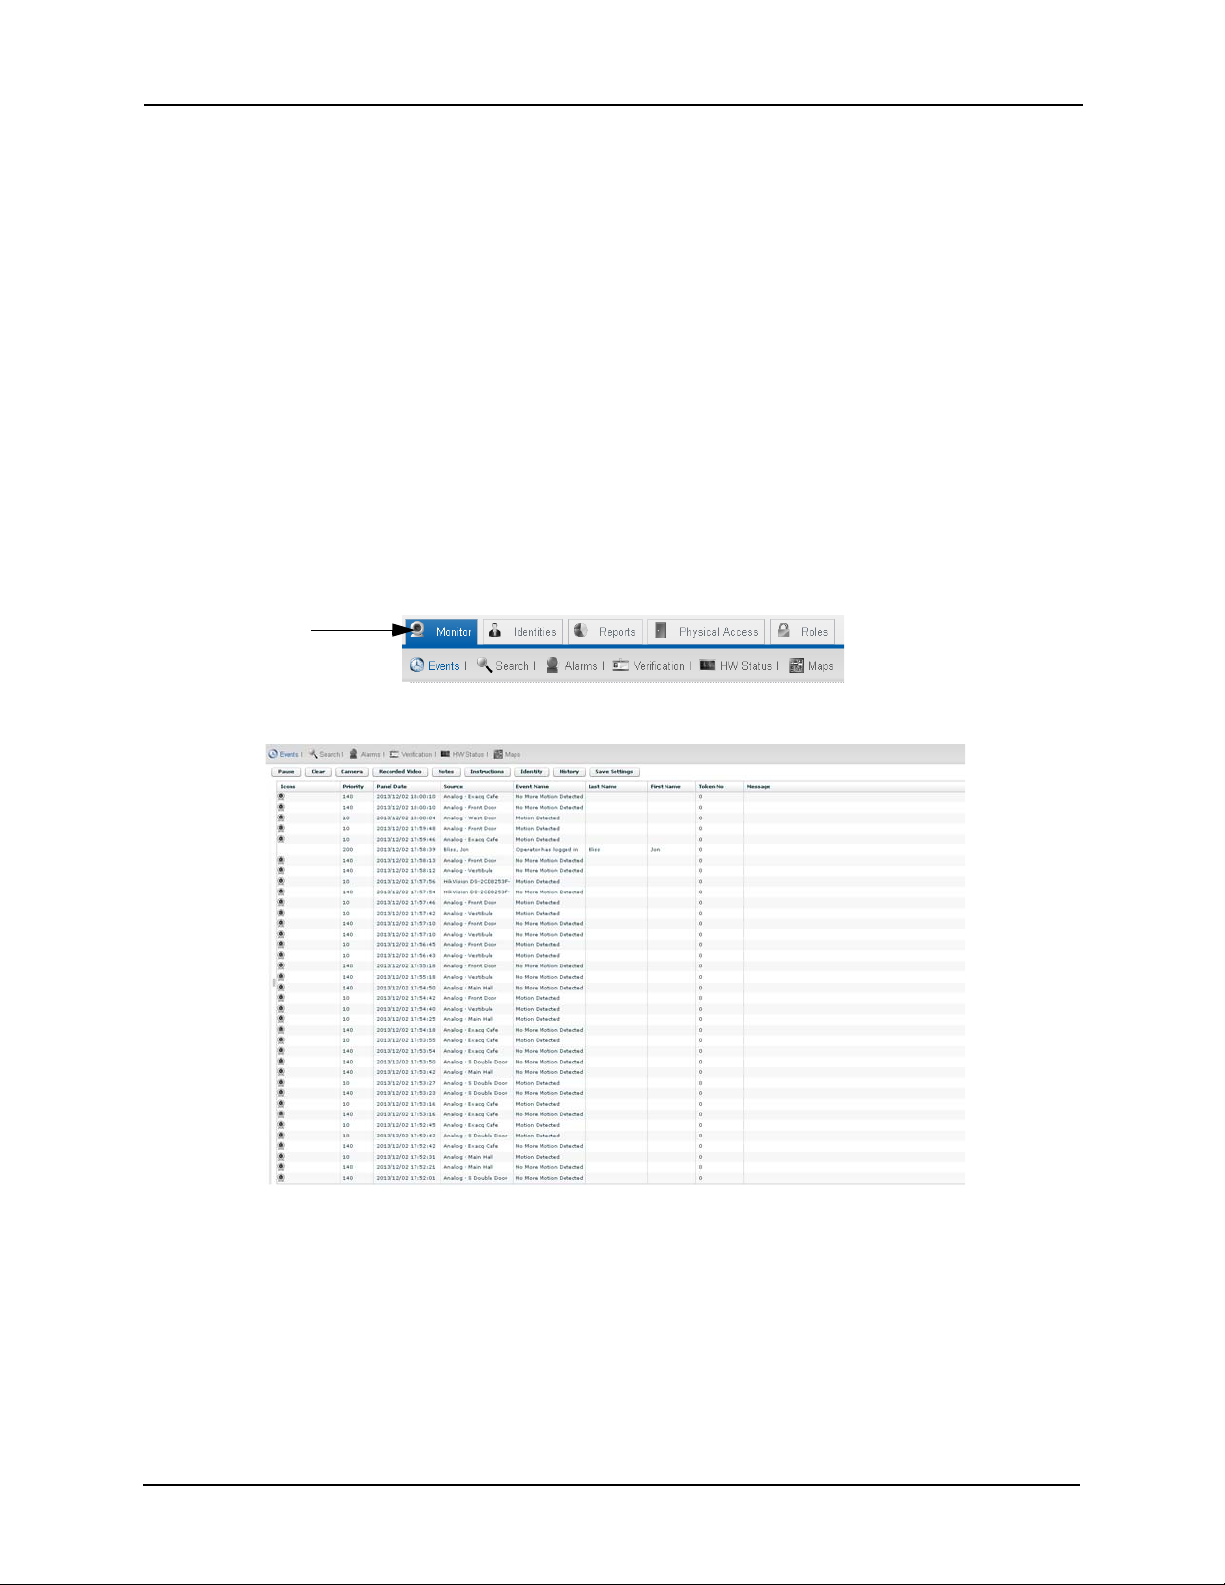
2. At the Access Control Manager home page, click the Monitor icon from the icon task
bar as shown below:
The Event Monitor feature appears with the Events page uppermost like this example:
The pages of the Monitor feature enable the operator to view second-by-second information
about events and alarms occurring throughout the system.
This feature also provides a search filter to specify which physical devices to display as well as a
verification tool to ascertain whether a specific code or card is properly assigned. The monitor
screen is divided into six pages:
• Events – Display the events polled on this system.
• Alarms – Display the alarms detected by this system.
1
Page 6

Alarm & Event Monitoring Operator Guide
• Search – Initiate a search for specific events/alarms on this system.
• Verification – Verify the identity of a person enrolled on this system.
• HW Status – Display the current status of the hardware and software used by this system.
• Maps – Display alarms/events on one or more maps. This enables the qualified operator to
locate the source of the alarm/event.
For more information on these and related page, refer to Page Descriptions on page 21.
Monitoring Events
When you click the Events tab from the Monitor screen or enter the Monitor screen by clicking the
Monitor icon, the Events page appears as detailed in Events Page on page 21.
Events are defined as any activity that is reported between the appliance and the security system
it oversees. An event includes all alarms, but not all events are alarms. Events can include changes
in configuration, a report on the granting of access to a card or code holder, the enrolling of an
identity in the system. In other words, any transfer of data within the system is an event.
The operator should be familiar with these functions:
• Clearing an event
• Making a note about an event
• Getting instructions on an event
• Tracking the history of an event
• Bringing up card or code holder identity information
• Viewing a surveillance camera
• Reviewing recorded video associated with an event
• Viewing live video from one or more cameras associated with the hardware device that
generated the event
Clearing Events
To clear one or more events:
1. Display the Events page.
2. Click on one or more events.
To select a series of events, click the first event then Shift + click the last event in the
series. To select non-contiguous events, Ctrl + click the events you want to select.
3. Click the button.
All selected items are deleted.
Making a Note
Operators are often asked to make a note on a specific event.
To note an event:
1. Display the event page.
2
Page 7

Alarm & Event Monitoring Operator Guide
2. Click to highlight the required event.
3. Click the button.
The Notes page pops up as described in Notes Page on page 33.
4. Enter a note on this event as required in the new note area.
5. Click the button.
6. Click the button to exit this page and return to the main Event page.
Getting Instructions
Depending on how the system is configured, a particular kind of event may be associated with
instructions on how to respond.
To access instructions:
1. Display the event page.
2. Click to highlight the required event.
3. Click the button.
The Instructions page appears as described in Instructions Page on page 34.
4. Read the instructions and perform the tasks specified.
5. When you’ve finished with the instructions, click the exit button, , at the upper right
hand corner of this page.
6. Make any notes you need as described in Making a Note on page 2.
Tracking an Event History
Some events require repeated operations to complete. In order for the operator to familiarize him/
herself with a specific event:
1. Display the event page.
2. Click to highlight the required event.
3. Click the button.
The History page pops up as described in History Display on page 34.
If there is no history on this event, the page only contains details of the event and the
message ‘No History’.
If there is a history on this event, read it.
4. When you’re finished consulting the history, click the exit button, , at the upper right
hand corner of this page.
3
Page 8
Alarm & Event Monitoring Operator Guide
Viewing Identity Information
Many events are caused by the entry of cards and/or codes, such as when an employee enters a
PIN at a door reader and is granted access. The Access Control Manager application enables the
operator to see who the person associated with the entered token (card or code) is and review the
information entered in the Access Control Manager database.
To review identity information:
1. Select an event associated with an identity.
2. Click the button.
The Identity pop-up screen appears as described in Identity Display on page 35.
3. Review the information on this page which can include a photo enrolled with the
identity.
4. When you’re finished, click the exit button, , at the upper right hand corner of this
page.
Viewing Video Feed
When one or more surveillance cameras have been associated with a specified event or event
location, you can access and view the location where the event occurred using this screen.
To view video coming from a camera feed:
1. From one of the Monitor pages (Events, Alarms, or Search), click to highlight the event/
alarm whose associated camera you want to view.
Only those events or alarms that have a in the left column have been associated with
a camera.
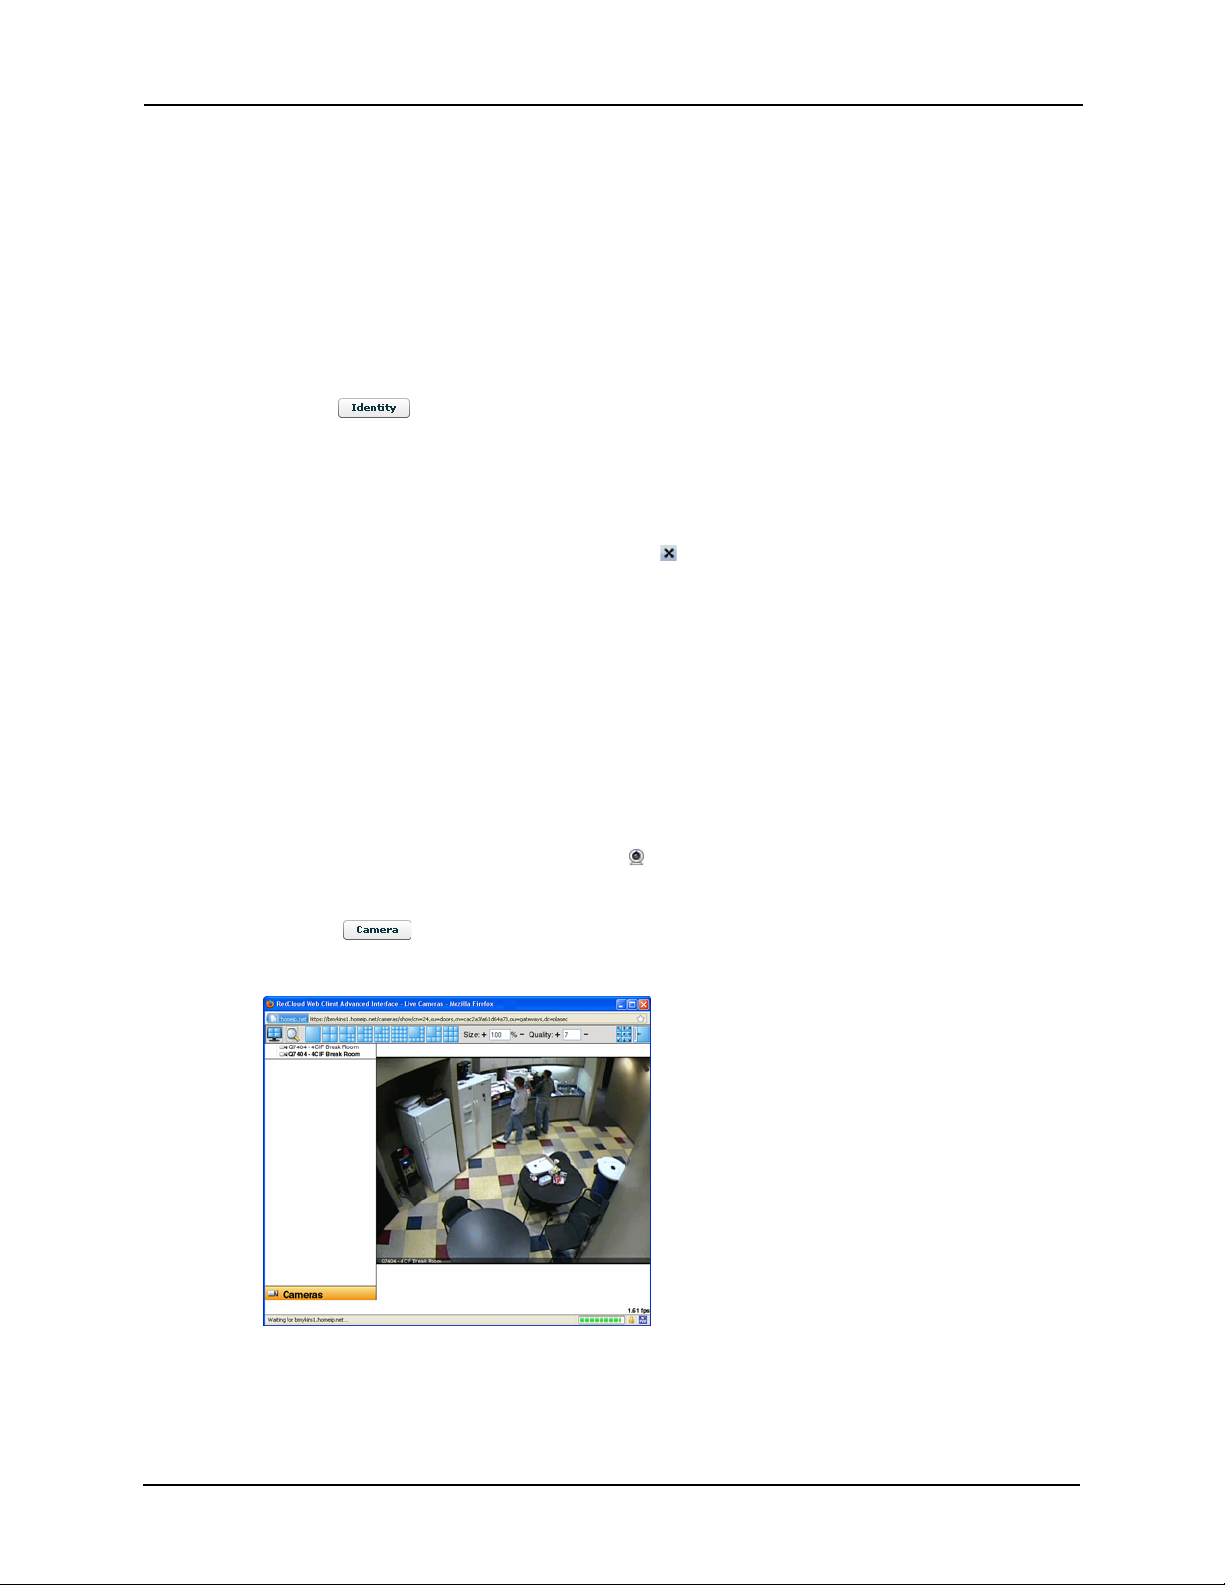
2. Click the button.
The Camera Video window pops up.
For more on this, refer to Camera Video Window on page 36.
3. Using the various controls on this screen, manipulate the camera view. These controls
include:
4
Page 9

Alarm & Event Monitoring Operator Guide
• Zoom and magnify
• Change quality
• Pan and tilt
4. If required, click to bring up the Video window and begin reviewing the
recorded video associated with the event.
5. When you're finished, exit the screen by clicking the button in the upper right corner
of the window.
Reviewing Recording Video
In addition to viewing real-time video feed from a camera associated with an event, many Access
Control Manager installations also allow the operator to play back recorded video. For more on
playing back recorded video, refer to Playing Back Recorded Video on page 5.
1. From the Events, Alarms, or Search pages on the Monitor screen, click to highlight an
entry (either event or alarm) associated with a video camera. Only those items with the
icon in the left column can be accessed using the recorded video or camera buttons.
2. Click the button.
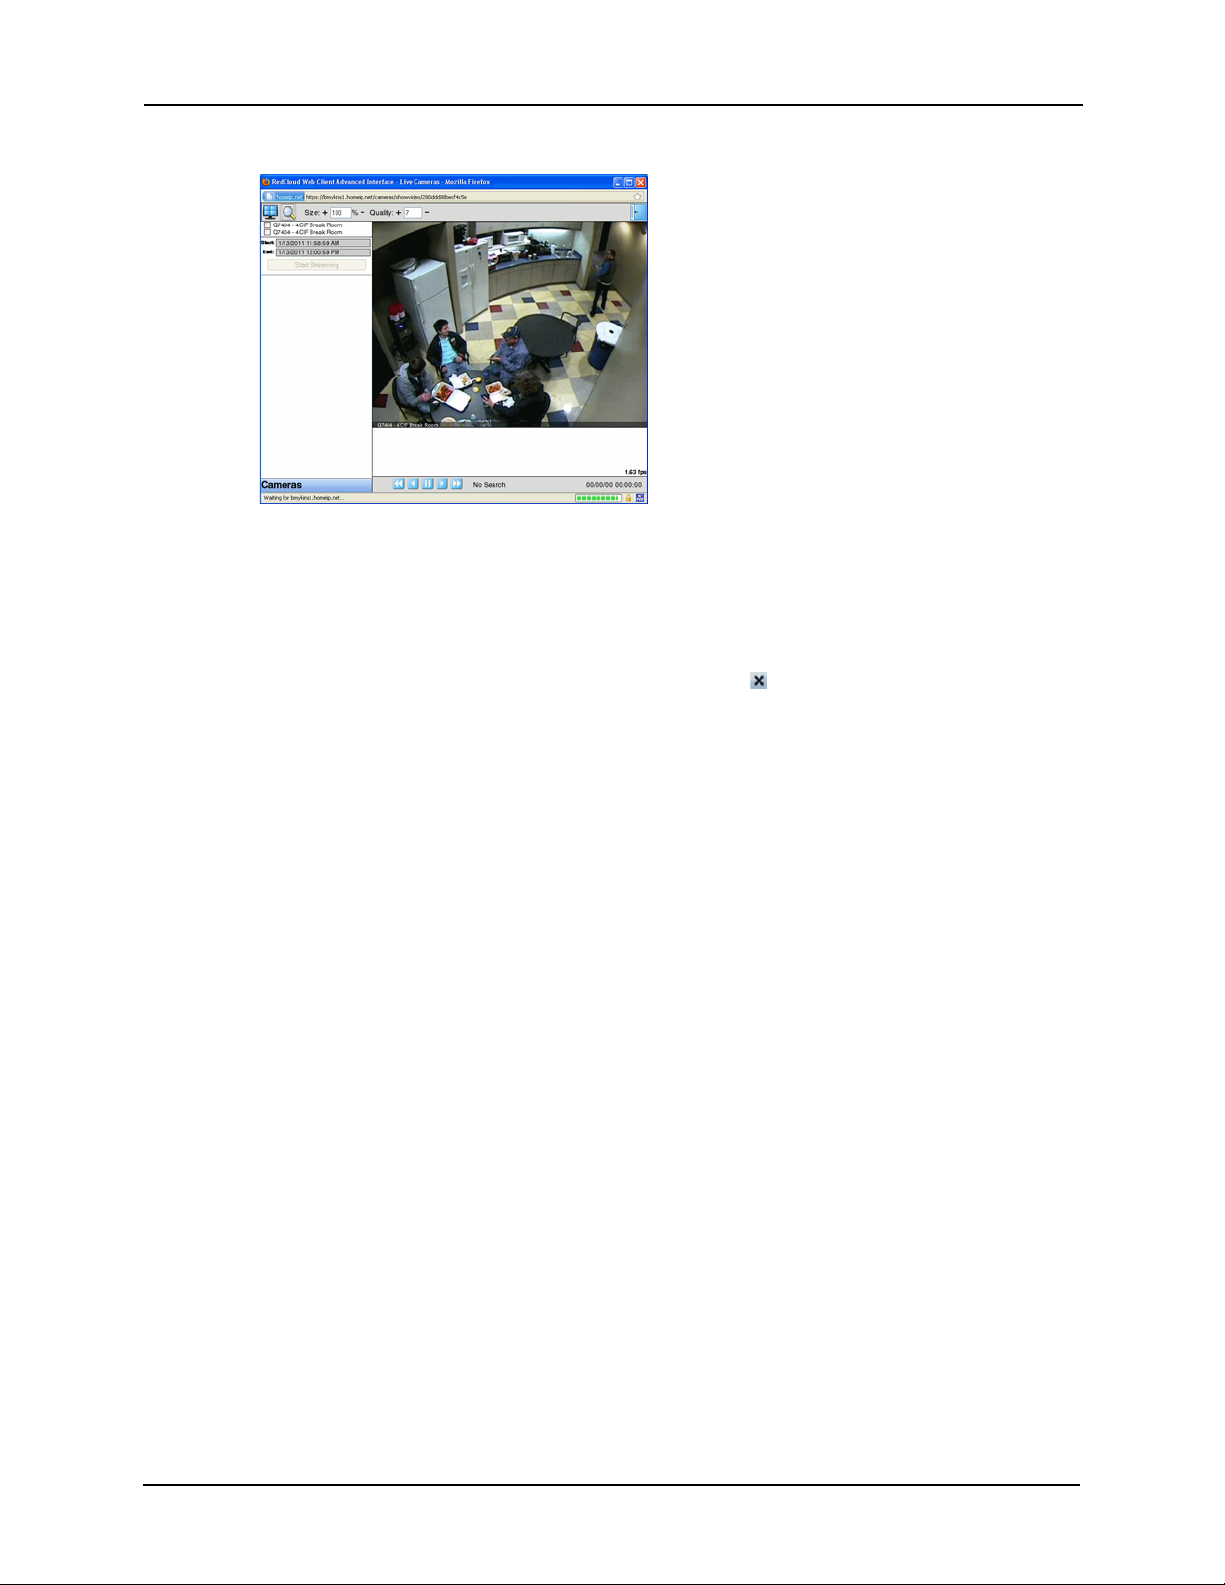
After a few seconds, the video window appears displaying the view from the camera
associated with this item.
3. From the upper right corner, check the camera you want to view recorded video.
The Start Streaming button is activated.
4. If required, customize your playback with any of these settings:
• Select the start and stop times for this video recording.
• Customize the size of the video frame using the Size field or icon.
• Select or deselect multiple views by selecting the button.
• Change the quality of the recorded video by setting the Quality field.
5. Click Start Streaming.
The button changes to display Stop Streaming.
6. When you're finished with the segment, click Stop Streaming.
Once you have finished reviewing the recorded video, your video segment is saved and listed in
the video pane on the left.
You can then play back the recorded video as required.
Playing Back Recorded Video
To play back previously recorded video:
From one of the Monitor screens (Events, Alarms, or Search), click to highlight the alarm/event
whose video has been recorded.
1. Click the button.
5
Page 10
Alarm & Event Monitoring Operator Guide
The Video window appears.
For more on this window, refer to Page Descriptions on page 21.
2. From the video pane on the left, select the previously recorded video.
3. Using the playback controls at the bottom of the screen, play the video segment as
required.
4. When you're finished, exit the screen by clicking the button in the upper right corner
of the window.
NOTE: To send a video segment to another place, such as the police or lawyer, refer to the
instructions that come with this recording server.
Monitoring Alarms
When you click the Alarms tab from the Monitor screen, the Alarms page appears as detailed in
“Alarms Page” on page 25.
Alarms include unexpected or unplanned activity, such as unauthorized access, intruder alerts, fire
alarms, occupancy overflow, emergency exits, or any number of other incidents that call for
operator oversight and action.
The functions that an operator must perform for alarms include:
• Acknowledging alarms
• Clearing alarms
• Making notes about alarms
• Tracking the history of an alarm
• Getting instructions on an alarm
• Bringing up card or code holder identity information
• Viewing a surveillance camera associated with an alarm
• Replaying video on an alarm
• Turning the sound on/off on alarms
6
Page 11

Alarm & Event Monitoring Operator Guide
Acknowledging Alarms
When you acknowledge an alarm, you indicate to the Access Control Manager application that
you have performed whatever function was required to investigate and resolve the problem. By
acknowledging an alarm, you move that alarm from the Un acknowledged window to the
Acknowledged window.
To acknowledge one or more alarms:
1. Display the alarm page.
2. Click on one or more alarms.
To select a series of alarms, click the first alarm then Shift + click the last alarm in the
series. To select non-contiguous alarms, Ctrl + click the alarms you want to select.
3. Click the button.
All selected items are acknowledged and moved to the Acknowledged window.
Acknowledge All Alarms
Occasionally it may be necessary to acknowledge all alarms at a single operation.
NOTE: This is not the recommended technique for acknowledging alarms, since it may overlook
an alarm that requires special attention.
To acknowledge all alarms:
1. Display the alarm page.
2. Click the button.
All alarms in the Unacknowledged window are moved to the Acknowledged window.
Clearing Alarms
Only those alarms that have been previously acknowledged and moved to the Acknowledged
window can be cleared. Once cleared, the alarm is deleted from the database.
To clear one or more alarms:
1. Display the alarm page.
2. Click on one or more alarms.
To select a series of alarms, click the first alarm then Shift + click the last alarm in the
series. To select non-contiguous alarms, Ctrl + click the alarms you want to select.
3. Click the button.
All selected and acknowledged alarms are deleted.
7
Page 12

Alarm & Event Monitoring Operator Guide
Clearing All Alarms
Only those alarms that have been previously acknowledged and moved to the Acknowledged
window can be cleared. Once cleared, the alarm is deleted from the database.
NOTE: This is not the recommended technique for clearing alarms, since it may overlook an alarm
that requires special attention.
To clear all alarms:
1. Display the alarm page.
2. Click the button.
All acknowledged alarms are deleted.
Making a Note
Operators are often asked to make a note on a specific alarm.
To note an alarm:
1. Display the alarm page.
2. Click to highlight the required alarm.
3. Click the button.
The Notes page pops up as described in Notes Page on page 33.
4. Enter a note on this alarm as required in the new note area.
5. Click the button.
6. Click the button to exit this page and return to the main Alarm page.
Getting Instructions
Depending on how the system is configured, a particular kind of alarm may be associated with
instructions on how to respond.
To access instructions:
1. Display the alarm page.
2. Click to highlight the required alarm.
3. Click the button.
The Instructions page appears as described in Instructions Page on page 34.
4. Read the instructions and perform the tasks specified.
5. When you’ve finished with the instructions, click the exit button, , at the upper right
hand corner of this page.
6. Make any notes you need as described in Making a Note on page 2.
8
Page 13

Alarm & Event Monitoring Operator Guide
Tracking an Alarm History
Some alarms require repeated operations to complete. In order for the operator to familiarize him/
herself with a specific alarm:
1. Display the alarm page.
2. Click to highlight the required alarm.
3. Click the button.
The History page pops up as described in History Display on page 34.
If there is no history on this alarm, the page only contains details of the alarm and the
message ‘No History’.
If there is a history on this alarm, read it.
4. When you’re finished consulting the history, click the exit button, , at the upper right
hand corner of this page.
Viewing Identity Information
Many alarms are caused by the entry of cards and/or codes, such as when an employee enters a
PIN at a door reader and is granted access. The Access Control Manager application enables the
operator to see who the person associated with the entered token (card or code) is and review the
information entered in the Access Control Manager database.
To review identity information:
1. Select an alarm associated with an identity.
2. Click the button.
The Identity pop-up screen appears as described in Identity Display on page 35.
3. Review the information on this page which can include a photo enrolled with the
identity.
4. When you’re finished, click the exit button, , at the upper right hand corner of this
page.
Viewing Video Feed
When one or more surveillance cameras have been associated with a specified alarm or alarm
location, you can access and view the location where the alarm occurred using this screen.
To view video coming from a camera feed:
1. From one of the Monitor pages (Alarms, Alarms, or Search), click to highlight the alarm/
alarm whose associated camera you want to view.
Only those alarms or alarms that have a in the left column have been associated with
a camera.
2. Click the button.
9
Page 14

Alarm & Event Monitoring Operator Guide
The Camera Video window pops up.
For more on this, refer to Camera Video Window on page 36.
3. Using the various controls on this screen, manipulate the camera view. These controls
include:
• Zoom and magnify
• Change quality
• Pan and tilt
4. If required, click to bring up the Video window and begin reviewing
recorded video associated with the event.
5. When you're finished, exit the screen by clicking the button in the upper right corner
of the window.
Playing Back Recorded Video
To play back previously recorded video:
From one of the Monitor screens (Alarms, Alarms, or Search), click to highlight the alarm/alarm
whose video has been recorded.
1. Click the button.
10
Page 15

Alarm & Event Monitoring Operator Guide
The Video window appears.
For more on this window, refer to Page Descriptions on page 21.
2. From the video pane on the left, select the previously recorded video.
3. Using the playback controls at the bottom of the screen, play the video segment as
required.
4. When you're finished, exit the screen by clicking the button in the upper right corner
of the window.
NOTE: To send a video segment to another place, such as the police or a lawyer, refer to the
instructions that come with this recording server.
Turning Sound On/Off
In its default condition, every alarm that is displayed by the Alarms page is accompanied by a
beeping sound. While this is normally a useful way for the operator to keep track of incoming
alarms, it can become irritating when it goes on too long.
To turn the sound off:
• From the Alarm page, click the button. The beeping sound is silenced and the
button appears.
To turn the sound back on:
• From the Alarm page, click the button. The beeping sound recurs and the
button reappears.
Searching for Events and Alarms
Large numbers of alarms and events are generally polled during the course of a single day for
even a small installation. Over the course of several days or weeks, the number of alarms can
become truly vast. To filter alarms and events down to a manageable size, use the following
feature.
To search for a specific event, alarm, or item within the monitor database, do this:
11
Page 16

Alarm & Event Monitoring Operator Guide
1. From the Monitors screen, click on the Search tab.
The Search page appears as detailed in Search Page on page 23.
2. Go to the search and navigation bar at the bottom of the screen and click the icon.
The Search area appears like this example:
3. From the 'Text Fields' drop-down pick list, select the search term you want to use as a
filter.
4. From the 'equal' drop-down pick list, select the argument to use with the search term.
The available argument options include:
5. In the text window to the right, enter the value you require to complete this search
argument.
This term can be any text string, including any combination of alphanumeric characters
with the exception of the asterisk character, *, which is reserved as a wildcard
character.
The string you enter can represent any item that appears in the “Source Location”,
“Source Name”, “Last Name”, “Message” or “Event Name”. The wildcard * can be used
along with other characters such as:
s* - any of the above fields starting with “s”
*s - any of the above fields ending with “s”
*s* - any of the above fields with “s” anywhere in them
The string you enter can represent any item that appears in these fields:
• Source Location
•Source Name
•Last Name
• Message
•Event Name
•Card Number
• Embossed Number
6. If you require additional search arguments, click to enter another line of fields like
this example:
12
Page 17

Alarm & Event Monitoring Operator Guide
7. Use as many lines as you require to specify your full search criteria.
8. When you have completed your search arguments, click .
A list of all events that include the specified search string appear in the table.
9. Select one or more alarms or events and use the available buttons to control or monitor
the listed event.
Those items marked with a indicate that it has a video camera associated with the
alarm/event. For more on these, refer to Reviewing Recording Video on page 5.
10. Repeat Steps 1 - 8 for more searches.
11. To save a search argument, click .
Verifying Door and Identity Status
This feature enables a qualified operator to review information, including photos, about card
holders entering or exiting a specified door.
To use this feature:
1. Click the Verific ation tab.
The Verification page appears as detailed in Verification Page on page 27.
2. Click one of the button.
A list of available doors appears like this example:
Only those doors previously defined for this system appear in this list.
3. Select the door you want to monitor.
13
Page 18

Alarm & Event Monitoring Operator Guide
When a card holder attempts to enter this door using a card or code, the available
identity information on that card holder appears like this example: The window includes
the card holder's name, number, entry status, and the time and date of entry. If a photo
has been associated with this identity either through capture or uploading, the image
also appears. Underneath this pane appears more detailed information about the entry/
exit event as shown in this example:
Up to four doors can be monitored in this way at any given time.
4. To activate another door, repeat Steps 1-2.
Monitoring Hardware Status
When the operator needs to monitor the hardware that makes up the installation, use this feature.
To monitor the status of the security hardware:
1. From the Monitor screen, click the HW Status tab.
The HW Status page appears. This page is detailed in Hardware Status Page on
page 27.
14
Page 19

Alarm & Event Monitoring Operator Guide
Review door status.
Only those doors currently
installed and active have a
check box to the left.
Control selected doors using
the available buttons.
Review panel information.
Expand the linked panels to
reveal subpanels and their
dependent inputs and
outputs then click one of the
relevant buttons.
Monitor the status of any
LifeSafety panels on you
system.
If you click on one of the
panel links like this...
... the associated subpanels
appear like this...
... and the associated
inputs and outputs
appear like this...
Click on one of the linked
subpanels like this one...
2. Review the current status of the devices, such as the readers and doors, associated
with this system.
In addition to overseeing system devices, the qualified operator can also control various system
functions. For more on this, refer to Controlling System Hardware on page 16.
3. At the top of the page, review the currently active panels in the panel matrix.
4. To review subpanels and devices associated with a specified panel or subpanel, click
the selected panel/subpanel to reveal its dependent devices as shown below:
This enables you to drill down to the input and output level, inspecting every device
connected to a specified panel.
15
Page 20

Alarm & Event Monitoring Operator Guide
Check the relevant box to
specify control.
Notice that only installed
and active doors possess a
check box to the left.
Controlling System Hardware
The qualified operator can perform the following functions on doors and readers configured for
use with this system. These are often override functions and are used only when required and at
the discretion of the operator or the supervisor.
To control a door or reader:
1. Click the HW Status tab to bring up the Hardware Status page.
The Hardware Status page is detailed in Hardware Status Page on page 27.
2. In the Doors pane, check the box of each door you want to operate as shown in the
following example:
NOTE: Only those doors that are currently installed and active have a check mark to the left of
their name.
3. From the door control panel, click the appropriate button:
The available buttons are:
Click this button to disable the specified door. This keeps it from operating
and allows no access.
Click this button to unlock the specified door. This door will remain
unlocked until the Lock command is issued, or until another change of
state is directed, either via operator override or scheduled action.
Click this button to lock the specified door. This door will remain locked
until the Unlock command is issued, or until another change of state is
directed, either via operator override or scheduled action.
Click this button to grant the current user access to the specified door. The
door will be momentarily unlocked to permit a single time entry through
the door.
Click this button to reset the doors's configuration values to their default
value.
Click this button to mask the Door Held Open alarm for this door.
Click this button to unmask the Door Held Open alarm for this door.
Click this button to mask the Forced Held Open alarm for this door.
Click this button to unmask the Door Forced Open alarm for this door.
The operation is performed on the specified device.
16
Page 21

Alarm & Event Monitoring Operator Guide
If you click on one of the
panel links like this...
... the associated subpanels
appear like this...
... and the associated
inputs and outputs
appear like this...
Click on one of the linked
subpanels like this one...
Click the appropriate
buttons to perform
specific operations on a
selected device
4. At the bottom of the page in the Panels pane, expand each linked panel as required.
Many linked panels expand to reveal dependent subpanels. Expand these subpanels
and panels without dependent subpanels to reveal the dependent inputs and output
devices as shown in this example:
Monitoring Alarms and Events From Maps
Many operators find it easier to visualize the location of an alarm and event if they have a map to
help them.
5. Click the appropriate button associated with the input or output as required. The
available buttons are:
Inputs
Click this button to mask a specified input.
Click this button to unmask a specified input.
Outputs
Click this button to power the output. If this output is a door, it energizes
the circuit.
Click this button to turn off the power to this output. If this output is a
door, it de-energizes the circuit.
Click this button to alternatively energize and de-energize the circuit. The
pulse interval is determined by the output’s settings.
6. If required, undo the operation when appropriate.
For example, if you click to unlock a door, you should click to relock the door
once the entry is complete.
17
Page 22
Alarm & Event Monitoring Operator Guide
The Access Control Manager application provides this capability with the Maps page.
To use the maps page:
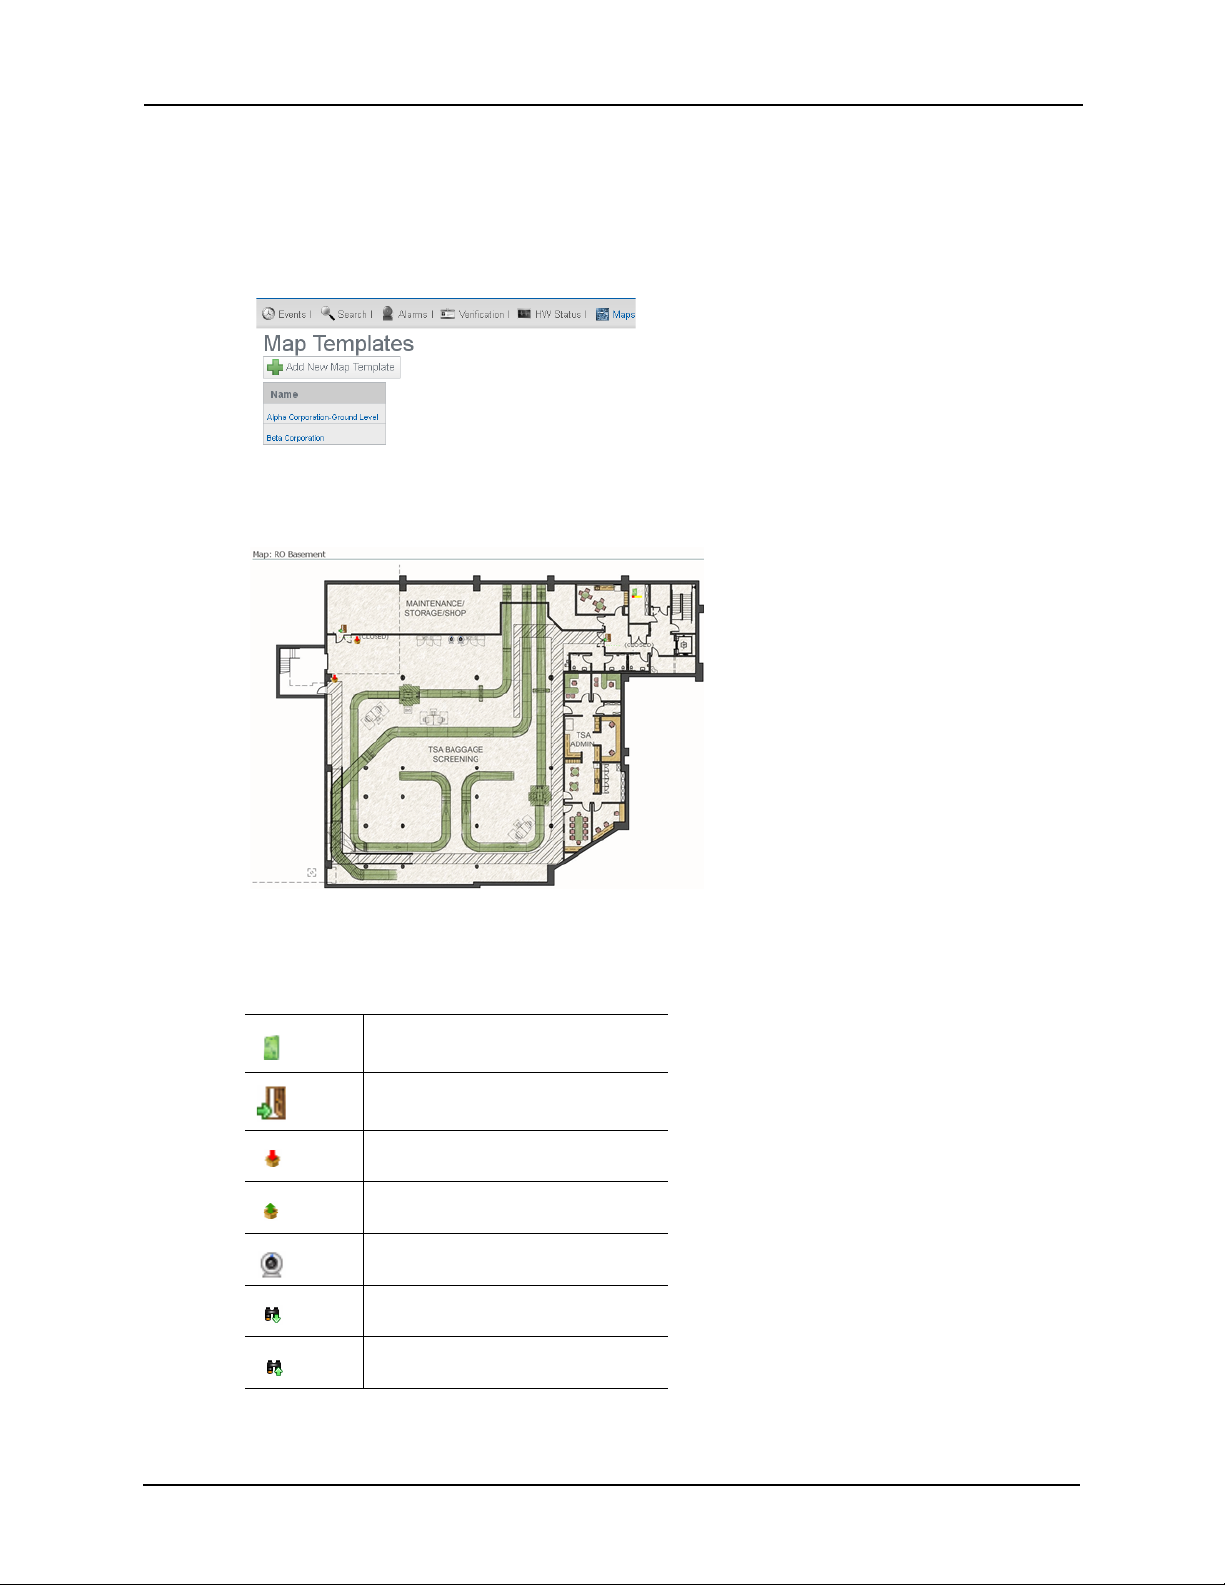
1. From the Monitor screen, click the Maps tab.
The Maps page appears like this example:
2. Click the map you want to view.
A map like this example appears:
Notice that there are a variety of alarm points that have been placed on this map, such
as doors, inputs, outputs, and cameras. You can determine the type of point it is by its
icon:
Panel or sub-panel
Door
Input
Output
Camera
Zoom In
Zoom Out
3. Examine the map for any points that are currently in alarm.
18
Page 23
Alarm & Event Monitoring Operator Guide
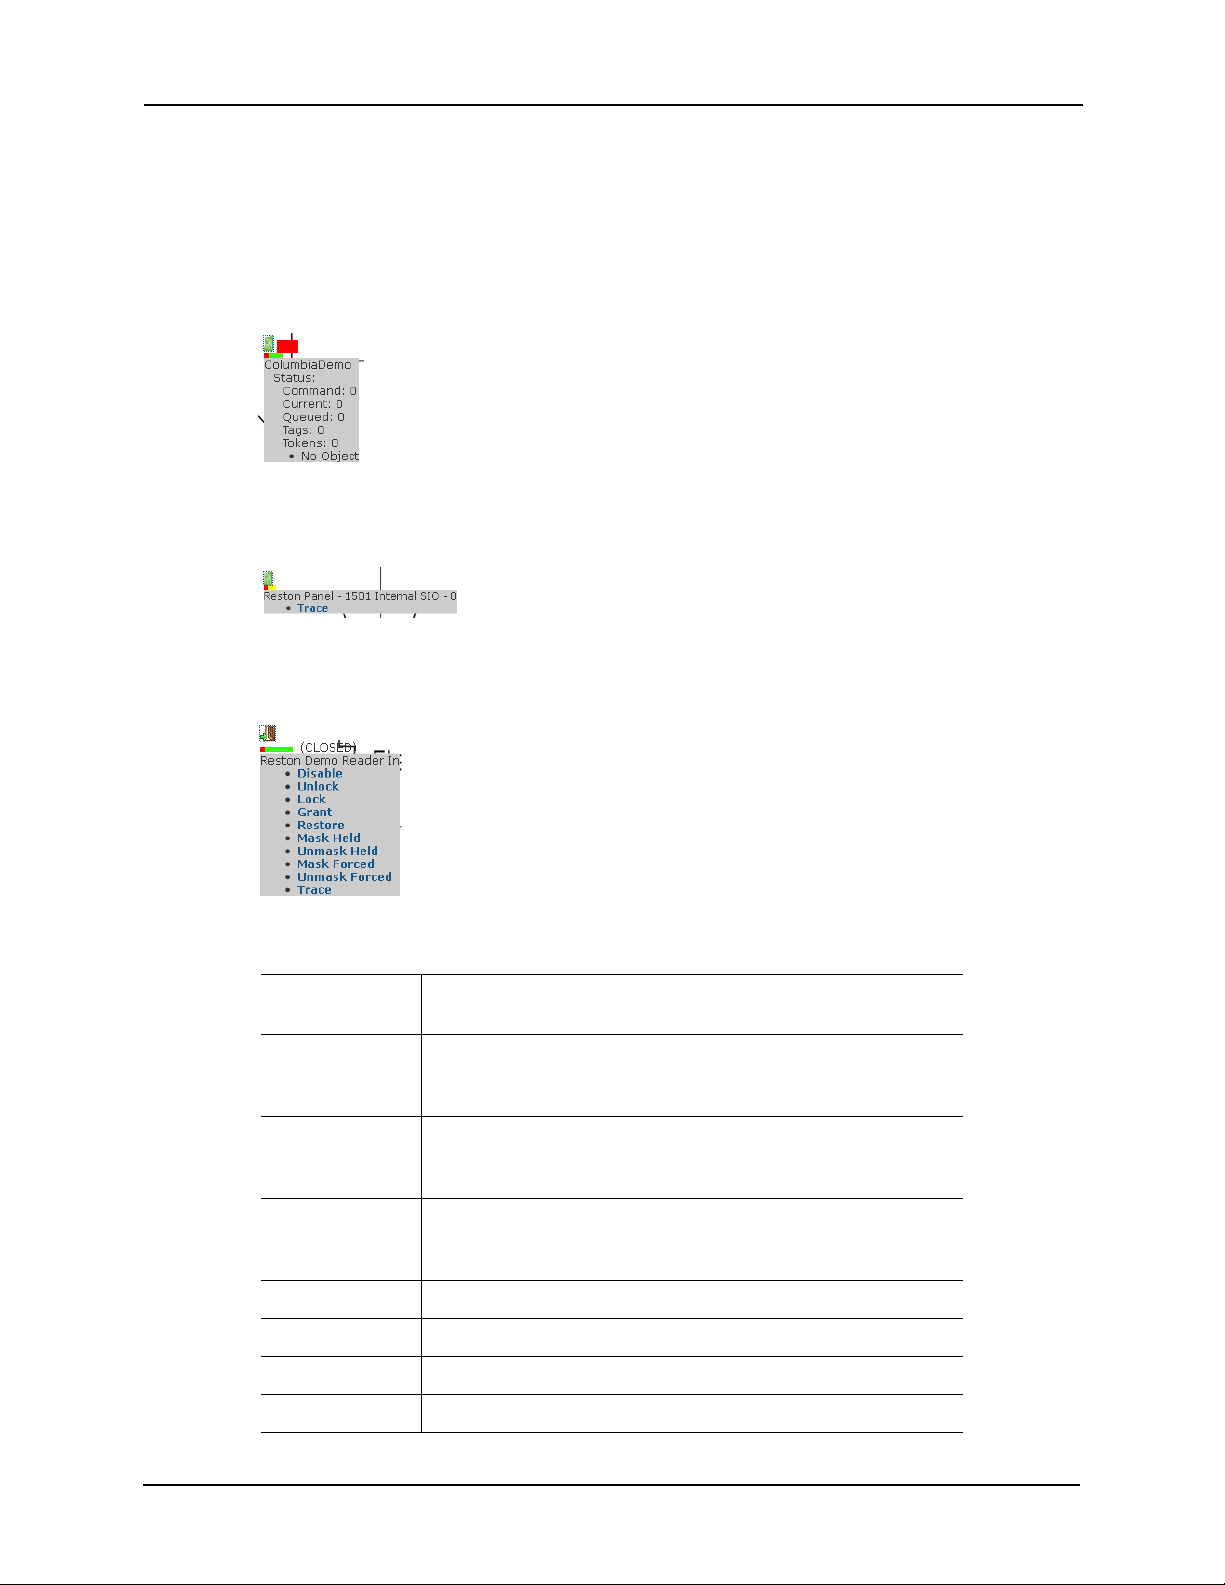
An alarm point is indicated by a blinking icon in red like the panel example shown
below in Step 4. Also notice that each input icon indicates its current condition (in this
case 'Closed').
4. To inspect an icon more carefully, mouse over the icon and click.
A more detailed view of the alarm point is provided. For example, if you click on the
alarmed panel at the upper left, a list like this appears:
This lists data on the exact state of the panel.
5. If you click on the sub-panel icon just above the panel, a pop-up like this appears:
6. You can click on the Trace option to perform that operation on the sub-panel.
7. If you click on the door icon, a list of options appear like this:
Each of these options is explained briefly below.
Disable Disable this door so that no card or code can access it. This keeps
it from operating and allows no access.
Unlock Unlock the specified door. This door will remain unlocked until the
Lock command is issued, or until another change of state is
directed, either via operator override or scheduled action.
Lock Lock the specified door. This door will remain locked until the
Unlock command is issued, or until another change of state is
directed, either via operator override or scheduled action.
Grant Grant the current user access to the specified door. The door will
be momentarily unlocked to permit a single time entry through the
door.
Restore Return the door to its default state.
Mask Held Mask the Door Held Open alarm for this door.
Unmask Held Unmask the Door Held Open alarm for this door.
Mask Forced Mask the Forced Held Open alarm for this door.
19
Page 24
Alarm & Event Monitoring Operator Guide
Unmask Forced Unmask the Door Forced Open alarm for this door.
Tra ce Execute a trace on this door.
8. Click on one of these linked functions to perform the required functions on the
specified door.
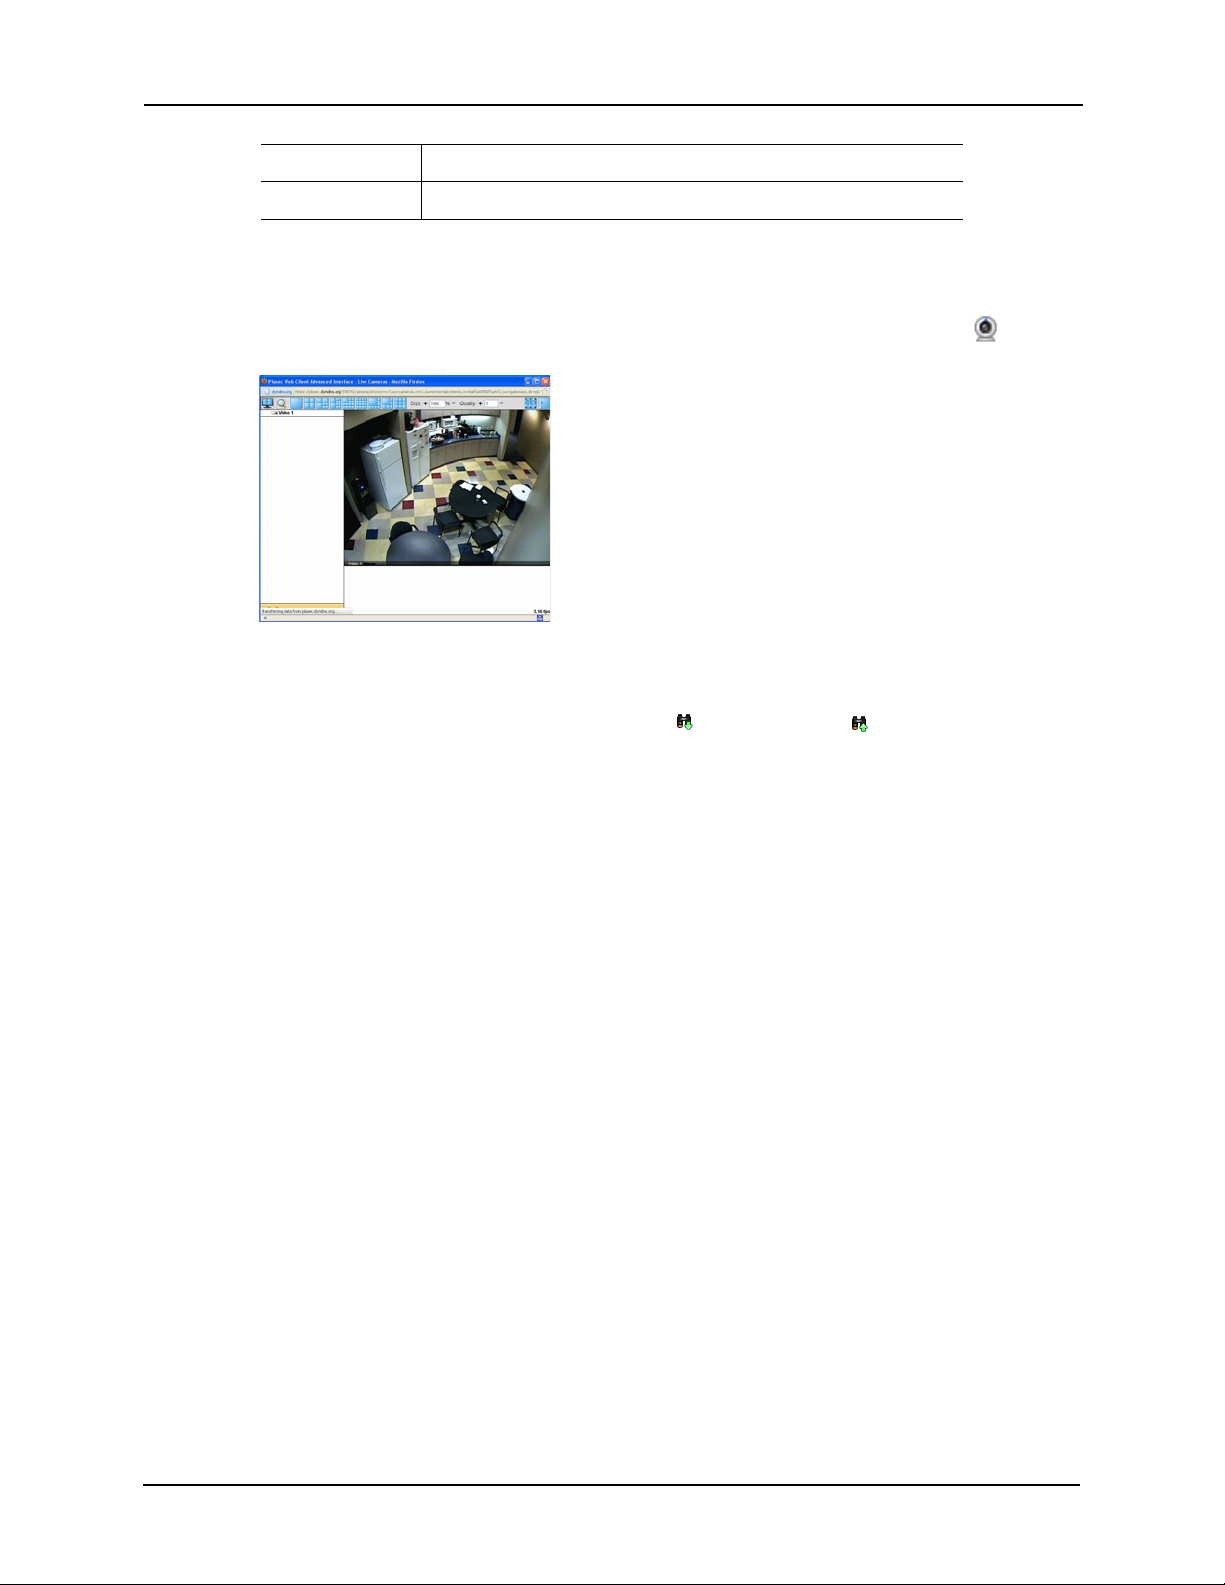
If you want to view the immediate vicinity, click on one of the camera icons, , and a
camera pane pops up to reveal video from that camera like this example:
For more on this, refer to Viewing Video Feed on page 4.
9. To zoom in or out of this map for a more detailed map or larger look at the area with a
larger detail map, use an available Zoom In ( ) or Zoom Out ( ) icon.
10. When you're finished with this screen, click the browser's back arrow or click on the
Maps bread crumb link.
As you can see, not only can you view relevant maps at various levels of granularity, but you can
also view video associated with those maps, and, when required, address the issues using pop-up
options directly from the map feature.
20
Page 25
Alarm & Event Monitoring Operator Guide
Page Descriptions
This section provides detailed descriptions of each page and pop-up display associated with the
Monitor feature. These include:
• Events page (page 21)
• Search page (page 23)
• Alarms page (page 25)
• Verification page (page 27)
• HW Status page (page 27)
• Notes page (page 33)
• Instructions page (page 34)
• History display (page 34)
• Identity display (page 35)
• Camera Video window (page 36)
• Recorded Video window (page 37)
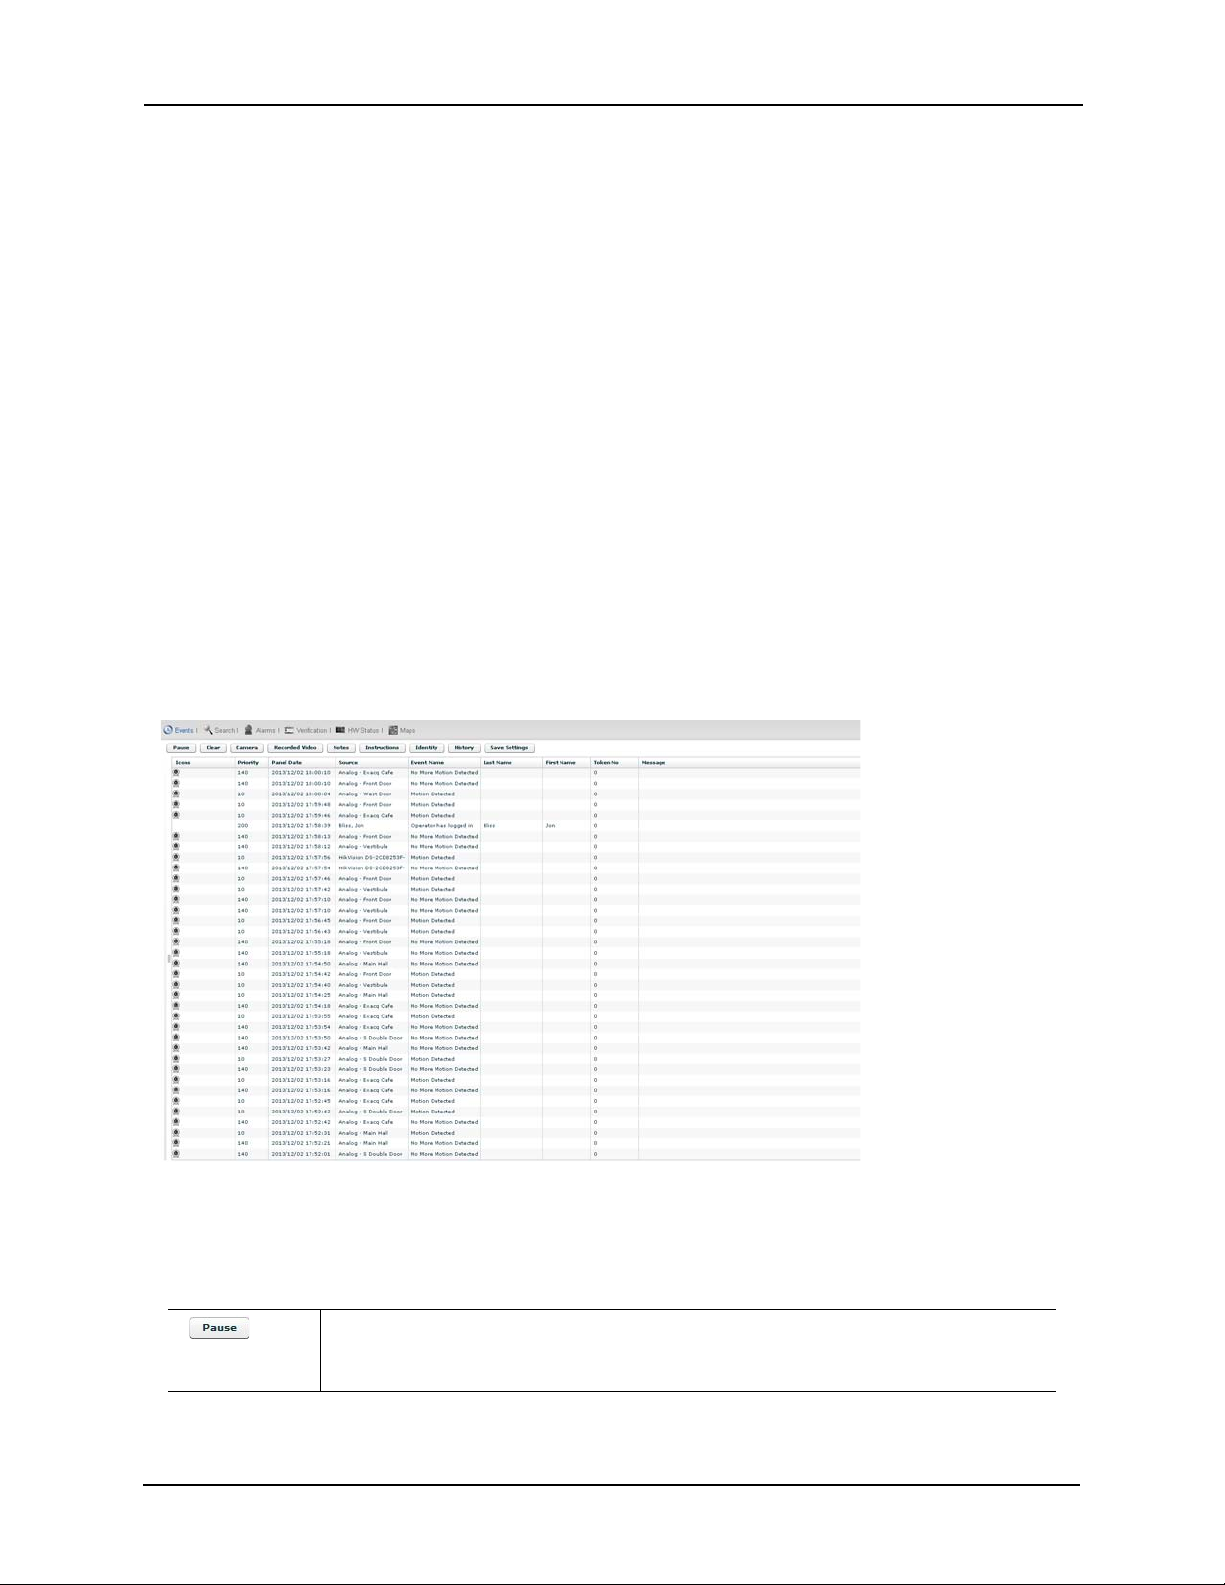
Events Page
When you open the Monitor feature or click the Events tab, the Monitor Transactions page
appears like this example:
This page contains information about all system activity, including system user activity, in the
Access Control Manager application.
Buttons on this page are:
Click this button to pause the flow of events down the page. This button is replaced with
the Resume button. Polling is not suspended; detected events are not displayed until the
Resume button is pushed.
21
Page 26

Alarm & Event Monitoring Operator Guide
Click this button to remove all events from the screen. New events begin to populate the
list.
Click this button to activate the camera associated with the selected event. The Camera
Video window appears.
For more on this feature, refer to Camera Video Window on page 36.
Click this button to activate the video server and camera associated with a selected event.
The Video Window appears.
For more on this feature, refer to Reviewing Recording Video on page 5.
Click this button to enter notes and/or reveal any previously saved notes associated with
the selected event. The Alarm Notes window appears.
For more on this feature, refer to Notes Page on page 33.
Click this button to reveal any instructions that may be associated with this event.
A floating page pops up with the instructions. Instructions are assigned to a specific event
using the Instructions window on the Event Add page.
For more on this feature, refer to Instructions Page on page 34.
Click this button to display information on the person causing the selected event. Any
statistics and photos of this person are displayed on the screen.
For more on this feature, refer to Identity Display on page 35.
Click this button to display a detailed history of this event.
For more on this feature, refer to History Display on page 34.
Click this button to save the operator’s current settings (columns, widths, order) for this
page.
These statistics are a list of current events detected by the security system this server supervises.
The default columns on this page include:
This indicates that the event has a camera associated with it.
You can use the and buttons to view live or recorded video at the
site associated with this event.
Priority Displays the urgency of this event where 1 is the most urgent and 99 is the least urgent.
Priorities are normally assigned to a specific event using the Priority field on the Event Add
page.
Panel Date Displays the date the source panel issued this event.
Source Displays the device (such as a reader or input) that issued this event.
Event Name Displays the name of this event. This name can be changed or assigned to a specific event
using the Name field on the Event Add page.
Last Name Displays the last name of the person responsible for creating the event. This is almost
always the person who used a card or code to enter or exit a supervised area.
First Name Displays the first name of the person responsible for creating the event. This is almost
always the person who used a card or code to enter or exit a supervised area.
Token No. Displays the number of the token that caused the alarm or event to occur. The token can be
a card and/or PIN number enabling a person to enter or exit a supervised area.
22
Page 27

Alarm & Event Monitoring Operator Guide
Click the Search icon, , enter
a term, then click the Search
button.
Message Displays a message associated with this event. Messages are normally assigned to a
specific event using the Instructions window on the Event Add page.
Search Page
When you click the Search tab, a page like this example appears:
The search window events and alarms contain the following default columns:
This indicates that the selected alarm or event has a camera associated with it.
You can use the and buttons to view live or recorded video at
the site associated with this event.
Priority Displays the urgency of this alarm or event where 1 is the most urgent and 99 is the least
urgent. Priorities are normally assigned to a specific event using the Priority field on the
Event Add page.
When Displays the date and time when this alarm or event was issued.
Count Indicates the number of times this alarm or event was issued.
Status Indicates the status of this alarm or event.
Source Displays the device (such as a reader or input) that issued this alarm or event.
Event Name Displays the name of this alarm or event. This name can be changed or assigned to a
specific alarm using the Name field on the Event Add page.
Last Name Displays the last name of the person responsible for creating the alarm or event. This is
almost always the person who used a card or code to enter or exit a supervised area.
First Name Displays the first name of the person responsible for creating the alarm or event. This is
almost always the person who used a card or code to enter or exit a supervised area.
Token No. Displays the number of the token that caused the alarm or event to occur. The token can
be a card and/or PIN number enabling a person to enter or exit a supervised area.
Message Displays a message associated with this alarm or event. Messages are normally assigned
to a specific alarm using the Instructions window on the Event Add page.
23
Page 28

Alarm & Event Monitoring Operator Guide
The search and navigation tray appears at the bottom of this screen and looks like this:
This includes the following buttons and windows:
Click this search icon to display the find dialog box that enables you to refine the focus
of this report:
For more on this, refer to Searching for Events and Alarms on page 11.
Select the number of items you want to display on a single page.
Click this button to return to the start of the search event list.
Click this button to return to the previous page of the search event list.
Enter the page of the search event list you want to review.
The number of pages in this list is shown to the right.
Click this button to bring up the next page.
Click this button to go to the last page.
Click this button to refresh this list.
This read-only field displays the number of items currently displayed.
The buttons on this screen include these:
Click this button to activate the camera associated with the selected alarm or event. The
Camera Video window appears.
For more on this feature, refer to Viewing Video Feed on page 4.
Click this button to activate the video server and camera associated with a selected alarm or
event. The Video Window appears.
For more on this feature, refer to Reviewing Recording Video on page 5.
Click this button to enter notes and/or reveal any previously saved notes associated with the
selected alarm/event. The Alarm Notes window appears.
For more on this feature, refer to Notes Page on page 33.
Click this button to reveal any instructions that may be associated with this alarm or event. A
floating page pops up with the instructions.
For more on this feature, refer to Instructions Page on page 34.
Instructions are assigned to a specific alarm using the Instructions window on the Event Add
page.
24
Page 29

Alarm & Event Monitoring Operator Guide
Click this button to display information on the person causing the selected alarm or event.
Any statistics and photos of this person are displayed on the screen.
For more on this feature, refer to Identity Display on page 35.
Click this button to display a detailed history of this alarm or event.
For more on this feature, refer to History Display on page 34.
Click this button to save the operator’s current settings (columns, widths, order) for this page.
For step-by-step instructions on using the search feature, refer to Searching for Events and
Alarms on page 11.
Alarms Page
When you click on the Alarms tab on the Monitor screen, a page like this appears:
Any alarms detected are listed in the ‘Acknowledged Alarms’ window and the server will beep.
This page contains a row of buttons at the top and two windows. These buttons include these:
Click this button to acknowledge one or more selected alarms. The selected alarms are
moved from the ‘Unacknowledged Alarms’ window to the ‘Acknowledged Alarms’
window.
Click this button to remove one or more selected alarms from either one of the alarm
windows. The selected alarms are permanently deleted.
Click this button to acknowledge all alarms in the ‘Unacknowledged Alarms’ window.
Click this button to clear all alarms in the ‘Acknowledged Alarms’ window.
Click this button to activate the camera associated with the selected alarm. The Camera
Video window appears. For more on this feature, refer to Camera Video Window on
page 36
Click this button to activate the video server and camera associated with a selected
alarm. The Video Window appears. For more on this feature, refer to Reviewing
Recording Video on page 5
Click this button to enter notes and/or reveal any previously saved notes associated with
the selected alarm. The Alarm Notes window appears.
For more on this feature, refer to Notes Page on page 33.
25
Page 30

Alarm & Event Monitoring Operator Guide
Click this button to reveal any instructions that may be associated with this alarm. A
floating page pops up with the instructions.
For more on this feature, refer to Instructions Page on page 34.
Instructions are assigned to a specific alarm using the Instructions window on the Event
Add page.
Click this button to display information on the person causing the selected alarm. Any
statistics and photos of this person are displayed on the screen.
For more on this feature, refer to Identity Display on page 35.
Click this button to display a detailed history of this alarm.
For more on this feature, refer to History Display on page 34.
Click this button to save the operator’s current settings (columns, widths, order) for this
page.
Click this button to turn the alarm beeping off. The button toggles to a Sound On button.
If the sound is already off and you want to turn it back on, click the Sound On button.
In addition to the button bar, there are two windows:
• ‘Unacknowledged Alarms’ window includes all those alarms recorded by the system that
have not yet been acknowledged or addressed.
• ‘Acknowledged Alarms’ window includes all those alarms that were initially listed in the
‘Unacknowledged Alarms’ window but have subsequently been acknowledged and
placed in this window.
Each of these windows contains the following default columns:
This indicates that the alarm has a camera associated with it.
You can use the and buttons to view live or recorded video at
the site associated with this event.
Priority Displays the urgency of this alarm where 1 is the most urgent and 99 is the least urgent.
Priorities are normally assigned to a specific event using the Priority field on the Event Add
page.
When Displays the date and time when this alarm was issued.
Count Indicates the number of times this alarm was issued.
Status Indicates the status of this alarm.
Source Displays the device (such as a reader or input) that issued this alarm.
Event Name Displays the name of this alarm (event). This name can be changed or assigned to a
specific alarm using the Name field on the Event Add page.
Last Name Displays the last name of the person responsible for creating the alarm. This is almost
always the person who used a card or code to enter or exit a supervised area.
First Name Displays the first name of the person responsible for creating the alarm. This is almost
always the person who used a card or code to enter or exit a supervised area.
Token No. Displays the number of the token that caused the alarm or event to occur. The token can
be a card and/or PIN number enabling a person to enter or exit a supervised area.
26
Page 31

Alarm & Event Monitoring Operator Guide
Message Displays a message associated with this alarm. Messages are normally assigned to a
specific alarm using the Instructions window on the Event Add page.
Verification Page
When you click the Verification tab on the Monitor screen, a page like this example appears:
For more on using this page, refer to Verifying Door and Identity Status on page 13.
Hardware Status Page
When you click the HW Status tab from the Monitor screen, a page like this example appears:
27
Page 32

Alarm & Event Monitoring Operator Guide
This page displays the current status of all connected panels, doors, inputs, outputs and
associated security devices. A qualified operator can also use this screen to control certain
aspects of installed readers.
These fields and buttons are defined below:
Appliance name Displays the time this Access Control Manager appliance has been running.
Timestamp Displays the date and time when the appliance initially went online.
Up Displays the time this Access Control Manager server has been running.
RAM Displays the number of megabytes (MB) the Access Control Manager server currently
possesses.
Flash Displays the MB of flash memory the Access Control Manager appliance currently
contains.
Disk Indicates the total number of MB the Access Control Manager server hard driver contains.
Load Indicates the current compute load the Access Control Manager server is experiencing.
Port Indicates the ports the server is currently using to connect to the Access Control Manager
application. Eight ports are displayed.
Link Indicates the current state of the link supported by the indicated port. This is either
Normal or None.
Rx Indicates the number of data packets the designated Access Control Manager server port
has received.
Tx Indicates the number of data packets the designated Access Control Manager server port
has transmitted.
Doors The status of connected doors in these three categories: Offline Active Masked
Panels The status of connected panels in these categories: Offline Active
Inputs The status of connected inputs in these three categories: Offline Active Masked
Subpanels The status of connected subpanels in these categories: Offline Active
Click this button to disable the specified door. This keeps it from operating and allows no
access.
Click this button to unlock the specified door. This door will remain unlocked until the
Lock command is issued, or until another change of state is directed, either via operator
override or scheduled action.
Click this button to lock the specified door. This door will remain locked until the Unlock
command is issued, or until another change of state is directed, either via operator
override or scheduled action.
28
Page 33

Alarm & Event Monitoring Operator Guide
Click this button to grant the current user access to the specified door. The door will be
momentarily unlocked to permit a single time entry through the door.
Click this button to reset the doors's configuration values to their default value.
Click this button to mask the Door Held Open alarm for this door.
Click this button to unmask the Door Held Open alarm for this door.
Click this button to mask the Forced Held Open alarm for this door.
Click this button to unmask the Door Forced Open alarm for this door.
All / None Check the individual box next to the door to indicate that the door on this line should be
included in the control panel above.
If you click on All in the title line, it automatically checks the boxes of all currently listed
doors; the word changes to None.
If all doors are currently listed, click None to deselect all listed doors.
Name The name assigned to this door.
Installed
Manuf The vendor or manufacturer of this door.
Panel The name of the panel to which this door is connected.
The status of the door's installation: or . This field is selectable and can be
toggled.
Status of communications between the door and specified panel. The color indicates the
current status.
Indicates whether this door is locked or not.The color indicates the current status.
Indicates the status of the power on the door. The color indicates the current status.
Indicates the status of the tamper switch on the door. The color indicates the current
status.
Indicates the status of the battery backup on the door. The color indicates the current
status.
Indicates whether this door is in a forced state.The color indicates the current status.
Indicates whether this door is currently in a held open state.The color indicates the
current status.
29
Page 34

Name The name assigned to the panel.
To expand this panel and review the dependent components – such as subpanels,
inputs, and outputs – controlled by this panel, click on the name. The contingent
subpanels appear like this example:
To expand a subpanel to reveal the inputs and outputs controlled by a specific subpanel
or panel, click on a selected subpanel and the components controlled by that subpanel
appear as shown in this example:
Alarm & Event Monitoring Operator Guide
Installed
You can bore down to the input and output component level, if needed, to review and
control relevant components.
The status of the panel's installation: or . This field is selectable and can be
toggled.
Status of communications between the door and specified panel. The color indicates the
current status.
Indicates the status of the power on the door. The color indicates the current status.
Indicates the status of the tamper switch on the door. The color indicates the current
status.
30
Page 35

Alarm & Event Monitoring Operator Guide
Indicates the status of the battery backup on the door. The color indicates the current
status.
Sub-Panel
Status
Indicates the number of the sub-panels attached to this panel. Each relevant subpanel is
displayed together with its current status.The color indicates the current status.
Subpanel The name of this subpanel. To drill down into the inputs and outputs associated with this
subpanel, click this link.
C Status of communications between the panel and specified sub-panels. The color
indicates the current status.
P Indicates the status of the power on this panel.The color indicates the current status.
T Indicates the status of the tamper switch on this panel.The color indicates the current
status.
Installed
The status of the sub-panel's installation: or . This field is selectable and can be
toggled.
Input This column lists all the inputs controlled by this subpanel, with the name and address of
each input.
Cmd
If allowed, one or more functions that can be performed on the input. The possible
functions are:
– Click this button to mask thedesignated input.
– Click this button to unmask a previously masked input.
Output This column lists all the outputs (including relays and locks) controlled by this subpanel,
with name and address of each output.
Cmd If allowed, click one or more of these functions that can be performed on the output.
The possible functions are:
– Click this button to power the output. If this output is a door, it energizes the
circuit.
– Click this button to turn off the power to this output. If this output is a door, it de-
energizes the circuit.
– Click this button to alternately energize and de-energize this output.The pulse
interval is determined by the output’s settings.
31
Page 36
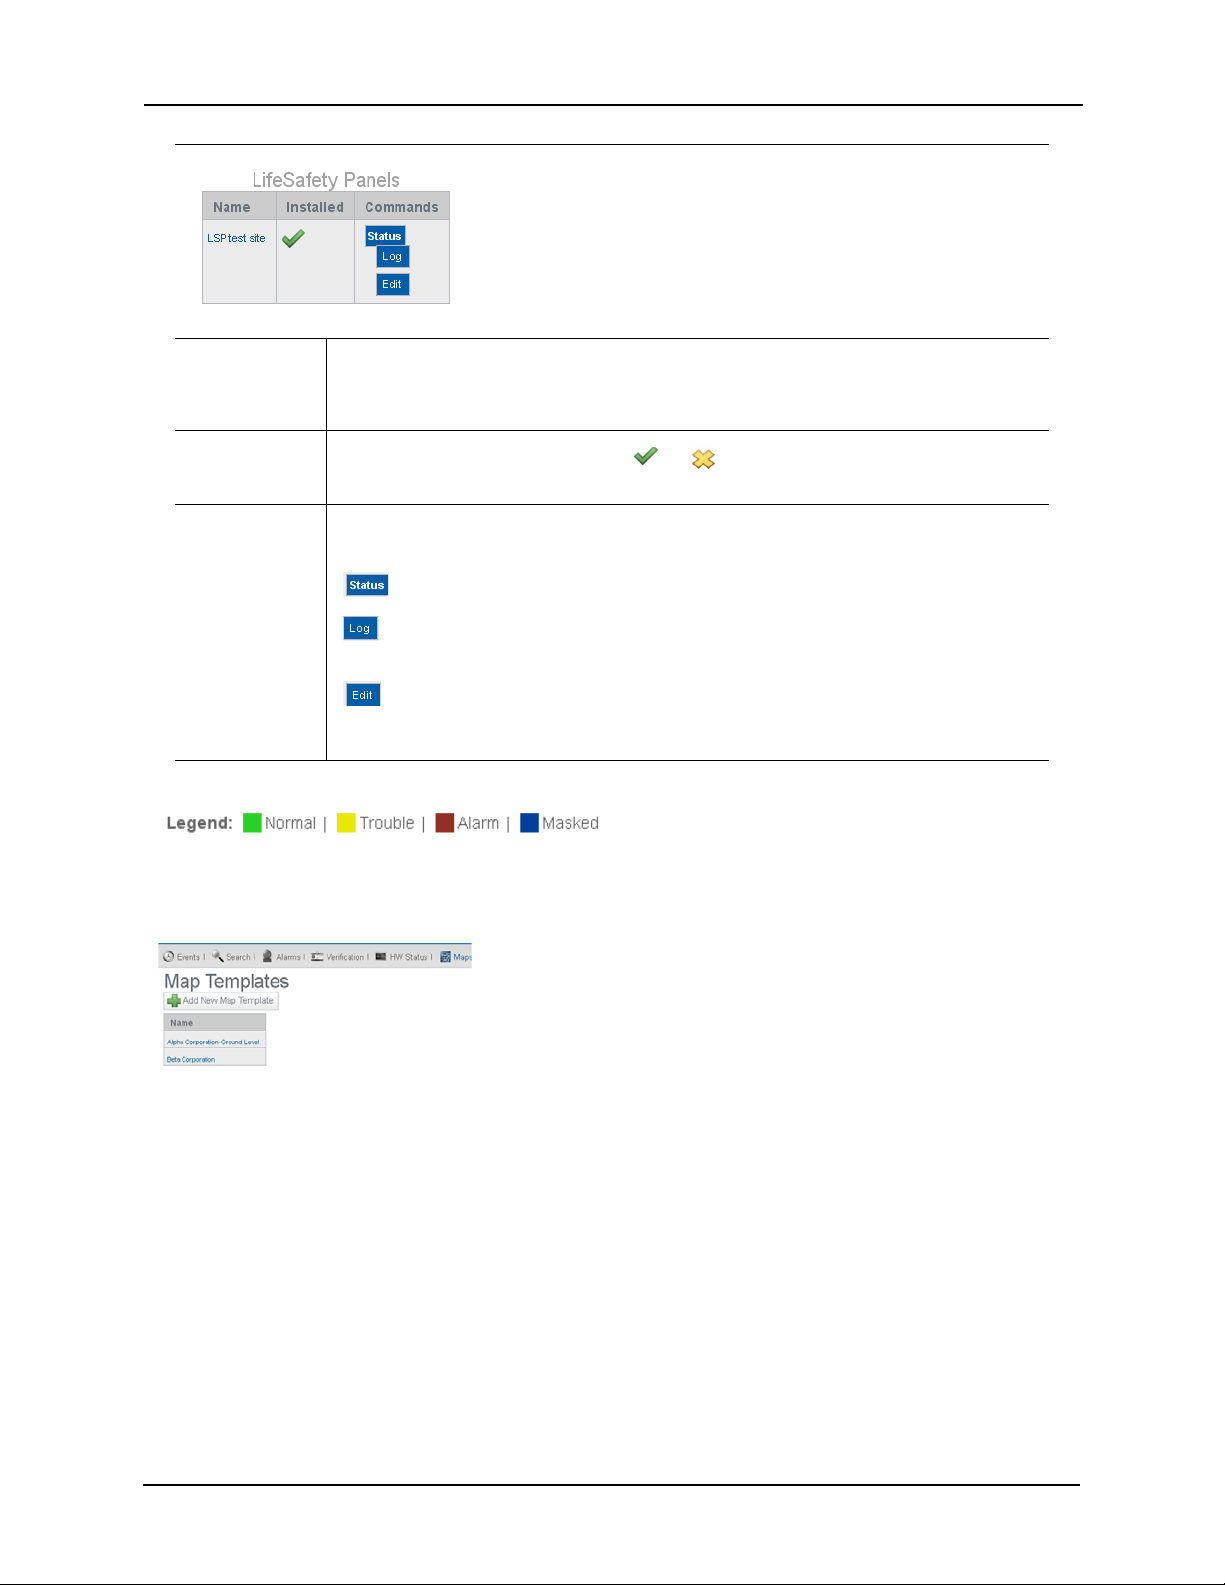
Name The name of the LifeSafety panel.
Click this name to display the LSP details. Only those panels previously defined for this
system appear in this list.
Alarm & Event Monitoring Operator Guide
Installed
Commands If allowed, click one or more of these functions that can be performed on the available
The status of the panel's installation: or . This field is selectable and can be
toggled.
and installed LifeSafety panels. The possible functions are:
- Click this button to display the current status of the displayed LifeSafety panel.
- Click this button to view the log of events/alarms recorded by the LifeSafety
panel.
- Click this button to open the browser page for this remotely connected panel and
make changes to the configuration as required. The page displayed is determined by the
URL specified on the 'Address' field of the LifeSafety Add page.
This is the color legend used by both the doors and panels.
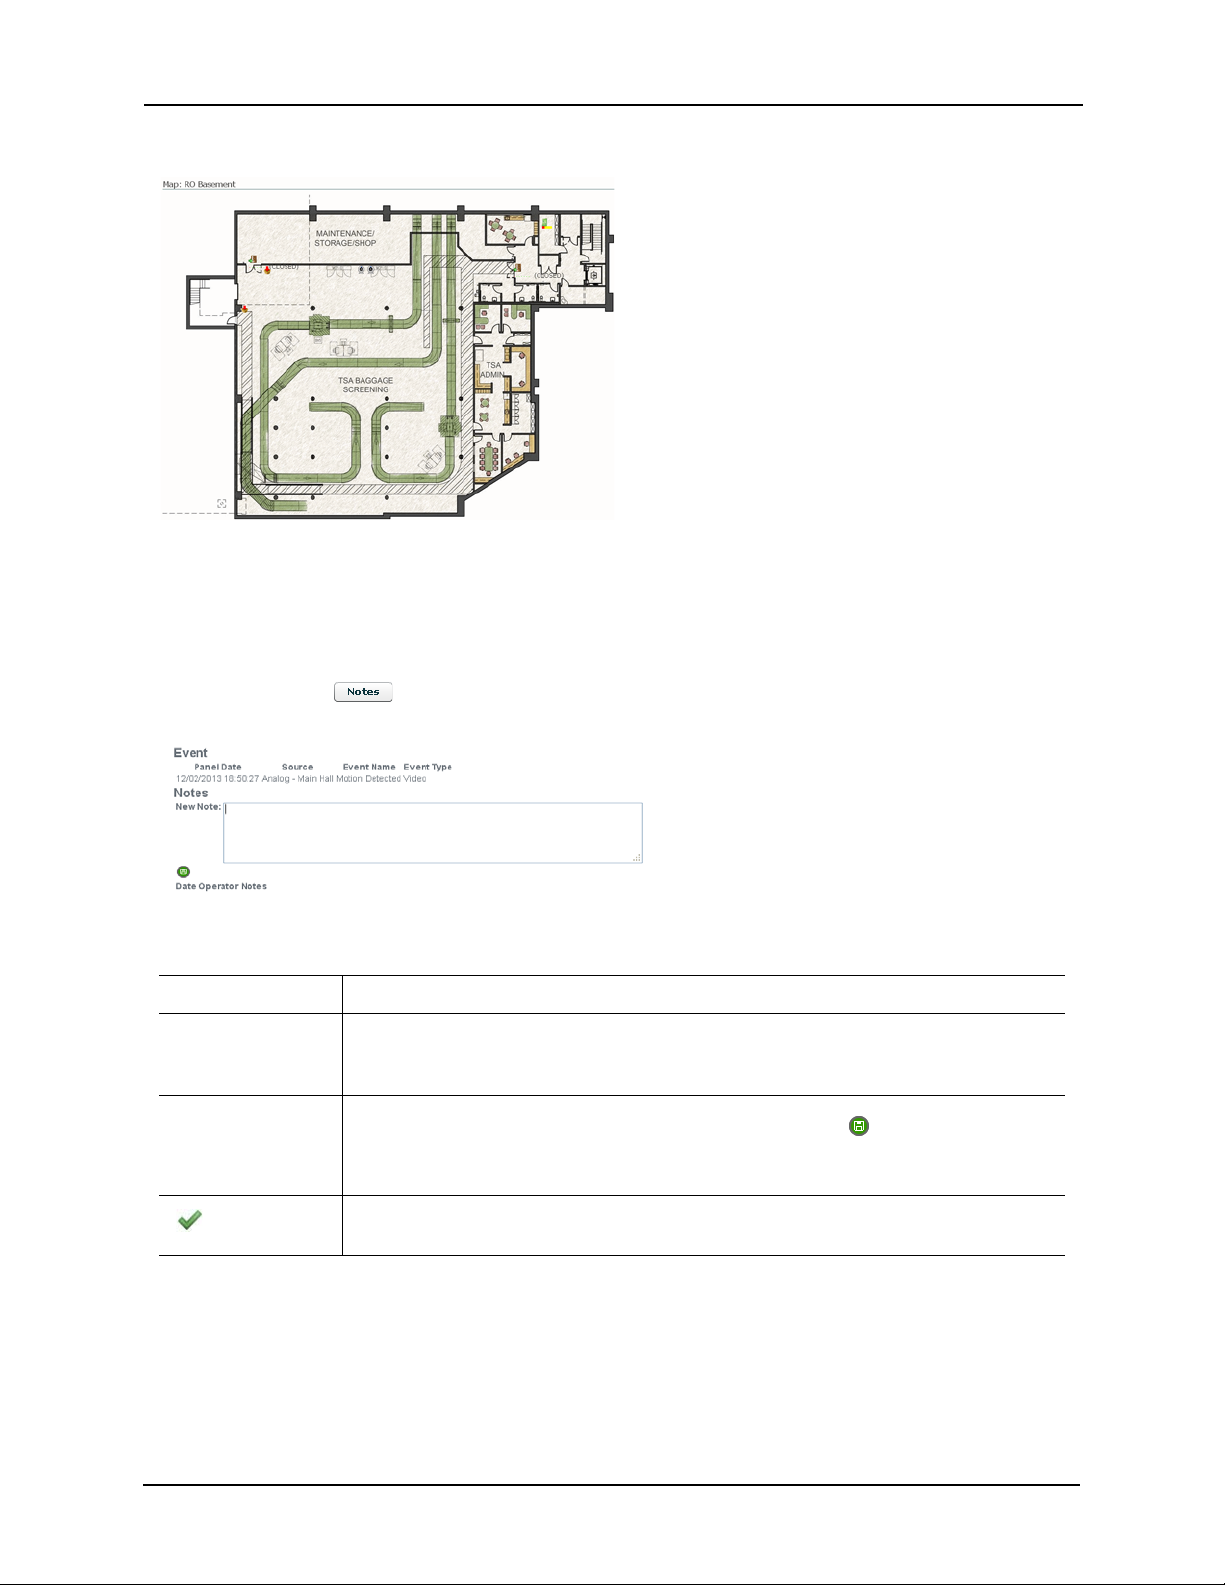
Maps Page
When you click on the Maps tab, a page like this appears:
32
Page 37
Alarm & Event Monitoring Operator Guide
Click on the map you want to view and a page like this example appears:
For more on this page follow the instructions in Monitoring Alarms and Events From Maps on
page 17.
Notes Page
When you click the button for a selected alarm or event, a pop-up page like this example
appears:
This page contains three areas:
Event/Alarm
Description This line provides information about the event or alarm including the date of the event or
alarm as recorded by the panel, the source of the alarm, the event name, and the type of
event it was.
Notes
New Note:
Enter any note on this alarm you need to document then click . The note you just
entered is moved to the Notes Record list with the date and name of the person who
saved it.
Click this button to save the notes you made in the Notes text box. The notes are saved
to the Notes Record list with the date and name of the person who saved it.
33
Page 38
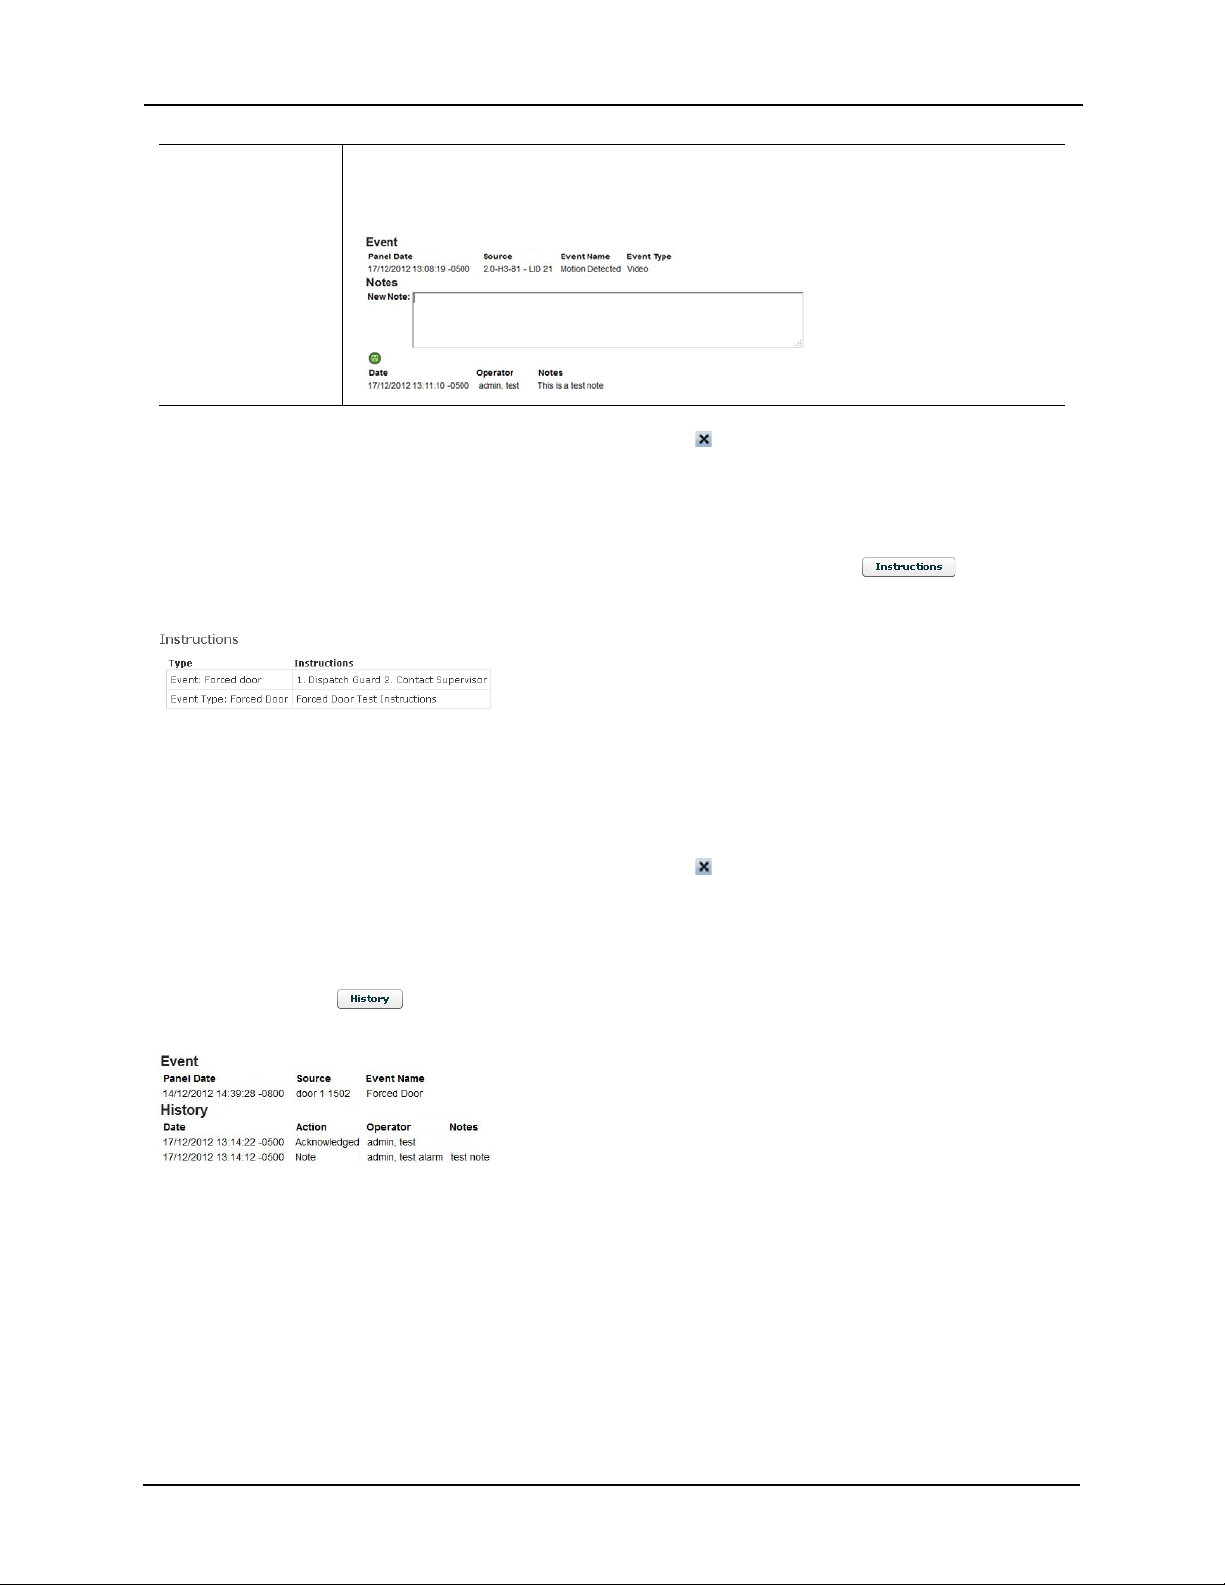
Alarm & Event Monitoring Operator Guide
Notes Record list This list displays all notes recorded for this alarm. This includes the note itself, the name
of the operator who created and saved the notes, and the exact time and date when the
note was saved. An example of this list is shown in the example below.
When you're finished with this page, click the exit button, , at the upper right hand corner of this
page.
Instructions Page
When you select a specific event, alarm, or searched event, then click the button, a
screen like this may pop up:
This page only appears if the event or alarm type specified has previously been supplied with
instructions.
If no instructions have been provided, the message ‘No Instructions’ appears instead.
When you're finished with this page, click the exit button, , at the upper right hand corner of this
page.
History Display
When you click the button for a specified event or alarm, a screen like this appears
example:
In the upper matrix, this page lists the date and time when this event/alarm occurred, the source of
the alarm/event, and the event name.
34
Page 39

Alarm & Event Monitoring Operator Guide
The lower matrix lists all information about the action that was performed in response to this
alarm/event. The information entered here includes:
Event/Alarm
Panel Date The date and time on which this event was recorded by the panel.
Source The point where the event was detected.
Event
Name
History
Date The date and time when the note was entered for this alarm/event.
Action This indicates the action that was taken. This is normally a note entry; however, it can also be an
Operator The operator who performed the action.
Notes The note entered concerning this action.
The name of the event that was detected.
action performed by the operator overseeing the event.
Identity Display
Many events or alarms that occur are caused by the entry of a card or PIN at a specific entry or exit
point. In order to help the guard or security operator identify the person who is assigned that card
or PIN code, Access Control Manager provides the ability to pull up the identity of the card or code
holder within the Monitor module.
To do this:
1. Bring up the Event, Alarm, or Search monitor screen.
2. Click to highlight a specific event or alarm.
3. Click the button.
A screen like this example appears:
NOTE: A screen like this only appears if the system has a record of the card or code holder's
identity.
Notice that this screen includes the relevant information about the card or code holder's identity
as entered in the Identity module.
35
Page 40

Alarm & Event Monitoring Operator Guide
In addition, the most recent use of the token associated with this identity is shown underneath the
picture, including the door accessed and the time/date on which the door was accessed.
Camera Video Window
When you select an event or alarm then click the button, a screen like this example
appears:
This window contains not only the real-time video coming from the camera associated with this
event or alarm, it also contains a variety of control buttons as shown below:
These buttons include:
Zoom control
Camera
Selection bar
Enter a value in the text box or click on the
the picture. Use the icon to zoom in on a specific aspect of the video feed.
Check one or more boxes to indicate the camera feeds you want to appear in the video
window.
If you have selected more than one, you can click on the appropriate button on the Multiple
Frame Selection bar to display as many of the camera feeds as required.
+ or - buttons to increase or decrease the size of
36
Page 41

Alarm & Event Monitoring Operator Guide
Multiple Frame
Selection bar
Pan & Tilt
controls
Click on the appropriate button to display up to nine different camera views in a number of
different arrangements.
If the selected camera is a PTZ camera, you can click on any of the buttons in this control
panel to move the camera in the desired direction.
Recorded Video Window
When you click the button for a designated event or alarm, a picture like this example
appears:
This screen includes the following buttons and fields:
Check the camera whose recorded video you want to review.
In the boxes, select the day and time you want to begin and end the recorded
video.
Once you have selected the camera to use, this button is activated. Click this
button to manually start the recorded video clip.
Once you have started streaming, this button is activated. Click this button to
end the recorded video clip.
The recorded video clip appears in the left panel below this button.
Use the buttons on this panel to play video selected from the left panel below
the Start Streaming button.
37
 Loading...