

Page 1

Collaboration Administrator Manual
Ver si on 5.0
Page 2

AV04-0114, January 2, 2014
Version 5.0
Copyright© 2013 Avigilon Corporation
Avigilon Inc.
Box 378
#101-1001 West Broadway
Vancouver, British Columbia
V6H 4E4
Canada
Phone:888.281.5182
Web:www.avigilon.com
Collaboration Administrator Manual
ii
Page 3

Collaboration Administrator Manual
Getting Help
If you encounter a problem that is not discussed in available Access Control Manager user guides
or on-line help files, and need technical support, please contact your local Value Added Reseller
(VAR) or Access Control Manager provider.
When contacting your VAR, please be sure to have your software version number available.
For future reference, record these numbers here.
Version Number: ________________________________
VAR: __________________________________________
VAR Phone #: __________________________________
iii
Page 4

Table of Contents
Getting Help . . . . . . . . . . . . . . . . . . . . . . . . . . . . . . . . . . . . . . . . . . . . iii
Overview . . . . . . . . . . . . . . . . . . . . . . . . . . . . . . . . . . . . . . . . . . . . . . . 1
Collaboration Procedures . . . . . . . . . . . . . . . . . . . . . . . . . . . . . . . . . 2
Adding a Collaboration . . . . . . . . . . . . . . . . . . . . . . . . . . . . . . . . . . . . . . . . . . 2
Editing a Collaboration . . . . . . . . . . . . . . . . . . . . . . . . . . . . . . . . . . . . . . . . . . . 2
Deleting a Collaboration . . . . . . . . . . . . . . . . . . . . . . . . . . . . . . . . . . . . . . . . . 3
Assigning an Event Type to a Collaboration . . . . . . . . . . . . . . . . . . . . . . . . . 3
Assigning Events to a Collaboration . . . . . . . . . . . . . . . . . . . . . . . . . . . . . . . 3
Collaboration Add Page . . . . . . . . . . . . . . . . . . . . . . . . . . . . . . . . . . . . . . . . . . 4
Additional Fields . . . . . . . . . . . . . . . . . . . . . . . . . . . . . . . . . . . . . . . . 4
Identity CSV One-Time Upload . . . . . . . . . . . . . . . . . . . . . . . . . . . 5
Identity CSV Recurring Upload . . . . . . . . . . . . . . . . . . . . . . . . . . . . 6
Events Collaborations . . . . . . . . . . . . . . . . . . . . . . . . . . . . . . . . . . . 7
Pull Types . . . . . . . . . . . . . . . . . . . . . . . . . . . . . . . . . . . . . . . . . . . . . . 8
Collaboration Listing Page . . . . . . . . . . . . . . . . . . . . . . . . . . . . . . . . . . . . . . . .10
Collaboration Edit Screen . . . . . . . . . . . . . . . . . . . . . . . . . . . . . . . . . . . . . . . . 11
Collaboration Types . . . . . . . . . . . . . . . . . . . . . . . . . . . . . . . . . . . . . . . . . . . . .12
Running a Collaboration . . . . . . . . . . . . . . . . . . . . . . . . . . . . . . . . . . . . . . . . . .12
Previewing Records . . . . . . . . . . . . . . . . . . . . . . . . . . . . . . . . . . . . . . . . . . . . . 13
Collaboration Administrator Manual
Collaboration Details. . . . . . . . . . . . . . . . . . . . . . . . . . . . . . . . . . . . 14
ArcSight CEF Edit Screen . . . . . . . . . . . . . . . . . . . . . . . . . . . . . . . . . . . . . . . . . 14
Arcsight CEF . . . . . . . . . . . . . . . . . . . . . . . . . . . . . . . . . . . . . . . . . . . 14
CSV Recurring . . . . . . . . . . . . . . . . . . . . . . . . . . . . . . . . . . . . . . . . . . . . . . . . . . 14
CSV One-Time Upload Edit Screen . . . . . . . . . . . . . . . . . . . . . . . . . . . . . . . .16
CSV Uploads . . . . . . . . . . . . . . . . . . . . . . . . . . . . . . . . . . . . . . . . . . .16
Preparing the CSV File . . . . . . . . . . . . . . . . . . . . . . . . . . . . . . . . . . .17
Uploading CSV Files . . . . . . . . . . . . . . . . . . . . . . . . . . . . . . . . . . . . . 17
Avoiding Duplicate Identities and Errors . . . . . . . . . . . . . . . . . . . 17
Mandatory Fields . . . . . . . . . . . . . . . . . . . . . . . . . . . . . . . . . . . . . . . 17
Field List . . . . . . . . . . . . . . . . . . . . . . . . . . . . . . . . . . . . . . . . . . . . . . .17
CSV Upload Template . . . . . . . . . . . . . . . . . . . . . . . . . . . . . . . . . . .19
LDAP Edit Screen . . . . . . . . . . . . . . . . . . . . . . . . . . . . . . . . . . . . . . . . . . . . . . 20
Milestone Video Edit Screen . . . . . . . . . . . . . . . . . . . . . . . . . . . . . . . . . . . . . 20
Oracle RDBMS Pull Edit Screen . . . . . . . . . . . . . . . . . . . . . . . . . . . . . . . . . . .21
Pelco Digital Sentry Edit Screen . . . . . . . . . . . . . . . . . . . . . . . . . . . . . . . . . . .21
Pelco Endura Edit Screen . . . . . . . . . . . . . . . . . . . . . . . . . . . . . . . . . . . . . . . 22
Pelco Endura Page . . . . . . . . . . . . . . . . . . . . . . . . . . . . . . . . . . . . . 22
SNMP Edit Screen . . . . . . . . . . . . . . . . . . . . . . . . . . . . . . . . . . . . . . . . . . . . . . 23
SNMP Page . . . . . . . . . . . . . . . . . . . . . . . . . . . . . . . . . . . . . . . . . . . 23
Splunk Edit Screen . . . . . . . . . . . . . . . . . . . . . . . . . . . . . . . . . . . . . . . . . . . . . 23
Splunk Page . . . . . . . . . . . . . . . . . . . . . . . . . . . . . . . . . . . . . . . . . . . 24
SQL Edit Screen . . . . . . . . . . . . . . . . . . . . . . . . . . . . . . . . . . . . . . . . . . . . . . . . 24
Syslog Edit Screen . . . . . . . . . . . . . . . . . . . . . . . . . . . . . . . . . . . . . . . . . . . . . 24
Syslog Page . . . . . . . . . . . . . . . . . . . . . . . . . . . . . . . . . . . . . . . . . . . 25
XML Edit Screen . . . . . . . . . . . . . . . . . . . . . . . . . . . . . . . . . . . . . . . . . . . . . . . 25
XML Page . . . . . . . . . . . . . . . . . . . . . . . . . . . . . . . . . . . . . . . . . . . . . 25
Blob Page . . . . . . . . . . . . . . . . . . . . . . . . . . . . . . . . . . . . . . . . . . . . . . . . . . . . . 26
Events Page . . . . . . . . . . . . . . . . . . . . . . . . . . . . . . . . . . . . . . . . . . . . . . . . . . . 27
Identities Page . . . . . . . . . . . . . . . . . . . . . . . . . . . . . . . . . . . . . . . . . . . . . . . . . 28
Roles Page . . . . . . . . . . . . . . . . . . . . . . . . . . . . . . . . . . . . . . . . . . . . . . . . . . . . 28
Schedule Page . . . . . . . . . . . . . . . . . . . . . . . . . . . . . . . . . . . . . . . . . . . . . . . . . 29
iv
Page 5

Collaboration Administrator Manual
Source Page . . . . . . . . . . . . . . . . . . . . . . . . . . . . . . . . . . . . . . . . . . . . . . . . . . . 29
Tokens Page . . . . . . . . . . . . . . . . . . . . . . . . . . . . . . . . . . . . . . . . . . . . . . . . . . 30
User Defined Page . . . . . . . . . . . . . . . . . . . . . . . . . . . . . . . . . . . . . . . . . . . . . .31
v
Page 6

Collaboration Administrator Manual
Overview
Collaboration provides the ability to exchange data between Access Control Manager software
and a large number of database types including:
•Events - ArcSight CEF
• Events - Generic XML
• Events - Milestone Video
• Events - Pelco Digital Sentry
•Events - Pelco Endura
•Events - SNMP
• Events - Splunk
• Events - Syslog
• Identity CSV One-Time Upload
•Identity CSV Recurring
• Identity LDAP Pull
• Identity Oracle RDBMS Pull
• Identity SQL Server Pull
For example, this enables Access Control Manager to pull personnel information from an existing
HR database to populate its own Identities definitions. This saves the time and cost of re-entering
the information and allows a simultaneous updating of information based on current employee or
security status.
To open this feature:
• From the Setup Links section of the main menu, select Collaboration. The Collaboration
Listing page appears.
To use this feature, refer to Collaboration Procedures on page 2.
For details on screens and pages that appear in the Collaboration feature, refer to Collaboration
Details on page 14.
1
Page 7
Collaboration Administrator Manual
Collaboration Procedures
Collaboration is managed and maintained using these topics:
• Adding a collaboration (page 2)
• Editing an existing collaboration (page 2)
• Deleting an existing collaboration (page 3)
• Assigning the event type (page 3)
The main screens used during these procedures are shown in these topics:
• Collaboration Add page (page 4)
• Collaboration Listing page (page 10)
• Collaboration Edit page (page 11)
Adding a Collaboration
To add a collaboration:
1. At the Setup Links section of the home screen, click Collaboration.
The Collaboration Listing page appears (see page 10).
2. Click .
The Collaboration Add screen appears (see page 4).
3. Enter or supply the information as required for the fields including the 'Type' field.
4. Depending on the option you select in the 'Type' field, additional fields are added.
5. Enter values or select options for the additional fields.
6. When you're finished, click to confirm your selections.
The Collaboration Edit screen appears (see page 11). This screen often includes multiple
tabbed pages.
7. Make changes to the necessary fields on the required tabbed pages.
8. Click to save those changes.
Editing a Collaboration
To edit an existing collaboration:
1. At the Setup Links section of the home screen, click Collaboration.
The Collaboration Listing page appears (see page 10).
2. Click the name of the Collaboration you want to edit.
The Collaboration Edit screen appears (see page 11).
3. Select options and enter values to the requisite pages on this screen as required.
2
Page 8

Not all tabbed pages for all types of collaborations are relevant. Those pages which are
not available for a specific store are not activated.
4. When you're finished, click .
You are returned to the Collaboration Listing page with a message indicating that the
update was successful.
Deleting a Collaboration
To delete an existing collaboration:
1. At the Setup Links section of the home screen, click Collaboration.
The Collaboration Listing page appears (see page 10).
2. Click to the right of the collaboration you want to delete.
A message appears asking you to confirm your deletion.
3. Click OK.
You are returned to the Collaboration Listing page. The deleted collaboration no longer
appears.
Collaboration Administrator Manual
Assigning an Event Type to a Collaboration
To assign an event type to a collaboration:
1. Create a new collaboration or access an existing collaboration by clicking the
Collaboration icon.
The Collaboration Listing page appears (see page 10).
2. Select the collaboration to which you want to add or edit the event type.
The Collaboration Add page appears (see page 4).
3. At the 'Type' pick list, select the collaboration event type you need.
4. Click OK.
Assigning Events to a Collaboration
Many types of collaborations enable the operator to specify which events are to be shared.
To assign an event to a collaboration:
1. At the Setup Links section of the home screen, click Collaboration.
The Collaboration Listing page appears (see page 10).
2. Do one of these:
• To edit an existing collaboration, select the collaboration whose type you want to
modify.The Collaboration Edit page appears.
• Create a new collaboration.The Collaboration Add page appears.
3
Page 9
Collaboration Administrator Manual
3. Click the Events tab.
The Events page appears (see “Events Page” on page 27).
4. From the 'Available' window click to highlight each event type you want to share.
To pick multiple events, use Ctrl + right-click to select non-consecutive events, or use
Shift + right-click to select a range of events.
5. Click to move the selected events over to the 'Members' window.
6. Click .
The selected events will be shared between the database and this application.
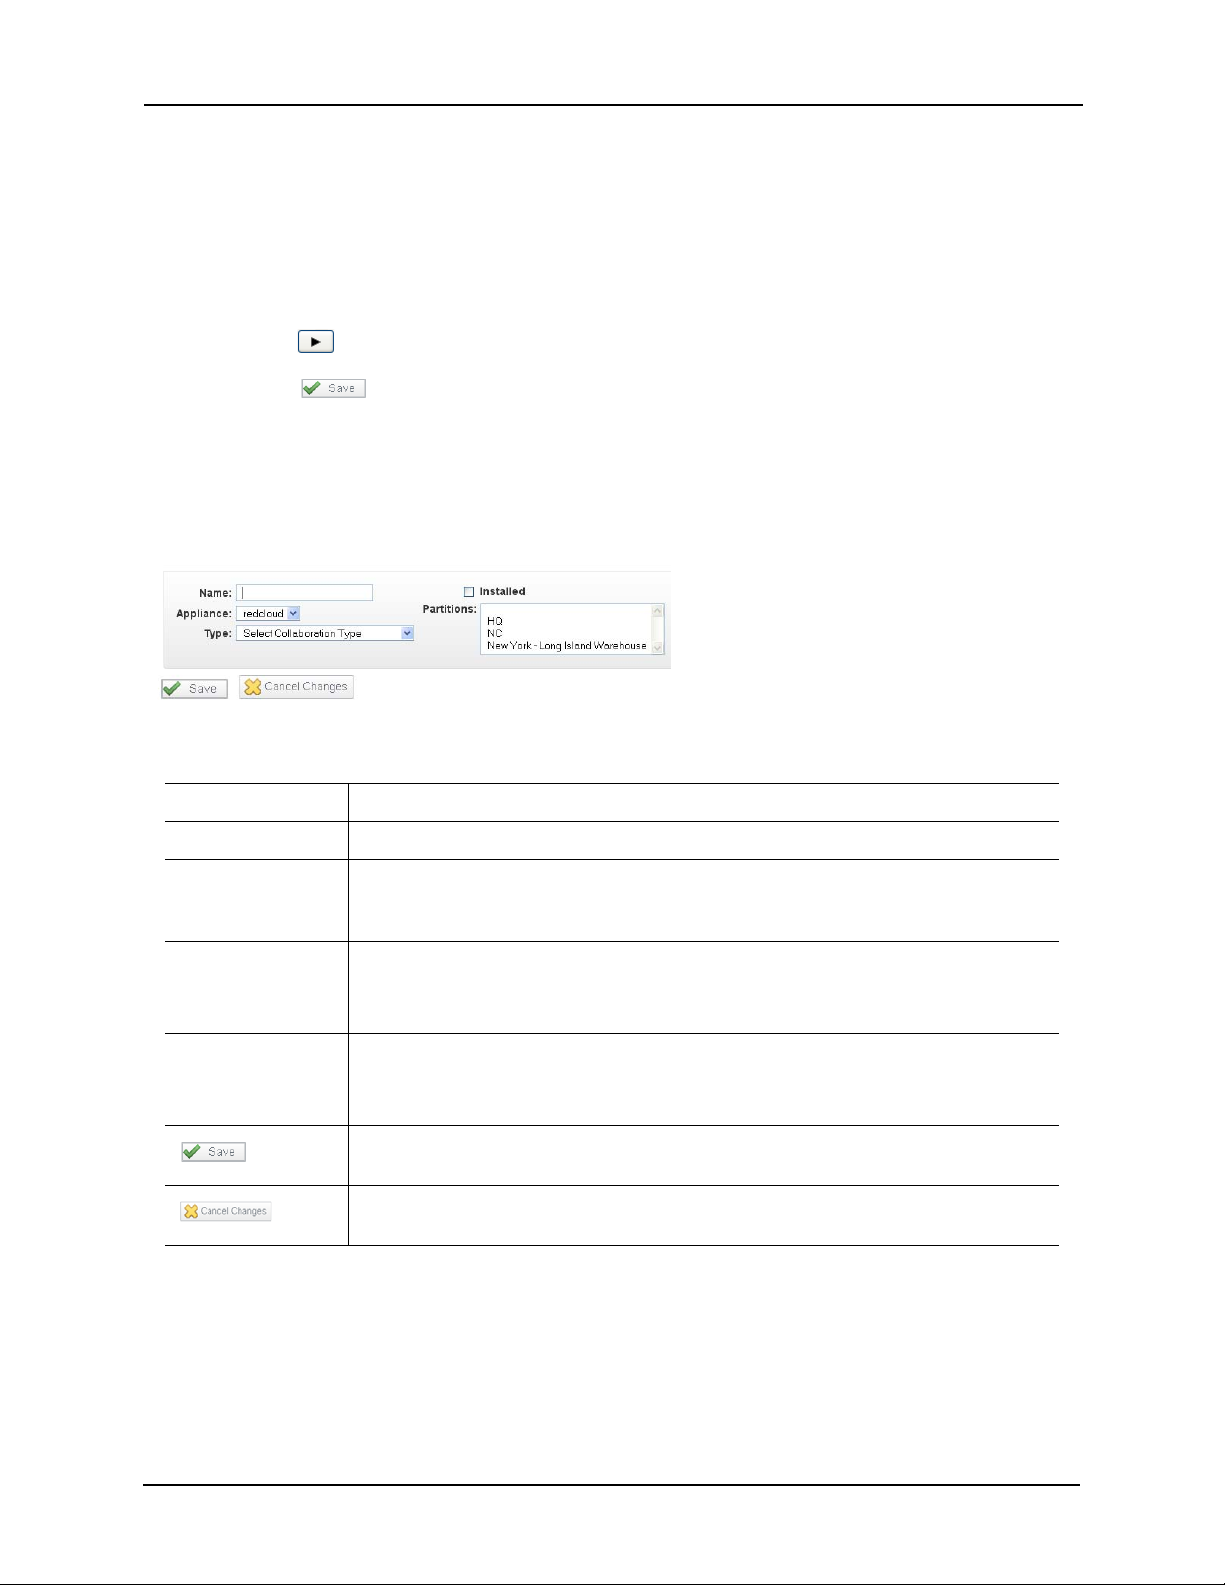
Collaboration Add Page
When you add a collaboration from the Listing page, a screen like this appears:
The fields on this page are:
Name Enter the name of this collaboration.
Installed Click to check this box if this collaboration is currently enabled.
Appliance Select from the drop-down pick list one of the existing appliances as the main
connection to this collaboration type. Only those appliances previously defined for this
application appear in this list.
Type Select the collaboration type from the drop-down pick list. Depending on the type of
collaboration you select, additional files are added as shown below.
For more information on these options, see Collaboration Types on page 12.
Partitions If required, select the partitions to which this collaboration will belong.
Only those partitions currently defined for this system appear in this field. If no partitions
are defined, this window will not appear.
Click this icon to save changes made to this form. The new collaboration is added to the
Collaboration Listing page.
Click this icon to ignore any changes made to this form during the current session and
return to the Collaboration Listing page.
Additional Fields
Depending on the option you select in the 'Type' field, the following additional fields can appear:
• Identity CSV One-Time Upload (see page 5)
• Identity CSV Recurring Upload (see page 6)
4
Page 10

Collaboration Administrator Manual
• Identity LDAP (see page 20)
• Identity Milestone Video (see page 20)
• Oracle RDBMS (see page 21)
• Identity SQL Server Pull (see page 24)
• Pelco Digital Sentry (see page 21)
• Pelco Endura (see page 22)
• SNMP (see page 23)
• Events – ArcSight CEF (see page 14)
• Events – Splunk (see page 23)
• Events – Syslog (see page 24)
• Events – Generic XML (see page 25)
Identity CSV One-Time Upload
This collaboration type is supported in two formats: short and long.
If you select Identity CSV One-Time Short format as your collaboration type, an additional field
like this appears:
The additional field is:
CSV File
Click the button and select the flat file with the CSV extension for this database.
Once you have selected a CSV file, click the button and the upload process
commences.
If you select Identity CSV One-Time Long format as your collaboration type, several fields appear
as shown in this example:
The additional field is:
Delimiter From the pick list, select the character that is used in this file as the delimiter.
5
Page 11
Collaboration Administrator Manual
Text Qualifier From the pick list, select the punctuation used to specify text for this data upload.
Date Format From the pick list, select the format used in this file for the date.
CSV File
Click the button and select the flat file with the CSV extension for this database.
Once you have selected a CSV file, click the button and the upload process
commences.
If you select Identity CSV One-Time Upload as your collaboration type, an additional field like this
appears:
For more information on this collaboration type, refer to CSV One-Time Upload Edit Screen on
page 16 and Uploading CSV Files on page 17.
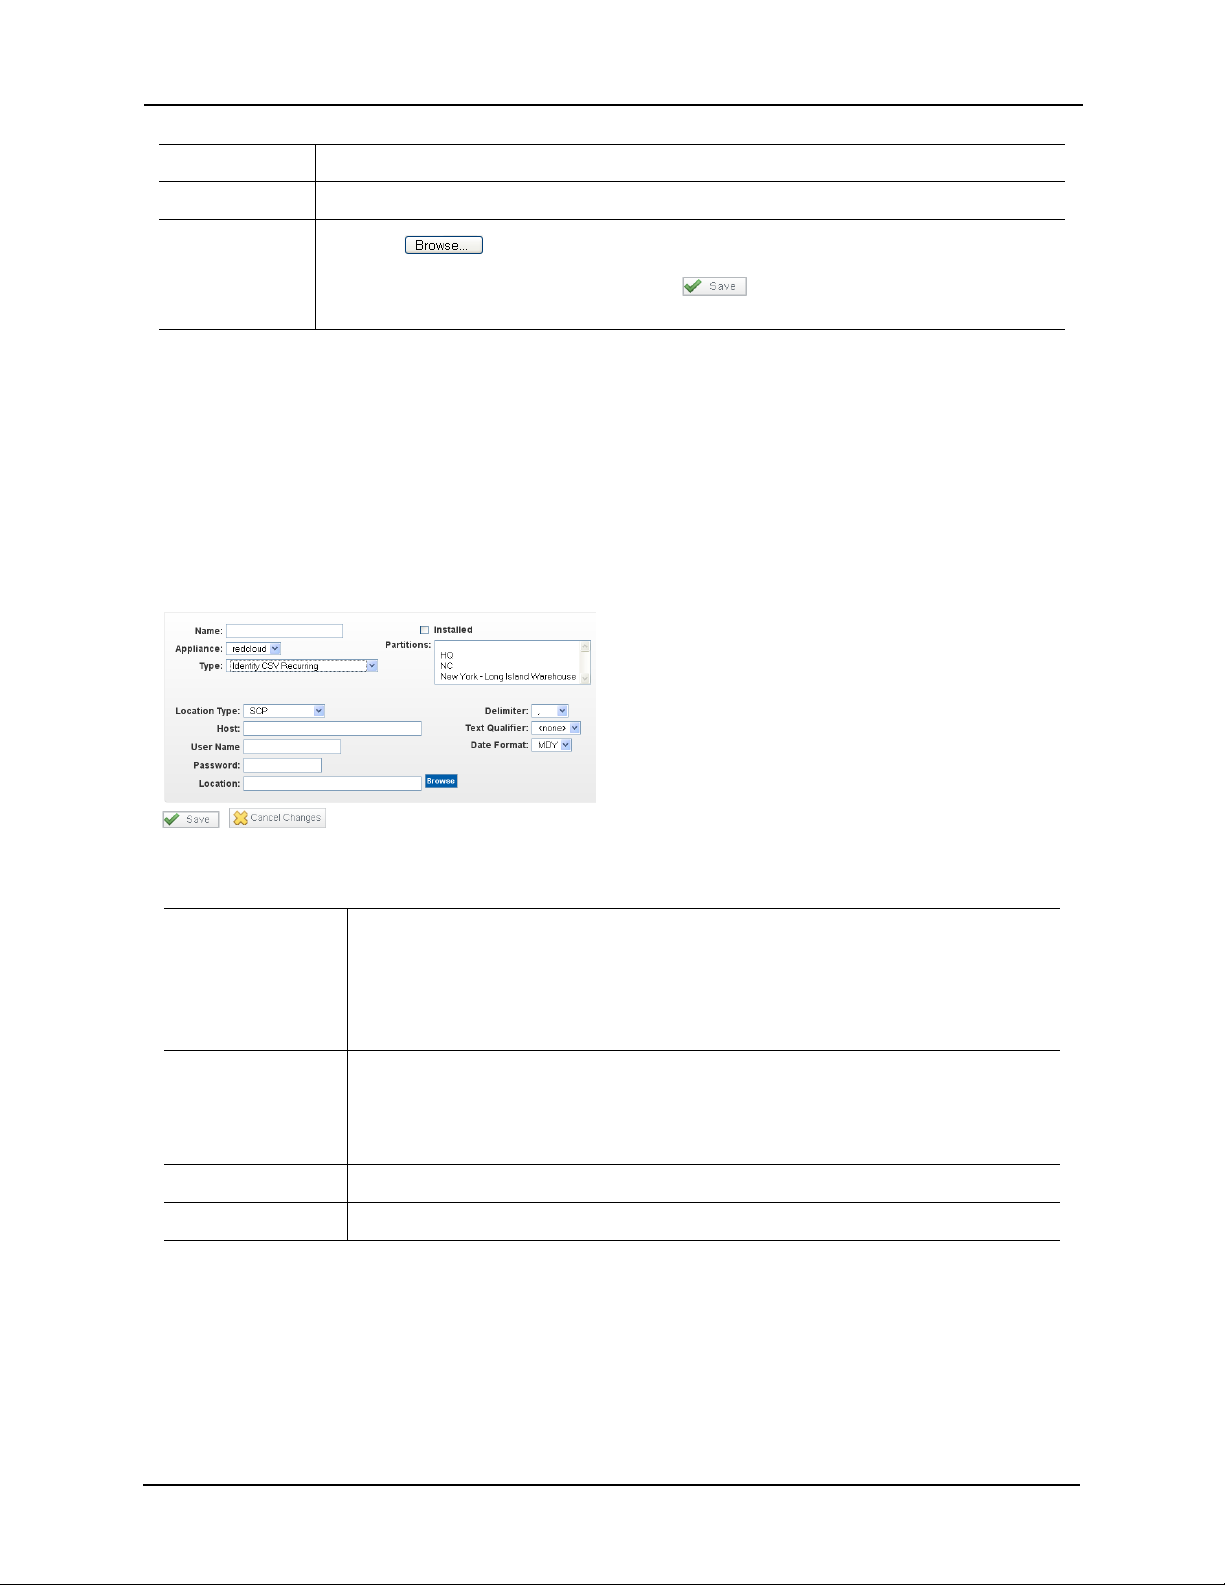
Identity CSV Recurring Upload
If you select either Identity CSV Recurring Upload as your collaboration type, an additional field
like this appears:
The additional field is:
Location Type From the drop-down list, select the location type this CSV upload requires. The options
are:
• SFTP – A frequently used backup technique
• Windows Share – the MS Windows share technique (in a Windows environment,
most people will use this)
Host If you are using Windows Share, enter the IP address of the computer on which the
share file will appear and the directory separated by a forward slash (/).
If you are using SFTP, enter just the host name (which can be just the IP address) without
the directory.
User Name Enter the user name allowing access to this location.
Password Enter the password allowing access to this location.
6
Page 12

Collaboration Administrator Manual
Location Enter the name of the subdirectory where the backup files are stored on the host
computer as shown in the above example.
If the file is to be located in a subdirectory of the share, use this format:
/directory_name/
Notice that the directory name needs both a leading slash and a trailing slash. If the file
is to be located in the top level of the share (no subdirectory), use this format:
/directory_name
Notice that there is only one leading slash required. There must be an entry in the
Location field for the backup to work.
Delimiter Select the delimiter used to separate column data for this data upload.
Text Qualifier Select the punctuation used to specify text for this data upload.
Date Format Select the format to be used for this data upload.
For more information on this collaboration type, refer to CSV One-Time Upload Edit Screen on
page 16 and Uploading CSV Files on page 17.
Events Collaborations
If you select any of the events collaborations – including Splunk, Syslog, ArcSight CEF, Pelco
Digital Sentry, Pelco Endura, Milestone Video, XML, and SNMP – additional fields like this example
appears:
The additional fields are:
Host Enter the name of the host computer where this database resides. Include the domain and
computer name where appropriate.
Port Number Enter the port number at the host computer that should be used for extracting the database
information to the specified host.
Require TCP Check this box to indicate that the transfer of data between the designated host server that
contains the database and this application is being conducted over the network.
For more information on these event collaboration types, refer to:
• ArcSight CEF (see page 14)
• Milestone Edit Screen (see page 20)
• Splunk Edit Screen (see page 23)
• Pelco Digital Sentry screen (see page 21)
• Pelco Endura screen (see page 22)
7
Page 13

Collaboration Administrator Manual
• SNMP Edit Screen (see page 23)
• XML Edit Screen (see page 25)
Pull Types
If you select the database Identity LDAP pull, additional fields appear like these examples:
The additional fields are:
Host Enter the name of the host database server where this database resides. Include the domain
and computer name where appropriate.
Port Number Enter the port number at the host computer that should be used for extracting the LDAP
database information to the specified host.
SSL Check this box to indicate that the transfer of data between the designated database host
server and this application is being conducted using SSL.
Bind DN Enter the name of the user on the external LDAP server permitted to search the LDAP directory
within the defined search base.
Password Enter the password used to access the host.
For more information on this type, refer to LDAP Edit Screen on page 20.
If you select the identity database SQL Server pull, additional fields appear like these examples:
The additional fields are:
Host Enter the name of the host database server where this SQL database resides. Include the
domain and computer name where appropriate.
Port Number Enter the port number at the host computer that should be used for extracting the SQL
server database information to the specified host.
User Name Enter the user name required to access this SQL database server.
Password Enter the password used to access the SQL Server host.
8
Page 14

Collaboration Administrator Manual
Database From the drop-down list, select the SQL database you want to share.
For more on this type, refer to SQL Edit Screen on page 24.
If you select the identity database Oracle RDBMS, additional fields like this example appear:
The additional fields are:
Host Enter the name of the host database server where this database resides. Include the
domain and computer name where appropriate.
Port Number Enter the port number at the host computer that should be used for extracting the
database information to the specified host.
User Name Enter the name of the person authorized to access this Oracle database.
Password Enter the password used to access the Oracle host.
Connection options Enter, in RDBMS script, the options required for this Oracle database.
Database From the drop-down list, select the Oracle you want to share.
Instance Enter the instance of the Oracle database to which you want to connect.
For more information on this type of pull, refer to Oracle RDBMS Pull Edit Screen on page 21.
9
Page 15

Collaboration Administrator Manual
Collaboration Listing Page
When you select the Collaboration icon, the Collaboration Listing page appears like the following
example:
This page displays the following buttons and fields:
Name Name of the collaboration.
Click this name to bring up the Collaboration Edit page.
Installed
Type The type of collaboration represented by this collaboration.
Last Transfer The date and time when the last transfer of this collaboration took place.
Preview
Run
Delete
if this collaboration is enabled; if this collaboration is currently disabled.
Click this link to change the state of this installation.
Click to view a handful of sample records based on the Collaboration configuration.
For more on this, refer to Previewing Records on page 13.
Click to run (sync) the specified collaboration immediately.
Only those collaboration types that allow such operations, such as pulls and uploads, display
this icon. A message appears asking you whether you are sure you
want to run this collaboration. Click
For more on this feature, see Running a Collaboration on page 12.
Click to delete this specific collaboration.
Ye s to confirm.
Click this icon to add another collaboration.
Click this icon to generate a PDF report based on the collaborations in this list.
10
Page 16

Collaboration Administrator Manual
Collaboration Edit Screen
Depending on the type of collaboration you selected on the add page, this screen can consist of
anywhere from one to seven tabbed pages as shown in the following examples:
All editable pages include the following fields and buttons:
Name Enter the name of this collaboration.
Installed Click to check this box if this collaboration is currently enabled.
Appliance Select from the drop-down pick list one of the existing appliances as the main connection to
this collaboration type. Only those appliances previously defined for this application appear
in this list.
Partitions If required, select the partitions to which this collaboration will belong.
Only those partitions currently defined for this system appear in this field. If no partitions are
defined, this window will not appear.
Type This read-only field indicates the type of collaboration that was selected on the Add page.
Click this icon to save changes made to this form during this session. The new collaboration
is added to the Collaboration Listing page.
Click this icon to ignore any changes made to this form during the current session and return
to the Collaboration Listing page.
For specific page descriptions and definitions of type-specific fields, refer to the following edit
screens:
• ArcSight CEF (see page 14)
• CSV Edit Screen (see page 16)
• LDAP Edit Screen (see page 16)
• Milestone Edit Screen (see page 20)
• Oracle RDBMS Pull Edit Screen (see page 21)
• Pelco Digital Sentry Edit Screen (see page 21)
• Pelco Endura Edit Screen (see page 22)
• SNMP Edit Screen (see page 23)
• Splunk Edit Screen (see page 23)
• SQL Edit Screen (see page 24)
• Syslog Edit Screen (see page 24)
• XML Edit Screen (see page 25)
11
Page 17

Collaboration Types
The types of collaboration available in this application include:
Option Explanation
Collaboration Administrator Manual
Identity CSV OneTime Upload
Identity CSV
Recurring Upload
Identity LDAP Pull Pull identities, tokens, groups, roles from a directory store and keep the Access Control
Identity Oracle
RDBMS Pull
Identity SQL Server
Pull
Events – Arcsight
CEF
Events – Generic
XML
Events – Pelco
Digital Sentry
Upload identities, tokens, groups, roles from an uploaded CSV file and keep the Access
Control Manager identity database in sync with changes. For more on using this
collaboration type, see CSV Uploads on page 16.
Upload identities, tokens, groups, and roles periodically from an updated CSV file and
keep the Access Control Manager identity database in sync with changes.
For more on using this collaboration type, see CSV Recurring on page 14.
Manager identity database in sync with changes. For more on using this collaboration
type, see LDAP Edit Screen on page 20.
Pull identities, tokens, groups, roles from a Oracle RDBMS store and keep the Access
Control Manager identity database in sync with changes. For more on using this
collaboration type, see Oracle RDBMS Pull Edit Screen on page 21.
Pull identities, tokens, groups, roles from a Microsoft SQL Server RDBMS store and keep
the Access Control Manager identity database in sync with changes. For more on using
this collaboration type, see SQL Edit Screen on page 24.
Transmit events in real time using the Arcsight CEF format. For more on using this
collaboration type, see ArcSight CEF Edit Screen on page 14.
Transmit events in real time using XML. For more on using this collaboration type, see
XML Edit Screen on page 25.
Transmit events in real time using the Pelco digital sentry format. For more on using this
collaboration type, see Pelco Digital Sentry Edit Screen on page 21.
Events – Pelco
Endura
Events – Milestone
Video
Events – SNMP Transmit events in real time using SNMP traps. For more on using this collaboration type,
Events – Splunk Transmit events in real time using XML and Splunk tagged fields. For more on using this
Events – Syslog Transmit events in real time to a syslog utility. For more on using this collaboration type,
Transmit events in real time using the Pelco Endura format. For more on using this
collaboration type, see Pelco Endura Edit Screen on page 22.
Transmit events in real time and insert the Milestone video database. For more on using
this collaboration type, see Milestone Video Edit Screen on page 20.
SNMP Edit Screen on page 23.
see
collaboration type, see Splunk Edit Screen on page 23.
see Syslog Edit Screen on page 24.
Running a Collaboration
There are several types of collaborations that enable the qualified operator to synchronize a
collaboration immediately. The collaboration types that support this are:
• Pulls (such as SQL Server and LDAP)
•CSV One-Time Upload
• CSV Recurring
12
Page 18

Collaboration Administrator Manual
To perform this operation:
1. If not already done, define one of the collaborations supported by this feature.
2. From the Collaboration Listing page, click the green check mark, , from the ‘Run’
column.
You are asked to confirm this operation.
3. Select Ye s .
The operation, whether it is a pull or an upload, is performed.
Previewing Records
When you click the button from the Collaboration Listing page, you are prompted by a
message asking you whether you want to view the records associated with this selected
collaboration.
To view the records, click OK. A list of this collaboration's records appears like this example:
Use the browser's back button to return to the previous page.
13
Page 19

Collaboration Administrator Manual
Collaboration Details
The chapter discusses the various fields available on the Collaboration pages as well as details
the fields contained on the various Collaboration pages.
ArcSight CEF Edit Screen
If you specify Events - ArcSight CEF as the collaboration type, a screen like this example appears:
The pages on this screen are:
•Arcsight CEF
• Events (see page 27)
Arcsight CEF
This page includes these type-specific fields:
Host Enter the name of the host computer where this database resides. Include the domain
and computer name where appropriate.
Port Number Enter the port number at the host computer that should be used for extracting the
database information to the specified host.
Require TCP Check this box to indicate that the transfer of data between the designated host server
that contains the database and this application is being conducted over the network.
CSV Recurring
If you create an Identity CSV Recurring collaboration type, this editable page appears:
14
Page 20

Collaboration Administrator Manual
The fields on this page include:
Name If required, modify the name of this collaboration.
Installed Click to check this box if this collaboration is currently enabled.
Appliance Select from the drop-down pick list one of the existing appliances as the main
connection to this collaboration type. Only those appliances previously defined for
this application appear in this list.
Type This read-only field indicates the type of collaboration this is.
Partitions If partitions are defined for this system, select one or more partitions to which this
collaboration belongs. Only those partitions previously defined for this system
appear on this pick list.
Location Type From the drop-down list, select the location type this CSV upload requires. The
options are:
SFTP – A frequently used backup technique
Windows Share – the MS Windows share technique (in a Windows environment,
most people will use this)
Host If you are using Windows Share, enter the IP address of the computer on which the
share file will appear and the directory separated by a forward slash (/). If you are
using SFTP, enter just the host name (which can be just the IP address) without the
directory.
User Name Enter the user name allowing access to this location.
Password Enter the password allowing access to this location.
Location Enter the name of the subdirectory where the backup files are stored on the host
computer as shown in the above example.
If the file is to be located in a subdirectory of the share, use this format:
/directory_name/
Notice that the directory name needs both a leading slash and a trailing slash.
If the file is to be located in the top level of the share (no subdirectory), use this
format:
/directory_name
Notice that there is only one leading slash required. There must be an entry in the
Location field for the backup to work.
Delimiter Select the delimiter used to separate column data for this data upload.
Text Qualifier Select the punctuation used to specify text for this data upload.
Date Format Select the format to be used for this data upload.
Click this icon to save changes made to this form. The modified collaboration is
updated in the Collaboration Listing page.
Click this icon to ignore any changes made to this form during the current session
and return to the Collaboration Listing page.
15
Page 21

Collaboration Administrator Manual
CSV One-Time Upload Edit Screen
This collaboration type is supported in two formats: short and long.
If you select Identity CSV One-Time Short format as your collaboration type, an additional field
like this appears:
The additional field is:
CSV File
Click the button and select the flat file with the CSV extension for this database.
If you select Identity CSV One-Time Long format as your collaboration type, several fields appear
as shown in this example:
The additional field is:
Delimiter From the pick list, select the character that is used in this file as the delimiter.
Text Qualifier From the pick list, select the punctuation used to specify text for this data upload.
Date Format From the pick list, select the format used in this file for the date.
CSV File
Click the button and select the flat file with the CSV extension for this database.
For more information on this collaboration type, refer to CSV One-Time Upload Edit Screen on
page 16 and Uploading CSV Files on page 17.
CSV Uploads
The CSV upload is one of the most commonly used collaboration files. The following procedures
enable the qualified operator to upload CSV fields easily.
16
Page 22

Collaboration Administrator Manual
Preparing the CSV File
To properly upload a CSV file into the application, it is important that the data be formatted
correctly and the CSV created properly. Use the CSV upload example template on page 19 to aid
in creating an identity CSV file. The very first row of the CSV file is reserved for column headers.
Make sure that the data in the rows reflects the column names. Moving a date or name to a
different column will cause the identity CSV upload to fail.
Uploading CSV Files
To upload an identity CSV file:
1. At the Collaboration Add page, create a new collaboration with either the Identity CSV
One-Time Upload Short form or Identity CSV One-Time Upload Long form type
selected.
2. If this is the long form, supply values to the three text fields as required.
3. Click to save the collaboration.
4. From the upload selection box, click the .
The Find File dialog box appears.
5. Locate the CSV file you need and select it.
The new CSV file appears on the collaboration edit page.
6. Save to start the upload process.
Avoiding Duplicate Identities and Errors
Running the identity CSV upload twice will result in identities being duplicated. Also, having an
error occur in the middle of an upload then starting over from the beginning can result in duplicate
identities. Duplicate identities can easily be deleted in the Identities section of the application. If
an error occurs, a message will appear on screen with approximate CSV line location. This will
help locate the error and start the CSV upload at the point where the last record failed.
Mandatory Fields
Not every field must have a value, but there are three mandatory fields: First name, Last Name,
and Status. If these fields do not have values, the upload will not work properly.
Field List
There are currently 19 fields that are available for uploading data:
External System ID The ID assigned to an identity by the user. For example, the primary key of an SQL table
that the user row is being pulled form. The external ID is a string and will accept
alphanumeric characters as well as hyphens, underscores, etc.
Load Date The date that the user ID is loaded into the table. The specific date format is mm/dd/yyyy
or 07/04/2012 for example.
17
Page 23

Collaboration Administrator Manual
First Name The user ID's first name and is a required value. The first name is a string and will accept
alphanumeric characters as well as hyphens, underscores, etc.
Last Name The user ID's last name and is a required value. The last name is a string and will accept
alphanumeric characters as well as hyphens, underscores, etc.
Middle Name The user ID's middle name. The middle name is a string and will accept alphanumeric
characters as well as hyphens, underscores, etc.
Address The user ID's street address. The address is a string and will accept alphanumeric
characters as well as hyphens, underscores, etc.
City The user ID's city. The city is a string and will accept alphanumeric characters as well as
hyphens, underscores, etc.
State The user ID's state. The state is a string and must be the states full name spelled out
starting with a capital letter for each word followed by lower case letters. Here are a few
examples: District of Columbia, North Carolina, California, West Virginia, Texas (DC is the
only exception).
Zip The user ID's zip code. The zip code is a string and will accept alphanumeric characters
as well as hyphens, underscores, etc.
Phone The user ID's phone. The phone is a string and will accept alphanumeric characters as
well as hyphens, underscores, etc. For Example: (303) 555-1234, 303.555.1234, 303555-1234, 303 555 1234.
Work Phone The user ID's work phone. The work phone is a string and will accept alphanumeric
characters as well as hyphens, underscores, etc. For Example: (303) 555-1234,
303.555.1234, 303-555-1234, 303 555 1234.
Email Address The user ID's email address. The email address is a string and will accept alphanumeric
characters as well as hyphens, underscores, etc.
Status The user ID's status and is a required value. This numeric field must be set to 1 (for Active)
or 2 (for Inactive).
Title The user ID's title and can be any title the user needs. Default titles currently are:
Accountant, CEO, Manager, Staff, Temporary, VP. Any value entered here that is not on
the option list must be defined in the Settings > User Lists option of the main application
in order for the pick list to display the value properly. The entered value is a string match
with the corresponding User List value, be sure to spell properly and remember the
value is case sensitive. The title is a string and will accept alphanumeric characters as
well as hyphens, underscores, etc.
Department The user ID's department and can be any department the user needs. Default
departments currently are: Accounting, Marketing, Human Resources, Sales, IT, R&D.
Any value entered here that is not on the option list must be defined in the Settings >
User Lists option of the main application in order for the pick list to display the value
properly. The entered value is a string match with the corresponding User List value, be
sure to spell properly and remember the value is case sensitive. Department is a string
and will accept alphanumeric characters as well as hyphens, underscores, etc.
Division The user ID's division and can be any division the user needs. Default divisions currently
are: Consumer Products, Commercial Products, Federal Sector. Any value entered here
that is not on the option list must be defined in the Settings > User Lists option of the
main application in order for the pick list to display the value properly. The entered value
is a string match with the corresponding User List value, be sure to spell properly and
remember the value is case sensitive. Division is a string and will accept alphanumeric
characters as well as hyphens, underscores, etc.
18
Page 24

Collaboration Administrator Manual
Site Location The user ID's site location and can be any title the user needs. Default site locations
currently are: North, South, East, West. Any value entered here that is not on the option
list must be defined in the Settings > User Lists option of the main application in order
for the pick list to display the value properly. The entered value is a string match with the
corresponding User List value, be sure to spell properly and remember the value is case
sensitive. Site location is a string and will accept alphanumeric characters as well as
hyphens, underscores, etc.
Type The user ID's type and can be any value the user needs. Default titles currently are:
Employee, Contractor, Visitor. Any value entered here that is not on the option list must
be defined in the Settings > User Lists option of the main application in order for the pick
list to display the value properly. The entered value is a string match with the
corresponding User List value, be sure to spell properly and remember the value is case
sensitive. Type is a string and will accept alphanumeric characters as well as hyphens,
underscores, etc.
Building The user ID's building and can be any value the user needs. Default buildings currently
are: Main Office, Warehouse. Any value entered here that is not on the option list must
be defined in the Settings > User Lists option of the main application in order for the pick
list to display the value properly. The entered value is a string match with the
corresponding User List value, be sure to spell properly and remember the value is case
sensitive. Building is a string and will accept alphanumeric characters as well as hyphens,
underscores, and other characters.
CSV Upload Template
The CSV should follow the general format shown in this example:
External
System I D
Load Date
1234 ########John Smith Stout 123 Pine
3213 ########Fred Apler J 12 Elm St.
Phone
5552321244
323555-
Work
Phone
(555)2
343421
303.23
4.5555
3452
First
Name
Email
Address
jsmith@
bear.or
g
fapler@
bill.net
Last Name
Middle
Name
Address State City Zip
Hurst
Apt # 4
Status Title Department Division Type
Active Staff IT Federal
Sector
DisabledVP Sales Consu
mer
Product
s
Florida Amber 23345
Ohio Dayton 45323
Site
Location
Building
EmployeeNorth Main
Office
ContractorSouth Warehou
se
19
Page 25

Collaboration Administrator Manual
LDAP Edit Screen
If you create an Identity LDAP Pull collaboration type, a multi-page edit screen like this example
appears:
This screen includes the following pages:
• Blob (see page 26)
• Identities (see page 28)
• Roles (see page 28)
• Schedule (see page 29)
• Source (see page 29)
• Tokens (see page 30)
• User Defined (see page 31)
Milestone Video Edit Screen
If you select the Events - Milestone video collaboration type from the collaboration add page, a
screen like this appears:
This screen includes these editable pages:
• Milestone
• Events (see page 27)
Each of these pages and their associated type-specific fields are defined below.
The type-specific fields on this page include:
Host Enter the name of the host computer where this database resides. Include the domain and
computer name where appropriate.
Port Number Enter the port number at the host computer that should be used for extracting the database
information from the specified host.
20
Page 26

Collaboration Administrator Manual
Require TCP Check this box to indicate that the transfer of data between the designated host server that
contains the database and this application is being conducted over the network.
Oracle RDBMS Pull Edit Screen
If you edit an Identity Oracle RDBMS Pull collaboration type, an edit screen like this example
appears:
The pages on this screen include:
• Source (see page 29)
• Schedule (see page 29)
• Identities (see page 28)
• Tokens (see page 30)
• Blob (see page 26)
• User Defined (see page 31)
• Roles (see page 31)
Pelco Digital Sentry Edit Screen
When you add the Events - Pelco Digital Sentry screen, an edit screen like this appears:
The editable pages on this screen include:
• Pelco Digital Sentry
• Events (see page 27)
The Pelco Digital Sentry page includes the following fields:
Name Enter or modify the name of this device.
Installed Check to indicate that this device is connected and communicating with the appliance.
Appliance Indicates the appliance to which this device is connected.
21
Page 27

Collaboration Administrator Manual
Type Indicates the device type.
Host Enter the name of the host computer where this database resides. Include the domain and
computer name where appropriate.
Port Number Enter the port number at the host computer that should be used for extracting the database
information from the specified host.
Require TCP Check this box to indicate that the transfer of data between the designated host server that
contains the database and this application is being conducted over the network.
Pelco Endura Edit Screen
When you add a database with the Events - Pelco Endura option, an edit screen like this appears:
The editable pages on this screen include:
•Pelco Endura
• Events (see page 27)
Pelco Endura Page
The Pelco Endura page includes the following additional fields:
Host Enter the name of the host computer where this database resides. Include the domain and
computer name where appropriate.
Port Number Enter the port number at the host computer that should be used for extracting the database
information from the specified host.
Require TCP Check this box to indicate that the transfer of data between the designated host server that
contains the database and this application is being conducted over the network.
22
Page 28

Collaboration Administrator Manual
SNMP Edit Screen
If you edit an Events - SNMP collaboration type, a screen like this example appears:
These editable pages appear:
•SNMP
• Events (see page 27)
For a description of each page and the type-specific fields that appear on them, see below.
SNMP Page
This page includes these type-specific fields:
Host Enter the name of the host computer where this database resides. Include the domain and
computer name where appropriate.
Port Number Enter the port number at the host computer that should be used for extracting the database
information from the specified host.
Require TCP Check this box to indicate that the transfer of data between the designated host server that
contains the database and this application is being conducted over the network.
Splunk Edit Screen
If you edit an Events - Splunk collaboration type, a screen like this example appears:
The editable pages on this screen include:
• Splunk
• Events (see page 27)
The pages and the type-specific fields that appear on them are described below.
23
Page 29

Collaboration Administrator Manual
Splunk Page
This page includes these type-specific fields:
Host Enter the name of the host computer where this database resides. Include the domain and
computer name where appropriate.
Port Number Enter the port number at the host computer that should be used for extracting the database
information to the specified host.
Require TCP Check this box to indicate that the transfer of data between the designated host server that
contains the database and this application is being conducted over the network.
SQL Edit Screen
If you edit an Identity SQL Server Pull collaboration type, a screen like this example appears:
This screen includes the following tabbed pages:
• Blob (see page 26)
• Identities (see page 28)
• Roles (see page 28)
• Source (see page 29)
• Schedule (see page 29)
• Tokens (see page 30)
• User Defined (see page 31)
The type-specific fields associated with them are defined below.
Syslog Edit Screen
If you edit an Events - Syslog collaboration type, a screen like this example appears:
24
Page 30

Collaboration Administrator Manual
This screen includes these tabbed pages:
•Syslog
• Events (see page 27)
These editable pages and the type-specific fields on them are described below.
Syslog Page
This page includes these type-specific fields:
Host Enter the name of the host computer where this database resides. Include the domain and
computer name where appropriate.
Port Number Enter the port number at the host computer that should be used for extracting the database
information to the specified host.
Require TCP Check this box to indicate that the transfer of data between the designated host server that
contains the database and this application is being conducted over the network.
XML Edit Screen
If you edit an Events - Generic XML collaboration type, a screen like this appears:
The editable pages on this screen include:
•XML
• Events (see page 27)
These pages and the type-specific fields on them are defined below.
XML Page
This page includes these type-specific fields:
Host Enter the name of the host computer where this database resides. Include the domain and
computer name where appropriate.
Port Number Enter the port number at the host computer that should be used for extracting the database
information to the specified host.
Require TCP Check this box to indicate that the transfer of data between the designated host server that
contains the database and this application is being conducted over the network.
25
Page 31

Collaboration Administrator Manual
Blob Page
When you click the Blob tab from the LDAP, Oracle RDBMS Pull, or SQL edit screen, a page like
these examples appear:
The Blob page includes the following type-specific fields:
Tabl e Select the database table from which the data will be extracted.
Base DN Enter the distinguished name for this database source from which the data will be
extracted.
Filter Enter the criteria to use in selecting elements within the scope of available blobs (binary
large objects).
Attributes Specify each field type to be extracted. Select the relevant qualifying element from the
drop-down list.
Primary Image Check this box to indicate that this blob is the primary image.
Identity Select the criteria to use when selecting the identities associated with these blobs.
Image Select the criteria to use when selecting images to be transferred.
Type Select the criteria to use when selecting the type of blobs to be transferred.
Last Update Select the criteria specifying the last update.
26
Page 32

Collaboration Administrator Manual
Events Page
If you select the Events tab from the ArcSight CEF, Splunk Edit, Milestone, Pelco Digital Sentry,
Pelco Endura, SNMP, SysLog, or XML edit screen, a page like one of these examples appears:
The type-specific fields on this page include:
Schedule Select from the drop-down list the schedule during which this collaboration is operative. Only
those schedules previously defined by the system or the operator are shown in this list. The
default value is Never Active.
Send
Acknowledge
ments
Send Clears If applicable to this collaboration type, check this box to indicate that this collaboration can
Send Notes If applicable to this collaboration type, check this box to indicate that this collaboration can
Available This window lists all events available for this collaboration. From the list of available events,
Members This window lists all events that have been added to this collaboration. All events in this
If applicable to this collaboration type, check this box to indicate that this collaboration can
send acknowledgements with event collaborations.
send clears with event collaborations.
send notes with event collaborations.
select those events which are required to collaborate for this database transfer and move them
to the Members window. To move one or more events to the Members window, click to select
one event, Ctrl + click to select a non-consecutive group of events, or Shift + click to select a
consecutive group of events then click the button.
window are included in the collaboration. For more on this, refer to Assigning Events to a
Collaboration on page 3.
Click this symbol to move one or more selected event types from the Available window to the
Members window.
Click this symbol to move one or more selected event types from the Members window back to
the Available window.
NOTE: If you configure a Splunk connection, the Splunk link word appears in the basic link
section at the top of the Access Control Manager home page.
27
Page 33

Collaboration Administrator Manual
Identities Page
When you click the Identities tab from the LDAP, Oracle RDBMS Pull, or SQL edit screen, a page
like this example appears:
The Identities page includes the following type-specific fields:
Tab le Select the database table from which the data will be extracted.
Filter Enter the criteria to use in selecting elements within the scope of available identities.
Attributes Specify each field type to be extracted. Select the relevant qualifying element from the drop-
down list.
Roles Page
When you click the Roles tab at the SQL Edit screen, a page like this example appears:
The Roles page includes the following type-specific fields:
Tabl e Select the database table from which the data will be extracted.
Attributes Specify each field type to be extracted. Select the relevant qualifying element from the drop-
down list.
28
Page 34

Collaboration Administrator Manual
Schedule Page
When you click the Schedule tab from the LDAP, Oracle RDBMS Pull, or SQL edit screen, a page
like this example appears:
The Schedule page includes the following type-specific fields:
Every Enter the interval required during the active period that a transfer can take place. Specify both
the value and select the appropriate unit (seconds, minutes, hours). For example, if you
specify 30 minutes, the Access Control Manager engine will connect to the SQL Server every
30 minutes during the period specified by the State and Ending date fields.
Start date Enter the date on which the transfers begin. Click the field to bring up the calendar and locate
the date you need.
Ending date Enter the date on which the transfers end. Click the field to bring up the calendar and locate
the date you need.
Last transfer Specify the last transfer allowed from the SQL Server to the Access Control Manager engine.
Source Page
When you click the Source tab from a LDAP, Oracle RDBMS Pull, or SQL edit screen, a page like
one of these examples appear:
The source page includes the following type-specific fields and buttons:
Host Enter the name of the host database server where this database resides. Include the
domain and computer name where appropriate.
Port Number Enter the port number at the host computer that should be used for extracting the
database information to the specified host.
User Name Enter the user name required to access this database server. This is SQL or Oracle only.
Password Enter the password required to access this database server.
29
Page 35

Collaboration Administrator Manual
Connection
Options
Database Enter the name of the database within the database server to transfer to the Access
Instance Enter the instance within the database to which to connect. This is SQL or Oracle only.
SSL Check this box to indicate that the transfer of data between the designated database host
Bind DN Enter the DN (distinguished name) used to authenticate this client to the server. This is
Password Enter the password used to authenticate this client.
Enter the options required for the connection between the database server and the Access
Control Manager engine. This is SQL or Oracle only.
Control Manager engine. This is SQL or Oracle only.
server and this application is being conducted using SSL. This is LDAP only.
LDAP only.
Toke ns Page
When you click the To ke n s tab from the LDAP, Oracle RDBMS Pull, or SQL edit screens, a page
like this example appears:
The Tokens page includes the following type-specific fields:
Tab le Select the database table from which the data will be extracted.
Base DN Enter the distinguished name of the entry at which to start the search. This is LDAP only.
Filter Enter the criteria to use in selecting elements within the scope of available tokens.
Attributes Specify each field type to be extracted. Select the relevant qualifying element from the drop-
down list.
30
Page 36

Collaboration Administrator Manual
User Defined Page
When you click the User Defined tab from the LDAP, Oracle RDBMS Pull, or SQL edit screens, a
page like this example appears:
The User Defined page includes the following type-specific fields:
Tab le Select the database table from which the data will be extracted.
Filter Enter the criteria to use in selecting elements within the scope of available user definitions.
Attributes Specify each field type to be extracted. Select the relevant qualifying element from the drop-
down list.
Identity Select the criteria to use in searching for a person in this database.
Birthday Select the criteria to use when selecting a birthday in this database.
31
 Loading...