

Page 1
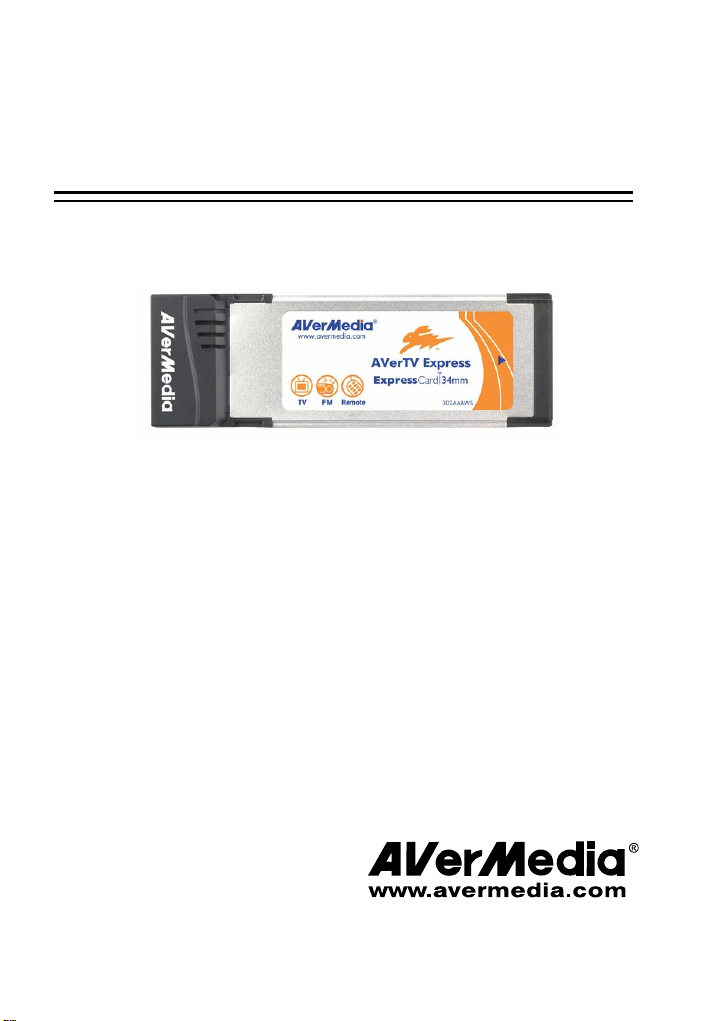
AAVVeerrTTVV EExxpprreesss
s
Quick Installation Guide
English
Deutsch
Español
Português
Nederlands
Türkçe
ภาษาไทย
Việ t nam
Page 2
European Community Compliance Statement
Class B
This product is conformity with the protection requirements of EU
Council Directives 89/336/EEC amended by 92/31/EEC on the laws of
the Member States relating to electromagnetic compatibility.
DISCLAIMER
No warranty or representation, either expressed or implied, is made with respect to the
contents of this documentation, its quality, performance, merchantability, or fitness for a
particular purpose. Information presented in this documentation has been carefully
checked for reliability; however, no responsibility is assumed for inaccuracies. The
information contained in this documentation is subject to change without notice.
In no event will AVerMedia be liable for direct, indirect, special, incidental, or
consequential damages arising out of the use or inability to use this product or
documentation, even if advised of the possibility of such damages.
TRADEMARKS
AVerMedia is registered trademarks of AVerMedia TECHNOLOGIES, Inc. IBM PC is
a registered trademark of International Business Machines Corporation. Macintosh is a
registered trademark of Apple Computer, Inc. Microsoft is a registered trademark and
Windows is a trademark of Microsoft Corporation. All other products or corporate
names mentioned in this documentation are for identification and explanation purposes
only, and may be trademarks or registered trademarks of their respective owners.
COPYRIGHT
© 2007 by AVerMedia TECHNOLOGIES, Inc. All rights reserved. No part of this
publication may be reproduced, transmitted, transcribed, stored in a retrieval system, or
translated into any language in any form by any means without the written permission of
AVerMedia TECHNOLOGIES, Inc.
THE MARK OF CROSSED-OUT WHEELED BIN INDICATES THAT
THIS PRODUCT MUST NOT BE DISPOSED OF WITH YOUR OTHER
HOUSEHOLD WASTE. INSTEAD, YOU NEED TO DISPOSE OF THE
WASTE EQUIPMENT BY HANDING IT OVER TO A DESIGNATED
COLLECTION POINT FOR THE RECYCLING OF WASTE ELECTRICAL AND
ELECTRONIC EQUIPMENT. FOR MORE INFORMATION ABOUT WHERE TO
DROP OFF YOUR WASTE EQUIPMENT FOR RECYCLING, PLEASE
CONTACT YOUR HOUSEHOLD WASTE DISPOSAL SERVICE OR THE SHOP
WHERE YOU PURCHASED THE PRODUCT.
Page 3
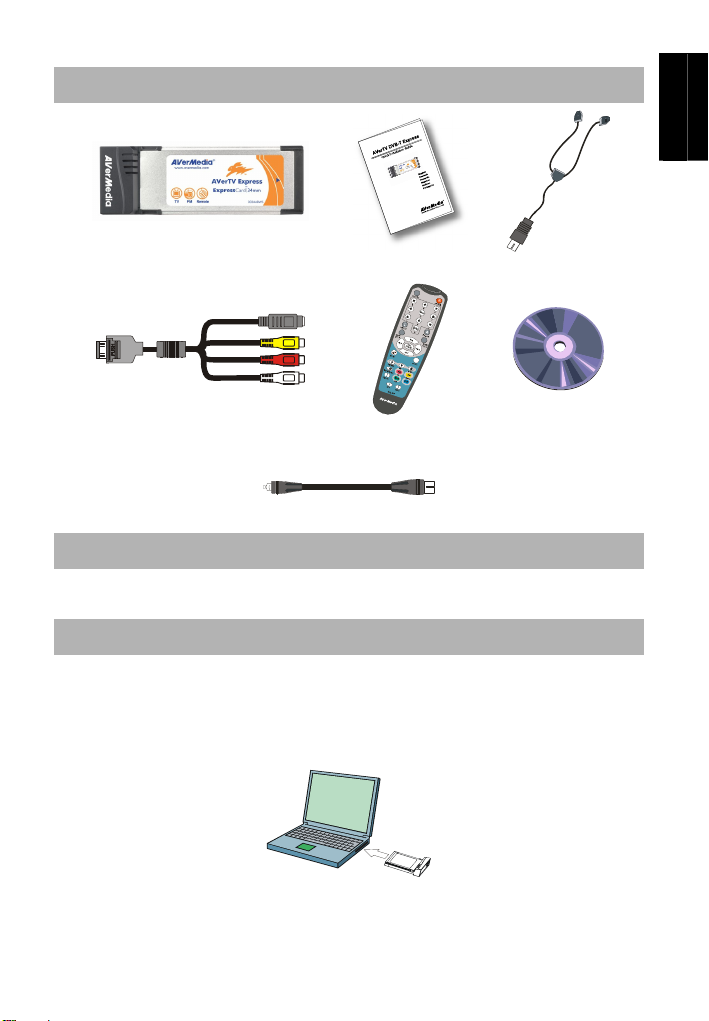
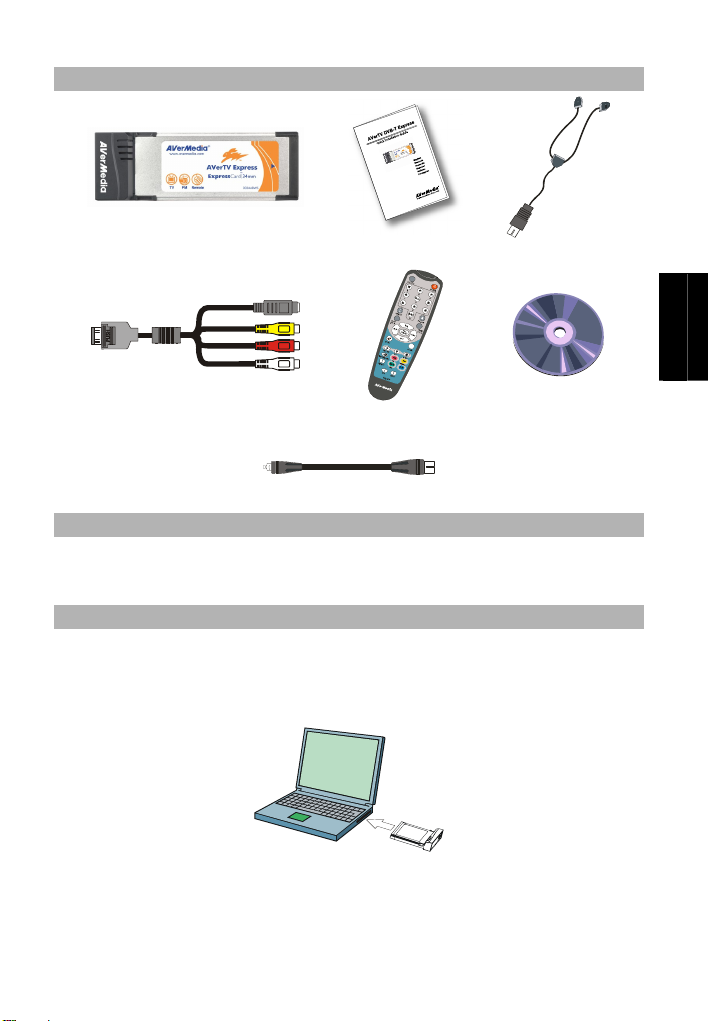
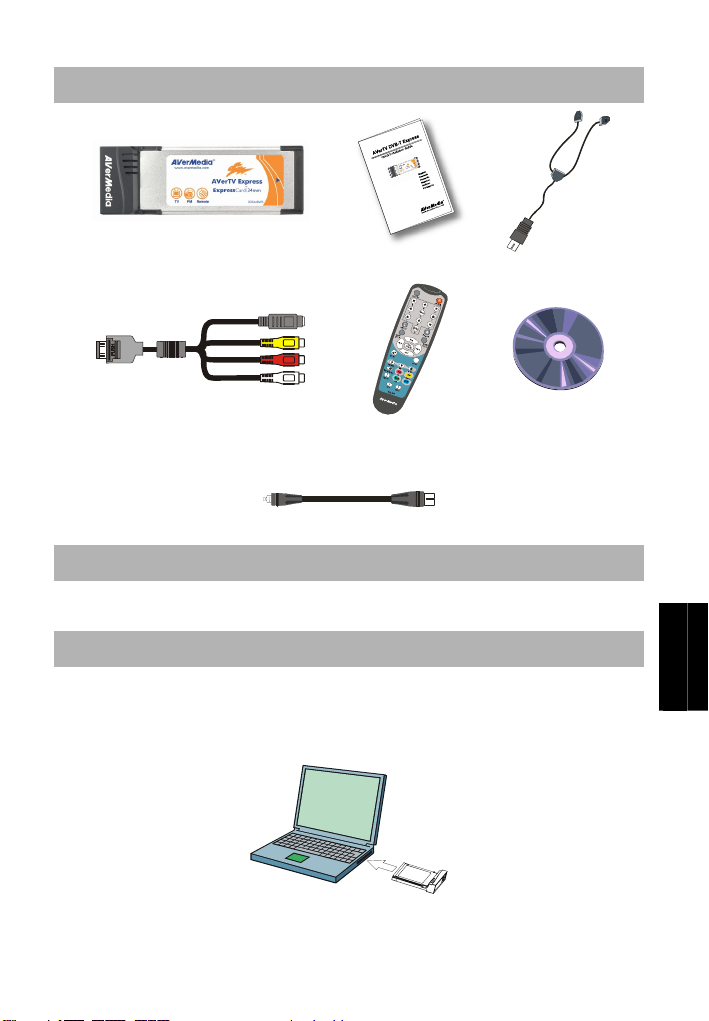
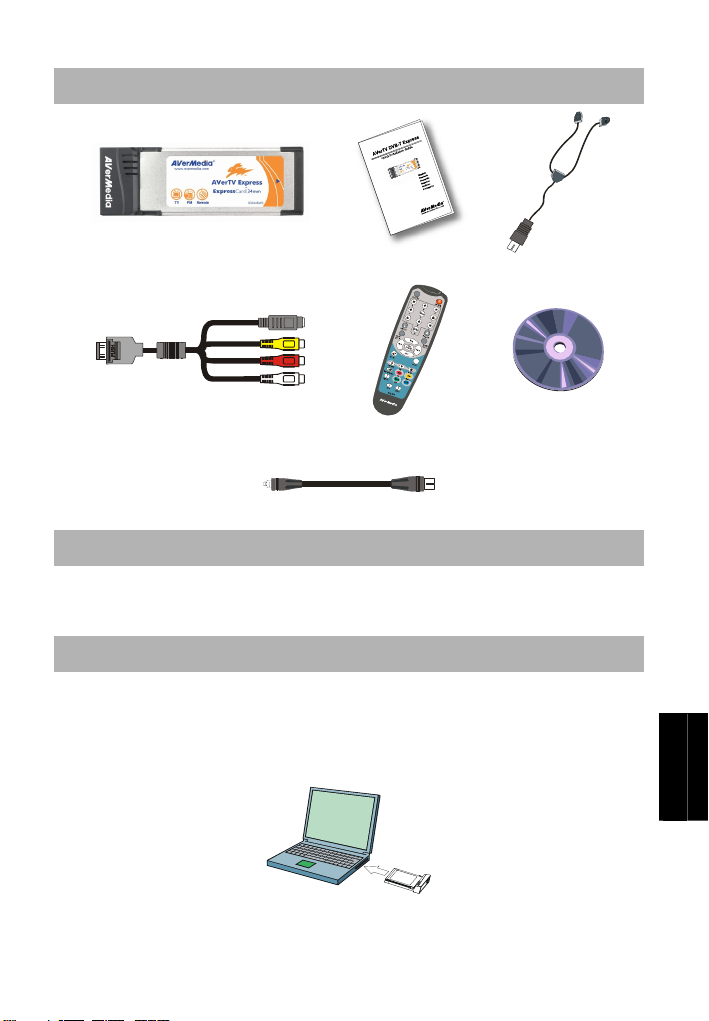
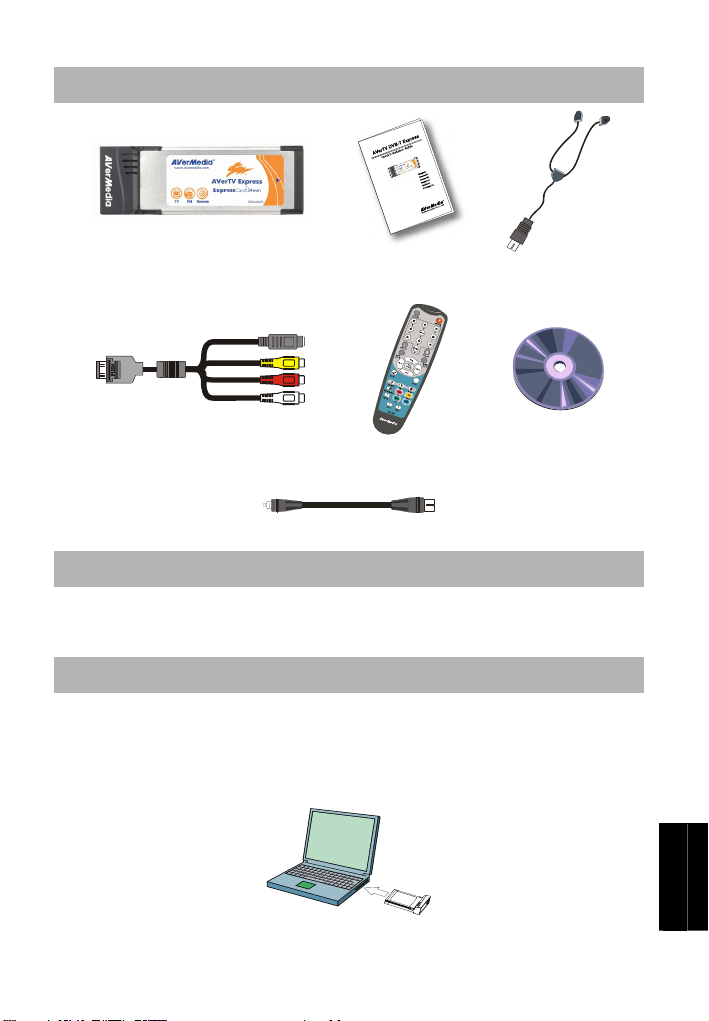
ˋPackage Contents
AVerTV Express Quick Installation Guide FM Radio Antenna
Quick Installation Guide
English Deutsch Español Português Nederlands Türkçe ภาษาไทย Việt nam
S-Video/ Composite 2-in-1 Cable
Remote control
(Batteries included)
Installation CD
RF Cable
System Requirements
System requirements are described in detail on the package box. Before installing AVerTV
Express, verify that your PC meets the described requirements.
Hardware Installation
Step 1 : Inserting AVerTV Express
Insert the AVerTV Express into the ExpressCard™ slot on your laptop. (The 34 mm cards fit
into both 34 mm and 54 mm ExpressCard™ slots.)
ENG-1
Page 4
AVerTV Express
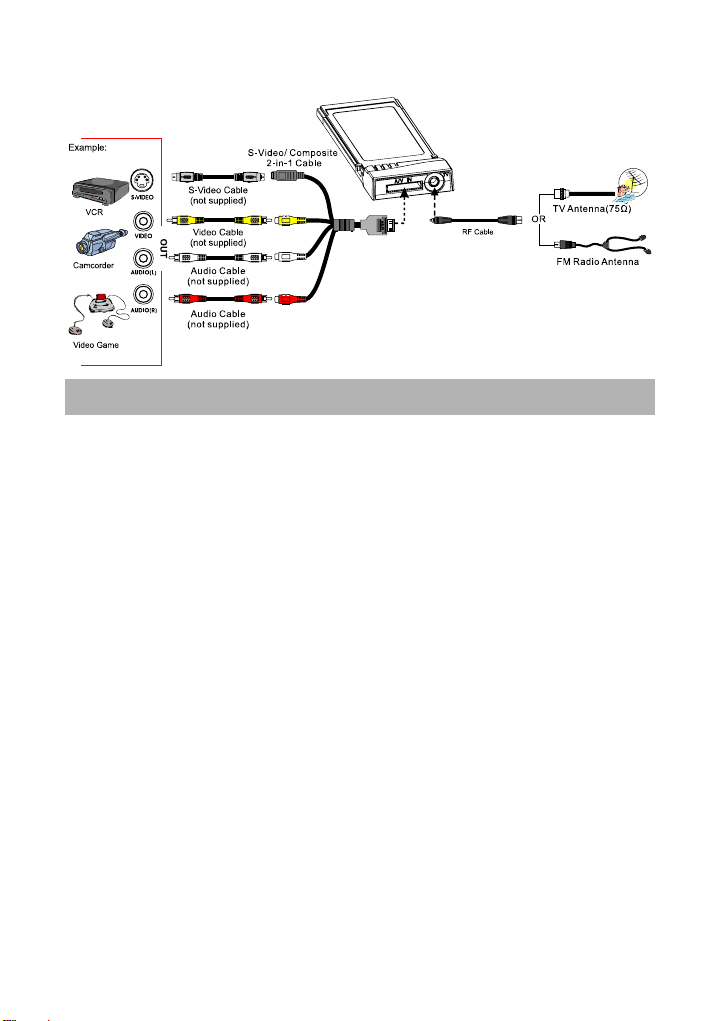
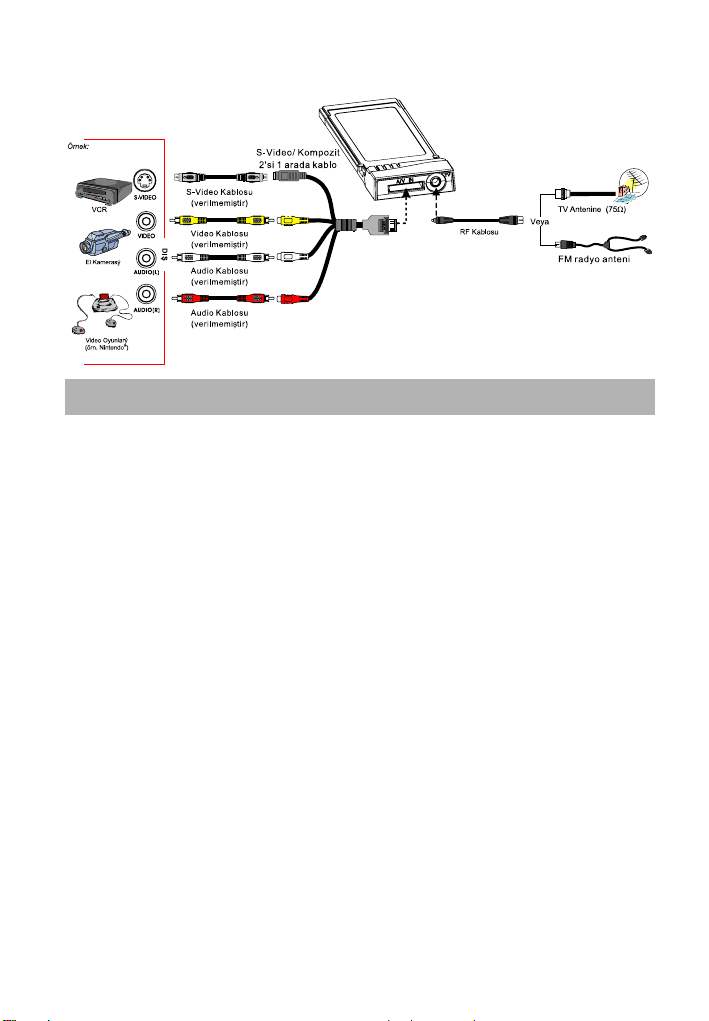
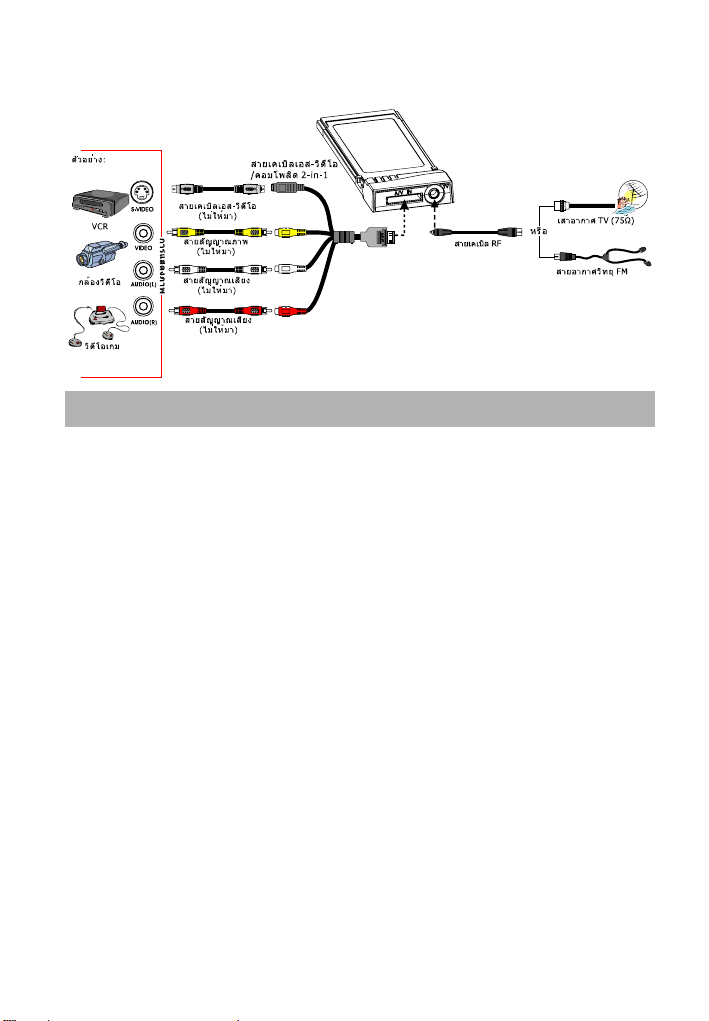
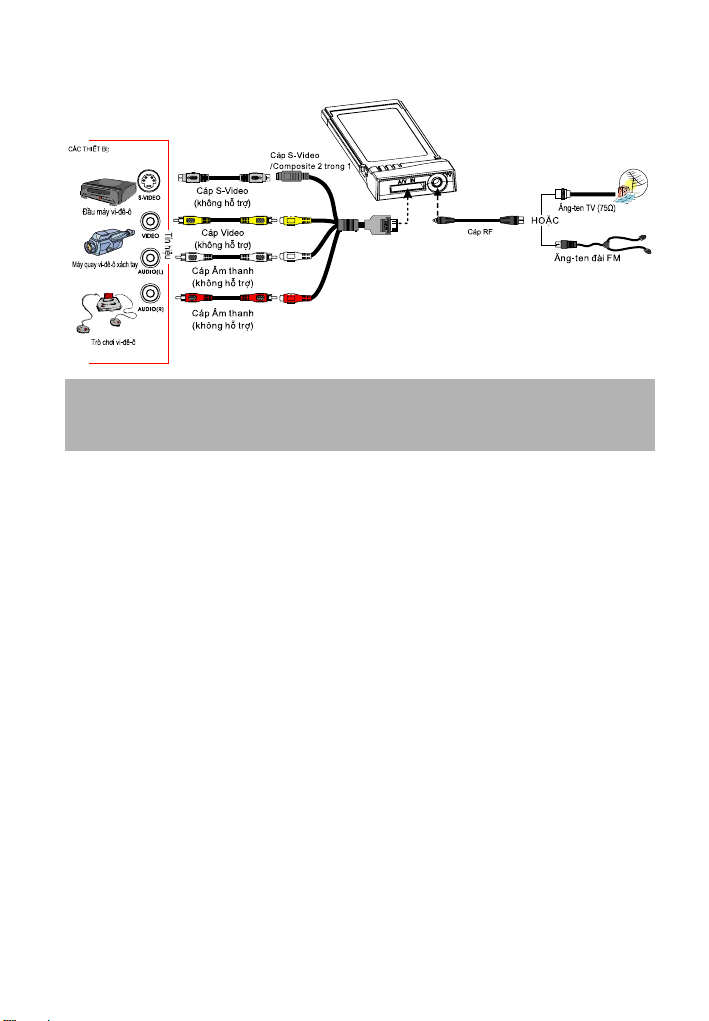
Step 2 : Making the Connections
Installing Drivers and the TV Software Utility
After the card is installed properly, turn on the computer. The system will automatically detect
the new device. Simply skip the wizard, and insert the accompanying installation CD to install
the driver and TV software utility simultaneously.
Installing Drivers and the Application in Windows XP / Windows XP Media
Center Edition
To install the driver and application, Windows XP MCE users need to exit and switch to
Windows mode if they are in Media Center Edition mode.
1. The “Found New Hardware Wizard” dialog box will appear. Just click Cancel to skip the
Wizard installation procedures.
2. Place the installation CD into the CD-ROM drive.
3. When the installation main screen appears, choose Install AVerTV.
4. Click Next to continue the installation process.
5. Read the license agreement and if you agree to the terms, select “I accept the terms of the
license agreement” and then click Next.
6. Choose Complete to install all the necessary softwares, including AVerTV 6, Acrobat
Reader, DirectX 9.0c and Driver. Then click Next. For advanced users, it is
recommended to choose Custom to select the software you want. To choose a different
destination folder, click Browse.
7. In the “InstallShield Wizard” dialog box, if you are instructed to restart your computer,
select Yes.
8. Then click Finish to complete the installation.
9. For Windows XP MCE users, if you want to use the Media Center as the TV application,
start Media Center and follow the on-screen instruction to complete the configuration.
* We recommend to exit the Media Center mode before activating the AVerTV 6.
ENG-2
Page 5

Quick Installation Guide
Installing Drivers and the Application in Windows Vista™
1. The “Found New Hardware Wizard” dialog box will appear. Just click Cancel to skip
the Wizard installation procedures.
2. Place the installation CD into the CD-ROM drive.
3. When the “AutoPlay” dialog box appears, select Run Autorun.exe.
4. When the installation main screen appears, choose Install AVerTV.
5. If the “User Account Control” dialog box appears, select Allow to continue the
process.
6. Click Next to continue the installation process.
7. Read the license agreement and if you agree to the terms, select “I accept the terms of
the license agreement” and then click Next.
8. Choose Complete to install all the necessary softwares, including AVe r TV 6,
Acrobat Reader, DirectX 9.0c and Driver. Then click Next. For advanced users, it
is recommended that you choose Custom to select the software you want. To choose
a different destination folder, click Browse.
9. Then click Finish to complete the installation.
NOTE:
1. If DirectX 9.0c or above is not installed in your system, usually the installation CD will
automatically install it during the process of installation. Make sure your system has
DirectX 9.0c or above installed so that the TV software utility can function properly.
2. If your system is not equipped with Acrobat Reader, the installation wizard will
automatically be called up during the process of installation.
3. The product does not come with a software DVD decoder. If users can playback DVD or
MPEG-2 video files on the computer, there is no need to install a DVD decoder. However, if the
Decoded Error message appears on the screen, please install the compatible DVD decoder via
the Windows
®
XP Media Center Edition Partners site.
Activating the AVerTV Application
To run the application from the Programs menu, choose Start Programs AVerMedia
AVerTV 6 AVerTV 6.
English Deutsch Español Português Nederlands Türkçe ภาษาไทย Việt nam
Uninstalling Application and Drivers
--Windows XP / Windows XP Media Center Edition --
If you are in Media Center Mode, please exit and switch to Windows mode first. To remove the
installed TV software utility from the system, simply choose Start Programs
AVerMedia AVerTV 6 Uninstaller Remove All Next OK Finish.
ENG-3
Page 6
AVerTV Express
--Windows Vista™ --
1. To remove the installed TV software utility from the system, simply choose Start All
Programs AVerMedia AVerTV 6.
2. Right Click Uninstaller. When a pop-up menu appears, choose Run as administrator.
3. When the “User Account Control” dialog box appears, select Allow.
4. Select Remove All Next OK Finish.
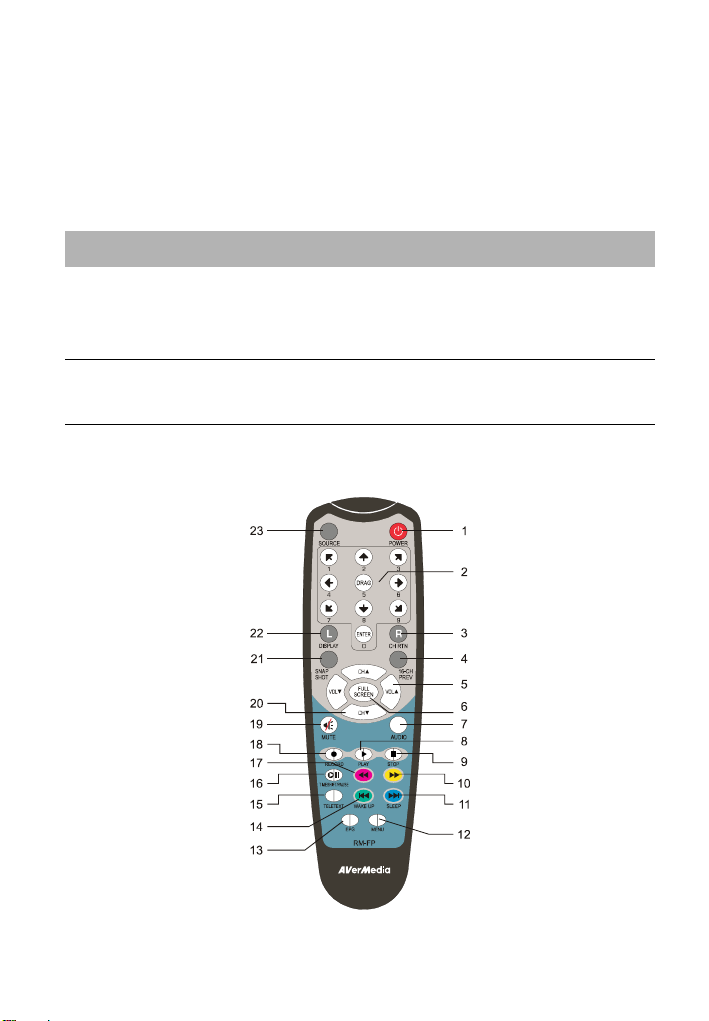
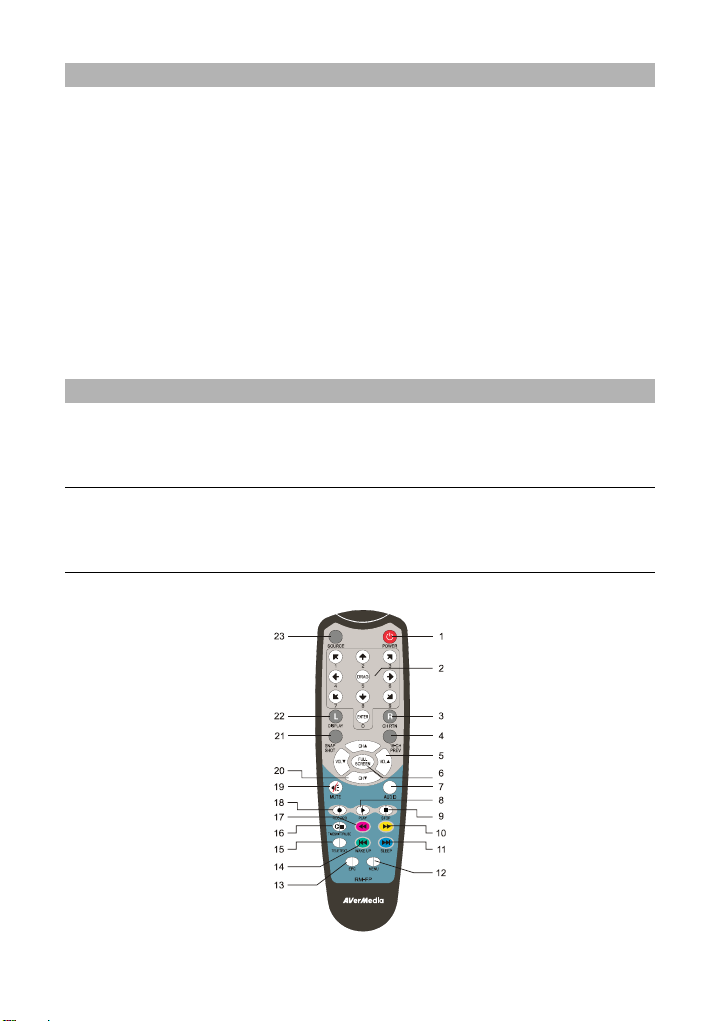
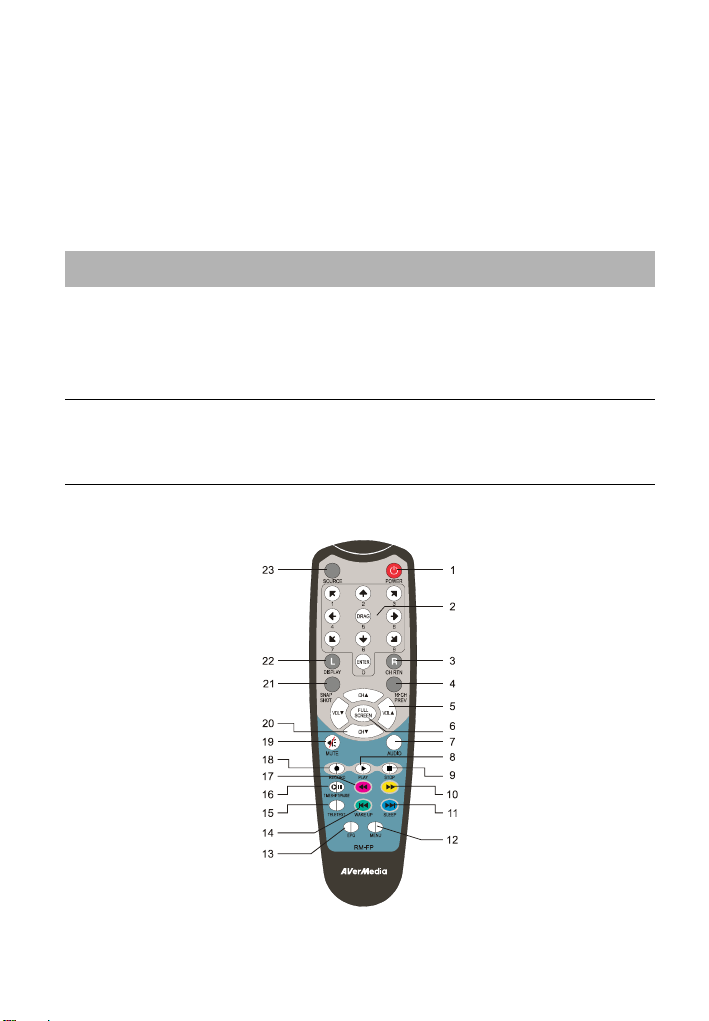
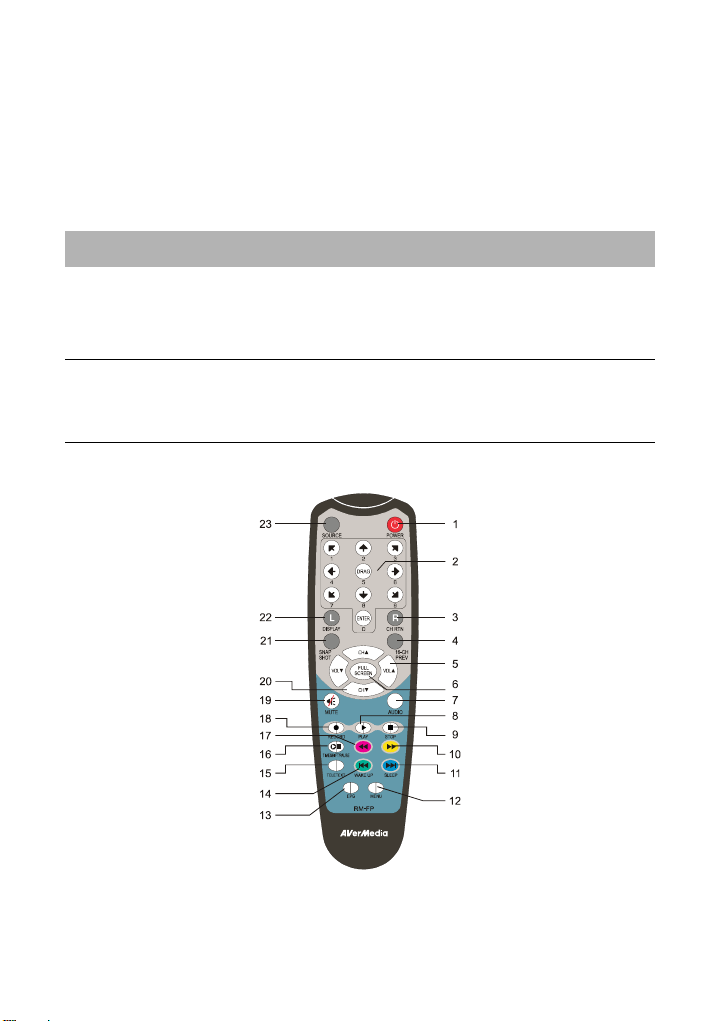
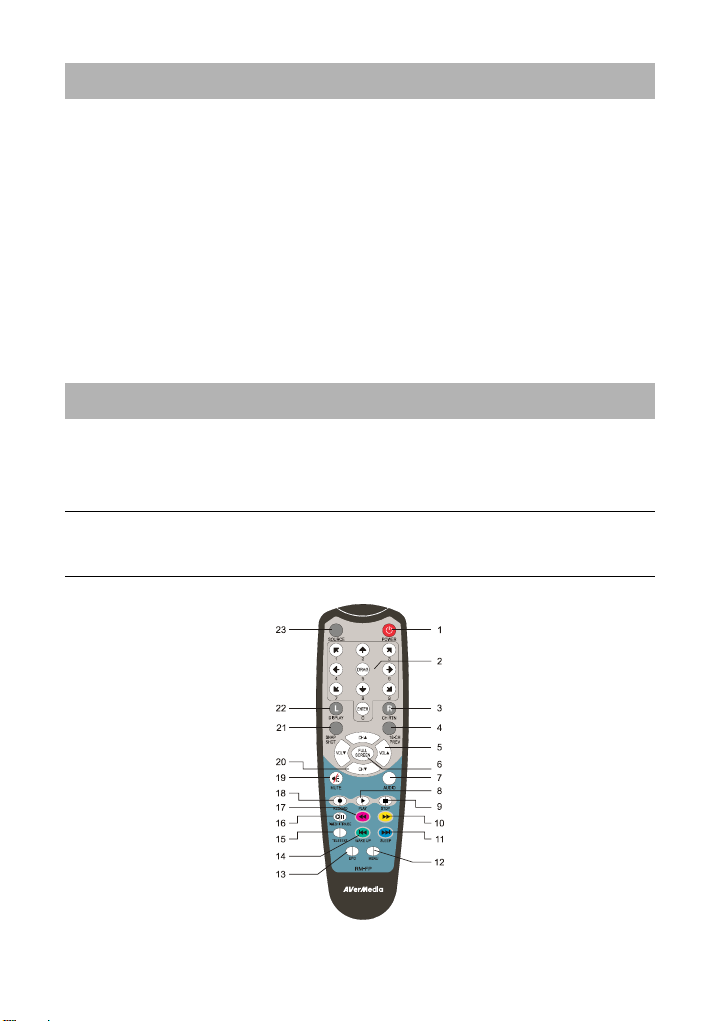
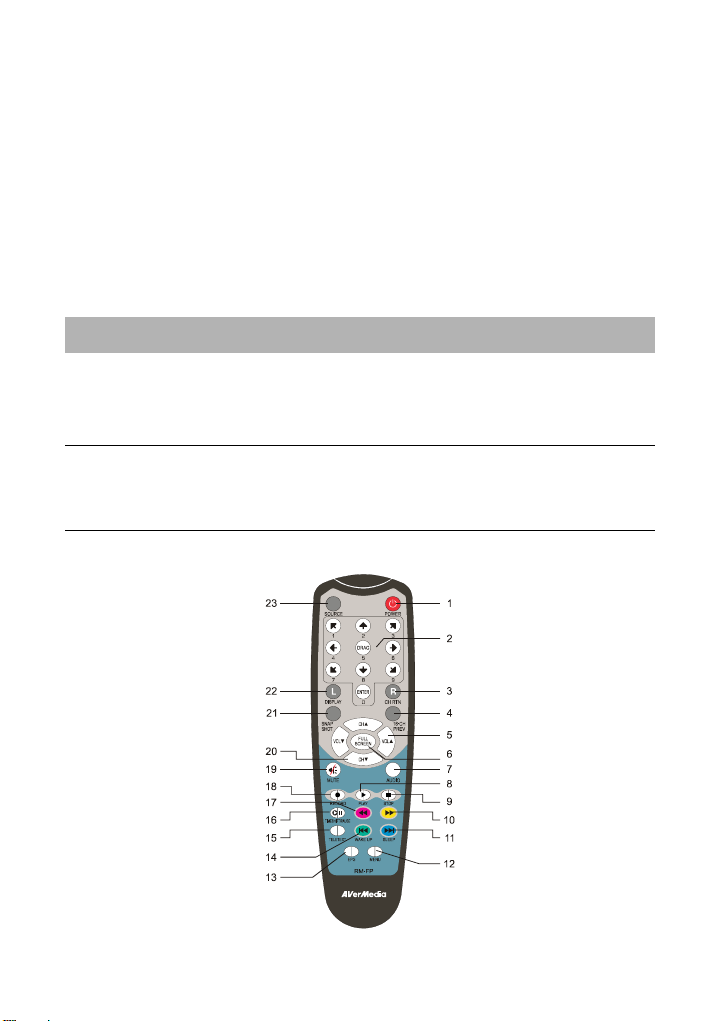
Remote Control
After installing drivers and applications, you can use a remote control to turn on/off the
programs, select channels, adjust volume and so on. In addition, the remote control can function
as a Remote Mouse by using the arrow keys (←↑→↓) to control the mouse pointer when
the software is closed.
NOTE:
AVerQuick launcher is important for the remote control. If it is not activated, the remote control
feature is automatically disabled. For details, please refer to the User Manual on the installation CD.
Remote Control Buttons
ENG-4
Page 7
Quick Installation Guide
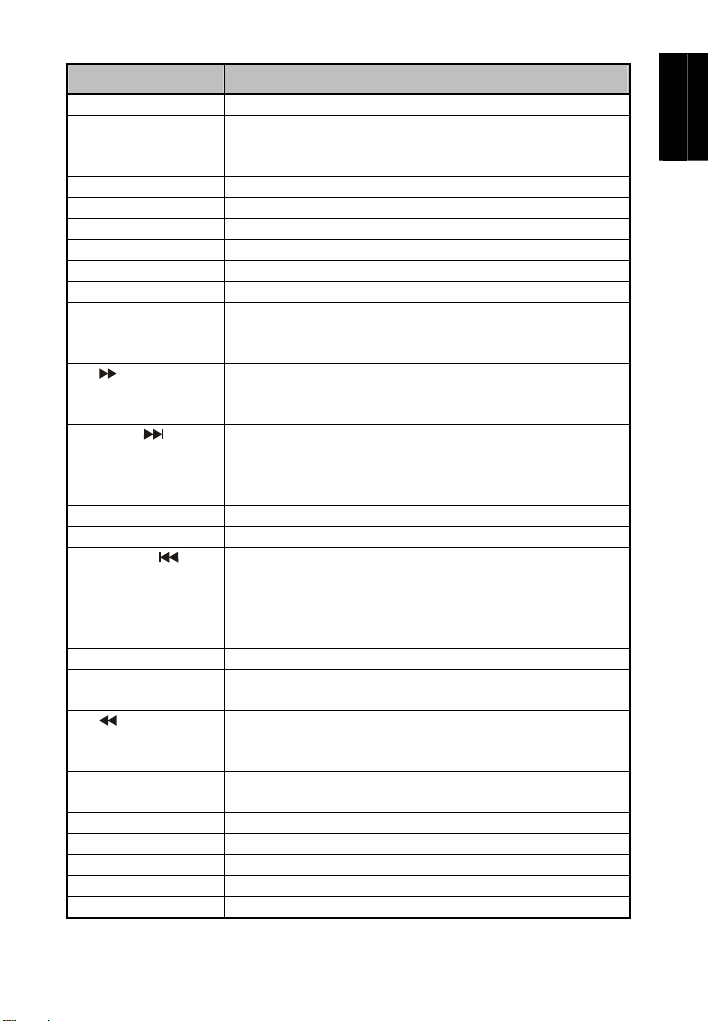
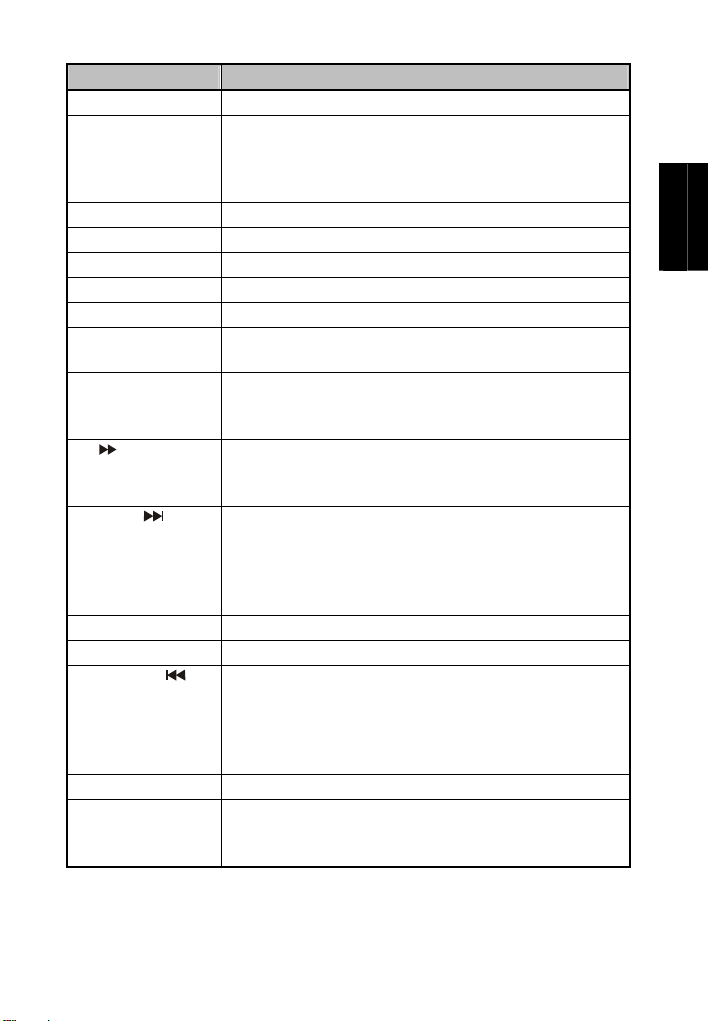
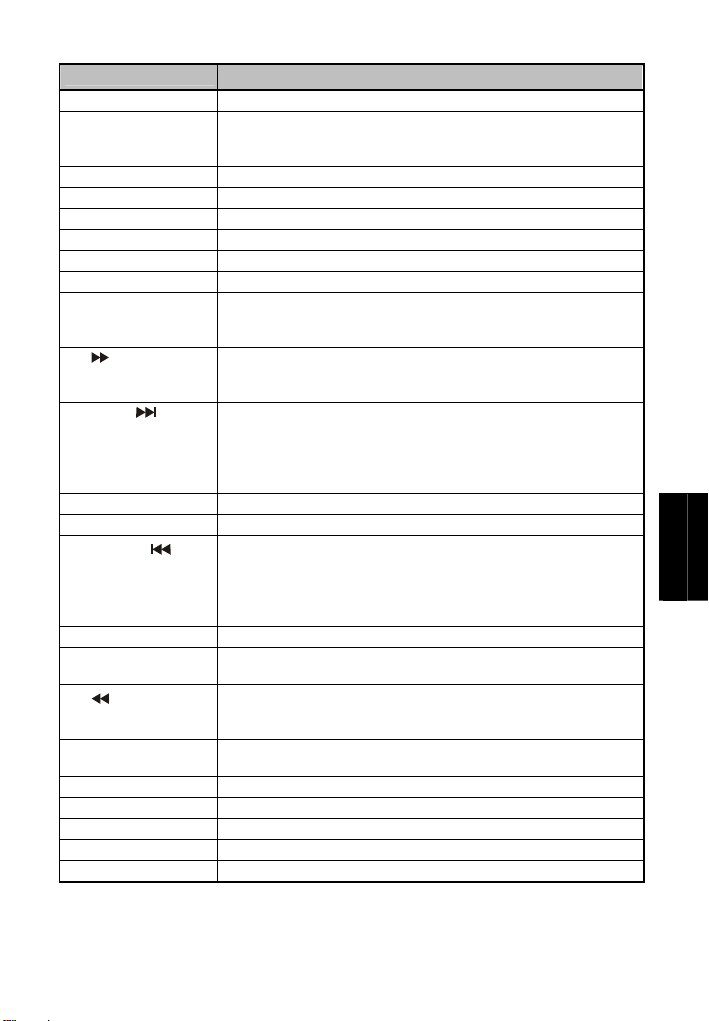
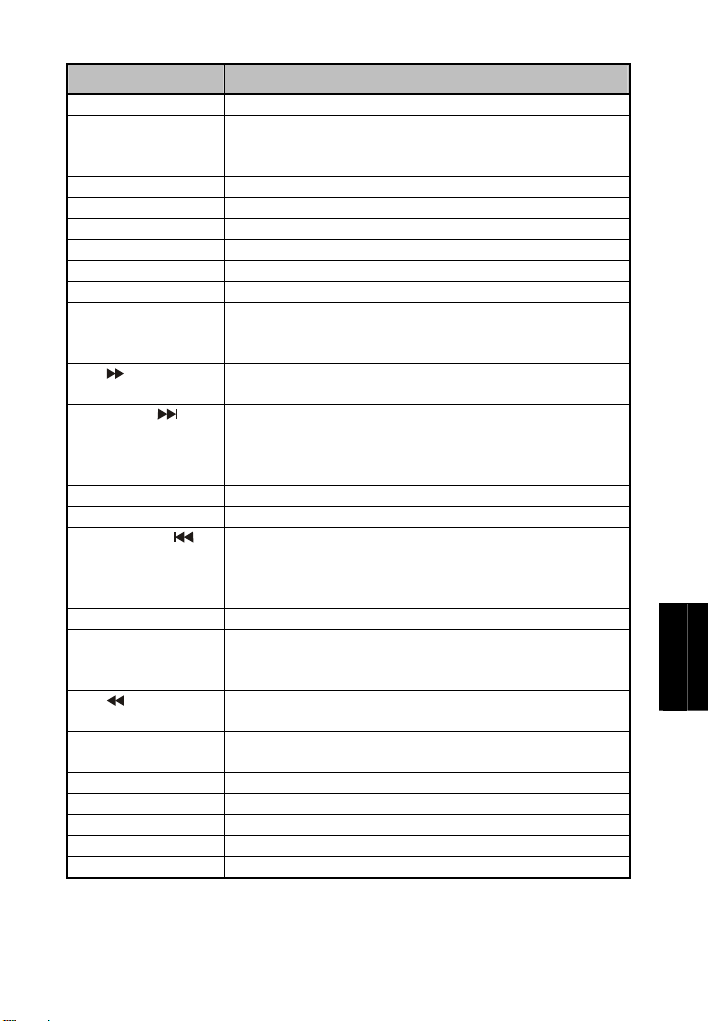
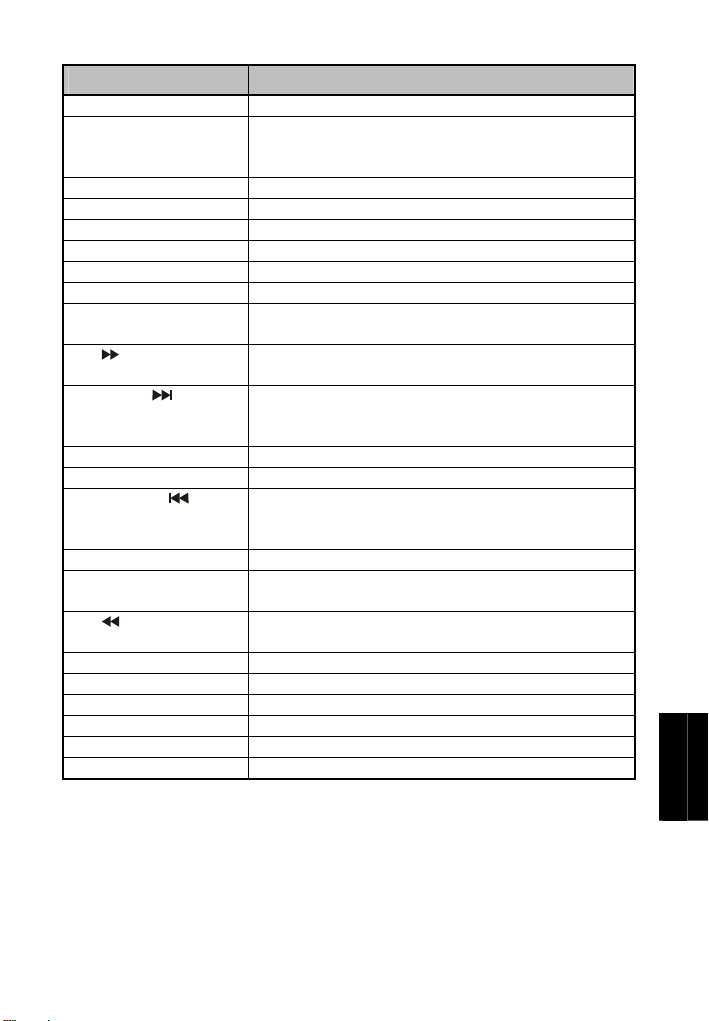
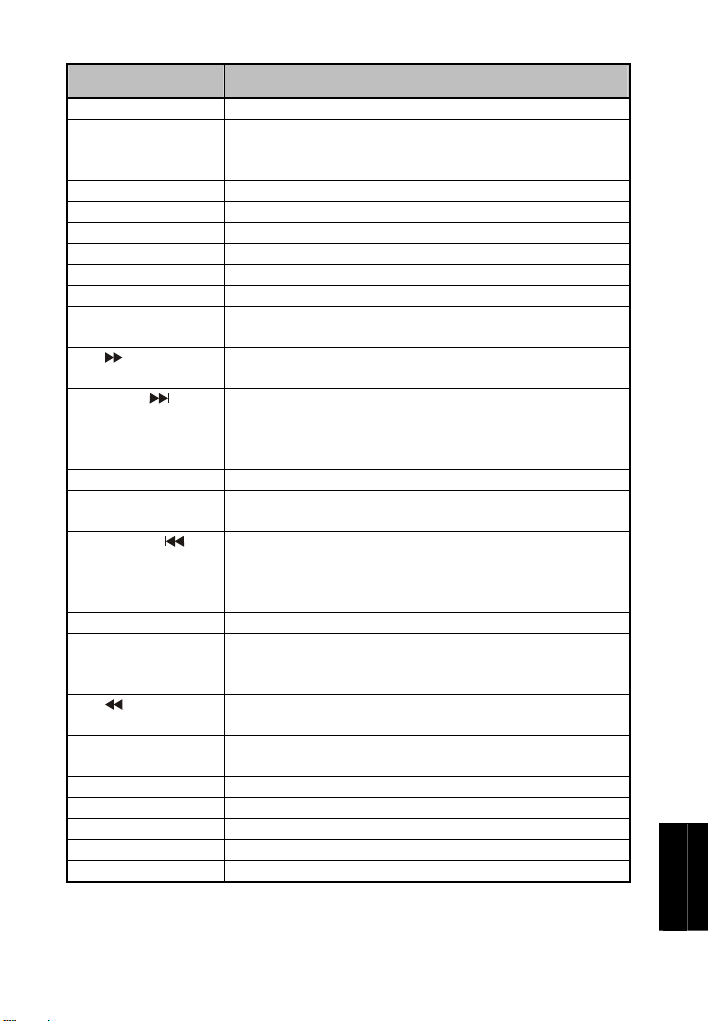
Button Description
1.POWER Turn on/off the application
2.Numeric Buttons - Select a TV channel.
- Under the 16-channel preview mode, use↑ ↓ ← → to highlight the
intended channel.
3.CH RTN Go to the previously selected channel.
4.16-CH PREV 16-channel Preview.
5. VOL▲/▼ Increase/decrease the volume.
6.FULL SCREEN Display TV in full screen.
7. AUDIO Switch between available audio modes.
8. ► (Play) Play the last recorded or played file.
9. ■ (Stop) - End the Playback or recording.
- End the TimeShift mode and return to real-time TV or Radio
mode.
10. (Forward) - Advance the playback.
- Jump to the teletext page of the corresponding color according to
this button.
11. SLEEP - Go to the next file in the playlist.
- Set the time to put your computer in Stand By or Hibernate mode.
- Jump to the Teletext page of the corresponding color according to
this button.
12. MENU Display or hide the Control Panel.
13. EPG Launch the Electronic Program Guide. (DVB-T only)
14. WAKE UP - Go to the previous file in the playlist.
- Set the time to bring your computer out of Stand By or Hibernate
mode.
- Jump to the teletext page of the corresponding color according to
this button.
15. TELETEXT Launch the Teletext application.
16. TIMESHIFT/PAUSE - Freeze the playback.
- Switch from real-time TV or Radio to TimeShift mode.
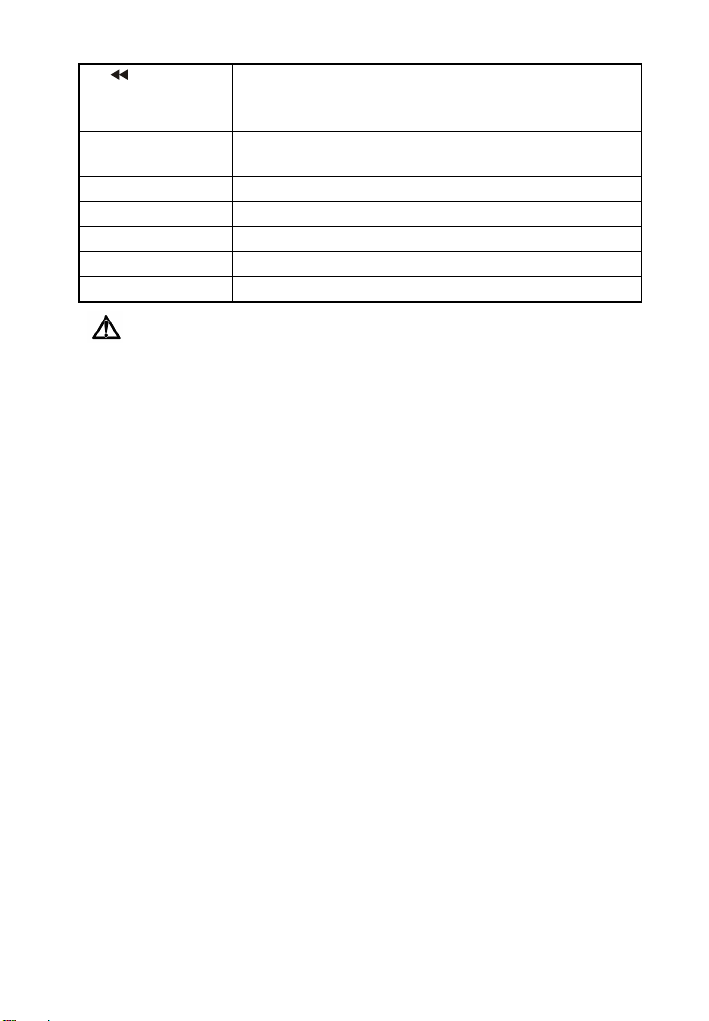
17. (Rewind) - Rewind the playback.
- Jump to the Teletext page of the corresponding color according to
this button.
18. ● (Record) Switch to DVR mode and record the current program or video into
your hard drive.
19. MUTE Turn on/off the sound.
20. CH ▲/▼ Go up or down to the next active channel.
21. SNAPSHOT Capture the on-screen image to a bitmap file.
22. DISPLAY Display information.
23. SOURCE Switch between available signal sources.
English Deutsch Español Português Nederlands Türkçe ภาษาไทย Việt nam
ENG-5
Page 8

AVerTV Express
Battery Safety Information:
- Store the batteries in a cool dry place.
- Do not dispose of used batteries in domestic waste. Dispose of batteries at special
collection points or return to point of sale if applies.
- Remove the batteries during long periods of non-use. Always remove exhausted
batteries from the remote control. Battery leakage and corrosion can damage this remote
control, dispose of batteries safely.
- Do not mix old and new batteries.
- Do not mix different types of batteries: alkaline, standard (carbon-zinc) or rechargeable
(nickel-cadmium).
- Do not dispose of batteries in a fire. The batteries may explode or leak.
- Never short circuit the battery terminals.
ENG-6
Page 9
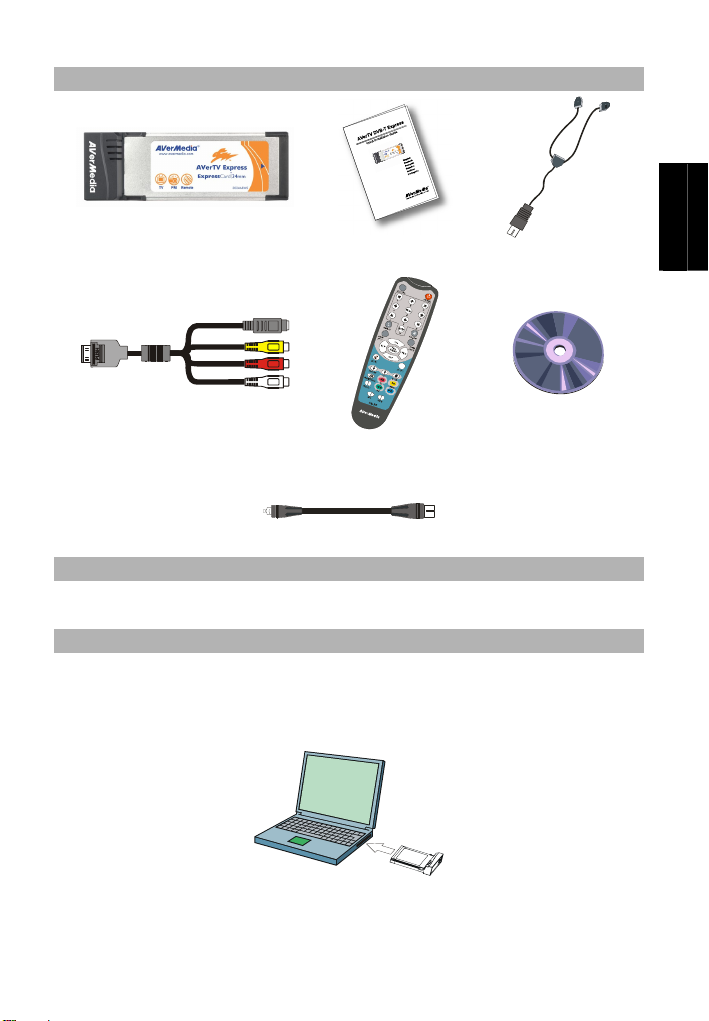
Packungsinhalt
Schnellinstallationsanleitung
English Deutsch Español Português Nederlands Türkçe ภาษาไทย Việt nam
AVerTV Express Schnellinstallationsanleitung FM-Radio-Antenna
S-Video / Composite 2-in-1 Kabel
Fernbedienung
(einschließlich Batterien)
Installations-CD
TV-Adapter
Systemvoraussetzungen
Systemvoraussetzungen sind auf dem Verpackungskarton angegeben. Bevor Sie die AVerTV
Express installieren, stellen Sie sicher, dass Ihr PC die angegebenen Voraussetzungen erfüllt.
Hardware installieren
Schritt 1 : Einfügen des AVerTV Express
Stecken Sie die AVerTV Express in den ExpressCard™ Slot an Ihrem Notebook. (Die 34 mm
Karte passt in die 34 mm und 54 mm ExpressCard Einschübe (Slots)
DEU-1
Page 10
AVerTV Express
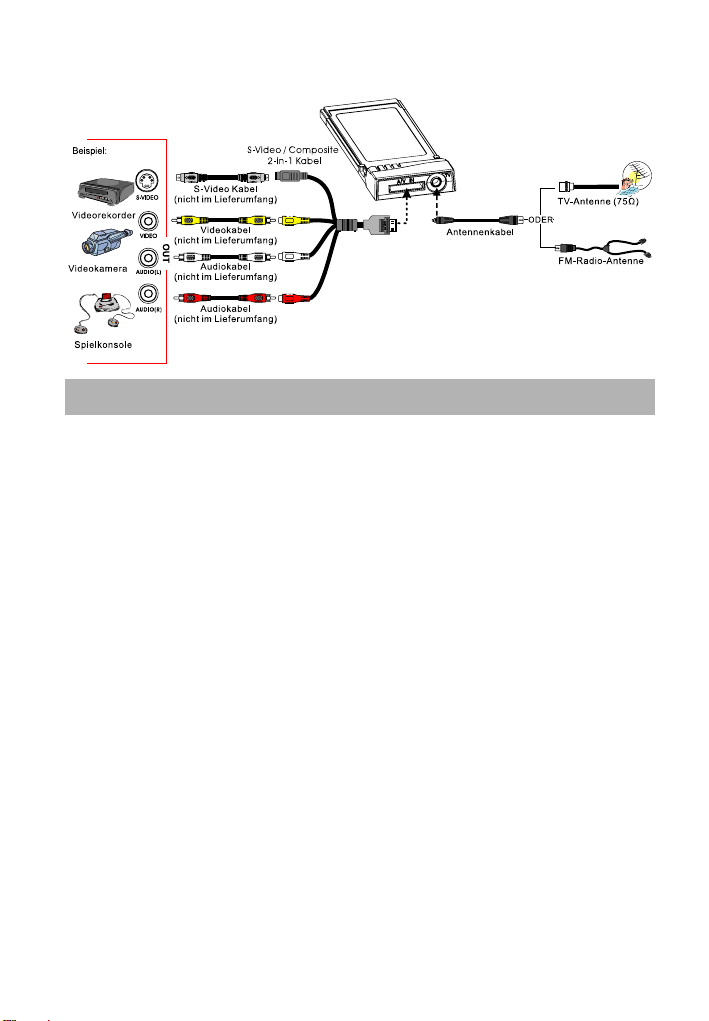
Schritt 2 : Anschlüsse
Installieren von Treibern und dem TV-Anwenderprogramm
Sobald Sie die Karte korrekt eingebaut haben, können Sie ihren Computer einschalten. Das System
wird beim ersten Hochfahren automatisch das neu installierte Gerät finden. Überspringen Sie den
Installationsassistenten und legen die beiliegende Installations-CD ein, um gleichzeitig Treiber und
TV-Anwenderprogramm zu installieren.
Installieren von Treibern und Anwenderprogramm unter Windows XP /
Windows XP Media Center Edition
Zum installieren der Treiber und TV-Anwendung muss die Media Center Anwendung
beendet werden und der Rechner im Windows Modus gestartet werden.
1. Die Dialogbox “Assistent für das Suchen neuer Hardware” erscheint. Klicken Sie auf
Abbrechen, um den Installationsassistenten zu beenden.
2. Geben Sie die Installations-CD in das CD-ROM-Laufwerk ein.
3. Wenn das Installationsfenster erscheint, wählen Sie Installieren AVerTV.
4. Klicken Sie auf Weiter um mit dem Installationsprozess fortzufahren.
5. Lesen Sie bitte die Lizenzbestimmungen und wenn Sie diesen zustimmen, wählen Sie
„Ich akzeptieren die Lizenzbestimmungen“ und klicken dann auf Weiter.
6. Wählen Sie Vollständig um alle benötigten Softwarekomponenten zu installieren,
inclusive AVerTV 6, Acrobat Reader, DirectX 9.0c und Treiber. Dann klicken Sie auf
Weiter. Erfahrenen Anwendern wird empfohlen, Individuell anzuklicken und so die
gewünschte Software auszuwählen. Um ein anderes Installationsverzeichnis zu wählen,
klicken Sie auf Durchsuchen.
7. Wenn Sie in der Dialogbox “Installationsassistent” angewiesen werden, den Computer
neu zu starten, klicken Sie auf Ja.
8. Klicken Sie dann auf Beenden, um mit der Installation fortzufahren.
DEU-2
Page 11

9. Für Windows XP MCE Nutzer, wenn Sie die Media Center Anwendung als
Schnellinstallationsanleitung
TV-Anwendung nutzen wollen, starten Sie die Media Center Anwendung und folgen Sie
den Anweisungen.
* Wir empfehlen Ihnen, den Media Center zu schließen, ehe Sie AVerTV 6 aktivieren.
Installieren von Treibern und Anwenderprogramm unter Windows Vista™
1. Die Dialogbox “Assistent für das Suchen neuer Hardware” erscheint. Klicken Sie auf
Abbrechen, um den Installationsassistenten zu beenden.
2. Geben Sie die Installations-CD in das CD-ROM-Laufwerk ein.
3. Wenn die “AutoPlay” Anwendung erscheint, wählen Sie Run Autorun.exe.
4. Wenn das Installationsfenster erscheint, wählen Sie Installieren AVe r T V.
5. Wenn das “Nutzer Zugangskontrolle” Fenster erscheint, wählen Sie „Zulassen“ um fort zu
fahren.
6. Klicken Sie auf Weite r um mit dem Installationsprozess fortzufahren.
7. Lesen Sie bitte die Lizenzbestimmungen und wenn Sie diesen zustimmen, wählen Sie „Ich
akzeptieren die Lizenzbestimmungen“ und klicken dann auf Weiter .
8. Wählen Sie Vollständig um alle benötigten Softwarekomponenten zu installieren,
inclusive AVerTV 6, Acrobat Reader, DirectX 9.0c und Tre ib er. Dann klicken Sie auf
Wei ter. Erfahrenen Anwendern wird empfohlen, Individuell anzuklicken und so die
gewünschte Software auszuwählen. Um ein anderes Installationsverzeichnis zu wählen,
klicken Sie auf Durchsuchen.
9. Klicken Sie dann auf Beenden, um mit der Installation fortzufahren.
HINWEIS:
1. Falls DirectX 9.0c oder eine neuere Version nicht in Ihrem System installiert ist, wird dieses
Programm in der Regel während des Installationsvorgangs automatisch von der Installations-CD
aus installiert. Stellen Sie sicher, dass in Ihrem System DirectX 9.0c oder eine neuere Version
installiert ist, so dass die TV-Software-Utility korrekt funktionieren kann.
2. Wenn kein Acrobat Reader installiert ist, werden Sie während der Installation gefragt, ob diese
automatisch installieren wollen.
3. Dieses Produkt wird ohne DVD Decoder geliefert. Wenn Sie DVD oder MPEG-2 Filme auf Ihrem
Rechner abspielen können, müssen Sie keinen DVD Decoder installieren. Wenn jedoch ein
Decoder Fehler in Windows
MCE Partnerseite, ob Ihr DVD Decoder Windows
®
Media Center Edition erscheint, dann überprüfen Sie bitte auf der
®
Media Center Edition kompatibel ist.
Aufrufen des AVerTV-Anwenderprogramms
Um die TV-Applikation aus dem Programm Menü heraus zu starten, klicken Sie auf Start
Programme AVerMedia AVerTV 6 AVerTV 6.
English Deutsch Español Português Nederlands Türkçe ภาษาไทย Việt nam
DEU-3
Page 12
AVerTV Express
Deinstallation von Anwendung und Treibern
--Windows XP / Windows XP Media Center Edition--
Wenn Sie im Media Center Modus sind, beenden Sie diesen und wechseln in den Windows
Modus. Um das installierte Programm von Ihrem System zu entfernen, wählen Sie Start
Programme AVerMedia AVerTV 6 Uninstaller Alles entfernen Weiter
OK Beenden.
--Windows Vista™ --
1. Um die TV-Software von Ihrem System zu deinstallieren, wählen Sie Start
Programme AVerMedia AVerTV 6.
2. Klicken Sie mit der rechten Maustaste auf Uninstaller. Wenn das Pop-Up Fenster
erscheint, wählen Sie Start als Administrator.
3. Wenn das “Nutzer Zugangskontrolle” Fenster erscheint, wählen Sie „Zulassen“.
4. Wählen Sie Alles entfernen Weiter OK Beenden.
Fernbedienung
Nach Installation der Treiber und Anwendungen können Sie die Fernbedienung verwenden, um
Programme ein- und auszuschalten, Sender auszuwählen, die Lautstärke zu regeln usw. Darüber
hinaus können Sie die Fernbedienung als Fern-Maus verwenden. Benutzen Sie hierfür die
Pfeiltasten (←↑→↓), um den Mauszeiger zu steuern, wenn die Software geschlossen ist.
NOTE:
Der AVerQuick Launcher ist wichtig für die Nutzung der Fernbedienung. Wenn dieser nicht aktiviert
ist, sind die Funktionen für und von der Fernbedienung nicht ausführbar. Detailierte Informationen
hierzu finden Sie im Handbuch auf der Installations-CD.
Fernbedienungstasten
DEU-4
Page 13
Taste Beschreibung
1. POWER
2. Zifferntasten
3. CH RTN
4. 16-CH PREV
5. VOL▲/▼
6. FULL SCREEN
7. AUDIO
8. ► (Wiedergabe)
9. ■ (Stopp)
10. (Vor)
11. SLEEP
12. MENU
13. EPG
14. WAKE UP
15. TELETEXT
16. TIMESHIFT /Pause
Anwendung ein-/ausschalten
- Wählen Sie einen TV-Sender.
- Während Sie sich im 16-Sender-Vorschaumodus befinden,
verwenden Sie ↑↓← →, um den gewünschten Sender
auszuwählen.
Gehen Sie zum zuvor ausgewählten Sender zurück.
16-Sender-Vorschau.
Erhöhen/Verringern Sie die Lautstärke.
Zeigen Sie TV- oder Video-Vollbildschirm an.
Wechseln Sie zwischen den verfügbaren Sprachen.
Geben Sie die zuletzt aufgenommene oder wiedergegebene Datei
wieder.
- Beenden Sie die Wiedergabe oder Aufnahme.
- Beenden Sie den TimeShift-Modus und kehren Sie zum
Echtzeit-TV- oder Radio-Modus zurück
- Spulen Sie die Wiedergabe vor.
- Springen Sie zur Teletextseite der entsprechenden Farbe dieser
Schaltfläche.
- Gehen Sie zur nächsten Datei in der Wiedergabeliste.
- Setzen Sie die Zeit wann der Computer in den Stand-By oder Hibernate
Modus gehen soll.
- Springen Sie zur Teletextseite der entsprechenden Farbe dieser
Schaltfläche.
Benutzeroberfläche anzeigen oder verstecken.
Starten Sie den elektronischen Programmführer. (Nur DVB-T)
- Gehen Sie zur vorherigen Datei in der Wiedergabeliste.
- Setzten Sie die Zeit wann der Computer aus dem Stand By- oder
Hibernate Modus aufwachen soll.
- Springen Sie zur Teletextseite der entsprechenden Farbe dieser
Schaltfläche.
Starten Sie die Teletext-Anwendung.
- Halten Sie die Wiedergabe an.
- Wechseln Sie vom Echtzeit-TV- oder Radio- zum
TimeShift-Modus.
Schnellinstallationsanleitung
English Deutsch Español Português Nederlands Türkçe ภาษาไทย Việt nam
DEU-5
Page 14
AVerTV Express
17. (Zurückspulen)
18 ● (Aufnahme)
19. MUTE
20. CH ▲/▼
21. SNAPSHOT
22. DISPLAY
23. Source
- Spulen Sie die Wiedergabe zurück.
- Springen Sie zur Teletextseite der entsprechenden Farbe dieser
Schaltfläche.
Wechseln Sie zum DVR-Modus und nehmen Sie das aktuelle
Programm oder Video auf Ihre Festplatte auf.
Schalten Sie den Ton ein/aus.
Gehen Sie zum nächsten aktiven Sender herauf oder herunter.
Nehmen Sie das Bild auf dem Bildschirm als eine Bitmap-Datei auf.
Zeigt die Informationen an.
Umschalten zwischen verschiedenen Signalquellen.
DER SICHERE UMGANG MIT BATTERIEN:
- Achtung! Im Lieferumfang befinden sich Batterien. Batterien gehören nicht in den
Hausmüll. Sie werden vom Hersteller, Händler oder deren Beauftragten kostenlos
zurückgenommen, um sie einer Verwertung bzw. Entsorgung zuzuführen.
- Wenn Sie Fragen zur Entsorgung haben, wenden Sie sich bitte an Ihre Verkaufsstelle
oder an unseren Service.
- Batterien können brennbare Stoffe enthalten. Bei unsachgemäßer Behandlung
können Batterien auslaufen, sich stark erhitzen, entzünden oder gar explodieren, was
Schäden für Ihr Gerät und ihre Gesundheit zur Folge haben könnte.
- Bitte befolgen Sie unbedingt folgende Hinweise:
- Vermeiden Sie Hitze und werfen Sie die Batterien nicht ins Feuer.
- Zerlegen oder verformen Sie die Batterien nicht. Ihre Hände oder Finger könnten
verletzt werden oder Batterieflüssigkeit könnte in Ihre Augen oder auf Ihre Haut
gelangen. Sollte dies passieren, spülen Sie die entsprechenden Stellen mit einer
großen Menge klaren Wassers und informieren Sie umgehend Ihren Arzt.
- Vermeiden Sie starke Stöße und Erschütterungen.
- Entfernen Sie die Batterie aus der Fernbedienung, wenn dieses über einen längeren
Zeitraum nicht benutzt wird.
DEU-6
Page 15
Contenido del paquete
AVerTV Express Guía de instalación rápida Antena Radio FM
Guía de instalación rápida
English Deutsch Español Português Nederlands Türkçe ภาษาไทย Việt nam
Cable S-Vídeo/ Compuesto 2 en 1
Control remoto
(pilas incluidas)
CD de instalación
Cable RF
Requisitos del sistema
Los requisitos del sistema están descritos con detalle en el paquete de embalaje. Antes de instalar
AVerTV Express, verifique si su PC cumple los requisitos descritos.
Instalación del Hardware
Paso 1 : Inserción de la tarjeta AVerTV Express
Inserte la tarjeta AVerTV Express en la ranura ExpressCard™ del equipo portátil. (Las tarjetas
de 34mm pueden ser conectadas en ranuras ExpressCardTM de 34 y 54 mm respectivamente)
ESN-1
Page 16
AVerTV Express
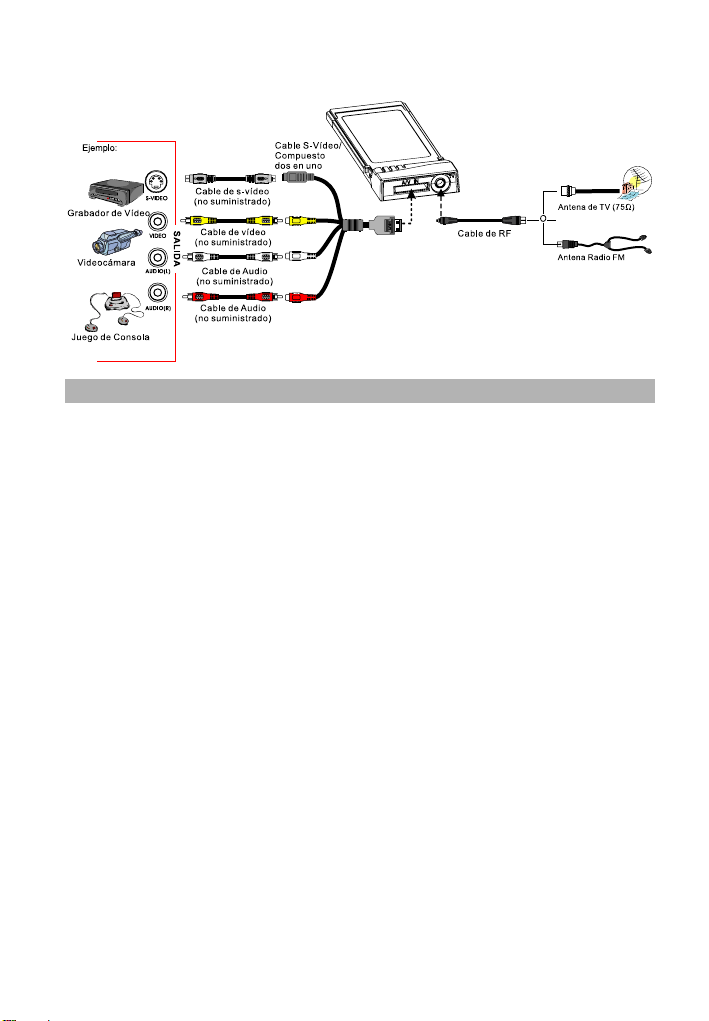
Paso 2 : Cómo hacer la conexión
Instalando los drivers y el programa de utilidades de TV
Después de la correcta instalación de la tarjeta, encienda su PC. El sistema detectará
automáticamente el nuevo dispositivo. Simplemente cancele el asistente e inserte el CD de
instalación para instalar el controlador y el programa de utilidades de TV al mismo tiempo.
Instalando los drivers y la aplicación en Windows XP / Windows XP Media Center
Edition
Para instalar los controladores y la aplicación, los usuarios de Windows XP MCE deben
salir del modo Media Center Edition y cambiar al modo Windows.
1. Aparecerá el “Asistente de Nuevo Hardware encontrado”. Simplemente presione
Cancelar para omitir el asistente de instalación.
2. Inserte el CD de instalación en la unidad de CD-ROM.
3. Cuando la pantalla principal de instalación aparezca, elija Instalar AVerTV.
4. Pulse en Siguiente para continuar con el proceso de instalación.
5. Lea los términos de licencia y si está de acuerdo seleccione: “Acepto los términos de
licencia” y pulse en Siguiente.
6. Elija “completa” para instalar todo el software necesario, incluido AVerTV 6, Acrobat
Reader, DirectX 9.0c y los controladores. Después, pulse en siguiente, para usuarios
avanzados, es recomendable seleccionar Personalizada, para elegir los programas que
desea. Para elegir un directorio diferente de instalación elija Explorar.
7. Si fuera necesario reiniciar el PC, seleccione Sí en el cuadro de diálogo “Asistente
InstallShield”.
8. Luego, haga clic en Finalizar para completar la instalación.
9. Si es usuario de Windows XP MCE, si desea utilizar la aplicación Media Center como
programa para ver la TV, inicie la aplicación Media Center y siga los pasos para
completar la configuración.
ESN-2
Page 17

* Le recomendamos salir del modo Media Center antes de activar AVerTV 6.
Guía de instalación rápida
Instalando los drivers y la aplicación en Windows Vista™
1. Aparecerá el “Asistente de Nuevo Hardware encontrado”. Simplemente presione Cancelar
para omitir el asistente de instalación.
2. Inserte el CD de instalación en la unidad de CD-ROM.
3. Cuando aparezca el cuadro de diálogo de “reproducción automática” (“Autoplay”),
seleccione ejecutar Autorun.exe.
4. Cuando la pantalla principal de instalación aparezca, elija Instalar AVerTV.
5. Si el cuadro de diálogo “control de cuentas de usuario” aparece, seleccione Permitir para
continuar el proceso.
6. Pulse en Siguiente para continuar con el proceso de instalación.
7. Lea los términos de licencia y si está de acuerdo seleccione: “Acepto los términos de
licencia” y pulse en Siguiente.
8. Elija “completa” para instalar todo el software necesario, incluido AVerTV 6, Acrobat
Reader, DirectX 9.0c y los controladores. Después pulse en siguiente, para usuarios
avanzados, es recomendable seleccionar Personalizada para elegir los programas que desea.
Para elegir un directorio diferente de instalación, elija Explorar.
9. Luego, haga clic en Finalizar para completar la instalación.
NOTA:
1. Si DirectX 9.0c o superior no está instalado en su sistema, el CD de instalación lo instalará
automáticamente durante el proceso de instalación. Asegúrese de que el sistema tiene DirectX
9.0c o superior para que el software de TV pueda funcionar de manera apropiada.
2. Si su sistema no tiene instalado Acrobat Reader, el proceso de instalación le abrirá el diálogo de
instalación automáticamente
3. El producto no incluye un descodificador de DVD de software. Si los usuarios pueden reproducir
DVD o archivos de vídeo MPEG-2 en el equipo, no es necesario instalar un descodificador de DVD.
No obstante, si aparece el mensaje de error de descodificación en la pantalla, instale el
descodificador de DVD compatible a través del sitio de Windows
Partners.
®
XP Media Center Edition
Activando la aplicación AVerTV
Para ejecutar la aplicación desde el menú programas, pulse en Inicioprogramas
AVerMedia AVerTV 6 AVerTV 6.
Para desinstalar la aplicación y los controladores
--Windows XP / Windows XP Media Center Edition--
Si está en el modo Media Center, por favor salga y cambie al modo Windows. Para
eliminar la aplicación de software de TV del sistema elija,
ESN-3
English Deutsch Español Português Nederlands Türkçe ภาษาไทย Việt nam
Page 18
AVerTV Express
InicioProgramas AVerMediaAVerTV 6 Unistaller Eliminar
todoSiguiente OK Finalizar.
--Windows Vista™ --
1. Para eliminar la utilidad de software de TV del sistema, simplemente elija InicioTodos
los programasAVerMediaAVerTV 6.
2. Haga click con el botón derecho del ratón en el icono Unistaller (Desinstalador).
Cuando aparezca el menú, elija Ejecutar como administrador.
3. Cuando aparezca el cuadro de diálogo “control de cuentas de usuario”, seleccione
Permitir.
4. Pulse en Eliminar todoSiguiente OK Finalizar.
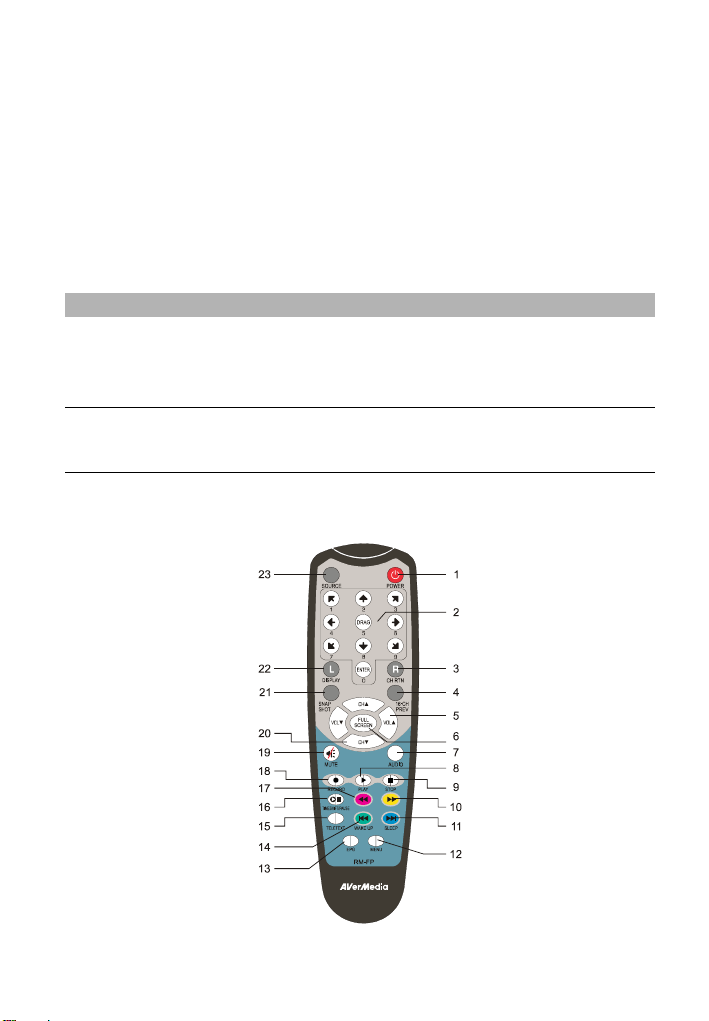
Control remoto
Después de instalar los controladores y las aplicaciones, use el control remoto para encender /
apagar los programas, seleccionar canales, ajustar el volumen, etc. Además, el control remoto
puede funcionar como un ratón remoto usando las teclas de flecha (←↑→↓) para
controlar el puntero del ratón cuando el software AVerTV esté apagado.
NOTA:
La aplicación AVerQuick es muy importante para el mando a distancia. Si no está activado, el mando a
distancia no funcionará. Para más detalles consulte el manual de usuario, en el CD de instalación.
Botones del control remoto
ESN-4
Page 19
Guía de instalación rápida
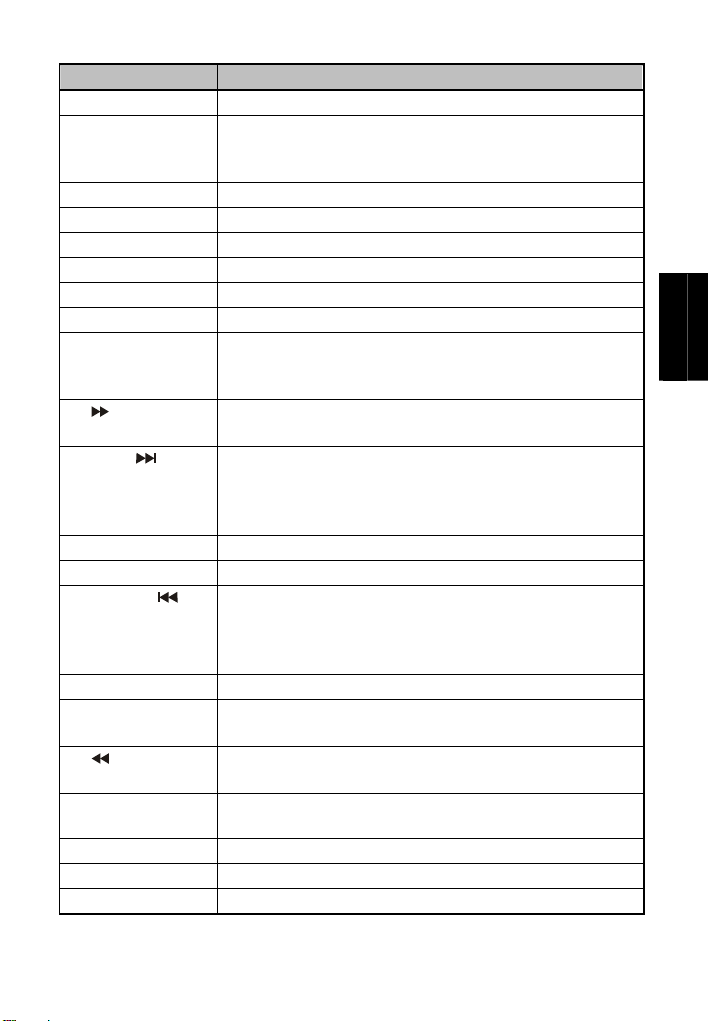
Botón Descripción
1. POWER Encender/apagar la aplicación
- Seleccionan un canal de TV.
2. Botones numéricos
3. CH RTN Ir al canal seleccionado anteriormente.
4. 16-CH PREV Vista previa de 16 canales.
5. VOL▲/▼ Aumentar/disminuir el volumen.
6. FULL SCREEN Mostrar TV o vídeo en pantalla completa.
7. AUDIO Alternar entre los idiomas disponibles.
8. ► (Reproducir) Reproducir el último archivo grabado o reproducido.
9. ■ (Detener) - Terminar la reproducción o la grabación.
10. (Avanzar) - Avanzar la reproducción.
11. SLEEP - Va al archivo siguiente en la lista de reproducción.
12. MENU Muestra u oculta el panel de control.
13. EPG Iniciar la Guía de programación electrónica. (Sólo DVB-T)
14. WAKE UP - Va al archivo anterior en la lista de reproducción.
15. TELETEXT Inicia la aplicación teletexto.
16. TIMESHIFT /PAUSE - Congela la reproducción
17. (Retroceder) - Retrocede la reproducción.
18. ● (Grabar) Alterna al modo DVR y graba el programa o el vídeo actual en el disco
19. MUTE Activa o desactiva el sonido.
20. CH ▲/▼ Va al canal activo anterior o siguiente.
21. SNAPSHOT Captura la imagen en la pantalla a un archivo de mapa de bits.
- Bajo el modo de vista previa de 16 canales, use ↑↓← → para resaltar
el canal deseado.
- Finalizar el modo TimeShift y volver al modo TV o radio en tiempo
real.
- Saltar a la página de teletexto del color correspondiente a este botón.
- Establece el tiempo necesario para que su ordenador entre en modo
Suspensión o Hibernación.
- Salta a la página de teletexto del color correspondiente a este botón.
- Establece el tiempo necesario para finalizar el estado de Suspensión o
Hibernación de su ordenador.
- Salta a la página de teletexto del color correspondiente a este botón.
- Alterna entre los modos TV o radio en tiempo real y TimeShift
- Salta a la página de teletexto del color correspondiente a este botón.
duro.
English Deutsch Español Português Nederlands Türkçe ภาษาไทย Việt nam
ESN-5
Page 20
AVerTV Express
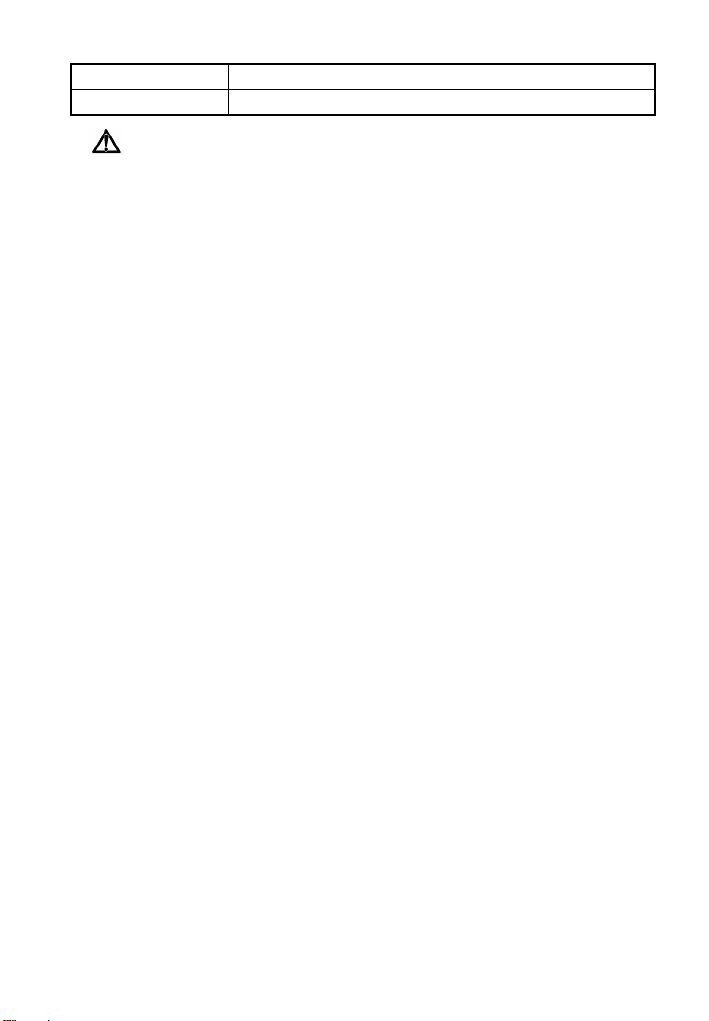
22. DISPLAY Muestra la información.
23. Source Selecciona entre las fuentes de video disponibles.
Información acerca de la seguridad de las pilas:
- Almacene las pilas en un lugar fresco y seco.
- No tire las pilas usadas junto a los desperdicios domésticos. Tire las pilas en lugares especiales
acondicionados para ello o devuélvalas al lugar donde las compró, si procede.
- Quite las pilas en periodos largos en los que no utilice el mando a distancia. Quite siempre las
pilas gastadas del mando a distancia. Si las pilas gotean, la corrosión podría dañar el mando a
distancia, guárdelas en lugar seguro.
- No mezcle pilas viejas y nuevas.
- No mezcle diferentes tipos de pilas: alcalinas, estándar (carbono-zinc) o recargables
(níquel-cadmio).
- No tire las pilas al fuego. Las pilas podrías explotar o derramar líquidos.
- Nunca haga cortocircuitos en los terminales de las pilas.
ESN-6
Page 21
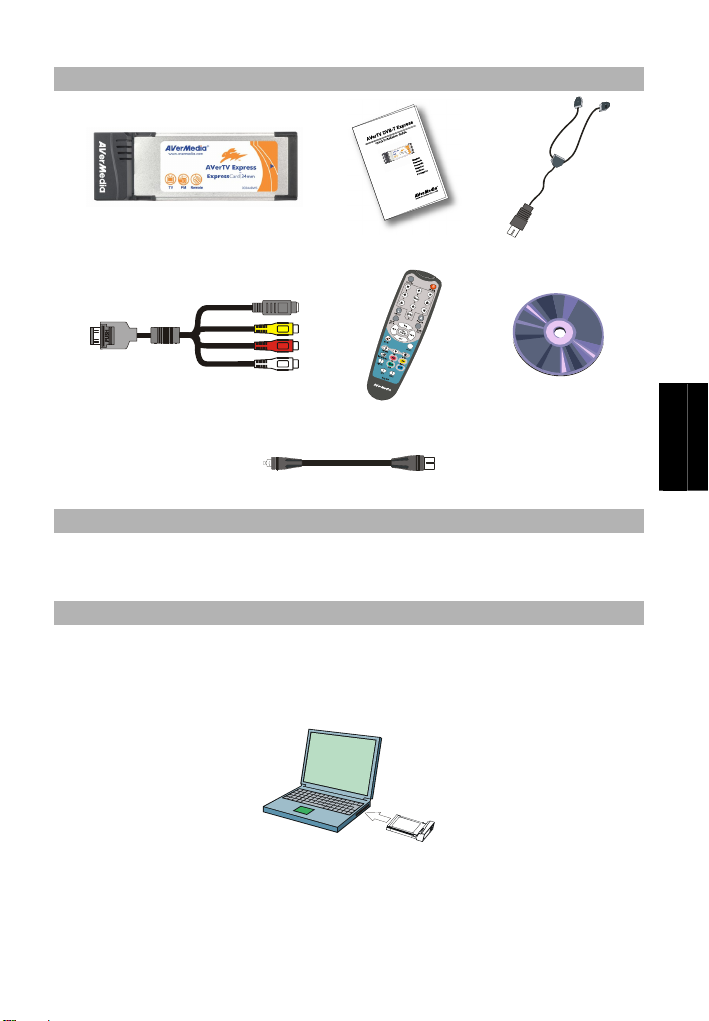
Conteúdo do Pacote
Guia de instalação rápida
English Deutsch Español Português Nederlands Türkçe ภาษาไทย Việt nam
AVerTV Express Guia de instalação rápida Antena Rádio FM
Cabo tudo-em-um
Controle remoto
(Pilhas incluídas)
Cd de instalação
Cabo RF
Requisitos do sistema
Os requisitos do sistema estão descritos em detalhes na embalagem. Antes de instalar o AVerTV
Hybrid Express, verifique se seu computador atende aos requisitos indicados.
Instalação de hardware
Etapa 1 : Introduzir o AVerTV Express
Insira o AVerTV Express na ranhura da placa ExpressCard™ do seu portátil. (A placa de 34 mm
serve tanto nas ranhuras ExpressCard™ de 34 mm, como nas ranhuras ExpressCard™ de 54 mm)
PTG-1
Page 22
AVerTV Express
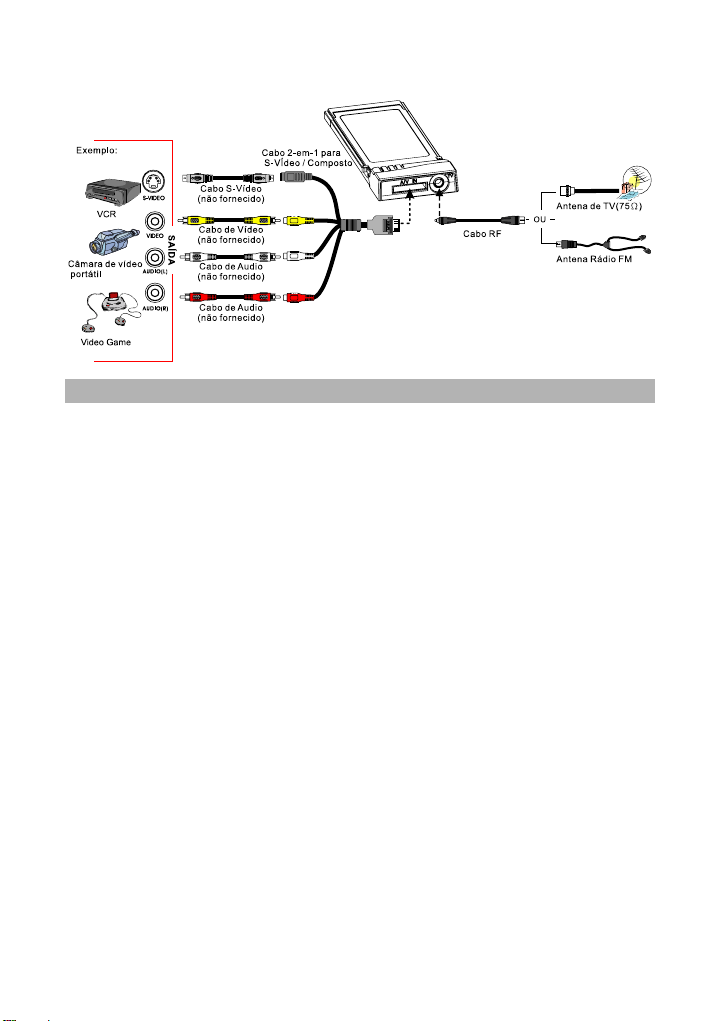
Etapa 2 : Conexão
Instalação dos controladores e do software de TV
Ligue o computador depois de instalar corretamente a placa. O sistema detectará o novo
dispositivo automaticamente. Ignore o assistente e introduza o CD de instalação que consta da
embalagem para instalar o controlador e o software de TV ao mesmo tempo.
Instalação dos controladores e da aplicação do Windows XP / Windows XP
Media Center Edition
Para instalar o controlador e a aplicação, os utilizadores do Windows XP MCE terão de
sair e comutar para o modo Windows caso se encontrem no modo Media Center Edition.
1. Aparecerá a caixa de diálogo “Assistente para adicionar novo hardware”. Clique em
Cancelar para ignorar o assistente de instalação.
2. Coloque o CD de instalação no CD-ROM.
3. Quando visualizar o ecrã principal, escolha Instalar AVerTV.
4. Clique em Seguinte para prosseguir a instalação.
5. Leia o contrato relativo à licença e, caso esteja de acordo, seleccione “Aceito os termos
do contrato de licença”. A seguir, clique em Seguinte.
6. Escolha Concluir para instalar todo o software necessário, incluindo AVerTV 6, Acrobat
Reader, DirectX 9.0c e os controladores. A seguir, clique em Seguinte. Aos
utilizadores avançados, recomendamos a opção Personalizada para selecção do software
a instalar. Para escolher uma pasta de destino diferente, clique em Pesquisar.
7. Na caixa de diálogo “InstallShield Wizard Complete” (Assistente do InstallShield concluído),
se for solicitado a reiniciar seu computador, selecione Sim.
8. Em seguida clique em Concluir para finalizar a instalação.
9. Para os utilizadores do Windows XP MCE: caso pretenda utilizar o Media Center como
aplicação de TV, inicie o Media Center e siga as instruções no ecrã de forma a completar
a configuração.
* Recomendamos-lhe que saia do modo Media Center antes de activar o AVerTV 6.
PTG-2
Page 23
Guia de instalação rápida
Instalação dos controladores e da aplicação do Windows Vista™
1. Aparecerá a caixa de diálogo “Assistente para adicionar novo hardware”. Clique em
Cancelar para ignorar o assistente de instalação.
2. Coloque o CD de instalação no CD-ROM.
3. Quando surgir a caixa de diálogo “AutoPlay” seleccione Run Autorun.exe.
4. Quando visualizar o ecrã principal, escolha Instalar AVerTV.
5. Caso surja a caixa de diálogo “User Account Control” (“Controlar Conta de
Utilizador”), seleccione Allow (Permitir) para continuar o processo.
6. Clique em Seguinte para prosseguir a instalação.
7. Leia o contrato relativo à licença e, caso esteja de acordo, seleccione “Aceito os termos do
contrato de licença”. A seguir, clique em Seguinte.
8. Escolha Concluir para instalar todo o software necessário, incluindo AVer TV 6 , Acrobat
Reader, DirectX 9.0c e os controladores. A seguir, clique em Seguinte. Aos utilizadores
avançados, recomendamos a opção Personalizada para selecção do software a instalar.
Para escolher uma pasta de destino diferente, clique em Pesquisar.
9. Em seguida clique em Concluir para finalizar a instalação.
OBSERVAÇÃO:
1. Se o DirectX 9.0c ou superior não estiver instalado em seu sistema, normalmente o CD de
instalação o fará automaticamente durante processo de instalação. Certifique-se de que seu
sistema tenha o DirectX 9.0c ou superior instalado para que o software utilitário de TV possa
funcionar corretamente.
2. Caso o seu sistema não esteja equipado com Acrobat Reader, o assistente de instalação será
activado automaticamente durante o processo de instalação.
3. Este produto não é fornecido com um software de descodificador de DVD. Se o utilizador
conseguir reproduzir DVD ou ficheiros de vídeo MPEG-2 no computador, não haverá necessidade
de instalar um descodificador de DVD. No entanto, caso apareça no ecrã a mensagem de Erro de
Descodificação, deverá instalar o descodificador de DVD compatível no site dos parceiros do
®
Windows
XP Media Center Edition.
Activação da aplicação AVerTV
Para executar a aplicação a partir do menu Programas, clique em Início
Programas AVerMedia AVerTV 6 AVerTV 6.
Desinstalação do aplicativo e dos drivers
--Windows XP / Windows XP Media Center Edition--
English Deutsch Español Português Nederlands Türkçe ภาษาไทย Việt nam
Se estiver no Modo Media Center deverá sair e comutar primeiro para o modo Windows. Para
remover do sistema o software utilitário de TV instalado, basta escolher Início Programas
AVerMedia AVerTV 6 Desinstalador Remover Tudo Seguinte OK
Terminar.
PTG-3
Page 24
AVerTV Express
--Windows Vista™ --
1. Para remover do sistema a utilidade do software de TV basta escolher Início Todos os
Programas AVerMedia AVerTV 6.
2. Clique com o botão direito do rato em Desinstalar. Quando se abrir a janela do menu,
escolha Run as administrator (Executar como Administrador).
3. Quando surgir a caixa de diálogo “User Account Control” (“Controlar Conta de
Utilizador”), seleccione Permitir (Allow).
4. Basta escolher Remover Tudo Seguinte OK Terminar.
Controle remoto
Após a instalação dos drivers e aplicativos, você pode usar o controle remoto para abrir e fechar
os programas, selecionar canais, ajustar o volume e assim por diante. Além disso, o controle
remoto pode funcionar como um mouse remoto usando-se as teclas de seta (←↑→↓) para
controlar o ponteiro do mouse quando o software estiver fechado.
OBSERVAÇÃO:
A barra de lançamento AVerQuick é importante para o funcionamento do telecomando, pois caso não
esteja activada, a função de telecomando será automaticamente desabilitada. Para mais informações
consulte o Manual do Utilizador no CD de instalação.
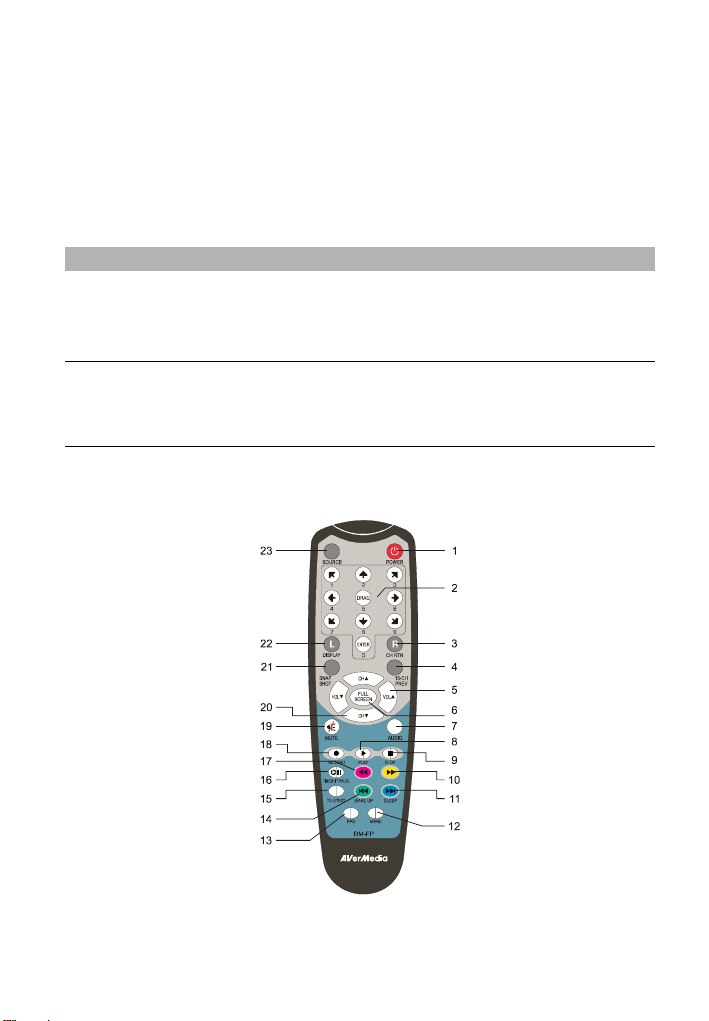
Botões do controle remoto
PTG-4
Page 25
Guia de instalação rápida
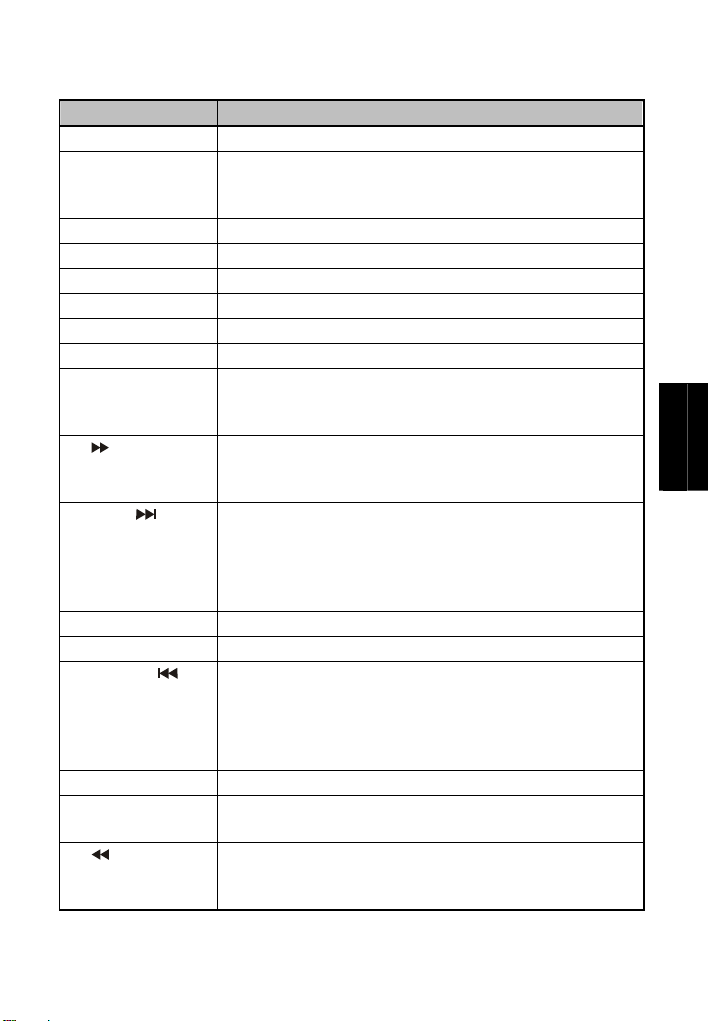
Botão Descrição
1. POWER Liga e desliga o aplicativo.
- Selecionar um canal de TV.
2. Botões numéricos
3. CH RTN Ir ao canal selecionado anteriormente.
4. 16-CH PREV Visualização de 16 canais.
5. VOL▲/▼ Aumenta ou diminui o volume.
6. FULL SCREEN Exibir TV ou vídeo em tela inteira.
7. AUDIO Alternar entre os línguas disponíveis.
8. ► (Reproduzir) Reproduz o último arquivo reproduzido ou gravado.
9. ■ (Parar)
10. (Avançar) - Avança a reprodução.
11. SLEEP - Ir ao próximo arquivo da lista de reprodução.
12. MENU Mostrar ou ocultar o Control Panel (Painel de controlo).
13. EPG Inicia o Guia Eletrônico de Programação. (Só para DVB-T)
14. WAKE UP - Ir ao arquivo anterior da lista de reprodução.
15. TELETEXT Inicia o aplicativo de tele-texto.
16. TIMESHIFT /PAUSE - Congela a reprodução.
17. (Retroceder) - Retrocede a reprodução.
- No modo de visualização de 16 canais, use as teclas ↑↓← → para
realçar o canal desejado.
- Para a reprodução ou a gravação.
- Para o modo TimeShift e retorna ao modo TV ou rádio em tempo
real.
- Salta para a página de tele-texto da cor correspondente de acordo com
esse botão.
- Regula o tempo para colocar o computador no modo de reserva ou
modo de hibernação.
- Salta para a página de tele-texto da cor correspondente de acordo com
esse botão.
- Regula o tempo para retirar o computador do modo de reserva ou de
hibernação.
- Salta para a página de tele-texto da cor correspondente de acordo com
esse botão.
- Alterna de TV ou rádio em tempo real para o modo TimeShift.
- Salta para a página de tele-texto da cor correspondente de acordo com
esse botão.
English Deutsch Español Português Nederlands Türkçe ภาษาไทย Việt nam
PTG-5
Page 26
AVerTV Express
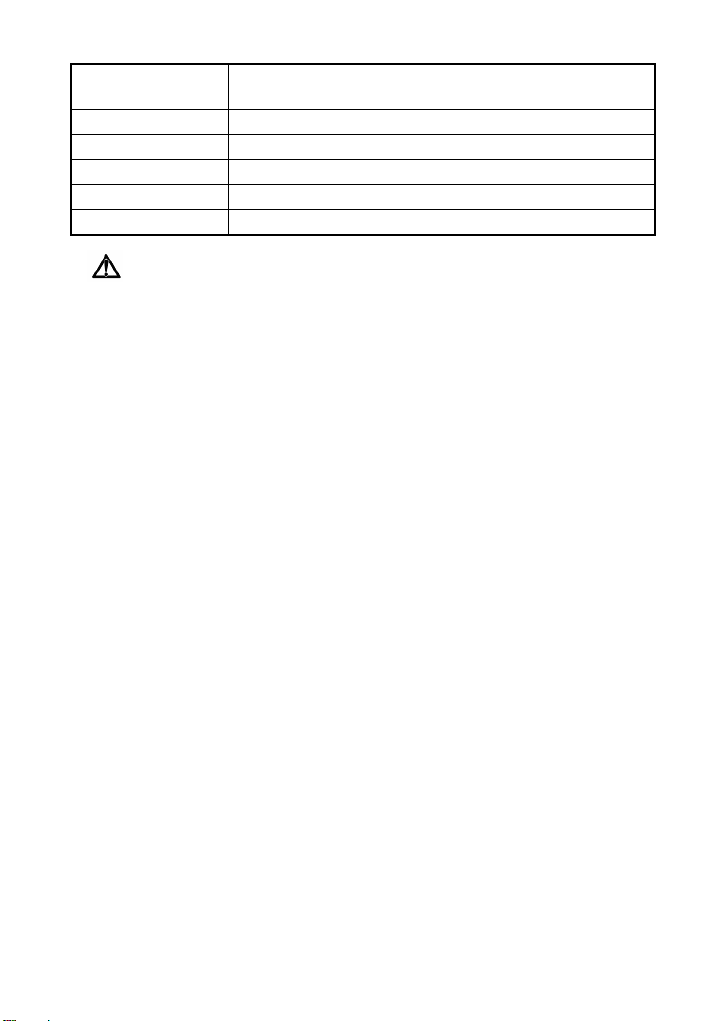
18. ● (Gravar) Alterna para o modo DVR e grava o programa ou vídeo atual em seu
19. MUTE Liga e desliga o som.
20. CH ▲/▼ Sobe ou desce para o próximo canal ativo.
21. SNAPSHOT Captura a imagem da tela em um arquivo de bitmap.
22. DISPLAY Exibe informações.
23. Source Alterne entre as fontes de sinal disponíveis.
disco rígido.
Informação de segurança relativa às pilhas:
- Guarde as pilhas num local fresco e seco.
- Não deposite as pilhas gastas juntamente com o lixo doméstico. Deposite as pilhas nos pontos
de recolha próprios para o efeito ou entregue-as nos pontos de venda, se for o caso.
- Retire as pilhas quando se prevejam períodos longos de não utilização. Retire sempre as pilhas
gastas do comando a distância. O derramamento a corrosão das pilhas poderão danificar o
comando a distância.
- Não misture pilhas novas com pilhas já gastas.
- Não misture tipos de pilhas diferentes: alcalinas, standard (carvão-zinco) ou recarregáveis
(níquel-cádmio).
- Não lance as pilhas nas chamas, pois poderão ocorrer explosões ou derramamentos.
- Nunca provoque curto-circuitos nos terminais da pilha.
PTG-6
Page 27
N
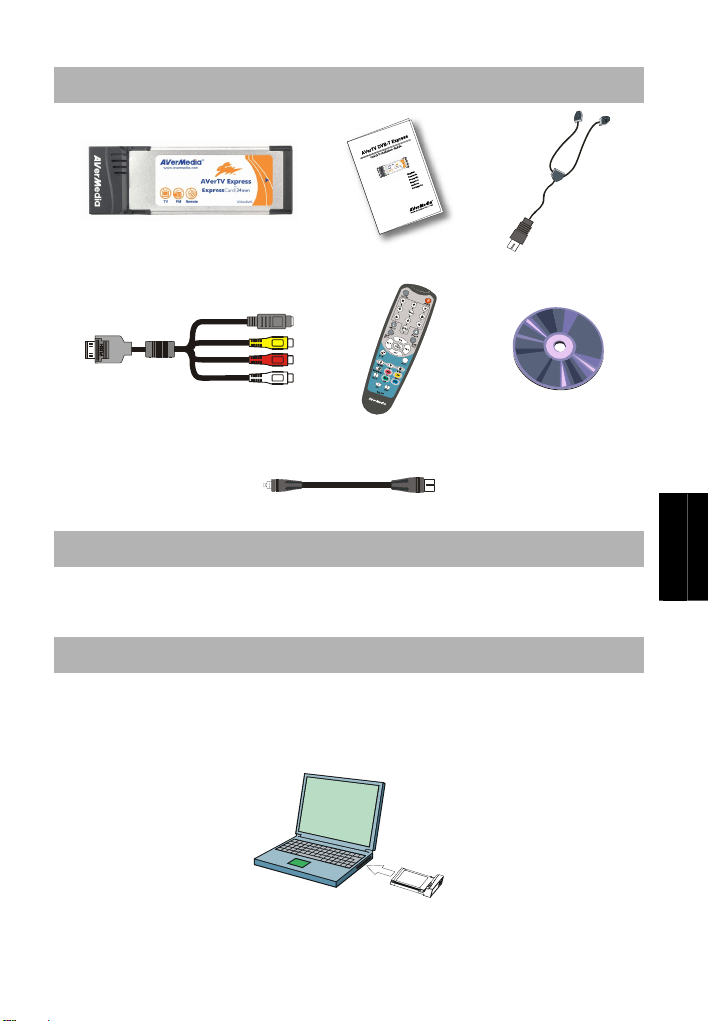
Inhoud van de verpakking
Snelle installatiehandleiding
English Deutsch Español Português Nederlands Türkçe ภาษาไทย Việt nam
AVerTV Express Snelle installatiehandleiding FM radioantenne
S-Video/ Composite 2-in-1 kabel
(inclusief batterijen)
Installatie CD
Afstandsbediening
RF Kabel
Systeemvereisten
De systeemvereisten zijn gedetailleerd beschreven op de doos. Voordat u AVerTV Express
installeert, controleert u of uw PC voldoet aan de beschreven vereisten.
Hardware installatie
Stap 1: Plaatsen van de AVerTV Express
Steek de AVerTV Express in de ExpressCard™-gleuf van de schootcomputer. (De 34
mm-kaarten passen in een ExpressCard™-gleuf van 34 of 54 mm.)
LD-1
Page 28
AVerTV Express
N
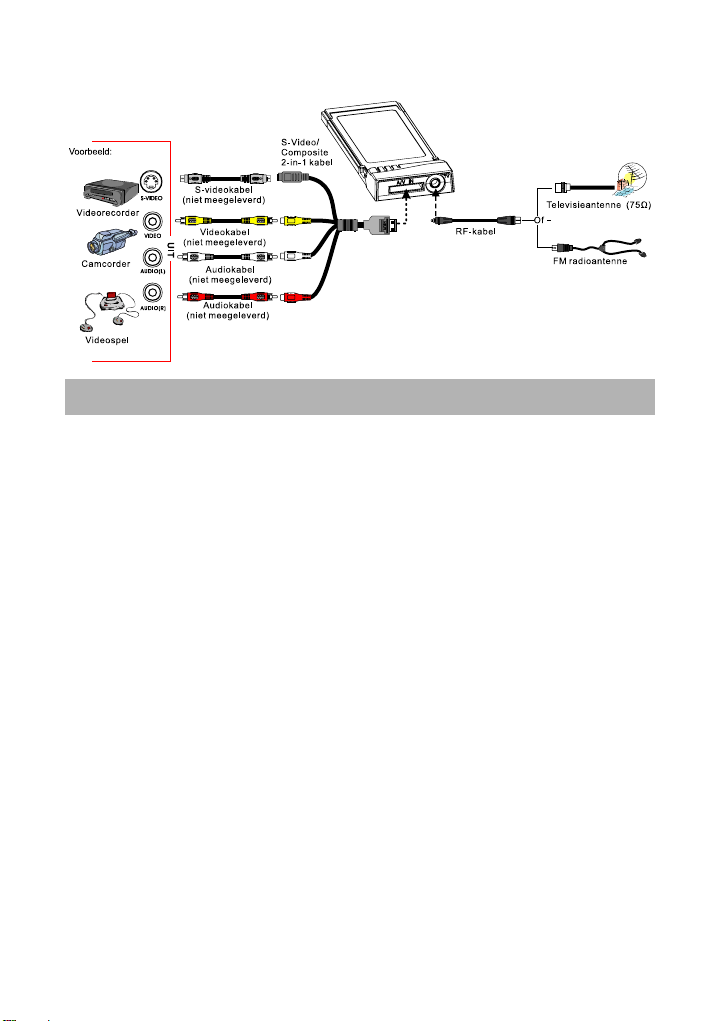
Stap 2 : Verbinding maken
Stuurprogramma’s en televisiesoftware installeren
Nadat de kaart gemonteerd is, zet u de computer weer aan. Het systeem zal een nieuw apparaat
detecteren. Sla de wizard over en leg de meegeleverde installatie-cd in de computer om tegelijk
het stuurprogramma en de televisiesoftware te installeren.
Stuurprogramma’s en toepassing installeren onder Windows XP / Windows
XP Media Center Edition
Om de driver en software te installeren, Windows XP MCE gebruikers moeten naar
Windows modus heen gaan en overschakelen indien zij in Mediacenter modus zijn.
1. Het dialoogvenster “Wizard Nieuw hardware gevonden” verschijnt. Klik op Cancel
(Annuleren) om de installatieprocedures van de wizard over te slaan.
2. Plaats de installatie-CD in het CD-ROM station.
3. Wanneer de installatie hoofd scherm verschijnt,kies Install AVerTV.
4. Klik op Volgende om verder te gaan met installatie proces.
5. Lees de licentieovereenkomst en indien u akkoord selecteer "ik accepter de voorwaarden
van de licentieovereenkomst " en klik dan op Volgende
6. Kies volledig installatie van alle noodzakelijke softwares inclusief AVerTV 6, Acrobat
Reader, DirectX 9.0c en Drivers. Dan klik op volgende. Het word aangeraden Custom
te selecteren en dan de software selecteren en installeren. Om een andere folder te kiezen ,
klik op Browse.
7. In het dialoogvenster “InstallShield Wizard” selecteert u Ja wanneer u de instructie ziet uw
computer opnieuw op te starten
8. Klik vervolgens op Voltooien om de installatie te voltooien.
9. Voor Windows XP MCE gebruikers indien u het Mediacenter als de TV toepassing wilt
gebruiken, start Mediacenter en volg de instructie op het scherm om de configuratie te
volgen.
LD-2
Page 29

N
* We adviseren u Media Centre af te sluiten voordat u AVerTV 6 start.
Stuurprogramma’s en toepassing installeren onder Windows Vista™
1. Het dialoogvenster “Wizard Nieuw hardware gevonden” verschijnt. Klik op Cancel
(Annuleren) om de installatieprocedures van de wizard over te slaan.
2. Plaats de installatie-CD in het CD-ROM station.
3. Waneer de “AutoPlay” verschijnt, select Run Autorun.exe.
4. Wanneer de installatie hoofd scherm verschijnt,kies Install AVerTV
5. Als de “User Account Control” verschijnt, select volgende om verder te gaan
6. Klik op Volgende om verder te gaan met installatie proces.
7. Lees de licentieovereenkomst en indien u akkoord selecteer "ik accepter de voorwaarden
van de licentieovereenkomst " en klik dan op Volgende
8. Kies volledig installatie van alle noodzakelijke softwares inclusief AVerTV 6, Acrobat
Reader, DirectX 9.0c en Drivers. Dan klik op volgende. Het word aangeraden Custom te
selecteren en dan de software selecteren en installeren. Om een andere folder te kiezen,
klik op Browse.
9. Klik vervolgens op Voltooien om de installatie te voltooien.
OPMERKING:
1. Wanneer DirectX 9.0c of hoger niet geïnstalleerd is op uw systeem, installeert de installatie-CD
dit automatisch tijdens het installeren. Zorg dat op uw systeem DirectX 9.0c of hoger is
geïnstalleerd zodat de TV software utility correct kan functioneren.
2. Indien uw systeem niet over Acrobat Reader beschikt , zal de installatie wizard automatisch
tijdens het proces van installatie opgeroepen worden.
3. Het product wordt niet geleverd met een dvd-decoder in software. Als u een dvd of een
mpeg-2-videobestand op de computer kunt afspelen, is het niet nodig een dvd-decoder te
Snelle installatiehandleiding
installeren. Evenwel als de melding Decodeerfout op het scherm verschijnt, installeer dan de
compatibele dvd-decoder vanaf de website van Windows
®
XP Media Centre Edition Partners.
English Deutsch Español Português Nederlands Türkçe ภาษาไทย Việt nam
Activeren AVeTV Applicatie
Om de toepassing te starten via Programma's menu, klik Start Programma's
AVerMedia AVerTV 6 AVerTV 6.
Het verwijderen van het TV Software
--Windows XP / Windows XP Media Center Edition--
Als u in Media center mode bevind ,switch eerst naar de windows mode. Om
geinstallerd TV software te verwijderen vanuit de systeem, Kies Start Programs
AVerMedia AVerTV 6 Uninstaller Remove All Next OK Finish.
LD-3
Page 30
AVerTV Express
N
--Windows Vista™ --
1. Verwijder de geinstallerde Tv software van de system ,kies Start All
Programs AVerMedia AVerTV 6.
2. Recht klik Uninstaller.wanneer een pop-up menu verschijnt,kies Run as
administrator.
3. Wanneer de “User Account Control” venster verschijnt, select Volgende.
4. Kies Remove All Next OK Finish.
Afstandsbediening
Na het installeren van stuurprogramma en toepassingen, kunt u de afstandsbediening gebruiken
om de programma’s aan/uit te schakelen, kanalen te selecteren, volume te wijzigen, enzovoort.
Daarnaast kunt u de afstandsbediening gebruiken als een Draadloze Muis door de pijltoetsen
(←↑→↓ ) te gebruiken om de muisaanwijzer te bewegen wanneer de software utility is
afgesloten.
OPMERKING:
AVerQuick is belangrijk voor de afstand bediening . als die niet geactiverd is dan kunt u de
afstandbedienings functie niet gebruiken, voor uitgebreide beschrijving kunt u vinden in de gebruikers
aanwijzing in de installatie cd,
Toetsen Afstandsbediening
LD-4
Page 31
N
To et s
1.POWER
2. Numerieke toetsen
3.CH RTN
4.16-CH PREV
5. VOL▲/▼
6.FULL SCREEN
7. AUDIO
8. ► (Afspelen)
9. ■ (Stop)
10. (Vooruit)
11. SLEEP
12. MENU
13. EPG
14. WAKE UP
15. TELETEXT
16. TIMESHIFT/PAUSE
17. (Terugspoelen)
18. ● (Opnemen)
19. MUTE
20. CH ▲/▼
21. SNAPSHOT
22. DISPLAY
23. SOURCE
Snelle installatiehandleiding
Beschrijving
Schakelt de toepassing aan/uit
- Selecteer een TV kanaal.
- Gebruik ↑↓← → in de 16-kanaals voorbeeldmodus om het
gewenste kanaal te markeren.
Ga naar het vorige geselecteerde kanaal.
16-kanaals voorbeeld.
Zet het volume harder/zachter.
Geeft TV of video weer op het volledige scherm.
Schakelt tussen beschikbare talen.
Speel het laatst opgenomen of afgespeelde bestand af.
- Stop het afspelen of opnemen.
- Stop de modus Time Shift en ga terug naar real-time TV of
Radio modus.
- Spoel het afspelen vooruit.
- Springt naar de teletekstpagina met de kleur die overeenkomt
met de kleur van deze toets.
- Ga naar het volgende bestand in de afspeellijst.
- Stel de tijd in waarop uw PC in de Standby of Hibernate mode
moet komen.
- Springt naar de teletekstpagina met de kleur die overeenkomt
met de kleur van deze toets.
Toon of verberg het Configuratiescherm.
Open de Electronische Programmagids. (alleen DVB-T)
- Ga naar het vorig bestand in de afspeellijst.
- Stel de tijd in waarop uw PC uit de Standby of Hibernate mode
moet komen.
- Springt naar de teletekstpagina met de kleur die overeenkomt
met de kleur van deze toets.
Opent de Teletekst toepassing.
- Pauzeert het afspelen
- Schakel van real-time TV of Radio naar Time Shift modus.
- Spoel het afspelen terug.
- Springt naar de teletekstpagina met de kleur die overeenkomt
met de kleur van deze toets.
Schakel naar DVR modus en neem het huidige programma of
video op, op de harde schijf.
Schakelt het geluid aan/uit.
Ga omhoog of omlaag naar het volgende actieve kanaal.
Leg het beeld op het scherm vast in een bitmap bestand.
Weergave-informatie.
Zet de TV of Radio modus aan.
English Deutsch Español Português Nederlands Türkçe ภาษาไทย Việt nam
LD-5
Page 32

AVerTV Express
N
Informatie over veiligheid van batterij:
- Bewaar de batterijen op een koele, droge plaats.
- Gooi de batterijen niet bij het huisvuil. Breng ze naar de darvoor bestemde
inzamelpunten of naar een verkooppunt.
- Verwijder de batterijen als ze langere tijd niet worden gebruikt. Verwijder
uitgeputte batterijen altijd uit de afstandbediening. Door lekkende batterijen en
corrosie kan de afstandbediening beschadigd worden. Gooi de batterijen op de
voorgeschreven manier weg.
- Gebruik niet oude en nieuwe batterijen tegelijk.
- Gebruik niet verschillende typen batterijen tegelijk: alkaline, standaard
(koolstof-zink) of oplaadbare (nikkel-cadmium).
- Gooi batterijen niet in het vuur. Ze zouden kunnen exploderen of lekken.
- Sluit de contacten van de batterijen niet kort.
LD-6
Page 33
Paketin İçerisindekiler
AVerTV Express Hızlı Kurulum Kılavuzu FM radyo anteni
Hızlı Kurulum Kılavuzu
English Deutsch Español Português Nederlands Türkçe ภาษาไทย Việt nam
S-Video/ Kompozit 2'si 1 arada kablo
Uzaktan Kumanda
RF Kablosu
Kurulum CD’si
(pilleri mevcut)
Sistem Gereksinimleri
Sistem gereksinimleri kutu üzerinde detaylı olarak gösterilmiştir. Ürünü kurmadan önce lütfen
yeterli sistem özelliklerine sahip olduğunuzdan emin olunuz.
Donanımın Montajı
Adım 1 : AVerTV Express Kartının Takılması
AVerTV Express kartı laptopunuzun Express kart yuvasına takınız. (34 mm kartlar hem 34 mm
hem de 54 mm Express kartlara uymaktadır.)
TRK-1
Page 34
AVerTV Express
Adım 2. Bağlantıları nı n Yapılması
Sürücülerin ve TV Yazılım Yardımının Kurulması
Kart uygun bir şekilde yerleştirildikten sonra bilgisayarınızı açın. Sistem otomatik olarak yeni
cihazı tanıyacaktır. Hemen hızlıca sihirbaza göz atın, Tv yazılımını ve beraberinde gelen
sürücüyü yüklemek için CD yi yükleyiniz.
Sürücülerin ve Uygulamanın Windows® XP / Windows XP Media Center
Edition 'de kurulması
Sürücüyü ve programı yüklemek için eğerWindows XP MCE kullanıcısıysanı z veya
Media Center edition modundaysanız bu moddan çıkı p, Windows moduna geçmeniz
gerekmektedir.
1. “Yeni Donanım Sihirbazı Bulundu” iletişim kutusu belirecektir. Sihirbaz kurulum
prosedürlerine geçmek için yapmanız gereken sadece İptal'e tıklamaktır.
2. CD-ROM sürücüsüne kurulum CD’sini takınız.
3. Kurulum ana ekranı belirdiğinde Install AVerTV (AVerTV’yi kur) seçeneğini tıklayın.
4. Next (ileri) tuşunu tıklayın.
5. Lisans anlaşmasını okuyun ve eğer kabul ediyorsanız seçerek ileri’yi tıklayın.
6. Complete (Tamamla) yı tıklayarak AverTV6, Acrobat Reader, DirectX 9.0c ve
sürücüleri yükleyin. İleri’yi tıklayın. Gelişmiş kullanıcılar için, kurmak istediğiniz
yazılımı seçmeniz için Özel'i seçmeniz önerilir. Başka bir kurulum klasörü için Gözat’ı
tıklayın.
7. “InstallShield Wizard Complete” iletişim kutusunda, bilgisayarı yeniden başlatmanız
talimatı verilirse, Yes (Evet)’i seçin.
8. Ardından kurulumu tamamlamak için Bitti’ye tıklayın.
9. Windows XP MCE kullanıcıları eğer Media Center kullanmak isterlerse konfigürasyonu
tamamlamak için Media Center’ı başlatın ve ekranda gelen talimatları izleyin.
* AVerTV6 yı aktif olarak başlatmadan once Media Center modundan çıkmanızı tavsiye ederiz
TRK-2
Page 35

Hızlı Kurulum Kılavuzu
Sürücülerin ve Uygulamanın Windows Vista™ 'de kurulması
1. “Yeni Donanım Sihirbazı Bulundu” iletişim kutusu belirecektir. Sihirbaz kurulum
prosedürlerine geçmek için yapmanız gereken sadece İptal'e tıklamaktır.
2. CD-ROM sürücüsüne kurulum CD’sini takınız.
3. Autoplay ‘ diyalog kutusu gözüktüğünde ‘ Run Autorun.exe’ yi seçiniz.
4. Kurulum ana ekranı belirdiğinde Install AVerTV (AVerTV’yi kur) seçeneğini tıklayın.
5. Next (ileri) tuşunu tıklayın.
6. Lisans anlaşmasını okuyun ve eğer kabul ediyorsanız seçerek ileri’yi tıklayın.
7. Complete (Tamamla) yı tıklayarak AverTV6, Acrobat Reader, DirectX 9.0c ve
sürücüleri yükleyin. İleri’yi tıklayı
yazılımı seçmeniz için Özel'i seçmeniz önerilir. Başka bir kurulum klasörü için Gözat’ı
tıklayın.
8. Ardından kurulumu tamamlamak için Bitti’ye tıklayın.
n. Gelişmiş kullanıcılar için, kurmak istediğiniz
NOT:
1. DirectX 9.0c veya üstü sisteminize kurulmamışsa, kurulum sürecinde kurulum CD'si
genellikle otomatik olarak kuracaktır. Sisteminizde DirectX 9.0c veya üstünün kurulu
olduğundan emin olun, böylece TV yazılım programı doğru çalışabilir.
2. Eğer sisteminizde Acrobat Reader kurulu değilse, otomatik olarak kurulum sihirbazı
belirecektir.
3. Ürün bir yazılımsal DVD Decoder ile gelmemektedir. Eğer kullanıcılar bilgisayarda
DVD veya MPEG-2 video dosyalarını çalabilirse, DVD dekoderini kurmanız
gerekmemektedir. Ancak, ekranda Dekoder hatası belirirse, lütfen Windows® XP Media
Center Edition Partners sitesinden uyumlu DVD dekoderini kurun.
AVerTV Uygulamasının Etkinleştirilmesi
AVerTV 6 programını başlatmak için sırası yla Başlat – Programlar – Avermedia –
AverTV 6 – AverTV 6 ‘yı tı klayın.
Uygulamanın ve Sürücülerinin Kurulumunun
English Deutsch Español Português Nederlands Türkçe ภาษาไทย Việt nam
Kaldırılması
--Windows XP / Windows XP Media Center Edition --
Eğer Media Center modundaysanı z lütfen çıkı p Windows moduna geçiniz . Sırası yla
Başlat – Programlar – Avermedia – AvetTV6 – Kaldır – Hepsini kaldı r – İeri –
Tamam – Bitir ‘i tıklayın.
TRK-3
Page 36
AVerTV Express
--Windows Vista™ --
1. Sı rasıyla Başlat – Programlar – AVerMedia – AVerTV6 – Kaldı r – Hepsini
kaldır – İeri – Tamam – Bitir ‘i tıklayın.
2. Kaldır’ı sağ tı klayın. Pop-up menü belirdiğinde, Run as administrator seçin.
3. User account control belirdiğinde, Allow’u seçin.
4. Remove all – next – ok – finish seçin.
Uzaktan Kumanda
Programları kurduktan sonra, uzaktan kumanda ile tüm fonksiyonları kullanabilirsiniz.
Ayrıca, uzaktan kumanda aygıtı, TV yazılım yardımı kapalı iken farenin işaret okunu kumanda
etmek üzere (←↑→↓↖↗↘↙) tuşlarını kullanarak Uzaktan Kumandalı Fare olarak da
çalıştırılabilir.
NOT:
AVerQuick programı uzaktan kumanda kullanımı için önemlidir. Eğer program aktif olmazsa
uzaktan kumanda özelliği kullanılamaz. Ayrıntılar için yükleme CD’sindeki kullanım kılavuzuna
lütfen bakınız.
Uzaktan Kumanda Düğmeleri
TRK-4
Page 37
Hızlı Kurulum Kılavuzu
Düğmeleri Açıklama
1.POWER Uygulamayı açın/kapatın
2. Sayısal düğmeler - Bir TV kanalını seçer.
- 16-kanal önizleme modunda iken istenen kanalı belirginleştirmek
için kullanılır.
3.CH RTN Daha önceden seçilmiş olan kanala gider.
4.16-CH PREV 16-kanal Önizleme.
5. VOL▲/▼ Ses şiddetini Arttırır/Azaltır.
6.FULL SCREEN TV’yi tam ekran gösterin.
7. AUDIO Mevcut ses türleri arasında seçim yapar.
8. ► (Oynat) Son kaydedilen veya oynatılan dosyayı çalıştırır.
9. ■ (Dur) - Pleybeği veya kayıt işlemini durdurun.
- Zaman Kaydırma modunu sonlandırın ve gerçek zamanlı TV veya
Radyo moduna dönün.
10. (İleri sar) - Pleybeği ilerletin.
- Bu düğmeye göre ilgili renge ait teleteks sayfasına gidin.
11. SLEEP - Çal listesinde sonraki dosyaya gidin.
- Bilgisayarınızı Bekleme veya Derin uyku moduna almak için
zamanı ayarlayın.
- Bu düğmeye göre ilgili renge ait teleteks sayfasına gidin.
12. MENU Denetim Masasını göster veya gizle.
13. EPG Elektronik Program Kılavuzunu başlat. (Sadece DVB-T)
14. WAKE UP - Çal listesinde önceki dosyaya git.
- Bilgisayarınızı Bekleme veya Derin uyku moduna getirmek için
zamanı ayarlayın.
- Bu düğmeye göre ilgili renge ait teleteks sayfasına gidin.
15. TELETEXT Teleteks uygulamasını başaltın.
16. TIMESHIFT
/PAUSE
- Playback’i dondurur.
- Gerçek zamanlı TV veya Radyodan Zaman Kaydırma moduna
geçin.
17. (Geri sar) - Pleybeği geri sarın.
- Bu düğmeye göre ilgili renge ait teleteks sayfasına gidin.
18. ● (Kayıt) DVR moduna geçer ve o andaki programı veya videeoyu sabit
diskinize kaydeder
19. MUTE Ses Kapatır/Açar.
20. CH ▲/▼ Bir sonraki/önceki aktif TV kanalına gider
21. SNAPSHOT Ekran görüntüsünü Bitmap dosyasında yakalayın.
22. DISPLAY Bilgileri ekrana getirir
23. SOURCE Mevcut sinyal kaynakları arasında geçiş yapın.
English Deutsch Español Português Nederlands Türkçe ภาษาไทย Việt nam
TRK-5
Page 38

AVerTV Express
Pil Güvenlik Bilgisi:
- Pilleri kuru bir yere saklayınız.
- Kullanı lan pilleri ev kullanımı için olan çöpe atmayınız. Pilleri belirlenen toplama
noktalarına atın ya da gerektiğinde satış noktasına geri getirin.
- Uzun süre kullanmadığını zda pilleri çıkartın. Biten pilleri uzaktan kumandadan
daima çıkartın. Pil sızıntı ları ve korozyon bu uzaktan kumandaya zarar verebilir,
pileri güvenilir bir şekilde atın.
- Eski ve yeni pilleri karıştırmayı n.
- Farklı türdeki pilleri karıştı rmayın: alkalin, standart (karbon-çinko) veya yeniden
şarj edilebilir (nikel-kadminyum).
- Pilleri ateşe atmayın. Piller patlayabilir veya sızabilir.
- Pil kutupları nı asla kı sa devre yaptırmayın.
TRK-6
Page 39
รายการอุปกรณในกลอง
AVerTV Express คูมือการติดตั้งอยางเร็ว สายอากาศวิทย ุ FM
คูมือการติดตั้งอยางเร็ว
English Deutsch Español Português Nederlands Türkçe ภาษาไทย Việt nam
สายเคเบิลเอส-วิดีโอ/คอมโพสิต 2-in-1
รีโมทคอนโทรล
(รวมแบตเตอร ี่)
สายเคเบิล RF
ซีดีการติดตั้ง
ความตองการของระบบ
กอนติดตั้ง AVerTV Express ขอใหตรวจสอบวาเครื่องพีซีของคุณ
มีคุณสมบัติตรงตามความตองการของระบบที่ระบุหรือไม
(ความตองการของระบบมีการอธิบายอยางละเอียดบนกลอง)
การติดตั้งฮารดแวร
ขั้นที่ 1 : เสียบ AVerTV Express
ติดตั้ง AVerTV Express ในชอง ExpressCard ของเครื่องโนตบุคของทาน (การดขนาด 34 ม.ม.
สามารถใสกับ ExpressCard ไดทั้ง 34 ม.ม. และ 54 ม.ม.)
THA-1
Page 40
AVerTV Express
ขั้นที่ 2 : การทําการเชื่อมตอ
ติดตั้งไดรเวอรและโปรแกรมดูทีวี
หลังจากติดตั้งอุปกรณเรียบรอยแลวจึงเปดเครื่องคอมพิวเตอร ระบบจะพบอุปกรณโดยอัตโนมัติ
ใหยกเลิกตัวชวยการติดตั้งที่แสดงขึ้นมา แลวใสแผนซีดีที่ใหมาดวย
เพื่อติดตั้งไดรเวอรและโปรแกรมดูทีวี
การติดตั้งไดรเวอรและแอบพลิเคชั่นใน Windows® XP / Windows XP Media
Center Edition
สําหรับผูที่ใชงาน Window XP MCE จะตองออกจากโหมด Media Center กอน
เพื่อเขาสูโหมด Windows แลวจึงสามารถติดตั้งไดรเวอรและโปรแกรมดูทีวีได
1. กลองโตตอบ “Found New Hardware Wizard” จะปรากฏขึ้น ใหเลือก Cancel (ยกเลิก)
เพื่อยกเลิกกระบวนการติดตั้งของตัวชวยการติดตั้ง
2. ใสแผนซีดีการติดตั้งลงในไดรฟ CD-ROM
3. เมื่อหนาตางติดตั้งโปรแกรมแสดงขึ้นมา ใหเลือก Install AVerTV
4. กด Next เพื่อเขาสูขั้นตอนติดตั้งตอไป
5. เมื่ออานขอตกลงเสร็จแลว ถาทานเห็นดวยใหเลือก “I accept the terms of the license
agreement” แลวกด Next
6. เลือก Complete เพื่อติดตั้งโปรแกรมที่จําเปนตางๆ ซึ่งประกอบไปดวย AVerTV6,
Acrobat Reader, DirectX 9.0c และไดรเวอร แลวกด Next, สําหรับผูที่ชํานาญแลว
ใหเลือก Custom เพื่อเลือกเฉพาะโปรแกรมที่ทานตองการจะติดตั้ง, กด Browse
เพื่อเปลี่ยนโฟลเดอรที่จะติดตั้งโปรแกรม
7. ในหนาตาง “InstallShield Wizard” ถาทานไดรับคําแนะนําใหรีสตารทเครื่องใหม ใหกด
Yes
8. จากนั้นเลือกที่ Finish (เสร็จ) เพื่อเสร็จสิ้นการติดตั้ง
THA-2
Page 41

9. สําหรับผูที่ใชงาน Windows XP MCE, ถาทานตองการใชงาน Media Center
เปนโปรแกรมดูทีวี ใหเริ่มการใชงาน Media Center
และทําตามคําแนะนําบนหนาจอเพื่อตั้งคาตางๆใหสมบูรณ
*เราแนะนําใหทานออกจากโหมด Media Center กอนที่จะใชงาน AVerTV 6
การติดตั้งไดรเวอรและแอบพลิเคชั่นใน Windows Vista™
1. กลองโตตอบ “Found New Hardware Wizard” จะปรากฏขึ้น ใหเลือก Cancel (ยกเลิก)
เพื่อยกเลิกกระบวนการติดตั้งของตัวชวยการติดตั
2. ใสแผนซีดีการติดตั้งลงในไดรฟ CD-ROM
3. เมื่อหนาตาง “AutoPla y” แสดงขึ้นมา ใหเลือก Run Autorun.exe
4. เมื่อหนาตางติดตั้งโปรแกรมแสดงขึ้นมา ใหเลือก Install AVerTV
5. ถาหนาตาง “User Account Control” แสดงขึ้นมา ใหเลือก Allow เพื่อดําเนินการตอไป
6. กด Next เพื่อเขาสูขั้นตอนติดตั้งตอไป
7. เมื่ออานขอตกลงเสร็จแลว ถาทานเห็นดวยใหเลื
agreement” แลวกด Next
8. เลือก Complete เพื่อติดตั้งโปรแกรมที่จําเปนตางๆ ซึ่งประกอบไปดวย AVerTV6,
Acrobat Reader, DirectX 9.0c และไดรเวอร แลวกด Next, สําหรับผูที่ชํานาญแลว
ใหเลือก Custom เพื่อเลือกเฉพาะโปรแกรมที่ทานตองการจะติดตั้ง, กด Browse
เพื่อเปลี่ยนโฟลเดอรที่จะติดตั้งโปรแกรม
9. จากนั้นเลือกที่ Finish (เสร็จ) เพื่อเสร็จสิ้นการติดตั้ง
้ง
อก “I accept the terms of the license
หมายเหตุ:
1. ถาในระบบของคุณไมมี DirectX 9.0c ขึ้นไปติดตั้งอยู โดยปกติซีดีการติดตั้ง
จะติดตั้งโปรแกรมใหเองโดยอัตโนมัติ ระหวางกระบวนการติดตั้ง,
กรุณาตรวจสอบวาระบบของคุณมี DirectX 9.0c ขึ้นไป ติดตั้งอยู เพื่อที่วายูทิลิตี้ซอฟตแวร TV
จะทํางานไดอยางเหมาะสม
2. ถาเครื่องคอมพิวเตอรของทาน ไมไดติดตั้ง Acrobat Reader
ตัวชวยการติดตั้งจะถูกเรียกขึ้นมาโดยอัตโนมัติ
3. สินคาของเราไมไดมาพรอมกับซอฟตแวร DVD Decoder
ถาทานสามารถเลนภาพยนตในรูปแบบ DVD หรือ MPEG-2 บนคอมพิวเตอร
ทานไมจําเปนตองติดตั้งโปรแกรม DVD decoder ใดๆเพิ่มเติม แตอยางไรก็ตาม
ถามีขอความแสดงวา Decoded Error บนหนาจอ ใหติดตั้ง DVD decoder
ผานทางเว็บไซตพารทเนอรของ Windows XP Media Center Edition
คูมือการติดตั้งอยางเร็ว
English Deutsch Español Português Nederlands Türkçe ภาษาไทย Việt nam
เปดใชงานแอบพลิเคชั่น AVerTV
เพื่อที่จะเปดโปรแกรมจาก Programs menu ใหเลือก Start Programs
AVerMedia AVerTV 6 AVerTV 6
THA-3
Page 42
AVerTV Express
การถอนการติดตั้งโปรแกรมการใชงานและไดรเวอร
--Windows XP / Windows XP Media Center Edition --
ถาทานอยูในโหมด Media Center อยู ใหทานออกมาที่โหมด Windows กอน,
เพื่อถอนการติดตั้งโปรแกรมดูทีวีออกจากระบบ ใหเลือก Start Programs
AVerMedia AVerTV 6 Uninstaller Remove All Next OK Finish
--Windows Vista™ --
1. เพื่อถอนการติดตั้งโปรแกรมดูทีวีออกจากระบบ ใหเลือก Start Programs
AVerMedia AVerTV 6
2. คลิ้กขวาท
administrator
3. เมื่อหนาตาง “User Account Control” แสดงขึ้นมาใหเลือก Allow
4. เลือก Remove All Next OK Finish
ี่ Uninstaller และเมื่อมีเมนูยอยขึ้นมา ใหเลือก Run as
รีโมทคอนโทรล
หลั งจากติ ดตั้งไดรเวอรและแอบพลิ เคชั่นแลว คุณสามารถใชรี โมทคอนโทรล เพื่อ
เปด/ปดรายการทีวี, เลือกชอง, ปรับความดัง, และอื่นๆได นอกจากนั้น
รีโมทคอนโทรลยังสามารถทําหนาที่เปน
เพื่อควบคุมตัวชี้ของเมาส เมื่อปดโปรแกรมดูทีวีแลว
หมายเหตุ:
AVerQuick launcher จะตองเปดการทํางานอยูเสมอ ทานจึงจะสามารถใชงานรีโมทคอนโทรลได
สําหรับรายละเอียดเพิ่มเติมใหดูจากคูมือการใชงานที่อยูในแผนซีดี
ปุมบนรีโมทคอนโทรล
Remote Mouse
ไดโดยใชคียลูกศร (←↑→↓)
THA-4
Page 43
คูมือการติดตั้งอยางเร็ว
ปุม รายละเอียด
1.POWER เปด/ปด แอบพลิเคชั่น
2. ปุมตัวเลข - เลือกชองทีวี
- ในโหมดพรีวิว 16 ชอง ใหใช ↑↓← →
เพื่อเลื่อนแถบสวางไปยังชองที่ตองการ
3.CH RTN ไปยังชองที่เลือกกอนหนานี้
4.16-CH PREV พรีวิว 16 ชอง
5. VOL▲/▼ เพิ่ม/ลด ความดัง
6.FULL SCREEN แสดงทีวีเต็มหนาจอ
7. AUDIO สลับระหวางโหมดเสียงที่มี
8. ► (เลน) เลนไฟลที่บันทึกไวหรือที่เลนไวลาสุด
9. ■ (หยุด) - จบการเลนหรือการบันทึก
- สิ้นสุดโหมด Time Shift แลวกลับสูโหมดเรียลไทมทีวีหรือเรดิโอ
10. (เรงภาพ) - เรงภาพใหเร็วขึ้น
- ขามไปยังหนาเทเลเท็กซของสีที่เกี่ยวของตามปุมนี้
11. SLEEP - ไปยังไฟลถัดไปในรายชื่อ
- ตั้งเวลาใหคอมพิวเตอรเขาสูโหมดสแตนดบายหรือไฮเบอรเนท
- ขามไปยังหนาเทเลเท็กซของสีที่เกี่ยวของตามปุมนี้
12. MENU แสดงหรือซอนแผงควบคุม
13. EPG เปดคูมือโปรแกรมอิเล็กทรอนิกส (เฉพาะ DVB-T เทานั้น)
14. WAKE UP - ไปยังไฟลกอนหนาในรายชื่อ
- ตั้งเวลาใหคอมพิวเตอรออกจากโหมดสแตนบายหรือไฮเบอรเนท
- ขามไปยังหนาเทเลเท็กซของสีที่เกี่ยวของตามปุมนี้
15. TELETEXT เปดแอบพลิเคชั่น Teletext
16. TIMESHIFT/Pause - หยุดการเลน
- สลับจากเรียลไทมทีวีหรือเรดิโอ เปนโหมด Time Shift
17. (กรอกลับ) - กรอภาพกลับยอนหลัง
- ขามไปยังหนาเทเลเท็กซของสีที่เกี่ยวของตามปุมนี้
18. ● (บันทึก) บันทึกรายการทีวีหรือวิดีโอที่กําลังเลนอยูลงในฮารดไดรฟ
19. MUTE เปด/ปด เสียง
20. CH ▲/▼ เลื่อนชองถัดไปขึ้นหรือลง
21. SNAPSHOT จับภาพบนหนาจอ ใหเปนไฟล Bitmap
22. DISPLAY แสดงขอมูลบนหนาจอ
23. SOURCE สลับไปมาระหวางแหลงสัญญาณที่มี
English Deutsch Español Português Nederlands Türkçe ภาษาไทย Việt nam
THA-5
Page 44

AVerTV Express
ขอมูลเกี่ยวกับความปลอดภัยของแบตเตอรี่:
- เก็บแบตเตอรี่ในที่เย็นและแหง
- อยาทิ้งแบตเตอรี่ใชแลวรวมกับขยะทั่วไป ทิ้งแบตเตอรี่ในจุดที่จัดไวเฉพาะ
หรือสงคืนยังรานคาที่ซื้อมาหากทําได
- ถอดแบตเตอรี่ออกเมื่อไมใชงานเปนเวลานาน หรือถอดแบตเตอรี่ที่ใชหมดแลว
ออกจากรีโมทคอนโทรล เพราะแบตเตอรี่ที่รั่วซึมหรือกัดกรอน
อาจทําใหรีโมทคอนโทรลเสียหายได และทิ้งแบตเตอรี่ในจุดที่ปลอดภัย
- อยาใชแบตเตอรี่เกากับแบตเตอรี่ใหมรวมกัน
- อยาใชแบตเตอรี่ตางชนิดรวมกัน: ชนิดอัลคาไลน ชนิดมาตรฐาน (carbon-zinc)
หรือชนิดชารจไฟได (nickel-cadmium)
- อยาทิ้งแบตเตอรี่ลงในกองไฟ เพราะอาจระเบิดหรือรั่วได
- อยาลัดวงจรที่ขั้วแบตเตอรี่
THA-6
Page 45
Nội dung Gói sản phẩm
AVerTV Express
Hướng dẫn Cài đặt
Nhanh
Hướng dẫn Cài đặt Nhanh
Ăng-ten đài FM
English Deutsch Español Português Nederlands Türkçe ภาษาไทย Việt nam
Cáp S-Video/Composite 2 trong 1
Cáp RF
Điều khiển Từ xa
(gồm cả pin)
CD Cài đặt
Yêu cầu Hệ thống
Những yêu cầu về hệ thống được mô tả chi tiết trong hộp sản phẩm. Tröôùc khi caøi ñaët
AVerTV Express, haõy kieåm tra ñeå baûo ñaûm laø maùy tính caù nhaân cuûa baïn ñaùp öùng
ñöôïc nhöõng yeâu caàu nhö ñaõ moâ taû.
Cài đặt Phần cứng
Bước 1: Cắm AVerTV Express
Đưa sản phẩm AVerTV Express vào trong khe cắm của ExpressCardTM trên máy vi tính xách
tay. (Các thẻ có kích cỡ 34mm thì vừa khít cả hai kích cỡ 34mm và 54mm của những khe cắm
ExpressCardTM )
VIT-1
Page 46
AVerTV Express
Bước 2. Kết nối
Caøi ñaët caùc Trình ñieàu khieån vaø Tieän ích Phaàn meàm
TV.
Sau khi thẻ đã được cài đặt đúng cách, khởi động máy vi tính. Hệ thống sẽ tự động dò tìm thiết
bị mới. Dễ dàng bỏ qua chương trình “Wizard”, và thiết lập sự cài đặt CD phụ để cài đặt bộ phận
điều khiển và tiện ích phần mềm TV cùng một lúc.
Cài đặt các Trình Điều khiển và Ứng dụng trong Windows® XP / Windows XP
Media Center Edition
Để thiết lập bộ phận điều khiển và ứng dụng, người sử dụng Windows XP MCE cần phải
thoát ra và chuyển đổi đến chế độ Windows nếu chúng đang ở trong chế độ Media Center
Edition.
1. Hộp thoại “Tìm thấy trình Wizard Phần cứng Mới” sẽ xuất hiện. Chỉ cần bấm Bỏ để bỏ
qua những thủ tục cài đặt trình Wizard.
2. Đưa CD cài đặt vào trong ổ CD-ROM.
3. Khi màn hình thiết lập chính xuất hiện, chọn Install AVerTV.
4. Nhấn Next để tiếp tục tiến trình cài đặt.
5. Đọc sự đồng ý bản quyền và nếu bạn đồng ý những điều kiện, chọn “ I accept the terms
of the license agreement” và sau đó nhấn Next.
6. Chọn Complete để cài đặt tất cả các phần mềm cần thiết, bao gồm AverTV 6, Acrobat
Reader, DirectX 9.0c và Driver. Sau đó nhấn Next. Đối với những người sử dụng cao
cấp, được giới thiệu bằng cách chọn Custom để chọn phần mềm mà bạn muốn. Để chọn
một danh mục đến khác nhau, nhấn Browse.
7. Trong hộp thoại “Hoàn thành Cài đặt Wizard”, nếu bạn được hướng dẫn khởi động lại
máy vi tính của mình, chọn Có.
8. Sau đó bấm Kết thúc để hoàn thành cài đặt.
VIT-2
Page 47

9. Đối với những người sử dụng chương trình Windows XP MCE, nếu bạn muốn sử dụng
Media Center như ứng dụng TV, bắt đầu với Media Center và theo sau là sự hướng dẫn
trên màn hình để hoàn thành cấu hình.
* Chúng tôi giới thiệu để thoát ra khỏi chế độ Media Center trước khi kích hoạt AVerTV 6.
Cài đặt các Trình Điều khiển và Ứng dụng trong Windows Vista™
1. Hộp thoại “Tìm thấy trình Wizard Phần cứng Mới” sẽ xuất hiện. Chỉ cần bấm Bỏ để bỏ
qua những thủ tục cài đặt trình Wizard.
2. Đưa CD cài đặt vào trong ổ CD-ROM.
3. Khi hộp thoại “AutoPlay” xuất hiện, chọn Run Autorun.exe.
4. Khi màn hình thiết lập chính xuất hiện, chọn In st a ll AVe r TV.
5. Nếu hộp thoại “Use Account Control” xuất hiện, chọn Allow để tiếp tục tiến trình.
6. Nhấn Next để tiếp tục ti
7. Đọc sự đồng ý bản quyền và nếu bạn đồng ý những điều kiện, chọn “ I accept the terms of
the license agreement” và sau đó nhấn Next.
8. Chọn Complete để cài đặt tất cả các phần mềm cần thiết, bao gồm Aver T V 6, Acrobat
Reader, DirectX 9.0c và Driver. Sau đó nhấn Next. Đối với những người sử dụng cao cấp,
được giới thiệu bằng cách chọn Custom
danh mục đến khác nhau, nhấn Browse.
9. Sau đó bấm Kết thúc để hoàn thành cài đặt.
ến trình cài đặt.
để chọn phần mềm mà bạn muốn. Để chọn một
CHÚ Ý:
1. Nếu DirectX 9.0c hay các phần mềm trên còn chưa được cài đặt vào hệ thống của bạn,
thông thường thì CD cài đặt sẽ tự động cài đặt phần mềm này trong quá trình cài đặt. Hãy
đảm bảo rằng hệ thống của bạn được cài đặt DirectX 9.0 hay những phần mềm trên để
phần mềm tiện ích TV có thể hoạt động tốt.
2. Nếu hệ thống của bạn không được trang bị chương trình Acrobat Reader, chương trình cài
đặt “wizard” được nhắc lại tự động trong quá trình cài đặt.
3. Sản phẩm không đi kèm với một thiết bị phần mềm giải mã DVD. Nếu có thể phát lại
DVD hoặc tập tin video MPEG-2 trên máy tính, bạn không cần cài phần mềm giải mã
DVD. Tuy nhiên, nếu thông báo Decoder Error hiển thị trên màn hình, hãy cài phần mềm
giải mã DVD tương thích qua trang liên kết của Windows® XP Media Center Edition.
Hướng dẫn Cài đặt Nhanh
English Deutsch Español Português Nederlands Türkçe ภาษาไทย Việt nam
Kích hoạt Ứng dụng AVerTV
Để chạy ứng dụng từ bảng chọn chương trình, chọn Start → Programs →
AVerMedia → AVerTV 6 → AVerTV 6.
Hủy cài đặt Đĩa và Ứng dụng
--Windows XP / Windows XP Media Center Edition --
Nếu bạn đang ở trong chế độ Media Center, xin vui lòng thoát ra và chuyển đổi đến
VIT-3
Page 48
AVerTV Express
chế độ Windows trước. Để gỡ bỏ các phần mềm tiện ích TV đã được thiết lập từ hệ
thống, dễ dàng chọn Start Programs AVerMedia AVerTV 6 Uninstaller
Remove All Next OK Finish
--Windows Vista™ --
1. Để gỡ bỏ những tiện ích phần mềm TV đã được thiết lập, dễ dàng chọn Start
All Programs AVerMedia AVerTV 6.
2. Nhấn chuột phải chọn Uninstaller. Khi trình đơn bật lên xuất hiện, chọn Run
as administrator.
3. Khi hộp thoại “ User Account Control” xuất hiện, chọn Allow.
4. Chọn Remove All Next OK Finish.
Điều khiển Từ xa
Sau khi cài đặt trình điều khiển và các ứng dụng bạn có thể sử dụng điều khiển từ xa để bật/tắt
những chương trình, chọn kênh, điều chỉnh âm lượng, vân vân. Thêm nữa, điều khiển từ xa có
thể hoạt động như một Con chuột Từ xa bằng cách dùng các phím mũi tên (←↑→↓) để
điều khiển con trỏ khi phần mềm đã được đóng lại.
CHÚ Ý:
Thanh công cụ AVe r Q u i c k thì rất quan trọng cho bộ điều khiển. Nếu nó không được kích hoạt,
những đặt điểm của bộ điều khiển tự động vô hiệu hóa. Mọi chi tiết, xin vui lòng tham khảo sự
hướng dẫn dành cho người sử dụng trên CD cài đặt.
Các Nút Điều khiển Từ xa
VIT-4
Page 49
Hướng dẫn Cài đặt Nhanh
Nút Mô tả
1.POWER Baät/Taét öùùng duïng
2. Các Nút Số - Chọn một kênh TV.
- Bên dưới chế độ duyệt 16-kênh, dùng ←↑→↓ làm nổi kênh muốn
xem.
3.CH RTN Quay lại kênh đã chọn trước đó.
4.16-CH PREV Duyệt 16 kênh.
5. VOL▲/▼ Tăng/giảm âm lượng.
6.FULL SCREEN Hiển thị Tivi trên toàn màn hình.
7. AUDIO Chuyển giữa các ngôn ngữ sẵn có.
8. ► (Chạy) Chạy tập tin đã ghi hay đã chạy lần trước.
9. ■ (Dừng) - Ngừng Phát lại hay ghi hình.
- Tắt chế độ Chỉnh Giờ và trở về chế độ Tivi hoặc Radio thực tế.
10. (Về phía trước) - Thöïc hieän vieäc phaùt laïi
- Chuyển đến trang tin tức với màu tương ứng theo nút này.
11. SLEEP - Chuyeån ñeán teäp tieáp theo trong danh saùch chôi nhaïc.
- Ñaët thôøi gian ñeå maùy tính cuûa baïn ôû cheá ñoä Döï phoøng
hoaëc Nguû ñoâng.
- Chuyển đến trang tin tức với màu tương ứng theo nút này.
12. MENU Hieån thò hoaëc aån Pa-nen Ñieàu khieån.
13. EPG Khôûi chaïy Höôùng daãn Söû duïng Chöông trình Ñieän töû. (Chỉ
dùng cho hệ thống DVB-T)
14. WAKE UP - Chuyeån ñeán teäp tröôùc ñoù trong danh saùch chôi nhaïc.
- Ñaët thôøi gian ñeå ñöa maùy tính cuûa baïn ra khoûi cheá ñoä
Döï phoøng hoaëc Nguû ñoâng.
- Chuyển đến trang tin tức với màu tương ứng theo nút này.
15. TELETEXT Khôûi chaïy öùng duïng Teletext.
16. TIMESHIFT/PAUSE - Tạm ngừng phát.
- Chuyển từ chế độ Tivi hoặc Radio thực tế sang chế độ Chỉnh
Giờ.
17. (Tua lại) - Tua laïi vieäc phaùt laïi
- Chuyển đến trang tin tức với màu tương ứng theo nút này.
18. ● (Ghi) Chuyển đến chế độ DVR rồi ghi chương trình hay hình ảnh hiện tại vào
ổ đĩa cứng của bạn.
19. MUTE Bật/tắt âm thanh.
20. CH ▲/▼ Chuyển lên hoặc xuống tới kênh đang phát kế tiếp.
21. SNAPSHOT Sao laïi hình aûnh treân maøn hình baèng teäp aûnh bitmap.
22. DISPLAY Hiển thị thông tin.
23. SOURCE Chuyeån giöõa caùc nguoàn tín hieäu hieän coù.
English Deutsch Español Português Nederlands Türkçe ภาษาไทย Việt nam
VIT-5
Page 50

AVerTV Express
Bảo quản và sử dụng pin an toàn:
- Để pin ở nơi khô và mát.
- Không bỏ pin đã sử dụng vào nơi vứt rác trong nhà. Bỏ pin tại các điểm chuyên thu gom
hay trả lại nơi mua pin nếu có thể.
- Tháo bỏ pin không sử dụng trong thời gian dài. Luôn luôn tháo bỏ pin đã dùng hết khỏi
điều khiển từ xa. Pin rò gỉ có thể làm hỏng điều khiển từ xa, vứt bỏ pin một cách an toàn.
- Không dùng chung pin cũ cùng pin mới.
- Không dùng chung các loại pin khác nhau: pin kiềm, pin tiêu chuẩn (carbon-kẽm) hoặc
pin xạc lại được (nickel-cadmium).
- Không vứt pin vào lửa. Pin có thể nổ hoặc bị rò.
- Không bao giờ làm chập mạch các đầu cuối pin.
VIT-6
Page 51

Page 52

Made in Taiwan
P/N 300AA577ACKA
 Loading...