

Page 1

Quick Guide
AW313
Wireless Teacher Microphone
English
Deutsch
Español
Português do Brasil
Magyar
Pусский
繁體中文
简体中文
Page 2

Page 3

Disclaimer
All the images in this documentation are example only . The images may vary
depending on the product and software version. Information presented in this
documentation has been carefully checked for reliability; however, no responsibility is
assumed for inaccuracies. The information contained in this documentation is subject
to change without notice.
Copyright and Trademark Information
©2016 by AVerMedia Technologies, Inc. All rights reserved. No part of this publication,
in whole or in part, may be reproduced, transmitted, transcribed, altered or translated
into any language in any form by any means without the written permission of
AVerMedia Technologies, Inc. Information and specication contained in this manual
are subject to change without notice and do not represent a commitment on the part of
AVerMedia.
For more information, please refer to www.avermedia.com. "AVerMedia" is a trademark
or registered trademark of AVerMedia Technologies, Inc.The pictures contained in this
manual are provided for reference purposes only.
Made in Taiwan (Except Accessories).
US Ofce
Address 47358 Fremont Blvd., Fremont, CA 94538
Website www.avermedia-usa.com
Telephone +1(510)403-0006
Headquarters
Address No.135, Jian 1st Rd., Zhonghe Dist., New Taipei City 23585, Taiwan
Website http://www.avermedia.com
Telephone +886-2-2226-3630
v1.0 02/2016
Page 4

免責聲明
此文件所有的圖示僅供參考,圖示內容可能因產品與軟體版本不同而有所更動。本文內
的所有資訊皆已經過詳細確認,但並無法保證完全準確無誤。本文件之內容如有修改,
恕不另行通知。
版權聲明
©2016 圓剛科技版權所有、轉載必究。
本使用手冊內容受到著作權之保護並歸屬於本公司所有。非經本公司書面同意,不得以
任何方式將本手冊之全部或一部進行重製、傳輸、抄寫、轉譯或翻譯成其他語言,或以
任何型態呈現其內容。本公司保留變更或改善產品的權利,恕不另行通知。歡迎至官網
www.avermedia.com 取得本產品相關最新資訊。
AVerMedia為圓剛科技股份有限公司所擁有的商標或註冊商標。
手冊所述產品及配件之示意圖僅供參考,實際外觀以產品出貨為準。
國際總部
地址 23585 新北市中和區建一路 135 號
網址 www.avermedia.com
支援 www.avermedia.com/support
電話 +886-2-2226-3630
Page 5

免责声明
此文件所有的图示仅供参考,图示内容可能因产品与软体版本不同而有所更动。本文内
的所有资讯皆已经过详细确认,但并无法保证完全准确无误。本文件之内容如有修改,
恕不另行通知。
版权声明
©2016 圆刚科技版权所有、转载必究。
本使用手册内容受到著作权之保护并归属于本公司所有。非经本公司书面同意,不得以
任何方式将本手册之全部或一部进行重制、传输、抄写、转译或翻译成其他语言,或以
任何型态呈现其内容。本公司保留变更或改善产品的权利,恕不另行通知。欢迎至官
网 www.avermedia.com.cn 或 solutions.avermedia.com/zh-cn 取得本产品相关最新
资讯。
AVerMedia为圆刚科技股份有限公司所拥有的商标或注册商标。
手册所述产品及配件之示意图仅供参考,实际外观以产品出货为准。
国际总部
地址 23585 新北市中和区建一路 135 号
网址 www.avermedia.com
支援 www.avermedia.com/support
电话 +886-2-2226-3630
中国子公司
地址 上海市静安区武宁南路488号智慧广场1510室
网址 www.avermedia.com.cn
电话 +86-21-5298-7985
Page 6

Important Safety Instructions and Disclaimer
WARNING: Failure to follow these safety instructions could result in fire,
electric shock, other injury or damage to device or other property, and/or loss
of life. AVerMedia is not responsible for damage or injury arising from failure to
follow safety instructions relating to the product’s use.
General Guidelines and Warning
Read and follow these instructions.•
Do not use the device on uneven or unstable surfaces.•
Do not use this device in a wet environment or near water.•
Unplug the device before cleaning. Clean only with a dry cloth.•
Use in a well ventilated environment. Do not block any ventilation openings.•
Use the device in environments with ambient temperatures between 0°C (32°F) •
and 35°C (95°F).
Use power sources within the specied voltage range.•
Do not place heavy objects on the device.•
Do not install near heat sources such as radiators or stoves.•
Do not defeat the safety purposes of the polarized or grounding-type plug. •
Protect the power cord from being walked on or pinched, particularly where the •
cord connects with plugs or adapters.
Only use the attachments and accessories specied by the manufacturer.•
Unplug this device during lightning storms or when unused for prolonged time.•
Do not modify or disassemble the device in any way.•
Refer all servicing to qualied personnel.•
Do not dispose the device as general household waste. Dispose in accordance •
with local environmental laws.
General Battery Instructions
Never short circuit the battery terminals.•
Store the batteries in a cool dry place.•
Keep the battery away from children.•
Keep the battery away from re.•
Page 7

Stop using or charging the battery immediately if the battery becomes or appears •
damaged, gives off an odor, becomes discolored or deformed, starts to balloon or
swell, leaks.
Never store or charge the battery inside your car or in extreme temperature. •
Extreme temperatures might ignite the battery and cause re.
Do not dispose of used batteries in domestic waste. Dispose of batteries at special •
collection points or return to point of sale if applies.
Lithium Polymer Battery
Attempting to disassemble or modify the battery can cause an explosion or liquid •
leakage from the battery. If the rechargeable battery is incorrectly replaced, there is
danger of an explosion.
The battery contains a small amount of harmful substances. To avoid possible •
injury, replace it with a battery type recommended by AVerMedia.
The battery’s working temperature is between 0°C and 35°C, be sure to operate •
the device within this range. Do not expose it to direct sunlight as it could cause
overheating, rupture, or even re.
Even if the battery is fully charged and not in use, it will still discharge gradually •
over time. If you haven’t used the device for a while, it is recommended to recharge
it before use.
Batteries are consumable supplies. Their power capacities degrade gradually after •
repeated charging. Therefore, even when you charge it fully every time, the usage
time will still reduce and batteries will eventually die out.
When the device is in use or charging, it is normal for it to get warm.•
Never charge the battery unattended. During the entire process of charging your •
battery, you must constantly observe and monitor the charging process so that you
can quickly react to any problems that may occur and to be certain that the battery
is being charged properly.
The battery should be stored at room temperature, charged to approximately 30 to •
50% of capacity at least once per year to prevent over-discharge.
Do not discharge the battery at a rate exceeding the maximum continuous •
discharge current specied for it. Otherwise, the battery will overheat and result in
battery deterioration, bursting, ballooning, or possibly cause a re or explosion.
Page 8

Limited Warranty
AVerMedia warrants that the Product is free from defects in material and/or
workmanship under normal use.
AVerMedia does not warrant that the operation of the Product will be uninterrupted or
error-free. The Limited Warranty does not cover:
The warranty period has expired;•
Product that has (a) serial numbers or the warranty sticker that have been removed •
tampered, damaged or altered, or (b) nonconforming.
Product purchased from an unauthorized distributor;•
Product has been tested, altered, modied, repaired or serviced by someone other •
than AVerMedia (or its authorized service centers);
Failure to adhere to user’s manual.•
Product that are operated in combination with third party’s software which may be •
obtained by user or provided by AVerMedia in the product packaging.
Product that are operated in combination with third party’s device(s)/equipment(s), •
or the damage is caused from computer viruses
Damage caused by (a) misuse, abuse, neglect, improper use of the physical •
or operating environment (such as the exterior ruptures, moisture, exposure to
temperature, high or low humidity, power overload, placement subject to extreme
environments that include a lack of ventilation or stacking, throwing, soakage, etc.)
or modification; (b) improper or unauthorized installation, wiring, repair, testing;
(c) use of the Product outside AVerMedia published guidelines; (d) accident, re,
acts of God or force majeure such as natural disasters, environmental distress, or
lightning; power surges; (e)improper maintenance or failure to use the information
content in accordance with the Product.
Other than the above, similar circumstances not attributable to AVerMedia. •
Warranty Period
The term of the warranty begins from the date of purchase. Your dated sales receipt
showing the date of purchase is the proof of purchase. The warranty period varies
by product and is generally 1 or 2 years; consult your original AVerMedia product
packaging or user information provided by AVerMedia and local in-country distributor at
the time of purchase for the warranty term specic to your product ("Warranty Period").
Page 9

How to Obtain Warranty Service – Contact Your Local In-Country Distributor
To obtain warranty service, an original or copy of the sales receipt from the original •
retailer is required.
A separate warranty may be provided by international distributors. This warranty •
is provided by the local in-country distributor and this distributor provides local
service for your device. Distributor warranties are only valid in the area of intended
distribution.
When a Product or part is replaced, the replacement item becomes your property •
and the returned product or part becomes the property of AVerMedia or its
distributor.
Usage of Personal Contact Information
If you obtain service under this warranty, you agree to and fully authorize AVerMedia
or its distributor to store, use, and handle information related to the warranty service,
as well as your personal contact information, including but not limited to your
name, phone number, address, and email. AVerMedia or its distributor requires this
information to perform the necessary service set forth by this warranty. For warranty
service and outcome satisfaction, AVerMedia reserves the right to contact you in order
to understand the problems that occur during usage of the product; the company may
also notify you about any product recalls or safety issues. To achieve satisfactory
results, you agree to fully license AVerMedia to transfer his/her customer information to
the country or region of the original purchase. This allows AVerMedia to undertake the
scope of product or parts maintenance of the warranty service. AVerMedia may also
disclose this information under certain legal requirements.
How to Provide Warranty Service
Services may vary by geographic region, please contact AVerMedia or its distributor for
a response regarding the appropriate services for your Product. The Warranty Service
may be provided by the following types.
a. Customer Delivery Service
According to “Customer Delivery Service,” the customer must pay for their own product
to be delivered to a designated service center for repair or replacement, and all risks
are borne by the customer. The customer may retrieve the product after the repair
or replacement process has been completed. Should the customer fail to collect the
Page 10

product, the company will handle the product as it sees t without incurring any liability.
b. Mail-In Service
According to “Mail-In Service,” customers will be required to pay for their own products
to be mailed to a designated service center for repair or replacement, and all the
risks are borne by the customer. After the product has been repaired or replaced,
AVerMedia will send the product back to the customer at their own expense and bear
all risks, except where otherwise specied by service dealers.
c. Customers’ Two-Way Mail Service
According to “Customers’ Two-Way Mail Service,” customers will be required to
pay for their own product to be delivered to a designated service center for repair
or replacement, and all the risks are borne by the customer. After the product has
been repaired or replaced, the product will be returned to the customer, for which all
delivery and other risks are borne by the customer. If the customer fails to arrange for
the return transport of the product, the company will handle the product as it sees t
without incurring any liability.
No On-Site Service
AVerMedia and its distributor do not provide on-site service, including but not limited
to, installation, maintenance, instructing, troubleshooting problems, the usage of the
product or the warranty service. In the event that calling, updating software, or other
means fail to resolve the issue, AVerMedia and its distributor will arrange warranty
service as specied under “Scope of Warranty Services (a).”
Limitation of Liability
AVerMedia accepts responsibility for the damage of loss of products only under the
following circumstances: when the company has a product in store or when a product
is being transported by the company.
If any information contained in the product (including confidential information,
proprietary information, or personal information) is missing or revealed, AVerMedia or
its service dealers are without responsibility.
Under any circumstances, if the solutions proposed under the warranty have not
fullled its basic purpose, AVerMedia, its subsidiaries, suppliers, and dealers do not
assume any burden of liability: (a) loss, damage, or disclosure of client data; (b)
Page 11

special damages, incidental damages, punitive damages, or consequential damages,
including but not limited to loss of profits, loss of business revenue, goodwill, or
anticipated damage to balance loss, and even if the possibility has been raised,
whether the claim is based on contract, warranty, negligence, strict liability, or other
liability. Under the circumstances that AVerMedia, its subsidiaries, suppliers and
distributors assumes responsibility for damages caused by any reason, the amount
of its total liability shall not exceed the actual payable of direct damages, nor shall it
exceed the amount paid by the customer for the product.
Prejudice to the foregoing restriction does not apply to personal injury or death caused
by injury, nor does it apply to the compensation required by law for AVerMedia to
assume with regards to real or tangible property.
Where the law does not exclude or limit incidental or consequential damages, the
above limitations or exclusions may not apply to the customer.
Other Rights
This warranty provides the customer with specic legal rights. The customer may be
subject to jurisdiction in accordance with the relevant laws in his or her district, but the
customer is subject to the laws and regulations that govern the country or state where
the product was originally purchased. This warranty does not affect any legal rights,
including the limitations or exclusions laid out by this contract; instead, the control
of the consumer goods sold is governed by the relevant laws or regulations born of
consumer rights.
This device complies with Part 15 of the FCC Rules. Operation is subject to the
following two conditions: (1) this device may not cause harmful interference, and (2)
this device must accept any interference received, including interference that may
cause undesired operation.
Battery Warranty
Your battery is guaranteed to be free of manufacturer’s defects at the time of
purchase. Batteries that have been mishandled, abused, or damaged by the user are
not covered under warranty. AVerMedia Technologies, Inc. is not liable for any loss or
damage, whether direct or indirect, incidental or consequential, or from any special
situation, arising from the use, misuse, or abuse of this product.
Page 12

重要安全說明及免責聲明
警告:未遵守這些安全說明可能會導致起火、觸電、設備或其他財產損壞、或生命
損失。圓剛科技不負責因未能遵守產品的使用安全說明造成的傷害或損失。
一般準則和警告
仔細閱讀並遵循以下說明。
請勿將本產品安裝於不平穩的表面。
請勿在潮濕或靠近水的地方使用本產品。
清潔前請拔除電源。僅使用乾布清潔。
請於通風的環境使用本產品。請勿堵住通風口。
請在環境溫度介於 0°C (32°F) 至 35°C (95°F) 的範圍內使用本產品。
請使用額定電壓範圍內的電源。
請勿放置重物於本產品上。
請勿安裝於熱源附近如暖器或火爐旁。
請勿破壞極性或接地插頭的安全防護設計。
請保護電源線,勿使其被踩踏或碾壓,特別是與插頭或變壓器的連接處。
僅使用製造商指定的配件及零件。
打雷或長時間不使用時請拔除電源。
請勿以任何方式改造或拆解本產品。
如需維修請洽合格維修人員。
請勿當作家庭垃圾任意丟棄。請遵從當地環境法規妥善處理。
一般電池的使用方法
請勿使電池短路。
請將電池置放於陰涼、乾燥的地方。
請將電池置於兒童無法觸及之處。
請將電池遠離火源。
當電池有損壞,發出異味,變色、變形、或開始膨脹、漏電池液,請立即停止使用或
停止充電。
請勿在車內或高溫度環境儲存電池或充電。溫度過高可能點燃電池,導致火災。
請勿將電池丟入以掩埋方式處理的垃圾中。處理電池時,請遵照當地的法令或法規。
Page 13

鋰聚合物電池
試圖拆解或改裝電池可能會導致電池爆炸或液體洩漏。如果充電電池更換不當,可能
有爆炸的危險。
該電池中含有少量的有害物質。為了避免可能的傷害,請使用圓剛建議之電池類型進
行更換。
電池的工作溫度在0℃至35℃下,務必在該範圍內操作設備。不要將其暴露在直射陽
光下,因它可能會導致過熱、破裂,甚至引起火災。
即使電池完全充飽電且不在使用,它仍會隨時間逐漸放電。如果已有一段時間沒有使
用設備,建議在使用前重新充電。
電池是消耗品。他們的儲電能力會在反覆充電下逐漸降低。因此,即使每次充滿電,
使用時間仍會降低,電池將最終死亡。
設備在使用或充電中發熱屬於正常現象。
請勿在無人觀察時進行充電。在充電時,須有人不斷地注意和監測充電過程,以確保
電池有在適當的充電或在發生任何問題時可快速應對。
電池應在室溫下保存,每年至少一次充電到大約30至50%的容量,以防止過度放電。
請勿放電超過電池的最大持續放電電流,否則電池會過熱並導致電池老化、破裂、或
可能引起火災或爆炸。
Page 14

產品有限保固責任
保固期限內,本公司保證本產品在正常使用的情況下,無材料及製造上之缺陷。
本公司不保證本產品不會發生錯誤或出現任何運作中斷的情形。但本有限保固不包含下
列狀況:
產品已過保固期
產品序號 (貼紙) 之變更、塗改,汙損無法辨識或移除
非透過當地授權經銷商售出的產品
未經本公司同意,自行變更本產品之設計或委由第三人進行維修因而造成之產品
異常。
未依照使用手冊進行使用導致產品之瑕疵、異常或損壞
使用第三人之軟體、裝置或電腦病毒導致產品之瑕疵、異常或損壞
不正確的安裝或是連接其他外部裝置導致產品之瑕疵、異常或損害
測試不當,操作不當,濫用,誤用,意外,疏忽,改建,腐蝕,或無可預防的未知
行為所造成產品的損害如產品之損害係受天災 (水災、火災、地震、雷擊等) 及人
禍 (如暴動、戰爭、核子災害)、人為之故意破壞 (如敲打、破裂、外觀損傷破裂、受
潮、暴露於溫、溼度過高/過低、電源超過負荷、放置位置密閉不通風/堆疊及其他類
似之極端環境、摔機、液體浸滲……等)、自然耗損、環境因素、電源失調、人為疏
忽或其他非正常使用致者
隨附於產品中或後續使用者自行取得的任何軟體程式
其他非本公司因素所造成
保固期間
產品的保固期限,除本公司另有指定外,將自您取得之銷售收據或發票上所示之購買原
始日期起計算,享有本公司保固服務。 保固期隨產品不同而有差別,請查看你的產品外
包裝或是詢問您購買產品之店家,以便進一步了解本產品的保固期間。
提出保固服務需求時請注意下列事項
發票上需有店家有效之註冊名稱或店章且售出之產品品名必需能清楚識別為該產品
方可受理
保固服務之申請應向原購買之店家或經銷商申請,若向它國或地區購買之產品,該
保固服務仍請至原購買之店家或經銷商申請
當產品或零組件被更換時,使用者取得替換商品的所有權,而被替換之商品所有權
將歸屬於 AVerMedia 或其經銷商
Page 15

為檢測或維修的需要,維修單位有權逕行將本產品回復原廠設定,如果因此而導致送修
資料的遺失,本公司、維修單位均不負任何責任。且本保固服務並不包含協助您將儲存
於本產品內的資料予以備份或恢復,請您於送修前自行備份或妥善保存產品內之的所有
程式與資料。本公司維修單位有權移除非保固範圍內的所有功能、零件、配件、改裝物
或附加物。
使用者連絡資料之使用
如您依據本保固取得服務,即表示您同意且已充分授權本公司儲存、使用及處理保固服
務之相關資訊,以及您的聯絡資訊,包括姓名、電話號碼、地址及電子郵件地址。本公
司得以使用此資訊執行本保固所提供之服務。本公司可能會聯絡您以便瞭解因使用產品
所發生的問題、對保固服務過程及結果的滿意度,或告知產品回收或安全問題的相關資
訊。為達成這些目標,您需完全授權 本公司將您之資訊轉移至您購買本產品所在之國家
或地區,提供予圓剛科技股份有限公司的當地維修單位或是維修代理機構,以進行保固
服務。本公司亦可能於法律要求下揭露此資訊。
保固服務類型
提供的服務可能因地理區域而異。若您自當地店家購得產品,可連絡本公司或其經銷
商,確認產品所適用的服務回應方式。本公司提供的保固服務方式包括:
a. 客戶運送服務
依據「客戶運送服務」,客戶需自行付費將產品送到指定的服務中心進行修繕或更換,
且所有風險由客戶自行承擔。於產品經修繕或更換後,客戶即可取回。若客戶未能取回
該產品,本公司得以自認合適的方式處理產品,且無需負任何賠償責任
b. 郵寄服務
依據「郵寄服務」,客戶需自行付費將產品郵寄至指定之服務中心進行修繕或更換,且
所有風險由客戶自行承擔。於產品經修繕或更換後,本公司會自費將產品送還給客戶並
承擔所有風險,惟服務經銷商另有規定者不在此限
c. 客戶雙程郵寄服務
依據「客戶雙程郵寄服務」,客戶需自行付費將產品送到指定之服務中心進行修繕或更
換,且所有風險由客戶自行承擔。於產品經修繕或更換後,即可將產品送還給客戶,運
送費用及風險均由客戶自行承擔。若客戶未能安排取回產品之運送事宜,本公司得以自
認合適的方式處理該產品,且無需負任何賠償責任
Page 16

不提供到府服務
AVerMedia 及其經銷商皆無提供到府維修、安裝、教學、排解使用問題的服務,如產品
有使用上的問題或需進行修繕或更換,AVerMedia 及其服務經銷商會嘗試透過電話、電
子郵件或遠端輔助方式來診斷及解決問題,若透過電話、套用軟體更新…等等皆無法解
決問題,本公司及其經銷商將依據「產品保固服務類型」- a 點來進行排程維修。
責任限制
本公司僅就產品於下列情況所遭受之毀損或滅失負責:本公司持有產品時,或本公司所
負擔之運送途中。
對於產品內之任何資料 (包括機密資訊、專有資訊或個人資訊) 遺失或遭人揭露,本公司
或服務經銷商皆無需負任何責任。
於任何情況下,即使本保固所規定之救濟方式未能達成其基本目的者,本公司、其子公
司、供應商、及經銷商均無需就下列任何情況負擔賠償責任:(a) 客戶端資料遺失、損毀
或遭人揭露;(b) 特殊損害、附帶損害、懲罰性損害、間接損害或衍生性損害,包括但
不限於利潤損失、營業收益損失、商譽損害或預期結餘損失,且縱使已被告知有此可能
性者,無論索賠係基於契約、保固、疏失、無過失責任或其他責任者,亦然。任何情況
下,本公司、其子公司、供應商及經銷商就任何原因所造成之損害,其應付之賠償責任
總額不得超過實際直接損害的金額,亦不得超過您購買產品所支付的金額。
前述限制不適用於人身傷害或死亡所致損害,亦不適用於本公司需依法賠償的不動產或
有形財產的損害。徜若法律規定不得排除或限制附帶或衍生性損害,則上述限制或排除
條款可能不適用於客戶。
其他權利
本保固賦予您具體特定之法律權利。您依所屬管轄地區的相關法律,可能享有其它權
利,但僅適用於原購買國家或地區的產品。本保固將不影響任何法定權利,包括不得以
契約免除或限制之,由管制消費類商品銷售的相關法律或規定所生的消費者權利。
電池保固責任
您的電池是保證在購買的時候無製造缺陷。用戶處理不當,濫用或損壞的電池不在保修
範圍之內。AVerMedia 不承擔任何無論是直接或間接、附帶或相應、或從使用、誤用或
濫用本產品而導致的任何特殊情況的損害責任。
Page 17

重要安全说明及免责声明
警告:未遵守这些安全说明可能会导致起火、触电、设备或其他财产损坏、或生命
损失。圆刚科技不负责因未能遵守产品的使用安全说明造成的伤害或损失。
一般准则和警告
仔细阅读并遵循以下说明。
请勿将本产品安装于不平稳的表面。
请勿在潮湿或靠近水的地方使用本产品。
清洁前请拔除电源。仅使用干布清洁。
请于通风的环境使用本产品。请勿堵住通风口。
请在环境温度介于 0°C (32°F) 至 35°C (95°F) 的范围内使用本产品。
请使用额定电压范围内的电源。
请勿放置重物于本产品上。
请勿安装于热源附近如暖器或火炉旁。
请勿破坏极性或接地插头的安全防护设计。
请保护电源线,勿使其被踩踏或碾压,特别是与插头或变压器的连接处。
仅使用制造商指定的配件及零件。
打雷或长时间不使用时请拔除电源。
请勿以任何方式改造或拆解本产品。
如需维修请洽合格维修人员。
请勿当作家庭垃圾任意丢弃。请遵从当地环境法规妥善处理。
一般电池的使用方法
请勿使电池短路。
请将电池置放于阴凉、干燥的地方。
请将电池置于儿童无法触及之处。
请将电池远离火源。
当电池有损坏,发出异味,变色、变形、或开始膨胀、漏电池液,请立即停止使用
或停止充电。
Page 18

请勿在车内或高温度环境储存电池或充电。温度过高可能点燃电池,导致火灾。
请勿将电池丢入以掩埋方式处理的垃圾中。处理电池时,请遵照当地的法令或法规。
锂聚合物电池
试图拆解或改装电池可能会导致电池爆炸或液体泄漏。如果充电电池更换不当,可能
有爆炸的危险。
该电池中含有少量的有害物质。为了避免可能的伤害,请使用圆刚建议之电池类型进
行更换。
电池的工作温度在0℃至35℃下,务必在该范围内操作设备。不要将其暴露在直射阳
光下,因它可能会导致过热、破裂,甚至引起火灾。
即使电池完全充饱电且不在使用,它仍会随时间逐渐放电。如果已有一段时间没有使
用设备,建议在使用前重新充电。
电池是消耗品。他们的储电能力会在反覆充电下逐渐降低。因此,即使每次充满电,
使用时间仍会降低,电池将最终死亡。
设备在使用或充电中发热属于正常现象。
请勿在无人观察时进行充电。在充电时,须有人不断地注意和监测充电过程,以确保
电池有在适当的充电或在发生任何问题时可快速应对。
电池应在室温下保存,每年至少一次充电到大约30至50%的容量,以防止过度放电。
请勿放电超过电池的最大持续放电电流,否则电池会过热并导致电池老化、破裂、或
可能引起火灾或爆炸。
Page 19

产品有限保固责任
保固期限内,本公司保证本产品在正常使用的情况下,无材料及制造上之缺陷。
本公司不保证本产品不会发生错误或出现任何运作中断的情形。但本有限保固不包含下
列状况:
产品已过保固期
产品序号(贴纸) 之变更、涂改,污损无法辨识或移除
非透过当地授权经销商售出的产品
未经本公司同意,自行变更本产品之设计或委由第三人进行维修因而造成之产品
异常。
未依照使用手册进行使用导致产品之瑕疵、异常或损坏
使用第三人之软体、装置或电脑病毒导致产品之瑕疵、异常或损坏
不正确的安装或是连接其他外部装置导致产品之瑕疵、异常或损害
测试不当,操作不当,滥用,误用,意外,疏忽,改建,腐蚀,或无可预防的未
知行为所造成产品的损害如产品之损害系受天灾(水灾、火灾、地震、雷击等) 及人
祸(如暴动、战争、核子灾害)、人为之故意破坏(如敲打、破裂、外观损伤破裂、受
潮、暴露于温、湿度过高/过低、电源超过负荷、放置位置密闭不通风/堆叠及其他类
似之极端环境、摔机、液体浸渗…等)、自然耗损、环境因素、电源失调、人为疏忽
或其他非正常使用致者
随附于产品中或后续使用者自行取得的任何软体程式
其他非本公司因素所造成
保固期间
产品的保固期限,除本公司另有指定外,将自您取得之销售收据或发票上所示之购买原
始日期起计算,享有本公司保固服务。保固期随产品不同而有差别,请查看你的产品外
包装或是询问您购买产品之店家,以便进一步了解本产品的保固期间。
提出保固服务需求时请注意下列事项
发票上需有店家有效之注册名称或店章且售出之产品品名必需能清楚识别为该产品
方可受理
保固服务之申请应向原购买之店家或经销商申请,若向它国或地区购买之产品,该
保固服务仍请至原购买之店家或经销商申请
当产品或零组件被更换时,使用者取得替换商品的所有权,而被替换之商品所有权
将归属于AVerMedia 或其经销商
Page 20

为检测或维修的需要,维修单位有权径行将本产品回复原厂设定,如果因此而导致送修
资料的遗失,本公司、维修单位均不负任何责任。且本保固服务并不包含协助您将储存
于本产品内的资料予以备份或恢复,请您于送修前自行备份或妥善保存产品内之的所有
程式与资料。本公司维修单位有权移除非保固范围内的所有功能、零件、配件、改装物
或附加物。
使用者连络资料之使用
如您依据本保固取得服务,即表示您同意且已充分授权本公司储存、使用及处理保固服
务之相关资讯,以及您的联络资讯,包括姓名、电话号码、地址及电子邮件地址。本公
司得以使用此资讯执行本保固所提供之服务。本公司可能会联络您以便了解因使用产品
所发生的问题、对保固服务过程及结果的满意度,或告知产品回收或安全问题的相关资
讯。为达成这些目标,您需完全授权本公司将您之资讯转移至您购买本产品所在之国家
或地区,提供予圆刚科技股份有限公司的当地维修单位或是维修代理机构,以进行保固
服务。本公司亦可能于法律要求下揭露此资讯。
保固服务类型
提供的服务可能因地理区域而异。若您自当地店家购得产品,可连络本公司或其经销
商,确认产品所适用的服务回应方式。本公司提供的保固服务方式包括:
a. 客户运送服务
依据「客户运送服务」,客户需自行付费将产品送到指定的服务中心进行修缮或更换,
且所有风险由客户自行承担。于产品经修缮或更换后,客户即可取回。若客户未能取回
该产品,本公司得以自认合适的方式处理产品,且无需负任何赔偿责任
b. 邮寄服务
依据「邮寄服务」,客户需自行付费将产品邮寄至指定之服务中心进行修缮或更换,且
所有风险由客户自行承担。于产品经修缮或更换后,本公司会自费将产品送还给客户并
承担所有风险,惟服务经销商另有规定者不在此限
c. 客户双程邮寄服务
依据「客户双程邮寄服务」,客户需自行付费将产品送到指定之服务中心进行修缮或更
换,且所有风险由客户自行承担。于产品经修缮或更换后,即可将产品送还给客户,运
送费用及风险均由客户自行承担。若客户未能安排取回产品之运送事宜,本公司得以自
认合适的方式处理该产品,且无需负任何赔偿责任
Page 21

不提供到府服务
AVerMedia 及其经销商皆无提供到府维修、安装、教学、排解使用问题的服务,如产品
有使用上的问题或需进行修缮或更换,AVerMedia 及其服务经销商会尝试透过电话、电
子邮件或远端辅助方式来诊断及解决问题,若透过电话、套用软体更新…等等皆无法解决
问题,本公司及其经销商将依据「产品保固服务类型」- a 点来进行排程维修。
责任限制
本公司仅就产品于下列情况所遭受之毁损或灭失负责:本公司持有产品时,或本公司所
负担之运送途中。
对于产品内之任何资料(包括机密资讯、专有资讯或个人资讯) 遗失或遭人揭露,本公司
或服务经销商皆无需负任何责任。
于任何情况下,即使本保固所规定之救济方式未能达成其基本目的者,本公司、其子公
司、供应商、及经销商均无需就下列任何情况负担赔偿责任:(a) 客户端资料遗失、损毁
或遭人揭露;(b) 特殊损害、附带损害、惩罚性损害、间接损害或衍生性损害,包括但
不限于利润损失、营业收益损失、商誉损害或预期结余损失,且纵使已被告知有此可能
性者,无论索赔系基于契约、保固、疏失、无过失责任或其他责任者,亦然。任何情况
下,本公司、其子公司、供应商及经销商就任何原因所造成之损害,其应付之赔偿责任
总额不得超过实际直接损害的金额,亦不得超过您购买产品所支付的金额。
前述限制不适用于人身伤害或死亡所致损害,亦不适用于本公司需依法赔偿的不动产或
有形财产的损害。徜若法律规定不得排除或限制附带或衍生性损害,则上述限制或排除
条款可能不适用于客户。
其他权利
本保固赋予您具体特定之法律权利。您依所属管辖地区的相关法律,可能享有其它权
利,但仅适用于原购买国家或地区的产品。本保固将不影响任何法定权利,包括不得以
契约免除或限制之,由管制消费类商品销售的相关法律或规定所生的消费者权利。
电池保固责任
您的电池是保证在购买的时候无制造缺陷。用户处理不当,滥用或损坏的电池不在保修
范围之内。 AVerMedia 不承担任何无论是直接或间接、附带或相应、或从使用、误用或
滥用本产品而导致的任何特殊情况的损害责任。
Page 22

Page 23

1
Inside the Box
These are what you'll nd in the box:
Smart Microphone
(AW313T)
Receiver
(AW310R)
Quick Guide
USB AC Adapter USB Power Cable x 2 3.5 mm Audio Cable
BuckleLanyard
Quick Guide
EN
* A Charging Station and Headset Microphone can be purchased separately.
Page 24

2
2
1
3
4
5
BATTY
MIC IN
Parts and Ports
1 Microphone
2 Lanyard Hole
3 Battery LED
4 USB Power Port
5 Mic Input
6 Clip
7 Charging Station Connector
8 Power LED
9 Power Button
10 Volume Up Button
11 Volume Down Button
12 Power Button
13 USB Power Port
14 Power LED
15 Line Output
Microphone / Receiver
Power LED
Solid Green: On
Flashing Green: Synchronizing
Microphone
Receiver
12
13
14
15
POWER
LINE OUT
8
9
10
11
6
7
POWER
VOL
+
-
Page 25

3
Installation
Note: (i) To avoid excessive sound on initial sound test, lower your speaker
system volume rst. (ii) Fully charge your microphone before rst use.
Connect the receiver to a power outlet.1.
Connect the receiver to a Line Input on a speaker system then 2.
press the Power Button.
Turn on the microphone and start using.*3.
12
LINE IN
3
POWER
VOL
* If both Power LEDs continue to ash, re-synchronize the microphone
and receiver by pressing the microphone's Power Button for 3 seconds
and waiting until the Power LED turns solid.
EN
Page 26

4
Charging
Plug in the USB Power Cable to charge your microphone.
Battery LED (BATTY)
Flashing Red: Critical
Solid Orange: Low
Flashing Red >
Orange > Green: Charging
(Charging) Solid Green: Fully Charged
Preparation
Thread the lanyard through the buckle. Then attach the buckle to
the microphone.
Lanyard
Buckle
Page 27

5
Wearing
You can clip the microphone to your clothing or wear it with the lanyard.
The microphone is most effective when worn within 6 inches (15 cm) from
your mouth.
EN
6 in
(15 cm)
Page 28

6
Page 29

7
Paketinhalt
Lieferumfang in der Schachtel:
Intelligentes Mikrofon
(AW313T)
Empfänger
(AW310R)
Schnellstartanleitung
USB-Netzteil USB-Stromkabel x 2 3,5 mm Audiokabel
SchlaufeUmhängeband
Quick Guide
DE
* Ladestation und Headset-Mikrofon separat erhältlich
Page 30

8
2
1
3
4
5
BATTY
MIC IN
Teile und Anschlüsse
1 Mikrofon
2 Umhängeband-Öffnung
3 Batterie-LED
4 USB-Stromanschluss
5 Mikrofoneingang
6 Clip
7 Ladestation-Anschluss
8 Netz-LED
9 Ein-/Ausschalter
10 Lautstärketaste +
11 Lautstärketaste –
12 Ein-/Ausschalter
13 USB-Stromanschluss
14 Netz-LED
15 Line-Ausgang
Mikrofon / Empfänger
Netz-LED
Grün dauerhaft leuchtend: Ein
Grün blinkend: Synchronisation
Mikrofon
Empfänger
12
13
14
15
POWER
LINE OUT
8
9
10
11
6
7
POWER
VOL
+
-
Page 31

9
Installation
Hinweis: (i) Zuerst die Lautstärke verringern, um bei erstmaliger
Verwendung zu große Lautstärke zu vermeiden. (ii) Laden Sie das
Mikrofon vor der ersten Verwendung vollständig auf.
Empfänger mit einer Steckdose verbinden.1.
Verbinden Sie den Empfänger mit dem Line-Eingang eines 2.
Lautsprechersystems, und drücken Sie dann die Ein/Aus-Taste.
Mikrofon einschalten und benutzen.*3.
12
LINE IN
3
POWER
VOL
* Wenn beide Betriebsanzeige-LEDs weiterhin blinken, synchronisieren
Sie Mikrofon und Empfänger erneut, indem Sie die Ein/Aus-Taste
des Mikrofons 3 Sekunden lang drücken, und warten Sie bis die
Betriebsanzeige-LED dauerhaft leuchtet.
DE
Page 32

10
Laden
Stecken Sie das USB-Ladekabel an, um Ihr Mikrofon zu laden.
Batterie-LED (BATTY)
Rot blinkend: kritisch
Orange dauerhaft: niedrig
Blinken Rot > Orange > Grün: Laden
(Laden) Grün dauerhaft: voll geladen
Vorbereitung
Fädeln Sie die Kordel durch die Schlaufe, und befestigen Sie dann
die Schlaufe am Mikrofon.
Umhängeband
Schlaufe
Page 33

11
Tragen des Mikrofons
Sie können das Mikrofon an Ihre Kleidung anklipsen oder mit der
Kordel um den Hals hängen. Die beste Wirkung erzielen Sie jedoch,
wenn es maximal 15 cm von Ihrem Mund entfernt ist.
DE
15 cm
(6 in)
Page 34

12
Page 35

13
Contenido
Contenido de la caja:
Micrófono inteligente
(AW313T)
Receptor
(AW310R)
Guía Rápida
Adaptador USB Cable USB x 2 Cable Audio de 3.5 mm
FiadorCorrea
Quick Guide
ES
* Se puede adquirir una estación de carga y micrófono de auriculares por separado.
Page 36

14
2
1
3
4
5
BATTY
MIC IN
Partes y Puertos
1 Micrófono
2 Soporte Correa
3 LED Batería
4 Entrada USB
5 Entrada de micrófono
6 Clip
7 Conector de estación de
carga
8 LED encendido
9 Botón Encendido
10 Botón para subir el volumen
11 Botón para bajar el volumen
12 Botón Encendido
13 Conexión USB
14 Power LED
15 Salida de línea
Micrófono / Receptor
LED encendido
Verde jo: encendido
Verde intermitente:
sincronizando
Micrófono
Receptor
12
13
14
15
POWER
LINE OUT
8
9
10
11
6
7
POWER
VOL
+
-
Page 37

15
Instalación
Nota: (i) Para evitar ruido excesivo en el primer test, baje el sonido del
sistema primero. (ii) Carge la batería de su micrófono antes de usarlo.
Concecte el receptor a la toma de corriente.1.
Conecte el receptor a una entrada de línea de un sistema de 2.
altavoces y pulse el botón de encendido.
Encienda el micrófono y comience a usarlo.*3.
12
LINE IN
3
POWER
VOL
* Si los dos LED de encendido siguen parpadeando, vuelva a sincronizar
el micrófono y el receptor. Para ello, pulse el botón de encendido del
micrófono durante 3 segundos y espere a que el LED de encendido deje
de parpadear.
ES
Page 38

16
Cargando
Conecte el cable de alimentación USB para cargar el micrófono.
Battery LED (BATTY)
Rojo intermitente: muy baja
Naranja jo: baja
Rojo > Naranja > Verde intermitente: cargando
(En carga) Verde jo: carga completada
Preparación
Pase la correa por el ador y, a continuación, sujete el micrófono
con el ador.
Correa
Fiador
Page 39

17
Vistiendo
Puede sujetar el micrófono en la ropa o llevarlo colgado de la correa. Para un funcionamiento óptimo, mantenga una distancia de
15 cm (6 pulgadas) entre el micrófono y la boca.
ES
15 cm
(6 in)
Page 40

18
Page 41

19
Dentro da Caixa
Aqui está o que você vai encontrar dentro da caixa:
Microfone Smart
(AW313T)
Receptor
(AW310R)
Guia Rápido
Adaptador de
Energia USB
Cabo USB de Energia x 2 Cabo de Áudio
de 3.5 mm
Fivela de FechoCordão de Segurança
Quick Guide
PB
* Um dock de carregamento e microfone de orelha pode ser comprado separadamente.
Page 42

20
2
1
3
4
5
BATTY
MIC IN
Partes e Portas
1 Microfone
2 Espaço Para Cordão de
Segurança
3 LED de Bateria
4 Porta de Energia USB
5 Entrada de Microfone
6 Clip
7 Entrada Para Dock de
Carregamento
8 LED de Energia
9 Botão de Ligar
10 Controle de Volume +
11 Controle de Volume -
12 Botão de Ligar
13 Porta de Energia USB
14 LED de Energia
15 Saída de Line
Instruções do Power LED do
Microfone / Receptor
Verde Contínuo: Ligado
Verde Piscante: Sincronizando
Microfone
Receptor
12
13
14
15
POWER
LINE OUT
8
9
10
11
6
7
POWER
VOL
+
-
Page 43

21
Instalação
Nota: (i) Para evitar som excessivo no teste de som inicial, baixe o
volume do seu sistema de som primeiramente. (ii) Carregue totalmente
seu microfone antes do primeiro uso.
Conecte o receptor a uma tomada de energia1.
Conecte o receptor em uma entrada de linha em um speaker 2.
ou mesa de som e pressione o botão de ligar.
Ligue o microfone e inicie o uso*3.
* Se ambos os leds continuares a piscar, faça a ressincronização do
microfone e receptor pressionando o botao de ligar por 3 segundos e
espere o power LED car continuamente ligado.
12
LINE IN
3
POWER
VOL
PB
Page 44

22
Carregando
Plugue o cabo de alimentação USB para carregar seu microfone.
LED de Bateria (BATTY)
Piscante Vermelho: Nível Crítico
Laranja Contínuo: Nível Baixo
Piscante Vermelho > Laranja > Verde:
Carregando
(Carregando) Verde Contínuo:
Totalmente Carregado
Preparando
Passe o cordão de segurança pela vela de fecho. Então avele
ao microfone.
Cordão de
Segurança
Fivela de Fecho
Page 45

23
Vestindo: Usado
Você pode prender o microfone à sua roupa ou usá-lo com a correia
de segurança. O microfone é mais ecaz quando usado à 15 cm (6
polegadas) de sua boca.
PB
15 cm
(6 in)
Page 46

24
Page 47

25
Doboz Tartalma
Ezeket találja a dobozban:
Smart Mikrofon
(AW313T)
Vevőegység
(AW310R)
Útmutató
USB AC Adapter USB kábel x 2 3,5 mm audió
átalakító kábel
Nyakpánt
Quick Guide
HU
* A töltő állomást és fejpántos mikrofon külön lehet megvásárolni.
Csat
Page 48
26
2
1
3
4
5
BATTY
MIC IN
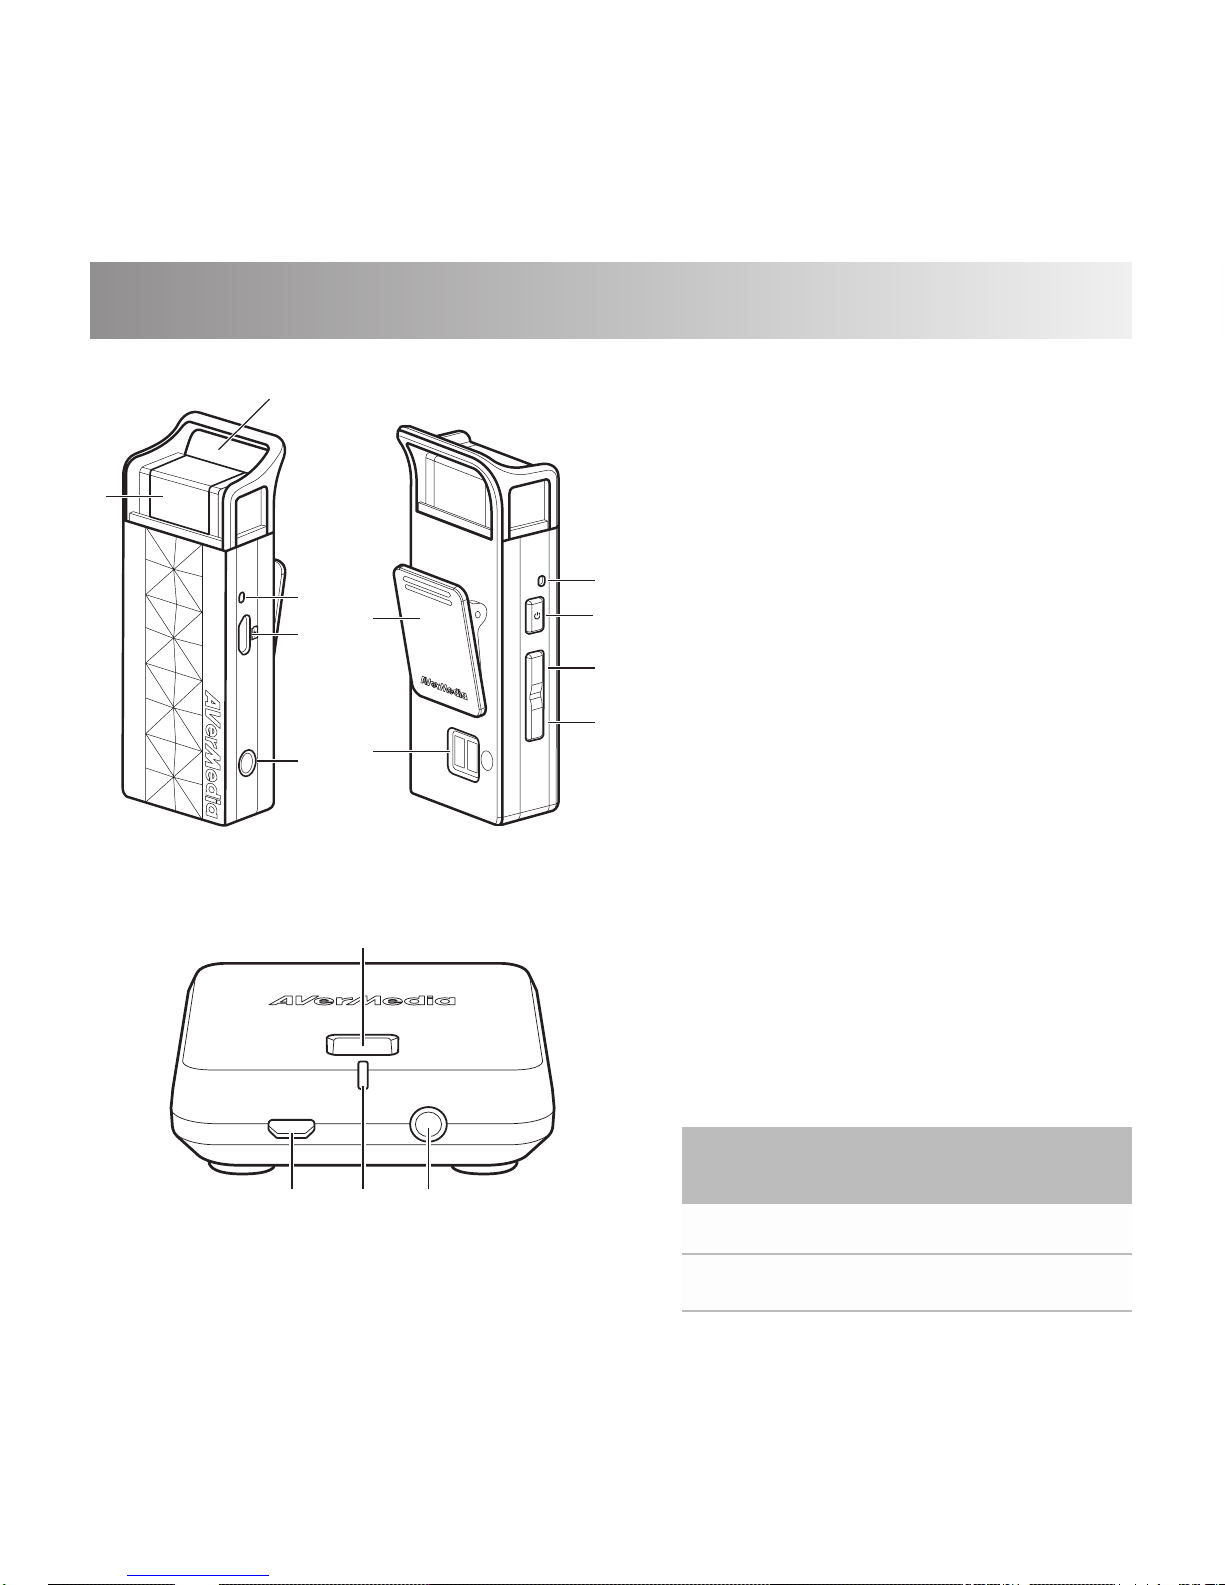
Részek és Csatlakozások
1 Mikrofon
2 Nyakpánt lyuk
3 Akku LED
4 USB töltő aljzat
5 Mikrofon bemenet
6 Csipesz
7 Töltő állomás csatlakozó
8 Üzemi LED
9 Bekapcsoló gomb
10 Hangerő Fel gomb
11 Hangerő Le gomb
12 Bekapcsoló gomb
13 USB töltő aljzat
14 Üzemi LED
15 Audió kimenet
Mikrofon / Vevőegység
Üzemi LED
Folyamatos Zöld: bekapcsolva
Villogó Zöld: Szikronizáció
Mikrofon
Vevőegység
12
13
14
15
POWER
LINE OUT
8
9
10
11
6
7
POWER
VOL
+
-
Page 49

27
Beüzemelés
Megjegyzés: (i) Az első beüzemeléskor előforduló zavaró hanghatások
elkerülése érdekében, előbb csökkentse a rendszerének hangerejét.
(ii) Töltse fel teljesen a mikrofont az első használat előtt.
Csatlakoztassa a vevőegységet a hálózati adaterhez.1.
Csatlakoztassa a vevőegységet a hangrendszer egy vonal 2.
bemenetéhez, majd nyomja meg a bekapcsoló gombot.
Kapcsolja be a mikrofont és elkezdheti a haználatot.*3.
12
LINE IN
3
POWER
VOL
* Ha mindkét
Üzemi
LED folyamatosan villog, újra kell szinkronizálnia
a mikrofont és a vevőegységet, ehhez tartsa lenyomva a mikrofon
bekapcsoló gombját 3 másodpercig, és várja meg amíg a LED
folyamatos világításra vált.
HU
Page 50

28
Töltés
Dugja be az USB kábelt a mikrofon töltéséhez.
Akku LED (BATTY)
Villogó piros: Kritikus töltöttség
Folyamatos narancs: Alacsony tölt
Villogó piros > Narancs > Zöld: Töltés
(Töltés) Folyamatos zöld: Feltöltve
Beüzemelés
Fűzze át a nyakpánt a csaton. Ezután csatlakoztassa a csatot a
mikrofonhoz.
Nyakpánt
Csat
Page 51

29
Hogyan Hordjuk
A mikrofont csíptetheti a ruhájára vagy hordhatja a nyakpánton is. A
mikrofon akkor a leghatékonyabb, ha 15 cm távolságra van a szájától.
HU
15 cm
(6 in)
Page 52

30
Page 53

31
Комплект поставки
Внутри коробки находятся:
Смарт микрофон
(AW313T)
Ресивер
(AW310R)
Краткое
руководство
USB адаптер питания
сети переменного тока
USB кабель питания x 2 Аудио кабель с 3,5 мм
Хомутик
Ремешок на шею
Quick Guide
RU
* Подставка для зарядки и Гарнитурный микрофон приобретается отдельно.
Page 54

32
2
1
3
4
5
BATTY
MIC IN
Описание элементов и портов
1 Микрофон
2 Крепление для ремешка
3 Светодиодный
индикатор батареи
4 Разъем USB питания
5 Микрофонный вход
6 Клипса
7 Разъем для подключения к
заряюной подставке
8 Светодиодный
индикатор питания
9 Кнопка питания
10 Кнопка увеличения
громкости
11 Кнопка уменьшения
громкости
12 Кнопка питания
13 Разъем USB питания
14 Светодиодный
индикатор питания
15 линейным выход
Микрофон / Ресивер
Светодиодный
индикатор питания
Зеленый горит: вкл.
Зеленый мигает:
синхронизация
Микрофон
Ресивер
12
13
14
15
POWER
LINE OUT
8
9
10
11
6
7
POWER
VOL
+
-
Page 55

33
Подключение
Примечание: (i) Во избежание очень громкого звука при тестировании,
вначале уменьшите громкость вашей аудио системы. (ii) полностью
зарядите микрофон, перед первым изпользованием.
Подсоедините ресивер к сети электропитания.1.
Соедините ресивер с линейным входом аудио системы и 2.
нажмите кнопку включения питания.
Включите микрофон и начните использование.*3.
* В случае, если кнопка питания продолжает мигать,
пересинхронизируйте микрофон, нажав кнопку питания на 3
секунды, и дождитесь пока перестанет мигать индикатор питания.
RU
12
LINE IN
3
POWER
VOL
Page 56

34
Зарядка
Подсоедините USB кабель питания для зарядки микрофона.
Светодиодный индикатор
батареи (BATTY)
Мигает красный: критический разряд
Горит оранжевый: низкий зарад
Мигает красный > Оранжевый > Зеленый:
заряжается
Горит зеленый (Заряжается):
полностью заряжен
Подготовка
Проденьте ремешок на шею через хомутик. Затем прикрепите
хомутик к микрофону.
Ремешок
на шею
Хомутик
Page 57

35
Эксплуатация
Вы межете прикрепить микрофон к одежде с помощью
клипсы или повесить его на шнурок. Наиболее эффективное
расстояние между ртом и микрофоном составляет 15 см.
RU
15 cm
(6 in)
Page 58

36
Page 59

37
包裝內容
請確認您購買的包裝盒內包含以下所有物品。
無線麥克風
(AW313T)
接收器
(AW310R)
快速安裝手冊
USB 電源轉換器 USB 電源線 x 2 3.5 mm 音源線
掛繩釦掛繩
Quick Guide
TC
* 麥克風充電座及耳掛式麥克風皆可單獨購買。
Page 60

38
2
1
3
4
5
BATTY
MIC IN
外觀簡介
1
麥克風
2
掛繩孔
3
電池指示燈
4
USB 電源插孔
5
麥克風輸入
6
背夾
7
充電底座接頭
8
電源指示燈
9
電源鍵
10
增大音量鍵
11
減小音量鍵
12
電源鍵
13
USB 電源插孔
14
電源指示燈
15
LINE 音源輸出
麥克風 / 接收器
電源指示燈
恆亮綠燈: 開
閃爍綠燈: 配對中
麥克風
接收器
12
13
14
15
POWER
LINE OUT
8
9
10
11
6
7
POWER
VOL
+
-
Page 61

39
安裝步驟
注意:
(i)
為了避免在初次試音時聲音過大,請先降低音響系統的音量。
(ii)
初次使用前先將麥克風充飽電。
將接收器連接電源。
1.
將接收器連接喇叭上的 Line 音源輸入孔。按下電源鍵。
2.
開啟麥克風,並開始使用。*
3.
12
LINE IN
3
POWER
VOL
*
如開啟後,麥克風和接收器的電源指示燈不斷閃爍且無法使用,請長按麥克風
電源鍵3秒鐘進行配對,待電源指示燈變為恆亮即可。
TC
Page 62

40
充電
將 USB 電源線插上麥克風進行充電。
電池指示燈 (BATTY)
閃爍紅燈: 電量嚴重不足
恆亮橘燈: 低電量
閃爍紅燈
>
橘燈
>
綠燈: 充電中
(充電中) 恆亮綠燈: 充滿電
準備
先將掛繩穿過掛繩釦,然後將掛繩釦扣上麥克風。
掛繩
掛繩釦
Page 63

41
穿戴
您可使用背夾將麥克風夾於衣服上,或使用掛繩穿戴麥克風。麥克風最
佳
使用距離為 15 公分 (6 英寸) 以內。
TC
15 cm
(6 in)
Page 64

42
Page 65
43
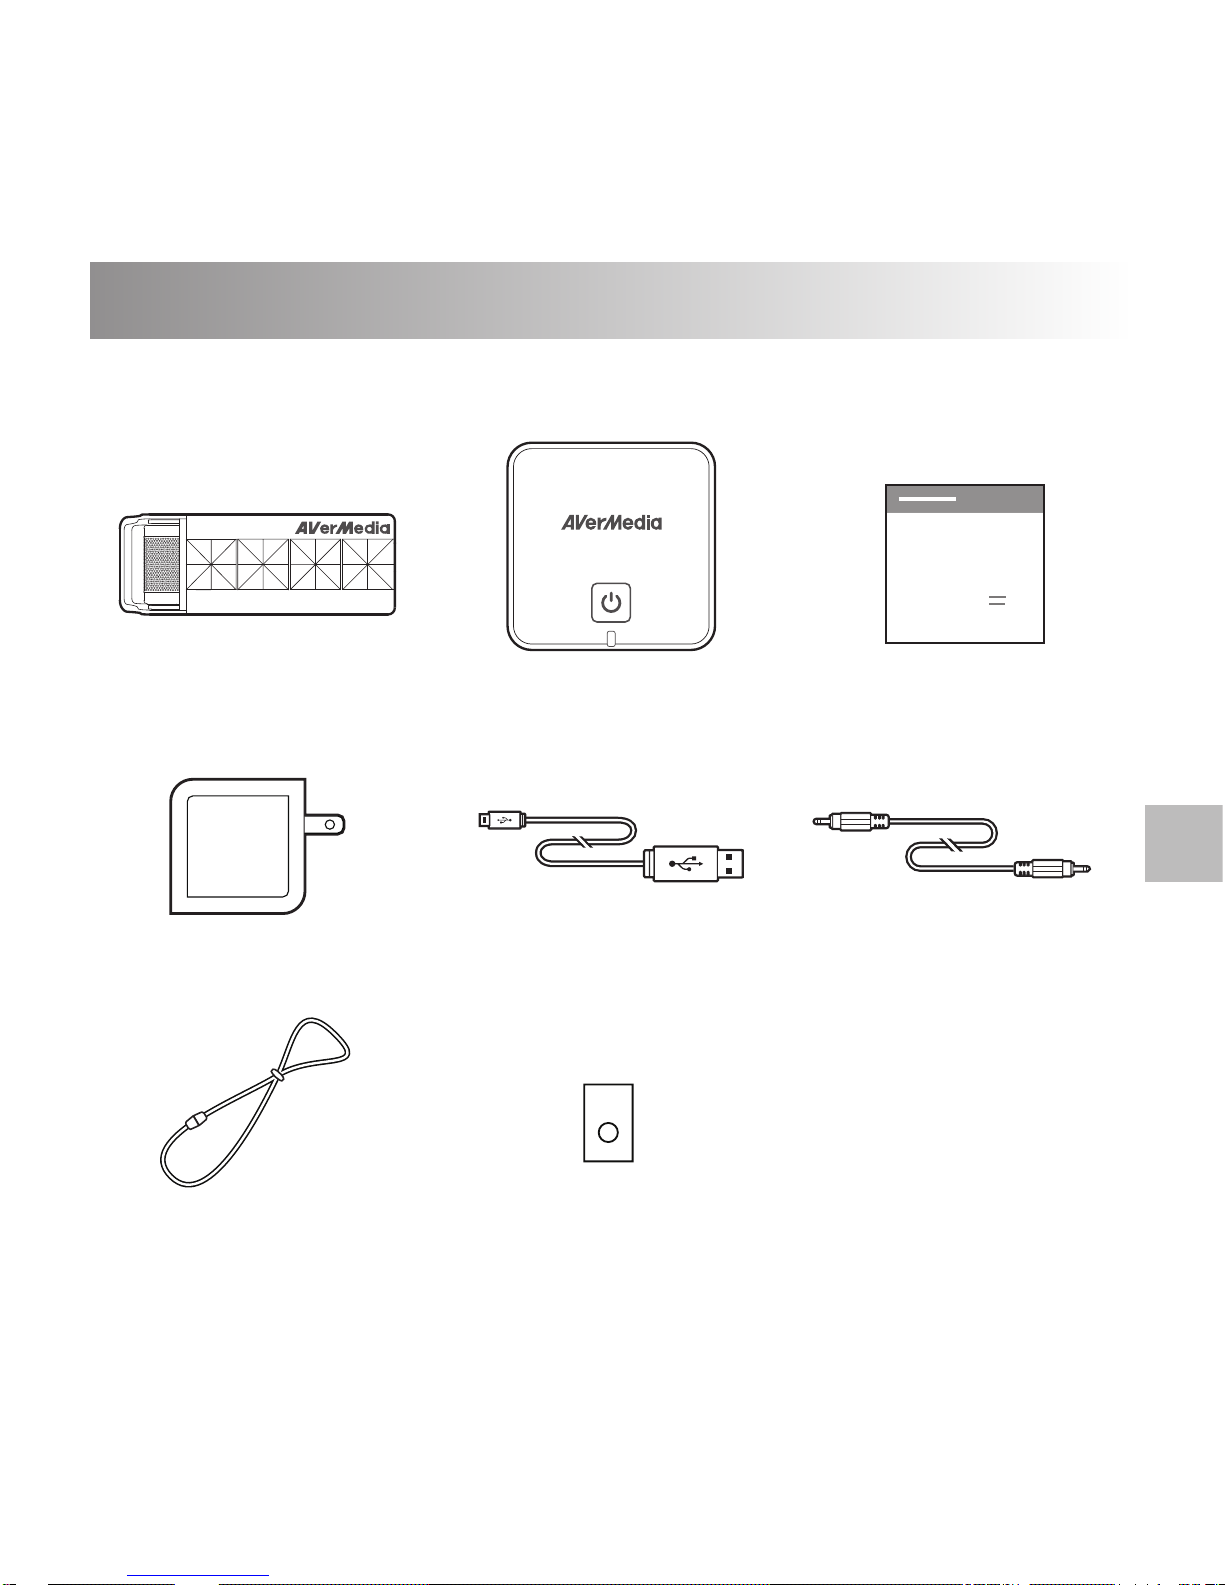
包装内容
请确认您购买的包装盒内包含以下所有物品。
麦克风
(AW313T)
接收器
(AW310R)
快速安装手册
USB 电源转换器 USB 电源线 x 2 3.5 mm 音频线
挂绳扣挂绳
Quick Guide
SC
* 麦克风充电座及耳挂式麦克风皆可单独购买。
Page 66

44
2
1
3
4
5
BATTY
MIC IN
外观简介
1
麦克风
2
挂绳孔
3
电量指示灯
4
USB 电源插孔
5
麦克风输入
6
领夹
7
充电底座接头
8
电源指示灯
9
电源键
10
增加音量键
11
减小音量键
12
电源键
13
USB 电源插孔
14
电源指示灯
15
LINE 音频输出
麦克风 / 接收器
电源指示灯
恒亮绿灯:开
闪烁绿灯:配对中
麦克风
接收器
12
13
14
15
POWER
LINE OUT
8
9
10
11
6
7
POWER
VOL
+
-
Page 67

45
安装步骤
注意:(i) 为了避免在初次试音时声音过大,请先降低音响系统的音量。
(ii) 初次使用前先将麦克风充饱电。
将接收器连接电源。
1.
将接收器连接音响系统上的 LINE 音频输入孔,按下电源键。
2.
开启麦克风,并开始使用。*
3.
12
LINE IN
3
POWER
VOL
* 如开启后,麦克风和接收器的电源指示灯不断闪烁,且麦克风无法使用,请长
按麦克风电源键3秒钟进行配对,待电源指示灯变为绿色恒亮即可正常使用。
SC
Page 68

46
充电
将USB电源线插上麦克风进行充电。
电池指示灯 (BATTY)
闪烁红灯: 电量严重不足
恒亮橘灯: 低电量
闪烁红灯 > 橘灯 > 绿灯: 充电中
(充电中)恒亮绿灯: 充满电
准备
先将挂绳穿过挂绳扣,然后将挂绳扣扣上麦克风。
挂绳
挂绳扣
Page 69
47
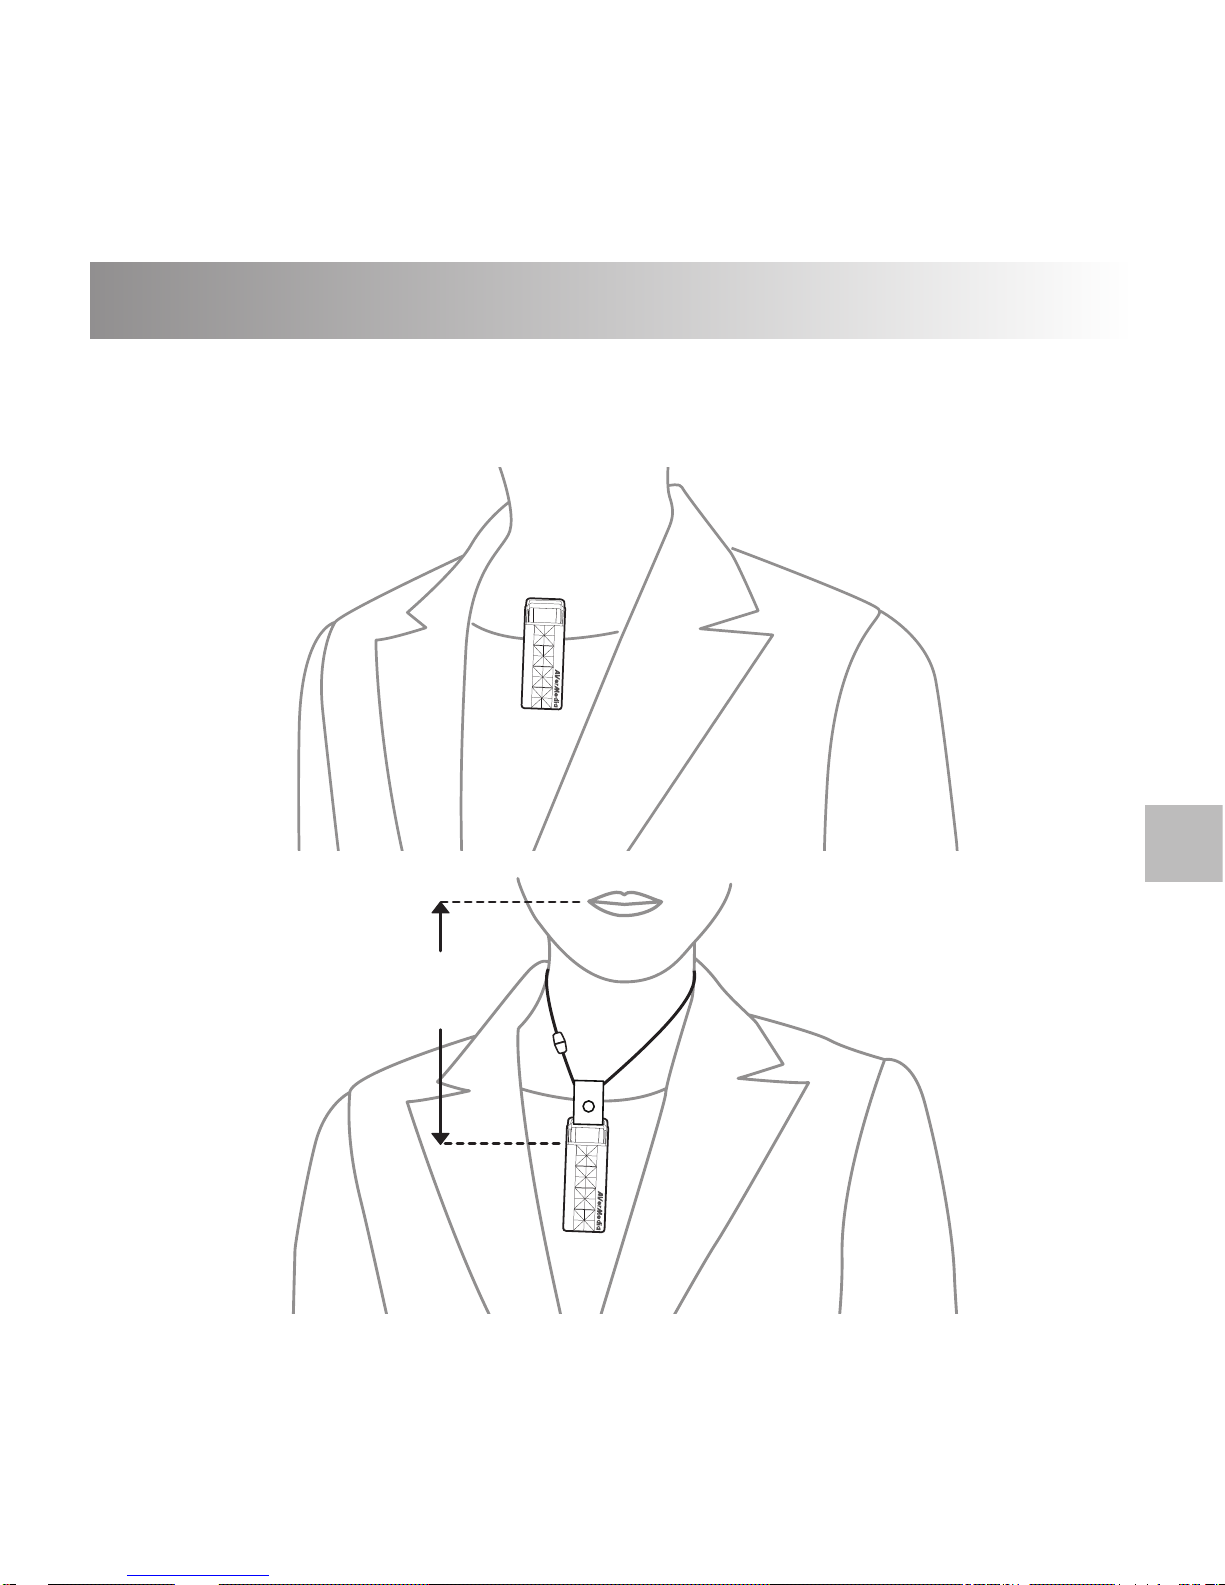
穿戴
您可使用背夹将麦克风夹于衣服上,或使用挂绳穿戴麦克风。麦克风最佳使用
距离为15 公分 (6 英寸) 以内。
SC
15 cm
(6 in)
Page 70

FCC NOTICE Class B
This device complies with Part 15 of the FCC Rules. Operation is subject to the
following two conditions: (1) this device may not cause harmful interference, and
(2) this device must accept any interference received, including interference that
may cause undesired operation.
Federal Communications Commission Statement
NOTE - This equipment has been tested and found to comply with the limits
for a Class B digital device, pursuant to Part 15 of the FCC Rules. These limits
are designed to provide reasonable protection against harmful interference
in a residential installation. This equipment generates, uses and can radiate
radio frequency energy and, if not installed and used in accordance with the
instructions, may cause harmful interference to radio communications. However,
there is no guarantee that interference will not occur in a particular installation. If
this equipment does cause harmful interference to radio or television reception,
which can be determined by tuning the equipment off and on, the user is
encouraged to try to correct the interference by one or more of the following
measures:
Reorient or relocate the receiving antenna.
Increase the separation between the equipment and receiver.
Connect the equipment into an outlet on a circuit different from that to which the
receiver is connected.
Consult the dealer or an experienced radio/television technician for help.
CAUTION ON MODIFICATIONS
To comply with the limits for the Class B digital device, pursuant to Part 15 of
the FCC Rules, this device must be installed in computer equipment certied
to comply with the Class B limits. All cables used to connect the computer
and peripherals must be shielded and grounded. Operation with non-certied
computers or non-shielded cables may result in interference to radio or television
reception.
Changes and modications not expressly approved by the manufacturer or
registrant of the equipment can void your authority to operate the equipment
under Federal Communications Commission rules.
Radiation Exposure Statement
This equipment complies with FCC radiation exposure limits set forth for an
uncontrolled environment. This equipment should be installed and operated with
minimum distance 20cm between the radiator & your body.
Page 71

European Community Compliance Statement
Class B
This product is herewith conrmed to comply with the requirements set out
in the Council Directives on the approximation of the laws of the Member
States relating to R&TTE Directive 1999/5/EC, Low Voltage Directive (LVD)
2014/35/EU.
Waste Electrical and Electronic Equipment
The mark of crossed-out wheeled bin indicates that this product must
not be disposed of with your other household waste. Instead, you need
to dispose of the waste equipment by handing it over to a designated
collection point for the recycling of waste electrical and electronic
equipment. For more information about where to drop off your waste
equipment for recycling, please contact your household waste disposal
service or the shop where you purchased the product.
台灣NCC
低功率電波輻射性電機管理辦法
第十二條:經型式認證合格之低功率射頻電機,非經許可,公司、商號或使
用者均不得擅自變更頻率、加大功率或變更原設計之特性及功能。
第十四條:低功率射頻電機之使用不得影響飛航安全及干擾合法通信;經發
現有干擾現象時,應立即停用,並改善至無干擾時方得繼續使用。
前項合法通信,指依電信法規定作業之無線電通信。
低功率射頻電機須忍受合法通信或工業、科學及醫療用電波輻射性電機設備
之干擾。
Page 72

Page 73

Page 74

Page 75

Page 76

www.avermedia.com
Mo d e l No.: AW 31 3
P/N: 300AAW313D9H
MADE IN TAIWAN
 Loading...