

Page 1
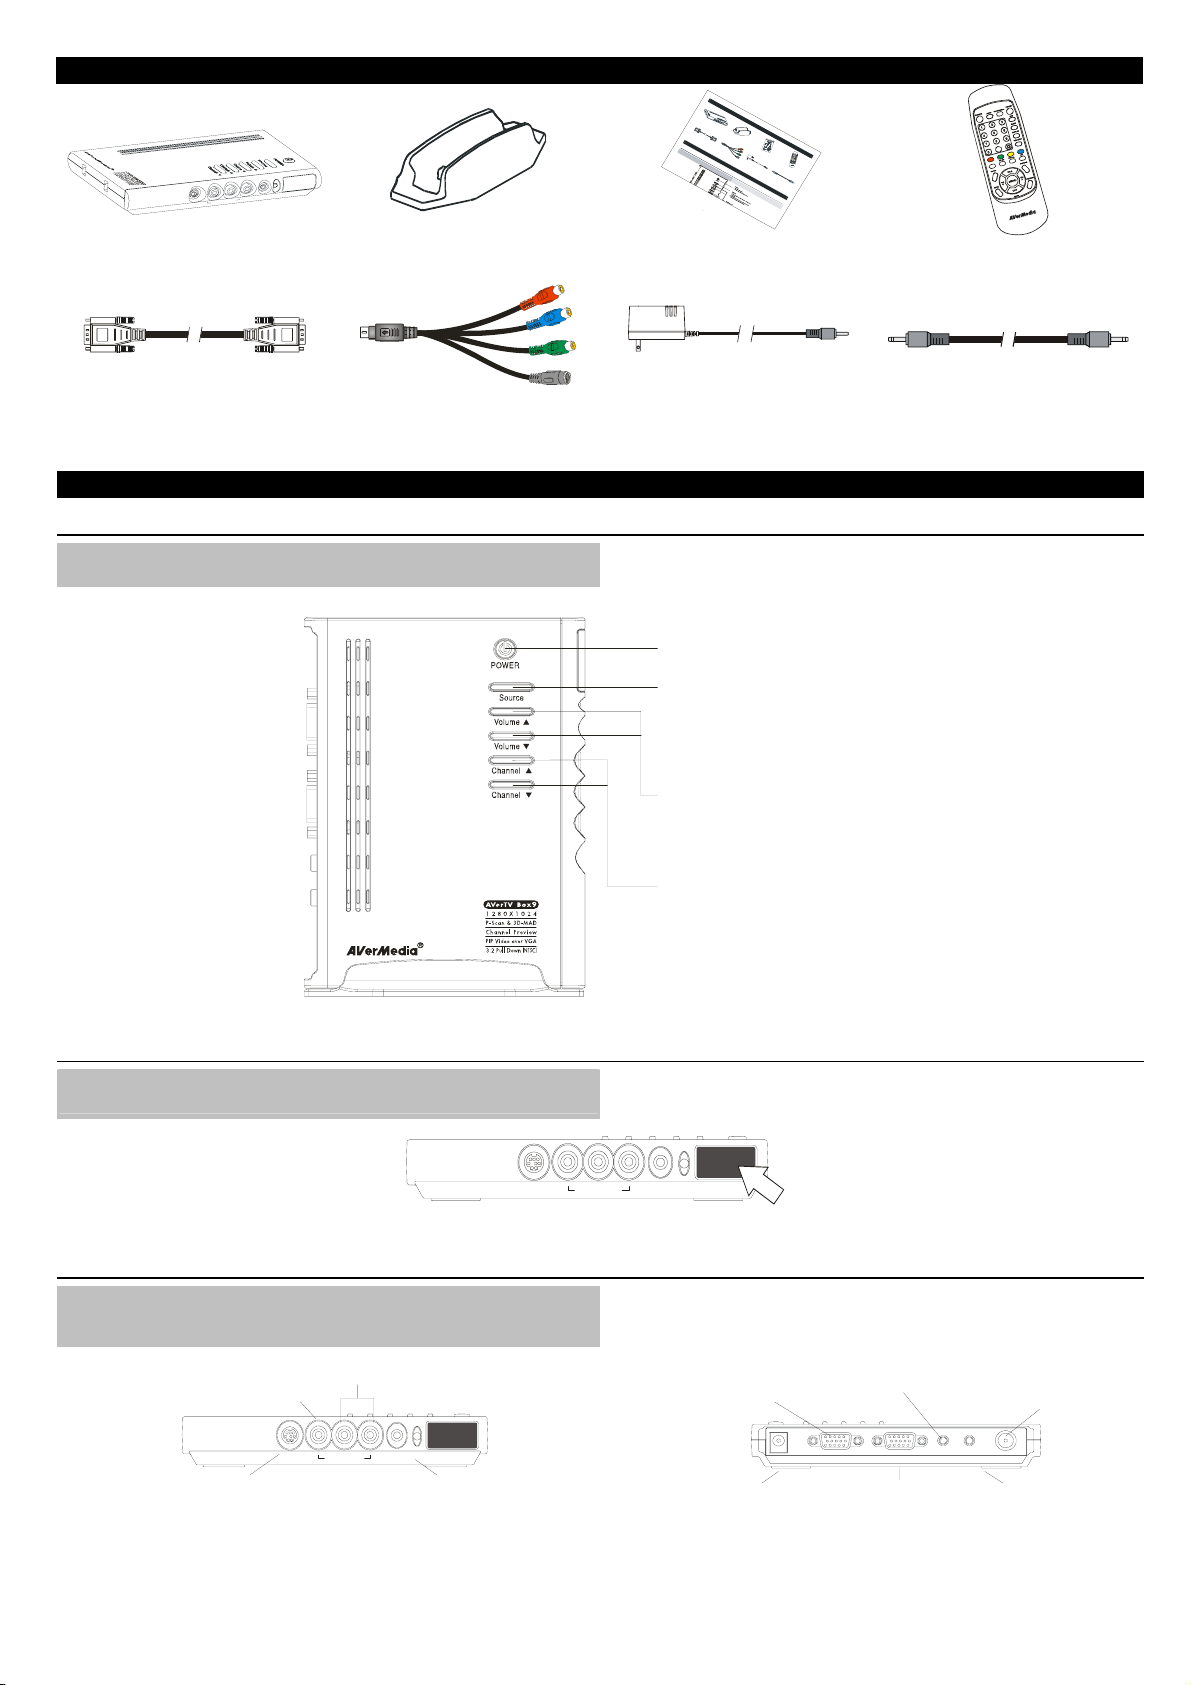
What’s in the Package/ Комплект поставки
E
N
O
H
P
R
A
E
N
I
V
/
A
N
I
-
S
AVerTV Box9
• Vertical Stand
• Подставка
• User Manual
• Руководство пользователя
W
h
a
t
'
s
i
n
t
h
e
P
a
c
k
a
g
e
/
К
о
м
п
л
е
к
т
п
A
о
V
e
с
r
т
T
V
а
в
B
к
o
x
и
9
·
V
e
r
€
t
·
i
€
c
a
П
l
о
·
S
д
V
t
с
€
a
т
!
G
n
а
·
A
d
в
V
к
C
а
G
a
A
b
l
к
e
а
б
е
л
ь
T
h
e
A
V
T
e
o
r
T
u
€
€
V
c
h
T
h
B
e
T
a
u
c
o
c
u
e
c
s
h
s
B
t
o
u
t
c
t
o
o
m
n
m
o
n
l
y
·
·
U
S
-
B
s
!
V
€
e
·
·
i
r
o
d
Р
S
M
e
у
x
o
V
к
t
t
o
n
P
a
n
e
l
f
u
o
u
s
e
d
f
u
n
a
/
о
9
n
i
C
d
в
u
o
e
о
a
U
n
C
i
o
t
/
n
t
r
o
l
n
d
P
o
a
n
c
t
n
h
t
i
e
o
n
t
o
s
.
p
s
i
d
e
o
f
t
o
m
д
l
/
с
p
к
т
o
о
в
м
n
о
п
e
п
n
о
t
о
н
2
л
е
Т
ь
-
н
i
з
n
т
о
ю
-
2
1
в
а
н
C
в
т
е
1
a
е
л
b
к
я
l
р
e
а
б
A
е
л
e
ь
V
€
€
·
l
/
Н
а
з
h
e
A
V
e
r
T
V
R
e
e
·
r
m
P
·
Me
o
!
!
П
o
w
t
у
e
·
e
л
Б
C
r
н
а
ч
B
o
x
9
p
ь
л
d
o
A
т
о
n
Д
i
к
d
t
a
r
a
У
п
o
p
е
A
н
V
и
е
к
н
r
о
o
v
п
i
d
о
e
s
q
u
i
c
k
д
о
и
l
t
(
e
т
с
(
r
а
w
н
б
i
а
t
и
h
т
e
я
а
b
r
р
a
е
T
t
й
t
e
к
V
r
а
i
м
e
s
и
)
B
)
o
к
x
9
н
€
а
·
A
u
к
d
о
·
!
i
А
o
У
р
у
C
п
д
п
a
р
и
b
а
о
у
l
в
к
e
л
а
с
я
с
б
т
ю
е
е
у
л
щ
п
ь
т
и
к
?
е
н
ю
к
а
н
и
о
б
н
п
о
к
л
е
и
е
р
е
н
ч
а
а
а
к
с
о
т
р
о
п
и
у
с
с
п
е
о
т
л
ю
ь
н
з
у
е
е
р
м
а
ы
п
м
р
е
ф
д
у
о
н
с
т
к
а
ц
в
и
л
я
я
.
м
ю
.
т
о
п
е
р
а
т
и
в
н
ы
й
• Remote Control (with batteries)
• Пульт ДУ (с батарейками)
• VGA Cable
• VGA кабель
• S-Video/Component 2-in-1 Cable
• S-Video/Компонентный 2 в 1 кабель
• Power Adapter
• Блок питания
The AVerTV Box9 Unit/ Тюнер AVerMedia AVerTV Box9
Touch Button Control Panel/ Назначение кнопок на корпусе тюнера
The Touch Button Panel found on the top side of the AVerTV Box9 provides quick
access to commonly used functions.
Управляющие кнопки на корпусе тюнера предоставляют оперативный доступ к
наиболее часто используемым функциям.
POWER
!!Turn t he unit on /off
Кнопк а вклю чения / вы ключ ения
SOURCE
!!Press this button to toggle between T V/Video and
PC d isplay
Нажимайте эту кнопку для выбора источника
сигн ала (ТВ, вид ео или компьютер)
VOLUME /!"
!!Press Volum e to increas e and Volume to
decrease the volume level
Нажимайте Vo lume для увеличения или
"
Vol um e для уменьшения гром ко ст и
CHANNEL /!"
!!Press Channel to go up and Channel to go
down to the next active TV channel
Нажимайте Channel для выбора следующего
или Channel для выбора предыдущего ТВ
канал а
• Audio Cable
!"
!
!"
!
"
• Аудиокабель
Infrared Sensor/ Инфракрасный приёмник
When using the remote control, aim it at the In-frared Sensor which is located at the
front panel of the AVerTV Box9.
S - IN
Connection Ports/ Входы/выходы
The port connectors allow connection of your TV antenna, PC, VGA monitor or LCD
projector, speakers, video, or s-video source etc.
!!COMPOSITE VIDEO INPUT
Композитный видеовход
!!S-VIDEO/COMP ONENT VIDEO INPUT
S-Video/ омпонент видеовходКный
AVerTV Box9 Back Panel/ Задняя панель AVe rTV Bo x 9
!!Left & Right AUDIO INPUT
Аудиовход (левый и правый каналы)
A / V IN
S - IN
EAR PHONE
!!EARPHONE JACK
Выход для наушник ов
Когда вы пользуетесь пультом ДУ, старайтесь направлять его в сторону
инфракрасного приёмника, расположенного на лицевой панели AVerTV Box9.
A / V IN
EAR PHONE
Набор входов/выходов тюнера позволяет подключить к нему ТВ антенну,
компьютер, VGA монитор или LCD проектор, активные колонки, источники VHS
или S-VHS сигнала и т.д.
!!VGA OUTPUT to MONITOR
Выход VGA для
подключения кмонитору
!!POWER ADAPTER
Блок питания
!!AUDIO INPUT from S OUND CARDPC's
Вход аудио для сигнала со звуковой
платы компьютера
DC VGA OUT VGA IN AUDIO IN SPEAKER OUT ANT IN
!!VGA INPUT from PC
Вход VGA для
подключения компьютера
!
TV Antenna (75 )
!
ТВ антенна
!!Speaker Connection
Вход для подключения
колонок
AVerTV Box9 Front Panel/ Передняя панель AVe rT V B ox 9
(75 )
Ω
Ω
Page 2
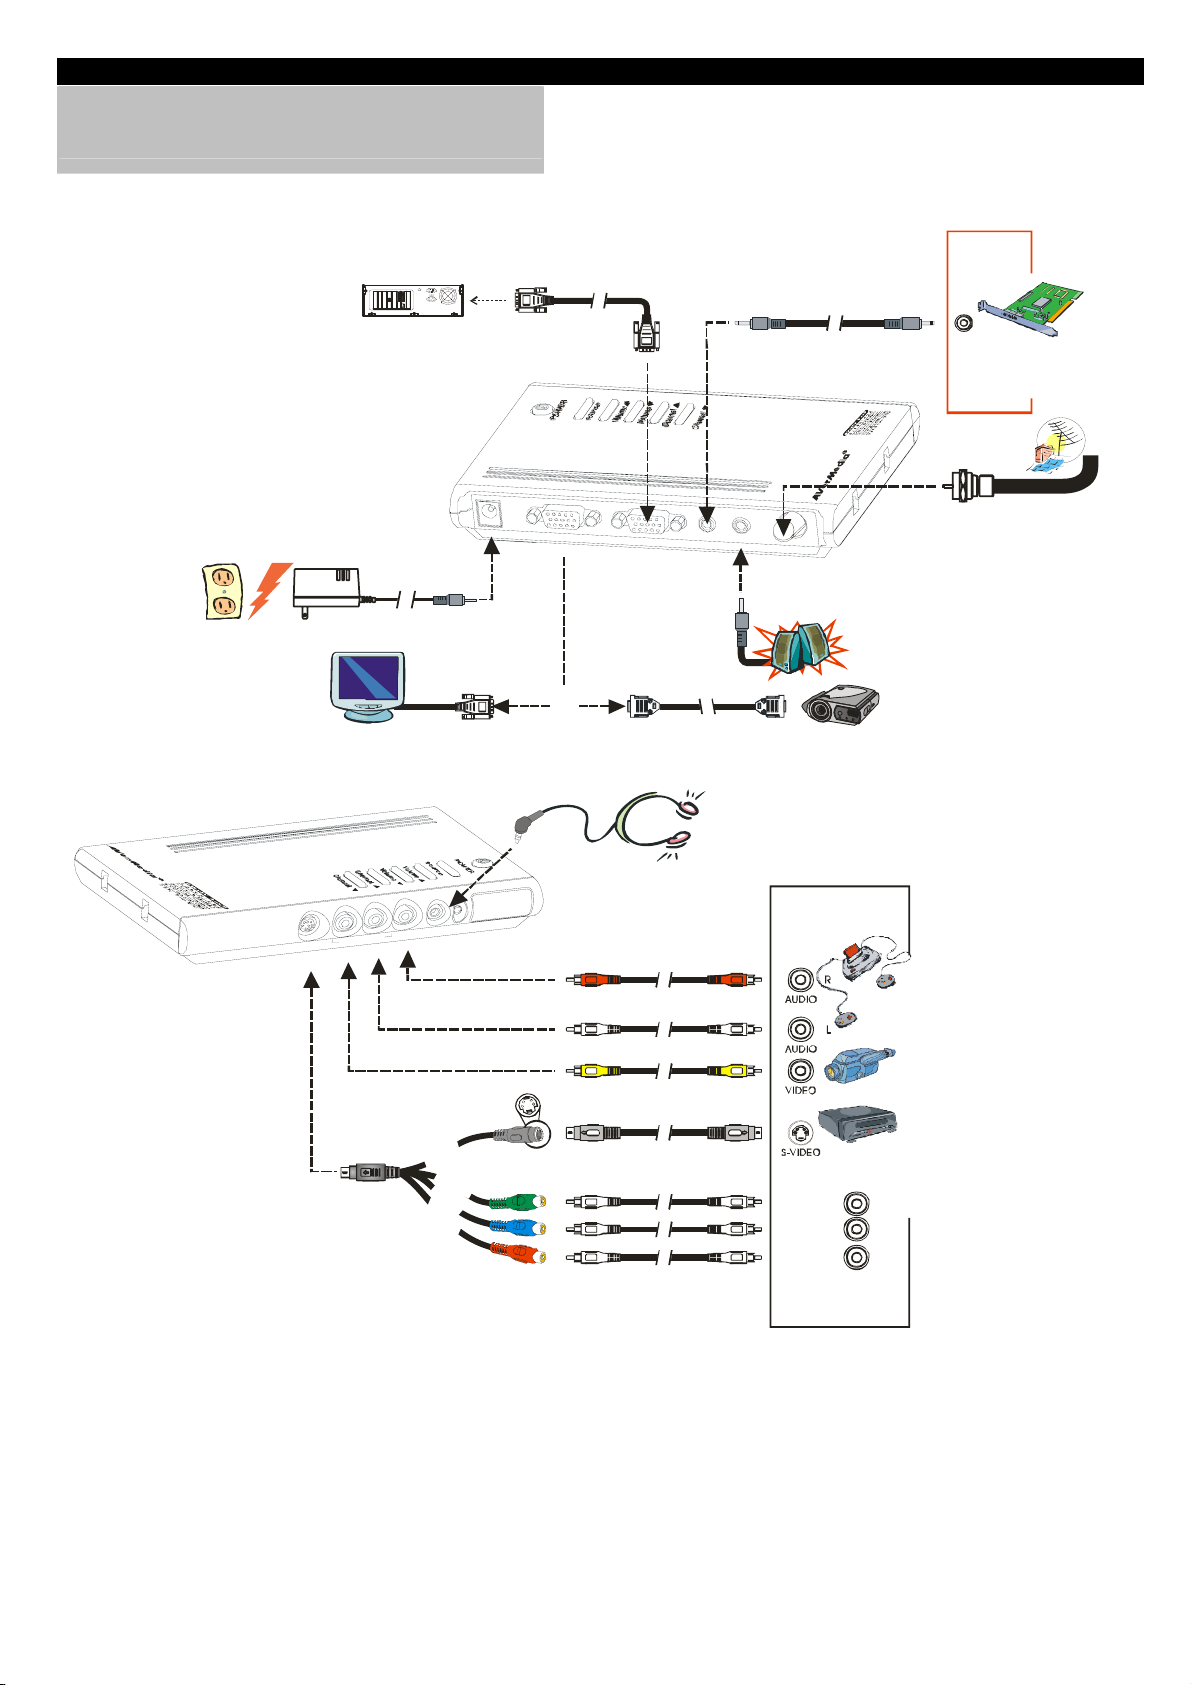
Installation and Setup/ Установка и подключение
The Installation and Setup section provides more information on cable
connections.
The figure below shows the proper cable connections for installing AVerTV
Box9 and connecting it to your audio/video equipment.
Раздел «Устан овк а и подключение» предоставляет дополнительную информацию по
подключению тюнера.
На рисунке, приведённом ниже, показана схема соединения AVer TV Bo x9 с внешними
аудио/видео устройствами.
!!VGA Cable (supplied)
Кабель VGA (входит в
комплект поста вк и)
!!OUT
Выход
!!Wall Outlet
Настенная розетка
!!Power Adapter
N
I
-
S
!!IBM Compatible PC
IBM совместимый компьютер
Блок пи та ния
!!VGA Monitor
VGA монитор
E
N
O
H
P
R
A
E
N
I
V
/
A
!!Audio Cable (supplied)
Аудиокаб ель (входит в
комплект
D
C
V
G
A
O
U
T
OR
Или
!!Audio Cable (not supplied)
V
G
A
I
N
A
U
D
I
O
I
N
!!VGA Cable (not supplied)
Кабель VGA (входит в
комплект поставки)
!!Earphone or headphone (not supplied)
Наушники (не поставляются)
Аудиок аб ель (не поставляется)
S
P
E
A
K
E
R
O
U
T
A
N
T
I
N
!!External Amplified Speaker
Внешняя акустическая система
!!LCD PROJECTOR
Выход
!!Example:
Пример:
!!OUT
!!PC Sound Card
!
!
LCD проектор
Звуковая карта
TV A nte nna ( 75 )Ω
ТВ антенна (75 )Ω
!!S-Video/Component 2-in-1 Cable
/ омпонентный 2 в 1 ка б ельS- КVideo
!!Audio Cable (not supplied)
Аудиок аб ель (не поставляется)
!!Video Cable (not supplied)
Видеокабель (не поста вляет ся)
k
c
a
l
й
B
ы
!
н
р
е
ч
!
!
g
r
e
e
!
n
з
е
л
!
е
н
b
ы
й
l
u
!
e
с
и
н
!
и
r
й
e
!
d
к
р
а
с
н
ы
й
!!S-Video Cable (not supplied)
S-VIDEO кабель (не п ост авл яет ся)
Y
P
b
P
r
!!RCA Cable (not supplied)
Кабель RCA (не поставляется)
COMPONENT VIDEO
комп онен т видео
!
!
!!Video Game (e.g. N intendo )
Игровая приставка (на пр .
Nintendo®)
!!Camcorder
Видеокамера
!!VCR/ VCD/ DVD Player
Видео/CD/DVD
плеер
Y
P
b
P
r
®
1
P/N 300AACAB
Made in Taiwan
Page 3
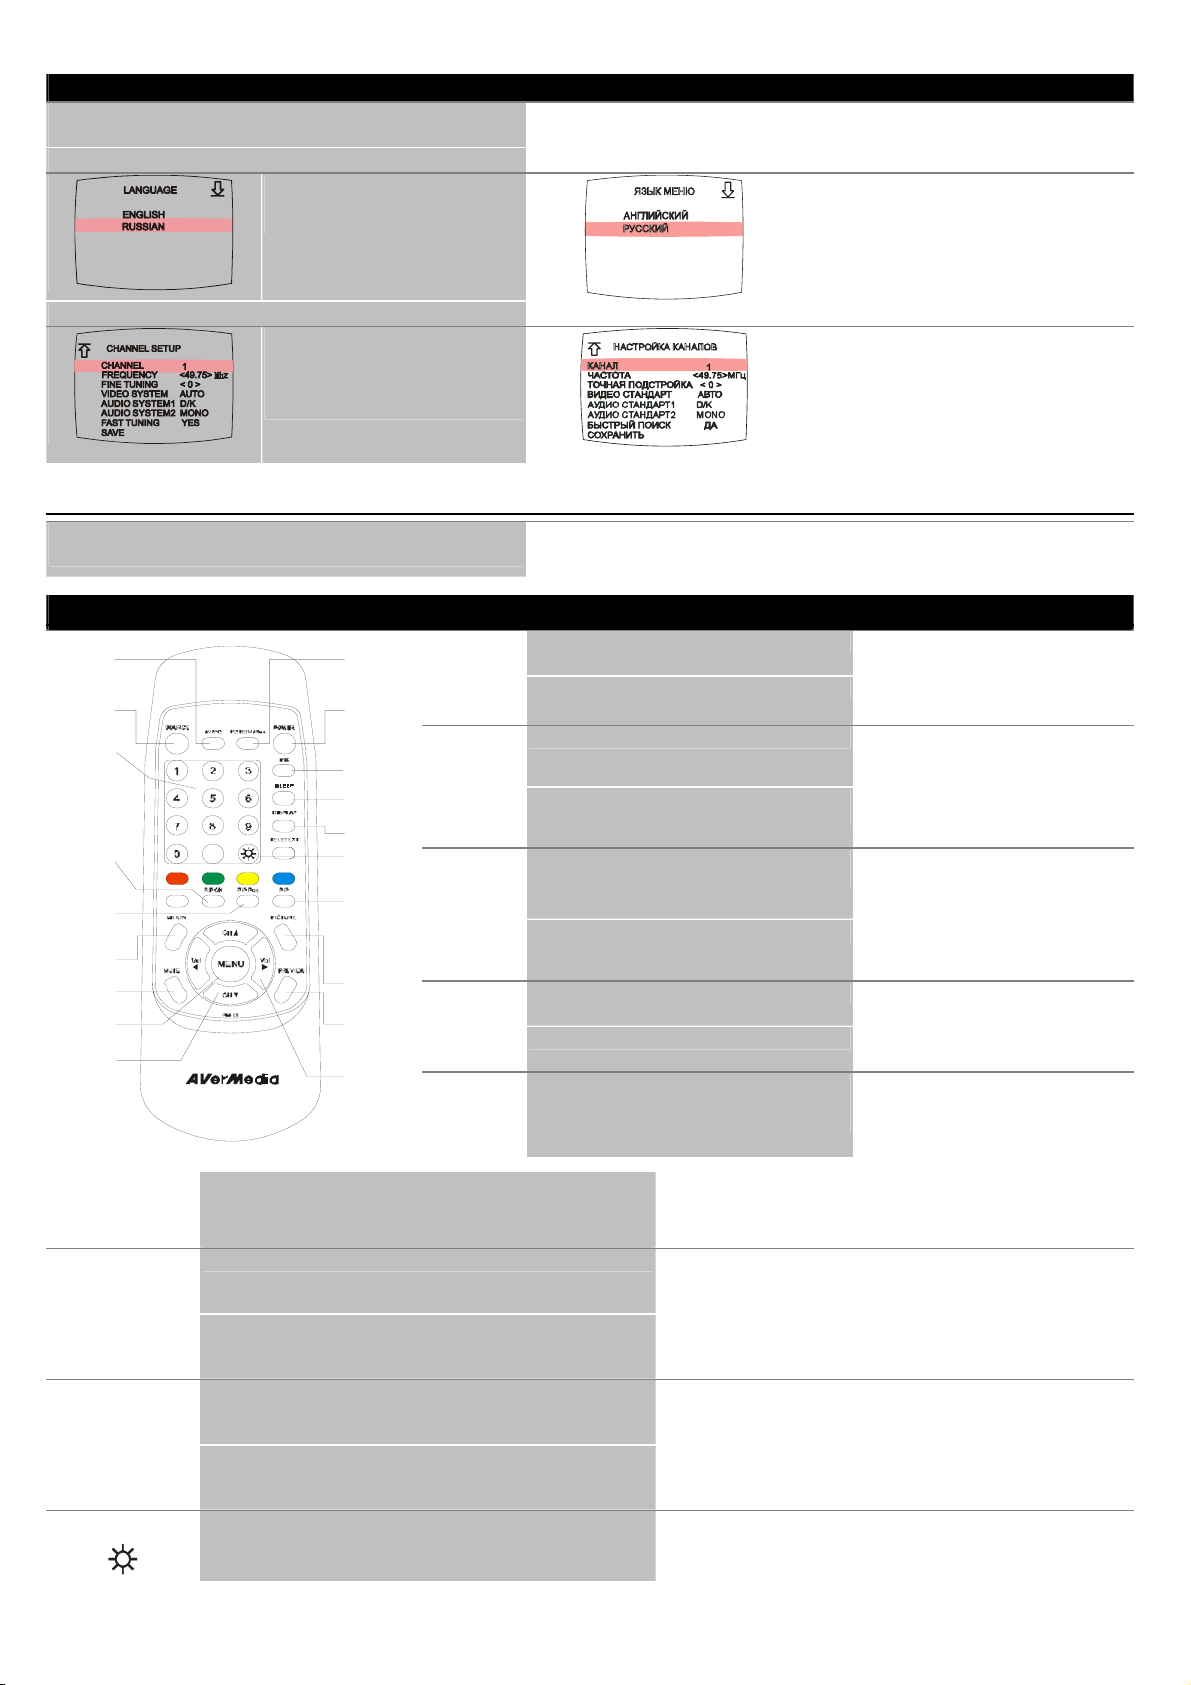
Using the AVerTV Box9/ Настройка AVerTV Box9
The first time you power on the AVerTV Box9 unit, it will automatically
display the following menus:
1. LANGUAGE menu 1. Меню ЯЗЫК МЕНЮ
In this menu, choose the language to
use for the menus and on-screen display
(OSD).
При первом включении тюнера AVer TV Bo x9 на экране автоматически появится серия из
двух меню:
Первое меню предлагает сразу выбрать и
установить язык, который в дальнейшем будет
использоваться в самом меню и при выводе
информации на экран (OSD).
2. CHANNEL SETUP menu 2. Меню НАСТРОЙКА КАНАЛОВ
In this menu, change the TV frequency
assignments of certain channels, fine
tune TV channels, etc. See details on
each configuration setting in the
CHANNEL SETUP menu.
Accessing TV Controls/ Управление тюнером
To access various TV controls, open up the menu displays or press on the
remote control buttons.
Получить доступ к различным функциям управления тюнером можно через экранное меню
тюнера либо посредством пульта ДУ.
The Remote Control/ Пульт ДУ
1
2
3
4
5
6
7
8
9
10
PC BGM/ Res
11
POWER
12
MTS
13
SLEEP
14
DISPLAY.
15
1
10
AV/ PC
2
11
SOURCE
3
12
13
NUMBER
BUTTONS
4
PIP CH
14
15
5
PIP Pos.
16
6
CHANNEL
17
18
19
- Switch the audio source from the AVerTV Box9 when in PC display
mode
- Switch between the available display resolution settings when in
TV/Video mode
Turn the unit on/off Включение/выключение тюнера.
If the channel offers multi-language feature, press this button to toggle
between languages.
To automatically turn off the unit after 0:30, 1:00, 1:30, 2:00 or 2:30. Уст ан овка времени таймера на выключение через 0:30, 1:00, 1:30, 2:00
Display information Вывод информации на экран.
Allows you to instantly switch to three (3) brightness level. Выбор одного из трёх предопределённых уровней яркости.
RETURN
7
MUTE
8
MENU
9
CH!/"
To toggle between TV/ Video or PC display Переключение между ТВ/Видео или
Switch between TV or external video sources Выбор ТВ или одного из внешних
To select a TV channel Выбор ТВ канала.
To use the normal function of the CH ▲, CH ▼, Vol
◄, and Vol ► buttons in PIP mode
To move the small TV/Video screen using the
CH!, CH ", Vol#, and Vol$ buttons in PIP mode
Go to the previously selected channel Переход к ранее выбранному каналу.
To turn off /on the sound Выключение/включение звука.
To call up the menu display Вызов экранного меню
- Go to the next or previous TV channel line up
- Use these buttons to make the selection in the
menu or picture setting
- Выбор источника звука в режиме PC.
- Выбор разрешения экрана в режиме ТВ/Видео.
Если телевизионный канал транслируется на нескольких языках,
нажмите эту кнопку, чтобы выбрать нужный язык.
или 2:30.
Второе меню предлагает вам сразу приступить к
настройке тюнера и настроить такие параметры
каналов, как номер канала, его частота, тип ТВ
системы и т.д. См. более детальную инструкцию
по работе с меню НАСТ РОЙКА КАНАЛОВ
изображением с компьютера.
видеовходов.
Назначение кнопкам CH ▲, CH ▼, Vol ◄,
и Vol ► стандартных функций в режиме
«Кадр в кадре».
Использование кнопок CH ▲, CH ▼, Vol
◄, и Vol ► дпя изменения положения
TВ/Видео окна в режиме «Кадр в
кадре».
- Переход к следующему/предыдущему
ТВ каналу в списке.
- Выбор элемента экранного меню.
Page 4

16
PIP
17
PICTURE
18
Switch between PIP*, PIP See-thru** and Full Screen mode.
*To watch TV/Video in a small screen on an always on top of the PC
display.
**Make the small video screen semi-transparent allowing the image
behind the small screen show through.
To adjust screen resolution, frame rate(except YPbPr), brightness,
contrast, sharpness, etc.
When you are in YPbPr mode, you can only adjust the screen brigtness,
contrast and saturation.
Display 13 consecutive TV channels on-screen
Переключает между режимами «Кадр в кадре»*, «Полупрозрачный
кадр в кадре»** и полноэкранным режимом .
* Просмотр TV/Видео в окне на фоне десктопа.
** Сделав TV/Видео окно на фоне десктопа полупрозрачным, можно
будет видеть всё, что находится за ним.
Вызов меню настройки разрешения, частоты кадров, яркости,
контрастности, чёткости и пр. параметров экрана.
Если вы находитесь в режиме YPbPr, то вы можете изменить только
яркость, контрастность и насыщенность изображения.
13-ти канальный предварительный просмотр
PREVIEW
19
- To increase/decrease volume level
- Use these buttons to adjust the menu or picture settings
- Регулировка громкости звука.
- Выбор элемента экранного меню.
VOL ◄/►
Customizing the Picture Settings/ Персональные настройки изображения
If you want to change the screen resolution, set
the frame rate, or adjust the picture quality, press
the PICTURE button on the remote control. Then,
you can use the CH▲ or CH▼ button to select
the items in the PICTURE menu; and the Vol◄ or
Vol ► button to open a submenu or make picture
setting adjustments.
To restore the picture default settings, select SET
DEFAULT and then press Vol ►.
In the SCREEN RESOLUTION submenu, choose
the desired display resolution for your monitor
screen. Press the CH▲ or CH▼ button to move
up or down the menu and select a resolution, then
press Vol ► to confirm your selection. If you don’t
confirm the selected resolution by pressing Vol ►
within 15 seconds, the resolution will keep at
previous resolution.
In the FRAME RATE submenu, choose the
appropriate refresh rate for your display monitor.
Press the CH▲ or CH▼ button to make a
selection, then press Vol ► to confirm your
selection. If you don’t confirm the selected frame
rate by pressing Vol ► within 15 seconds, it will
keep at previous frame rate.
To adjust picture properties such as brightness, contrast, saturation, hue, or
sharpness, first press CH▲ or CH▼ to select a property. Then, press Vol◄ to
decrease its level or press Vol ► to increase the level.
Для настройки таких параметров изображения, как яркость, контраст, насыщенность,
оттенок и чёткость, кнопками CH▲ или CH▼ выберите соответствующий пункт
экранного меню и нажатием Vol◄ или Vol ► подберите желаемое значение.
Calling Up the MAIN MENU/ Вызов главного меню
Если вы хотите изменить разрешение экрана, частоту
кадров или др. параметры изображения, нажмите
кнопку PICTURE на пульте ДУ, выберите кнопками
CH▲ или CH▼ нужный пункт появившегося экранного
меню и с помощью кнопок Vol◄ или Vol ► войдите в
нужное подменю или установите непосредственное
значение.
Чтобы установить значения по умолчанию, выберите
пункт меню ПО УМОЛЧАНИЮ и нажмите Vol ►.
В подменю РАЗРЕШЕНИЕ ЭКРАНА кнопками CH▲
или CH▼ выберите желаемое разрешение и
назначьте его нажатием кнопки Vol ►. Если в
последующие 15 секунд вы не подтвердите свой
выбор нажатием кнопки Vol ►, разрешение экрана
вернётся к предыдущ ему значению.
В подменю ЧАСТОТА КАДРОВ кнопками CH▲ или
CH▼ выберите подходящее значение частоты кадров
и назначьте его нажатием Vol ►. Если в последующие
15 секунд вы не подтвердите свой выбор нажатием
кнопки Vol ►, частота кадров экрана вернётся к
предыдущему значению.
MAIN
MENU
SOURCE
CHANNEL
SETUP
Press the MENU button on the remote control
to open/close the MAIN MENU or a submenu.
Then, you can use the CH▲ or CH▼ button to
select the items in the menu list; and the Vol◄
or Vol► button to adjust a setting. The next
table lists the different functions you will find in
the MAIN MENU.
Используйте кнопку MENU пульта ДУ, чтобы
вызывать/убирать с экрана ГЛАВНОЕ МЕНЮ
настройки или для выхода из подменю. Пока
ГЛАВНОЕ МЕНЮ находится на экране,
кнопками CH▲ или CH▼ можно выбрать
соответствующий пункт меню и кнопками Vol ◄
или Vol► осуществить переход в выбранное
подменю. Нижеприведённая таблица содержит
описание функций, доступных из главного
меню.
Ssubmenus Usage Подменю Описание Подменю
In the SOURCE submenu, press
CH▲ or CH▼ to select
ANTENNA, composite VIDEO,
S-VIDEO or YPbPr as your input
source. Then press Vol► to
confirm your selection and return
to the MAIN MENU.
The CHANNEL SETUP menu
allows you to change or fine tune
the TV frequency of channel
numbers, choose the video
system used in your region, and
more. (See the "CHANNEL
SETUP Menu" table for details.)
ИСТОЧНИК
СИГНАЛА
НАСТРОЙКА
КАНАЛОВ
В подменю ИСТОЧНИК СИГНАЛА
кнопками CH▲ или CH▼ вы
можете выбрать и нажатием Vol►
подключить соответствующий вход
тюнера.
Подменю НАСТРОЙКА КАНАЛОВ
позволяет вам изменить или
настроить такие параметры
каналов, как номер канала, его
частота, тип ТВ системы и пр. (См.
более детальную инструкцию по
работе с меню НАСТРОЙКА
КАНАЛОВ.)
2
Page 5

CHANNEL
REMAPPING
PICTURE
SOUND
TIMER
LANGUAGE
FACTORY
DEFAULT
OSD
CHANNEL SETUP
Menu
The CHANNEL REMAPPING
menu allows you to reprogram
channel numbers or
enable/disable channels. (See
the "CHANNEL REMAPPING
Menu" table for details.)
СОРТИРОВКА
КАНАЛОВ
The PICTURE menu allows you
to change the screen resolution,
set the frame rate, or adjust the
picture quality. (See the
"Customizing the Picture
Settings" section for details.)
ИЗОБРАЖЕНИЕ
The SOUND menu lets you select
the sound source and adjust your
speakers. (See the "Sound
Menu" table for details.)
ЗВУК
Press CH▲ or CH▼ button to
select setting the current time, on
timer or off timer then press
Vol►.
Use this function to set the
current time, and to program the
unit to automatically turn on and
off.
The LANGUAGE menu sets the
language to use for the OSD
menus.
Press CH▲ or CH▼ to select a
language, then press Vol► to
confirm your selection.
This menu allows you to revert
settings back to the default.
Select YES if you want to reset
AVerTV Box9 back to the factory
default settings. Otherwise,
select NO to keep the current
settings. Then press Vol► to
confirm your selection.
The OSD menu allows you to
customize the color and position
of the OSD menus. (See the
"OSD Menu" table for details.)
ТАЙМЕР
ЯЗЫК МЕНЮ
ЗАВОДСКИЕ
УСТАНОВКИ
НАСТРОЙКА
МЕНЮ
Settings Usage Меню настройки
CHANNEL
After selecting a frequency, choose
a channel number to assign to that
frequency. Use the Vol◄ or Vol►
button when choosing a channel
number.
Note: You can also use the
CHANNEL setting to switch to
composite VIDEO, S-VIDEO or
YPbPr.
каналов
Пункт
меню
КАНАЛ
Подменю СОРТИРОВКА КАНАЛОВ
позволяет вам изменить порядок
следования каналов в списке, а
также включить/выключить
выбранный канал. (Более
детальную инструкцию по работе с
меню СОРТИРОВКА КАНАЛОВ
см.)
Подменю ИЗОБРАЖЕНИЕ
позволяет изменить разрешение
экрана, частоту кадров, яркость,
контраст и пр. параметры
изображения. (См. раздел
«Персональные настройки
изображения».)
Меню ЗВУК даёт вам возможность
выбрать и настроить источник
звука для прослушивания.
Меню ТАЙМЕР позволяет вам
установить текущее время и
запрограммировать таймеры на
включение и отключение тюнера.
Это меню предлагает выбрать и
установить язык, который будет
использоваться в самом меню и
при выводе информации на экран
(OSD).
Кнопками CH▲ или CH▼ выберите
нужный язык и подтвердите выбор
нажатием Vol►
Это меню позволяет вам сбросить
все установки тюнера в состояние
по умолчанию (заводские
установки).
Выберите ДА, если вы хотите
применить к тюнеру AVerT V Box 9
заводские установки или выберите
НЕТ для отмены вашего решения.
Нажмите Vol►, чтобы подтвердить
выбор.
Пункт НАСТРОЙКА МЕНЮ
позволяет выбрать и
индивидуально настроить ряд
параметров самого меню
Описание
Вы можете выбрать номер канала,
чтобы настроить его на нужную
частоту, или, настроившись по частоте
на какой-либо канал, присвоить ему
свой номер. Номер канала выбирается
кнопками Vol ◄ или Vol►.
Примечание: Вы также можете
использовать меню КАНАЛ для выбора
и настройки VIDEO, S-VIDEO и YPbPr
входов тюнера.
FREQUENCY
Press the Vol◄ or Vol► button to
scan down or up and choose a TV
frequency.
When FAST TUNING is disabled,
pressing Vol◄ or Vol► once
changes the TV frequency by -/+
0.25MHz; pressing and holding
down Vol◄ or Vol► continuously
changes the frequency by -/+
0.25MHz and stops when an active
channel is found.
When FAST TUNING is enabled,
pressing Vol◄ or Vol► once goes
to the next frequency that's in the
TV frequency table; pressing and
holding down Vol◄ or Vol►
continuously scans through the
frequencies in the TV frequency
table and stops when an active
ЧАСТОТА
Нажав Vol◄ или Vol►, запустите
сканирование и настройтесь на нужный
ТВ канал.
Если БЫСТРЫЙ ПОИСК запрещён,
однократное нажатие Vol◄ или Vol ►
будет изменять частоту на -/+ 0.25МГц;
нажатие и удержание кнопки Vol◄ или
Vol► приводит к автоматическому
перебору частоты с шагом -/+ 0.25МГц
и остановке поиска, когда активный
канал будет найден.
Если БЫСТРЫЙ ПОИСК разрешён,
однократное нажатие Vol◄ или Vol ►
будет изменять частоту настройки в
соответствии со значениями в
региональной таблице частот; нажатие
и удержание Vol◄ или Vol ► приведёт к
автоматическому перебору значений
таблицы частот и остановке поиска,
Page 6

AUDIO
SYSTEM1
FINE
TUNING
VIDEO
SYSTEM
channel is found.
Note: After you have found a
desired frequency, assign a
CHANNEL number, adjust FINE
TUNING, and select a VIDEO
SYSTEM for that frequency. Then
save your settings before locating
another TV frequency.
If the reception of the selected
channel is not clear, choose FINE
TUNING then press the Vol◄ or
Vol► button until the TV picture
becomes clear.
Use the Vol◄ or Vol► button to
select the video standard used in
your region. You can set this to
AUTO to make AVerTV Box9
automatically detect the video
system, or you can manually
choose between SECAM, PAL or
NTSC.
Use the Vol◄ or Vol► button to
select the audio system. You can
choose between D/K or B/G.
когда активный канал будет найден.
Примечание: После того, как активный
канал будет найден, ему можно
присвоить номер, выбрать тип
телевизионной и аудио системы и
осуществить его точную подстройку.
ТОЧНАЯ
ПОДСТРОЙКА
ВИДЕО
СТАНДАРТ
АУДИО
СТАНДАРТ1
Улучш ить качество приёма канала
можно, осуществив его точную
подстройку. Выберите пункт меню
ТОЧНАЯ ПОДСТРОЙКА и кнопками
Vol◄ or Vol► осуществите подстройку
канала.
Этот пункт меню позволяет изменить
телевизионный стандарт для
выбранного канала. Вы можете
выбрать либо AUTO (AVerTV Box9
будет автоматически определять тип
ТВ системы) либо один из
предлагаемых типов - SECAM, PAL или
NTSC.
Кнопками Vol ◄ или Vol► вы можете
выбрать одну из доступных аудио
систем D/K или B/G.
AUDIO
SYSTEM 2
FAST
TUNING
SAVE
Use the Vol◄ or Vol► button to
select the audio system. You can
choose between MONO, NICAM
MONO, NICAM STEREO, NICAM
DUAL A, NICAM DUAL B, A2
MONO, A2 STEREO, A2 DUAL A
or A2 DUAL B.
Use the Vol◄ or Vol► button to
enable or disable fast tuning. Select
YES if you want to enable fast
tuning and scan through available
frequencies only in the TV
frequency table when you are
choosing a frequency for a channel.
By default, NO is selected which
allows you to scan through
frequencies at intervals of 0.25
MHz.
When you have adjusted the
frequency, fine tuning and/or the
video system setting, the SAVE
item will show a question mark (?).
Press the Vol► button to change
this item to OK and save the
settings.
Note: After selecting a TV
frequency and assigning a channel
number, save the channel first
before choosing a TV frequency for
another channel.
АУДИО
СТАНДАРТ2
БЫСТРЫЙ
ПОИСК
СОХРАНИТЬ
Кнопками Vol ◄ или Vol► вы можете
выбрать одну из доступных стерео
систем MONO, NICAM MONO, NICAM
STEREO, NICAM DUAL A, NICAM DUAL
B, A2 MONO, A2 STEREO, A2 DUAL A
или A2 DUAL B.
Позволяет включить или отключить
быстрый поиск при настройке каналов
(см. меню ЧАСТОТА).
После того как вы изменили значение
частоты, точной подстройки или
видео/аудио системы канала, эти
значения необходимо сохранить в
памяти тюнера, выбрав пункт меню
СОХРАНИТЬ и нажав Vol►.
Channel Remapping
Menu
This menu allows you to enable or disable a
channel, reprogram or reassign TV frequencies
with channel numbers that are easier to
remember.
A channel is enabled when there is a "+" sign
indicated; a channel is disabled when there is a "-"
sign indicated. To enable or disable a channel,
press Vol◄.
To reassign a TV frequency to another channel
number, first select the original channel number
and hold down the Vol►button. While the original
channel number is blinking, press CH▲ or CH▼
continuously until you reach the new channel
number. Then, press Vol►.
Sound Menu Settings Usage Меню ЗВУК Пункт меню Описание
Usage Меню сортировки
каналов
Описание
Подменю СОРТИРОВКА КАНАЛОВ позволяет вам
изменить порядок следования каналов в списке, а также
включить/выключить выбранный канал.
Включить/выключить канал в списке можно нажатием
кнопки Vol◄, предварительно выбрав нужный канал.
Чтобы изменить положение канала в списке, выберите
нужный канал, нажмите Vol► и строка с выбранным
каналом начнёт мигать. Это означае т, что теперь вы
можете кнопками CH▲ или CH▼ переместить
выбранный канал в нужную позицию. Зафиксируйте
новую позицию канала повторным нажатием Vol►.
SOUND
SOURCE
Press Vol◄ or Vol► to switch
the audio to TV or your
computer.
ИСТОЧНИК
ЗВУКА
Нажмите Vol◄ или Vol►, чтобы
выбрать источник звука (ТВ-тюнер
или компьютер) для прослушивания.
BALANCE Press Vol◄ or Vol► to
balance the sound of your left
and right speakers.
БАЛАНС
Нажмите Vol◄ или Vol►, чтобы
настроить баланс между левым и
правым каналом.
3
Page 7

TIMER Menu Submenus Usage Меню ТАЙМЕР Подменю Описание
CURRENT TIME
ON TIMER
OFF TIMER
Press CH▲ or CH▼ button to
select setting the hour or mins.
To set the hour and mins, press
Vol◄ or Vol► and then press
MENU button.
Press CH▲ or CH▼ button to
select setting the hour, min, daily
and timer.
-To set the hour and mins, press
Vol◄ or Vol►.
-In Daily option, press Vol◄ or
Vol► to select ON to active this
feature everyday or OFF to
active this feature only once.
-In Timer option, press Vol◄ or
Vol► to select ON to active this
feature or OFF to deactivate this
feature.
-After doing all the settings,
press MENU button.
The TIMER menu allows you to
set the time interval for the TV's
sleep timer.
Press CH▲ or CH▼ to select a
time interval, then press Vol► to
confirm your selection. AVerTV
Box9 will automatically switch to
sleep mode when it has been left
idle for the specified time interval.
(By default, the timer is disabled.)
ТЕКУЩЕЕ ВРЕМЯ
ТАЙМЕР НА
ВКЛЮЧЕНИЕ
ТАЙМЕР НА
ВЫКЛЮЧЕНИЕ
Кнопками CH▲ или CH▼
выберите параметр, который
вы хотите изменить и
нажатием Vol◄ или Vol►
установите текущее значение
времени.
Для программирования
таймера на включение,
кнопками CH▲ или CH▼
выберите соответствующий
пункт меню и кнопками Vol◄
или Vol► установите:
- значение часов и минут.
- опцию ЕЖЕДНЕВНО, если
вы хотите, чтобы таймер
срабатывал каждый день.
- включите сам таймер,
выбрав пункт меню ТАЙМЕР .
Меню ТАЙМЕР позволяет
включить и настроить таймер
на отключение тюнера.
Кнопками CH▲ или CH▼
выберите желаемый интервал
времени до отключения и
нажатием Vol► подтвердите
свой выбор. По истечении
выбранного времени AVer TV
Box9 выключится и перейдёт в
спящий режим. (По умолчанию
таймер выключен.)
OSD Menu Submenus Usage
BACKGROUND
TRANSPARENCY
TEXT COLOR
BACKGROUND
COLOR
This sets the transparency of the
OSD menus against the TV
image.
Press CH▲ or CH▼ to choose
the desired transparency level.
25% is the most transparent,
while 100% displays the OSD
menus clear and solid in color.
After you have made your
selection, press the Vol► button.
This sets the color of the
following text:
TITLE : Color of the menu name
BODY : Color of menu items
MESSAGE : Color of the hint
messages at the bottom of the
menus
Use the CH▲ or CH▼ button to
select the type of text whose
color you want to change. Then
use the Vol◄ or Vol► button to
browse through the available
colors and select a desired color.
This sets the color of the
following backgrounds:
TITLE : Color of the title bar on
top of the menus
BODY : Background color of
menu list
MESSAGE : Color of the
message bar at the bottom of the
menus
Use the CH▲ or CH▼ button to
select the type of background
whose color you want to change.
Then use the Vol◄ or Vol►
button to browse through the
available colors and select a
desired color.
Настройка
меню
ПРОЗРАЧНОСТЬ
ФОНА
ЦВЕТ ТЕКСТА
ЦВЕТ ФОНА
Подменю Описание
Этот пункт меню позволяет
выбрать уровень прозрачности
фона OSD.
Кнопками CH▲ или CH▼
выберите желаемый уровень
прозрачности фона. 25%
соответствует почти полностью
прозрачному фону, 100%
означает, что фон меню
полностью непрозрачен.
Подтвердите свой выбор
нажатием Vol►.
Это подменю позволяет
выбрать цвет текста
следующих компонентов меню:
ЗАГОЛОВОК: Цвет текста
заголовка меню
МЕНЮ: Цвет текста
центральной части меню
ПОДСКАЗКА: Цвет текста
области сообщений меню
Использую кнопки CH▲ или
CH▼ выберите компонент
меню, вид которого вы хотите
изменить, и кнопками Vol◄ или
Vol► подберите желаемый
цвет.
Это подменю позволяет
выбрать цвет текста
следующих компонентов меню:
ЗАГОЛОВОК: Цвет фона
заголовка меню
МЕНЮ: Цвет фона
центральной части меню
ПОДСКАЗКА: Цвет фона
области сообщений меню
Использую кнопки CH▲ или
CH▼ выберите компонент
меню, вид которого вы хотите
изменить, и кнопками Vol◄ или
Vol► подберите желаемый
цвет.
Page 8

POSITION
OSD TIME
This allows you to adjust the
position of OSD menus on the
monitor screen.
Press CH▲ to move the menu
display up, CH▼ to move down,
Vol◄ to move to the left, or Vol►
to move to the right.
This sets the duration for
displaying the OSD menus.
Press CH▲ or CH▼ to choose
the desired duration. After you
have made your selection, press
the Vol► button.
ПОЗИЦИЯ
ВРЕМЯ
ИНДИКАЦИИ
Данная опция позволяет
изменить положение меню на
экране.
Чтобы изменить положение
меню не экране
воспользуйтесь кнопками
CH▲, CH▼, Vol◄ или Vol ►
пульта ДУ.
Данный пункт меню позволяет
установить время индикации
меню на экране.
Чтобы изменить время
индикации меню, кнопками
CH▲ или CH▼ выберите
соответствующее значение и,
нажав Vol►, подтвердите свой
выбор.
FCC NOTICE
This device has been tested and found to comply with the limits for a Class B digital device, pursuant to Part 15 of the FCC Rules. These limits are designed to provide reasonable
protection against harmful interference in a commercial, industrial or business environment. This equipment can generate, use and radiate radio frequency energy and, if not
installed and used in accordance with the instruction, may cause harmful interference to radio communications. However, there is no guarantee that interference will not occur in a
particular installation. If this equipment does cause harmful interference to radio or television reception, which can be determined by turning the equipment off and on, the user is
encouraged to try to correct the interference by one or more of the following measures:
Reorient or relocate the receiving antenna.
Increase the separation between the equipment and receiver.
Connect the equipment into an outlet on a circuit different from that to which the receiver is connected.
Consult the dealer or an experienced radio/TV technician for help.
This device complies with Part 15 of the FCC Rules. Operation is subject to the following two conditions: (1) this device may not cause harmful interference, and (2) this device must
accept any interference received, including interference that may cause undesired operation.
CAUTION ON MODIFICATIONS
To comply with the limits for the Class B digital device, pursuant to Part 15 of the FCC Rules, this device must be installed in computer equipment certified to comply with the Class
B limits. All cables used to connect the computer and peripherals must be shielded and grounded. Operation with non-certified computers or non-shielded cables may result in
interference to radio or television reception.
Any changes or modifications not expressly approved by the grantee of this device could void the user's authority to operate the equipment.
CE NOTICE
This is a Class B product.
DISCLAIMER
No warranty or representation, either expressed or implied, is made with respect to the contents of this documentation, its quality, performance, merchantability, or fitness for a
particular purpose. Information presented in this documentation has been carefully checked for reliability; however, no responsibility is assumed for inaccuracies. The information
contained in this documentation is subject to change without notice.
In no event will AVerMedia be liable for direct, indirect, special, incidental, or consequential damages arising out of the use or inability to use this product or documentation, even if
advised of the possibility of such damages.
TRADEMARKS
AVerMedia and AVerTV Box are registered trademarks of AVerMedia TECHNOLOGIES, Inc. IBM PC is a registered trademark of International Business Machines Corporation.
Macintosh is a registered trademark of Apple Computer, Inc. Microsoft is a registered trademark and Windows is a trademark of Microsoft Corporation. All other products or
corporate names mentioned in this documentation are for identification and explanation purposes only, and may be trademarks or registered trademarks of their respective owners.
COPYRIGHT
© 2006 by AVerMedia TECHNOLOGIES, Inc. All rights reserved. No part of this publication may be reproduced, transmitted, transcribed, stored in a retrieval system, or translated
into any language in any form by any means without the written permission of AVerMedia TECHNOLOGIES, Inc
УВЕДОМЛЕНИЕ ФЕДЕРАЛЬНОЙ КОМИССИИ СВЯЗИ
По результатам тестирования данное устройство соответствует правилам (Пункт 15), установленным Федеральной комиссией св язи для цифровых устройств класса В.
Ограничения, представленные в данных правилах, были введены для обеспечения достаточной защиты против нежелательных вмешательств в коммерческую,
промышленную или бизнес сферы. Данное оборудование может генерировать, использовать и излучать электромагнитные во лны; по этой причине могут происходить
нежелательные вмешательства в радиокоммуникации, поэтому установка данного оборудования должна производиться в строгом соответствии с инструкцией. Однако
нельзя гарантировать, что этого не произойдет непосредственно во время установки. Помехи, производимые данным оборудованием на радио или телеприемники, что
можно определить путем переменного включения/выключения и устранить с помощью следующих мер:
Переориентируйте антенну или поместите ее в другое место.
Увел ич ьте расстояние между приемником и устройством.
Подключите устройство и приемник к разным розеткам в цепи.
Проконсультируйтесь у технического специалиста.
Данное устройство соответствует с Пунктом 15 Правил Федеральной комиссии связи. Эксплуатация соответствует следующим условиям: (1) данное устройство не
может причинить нежелательного вмешательства, и (2) данное устройство может воспринимать помехи, включая помехи, нежелательно влияющие на работу данного
устройства.
ПРЕДУПРЕЖДЕНИЕ О МОДИФИКАЦИЯХ
В соответствии с Правилами ФКС по эксплуатации цифрового оборудования (Часть 15), данное устройство может быть установлено на компьютерное оборудование,
соответствующее данным правилам. Все соединительные кабели должны иметь соответствующую изоляцию и заземление. Операции с несертифицированными
компьютерами и незащищенными кабелями могут являться причиной помех в радио или телевизионных приемниках.
Любые изменения или модификации, осуществленные несанкционированно, лишают пользователя права пользов аться данным устройством.
УВЕДОМЛЕНИЕ CE
Данный продукт является продуктом класса В.
ОТКАЗ ОТ ОТВЕТСТВЕННОСТИ
Надежность информации, представленной в данной документации тщательно проверена; однако за возможные неточности производитель ответственности не несет, и
сохраняет за собой право вносить изменения в представленную информацию без предупреждения. AVerMedia не несет ответственности за прямые, косвенные,
специальные, случайные повреждения и убытки, полученные вследствие использования или невозможности использования данного продукта или документации, даже
в случае уведомления.
ТОРГОВЫЕ МАРКИ
AVerMedia и AVerT V B ox зарегистрированные торговые марки AVerMedia TECHNOLOGIES, Inc. IBM PC зарегистрированная торговая марка International Business
Machines Corporation. Macintosh зарегистрированная торговая марка Apple Computer, Inc. Microsoft и Windows зарегистрированные торговые марки Microsoft Corporation.
Все другие названия компаний и продуктов, встречающиеся в этом документе, используются только в целях идентификации и пояснения и могут являться торговыми
марками соответствующих владельцев.
АВТОРСКОЕ ПРАВО
© 2006 AVerMedia TECHNOLOGIES, Inc. Все права защищены. Никакая часть данной публикации не может быть воспроизведена, передана, или переведена на другой
язык в любой форме без письменного разрешения AVerMedia TECHNOLOGIES, Inc.
4
 Loading...