

Page 1
USB Microphone
Quick Guide
English Português Pусский
Deutsch Nederlands Türkçe
Français Magyar
Italiano Polski
Español Čeština
AM310
繁體中文
简体中文
한국어
Page 2

Page 3

Disclaimer
All pictures contained in this documentation are example images only. The images may vary depending on
the product and software version. Information presented in this documentation has been carefully checked
for reliability; however, no responsi bility is assumed fo r in accuracies. Th e in formation con tained in this
documentation is subject to change without notice.
Copyright and Trademark Information
© 2 016 by AVerMedia Technologie s, Inc. A ll rights reserved. No part of this publicatio n, in whole or in
part, may be reproduced, t ransmitted, transcribed, altered or translated into any language in any form by
any means without the written p ermission of AVerMedia Technologies, Inc. Information an d spec ication
contained in this manual are subject to change without notice and do not represent a commitment on the
part of AVerMedia.
For more information, please visit www.avermedia.com.
AVerMedia is trademark or registered trademark of AVerMedia Technologies, Inc.
Headquarters
Address No.135, Jian 1st Rd., Zhonghe Dist., New Taipei City 23585, Taiwan
Website www.avermedia.com
Support www.avermedia.com/support
Telephone +886-2-2226-3630
US Ofce
Address 47358 Fremont Blvd., Fremont, CA 94538, United States
Website www.avermedia-usa.com
Telephone +1 (510) 403 0006
Europe Ofce
Address Distributieweg 13, 2742 RB Waddinxveen, The Netherlands
Telephone +31 10 7600 500
國際總部
地址 23585新北市中和區建一路135號
網址 www.avermedia.com
支援 www.avermedia.com/support
電話 +886-2-2226-3630
中国子公司
地址 上海市静安区武宁南路488号智慧广场1510室
网址 www.avermedia.com.cn
电话 +86-21-52987985
Page 4

Important Safety Instructions
1. Read these instructions.
2. Keep these instructions.
3. Follow all instructions.
4. Heed all warnings.
5. Do not use the apparatus on uneven or unstable surfaces.
6. Do not use this apparatus in a wet environment or near water.
7. Unplug the apparatus before cleaning. Clean only with a dry cloth.
8. Use in a well ventilated environment. Do not block any ventilation openings.
9. Use the apparatus within ambient temperatures 32–104°F (0–40°C).
10. Use power sources within the specied voltage range.
11. Do not place heavy objects on the apparatus.
12. Do not install near heat sources such as radiators or stoves.
13. Do not defeat the safety purposes of the polarized or grounding-type plug.
14. Protect the power cord from being walked on or pinched, particularly where the
cord connects with plugs or adapters.
15. Only use the attachments and accessories specied by the manufacturer.
16. Unplug this apparatus during lightning or when unused for prolonged periods of
time.
17. Do not modify or disassemble the apparatus in any way.
18. Refer all servicing to qualied personnel.
19. Do not dispose the apparatus as general household waste. Dispose in
accordance with local environmental laws.
重要安全說明
1.
仔細閱讀這些說明。
2.
妥善保存這些說明。
3.
遵守所有的指示。
4.
注意所有的警告。
5.
請勿將本產品安裝於不平穩的表面。
6.
請勿在潮濕或靠近水的地方使用本產品。
7.
清潔前請拔除電源。僅使用乾布清潔。
8.
請於通風的環境使用本產品。請勿堵住通風口。
9.
請於規格溫度範圍32–104°F(0–40°C)使用本產品。
10.
請使用額定電壓範圍內的電源。
11.
請勿放置重物於本產品上。
12.
請勿安裝於熱源附近如暖器或火爐旁。
13.
請勿破壞極性或接地插頭的安全防護設計。
14.
請保護電源線,勿使其被踩踏或碾壓,特別是與插頭或變壓器的連接處。
15.
僅使用製造商指定的配件及零件。
16.
打雷或長時間不使用時請拔除電源。
17.
請勿以任何方式改造或拆解本產品。
18.
如需維修請洽合格維修人員。
19.
請勿當作家庭垃圾任意丟棄。請遵從當地環境法規妥善處理。
Page 5

重要安全说明
1.
仔细阅读这些说明。
2.
妥善保存这些说明。
3.
遵守所有的指示。
4.
注意所有的警告。
5.
请勿将本产品安装于不平稳的表面。
6.
请勿在潮湿或靠近水的地方使用本产品。
7.
清洁前请拔除电源。仅使用干布清洁。
8.
请于通风的环境使用本产品。请勿堵住通风口。
9.
请于规格温度范围32–104°F(0–40°C)使用本产品。
10.
请使用额定电压范围内的电源。
11.
请勿放置重物于本产品上。
12.
请勿安装于热源附近如暖器或火炉旁。
13.
请勿破坏极性或接地插头的安全防护设计。
14.
请保护电源线,勿使其被踩踏或碾压,特别是与插头或变压器的连接处。
15.
仅使用制造商指定的配件及零件。
16.
打雷或长时间不使用时请拔除电源。
17.
请勿以任何方式改造或拆解本产品。
18.
如需维修请洽合格维修人员。
19.
请勿当作家庭垃圾任意丢弃。请遵从当地环境法规妥善处理。
Page 6

Page 7
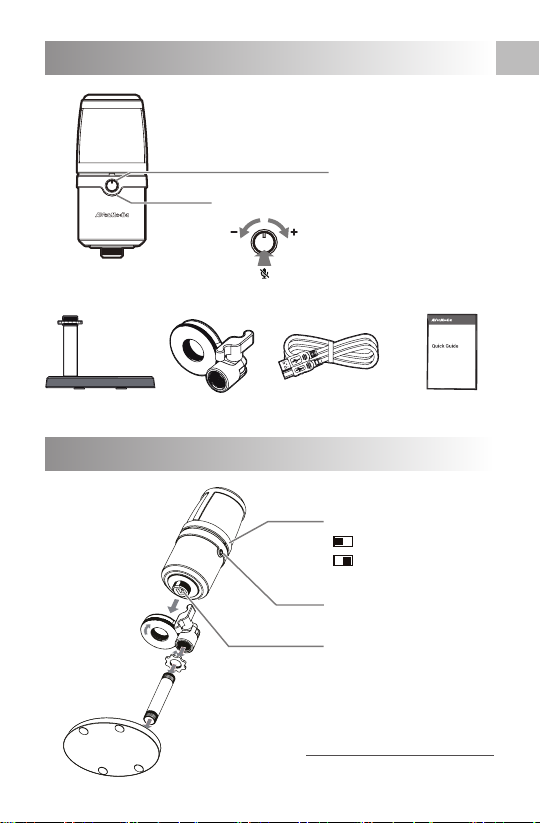
Inside the Box
EN
Microphone
Base and Shaft
Assembly
Hold the microphone
so the front is facing
you, and rotate the
base of the mount to
lock it in position.
Use the washer
to lock the mount
in position.
Headphone
Volume Knob
Mount
Blue: Powered On
Red: Muted
USB Cable
Headphone Mode Switch
PC Audio Playback
Microphone Monitoring
LED Indicator
4
3
2
1
For more information, download the online manual from:
3.5 mm Headphone Jack
USB 2.0 Port
q.avermedia.com/am310-download
Quick Guide
7
Page 8

DE
Verpackungsinhalt
Mikrofon
Ständer und Achse
Befestigung
Zusammenbau
Halten Sie das
Mikrofon mit der
Front zu Ihnen
zeigend, und drehen
Sie den Ständer so
das er einrastet.
Benutzen Sie die
Unterlegscheibe um
den Ständer in der
richtigen Position zu
xieren.
8
4
2
1
Bedienungsanleitung hier q.avermedia.com/am310-download
Kopfhörer
Lautstärkeregler
LED Anzeige
Blau: eingeschaltet
Rot: stummgeschaltet
USB Kabel
startanleitung
Kopfhörer Modus Schalter
PC Audio Playback
Mikrofon Monitoring
3,5 mm Kopfhöreranschluss
3
Für weitere Informationen laden Sie sich bitte die
USB 2.0 Anschluss
Schnell-
herunter.
Page 9

Contenu du Coffret
FR
Microphone
Base et Support
Assemblage
Tenez le micro de
sorte que la face avant
soit tournée vers vous,
et faîtes tourner la
base du support an
de le vérouiller dans
cette position.
Utilisez la rondelle
an de vérrouiller le
support en position.
4
1
Contrôle du Volume
du Casque
Monture
3
2
Indicateur LED
Bleu: En Fonctionnement
Rouge: Mute / Eteint
Câble USB
Guide de
Démarrage
Switch du Mode Casque
Playback Audio PC
Contrôle du Micro
Jack Casque 3.5 mm
Port USB 2.0
veuillez télécharger le manuel en ligne:
Pour plus d'informations,
q.avermedia.com/am310-download
9
Page 10

IT
Contenuto della scatola
Microfono
Base e asta
Montaggio
Tenere il microfono
in modo che la parte
anteriore si rivolta
verso di voi, e ruotare
la base del sostegno
per bloccarla in
posizione.
Usare la rondella
per bloccare
il supporto in
posizione.
10
Manopola
volume cufe
Supporto
Blu: Acceso
Rosso: Audio spento
Cavo USB
Guida rapida
Interruttore modalità cufe
Riproduzione audio PC
Monitoraggio microfono
Indicatore LED
4
3
2
1
Per maggiori informazioni, scaricare il manuale online da:
Presa cufe da 3,5 mm
Porta USB 2.0
q.avermedia.com/am310-download
Page 11

Dentro de la caja
ES
Micrófono
Base y eje
Asamblea
Mantén el micrófono
frente a ti y gira la
base del soporte para
jarlo en su posición.
Usa la arandela para
jar el soporte en su
posición.
Control del
volumen
Soporte
Azul: Encendido
Rojo: Silencio
Cable USB
Guía Rápida
Modo auricular
Reproducción audio PC
Control del micrófono
Indicador LED
4
3
2
1
Para más información, descargue el manual completo desde:
Cable jack 3.5mm
Puerto USB2.0
q.avermedia.com/am310-download
11
Page 12

PT
Conteúdo da embalagem
Microfone
Base e eixo
Montagem
Segure no microfone
de modo a que a parte
frontal que voltada
para si e rode a base
do suporte para xar
na posição correta.
Utilize a anilha
para xar o suporte na
posição correta.
12
4
Indicador LED
Azul: Ligado
Vermelho: Silenciado
Cabo USB
volume dos
auscultadores
Suporte
Botão de
Seletor de modo dos
auscultadores
Reprodução de áudio do PC
Monitorização do microfone
Tomada de auscultadores de
3,5 mm
3
2
1
Para mais informações, transra o manual online em:
Porta USB 2.0
q.avermedia.com/am310-download
Guia Rápido
Page 13

In de doos
NL
Microfoon
Basis en as
Montage
Houd de microfoon
zodat de voorkant
naar u is gericht,
en draai de voet
van de bevestiging
om het in positie te
vergrendelen.
Gebruik de sluitring
om de bevestiging
in positie te
vergrendelen.
Hoofdtelefoon
Volumeknop
Bevestiging
Blauw: Ingeschakeld
Rood: Gedempt
USB-kabel
Beknopte
handleiding
Hoofdtelefoonmodusschakelaar
PC-audio afspelen
Microfoonbewaking
LED-indicator
4
3
2
1
Voor meer informatie, download de online handleiding van:
3,5 mm
hoofdtelefoonaansluiting
USB 2.0 poort
q.avermedia.com/am310-download
13
Page 14

HU
A doboz tartalma
Mikrofon
Fejhallgató
hangerő gomb
LED visszajelző
Kék: Bekapcsolva
Piros: Némítva
Alapzat és tengely
Összeszerelés
Tartsa úgy a mikrofont,
hogy az eleje Ön felé
nézzen, és forgassa el
a rögzítő alapzatát a
rögzítéshez.
Az alátéttel rögzítse a
helyére a rögzítőt.
14
4
1
Rögzítő
USB-kábel
Gyors
útmutató
Fejhallgató mód kapcsoló
PC hanglejátszás
Mikrofon hanglejátszás
Monitoring
3,5 mm fejhallgató csatl.
3
2
További információért töltse le az online kézikönyvet:
USB 2.0 port
q.avermedia.com/am310-download
Page 15

W pudełku
PL
Mikrofon
Podstawa i drążek
Montaż
Trzymaj mikrofon
przodem do siebie
i obracaj podstawę
uchwytu, aż do
zablokowania go w
odpowiedzniej pozycji.
Do przykręcenia
podstawy użyj
podkładki.
4
Słuchawki
Regulacja
Głośności
Uchwyt
Dioda LED
Niebieski: Włączony
Czerwony: Wyciszony
Kabel USB
Przełącznik trybu
słuchawek
Odtwarzanie PC Audio
Odsłuch mikrofonu
Gniazdo słuchawkowe
3,5 mm
3
2
1
Aby uzyskać więcej informacji, pobierz instrukcję z:
Port USB 2.0
q.avermedia.com/am310-download
Krótki
przewodnik
15
Page 16

CS
Obsah balení
Mikrofon
Základna
Montáž
Držte mikrofon čelem
k sobě a otáčejte
základnou pro její
zajištění.
Použijte podložku
pro zamknutí
uchycení.
16
Upevňovací
součástky
4
3
2
1
Ovládání hlasitosti
sluchátek
USB kabel
Pro více informací si stáhněte manuál:
q.avermedia.com/am310-download
LED indikátor
Modrá: zapnutý
Červená: ztlumený
Příručka
Přepínač režimu
PC Audio Playback
Mikrofon Monitoring
Jack na 3.5mm sluchátka
USB 2.0 Port
Page 17

Комплектация
RU
Mикрофона
Основание и вал
Сборка
Держите микрофон
так, чтобы его лицевая
часть была перед
вами, и поверните
основание крепления
для фиксации ее в
нужном положении.
Используйте шайбу,
чтобы зафиксировать
крепление в
заданном положении.
Крепление
4
2
1
Регулятор
громкости
наушников
LED индикатор
Синий: Вкл
Красный: приглушен
USB кабель
Переключатель
режима наушников
Воспроизведение ПК аудио
Мониторинг микрофона
3,5 мм разъем для
наушников
3
Для получения дополнительной информации
Порт USB 2.0
скачайте онлайн руководство:
q.avermedia.com/am310-download
Краткое
пособие
17
Page 18

TR
Kutunun İçindekiler
Mikrofon
Taban ve Mil
Montaj
Mikrofonu ön tarafı
size bakacak şekilde
tutun ve desteğin
altını kilitlenecek
şekilde döndürün.
Desteği pozisyonda
kilitlemek için pulu
kullanın.
18
Başlık Ses
Düğmesi
Destek
Mavi: Güç açık
Kırmızı: Sessiz
USB kablosu
Hızlı rehber
Kulaklık Modu Sviçi
PC Ses Çalma
Mikrofon İzleme
LED Gösterge
4
3
2
1
Daha fazla bilgi için, çevrimiçi kılavuzu indirin:
3.5 mm Kulaklık Jakı
USB 2.0 Port
q.avermedia.com/am310-download
Page 19

包裝內容
TC
麥克風
底座與支架
組裝
握住麥克風使其正面朝
上面對你,並以旋轉方
式連接並固定於旋轉座
卡榫。
使用墊圈將旋轉座
鎖定到位。
耳機音量
調節旋鈕
旋轉座
藍燈:啟動中
紅燈:靜音
USB線
安裝手冊
耳機模式切換
PC音樂播放
麥克風監聽
LED指示燈
4
3
2
1
更多產品訊息,請上網下載使用手冊完整版:
3.5mm耳機接口
USB2.0接口
q.avermedia.com/am310-download
19
Page 20

SC
包装内容
麦克风
底座与支架
组装
握住麦克风使其正面朝
上面对你,并以旋转方
式连接并固定于旋转座
卡榫。
使用垫圈将旋转座
锁定到位。
20
耳机音量
调节旋钮
旋转座
USB 线
蓝灯: 启动中
红灯: 静音
安装手册
耳机模式切换
PC 音乐播放
麦克风监听
LED 指示灯
4
3
2
1
更多产品讯息,请上网下载使用手册完整版:
3.5 mm 耳机接口
USB 2.0 接口
q.avermedia.com/am310-download
Page 21

구성품
마이크로폰
헤드폰
볼륨 노브
KO
LED 상태 표시
블루 : 파워 온
레드 : 음소거
베이스 및 샤프트
체결 방법
마이크로폰을 전면
방향으로 잡고 마운
트에 회전하여 체결
합니다.
마운트를 위치에
맞게 체결합니다.
마운트
USB 케이블
헤드폰 모드 스위치
PC 오디오 플래이백
마이크로 모니터링
4
3
2
1
사이트를 방문하세요: q.avermedia.com/am310-download
3.5mm 헤드폰 잭
USB 2.0 포트
온라인 매뉴얼과 보다 자세한 사항은 아래
퀵 가이드
21
Page 22

Federal Communications Commission Statement Class B
This device complies wit h Pa rt 15 of the FCC Rule s. O peration is subject to the following two
conditions: (1) this device may not cause harmful interference, and (2) this device must accept any
interference received, including interference that may cause undesired operation.
NOTE - This equipment has been tested and found to comply with the limits for a Class B digital
device, pur suant to Part 15 of the FCC Rules. These limits are designed to provide reasonable
protection against harmful in terference i n a res idential ins tallation . Thi s e quipment generates,
uses a nd can radi ate ra dio fr equency energy and, if not ins talled and used i n acco rdance with
the instructio ns, may cause harmful interference to radio communications. However, there is no
guarantee that interference will not occur in a particular installation. If this equipment does cause
harmfu l interf erence t o r adio or televisi on recep tion, wh ich can be d etermi ned by tun ing the
equipment off and on, the user is encouraged to try to correct the interference by one or more of
the following measures:
• Reorient or relocate the receiving antenna.
• Increase the separation between the equipment and receiver.
• Conn ect the equipme nt into an outlet on a circuit different from that to which the re ceiver is
connected.
• Consult the dealer or an experienced radio/television technician for help.
CAUTION ON MODIFICATIONS - To comply with the limits for the Class B digital device, pursuant
to Part 15 of the FCC Rules, this device must be installed in computer equipment certied to
comply with the Class B limits. All cables used to connect the computer and peripherals must be
shielded and grounded. Operation with non-certied computers or non-shielded cables may result
in interference to radio or television reception.
Change s and modi fications not e xpress ly approved by the manufa cturer o r regist rant of the
equipme nt can void y our autho rity to operate the eq uipment under Federal Communicat ions
Commission rules.
European Community Compliance Statement Class B
This p roduct is h erewith confir med t o comp ly wi th the requ irem ents s et ou t in th e Council
Directives on the ap proximatio n of the la ws of the Member States rel ating to Electromagnetic
Compatibility Directive (EMC) 2014/30/EU.
Waste Electrical and Electronic Equipment Directive
The mark of crossed-out wheeled bin indicates that this product must not be disposed of with your
other household waste. Instead, you need to dispose of the waste equipment by handing it over
to a designated collection point for the recycling of waste electrical and electronic equipment. For
more information about where to drop off your waste equipment for recycling, please contact your
household waste disposal service or the shop where you purchased the product.
CAN ICES-3(B)/NMB-3(B)
Canada - Canada Industry Canada (IC) Labelling Requirements
Every manufacturer or imp orter shall ensure import or before offe ring for sale, as appropriate ,
that each unit of the type that they offer for sale bears, in alocation convenient for inspection, a
permanent label or marking containing (in French and English), the following statement:
ICES-003 (Interference - Causing Equipment Standards)
"This class B digital apparatus complies with Canadian ICES-003.
Cet appareil numérique de la classe B est conforme à la norme NMB-003 du Canada."
Technical Regulations of the Customs Union
TR CU 020/2011
TR CU 004/2011
MSIP Class B Statement (Korea)
B급 기기 (가정용 방송통신기자재): 이 기기는 가정용(B급) 전자파적합기기로서 주로 가정에서 사
용하는 것을 목적으로 하며, 모든 지역에서 사용할 수 있습니다.
Class B (For Home Use Broadcasting & Communication Equipment): This equipment is home use
(Class B) electromagnetic wave suitability equipment and tobe used mainly at home and it can be
used in all areas.
MSIP-REMAVM-AM310
Regulatory Compliance Mark
Page 23

USBMicrophone
ModelNo./型號/型号:AM310
Microphone/麥克風/麦克风
MadeinChina/中國製造/中国制造
Page 24

www.avermedia.com
 Loading...