

Page 1
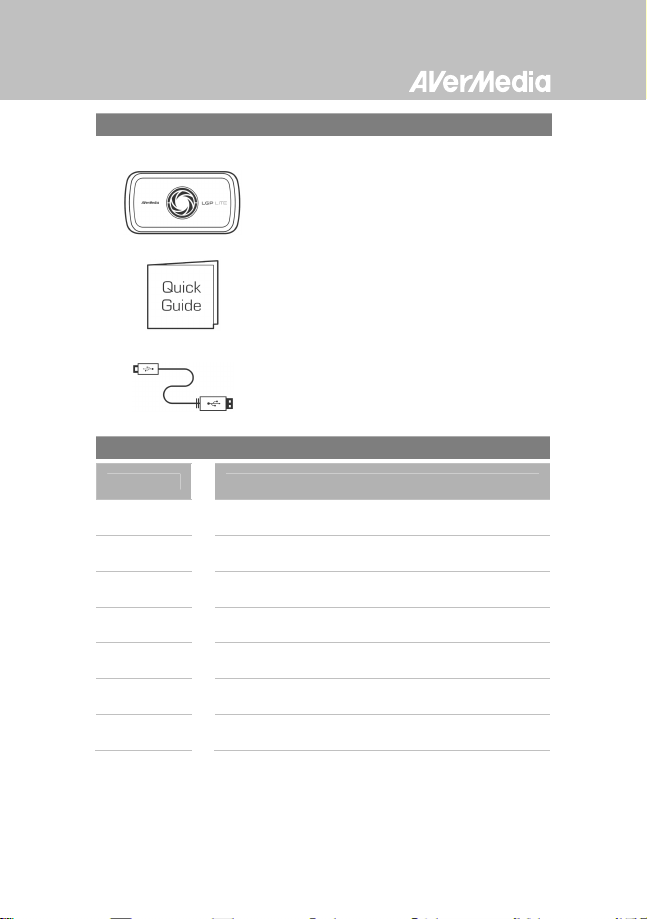
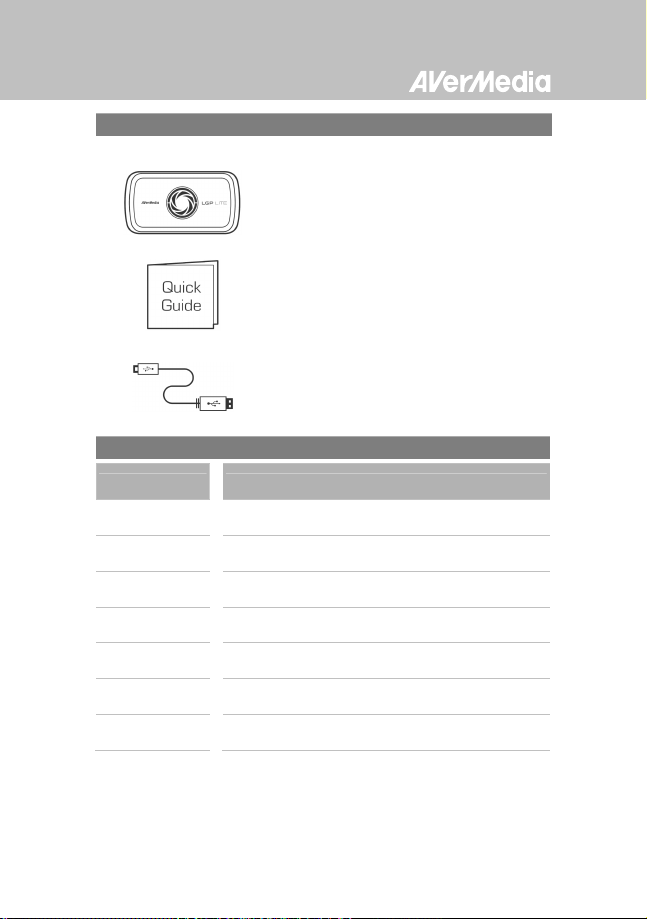
Package Contents
A. LGP Lite
B. Quick Installation Guide
C. Mini USB Cable
LED Indicators
Status PC Mode
Booting
Standby
Activating
RECentral
Recording
Streaming
Warning
Error
Flashes Blue clockwise in circle
Glows solid Blue
Flashes Blue clockwise in circle at a quick pace
Glows Red with a breathing pace
Glows Blue with a breathing pace
Flashes Red at a quick pace
Flashes Red/Blue alternatively at a quick pace
English - 1
Page 2
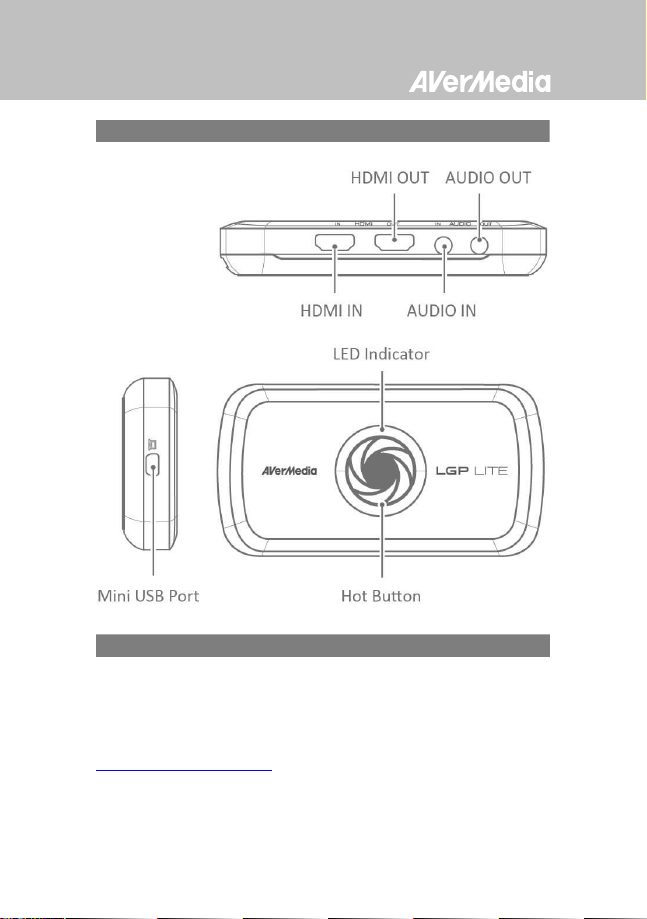
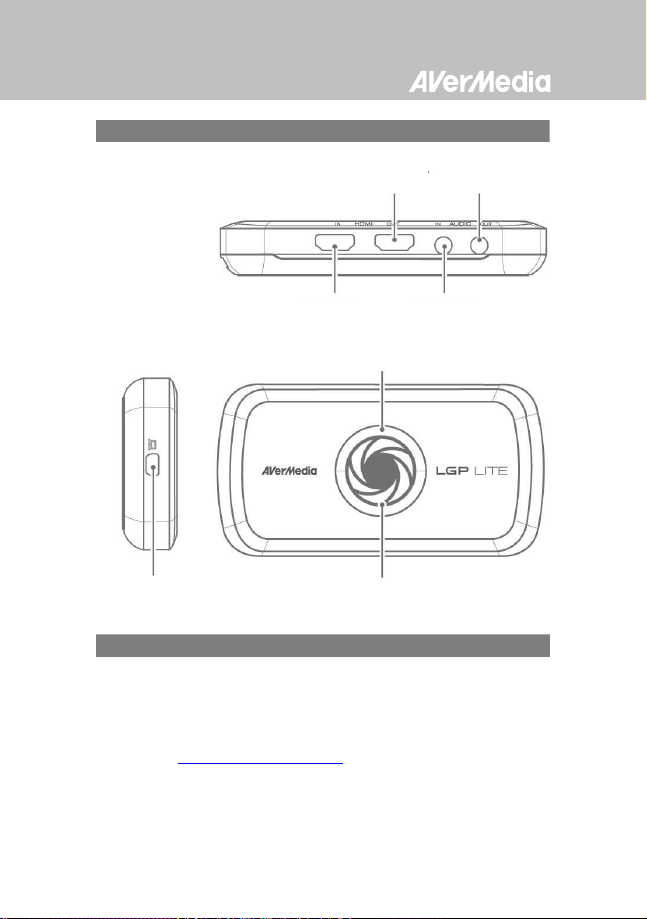
Hardware
Installation
Step 1: The LED indicator glows solid BLUE when the device is
eady.
r
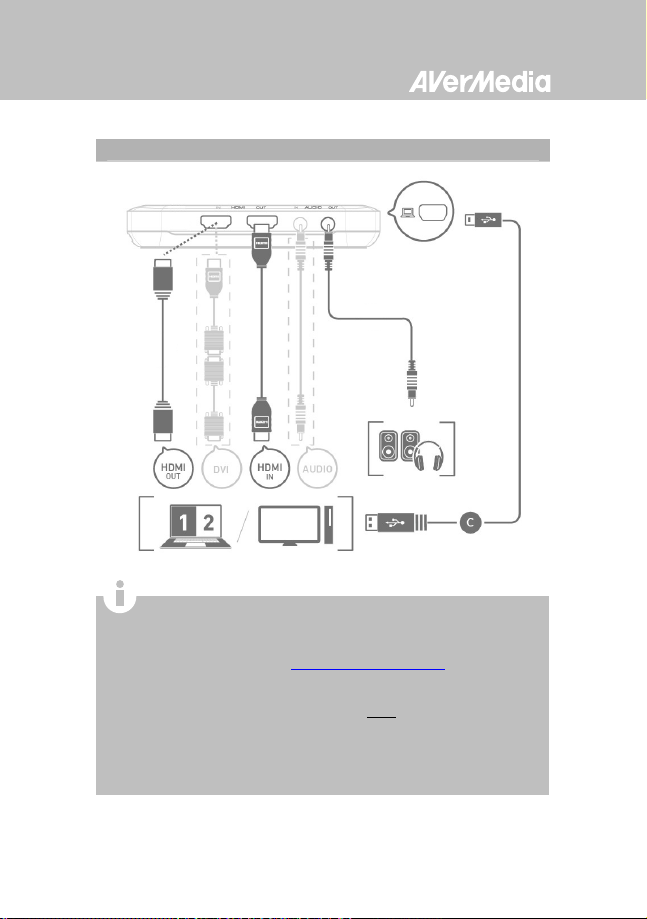
Step 2: Refer to the diagram below to connect your device.
Step 3: Download and install the latest driver and RECentral from
gamerzone.avermedia.com
English - 2
Page 3
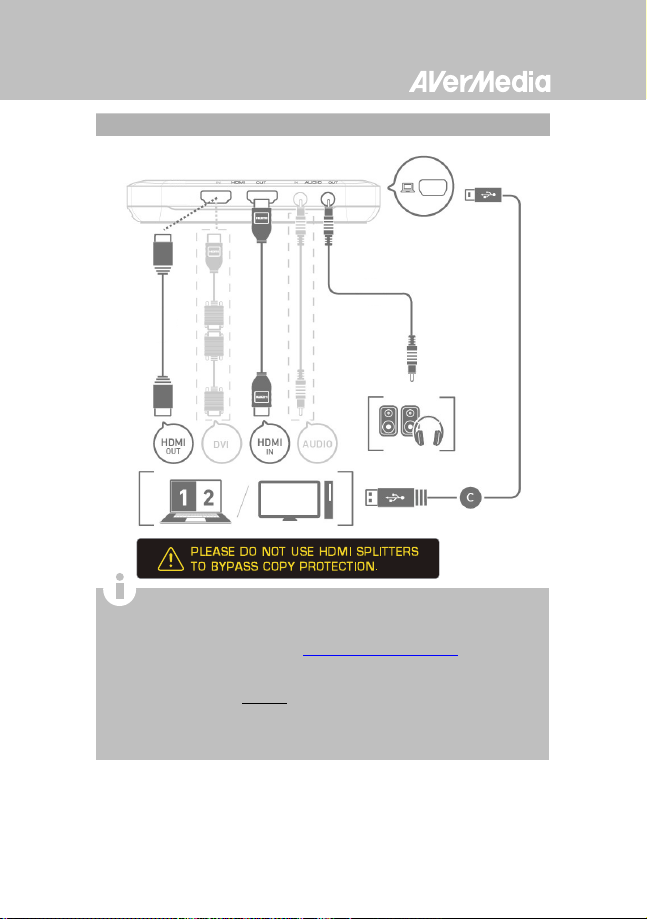
When using a laptop,
if you want to output source,
p
lease
Connecting to Your PC – Desktop / Laptop
duplicate the displays to avoid no image on screen. To know more,
please refer to the FAQ on gamerzone.avermedia.com
To capture from the other computer, please connect the computer
of your video source to the HDMI IN port on the LGP Lite.
For a computer without a HDMI Port, use a DVI to HDMI cable or
converter for connection. Also connect your PC or laptop to the
device (AUDIO IN) via the 3.5mm Audio Cable.
English - 3
Page 4
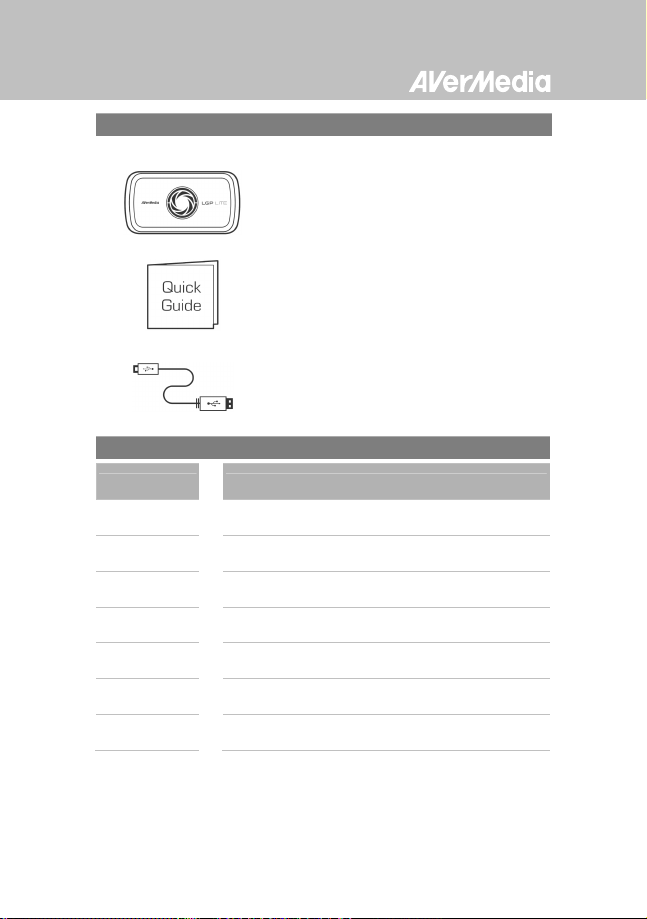
Lieferumfang
A. LGP Lite
B. Installations-Kurzanleitung
C. Mini-USB-kable
Status
Startvorgang
Bereitschaft
RECentral
aktivieren
Aufnahme
Streaming
Warnung
Fehler
LED-Indikatoren
PC-Modus
Blinkt blau(im Uhrzeigersinn)
Leuchtet Blau
Blinkt blau (im Uhrzeigersinn, schnell)
Leuchtet rot (pulsierend)
Leuchtet blau (pulsierend)
Blinkt rot (schnell)
Blinkt abwechselnd rot/blau (schnell)
Deutsch - 1
Page 5
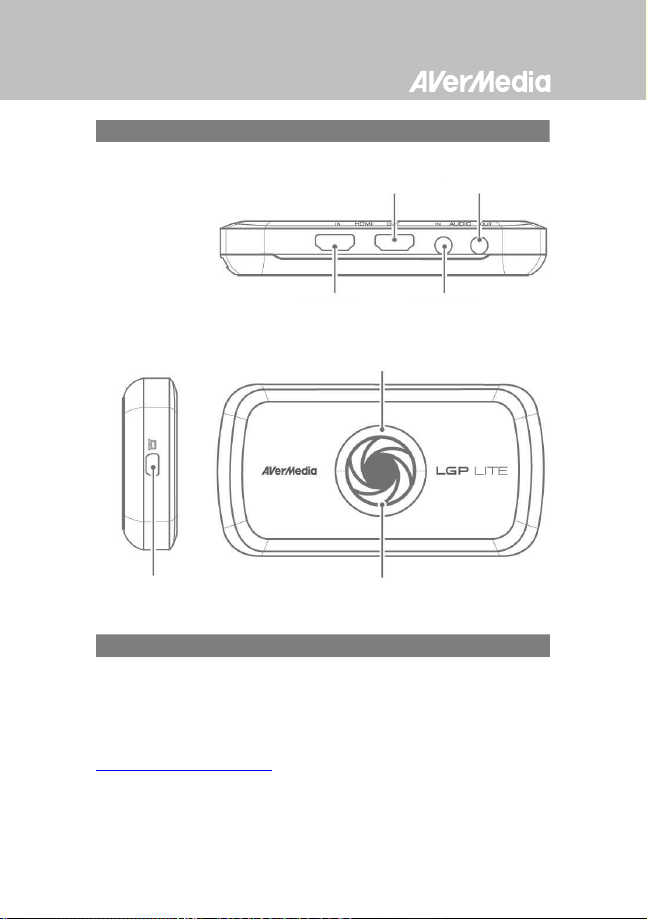
Audioeingang
Mini-USB-Port
Schnelltaste
Hardware
HDMI-Ausgang Audioausgang
HDMI-Eingang LED-Indikator
Audioeingang
Installation
Schritt 1: Der LED-Indikator leuchtet blau, wenn das Gerät bereit
t.
is
Schritt 2: Beachten Sie das nachstehende Diagramm zum Verbinden
Ihres Gerätes.
Schritt 3: Laden Sie den aktuellsten Treiber und RECentral von
gamerzone.avermedia.com herunter, installieren Sie es.
Deutsch - 2
Page 6
Wenn Sie beim Einsatz ei
nes Notebooks die Quelle ausgeben
Mit Ihrem-PC verbinden – Desktop / Notebook
möchten, duplizieren Sie die Anzeigen bitte, damit ein Bi ld
angezeigt wird. Weitere Hinweise erhalten Sie in FAQ (häufig
gestellte Fragen) unter gamerzone.avermedia.com
Bitte verbinden Sie zur Erfassung vom anderen Computer den
Computer Ihrer Videoquelle mit dem HDMI-Eingang am LGP Lite.
Verwenden Sie bei einem Computer ohne HDMI-Port ein(en)
DVI-zu-HDMI-Kabel/-Wandler zur Verbindung. Verbinden Sie
Ihren Desktop- oder Notebook-PC außerdem über das
3,5-mm-Audiokabel mit dem Gerät (Audioeingang).
Deutsch - 3
Page 7
Contenu de l’emballage
A. LGP Lite
B. Guide d’installation rapide
Témoins LED
État Mode PC
C. Câble mini USB
Démarrage
Veille
Activation de
RECentral
Enregistrement
Streaming
Clignote en Bleu en cercle dans le sens horaire
S'allume entièrement en Bleu
Clignote rapidement en Bleu en cercle dans le sens
horaire
S'allume en Rouge en imitant un rythme de
respiration
S'allume en Bleu en imitant un rythme de
respiration
Avertissement Clignote en Rouge rapidement
Erreur
Clignote en Rouge/Bleu rapidement en mode
alterné
Français - 1
Page 8
ENTRÉE HDMI
ENTRÉE AUDIO
Témoin LED
Bouton déporté
Port mini USB
Matériel
SORTIE HDMI SORTIE AUDIO
Installation
Étape 1 : Le t
l'appareil est prêt.
Étape 2 : Veuillez vous référer au schéma ci-dessous pour brancher
votre appareil.
Étape 3 : Téléchargez et installez le pilote le plus récent et RECentral à
partir du site gamerzone.avermedia.com
émoin LED s'allume entièrement en BLEU quand
Français - 2
Page 9

Si vous utilisez un ordinateur portable et que vous voulez
Connexion à votre PC – Ordinateur de bureau / portable
effectuer une sortie de source, veuillez dupliquer les écrans pour
éviter qu'il n'y ait aucune image à l'écran. Pour en savoir plus,
veuillez vous reporter à la FAQ sur gamerzone.avermedia.com
Pour effectuer une capture depuis l'autre ordinateur, connectez
l'ordinateur de votre source vidéo au port d'ENTRÉE HDMI sur le
LGP Lite.
Si un ordinateur n'a pas de port HDMI, utilisez un câble ou
convertisseur DVI-HDMI pour la connexion. Reliez aussi votre PC
ou ordinateur portable au périphérique (ENTRÉE AUDIO) via le
câble audio de 3,5 mm.
Français - 3
Page 10

Contenuto della confezione
A. LGP Lite
B. Guida di Installazione Rapida
C. Cavo USB mini
Stato
Avvio
Standby
Attivazione di
RECentral
Registrazione
Streaming
Avviso
Errore
Indicatori LED
Modalità PC
Lampeggia di colore blu in senso orario
Acceso di colore blu
Lampeggia rapidamente di colore blu in senso orario
Acceso di colore rosso con una cadenza raggiante
Acceso di colore blu con una cadenza raggiante
Lampeggia rapidamente di colore rosso
Lampeggia rapidamente di colore alternato
rosso/blu
Italiano - 1
Page 11

Uscita HDMI
Uscita audio
N
gresso HDMI
Ingresso audio
Indicatore LED
Tasto Hot
Porta USB mini
Hardware
Installazione
Fase 1: L'indicatore LED si illumina di colore blu quando il dispositivo
onto.
è pr
Fase 2: Consultare l'immagine di seguito per connettersi al dispositivo.
Fase 3: Scaricare ed installare il driver RECentral più recente da
gamerzone.avermedia.com.
Italiano - 2
Page 12

Quando si utilizza un portatile, duplicare lo schermo per eseguire
Collegamento del PC – computer / portatile
l’uscita dell’origine ed evitare che non appaia alcuna immagine
sullo schermo. Per saperne di più, fare riferimento alle FAQ su
gamerzone.avermedia.com.
Per acquisire da un altro computer, collegare il computer
dell’origine video alla porta HDMI IN di LGP Lite.
Per i computer senza porta HDMI, usare un cavo o convertitore
DVI-HDMI per eseguire il collegamento. Inoltre, collegare il PC o
portatile al dispositivo (AUDIO IN) usando il cavo audio 3.5 mm.
Italiano - 3
Page 13

Parpadea en
azul en círculos de derecha a
Parpadea en
rojo / azul alternativam
ente de
Contenido de la caja
A. LGP Lite
B. Guía de instalación rápida
Estado Modo PC
Iniciando
En suspensión
Activación de
RECentral
Grabación
Transmisión
Advertencia
Error
Indicadores LED
izquierda
Se iluminará en color azul
C. Cable mini USB
Parpadea en azul en círculos de derecha a
izquierda rápidamente
Se ilumina en rojo de manera pausada
Se ilumina en azul de manera pausada
Parpadea en rojo rápidamente
forma rápida
Español- 1
Page 14

Hardware
Instalación
Step 1: El indicador LED se iluminará en color AZUL cuando el
ivo esté listo.
disposit
Step 2:
Fíjate en el siguiente diagrama para conectar tu dispositivo.
Step 3: Descargue e instale el último controlador y software
RECentral de la página web gamerzone.avermedia.com.
Español- 2
Page 15

Si desea mostrar la fuente cuand
o esté utilizando un portátil,
audio de 3
.
5 mm.
Conexión al PC – Sobremesa / Portátil
duplique las visualizaciones para asegurarse de que se muestran
imágenes en la pantalla. Para obtener más información, consulte
las preguntas frecuentes en la página web
gamerzone.avermedia.com
Para realizar capturas desde el otro equipo, conecte el equipo de la
fuente de vídeo al puerto ENTRADA HDMI en el LGP Lite.
Para un equipo sin puerto HDMI, uti lice un cable o un conversor
DVI a HDMI para realizar la conexión. También puede conectar el
PC o el portátil al dispositivo (ENTRADA DE AUDIO) con el cable de
.
Español- 3
Mo de l No .: GL 31 0
P/N : 30 0A GL310 D4 2
M a d e i n T a i w a n
Page 16

Conteúdo da embalagem
A. LGP Lite
B. Guia de instalação rápida
Estado
A arrancar
Em espera
A ativar o
RECentral
A gravar
A transmitir
Aviso
Erro
Indicadores LED
Modo PC
Pisca a Azul circularmente no sentido dos ponteiros
do relógio
Acende a Azul
Pisca a Azul circularmente no sentido dos ponteiros
do relógio a um ritmo rápido
Acende a Vermelho num padrão crescente
Acende a Azul num padrão crescente
Pisca a Vermelho a um ritmo rápido
Pisca a Vermelho/Azul alternadamente a um ritmo
rápido
Português - 1
C. Cabo Mini USB
Page 17

SAÍDA HDMI
SAÍDA DE ÁUDIO
ENTRADA HDMI
Indicador
LED
Hardware
ENTRADA DE ÁUDIO
Porta Mini USB
Botão principal
Instalação
Passo 1: O indic
pronto.
Passo 2: Consulte o diagrama abaixo para ligar o seu dispositivo.
Passo 3: Transfira e instale o controlador mais recente e o RECentral a
partir de gamerzone.avermedia.com.
ador LED acende em AZUL quando o dispositivo estiver
Português - 2
Page 18

Ao utilizar um computador portátil, se desejar efetuar a saída da
Ligar ao PC de jogos – Computador de secretária / portátil
fonte, duplique os ecrãs para evitar que não apareça nenhuma
imagem no ecrã. Para obter mais informações, consulte as
Perguntas frequentes em gamerzone.avermedia.com
Para efetuar a captura a partir de outro computador, ligue o
computador da sua fonte de vídeo à porta HDMI IN (ENTRADA
HDMI) do LGP Lite.
Para um computador sem uma porta HDMI, utilize um cabo ou
conversor DVI para HDMI para efetuar a ligação. Ligue também o
seu PC ou computador portátil (AUDIO IN (ENTRADA DE ÁUDIO))
através do Cabo de áudio de 3.5mm.
Português - 3
Page 19

상품
상품 구성
구성
상품상품
상태
상태 PC 모드
상태상태
구성구성
A. LGP Lite
B. 빠른
C. 미니
LED 표시등
표시등
표시등표시등
빠른 설치
설치 가이드북
설치설치
모드
모드모드
가이드북
가이드북가이드북
케이블
케이블케이블
빠른빠른
미니 USB 케이블
미니미니
부팅
대기
RECentral
활성화
녹화
스트리밍
경고
오류
시계 방향으로 청색
청색
청색으로 점등
청색청색
시계 방향으로 청색
빠르게 점멸
적색
적색으로 강약으로 점등
적색적색
청색
청색으로 강약으로 점등
청색청색
적색
적색으로 빠르게 점멸
적색적색
적색
적색/청색
청색으로 번갈아 빠르게 점멸
적색적색
청색청색
청색으로 원을 그리면서 점멸
청색청색
청색으로 원을 그리면서
청색청색
한국어 - 1
Page 20

하드웨어
하드웨어
하드웨어하드웨어
HDMI 출력
출력 AUDIO 출력
출력출력
HDMI 입력
입력 AUDIO 입력
입력입력
LED 표시등
표시등
표시등표시등
핫핫핫핫 버튼
버튼
Mini USB 포트
1 단계
포트
포트포트
설치
설치
설치설치
단계: 장치가 준비가 되면 LED 표시등이 청색으로
단계단계
버튼버튼
점등됩니다.
2 단계
단계: 장치를 연결하려면 아래 그림을 참조하십시오.
단계단계
3 단계
단계: 최신 드라이버와 RECentral 을
단계단계
gamerzone.avermedia.com
에서 다운로드하여 설치합니다.
입력
입력입력
출력
출력출력
한국어 - 2
Page 21

,
게이밍
게이밍 PC – 데스크톱
게이밍게이밍
데스크톱 / 노트북에
데스크톱데스크톱
노트북에 연결하기
노트북에노트북에
연결하기
연결하기연결하기
노트북을 사용할 때, 소스를 출력하기를 원할 경우
디스플레이를 복제하 여 화면에 이미지가 없게 하십시오.
자세한 내용은 gamerzone.avermedia.com 의 FAQ 를
참조하십시오.
다른 컴퓨터에서 캡처하려면 비디오 소스의 컴퓨터를 LGP
Lite 의 HDMI 입력 포트에 연결 하십시오.
HDMI 포트가 없는 컴퓨터의 경우 DVI - HDMI 케이블 또는
연결용 컨버터를 사용합니다. 또한 PC 또는 노트북을
3.5mm 오디오 케이블로 장치(오디오 입력)에 연 결합니다.
한국어 - 3
Page 22

LGP Lite
GL310
English
Deutsch
Français
Italiano
Español
Português
한국어
Quick Guide
Page 23

European Union Directives conformance statement
Responsible manufacturer:
AVerMedia Technologies, Inc.
No. 135, Jian 1st Rd.,Zhonghe Dist., New Taipei City 23585, Taiwan
TEL: +886-2-2226-3630
European Community contact:
VerMedia Technologies Europe B.V.
A
Kwartsweg 50, 2665 NN, Bleiswijk, The Netherlands
Technical Support: http://solutions.avermedia.com/
FCC NOTICE (Class B)
Federal Communications Commission Statement
NOTE- This equipment has been tested and found to comply with the limits for a Class B digital
device, pursuant to Part 15 of the FCC Rules. These limits are designed to provide reasonable
protection against harmful interference in a residential installation. This equipment generates, uses
and can radiate radio frequency energy and, if not installed and used i n accordance with the
instructions, may cause harmful interference to radio communications. However, there is no
guarantee that i nterference will not occur i n a particular installation. If this equipment does cause
harmful interference to radio or television reception, which can be determined by tuning the
equipment off and on, the user is encouraged to try to correct the interference by one or more of the
following measures:
‧ Reorient or relocate the receiving antenna.
‧ Increase the separation between the equipment and receiver.
‧ Connect the equipment into an outlet on a circuit different from that to which the receiver is
‧ Consult the dealer or an experienced radio/television technician for help.
CAUTION ON MODIFICATIONS
To comply with the limits for the Class B digital device, pursuant to Part 15 of the FCC Rules, this
device must be installed in computer equipment certified to comply with the Class B limits. All cables
used to connect the computer and peripherals must be shielded and grounded. Operation with
non-certified computers or non-shielded cables m ay result in interference to radio or television
reception.
Changes and modifications not expressly approved by the manufacturer or registrant of the
equipment can void your authority to operate the equipment under Federal Communications
Commission rules.
Responsible manufacturer:
Class B
This product is herewith confirmed to comply with the requirements set out
in the Council Directives on the Approximation of the laws of the Member
States relating to Electromagnetic Compatibility Directive 2004/108/EC.
This device complies with Part 15 of the FCC Rules. Operation i s subject to the
following two conditions: (1) this device may not cause harmful interference, and
(2) this device must accept any i nterference received, including interference that
may cause undesired operation.
connected.
Page 24

AVerMedia Technologies, Inc.
No. 135, Jian 1st Rd.,Zhonghe Dist.,
New Taipei City 23585, Taiwan
TEL: +886-2-2226-3630
The mark of crossed-out wheeled bin indicates that this product must not be disposed
of with your other household waste. Instead, you need to dispose of the waste
equipment by handing it over to a designated collection point for the recycling of waste
electrical and electronic equipment. For more information about where to drop off your
waste equipment for recycling, please contact your household waste disposal service
or the shop where you purchased the product.
Disclaimer
All the screenshots in this documentation are only example images. The images may vary
depending on the product and software version. Information presented in this
documentation has been carefully checked for reliability; however, no responsibility is
assumed for inaccuracies. The information contained in t his documentation is subject to
change without notice.
Copyright
©2014 by AVerMedia Technologies, Inc. All rights reserved.
No part of this document may be reproduced or transmitted in any form, or by any means
(Electronic, mechanical, photocopy, recording, or o therwise) without prior written
permission of AVerMedia Technologies, Inc. Information in this document is subject to
change without notice. AVerMedia Technologies, Inc. reserves the right to modify, change,
improve or enhance its products a nd to make changes in the content without obligation to
notify any person or organization of such changes. Please visit www.avermedia.com to get
the updates of the operation and u se of AVerMedia products. "AVerMedia" is a trademark
and lo go of AVerMedia Technologies, Inc. Other trademarks used herein for description
purpose on ly belong to each of their companies. Made in Taiwan (Expect Accessories).
Picture shown may vary from actual product.
USA Office contact:
AVerMedia Technologies U.S.A.
47358 Fremont Blvd., Fremont, CA 94538
Technical Support:
http://solutions.avermedia.com/
 Loading...