

Page 1

AVerTV 6.3
DISCLAIMER
User Manual English
All the screen shots in this documentation are only example images. The images may vary depending on the pro duct and software version.
Information presented in this documentation has been carefully checked for reliability; however, no responsibility is assumed for inaccuracies.
The information contained in this documentation is subject to change without notice.
COPYRIGHT
© 2009 by AVerMedia TECHNOLOGIES, Inc. All rights reserved. No part of this publication may be reproduced, transmitted, transcribed, stored
in a retrieval system, or translated into any language in any form by any means without the written permission of AVerMedia TECHNOLOGIES,
Inc.
AP-6.3.1
200908
Page 2

Table of Contents
Chapter 1 Device Introduction ......................................................................................1
Chapter 2 AVerTV 6 Introduction..................................................................................3
Chapter 3 Introducing the AVerTV Application ...........................................................4
3.1 Launching the AVerTV 6 Application................................................................................................................4
3.2 Running the AVerTV 6 application for the first time.........................................................................................5
3.2.1 Scanning for Analog / Digital Programs.....................................................................................................5
3.2.2 Scanning for Digital Satellite Programs...................................................................................................... 8
3.3 Introducing the User Interface .......................................................................................................................... 12
3.4 The Control Panel............................................................................................................................................. 13
3.5 Remote Control................................................................................................................................................. 15
3.5.1 Remote Control Buttons (Model 1) (RM-HR).......................................................................................... 15
3.5.2 Remote Control Buttons (Model 2) (RM-FP)........................................................................................... 16
3.5.3 Remote Control Buttons (Model 3) (RM-JC)........................................................................................... 18
3.5.4 Remote Control Buttons (Model 4) (RM-JX)........................................................................................... 20
3.5.5 Remote Control Buttons (Model 5) (RM-KS) .......................................................................................... 21
3.5.6 Remote Control Buttons (Model 6) (RM-KV)..........................................................................................22
3.6 Resizing the TV Monitor Window ...................................................................................................................25
3.7 Always on Top.................................................................................................................................................. 25
3.8 Setting Windows® Power Options....................................................................................................................25
3.9 Minimize the Application ................................................................................................................................. 27
3.10 Change Definitions of the Remote Control Buttons ......................................................................................... 28
3.11 Customize the Remote Control Source Button................................................................................................. 29
3.12 Customize Definitions of the Mouse ................................................................................................................30
3.13 Customize Definitions of the Keyboard (Hot Keys)......................................................................................... 30
3.14 Changing the OSD Attributes ........................................................................................................................... 31
3.15 Configurations Import and Export....................................................................................................................32
3.16 Graphic Equalizing ........................................................................................................................................... 33
3.17 System Settings................................................................................................................................................. 34
3.18 Customize Sound Card Settings (Optional)...................................................................................................... 34
3.19 Changing Renderer and Decoder (Optional) ....................................................................................................36
3.20 Setting Live TV as Desktop Wallpaper ............................................................................................................ 37
Chapter 4 TV .................................................................................................................38
i
Page 3

Analog TV ........................................................................................................................................................ 38
4.1
4.1.1 Scanning Channels.................................................................................................................................... 38
4.1.2 Scanning Channels (For Advanced Users) ...............................................................................................39
4.1.3 Customize Video Record Settings ............................................................................................................ 40
4.1.4 Analog EPG Import .................................................................................................................................. 44
4.1.5 Fine Tuning Color of the Display ............................................................................................................. 46
4.1.6 Enhancing the Video Quality.................................................................................................................... 48
4.1.7 Using the De-interlace Function ............................................................................................................... 48
4.2 Digital Satellite TV...........................................................................................................................................50
4.2.1 Scanning channels (Importing a Frequency Table)...................................................................................50
4.2.2 Scanning channels (Adding Frequencies Manually).................................................................................54
4.2.3 Editing or Removing Frequencies.............................................................................................................55
4.2.4 Scanning Channels (For Advanced Users) ...............................................................................................55
4.3 Digital TV.........................................................................................................................................................56
4.3.1 Scanning Channels.................................................................................................................................... 56
4.3.2 Scanning Channels (For Advanced Users) ...............................................................................................57
4.3.3 Customize Video Record Settings ............................................................................................................ 59
4.3.4 Using the EPG Function ........................................................................................................................... 61
4.3.5 Fine Tuning Color of the Display ............................................................................................................. 63
4.3.6 Enabling Subtitle Function .......................................................................................................................63
4.4 Adding and Deleting Program Lists .................................................................................................................64
4.5 Selecting a TV/Radio Channel..........................................................................................................................66
4.6 Creating Channel Groups.................................................................................................................................. 66
4.7 Adjusting Volume............................................................................................................................................. 67
4.8 Specifying A Channel Name or Description..................................................................................................... 68
4.9 Modifying A Program List Name..................................................................................................................... 69
4.10 Removing Unwanted Channels.........................................................................................................................70
4.11 Using the OverScan Function ........................................................................................................................... 71
4.12 Using Magic Video Effect (Playback and Preview Only) ................................................................................ 73
4.13 Multi-Channel Preview..................................................................................................................................... 74
4.14 Changing Signal Source.................................................................................................................................... 77
4.15 Sound Controlling (Optional) ........................................................................................................................... 77
4.16 Color Adjustment (Optional)............................................................................................................................ 78
Chapter 5 FM Radio ......................................................................................................79
ii
Page 4

FM Radio Controls ...........................................................................................................................................79
5.1
5.2 How to Auto Scan FM Radio Channels............................................................................................................ 80
5.3 Manually Scanning Specific FM Channels....................................................................................................... 81
5.4 Selecting a Channel ..........................................................................................................................................82
5.5 Adjusting Volume............................................................................................................................................. 82
5.6 Skipping Unwanted Channels........................................................................................................................... 83
5.7 Adding a Radio Frequency ............................................................................................................................... 83
5.8 Assigning a Radio Frequency........................................................................................................................... 84
5.9 Modifying a Radio Name .................................................................................................................................85
5.10 Adding and Deleting Program Lists .................................................................................................................85
5.11 Creating Channel Groups.................................................................................................................................. 85
5.12 Customize Audio Recording Settings...............................................................................................................86
5.13 Sound Controlling (Optional) ........................................................................................................................... 87
5.14 Viewing RDS Information (Optional) .............................................................................................................. 88
Chapter 6 TimeShift......................................................................................................89
6.1 TimeShift Controls ...........................................................................................................................................89
6.2 Customizing TimeShift Settings.......................................................................................................................89
6.3 Using the TimeShift Function........................................................................................................................... 91
Chapter 7 PVR ..............................................................................................................92
7.1 PVR Controls.................................................................................................................................................... 92
7.2 Recording Settings............................................................................................................................................ 93
7.3 Using the Recording Function .......................................................................................................................... 93
7.4 Playing the Recorded Programs........................................................................................................................ 93
7.5 Picture-in-Picture Display................................................................................................................................. 95
Chapter 8 Image Capture.............................................................................................96
8.1 Before Capturing ..............................................................................................................................................96
8.2 Capturing a TV/ Video Image........................................................................................................................... 96
8.3 Multiple Image Sequence Capture.................................................................................................................... 98
Chapter 9 Teletext (PAL/SECAM only)......................................................................100
9.1 Customize the Display Mode.......................................................................................................................... 100
9.2 Overview ........................................................................................................................................................ 101
9.3 Toolbar Buttons .............................................................................................................................................. 102
9.4 LED Lamp ...................................................................................................................................................... 102
9.5 Using Teletext................................................................................................................................................. 102
iii
Page 5

Chapter 10 Scheduler...................................................................................................105
10.1 Adding Schedules ........................................................................................................................................... 105
Chapter 11 Customer Service .....................................................................................108
Appendix ....................................................................................................................109
Hot Keys ........................................................................................................................................................ 109
Editing EPG Import Files ............................................................................................................................... 111
EPG File Mapping (Index File *.idx) .........................................................................................................111
Editing AVerMedia EPG File Format (*.avr)............................................................................................. 113
Satellite Internet Access (for Windows XP only) ..................................................................................... 116
Universal DVB Plug-in (for Microsoft / Vista MCE only) ...................................................................... 118
Video Gaming Plug-in (for Microsoft Vista / Windows 7 MCE only)...........................................................119
Video Quality Enhancement Plug-in (for Microsoft Vista / Windows 7 MCE only)..................................... 120
iv
Page 6
Chapter 1 Device Introduction
Thanks for purchasing AVerMedia’s product. The table below lists an overview of the product you
purchased. From this table, you can quickly learn about your product features and know which chapter
you need to read. Please do read this table before using AVerTV 6 application.
Product Name AVerTV Hybrid Volar HD
Model No. H830
TV System ; Digital TV (; DVB-T ☐ ATSC ☐ DVB-S)
; Analog TV (; NTSC ; PAL ; SECAM)
Audio Mode ; Stereo ; Mono ; SAP
FM Radio ; Support ☐ Not Support
Remote Control ; Support
☐ Model 1 (RM-HR)
☐ Model 2 (RM-FP)
☐ Model 3 (RM-JC)
☐ Model 4 (RM-JX)
; Model 5 (RM-KS)
☐ Model 6 (RM-KV)
☐ Not Support
External Signal
Source
Others ; Teletext ; MHEG-5 (UK only)
; S-Video ; Composite
☐ Not Support
; EPG ; iEPG (USA only) ; Analog EPG import
; Closed Caption (USA only) ; Digital Subtitle
1
Page 7

Reference Chapter ; Chapter 1
; Chapter 2
; Chapter 3 (; 3.1 ; 3.2.1 ;3.3 - 3.4 ; 3.5.5 ; 3.6 - 3.20)
; Chapter 4 (; 4.1 ; 4.3 – 4.14)
; Chapter 5 (; 5.1 – 5.13)
; Chapter 6
; Chapter 7
; Chapter 8
; Chapter 9
; Chapter 10
; Chapter 11
Appendix ; Hot Keys
; Editing EPG Import Files
☐ Satellite Internet Access
☐ Universal DVB Plug-in (for Microsoft XP / Vista MCE only)
; Video Gaming Plug-in (for Microsoft Vista / Windows 7 MCE only)
; Video Quality Enhancement Plug-in (for Microsoft Vista / Windows
7 MCE only)
Note DVB is a registered trademark of the DVB Project.
2
Page 8

Chapter 2 AVerTV 6 Introduction
Now, with this product, you can watch TV, listen to the radio, record your favorite programs and
enjoy other features on your PC. Turn your computer system into a real multimedia entertainment
center.
You’ll never miss your favorite ball games, soaps or game shows anymore because the TimeShift
function performs background recording of a TV program. This means you can return and watch from
the part of the program where you left off.
®
To enjoy high quality TV or radio programs, AVerMedia
Please be noted that the functions or the remote control mentioned in this manual may vary depending
on the product you purchase and the area you live.
product is your best choice.
3
Page 9
Chapter 3 Introducing the AVerTV Application
AVer
The AVerTV 6 application allows you to watch TV or video, and record still or motion video
on your PC while you work on your computer.
3.1 Launching the AVerTV 6 Application
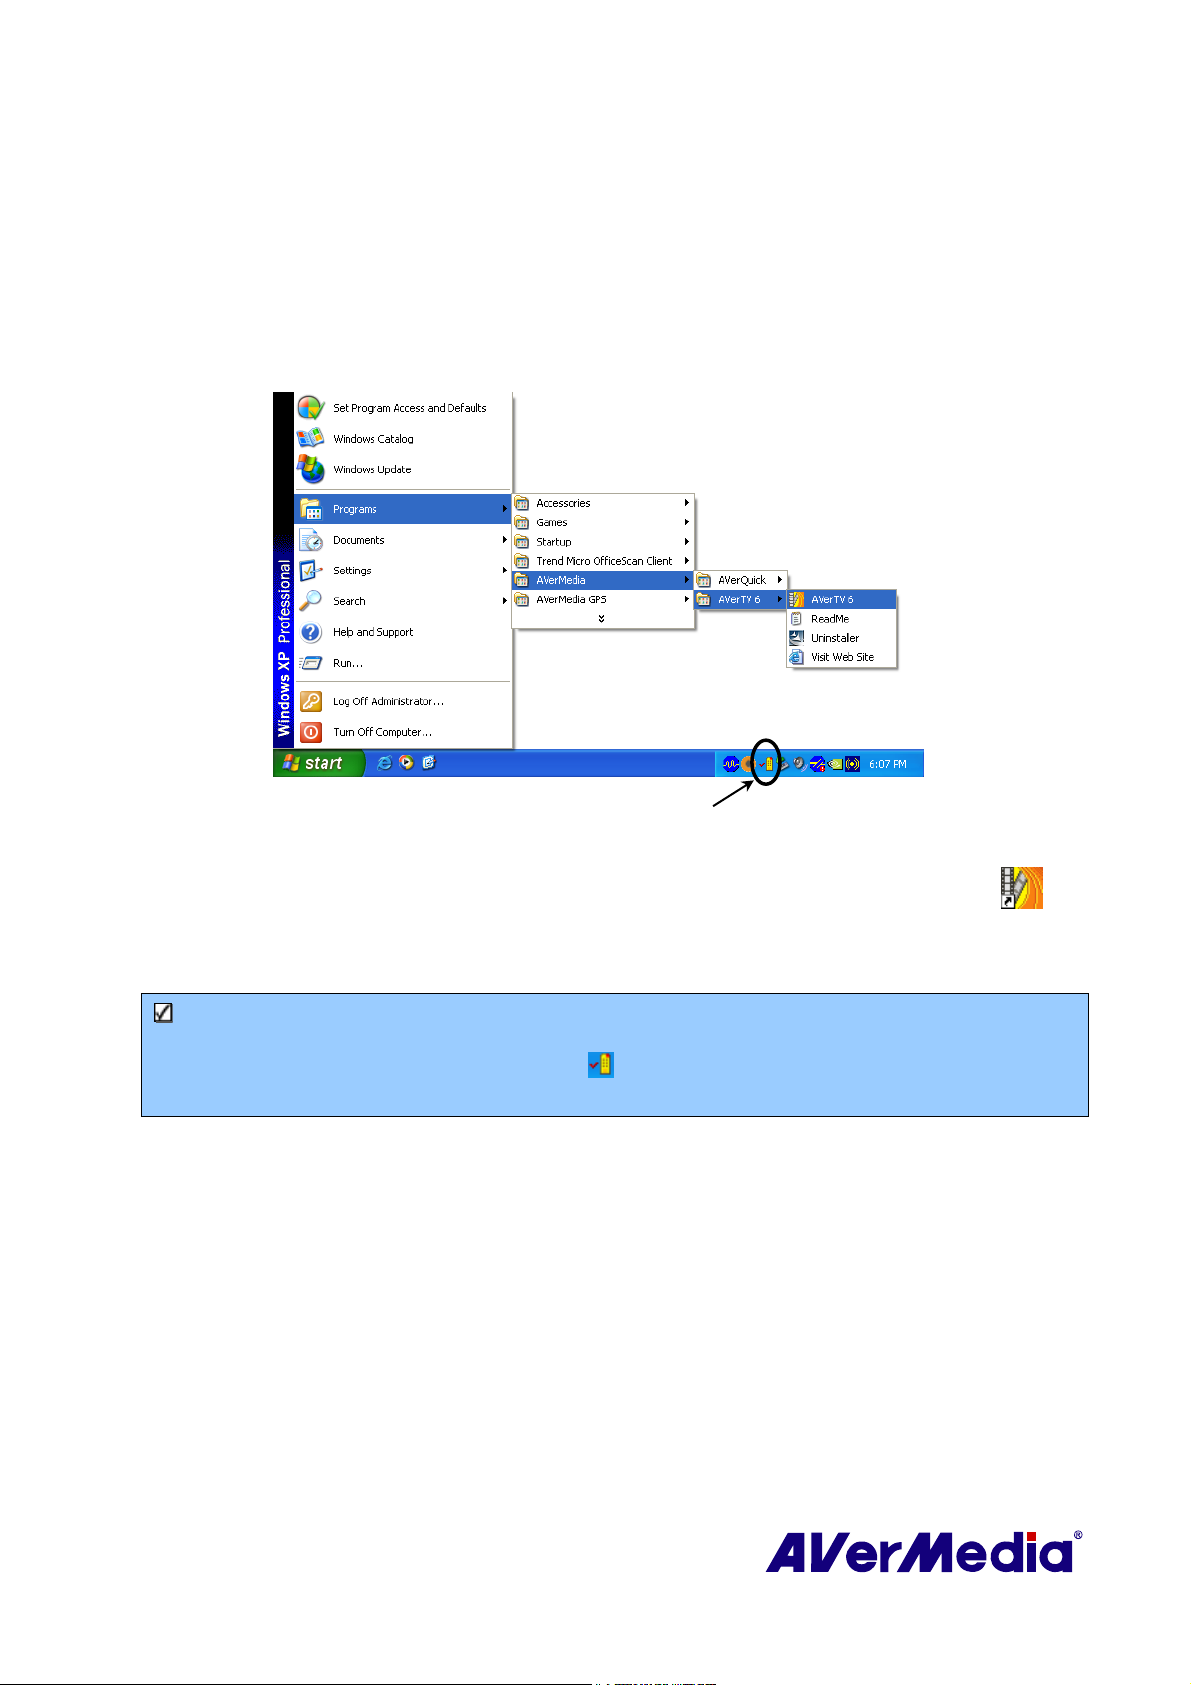
Run the AVerTV 6 application from the Programs menu.
To run the application, click Start, point to Programs, choose AVerMedia, AVerTV 6, and
then click AVerTV 6. Another way is to double-click the AVerTV 6 program icon “
the desktop. Or, you can double-click the AVerQuick launcher located at the lower right
corner of the screen.
Note: AVerQuick allows to set the desired default application, which means you can
choose either AVerTV 6 or AVer MediaCenter as the default application when
double clicking AVerQuick icon . To do this, right click AVerQuick, choose
“Setting”, and select the preferred application in the “Application” tab.
Quick
”on
4
Page 10
3.2 Running the AVerTV 6 application for the first time
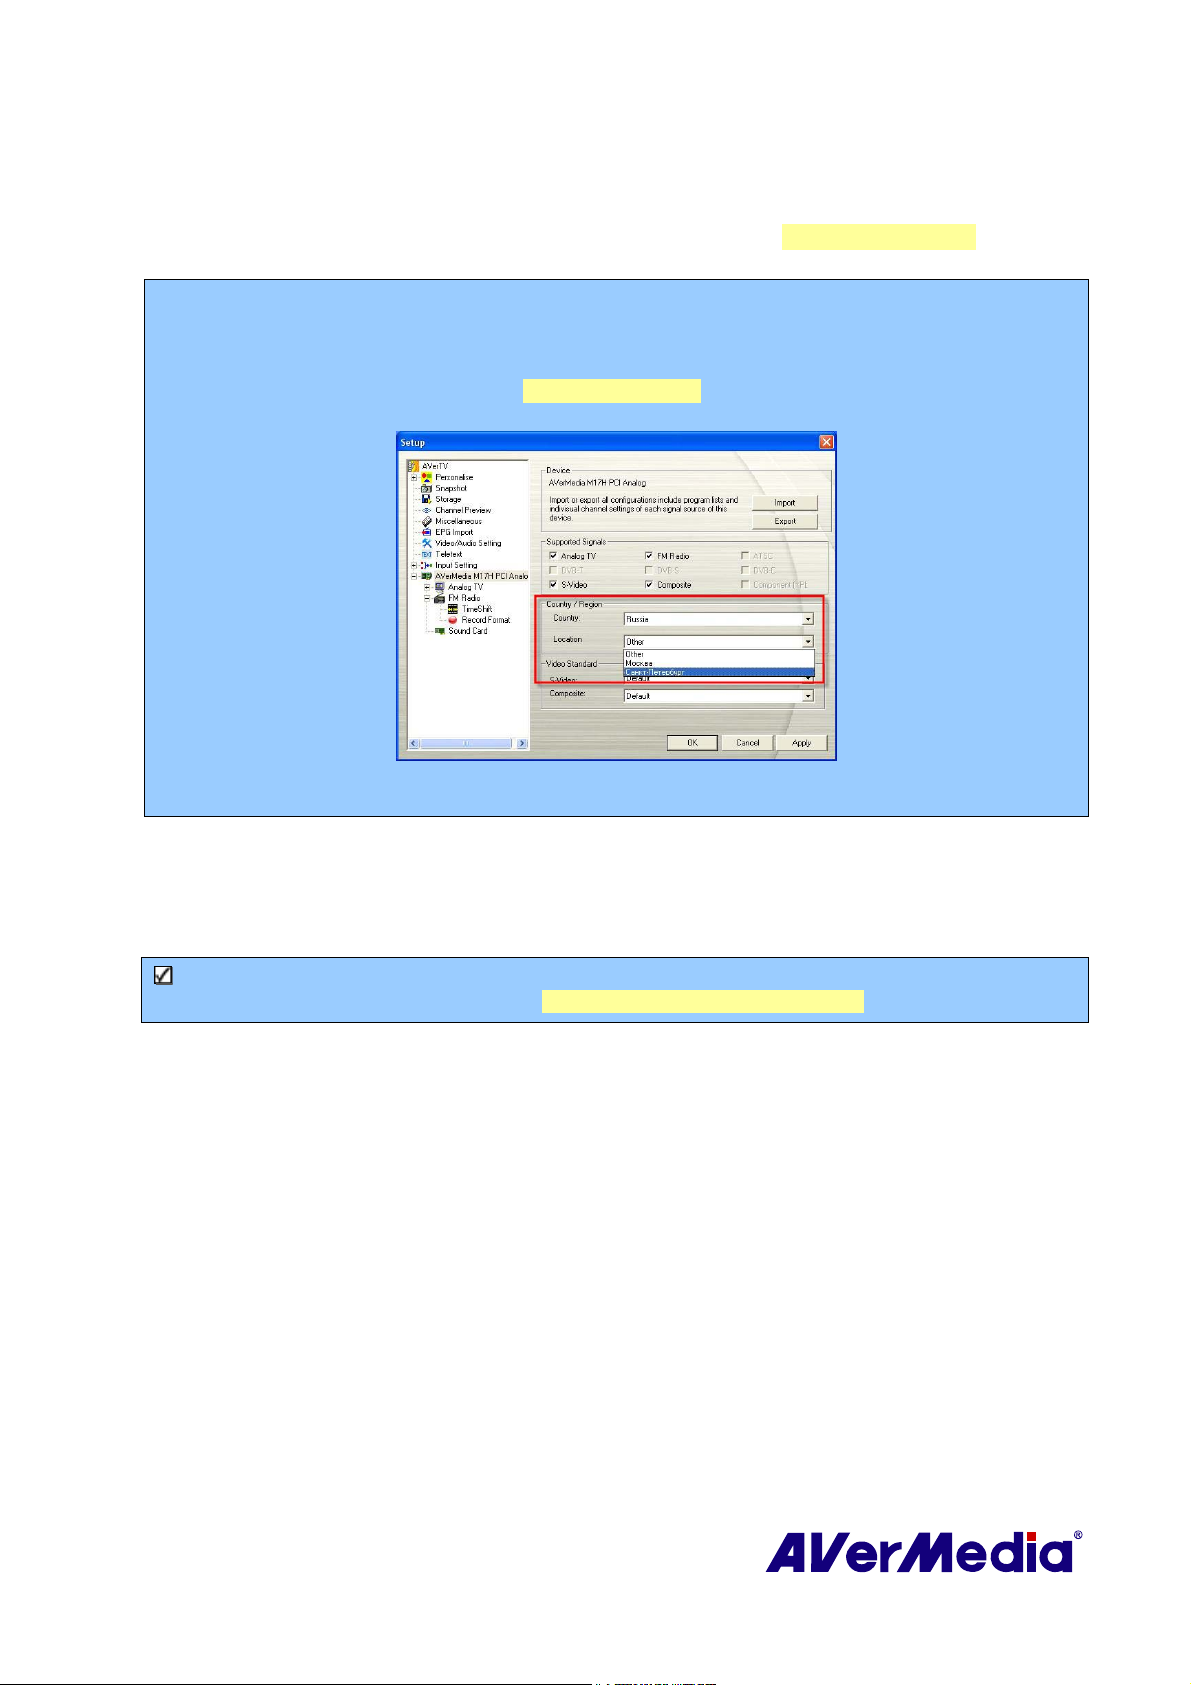
If this is your first time running the application, the Setup dialog box will appear to prompt
you to scan for channels. (For details, please refer to the section Scanning Channels).
Note: Using the application in Russia, scanning for channels may be skipped. When the Setup dialog
box appear, simply choose the country Russia and the location—Moscow or St. Petersburg—
from the drop-down list. Then you are able to watch the programs without scanning channels.
However, if the location you choose is Others, you still need to scan for channels. (For
details, please refer to the section Scanning Channels).
(This picture is only for reference)
3.2.1 Scanning for Analog / Digital Programs
1. Choose your desired signal input (Digital TV, Analog TV or FM Radio) on the left pane
of the Setup dialog box.
Note: Before choosing the signal input, please make sure that your country/region is correct. For
more information, please refer to “Scanning Channels” in Chapter 4.
2. Then you need to select the TV option to search for air channels, or select CATV to scan
for cable channels if your choice is “Analog TV” in step 1.
5
Page 11
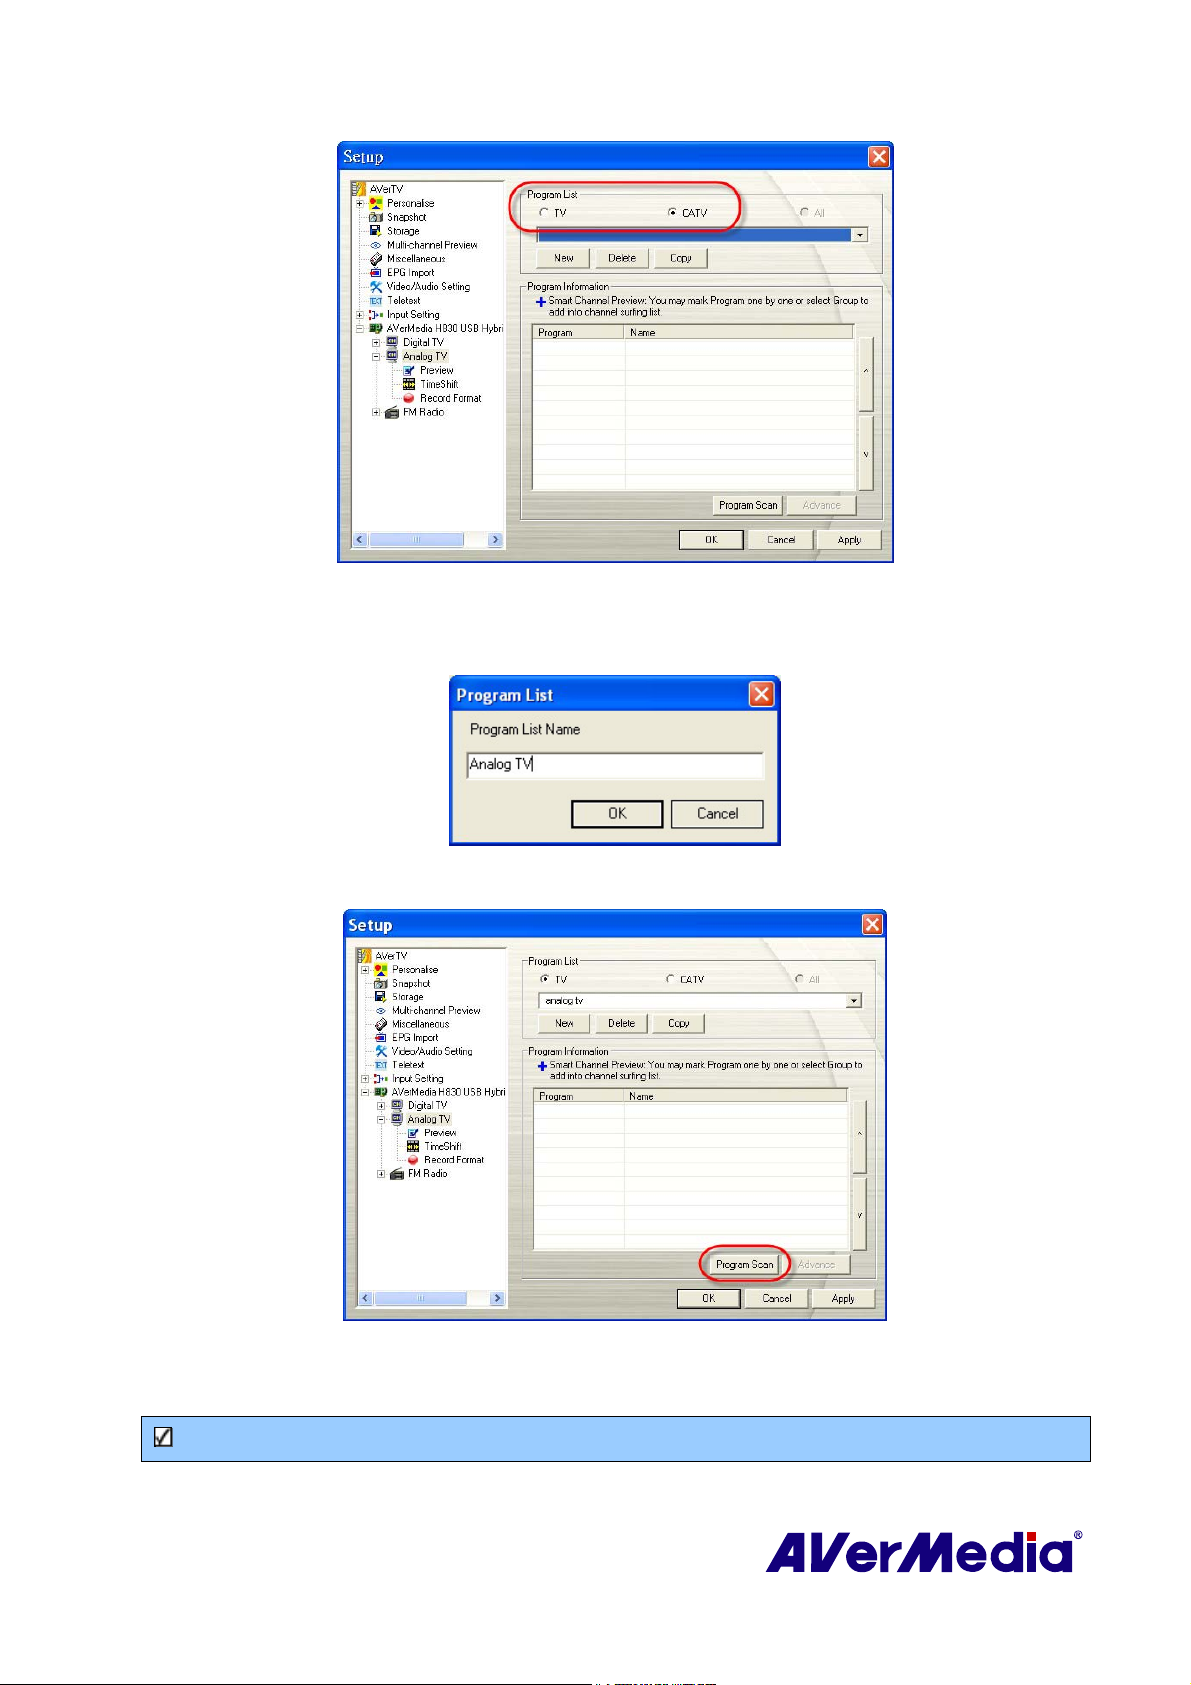
(This picture is only for reference)
3. Click New and the Program List dialog box will appear. Type in the desirable name and
click OK.
4. Click Program Scan to search for available channels/programs in your area.
(This picture is only for reference)
5. After scanning, the active TV channels will be listed inside the box. Click Apply to save
the scanned channels.
Note: Digital channels that are in red text indicate they are locked channels (eg. Adult channels).
6. To exit the current dialog box, click OK.
6
Page 12

7. If you choose FM Radio or Digital TV in step 1, just repeat step 3-6 to complete the
program scanning.
7
Page 13
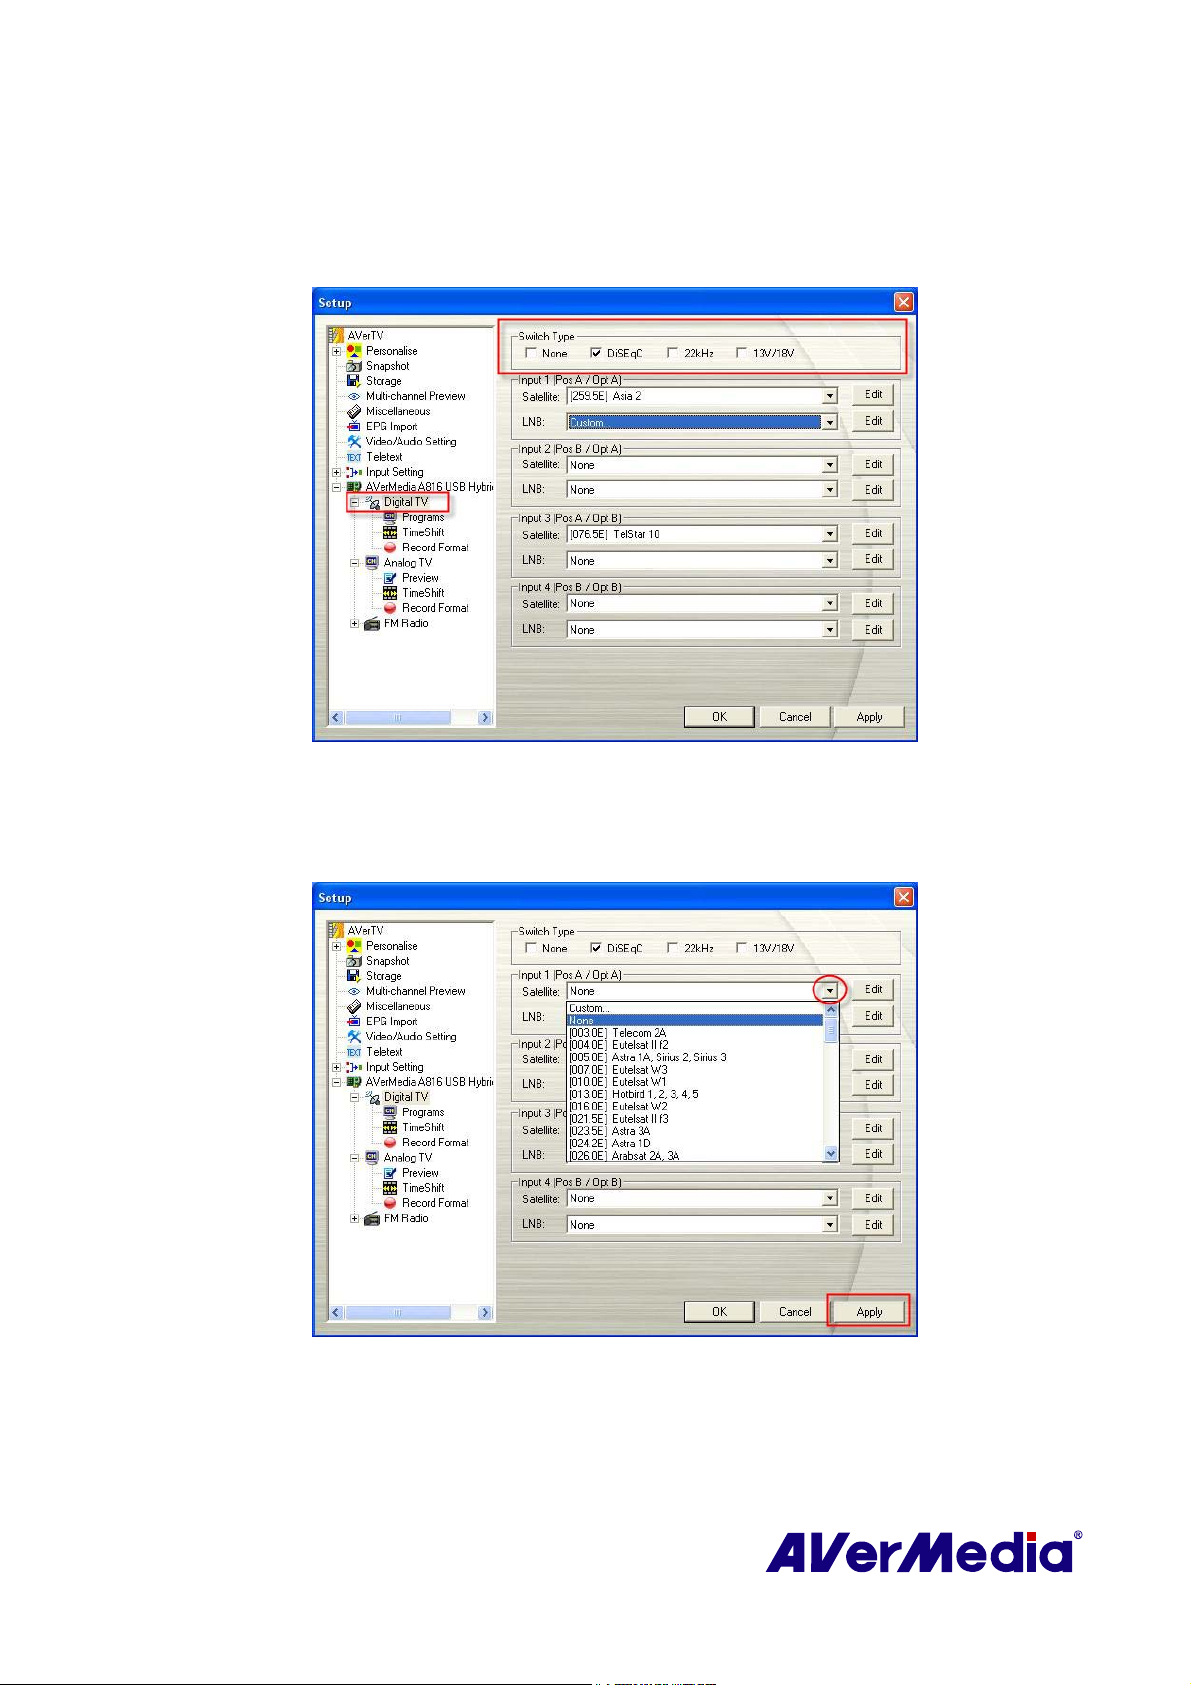
3.2.2 Scanning for Digital Satellite Programs
1. Select Digital TV on the left pane of the Setup dialog box.
2. Choose the switch type that is used by your satellite system.
(This picture is only for reference.)
3. From the Satellite drop-down list under Input 1, Input 2, Input 3, and/or Input 4,
choose the correct satellite. Then click Apply to save the settings.
(This picture is only for reference.)
8
Page 14
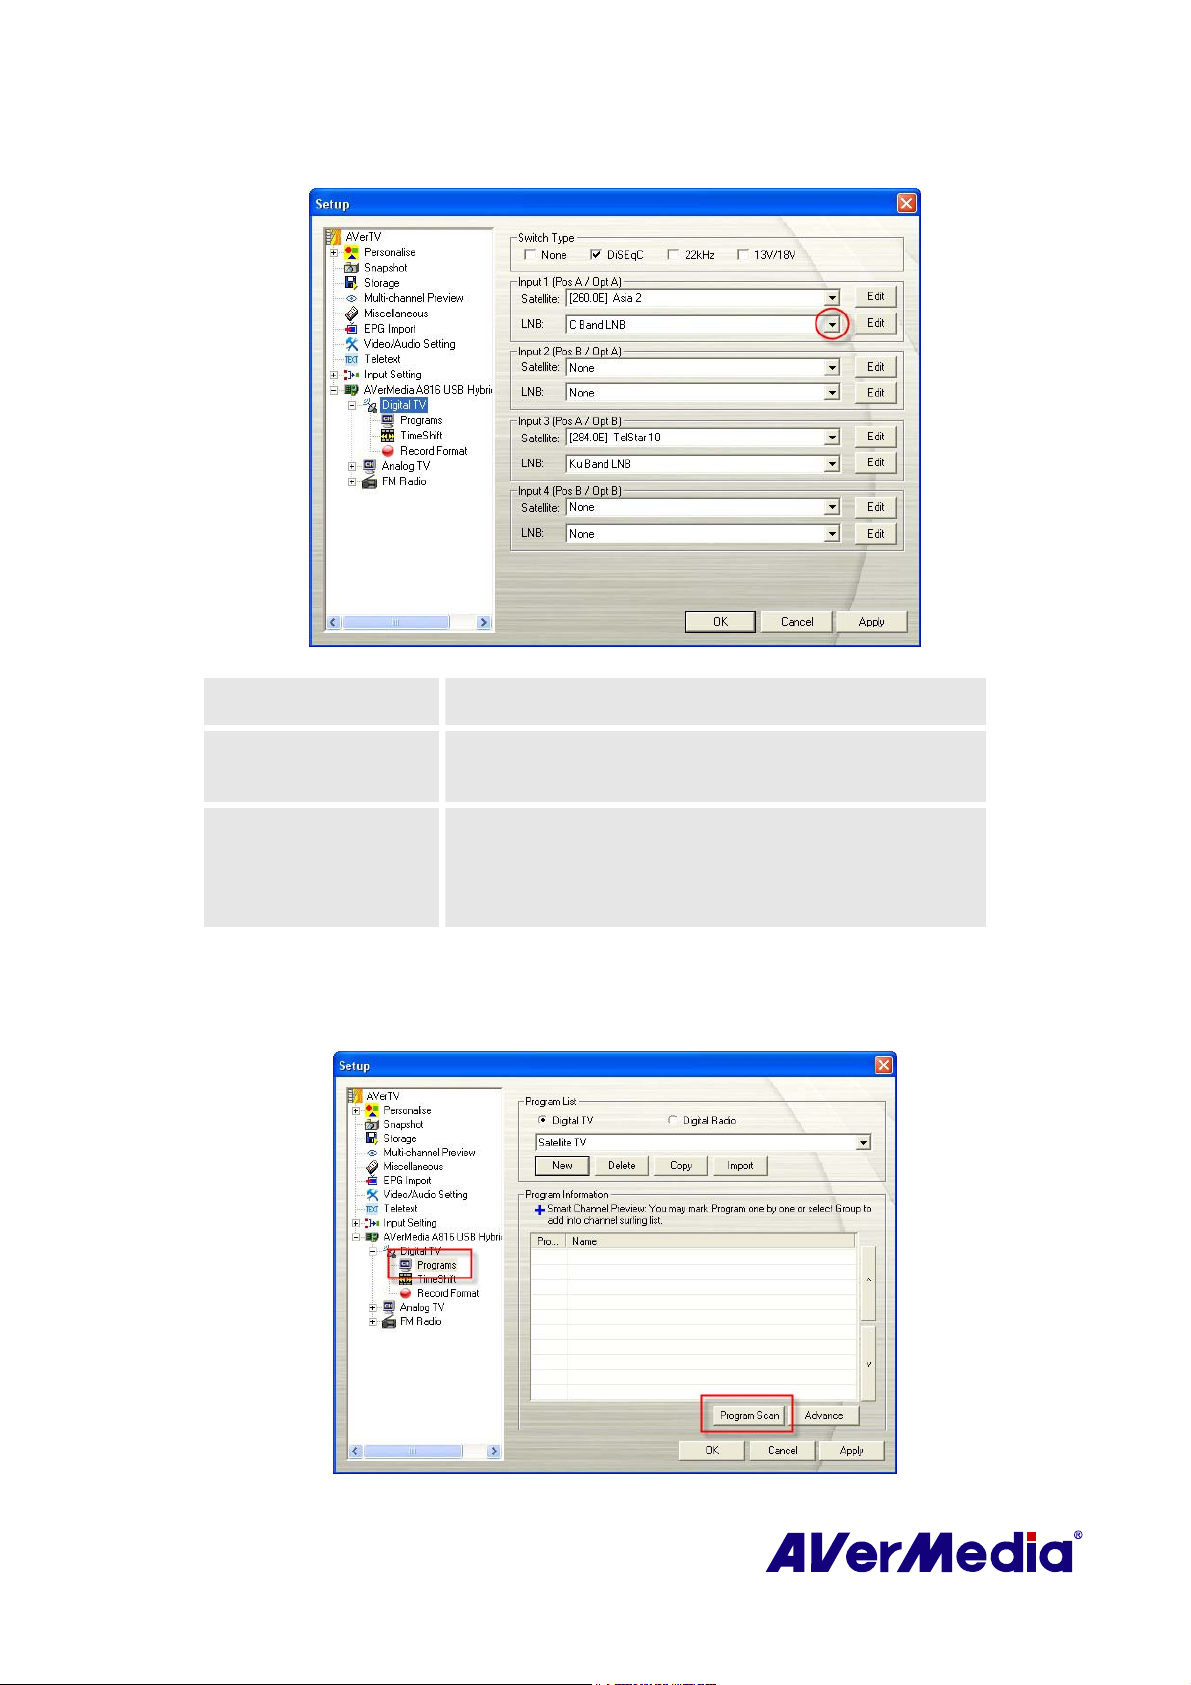
4. From the LNB drop-down list, choose the appropriate setting.
(This picture is only for reference.)
None If you do not use any LNB device, choose this option
Universal Ku Band
LNB or C Band LNB
Choose this option if your LNB device is this type.
When you choose this option, click Edit to configure your
Custom
own LNB information, such as specifying an LNB name,
its frequency type, input range, etc. For related data, refer
to the documentation that comes with your LNB device.
5. Select Programs under the Digital TV icon on the left pane, and click Program Scan to
start the scanning process.
(This picture is only for reference.)
9
Page 15
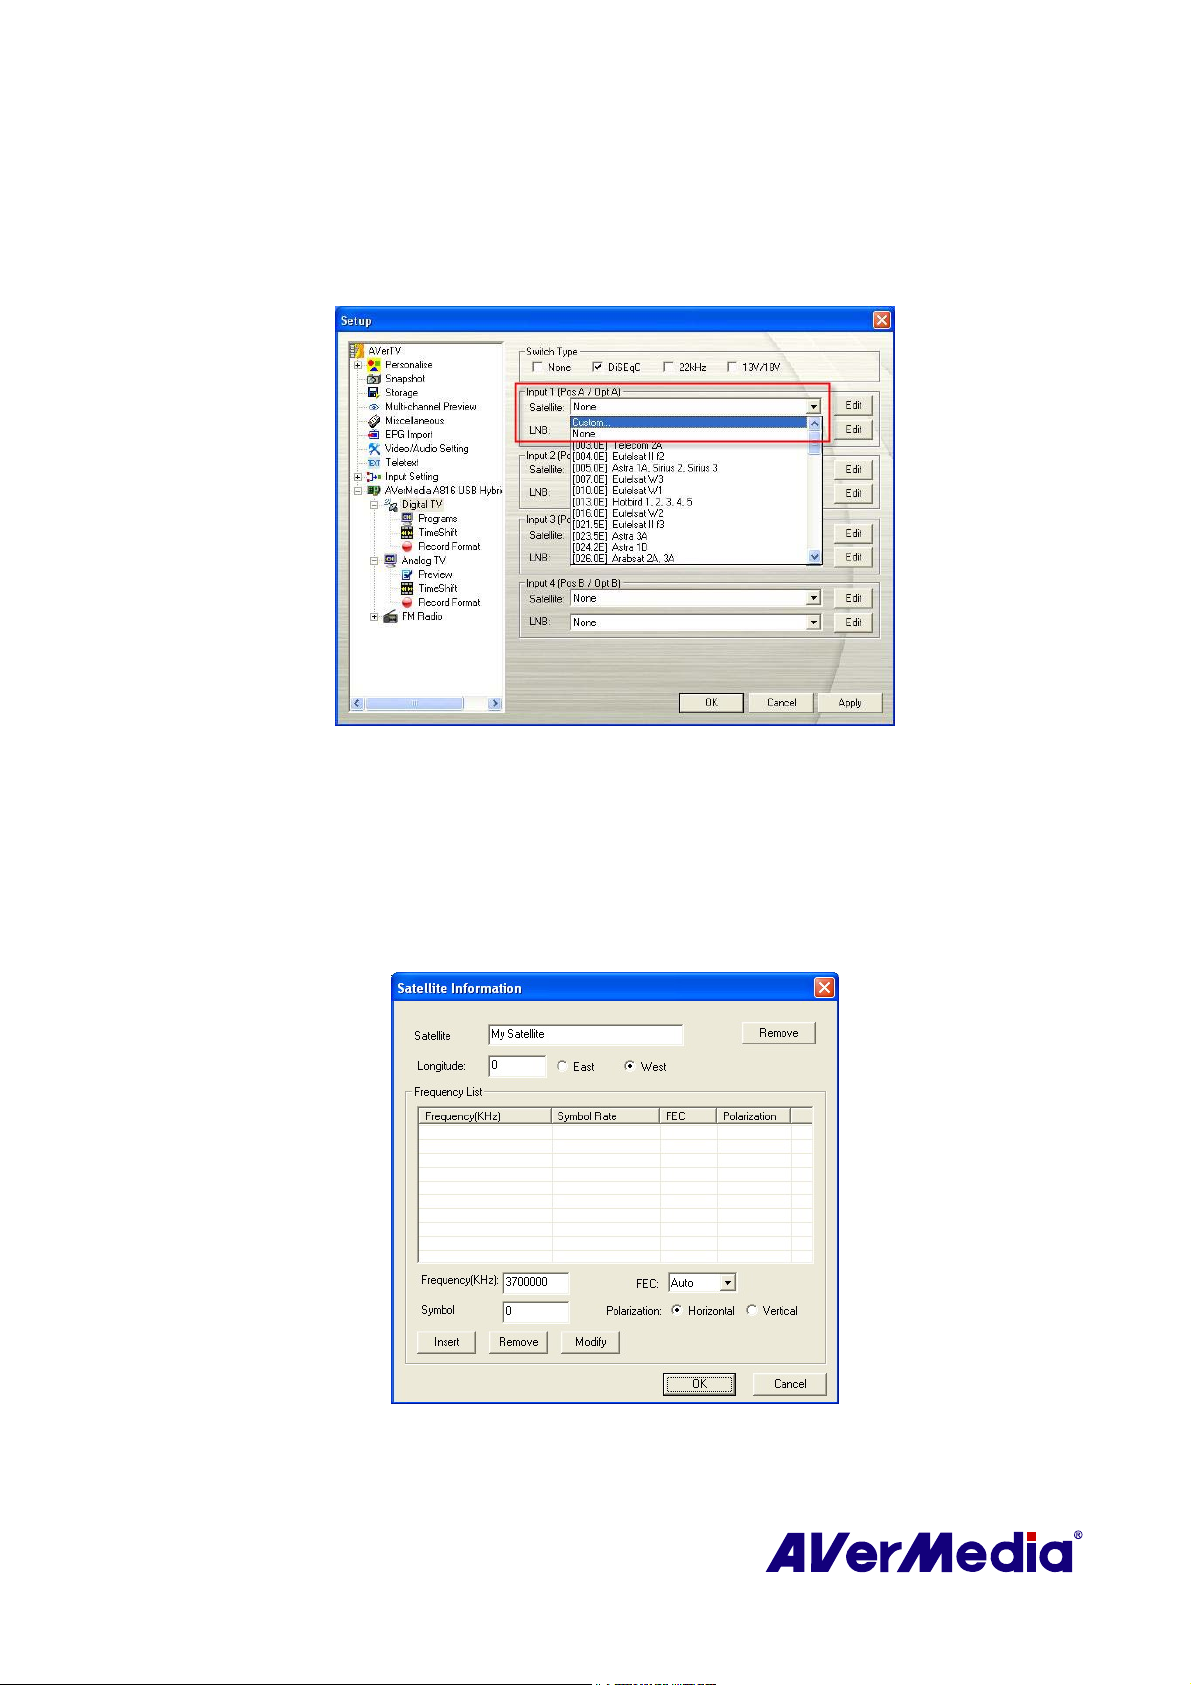
6. Click Apply to save the scanning results.
If you cannot find the satellite you want in step 3 above, but the input port DOES receive
satellite signals, choose Custom…. Otherwise, choose None.
(This picture is only for reference.)
If you choose Custom…in step 3 above, please keep doing the followings steps for setup:
1. Click Edit to configure the satellite information.
2. In the Satellite Information dialog box, type in the satellite’s name in the Satellite box.
(This picture is only for reference.)
3. Specify the frequencies that you want to scan for available satellite programs.
10
Page 16
There are two ways to do this:
Import the existing frequency data: refer to the section 4.2.1 Scanning Channels
(Importing a Frequency Table) for details.
Manually add frequencies: refer to 4.2.2 Scanning Channels (Adding Frequencies
Manually) for details. If you add frequencies manually, please make sure you
specify the correct longitude data.
4. Click OK to exit the Satellite Information dialog box.
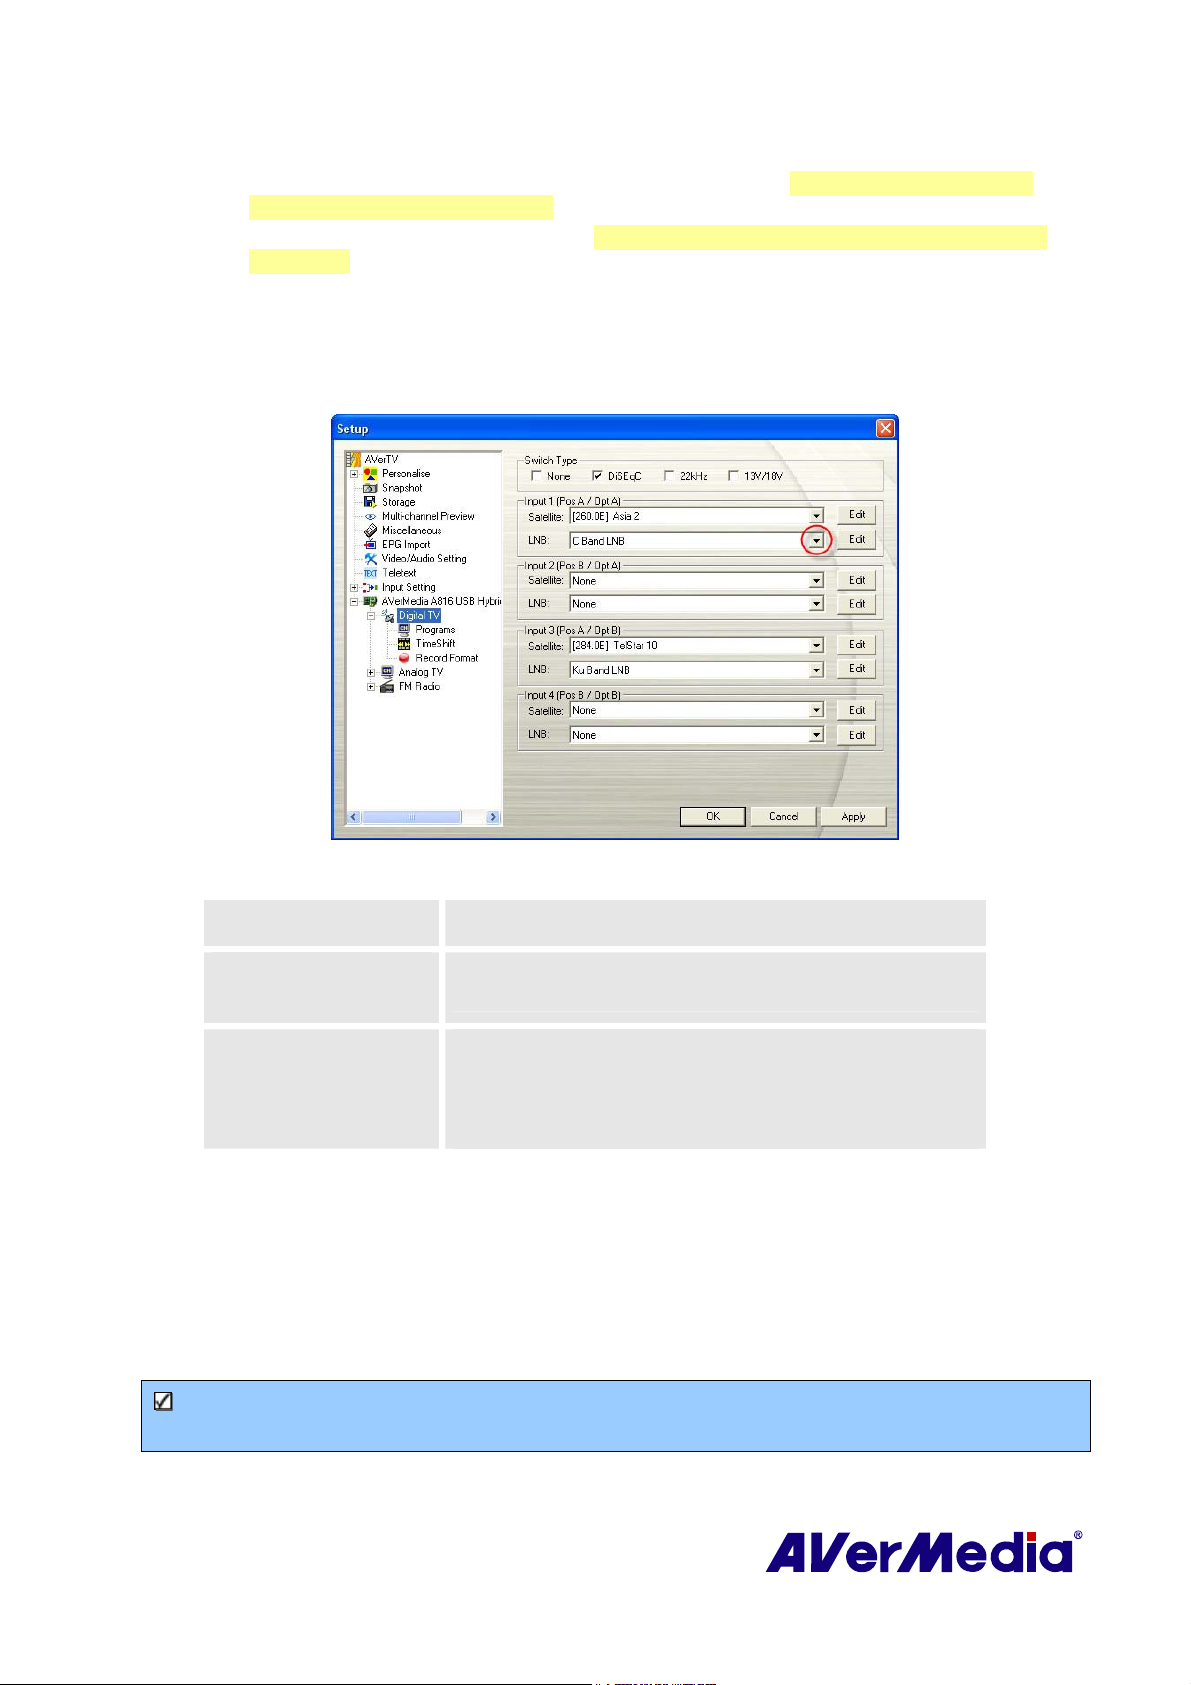
5. From the LNB drop-down list, choose the appropriate setting.
(This picture is only for reference.)
None If you do not use any LNB device, choose this option
Universal Ku Band
LNB or C Band LNB
Custom
Choose this option if your LNB device is this type.
When you choose this option, click Edit to configure your
own LNB information, such as specifying an LNB name,
its frequency type, input range, etc. For related data, refer
to the documentation that comes with your LNB device.
6. Repeat steps 1 to 6 if you need to configure Input 2, Input 3, etc. Then click Apply to
save the settings.
7. Select Programs under the Digital TV icon on the left pane, and click Program Scan to
start the scanning process.
8. Click Apply to save the scanning results.
Note: After Media Center Edition scan, you may not be able to lock channels with AVerTV
6. Please restart the computer to make it function normally.
11
Page 17
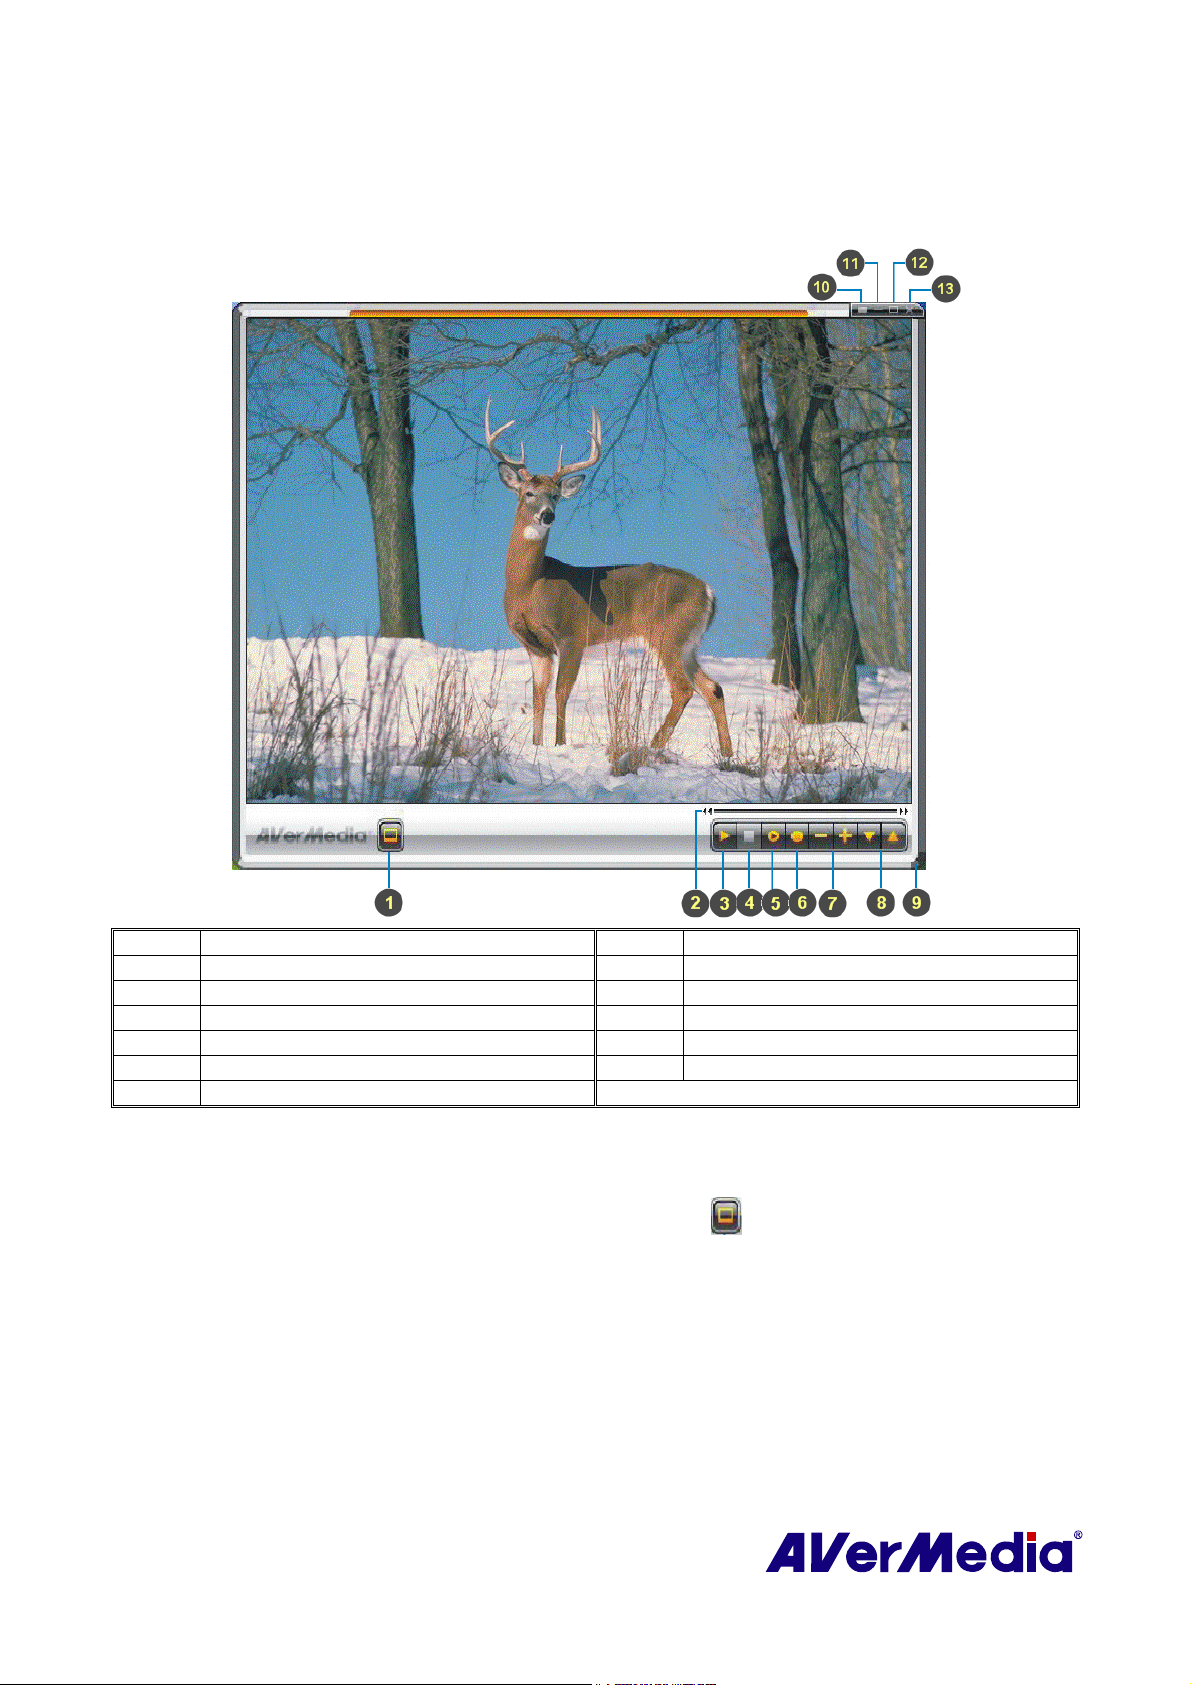
3.3 Introducing the User Interface
The TV monitor allows you to watch live TV or video.
1 Panel On / Off 8 Channel Up/Down
2 Playback Seek Slider 9 Resize Window
3 Play / Pause 10 Show / Hide Video Frame
4 Stop 11 Minimize
5 TimeShift 12 Full Screen
6 Record 13 Exit
7 Volume
The Control Panel provides button controls for selecting channels, adjusting volume,
capturing images, and more. It has a panel display that shows the current channel number and
channel name.
To display or hide the Control Panel, click the button
the TV Monitor.
located at the lower left corner of
12
Page 18
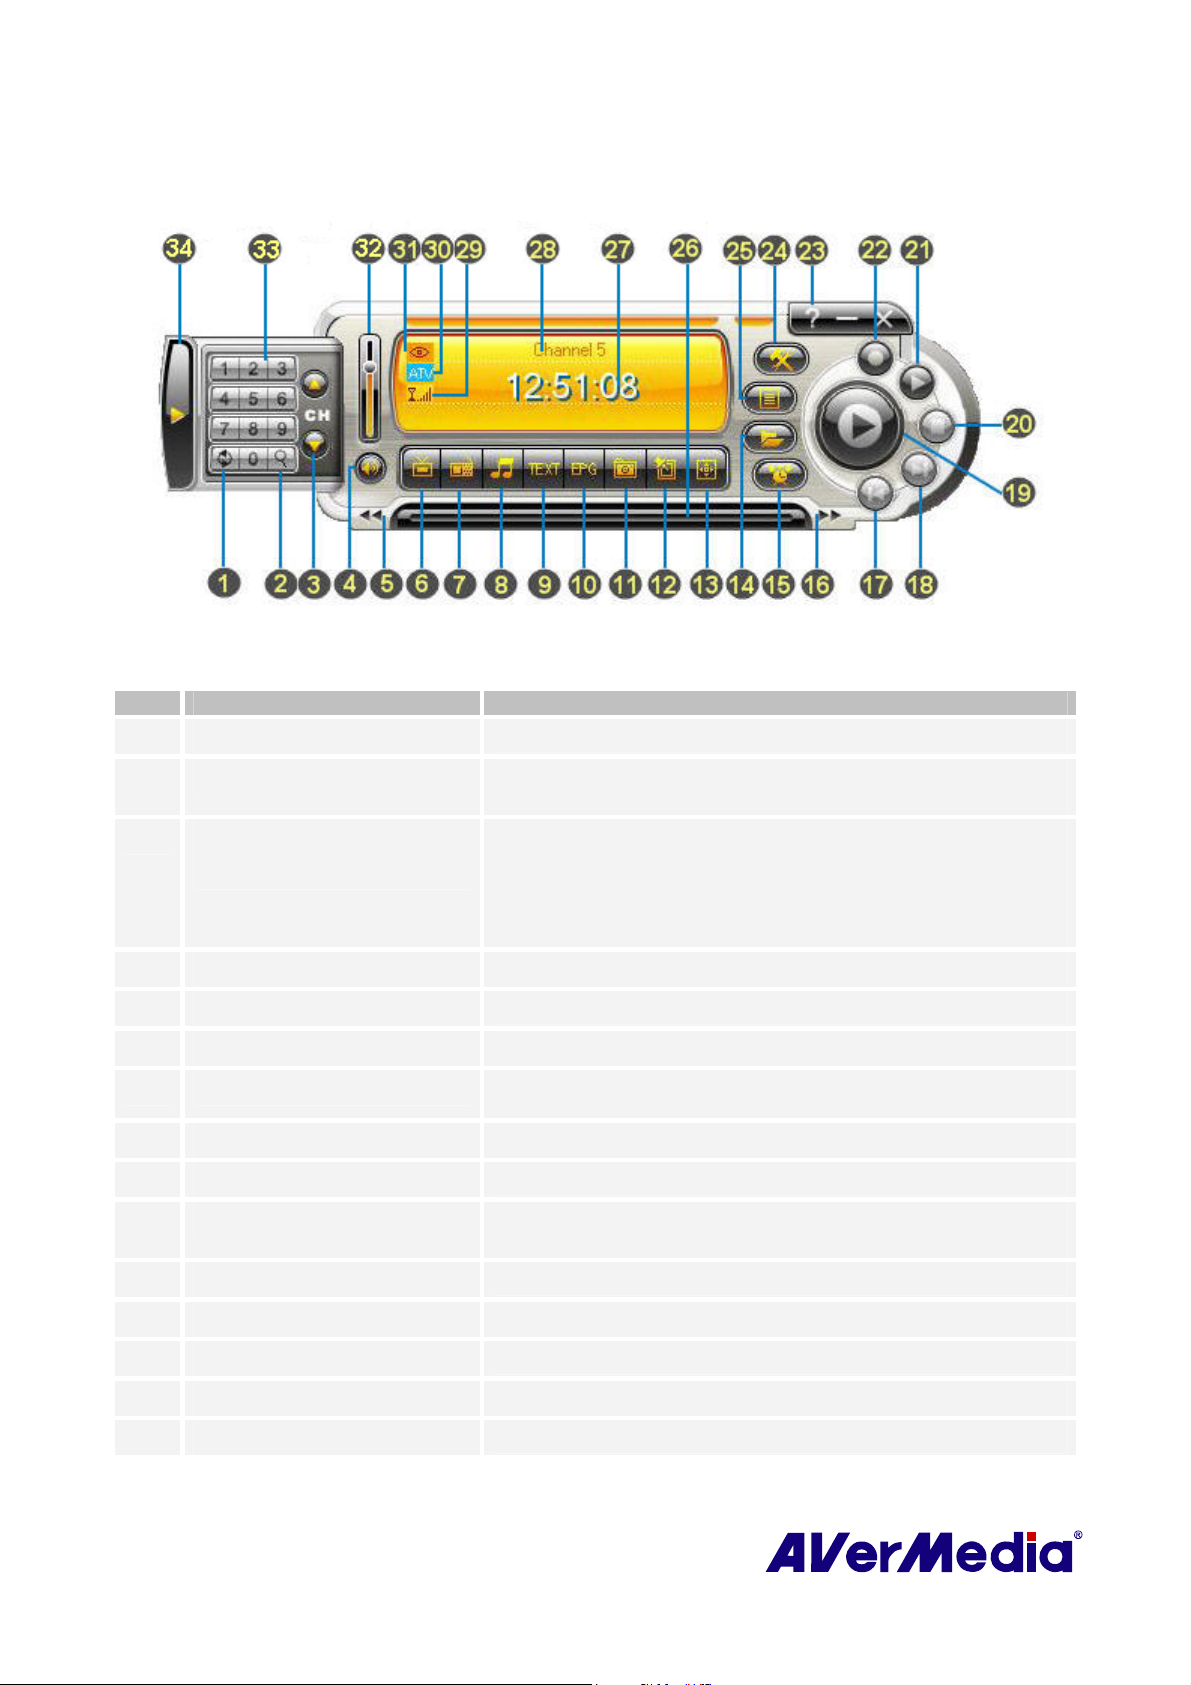
3.4 The Control Panel
The table below describes the functions of the buttons on the Control Panel.
BUTTON FUNCTION
Channel Loop Return to previously accessed channel.
1
Multi-Channel Preview Display 4 ~ 64 consecutive TV channels on the TV Monitor window.
2
(By default, 16 TV channels will be displayed.)
Channel Up/ Down
3
Frequency Tune Up/ Down
Mute Turn off the sound.
4
Backward Timeshift mode: Move backward in intervals.
5
Change Video Source Switch between analog TV, digital TV, or S-video.
6
Radio Source
7
Audio Mode Switch between available audio modes.
8
Teletext View Teletext (PAL/SECAM) / Closed Caption (NTSC) information.
9
EPG View EPG information (digital TV/analog TV with available EPG
10
Snapshot Capture a single image or a sequence of images.
11
TV / FM mode: Move up/down the channel list
FM mode: Frequency tune up/down
Click on CH to switch between Channel mode (CH) and Frequency
mode (FQ).
Switch between FM radio and DVB-T radio. (Only access to DVB-T
Radio Broadcast, not Digital Audio Broadcast system.)
data).
Always on Top Make the TV monitor float over the top of other program windows.
12
Full Screen Show TV/Video programs in full screen.
13
Play List Create a playlist of video files to playback.
14
Scheduler Display Scheduler dialog box.
15
13
Page 19

Forward / Playback Speed Switch Timeshift mode: Skip forward in intervals.
16
Playback mode: Switch to next playback speed level.
Previous File Play the previous file in the playlist.
17
Next File Play the next file in the playlist.
18
TimeShift / Pause Performs background recording of the live TV program. This function
19
lets you view the recorded parts, while at the same time, recording is in
progress. / Freeze the playback temporarily.
Stop Stop the playback, recording, TimeShift, etc.
20
Play / Pause Playback recorded video files. / Freeze the playback temporarily.
21
Record Record the current TV show.
22
Help View User’s Manual.
23
Setup Allows you to:
24
*Autoscan channels.
*Import analog EPG.
*Customize the OSD settings.
*Configure the Multi-Channel Preview settings.
*Configure the Input Remapping settings.
*Configure snapshot settings.
*Customize record settings.
*Customize the TimeShift function.
Program List Display the and adjust color, volume and so on.
25
Slider / Playback Speed List Playback mode: Right click on the slider to select playback or fast
26
forwarding speed.
Time Display / Spectrum
27
Analyze
Channel Display Display and switch channels. Right click on the channel display area of
28
Display time and spectrum analyze. Click on the time area on the panel
to switch between time and spectrum analyze display.
the control panel to select channels.
Signal Strength Display signal strength.
29
Signal Status /
30
Repeat Play Status
TV/Radio mode: Right click on the info icon on the control panel to
switch signal sources.
Playback mode: Right click on the repeat icon on the control panel to
enable the repeat function. The system will continuously playback the
files in the playlist.
Mode Display Display the mode in use.
31
Volume Control Increase/decrease the volume level.
32
Numeric Buttons Select channels/programs.
33
Show/ Hide Numeric Panel Toggle between displaying or hiding the Numeric Panel.
34
14
Page 20
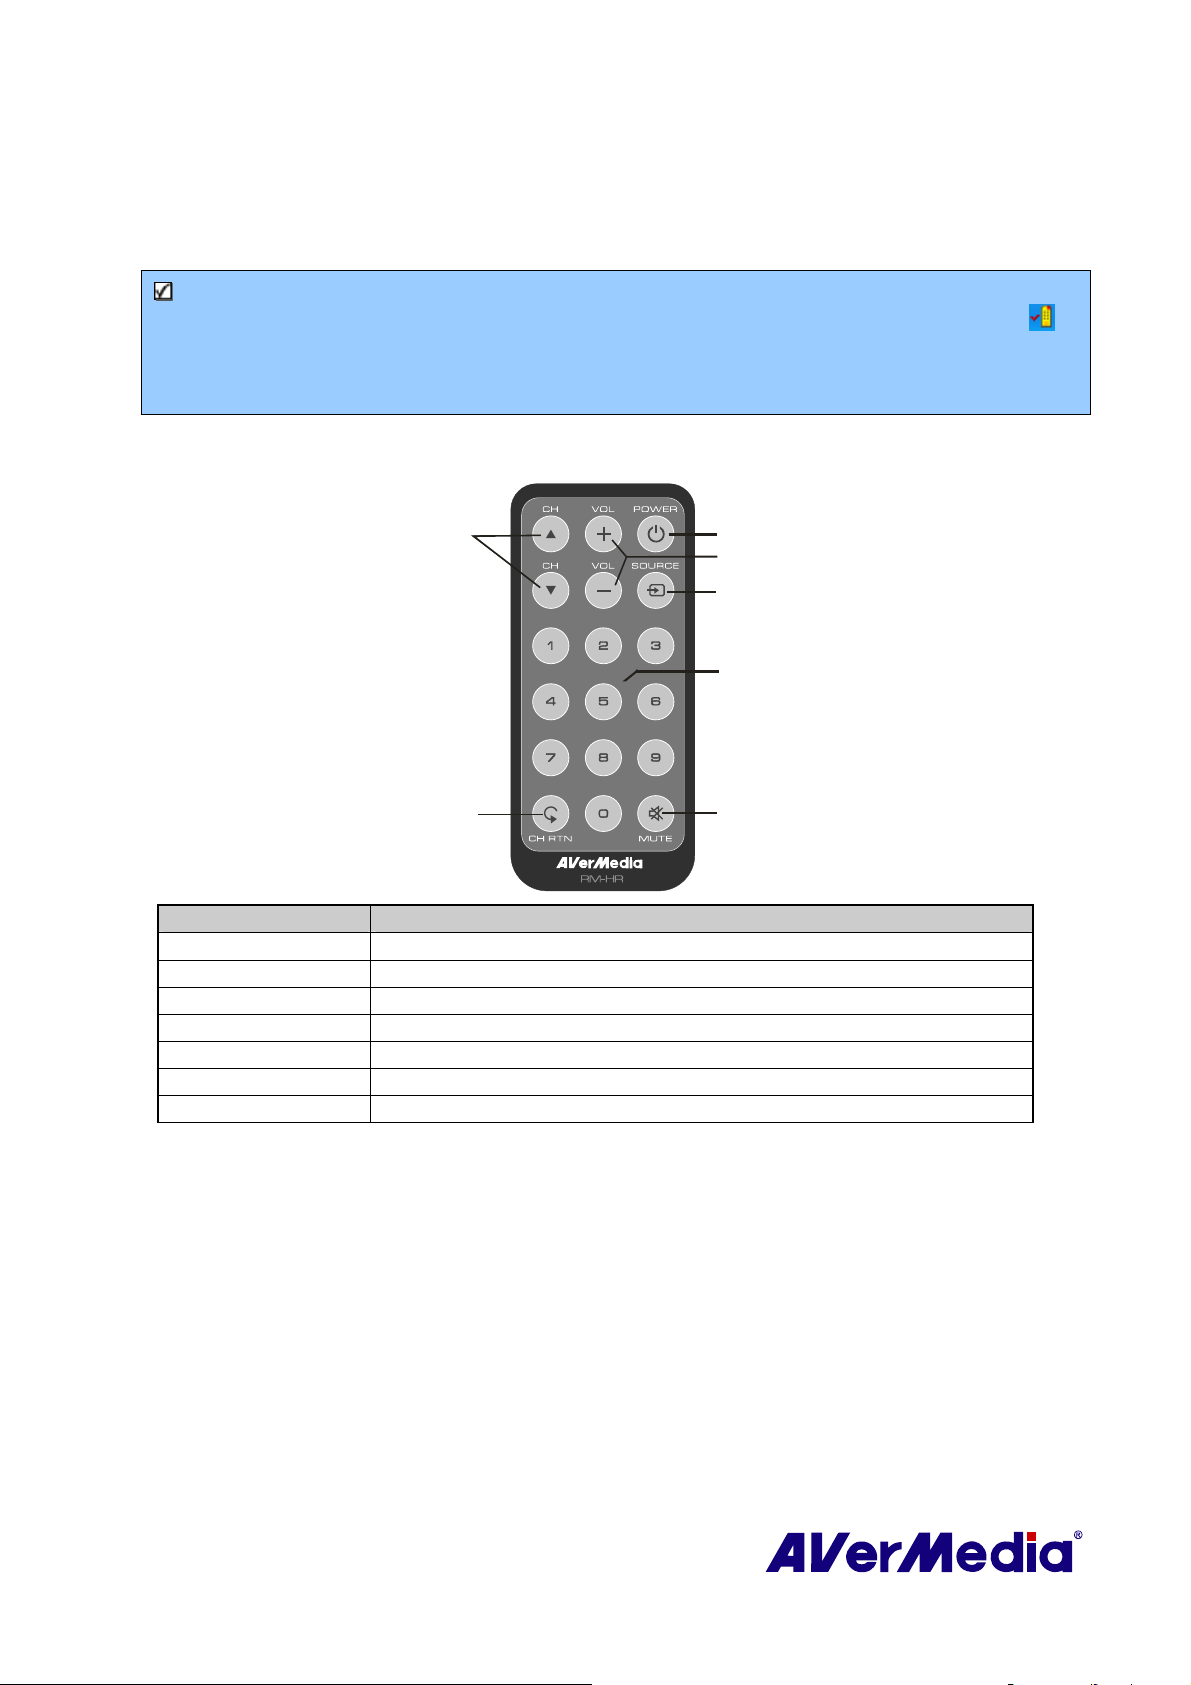
3.5 Remote Control
You can use remote control to turn on/off the programs, select channels, adjust volume and so
on.
Note: To control two or more than two cards/devices with a remote control, it is recommended to
enable the multiple infrared receiver function first. To do this, right click AVerQuick icon at
the lower right corner of the screen, choose “Setting”, “Remote control” tab and select check
boxes next to the device name. Please check your supported remote control model before activating
this function.
3.5.1 Remote Control Buttons (Model 1) (RM-HR)
6
7
1
2
3
4
5
Button Description
1. Power Turn on/off the application
2. VOL +/- Volume up/down.
3. Source Switch between available signal sources.
4. Numeric Buttons Select a TV channel.
5. MUTE Turn on/off the sound.
6. CH ▲/▼ Go up or down to the next active channel.
7. CH RTN Go to the previously selected channel.
15
Page 21
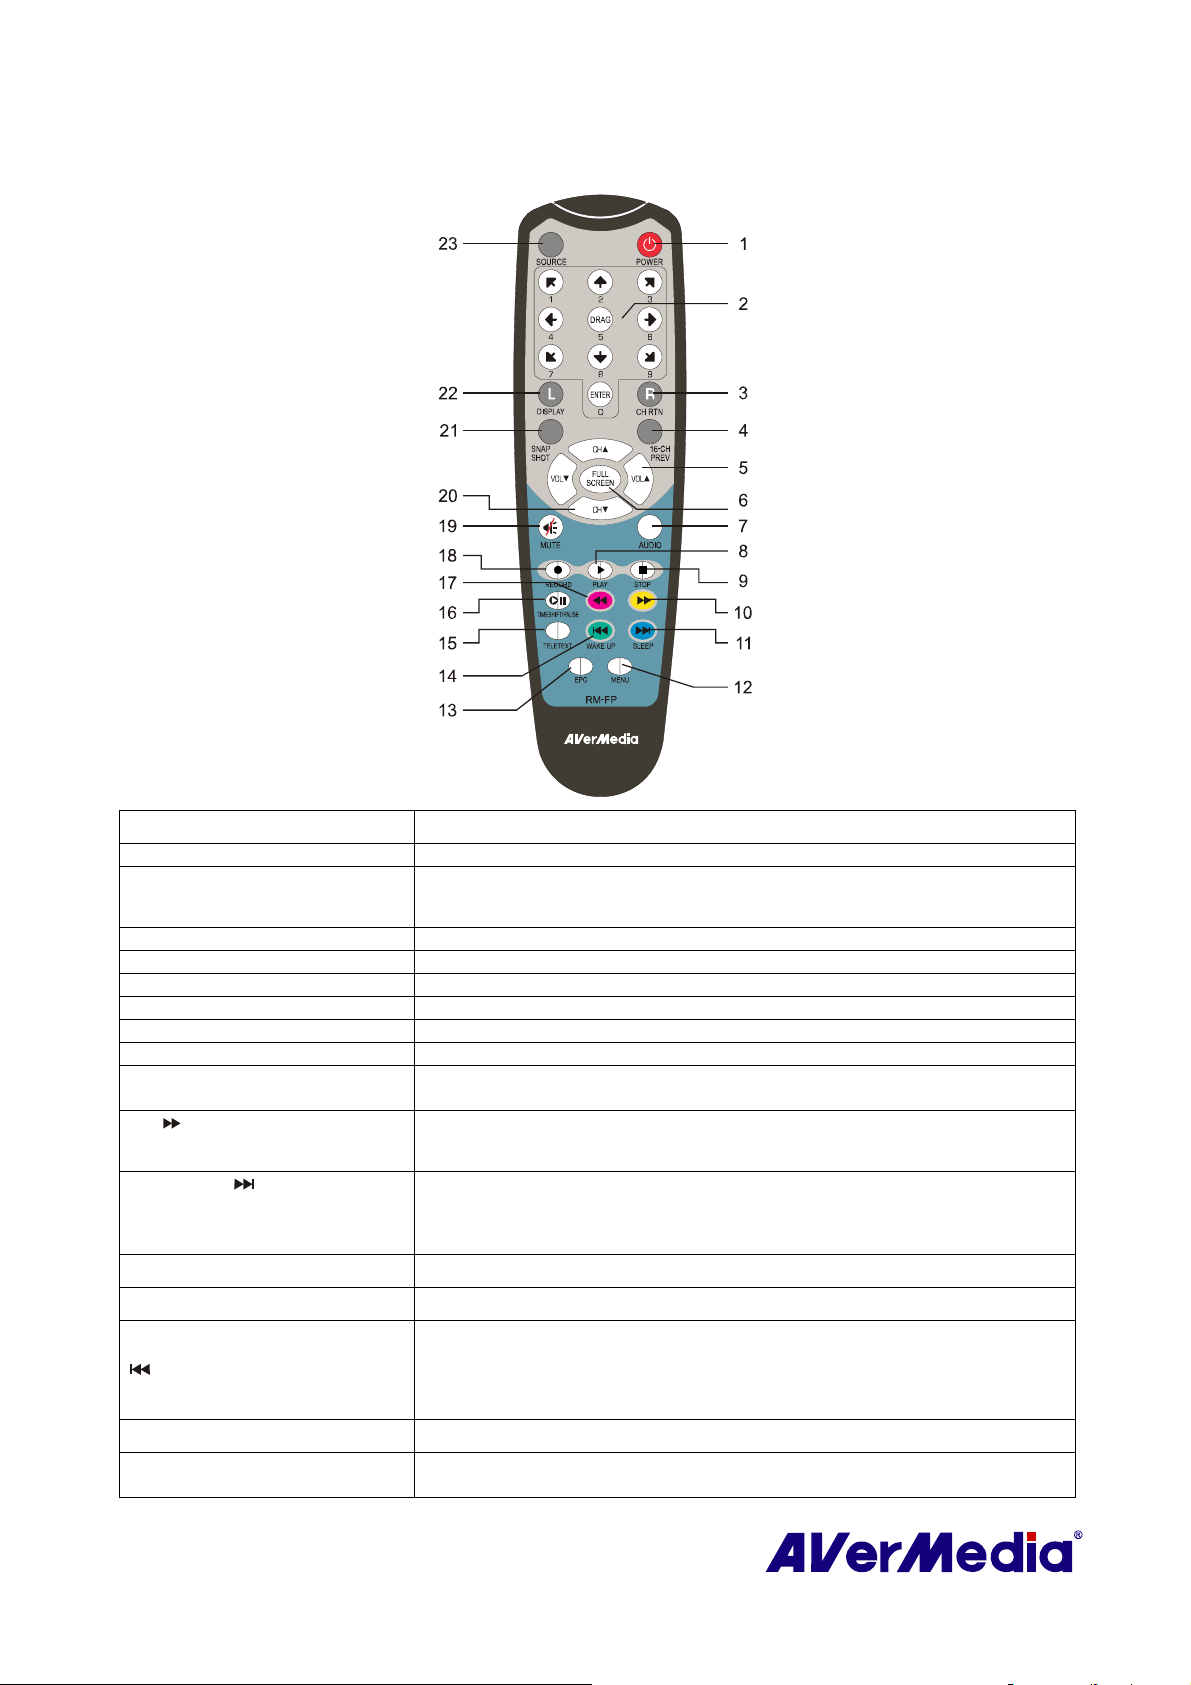
3.5.2 Remote Control Buttons (Model 2) (RM-FP)
Button Description
1. POWER Turn on/off the application.
2. NUMERIC BUTTONS - Select a TV channel.
- Under the Multi-Channel Preview mode, use ← ↑ → ↓ to highlight
the intended channel.
3. CH RTN Go to the previously selected channel.
4. 16-CH PREV Preview 4 ~ 64 Channels. (By default, 16 channels will be displayed.)
5. VOL▲/▼ Volume up/down.
6. FULL SCREEN Display TV in full screen.
7. AUDIO Switch between available audio modes.
8. ► (Play) Play the last recorded or played file.
9. ■ (Stop) - End the playback or recording.
- End the TimeShift mode and return to real-time TV or Radio mode.
10. (Forward) - Advance the playback.
- Jump to the Teletext page of the corresponding color according to
this button.
11. SLEEP - Go to the next file in the playlist.
- Set the time to put your computer in Stand By or Hibernate mode.
- Jump to the Teletext page of the corresponding color according to
this button.
12. MENU
13. EPG
14. WAKE UP
15. TELETEXT
16. TIMESHIFT /PAUSE
Display or hide the Control Panel.
Launch the Electronic Programme Guide.
- Go to the previous file in the playlist.
- Set the time to bring your computer out of Stand By or Hibernate
mode.
- Jump to the Teletext page of the corresponding color according to
this button.
View Teletext (PAL/SECAM) / Closed Caption (NTSC) information
- Freeze the playback.
- Switch from real-time TV or Radio to TimeShift mode.
16
Page 22

17. (Rewind)
18. ● (Record)
19. MUTE
20. CH ▲/▼
21. SNAPSHOT
22. DISPLAY
23. SOURCE
- Rewind the playback.
- Jump to the Teletext page of the corresponding color according to
this button.
Switch to PVR mode and record the current program or video into your
hard drive.
Turn on/off the sound.
Go up or down to the next active channel.
Capture the on-screen image to a bitmap file.
Display information.
Switch between available signal source.
17
Page 23
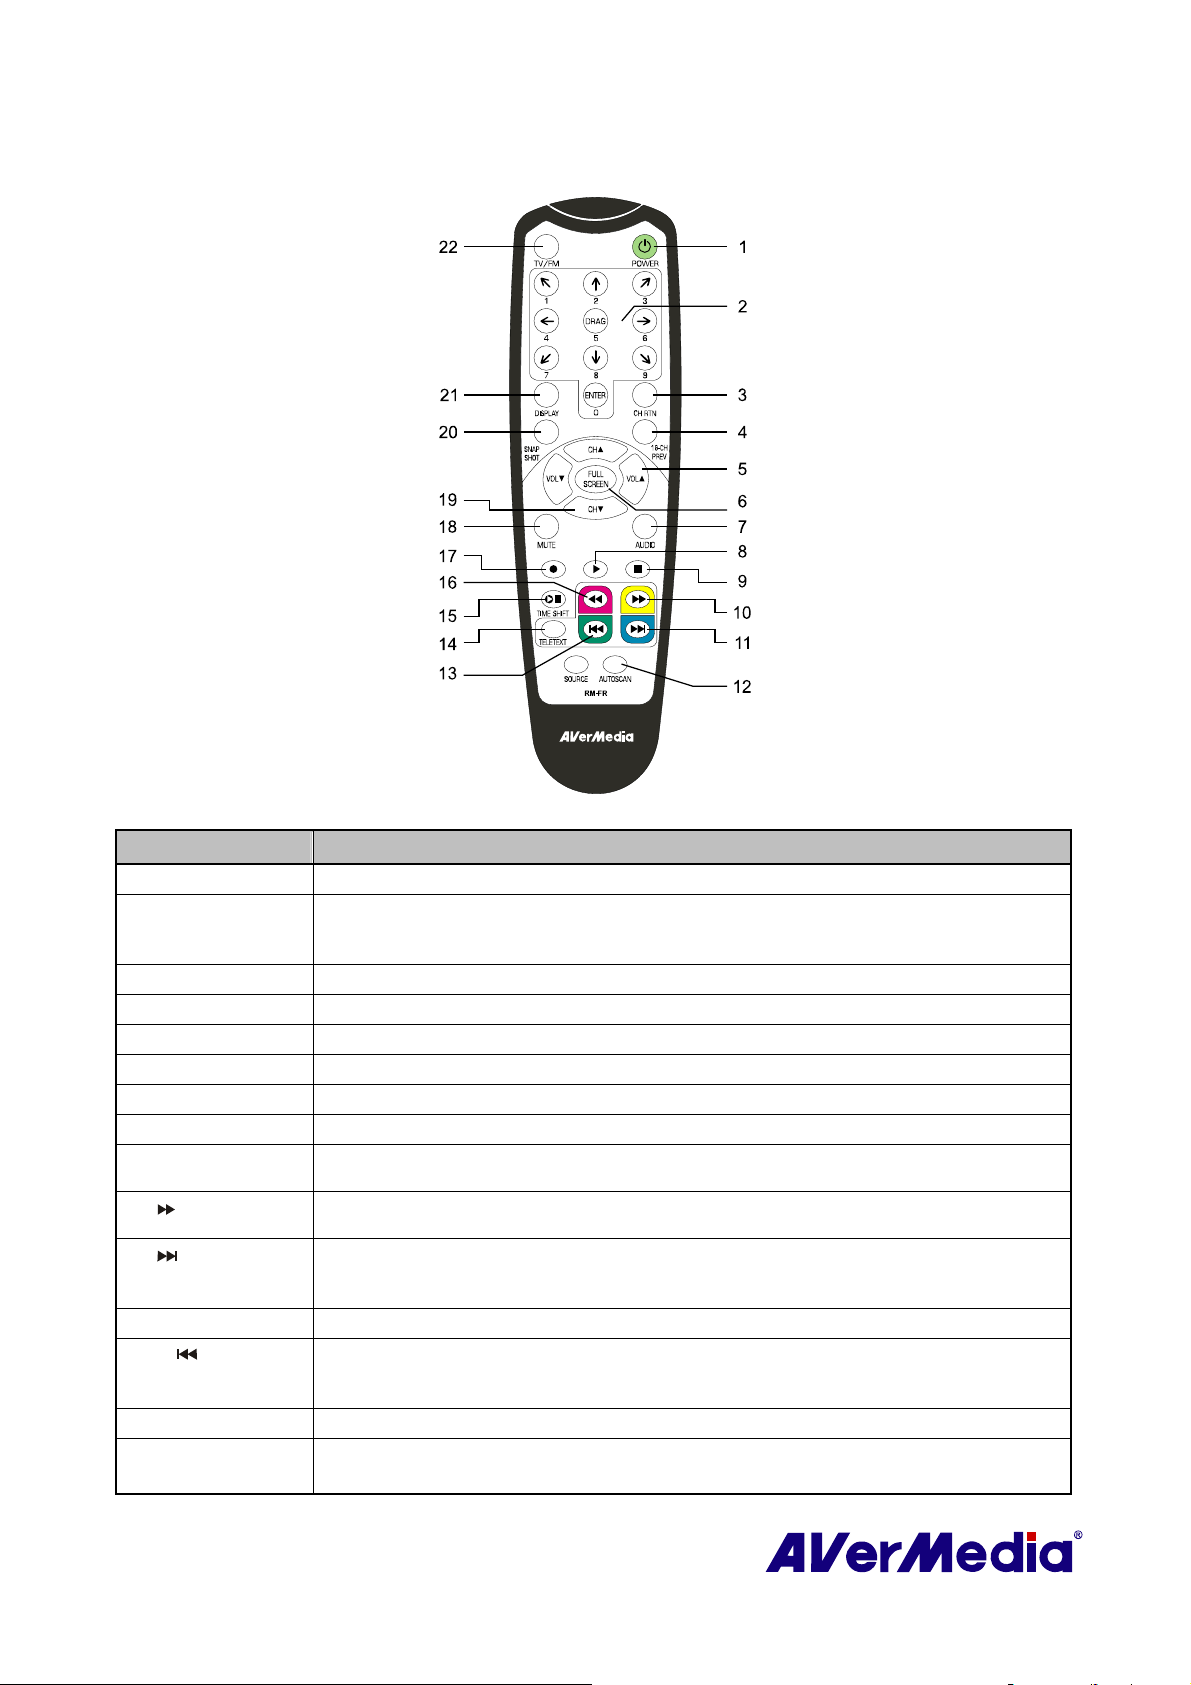
3.5.3 Remote Control Buttons (Model 3) (RM-JC)
Button Description
1.Power Turn on/off the application
2.Numeric Buttons
3.CH RTN Go to the previously selected channel.
4.16-CH PREV Preview 4 ~ 64 channels. (By default, 16 channels will be displayed.)
5. VOL▲/▼ Increase/decrease the volume.
6.FULL SCREEN Display TV or video in full screen.
7. AUDIO Switch between available audio modes.
8. ► (Play) Play the last recorded or played file.
9. ■ (Stop)
10. (Forward)
11. (Next File)
12. AUTOSCAN
13. (Previous
File)
14. TELETEXT View Teletext information.
15.
TIMESHIFT/PAUSE
- Select a TV channel.
- Under the Multi-Channel Preview mode, use↑↓← → to highlight the intended
channel.
- End the playback or recording.
- End the TimeShift mode and return to real-time TV or FM mode.
- Advance the playback.
- Jump to the Teletext page of the corresponding color according to this button.
- Go to the next file in the playlist.
- Set the time to put your computer in Standby or Hibernate mode.
- Jump to the Teletext page of the corresponding color according to this button.
Display or hide the Control Panel.
- Go to the previous file in the playlist.
- Set the time to bring your computer out of Standby or Hibernate mode.
- Jump to the Teletext page of the corresponding color according to this button.
- Freeze the playback.
- Switch from real-time TV or FM to Time Shift mode.
18
Page 24

16. (Rewind)
17. ● (Record) Switch to PVR mode and record the current program or video into your hard drive.
18. MUTE Turn on/off the sound.
19. CH ▲/▼ Go up or down to the next active channel.
20. SNAPSHOT Capture the on-screen image to a bitmap file.
21. DISPLAY Display information.
22. TV/FM
- Rewind the playback.
- Jump to the Teletext page of the corresponding color according to this button.
Switch between available signal sources.
19
Page 25
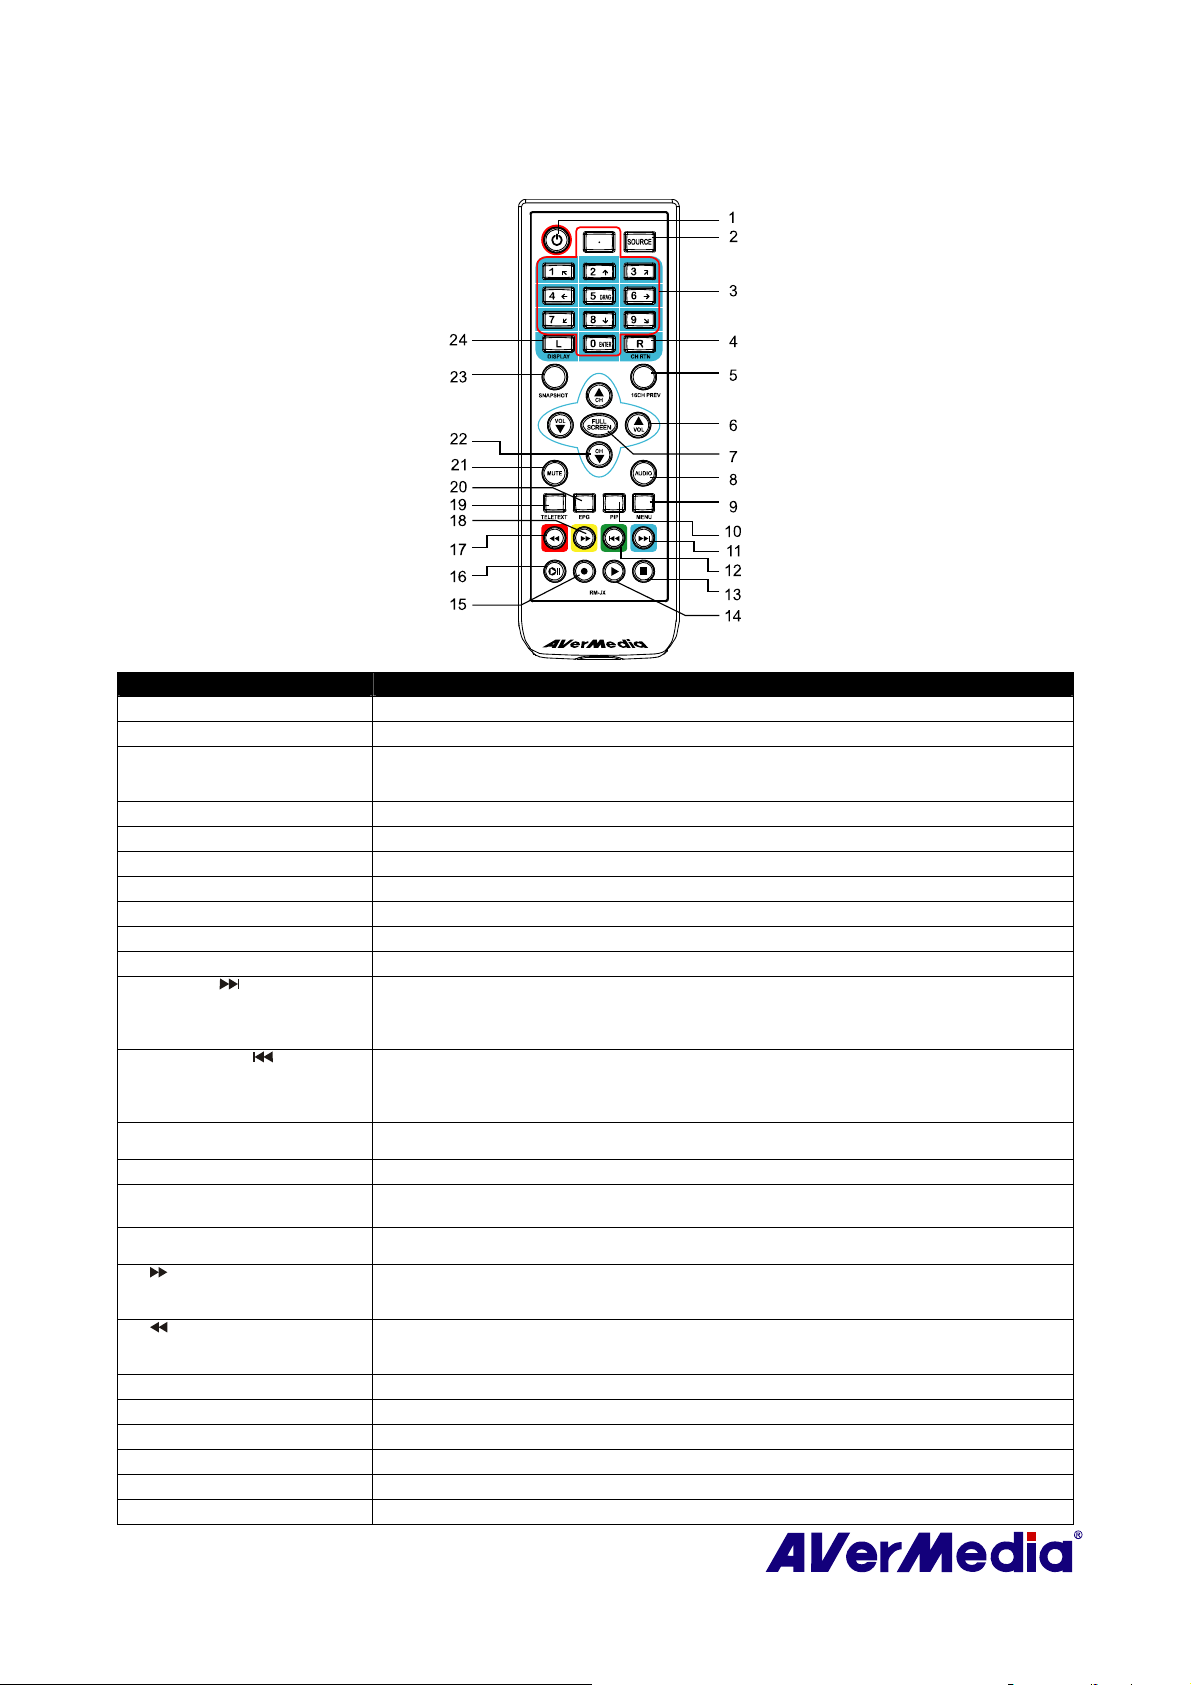
3.5.4 Remote Control Buttons (Model 4) (RM-JX)
Button Description
1. POWER
2. SOURCE
3. Numeric Buttons - Select a TV channel.
4. CH RTN
5. 16-CH PREV
6. VOL▲/▼
7. FULL SCREEN
8. AUDIO
9. MENU
10. PIP
11. SLEEP - Go to the next file in the playlist.
12. WAKE UP - Go to the previous file in the playlist.
13. ■ (Stop) - End the Playback or recording.
14. ► (Play)
15. ● (Record)
16. TIMESHIFT /PAUSE - Freeze the playback.
17. (Forward) - Advance the playback.
18. (Rewind) - Rewind the playback.
19. TELETEXT
20. EPG
21. MUTE
22. CH ▲/▼
23. SNAPSHOT
24. DISPLAY
Turn on/off the application
Switch between available signal sources.
- Under the Multi-Channel Preview mode, use↑↓← → to highlight the
intended channel.
Go to the previously selected channel.
Preview 4 ~ 64 Channels. (By default, 16 channels will be displayed.)
Volume up/down.
Display TV in full screen.
Switch between available audio modes.
Display or hide the Control Panel.
Display or hide the PIP window.
- Set the time to put your computer in Stand By or Hibernate mode.
- Jump to the Teletext page of the corresponding color according to this
button.
- Set the time to bring your computer out of Stand By or Hibernate mode.
- Jump to the Teletext page of the corresponding color according to this
button.
- End the TimeShift mode and return to real-time TV or Radio mode.
Play the last recorded or played file.
Switch to PVR mode and record the current program or video into your hard
drive.
- Switch from real-time TV or Radio to TimeShift mode.
- Jump to the Teletext page of the corresponding color according to this
button.
- Jump to the Teletext page of the corresponding color according to this
button.
View Teletext/MHEG-5/ Closed Caption information.
Launch the Electronic Program Guide.
Turn on/off the sound.
Go up or down to the next active channel.
Capture the on-screen image to a bitmap file.
Display information.
20
Page 26
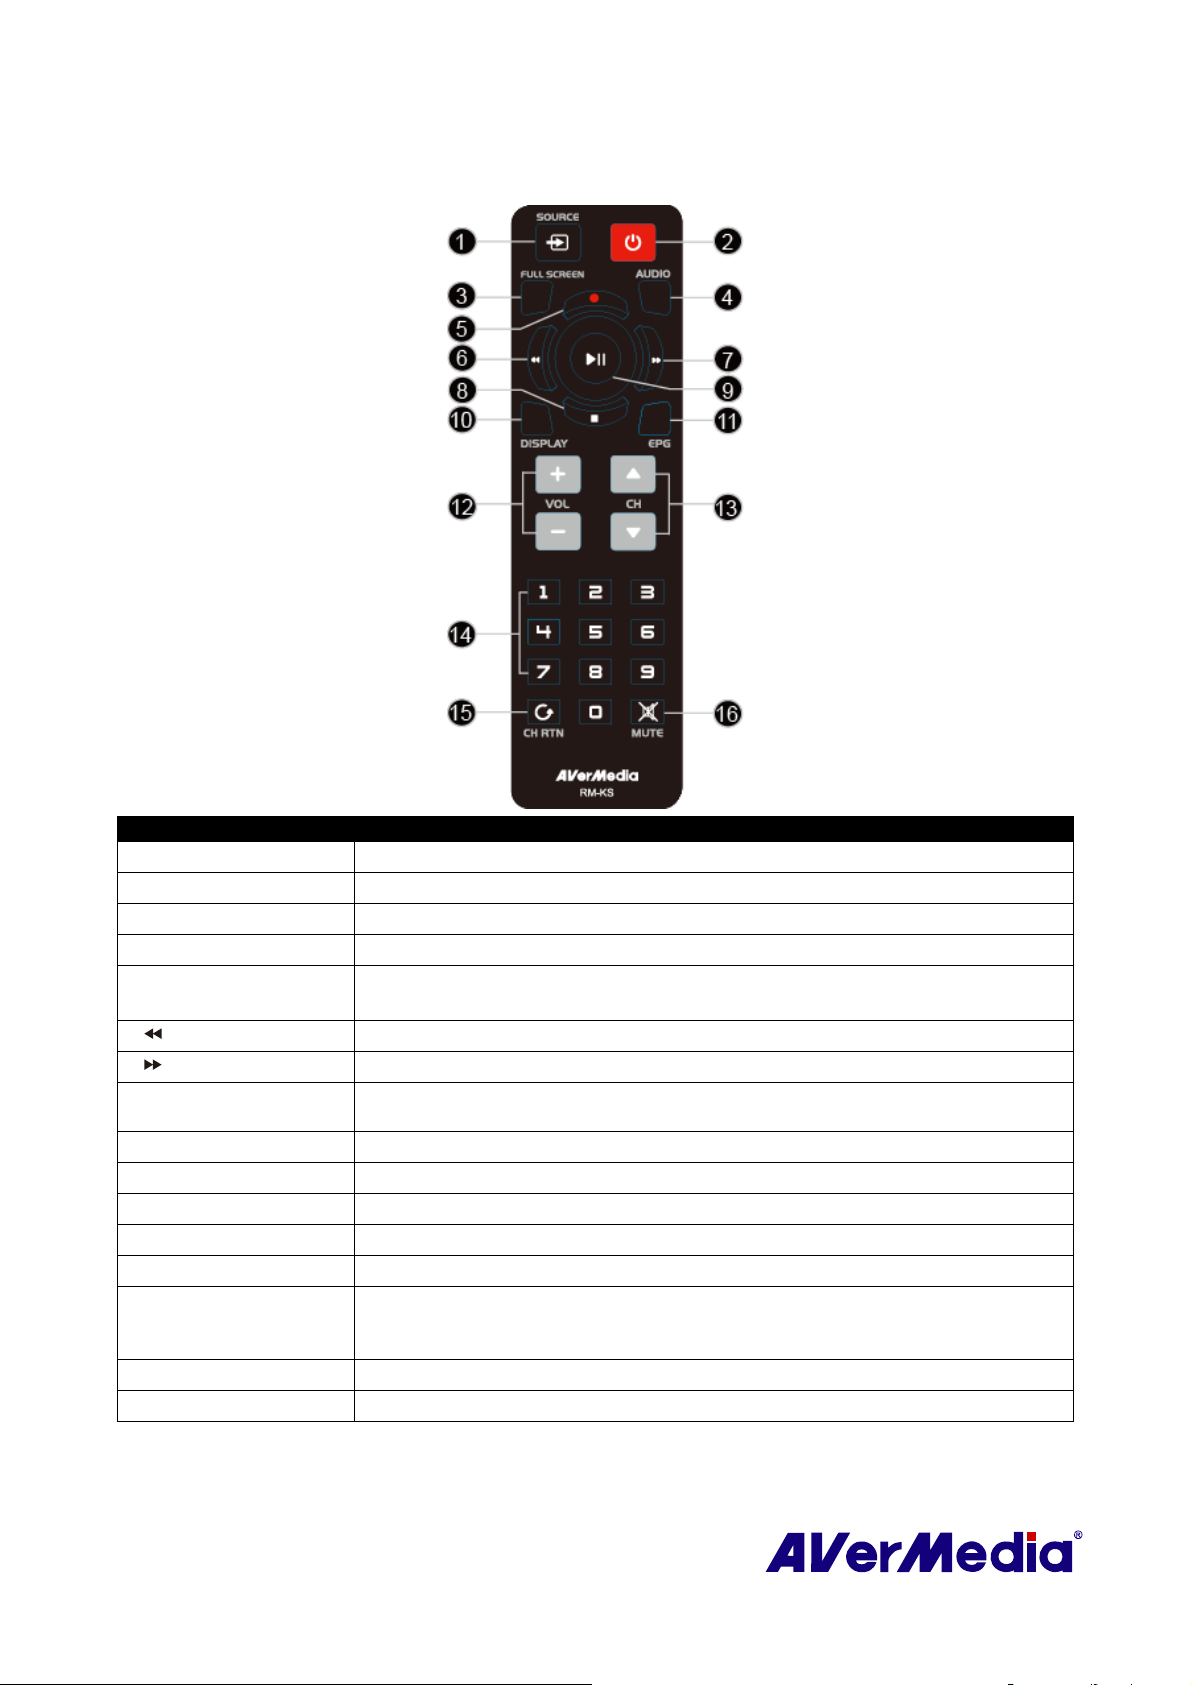
3.5.5 Remote Control Buttons (Model 5) (RM-KS)
Button Description
1. SOURCE
2. POWER
3. FULL SCREEN
4. AUDIO
5. ● (Record)
Switch between available signal sources.
Turn on/off the application
Display TV in full screen.
Switch between available audio modes.
Switch to PVR mode and record the current program or video into your hard
drive.
6. (Rewind)
7. (Forward)
Rewind the playback.
Advance the playback.
8. ■ (Stop) - End the Playback or recording.
- End the TimeShift mode and return to real-time TV or Radio mode.
9. ► (Play) / PAUSE
10.DISPLAY
11.EPG
12.VOL+/-
13.CH ▲/▼
Play the last recorded or played file. / Freeze the playback.
Display information.
Launch the Electronic Program Guide. (DVB-T only)
Volume up/down.
Go up or down to the next active channel.
14.Numeric Buttons - Select a TV channel.
- Under the 16-Channel preview mode, use 2 4 6 8 to highlight the intended
channel.
15.CH RTN
16.MUTE
Go to the previously selected channel.
Turn on/off the sound.
21
Page 27
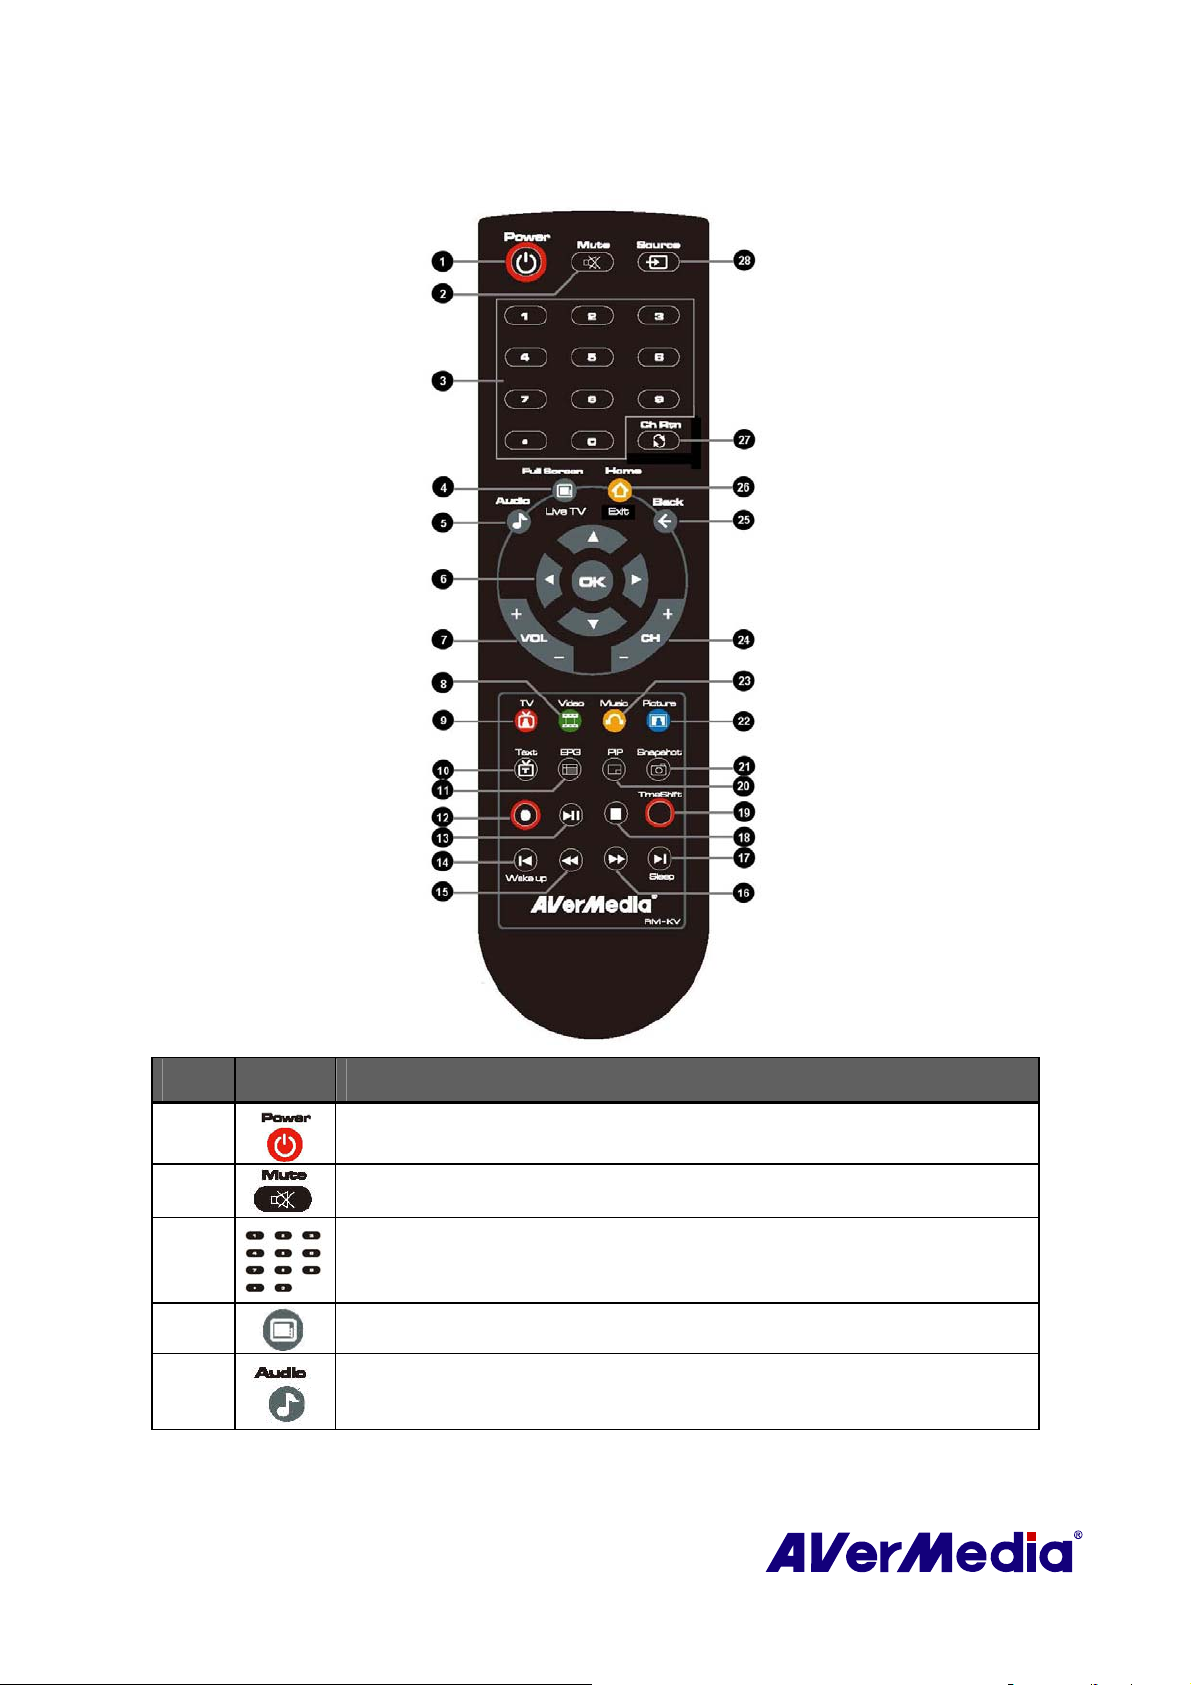
3.5.6 Remote Control Buttons (Model 6) (RM-KV)
Button Description
(1)
(2)
(3)
(4)
(5)
Turn on/off the application.
Turn off/on the sound.
Use numeric buttons to select a channel.
Display TV in full screen.
Change between available audio modes.
22
Page 28
(6)
(7)
(8)
(9)
(10)
(11)
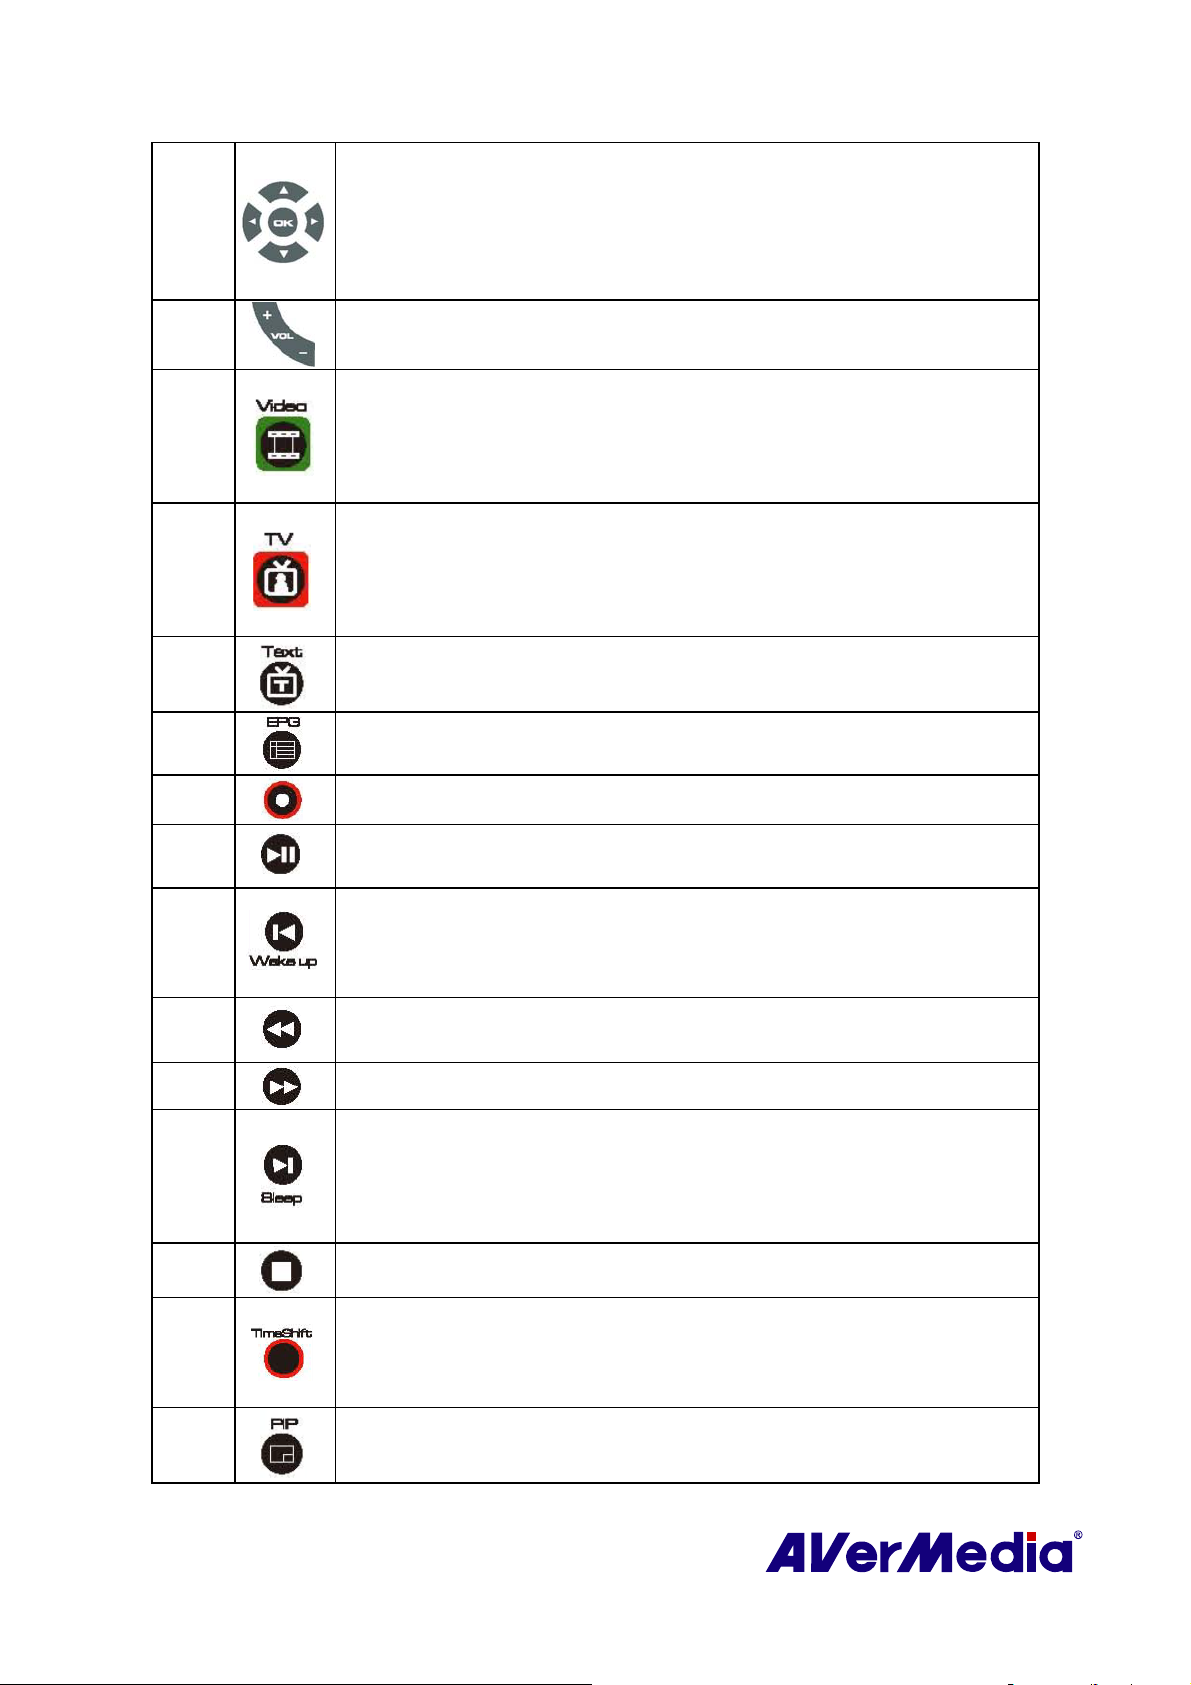
Main Screen: Use the arrow button to navigate all on-screen items. Use OK
to confirm the selection. (This function is only available for AVer
MediaCenter)
PIP Mode: Change size or position of the selected screen by the arrow
buttons. (This function is only available for AVer MediaCenter)
Volume up / Volume down.
Main Screen: A shortcut to the main menu-- “Video”. (This function is only
available for AVer MediaCenter)
Teletext Mode: Jump to the teletext page of the corresponding color
according to this button.
Main Screen: A shortcut to the main menu--“TV”. (This function is only
available for AVer MediaCenter)
Teletext Mode: Jump to the teletext page of the corresponding color
according to this button.
View Teletext / Close Caption information.
View EPG information. (This function is only available for digital TV)
(12)
(13)
(14)
(15)
(16)
(17)
(18)
(19)
Record the current program.
Play the selected file or temporarily freeze the playback.
- Go to the previous item in the playlist.
- Set the time to bring your computer out of Stand By or Hibernate mode.
(This function is only available for AVerTV 6)
Move backwards in intervals.
Skip forward in intervals.
- Go to the next item in the playlist.
- Set the time to put your computer into Stand By / Hibernate mode, exit the
application or turn off the computer. (This function is only available for
AVerTV 6)
Stop the playback, recording, TimeShift, etc.
- Switch from real-time TV or Radio to TimeShift mode.
(20)
- Temporarily freeze the playback. (This function is only available for
AVerTV 6)
Activate the Picture in Picture (PIP) / Multi-Channel Display function.
23
Page 29
(21)
(22)
(23)
(24)
(25)
(26)
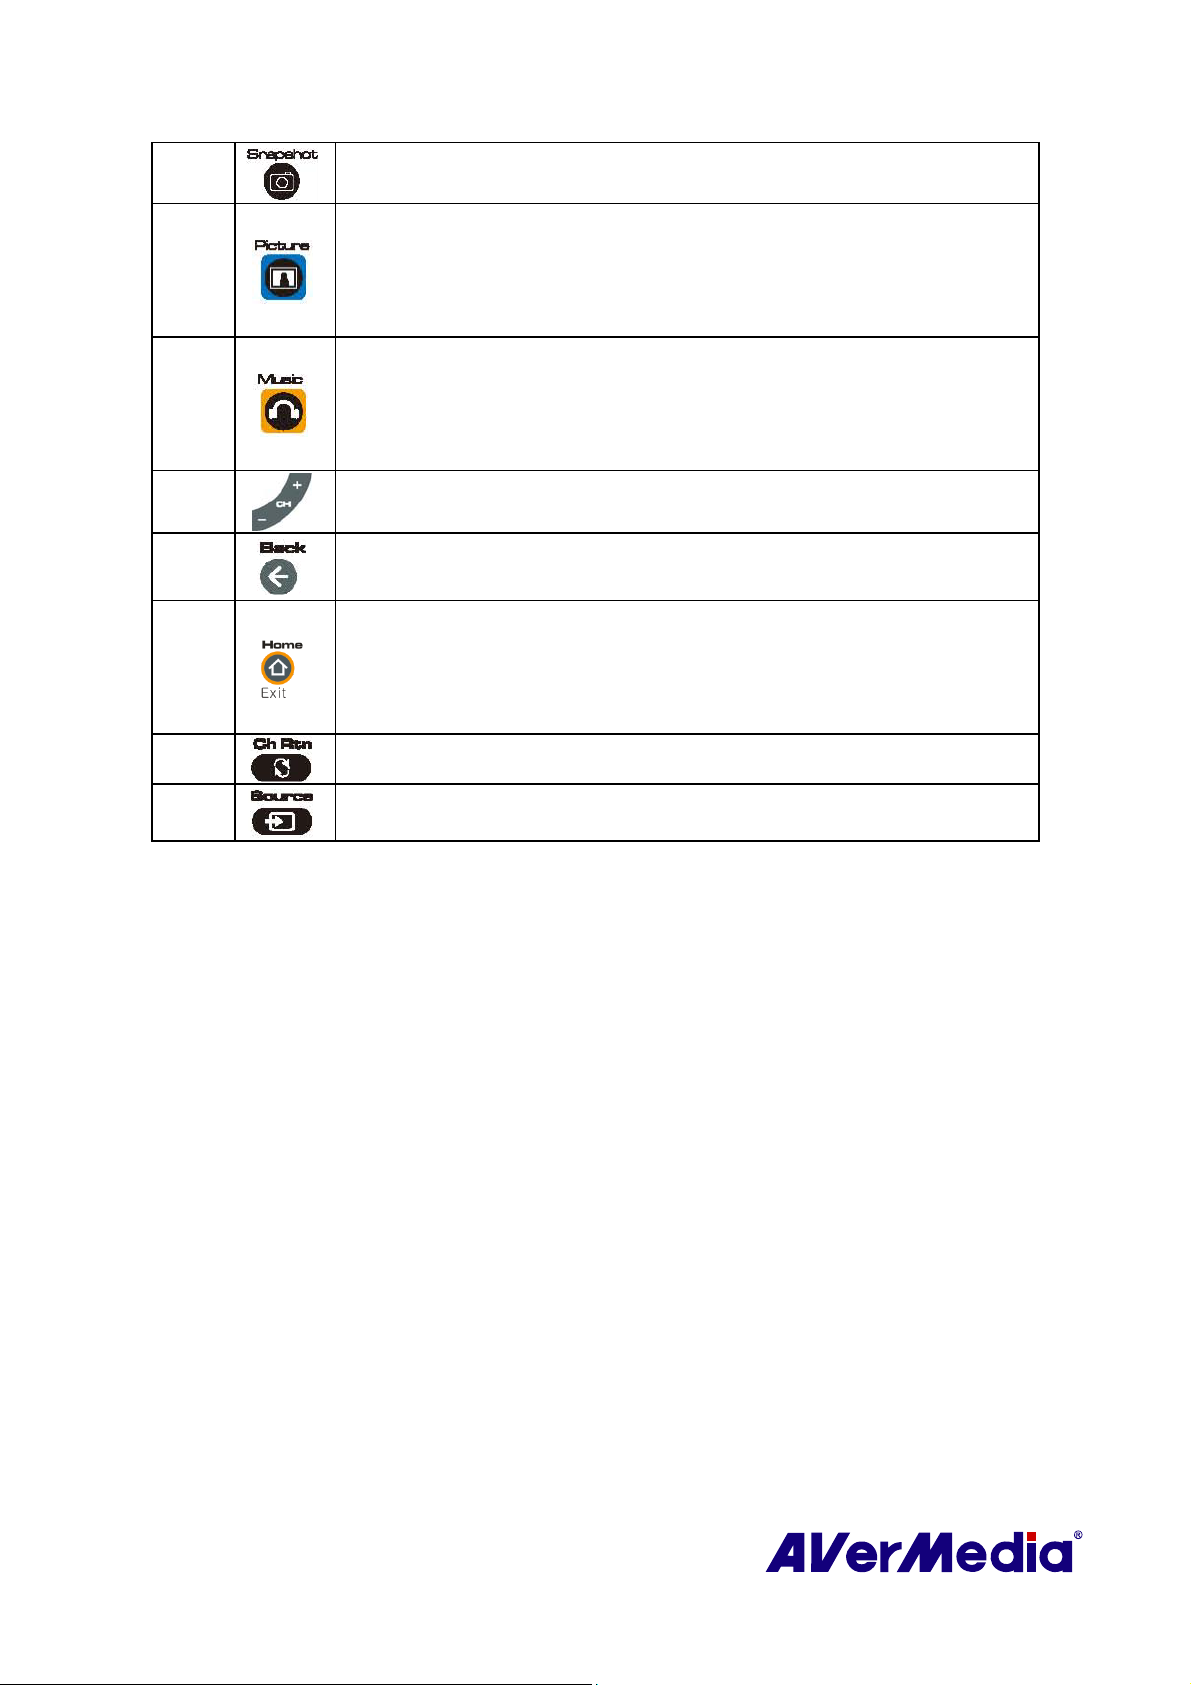
Capture an image or a continuous sequence of images.
Main Screen: A shortcut to the main menu--“Pictures”. (This function is only
available for AVer MediaCenter)
Teletext Mode: Jump to the teletext page of the corresponding color
according to this button.
Main Screen: A shortcut to the main menu--“Music”. (This function is only
available for AVer MediaCenter)
Teletext Mode: Jump to the teletext page of the corresponding color
according to this button.
Channel up and channel down.
Go back to the previous page. (This function is only available for AVer
MediaCenter)
- Go to the main menu. (This function is only available for AVer
MediaCenter)
- Exit from CI/CA Information dialog. (This function is only available for the
device supporting CI/CA interface.)
(27)
(28)
Return to previously accessed channel.
Change between available signal sources.
24
Page 30
3.6 Resizing the TV Monitor Window
To enlarge or reduce the size of the TV Monitor window, click and drag the lower right
corner of the window.
Double-click the TV Monitor window to display it in full screen or click the Full Screen
button
When in full screen mode, just double-click anywhere on the screen to revert to the normal
TV window size.
on the Control Panel.
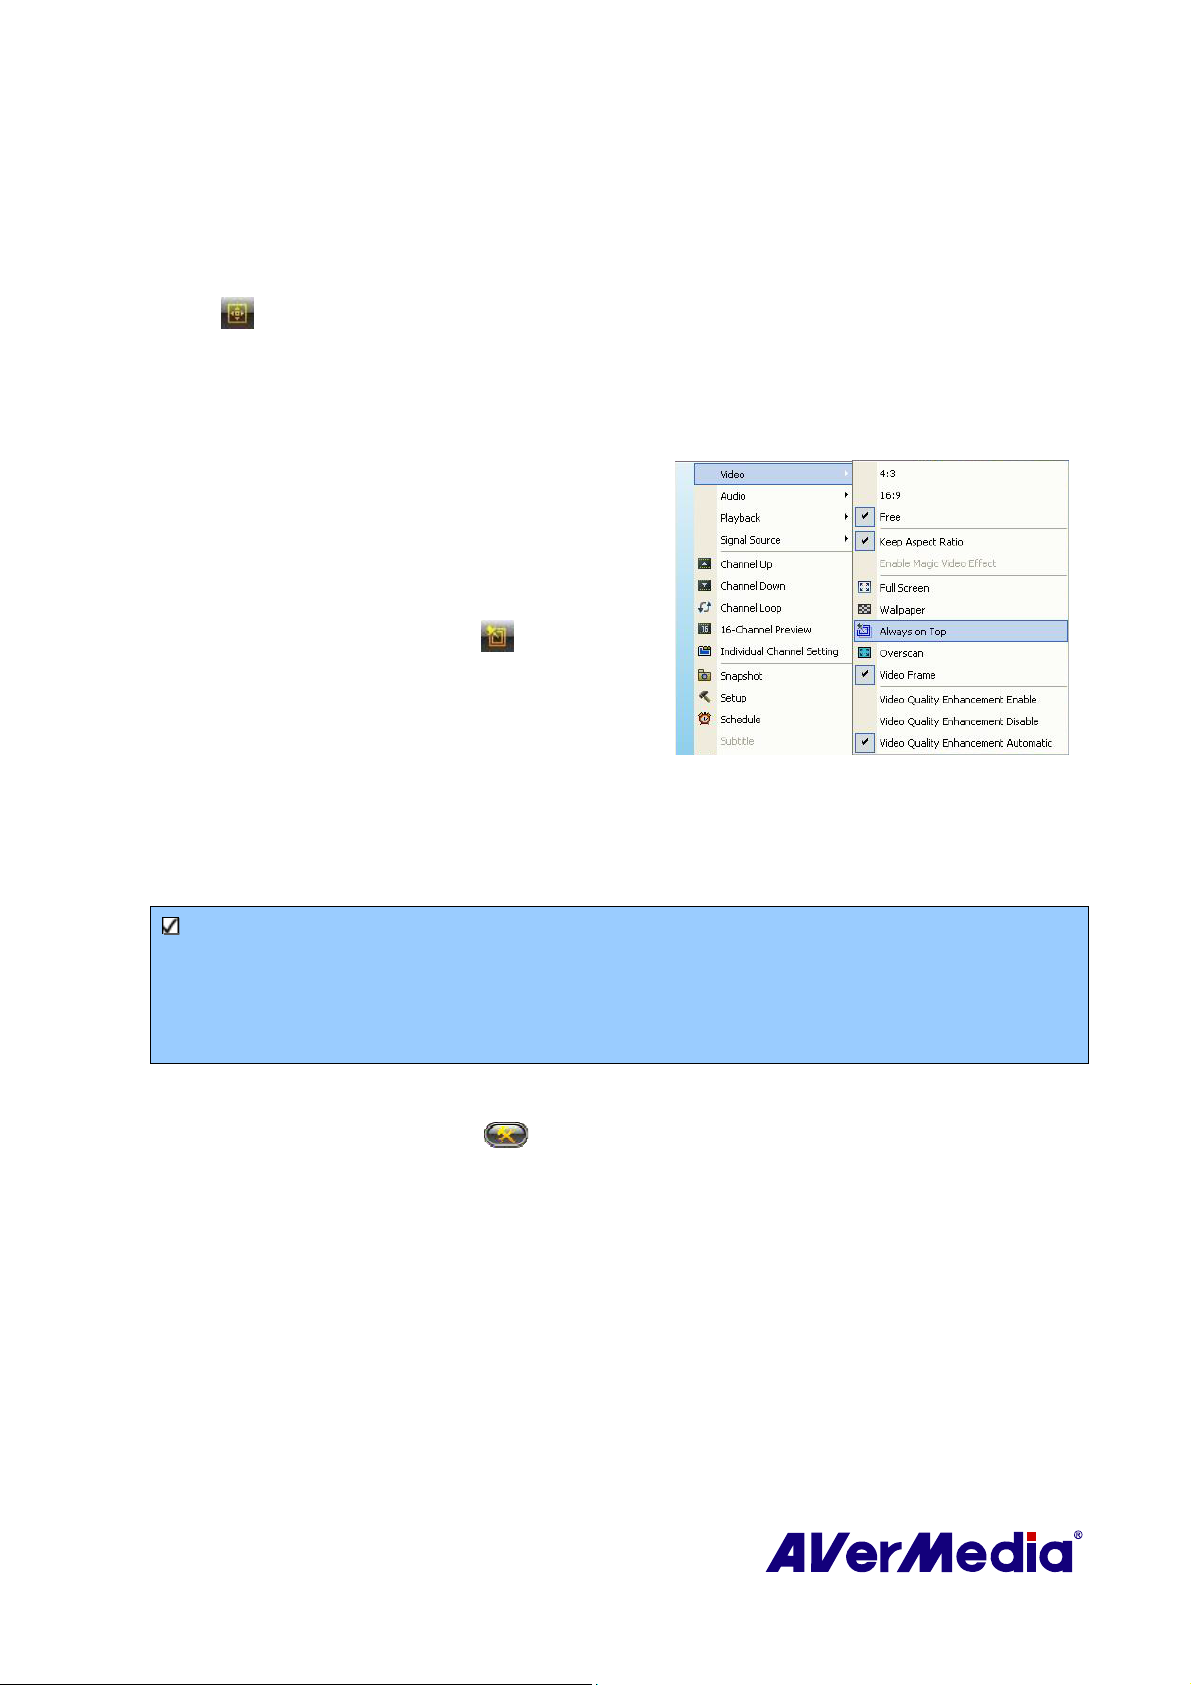
3.7 Always on Top
To make the TV monitor window float over the top
of other program windows, right-click on the TV
monitor. In the pop-up menu, point to Video and
choose Always on Top.
OR,
Click the Always on Top button
Panel.
3.8 Setting Windows
This option allows you to put your computer in Stand By or Hibernate mode, power off, exit
the application or log off from the computer while you are away from the computer.
®
Power Options
on the Control
Note:
Stand By: Stand By is a state in which your monitor and hard disks turn off, so that your
computer uses less power.
Hibernate: Hibernation is a state in which your computer shuts down to save power but first
saves everything in memory on your hard disk.
Please do the following:
1. First, Click the Setup button
on the left pane.
2. By default, the system is set to enable the Stand By/Hibernation option. What you have to
do is to choose the desired power-saving settings. If your computer has a problem with
coming out of Stand By or Hibernate mode, please clear the Stand By/Hibernate option.
and in the Setup dialog box, click Miscellaneous icon
25
Page 31
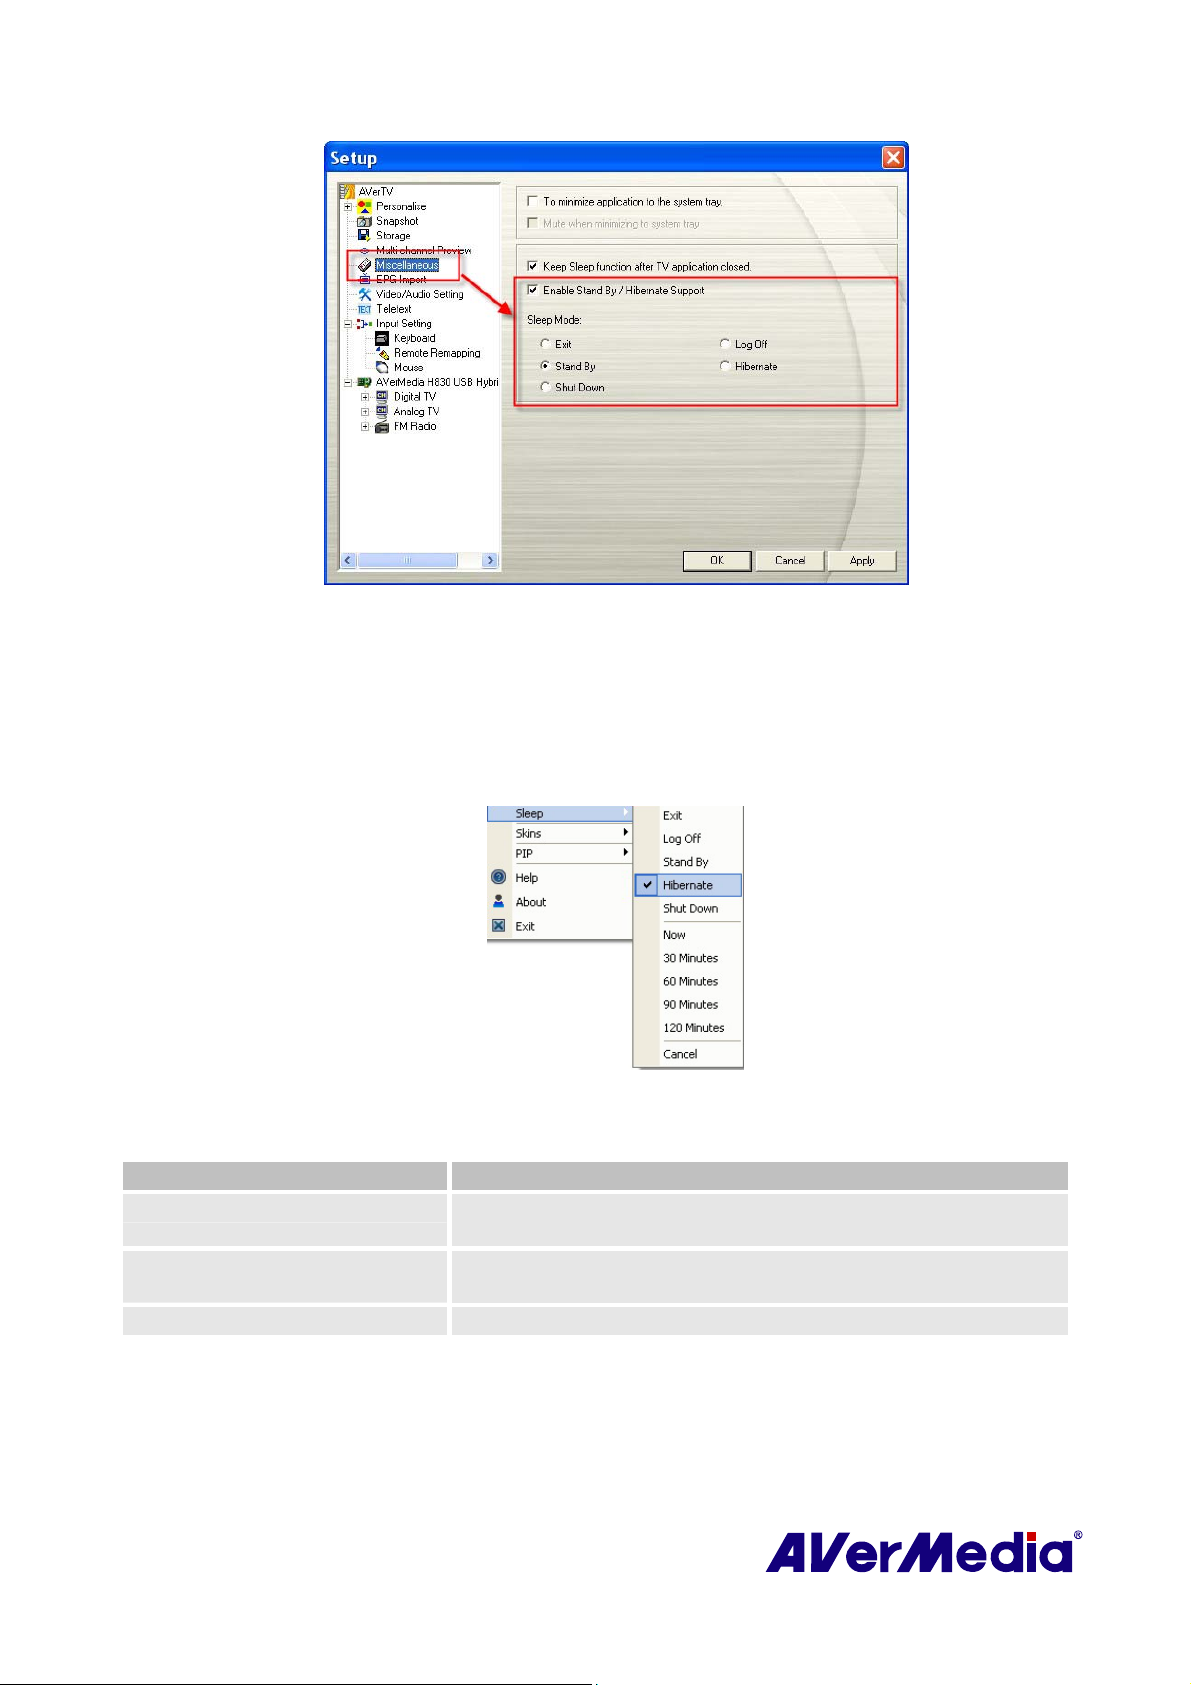
(This picture is only for reference.)
3. Then press the Sleep button on the remote control repeatedly to set the execution time.
OR,
1). Right-click on the TV monitor, point to Sleep and select the desired mode.
2). Right-click on the TV monitor again, point to Sleep and choose an execution time.
3). The time setting will be displayed on the TV monitor. For details, please see the
description below.
Time setting mode Description
Sleep 30/60/90/120 Minute(s) Your computer will go into Stand By or Hibernate mode in
30/60/90/120 minutes.
Now Your computer will go into Stand By or Hibernate mode in
about 10 seconds.
Cancel Your computer will return to original settings.
4. You can choose to keep or disable your setting when exiting the AVerTV application.
26
Page 32
(This picture is only for reference.)
3.9 Minimize the Application
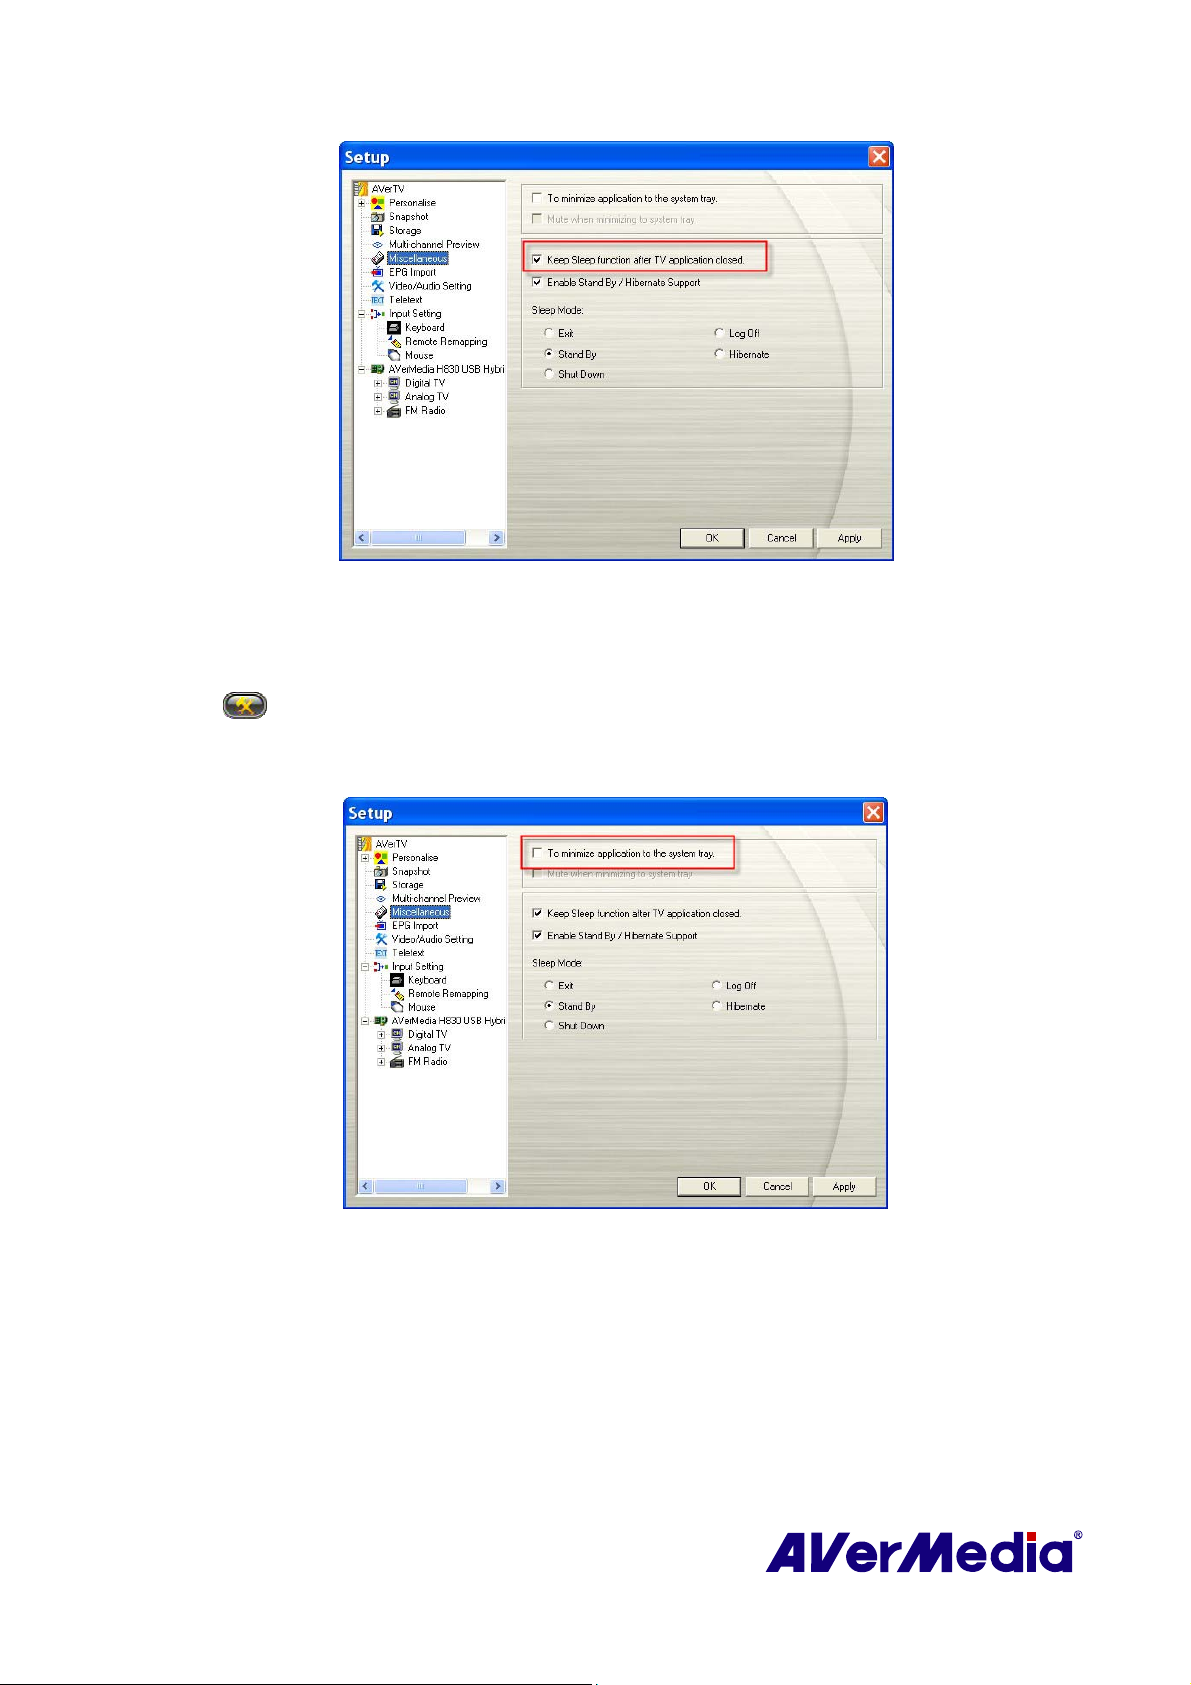
To minimize AVerTV application to the system tray (notification area), click the Setup
button
Select the To minimize application to the system tray. check box. Or clear the check box to
simply minimize the application to a taskbar button.
and in the Setup dialog box, click Miscellaneous icon on the left pane. Then
(This picture is only for reference.)
27
Page 33
3.10 Change Definitions of the Remote Control Buttons
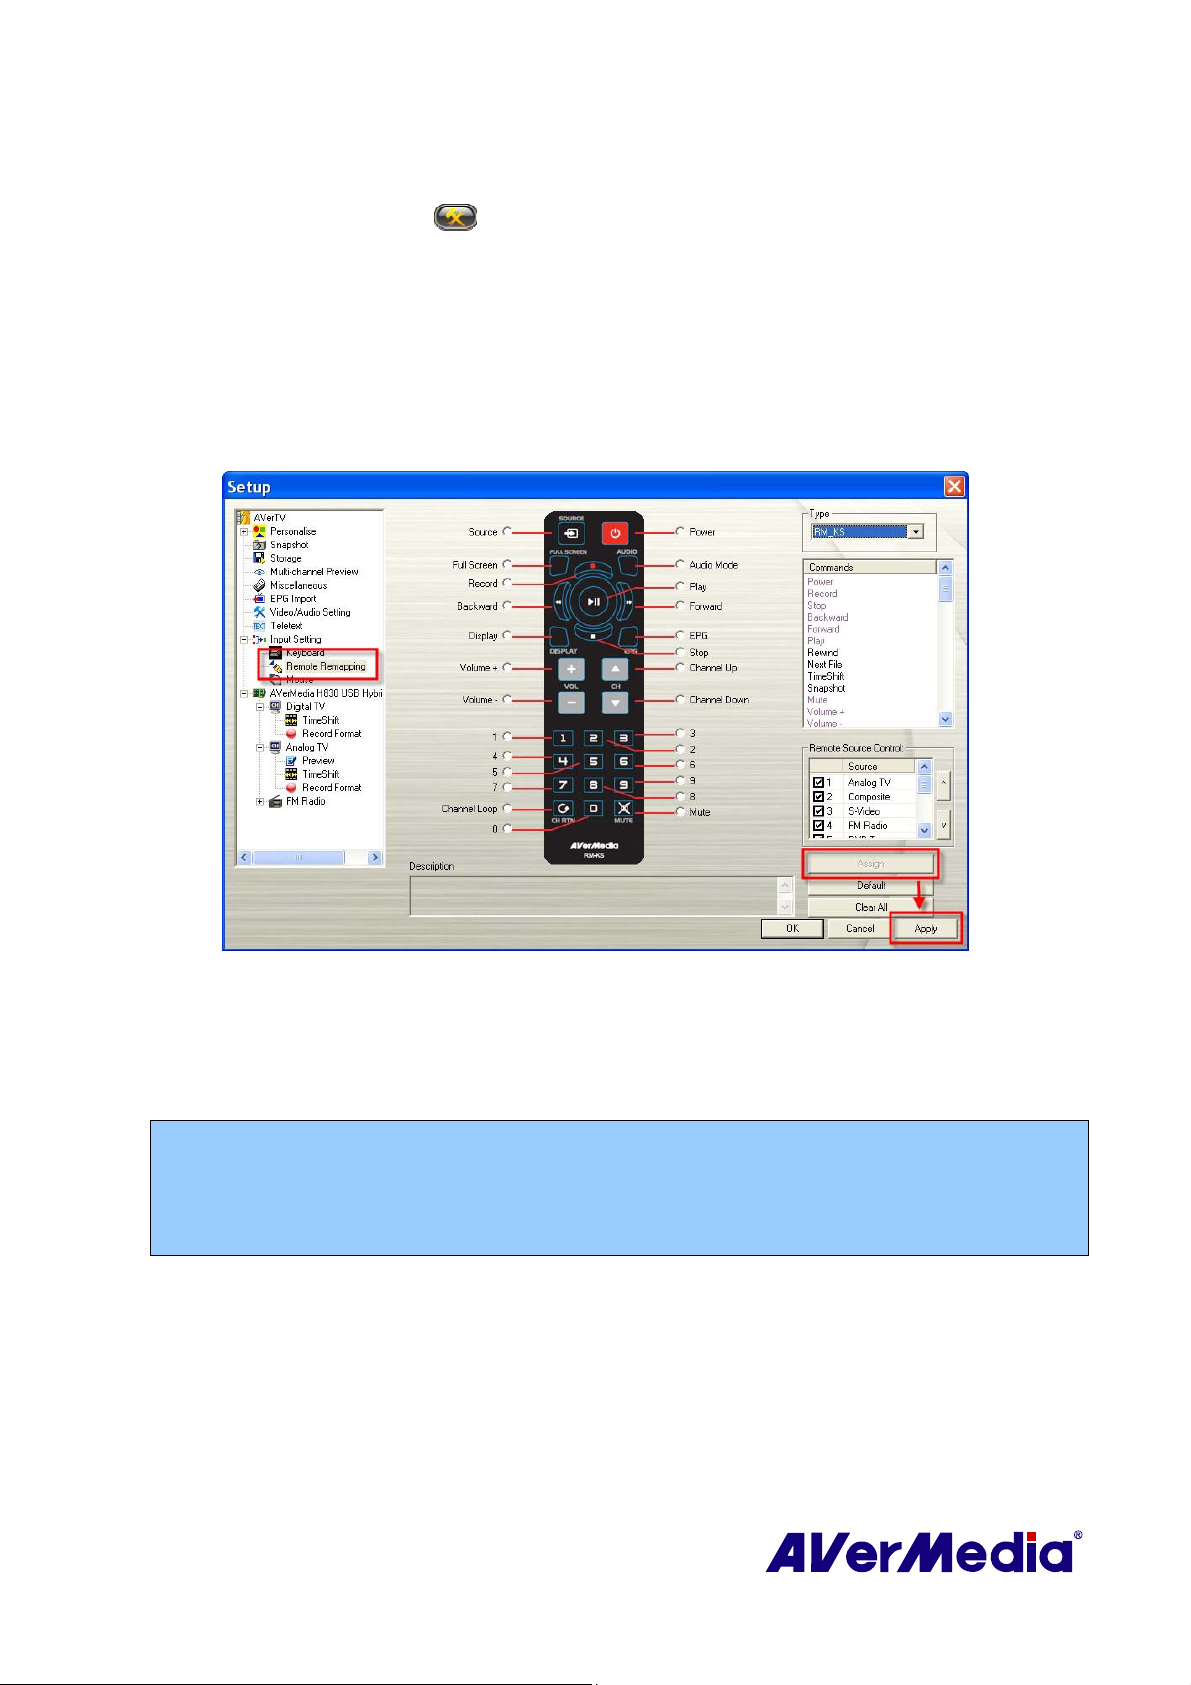
1. Click the Setup button and in the Setup dialog box, select Input Setting in the left
pane. Then click on the Remote Remapping icon on the left pane.
2. To re-define a function for a certain button:
● Select a desired button and choose a new command from the right pane of the dialog box.
Then click Assign.
● From the right pane of the dialog box, drag the desired command and drop it on the remote
button which you want to change the definition.
(This picture is only for reference.)
3. Click Apply to save the settings.
4. Click Clear All to delete all definitions of the remote control or click Default to revert
to the factory setting.
Note: For the following situations, please select RM_USB_FP from the Type drop-down list to re-
define a function for a certain button:
1. Your device uses external USB remote sensor and the remote control Part No. is “FP” or “KH”.
2. Your product is AVerTV Volar GPS 805.
28
Page 34
3.11 Customize the Remote Control Source Button
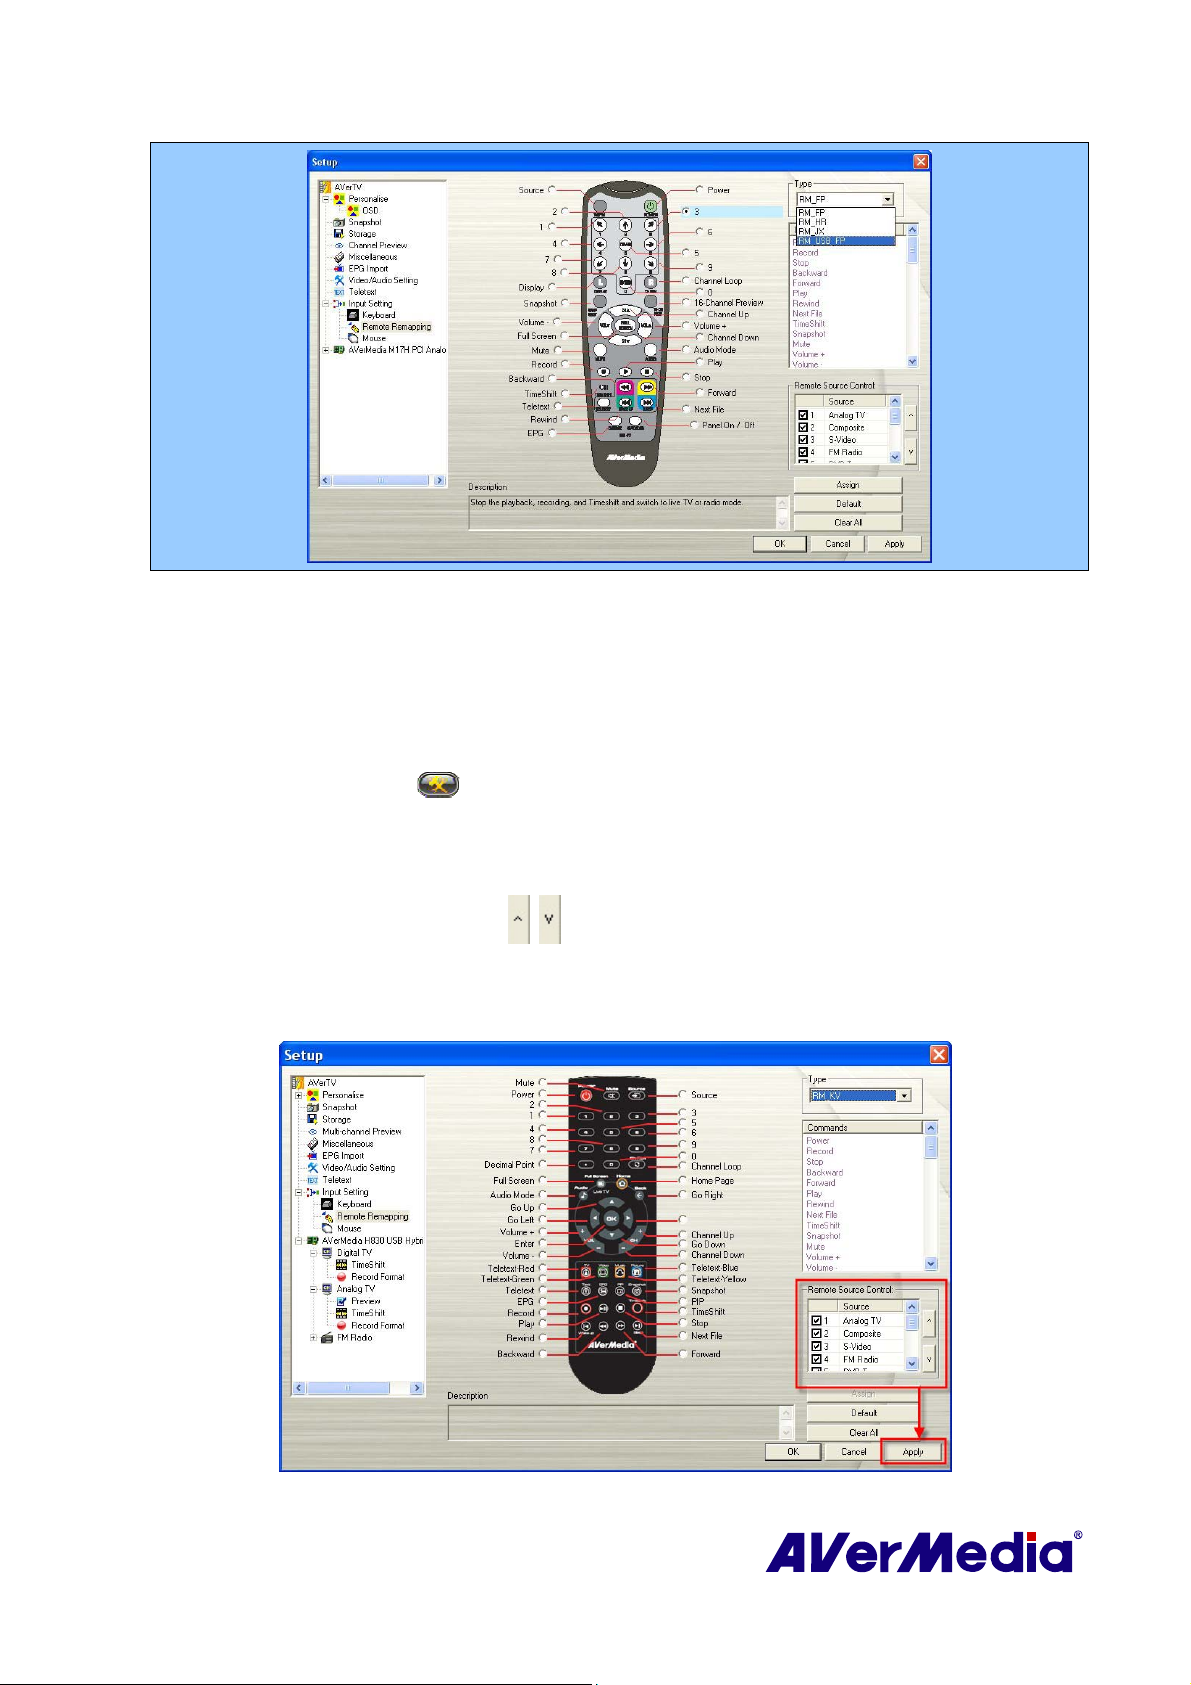
On the Remote Source Control page, you may customize the remote control “Source” button
to switch on the selected item.
1. Click the Setup button and in the Setup dialog box, select Input Setting in the left pane.
Then click on the Remote Remapping.
2. Select the signal source that you want from the Remote Control Source.
3. Click the UP or DOWN button
location you desire.
4. Click Apply to save the settings. Or click Default to revert to the factory setting.
at the right side until the selected signal reaches the
(This picture is only for reference.)
29
Page 35
3.12 Customize Definitions of the Mouse
To re-define the mouse:
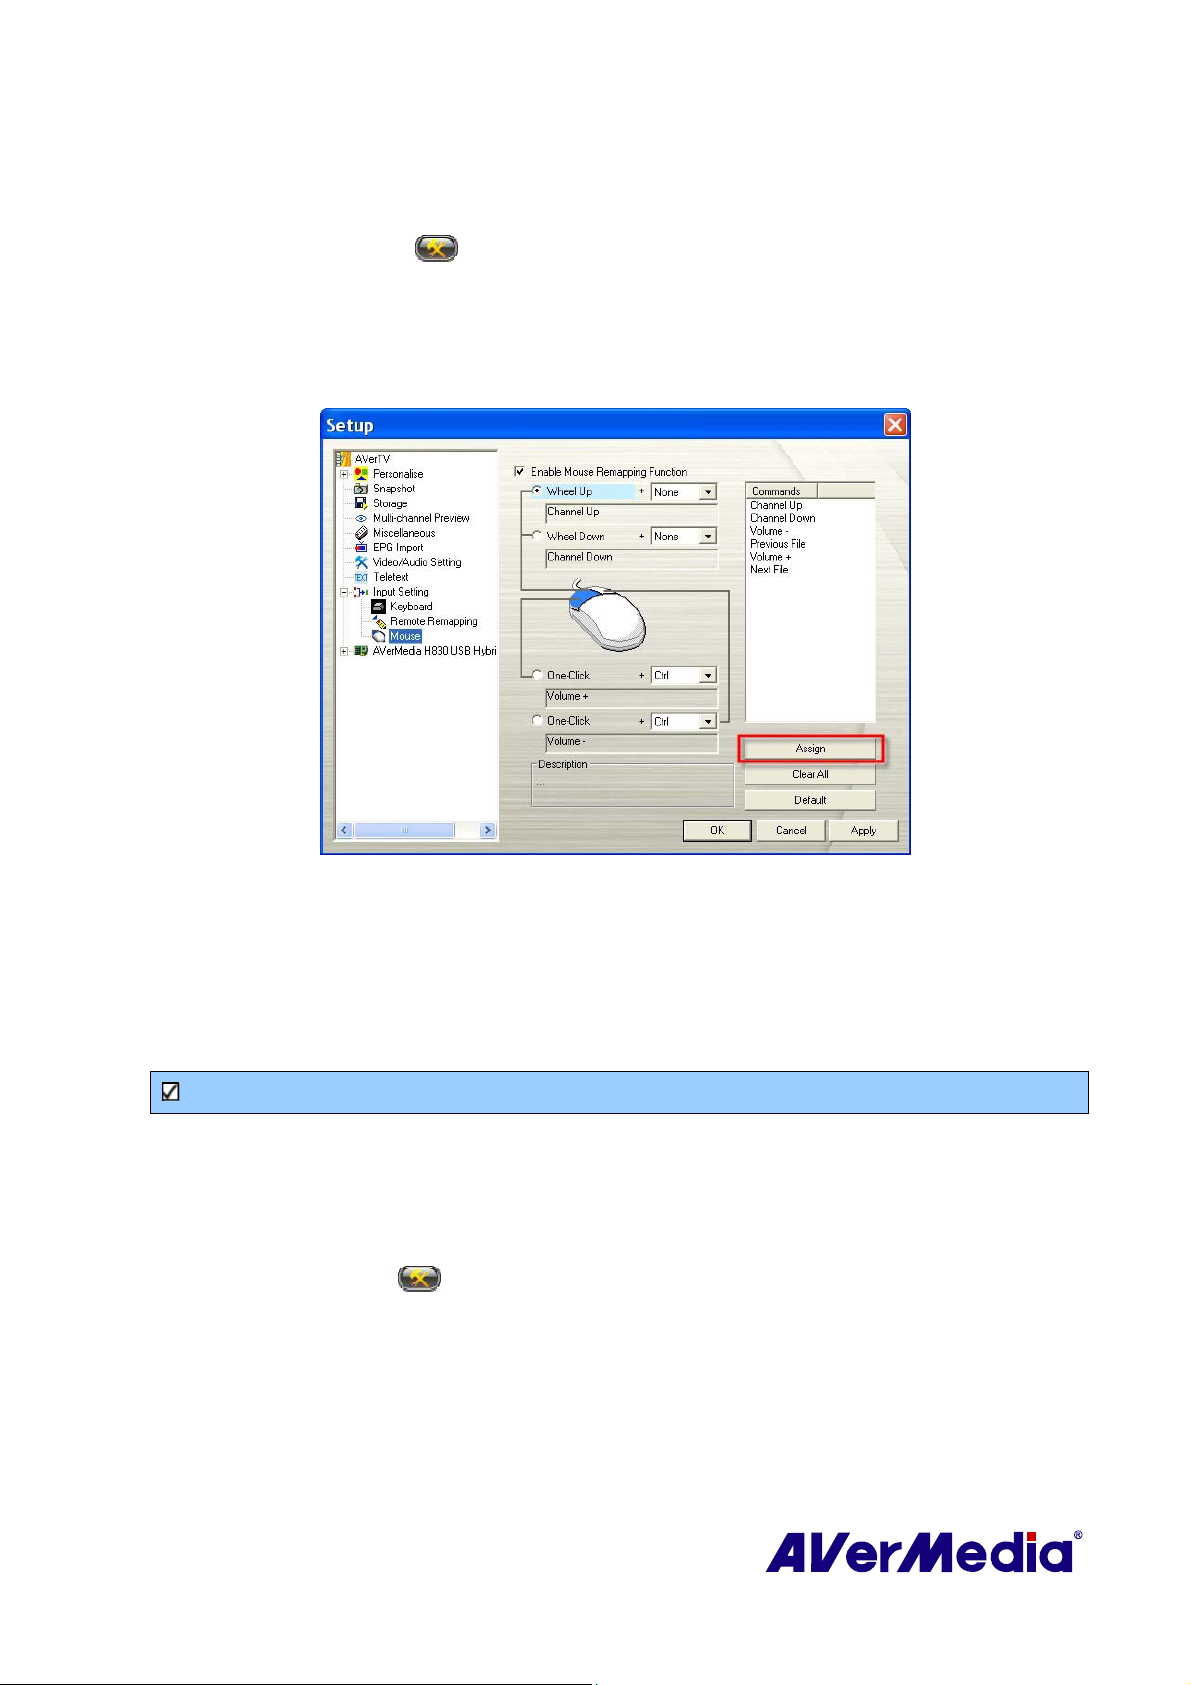
1. Click the Setup button and in the Setup dialog box, select Input Setting in the left pane.
Then click on the Mouse icon on the left pane.
2. To re-define a function for a certain button, select Wheel Up, Wheel Down or One-Click and the
desired item from the drop down list. Then choose a new command from the right pane of the
dialog box. Then click Assign.
(This picture is only for reference.)
3. Click Apply to save the settings.
4. Click Clear All to delete all definitions of the mouse or click Default to revert to the factory
setting.
3.13 Customize Definitions of the Keyboard (Hot Keys)
Note: It is recommended to use an unassigned key to use as your new keys.
You can use the default hot keys or create your own hot keys.
To re-define the shortcut keys:
1. Click the Setup button . In the Setup dialog box, choose the Input Setting, and click the
Keyboard icon on the left pane.
2. Choose the signal status from the Category drop down list.
3. Choose a command that you want to specify a new hot keys.
4. Assign hotkey combination to the command that you use most often and then click Assign. Or you
can click Remove to delete hotkeys.
30
Page 36
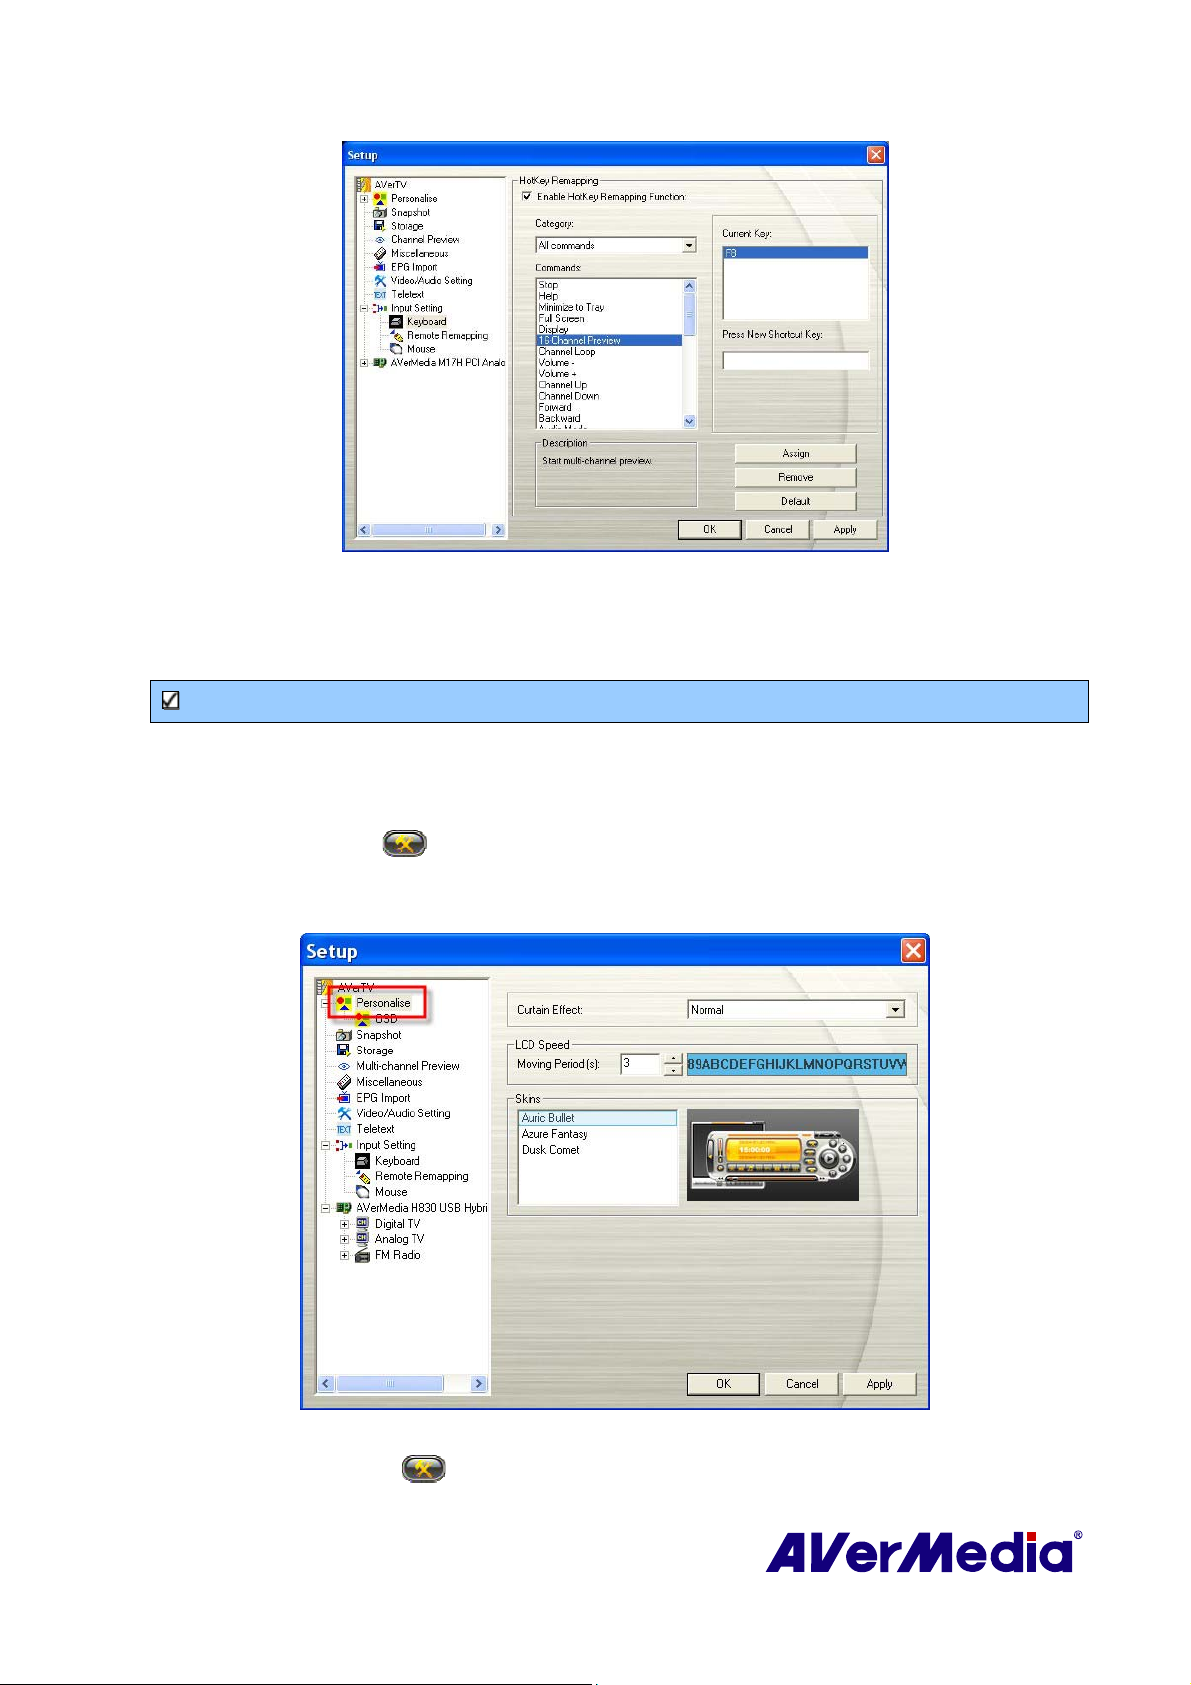
(This picture is only for reference)
5. Click Default if you want to revert to the factory setting.
6. Click Apply to save settings or click Cancel to abort without settings.
Note: It is recommended to use an unassigned key to use as your new keys.
3.14 Changing the OSD Attributes
Click the Setup button and in the Setup dialog box, click the Personalise icon on the left
pane. On this page, you can customize the curtain effect, LCD speed, or appearance of the TV
monitor and the control panel skin.
(This picture is only for reference.)
1. Click the Setup button and in the Setup dialog box, click on the Personalise icon on the left
pane.
31
Page 37
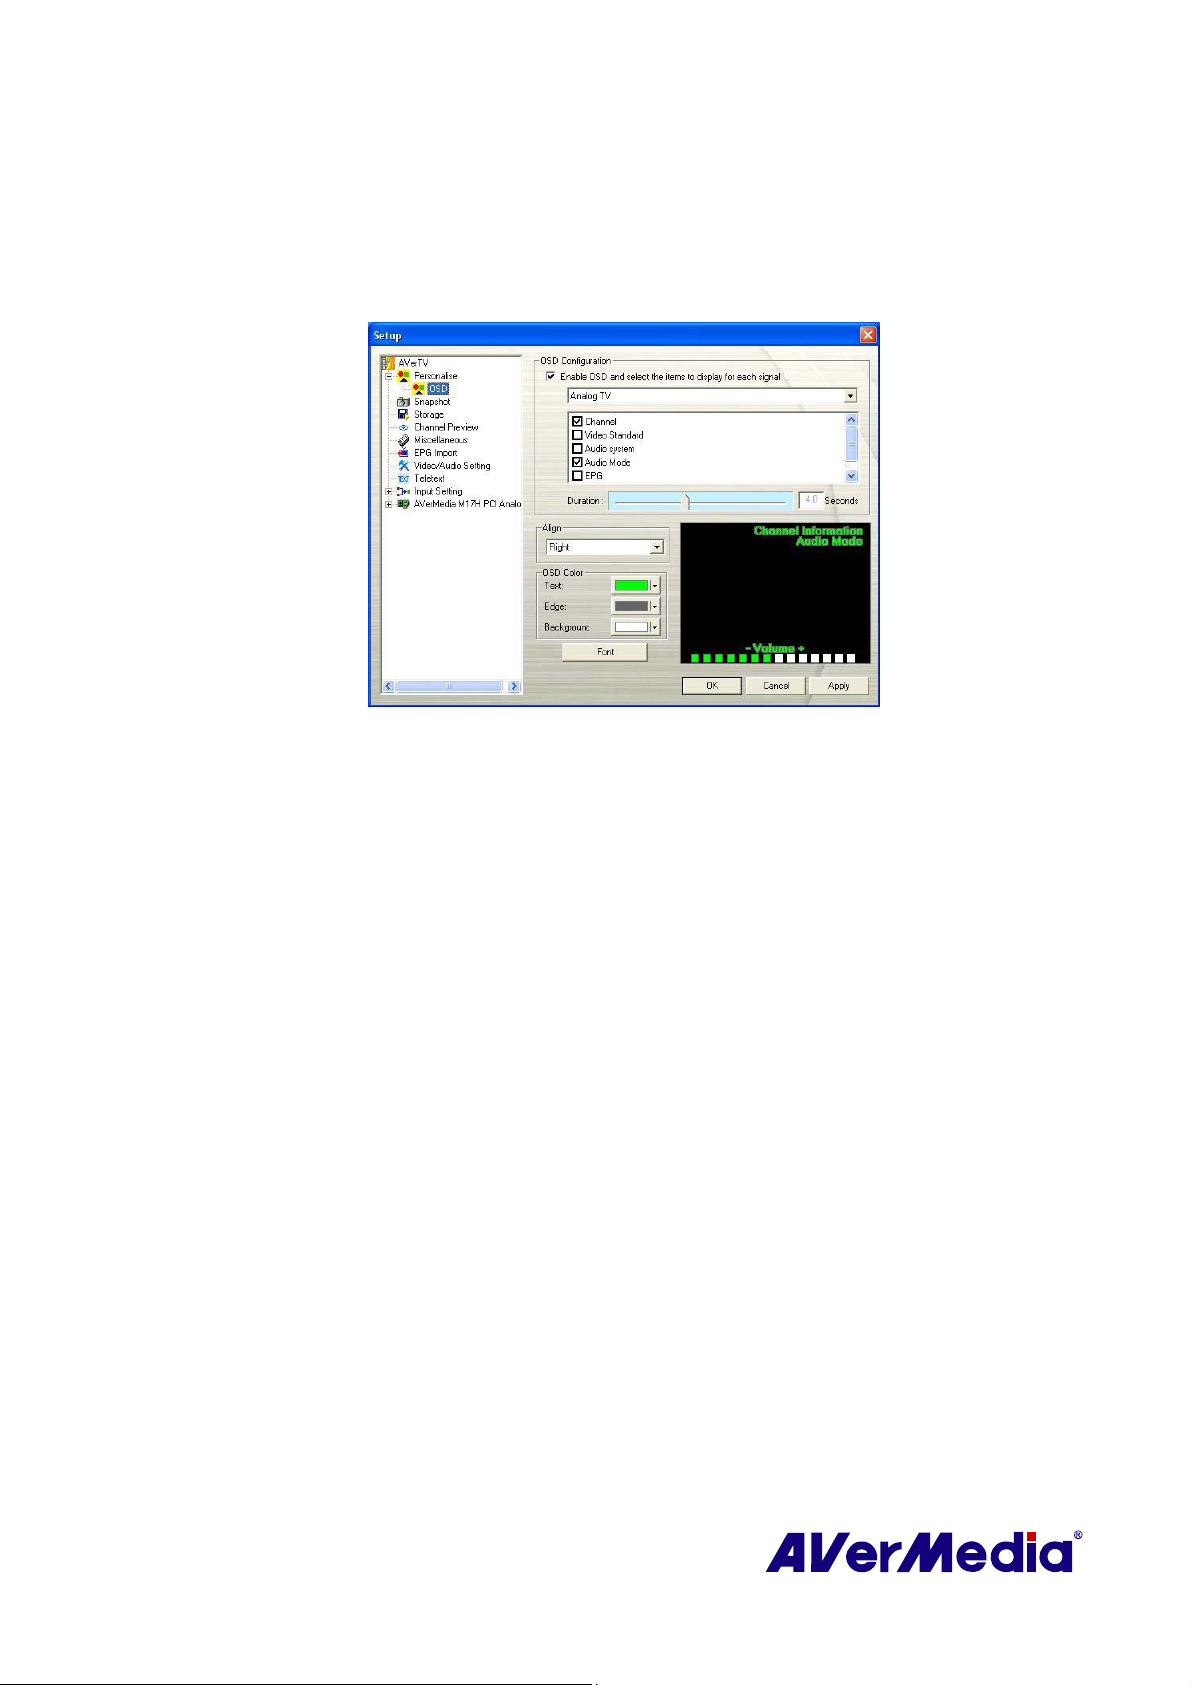
2. In this page, you can customize menu effect (Fade In/Fade Out), set the speed of marquee (LCD
Speed), and change the appearance of the TV monitor and the control panel (Skins).
3. Then select OSD. In this page, you can choose the TV system from the drop-down list for
different display information on the TV monitor. You can also adjust OSD color (Text, Edge,
Background).
(This picture is only for reference.)
Click Apply to save settings or click Cancel to abort without settings.
4.
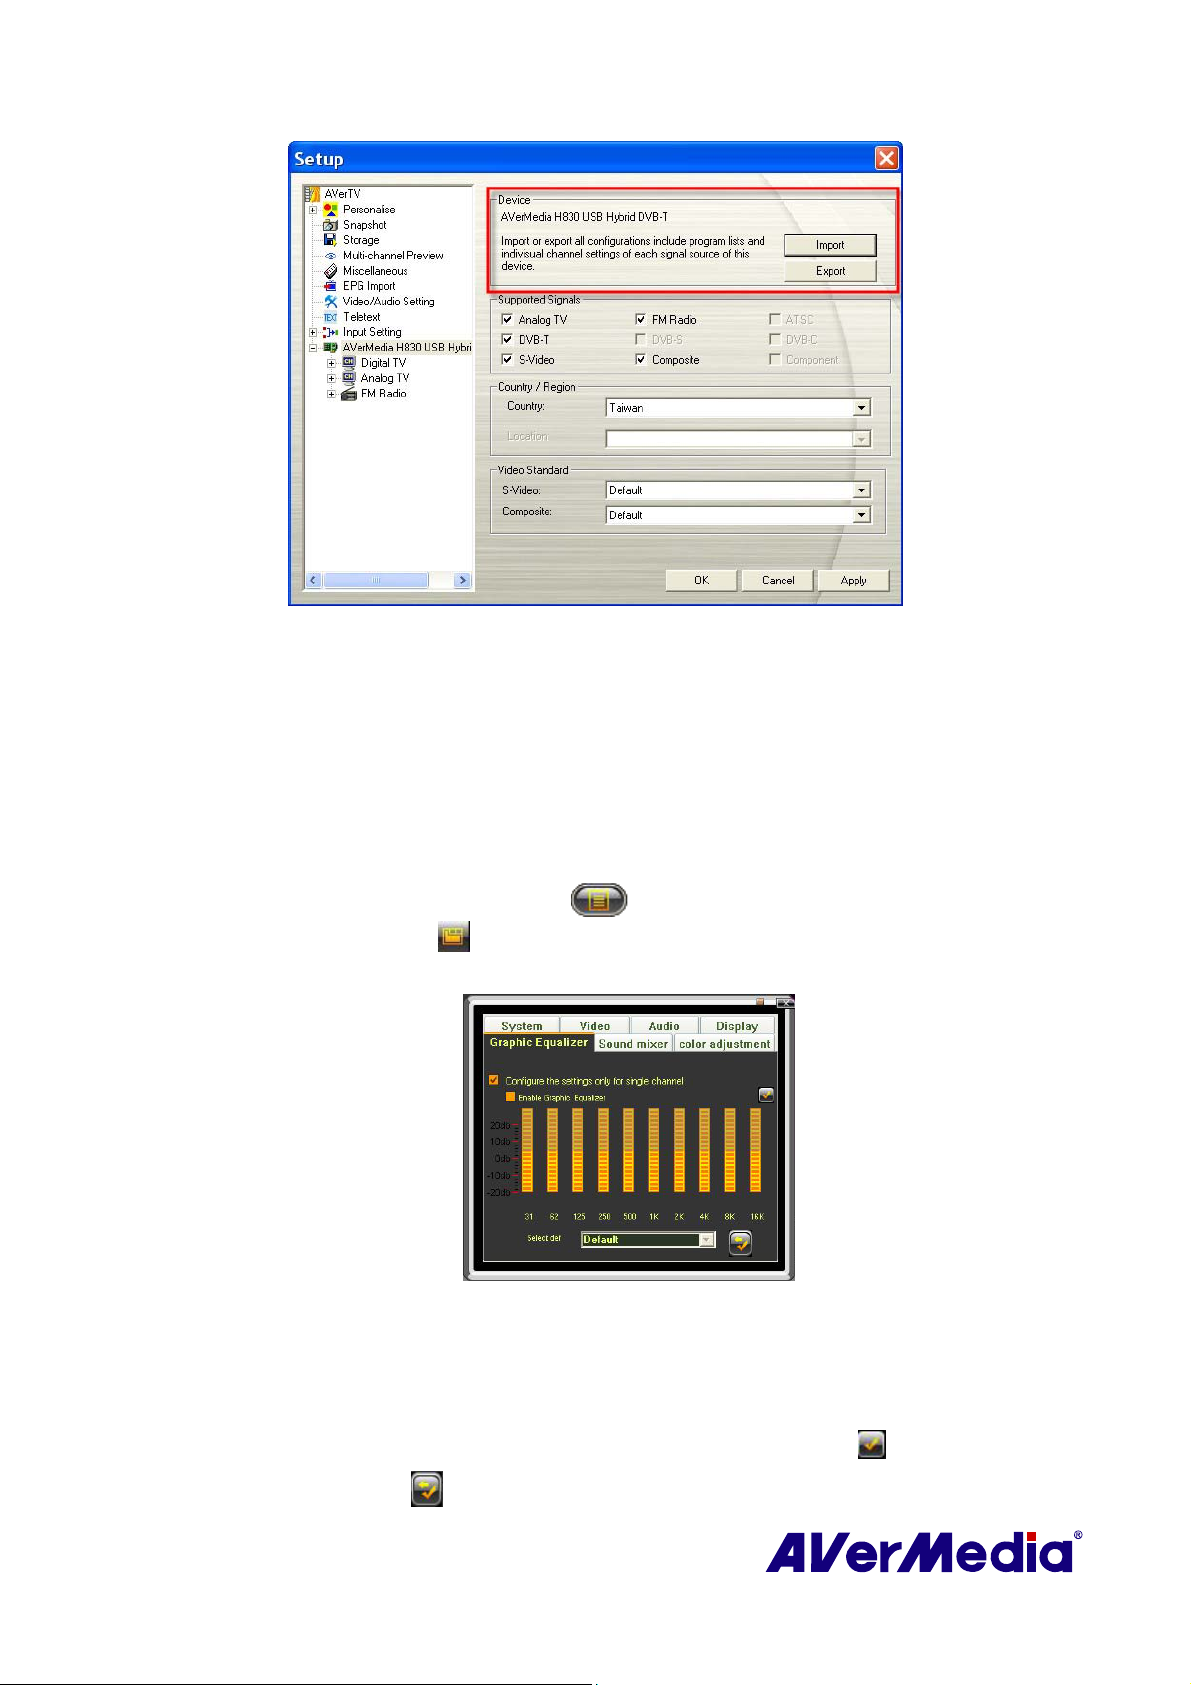
3.15 Configurations Import and Export
After setting up the device, all configurations can be saved as a file (.adi). Thus, resetting-up
is unnecessary unless the adi. file has been removed.
1.
To export the file of all configurations, press Export button, and the Save As Dialog will appear
for users to select the saving path.
2. To import the saved file of all configurations, press Import button, and the Open Dialog will
appear for users to select the saved files.
32
Page 38
(This picture is only for reference.)
3. Click Apply to save settings or click Cancel to abort without settings.
3.16 Graphic Equalizing
The graphic equalizer function enables users to have best audio quality of the chosen
music style.
1. Right click on the TV monitor. When a pop-up menu appears, select Individual Channel
Setting. Or click Program List button
Channel Setting button
2. When a dialog box appears, select Graphic Equalizer tab.
3. Select Enable Graphic Equalizer check box to enable the function.
4. Then choose the desired music style from the drop-down list.
5. If you just want to adjust sound effects of one specific channel, select Configure the settings
only for single channel and repeat step 3 and step 4.
on the control panel and then click Individual
.
(This picture is only for reference)
6. To apply the converted settings to all channels, click Apply All button
7. Click Default button
if you want to revert the factory settings.
33
.
Page 39
3.17 System Settings
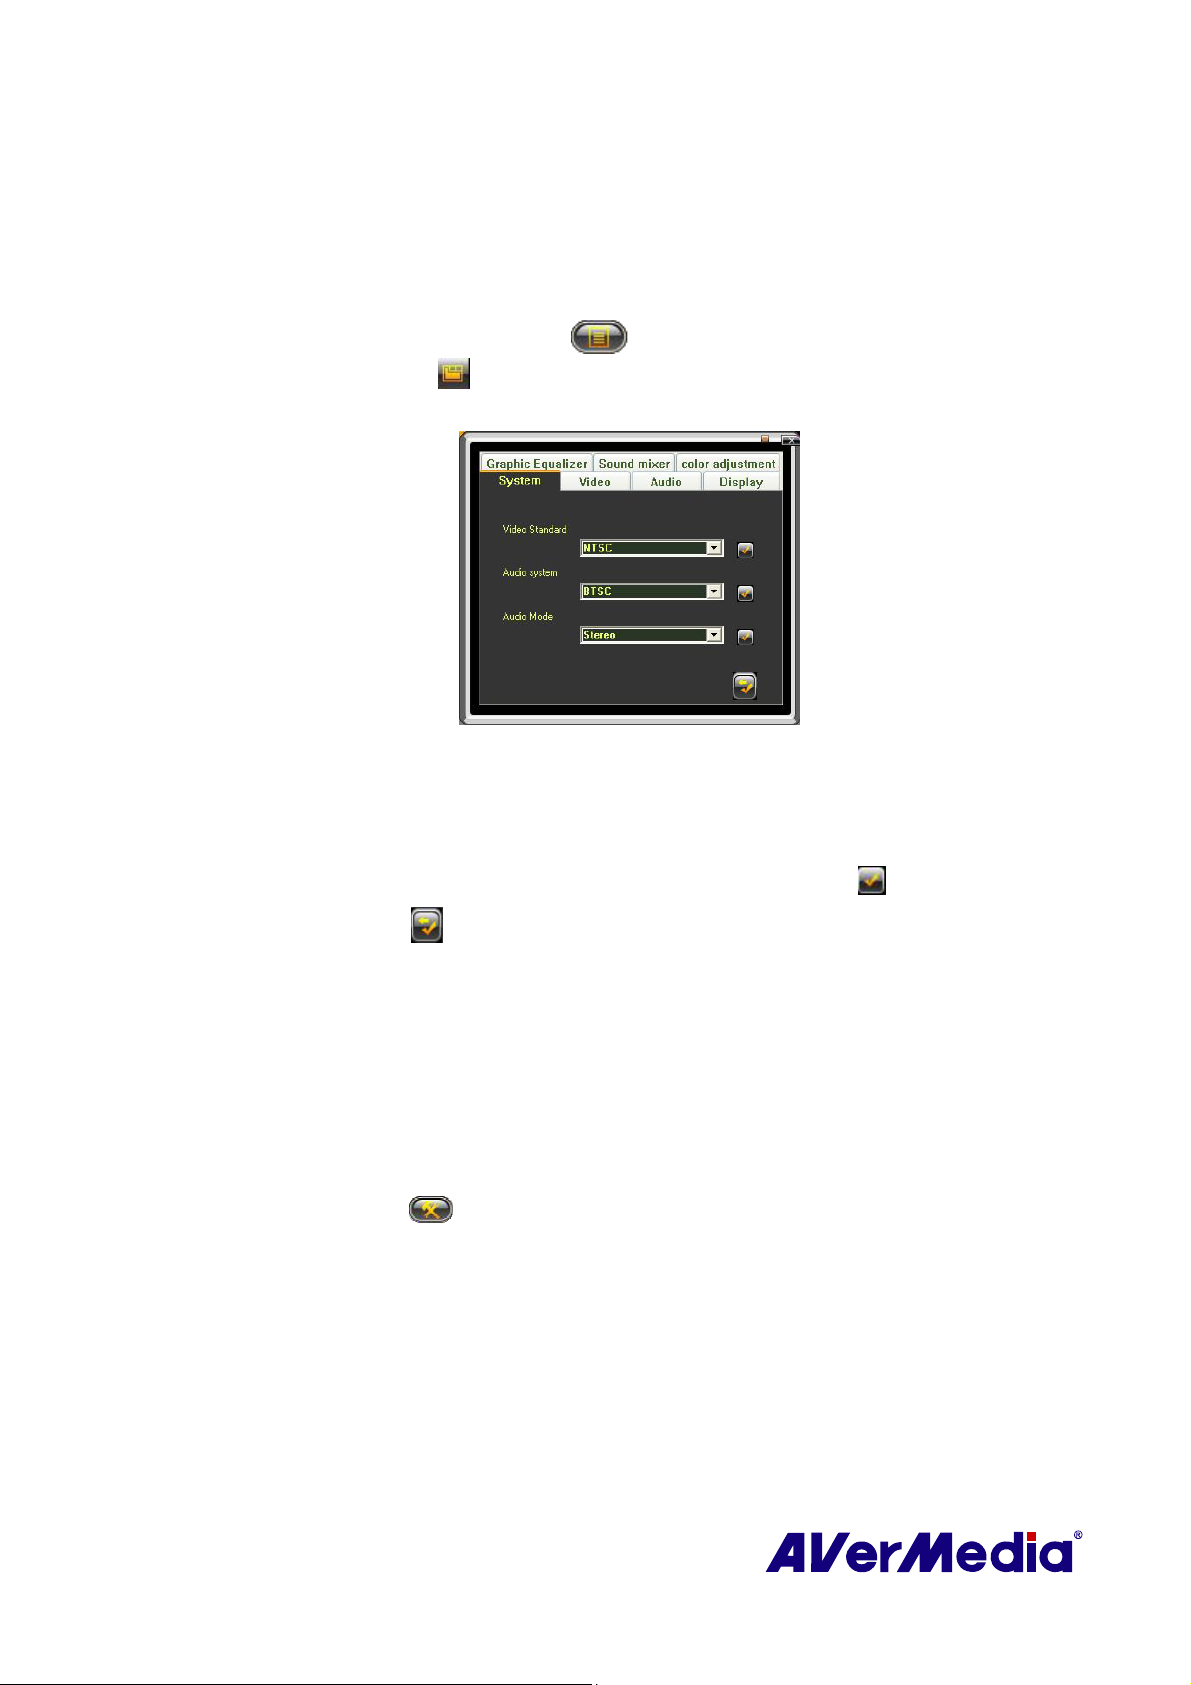
In the System settings page, you are able to modify the audio system and audio mode based
on the TV system you use.
1. Right click on the TV monitor. When a pop-up menu appears, select Individual Channel
Setting. Or click Program List button
Channel Setting button
2. When a dialog box appears, select System tab.
3. Select the TV system from the Video Standard drop-down list.
4. Choose the preferred Audio System or Audio Mode from the drop-down list. (The items in the
drop-down menu of Audio System and Audio Mode may differ based on the selected Video
Standard.)
5. To apply the converted settings to all channels, click Apply All button
.
(This picture is only for reference)
on the control panel and then click Individual
.
6. Click Default button if you want to revert the factory settings.
3.18 Customize Sound Card Settings (Optional)
On the Sound Card setting page, you can choose the available sound cards. By default, Direct
Sound is chosen. If Loop Back is supported, you can choose it for better quality in audio-
visual synchrony.
To customize Loop Back settings:
1. Click the Setup button and in the Setup dialog box, click on the Sound Card icon on the left
pane. Then choose Loop Back from the drop down list.
34
Page 40
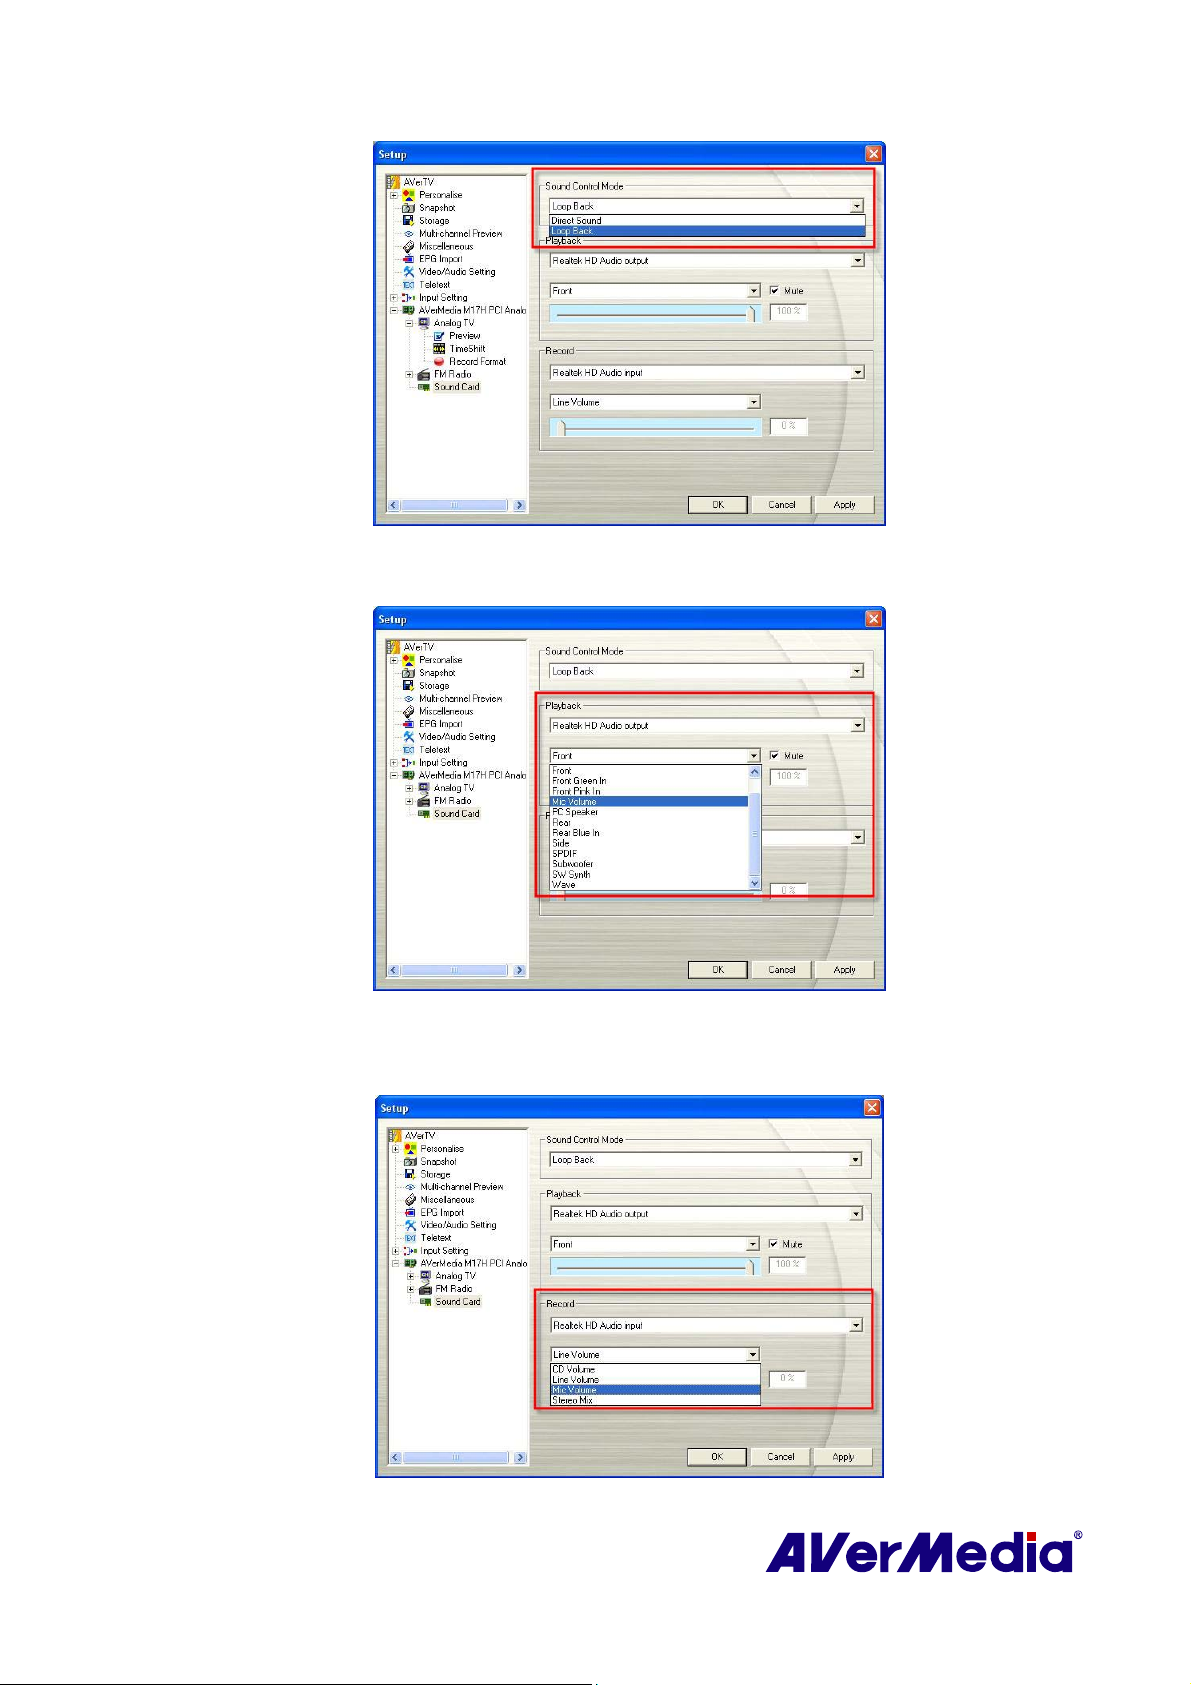
(This picture is only for reference)
2. In the Playback area, select the output to use from the drop down menu.
(This picture is only for reference)
3. In the Record area on the same page, you can select the input source to use from the drop down
menu.
(This picture is only for reference)
35
Page 41
Note: The input and output choices in the drop-down menu of the Playback and Record area may
not be exactly the same in different PCs. Please select the correct and corresponding input and
output individually to ensure better playback and recording quality.
4. Click Apply to save settings or click Cancel to abort without settings.
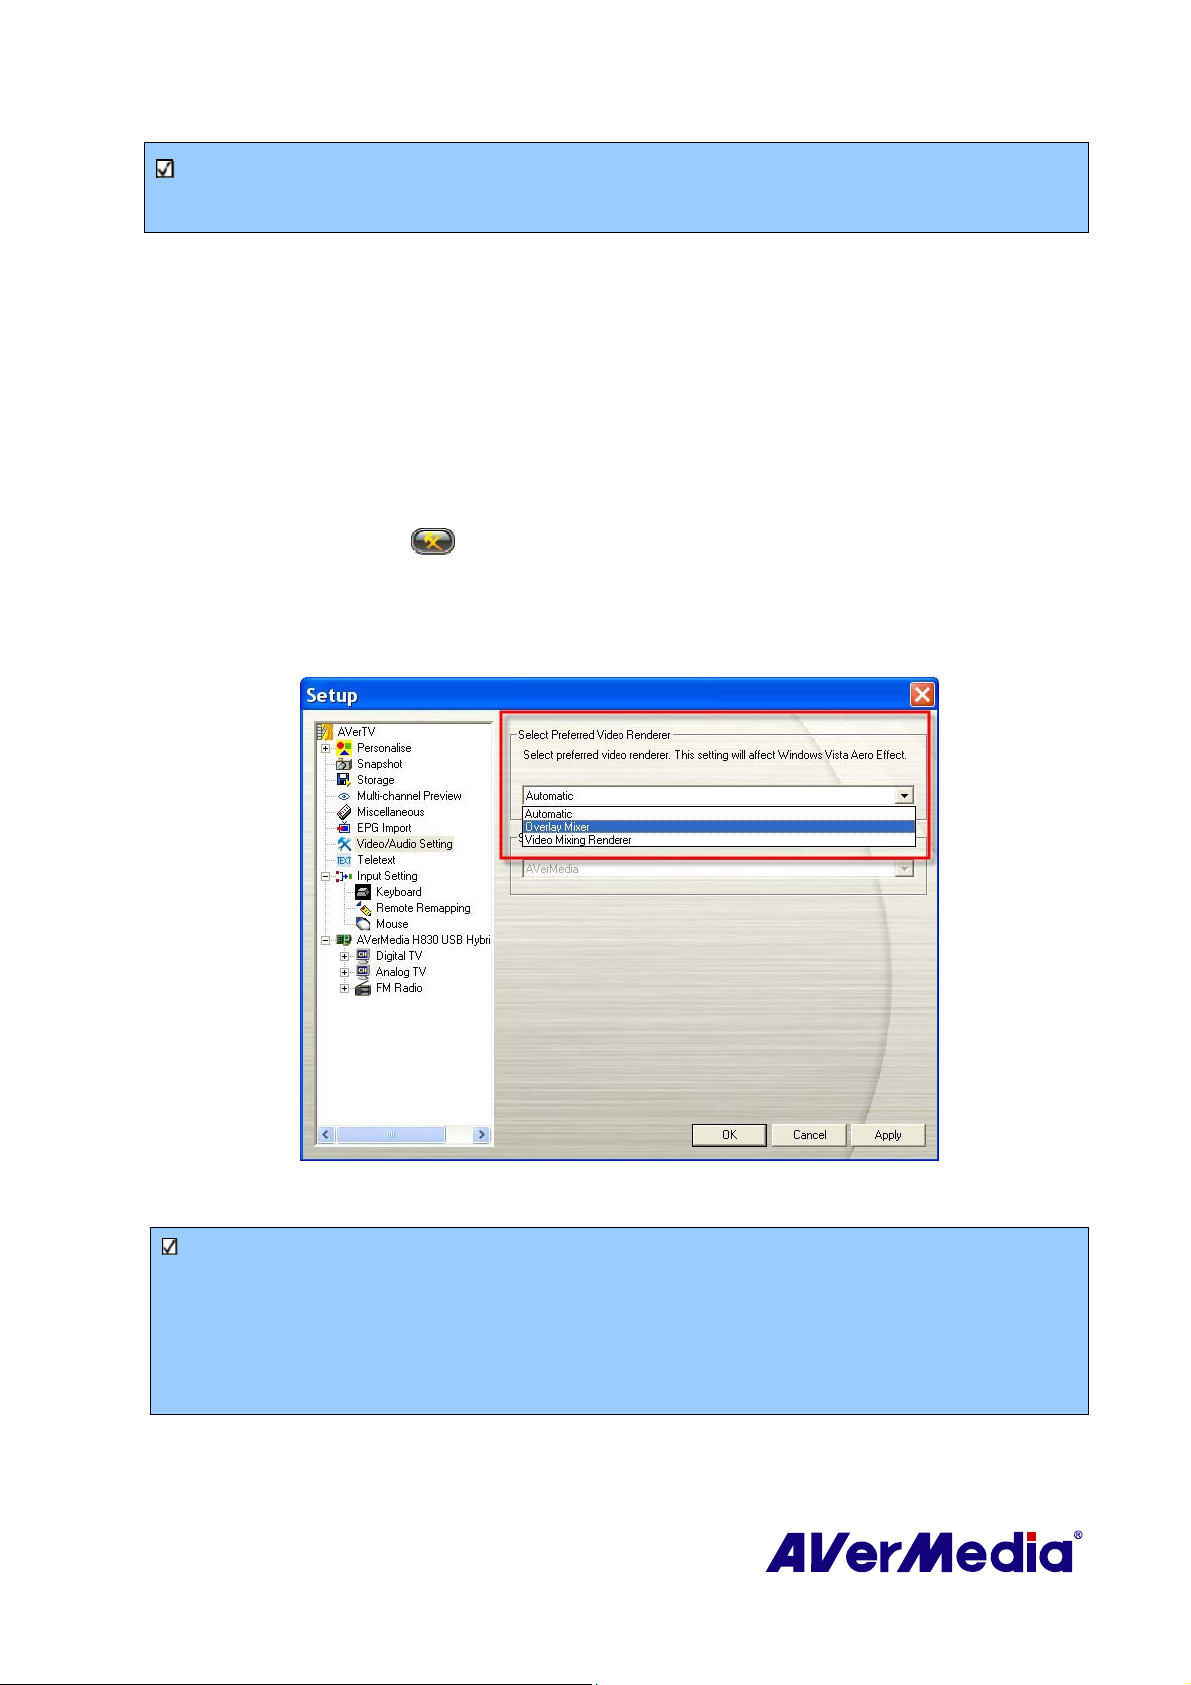
3.19 Changing Renderer and Decoder (Optional)
According to your graphic card and computer, you can choose a suitable renderer for best
watching experience. EVR (Enhanced Video Renderer) filter is only supported on Vista OS,
and is not available on XP or older OS versions. The benefit of using EVR can reduce color
space transform costs and have better timing and synchronization mechanism that can balance
CPU resource well.
To choose the video renderer you prefer:
1. Click the Setup button and in the Setup dialog box, click the Video/Audio Setting icon on
the left pane.
2. In the Select Preferred Video Renderer area, you can select preferred video renderer from the
drop-down list.
(This picture is only for reference.)
Note:
1. By default, the renderer is set to Automatic (Overlay Mixer for Windows XP system; Enhanced
Video Renderer (EVR) for Windows Vista system).
2. Under Windows Vista system, if you choose Overlay Mixer, the Aero Effect will be affected.
Then if you select VMR again, you will be asked to restart the application to re-enable Aero
Effect.
3. Click Apply to save settings or click Cancel to abort without settings.
36
Page 42
To choose the MPEG-2 video decoder you want:
1. Click the Setup button and in the Setup dialog box, click the Video/Audio Setting icon on
the left pane.
2. In the Select Preferred MPEG-2 Video Decoder area, you can select preferred decoder from the
drop-down list.
Note: The MPEG-2 Video Decoders can be chosen only in Windows Vista system.
3. Click Apply to save settings or click Cancel to abort without settings.
Note:
1. Under Windows Vista system, if you choose Overlay Mixer, the Aero Effect will be affected.
2. You need to choose Overlay Mixer as the preferred video renderer to enable the function of display the
live TV as your desktop wallpaper. For more information, please refer to the section “Setting Live TV as
Desktop Wallpaper”.
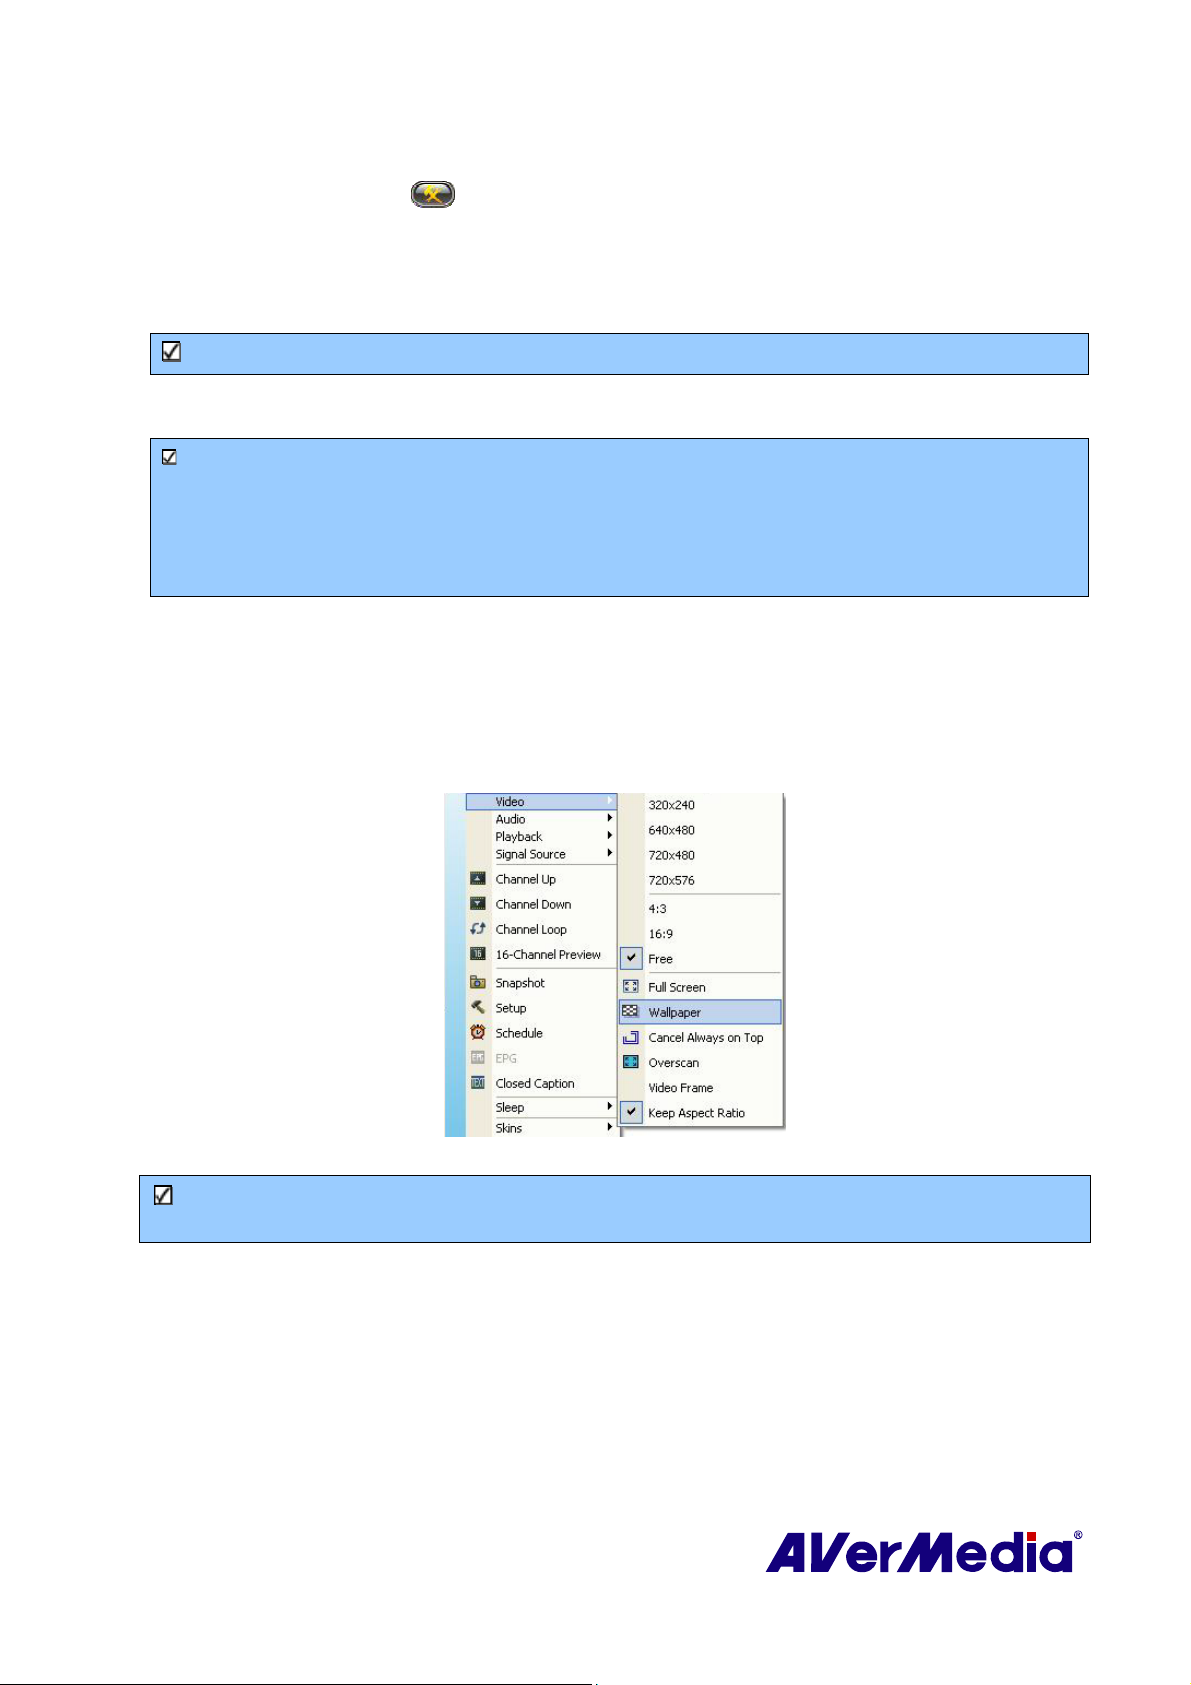
3.20 Setting Live TV as Desktop Wallpaper
To set the live TV program as your desktop wallpaper, just right click on the TV monitor, and point to
Video and select Wallpaper.
(This picture is only for reference.)
Note: You need to choose Overlay Mixer as the preferred video renderer to enable the function of
display the live TV as your desktop wallpaper.
37
Page 43
Chapter 4 TV
In this chapter, we will introduce methods to scan programs, select a TV/Radio program,
create a group and so on.
4.1 Analog TV
4.1.1 Scanning Channels
If you didn’t complete the channel scanning when you first ran the application, please follow
these steps to complete this procedure.
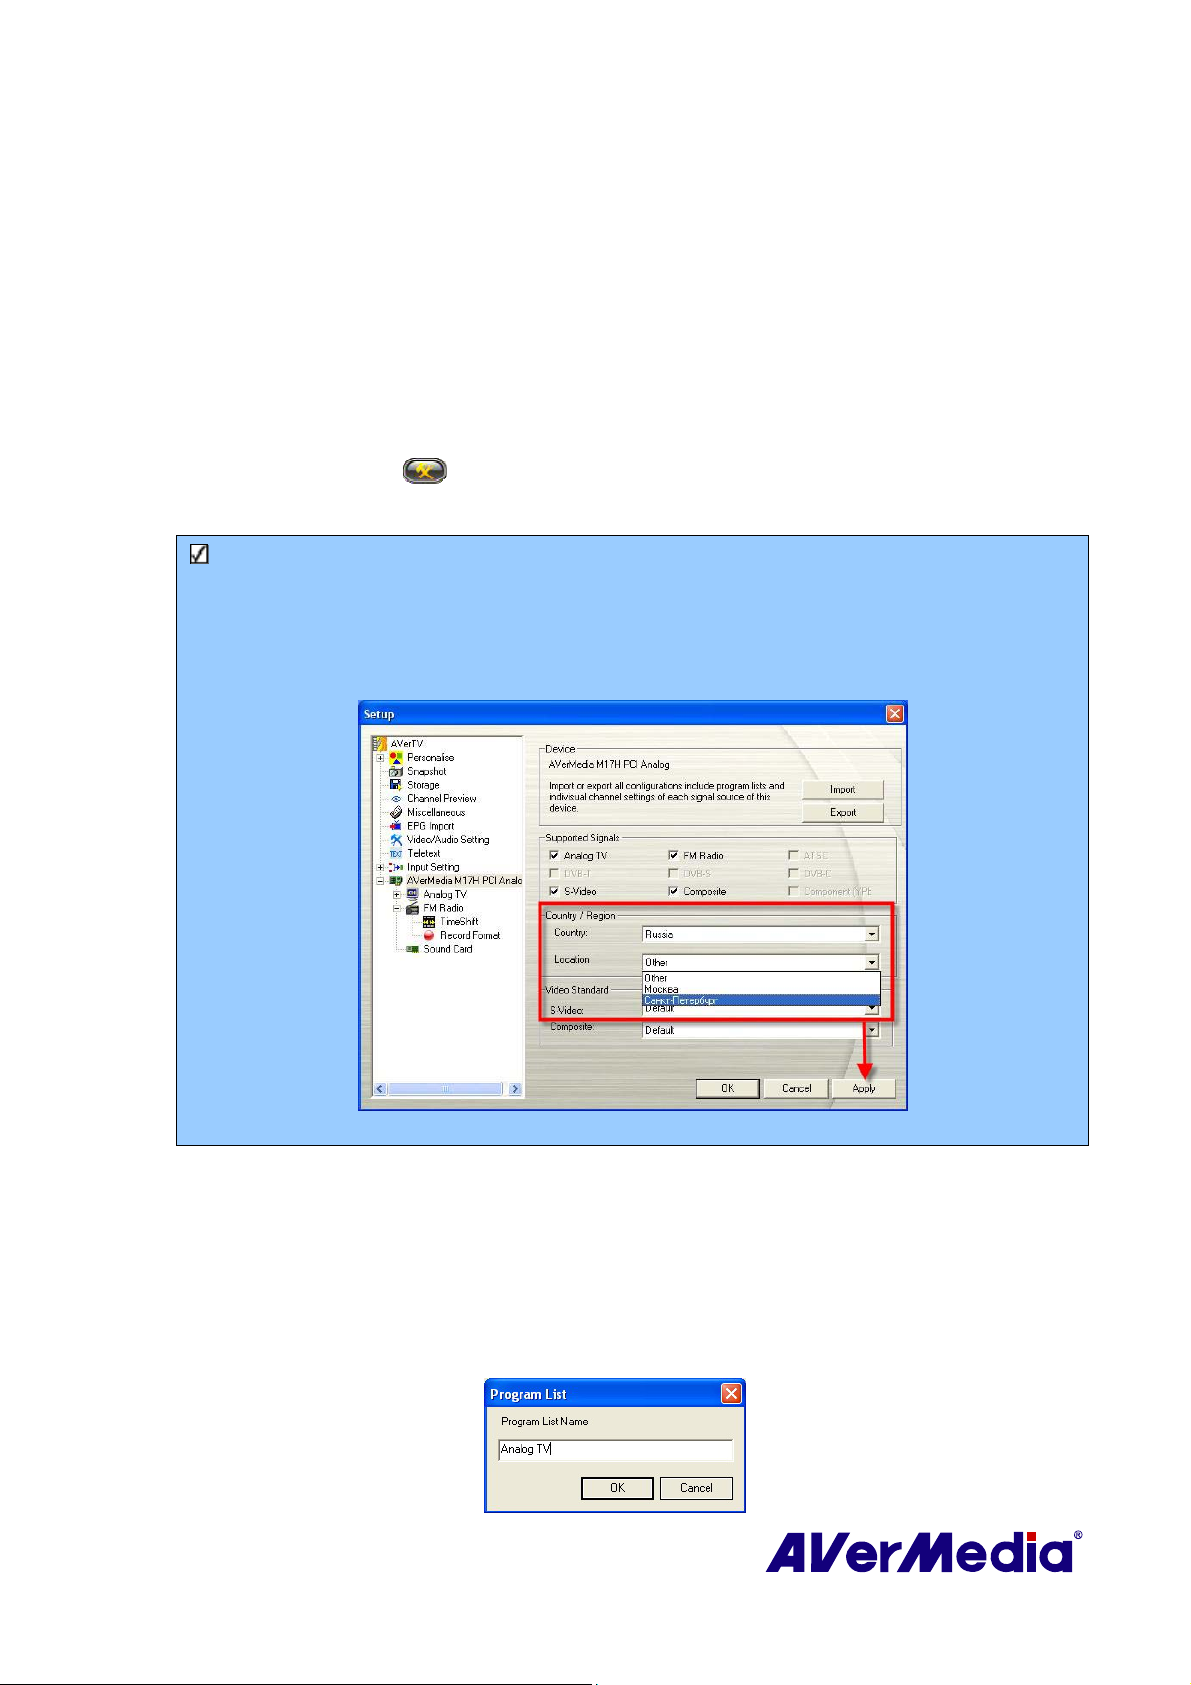
1. Click the Setup button and in the Setup dialog box, select an available Avermedia device in
the left pane.
Note:
Make sure that your Country/Region is correct.
a. First, select an available Avermedia device in the left pane.
b. From the Region/Country drop-down list, select your country or region.
c. Click Apply to save the settings.
(This picture is only for reference.)
2. Then select Analog TV. On this page, choose the TV option to search only for air channel,
select CATV to scan for cable channels or choose All option to scan for both air channel
and cable channels.
3. Click New and the Program List dialog box will appear. Type in the desirable name and
click OK.
38
Page 44
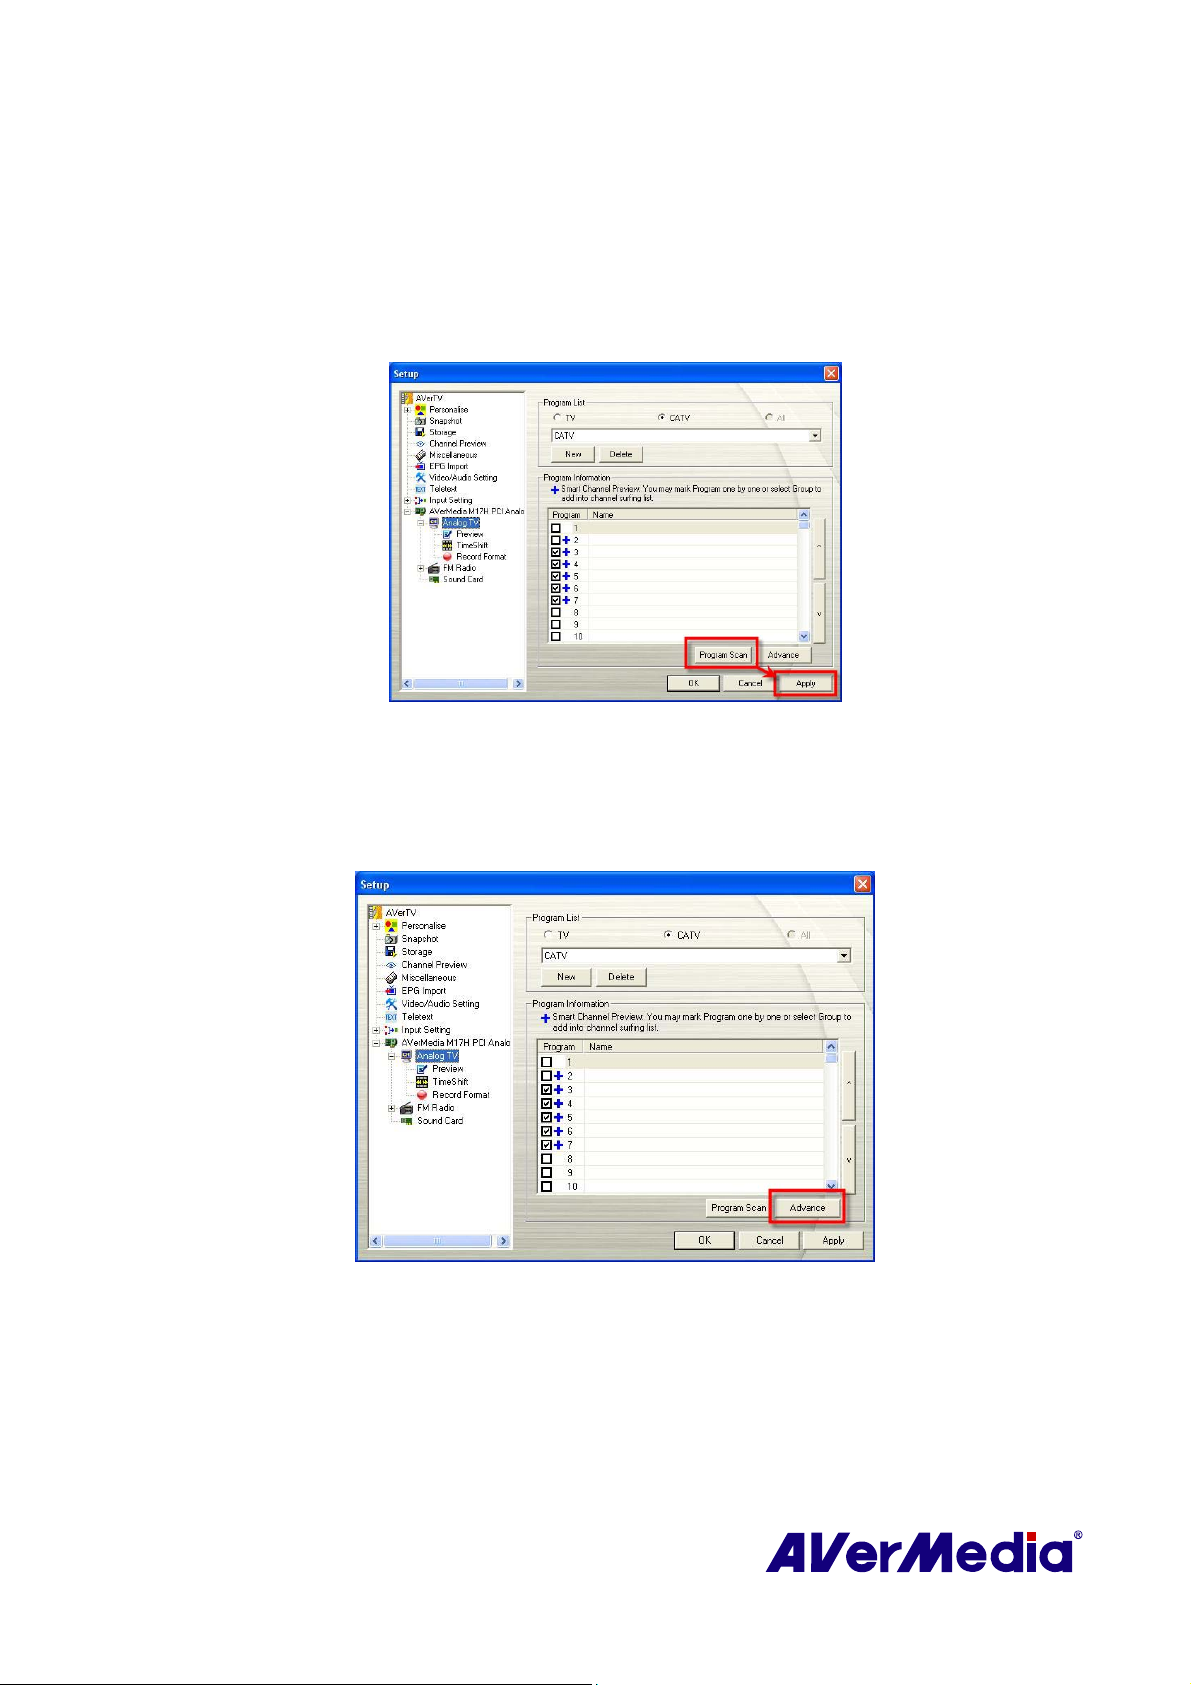
4. Then Click Program Scan to start the scanning process.
The application comes with a default frequency table therefore the application will use
this table to search for active channels/programs. If you want to terminate the searching
process, just click Stop.
5. You can check the scanning progress from the progress bar. After scanning, the active
TV/Radio channels will be listed inside the box. Click Apply to save the scanned channels.
(This picture is only for reference.)
4.1.2 Scanning Channels (For Advanced Users)
1. Click Advance located at right-lower corner in the Program Information section. Then
the Advance Program Configuration dialog box will appear.
(This picture is only for reference.)
2. If you don’t want to miss any channels, click All Frequencies Scan.
39
Page 45
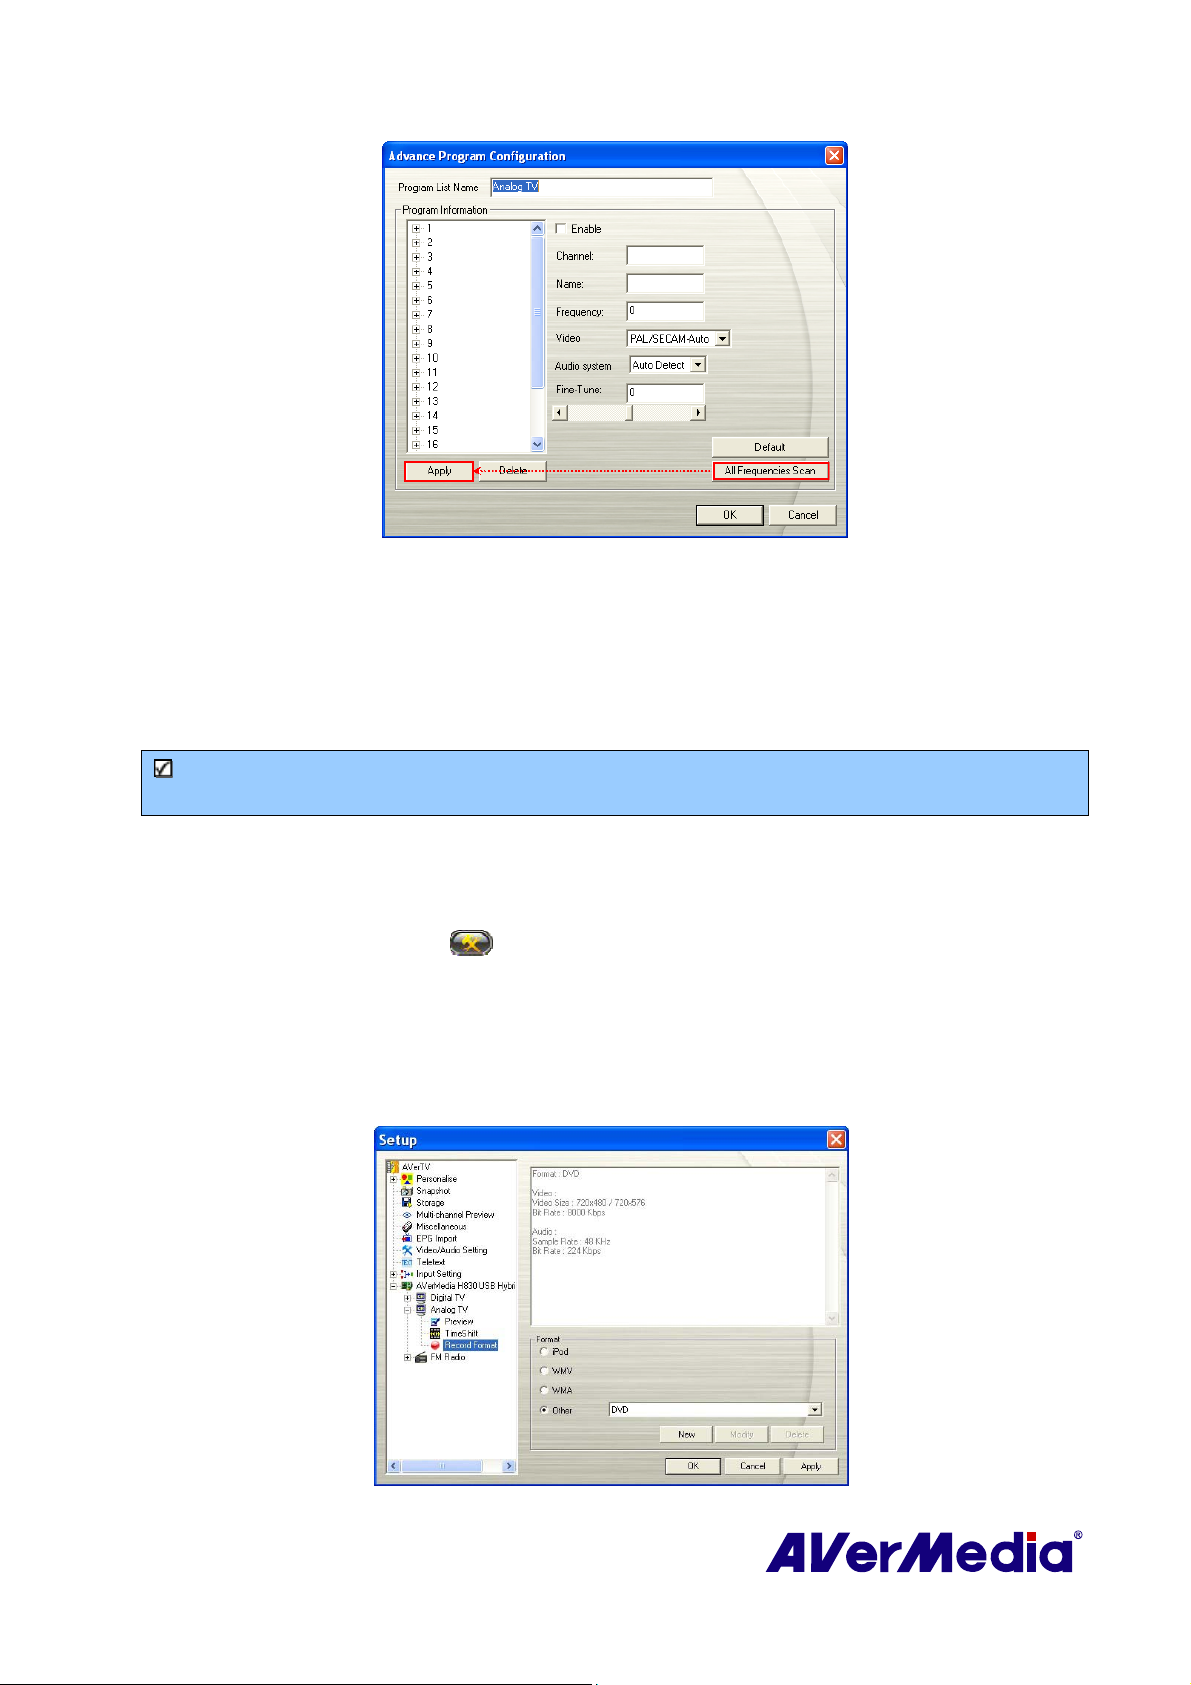
3. When a warning message appears, click Yes to continue the procedure or click No to abort
this operation.
4. After scanning, new active channels/programs will be memorized and listed in the left
pane of the dialog box.
5. Click Apply to save the scanned channels.
Note: Here you can modify the channel name, select the video and audio system. If you want to
revert to factory setting, simply click Default button.
4.1.3 Customize Video Record Settings
To customize the video record settings, please do the following.
1. Click the Setup button
on the left pane.
2. Select the Record Format option.
3. Determine the video file format to use for saving the recorded video file.
4. You can use the default format or select New to create your own file format.
and in the Setup dialog box, click on the Analog TV icon
(This picture is only for reference.)
40
Page 46
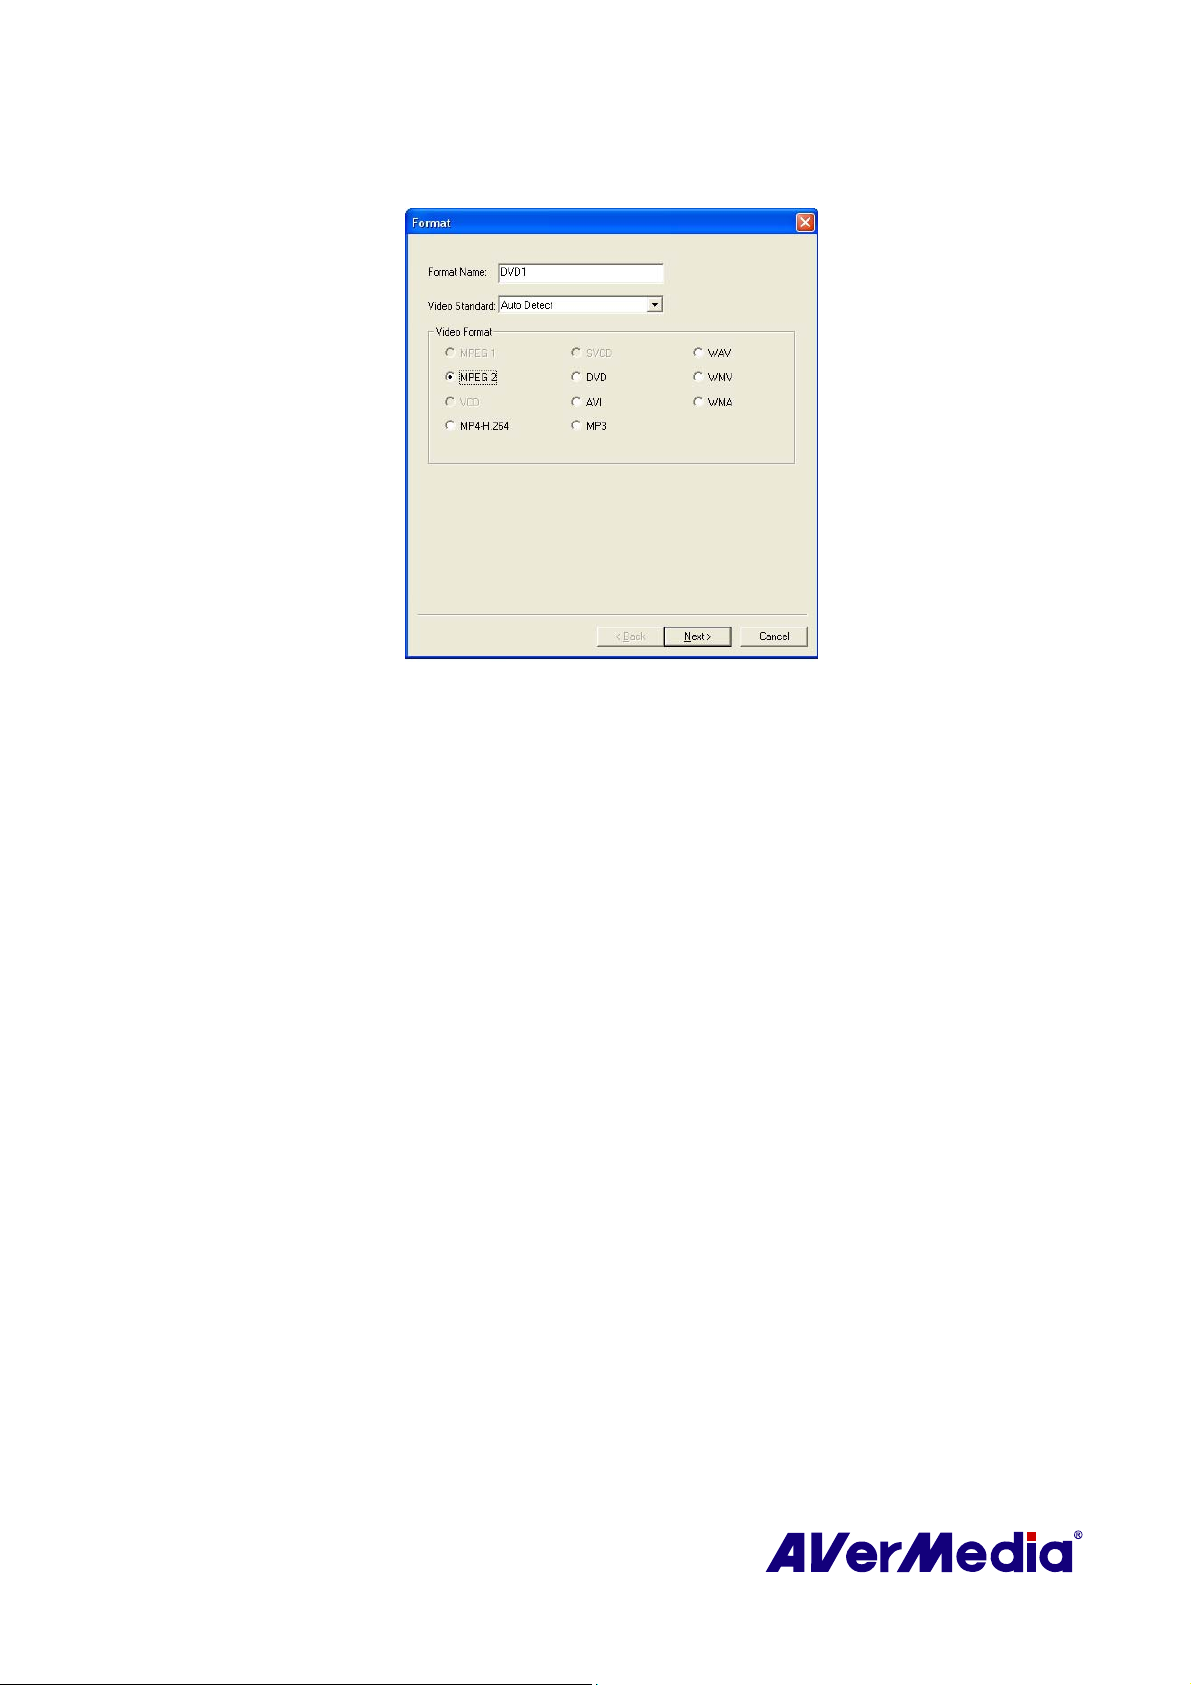
5. Click New and the Format dialog box appears. In the Format dialog box, select the file
format you want and enter the desired name in the text box. Click Next.
(This picture is only for reference.)
6. In the Video dialog box, you can set the video format and audio format. Click Finish.
7. If you want to change the settings of your own file format, click Modify. Or click
Delete to remove the unwanted file format that you created.
8. Click Apply to save the setting and click OK to exit the current dialog box. To abort
this operation, click Cancel.
The WMA/WMV/ MPEG-2 files are allowed to be customized (For Advanced Users):
1. Follow the previous steps, but choose the WMA, WMV or MPEG-2 file format in step
3.
2. Click New. In the Format dialog box, select the WMA/WMV/MPEG-2 file format and
enter the desired name in the text box. Click Next.
3. In Video dialog box, select a profile or click Add button to create a customized format.
41
Page 47
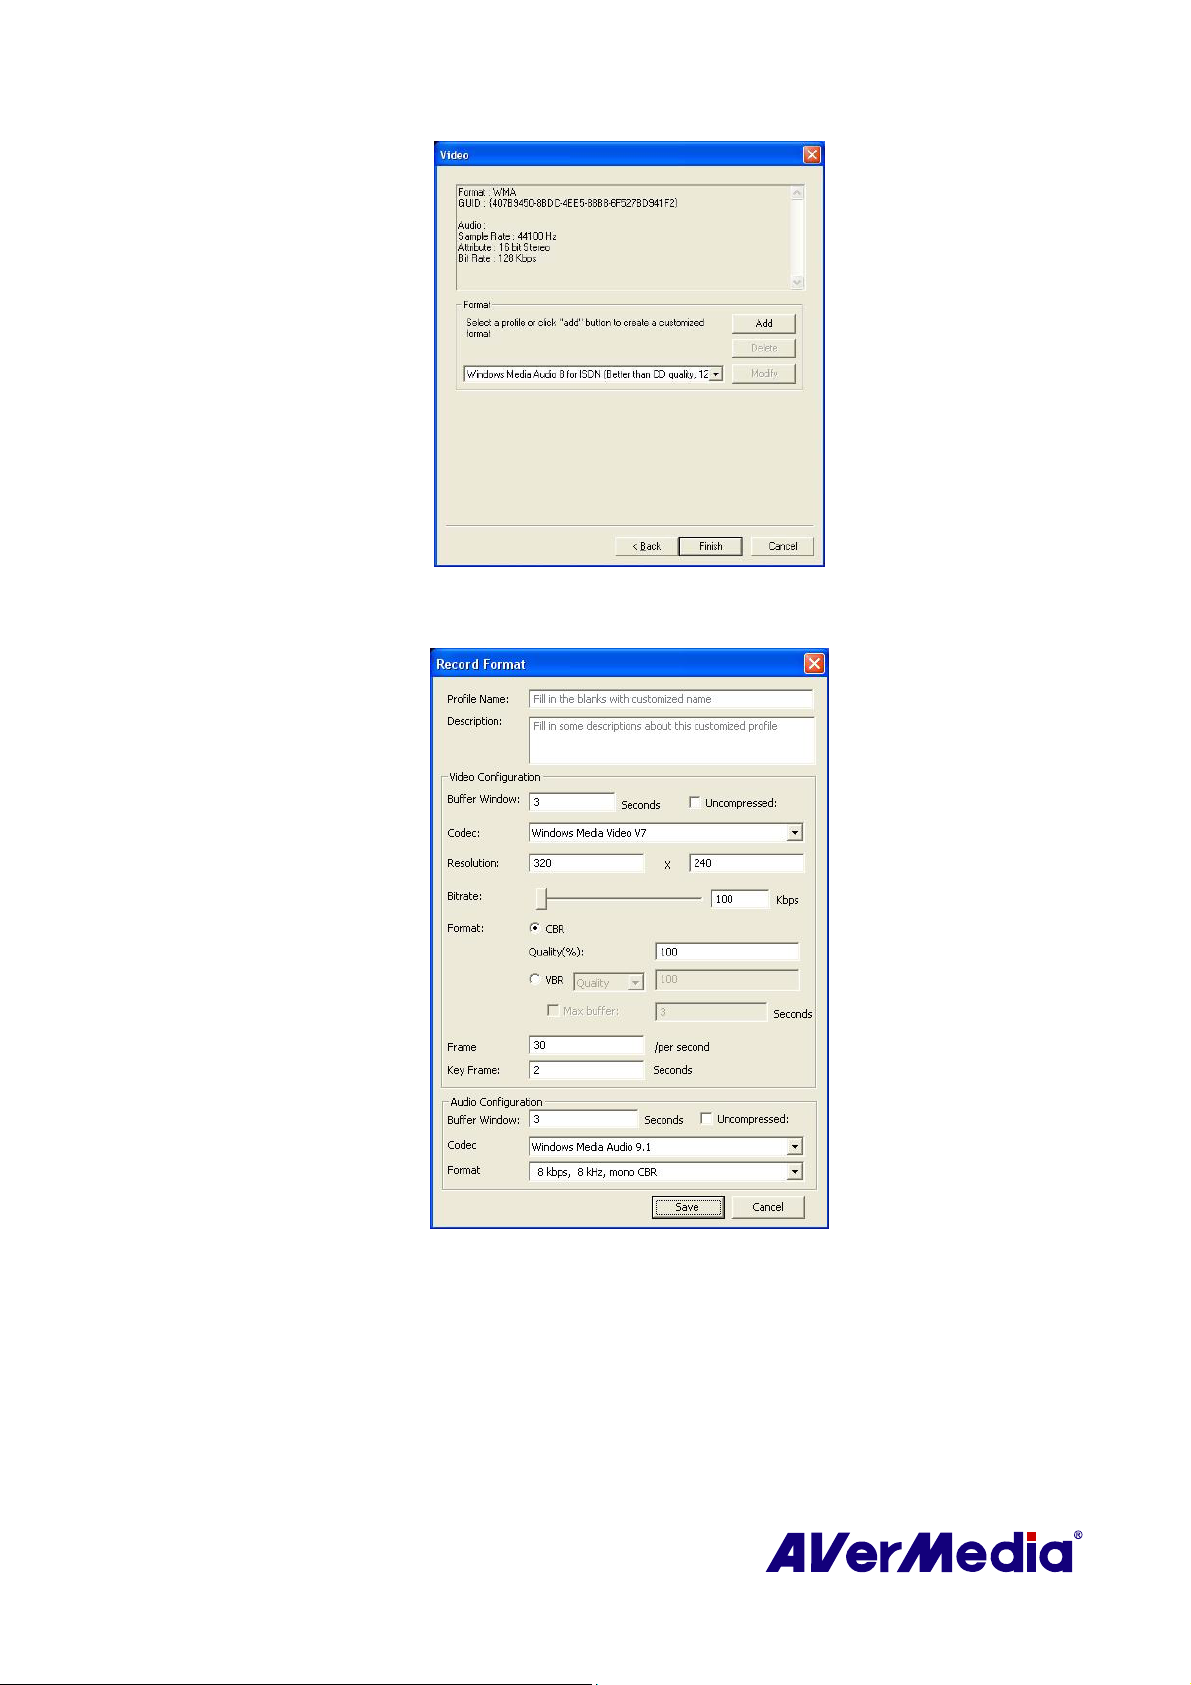
4. Click Add. If you choose the WMA/WMV files, you will see the following Record
Format dialog box.
(This picture is only for reference.)
5. Here you can create your preferred video and audio configurations for video recording.
Then, click SaveÆFinish.
6. If you choose the MPEG-2 files, you will see the following Video dialog box.
42
Page 48
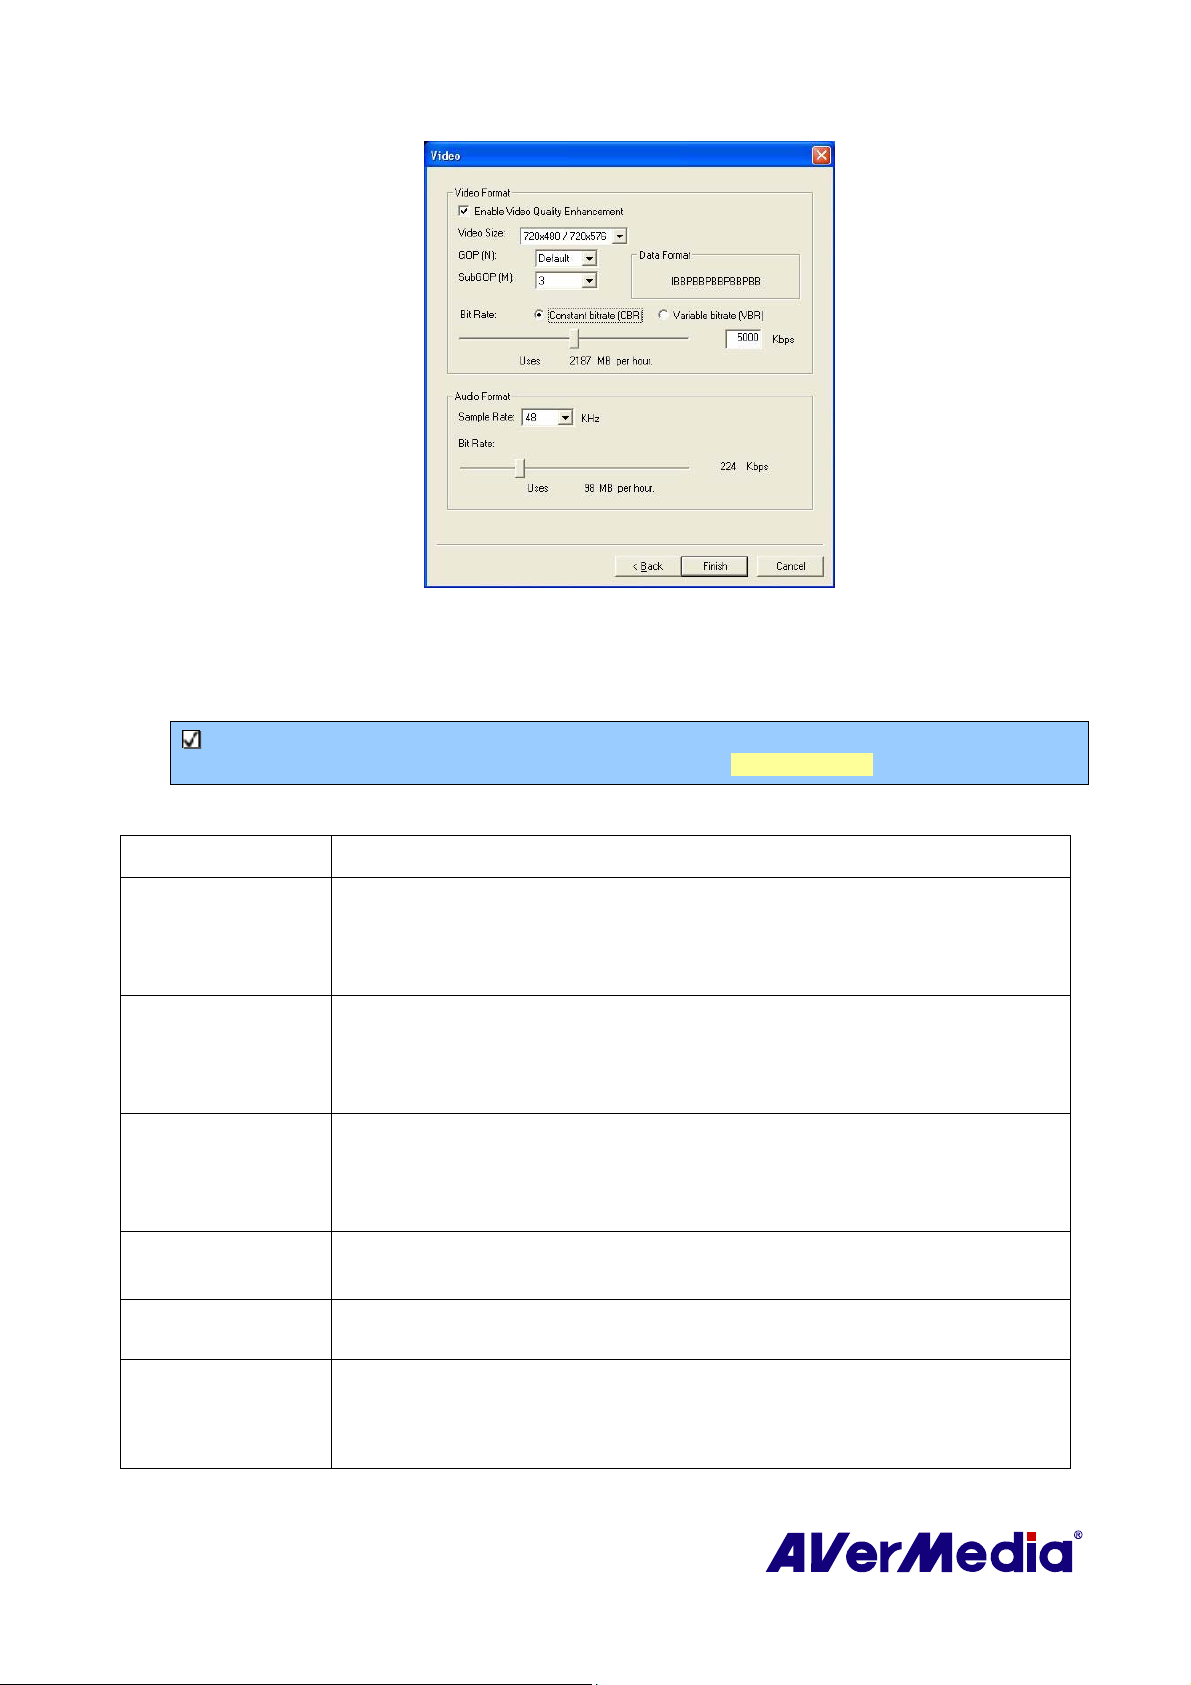
(This picture is only for reference.)
7. Here you are able to set the video/audio format as you wish. Then click Finish.
8. Click Apply to save the setting and click OK to exit the current dialog box.
Note: To determine the length of recording and to choose a destination folder in which to save
the recorded audio, please refer to the section titled Record Settings in Chapter 6.
Information:
File Format Description
MPEG-2 Videos compressed using MPEG-2 have extremely high quality pictures
and full CD-quality sound. Choose MPEG-2 format for video files that are
intended for DVD-ROM playback on a computer or if you want broadcast
quality videos.
DVD When you choose this format, the recorded video file will be saved in
MPEG-2 format that is compliant with DVD standards. Standard DVD
frame size and frame rate are 720 x 480 pixels at 29.97 fps for NTSC and
720 x 576 at 25 fps for PAL.
AVI AVI is the most common video file format for playback on the computer.
It can be saved in uncompressed form if you want high quality video, or
compressed using any of the available codecs if you want to minimize the
file size.
WAV A common audio file format for Windows computers. It was created by
Microsoft and has become a standard PC audio file format.
iPod
MP4-H.264
A video format base on H.264 standard but has smaller video bit rate. It’s an iPod compatible format.
Videos compressed using MPEG-4 standard are two or three times more efficient
than MPEG-2.
networks
applications.
and systems like HD-DVD, Digital TV, Broadcast and Streaming
This format can be applied to a wide variety of applications or
43
Page 49
WMA
WMV
MP3
An audio file format that is use for content intended for local playback or
download and play. It provides near-CD quality.
WMV stands for Window Media Video, which is defined by Microsoft. This file
targets audiences with high speed Internet or LAN connections.
An audio format compressed with a standard defined by Motion Picture Experts
Group offers near-CD quality sound.
4.1.4 Analog EPG Import
Electronic Program Guide (EPG) is a service that allows you to check the next succeeding
program schedule and even the program schedules of the whole week.
For Analog TV, the EPG needs to be imported manually.
Import analog EPG for the first time:
1. If the EPG service is provided in your region/country, go to the TV website of your
region/country, and download the EPG files (*.ndx, *.pdt, *.avr)
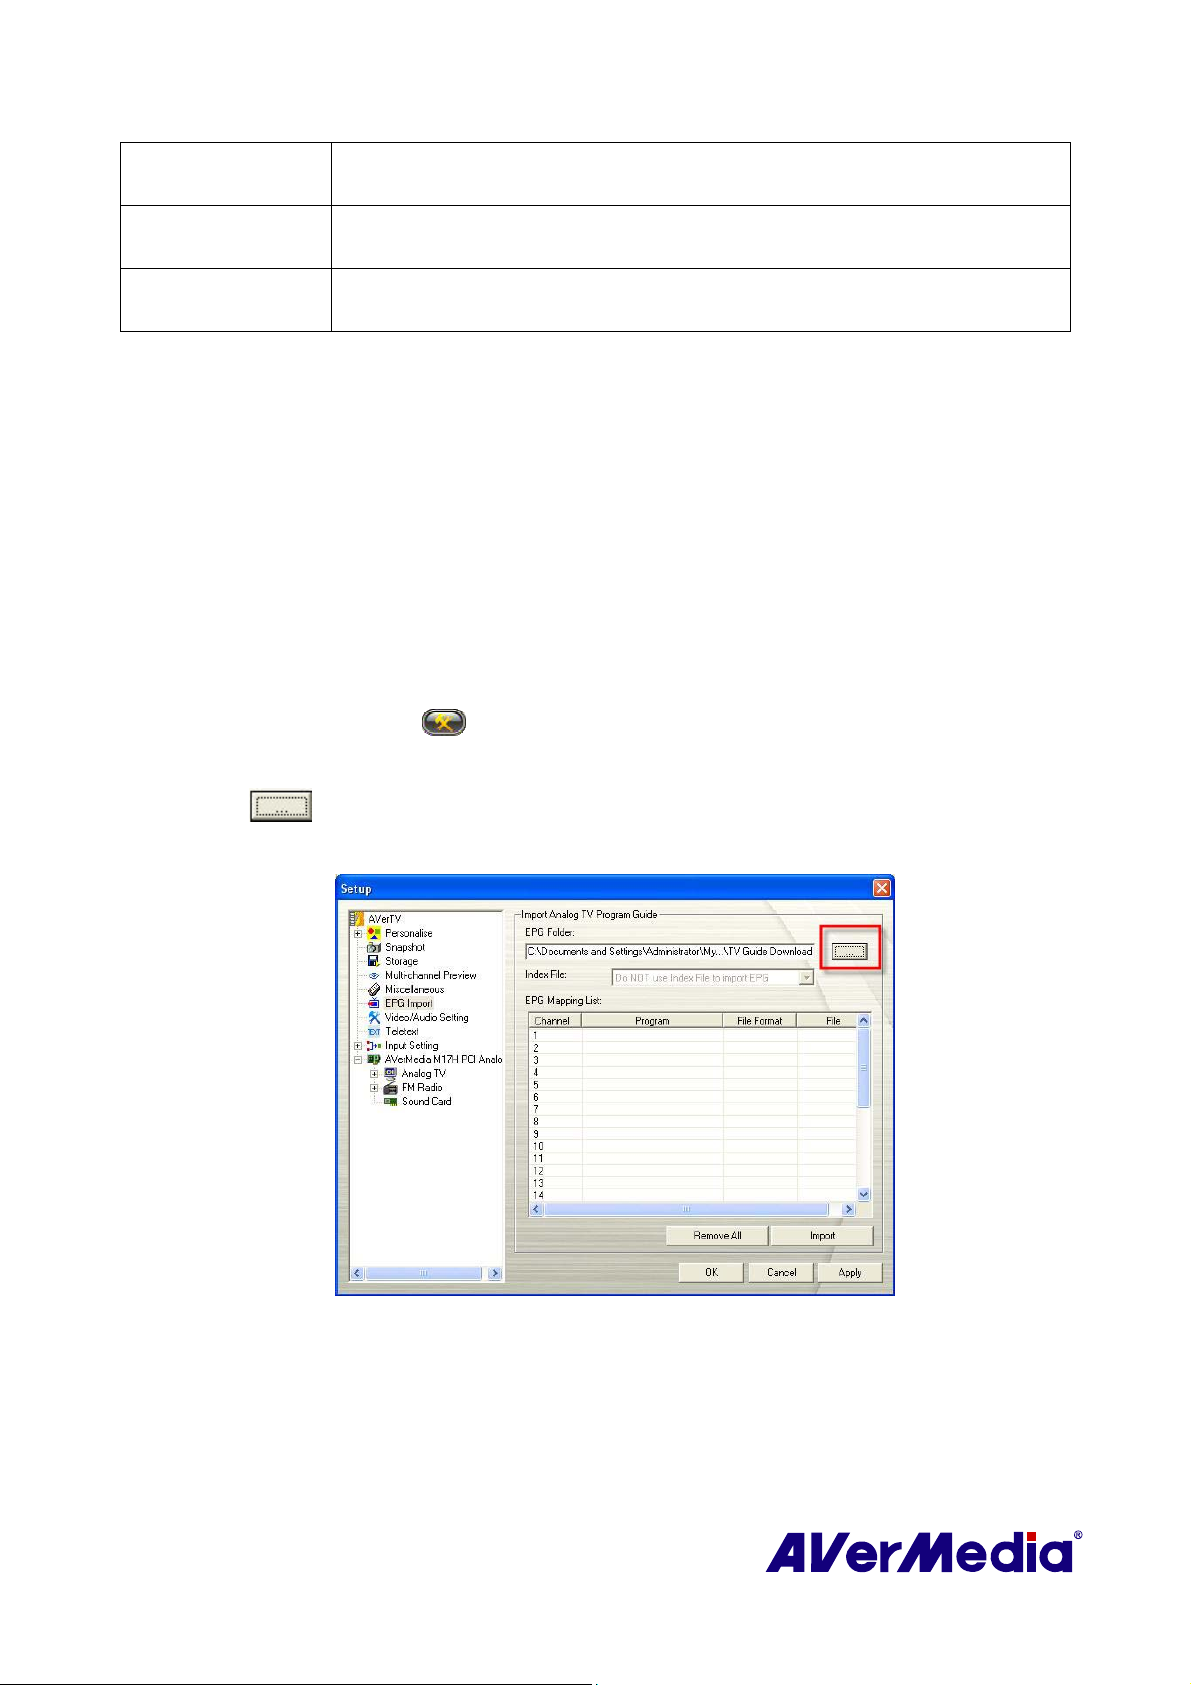
2. Click the Setup button
icon on the left pane.
and in the Setup dialog box, click on the Analog EPG Import
3. Click
to choose the designated folder in which the EPG files (.ndx or .avr) are
saved.
(This picture is only for reference.)
4. Then double click on the space under File Format to select the file format (.ndx or .avr)
from the drop down list.
44
Page 50
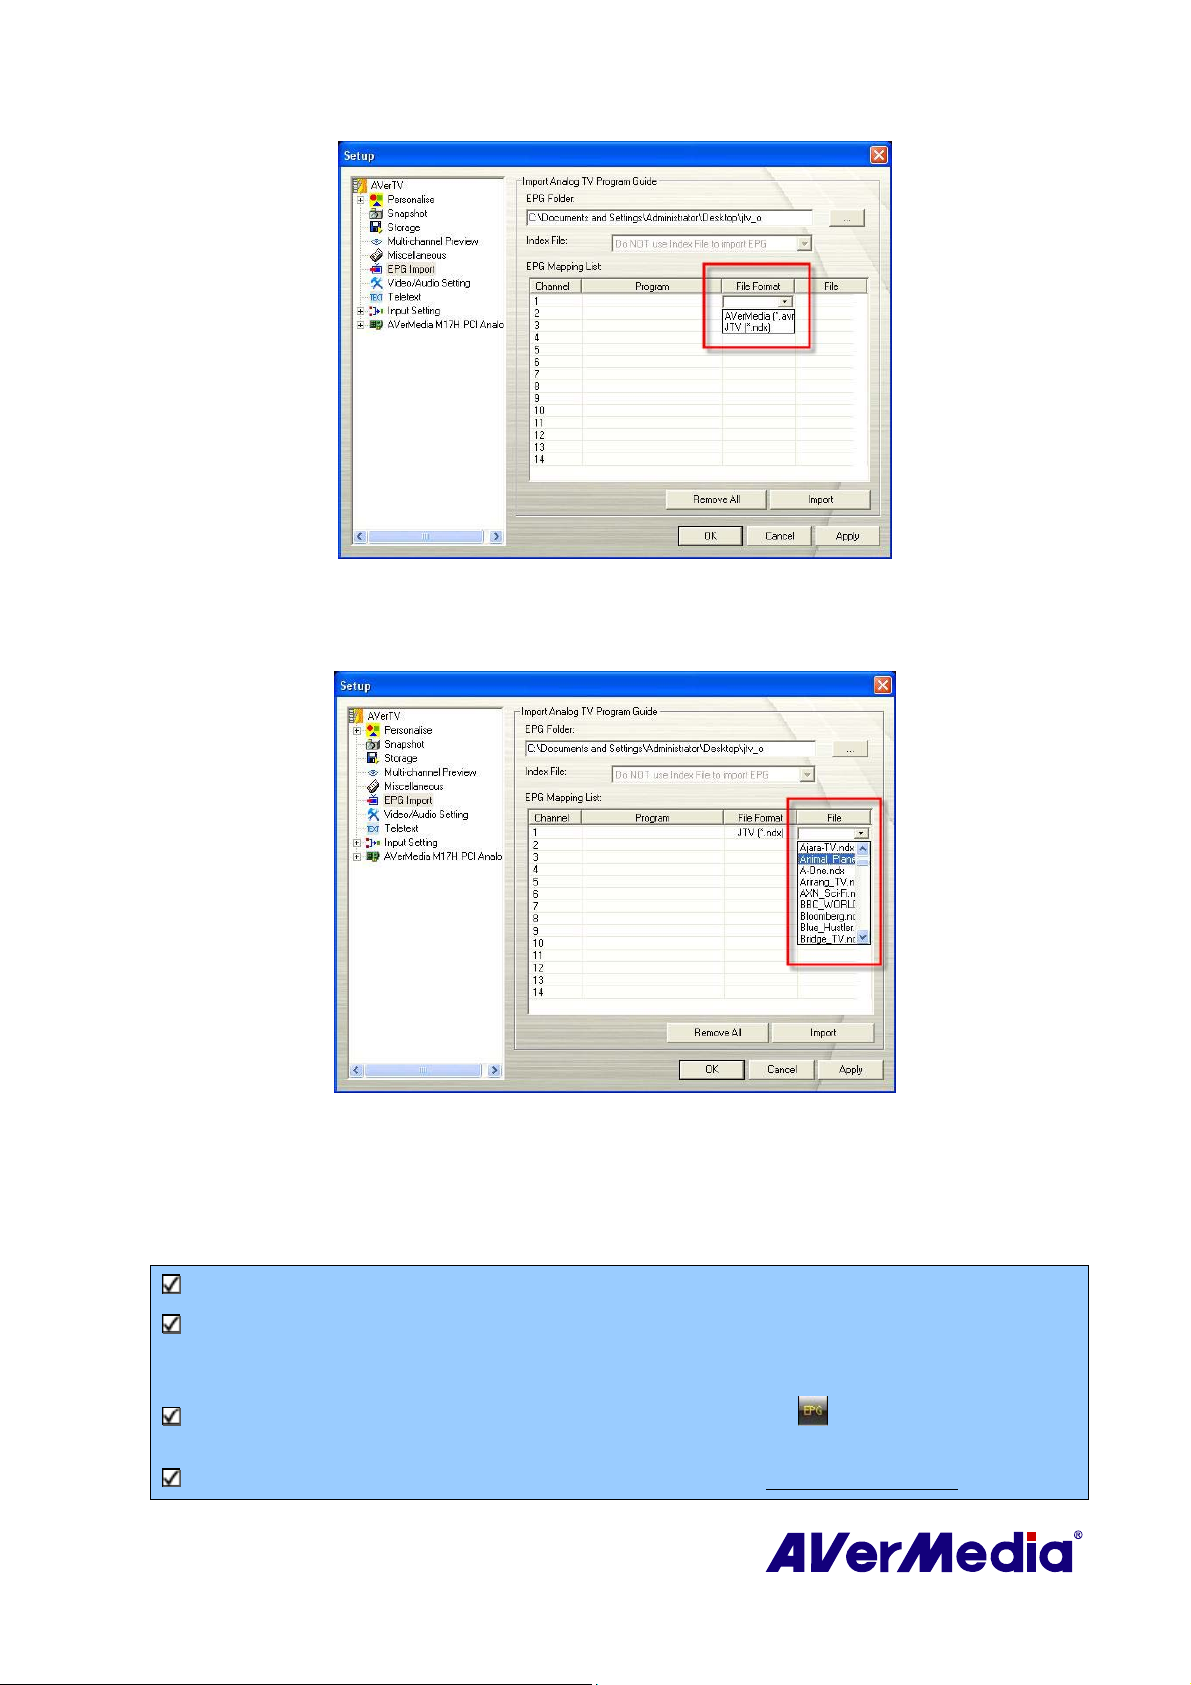
(This picture is only for reference.)
5. Then double click on the space below File to choose the designated file to insert.
(This picture is only for reference.)
6. Click Import button to complete EPG import.
Then click Apply to save the imported EPG.
7.
Note: Each file refers to the TV programs of one channel.
Note: After importing analog EPG for the first time, the channels you’ve chosen to import will be
saved and listed in the EPG Mapping List. However, you still need to click on Import button to
update and get the latest EPG information.
Note: To see the imported EPG information, just click the EPG button on the control panel to open
the EPG window.
Note: JTV format EPG TV guide (*.ndx and *.pdt) can be found at http://www.teleweb.ru .
45
 Loading...