

Page 1
PTC500
User Manual
Page 2
IMPORTANT NOTICE
PLEASE READ THE INSTRUCTIONS IN THIS MANUAL BEFORE INSTALLING THE PTC500
TRACKING CAMERA.
DO NOT DISASSEMBLE OR MODIFY THE ITEMS BY YOURSELF. CONTACT THE DEALER
FOR HELP WHEN THE ITEMS IS FAILED TO WORK.
CONNECT THE DEVICES WITH PROPER CABLES.
TO REDUCE RISK OF ELECTRIC SHOCK ONLY USE INDOORS.
AVOID INSTALLING AT HUMID ENVIRONMENT.
Federal Communication Commission Interference Statement
This device complies with Part 15 of the FCC Rules. Operation is subject to the following
two conditions: (1) This device may not cause harmful interference, and (2) this device must
accept any interference received, including interference that may cause undesired
operation.
This equipment has been tested and found to comply with the limits for a Class B digital device,
pursuant to Part 15 of the FCC Rules. These limits are designed to provide reasonable protection
against harmful interference in a residential installation. This equipment generates uses and can
radiate radio frequency energy and, if not installed and used in accordance with the instructions, may
cause harmful interference to radio communications. However, there is no guarantee that interference
will not occur in a particular installation. If this equipment does cause harmful interference to radio or
television reception, which can be determined by turning the equipment off and on, the user is
encouraged to try to correct the interference by one of the following measures:
Reorient or relocate the receiving antenna.
Increase the separation between the equipment and receiver.
Connect the equipment into an outlet on a circuit different from that to which the receiver is
connected.
Consult the dealer or an experienced radio/TV technician for help.
FCC Caution: Any changes or modifications not expressly approved by the party responsible for
compliance could void the user's authority to operate this equipment.
This transmitter must not be co-located or operating in conjunction with any other antenna or
transmitter.
European Community Compliance Statement (Class A)
This product is herewith confirmed to comply with the requirements set out in the Council
Directives on the Approximation of the laws of the Member States relating to
Electromagnetic Compatibility Directive 2014/30/EU.
Warning - This is a Class A product. In a domestic environment this product may cause radio
interference in which case the user may be required to take adequate measures to correct this
interference.
Page 3

DISCLAIMER
No warranty or representation, either expressed or implied, is made with respect to the contents of this
documentation, its quality, performance, merchantability, or fitness for a particular purpose. Information
presented in this documentation has been carefully checked for reliability; however, no responsibility is
assumed for inaccuracies. The information contained in this documentation is subject to change without
notice.
In no event will AVer Information Inc. be liable for direct, indirect, special, incidental, or consequential
damages arising out of the use or inability to use this product or documentation, even if advised of the
possibility of such damages.
TRADEMARKS
“AVer” is a trademark owned by AVer Information Inc. Other trademarks used herein for description
purpose only belong to each of their companies.
COPYRIGHT
© 2017 AVer Information Inc. All rights reserved.
All rights of this object belong to AVer Information Inc. Reproduced or transmitted in any form or by any
means without the prior written permission of AVer Information Inc. is prohibited. All information or
specifications are subject to change without prior notice.
The mark of Crossed-out wheeled bin indicates that this product must not be disposed
of with your other household waste. Instead, you need to dispose of the waste
equipment by handing it over to a designated collection point for the recycling of waste
electrical and electronic equipment. For more information about where to drop off your
waste equipment for recycling, please contact your household waste disposal service or
the shop where you purchased the product.
Page 4

CONTENTS
INTRODUCTION .................................................................................................................. 1
Package Contents ......................................................................................................... 1
Product Overview .......................................................................................................... 2
Dimension ..................................................................................................................... 2
Remote Controller ......................................................................................................... 3
INSTALLATION .................................................................................................................... 4
Device Connections ................................................................................................ ....... 4
Installation ..................................................................................................................... 5
Teacher Mode ........................................................................................................... 5
Student Mode ............................................................................................................ 6
RS232 Pin Definition ................................................................................................. 7
OSD TREE MAP .................................................................................................................. 8
Main ................................ ................................ ............................................................... 8
Tracking ......................................................................................................................... 9
Camera .......................................................................................................................... 9
Camera ID ............................................................................................................... 10
DHCP ...................................................................................................................... 10
Static IP ................................................................................................................... 10
PTZ Camera ............................................................................................................ 11
Video Format ............................................................................................................... 14
Advanced Setting ........................................................................................................ 15
Preset .......................................................................................................................... 15
Language .................................................................................................................... 17
Page 5

Profile .......................................................................................................................... 17
Factory Default ............................................................................................................ 18
Information .................................................................................................................. 18
USING PTC500 VIA ACUCONTROL ................................................................................. 19
Before You Begin ......................................................................................................... 19
For the First Time Use ................................................................................................. 19
Setup IP Address .................................................................................................... 19
Make a Connection with iPad .................................................................................. 21
USING IPAD TO SETUP PTC500 ...................................................................................... 24
Teacher Mode .............................................................................................................. 24
Setup Preset Setting ............................................................................................... 25
Setup Tracking Zone ............................................................................................... 27
Setup Shield Zone ................................................................................................... 29
Student Mode .......................................................................................................... 31
Setup Preset Setting ............................................................................................... 32
Setup Tracking Zone ............................................................................................... 35
Setup Shield Zone ................................................................................................... 37
Setup Front Side Student Height ............................................................................. 39
Setup Rear Side Student Height ............................................................................. 39
Change Camera Password ......................................................................................... 40
Function Table ............................................................................................................. 41
FAQ .................................................................................................................................... 48
Page 6
1
INTRODUCTION
AVer PTC500 is a professional tracking camera which can be teacher mode or student mode depended
on user’s subject target. The PTC500 use body motion and image analysis algorithm to tracking target;
the target subject no need to wear any signal transmit device. The PTC500 can communicate with
recording system through RS232, RS485 or network interface. The PTC500 has stable system, easy to
use, and suitable for classroom, meeting room, and any lecture or course environment.
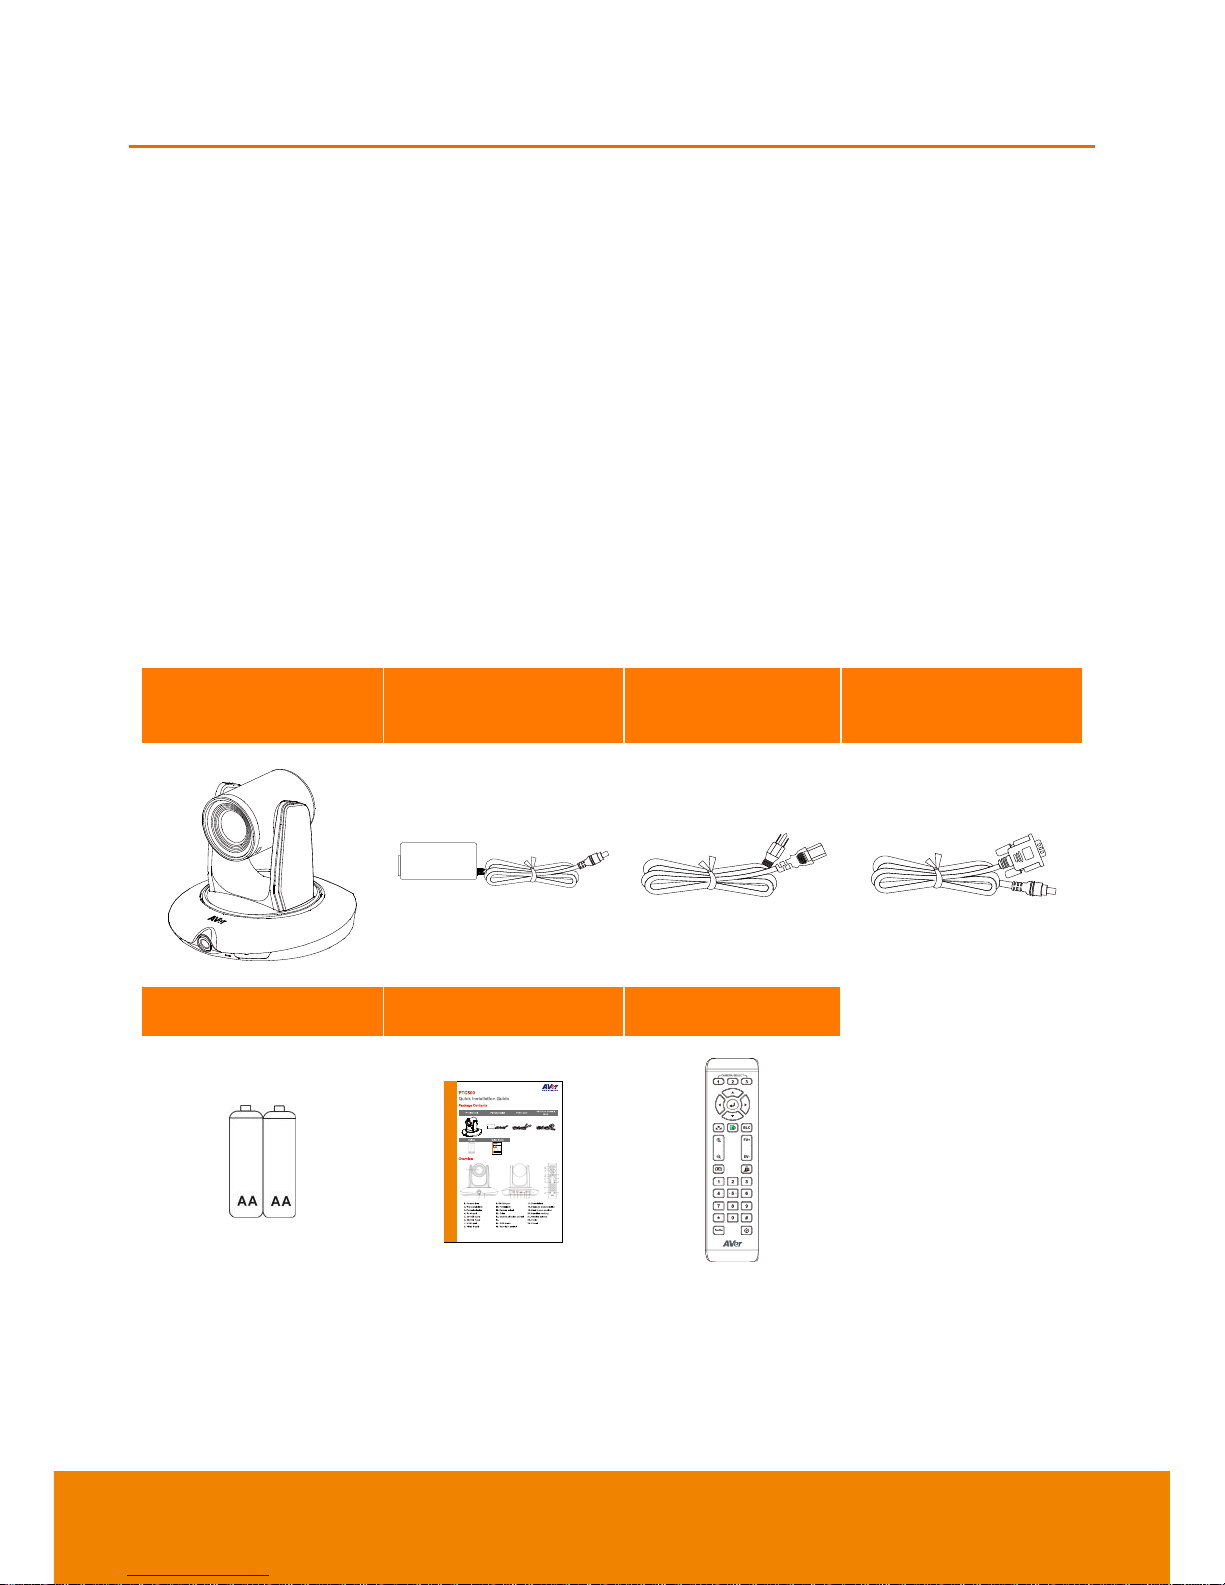
Package Contents
The following items are included in the package. Please check if each item is available and confirm if
there are damage before using.
[Note]
1. Do not disassemble or modify the items by yourself. Contact the dealer for help when the items is
failed to work.
2. Store the items in a dry place away from moisture.
PTC500 unit
Power adapter
Power cord
RS-232 to D-Sub 9
cable
Battery
Quick Guide
Remote Control
[Note] The power cord will vary depending on the standard power outlet of the country where it is sold.
Page 7

2
Product Overview
1
2 3 4 5 6 7 8 9 10
1. PTZ camera
6. 3G-SDI 1 port(PTZ view)
2. Panoramic camera
7. HDMI port(PTZ view)
3. Power indicator
8. Video in port
4. RJ-45 port
9. RS-232 port
5. 3G-SDI 2 port(Panoramic view)
10. Power jack
Dimension
Page 8
3
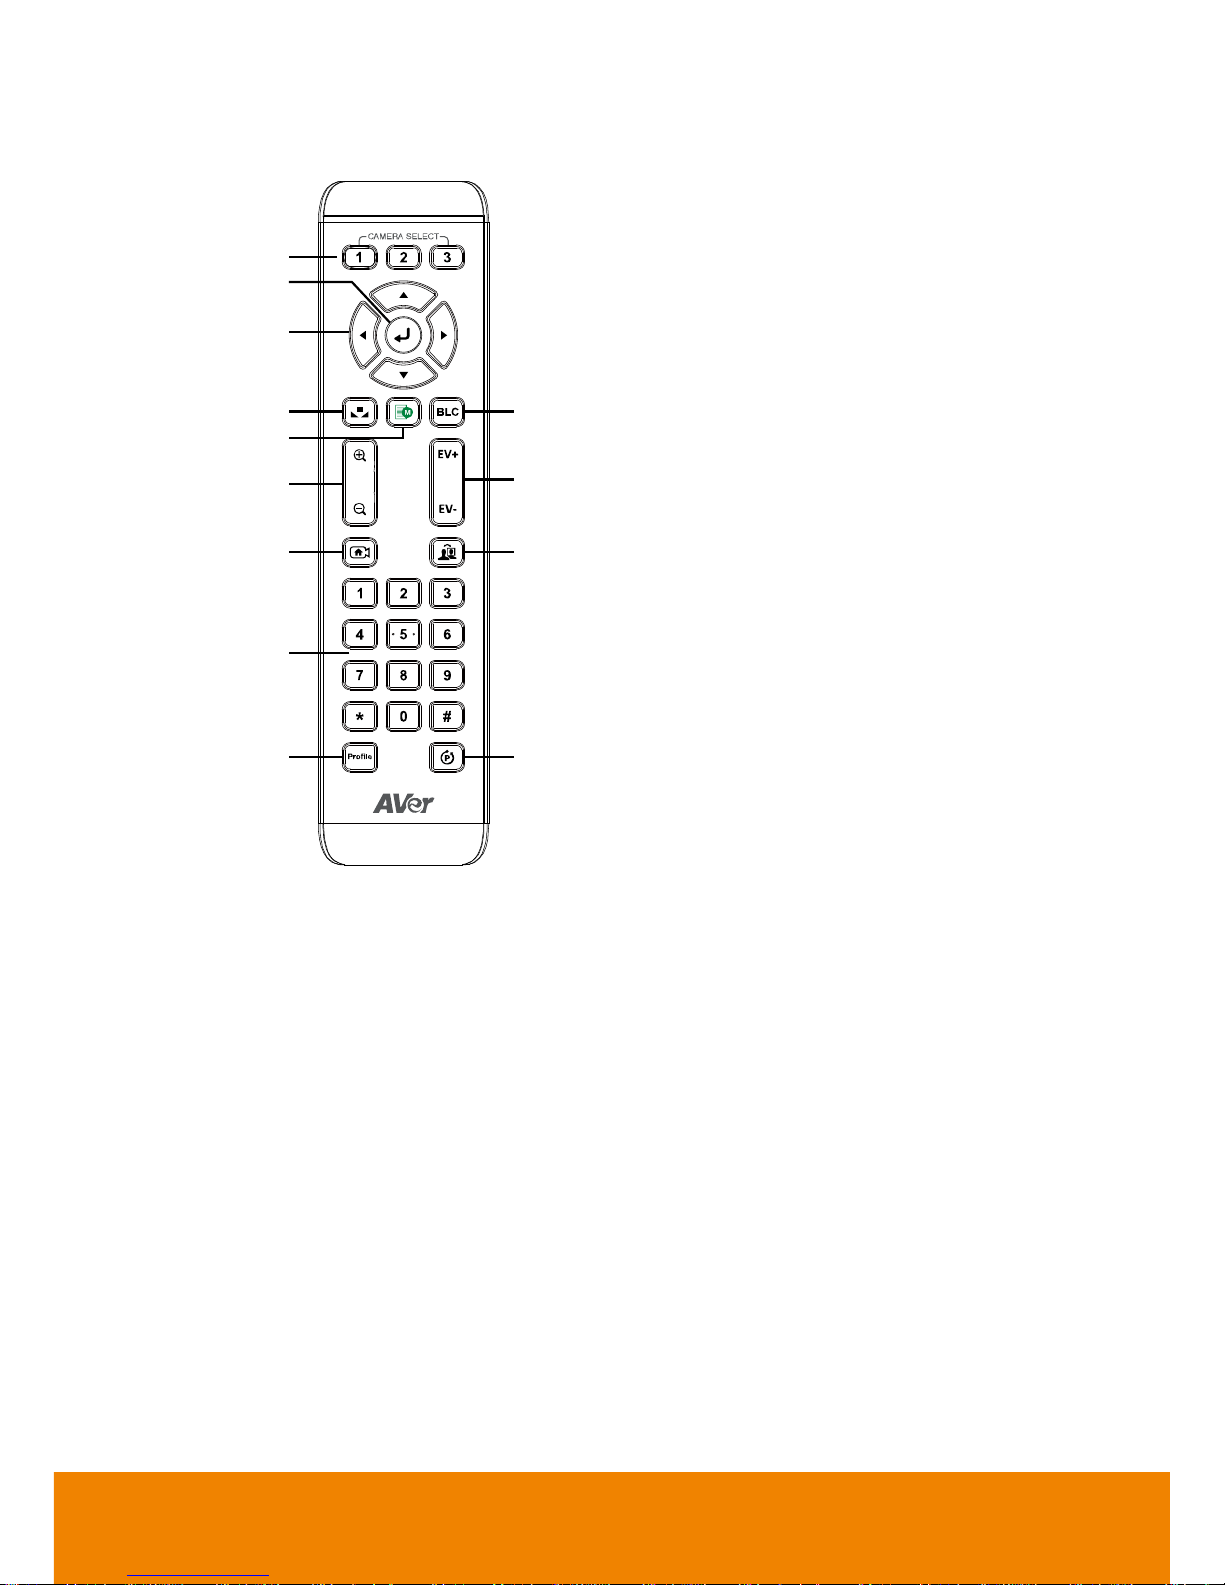
Remote Controller
1
6
8
10
13
2
3
4
7
9
11
12
5
1. Camera select
[Note] Only channel No.1 is available.
Before you use remote, please press
channel 1 first.
2. Enter
3. Camera direction control
4. White balance
5. OSD menu
6. Back light control
7. Zoom in/out
8. Exposure compensation
9. Back to zero position((home preset)
10. Specifies tracking(Not available yet)
11. Number buttons
12. Profile
13. Preset
Page 9
4
INSTALLATION
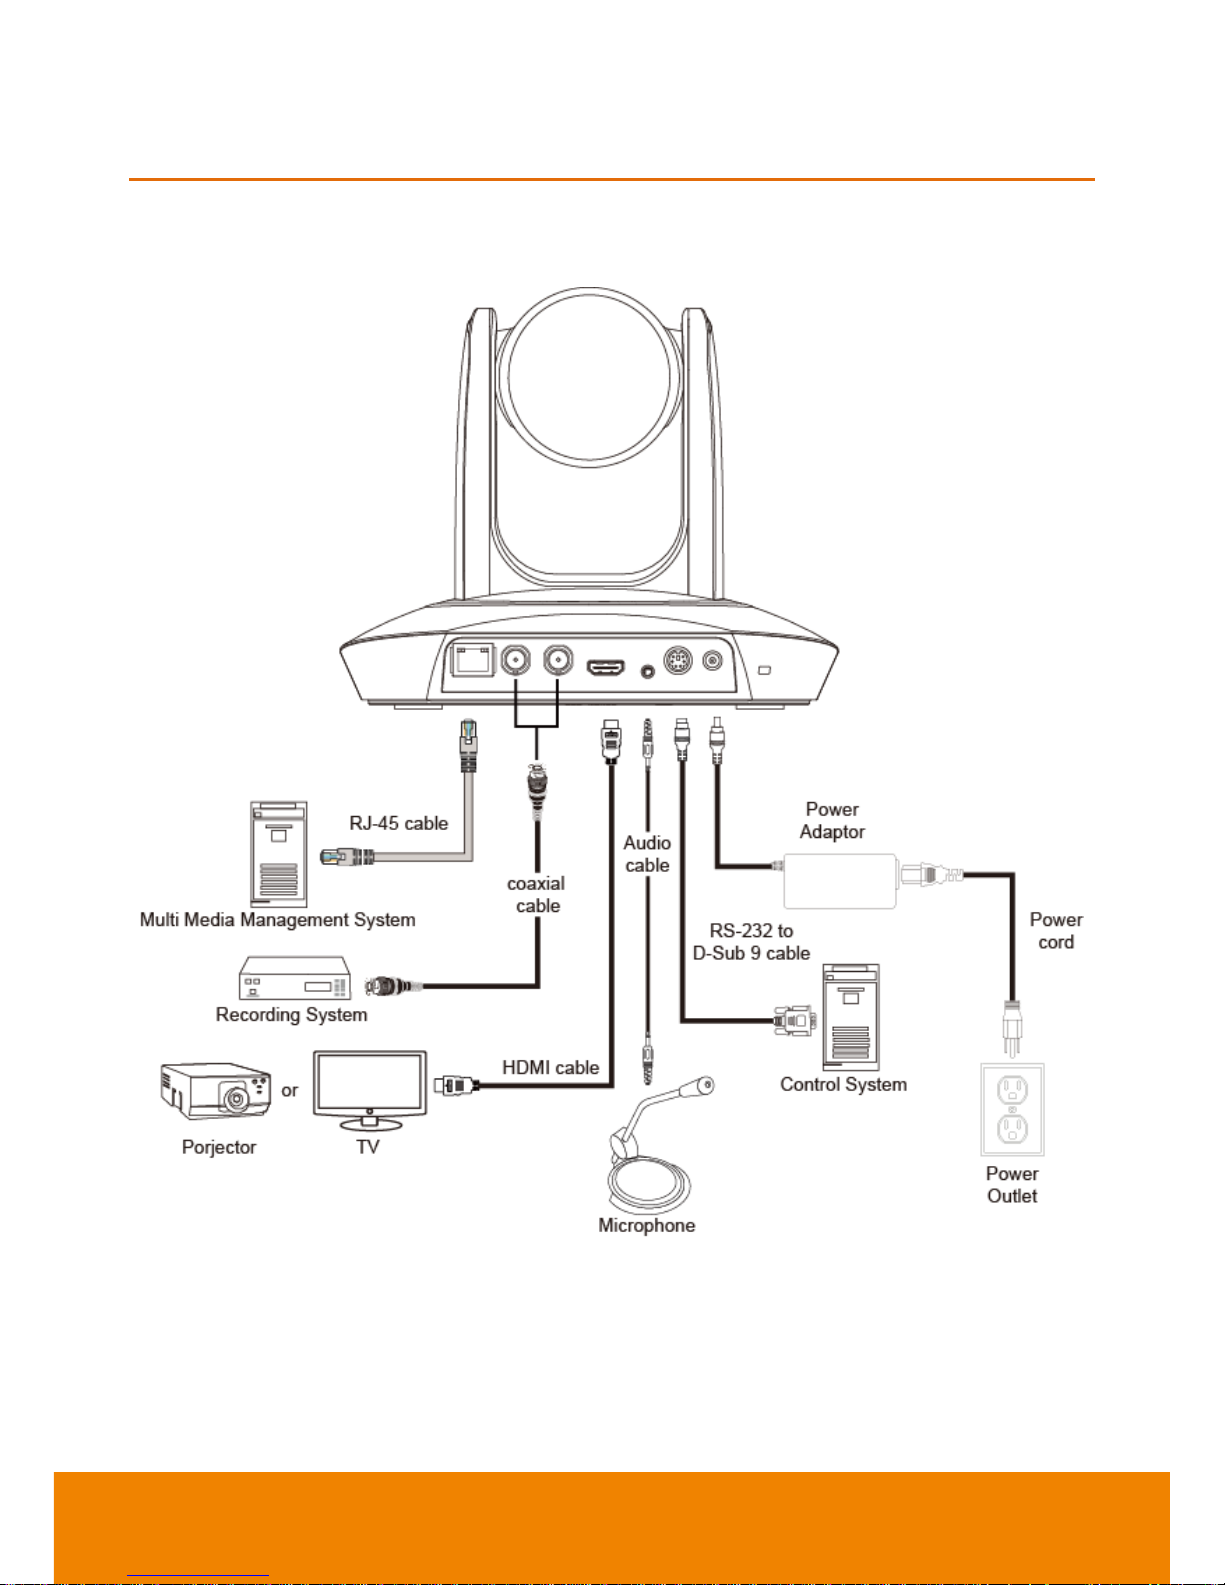
Device Connections
Page 10
5
Installation
Please refer to following suggestion to install the PTC500 in a proper position.
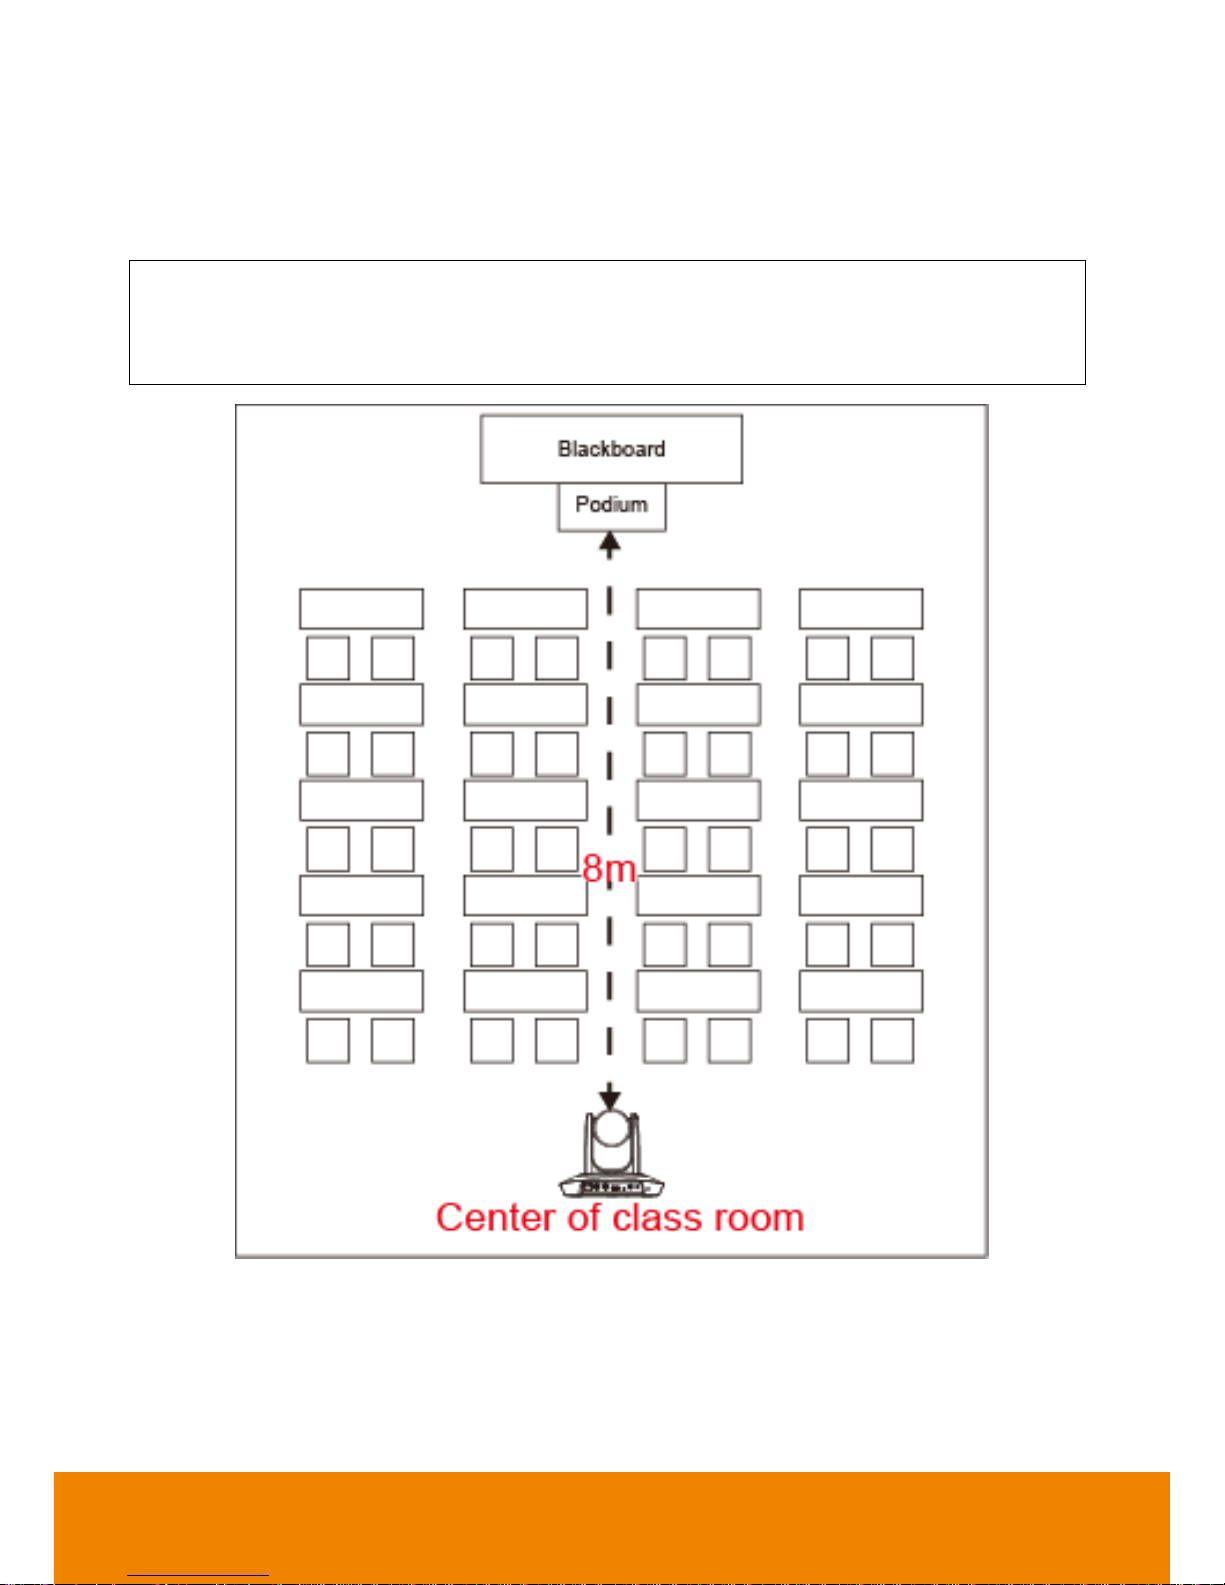
Teacher Mode
Install height range (from floor): 2 ~ 3m; 2.4m is suggested.
Distance range to podium: 4~15m; 8m is suggested.
Position: Center of class room.
Page 11
6
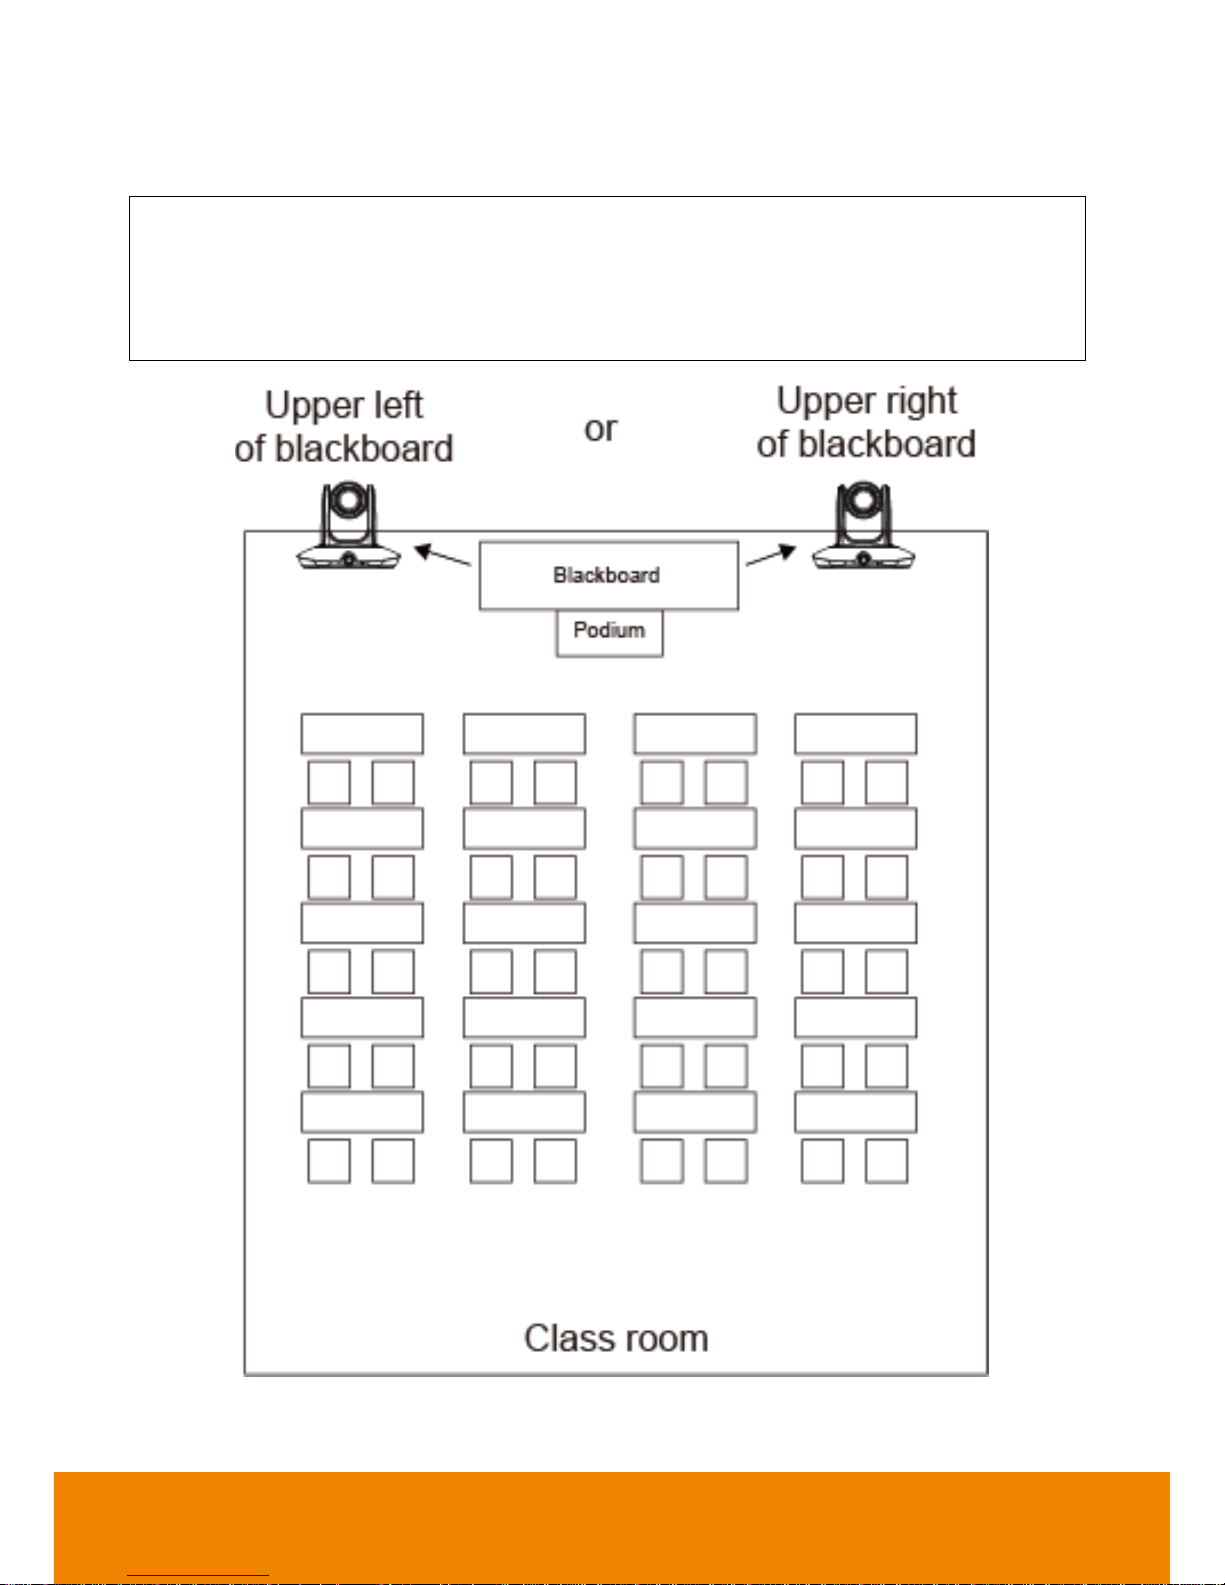
Student Mode
[Note] Student mode is only available on AcuControl app.
Install height range (from floor): 2 ~ 3m; 2.4m is suggested.
Position: Upper left or right of blackboard.
Make sure the view range includes all students.
Class room size: Up to 15m x 8m
Page 12
7
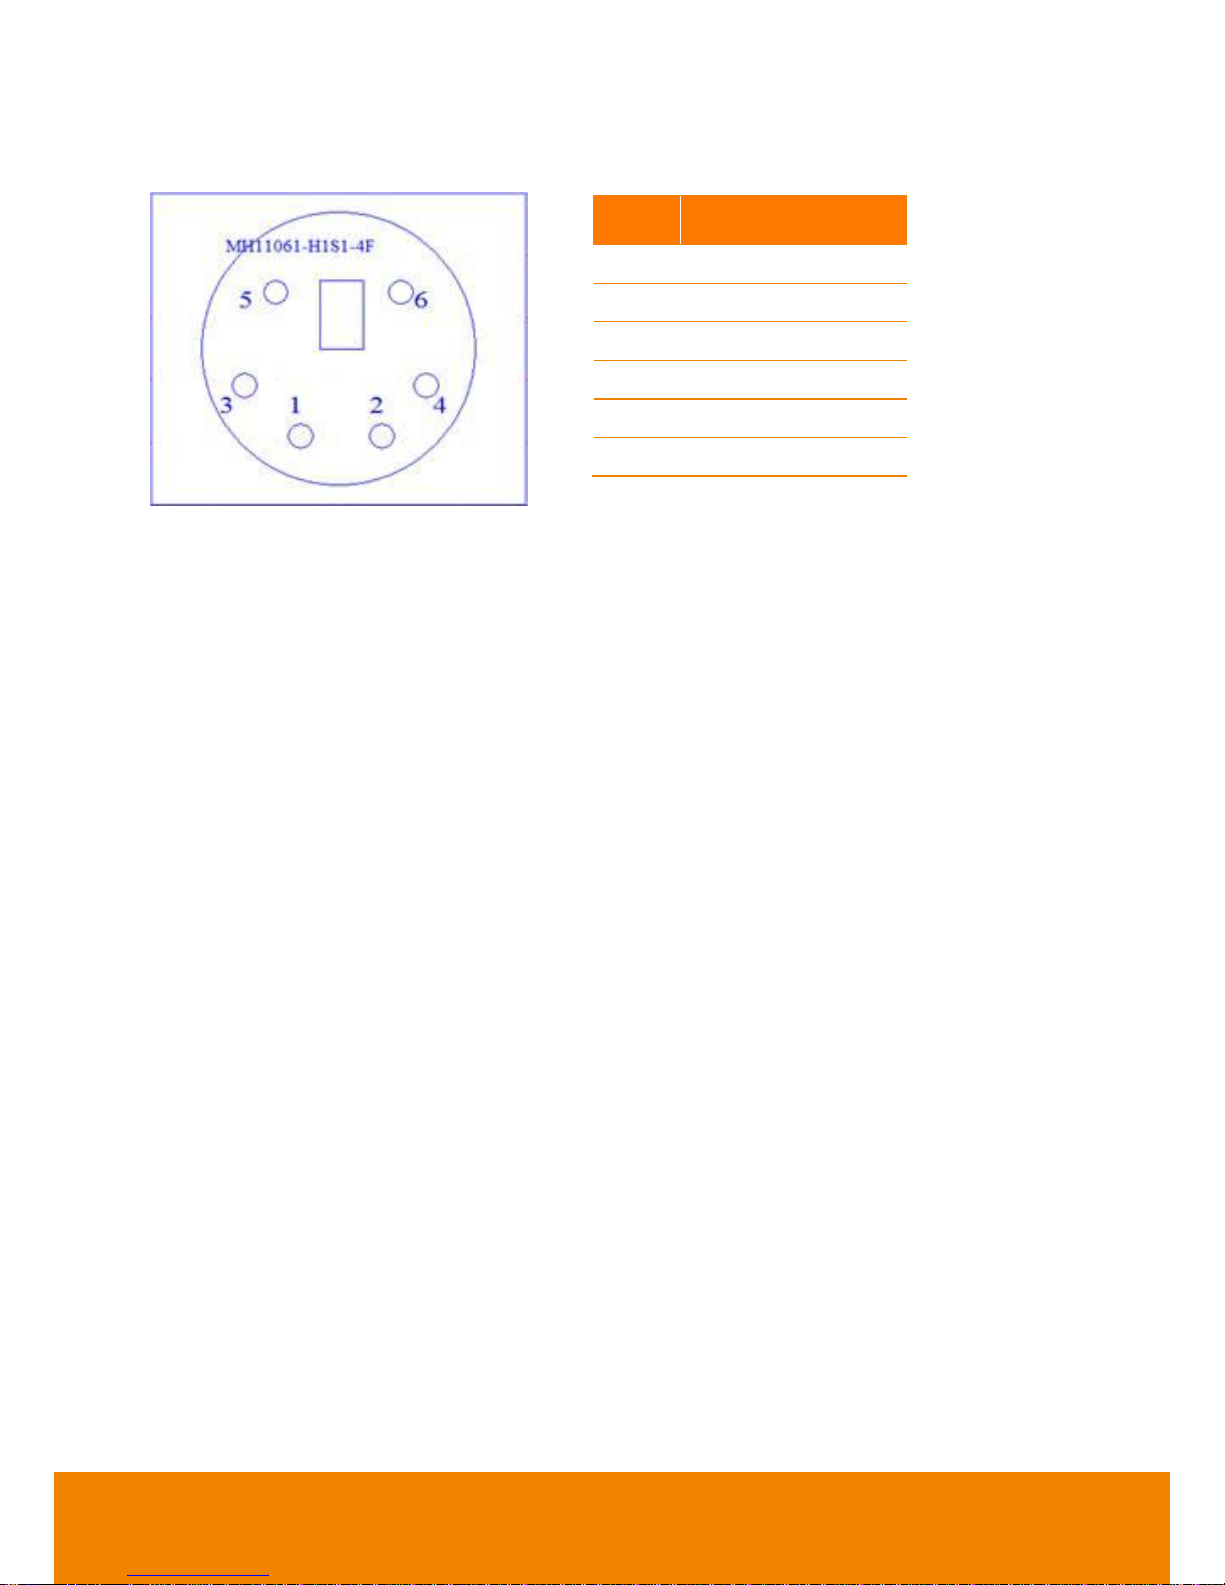
RS232 Pin Definition
Pin
Definition
1
RS232_DTR
2
RS232_DSR
3
N.C.
4
RS232_TXD
5
GND
6
RS232_RXD
Page 13
8
OSD TREE MAP
Trigger OSD Menu
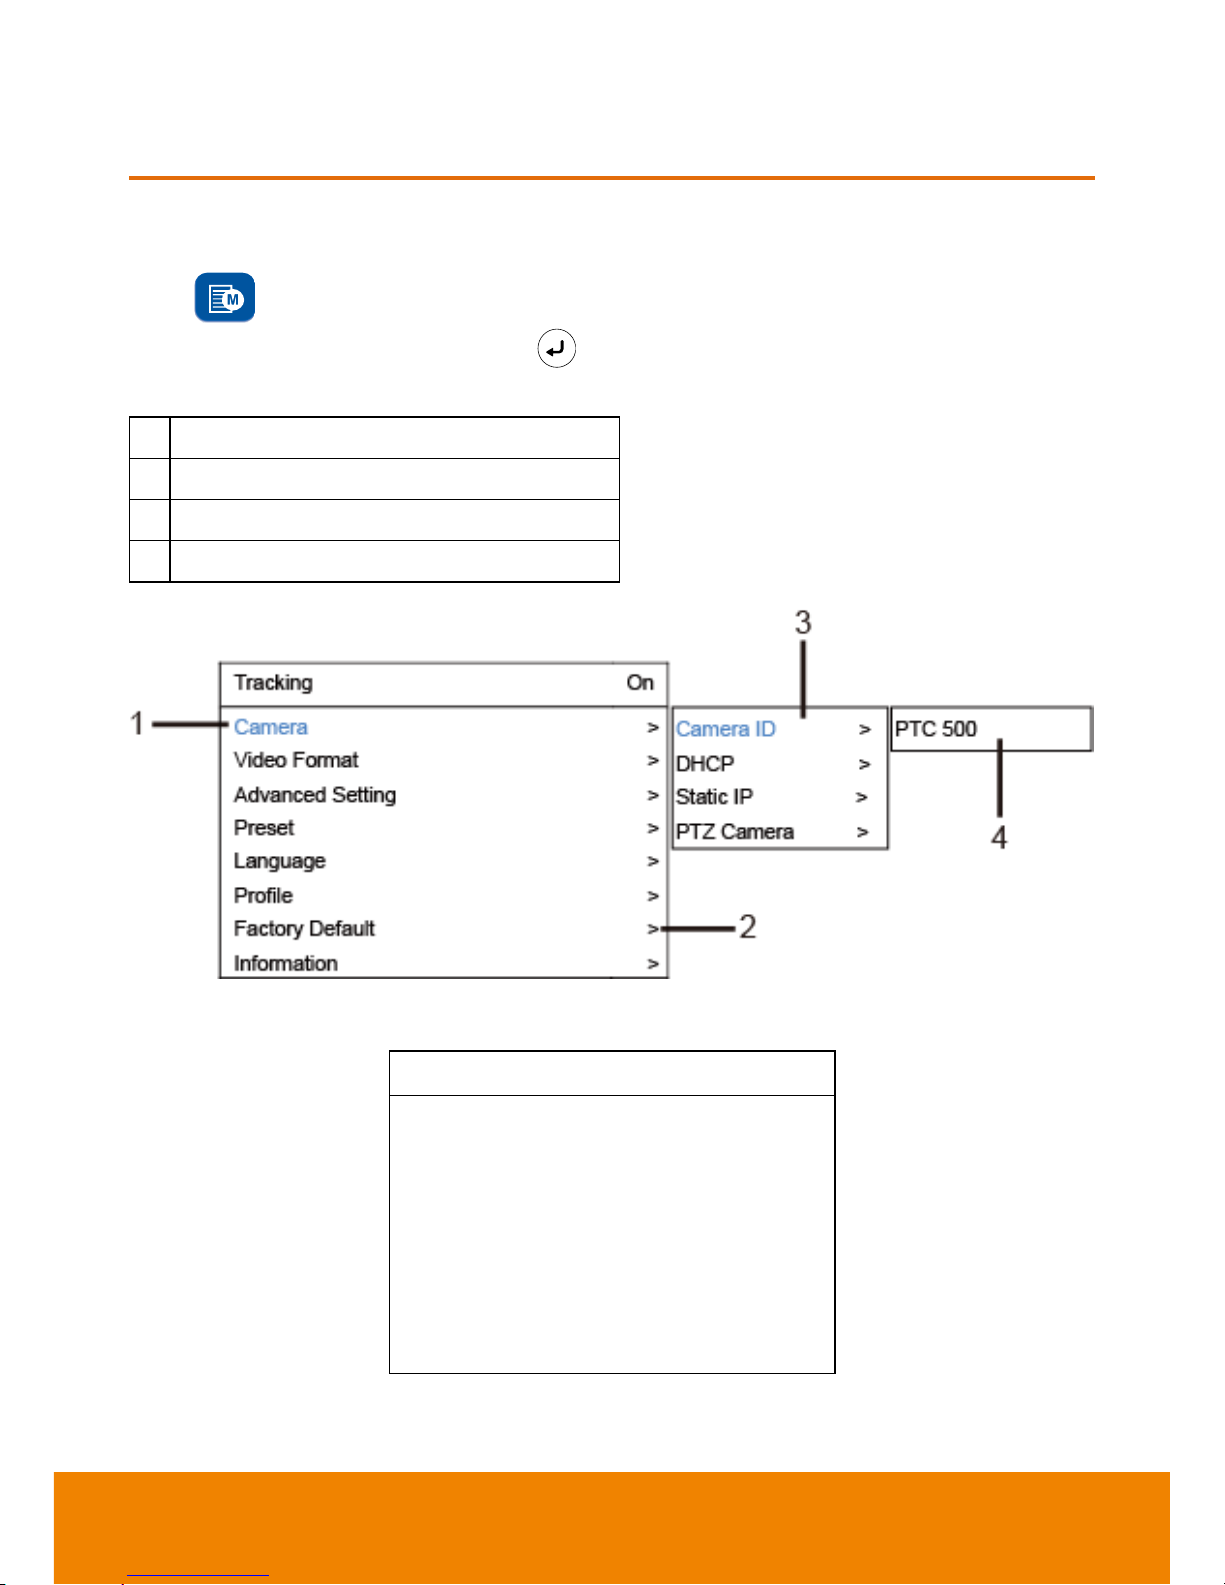
Press button on remote controller to call out OSD menu. Use to enter sub-menu, use ▲
and ▼ to move to the selection and use to confirm the selection. Press button can back to
previous level of menu.
1
Blue text indicates the current selection.
2
“>” means has sub-menu or value selection.
3
Sub-menu
4
Column for enter value or value selections.
Main
Tracking
On
Camera
Video Format
Preset
Advanced Setting
Language
Profile
Factory Default
Information
>
>
>
>
>
>
>
>
Page 14

9
Tracking
User can enable or disable auto-tracking.
PTC-500 will not track on object automatically when the feature is disabled.
To enable auto-tracking, please select “On”.
To disable auto-tracking, select “Off”.
Tracking
On
Camera
Video Format
Advanced Setting
Preset
Language
Profile
Factory Default
Information
>
>
>
>
>
>
>
>
Camera
In the section, users can change camera ID, network setting and adjust parameter of camera settings.
Tracking
On
Camera
Video Format
Advanced Setting
Preset
Language
Profile
Factory Default
Information
>
>
>
>
>
>
>
>
On
Off
Camera ID >
DHCP >
Static IP >
PTZ Camera >
Page 15

10
Camera ID
To change camera ID, please select Camera > Camera ID.
Tracking
On
Camera
Video Format
Advanced Setting
Preset
Language
Profile
Factory Default
Information
>
>
>
>
>
>
>
>
DHCP
To enable DHCP, select Camera > DHCP.
Tracking
On
Camera
Video Format
Advanced Setting
Preset
Language
Profile
Factory Default
Information
>
>
>
>
>
>
>
>
Static IP
To setup network as a static IP, select Camera > Static IP (Please set DHCP off before the Static IP
setting)
Tracking
On
Camera
Video Format
Advanced Setting
Preset
Language
Profile
Factory Default
Information
>
>
>
>
>
>
>
>
Camera ID >
DHCP >
Static IP >
PTZ Camera >
PTC 500
Camera ID >
DHCP >
Static IP >
PTZ Camera >
DHCP10.1.0.1 ON
Camera ID >
DHCP >
Static IP >
PTZ Camera >
IP 10.1.0.1
Mask 255.255.0.255
Gateway 10.1.0.1
DNS
>
>
>
>
Page 16

11
PTZ Camera
To adjust the parameters of PTZ camera, select Camera >PTZ Camera.
Tracking
On
Camera
Video Format
Advanced Setting
Preset
Language
Profile
Factory Default
Information
>
>
>
>
>
>
>
>
Camera Mode Full Auto
Full Auto
Shutter Priority
Iris Priority
Manual
White Balance
Shading Correction
>
>
>
>
>
>
>
Pan/Tile Speed
Zoom Speed
Digital Zoom Limit
PTZ Zoom Focus
Power Up
Frequency
Contrast
Saturation
Sharpness
NosieReduction
1
Low
12
Off
Home
Auto
2
5
Medium
Medium
Camera ID
DHCP
Static IP
PTZ Camera
>
>
>
>
Page 17

12
Camera Mode
There are 4 modes of camera mode, you can select one from Camera > PTZ Camera > Camera
Mode.
Camera Mode Full Auto
Full Auto
Shutter Priority
Iris Priority
Manual
White Balance
Shading Correction
>
>
>
>
>
>
>
Pan/Tile Speed
Zoom Speed
Digital Zoom Limit
PTZ Zoom Focus
Power Up
Frequency
Contrast
Saturation
Sharpness
NosieReduction
1
Low
12
Off
Home
Auto
2
5
Medium
Medium
Full Auto
Shutter Priority
Iris Priority
Manual
>
>
>
>
Slow Shutter
Maximum Gain
Back Light compens
Exposure
Off
24dB
Off
0
Speed
Maximum Gain
Exposure
1/30
24dB
0
Slow Shutter
Iris
Maximum Gain
Exposure
Off
F6.8
24dB
0
Maximum Gain
Speed
Iris
24dB
1/30
F6.8
Full Auto
Shutter Priority
Iris Priority
Manual
>
>
>
>
Full Auto
Shutter Priority
Iris Priority
Manual
>
>
>
>
Full Auto
Shutter Priority
Iris Priority
Manual
>
>
>
>
Page 18

13
White Balance
To adjust white balance value, select Camera > PTZ Camera > White Balance.
Camera Mode Full Auto
Full Auto
Shutter Priority
Iris Priority
Manual
White Balance
Shading Correction
>
>
>
>
>
>
>
Pan/Tile Speed
Zoom Speed
Digital Zoom Limit
PTZ Zoom Focus
Power Up
Frequency
Contrast
Saturation
Sharpness
NosieReduction
1
Low
12
Off
Home
Auto
2
5
Medium
Medium
Mode
Auto
Auto
One Push
Manual
6247
Page 19

14
Shading Correction
To adjust shading correction, select Camera > PTZ Camera > Shading Correction (The option is for
the screen corner shadow fixing.)
Video Format
To adjust Video Format, select Video Format from OSD menu.
Tracking
On
Camera
Video Format
Advanced Setting
Preset
Language
Profile
Factory Default
Information
>
>
>
>
>
>
>
>
Camera Mode Full Auto
Full Auto
Shutter Priority
Iris Priority
Manual
White Balance
Shading Correction
>
>
>
>
>
>
>
Pan/Tile Speed
Zoom Speed
Digital Zoom Limit
PTZ Zoom Focus
Power Up
Frequency
Contrast
Saturation
Sharpness
NosieReduction
1
Low
12
Off
Home
Auto
2
5
Medium
Medium
Upper Left
Upper Right
Bottom Left
Bottom Right
Off
Off
Off
Off
3G-SDI1/HDMI
3G-SDI2
Auto
Auto
Page 20

15
Advanced Setting
To adjust RS232 protocol, address and baud rate, select Advance Setting from OSD menu.
Tracking
On
Camera
Video Format
Advanced Setting
Preset
Language
Profile
Factory Default
Information
>
>
>
>
>
>
>
>
Preset
PTC-500 allows you to set 10 preset locations via remote controller.
To set up preset point:
1. Enter OSD and turn off the tracking function.
2. Move camera to the prefer location and zoom distance.
3. Press bottom >
Preset
>
Set
and use arrow key to assign a preset number and press enter
button on remote controller.
[Tip] Shortcut of setting a preset location as following:
Press “P” button > press “↑” > press number you want to set, ex: 1 and press enter.
Tracking
On
Camera
Video Format
Advanced Setting
Preset
Language
Profile
Factory Default
Information
>
>
>
>
>
>
>
>
To call a preset location:
Press bottom >
Preset
>
call
and use arrow key to select which preset number you would like
to recall -> press enter button on remote controller.
RS232 Protocol
Address(ADDRD)
Baud Rate
VISCA
1
9600
Set
Call 1 1
Page 21

16
[Tip] Shortcut of calling a preset location: press “P” > press number you want to recall, ex: 1.
[Teacher Mode]
1. Please adjust the target proportion in preset1. Set the person proportion more than the illustration.
The photo shows the minimum request. If target proportion is smaller than the photo, it may cause
the tracking failure.
2. 2. When PTC500 starts to track, the target proportion in the screen will be defined by preset1
setting.
[Student Mode]
1. Please adjust view of preset1 as panoramic view.
2. Please adjust optical zoom to the minimum level (panoramic view).
Page 22

17
Language
To change language, go to OSD menu > Language.
Tracking
On
Camera
Video Format
Advanced Setting
Preset
Language
Profile
Factory Default
Information
>
>
>
>
>
>
>
>
Profile
PTC500 allows you to save 5 profiles.
To set the profile, go to OSD menu > Set and use arrow key to assign a number and press enter button.
To call the profile, go to OSD menu > Apply and use arrow key to call an assigned number and press
enter button.
Tracking
On
Camera
Video Format
Advanced Setting
Preset
Language
Profile
Factory Default
Information
>
>
>
>
>
>
>
>
English
繁體中文
簡体中文
日本語
Deutsch
Francais
Espanol
Set
Apply
default
default
Page 23

18
Factory Default
To reset the PTC500 to default setting, go to OSD menu > Factory Default > Yes and press enter
button.
Tracking
On
Camera
Video Format
Advanced Setting
Preset
Language
Profile
Factory Default
Information
>
>
>
>
>
>
>
>
Information
To check out information on the PTC-500, ex: FW version. Go to OSD menu > Information.
Tracking
On
Camera
Video Format
Advanced Setting
Preset
Language
Profile
Factory Default
Information
>
>
>
>
>
>
>
>
Yes
No
Camera ID
Serial Number
Firmware Version
IP Address
PTC500
0000
0.0.0002.12
10.1.0.1
Page 24

19
USING PTC500 via AcuControl
Before You Begin
Make sure all connections are connected successfully before using the PTC500. Connections error will
cause no image showing or no reaction. (For more information, please refer to INSTALLATION
chapter.)
For the First Time Use
Setup IP Address
Setup IP address of PTC500 for a connection with iPad.
There are two ways to setup IP address of PTC500. Please follow the steps below to setup the IP
address.
Dynamic IP Address(DHCP)
Get IP address from your local DHCP server.
1. After starting-up, press button on remote control to call out OSD menu.
2. Use ▲ and ▼ buttons to select the
Camera
>
DHCP > DHCP > On
, then press or enter button
to get IP address from local DHCP server.
Page 25

20
3. Use ▲ and ▼ buttons go to “
Information
” to check the IP address information.
Static IP Address
Assign a fix IP address for PTC500.
1. After starting-up, press button on remote control to call out OSD menu.
2. Turn the DHCP off first. Go to
Camera
>
DHCP > DHCP > Off
then press or enter button to
confirm the selection. The menu selection will switch to “
Static IP
” when DHCP off is applied.
3. Use ▲, ▼, Enter button, and on-screen keyboard to setup the “IP”, “
Gateway
”, “
Mask
” and
“
DNS
”.
Page 26

21
Make a Connection with iPad
User can uses iPad to setup tracking parameters of PTC500 (tracking zone area, shield zone
area…etc.); no need to connect PTC500 to monitor for setup.
1. Have “AcuControl” app installed on the iPad. The "AccuControl" is available in App store.
[Note] The AccuControl app only supports iPad 4(2012) or advance models.
2. Run AcuControl on the iPad. Then, select “Add Camera”.
3. Enter the following information:
Client Name: Give a name of the camera for user to recognize on camera list.
Camera ID: The camera ID is shown on information section of PTC500 setup menu.
IP: Enter the IP address of PTC500. The IP address can be found on Information section of
PTC500 setup menu.
Port: Enter the port for communicating between PTC500 and iPad. Default is “80”.
Password: The password is used for authentication on PTC500. Default is “admin”.
Page 27

22
4. After entering all information, select “OK” to add a camera. User should see the camera is shown
on camera list.
5. Select the camera from the camera list and select “Connect” to make a connection with the
camera.
Page 28

23
6. When connection is successful, user should see the image view of PTC500 on screen. In view
screen, user can use on-screen control panel to move camera view, zoom in/out, and switch
camera view between PTZ camera and panoramic camera view.
7. For detail of using iPad to setup PTC500, refer to “Using iPad to Setup PTC500” chapter.
Page 29

24
USING iPAD to SETUP PTC500
Tracking zone, shield zone, and student heights setting only can be setup by AcuControl app on iPad.
Setup can be divided to two modes – teacher and student mode and details will be described in
following.
Teacher Mode
Before setting, please make sure your iPad and PTC500 are connected (Refer to “Make a Connection
with iPad” section).
1. Connecting to PTC500 through AcuControl app (Refer to Make a Connection with iPad section).
2. Before starting to setup PTC500, please turn off the tracking function. Select (settings) >
Tracking setting > Teacher > Tracking off
.
3. After completely all settings, remember to turn on the tracking function.
Page 30

25
Setup Preset Setting
Setup preset position.
[Note]
When setup preset position, the camera view is based on PTZ camera view.
Please adjust the target proportion in preset1. Set the person proportion more than the illustration.
The photo shows the minimum request. If target proportion is smaller than the photo, it may cause
the tracking failure.
2. When PTC500 starts to track, the target proportion in the screen will be defined by preset1
setting.
1. Select (settings) >
Preset setting
.
2. Select “
Save preset
” to setup preset position.
Page 31

26
3. In Save preset screen, use panel control to adjust the camera view to desire position and select
“
Save
”. Enter the number (1~255) of preset position and select “OK” to save. Total are 255 preset
positions can be set.
4. After setting preset, back to Preset Settings screen and select “
Call preset
” to check preset
position. Select preset number (ex: preset 1, preset 25...etc.) to view preset positon view.
Page 32

27
Setup Tracking Zone
If PTC500 detects motions in the defined zone and PTC500 will be triggered to track. If tracking zone
doesn’t setup, then, all the panoramic view will be the default active zone.
[Note] The screen of tracking zone setting is based on panoramic camera view.
1. Select (settings) >
Tracking setting > Teacher > Select tracking zone (1 grid)
.
Page 33

28
2. In Select tracking zone screen, select the area that wants to be tracking (a blue frame will show on
screen). User can select “Preview” to see the view of the camera.
3. Select “Save” to save the setting.
Page 34

29
Setup Shield Zone
Define the area that user doesn’t want camera to track. The shield zone should be within the active
zone. 8 shield zones can be set.
[Note] The screen of shield zone setting is based on panoramic camera view.
1. Select (settings) >
Tracking setting > Teacher > Select shielded zone (8 grid)
.
Page 35

30
2. In Shield tracking zone screen, select the area that don’t want to be tracking (a gray block will show
on screen). User can select “Preview” to see the view of the camera. To delete the shield zone area,
select “-“and select the gray block area.
3. Select “Save” to save the setting.
Page 36

31
Student Mode
Before setting, please make sure your iPad and PTC500 are connected (Refer to “Make a Connection
with iPad” section).
1. Connecting to PTC500 through AcuControl App (Refer to Make a Connection with iPad section).
2. Before starting to setup PTC500, please turn off the tracking function. Select (settings) >
Tracking setting > Student > Tracking off
.
3. After completely all settings, remember to turn on the tracking function.
Page 37

32
Setup Preset Setting
Setup preset position.
[Note]
When setup preset position, the camera view is based on PTZ camera view.
Please adjust view of preset1 as panoramic view.
Please adjust optical zoom to the minimum level (panoramic view).
1. Select (settings) >
Preset setting
.
Page 38

33
2. Select “
Save preset
” to setup preset position.
3. In Save preset screen, use panel control to adjust the camera view to desire position and select
“
Save
”. Enter the number (1~255) of preset position and select “OK” to save. Total are 255 preset
positions can be set.
Page 39

34
4. After setting preset, back to Preset Settings screen and select “Call preset” to check preset position.
Select preset number (ex: preset 1, preset 25...etc.) to view preset positon view.
Page 40

35
Setup Tracking Zone
User needs to define the active zone for PTC500 to detect. If PTC500 detects motions in the setup
zone and PTC500 will be triggered to track. If tracking zone doesn’t setup, then, all the panoramic view
will be the default active zone.
[Note] The screen of tracking zone setting is based on panoramic camera view.
1. Select (settings) >
Tracking setting > Teacher > Select tracking zone (1 grid)
.
Page 41

36
2. In Select tracking zone screen, select the area that wants to be tracking (a blue frame will show on
screen). User can select “
Preview
” to see the view of the camera.
3. Select “
Save
” to save the setting.
Page 42

37
Setup Shield Zone
Define the area that user doesn’t want camera to track. The shield zone should be within the active
zone. 8 shield zones can be set.
[Note] The screen of shield zone setting is based on panoramic camera view.
1. Select (settings) >
Tracking setting > Teacher > Select shielded zone (8 grid)
.
Page 43

38
2. In Shield tracking zone screen, select the area that you don’t want to be tracking (a gray block will
show on screen). User can select “
Preview
” to see the view of the camera. To delete the shield
zone area, select “-“and select the gray block area.
3. Select “
Save
” to save the setting.
Page 44

39
Setup Front Side Student Height
User needs to stand at the front side and define the whole height on screen.
1. Select (settings) >
Tracking setting > Front side student height (0px)
.
2. Using “ ” on screen to measure and set the student height. The number of height is displayed
when measure and set height.
3. Click “
Save
” to save the setting.
Setup Rear Side Student Height
User needs to stand at the rear side and define the whole height on screen.
1. Select (settings) >
Tracking setting > Front side student height (0px)
.
2. Using “ ” on screen to measure and set the student height. The number of height is displayed
when measure and set height.
3. Click “
Save
” to save the setting.
Page 45

40
Change Camera Password
Change PTC500’s password.
1. Select (settings) >
System setting > Change camera password
.
2. Enter the old password and new password, then select “OK” to confirm the changes.
Page 46

41
Function Table
Home Menu
Sub menu
2nd sub menu
Note
Add camera
Add Tracking Camera
Client name
Camera ID
IP Port
Default is 80.
Password
Default is admin.
Cancel/OK
Camera
(Select camera to
setup)
Connect
Delete
Edit
Client name
Camera ID
IP
Port
Default is 80.
Password
Default is admin.
Cancel
Live Menu
Sub menu
2nd sub menu
Note
PTZ camera
Live Streaming of PTZ
Panoramic camera
Live Streaming of
Panoramic
Page 47

42
Setting menu
Sub menu
2nd sub menu
Note
PTZ Camera Setting
Full Auto
Exposure Compensation
Maximum Gain
Slow Shutter
BLC
On 2 (only workable
under Full Auto)
Shutter Priority
Exposure Compensation
Maximum Gain
Shutter Speed
Iris Priority
Exposure Compensation
Maximum Gain
Slow Shutter
Iris
Manual
Gain
Speed
Iris
White Balance
Mode
Frequency
Auto, 50,60
Contrast
0 1 2 3 4
Saturation
0 1 2 3 4 5 6 7 8 9 10
Sharpness
Off Low Middle High
Noise Reduction
Off Low Middle High
Shading correction
Upper Left
The option is for the
screen corner shadow
fixing. It has 4 levels.
Upper Right
Bottom Left
Bottom Right
Page 48

43
Setting menu
Sub menu
2nd sub menu
Note
PTZ Camera Setting
Pan/Tilt Speed
1
The higher number
means more sensitive
2 3 4 5 6 7 8
Zoom Speed
High
Zoom speed adjustment
Low
Digital Zoom Limit
X1,X2,X3,X4,X5,X6,X7,X
8,X9,X10,X11,X12
To disable digital zoom,
please set the value at 1
PTZ Zoom Focus
On
Auto focus when camera
is doing zoom in/out
Off
Power up ACT
Preset 1,Preset 2,Preset
3,Preset 4,Preset 5,Preset
6,Preset 7,Preset 8,Preset
9,HOME
Define the default
location after PTC500
power on.
Video & Audio Setting
Video Output
3G-SDI 1/HDMI: PTZ
Camera
Auto
Auto is for HDMI. If there
is no HDMI connection,
the default value is
1080p/60
1080P/60
1080P/50
1080P/30
1080i/60
720P/60
Video Output
3G-SDI 2: PTZ Camera
1080P/60
1080P/30
720P/60
Page 49

44
Setting menu
Sub menu
2nd sub menu
Note
Video & Audio Setting
Video Output
3G-SDI 2: Panoramic
Auto
1080P/60
1080P/30
720P/60
Audio Input
Audio line in format:
G.711
IP Streaming Mode
Mode 1
PTZ Camera
Panoramic Camera
IP Streaming Mode
Mode 2
PTZ Camera
1080P/30
Panoramic Camera
1080P/30
Tracking Setting
(Teacher mode)
Mode
Teacher (default)
User can choose function
in this option.
Student
Tracking
Tracking on/off
Tracking on/off
Tracking
Select tracking zone (1
grid) set
Preview
Define the active zone.
Active zone is an area for
panoramic lens motion
detection. If you don’t set
it up. The default setting
is all the screen is active
zone.
Save
Tracking
Select shielded zone (8
grid) set
Preview
Define the shield zone.
Shield zone is an area
that you don’t want to
detect motion.
Save
+
Press + to add the new
area
-
Press - to eliminate the
existed area.
Page 50

45
Setting menu
Sub menu
2nd sub menu
Note
Tracking Setting
(Teacher mode)
Tracking
Tracking motion: Auto
zoom on/off
The option enables to
zoom in/out the target
depends on the distance
from camera.
Tracking
Tracking motion:
Vertical tracking on/off
If set the option as off, the
tracking camera will only
do the horizontal
tracking.
Camera position of lost
target: Preset 1
Advanced Setting
Action sensitivity: 0~7
If the target moves
quickly, suggest to adjust
it higher.
Advanced Setting
Tracking lost time: 0~7
The time which the
camera takes to go back
preset 1 when it loses
tracking target. 0-->1
seconds, 7-->8 seconds
Tracking Setting
(Student mode)
Mode
Teacher (default)
User can choose function
in this option.
Student
Tracking
Tracking on/off
Tracking on/off
Tracking
Select tracking zone (1
grid) set
Preview
Define the active zone.
Active zone is an area for
panoramic lens motion
detection. If you don’t set
it up. The default setting
is all the screen is active
zone.
Save
Page 51

46
Setting menu
Sub menu
2nd sub menu
Note
Tracking Setting
(Student mode)
Tracking
Select shielded zone (8
grid) set
Preview
Define the shield zone.
Shield zone is area that
you don’t want to detect
motion.
Save
+
Press + to add the new
area
-
Press - to eliminate the
existed area.
Front side student
height(0 px)
To assure the close up
screen consistency
Rear side student
height (0px)
Camera position of lost
target preset 1
Image switch mode
tracking mode (default)
User can see the PTZ
tracking procedures.
Panoramic mode
The tracking screen will
be directly transferred
from panoramic view to
close up view
Motion sensitivity
0-7(low to high)
Overtime
35s to 280s
The time which the PTZ
go back to panoramic
view after lock the target.
Advanced Correction
Installation Height
2.0m~3.0 (10 levels)
default is 2.4
Angle Compensation
-5 degrees ~+5 degrees
(100 levels) default is 0
Preset Setting
Save preset
Call preset
ADDR (Gray out)
1
Baud rate (Gray out)
9600
Baud rate speed
adjustment
Page 52

47
Setting menu
Sub menu
2nd sub menu
Note
Advance Setting
RS232 format protocol
VISCA
Protocol choose
Pelco D
Pelco P
ADDR (Gray out)
1
Baud rate (Gray out)
9600
Baud rate speed
adjustment
Profile Setting
Save as current setting
Profile 1
Profile setting location
Profile 2
Profile 3
Profile 4
Profile 5
Load other setting
System Setting
Change Camera
password
Camera ID: PTC500
Camera serial number
Software version:
1.XX.XX.XX
Software version
Download firmware
When user would like to
upgrade the firmware,
please press "Download
firmware" first. Then,
press "Upgrade firmware"
to do the upgrade.
Upgrade firmware
Last firmware version:
X.XX.XX.X2
Current firmware
version: X.XX.XX.X1
Factory Default
Back to factory default
Yes
Please reboot the
camera after setting
factory default
No (default)
Page 53

48
FAQ
1. How preset 1 has influence in the tracking settings?
Define the proportion of the tracking target in the screen.
When tracking cam loses the target, the position camera will go back to.
2. How to define the zoom level of tracking target?
It’s determined by the preset 1 setting. You should stand on the assigned location as a proportional
scale and zoom in/out to the proportion that you want. Then save it as preset 1, and the following
tracking will based on this proportion.
3. How can I let the camera know who has to track?
After preset 1 setting and turning on the tracking, if someone goes into the preset 1, camera will detect
the motion and start to track him. Only let the person need to be tracked walk into the preset 1.
4. How to avoid it start tracking other person in the same area?
It’s hard to do it. The algorithm is based on what the camera see. It is not intelligent enough to judge
who should track or not if 2 or more persons are in the preset 1 or active zone. It will randomly choose
one to track.
5. What is the difference with HOME position?
Home is the position that after power on
6. What about Preset 2 ~9 are used for anything related to tracking?
If you turn off tracking, PTC500 is a regular PTZ. User can manipulate it to assign position via center
control system command. The other presets are these usages.
7. This camera supports several profiles; does each profile have a different PRESET1?
Each profile has its own preset definition.
 Loading...