

Page 1
Page 2
TABLE OF CONTENTS
1. PRODUCT INFO ................................................................................................................................ 3
MAIN FEATURES: ..................................................................................................................................... 3
2. WIRING DIAGRAM .......................................................................................................................... 4
3. CONTROL & POWER INPUTS: ........................................................................................................ 4
4. TECHNICAL SPECIFICATION .......................................................................................................... 5
5. TECHNICAL DRAWING .................................................................................................................... 6
6. WIRING CHART ................................................................................................................................. 7
7. TESTING THE FUNCTION OF THE AVEO AURORA/GALACTICA SERIES LIGHTS BEFORE
INSTALLATION .......................................................................................................................................... 7
8. CARE AND CLEANING OF YOUR AVEO ENGINEERING AVIATION LIGHTS ........................... 9
2
Page 3
1. PRODUCT INFO
The Ultra Series lights are a very popular choice for certified and general aviation aircraft of
any size, due to their compact design and easy installation. With full optical testing for
brightness and chromacity, the Ultra also completed the rigorous DO-160F testing regime
exceeding all requirements. The Ultra has also become the leading winglight solution for
numerous military and law enforcement/surveillance UAVs around the world and is very
popular with aircraft manufacturers.
Encapsulated in the exclusive AveoDiamidium™ formulation and with our
goniophotometer-optimized chromed reflector system, the Ultra wing lights are virtually
unbreakable. Our exclusive aircraft lifetime warranty means there is no risk to the owner
that he will ever need to buy another set of wing lights again. Our policy is simple, IF IT
FAILS WE REPLACE IT!
Packed with 27 ultra high brightness LEDs that are the industry state-of-the-art in
performance and output lumens, the Ultras still feature the same tiny footprint the popular
Aveo e-series wing lights have become so well-known for in the aviation world.
MAIN FEATURES:
- Position / Strobe LED light
- extremely lightweight at 83 grams
- 9-32 volt DC input range
- no external power supply or strobe unit
- light synchronization feature
- unbreakable Diamidium™ encapsulation
- exclusive Lifetime Warranty
- unmatched circuit technology
- advanced computer and goniophotometer engineered optics
3
Page 4
2. WIRING DIAGRAM
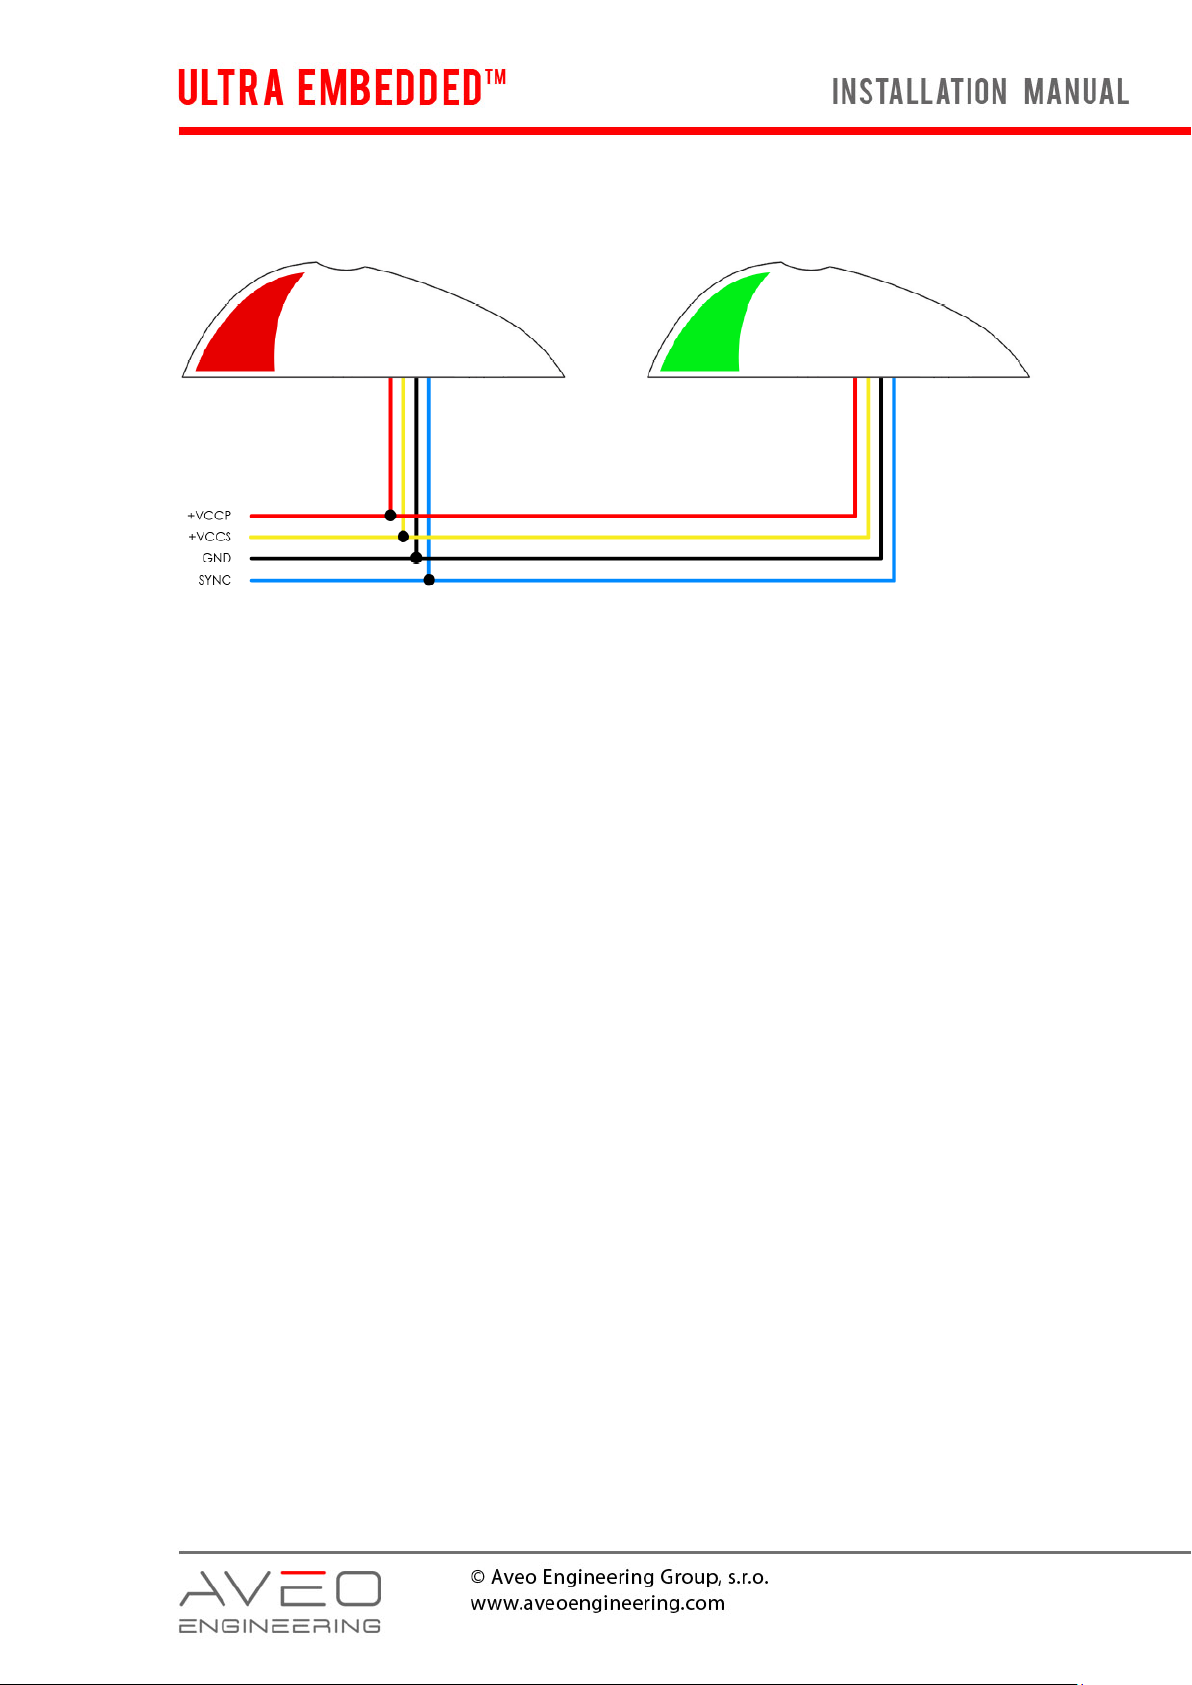
3. CONTROL & POWER INPUTS:
+VCCP - positive position power supply line
+VCCS - positive strobe power supply line
GND - negative common power supply line (ground)
SYNC - strobe synchronization line (mutually interconnect on all installed
AveoFlash lights)
4
Page 5
4. TECHNICAL SPECIFICATION
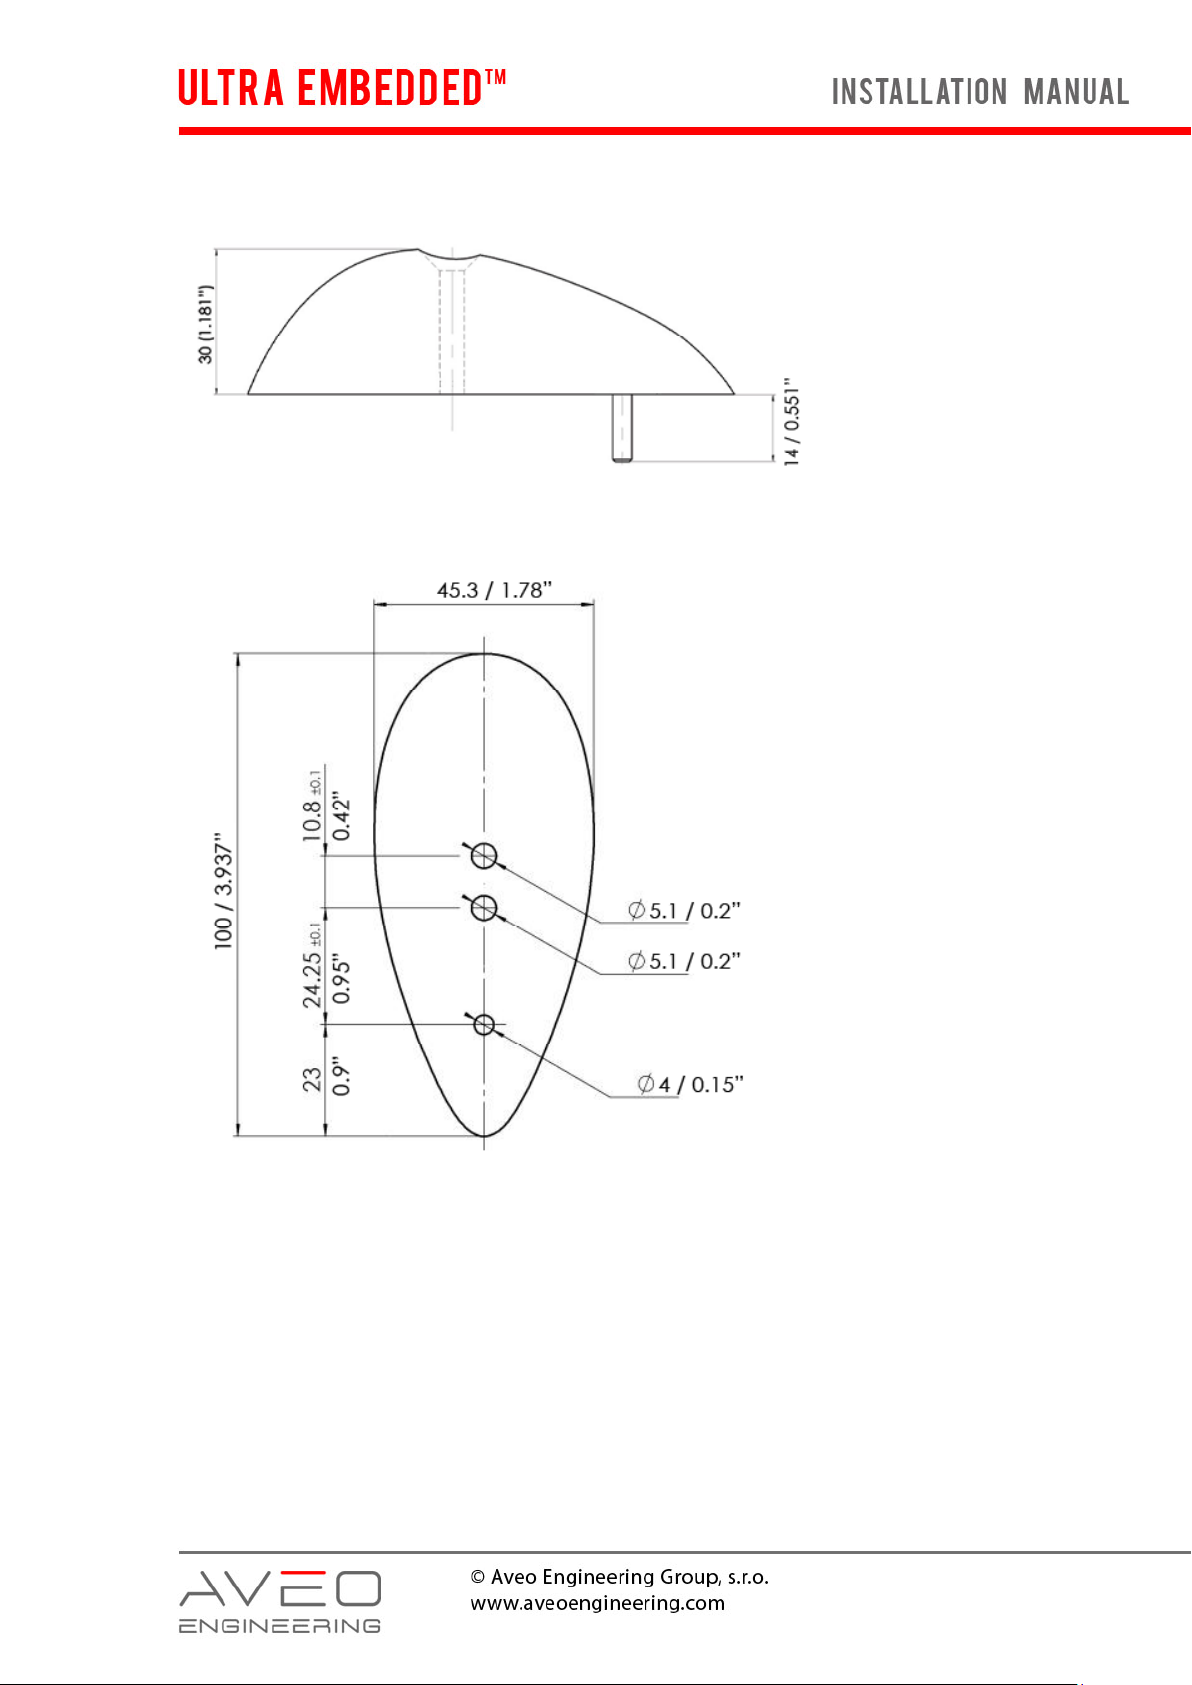
Dimensions: 100 mm x 45 mm x 30 mm
3.94” x 1.77” x 1.18”
Weight: 83 g / 2.93 oz
Operating Voltage Range: 9 – 32 Vdc
Power – position/nav: 5 W
Power – strobe: 7.2 W (36 W peak)
Current – position/nav (@12V): 0.42 A
Current – strobe (@12V): 0.6 A (3 A peak)
Repetition Flash Rate of Strobe: 50 cycles per minute
Exceed requirements of: - TSO C30c C96a
- SAE AS 8037 and AS8017a
- DO-160F
Recommended size of mounting screw: M5, stainless steel recommended. Length
depends upon placement location on wing
tips.
Supplied cable:
Wire Type is AWG 20 / 0.812 mm
Lenght of pigtail wires is 7 inches / 177,8 mm
Reverse polarity protected NO
Waterproof YES
Vibration-proof YES
Shock-proof YES
Dust-proof YES
Over Voltage protected NO
5
Page 6
5. TECHNICAL DRAWING
6
Page 7
6. WIRING CHART
7. TESTING THE FUNCTION OF THE AVEO
AURORA/GALACTICA SERIES LIGHTS BEFORE
INSTALLATION
All Aveo Aviation lights undergo rigorous testing prior to being released from our
engineering manufacturing department. This testing involves a burn-in time as well as
other function testing. No light is released for sale without undergoing this extensive
operational testing.
When you receive the Aveo Galactica/Aurora Series Aviation Lights, and wish to test the
function of the lights prior to installation on your aircraft, please note the following:
1. Please review the written information that is enclosed in the packaging. Warranty
information as well as a cautionary note about power supply removal is enclosed
with each package.
7
Page 8
2. Remove the lights from the package. Note that there are four (4) wires coming
from each light. These wires are:
a. Black wire – Ground wire (negative lead)
b. Red wire – Position/Navigation light function wire (positive lead)
c. Yellow wire – Strobe light function wire (positive lead)
d. Blue wire – used if the synchronization of the Aveo lights is selected
3. Testing of the function of each light can be done with a regular 12V/5A dc power
supply (not a battery chargers). Connect the black wire to the ground (negative)
leads of a power supply, then connect the red wire to the positive (+) leads on the
power supply. The position/navigation light, either red or green on the front side
and white on the back side should light up. While the red wire is still in contact
with the positive side of the power supply, connect the yellow wire to the positive
lead. Both the position/navigation part of the light and the strobe function should
work. For the Galactica Series of lights, the strobe function is separate from
the nav function and can be tested separately. To test the strobe function
separately, just connect the yellow wire only to the positive terminal of the power
supply while the black wire is connected the ground side of the power supply.
Connecting the blue wires from each light together (and not to the ground or
positive terminals on the battery) should show that the lights are flashing together
and indicates the synchronization feature is working properly. When installed on
the aircraft, using the aircraft’s power (14 or 28 volts), the lights will be at their
maximum intensity.
After testing, the lights can be installed on the aircraft.
IMPORTANT NOTES:
1. Under no circumstances should any power supply other than a 9-32V DC, or a
12/24 volt battery be used to test the lights. Do not use: Battery chargers, battery
back-up power devices, or other bench avionics testing methods to test the
aviation lights. The lights are functional between 9 and 32 volts. Use of a battery
charger or other power unit to test the lights will void the warranty and may
damage the lights.
2. All power supplies for existing strobe lights, flasher beacons, etc. are required to be
removed from the aircraft prior to the installation of the Aveo lights.
If you have any questions about the installation of the lights, please refer to our web site:
www.aveoengineering.com, and check FAQ and other links on our aviation lights web
page.
8
Page 9
8. CARE AND CLEANING OF YOUR AVEO
ENGINEERING AVIATION LIGHTS
When you receive your Aveo Engineering Aviation Lights, they will have been factory
polished and ready to install on the aircraft. Upon installation, just give the lights a good
coat or two of a quality automotive polish. This should protect the lights from dirt and
other environmental factors. Once or twice a month, just refresh the polish and hand buff
to bring back the lights to factory like new condition.
If the lights need a deeper cleaning, they can be polished with a good automotive cleaner
wax and/or a liquid polishing compound. The liquid polishing compounds can normally
be found at automotive parts stores or an automotive paint store. After using a polishing
compound, just give the lights another coat of an automotive polish and you will again
protect the lights against dirt, etc.. An electric buffing machine, with a lamb’s wool cover,
can also be used for deeper cleaning and polishing. Under no circumstances should any
petroleum based product be used to clean the lights.
9
 Loading...