

Page 1

Table of Contents
1 About Wireless LAN
Kit Contents 1-1
Network Options 1-3
■ Peer-to-Peer Workgroup 1-3
■ Home Office Networking 1-4
■ Enterprise Networking 1-6
PC Card Features 1-9
■ PC Card Features 1-10
About the CD-ROM 1-11
Finding Information 1-12
2 Installation for Windows
Introduction 2-1
Insert your PC Card 2-3
Install Drivers 2-4
■ Before You Start the Installation 2-4
■ What You Need to Know 2-4
■ Driver Installation for Windows 2-4
Set Windows Network Properties 2-6
Avaya Wireless PC Card - Getting Started Guide i
Page 2

Wireless LAN Properties 2-8
■ Configuration Profile 2-8
■ Basic Settings 2-10
Finish the Installation 2-14
■ After Restarting Your Computer 2-15
3 Working with Wireless LAN and Windows
Introduction 3-1
Use your PC Card 3-2
■ Radio Antennae 3-2
■ Remove the PC Card 3-2
■ Maintenance of your PC Card 3-4
View Other Computers 3-5
Using the Client Manager 3-7
■ View Wireless Link Quality 3-7
■ View/Modify PC Card Settings 3-8
4 Advance d Set tings
Introduction 4-1
Advanced Parameters Tab 4-2
Admin Parameters Tab 4-4
A Card Specifications
Physical Specifications A-1
ii Avaya Wireless PC Card - Getting Started Guide
Page 3

Electrical Characteristics A-2
Networking Characteristics A-3
Regulatory Information A-4
Radio Characteristics A-5
B Troubleshooting
■ LED Activity B-1
■ Can Not Connect To The Network B-4
■ LEDs Work But Can’t Connect to Network B-5
C Installation for Windows CE
Introduction C-1
■ Installing the Wireless LAN Driver C-3
■ Using Wireless LAN with Windows CE C-4
■ Modifying Configuration Parameters C-5
D Installation for Windows NT
Introduction D-1
Installing the Wireless LAN Driver D-3
■ Overview D-3
■ Start Insta l l a ti o n D-3
■ Enable PCMCIA Services D-4
■ Enable Network Support D-5
Avaya Wireless PC Card - Getting Started Guide iii
Page 4

iv Avaya Wireless PC Card - Getting Started Guide
Page 5

About Wireless LAN
1
Kit Contents
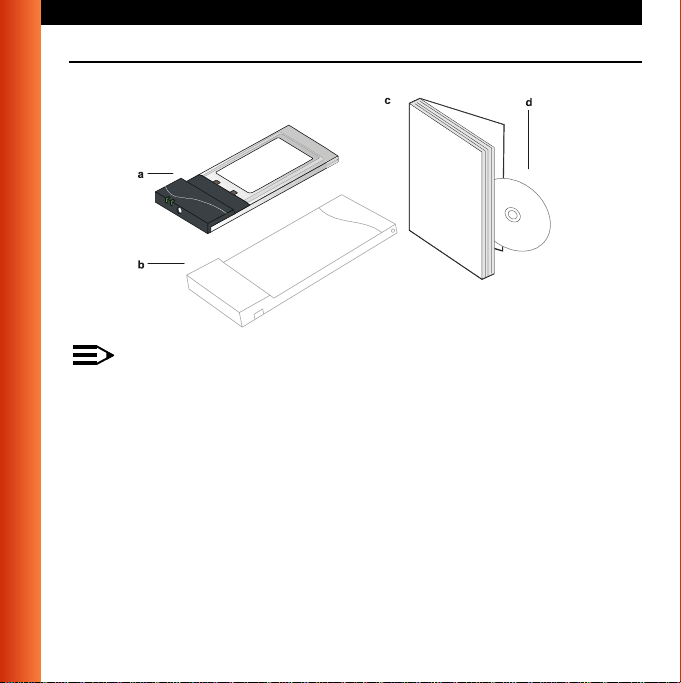
The PC Card kit includes the items as pictured in Figure 1-1:
a. One PC Card.
b. A tran spa re nt pr ot ec ti ve ca si ng fo r s to rin g y our PC Ca rd whi l e n ot in u s e.
c. The Avaya W ireles s PC Card Getting Started Guide
d. One Avaya Wireless LAN CD-ROM.
The Getting Started Gui de is an abstra ct from the elec t r onic User’s Guide
that is included on the CD-ROM.
Avaya Wireless PC Card - Getting Started Guide
1-1
Page 6
About Wireless LAN - Kit Contents
Figure 1-1 Kit Contents
NOTE:
In order to extend the life of the PC Card hardware it is advised t o
store the card in the protective casing whenever carrying the
computer on travel without operating the device.
1-2
Avaya Wireless PC Card - Getting Started Guide
Page 7

About Wireless LAN - Network Options
Network Options
The PC Card Kit enables you to:
■ Connect your computer to a Peer-to-Peer workgroup of wirel ess
computing devices ( see F ig ur e 1- 2 on page 1-4).
■ Connect your comput er to a Sm al l Office / Hom e O ffice (SO HO) network
that includes a Resident ia l Ga te w ay-I (see Figure 1-3 on page 1 -5 ).
■ Connect your computer to a Loc al A re a Net w or k ( LAN ) In fras t ruc t ur e
that includes Avaya access poi nt s ( see Figure 1-4 on page 1-6 and
Figure 1-5 on page 1-7).
■ Expand the capabilitie s of your access points, to supp or t wi r el ess
devices that have been equipped with Avaya wireless LAN adapters.
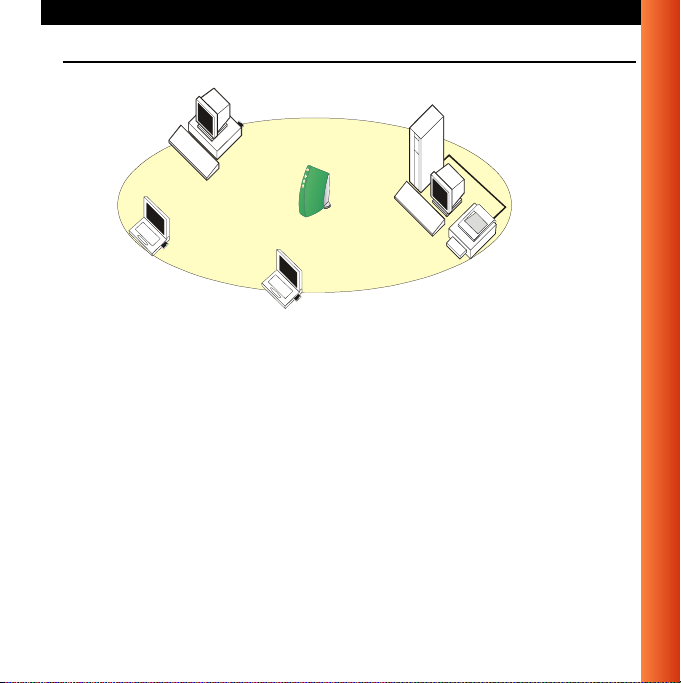
Peer-to-Peer Workgroup
The Peer-to-Peer workgr ou p configuration enables you to quickly set up a
small wireless workgro up, where the workgroup participants can excha nge
files using features like “File and Printer Sharing” as supported by Microsoft
Networking.
Avaya Wireless PC Card - Getting Started Guide
1-3
Page 8

About Wireless LAN - Network Options
Figure 1- 2 Peer-to-Peer Wireless Workgroup
You can use this option to set up a temporary or ad-hoc network in
environments wher e no access points are availa bl e ( fo r ex am ple in Small
Office/Home Office (SOHO) environments).
As long as the stations are w ithin range of one another, this is the easiest
and least expensive way to set up a wireless networ k.
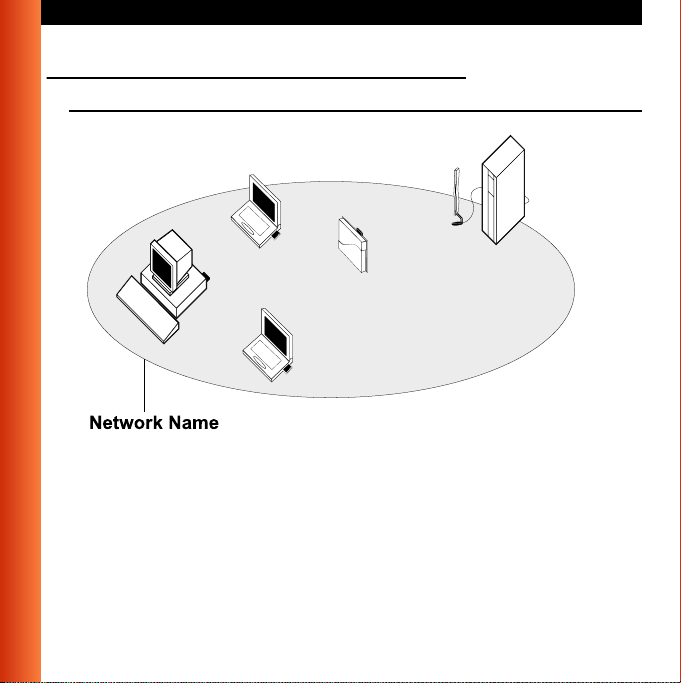
Home Office Networking
With the Avaya Residentia l Gat eway-I, wireless access to the Internet or
other computers is at your fingertips.
1-4
Avaya Wireless PC Card - Getting Started Guide
Page 9
About Wireless LAN - Network Options
Figure 1-3 Connect to a Res i dential Gateway (RG )
All you need to do is connect the w i re less computers to the Res ident i al
Gateway-I, and you are re ady to:
■ Share files and printers, and
■ Access the Internet via the built-in modem of the Resi dential Gateway-I.
Optionally the Resident i al Ga t ew ay -I all ow s you to connect your wirel ess
stations to previously installed wired computers and/or an external cable, an
xDSL or a ISDN mo dem.
Avaya Wireless PC Card - Getting Started Guide
1-5
Page 10
About Wireless LAN - Network Options
Enterprise Networking
Figure 1-4 Stand Alone Wireless LAN
With the Access Point-I and/or Access Point-II you can connect to a
corporate Local Area Ne t w or k (L AN) infrastructure to have wirel ess access
to all network facilities.
LAN Infrastructures m ay either be:
■ Stand-alone wireless LANs as pictured in Figure 1-4.
■ Wireless network infrastr uct ures connected to an exist i ng Et he rnet
network as pictured in Fi gu re 1-5 on page 1-7.
1-6
Avaya Wireless PC Card - Getting Started Guide
Page 11
About Wireless LAN - Network Options
Figure 1-5 LAN Infras tructure
It’s Easy
The PC Card functions like any standard wired Ethernet card, but Wireless
LAN does not need any wires !
Where an Ethernet ca rd req ui re s a cable connection to a hub and/or patch
panel, the cable physicall y t ies you down to the location of the wired
connection.
Avaya Wireless PC Card - Getting Started Guide
1-7
Page 12

About Wireless LAN - Network Options
Avaya Wireless LAN allows you to c onnect your computer to a Lo ca l Area
Network (LAN) syste m from anywhere within the wireless coverage area.
Expanding or re-designi ng your network is easy: Add or relocate access
points, power-up your (new) wireless computers, and you’re done!
Unlike Ethernet, wireless connectivity wi ll enable y ou to roam thro ughout the
network while remaini ng connected to the LAN .
NOTE:
All Avaya Wireless LAN products, are radio products. Refer to the
flyer “Information to the User” for regulatory information that may
apply in your country.
1-8
Avaya Wireless PC Card - Getting Started Guide
Page 13
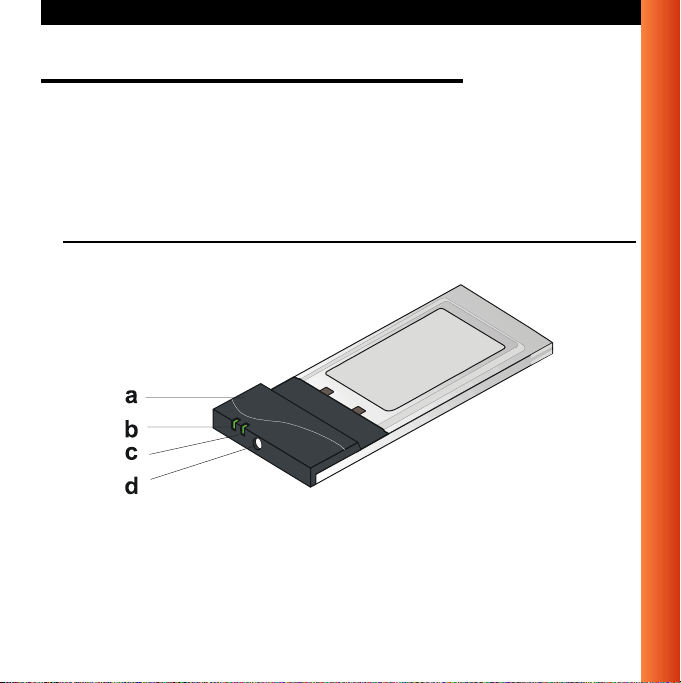
About Wireless LAN - PC Card Features
PC Card Features
The PC Card is a wireless network card that fits into any standard PC Card
Type II slot.
The PC Card has two LED indicators and two integrated antennas.
Optionally you can use the PC Card in combination with a n ext er na l
antenna.
Figure 1-6 The PC Card
a. Integrated Antennas
b. Radio LE D
■ Off - No wireless activity
■ Blinking - Sensing/transmitting wireless data
c. Power ON/OFF LED
Avaya Wireless PC Card - Getting Started Guide
1-9
Page 14
About Wireless LAN - PC Card Features
■ Solid Green - standard operational mode
■ Blinking Green - Power Management mode
d. Connector for optional Exte rn al Ant enna.
PC Card Features
■ Wi-Fi (Wireless Fidelity) certified by the Wireless
Ethernet Compatibility Alliance (WECA). This means
that your Wireless LAN hardware will communicate with
other vendo r s’ IEEE 802.11 compliant wireless LAN product s.
■ Fully compatible with any other wireless LAN system based on Direct
Sequence Spread Spectrum (DSSS) radio technology that complies with
the “IEEE 802.11 standard on wireless LANs (Revision B)”.
The PC Card supports th e following wireless LAN featur es :
■ Automatic Transmit Rate Select mechanism in the transmit range of 11,
5.5, 2 and 1 Mbit/s.
■ Automatic Frequency Channel Selection (2.4 GHz) allowing roaming
over multiple channels.
■ Card Power Management.
1-10
Avaya Wireless PC Card - Getting Started Guide
Page 15

About Wireless LAN - About the CD-ROM
About the CD-ROM
If you wish to install Wireless LAN drivers and software, turn to 2
“Installat i on for Windows”.
NOTE:
Prior to copying or instal l ing t he software, you are advised to read
the Software License Agreement “LICENSE.TXT”, located in the root
folder of the CD-ROM. By installing, copying or using the software,
you are consenting to be bound by this agreemen t. If yo u do not
agree to all of the terms of the Software License Agreement, do not
download, copy or install the software.
It is the policy of Avaya to impr ove products as new technology,
components, softw ar e and firmware become available. Before you
proceed with the instal lat i on of t hi s pr oduct, visit our website at:
http://www.avaya.com to:
■ Verify if newer versions of the software that was shipped with
your product are available.
■ Download and install the latest software with your purchased
product.
Avaya Wireless PC Card - Getting Started Guide
1-11
Page 16

About Wireless LAN - Finding Information
Finding Information
The Getting Started Gu id e was designed to give you a brie f intr oduction
about the PC Card and the Avaya wireless network system.
In this printed document you will find the most import ant in f or m at io n to get
your wireless network up and running, with a minimum set of parameters for
the MS-Windows 95/ 98, N T, 2000, ME and MS-Windows CE oper at i ng
systems.
Context-sensitive help for the configuration me nus and tools is available
when you:
■ Click the button on your screen, or
■ Press the function key on your keyboard.
F1
1-12
Avaya Wireless PC Card - Getting Started Guide
Page 17

Installation for Windows
2
Introduction
The installation of your PC Card for Windows consists of the following steps:
1. Insert the CD-ROM to ins ta l l the Cl i ent Manager software (se e page 2-
2).
2. Insert your PC Card (see pag e 2- 3) .
3. Install drivers (see page 2-4 ).
4. Set the wireless LAN prop erti es (se e page 2-8).
5. Finish installation (see pa ge 2-1 4).
To view and/or print this document in Adobe’s Acrobat Portable Document
File format (*.pdf) you will need to install the Adobe Acrobat Reader
software. You can find a copy of this software on the CD-ROM.
NOTE:
If you intend to use the PC Card in the Access Point-II, please refer
to the documentation that was shipped with the device. Alternatively
you can download these documents from our w ebsite at:
www.avaya.com
.
http://
Avaya Wireless PC Card - Getting Started Guide
2-1
Page 18

Installation for Windows - Introduction
Install the Client Manager
The ClientMan ager prog ram is a s of twar e tool that you c an use t o chec k the
quality of your network connection.
NOTE:
It is not mandatory to install t he C li ent Manager program in o rde r to
establish a network co nnection, but it provides you with more
options to:
■ View/change the settings of your network connec t io n.
■ Monitor your netw or k connection.
To install the Client Ma nager software, proceed as follows:
1. Insert the software CD-ROM that came with your PC Card kit into your
computer.
2. Follow the instruction s on y our screen.
NOTE:
If the CD-ROM does not start automatically:
1. Click the Windows
2. Select
Run
3. Browse to the CD-ROM
Start button
2-2
Avaya Wireless PC Card - Getting Started Guide
Page 19
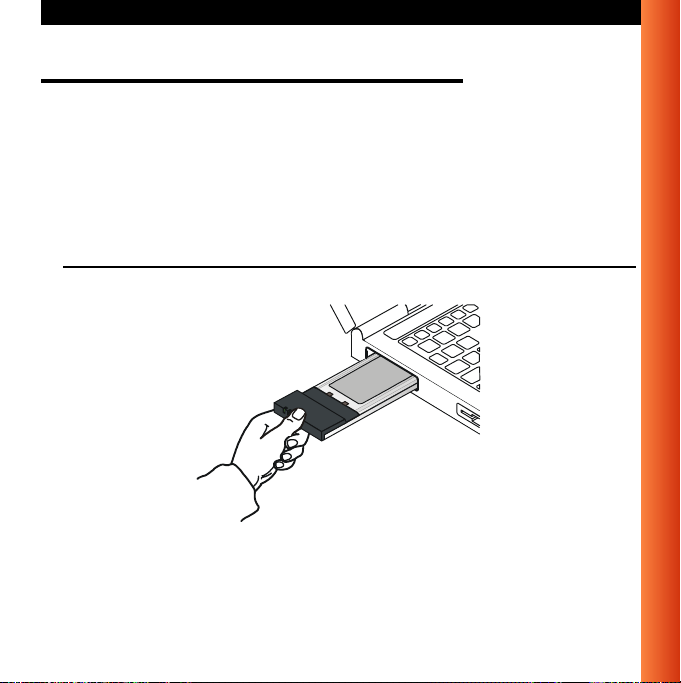
Installation for Windows - Insert your PC Card
Insert your PC Card
1. Unpack your PC Card kit an d verify that all items are present , as
described in “Kit Contents” on page 1-1.
If any of the items described appear to be damaged or missing, please
contact your supplier.
2. Insert the PC Card into the PC Card slot of your computer as pictured in
Figure 2-1.
Figure 2-1 Inserting the PC C ard into Your Computer
Avaya Wireless PC Card - Getting Started Guide
2-3
Page 20

Installation for Windows - Install Drivers
Install Drivers
Before You Start the Installation
Before you start the insta llat ion, you are advised to kee p th e W in dows
CD-ROM or software di skettes close at hand. If your computer came with a
factory-installed Windows operating system, these files will be stored on your
computer’s hard disk, in the form of cabinet (*.cab) files.
What You Need to Know
Installi ng a PC Card requi r es the same leve l of expertise that you woul d
need to install a standard Ethernet network adapter card. It is assumed that
you have a working know ledge of standard Window s operations and of
installing network ad apter cards. Refer to the Wi ndows Help when
necessary (on the Windows task bar, press the
Driver Installation for Windows
Most Microsoft Windows operating systems support “Plug & Play” for P C
Cards. Once you insert the PC Card into your computer, these operating
systems will automatically:
■ Detect the card, and enable t he driver, or
Start button and select Help).
2-4
Avaya Wireless PC Card - Getting Started Guide
Page 21

Installation for Windows - Install Drivers
■ Start the Add New Hardware wizard and prompt you to install the driver,
when the operating syst em cannot find the required dr iv er.
This would typically occur when inserting the PC Card into your
computer for the very first tim e.
When Windows starts the
Add New Hardware wizard:
1. Follow the instructions on your screen.
2. When you are prompted to locate the driver install at io n files, insert the
Avaya CD-ROM and navigat e t o th e f older th at m at ches your operating
system:
■ Windows 2000:D:\Drivers\Win_2000
■ Windows ME:D:\Drivers\Win_ME
■ Windows 98:D:\Drivers\Win_98
■ Windows 95:D:\Drivers\Win95
■ Windows NT:D:\Drivers\Win_NT
When finished installing the drivers, Windows automatically opens the
Add/Edit Configuration Profile window.
3. Continue with “Set Windows Network Properties” on page 2-6.
NOTE:
If your computer does not detect the new hardware you can consult
B “Troubleshooting”.
Avaya Wireless PC Card - Getting Started Guide
2-5
Page 22
Installation for Windows - Set Windows Network Properties
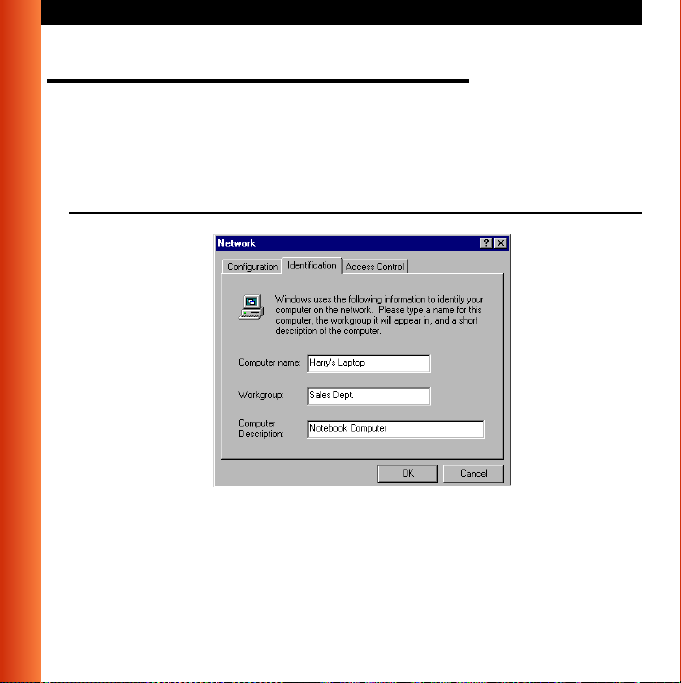
Set Windows Network Properties
If this is the very first time that Networking support is installed onto your
computer, the Windows operating system will prompt you to enter a
computer and workgroup name. These names will be used to identify your
computer on the Microsoft Network Neighborhood.
Figure 2-2 Windows Network Identification Properties
1. In the Computer Name field, enter a unique name for your computer.
2. In the Workgroup field, enter the name of your workgroup.
3. (Optional) Provide a descri pt i on of th e computer in the
Description
field.
Computer
2-6
Avaya Wireless PC Card - Getting Started Guide
Page 23

Installation for Windows - Set Windows Network Properties
For more information abo ut sett in g your Windows Network Pr operties,
consult your Windows documentation or the Wi ndows on-line help
information.
Avaya Wireless PC Card - Getting Started Guide
2-7
Page 24

Installation for Windows - Wireless LAN Properties
Wireless LAN Properties
After installing the drivers, W in dows will open the Add/Edit Conf i guration
Profile window for your P C Ca rd as pi ctured in Figure 2-3.
Figure 2-3 Add/Edit Configuration Profile window
Configuration Profile
The Add/Edit Configurat ion Profile window enables you to specify one or
more network conne ct i on profiles.
For example you can set up profiles for your office, your home or an ad-hoc
2-8
Avaya Wireless PC Card - Getting Started Guide
Page 25

Installation for Windows - Wireless LAN Properties
workgroup to share files with your colleagues or friends while being “on the
road”.
For more information about the different types of networks, refer to “Network
Options” on page 1-3.
To connect your computer to a wireless network you will need to:
1. Assign a name to the netwo rk pro file
2. Use the pull-down menu on the right to select how you wish to connect to
the wireless network:
■ Via the A cce ss Po int - I or Acc es s Po in t -I I to co nne ct to th e cor por at e
network
■ An ad-hoc peer-to-peer workgroup of wireles s st at ions without
access point.
3. Click the
Edit Profile button to view/modi fy the parameters for the
selected profile.
For first-time installations, you are advised to setup a single profile using only
the Basic Settings.
NOTE:
The number and type of p arameters you need to sp eci fy may differ
according to the select ed connection type.
For information about t he various opt i ons press the key or click
Help button.
the
F1
Avaya Wireless PC Card - Getting Started Guide
2-9
Page 26

Installation for Windows - Wireless LAN Properties
Figure 2-4 Edit Configuration w i ndow
Basic Settings
To connect to a wireless netwo rk, all you need to specify is:
■ A valid Network Name.
■ (Optional) a valid Encryption key.
2-10
Avaya Wireless PC Card - Getting Started Guide
Page 27

Installation for Windows - Wireless LAN Properties
Network Name
The Network Name is a case-sensitive string of alphanumeric characte rs in
the range of “a” to “z”, “A” to “Z” and “0”to “9“. It connects you to the wirele s s
LAN, like a cable would connec t a wir ed c om puter to an Ethernet LAN.
Valid values are subject to the type of network to whi ch you wish to connect
your computer:
■ To connect to a Residential Gateway-I, enter the 6-digit Network Name
that is printed on a label at the bot to m of the Resi dential Gateway-I
device.
■ T o connect to a Peer-to-Peer workgroup, enter the name as agreed upon
by the workgroup participants.
If you wish to start a workgroup yourself, enter a nam e wi t h a m axi m um
of 32 alphanumeric characters, and share that value with your workgroup
participants.
This value should have a maximum of 32 alphanum er ic. c har acters.
Alternatively you may choose to enter the value “ANY” (all character
upper-case) to connect to any IEEE 802.11 compliant wireless network
in the vicinity of your com puter.
Proceed with the Encryption Ke y settings, or click
to the Add/Edit Configuration Profile win dow.
OK to confirm and return
Avaya Wireless PC Card - Getting Started Guide
2-11
Page 28

Installation for Windows - Wireless LAN Properties
Encryption Key
To enhance the security of your wireless commu ni cations, you can also
choose to enable wireless data encryption.
The encryption opti ons differ according to the selected configuration profile
(page 2-8).
!
CAUTION:
To allow communicatio n, al l wir el ess devices should use ident i cal
encryption settings . As the encryption key is case-sensitive, make
sure you enter it with care.
■ When you selected to connect to a Residential Gateway-I, you can enter
one encryption key. The default Encryption Key matches the last 5
characters of the Network Name.
!
CAUTION:
Do not modify this key unl es s you have already chan ged the
encryption key of your R es id ent i al G at eway-I.
■ When connecting to a Peer-to-Peer workgroup, enter the key as agreed
upon by the workgroup participants.
■ When connecting to a corp or at e LAN via the Access Point profi le, the
encryp t ion tab all o ws you to e nter up to fo ur differe n t keys in either
alphanumerical or hexadecimal format.
Enter the values as defined by your LAN Adm i nistrato r.
2-12
Avaya Wireless PC Card - Getting Started Guide
Page 29

Installation for Windows - Wireless LAN Properties
NOTE:
The keys should be ent er ed i n exactly the same order as in the
access point.
Advanced Parameters
The Edit Configuration wi ndow also provides acces s t o th e advanced
parameters in the Advanced and Admin tab.
Yo u are advised to leave these parameters to their default settings, unless
special situations require a change of these parameters. For a description of
these parameters, cons ul t the on-line help file or the “User’s Guide” on the
CD-ROM.
Avaya Wireless PC Card - Getting Started Guide
2-13
Page 30

Installation for Windows - Finish the Installation
Finish the Installation
When you have finished the “Wireless LAN Propertie s”, click the OK button
to close the Add/Edit Configuration window and to proc eed with the
installation process. Windows will finish building the driver configuration
database and copy some files to your compu te r’s hard disk.
■ If the Windows operating system prompts you to id entify the location of
the Windows files, sp eci f y t he dr i ve and directory of the Wind ow s
Installation CD-ROM or diskettes.
When you had a PC Card i ns ta lled on your computer befor e, m ost of
these files are already available on your hard disk dr i ve. I f yo u do not
have the Windows C D-ROM available, you ma y try r epl acing the
proposed path in the Cop y Fi l es Fr om dial og box with:
“
C:\Windows\System” or “C:\Windows\”
■ If the Windows operating system prompts you to id entify the location of
driver files (typically file names starting with the characters w*.*) specify
the drive and director y of th e CD - R O M :
■ Windows 2000:D: \ D r iver s\ Win_2000
■ Windows ME:D:\Drivers\Win_ME
■ Windows 98:D:\Driv er s\ Win_98
■ Windows 95:D:\Driv er s\ Win95
■ Windows NT:D:\Drivers\Win_NT
If you downloaded the f ile s fr om t he In ternet, point to the disk driv e or
directory where you saved files.
2-14
Avaya Wireless PC Card - Getting Started Guide
Page 31

Installation for Windows - Finish the Installation
When Windows has finished copying files, it will prompt you to restart your
computer. Clic k
OK button to complete the installation.
After Restarting Your Computer
After you have restarted y our com puter, the Windows operating system w ill:
1. Detect the PC Card (you c an hear the two-tone sound of th e PC Card
Socket Controller).
2. Load the driver
3. Display a dialog box requesting you to enter a Windows user name and
password.
The password you enter her e w ill be t he one used to login to the
Windows Network Ne ig hborhood.
Write down this password an d keep it in a safe place.
Ve rifying installation
To verify if the installation of the drivers was completed successfully:
■ Check if the Windows task bar displays the PC Card icon as pi c tu re d in
Figure 2-5.
■ Check the LEDs on your PC Card.
— A steady green Power LED indicates the PC C ar d i s ac tive.
— A flickering green Radio LED indicates wireless activity.
Avaya Wireless PC Card - Getting Started Guide
2-15
Page 32

Installation for Windows - Finish the Installation
For other LED behavior see B.
■ (Optional) To check the quality of th e net w ork connection, start the
Client Manager program as described in 3 “Working with Wireless LAN
and Windows”.
Figure 2-5 PC Card icon on the Windows task bar
r
2-16
Avaya Wireless PC Card - Getting Started Guide
Page 33

Working with Wireless LAN and Windows
Introduction
This chapter provides general information on how to:
■ Use your PC Card
■ View Other Computers
■ View Wireless Link Quality
■ View/Modify PC Card Settings
3
Avaya Wireless PC Card - Getting Started Guide
3-1
Page 34

Working with Wireless LAN and Windows - Use your PC Card
Use your PC Card
Radio Antennae
The built-in radio and antennae of your PC Card perform best in an open
environment with as fe w obstacles as possible.
■ To ac hieve the maximum range for wireless communic at ions do not
cover the card with obj ec ts such as books or thick stac ks of pa per.
■ If you are using the card inside a deskto p computer you may consider
the purchase of the optio nal Range Extender Antenna.
Remove the PC Card
If you do not need the wirel ess connectivity of your PC C ar d, you can
remove the card from i ts sl ot as pi ct ured in Figure 3-1.
!
CAUTION:
When removing the PC Card you will lose your connection to the
network. Prior to removing the PC Card, make sure you have closed
all files and network appl ic at ions (such as e-mail).
You are advi sed to always di sable the PC Card prior to removing the card
from the PC Card slot. This will allow the Windows operating system to:
■ Log off from the network server
3-2
Avaya Wireless PC Card - Getting Started Guide
Page 35

Working with Wireless LAN and Windows - Use your PC Card
■ Disable the driver
■ Disconnect power to the PC Card slot (which will extend battery life for
mobile computers).
Figure 3-1 Remove the PC Ca rd
To sto p usi n g th e PC Car d:
1. Click once on the PC Card icon on t he r ig ht si de o f the Windows task
bar.
2. Select the option
Stop Avaya Wireless PC Card.
3. Wait a few seconds until the operatin g systems displays a pop -u p
message to indicate you c an safely remove the PC Car d.
Alternatively, you can disable the PC Card via the PC Card icon on the
Control Panel.
Avaya Wireless PC Card - Getting Started Guide
3-3
Page 36

Working with Wireless LAN and Windows - Use your PC Card
Maintenance of your PC Card
If you are not using the Wireless LAN PC Card for wireless communications,
extend its life by storing i t ins id e t he t ra nsparent plastic casing th at w as
shipped with the produ ct .
To clean the PC Card, gently wipe it wi th a sof t (da m p) cl ot h.
!
CAUTION:
T o avoid damage to the PC Card do not use abrasive materials, or
rinse the car d with liqui ds.
3-4
Avaya Wireless PC Card - Getting Started Guide
Page 37

Working with Wireless LAN and Windows - View Other Computers
View Other Computers
When multiple Wireless LAN stations are up-and-running in your wireless
network, you can use the procedure described below to display the othe r
computers:
1. Start Windows Explorer.
2. Scroll down the list of files and folders to look for the item
Neighborhood
.
3. Double-click the Network Neighborhood item to display all stations in
your Microsoft Netwo rk ing G r oup.
4. T o display other workgroups in the network environment, double-click the
Entire Network icon.
If you cannot find other (Wireless LAN) networked computers, verify whether
the other Wireless LAN com puters are:
■ Powered up and logged on t o th e ne twork.
■ Configured to operate with identical Microsoft Network settings
concerning:
— Networking Protocol.
— Wireless Network Name
— Workgroup Name
T o view or modify the
Station Name or Workgroup of your comp uter, proceed
as follows:
1. Click the button from the Window s t ask bar.
Network
Avaya Wireless PC Card - Getting Started Guide
3-5
Page 38

Working with Wireless LAN and Windows - View Other Computers
2. Click on Settings, and then on Control Panel.
3. In the Control Panel window, double-click the Network icon.
4. In the Network Settings window, select the
Identification tab.
Y ou can verify and change the Station Name or Workgroup parameters.
NOTE:
You have to restart your computer before changes to the Network
Settings will be effected.
T o verify the radio connection with other stations refer to “View Wireless Link
Quality” on page 3-7.
3-6
Avaya Wireless PC Card - Getting Started Guide
Page 39

Working with Wireless LAN and Windows - Using the Client Manager
Using the Client Manager
If you installed the Wireless LAN Client M anager as described in “Install the
Client Manager” on page 2-2, you can use the Client Manager to:
■ Verify the quality of your wireless connect i on t o th e network.
■ View/Modify the configurati on set tings of your wireless PC Car d.
The Client Manager will start automatically every time you power up your
computer.
The Client Manager icon is displayed in the “System Tray” of your
Windows task bar at the r ig ht -s ide on the bottom of your scre en,
indicating that the Client Manager program is running.
■ Click the icon once with you r left mouse button to retrieve a more
detailed status overview.
■ Click the icon once with you r right mouse button to display a menu with
more options.
View Wireless Link Quality
You can use the Client Manager icon on the W in dows task bar to verify the
link quality of your networ k connection.
An overview of all possible i cons is given in Table 3-2. When the
Client Manager icon is not indicating excellent or good radio connection, act
as described in Table 3-2.
Avaya Wireless PC Card - Getting Started Guide
3-7
Page 40

Working with Wireless LAN and Windows - Using the Client Manager
Table 3-2 Client Manager Icon
Icon Description Color
Excellent radio connection Green
Good radio connection Green
Marginal radio connection:
The radio signal is weak. Move closer to the:
■ Wireless LAN access point, or
■ Wireless LAN Base Station
Poor radio connection:
The radio signal is very weak. Save your files and move
closer to the:
■ Wireless LAN access point, or
■ Wireless LAN Base Station
No radio connection because:
■ Looking for initial connection, or
■ You have moved out of range of the network.
Peer-to-Peer network connection Blank
View/Modify PC Card Sett ings
If you would like to view or m odi f y W irel ess LAN parameters , for example
3-8
Avaya Wireless PC Card - Getting Started Guide
Yellow
Red
Red
Page 41

Working with Wireless LAN and Windows - Using the Client Manager
because you would like to conn ect to another network or type of network,
proceed as follows:
1. Right-click on the Client Manager icon on the Windows tas k bar.
2. From the menu, select
■ Add/Edit Profile t o add a new profile or to modify an existing profile.
■ One of the existing profiles (if present) to select a profile without
Configuration Profi le (see Figure 3-3) and select:
viewing or modifying the settings.
After selecting and another profile, the PC Card will use the sel ected
profile to connect to the w ireless network.
Figure 3-3 Edit Wireless Configura tion Settings
If your Client Man ager icon is not visible, you have to start the
Client Manager pro gr am again:
1. Click the button from the Window s t ask bar.
2. Next select
Client Manager to start the Client Manager program.
Alternatively you can to cha nge the PC Card configurati on via the Control
Panel:
Avaya Wireless PC Card - Getting Started Guide
3-9
Page 42

Working with Wireless LAN and Windows - Using the Client Manager
1. Click the button from the Windows task bar.
2. Click on Settings, and then on Control Panel.
3. In the Control Panel window, double-click the
Wireless Network icon.
4. (Optional) Change the parameters you would like to modify, and click
■ the OK button to confirm your cha nges, or
■ the Cancel button to ignore your m odif i cat ions.
3-10
Avaya Wireless PC Card - Getting Started Guide
Page 43

Advanced Settings
4
Introduction
Although your PC Card will wor k fine in most network environment with the
basic settings as described on 2 “Installation for Windows”, you may wish to
explore the advanced parameters options as displayed on the Configuration
window for your adapter.
Advanced parameters a re available only in the configuration profiles that
connect to an access point.
Consult your LAN Admini strator for information about w hether these
parameters apply to your situation.
For more information consult your LAN Administrator. You can also refer to
the help file and the “Wireless LAN Manager Suite User’s guide”.
Avaya Wireless PC Card - Getting Started Guide
4-1
Page 44

Advanced Settings - Advanced Parameters Tab
Advanced Parameters Tab
This tab of the Edit Configu ra tion window allows you to adjust a number of
parameter s related to th e performance of your wireless adapter.
Figure 4-1 Setup Advanced Parameters
■ Card Power Management allows you to extend the battery life of (mobile)
wireless devices.
■ Interference Robustness allows you to remedy slow performance related
to in-band interference from devices like mic ro w av e ovens.
■ RTS/CTS Medium Reservation controls the deferral behavior of wireless
devices. E nab ling this option may i mpr ov e r el iab il i ty of t he n et wor k whe n:
4-2
Avaya Wireless PC Card - Getting Started Guide
Page 45

Advanced Settings - Advanced Parameters Tab
— many wireless stations operate in an environment with relatively few
access points, and
— network performance is poor netwo rk due t o excessive frame
collisions at the access points.
Avaya Wireless PC Card - Getting Started Guide
4-3
Page 46

Advanced Settings - Admin Parameters Tab
Admin Parameters Tab
The Admin parameters tab allows LAN Administrato rs to ensure that your
adapter settings match specific settings that ap pl y t o th e ent ire net w ork.
Figure 4- 2 Setup Admin Parameters
■ Distance between Access Points allows you to control ne twork
performance in relati on to the number of access poin ts in your network.
■ MAC Address allows you to assign a local MAC address to your adapter
in case your network operating system requir es l ocal addressing.
4-4
Avaya Wireless PC Card - Getting Started Guide
Page 47

Card Specifications
A
Physical Specifications
Form Factor PC Card Type-II Extended
Dimensions (LxWxH) 117.8 x 53.95 x 8.7 mm
Weight 45 gram (PC Card)
Temperature & Humidity (non condensing)
Operation 0° to 55° C maximum humidity 95%
Transit -20° to 70° C humidity 15 to 95%
Storage -10° to 60° C humidity 10 to 90%
Although the PC Card may sti ll ope ra t e in the ran ge of -20° to 70°C,
operation outside the range of 0° to 55° C may no l onger be according to
specifications
Avaya Wireless PC Card - Getting Started Guide
A-1
Page 48

Card Specificati ons - Electr ical Charac teristics
Electrical Characteristics
Doze Mode 10 mA
Receive Mode 180 mA
Transmit Mode 280 mA
Power Supply 5 V
A-2
Avaya Wireless PC Card - Getting Started Guide
Page 49

Card Specifications - Networking Characteristics
Networking Characteristics
Compatibility ■ IEEE 802.11 Standard for Wireless LANS (DSSS)
■ Wi-Fi (Wireless Fidelity) certified by the Wireless
Host Operating
System
Media Access Protocol CSMA/CA (Collision Avoidance) with Acknowledgment
Data Rate
Ethernet Compatibility Alliance (WECA).
Microsoft Windows® 95:
■ NDIS3 Miniport Driver
Microsoft Windows® NT v4.0:
■ NDIS4 Miniport Driver
Microsoft Windows® 98/ME and 2000:
■ NDIS5 Miniport Driver
(ACK)
■ High 11 Mb/s
■ Medium 5.5 Mb/s
■ Standard 2 Mb/s
■ Low 1 Mb/s
The cards use an automatic Transmit Rate Select
mechanism.
Avaya Wireless PC Card - Getting Started Guide
A-3
Page 50

Card Specifications - Regulatory Information
Regulatory Information
Wireless communication is often subject to local radio regulations. Although
wireless networking products have been des i gned for operation in the
license-free 2.4 GHz band, local radio regulations may impose a number of
limitations to the use of wir eless communication equipment.
NOTE:
Refer to the flyer “Information to the User” for more regulatory
information that may apply in your country.
A-4
Avaya Wireless PC Card - Getting Started Guide
Page 51

Card Specifications - Radio Chara cteristics
Radio Characteristics
R-F Frequency Band 2.4 GHz (2400-2500 MHz)
Supported sub-channels 1 2412
Modulation Technique Direct Sequence Spread Spectrum
Spreading 11-chip Barker Sequence
Bit Error Rate (BER) Better than 10
Nominal Output Power 15 dBm
Encryption 64-bit Wired Equivalent Privacy (WEP) - Silver
2 2417
3 2422
4 2427
5 2432
6 2437
7 2442
8 2447
9 2452
10 2457 (default)
11 2462
CCK 11 & 5.5 Mb/s, DQPSK for 2 Mb/s and DBPSK for
1 Mb/s
-
5
128-bit (RC4) - Gold
Avaya Wireless PC Card - Getting Started Guide
A-5
Page 52

Card Specificati ons - Radio Cha racterist ics
Range/Transmit Rate 11 Mb/s 5.5 Mb/s 2 Mb/s 1 Mb/s
Open Office 160 m
Semi-Open Office 50 m
Closed Office 25 m
Receiver Sensitivity -83 dBm -87 dBm -91 dBm -94 dBm
Delay Spread (FER of
<1%)
(525 ft.)
(165 ft.)
(80 ft.)
65 ns 225 ns 400 ns 500 ns
270 m
(885 ft.)
70 m
(230 ft.)
35 m
(115 ft.)
400 m
(1300 ft.)
90 m
(300 ft.)
40 m
(130 ft.)
550 m
(1750 ft.)
115 m
(375 ft.)
(165 ft.)
The range of the wirele ss s ig nal i s re late d t o th e Transmit Ra te of the
wireless communication. Communications at lower T ransmit ra nge will travel
larger distances.
NOTE:
The range values listed above are typical distances as measured at
the Avaya Wireless LAN lab or at or ies. Th e se values may provide a
rule of thumb and may var y according to the actual rad io conditions
at the location where the Wireless LAN product will be installed.
The range of your wirel ess d ev ic es can be affected when the antenn as are
placed near metal surfaces and solid high-density materials.
Range is also impacted due to “obstacles” in the signal path of the radio that
may either absorb or refl ect the radio signal.
The listed ranges are typ ical val ues when used indoors in “office
environments” that can be described as follow s:
50 m
A-6
Avaya Wireless PC Card - Getting Started Guide
Page 53

Card Specifications - Radio Chara cteristics
■ In Open Office environments, antennas can “see” each other, i.e. there
are no physical obstruct io ns bet w een them.
■ In Semi-open Office environments, work space is div id ed by shoulder-
height, hollow wall elem ent s; antennas are at desktop le vel .
■ In Closed Office environme nt s, w or k space is separated by floo r- to-
ceiling brick walls.
Avaya Wireless PC Card - Getting Started Guide
A-7
Page 54

Card Specificati ons - Radio Cha racterist ics
Auto Channel Selection
When installing PC Ca rd s th e channel configuration i s m anaged as follows:
■ For wireless clients that op er at e i n an Wireless LAN Infrast ru ct ur e, the
PC Card will automatically start operation at the channel identified by the
access points. When roa ming between different acces s points the
station can dynamically switch to another channel if required.
■ For PC Cards installed in to wir el ess clients that operate in an “Peer-to-
Peer” mode, the PC Card will default use channel 10.
■ When inserted into the Access Point-II, the PC Card will use the factory-
set default channel (print ed in bold), unless the LAN Adm in is trator
selected a different channel when configuring the a ccess point device.
A-8
Avaya Wireless PC Card - Getting Started Guide
Page 55

Troubleshooting
B
LED Activity
If you encounter difficulty using and/or installing your Wireless LAN product,
the error may be related to various causes:
■ Out-of range situation, which prevents the PC Card from establishing a
wireless connection w ith the network.
■ Configur ati on mi smat ch, whi ch pr even ts t he P C Ca rd f rom est abli shi ng a
wireless connection w ith the ( correct) network.
■ Absence of, or conflict of the W ire le ss LAN Driver.
■ A problem or conflict with the PC C ar d sl ot w hi c h pr events the PC Card
from powering on.
■ A conflict of the hardware w ith anot her device.
The starting point to troubleshoot problems with your wireless network is
looking at the LED activity of the PC Card.
Table B-1 provides an overview of the va r ious modes of op eration and th e
associated LED activity. It also includes a number of troubleshooting hint s,
that may hel p you solve the pr oblem.
Avaya Wireless PC Card - Getting Started Guide
B-1
Page 56

Troubleshooting -
Ta ble B-1 LED Activity
Power LED Radio LED Description/Action
Continuous
Green
Blinking Standard operational mode.
■ Card is powered on.
■ Sensing/transmitting wireless data.
Off
■ Card is powered on.
■ No wireless activity.
No action is required.
Flicker Flicker Power Management mode:
■ Card is powered on, but set to power saving mode,
to conserve battery life.
■ Flashes indicates that the card wakes up at regular
intervals to verify if there is wireless data addressed
to your computer.
B-2
Avaya Wireless PC Card - Getting Started Guide
Page 57

Power LED Radio LED Description/Action
Both LEDs blink once
every 10 seconds
The PC Card works fine, but did not yet succeed
establishing a wireless connection with the wireless
Infrastructure.
Actions:
■ Contact the LAN Administrator to verify the Network
Name assigned to the wireless infrastructure.
■ Contact the LAN Administrator to verify the correct
value(s) of the encryption keys.
■ Contact the LAN Administrator to verify whether the
network infrastructure has been set to deny “ANY” as
valid Network Name (Closed Network).
■ Change the configuration of your PC Card to enter
the correct Network Name
■ If there are no access point devices available,
change the configuration of your PC Card to run in
“Peer-to-Peer” mode.
Troubleshooting -
Avaya Wireless PC Card - Getting Started Guide
B-3
Page 58

Troubleshooting -
Power LED Radio LED Description/Action
Off Off Card is not powered on, so it can not transmit/receive
data.
The cause may either be:
■ No Driver loaded/installed
■ Card - Driver mismatch which prevented the driver
from loading
■ Device conflict which prevented the driver from
loading
Actions:
■ Verify if a driver has been installed, if not install the
driver.
■ View/Modify the device settings of the PC Card to
determine/resolve the occurrence of a conflict with
another device
■ Verify the versions of the driver, and the embedded
software in the PC Card (also referred to as Station
firmware).
■ Check our website at: http://www.avaya.com to
download and install the latest embedded software
and driver.
Can Not Connect To The Network
If your PC Card seems to be working fine, but you are not able to connect to
the network, this erro r mi ght be due to a configuration mism atch.
B-4
Avaya Wireless PC Card - Getting Started Guide
Page 59

Troubleshooting -
For exampl e i f b ot h LE Ds o f y our P C C ard bl i nk on ce e v er y t en se con ds , the
problem is likely to be caused by a configuration mism a tc h of :
■ Network Name
■ Encryption Key
The Wireless LAN Network Name is case-sensitive.
LEDs Work But Can’t Connect to Network
If you can not connect to the n et w or k w hil e t he LEDs indicate that the
network is working prop erly (Power LED is on, Radio LED bl i nk s) your
problems might be caused by:
■ Incorrect TCP/IP settings for your wireless netw ork adapter (“Changing
TCP/IP Settings” on page B-5).
■ Your Windows operating system requires an update with a Microsoft
Service Pack “Install Windows 20 00 Service Pack” on page B-1 0) .
NOTE:
Some older versions of the Windows 95 operating system will not
automatically install the necessary TCP/IP network protocol.
Changing TCP/IP Settings
Consult your LAN Admini strator for the values of your TC P/ IP set tin gs.
To change the TCP/IP Settings:
Avaya Wireless PC Card - Getting Started Guide
B-5
Page 60

Troubleshooting -
1. On the W indows task bar cli ck the Start button
2. Select Settings and then select Control Panel.
3. On the Control Panel window, double click on the
the
Network Properties.
■ If this pr otoc ol is not yet inst all ed, c li ck th e Add button and select the
Network icon to v iew
TCP/IP protocol from the list. Refer to the Windows Help for more
information.
■ If this protocol is inst all ed, sel ect this protocol and click t he
Properties button. Check if the parameters resemble the settings
provided by your LAN Administrator. Make Changes if necessary,
and click
OK when you’re done.
4. When prompted, restar t yo ur com puter.
B-6
Avaya Wireless PC Card - Getting Started Guide
Page 61

Troubleshooting -
Static IP Addressing for Peer-to-Peer networks
In networks with Static IP addressing, the network administrator manually
assigns an IP address to ea ch computer. Once a Static IP address is
assigned, a computer uses the same IP address ev er y t ime it reboots and
logs on to the network, unless you manually change the IP address in the
Network Properties dialog box. Networks using Static IP addresses are easy
to set up and do not require additional network management software.
A Peer-to-Peer network envir onment is best suited for Static IP addressing,
because of its simplicity.
Peer-to-Peer networks are also not likely to have a DHCP server alrea dy set
up on the network.
Configure TCP/IP Settings for Static IP Addr essing
NOTE:
This IP configuratio n should only be applied to wire l ess networks
that do not have a DHCP server installed.
1. Right-click
2. Select
Properties
3. Select the
4. Click
Make sure the Specify an IP address option is selected.
Network Neighborhood on your desktop.
Properties from the pop-up menu to display the Network
dialog box.
Configuration tab, and click TCP/IP Avaya Wireless PC Card.
Properties to display the TCP/IP Properties dialog box.
Avaya Wireless PC Card - Getting Started Guide
B-7
Page 62

Troubleshooting -
NOTE:
In accordance with private IP addressing you can use IP addresses
192.168.0.1 to 192.168.0.254 with the Subnet Mask of
from
255.255.255.0.
■ Each computer on the network must have a unique IP address.
It is best to assign the value
192.168.0.2 to the next computer and so on.
■ All computers on the ne t wor k must use the same Subne t Mask
value
255.255.255.0.
5. Click
6. Select the Identification tab.
7. Click
OK to return to the Network Properties dialog box.
a. In the
Computer Name field, create a unique nam e to identify the
computer.
Each computer on the network must have a unique computer name.
b. In the
Workgroup field, create a workgroup name.
This name is th e same for all comp uters on the wireless networ k.
c. In the
Computer Description field, you can ent er a det ai l ed
description for the co m put er.
OK when completed. Click Yes to rest ar t the comp uter wit h th e new
network settings.
192.168.0.1. to the first computer,
B-8
Avaya Wireless PC Card - Getting Started Guide
Page 63

Installation for Windows CE
C
Introduction
The MS-Windows CE oper at i ng s yst em i s m ost commonly used on handheld computing devices such as the Pocket PC and Per son al D igi ta l
Assistants (PDA).
These devices come wi th di fferent pr ocessors and versions of th e CE
operating system.
You can use the Avaya Wireless LAN PC Card on any device th at ma tc hes
the requirements listed in th e ta ble on the following page.
The Avaya Wireless LAN CD-RO M i ncludes different installation programs
for each of the listed platform s.
Avaya Wireless PC Card - Getting Started Guide
C-1
Page 64

Installation for Windows CE - Introduction
Device Type Device Name CE version Processor
iPAQ Pocket PC 3.0 ARM,MIPS, SH3
H/PC PRO HPC 2000 3.0 ARM,MIPS, SH3, SH4
H/PC 3.0
HPC PRO
Generic WinCE300 3.0 SH3, SH4
WinCE212 2.12
2.11 ARM,MIPS, SH3, SH4
R3000, R4100
SA1100
i486,i586
T o determine whether you can use the PC Card on your Windows CE device
proceed as follows:
1. Click the button on the Windows Taskbar.
2. Click on Settings, then Control Panel.
3. On the Control Panel, double-click the System icon to display the window
pictured in Figure C - 1.
Figure C-1 Windows CE CPU Type
C-2
Avaya Wireless PC Card - Getting Started Guide
Page 65

Installation for Windows CE - Introduction
Installing the Wireless LAN Driver
What you Need
Windows CE devices are ty pi call y used in combination with desktop
computers running ‘Windows CE Services’ to trans fe r d at a bet ween the
desktop computer and the handheld device. To install the PC Card in your
CE device, you will need to:
1. Run an installation program to copy the driver and configuration files to
the Windows CE “synchronization folder ” on your desktop computer, and
2. Use the Windows CE Ser vices to transfer files to your CE device.
The default location of the synchronization folder is:
Files\Windows CE Services\
Please refer to the Microsoft Handheld PC Companion booklet and the user
documentation of your CE device for more information about installing the
Windows CE Services.
C:\Program
Running the Installation Program
1. Insert the CD-ROM that came with your PC Card into your computer.
Your operating system wi ll automatically start th e CD.
2. When finished, use the serial cable and/or docki ng st at i on to connect
your Windows CE devi c e to your computer.
Avaya Wireless PC Card - Getting Started Guide
C-3
Page 66

Installation for Windows CE - Introduction
Once the computer s have been connected, the Windows CE services
will automatically copy the files and drivers from your desktop computer
to the Windows CE device.
NOTE:
If the CD-ROM does not start automatically:
1. Click the Windows
Start button.
2. Select Run.
3. Browse to the CD-ROM
4. Double-click the file “
Run_CD.exe”
If you encounter difficulty copying the driver files to your Windows CE device,
please refer to the Microsoft Handheld PC Comp ani on booklet and the user
documentation of your H/P C device for mor e i nformatio n about instal ling
and/or troubleshooting the Windows CE Services.
If you encounter difficulty est abl ishing a network connect io n af te r y ou
installed the Wi rele ss LAN drive rs su cces sful ly, consult the
readme.txt of the
Wireless LAN driver files for Windows CE for troubl eshooting hints.
Using Wireless LAN with Windows CE
When you insert the PC Card card into your Windows CE device, it will start
operation with the follow i ng factory-set defaults:
■ Connect to a Network Infrastructure
C-4
Avaya Wireless PC Card - Getting Started Guide
Page 67

Installation for Windows CE - Introduction
■ Use the Netwo r k Name “ANY” to connect to the first access point that
provides a communic at ions quality that is accepta ble or better.
On the Control Panel of you r W in do w s C E device, you will also find a
Wireless Network icon, to view or modify the setting of your PC Card.
Monitoring Wireless Performance
To monitor wireless communications between your Windows CE device and
other computers, you can use either the Client Manager or AP Manager tool
(running on a computer Wi ndows 95, 98, ME or Wind ows NT).
■ For Peer-to-Peer workgroup environments, start the Client Manager
program on a standard co mputer.
The Link Test mode of this utility enables you to analyze the
communicat ion s qu ali ty be tween th e “Initiator” station and your Windows
CE device (identified as the “Re mote Station”).
■ In Infrastructure Networks, consult the LAN Administrator to run the AP
MANAGER tool. The “Remote Link Test” of this utility enables the LAN
Administrator to analyze the communications quality between the access
point (identified as the “Initiator” station) and your Windows CE device
(identified as the “Remote Station”).
Modifying Configuration Parameters
To view or modify the settings of your PC Card, open the Control Panel on
your Windows CE device and double-click the W i re le ss Network icon.
Avaya Wireless PC Card - Getting Started Guide
C-5
Page 68

Installation for Windows CE - Introduction
For more information about these parameters, pl ease consult:
■ The on-line help system f or your Windows CE drivers by cl icki ng the “?”
help icon, or
■ The chapters about other Windows operating systems described earlier
in this document.
C-6
Avaya Wireless PC Card - Getting Started Guide
Page 69

Installation for Windows NT
D
Introduction
Unlike Windows 95/98/ 2000 and ME, Windows N T 4. 0 does not support
“Plug & Play” and “Hot Swapping” of PC Cards:
■ In order to start the driver install at io n for your PC C ar d, you will need to
“introduce” the card to the operat i ng system.
■ To insert or remove PC Cards, Windows NT machines typically require
you to restart the computer in order to recognize the car d and load the
drivers.
The Windows NT operating system also identifies user profiles (accounts)
that are associated with dedicated levels of authority ( pr iv ileg es) like the
ones listed below:
■ Users - are allowed to change the visual appearance of the Windows NT
desktop and user-defined preferences.
■ Power Users - can cr eate “User Accounts” or “User Groups”.
■ Administrators - can manage and control the overall conf iguration of the
workstation.
Avaya Wireless PC Card - Getting Started Guide
D-1
Page 70

Installation for Windows NT - Introduction
NOTE:
To inst al l (or uni nstall) the PC Card in a Windo w s NT en vi ro nm ent,
you will need to login as the “Administrator”, or ensure that your
login profile provides the same level of privileges.
The privilege settings for each user (account) are se t in the
Microsoft Windows NT “User Manager” program. Please consult the
documentation tha t was shipped with your M icrosoft Windows NT
operating system or st at ion f or more information.
D-2
Avaya Wireless PC Card - Getting Started Guide
Page 71

Installation for Windows NT - Installing the Wireless LAN Driver
Installing the Wireless LAN Driver
Overview
1. Start Installation (page D-3)
2. Enable PCMCIA Services (page D-4)
3. Enable Network Suppor t (page D-5) for the workstation.
Start Installation
To ins ta ll the PC C ard on a computer running Windows NT 4.0, pro ceed as
follows:
1. Insert the PC Card into your computer.
2. Power up your computer.
3. Continue with Enabling PCMCIA Services.
NOTE:
T o be able to perform the steps as described on the following pages,
you will need:
■ Windows NT Serv i ce Pa ck v4.0 or higher
■ The privileges of th e Wi n dow s NT station administra to r.
To verify these settings:
Avaya Wireless PC Card - Getting Started Guide
D-3
Page 72

Installation for Windows NT - Installing the Wireless LAN Driver
— During start-up, check the blue start-up screen to verify which
NT Service Pack is installed on th e co mputer.
— From the Start menu, use the option
to close all windows
and log on as Administrator.
Shut Down, Log Off xxxxx
If the computer is running with Service Pack v3.0 or lower, download
and install Service Pac k v6a from the Microsoft web si te (
www.microsoft.com
) prior to installing the PC Card.
http://
Enable PCMCIA Services
To allow the Windows NT oper at in g system to detect PC Car ds i n th e
computer’s PC Card slot, you must enable the PC Card Sock et controller,
identified as the PCMCIA device.
1. Click the
Control Panel.
2. Double-click the
3. Scroll down the list of devices and select the item PCMCIA.
Start button, then select Settings and then click
Devices icon.
D-4
Avaya Wireless PC Card - Getting Started Guide
Page 73

Installation for Windows NT - Installing the Wireless LAN Driver
Figure D-1 Enable the PCMCIA service for Window s N T
4. Click the button
the Startup type for the item PCM CI A to
5. Click
6. Click
OK to confirm and return to the D evi c es w i ndow.
Close to return to the Control Panel.
Startup on the right side of the Devices window, and set
Boot.
Enable Network Support
To int ro duce your Wireless LAN n et work adapter card to the Windows NT
operating system, you will need to enable Network support fo r your Wire less
LAN wireless station.
1. From the Windows NT Taskbar, click the button.
2. Click on
Settings, then Control Panel.
Avaya Wireless PC Card - Getting Started Guide
D-5
Page 74

Installation for Windows NT - Installing the Wireless LAN Driver
3. In the Control Panel window, double-click the Network icon
to open the Network Settings window.
■ If no network has b een ins t al le d ye t, you will be
prompted to install it now.
Click
Yes to install Windows NT Networking, and follow the
instructions as they ap pear on your screen.
■ If networking supp ort was already installed, you will see a window
with multiple tabs.
4. Select the tab
Adapters, and click the Add button.
5. When prompted to select a driver, select “Driver from disk provided by
hardware manufacturer” and enter the following path:
where
d:\ represents the drive letter of you r CD - R OM
d:\drivers\win_nt,
6. Follow the instructions on your screen and restar t yo ur com puter when
prompted to do so.
7. Configure your PC Card as desc ribed in 2 “Installation for Wind ow s”.
D-6
Avaya Wireless PC Card - Getting Started Guide
 Loading...