

Page 1

Avaya VLAN
Manager
User Guide
August 2003
Page 2

Avaya VLAN Manager User Guide
Copyright 2003 Avaya Inc. ALL RIGHTS RESERVED
The products, specifications, and other technical information regarding the products
contained in this document are subject to change without notice. All information in this
document is believed to be accurate and reliable, but is presented without warranty of any
kind, express or implied, and users must take full responsibility for their application of any
products specified in this document. Avaya disclaims responsibility for errors which may
appear in this document, and it reserves the right, in its sole discretion and without notice, to
make substitutions and modifications in the products and practices described in this
document.
Avaya, P550 and SMON are trademarks of Avaya Inc.
© 2003 Avaya Inc. All rights reserved. All trademarks identified by the ® or are registered
trademarks or trademarks, respectively, of Avaya Inc. All other trademarks are the property
of their respective owners.
Release 1.001
Page 3

Table of Contents
Preface . . . . . . . . . . . . . . . . . . . . . . . . . . . . . . . . . . . . . . . . . . . . . . . . . . v
The Purpose of This Guide . . . . . . . . . . . . . . . . . . . . . . . . . . . . . . . . .v
Who Should Use This Guide . . . . . . . . . . . . . . . . . . . . . . . . . . . . . . . .v
Organization of This Guide . . . . . . . . . . . . . . . . . . . . . . . . . . . . . . . . .v
Chapter 1 Introduction to Avaya VLAN Manager. . . . . . . . . . . . . . 1
Avaya VLAN Manager Overview . . . . . . . . . . . . . . . . . . . . . . . . . . . .1
VLANs Overview . . . . . . . . . . . . . . . . . . . . . . . . . . . . . . . . . . . . .2
Master VLAN List . . . . . . . . . . . . . . . . . . . . . . . . . . . . . . . . . . . . .2
VLAN Tags . . . . . . . . . . . . . . . . . . . . . . . . . . . . . . . . . . . . . . . . . .2
Starting Avaya VLAN Manager . . . . . . . . . . . . . . . . . . . . . . . . . . . . .3
Avaya VLAN Manager User Interface . . . . . . . . . . . . . . . . . . . . . . . . .3
Toolbar . . . . . . . . . . . . . . . . . . . . . . . . . . . . . . . . . . . . . . . . . . . . .4
Device Tree . . . . . . . . . . . . . . . . . . . . . . . . . . . . . . . . . . . . . . . . .4
VLAN Tree . . . . . . . . . . . . . . . . . . . . . . . . . . . . . . . . . . . . . . . . . .4
Dialog Area . . . . . . . . . . . . . . . . . . . . . . . . . . . . . . . . . . . . . . . . .5
Searching in Avaya VLAN Manager . . . . . . . . . . . . . . . . . . . . . . . . . .6
Refreshing Information . . . . . . . . . . . . . . . . . . . . . . . . . . . . . . . . . . .6
Using Avaya VLAN Manager Help . . . . . . . . . . . . . . . . . . . . . . . . . . .7
Opening the Help to the Contents Page . . . . . . . . . . . . . . . . . . .7
Opening the Help to a Topic of Interest . . . . . . . . . . . . . . . . . . . .7
Chapter 2 Understanding Avaya VLAN Manager. . . . . . . . . . . . . . 8
Understanding the Device Tree . . . . . . . . . . . . . . . . . . . . . . . . . . . . .8
Sorting the Device Tree . . . . . . . . . . . . . . . . . . . . . . . . . . . . . . . .9
Understanding the VLAN Tree . . . . . . . . . . . . . . . . . . . . . . . . . . . . .10
Understanding the Selection List . . . . . . . . . . . . . . . . . . . . . . . . . . .12
Understanding the Port Configuration Area . . . . . . . . . . . . . . . . . . .13
Chapter 3 Managing VLANs . . . . . . . . . . . . . . . . . . . . . . . . . . . . . . 15
Creating VLANs . . . . . . . . . . . . . . . . . . . . . . . . . . . . . . . . . . . . . . . .15
Modifying VLANs . . . . . . . . . . . . . . . . . . . . . . . . . . . . . . . . . . . . . . .17
Synchronizing VLAN Names . . . . . . . . . . . . . . . . . . . . . . . . . . . . . .18
Deleting VLANs . . . . . . . . . . . . . . . . . . . . . . . . . . . . . . . . . . . . . . . .19
Chapter 4 Port VLAN Configuration . . . . . . . . . . . . . . . . . . . . . . . 20
Selecting Ports . . . . . . . . . . . . . . . . . . . . . . . . . . . . . . . . . . . . . . . . .20
Viewing Port VLAN Settings . . . . . . . . . . . . . . . . . . . . . . . . . . . . . . .21
Avaya VLAN Manager User Guide iii
Page 4

Table of Contents
Using the Port Configuration Area . . . . . . . . . . . . . . . . . . . . . . . . . .21
Drag-and-Drop . . . . . . . . . . . . . . . . . . . . . . . . . . . . . . . . . . . . . . . . .22
Chapter 5 Generating VLAN Reports. . . . . . . . . . . . . . . . . . . . . . . 23
VLAN Report Overview . . . . . . . . . . . . . . . . . . . . . . . . . . . . . . . . . .23
Report By Port . . . . . . . . . . . . . . . . . . . . . . . . . . . . . . . . . . . . . . . . .24
Generating a Report by Port . . . . . . . . . . . . . . . . . . . . . . . . . . .24
Report By Port Fields . . . . . . . . . . . . . . . . . . . . . . . . . . . . . . . . .24
Report By VLAN . . . . . . . . . . . . . . . . . . . . . . . . . . . . . . . . . . . . . . . .25
Generating a Report by VLAN . . . . . . . . . . . . . . . . . . . . . . . . . .25
Report By VLAN Fields . . . . . . . . . . . . . . . . . . . . . . . . . . . . . . .26
Appendix A Avaya VLAN Manager Menus . . . . . . . . . . . . . . . . . . 27
File Menu . . . . . . . . . . . . . . . . . . . . . . . . . . . . . . . . . . . . . . . . . . . . .27
Edit Menu . . . . . . . . . . . . . . . . . . . . . . . . . . . . . . . . . . . . . . . . . . . . .27
View Menu . . . . . . . . . . . . . . . . . . . . . . . . . . . . . . . . . . . . . . . . . . . .28
Actions Menu . . . . . . . . . . . . . . . . . . . . . . . . . . . . . . . . . . . . . . . . . .28
Help Menu . . . . . . . . . . . . . . . . . . . . . . . . . . . . . . . . . . . . . . . . . . . .28
iv Avaya VLAN Manager User Guide
Page 5

Preface
Welcome to Avaya VLAN Manager. This chapter provides an
introduction to the structure of this guide. It includes the following
sections:
The Purpose of This Guide - A description of the goals of this
guide.
Who Should Use This Guide - The intended audience of this
guide.
Organization of This Guide - A brief description of the subjects
contained in the various sections of this guide.
The Purpose of This Guide
This guide contains the information needed to use Avaya VLAN Manager
efficiently and effectively.
Who Should Use This Guide
This guide is intended for use by network managers familiar with
network management and its fundamental concepts.
Organization of This Guide
This guide is structured to reflect the following conceptual divisions:
Preface - A description of the guides purpose, intended
audience, and organization.
Introduction - An introduction to Avaya VLAN Manager,
including instructions on Starting Avaya VLAN Manager, a
detailed description of VLAN Managers user interface, and
instructions on how to use VLAN Managers on-line help.
Managing VLANs - Instructions on creating, deleting, and
editing VLANs using the VLAN Manager application.
Avaya VLAN Manager User Guide v
Page 6

Preface
Configuring Port VLAN Parameters - Instructions on viewing
port VLAN configuration and configuring port VLAN parameters.
Generating VLAN Reports - Instructions on how to generate
VLAN reports.
Menus - The full menu structure in Avaya VLAN Manager.
vi Avaya VLAN Manager User Guide
Page 7

1
Introduction to Avaya VLAN Manager
This chapter provides an introduction to Avaya VLAN Manager. It
includes the following sections:
Avaya VLAN Manager Overview - An overview of Avaya
VLAN Manager, including information on the purpose of the
application.
Starting Avaya VLAN Manager - Instructions on how to start
Avaya VLAN Manager.
Avaya VLAN Manager User Interface - An introduction to
Avaya VLAN Managers user interface, including instructions on
using the toolbar buttons.
Searching in Avaya VLAN Manager - Instructions on how to
search for ports in Avaya VLAN Manager.
Refreshing Information - Instructions on how to refresh the
information in Avaya VLAN Manager.
Using Avaya VLAN Manager Help - An explanation of the
options for accessing on-line help in Avaya VLAN Manager.
Avaya VLAN Manager Overview
This section contains an overview of VLANs and how to configure them,
and contains the following sections:
VLANs Overview
Master VLAN List
VLAN Tags
Avaya VLAN Manager User Guide 1
Page 8

Chapter 1
VLANs Overview
The building blocks of VLANs are switch ports. To build a new VLAN you
need to define a VLAN name and number. You can then add switch ports
to the VLAN by configuring the PVID of the port to the VLAN number.
The ports are members of the VLAN whose number is their PVID. In
addition, you can configure the VLAN tagging mode and binding style of
the switch ports. VLAN #1 is the default VLAN and is named Default.
For more information about VLANs, refer to VLANs in The Reference
Guide.
Master VLAN List
The master VLAN list is a file on the network management station that
contains a list of globally defined VLANs and their names. This list is only
available when running Avaya Network Manager. VLANs that are listed
in the master VLAN list are called globally known VLANs. VLANs that
are not in the master VLAN list but are configured on a device are called
locally known VLANs.
VLAN Tags
Packets can be tagged with VLAN information. When a tagged packet
enters a switch port, it maintains its tag. When an untagged packet
enters a switch port, the packet is tagged with the ports PVID (Port
VLAN ID).
When a packet arrives at the egress port, the VLAN Binding Style is
checked. If the packets VLAN tag does not match a VLAN to which the
egress port is bound, the packet is discarded. If the tag matches a VLAN
to which the egress port is bound, the Tagging Mode is used. If the
Tagging Mode is Clear, the packet is forwarded with no VLAN tag. If the
Tagging Mode is anything else, the packet is forwarded with its VLAN tag.
2 Avaya VLAN Manager User Guide
Page 9
Introduction to Avaya VLAN Manager
Starting Avaya VLAN Manager
To start Avaya VLAN Manager from Avaya Network Management
Console, select
opens.
Tools > Avaya VLAN Manager
. Avaya VLAN Manager
To start Avaya VLAN Manager from HP-OV NNM, select
Avaya VLAN Manager
. Avaya VLAN Manager opens.
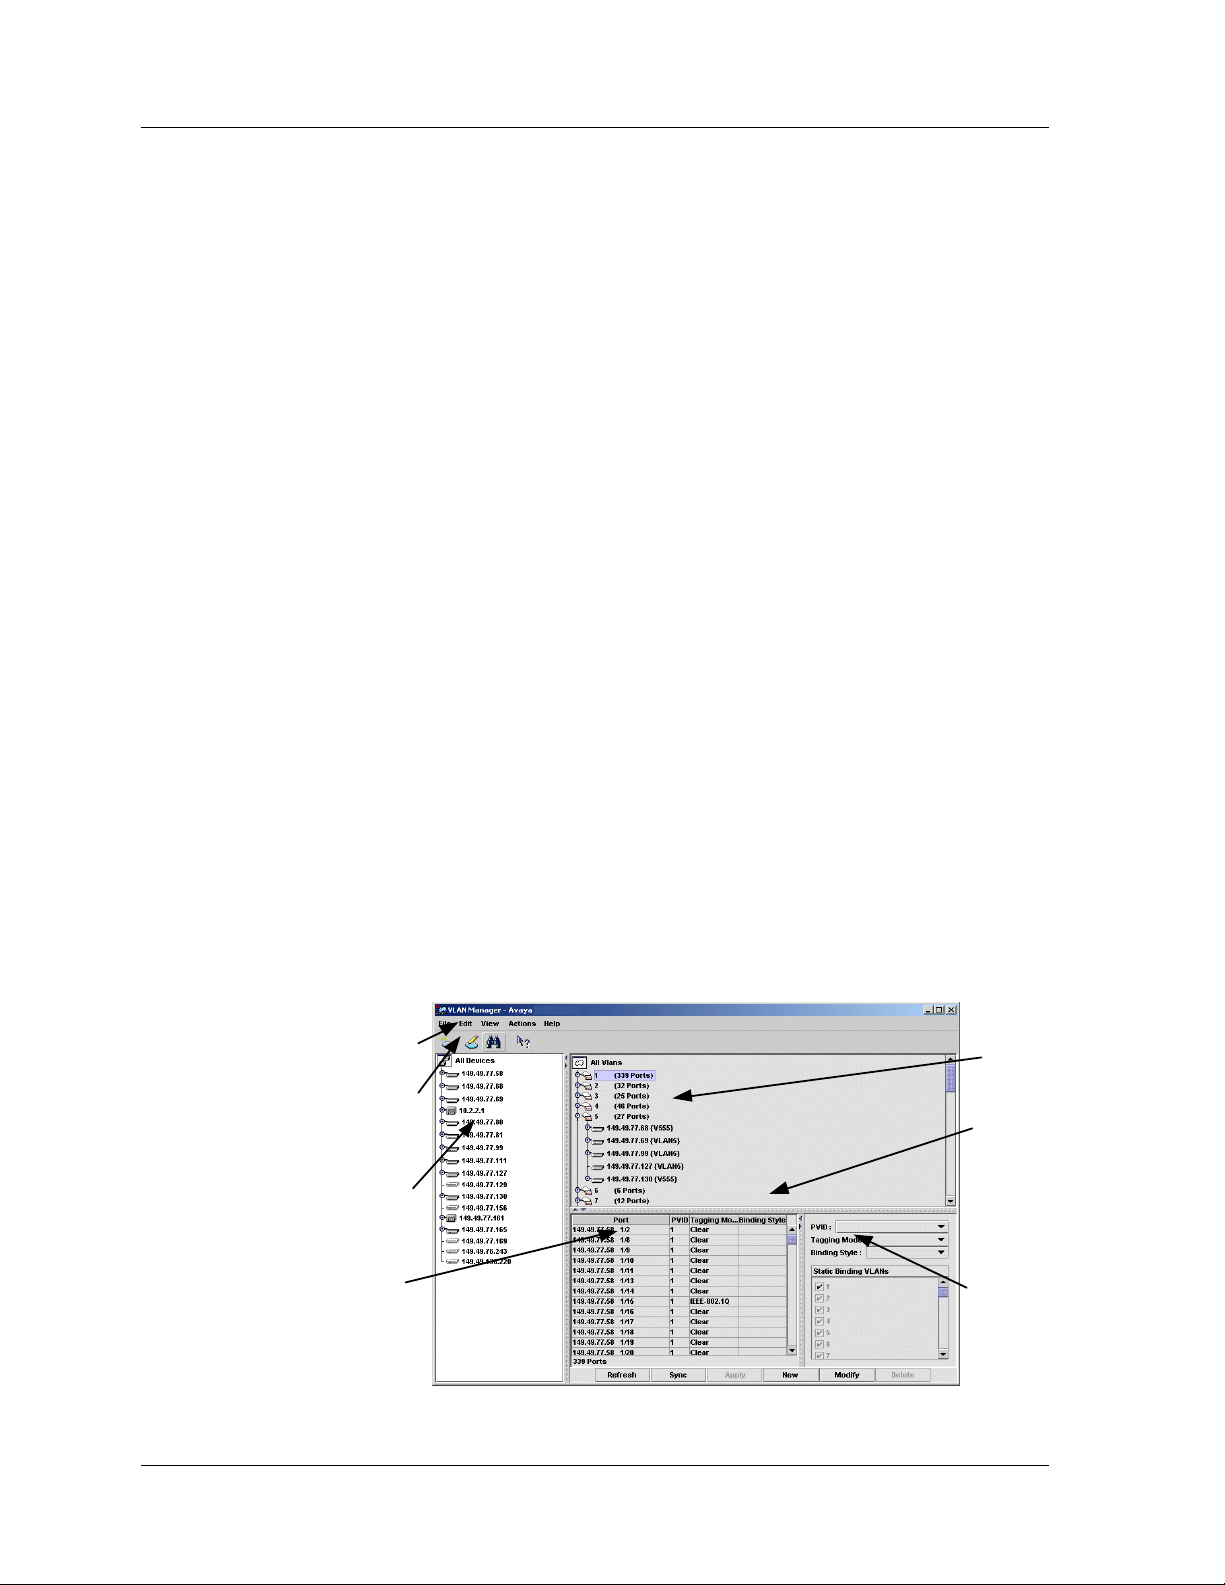
Avaya VLAN Manager User Interface
Avaya VLAN Managers user interface consists of the following elements:
Menu Bar - Menus for accessing Avaya VLAN Manager
management functions. For a full list of the menus in Avaya
VLAN Manager, refer to Appendix A, Avaya VLAN Manager Menus.
Toolbar - Toolbar buttons for accessing Avaya VLAN Manager
management functions.
Device Tree - A hierarchical representation of the supported
devices in the network.
VLAN Tree - A list of all the learned VLANs.
Dialog Area - A resizeable window where the Avaya VLAN
Manager dialog box opens.
Tools > Avaya >
Figure 1-1. Avaya VLAN Manager User Interface
Menu Bar
Tool Bar
Network
Tree
Selection
List
Avaya VLAN Manager User Guide 3
VLAN
Tree
Dialog
Area
Port
Conf iguration
Area
Page 10
Chapter 1
Tool ba r
The Toolbar provides shortcuts to the main Avaya VLAN Manager
functions. The table below describes the buttons on the Toolbar and
gives the equivalent menu options.
Table 1-1. Toolbar Buttons
Button Description Menu Item
Device Tree
Opens the New VLAN dialog
box.
Opens the Modify VLAN dialog
box.
Opens the Find Port dialog box.
Activates context-sensitive help.
When you place the cursor on a toolbar icon for one second, a label
appears with the name of the button.
The Device Tree provides a hierarchical representation of the devices and
ports in your network. For more information on the Device Tree, refer to
Understanding the Device Tree on page 8.
File > New VLAN
Edit > Modify VLAN
Edit > Find Port
Help > Help On
VLAN Tree
The VLAN Tree provides a list of the VLANs and their ports and LAGs.
The VLANs include all VLANs known on the network. The ports listed
under a VLAN include member ports and LAGs, and ports and LAGs
statically bound to the VLAN.
For more information on the VLAN Tree, refer to Understanding the
VLAN Tree on page 10.
4 Avaya VLAN Manager User Guide
Page 11

Dialog Area
Introduction to Avaya VLAN Manager
The area below the VLAN Tree is where the VLAN Manager dialog box
appears. This area can be resized by dragging the splitter bars with the
mouse. When no dialog box is open, the Selection List and Port
Configuration Area appear in the Dialog Area.
The Selection List contains a table with VLAN information about the
current selection. For example, if you select a module in the Tree View
or Chassis View, a list of the ports in the module with their VLAN
information appears in the Selection List. For more information on the
Selection List, refer to Understanding the Selection List on page 12.
The Port Configuration Area can be used to configure the VLAN
parameters of selected ports. For more information on the Port
Configuration Area, refer to Understanding the Port Configuration
Area on page 13.
You can hide the Selection List and Port Configuration Area. This can
prevent unintentional changes to the VLAN configuration. In addition, it
will cut the applications response time. To toggle the display of the
Selection List and Port Configuration Area, select
View > Configure
.
Avaya VLAN Manager User Guide 5
Page 12

Chapter 1
Searching in Avaya VLAN Manager
Avaya VLAN Manager allows you to search for ports in the Device Tree
and VLAN Tree.
To search for a port:
1. Click .
Or
Select
2. Select the IP address of the device on which the port you want to
find is located form the
3. Enter the port name of the port you want to find.
4. Click
Edit > Find
Figure 1-2. Find Port Dialog Box
Find Next
. Avaya VLAN Manager searches for the port.
Refreshing Information
You can refresh the information in the Device Tree and VLAN Tree.
Avaya VLAN Manager gets information about the devices in the network
from your network management application (Avaya Network
Management Console in Standalone Mode or HP-OV NNM). Refresh the
Avaya VLAN Manager information whenever devices or modules are
added to or removed from your network.
. The Find Port dialog box opens.
Device IP
pull-down listbox.
To refresh the information in the Avaya VLAN Manager:
Select
Or
Click
refreshed.
6 Avaya VLAN Manager User Guide
View > Refresh
Refresh
. The information in Avaya VLAN Manager is
.
Page 13

Introduction to Avaya VLAN Manager
Using Avaya VLAN Manager Help
This section explains how to use the on-line help in Avaya VLAN
Manager. The on-line help can be opened to the contents page or
directly to a topic of interest.
Opening the Help to the Contents Page
To open the help to the contents page, select
on-line help opens to the contents page.
Opening the Help to a Topic of Interest
To open the help directly to a topic of interest:
1. Click .
Or
Select
arrow with a question mark.
2. Click on a point of interest in Avaya VLAN Manager. The help
opens to a topic explaining the clicked feature.
Help > Help On
. The cursor changes to the shape of an
Help > Contents
. The
Avaya VLAN Manager User Guide 7
Page 14

Understanding Avaya VLAN
2
Manager
This chapter provides information on understanding Avaya VLAN
Manager functions and features. It includes the following sections:
Understanding the Device Tree
Understanding the VLAN Tree
Understanding the Selection List
Understanding the Port Configuration Area
Understanding the Device Tree
The Device Tree provides a hierarchical representation of the
network.
Figure 2-1. Device Tree
The following is a list of the levels in the Device Tree:
All Devices - An icon representing all of the ports in
supported devices in the network. When you select All
Devices, all of the ports in supported devices in the network
are selected.
Avaya VLAN Manager User Guide
-8
Page 15

Devices - The devices in the network. When you select a device,
all of the ports in the device are selected.
Modules - The modules in the network. When you select a
module, all of the ports in the module are selected.
Ports - The ports and LAGs in the network.
Sorting the Device Tree
You can sort the devices in the Device Tree by device type or device IP
address using the Sort dialog box.
To sort the devices in the Device Tree:
Understanding Avaya VLAN Manager
1. Select
View > Sort
. The Sort dialog box opens.
Figure 2-2. Sort Dialog Box
2. Select a sort criterion from the
criteria are:
—
Device IP - The devices are sorted by IP address.
—
Device Type - The devices are first sorted by device type.
3. Click
Sort
. The devices in the Device Tree are sorted by the
selected criterion.
Sort By
pull-down listbox. The sort
Avaya VLAN Manager User Guide 9
Page 16

Chapter 2
Understanding the VLAN Tree
The VLAN Tree provides a list of VLANs, devices, and their ports. The
VLANs include all VLANs known on the network and all VLANs
configured on the devices in the network. The ports listed under a VLAN
include member ports and ports statically bound to the VLAN.
Figure 2-3. VLAN Tree
To expand or contract a branch of the tree:
Double-click the VLANs name.
Or
Click the handle next to the VLANs name.
The VLAN symbol for locally defined VLANs includes the picture of a
network device. The VLAN symbol for globally defined VLANs includes
the picture of a green sheet of paper. VLANs defined both locally and
globally contain both pictures in their VLAN symbol.
If a VLAN is named differently on a device, the locally defined name
appears in braces after the device icon in the VLAN Tree. For example, if
VLAN 4 is locally named RandD on device 132.24.86.212, and globally
named Research, the following string will appear in the VLAN Tree
after the device name: 132.24.86.212 {RandD}. To change all locally
defined VLAN names to the globally defined names, you can
synchronize the VLAN names on the device. For information on
synchronizing VLAN names, refer to Synchronizing VLAN Names on
page 18.
10 Avaya VLAN Manager User Guide
Page 17

Understanding Avaya VLAN Manager
The VLANs member ports appear with yellow and blue triangles next to
the port name. Ports that are statically bound to the VLAN appear with a
blue triangle attached to the port name. Member ports are automatically
bound to the VLANs of which they are members. Ports whose VLAN
information has changed but has not been applied, appear with gray
triangles.
When a VLAN is selected in the VLAN Tree, information about the
member ports and statically bound ports appears in the Selection List.
When a device is selected in the VLAN Tree, the ports in the device that
are member ports or statically bound ports to the VLAN under which the
device appears appear in the Selection List.
For more information about the Selection List, refer to Understanding
the Selection List on page 12.
Avaya VLAN Manager User Guide 11
Page 18

Chapter 2
Understanding the Selection List
The Selection List provides VLAN information about selected ports. The
Selection List appears on the left side of the Dialog Area when no dialog
box is open.
Figure 2-4. Selection List
The following table provides a list of the information fields in the
Selection List and their descriptions.
Table 2-1. Selection List Fields
Field Description
Port
PVID
Tagging Mode
Binding Style
To sort the Selection List table by any of its fields, click the field header.
To reverse the order of the sort, click the field header a second time.
The device IP address and port number.
The Port VLAN ID (PVID) of the port. This is
the VLAN of which the port is a member.
The tagging mode of the port. For information
on tagging modes, refer to Understanding the
Port Configuration Area on page 13.
The binding style configured on the port. For
information on binding styles, refer to
Understanding the Port Configuration Area
on page 13.
The information in the Selection List is read-only.
12 Avaya VLAN Manager User Guide
Page 19

Understanding Avaya VLAN Manager
Understanding the Port Configuration Area
The Port Configuration Area enables you to configure the VLAN
configuration of selected ports. The Port Configuration Area appears on
the right side of the Dialog Area when no dialog box is open.
Figure 2-5. Port Configuration Area
The following table provides a list of the configuration parameters in the
Port Configuration Area and their description.
Table 2-2. Port Configuration Area Parameters
Field Description
PVID
Tagging Mode
The Port VLAN ID (PVID) of the port. This is
the VLAN of which the port is a member. The
PVID pull-down list contains all VLANs known
to the network and VLANs on the device.
The tagging mode of the port. The tagging
mode controls the tagging of packets that can
be forwarded by the port. The following
tagging modes are available:
Clear - The packet is forwarded with no
VLAN tag.
IEEE-802.1Q - The packet is forwarded
with a VLAN tag in conformance with the
IEEE-802.q standard.
Avaya VLAN Manager User Guide 13
Page 20

Chapter 2
Table 2-2. Port Configuration Area Parameters (Continued)
Field Description
Binding Style
Static Binding VLANs
The binding style configured on the port. The
binding style defines which packets can be
forwarded by the port. The following binding
styles are available:
Bind to All - The port is bound to all
VLANs known to a device. This is also
known as persistent binding. If a packet is
on a VLAN not known to the device, the
packet is discarded.
Bind to Configured - The port is bound
to all VLANs known to the device and to
the VLANs with which packets reaching
the ports are tagged. This is also known as
dynamic binding. If a packet is on a VLAN
not known to the device, the packet is
discarded.
Static - The port is bound to the VLANs
checked in the
Static Binding VLANs
list.
Packets on all other VLANs are discarded.
A list of VLANs known on the network and
VLANs configured on the device. Each VLAN
has an accompanying checkbox. Possible
values are:
Checked - The VLAN is bound to the
port being configured.
Unchecked - The VLAN is not bound to
the port being configured.
* Note: The settings are only used when
the port is configured with the
Static Binding Style.
A port setting may be insensitive if one of the selected ports is on a
device that does not support the VLAN setting. For example, if a selected
port is on a device that only supports VLAN IDs between 1 and 3071,
VLAN IDs between 3072 and 4096 in the
PVID
pull-down list will be
insensitive.
14 Avaya VLAN Manager User Guide
Page 21

Managing VLANs
3
This chapter provides instructions on how to create, edit, and delete
VLANs using Avaya VLAN Manager. It includes the following sections:
Creating VLANs
Modifying VLANs
Synchronizing VLAN Names
Deleting VLANs
Creating VLANs
To create a VLAN:
1. Click .
Or
New
Click
Or
Select
2. Enter a VLAN number in the
* Note: Avaya P330 devices cannot be assigned a VLAN ID greater
than 3071. Avaya P130, P580, and P882 devices cannot be
assigned a VLAN ID greater than 4096.
* Note: VLANs cannot be created on Avaya P120 Devices using
Avaya VLAN Manager.
3. Enter a name in the
characters in length.
.
File > New VLAN
VLAN Name
. The Create New VLAN dialog box opens.
VLAN ID
field.
field. Names must be 1 to 16
Avaya VLAN Manager User Guide 15
Page 22

Chapter 3
4. Click the
VLAN Name
field. The devices in the network appear in
the dialog boxs listboxes.
Figure 3-1. Create New VLAN Dialog Box
5. Move the IP addresses of the devices on which you want the
VLAN to be created locally from the
Devices On VLAN x
the
listbox, where x is the VLAN Number.
To move IP addresses from the
Devices On VLAN x
the
to move and click
listbox, select the IP addresses you want
Add
.
Devices Not on VLAN x
Devices Not on VLAN x
listbox to
listbox to
To move all IP addresses from the
to the
Devices On VLAN x
listbox, click
To move IP addresses from the
Devices Not on VLAN x
to move and click
listbox, select the IP addresses you want
Remove
To move all IP addresses from the
the
6. Click
Devices Not on VLAN x
OK
. The new VLAN is created globally and on the selected
listbox, click
devices.
Devices Not on VLAN x
Devices On VLAN x
.
Devices On VLAN x
Add All
Remove All
.
listbox
listbox to the
listbox to
.
16 Avaya VLAN Manager User Guide
Page 23

Modifying VLANs
To modify a VLAN:
1. Select the VLAN you want to modify.
2. Click .
Or
Click
Or
Modify
Managing VLANs
.
Select
Edit > Modify VLAN
. The Modify VLAN dialog box opens.
Figure 3-2. Modify VLAN Dialog Box
3. Enter a name for the VLAN in the
VLAN Name
field.
4. Configure the devices on which you want the VLAN to be created
and removed locally using the
On VLAN x
Not on VLAN x
and
listboxes, where x is the VLAN Number.
To move IP addresses from the
On VLAN x
and click
listbox, select the IP addresses you want to move
Add
.
Not on VLAN x
listbox to the
To move all IP addresses from the
On VLAN x
listbox, click
Add All
To move IP addresses from the
Not on VLAN x
and click
listbox, select the IP addresses you want to move
Remove
.
To move all IP addresses from the
Not on VLAN x
5. Click
OK
. The VLAN is edited in the master VLAN list and the
listbox, click
Not on VLAN x
.
On VLAN x
On VLAN x
Remove All
listbox to the
.
listbox to the
listbox to the
affected devices.
Avaya VLAN Manager User Guide 17
Page 24

Chapter 3
Synchronizing VLAN Names
VLANs with the same VLAN number can be defined with different
names on different devices in the network. In addition, VLAN names can
be configured in the master VLAN list. This can cause confusion when
referring to a VLAN by name rather than by number. Avaya VLAN
Manager enables you to synchronize VLAN names on the devices in the
network with the master VLAN list.
When synchronizing VLAN names, the VLANs on devices are renamed
to provide consistency with the names in the master VLAN list.
To synchronize VLAN names with the master VLAN list:
1. Click
Or
Select
box opens.
Sync
.
Actions > Synchronize VLANs
Figure 3-3. VLAN Synchronize Dialog Box
. The VLAN Synchronize dialog
The VLAN Synchronize dialog box provides a list of VLAN IDs and
names for VLANs that need to be synchronized. These include VLANs
that are in the master VLAN list with a name that differs from the
VLANs name on a device and VLANs that exist on devices, but are not
on the master VLAN list.
18 Avaya VLAN Manager User Guide
Page 25

Managing VLANs
2. Check the checkboxes next to the VLANs whose names you want
synchronized.
To check all VLANs in the list, click
To uncheck all VLANs in the list, click
3. Click
the master VLAN list, and VLANs that only exist locally are added
to the master VLAN list.
Deleting VLANs
To delete a VLAN:
1. Select the VLAN you want to delete.
2. Ensure that there are no ports associated with the VLAN.
3. Click
Or
Select
Tree.
Select All
OK
. VLANs on devices are renamed with the VLAN names in
Delete
.
Edit > Delete VLAN
. The VLAN does not appear in the VLAN
.
Unselect All
.
4. Click
Yes
. The VLAN is deleted from the master VLAN list.
Avaya VLAN Manager User Guide 19
Page 26

Port VLAN Configuration
4
This chapter describes how to view and configure the PVID, Tagging
Mode, and Binding Style of selected ports using Avaya VLAN Manager. It
includes following sections:
Selecting Ports
Viewing Port VLAN Settings
Using the Port Configuration Area
Drag-and-Drop
Selecting Ports
This section explains how to select ports for VLAN configuration.
Ports for VLAN Configuration can be selected from the Device Tree or
VLAN Tree.
To select a port, click the port in the Device Tree or VLAN Tree.
To select multiple ports, press CTRL while selecting additional
ports.
To select all of the ports on a module, click the module icon in the
Device Tree.
To select all of the ports on a device, click the device icon in the
Device Tree.
To select all of the ports associated with a VLAN (including
member ports and statically bound ports), click the VLAN in the
VLAN Tree.
Avaya VLAN Manager User Guide 20
Page 27

Viewing Port VLAN Settings
To view the VLAN configuration of a port, select a port in the Device Tree
or VLAN Tree. The ports VLAN configuration appears in the Selection
List. If you select multiple ports in the Device Tree or VLAN Tree, the
VLAN configurations for all of the selected ports appear in the Selection
List. In addition, parameters that are common to all ports in the selection
appear in the Port Configuration Area.
For details on the information provided in the Selection List, refer to
Understanding the Selection List on page 12.
Using the Port Configuration Area
To configure the VLAN setting for ports on the network using the Port
Configuration Area:
Port VLAN Configuration
1. Select the ports you want to configure in the Device Tree or VLAN
Tree. The settings that are common to all of the selected ports
appear in the fields in the Port Configuration Area. For
information on selecting ports, refer to Selecting Ports on
page 20.
2. Change the settings in the Port Configuration Area using the
pull-down lists and checkboxes. For information on the settings
in the Port Configuration Area, refer to Understanding the Port
Configuration Area on page 13. The VLAN configuration for the
selected ports is changed.
* Note: When changing the PVID of the selected ports, the ports do
not appear selected in the VLAN Tree. However, the ports
remain in the Selection List.
Avaya VLAN Manager User Guide 21
Page 28

Chapter 4
Drag-and-Drop
To configure the PVID of ports using drag-and-drop:
1. Select the ports you want to configure in the Device Tree or VLAN
2. Drag the ports until they are over a VLAN icon in the VLAN Tree.
* Note: When dragging ports from the VLAN Tree, only ports
Tree. For information on selecting ports, refer to Selecting Ports
on page 20.
The ports are added to the desired VLAN.
represented by PVID symbols are added to the desired VLAN.
Dragged static binding icons are ignored and do not change
port PVIDs.
22 Avaya VLAN Manager User Guide
Page 29

Generating VLAN Reports
5
This chapter provides instructions on how to generate VLAN
reports, and a description of the VLAN reports. It includes the
following sections:
VLAN Report Overview
Report By Port
Report By VLAN
VLAN Report Overview
Avaya VLAN Manager can generate VLAN reports. These reports
are in a comma separated value (CSV) format and can easily be
imported into a spreadsheet or database program. There are two
types of VLAN reports:
Report By Port
Report By VLAN
Avaya VLAN Manager User Guide
-23
Page 30

Chapter 5
Report By Port
This section explains Report By Port and includes the following topics:
Generating a Report by Port
Report By Port Fields
Generating a Report by Port
To generate a Report By Port:
1. Select
2. Enter a name for the report in the
csv extension.
3. Browse to the directory in which you want to save the report.
4. Click
Report By Port Fields
In the Report By Port, the information is ordered by port and reflects
each ports VLAN configuration.
The following table provides a list of the fields in the Report By Port and
their description.
Field Description
Device The IP address of the device in which the port is
File > Report > Report By Port
Report
. A Report By Port is generated.
Table 5-1. Report By Port Fields
located.
. A file browser opens.
File name
field. The report has a
Port The module and port number.
PVID The Port VLAN ID (PVID) of the port. This is the
VLAN of which the port is a member.
Tagging Mode The tagging mode of the port. For information on
tagging modes, refer to Understanding the Port
Configuration Area on page 13.
Binding Style The binding style configured on the port. For
information on binding styles, refer to
Understanding the Port Configuration Area on
page 13.
24 Avaya VLAN Manager User Guide
Page 31

Report By VLAN
This section explains Report By VLAN and includes the following topics:
Generating a Report by VLAN
Report By VLAN Fields
Generating a Report by VLAN
To generate a Report By VLAN:
Generating VLAN Reports
1. Select
2. Enter a name for the report in the
csv extension.
3. Browse to the directory in which you want to save the report.
4. Click
File > Report > Report By VLAN
Report
. A Report By VLAN is generated.
. A file browser opens.
File name
field. The report has a
Avaya VLAN Manager User Guide 25
Page 32

Chapter 5
Report By VLAN Fields
In the Report By VLAN, the information is ordered by VLAN and reflects
the status of each port with regard to the VLAN.
The following table provides a list of the fields in the Report By VLAN
and their description.
Field Description
VLAN ID/Name The VLAN ID.
Device The IP address of a device.
Port A module and port number.
PVID The ports PVID in relation to the VLAN ID. Possible
Table 5-2. Report By VLAN Fields
values are:
Y - The PVID is the same as the rows VLAN
ID. Therefore, the port is a member of the
VLAN.
N - Therefore, the PVID is different then the
rows VLAN ID, i.e. the port is not a member
of the VLAN.
Static Bind The ports static binding configuration in relation to
the VLAN. Possible values are:
Y - The PVID is statically bound to the VLAN.
N - The PVID is not statically bound to the
VLAN.
26 Avaya VLAN Manager User Guide
Page 33

A
File Menu
Avaya VLAN Manager Menus
This appendix gives the menu structure of Avaya VLAN Manager.
Table A-1. File Menu
Item Description
Edit Menu
New VLAN
Report > Report By Port
Report > Report By
VLAN
Exit
Item Description
Modify VLAN
Delete VLAN
Find Port
Opens the New VLAN dialog box.
Generates a Report By Port.
Generates a Report By VLAN.
Exits the application.
Table A-2. Edit Menu
Opens the Edit VLAN dialog box.
Deletes a VLAN from the VLAN Manager list.
Opens the Find dialog box.
Avaya VLAN Manager User Guide 27
Page 34

Appendix A
View Menu
Item Description
Table A-3. View Menu
Sort
Configure
Refresh
Actions Menu
Item Description
Synchronize VLANs
Apply
Help Menu
Sort the devices in the Device Tree according
to device type or IP address.
Toggles the Dialog Area.
Refreshes the list of devices in the Device Tree.
Table A-4. Actions Menu
Synchronizes VLAN names on devices with the
VLAN names in the master VLAN list.
Applies all the changes to the VLANs in the
network.
Table A-5. Help Menu
Item Description
Contents
Help On
About Avaya
VLAN Manager
28 Avaya VLAN Manager User Guide
Opens the help module contents page.
Activates context-sensitive help.
Copyright and version information about
Avaya VLAN Manager.
Page 35

Index
A
27
3
9
27
24,
1
5
27
28
1
8
3
22
21
15
19
4
8
17
13
24
26
12
6
24
25
25
23
v
Actions menu
Avaya VLAN Manager
7
help
introduction
menus
overview
starting
understanding
user interface
C
Configuring port VLAN parameters
using drag-and-drop
using port configuration area
Creating VLANs
D
Deleting VLANs
Device Tree
sorting
understanding
Dialog area
Drag-and-drop
22
using
E
Edit menu
Editing VLANs
F
Fields
port configuration area
report by port
report by VLAN
selection list
File menu
Finding ports
G
Generating
report by port
report by VLAN
reports
VLAN reports
Guide
intended audience
20
organization v
purpose
H
Help
contents page
context sensitive
menu
using
How to
configure port VLAN parameters
configure port VLAN parameters using
create VLANs
delete VLANs
edit VLANs
find ports
manage VLANs
modify VLANs
open context-sensitive help
open the help to a topic of interest
open the help to the contents page
refresh network information
relearn the network
search for ports
select ports and LAGs for VLAN configura-
sort the Device Tree
start Avaya VLAN Manager
synchronize VLAN names
use Avaya VLAN Manager help
use the port configuration area
view port VLAN settings
I
Introduction to Avaya VLAN Manager
L
LAGs
selecting for VLAN configuration
M
Managing VLANs
Master VLAN list
Menus
Actions
v
7
28
7
drag-and-drop
15
19
17
6
15
17
6
20
tion
15
2
28
7
20
22
7
7
7
6
6
9
3
18
7
21
21
1
20
Avaya VLAN Manager User Guide 29
Page 36

Index
Avaya VLAN Manager 27
27
Edit
27
File
28
Help
28
View
24
25
24,
9
23
24
13
25
25
12
17
v
1
20
20
v
6
6
3
Modifying VLANs
O
Organization of this guide
Overview
Avaya VLAN Manager
VLAN reports
13
21
24
26
6
12
2
6
6
VLANs
P
Port
VLAN configuration
Port configuration area
fields
understanding
using
Ports
finding
searching
selecting for VLAN configuration
Purpose of this guide
R
Refresh information
Relearn the network
Report by port
fields
generating
Report by VLAN
fields
generating
Reports
generating
S
Searching
ports
Selecting
ports and LAGs for VLAN configuration
Selection list
fields
understanding
Sorting
Device Tree
Starting, VLAN Manager
20
Synchronizing VLAN names
T
Tags
VLAN
2
Toolbar
Tree
network
VLAN
U
Understanding
Avaya VLAN Manager
port configuration area
selection list
the Device Tree
VLAN tree
User interface
Avaya VLAN Manager
Using
Avaya VLAN Manager help
drag-and-drop
port configuration area
V
View menu
Viewing
port VLAN settings
Virtual LANs, see VLANs
VLAN reports
generating
overview
VLAN tree
understanding
VLANs
creating
deleting
editing
managing
master list
modifying
new
overview
synchronizing names
tags
viewing port settings
W
Who should use this guide
4
4
4
8
13
12
8
10
3
22
21
28
21
23
23
4
10
15
19
17
15
2
17
15
2
18
2
21
18
7
v
30 Avaya VLAN Manager User Guide
 Loading...